

Page 1
WHITE
MODEL
1066
Page 2
WHITE
SEWING
MACHINE
Record
and
The
The
Serial
Model
Retain
Model
Serial
Model
No.
No.
these
in
space
No.
No.
1066
No.
is
numer
provided
of
this
located
is
lopated
below
appliance.
Rear
Rear
for
future
the
of
arm.
of
reference.
arm.
Serial
No.
Page 3
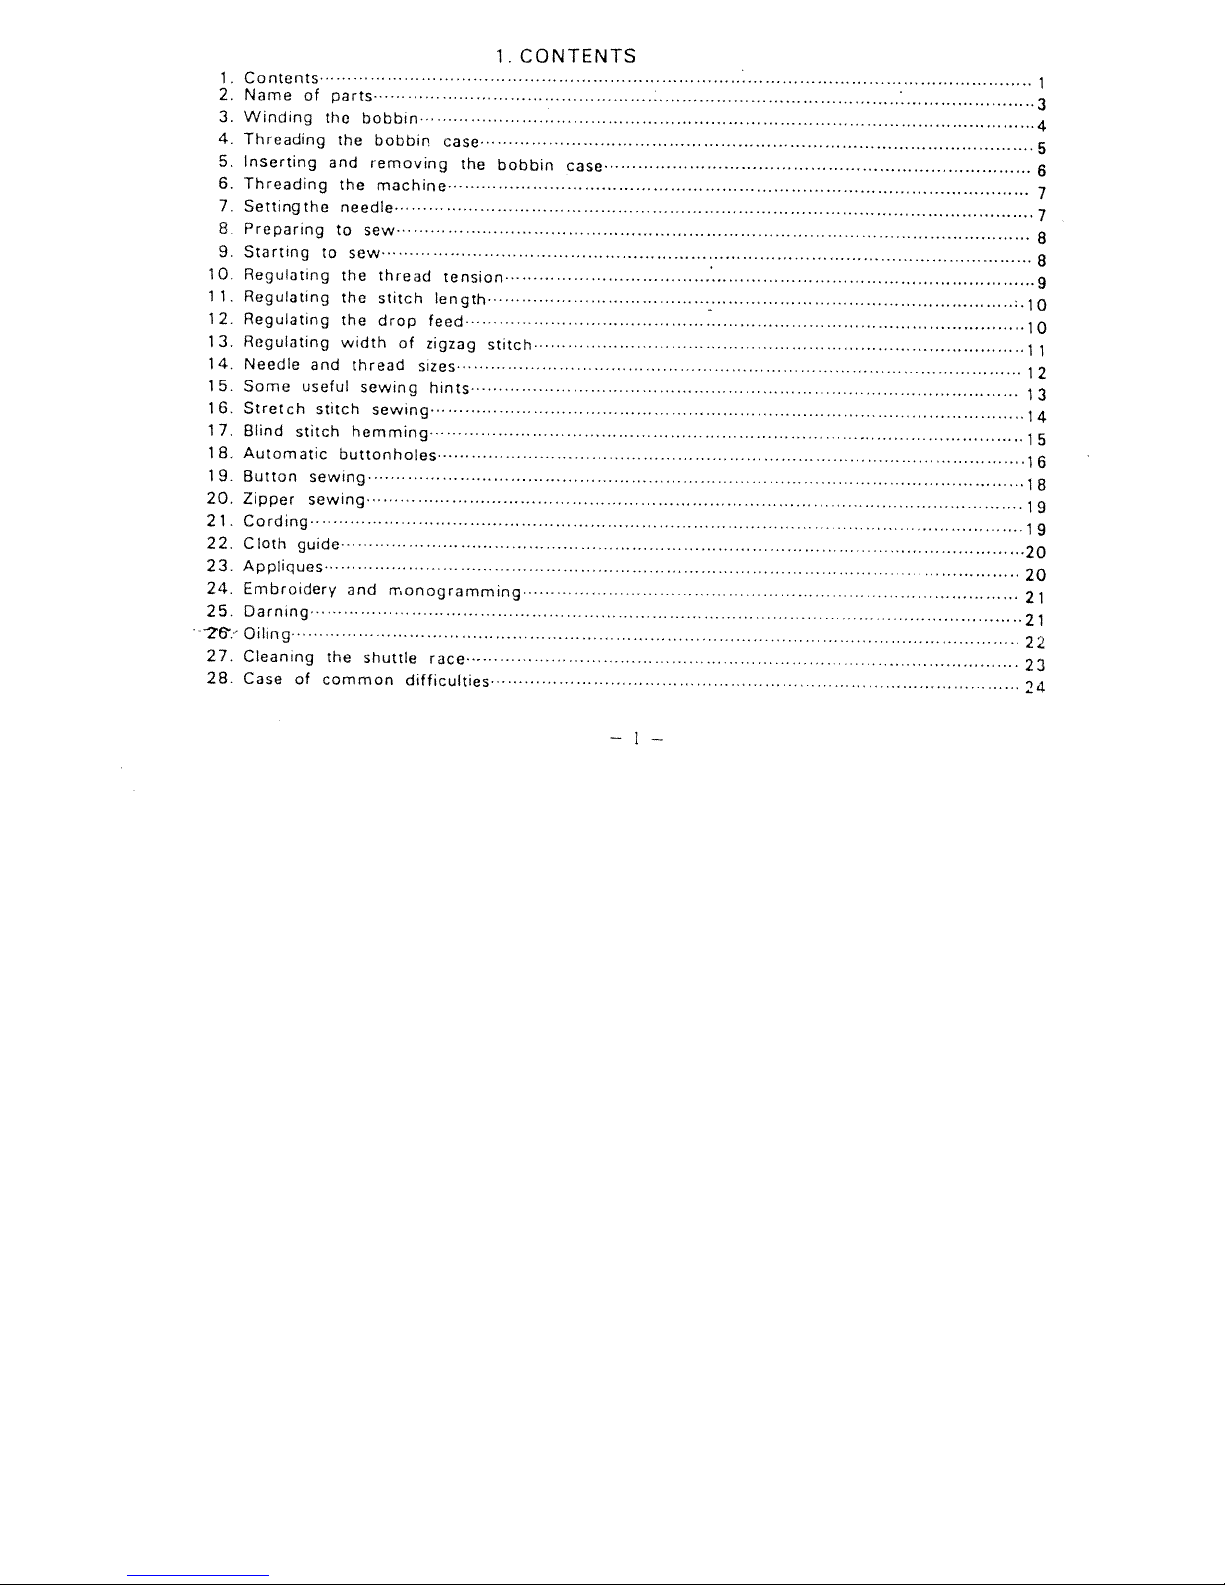
Contents
1
1.
2.
Name
Winding
3.
4.
Threading
Inserting
5.
6.
Threading
Settingthe
7.
Preparing
S
Starting
9.
Regulating
10.
11.
Regulating
12.
Regulating
Regulating
13.
14.
Needle
15.
Some
16.
Stretch
17.
Blind
18.Automatic
19.
Button
20,
Zipper
Cording
21.
Cloth
22.
Appliques
23.
24.
Embroidery
25.
Darning
Oiling
76’
27.
Cleaning
28.
Case
of
and
useful
stitch
sewing
sewing
guide
of
parts
the
the
and
the
needle
to
to
sew
the
the
the
width
stitch
buttonholes
and
the
common
bobbin
bobbin
removing
machine
sew
thread
stitch
drop
of
thread
sewing
sewing
hemming
monogramming
shuttle
case
tension
length
feed
zigzag
sizes
hints
race
difficulties
the
stitch
CONTENTS
1.
bobbin
case
3
4
5
6
7
7
8
8
9
•10
10
11
12
13
14
15
16
18
19
19
20
20
21
21
22
23
24
Page 4
O
8
6
9
L
ii
oz
LL
8L
Li
——
Page 5
10.
1
1
13.
14.
1
2.
3.
4.
5.
6.
7.
8.
9.
1
2.
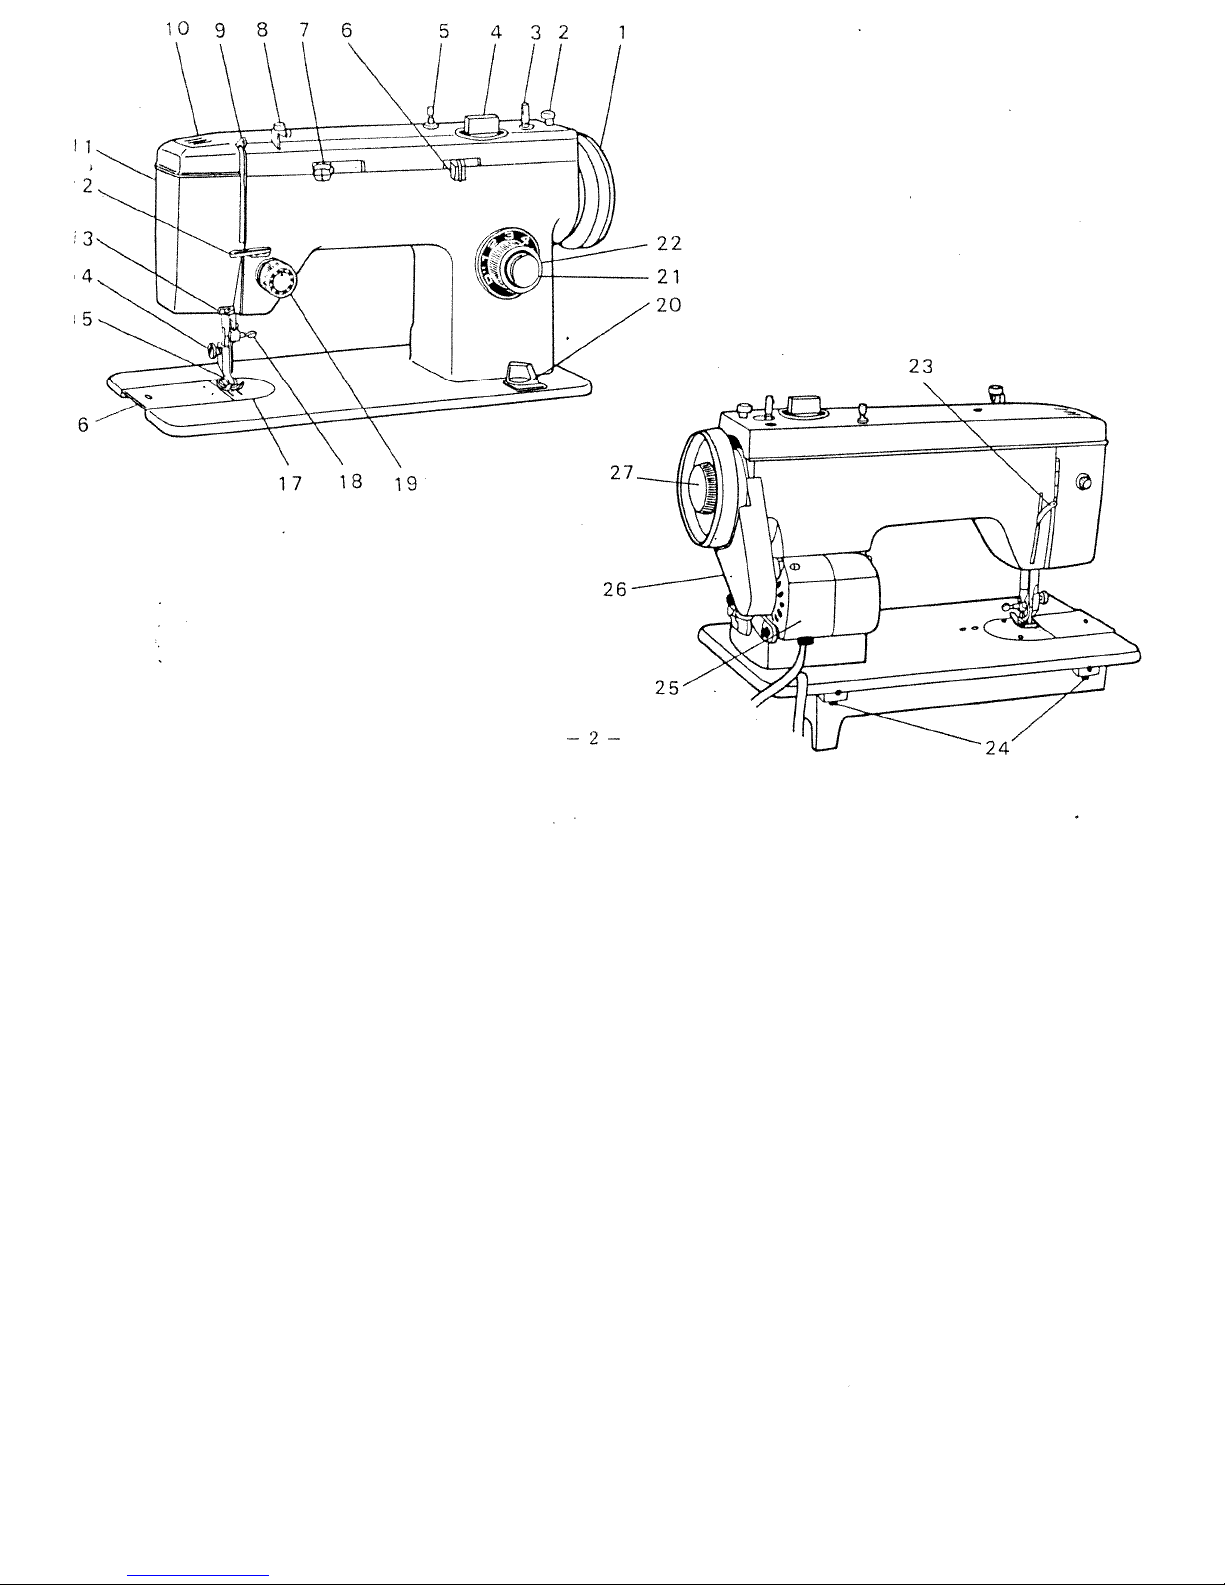
Balance
Bobbin
Bobbin
Automatic
Spool
Zigzag
Special
Upper
Thread
Arm
.
Face
Middle
Lower
Thumb
pin
width
thread
takeup
cover
cover
thread
wheel
winder
winder
buttonhole
stitches
thread
screw
stopper
knob
gnide
lever
guide
guide
lever
2.
dial
NAME
OF
PARTS
i
5,
Presser
16.
Slide
i
7.
Needle
18.Needle
1
9.
Tension
20.
Drop
21.
Reverse
22.
Stitch
23.
Presser
24.
Hinge
25.
Motor
Belt
26.
27.
Stop
plate
feed
dial
holding
cover
motion
foot
plate
clamp
dial
button
foot
knob
lift
screws
knob
lever
—3—
Page 6
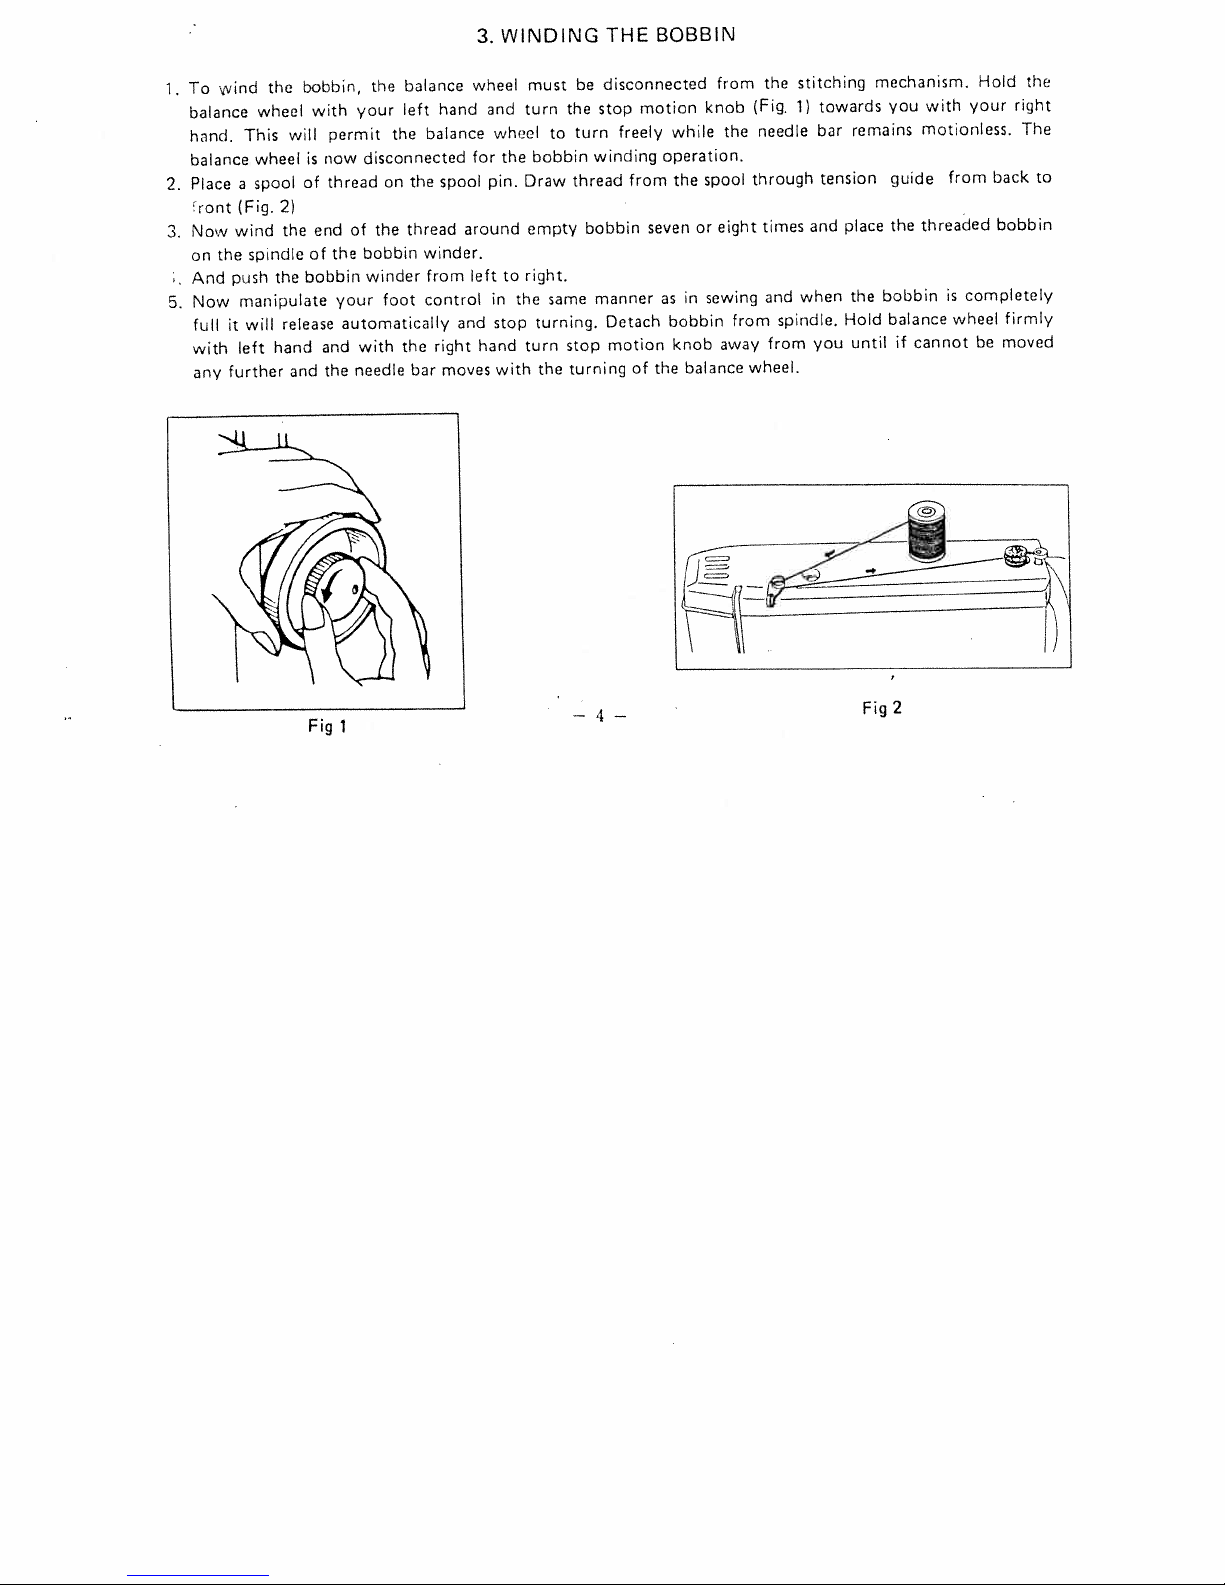
1.Towind
balance
hand.
balance
Place
2.
ront
Now
3.
the
on
push
And
Now
5.
full
it
with
further
any
the
wheel
This
wheel
spool
a
(Fig.
2)
the
wind
spindle
the
manipulate
release
will
hand
left
bobbin
will
is
of
of
bobbin
and
with
permit
now
thread
of
end
the
your
automatically
and
needle
the
balance
the
left
your
the
disconnected
the
on
thread
the
bobbin
winder
foot
with
the
bar
hand
balance
spooi
winder.
from
control
right
moves
3.
wheel
for
around
left
and
hand
WINDING
must
and
turn
wheel
the
bobbin
pin.
Draw
empty bobbin
to
right.
the
in
turning.
stop
turn
the
with
to
same
be
the
turn
winding
thread
manner
stop
turning
stop
THE
BOBBIN
disconnected
motion
while
freely
operation.
from
seven
as
motion
of
bobbin
knob
the
Detach
the
in
balance
from
knob
spool
eight
or
sewing
the
from
away
the
(Fig.
needle
through
times
and
spindle.
from
wheel.
stitching
1)
towards
bar
tension
and
when
you
mechanism.
you
with
guide
the
bobbin
balance
motionless.
threaded
remains
place
the
Hold
untilifcannot
Hold
your
from
is
completely
wheel
be
right
back
bobbin
firmly
moved
the
The
to
Fig
2
1
—4—
Fig
Page 7
Fig
Fig
Fig
4.-THREADING
3
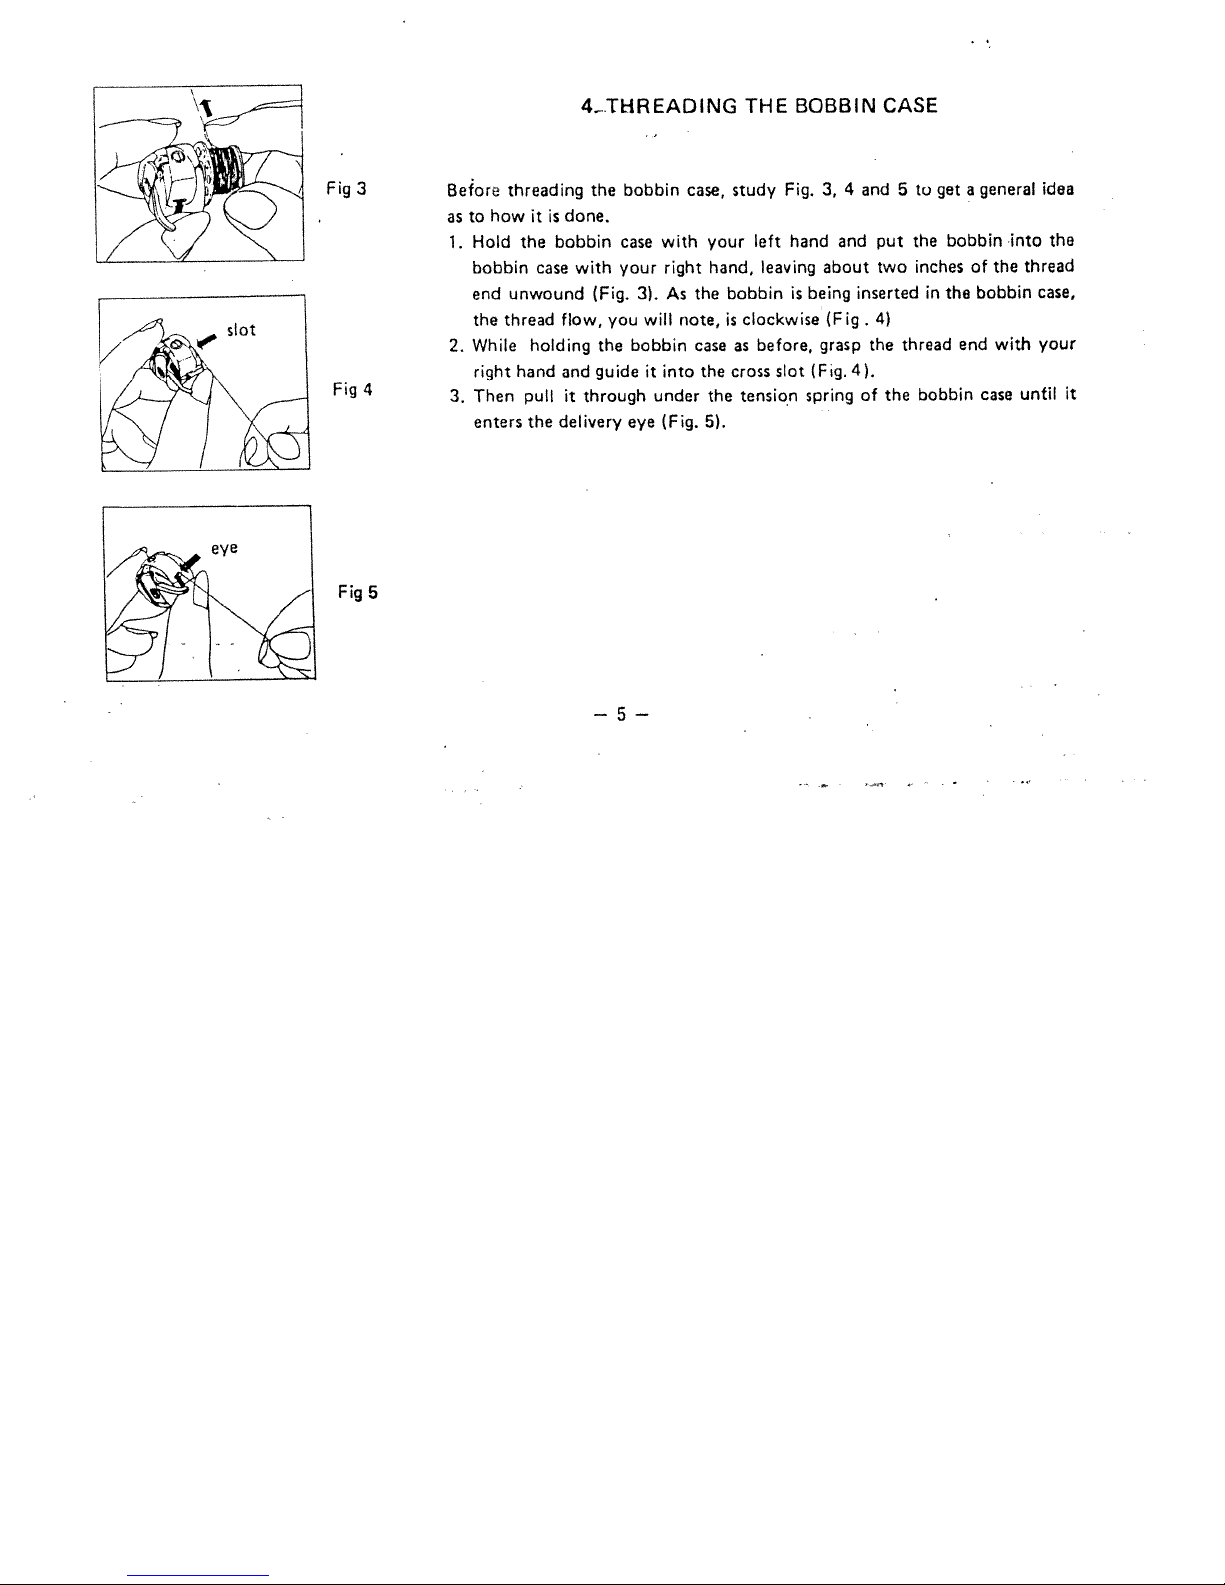
Before
to
as
Hold
1.
threading
how
the
bobbin
end
unwound
the
thread
holding
While
2.
right
4
5
3
Then
enters
hand
pull
the
it
case
done.
is
bobbin
with
flow,
and
it
through
delivery
the
bobbin
case
with
right
your
(Fig.
the
guideitinto
you
3).
will
bobbin
under
(Fig.
eye
As
case,
study
your
hand,
bobbinisbeing
the
note,
is
case
as
the
cross
the
5).
BOBBIN CASE
THE
Fig. 3, 4
left
hand
leaving
clockwise
before,
(Fig.
slot
tension
springofthe
and
about
(Fig.
grasp
and5to
put
two
inserted
4)
the
4).
get
a
bobbin
the
inchesofthe
in
the
thread
end
bobbin
general
into
bobbin
with
case
idea
thread
case,
your
until
the
it
—5—
Page 8
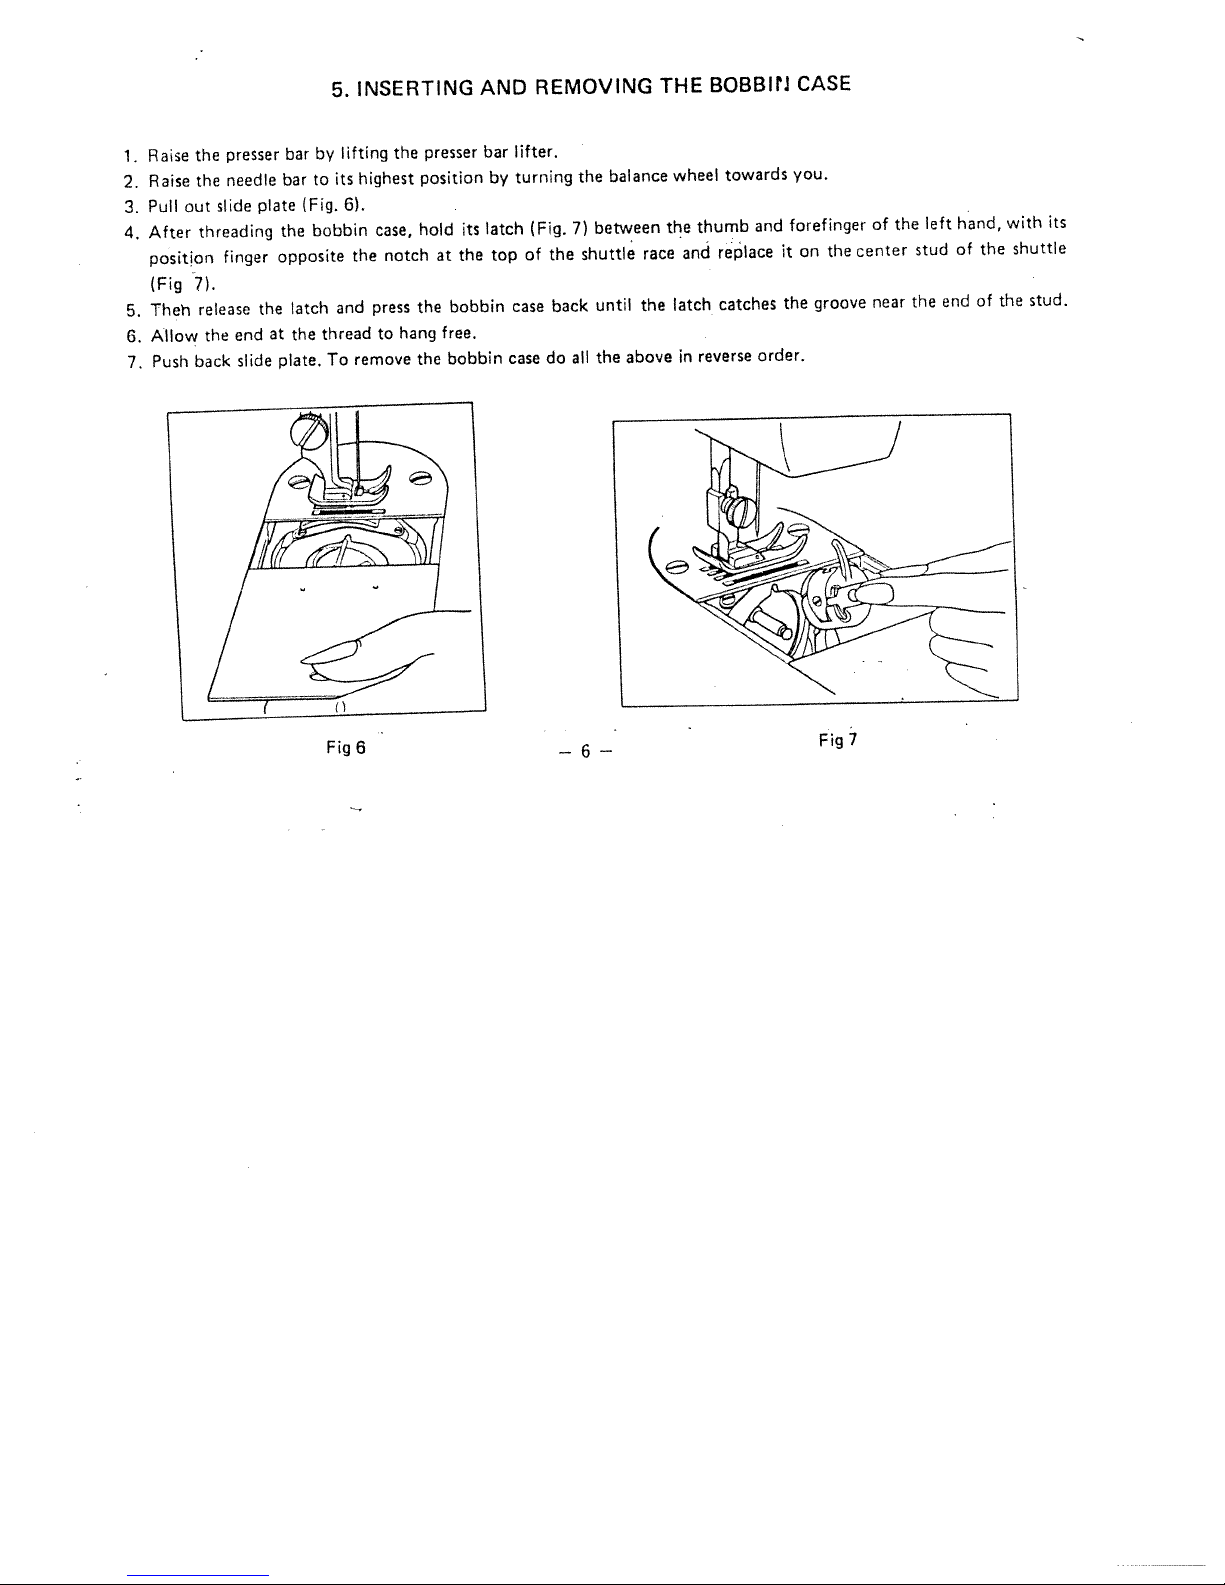
1.
2.
3.
4.
5.
6.
7.
Raise
Raise
Out
Pull
After
position
(Fig
Theh
Allow
Push
presser
the
needle
the
slide
threading
finger
7).
release
end
the
slide
back
plate
the
opposite
the
at
plate.
bar
bar
latch
the
by
to
(Fig.
bobbin
thread
5.
lifting
its
and
To
INSERTING
presser
the
case,
notch
press
to
position
hold
the
hang
the
highest
6).
the
remove
at
bobbin
free.
bobbin
its
the
AND
bar
by
latch
top
case
lifter.
turning
case
REMOVING
balance
the
the
back
do
7)
shuttle
all
between
until
the
(Fig.
of
race
the
above
THE
wheel
the
and
latch
in
BOBBIi
towards
thumb
replace
catches
reverse
and
order.
CASE
you.
forefinger
on
it
the
groove
the
of
center
near
the
stud
the
left
end
hand,
of
of
the
with
the
its
shuttle
stud.
Fig
7
6
—6---
Fig
Page 9

Place
a
levertoits
Pull
thread
through
andonup
i4)
left.
to
Return
lower
thread
thread
Thread
thread
of
Turn
1.
to
its
Hold
2.
and
it
as
the
en
6.
THREADING
spoolofthread
highest
point
through
tension
discus(2)up
the
into
through
guide
(7)
needle from
through
the
highest
the
insert
will
clamp
needle.
SETTING THE NEEDLE
7.
balance
position,
needle
the
needle up
with
go
screw
THE MACHINE
on
spool
Refer
to(Fig.
slot
lefttoright,
wheel
in
its
upper
of
into thread
of
the
eye
middle
and
thread
into
towards
and
loosen
the left hand
into
flat
surface to
(Fig.
9).
pin
takeup
needle
pulling
the
and
8)
thread
check
guide
bar
you,
the
with
th
raise
lever
(6)
thread
about
raising
needle
needle
right
guide
spring
(5)
down
the
clamp
the
take-up
down
(1)
(3)
from
through
guide
four
inches
needle
clamp
screw.
point
down
as
ther1retight
and
right
(8)
bar
for
—1—
Need’e
ba
head
guide
Need’e
Thread
Fig
8
Ne’dIo
bar
uraC
Fiat
i2W
SCi
Fig
9
Page 10

PREPARING
8.
TO
SEW
1.
2.
3.
4.
1.
2.
3.
Hold
slack
Turn
highest
the
from
the
the
Pull
with
up
both
Place
the
of
Place
Lower
Start
gradually
ALWAYS
end
the
balance
position.
thread
through
it
ends
presser
abric
the
the
sewing
working
of
hand
you
of
foot
9.
presser
by
TURN
upper-thread
the
the
to
towards
wheel
holding,
are
hole
the
upper
the
11).
(Fig.
STARTING
sewn
be
to
by
foot
turning
slowly
foot
the
BALANCE
needle.
the
in
and
TO
beneath
lowering
control.
WHEEL
and
lower
the
with
you
the
needle
SEW
the
the
balance
left
the
the
raise
to
thread
lower
as
plate,
under
thread
foot.
presser
bar
presser
wheel
TOWARDS
hand,
needle
will
shown
and
lifter.
towards
YOU!
leaving
bar
be
(Fig.
to
brought
10)
the
you
to
back
while
its
it
10
Fig
11
Fig
8—
Page 11

for
ordinary
and
lower
both
threads
if
13).
imperfect
require
require
INCREASE
TO
tension
TO
LESSEN
dial
in
ing
the
down).
As
all
readjusted
seldom
the
screw
more
for
threads
ore
stitching
light
a
mere
dial
(Fig.
the
tension
machines
before
requires
holding
tension,
stitching
the
in
tCflSiOfl
tension,
tension
12)
the
tension,
opposite
always
are
to
or
should
center
will
the
clockwise.
correctly
the
be
the
loosen
he
be
5
stronger
result.
while
obtain
to
tension,
turn
direction.
have
dealer
altered,
tension
tension
equal
of
delivers
the
10.
REGULATING
of
so
the
material
than
Fine
heavy
a
perfect
turn
the
the
thread
(When
presser
the
adjusted
but,
if
spring
on
screw
slightly
the
as
to
the
materials
materials
thread
tension
regulat’
before
them
this
the
upper
lock
(Fig.
other,
stitch.
foot
to
becomes
outside
for
leaving
you,
lesser
THE
the
lower
the
necessary,
of
the
tension
THREAD
factory
tension
tighten
bobbin
(Fig.
case
14).
Fig
and
TENSION
12
Needle
Needle
Correct
Thread
Thread
Stitch
Tension
Tension
Fig
too
13
tighten
too
loosen
strong
weak
—9....
Fig
14
Page 12

Th
lengtha’the
ordertoset
rhindicatoris
variable
a.
b.
The
height of
1.
2.
from
Regulate
Push
reverse
151
as
reverse
sewing
DROP
darning,
For
“DOWN”
stitch
the
For
normal
machine
the
far
stitch
with
FEED
the
REGULATING
ii.
stitch
facing
the selected
O—5.The
length
stitch
will
as
it
button
same
the
12.
is
feed dog
embroidering
place
and
plate,
so
sewing
can.be
changed
at
certain
a
normal
of
the
button
go.
is
stitch
lengthofstitch, turn
number
stitch
stitch
locatedinthe
The
machine
depressed.
length.
REGULATING
located
for
the
that
turn
on
the
sewing
and
feed
the material
to
the
knob
THE
with
on
lenght
for
forward
as
will
When
released
THE
bed
of the
normal
mechanism
material,
monogramming,
can
be
to
the
STITCH
the
the
scale.
is
2.
center
remain
DROP
machine
will
moved
right
LENGTH
stitch
the
The
sewing.
of
the
sewing
the
for
darning
turn
be
lowered
freely.
“UP”
length
stitch
length
stitch
machine
FEED
(Fig
place.
in
16)
and
the
under
dial
length
length
reverse
resumes
(Fig.
dial
of
the
stitch
dial
while
forward
It
regulates
embroidering
knob
the
level
1.5).
until
(Fig.
at
the
the
left
In
is
Fig
15
of
Fig
16
—10—
Page 13

width
The
zigzag
decrease
of
will
stitch
accordingly.
zigzag
increase
stitch
If
at
13.
REGULATING
is
regulated
accordingly.
position,
“0”
01234.5
the
there
by
zigzag
moving
will
by
And
WIDTH
I
\
Fig
17
knob.
the
straight
be
a
OF
By
zigzag
ZIGZAG
moving
knob
stitch.
STITCH
the
left,
to
zigzag
the
knob
width
of
stitch
the
will
idth
th
right.
to
zijzag
the
of
Page 14

Sizes
(Medium-Heavy)
Grades
&
Needles
•11
(Medium-Fine)
14
(Medium>
16
(Light-Heavy>
18
19
(Heavy>
21
(Extra-Heavy>
NEEDLE
14.
of
Medium,
For
dresses,
Dress
fabric
For
window
Heavy
For
quilting
Heavy
upholstery
For
or
Heavy
canvas
supplies
For
house
silks
general
men’s
work
cottons
bags,
light-weight
dresses,
aprons,
and
furnishing.
household
draperies
cretonne,
work
and
woven
and
or
LricsL
woven
and
sacking.
for
hospitals,
canvas
curtains.
cottons,
and
madras,
shirts,
fabric
coating,
awning
sports
suiting,
coarse
AND
Type
of
and
light
sewing,
fabric
muslin,
sturdy
light
materials,
coating,
heavy
hotels
cloths
and
summertime
dresses,
weight
fine
decorations,
smocks
weight
suits
covers
duck,
wash
and
and
•_Work_to_be_Done
children’s
furnishings.
uniforms,
nins,sli
For
THREAD
Fabric
washable
woolens,
men’s
brocades
and
canvas,
slipcover
made
and
ticking,
uniforms,
camps.
heavy
fabrics.
shirts,
and
aprons,
bed
of
mattresses,
goods.
SIZES
draperies,
fabrics.
strong
drilling,
bedding
cotton
smocks,
quilts.
heavy
ticking,
liner!
SIZE
Cotton
100
80
40
60
30
40
10
to
30
C’Ze
OF
THREAD
Silk
Linen
80
to
60
to
to
to
j
I
Twist
A
Twist
Twist
Twist
Twist
0
&
8
C
D
E
60
to
80
401
to
60
—
2—
Page 15

TO
TURN
1.
Stop
Raise
2.
Lower
3.
TO
SEW
In
sewing
thread
TO
SEW
When
paper
BASTING:
1.
Reduce
2.
The
TO
KEEP
1,
Keep
2.
Always
Do
not
3.
4.
When
the
materfar
Do
net
5.
CORNERS:
the
machine
the
the
ELASTIC
tension
VERY
sewing
underneath
the
stitches
YOUR
all
moving
turn
run
sewing,
operate
presser
presser
such
elastic
otherwise
THEN
very
tension
may
MACHINE
parts
handwheel
machine
do
automatically.
machine
while
foot
and
foot
and
FABRICS:
materials
CLOTH:
thin
the
material
the
of
then
be
of
toward
without
not
pull
the
the
cloth
upper
easily
IN
the
when
needle
turn
resume
thread
PERFECT
machine
cloth.
the
the
15.
the
as
which
and
thread
removed
you.
material
presser
SOME
is
still
fabric
sewing.
jerseys,
will
tends
sew
constantly
with
USEFUL
in
the
material.
using
the
bias
break
when
to
gather
the
shortest
and
employ
by
pulling
CONDITION:
oiled
otherwise
bar
lifter
needle
Cut
the
you
is
cloths
the
as
the
and
raised.
SEWING
as
a
etc.,
sewn
you
stitch
longest
lower
thread.
clean.
will
bend
pivot.
itisadvisable
materials
sew,
place
possible.
stitch
Do
the
HINTS
are
a
This
possible.
not
over-oil
needle.
to
stretched.
sheet
will
machine.
The
sew
of
newspaper
keep
machine
them
your
with
work
is
reduced
or
any
from
designnd
upper
other
gathering.
to
thin
feed
Page 16

Adjusting
stitch
SS.
the
This
straight
Straight
(A)
When
described
length
material
the
ZIGZAG
(8)
The
moved
be
Setting
the
the
NOTE.
control
(Fig.
machine
and
the
can
same
this
best
same
FOR
THE
NEVER
FULLY
your
zigzag
Stretch
special
above
manner
to
result.
manner
machine
lever
1
8)
capable
is
and
adjusted
be
being
STRETCH
beyond
control
The
ALL
POSITION.
‘M’
MOVE
RAISED
16.
for
the
to
seams.
Stitch
stitch
the
sewn.
STITCH
above
as
‘0’
between
stitch
described
as
NORMAL
THIS
STRETCH
stretch
position
right
producing
of
control
width
stitch
desired
as
except
any
to
‘3’
length
above
SEWING
CONTROL
OF
OUT
STITCH
stitching,
lever
according
the
number.
and
dial
THE
until
stretch
is
knob
zigzag
will
‘5’
can
straight
for
LEAVE
UNLESS
MATERIAL
SEWING
moving
by
lever
the
stitch
the
in
is
at
the
width
probably
also
THIS
THE
is
on
position
The
‘o’.
thickness
knob
adjusted
be
stretch
CONTROL
NEEDLE
BEING
special
against
stitch
give
sewing.
SEWN.
both
must
as
of
you
AT
in
Fig
18
IS
—14—
Page 17

17.
BLIND
STITCH
HEMMING
V
(Al
1.
2.
3.
6.
5.
For
Moving
against
Moving
Loosen
guide.
Fold
Sewing
edge,
fold.
Normal
the
BS.
the
presser
(Fig.
matarial
carefully
and
(Fig.
20
Fig
Material
special
(Fig.
zigzag
20)
as
slantina
22)
19)
foot
shown
so
(B)
The
be
You
stitch
width
that
stitches
For
same
moved
may
thumb
(Fig.
Stretch
knob
straight
manner
to
have
control
screw
211
pierce
between
‘0’.
at
and
Material
vary
to
lever
and
place
stitches
only
as
one
above
‘1’
the
fully
attach
it
and
setting
under
are
or
except
over
V
‘2’.
blind
foot.
made
two
Fig
according
—15--
to
threads
21
the
the
hem
on
left
hem
zigzag
55
of
M
Fig
FFi
must
knob
width
material.
the
to
SB
19
22
Page 18

DTErM:’:E
A)
or
SLTTING
wheel
buttonhole
Set
Lead
3.
and
t.
Completely
5.
Place
through
beginning
.e
r
tacks.
e
the
then
AUTOMATIC
18.
darneter
Mark
MACHINE
the
r.eedie
towat
.jot
zigzag
thread
to
push
material
center
line
CUTTONHOLE
and
thickness
buttonhole
its
to
ds
you
and
(Fig.
width
control
passes
the
back
under
of
of
through
rear
foot
foot
marking.
BUTTONHOLES
LENGTH
of
size
highest
replace
24)
to
the
for
as
sliding
and
so
normal
part
that
arrow
button
on
position
the
0’.
slot
(a)
marking
(b)
material.
presser
in
sewing.
(Fig.
(Fig.
and
by
the
25)
of
add
(Fig.
turning
foot
buttonhole
of
buttonhole
25)
0.3
Cm
23)
the
in
buttonhole
of
foot
(1
/8’)
balance
use
foot.
foot.
passes
indicates
the
Fig
marking
0.3cm(1/8)
thickness
23
—16—
Fig
24
Fig
25
Page 19

MAKINt3
(C)
Ensuring
lower
1,
Turn
bar
needle
Turn
2.
buttonhole,
needle
Turn
3.
making
stopping
Turn
4.
stopping
Return
5.
fasten.
Cut
6.
that
foot
the
the
tack
raised.
the
raised.
the
5
the
the
buttonhole
BUTTONHOLES
needle
the
the
onto
automatic
making
by
dial
same
stopping
(Fig.
dial
same
stitches
6
or
with
again
dial
same
needle
the
with
to
dial
along
material.
buttonhole
5
(2])
to
at
27)
to
the
to
(41)
OFF
center
is
still
or
the
(3fl)
(Fig.
needle
and
raised.
position
6
with
raised
dial
stitches
and
upper
and
28)
raised.
sew
buttonhole.
and
to
sew
as
the
bar
sew
to
(1,J)
(Fig.
the
for
left
make
its
tack
the
the
and
26),
right
hand
3
highest
sew
stopping
mark
upper
lower
or
hand
side
5
position,
the
with
bar
bar
(Fig.
stitches
lower
side
with
tack
tack,
29),
the
of
Fig
26
to
f-g29
Fi927
NOTE:
ALL
FOR
BUTTONHOLE
NORMAL
DIAL
SEWING
AT
THE
LEAVE
OF
THE
POSITION.
AUTOMATIC
Fi928
Page 20

19.
BUTTON
SEWING
Turn
Raise
foot
and
as
Place
foot
Adjust
or
Before
the
Then
When
lock
for
holes
center
shown
ordinary
material
that
width
in
sewing
of
five
sew
attaching
wheel
bar
holes
button.
the
with
balance
presser
as
embroidering.
so
thread
nd
in
sewing.
or
zigzag
of
with
holes
six
to
four-hole
two
towards
replace
Fig.
Upper
garment
in
button
power,
stitches
or
3Q
stitch
in
three
youtoget
regular
Drop
and
together
line
to
turn
button.lf
to
buttons
plain
the
lower
permit
attach
up
the
the
presser
feed
thread
with
with
balance
needle
button.
first
stitches
needle
dog
button
oblong
needle
sew
to
foot,
as
tensions
to
wheel
hit
one
in
last
highest
its
with
required
remain
under
hole
pass
by
button
the
set
hole.
button
in
through
hand
two
of
position.
for
the
the
presser
it
sewing
darning
same
presser
foot,
center
towards
will
holes,
break.
then
you
to
stitch
make
into
sure
that
second
needle
set
Fig
30
stitch
will
of
two
holes
in
and
—1
8
Page 21

1.
2.
3.
4.
Release
side
strike
into
Fold
the
of
Stretch
sew
To
foot
the
thc
notch
the
position.
edge
material
close
on
over
of
foot.
of
the
thumb
the
the
where
the
to
and
screw
foot
Fasten
materialby
edge
opposite
sew
20.ZIPPER
on
check
an&
thumb
%“
you
wishtoattach
the
of
of
side
same
the
CORDING
21.
rear
screw
and
zipper
the
way.
SEWING
of
side
position
the.
to
place
the
foot
zipper,
foot.
of
lock
zipper
zipper
along
loosen
the
zipper
Lower
make
under
thumb
foot
to
sure
the
teeth.
needle
avoide
that
folded
screw
into
needle
the
portion
and
the
foot
slide
Fig.
31
Using
(Fig.
will
to
of
sew
sew
your
the
32).
Zipper
and
close
between
work.
as
Foot
the
adjust
the
corded
to
pliesofmaterial
above,
position
fabric.
foldabias
the
of
You
produce
to
Foot
can
strip
as
then
a
‘piping’
overalength
above
so
the
use
effect
that
finished
—19—
the
on
of
cord
Needle
‘welting’
the
edge
Fig
32
Page 22

22.
CLOTH
GUIDE
The
c’oth
when making
greater
h3n
Itsatache’
Appliques
Presser
(aprpx.
Lightly
above,
Foot.
2nd
tack
carefully
guide
(Fig.
33)
wide
hems,
foot
esser
machineasillustrated.
.
23.
close
and
design
overstitch
desingsofone
are
cut-out
Diagram).
your
servesasa
deep
allows.
APPLIQUES
Zig-Zag
into position
the
edge
tucks
Stitch
ide
gu
seam
or
fabric
stitchedtoanother.
(Satin
and
then,
of
the
design
for
straight
widths
Stitch)
with
onto
your
your
stitching
which
but
Machine
work(Fig.
—2O
not
are
Use
Normal
too
wide
set
34).
33
Fig
as
Fig.
34
Page 23

Itisquite
or
Monogramming
turn
and
FeedTeeth
Stretch
Set
the
own
widths
Machine
fully
and
easy
the
fabric
Stitch
rather
be
24.
EMBROIDERY
follow
to
DropFeed
fully
are
tightlyinan
width
by
movenerit
fast
sure
keep
to
25.
a
design
Fig.
(see
Control
lowered
Embroidery
to
the
of
whilst
moving
fingers
DARNING
ortowork
35).
(see
size
you
the
outofthe
Remove
to
Page
Hoop
the
AND
the
10).
Hoop
prefer
to suit
Hoop
MONOGRAMMING
freehand
the
LEFT
and
or,
with
pathofthe
when
Presser
to ‘DOWN’
place
set
at
your
pattern.
both
Needle.
under
‘0’
hands.
Embroidering
Foot
completely
so
the
and
create
Operate
that
Work
the
Needle.
your
the
care
Fig.
35
Remove
Prepare
thread
frayed
Next
covering hole
the
must
Presser
fabric
and
ends.
cover
hole
has
not
stand
ALWAYS
Foot
and
lower
tobemendedasabove
Needle,
thick
hole with
(Fig.
again
still.
REMEMBER
been
vertical
36).
stitch
Then
covered.
Drop
Feed
and
once
around
linesofStitching
repeat
the
operation
Once
the
TO
RETURN
for
as
place
under
hole
to
as
close
from
Machineisin
FEED
TEETH
Embroidery
foot.
incorporate
together
side
motion,
TO
—21—
above.
Usingafine
all
the
as
possible,
to
side
until
the
cloth
‘UP’
POSITION
BEFORE
36
Fig.
RESUMING
NORMAL
SEV
Page 24

26.
OILING
_____________
______
To
No
lustrated
the
After
_
that
see
grease
machine
oiling,
in
your
is
required,
Fig.
over
run
ziL
machine
37
get
to
the
Fig.
&
38
machine
37
just
to
is
always
drop
a
by
arrow
parts
±)J
in
of
marks.
underneath
at
high
smooth
oil
speed
is
sufficient
To
the
running
oil
bed.
for
your
a
at
few
condition,
each
machine
minutes
yov
time
of
thoroughly,
to
oiling.
let
must
the
Fig.
keep
Points
open
oil
it
arm
penetrate
38
oiled
to
be
cover
at
oiled
to
all
and
all
times.
are
turn
parts.
il
—22—
Page 25

When
space
abrupt
When
1.
this
Raise
bobbin
the
between
heavy
occurs
the
case
thread
needle
is
the
running
out.
Fig.
tangled
shuttle
or
bar
40
in
and
complete
its
to
27.
CLEANING
the
race
shuttle-race,
stoppage
highest
or
position
lint
of
this
gets
the
and
THE
into
will
machine.
take
2.
3.
SHUTTLE
the
cause
the
Pull
the
&
aside,
40).
body
with
After
shuttle
all
of
them
KNOBS
then
your
back
RACE
(A)
fingers.
race
in
on
take
and
reverse
both
out
bobbin
order.
the
Side
outside
case
Fig.
of
have
39
shuttle
rm,
been
and
race
the
cleaned,
(Fig.
shuttle
39
put
2
3
—
Page 26

28.
CASE
OF
COMMON
DIFFICULTIES
BREAKING
1.
Incorrect
3.
Faulty
4.
Needle
5.
Needle
7.
Starting
BREAKING
1.
Incorrect
Bobbin
3.
4.
Rough
BREAKING
Pulling
1.
2.
Using
SKIPPING
Using
1.
3.
Needle
Pressure
5.
UNEVEN
Presser
1.
Using
3.
Using
5.
OF
THE
threading
needle
brushing
eye
too
the
machine
OF
THE
threading
being
edge
of
OF
THE
the
fabric
bent
needle
STITCHES:
bent
or
threaded
on
presser
STITCHES:
foot
not
too
short
too
fine
UPPER
or
needle
against
small
LOWER
wound
hole
NEEDLE:
while
blunt
incorrectly
resting
a
stitch
needle
a
for
with
of
the
too
in
needle
needles
foot
THREAD:
set
incorrectly
presser
thread
the
take-up
THREAD:
bobbin
fully
plate
machine
insufficient,
evenly
with
to
foot
used
is
on
coarse
or
lever
case
caused
running,
especially
material
a
other
thread
attachments
at
its
by
improper
thus
when
2.
6.
highest
2.
causing,
2.
4..
sewing
2.
4.
Upper
Starting
position
Lower
needle
the
Needle
Using
Feed
Pulling
thread
thread
action
needle
inserted
wrong
heavy
dog
the
the
not
tension
machine
tension
to
strike
size
material
being
cloth
too
suddenly
too
the
incorrectly
needle
high
while
the
tight
tight
needle
enough
machine
or
with
plate
is
running
jerk
a
—2$—
 Loading...