

Page 1
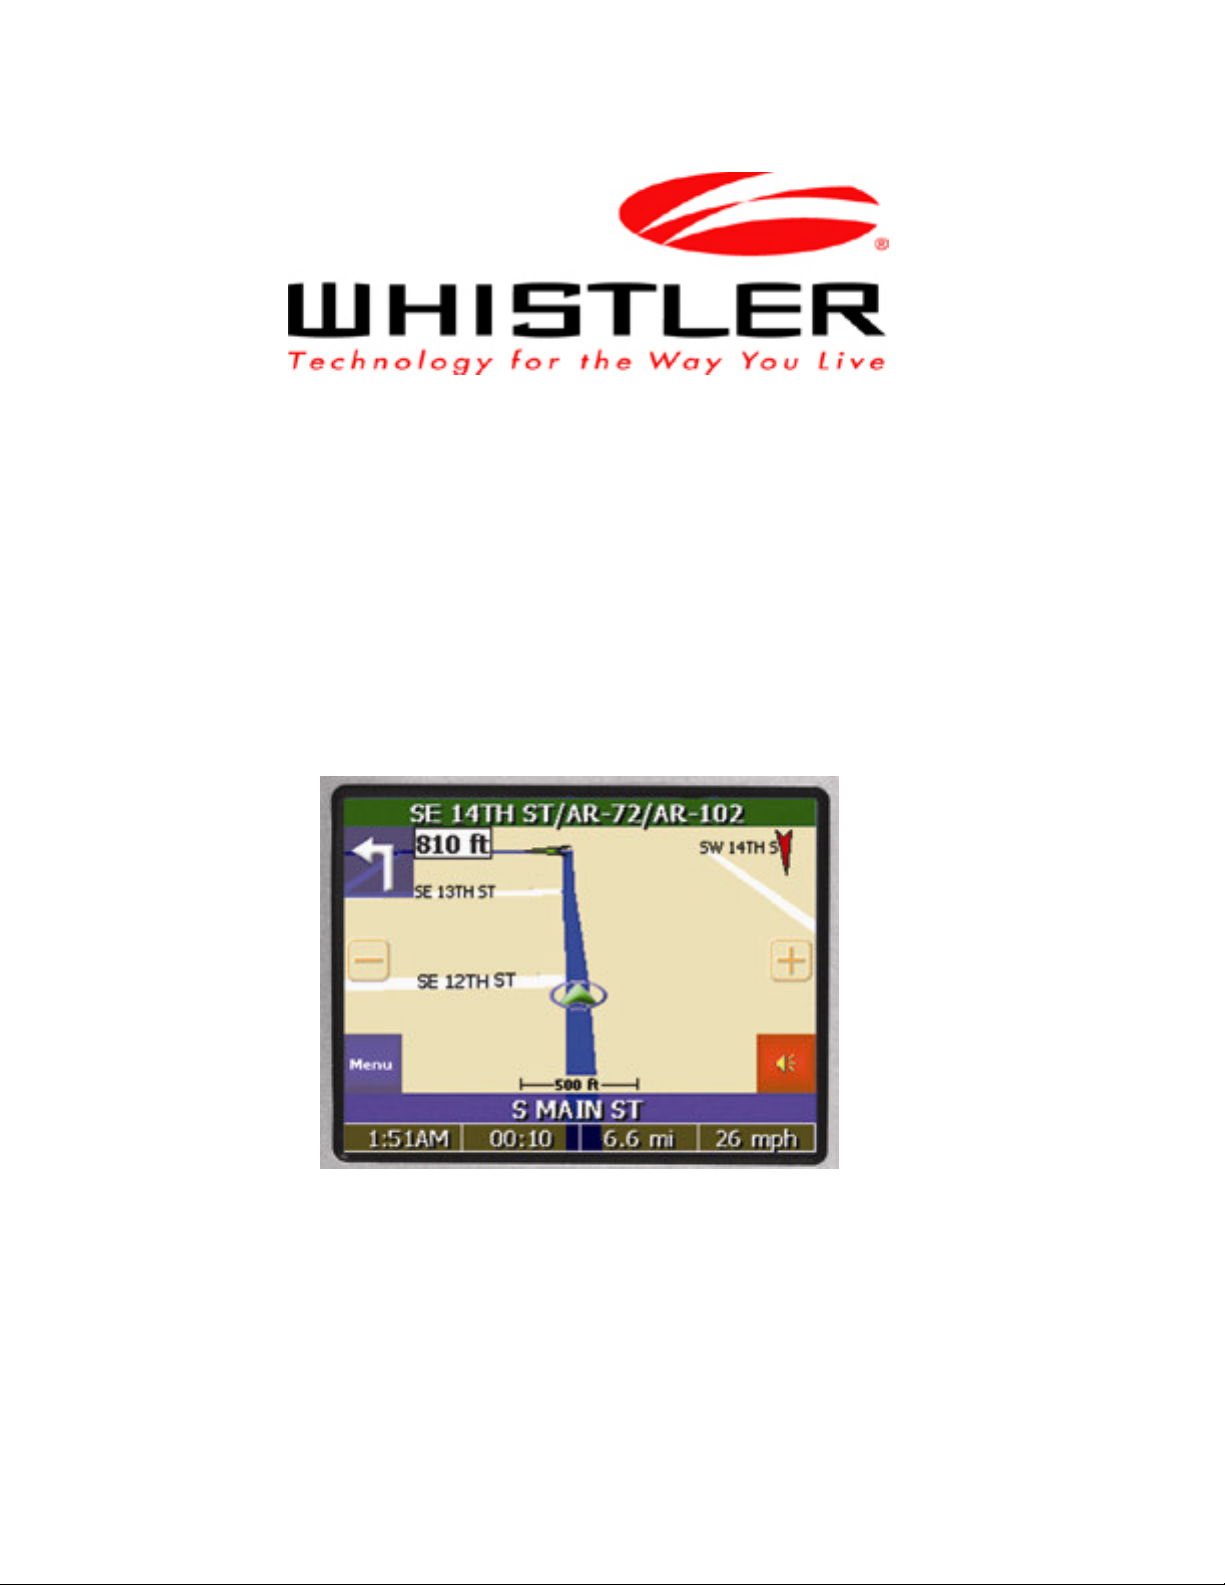
wMap GPS Software
wMap
Software User Manual
for
600 Series WGPX GPS Receivers
Note
Contents of this manual and product specifications can change without notice.
Rev 2
1
Page 2

wMap GPS Software
Introduction
Congratulations on your purchase of a Whistler GPS receiver and the wMap mapping software.
This system can provide an auto route to the destination of your choice using signals from Global
Positioning Satellites (GPS) orbiting the earth.
There are 24 GPS satellites orbiting the earth. A GPS device can calculate your position on the
earth if it can receive signals from at least three of these satellites. When it receives at least four
signals, a GPS device can also calculate your altitude (height above sea level).
To use the GPS receiver for the first time you need to charge the battery and install the map data
onto the Secure Digital/Multi-Media Card (SD/MMC). NOTE: Some models may have the maps
preloaded on the SD/MMC card so map loading is not necessary. If the GPS receiver offers other
countries, these country maps will be on the included CD/DVD. Simply copy the country maps to
an appropriately sized SD/MMC card and insert the card into the GPS receiver. See page 23 for
loading instructions.
Important! If the GPS receiver’s maps are preloaded on a SD/MMC card, please make a backup
copy of the card to the PC. If the card is reformatted, erased or lost, a new copy of the map files
can be placed onto a new SD/MMC card by using the backup copy. If a backup is not performed
and replacement maps are needed, a replacement fee will be charged.
See the unit’s hardware manual for detailed instructions for battery loading and charging
information as well as important hardware and software restrictions and precautions. All other
hardware questions and operation of other non GPS mapping programs are listed in the hardware
manual.
Introduction
2
Page 3

Legal
wMap GPS Software
Software Agreement
Whistler Map™ (wMap) Software License
ATTENTION: PLEASE READ THIS DOCUMENT CAREFULLY. THE INDIVIDUAL OR
ENTITY OPENING THE CD/DVD (THE "END-USER") AGREES TO BE BOUND BY THE
TERMS OF THIS LICENSE. IF YOU OPEN THE CD/DVD, YOU CANNOT RETURN THE
GPS FOR CREDIT.
The enclosed software files and the accompanying documentation are provided to the End-User
by The Whistler Group, Inc. ("Whistler") and Netropa Corporation for use only under the
following terms. Whistler reserves any right not expressly granted to the End-User. The End-User
owns the disk on which the Software is recorded, but Whistler retains ownership of all copies of
the Software itself. The End-User assumes sole responsibility for the installation, use and results
obtained from use of the Software.
1. License. End-User is granted a limited, non-exclusive license to do only the following:
A. Install and maintain the Software on one computer at any time for use only in the End-
User's own business.
B. Make one copy in machine-readable form solely for backup or archival purposes for the
computer on which the Software is installed. The Software is protected by copyright law.
As an expressed condition of this License, the End-User must reproduce on the copy
Whistler's copyright notice and any other proprietary legends on the original copy supplied
by Whistler.
C. Transfer the Software and all rights under this License to another party together with a copy
of this License and all written materials accompanying the Software, provided (i) the EndUser gives Whistler written notice of the transfer (including in such notice the identity of
the transferee), and (ii) the other party reads and agrees to accept the terms and conditions
of this License.
2. Restrictions. The End-User may NOT sublicense, assign, or distribute copies of the Software
to others. The End-User may NOT decompile, reverse engineer, disassemble, or otherwise reduce
the Software to a human readable form. THE END-USER MAY NOT MODIFY, ADAPT,
TRANSLATE, RENT, LEASE, LOAN, RESELL FOR PROFIT, DISTRIBUTE, OR
OTHERWISE ASSIGN OR TRANSFER THE SOFTWARE, OR CREATE DERIVATIVE
WORKS BASED UPON THE SOFTWARE OR ANY PART THEREOF, EXCEPT AS
EXPRESSLY PROVIDED IN SECTION 1.C. ABOVE.
3. Protection and Security. The End-User agrees to use its best efforts and to take all reasonable
steps to safeguard the Software to ensure that no unauthorized person shall have access thereto
and that no unauthorized copy, publication, disclosure or distribution in whole or in part, in any
form, shall be made. The End-User acknowledges that the Software contains valuable confidential
information and trade secrets and that unauthorized use and/or copying are harmful to Whistler.
4. Termination. This License is effective until terminated. This License will terminate
immediately without notice from Whistler if the End-User fails to comply with any of its
provisions. Upon termination the End-User must destroy the Software and all copies thereof, and
the End-User may terminate this License at any time by doing so.
3
Page 4

wMap GPS Software
Software Agreement - Continued
5. Export Law Assurances. The End-User agrees that the Software is to be used only in North
America and the Software will not be transferred or exported, directly or indirectly, outside North
America.
6. Limited Warranty. Whistler warrants that, for one year from the date of initial use by the
original End-User, the Software shall operate substantially in accordance with the published
functional specifications current at the time of shipment. If, during the warranty period, a defect
appears, the End-User shall return the Software to Whistler and Whistler's only obligation shall be,
at Whistler's election, to replace the defective Software. The End-User agrees that the foregoing
constitutes the End-User's sole and exclusive remedy for breach by Whistler under any warranties
made under this Agreement. This warranty does not cover any Software that has been altered or
changed in any way by anyone other than Whistler or Netropa Corporation. Whistler or Netropa
Corporation is not responsible for problems associated with or caused by incompatible operating
systems or equipment, or for problems in the interaction of the Software with software not
furnished by Whistler. No oral or written information or advice given by Whistler or its dealers,
distributors, employees or agents shall in any way extend, modify or add to the foregoing
warranty.
THE WARRANTY AND REMEDY PROVIDED ABOVE ARE EXCLUSIVE AND IN LIEU
OF ALL OTHER WARRANTIES, EXPRESS OR IMPLIED, INCLUDING BUT NOT
LIMITED TO THE IMPLIED WARRANTIES OF MERCHANTABILITY AND FITNESS FOR
A PARTICULAR PURPOSE. THE END-USER ASSUMES ALL RISK AS TO THE
SUITABILITY, QUALITY, AND PERFORMANCE OF THE SOFTWARE. IN NO EVENT
WILL WHISTLER, OR ITS DIRECTORS, OFFICERS, EMPLOYEES OR AFFILIATES, BE
LIABLE TO THE END-USER FOR ANY CONSEQUENTIAL INCIDENTAL, INDIRECT,
SPECIAL OR EXEMPLARY DAMAGES (INCLUDING DAMAGES FOR LOSS OF
BUSINESS PROFITS, BUSINESS INTERRUPTION, LOSS OF DATA OR BUSINESS
INFORMATION, AND THE LIKE) ARISING OUT OF THE USE OF OR INABILITY TO USE
THE SOFTWARE OR ACCOMPANYING WRITTEN MATERIALS, EVEN IF WHISTLER
HAS BEEN ADVISED OF THE POSSIBILITY OF SUCH DAMAGES. WHISTLER'S
LIABILITY TO THE END-USER (IF ANY) FOR ACTUAL DIRECT DAMAGES FOR ANY
CAUSE WHATSOEVER, AND REGARDLESS OF THE FORM OF THE ACTION, WILL BE
LIMITED TO, AND IN NO EVENT SHALL EXCEED, THE AMOUNT ORIGINALLY PAID
TO WHISTLER FOR THE LICENSE OF THE SOFTWARE.
7. Enhancements. From time to time Whistler may, in its sole discretion, advise the End-User of
updates, upgrades, enhancements or improvements to the Software and/or new releases of the
Software (collectively, "Enhancements"), and may license the End-User to use such
Enhancements upon payment of prices as may be established by Whistler from time to time. All
such Enhancements to the Software provided to the End-User shall also be governed by the terms
of this License. IN ORDER FOR THE END-USER TO BE ASSURED THAT IT WILL BE
ADVISED OF AND LICENSED TO USE ANY ENHANCEMENTS TO THE SOFTWARE,
THE END-USER MUST COMPLETE THE ONLINE REGISTRATION FORM AT
WWW.WHISTLERGROUP.COM OR CALL 1-800-531-0004.
Legal
4
Page 5

Legal
wMap GPS Software
Software Agreement - Continued
8. General. This License will be governed by and construed in accordance with the laws of the
State of Arkansas, and shall inure to the benefit of Whistler, End-User and their successors,
assigns and legal representatives. If any provision of this License is held by a court of competent
jurisdiction to be invalid or unenforceable to any extent under applicable law, that provision will
be enforced to the maximum extent permissible and the remaining provisions of this License will
remain in full force and effect.
Any notices or other communications to be sent to Whistler must be mailed first class, postage
prepaid, to the following address:
The Whistler Group, Inc.
Attn: Customer Service
13016 North Walton Blvd.
Bentonville, AR 72712
This Agreement constitutes the entire agreement between the parties with respect to the subject
matter hereof, and all prior proposals, agreements, representations, statements and undertakings
are hereby expressly cancelled and superseded.
This Agreement may not be changed or amended except by a written instrument executed by a
duly authorized officer of Whistler.
9. Acknowledgment. BY OPENING THIS PACKAGE, THE END-USER ACKNOWLEDGES
THAT IT HAS READ THIS LICENSE, UNDERSTANDS IT, AND AGREES TO BE BOUND
BY ITS TERMS AND CONDITIONS. Should you have any questions concerning this License,
contact Whistler at the address set forth above.
5
Page 6

wMap GPS Software
Contents
Introduction ...........................................................................................................2
Software Agreement - Legal...............................................................................3 - 5
Operation..........................................................................................................7-22
Map Page.....................................................................................................................................7
Zoom In/Out .......................................................................................................................7
Track Up/North Up ...........................................................................................................7-8
Navigation and Panning Modes.......................................................................................... 8-9
POI info.......................................................................................................................... 9
Saving a Location............................................................................................................ 9
Current Route Page .................................................................................................................9
Trip Information Page............................................................................................................ 10
GPS Info ............................................................................................................................... 10
Almanac................................................................................................................................ 10
Current Location.................................................................................................................... 11
Map View Style (2D/3D)......................................................................................................... 11
Creating and Using an Auto Route ............................................................................................... 12
Destination by Address ........................................................................................................... 13
Destination by Intersection ..................................................................................................... 14
Destination by Points Of Interest (POI).................................................................................... 15
Destination by Favorites ......................................................................................................... 16
Destination by Recent ............................................................................................................ 16
Destination by City Center ...................................................................................................... 16
Set a Detour .......................................................................................................................... 17
Add a Stop Over .................................................................................................................... 17
Set Route Options .................................................................................................................. 18
Demo an Auto Route .............................................................................................................. 18
Setting Options .......................................................................................................................... 19
Local Settings ........................................................................................................................ 19
Display Options ...................................................................................................................... 19
Creating or Adding Favorites ................................................................................................... 20
Programming the Go Home button .......................................................................................... 20
Panning and Zooming ................................................................................................................. 21
Guidance Volume Setting ............................................................................................................ 21
About Page ............................................................................................................................... 21
Speed Alert Setting..................................................................................................................... 22
Installing Maps.....................................................................................................23
Troubleshooting ...................................................................................................23
FAQs ...................................................................................................................24
Table of Contents
6
Page 7
Operation
wMap GPS Software
Navigating the Software
Once the GPS receiver is turned on, the unit will automatically go to the GPS receiver’s main
menu or depending on the GPS hardware, display the wMap’s map page. See the GPS receiver’s
hardware manual to determine the correct procedure to start the GPS unit’s mapping software.
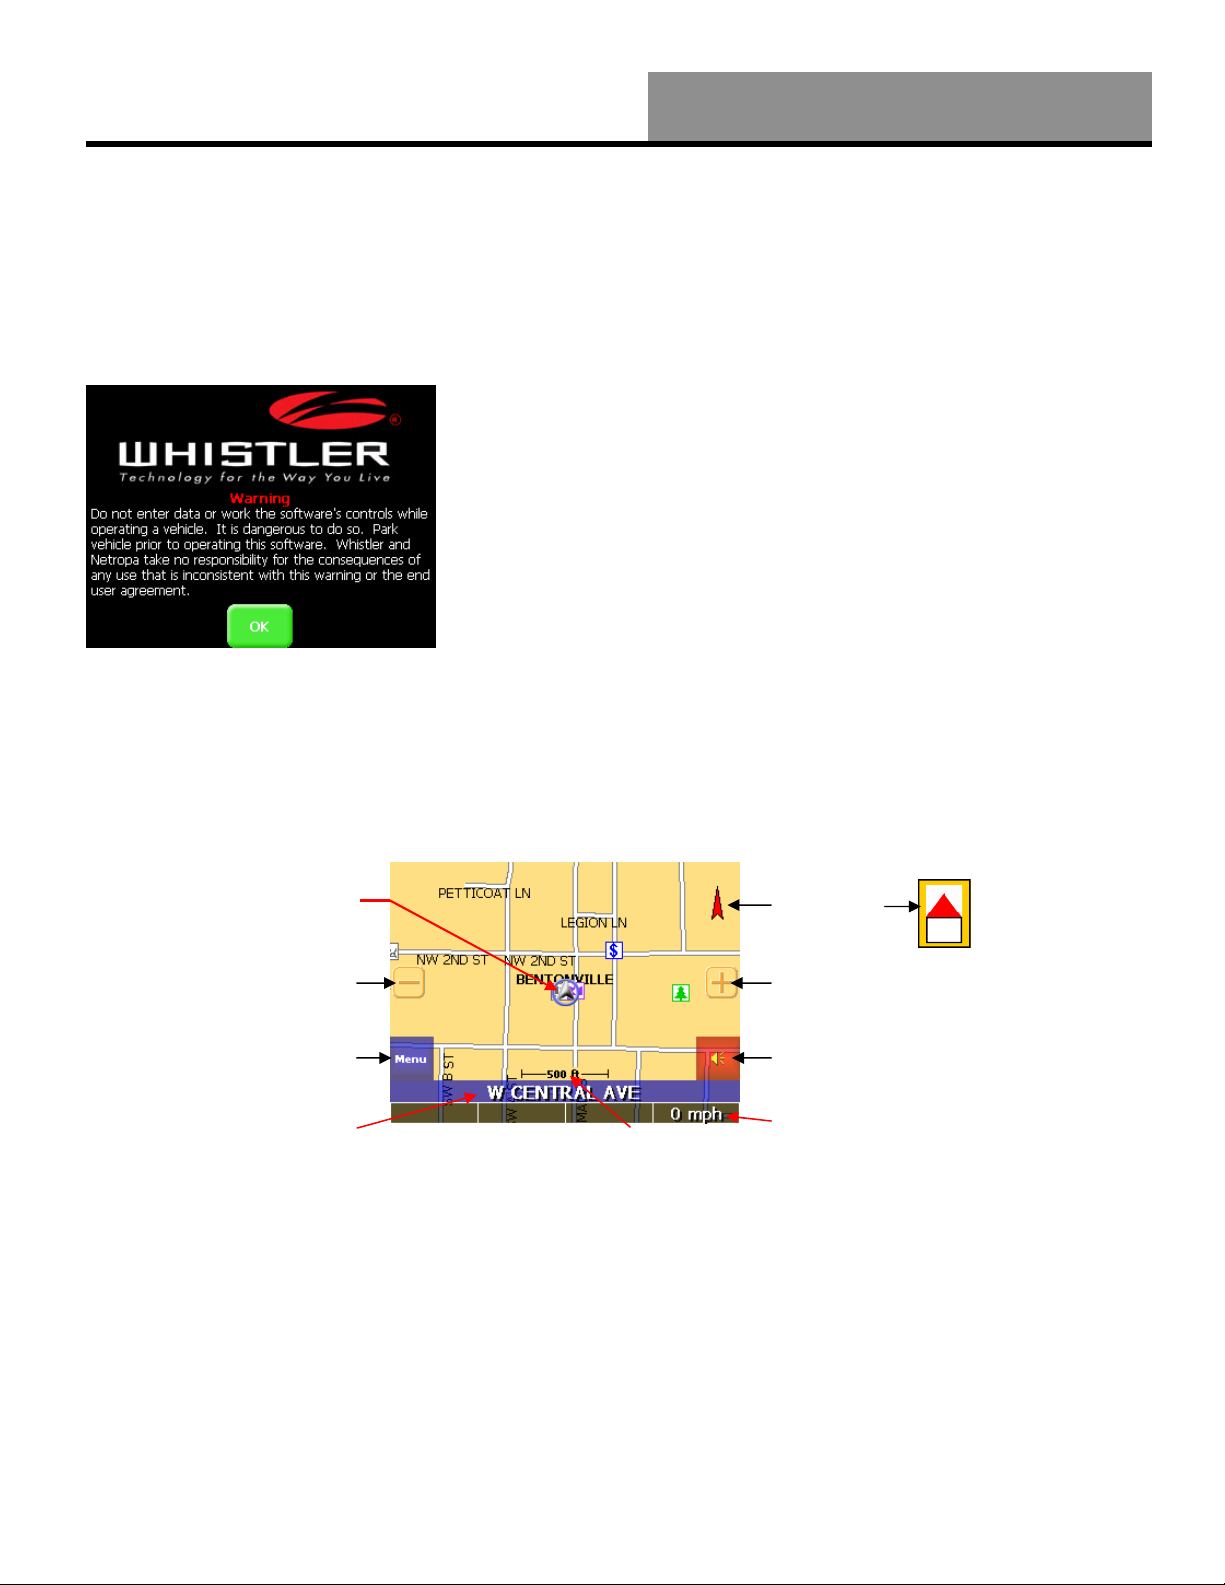
A warning screen will appear first. Simply read and tap the OK icon.
It is best to be outside and have a clear sky above to allow
the GPS to obtain better reception of the satellites. Clear
sky means: no trees, bridges, overhangs, carports etc.
Cloudy skies are ok. The unit is ready to travel and navigate
once the map page is displayed. The wMap software is
designed to be easy to use. Important! See the Setting
Options section on page 19 to enter correct time zone!
Figure 7A
Map Page
The Map Page displays your current position, zoom in/out buttons and zoom level in miles, street
traveling on, battery life and Menu and Mute Icons. The pointer represents your location and
direction on the map.
The following sections will describe the many features and
settings. Pressing the direction button on the unit either left
or right will toggle through the available screens.
SE
Figure
7C
Pointer Icon
Zoom Out Icon
Menu Icon
Current Road
Traveling
North Icon
Zoom In Icon
Mute Icon
Current Speed
Figure 7B Zoom Level
The pointer icon also indicates the signal strength of the satellite signals: Silver = no signal;
Red = poor signal; Yellow = weak signal and Green = good signal.
Zoom In/Out
The zoom level is displayed in the lower center of the map page . To change the zoom level, tap
the zoom icons on the screen or the (+) or (-) buttons on the GPS unit. Note: Street details are not
shown higher than zoom level of 2000 ft.
Track Up (Heading) or North Up
In the upper right hand corner is the North indicator icon. (See Figure 7B) This indicator will
always point to the north. While traveling, the direction of travel (Pointer Icon) is always pointing
up and the map rotates around the Pointer Icon.
7
Page 8
wMap GPS Software
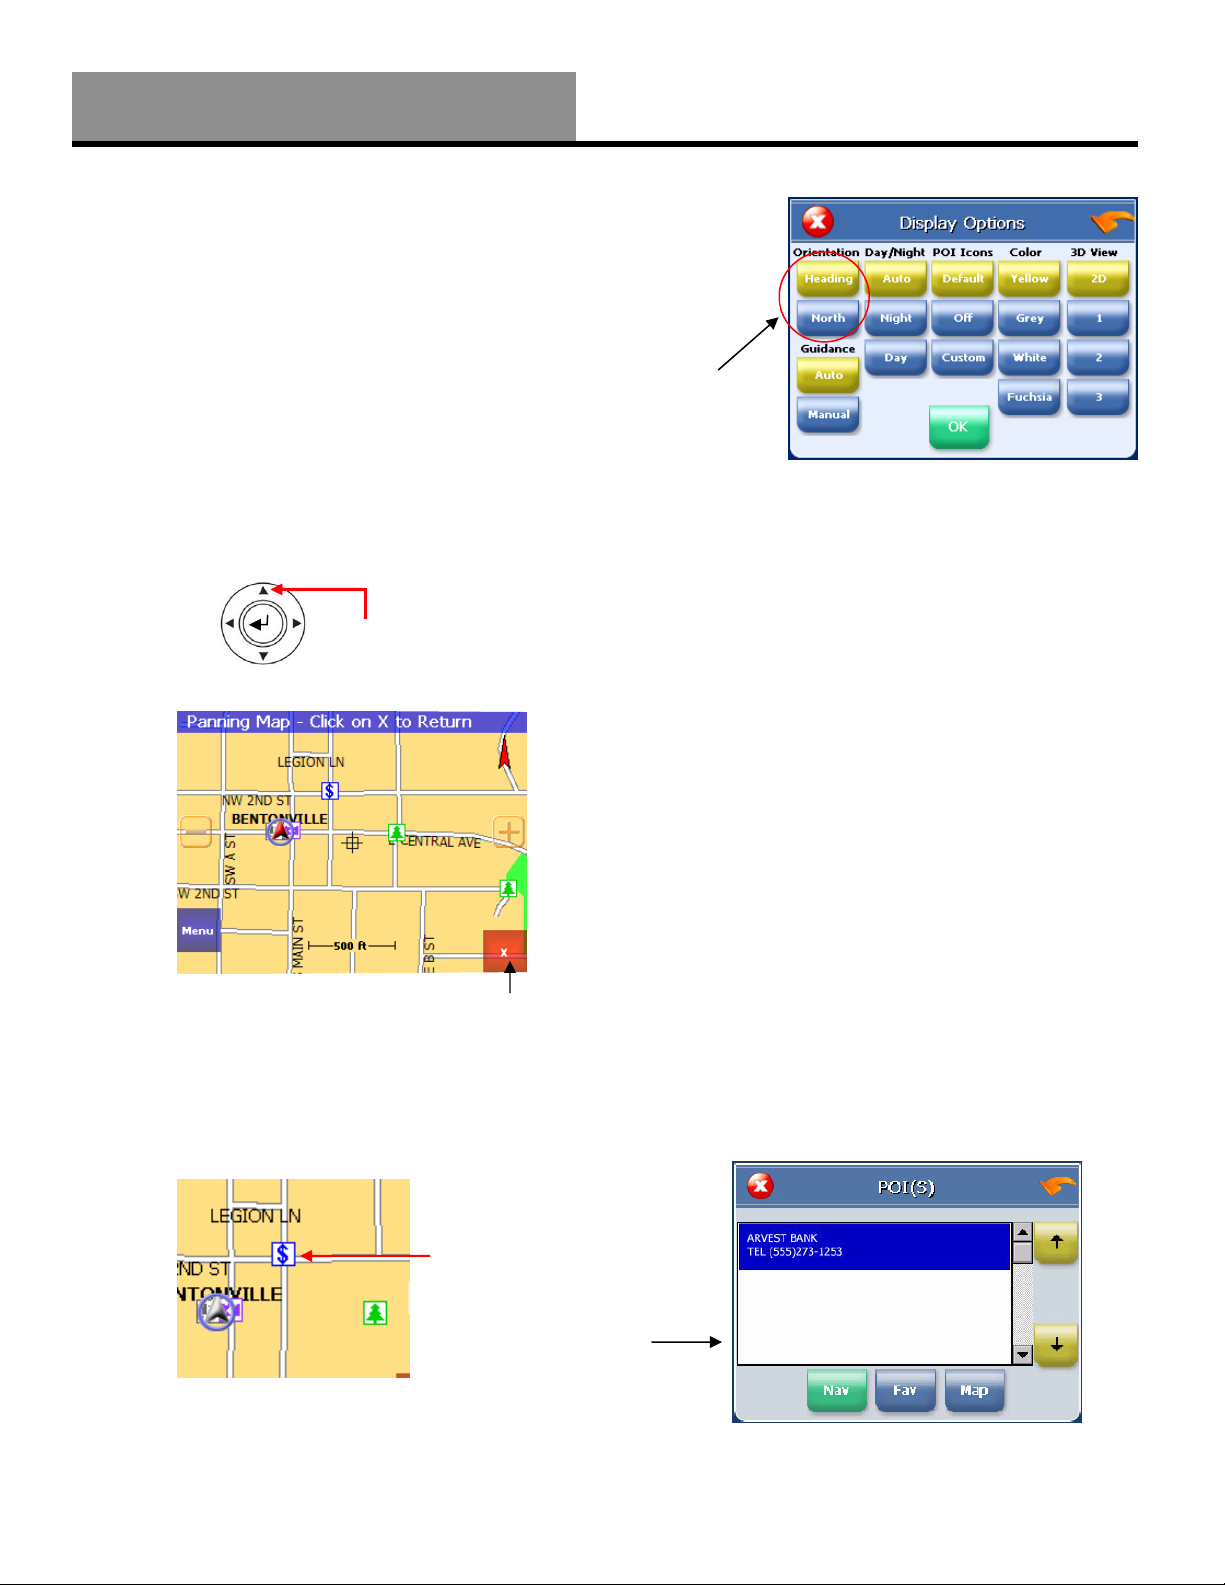
Track Up or North Up—continued
When the map is switched to North Up from the defaulted
Track Up, the direction of travel (N,S,E,W etc) is displayed
under the red arrow. See Figure 7C for an example for a SE
direction of travel.
There are three ways to change the
display:
1. Simply tap the North indicator and the icon will change
from one setting to the other.
2. Go to: Main Menu/Settings/Display Options/
Orientation and change the option.
3. Simply press the direction button in the up position.
Figure 8B Generic button shown
Figure 8C
To exit Panning Mode, tap the red “X” button in the lower right corner of the display.
To find out more info on a POI, simply tap on the POI’s icon and the POI Info screen will be
displayed.
Press the up arrow to
change views
Tap here to exit panning mode
Operation
Select the display
heading style
Figure 8A
Note: Menu layouts throughout this
manual may differ from what is shown.
Navigation and Panning Modes
The map page can be displayed in two views; Navigation
Mode (See Figure 7B) and Panning Mode (See Figure 8C).
Navigation Mode displays movements along the map.
Panning Mode allows Points of Interest (POI) and street
name information to be displayed and also allows movement
of the map to different areas for viewing.
To enter Panning Mode: Simply tap and drag along the
screen to allow movement of the map to view different areas.
8
Tap here to get detailed
POI information
POI Information screen
is displayed
Figure 8D
The POI Info screen provides the POI’s name and phone number. (See Figure 8E)
Figure 8E
Page 9

Operation
wMap GPS Software
Navigation and Panning Modes - continued
At the bottom of the POI Info page there are three choices for the POI info displayed:
Nav = Set an auto route to the POI
Fav = Saves this POI into the Favorites folder
Figure 9A
POI’s Displayed on the Map Page
Selecting only certain POI’s is helpful in large city areas
where the POI icons could overwhelm the map page.
To change the default settings.
1. Tap Menu/Settings/Display Options.
2. Under the POI Icons column, select Custom. This will select
what POI’s are shown on the map page. Default setting is all
POI’s are selected.
3. Tap OK
Figure 9C
The following screens can be accessed by moving the direction button on the GPS unit either left
or right.
Current Route
This page is normally blank unless an auto route is entered. All turns within the auto route are
displayed. This page is useful when looking for the next turn or turns that are approaching.
Map = Return to the map page
POI on
POI off
Figure 9B
Figure 9B
Saving a Current Location
To save current location.
1. Tap and hold anywhere on the map and an option menu will be
displayed. See figure 9C.
2. Select the desired option:
Set Start Location allows the auto route to use this location
instead of GPS location.
Set Destination creates an end point for an auto route.
Save This Location places this location into the Favorites folder.
Info provides county and latitude/longitude coordinates for the
selected area.
Tapping the Map icon will
show the highlighted turn on
the map. The map page will be
shown in panning mode.
Tap on either the yellow
arrow icons or the scroll
bar to see all turns in the
route.
Figure 9D
9
Page 10

wMap GPS Software
Trip Information Page
The Trip Information Page can store three different trips. The information displayed includes: trip
time, top speed, average speed, total distance, date and time information.
Trip 1 ready
Tap the Clear icon to erase a
trip.
GPS Info
This page displays the GPS receiver’s satellite reception, local and UTC time (24hr format independent of the GPS receiver’s own clock), current longitude and latitude, altitude and
traveling speed.
Operation
Figure 10A
Tap the Start icon to
begin the trip. Once a trip
has started this icon
changes to Stop. To end
the trip tap the Stop icon.
Figure 10B
Bars indicate receiving satellites
Satellite signal strength.
Numbers below the bars indicate satellite number
The vertical bars on the Satellite page indicate the signal strength of the received satellite(s). The
higher the bar, (also higher the number), the stronger the signal. The number below the bars
indicates the satellite number.
Almanac
The Almanac is a simple page that provides sunrise and
sunset times, current phase of the moon, age of the moon, full
moon and the next new moon expected.
10
Figure 10C
Page 11

Operation
wMap GPS Software
Current Location
Use this page to get information about the current position. From this page the location can be
saved to the Favorites folder.
Tap on either the yellow
arrow icons or the scroll
bar to see all the available
information.
Tapping the Save icon will
show the edit screen to allow
renaming the location before
saving it in the Favorites
folder.
Map View Style
The map page can be viewed in different dimensions; normal 2D and three options of 3D. There
are two ways to change the display view:
1. Simply press the directional button in the down position to
change from the default 2D viewing to 3D.
Figure 11A
Figure 11B
Generic button shown
2. Go to: Main Menu/Settings/Display Options/3D View and
change the option.
3. Tap either the OK Icon to accept or the X to cancel.
Figure 11C
2D View One of three
3D Views
Press the down arrow to change views
Select the display
viewing style
Note: 3D view only has 5
levels of zoom.
Figure 11D Figure 11E
11
Page 12

wMap GPS Software
Creating and Using an Auto Route
When an auto route is selected the map page will show the route on the map by changing the road
color to blue.
Operation
Turn approaching and
distance to the turn.
Auto route engaged and
displayed with a blue road
along the route
Estimated time once
arrived at destination
Estimated time to next turn
Street name of next turn
Figure 12A
Vehicle speed
Distance to destination
To start an auto route, begin from the map page. Tap the Menu icon and from the Main Menu
page tap on the Destination icon.
12
Tap on the Menu icon
or the menu button on the unit
to enter the Main Menu page.
Generic menu button
Tap on the Destination icon to enter
the Destination Menu page.
Figure 12B
Back Icon
Tap on the Shortcut icon
to find POI’s within 25
miles of your location.
Figure 12C
When the Destination Menu is shown, select the category to create
an auto route.
The following pages cover how to create an auto route from these
categories in Figure 12D.
Figure 12D
Page 13

Operation
wMap GPS Software
Creating and Using an Auto Route - continued
Destination by Address
1. Tap Menu, Destination, Address.
2. Tap Change to select the state in which to search.
3. Tap Street First to enter the street name first or City First
to enter the city name first.
Note: Any time the keyboard is displayed, the wMap program will display choices that closely
match the category name being typed. Tap the OK icon once a choice is correctly shown.
If Street First is selected
1. Enter street name and tap OK.
(!) Advisory - DO NOT ENTER STREET TYPE. For Main
Figure 13A
Figure 13B
If City First is selected
Space Bar
Street just enter Main. Note: The wMap program will
display choices that closely match the street name being
typed. Tap the OK icon once a choice is correctly shown.
2. Enter house number and tap OK.
3. From the match list, select the desired address.
4. Tap Nav to navigate to this location or;
5. Tap Fav to add this location to the Favorites folder or;
6. Tap Map to set this location as your starting point and see
the location on the map.
Figure 13C
1. Enter city name and tap OK.
2. Enter street name and tap OK.
(!) Advisory - DO NOT ENTER STREET TYPE. For Main
Street just enter Main.
3. Enter house number and tap OK.
4. From the match list, select the desired address.
5. Tap Nav to navigate to this location or;
6. Tap Fav to add this location to the Favorites folder or;
7. Tap Map to set this location as the starting point and see
Figure 13D
(i) Information - If a large number of records are found by the Street First method, the program
will automatically revert to City First method.
the location on the map.
13
Page 14

wMap GPS Software
Creating and Using an Auto Route - continued
Destination by Intersection
1. Tap Menu, Destination, Intersection.
2. Tap Change to select the state in which to search.
3. Tap either Street First to enter the street name first or City
First to enter the city name first.
If Street First is selected:
Operation
Figure 14A
1. Enter street name and tap OK.
(!) Advisory - DO NOT ENTER STREET TYPE. For Main
Street just enter Main. Note: The wMap program will
display choices that closely match the street name being
Figure 14B
Figure 14C
If City First is selected:
Space Bar
typed. Tap the OK icon once a choice is correctly shown.
2. Enter the name of the cross street and tap OK.
(!) Advisory - DO NOT ENTER STREET TYPE. For Main
Street just enter Main.
3. From the match list, select the desired intersection.
4. Tap Nav to navigate to this location or;
5. Tap Fav to add this location to the Favorites folder or;
6. Tap Map to set this location as the starting point and see
the location on the map.
1. Enter city name and tap OK.
2. Enter street name and tap OK.
(!) Advisory - DO NOT ENTER STREET TYPE. For Main
Street just enter Main.
3. Enter the name of the cross street and tap OK.
(!) Advisory - DO NOT ENTER STREET TYPE.
4. From the match list, select the desired intersection.
14
5. Tap Nav to navigate to this location or;
6. Tap Fav to add this location to the Favorites folder or;
Figure 14D
(i) Information - If a large number of records are found by the Street First method, the program
will automatically revert to City First method.
7. Tap Map to set this location as the starting point and see
the location on the map.
Page 15

Operation
Creating and Using an Auto Route - continued
Destination by Points of Interest (POI)
1. Tap Menu, Destination, Points of Interest.
2. Tap one of the categories for Points of Interest.
3. Tap a sub category (See figure 15B) or selection (if shown)
4. There are 4 options for how the POI list appears:
wMap GPS Software
“Within 25 Miles” - Select Alphabetical or By Distance
“Under State” - Select List All or By City.
If Alphabetical is selected:
1. Enter the name of the destination. (See Figure 15D)
2. Select a matching POI location from the list.
3. Tap OK to accept the location. The location details will be
shown.
4. Tap Nav to navigate to this location or;
5. Tap Fav to add this location to the Favorites folder or;
6. Tap Map to set this location as the starting point and see the
location on the map.
If By Distance is selected:
1. Select a POI from the list
2. Tap Nav to navigate to this location or;
3. Tap Fav to add this location to the Favorites folder or;
Figure 15A
Figure 15B
Figure 15C
4. Tap Map to set this location as the starting point and see the
location on the map.
Figure 15E
Space Bar
Figure 15D
15
Page 16

wMap GPS Software
Creating and Using an Auto Route - continued
Destination from Favorites
1. Tap Menu, Destination, Favorites.
2. Select a destination from the list if you have already created
one.
3. Tap Nav to navigate to this location or;
Operation
4. Tap Map to set this location as your starting point and see
the location on the map or;
5. Tap Edit to create a label such as HOME for this
destination or change the label if one already exists or;
6. Tap Del to delete this location from the Favorites folder.
Favorite location list.
Blue indicates selected
favorite location.
Destination from Recent
1. Tap Menu, Destination, Recent. (See Figure 16A)
2. Select the destination.
3. Tap Nav to navigate to this location or;
4. Tap Map to set this location as your starting point and see
Figure 16A
Figure 16B
16
the location on the map or;
5. Tap Fav to add this location to the Favorites folder or;
6. Tap Del to delete this location from the Recent list.
Destination from City Center
This option auto routes to a city instead of a street or POI.
City choices can be made statewide or within 25 miles from
the current location.
Figure 16D
Figure 16C
Page 17

Operation
Creating and Using an Auto Route - continued
To Set a Detour
The wMap software offers the ability to detour around a
section of street that you are currently driving on. The Detour
feature will only be present if a destination has been entered.
1. Tap Menu, Destination. The current destination will be
shown.
2. Tap Detour and the display will show three distance
options.
3. Tap one of the distance icons to create a Detour route.
To Cancel Detour and revert back to the original route
1. Tap Menu, Destination. The current destination will be
wMap GPS Software
Figure 17A
shown.
2. Tap Detour, Reset.
Figure 17B
To Add a Stopover
Stopover is a feature that offers to set an intermediate destination after a final destination is
selected. For example, if traveling from Los Angeles, CA to Las Vegas, NV, where Las Vegas is
the final destination, enter a Stopover for a rest break along the way. The Stopover feature will
only be present if a destination has been entered.
1. Tap Menu, Destination. The current destination will be shown.
2. Tap Stopover then enter a new destination. (See Figure 17A)
3. wMap will route to the Stopover destination.
4. Once at the Stopover, wMap will ask you if you want to proceed to the original destination.
To Cancel a Stopover Destination and Revert Back to the Original Destination
1. Tap Menu, Destination. The current destination will be shown.
2. Tap Clear Route.
3. Tap Yes when prompted to continue to original destination.
17
Page 18

wMap GPS Software
Creating and Using an Auto Route - continued
To Set the Route Options
1. Tap Menu, Route Options to open the Route Options screen.
2. Select the desired option(s).
3. Tap OK to accept or Cancel to reject changes.
Method: Selects the method of routing. The quickest route, shortest route, route that favors
major roads, or route that favors local roads.
Ferries: Selects whether ferries should be included or excluded in the route calculation. Note:
selecting ferries does not include ferry schedules or time spent on the ferry.
Toll Roads: Selects whether toll roads should be included or excluded in the route calculation.
Carpools: Selects whether carpool lanes (High Occupancy Vehicle lanes) should be included or
excluded in the route calculation.
Turns: Selects more or less turns in the auto route.
Operation
Yellow color indicates
selected option
Figure 18A
To Demo an Auto Route
The wMap software offers the ability to demo an auto
route. The Demo feature will only be present if a
destination has been entered.
1. Tap Menu, Destination. The current destination will be
18
shown.
2. Tap Demo and the unit will “drive” the complete route.
Figure 18B
To cancel Demo mode:
1. Tap Menu, Destination and tap the Stop icon to cancel demo mode. The Stop icon replaces the
Demo icon while in Demo mode.
The word “PLAY” will be shown on the upper right side of
the map indicating that the Demo mode is functioning.
Page 19

Operation
Setting Options
To Set Local Settings
Correctly setting the local time will allow the software to
properly show the local time. From this menu the following
can also be selected: Language, Unit of Measure and
Daylight Savings Time.
1. Tap Menu, Localization to open the local settings
menu.
Figure 19A
To Set the Display Options
1. Tap Menu, Display Options to open the Display Options
2. Select the correct settings for the area traveling.
wMap GPS Software
screen.
2. Select the desired option(s).
3. Tap OK to accept or Cancel to reject change(s).
Orientation: Orients the Map screen so that the driving direction is pointing up or North is
pointing up (See page 7).
Guidance: Sets the Guidance screen to automatically switch when getting closer to a turn
maneuver, or have it appear only when manually selected.
Day/Night: The Auto setting changes from Day to Night Mode automatically at approximately
sunrise and sunset. Select “Day” to have the display be bright or select “Night” to have the display
change to be better suited for night driving.
POI Icons: The “default” setting will display only commonly displayed icons that appear on the
map at 1000 ft zoom level or closer. The “Off” option turns off all POI icons so that none are
displayed. The “Custom” option allows which type or category of POI to be displayed.
Color: Sets the background color of the map page to several color choices.
3D View: Sets the viewing angle from the default setting of 2D to 3 different 3D views. Note:
when map page is set to 3D, tapping on the map will not provide POI information. Different views
can be toggled from 2D to 3D by pressing down on the directional button.
Figure 19B
19
Page 20

wMap GPS Software
Setting Options - continued
To Create or Add to the Favorites List
1. Enter a destination.
2. From the match list, tap Fav.
3. Tap OK.
- or -
1. Tap Menu, Recent.
2. Select a recent destination.
Operation
3. Tap Fav.
4. Tap OK.
To Add a label to your Favorites
1. Tap Menu, Destination, Favorites.
2. Select a destination.
3. Tap Edit.
4. Enter a label using the keypad.
5. Tap OK.
Programming the GO HOME Shortcut Icon
1. Tap Menu, Shortcuts, Set Home.
2. Tap Change to select the state in which home is located.
3. Tap either Street First to enter the street name first or City
Figure 20A
Figure 20B
20
First to enter the city name first.
4. Finish entering the home address and if needed, select the
correct address from the list shown.
5. Tap on the Save as Home icon.
6. A confirmation page will be displayed, tap OK if correct.
Using the “Go Home” shortcut
Now when setting a destination back to “Home” , simply tap Menu, Shortcuts, Go Home.
The unit will set an auto route to the programmed “Home” location. Remember, the Home button
doesn’t have to be a home—it could be a favorite location or a host hotel during a vacation.
Note: The POI’s listed in Figure 20C are within 25 miles of the current position. Select a POI
category and the nearest to the furthest will be listed with mileage and direction.
Figure 20C
Page 21

Operation
Panning and Zooming
To Pan the Map
From the Map screen tap and drag the map area.
wMap GPS Software
Zoom out icon
Figure 21A
(i) Information - While in Panning Mode, tap the X icon to return to the Map screen. Tap on the
North icon displayed to rotate the map so that North or Heading is pointing up.
To Zoom In and Out
Use the hardware up and down buttons to zoom in and zoom out. You can also use the zoom
icons (+/-) on the Map screen. See figure 21A.
(i) Information - The Map screen is the only view that allows zooming and panning.
Zoom in icon
Cancel icon
To Adjust the Guidance Volume Setting
1. Tap Menu, Volume.
2. Select the volume level.
3. Tap the Test icon to hear the volume level.
4. Tap OK to accept and return to Map screen.
About Screen
To find out what version software the GPS unit is using, tap the
Menu then System Information icons. To return the main menu
tap the “arrow” icon.
Figure 21B
Figure 21C
21
Page 22

wMap GPS Software
Speed Alert Setting
1. Tap Menu, Settings, Speed Alert.
2. Select desired speed alert:
Auto will use the speed limit for the classification of the road
traveling. Note: Speed zones may have changed, obey all posted
speed limits! Tap the Auto icon and then tap OK to set the
Speed Alert.
Fixed allows any speed to be programmed. Tap the Fixed icon
and the MPH box will be highlighted. Simply tap in the speed
that the unit will alarm at and tap OK to set the Speed Alert.
Figure 22B
Operation
Figure 22A
The speed readout on the map page will turn red and the unit will
emit a warning beep when the vehicle exceeds the set speed limit.
22
Page 23

Installing Maps - Troubleshooting
wMap GPS Software
Installing Maps
Some models may require loading the correct map data onto a SD/MMC card and then placing it
into the GPS receiver before you can use the unit. If the maps are preloaded for the country you
are traveling in, skip the following steps. If traveling in a different country other than what is
preloaded, continue with the following steps.
Important! Make a backup of the preloaded maps (if included) and save them to a folder on the
computer.
To install maps:
1. Put the CD/DVD into the CD/DVD drive on the computer. If the PC does not automatically
open the CD/DVD go to My Computer icon on the PC’s desktop and click on the CD/DVD
drive.
2. Place a blank SD/MMC card into the card reader/writer. This card should appear as a drive
letter, e.g. “E:.” Check the memory status to confirm that your storage card has sufficient
memory.
3. Open the folder for the country that is available and copy the files for this country to the SD/
MMC card.
Troubleshooting
My GPS doesn’t seem to be working
• Check the GPS Info screen to confirm GPS reception.
• Perform a Reset and restart. See hardware manual for details.
• Check to see if the batteries are low.
• Charge the battery on the GPS receiver.
The car cursor is red continuously
• If required, make sure that the GPS antenna is properly connected.
• If GPS receiver utilizes a flip out antenna, make sure it is properly positioned (See hardware
manual).
• Check the GPS Info screen to confirm GPS reception.
• Check to see if the GPS receiver has a clear view of the sky.
• If not, move to a location where the GPS receiver’s view of the sky is not blocked.
• Perform a Reset and restart.
A message on the display says “Outside of Map Area”
• If you are indoors or if the GPS receiver’s view of the sky is obstructed, the program may
think you are at an inaccurate location.
• Move to a location where the GPS receiver’s view of the sky is not blocked
• You may have driven beyond the coverage of the map loaded in the SD/MMC card.
23
Page 24

wMap GPS Software
Frequently Asked Questions
Q: What is GPS?
A: GPS stands for Global Positioning System. It is a system of satellites launched by the United
States Government used to calculate your coordinate position on the earth’s surface.
Q: What is routing?
A: Routing is the calculation of a driving route from a starting point to a destination.
Q: What is navigation?
A: Navigation is the turn-by-turn directions for assisting you through the driving route that has
been calculated to your destination.
Q: What is voice enabled output (direction)?
A: Voice enabled output is the verbal directions for the route. Example: Turn Left in 1000 feet.
Q: How accurate is GPS?
A: GPS accuracy is dependent on the hardware. Typically, GPS provides position accuracy to 10
or 30 meters depending on the GPS receiver and external conditions (weather, number of
satellites, etc).
Q: Do I have to pay a monthly fee for the services?
A: No. There are no fees to use GPS.
Q: Will it work indoors?
A: No. GPS receivers require a view of the sky to receive the necessary signals from the
satellites. Similarly, GPS will not work in a tunnel or under a freeway overpass.
Q: Can someone track me with it?
A: No. People cannot track your movements.
Q: Can I use this software with any other GPS receiver?
A: No. This software is intended for use with the bundled hardware. No other GPS receivers are
supported.
Q: Will it work in another country? Canada, Mexico, Japan, England?
A: GPS can provide positional coordinate for the earth’s surface as long as the receiver has a
clear view of the sky (and the GPS satellites). However, maps, navigation and routing are only
provided for the country(s) included on the CD/DVD.
For additional help or for warranty information, refer to the hardware manual, our FAQ page on
the web site or contact Customer Service at 800-531-0004.
FAQ’s
24
 Loading...