


Model WHED10
How to install, operate and maintain your Undersink Drinking Water Filter System
s
e
I
s
Do not return unit to store
If you have questions or concerns when
installing, operating or maintaining your
Undersink Drinking Water Filter System
call our toll free number:
1-866-986-3223
Monday - Friday, 8 am - 9 pm EST
System tested and certified by NSF Internationai
against NSF/ANSI Standards 42 & 53.
See performance data sheet for detaiis.
*0
s
s
s
7279066 (Rev. B 9/21/05)
Product No. 8578160

Table of Contents
Parts of the System / Typical Installation Drawing / Tools and Materials Needed............................................................ 4
Drinking Water Filter System Installation.......................................................................................................................... 5
Installing Supply Fitting..................................................................................................................................................... 5
Installing Faucet.................................................................................................................................................................. 5
Installing Filter Cartridge.................................................................................................................................................... 7
Filter Cartridge Life / Replacement.................................................................................................................................... 7
Repair Parts ........................................................................................................................................................................ 10
Before You Start
C Read all steps and guides carefully before installing and using your undersink drinking water filter
system. Follow all steps exactly to correctly install. Reading this manual will also help you to get all
the benefits from the undersink drinking water filter system.
C Do not use with water that is microbiologically unsafe or of unknown quality without ade
quate disinfection before or after the system. This system is certified for cyst reduction and may
be used on disinfected waters that may contain filterable cysts.
C All plumbing should be done in accordance with local codes and requirements. In Massachu
setts, plumbing code 248 CMR 3.00 and 10.00 shall be adhered to. Consult with your licensed
plumber.
C The undersink drinking water filter system works on water pressures of 30 psi (minimum) to 125
psi (maximum). If your house water pressure is over the maximum, install a pressure reducing valve
in the water supply pipe to the filter system.
C Do not install the undersink drinking water filter system outside, or in extreme hot or cold tempera
tures. Temperature of the water supply to the undersink drinking water filter system must be between
40°F and 100°F. Do not install on hot water.
Min. - Max. Supply Water Pressure
Min. - Max. Supply Water Temperature
Inlet - Outlet
3/8” quick connect fittings and tubing included
30- 125 psi (207 - 862 kPa)
40 - 100 °F (4 - 38 °C)

Parts of the System
filter system assembly including mounting bracket and screws
water supply fitting
filtered water faucet for sink or countertop mounting
3/8” tube benders
3/8” tubing to make all needed connections
Materials and Tools Needed
NOTE: Gather the requiredtools before starting installation. Read andfollow the instructions
provided with any tools listed here.
IMPORTANT: To avoid damaging the sink, consult a qualified plumber or installer for drilling
procedures in porcelain or stainless steel.
• slotted and Phillips screwdrivers
• pliers and adjustable jaw wrench
• tubing cutter
• electric drill and 1-3/8” drill bit if mounting hole is needed for the faucet
Typical Undersink Installation
Locate the water filter housing on the cold water supply pipe, under the kitchen and/or bathroom sink,
to filter the cold drinking water. Refer to the following drawing.
benders to prevent kinking.
Figure 1
NOTE: Aiiow a minimum space of 1-1/2” under the system for
removing the housings (to change the cartridges).
Installation Steps
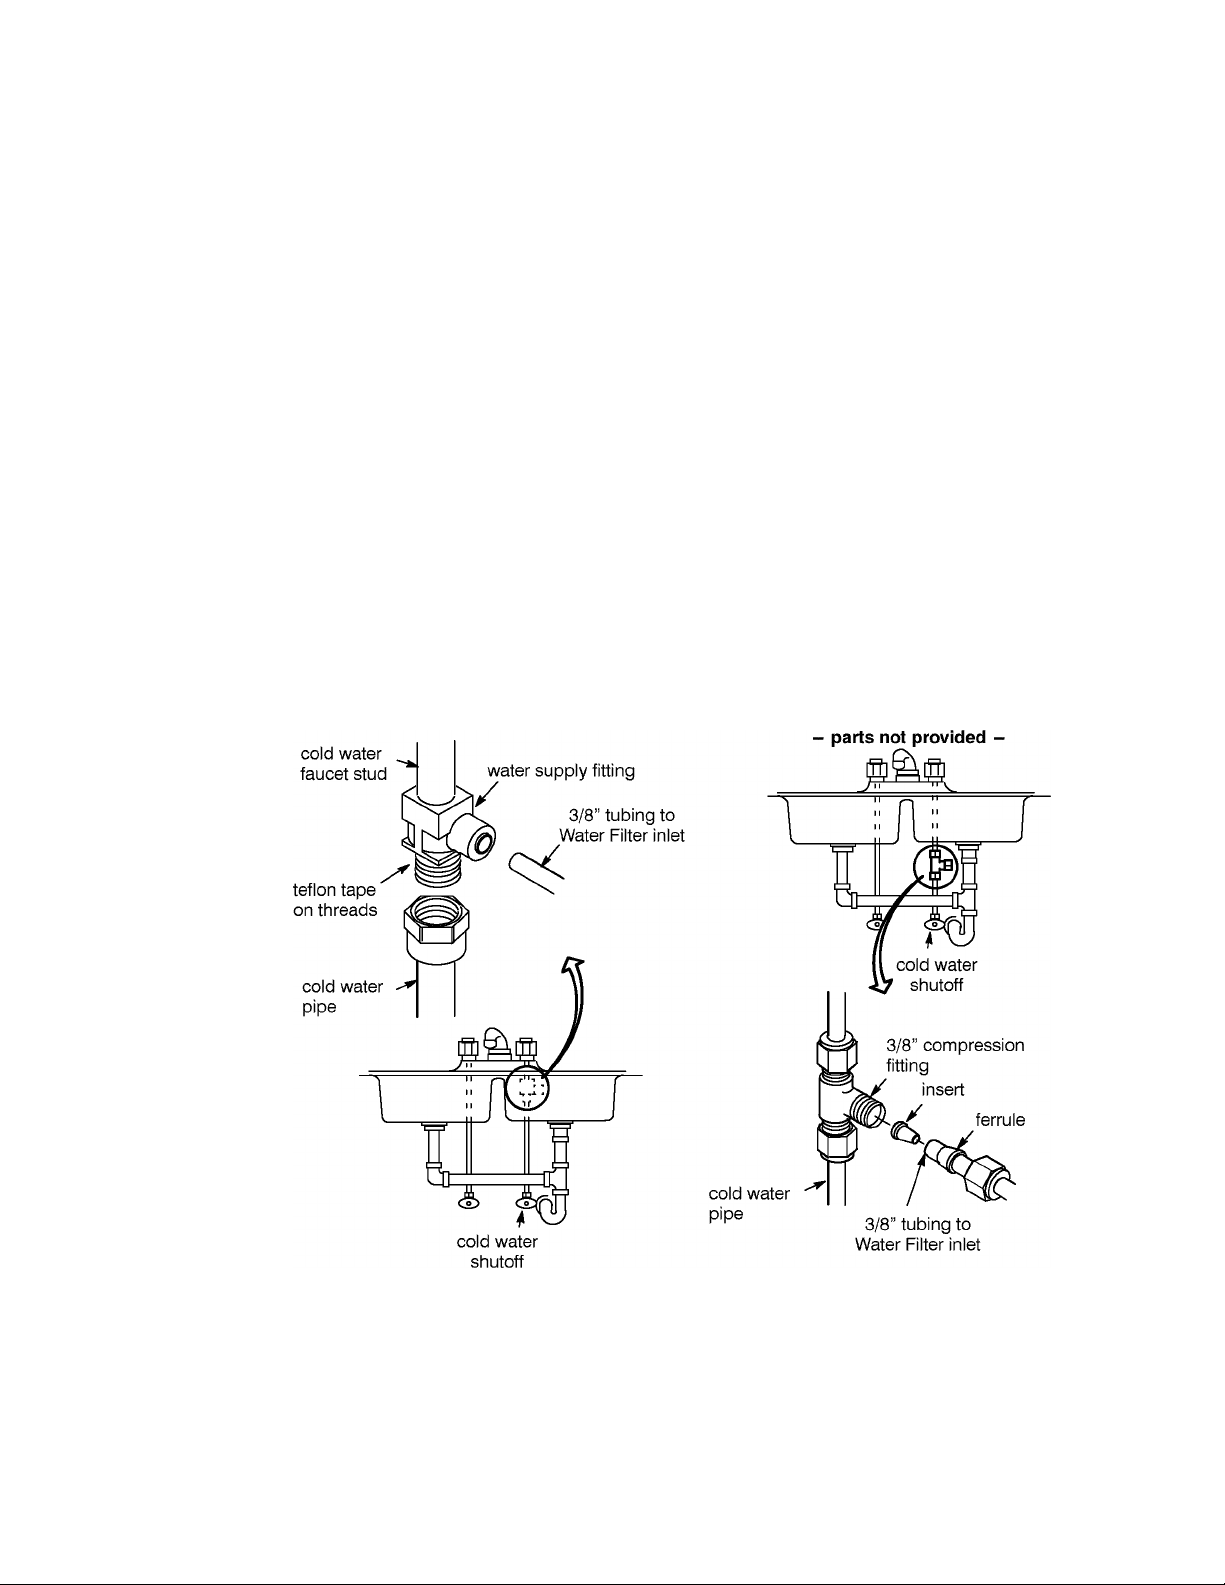
Step 1 - Cold Water Supply Fitting
Check and comply with local plumbing codes as you plan, then install a cold feed (supply) water fitting.
The fitting must provide a leak-tight connection to the water filter 3/8” tubing. A typical connection
using the included water supply fitting is shown in Figure 2A. An optional connection using standard
plumbing fittings (not included) is shown in Figure 2B.
Cold Water Supply Fitting
1. Close the house main water shutoff valve and open faucets to drain water from the sink cold water
pipe.
2. Remove nut that connects the cold water faucet to cold water plumbing.
3. Thread water supply fitting onto pipe and reconnect nut to bottom of fitting.
Optional Pipe Fittings (compression type shown)
NOTE: Be sure to turn off the water supply and open a faucet to drain the pipe.
Install a fitting on the cold water pipe to adapt 3/8” OD tubing. A typical connection is shown in Figure
2B. If threaded fittings are used, be sure to use pipe joint compound or Teflon tape on outside threads.
A. Water supply connect! on B. Water supply typical connection
(using compression fitting)
Figure 2
 Loading...