

WHIRLPOOL WHE39392 T User Manual
GB
DIAGRAM OF THE APPLIANCE (Fig. 1)
A. Handle.
B. Safety lock (if provided).
C. Gasket.
D. Separator (if provided).
E. Defrost water drain plug.
F. Control panel.
G. Side motor cooling grille.
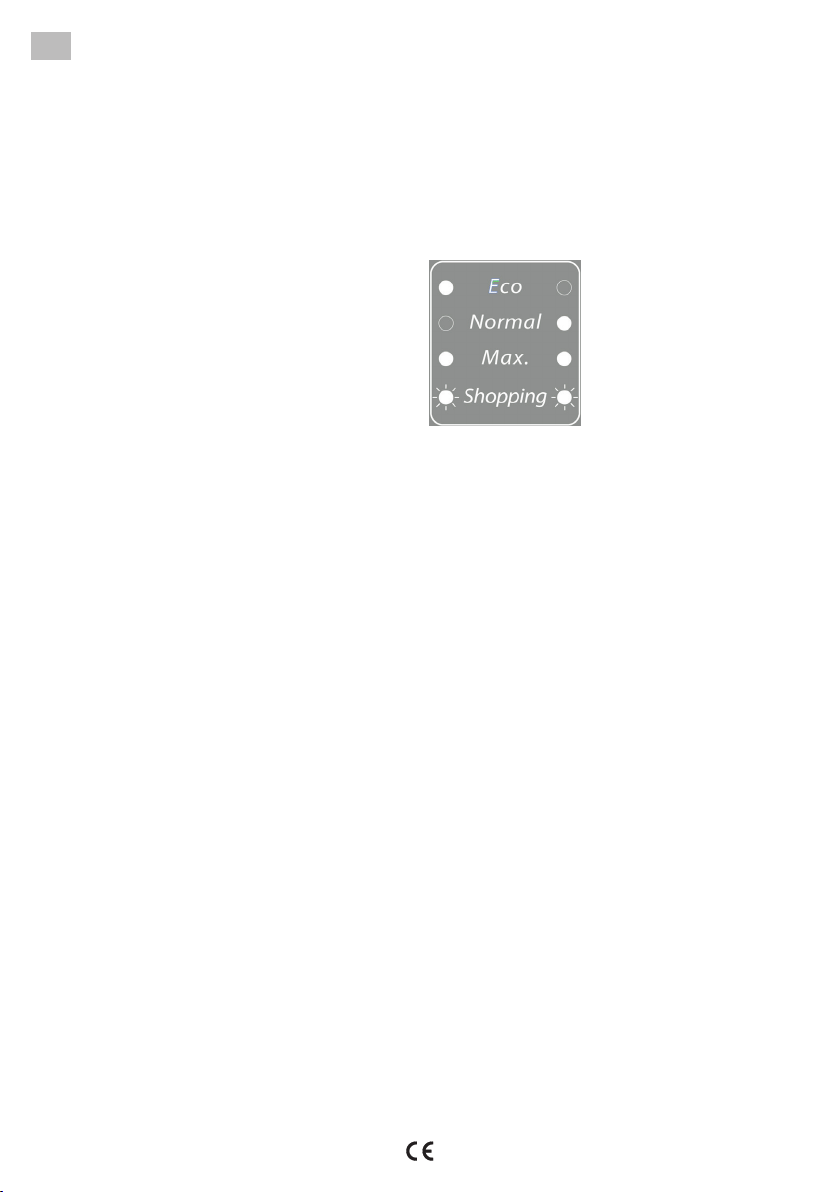
DIAGRAM OF THE CONTROL PANEL (Fig. 2)
1. Red indicator lamp: ashes to indicate an alarm
condition (see section “TROUBLESHOOTING GUIDE”).
2. Yellow indicator lamp: when on, indicates that the
Turbo freeze function has been activated (see section
“TURBO FREEZE FUNCTION”).
3. Green indicator lamps: indicate that the appliance in
ON, the set temperature and activation of the fast freeze
function (“Shopping”).
4. Setting button: to update the set temperature, to
activate/deactivate the fast freeze function (“Shopping”)
and to activate/deactivate the “Turbo freeze” function.
INSTALLATION
• Unpack the appliance.
• Remove the 4 spacers inserted between the door
and the appliance. (Fig. 3)
• Make sure the defrost water drain plug (if provided) is
correctly positioned (E).
• For optimum appliance operation and to avoid damage
when the door is opened, leave a space of at least 7 cm
from the rear wall and 7 cm at the sides. (Fig. 4)
• Fit the accessories (if provided).
• Clean the inside of the appliance before using it.
SWITCHING ON THE APPLIANCE
• Plug in the appliance.
• The green LED lights up (“Normal”).
• The red LED ashes to indicate that the temperature
inside the appliance is not yet suciently low for food
storage. The red LED will normally switch o within the
rst six hours after the appliance is switched on.
• Place food inside the product only when the red LED
has switched o.
Note: As the seal is tight, the appliance lid cannot be
reopened immediately after closing. Wait a few minutes
before re-opening the lid of the appliance.
• This appliance features “skin condenser”
technology: the condensing unit is integrated into
the walls of the freezer. For this reason the side and
front walls of the product may become hot while
the product is running. This is entirely normal and
also reduces the risk of condensation forming in
particularly critical environmental conditions (see
paragraph “Troubleshooting guide”).
INSTRUCTIONS FOR USE
TEMPERATURE ADJUSTMENT
lect the desired temperature using the button (4).
To adjust the internal temperature, proceed as follows:
• Press button (4) as required. With each touch of the
button, the set temperature is updated, toggling between
the values “Eco”, “Normal”, “Max” and “Shopping”.
• Select “Max” for a colder storage temperature.
• When the appliance is only partially full, it is advisable
to select “Eco” to optimize energy consumption.
The green indicator lamps (3) indicate the selected setting
according to the following diagram:
Eco: least cold temperature
(left indicator lamp lit).
Normal: intermediate
temperature
(right indicator lamp lit).
Max: extra low temperature
(both indicator lamps lit).
Shopping: Fast Freezing
(both indicator lamps lit). See
section “Freezing fresh food”.
Note: In the event of a power failure, the settings (except
for the “Turbo Freeze” function) remain memorised. The
time required for the freezer to reach the set temperature
depends on climatic conditions and the temperature setting
selected.
TURBO FREEZE FUNCTION
The Turbo Freeze function enables a reduction of up to
50% in the time required to freeze fresh food placed inside
the basket provided.
To use the function, proceed as follows:
1. Position the basket provided to the right of the adhesive
sticker shown in the gure.
2. The basket comes complete with a separator panel,
which splits the basket it into 2 areas. The smaller area
of the basket (to be positioned below the fan), must be
left empty in order to allow the fan to operate properly.
Place the food to be frozen in the larger section of
the basket (to be positioned towards the front of the
appliance).
3. Close the lid.
4. Activate the Turbo Freeze function from the control
panel, holding down button (4) for around 3 seconds.
The yellow indicator lamp (2) lights up. The lit yellow
indicator lamp (2) indicates that the function is active.
The function is deactivated automatically after the
time required to freeze food properly has elapsed
(approx. 6 hours).
When the Turbo Freeze indicator lamp switches o, it
means that the function is no longer active, and that food
can be removed from the basket. When the function is
deactivated, the yellow indicator lamp (2) switches o and
the previously selected temperature setting is restored.
Note:
- When the function is active, it is perfectly normal for the
appliance to produce a more audible running noise.
- When the function has been activated, it can be
deactivated manually by pressing button (4) again for
around 3 seconds.
1
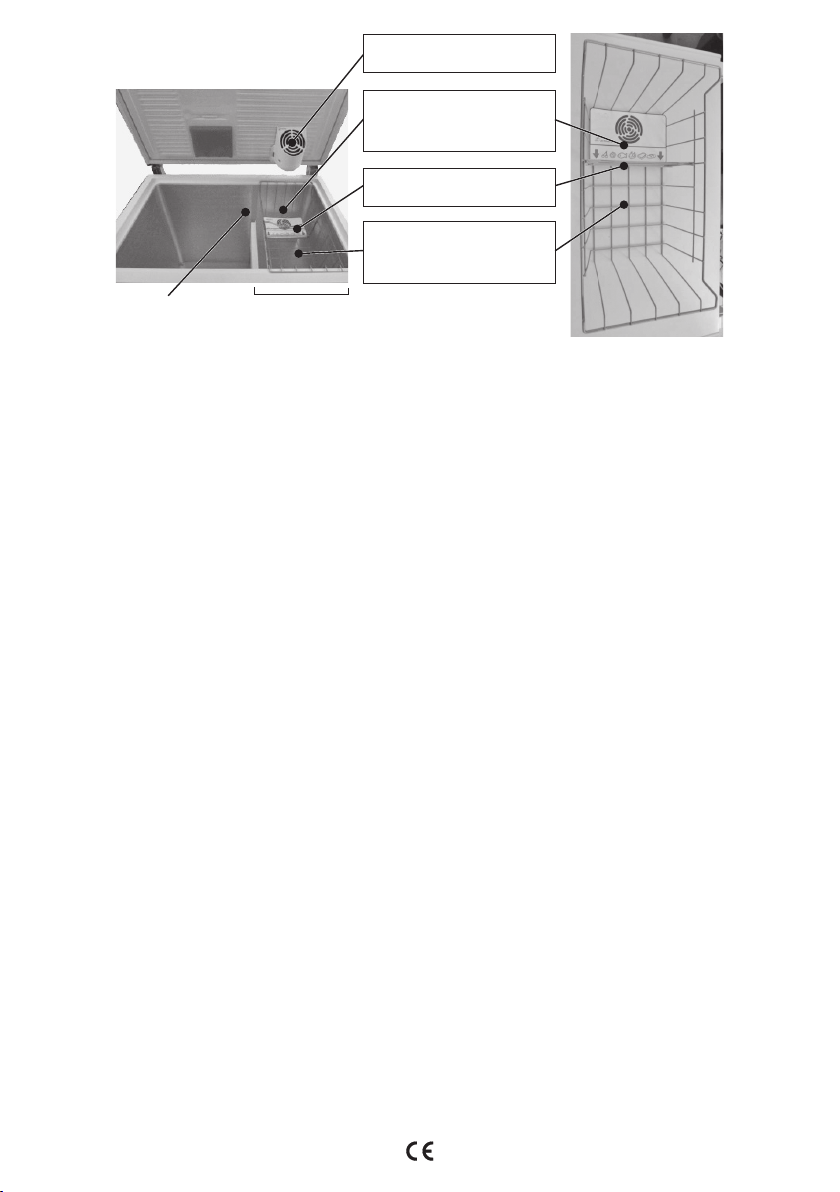
Turbo Freeze Fan
Small area of basket
(for fan only)
Basket separator panel
Large area of basket
(for food to be frozen)
Adhesive sticker
for basket
positioning
Basket area
FREEZING FOOD
Preparing fresh food for freezing
• Wrap and seal fresh food in: aluminium foil, cling lm,
air and water-tight plastic bags, polyethylene containers
with lids, provided they are suitable for freezing foods.
• Food must be fresh, mature and prime quality.
• Fresh vegetables and fruit should preferably be frozen
as soon as they are picked to maintain the full original
nutritional value, consistency, colour and avour.
• Always leave hot food to cool before placing in the
appliance.
Freezing fresh food
• Place foods to be frozen in direct contact with the walls
of the appliance:
A) - food to be frozen,
B) - food already frozen.
• Avoid placing foods to be frozen in direct contact with
food already frozen.
• For better and faster freezing, foods should be split into
small portions; this will also be useful when the frozen
items are to be used.
1. At least 24 hours before storing fresh food in the
appliance, activate fast freezing (“Shopping”) by
repeatedly pressing button (4) until both green indicator
lights (3) ash.
2. Place the food to be frozen inside the appliance and
keep the lid closed for 24 hours. Food will be fully frozen
after this period of time.
The fast freezing function (“Shopping”) can be deactivated
by pressing button (4) and selecting a dierent temperature
setting.
If the function is not deactivated manually, the appliance
automatically deactivates the function after 50 hours,
restoring the last setting selected (which was active for at
least 1 minute) before the “Shopping” setting was selected.
FOOD STORAGE
Refer to the table on the appliance.
Classication of frozen foods
Load and classify the frozen foods; it is advisable
to indicate the storage date on the packs, to ensure
consumption before the expiry dates listed in months in
Fig. 6 for each type of food.
Advice for storing frozen food
When buying frozen food, make sure that:
• The packaging is intact (food in damaged containers
may have deteriorated). If a package is swollen or has
damp patches, the product may not have been stored
in optimum conditions and therefore undergone partial
2
defrosting.
• When shopping, leave frozen food purchases until last
and carry them in a thermally insulated bag.
• On arriving home, immediately place the frozen food in
the appliance.
• Avoid or minimise temperature variations. Observe the
expiry date on the packaging.
• Always follow the storage instructions on frozen food
packages.
Note:
• Eat fully or partially defrosted foods immediately.
Do not refreeze unless the food is cooked after it
has thawed. Once cooked, the food can be refrozen.
• In case of a prolonged power failure: Do not open
the appliance door, except to place ice packs
(if provided) over the frozen foods on the right and
left side of the appliance. This will slow down the
rise in temperature.
APPLIANCE DEFROSTING
The appliance should be defrosted when the thickness of
ice on the walls reaches 5-6 mm.
• Disconnect the appliance from the power supply.
• Remove food from the appliance and put it in a very
cool place or a thermally insulated bag.
• Leave the appliance door open.
• Remove the internal defrost water drain plug
(depending on model) (Fig. 8).
• Remove the external defrost water drain plug
(depending on model) and reposition it as shown in
g. 8.
• Use the separator (depending on model) inside the
product as a recipient for any remaining water, (D) as
shown in g. 8. If there is no separator, use a shallow
container.
• Defrosting can be sped up by using a spatula to detach
the frost from the appliance walls.
• Remove the frost from the bottom of the appliance.
• In order to avoid permanent damage to the
appliance interior, do not use pointed or sharp
metal instruments to remove the ice.
• Do not use abrasive products or heat up the
interior articially.
• Dry the inside of the appliance thoroughly.
• Ret the plug after defrosting.
HANGING THE LID LIGHT BULB (if provided)
• Disconnect the appliance from the mains power supply.
• Remove the diuser by following the sequence of steps
 Loading...