

Whirlpool WFW82HEDW, WFW83HEDCB Use & Care Guide
Use & Care Guide
Guide d’utilisation et d’entretien
Front-Loading Automatic Washer
Laveuse automatique à chargement frontal
W10656457B
W10656476B - SP
Para obtener acceso al
Manual de uso y
cuidado en español, o para
obtener información adicional
acerca de su producto, visite:
www.whirlpool.com
If you have any problems or questions, visit us at www.whirlpool.com
Designed to use only HE
High Efficiency detergents.
Conçue pour l’utilisation
d’un détergent haute
efficacité seulement.
Table of Contents
WASHER SAFETY ...................................................................2
ACCESSORIES ........................................................................ 3
CONTROL PANEL AND FEATURES ......................................4
USING THE DISPENSER DRAWER .......................................6
CYCLE GUIDE ......................................................................... 7
USING YOUR WASHER ..........................................................9
WASHER MAINTENANCE ....................................................13
TROUBLESHOOTING ........................................................... 16
WARRANTY ...........................................................................23
ASSISTANCE OR SERVICE ..................................Back Cover
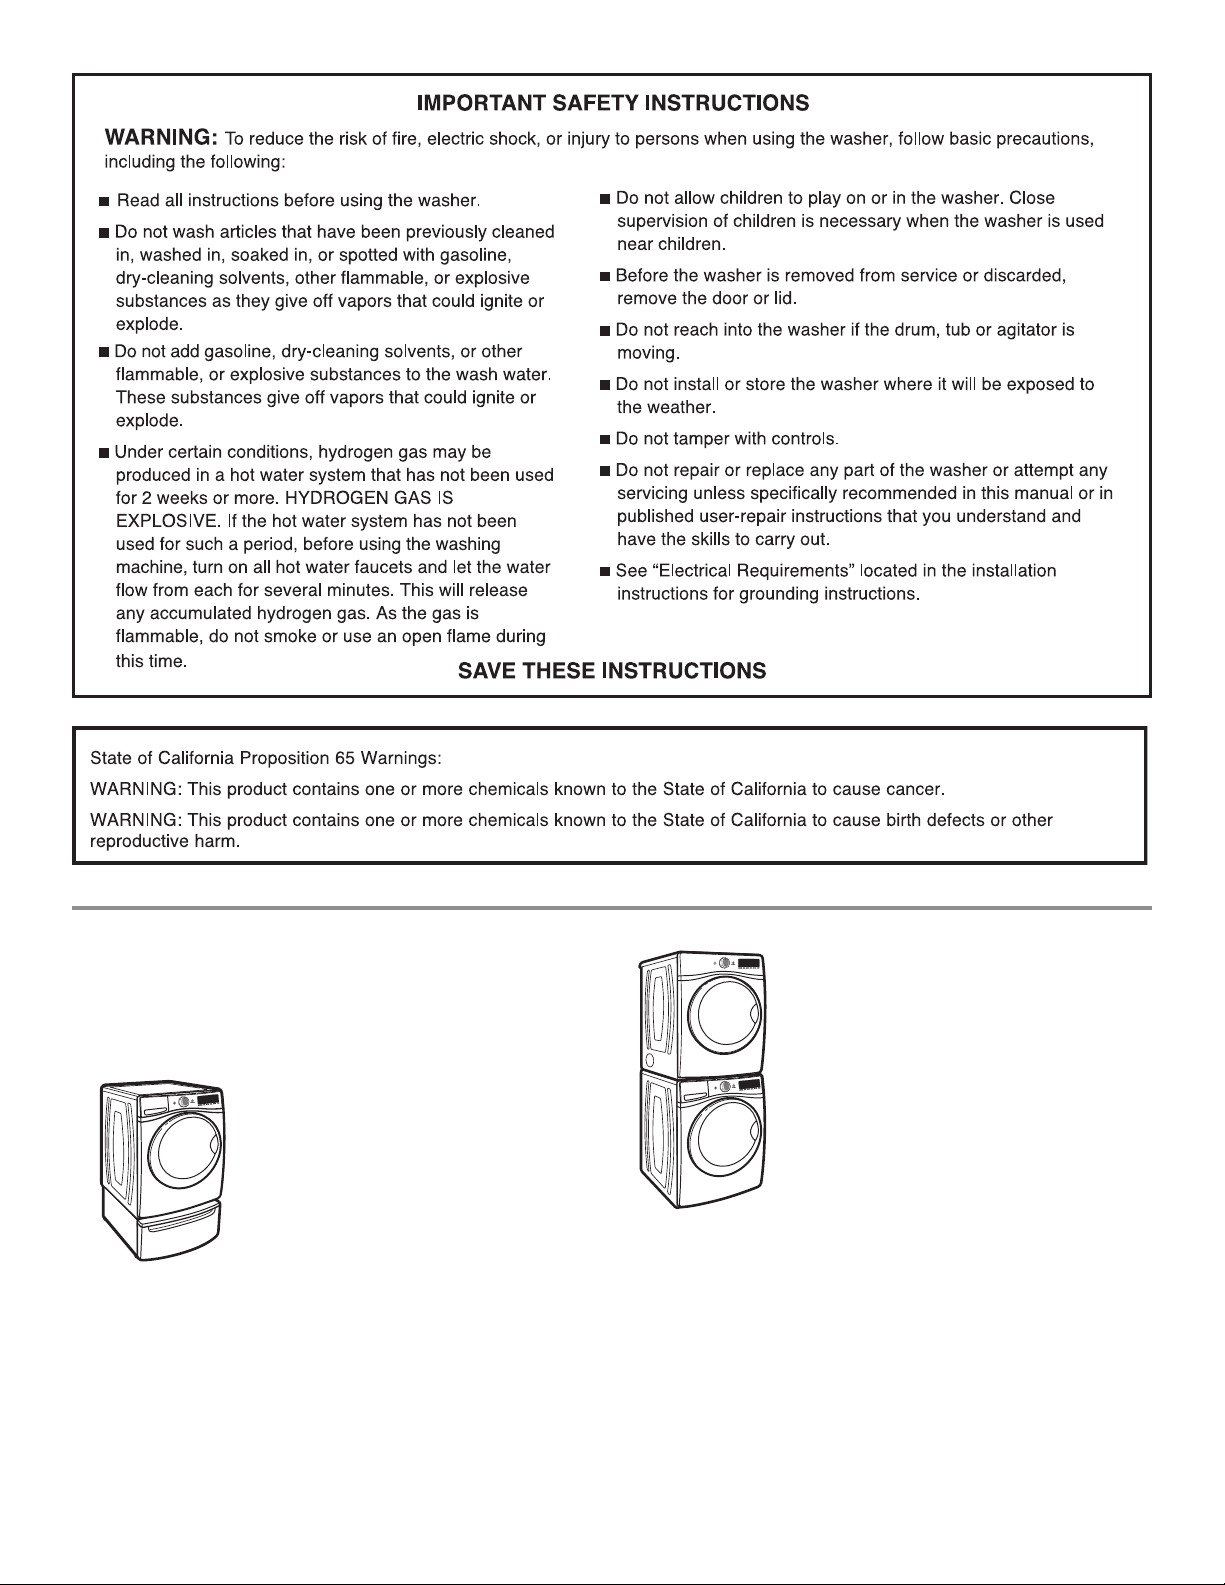
Washer Safety
Table de matières
SÉCURITÉ DE LA LAVEUSE ................................................24
ACCESSOIRES ...................................................................... 25
TABLEAU DE COMMANDE ET CARACTÉRISTIQUES .......25
UTILISATION DU TIROIR DU DISTRIBUTEUR ...................29
GUIDE DES PROGRAMMES ................................................ 30
UTILISATION DE LA LAVEUSE ............................................ 33
ENTRETIEN DE LA LAVEUSE ..............................................35
DÉPANNAGE .........................................................................38
GARANTIE ............................................................................. 46
ASSISTANCE OU SERVICE ...................... Couverture arrière
2
Accessories
Customize your new washer and dryer with the following
genuine Whirlpool accessories. For more information on
options and ordering, call 1-800-442-9991, or visit us at:
www.whirlpool.com/accessories. In Canada, call
1-800-807-6777 or visit us at www.whirlpool.ca.
15" Pedestal
Color-matched pedestals raise the
washer and dryer to a more comfortable
working height. The large drawer
provides convenient storage.
Stack Kit
If space is at a premium, the stack kit
allows the dryer to be installed on top
of the washer.
3
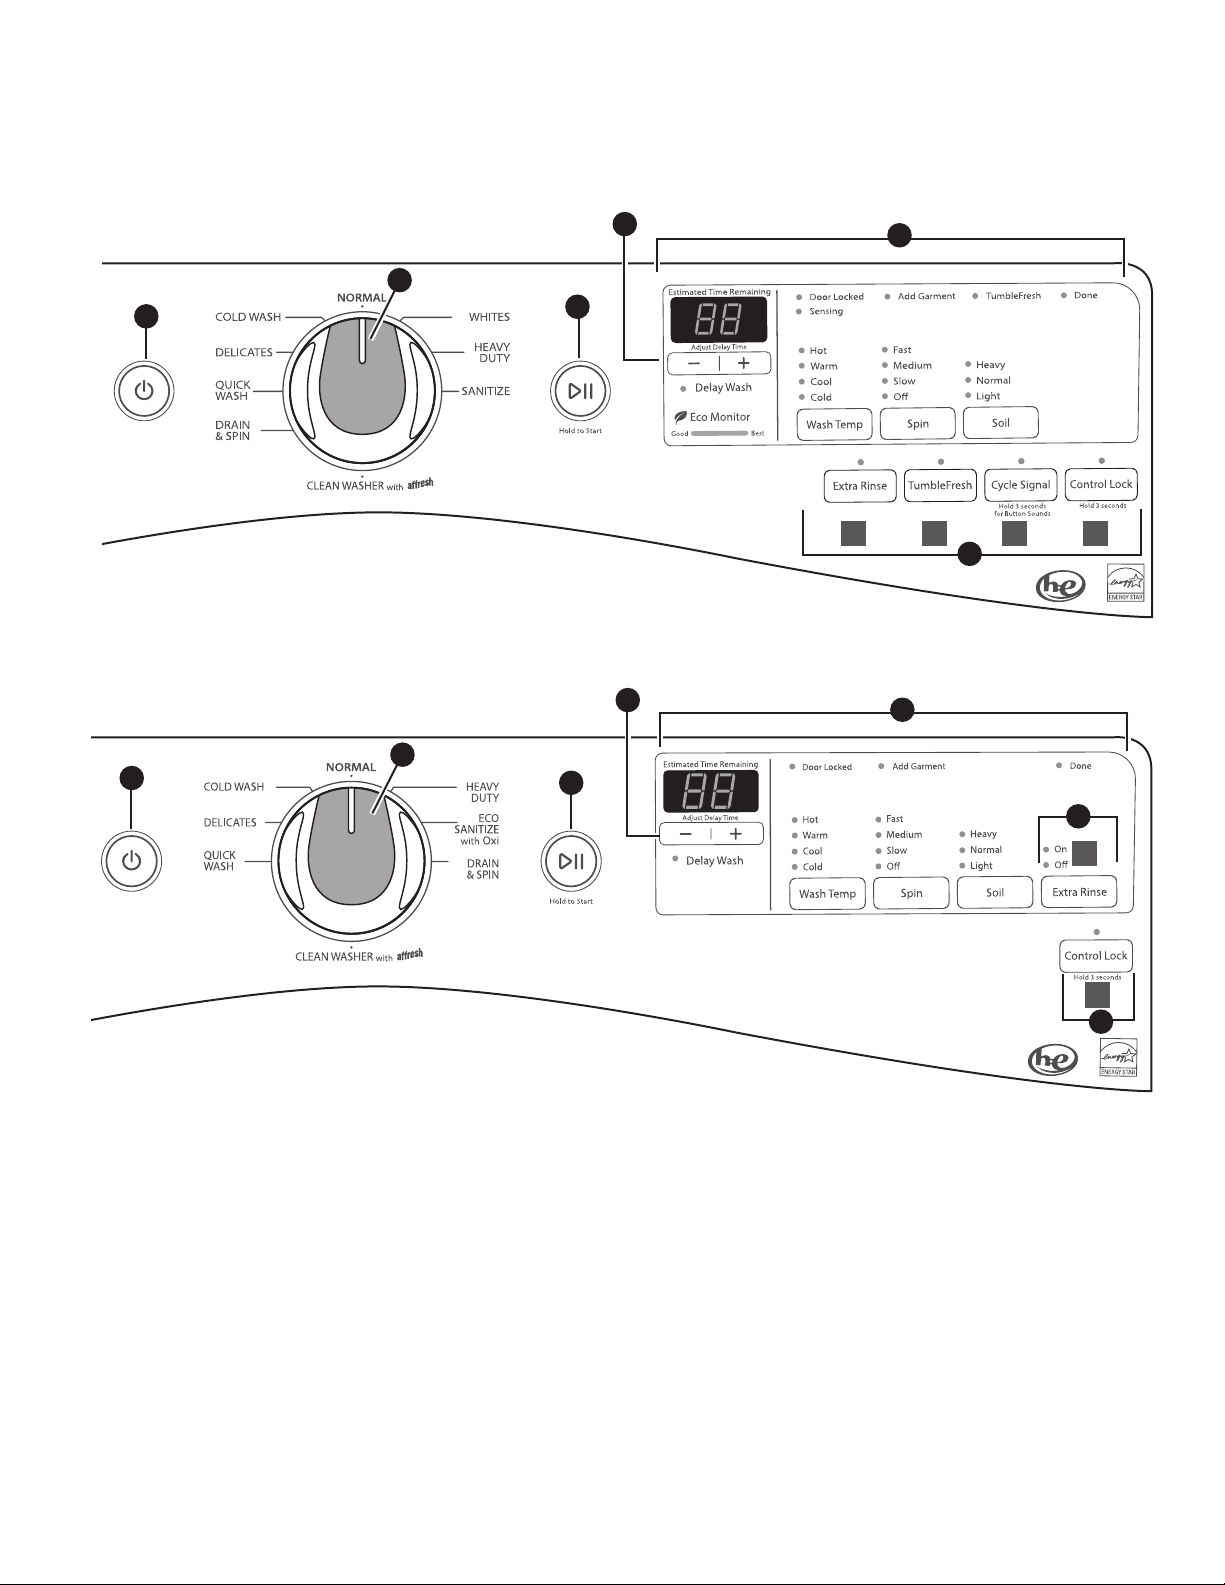
Control Panel and Features
Not all features and cycles are available on all models.
NOTE: The control panel features a sensitive surface that responds to a light touch of your finger. To ensure your selections are
registered, touch the control panel with your finger tip, not your fingernail. When selecting a setting or option, simply touch its name.
Model WFW81HE
1
Model WFW72HE
1
4
2
3
4
2
3
5
A DCB
6
5
6
A
D
6
4
POWER
1
Touch to turn the washer on and off. Touch to stop/cancel
a cycle at any time.
NOTE: Turning the Wash Cycle knob will also turn the
washer on.
WASH CYCLE KNOB
2
Turn the knob to select a cycle for your laundry load.
See “Cycle Guide” for detailed descriptions of cycles.
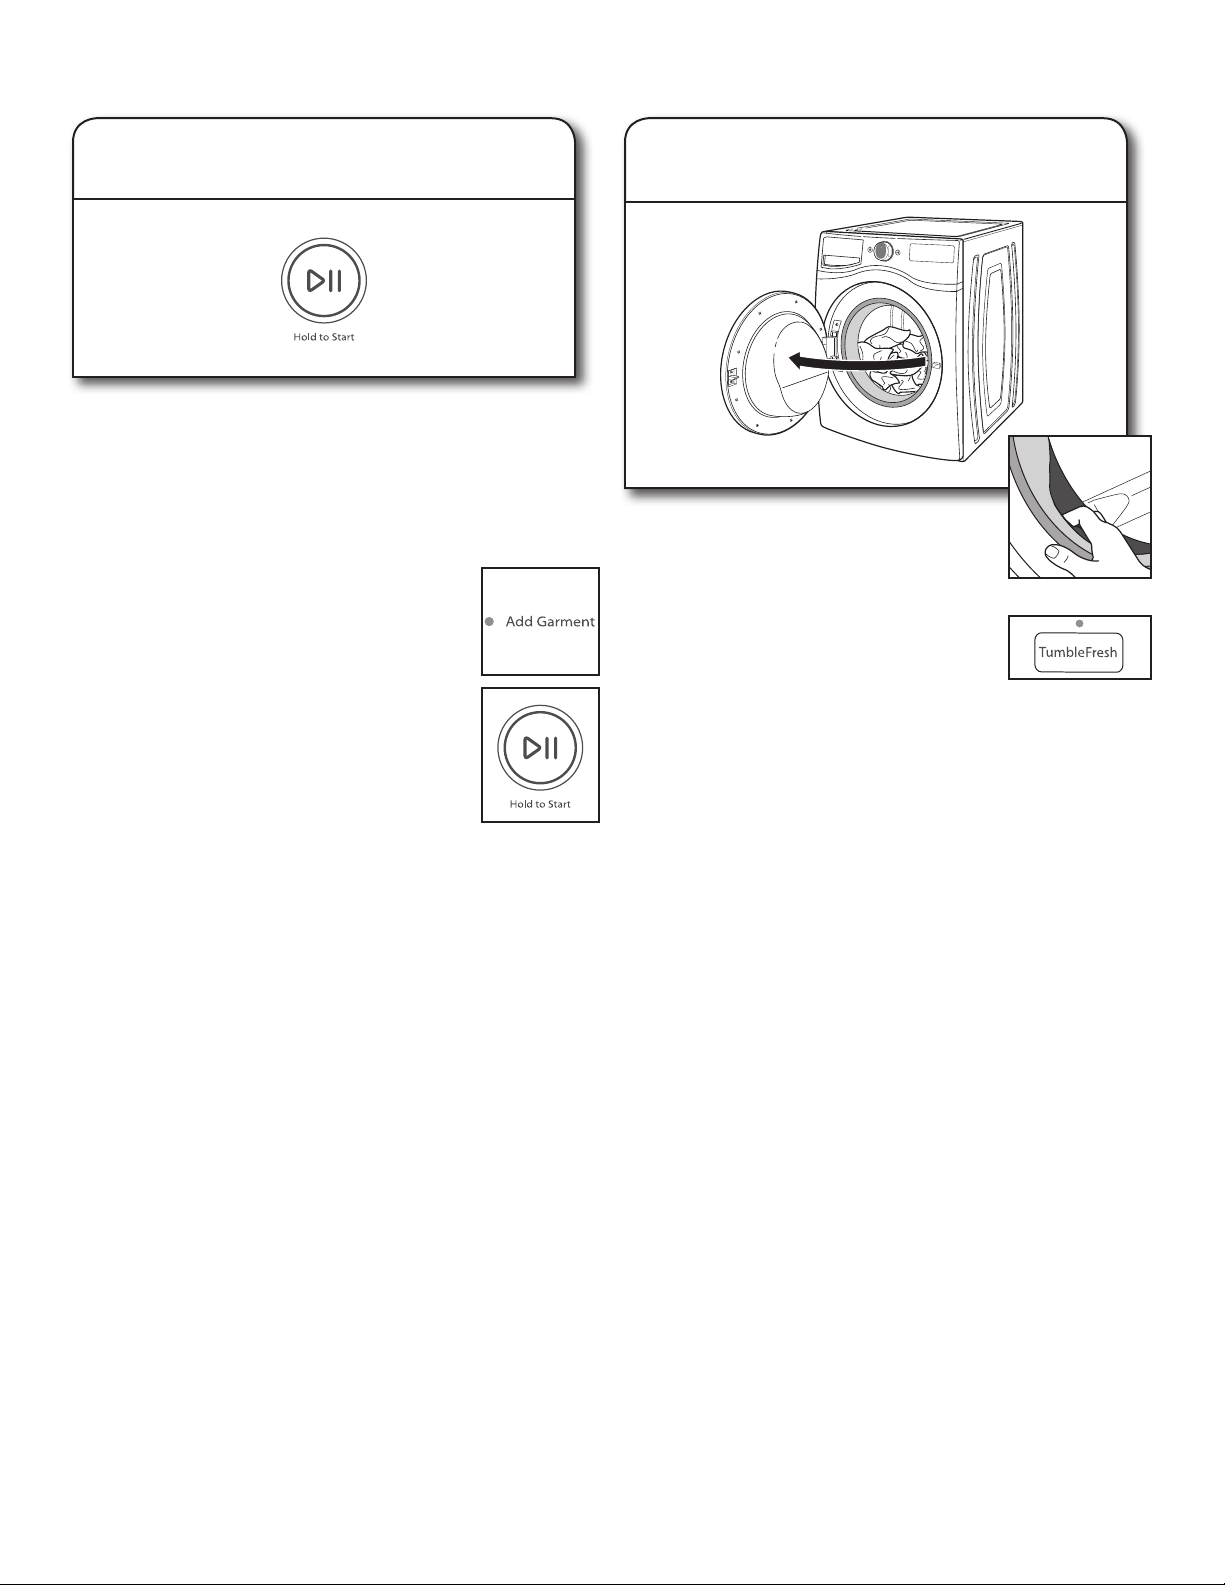
START
3
Touch and hold until the light above START comes on to start
a cycle, or touch once while a cycle is in process to pause it.
If you want to add a garment, you can touch START when the
“Add Garment” LED is on.
DELAY WASH
4
Use + and – to delay the start of the wash cycle by up to
12 hours. To turn off Delay Wash, use + and – to set the delay
time to “0,” or touch POWER.
LED DISPLAY AND SETTINGS
5
When you select a cycle, its default settings will light up and
the Estimated Time Remaining will be displayed (for times
longer than 60 minutes, hours will be displayed, followed
by minutes). Factors such as load size, wash temperature,
and water pressure may affect the time shown in the display
during the cycle. Tightly packing garments, unbalanced loads,
or excessive suds may cause the washer to adjust the cycle
time, as well.
Touch the desired setting along the bottom of the display to
adjust. See “Cycle Guide” for available settings on each cycle.
Not all settings are available with all cycles.
Cycle Status Lights
For details, see “Cycle Status Lights” section on the
next page.
Wash Temp
The recommended wash temperature is preset for each
cycle. You may also select a wash temperature based
on the type of fabric and soils being washed. For best
results, follow the garment label instructions. All wash
temperatures feature a cold rinse.
Spin
This washer automatically selects the spin speed based on
the cycle selected. Some preset speeds can be changed.
• Faster spin speeds mean shorter dry times, but may
increase wrinkling in your load.
• Slower spin speeds reduce wrinkling, but will leave
your load more damp.
Soil
The Soil setting (wash time) is preset for each wash
cycle. For most loads, use this preset soil level. When
you change the soil setting, the cycle time will increase
or decrease in the Estimated Time Remaining display.
For heavily soiled and sturdy fabrics, use the Soil setting
to select more wash time. For lightly soiled and delicate
fabrics, use the Soil setting to select less wash time. Lower
soil level settings will help reduce tangling and wrinkling.
OPTIONS
6
Touch to activate additional wash options or additional
features on the washer. Not all options are available on all
models.
Extra Rinse
A
Activate this option to add an extra rinse to most cycles.
TumbleFresh™ Option
B
The TumbleFresh™ option will periodically tumble
the load after the end of the cycle for up to 6 hours
to reduce humidity. To turn on the TumbleFresh™ option,
touch TumbleFresh. If, however, the TumbleFresh™ option
is turned on, it will stay on for all future cycles until turned
back off – the washer remembers the last on/off status
set. To turn off the TumbleFresh™ option, touch
TumbleFresh.
You may also activate the TumbleFresh™ option without
running a cycle by touching and holding POWER for one
second, then touching and holding TumbleFresh for 3
seconds, and then touching and holding START for 3
seconds.
To turn off the TumbleFresh™ option when it is running,
touch POWER.
NOTE: The door will lock while the TumbleFresh™ option
is active. To cancel the option and unlock the door, touch
POWER.
Cycle Signal
C
Use this option to turn on or off the signal that sounds
at end of cycle.
To turn off the tones that sound when a setting is
touched: Touch and hold CYCLE SIGNAL for about
3 seconds. Repeat to turn them on.
Control Lock
D
Touch and hold for 3 seconds to lock the controls
to avoid unwanted changes or operation. Touch and
hold 3 seconds again to unlock. For each second
CONTROL LOCK is held down, the display will count
down one second: you will see “3,” then “2,” then “1.”
You can still touch START to pause the cycle, or touch
POWER to turn off the washer.
7
A
7
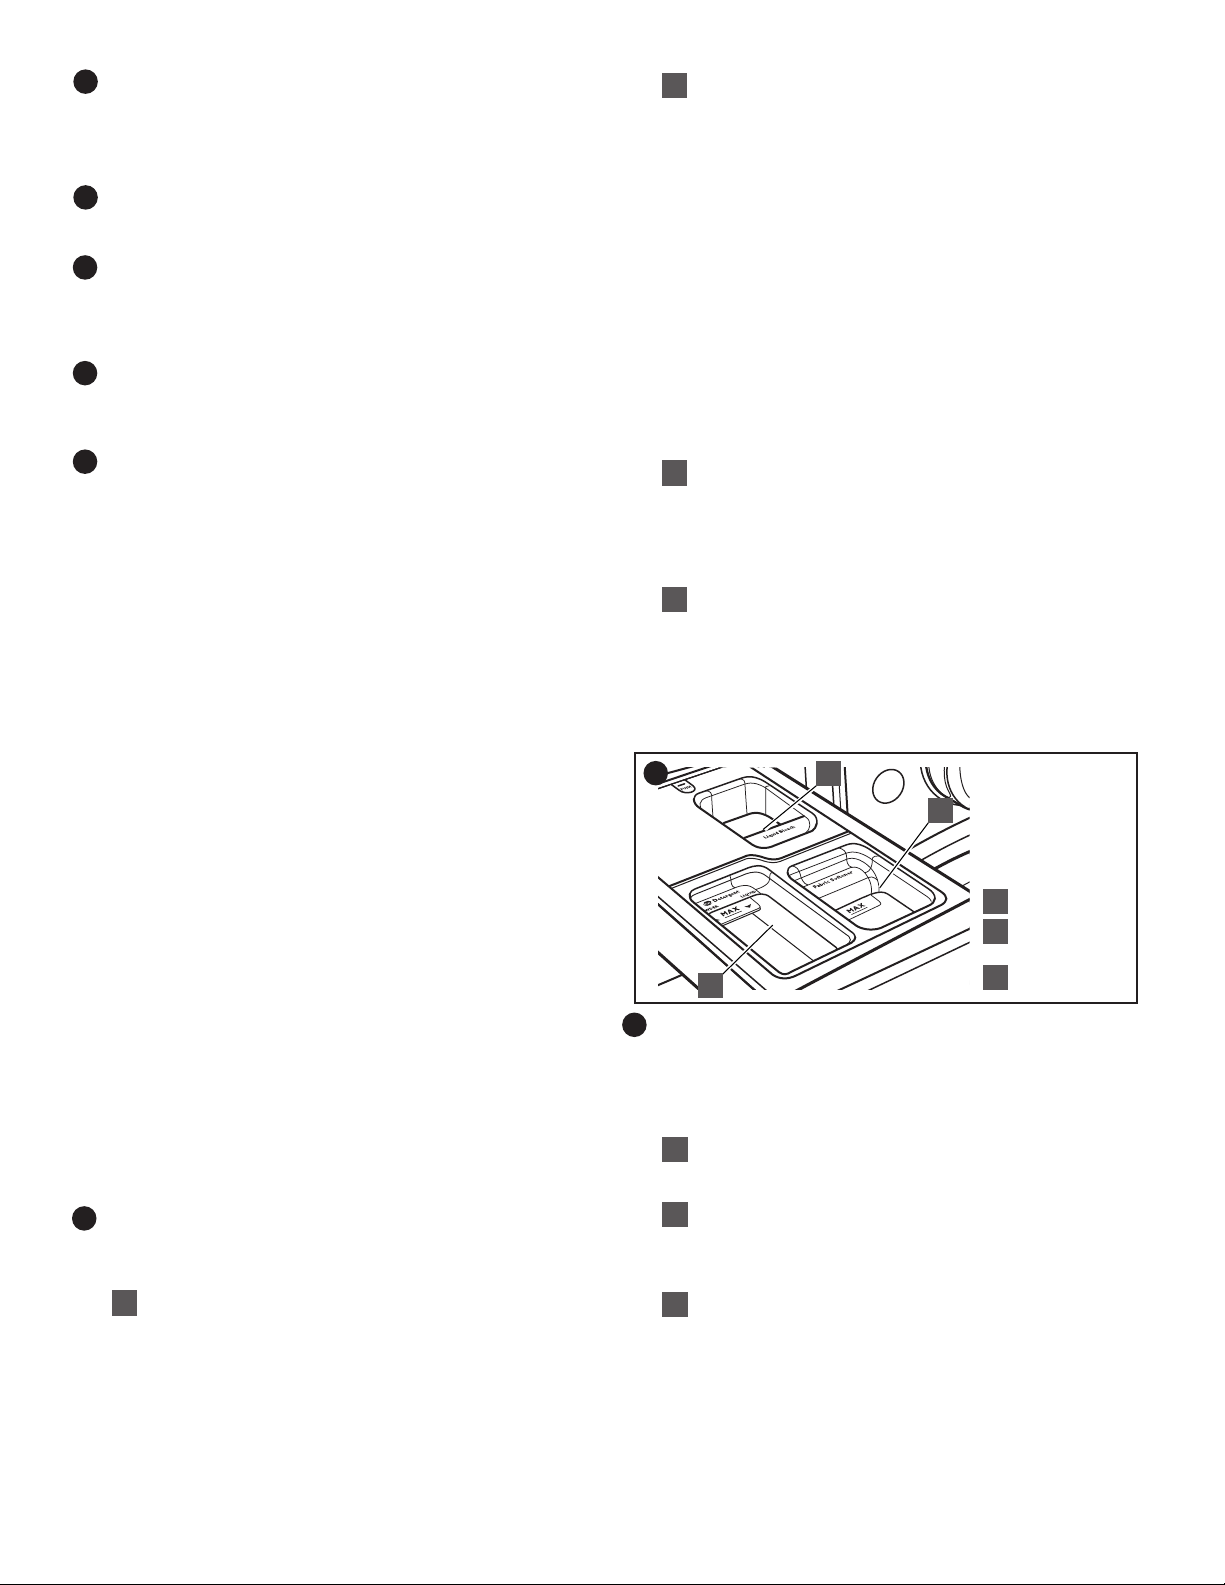
DISPENSER DRAWER
C
B
HE detergent
A
B
Liquid fabric
softener
Chlorine bleach
C
The dispenser drawer gives you the convenience of
automatically adding HE detergent, liquid chlorine bleach,
and liquid fabric softener to the wash load at the proper time.
See “Using the Dispenser Drawer” for information on using
the dispenser drawer.
High Efficiency “HE” detergent compartment
A
This compartment holds liquid or powdered HE detergent
for your main wash cycle.
Liquid fabric softener compartment
B
Automatically dilutes and dispenses liquid fabric softener
at the optimum time in the cycle.
n
Use only liquid fabric softener in this dispenser.
Liquid chlorine bleach compartment
C
Automatically dilutes and dispenses liquid chlorine bleach
at the optimum time during the first rinse after the wash
cycle. This compartment cannot dilute powdered bleach.
5
Control Panel and Features
Choosing the Right Detergent
Use only High Efficiency detergents. The package will be marked
“HE” or “High Efficiency.” Low-water washing creates excessive
sudsing with a non-HE detergent. Using non-HE detergent
will likely result in longer cycle times and reduced rinsing
performance. It may also result in component failure and, over
time, buildup of mold or mildew. HE detergents are low-sudsing
and quick-dispersing to produce the right amount of suds for
the best performance. They hold soil in suspension so it is not
re-deposited onto clean clothes. Follow the manufacturer’s
instructions to determine the amount of detergent to use.
TumbleFresh™ option
The TumbleFresh™ indicator will light when the TumbleFresh™
option is active. During this time, the washer will occasionally
tumble the load.
Done
Once the cycle is complete, this light will come on. Remove
the load promptly for best results. The Done indicator is also
lit during the TumbleFresh
Eco Monitor
The Eco Monitor allows you to see how the settings you select
affect your energy savings. To use the Eco Monitor, choose
the best cycle, temperature, spin speed, soil level, and options
for the fabrics being washed. The Eco Monitor will rate the
water and energy use of those selections, from Good to Best.
You can then adjust the settings and options to decrease the
amount of energy used within that cycle.
™
option.
Use only High Efficiency (HE) detergent.
Cycle Status Lights
Model WFW81HE shown
NOTE: Not all Cycle Status Lights are available on all models.
Delay Wash
If a Delay Wash is set, the Delay Wash indicator will light and
the delay time will count down in the display.
Door Locked
Door Locked will light to indicate that the door is locked and
cannot be opened without first pausing or canceling the cycle.
Sensing
When START is touched, the washer will first perform a
self-test on the door lock mechanism and the sensing light
will come on. You will hear a click, the drum will make a partial
turn, and the door will click again as it unlocks briefly. The
door will click one more time when it locks again.
Once the door has locked the second time, the washer will
drain to calibrate the sensors; then it will begin tumbling and
adding water. The sensing process will continue throughout
the cycle. You may also hear water flowing through the
dispenser, adding detergent to the load.
After the load size is sensed, the estimated time based on
load size will be displayed. The actual cycle time may be
lengthened; however, the display will continue to show the
estimated time.
The sensing light will blink once a second at various times
during the cycle, such as when the washer is reducing extra
suds.
Add Garment
When “Add Garment” is lit, you may pause the washer, open
the door, and add items. Touch and hold START to start the
washer again.
Using the Dispenser Drawer
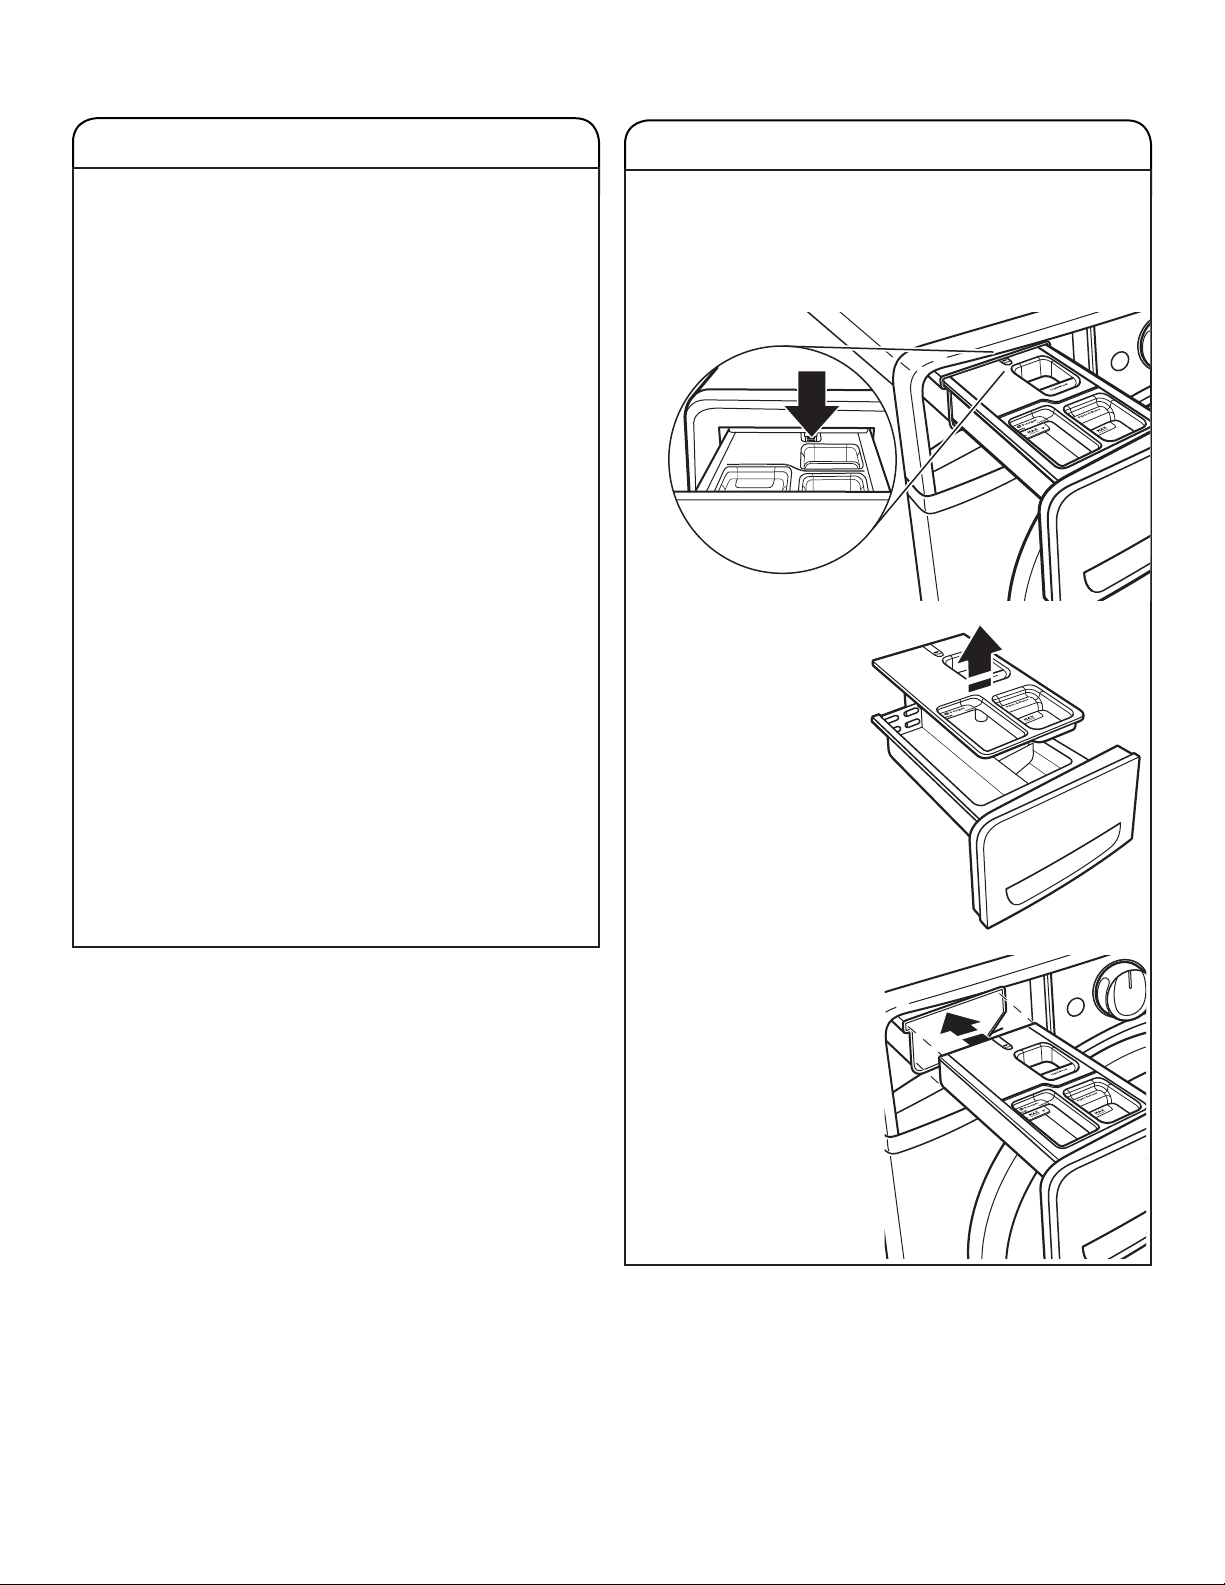
1. Open the dispenser drawer.
2. Add laundry products as described in steps 4–6 in the “Using
Your Washer” section.
3. Slowly close the dispenser drawer. Make sure it is
completely closed.
NOTE: A small amount of water may remain in the dispensers
from the previous wash cycle. This is normal.
Adding HE detergent to dispenser
Selector
HE detergent
compartment
Pour a measured amount of HE
detergent into detergent compartment.
For powdered detergent, lift the selector
to the high position. For liquid detergent,
push down the selector to the low
position.
Do not overfill; adding too much
detergent may cause detergent to be
dispensed into the washer too early.
Selector
in high
position
Powdered detergent:
Lift the selector to the high
position.
IMPORTANT:
n Do not add single-dose laundry packet to dispenser
drawer.
n Use powdered detergent when using the Delay Wash
option. Liquid detergent may seep out before the wash
begins.
Liquid detergent:
Push down the selector to
the low position.
Use only High Efficiency
(HE) detergent.
Selector
in low
position
6

Cycle Guide
Settings and options shown in bold are default settings for that cycle. For best fabric care, choose the cycle, options, and settings
that best fit the load being washed. Not all settings are available with each cycle, and some options cannot be used together.
NOTES:
n Not all cycles, temperatures, options, or spin speeds are available on all models.
n All wash temperature selections feature a cold rinse.
Items to wash
using default
cycle settings:
Normally soiled Normal Hot Fast Heavy TumbleFresh™ This cycle combines medium-
cottons, linens, Warm Medium Normal Extra Rinse speed tumbling and a fast-
sheets, and mixed Cool Off Light Delay Wash speed spin. This cycle is
garment loads Cold designed to provide the most
energy efficiency.
Heavily soiled white Whites Hot Fast Heavy TumbleFresh™ Uses a longer wash time with
fabrics and garments Warm Medium Normal Extra Rinse fast-speed tumbling, extra
Cool Slow Light Delay Wash rinsing, and a fast-speed spin
Cold Off to provide optimal cleaning and
rinsing when bleach is used.
Sturdy colorfast Heavy Hot Fast Heavy TumbleFresh™ Fast-speed tumbling and
fabrics and heavily Duty Warm Medium Normal Extra Rinse a fast-speed final spin help
soiled garments Cool Slow Light Delay Wash provide optimal cleaning
Cold Off and reduce drying times.
Clothing, bedding Sanitize Hot Fast Heavy TumbleFresh™ This cycle eliminates 99.99%
and towels requiring Medium Normal Extra Rinse of the most common bacteria
sanitization Slow Light Delay Wash found in clothes, sheets, and
Off towels. Using the highest wash
temperature available ensures
sanitization. Check
wash temperature of your items.
P. aureginosa, and S. aureus.
Eco Hot Fast Heavy TumbleFresh™ This cycle eliminates 99.99%
Sanitize Medium Normal Extra Rinse of the most common bacteria
with Oxi Slow Light Delay Wash found in clothes, sheets, and
Off towels. Using the highest wash
temperature available and
adding a powdered Oxi product
in the drum ensures sanitization.
Check recommended wash
temperature of your items
and use the amount of Oxi
Bacteria tested were K. pneumonia,
P. aureginosa, and S. aureus.
Cycle:
Wash
Temperature:
Spin
Speed:
Soil
Level:
Available
Options:
Cycle Details:
recommended
Bacteria tested were K. pneumonia,
recommended by the manufacturer.
Load Size Recommendations
For best results, follow the load size recommendations noted for
each cycle.
Small load: Fill the washer drum with 3–4 items, not more
than ¼ full.
Medium load: Fill the washer drum up to about ½ full.
Large load: Fill the washer drum up to about ¾ full.
Extra-large load: Fill the washer drum, but make sure clothes
can tumble freely. For best results, avoid packing tightly.
7

Cycle Guide
Settings and options shown in bold are default settings for that cycle. For best fabric care, choose the cycle, options, and settings
that best fit the load being washed. Not all settings are available with each cycle, and some options cannot be used together.
NOTES:
n Not all cycles, temperatures, options, or spin speeds are available on all models.
n All wash temperature selections feature a cold rinse.
Items to wash
using default
cycle settings:
No clothes in washer Clean TumbleFresh™ Use this cycle every 30 washes to
Washer Delay Wash keep the inside of your washer fresh
with and clean. This cycle uses a higher
affresh® water level. Use with affresh® washer
cleaner tablet or liquid chlorine bleach
to thoroughly clean the inside of your
washer. This cycle should not be
interrupted. See “Washer Care.”
IMPORTANT: Do not place garments
or other items in the washer during
the Clean Washer with affresh® cycle.
Use this cycle with an empty wash
tub. See “Washer Care” in “Washer
Maintenance.”
Wet load of clothes Drain N/A Fast N/A TumbleFresh™ Use Drain & Spin to remove
& Spin Medium Delay Wash excess water from the load.
Slow Spin speed can be set to
Off a slower setting.
Swimwear, items Drain Hot Fast Heavy TumbleFresh™ Select Drain & Spin; then select
that need rinsing & Spin Warm Medium Normal Delay Wash Extra Rinse to add water. The
with Cool Slow Light cycle includes a fast-speed
Extra Cold Off spin. For some fabrics, you may
Rinse wish to set the spin speed to a
slower setting.
Small loads of Quick Hot Fast Heavy TumbleFresh™ For small loads (2–4 items)
2–4 lightly soiled Wash Warm Medium Normal Extra Rinse needed quickly. This cycle
garments Cool Slow Light Delay Wash combines fast-speed tumbling,
Cold Off a shortened wash time, and a
fast-speed spin for reduced
drying times.
Sheer fabrics, Delicates Hot Fast Heavy TumbleFresh™ This cycle combines slow-
lingerie, sweaters, Warm Medium Normal Extra Rinse speed tumbling and slow-speed
and lightly-soiled Cool Slow Light Delay Wash spin for gentle fabric care
shirts, blouses, Cold Off and reduced wrinkling.
trousers, pants,
and skirts
Bright or darkly Cold Cold Fast Heavy TumbleFresh™ This cycle uses a concentrated
colored cottons, Wash Medium Normal Extra Rinse detergent solution along with
linens, casual Off Light Delay Wash cold water throughout the
and mixed loads cycle to gently lift out stains
and care for fabrics.
Cycle:
Wash
Temperature:
Spin
Speed:
Soil
Level:
Available
Options:
Cycle Details:
Load Size Recommendations
For best results, follow the load size recommendations noted for
each cycle.
Small load: Fill the washer drum with 3–4 items, not more
than ¼ full.
Medium load: Fill the washer drum up to about ½ full.
Large load: Fill the washer drum up to about ¾ full.
Extra-large load: Fill the washer drum, but make sure clothes
can tumble freely. For best results, avoid packing tightly.
8
Using Your Washer
First wash cycle without laundry
Before washing clothes for the first time, if not completed during
the final installation step, choose the QUICK WASH cycle and
run it without clothes. Use only HE detergent. Use 1/2 the
manufacturer’s recommended amount for a medium-size load.
This initial cycle serves to ensure the interior is clean before
washing clothes.
2. Add laundry products (if desired)
1. Sort and prepare your laundry
Sort items by recommended cycle, water temperature, and
colorfastness. Separate heavily soiled items from lightly soiled.
Separate delicate items from sturdy fabrics. Treat stains
promptly and check for colorfastness by testing stain remover
products on an inside seam.
IMPORTANT:
n Empty pockets. Loose change, buttons, or any small object
can plug pumps and may require a service call.
n Close zippers, fasten hooks, tie strings and sashes, and
remove non-washable trim and ornaments.
n Mend rips and tears to avoid further damage to items
during washing.
n Turn knits inside out to prevent pilling. Separate lint-takers
from lint-givers. Synthetics, knits, and corduroy fabrics will
pick up lint from towels, rugs, and chenille fabrics.
n Do not dry garments if stains remain after washing, because
heat can set stains into fabric.
n Always read and follow fabric care labels and laundry
product instructions. Improper usage may cause damage
to your garments.
Single-dose laundry packet, Oxi-type boosters, color-safe
bleach, or fabric softener crystals can be added to the drum
prior to adding laundry.
NOTE: Do not add clothes to washer drum prior to adding
laundry products. Always follow manufacturer’s instructions.
3. Load laundry into washer
Place a load of sorted clothes loosely in the washer. Items need
to move freely for best cleaning and to reduce wrinkling and
tangling. Close the washer door by pushing it firmly until the
latch clicks.
n Depending on load type and cycle, the washer can be fully
loaded, but not tightly packed. Washer door should close
easily. See “Cycle Guide” for loading suggestions.
n Mix large and small items and avoid washing single items.
Load evenly.
n Wash small items in mesh garment bags. For multiple items,
use more than one bag and fill bags equally.
9
Using Your Washer
USING LAUNDRY PRODUCT DISPENSERS
NOTE: Do not add single-dose laundry packets, Oxi-type
boosters, color-safe bleach, or fabric softener crystals to
dispensers. They will not dispense correctly.
4. Add HE detergent
6. Add liquid chlorine bleach to dispenser
(if desired)
Liquid
HE detergent
Adjust the selector, based on type of HE detergent used
(either liquid or powdered). See “Using the Dispenser
Drawer” instructions on how to use the dispenser.
Powdered
HE detergent
5. Add liquid fabric softener to dispenser
(if desired)
Pour a measured amount of liquid fabric softener into liquid
fabric softener compartment. Always follow manufacturer’s
directions for correct amount of fabric softener based on your
load size.
Fabric softener is always dispensed in the last rinse, even if
Extra Rinse is selected.
IMPORTANT: Do not overfill, dilute, or use more than ¼ cup
(60 mL) of fabric softener. Do not fill past the MAX line.
Overfilling dispenser will cause fabric softener to immediately
dispense into washer.
n Do not spill or drip any fabric softener onto the clothes.
n Do not use liquid fabric softener dispenser balls in this
washer. They will not dispense correctly.
Add liquid chlorine bleach to the bleach compartment.
Do not overfill, dilute, or use more than
Do not use color-safe bleach or Oxi in the same cycle with
liquid chlorine bleach.
n
Always measure liquid chlorine bleach. Use a measuring
cup with a pour spout; do not guess.
n
Do not fill beyond the “MAX” level. Overfilling could cause
garment damage.
2
⁄
cup (165 mL).
3
7. Touch POWER to turn on washer
(optional)
Slowly close the dispenser drawer. Make sure the drawer is
closed completely, then touch POWER to turn on the washer
or go to Step 8.
10

8. Select CYCLE*
Appearance may vary.
Turn cycle knob to select your wash cycle. See “Cycle Guide”
for details on cycle features.
10. Select any additional options*
Appearance may vary.
To add an option to the cycle, touch its name – Extra Rinse,
TumbleFresh, or Cycle Signal. To remove an option from
the selected cycle, touch the option again.
9. Adjust settings if desired*
Appearance may vary.
The display will show the default settings for the selected cycle.
To adjust a setting, touch its name – Wash Temp, Spin, or Soil.
Adjusting settings will change the Estimated Time Remaining.
Tightly packing the load, unbalanced loads, or excessive suds
may also cause the washer to increase the cycle time.
11. Setting a delayed wash
Appearance may vary.
If you do not want to begin a cycle immediately, you may
choose the DELAY WASH option. This will delay the start
of the wash cycle by up to 12 hours.
To set a delayed wash:
1. Touch DELAY WASH + and – buttons to set the desired
delay time.
2. Touch and hold START to set the delay. The delay
countdown has started when the START light stops blinking.
* Not all options and settings are available with all cycles.
See “Cycle Guide” for available options and settings.
11
Using Your Washer
12. Touch and hold START to begin
wash cycle
Touch and hold START to start the wash cycle. To pause a
cycle in progress, touch START once, then touch and hold
again to continue the cycle. To cancel a cycle, touch POWER.
Once you touch and hold START, you will hear the door lock,
unlock, and lock again. The washer door will remain locked
during the wash cycle.
Unlocking the door to add garments:
If you need to open the door to add 1 or 2
missed garments, you may do so while the
“Add Garment” light is lit.
Touch START once; the door will unlock
once the washer movement has stopped.
This may take several minutes. Then close
door and touch and hold START again to
restart the cycle.
13. Remove garments promptly
after cycle is finished
Promptly remove garments after cycle has
completed to avoid odor and rusting of
metal objects on garments. When unloading
garments, pull back the door seal and check
for small items between the tub and the washer drum.
If you will be unable to remove the load
promptly, use the TumbleFresh™ option.
If selected, the TumbleFresh™ option will
tumble the load periodically for up to 6 hours.
To turn off the TumbleFresh™ option, touch POWER. To set the
washer so that the TumbleFresh™ option does not come on for
future cycles, touch TumbleFresh.
NOTE:
n
The door will remain locked while the TumbleFresh™ option
is active. To cancel the option and unlock the door, touch
POWER.
n
A small amount of water may remain in the dispensers after
the wash cycle is complete. This is normal.
n
This washer has a tight seal to avoid water leaks. To avoid
odors, leave the door open to allow the washer to dry
between uses.
12

Washer Maintenance
WATER INLET HOSES
Replace inlet hoses after 5 years of use to reduce the risk
of hose failure. Periodically inspect and replace inlet hoses
if bulges, kinks, cuts, wear, or leaks are found.
When replacing your inlet hoses, mark the date of
replacement on the label with a permanent marker.
WASHER CARE
Recommendations to Help Keep Your Washer Clean
and Performing at its Best
1. Always use High Efficiency (HE) detergents and follow the
HE detergent manufacturer’s instructions regarding the
amount of HE detergent to use. Never use more than the
recommended amount because that may increase the
rate at which detergent and soil residue accumulate inside
your washer, which in turn may result in undesirable odor.
2. Use warm or hot water washes sometimes (not exclusively
cold water washes), because they do a better job of
controlling the rate at which soils and detergent
accumulate.
3. Always leave the washer door slightly ajar between
uses to help dry out the washer and avoid the buildup
of odor-causing residue.
4. Clean residue from the underside of the glass window.
Cleaning Your Front Loading Washer
Read these instructions completely before beginning the
routine cleaning processes recommended below. This
Washer Maintenance Procedure should be performed,
at a minimum, once per month or every 30 wash cycles,
whichever occurs sooner, to control the rate at which soils
and detergent may otherwise accumulate in your washer.
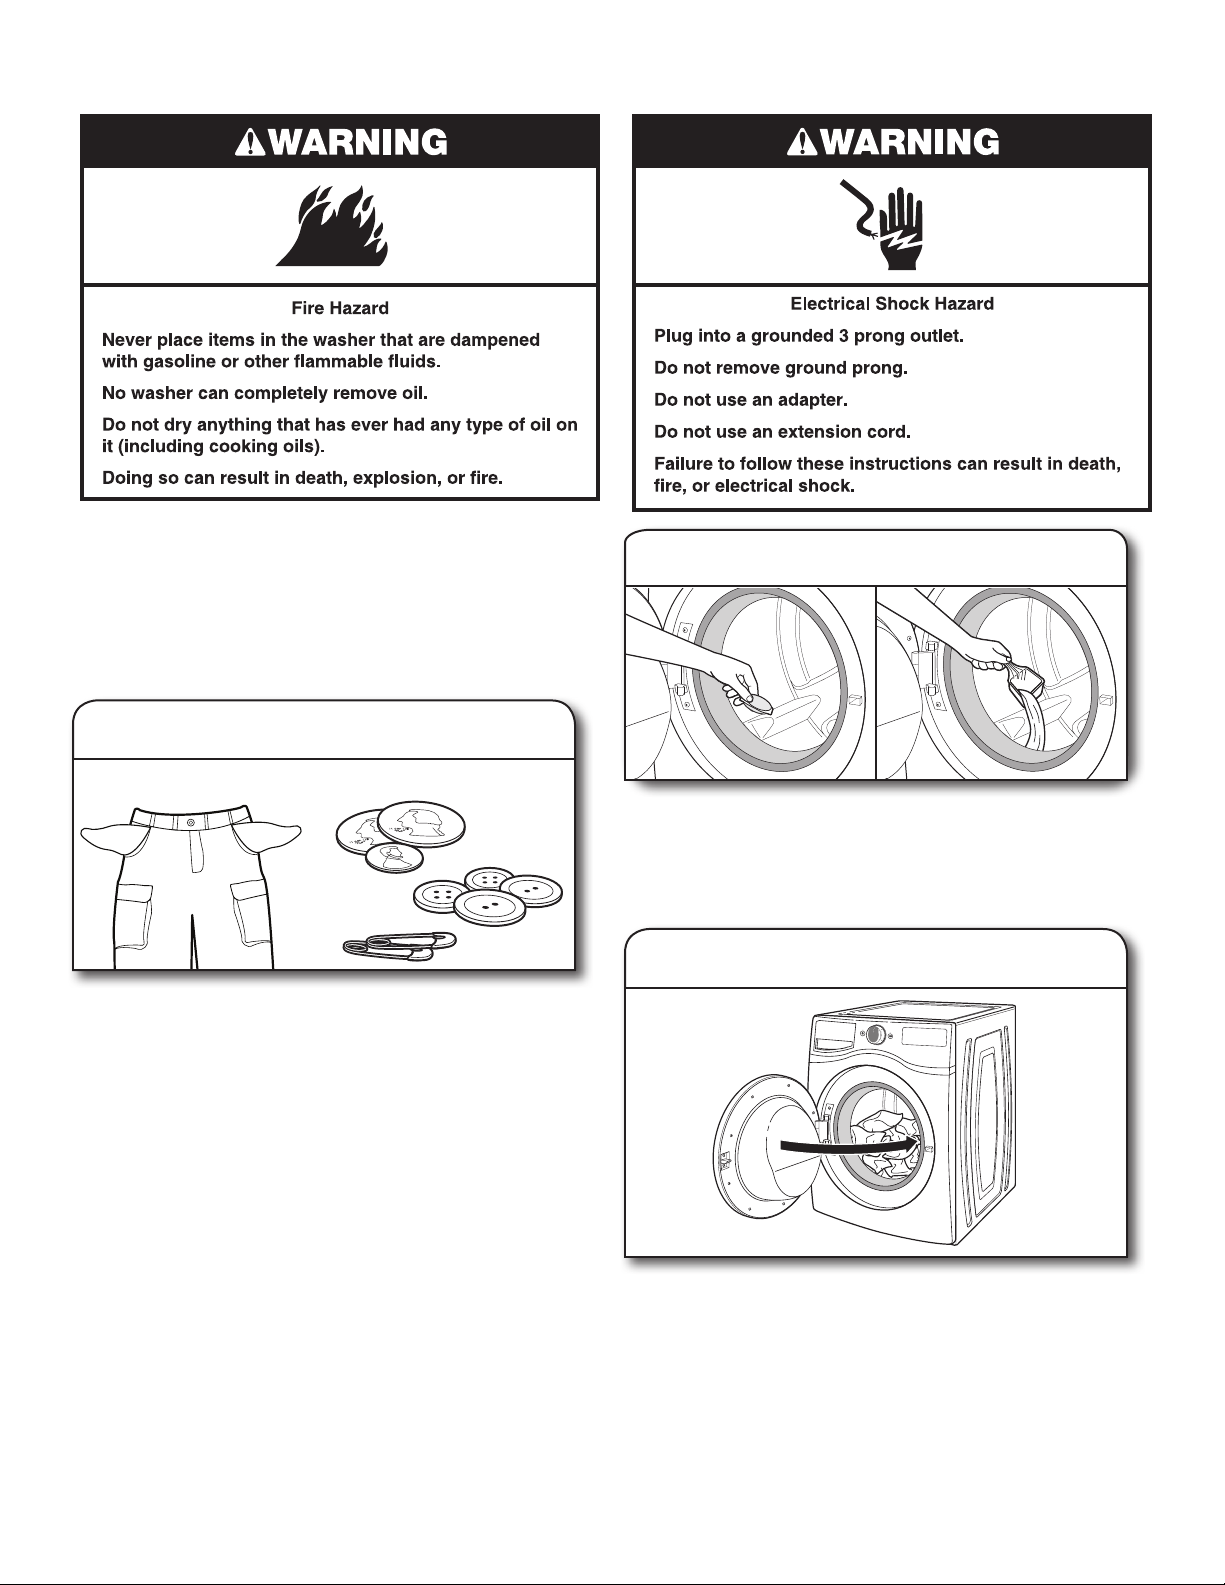
Cleaning the Door Seal
1. Open the washer door and remove any clothing or items
from the washer.
2. Inspect the colored seal between the door opening and
the drum for stained areas or soil buildup. Pull back the
seal to inspect all areas under the seal and to check for
foreign objects.
3. If stained areas or soil buildup are found, wipe down
these areas of the seal using either of the following
two procedures:
a. affresh® Grit Grabber™ Cloth Procedure:
i. When the cycle is complete, gently pull back the
rubber door seal and clean the entire surface with
the rough side of the Grit Grabber™ cloth.
b. Dilute Liquid Chlorine Bleach Procedure:
i. Mix a dilute bleach solution, using ¾ cup (177 mL)
of liquid chlorine bleach and 1 gallon (3.8 L) of warm
tap water.
ii. Wipe the seal area with the dilute solution, using
a damp cloth.
iii. Let stand 5 minutes.
iv. Wipe down area thoroughly with a dry cloth and let
washer interior air dry with door open.
IMPORTANT:
n Wear rubber gloves when cleaning with bleach.
n Refer to the bleach manufacturer’s instructions
for proper use.
WASHER CARE (cont.)
Cleaning the Inside of the Washer
This washer has a special cycle that uses higher water
volumes in combination with affresh® Washer Cleaner or
liquid chlorine bleach to thoroughly clean the inside of the
washer. Steam washer models also utilize steam to enhance
cleaning in this special cycle.
NOTE: Read these instructions completely before beginning
the cleaning process.
Begin procedure
1. Clean Washer with affresh® Cycle Procedure
(Recommended for Best Performance):
a. Open the washer door and remove any clothing
or items.
b. Add an affresh® Washer Cleaner tablet to the washer
drum.
c. Do not add the affresh® Washer Cleaner tablet
to the dispenser drawer.
d. Do not add any detergent or other chemical to the
washer when following this procedure.
e. Close the washer door.
f. Select the Clean Washer with affresh® cycle.
g. On some models: Select the Fan Fresh™/Tumble
Fresh™ option to help dry the washer interior after the
cycle is complete.
NOTE: The washer remembers your last option selection
and will use it for future wash cycles until you deselect
that option. While the fan is on, the washer door will lock.
To unlock the door, touch POWER.
h. Touch and hold START to begin the cycle. The Clean
Washer with affresh® Cycle Operation is described
below.
2. Chlorine Bleach Procedure:
a. Open the washer door and remove any clothing
or items.
b. Open the dispenser drawer and add liquid chlorine
bleach to the MAX level in both the bleach
compartment and the fabric softener compartment.
Either traditional or HE chlorine bleach can be used.
NOTE: Use of more liquid chlorine bleach than is
recommended above could cause washer damage
over time.
c. Close the washer door and the dispenser drawer.
d. Do not add any detergent or other chemicals to the
washer when following this procedure.
e. Close the washer door.
f. Select the Clean Washer with affresh® cycle.
g. On some models: Select the Fan Fresh™/Tumble
Fresh™ option to help dry the washer interior after the
cycle is complete.
NOTE: The washer remembers your last option
selection and will use it for future wash cycles until you
deselect that option. While the fan is on, the washer
door will lock. To unlock the door, touch POWER.
h. Touch and hold START to begin the cycle. The Clean
Washer with affresh® Cycle Operation is described
below.
NOTE: For best results, do not interrupt cycle.
13
Washer Maintenance
WASHER CARE (cont.)
Description of Clean Washer with affresh® Cycle
Operation:
1. The Clean Washer with affresh® cycle will determine
whether clothing or other items are in the washer.
2. If no items are detected in the washer, it will proceed
with the cycle.
a. If any items are detected in the washer, “rL” (remove
load) will be displayed. The door will unlock. Open
washer and remove any garments from the washer
drum.
b. Touch POWER to clear the “rL” code.
c. Touch and hold START to restart the cycle.
3. Steam models only: During the first 20 minutes of the
cycle, it will activate the steamer but the drum will not spin
or fill with water. You may see condensation on the door
glass during this initial phase. If you are using an affresh®
Washer Cleaner tablet, it will not dissolve completely
during the steam phase. This is normal.
After the cycle is complete, leave the door open slightly to
allow for better ventilation and drying of the washer interior.
Cleaning the Dispensers
After a period of using your washer, you may find some
residue buildup in the washer’s dispensers. To remove
residue from the dispensers, remove the drawer and wipe
the surfaces with a damp cloth and towel dry either before
or after you run the Clean Washer with affresh® cycle. Use
an all-purpose surface cleaner, if needed.
IMPORTANT: Dispenser is not dishwasher safe.
Cleaning the Outside of the Washer
Use a soft, damp cloth or sponge to wipe up any spills.
Occasionally wipe the outside of your washer to help
keep it looking new. Use mild soap and water.
IMPORTANT: To avoid damaging the washer’s finish, do not
use abrasive products.
WASHER CARE (cont.)
Removing the Dispenser
To remove:
1. Pull dispenser drawer out until it stops.
2. Press down on the release tab and pull straight out to
remove the dispenser.
3. Lift off cover panel by
pulling straight up.
To replace:
1. Slide cover panel back
onto posts on dispenser.
2. Align edges of dispenser
with guides in washer,
then slide dispenser
back into slot.
14
NON-USE AND VACATION CARE
REINSTALLING/USING WASHER AGAIN
Operate your washer only when you are home. If moving,
or not using your washer for a period of time, follow these
steps:
1. Unplug or disconnect power to washer.
2. Turn off water supply to washer to avoid flooding due
to water pressure surges.
3. Clean the dispensers. See “Cleaning the Dispensers.”
WINTER STORAGE CARE
IMPORTANT: To avoid damage, install and store washer
where it will not freeze. Because some water may stay in
hoses, freezing can damage washer. If storing or moving
during freezing weather, winterize your washer.
To winterize washer:
1. Shut off both water faucets, disconnect and drain water
inlet hoses.
2. Put 1 qt. (1 L) of R.V.-type antifreeze in washer drum
and run washer on NORMAL cycle for about two
minutes to mix antifreeze and remaining water.
3. Unplug washer or disconnect power.
To reinstall washer after non-use, vacation, winter storage,
or moving:
1. Refer to Installation Instructions to locate, level, and
connect washer.
2. Before using again, run washer through the following
recommended procedure:
To use washer again:
1. Flush water pipes and hoses. Reconnect water inlet
hoses. Turn on both water faucets.
TRANSPORTING YOUR WASHER
1. Shut off both water faucets. Disconnect and drain water
inlet hoses.
2. If washer will be moved during freezing weather, follow
WINTER STORAGE CARE directions before moving.
3. Disconnect drain hose from drain system and from back
of washer.
4. Unplug power cord.
5. Place inlet hoses and drain hose inside washer drum.
6. Bundle power cord with a rubber band or cable tie to
keep it from hanging onto the ground.
IMPORTANT: Call for service to install new transport bolts.
Do not reuse transport bolts. Washer must be transported
in the upright position. To avoid structural damage to
your washer, it must be properly set up for relocation by a
certified technician.
2. Plug in washer or reconnect power.
3. Run washer through HEAVY DUTY cycle to clean washer
and remove antifreeze, if used. Use only HE detergent.
Use half the manufacturer’s recommended amount for a
medium-size load.
15
 Loading...