


Whirlpool WED8620HC, WGD8620HW, WED5620HW, WED6620HC, WGD6620HC User Manual
DDRRYYEERR DDOOOORR RREEVVEERRSSAALL IINNSSTTRRUUCCTTIIOONNSS
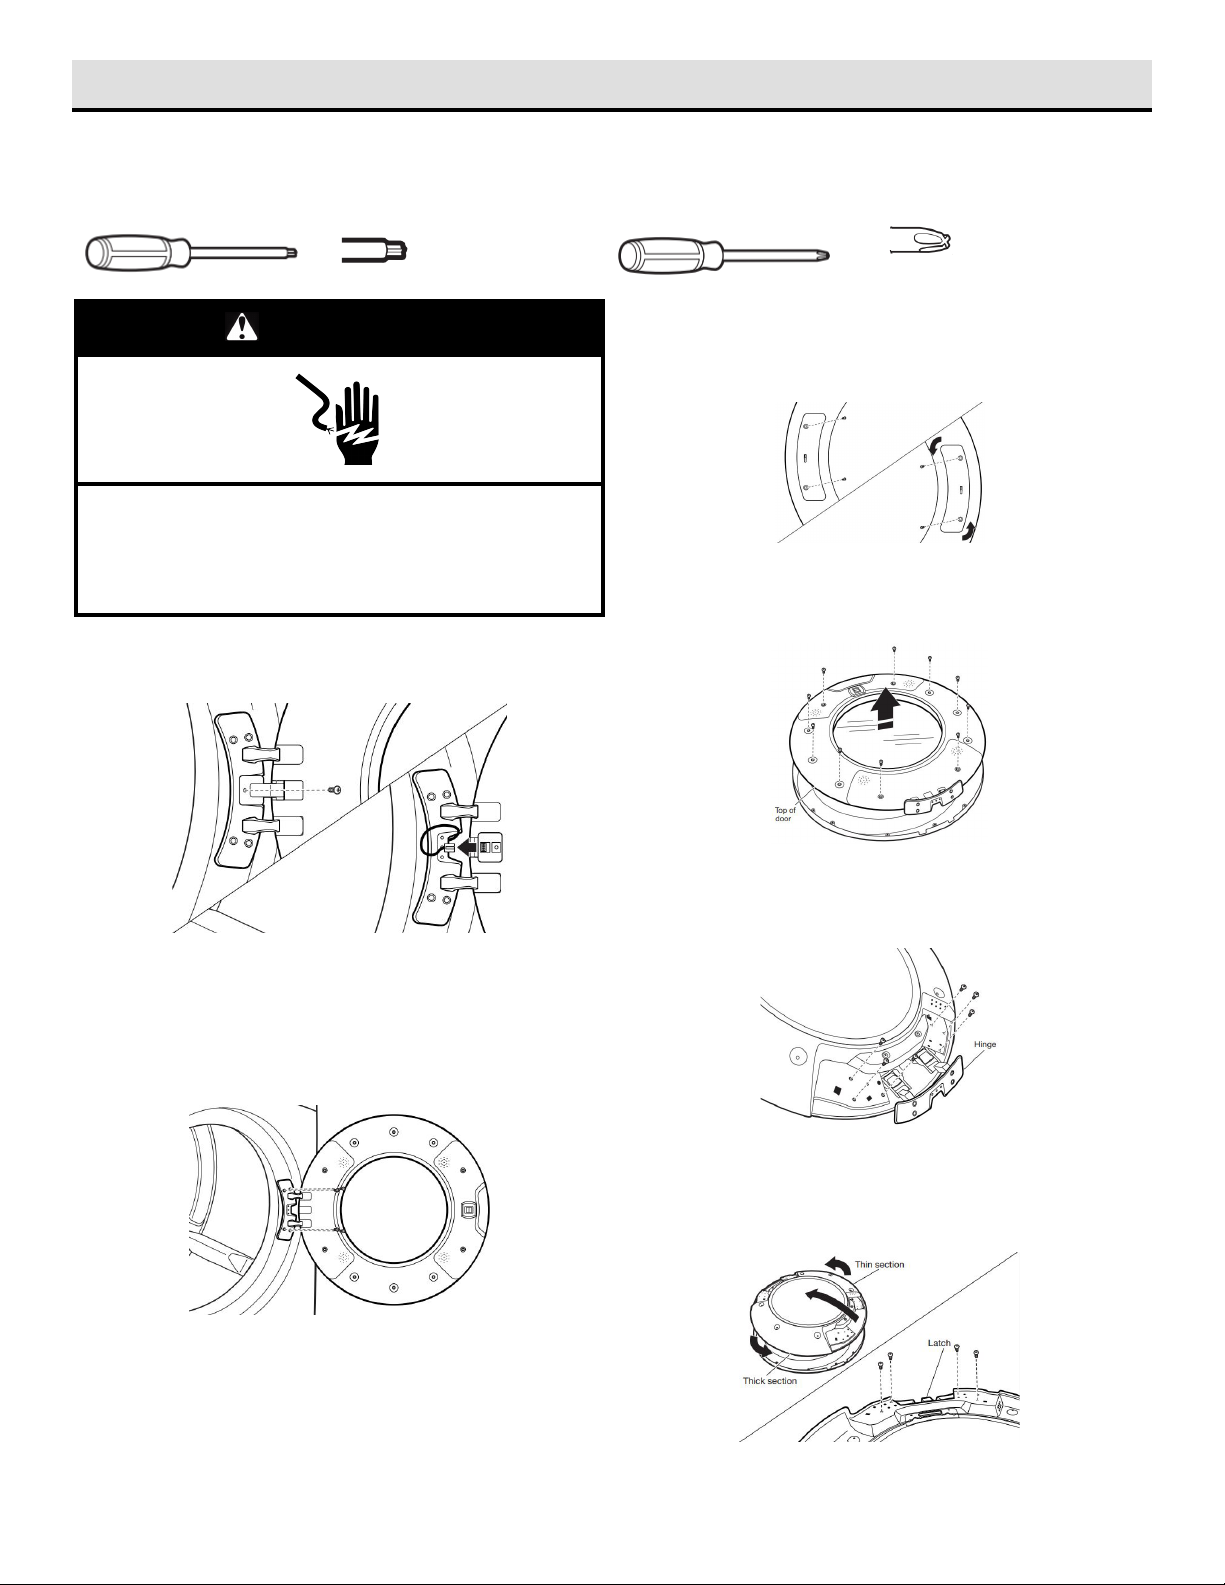
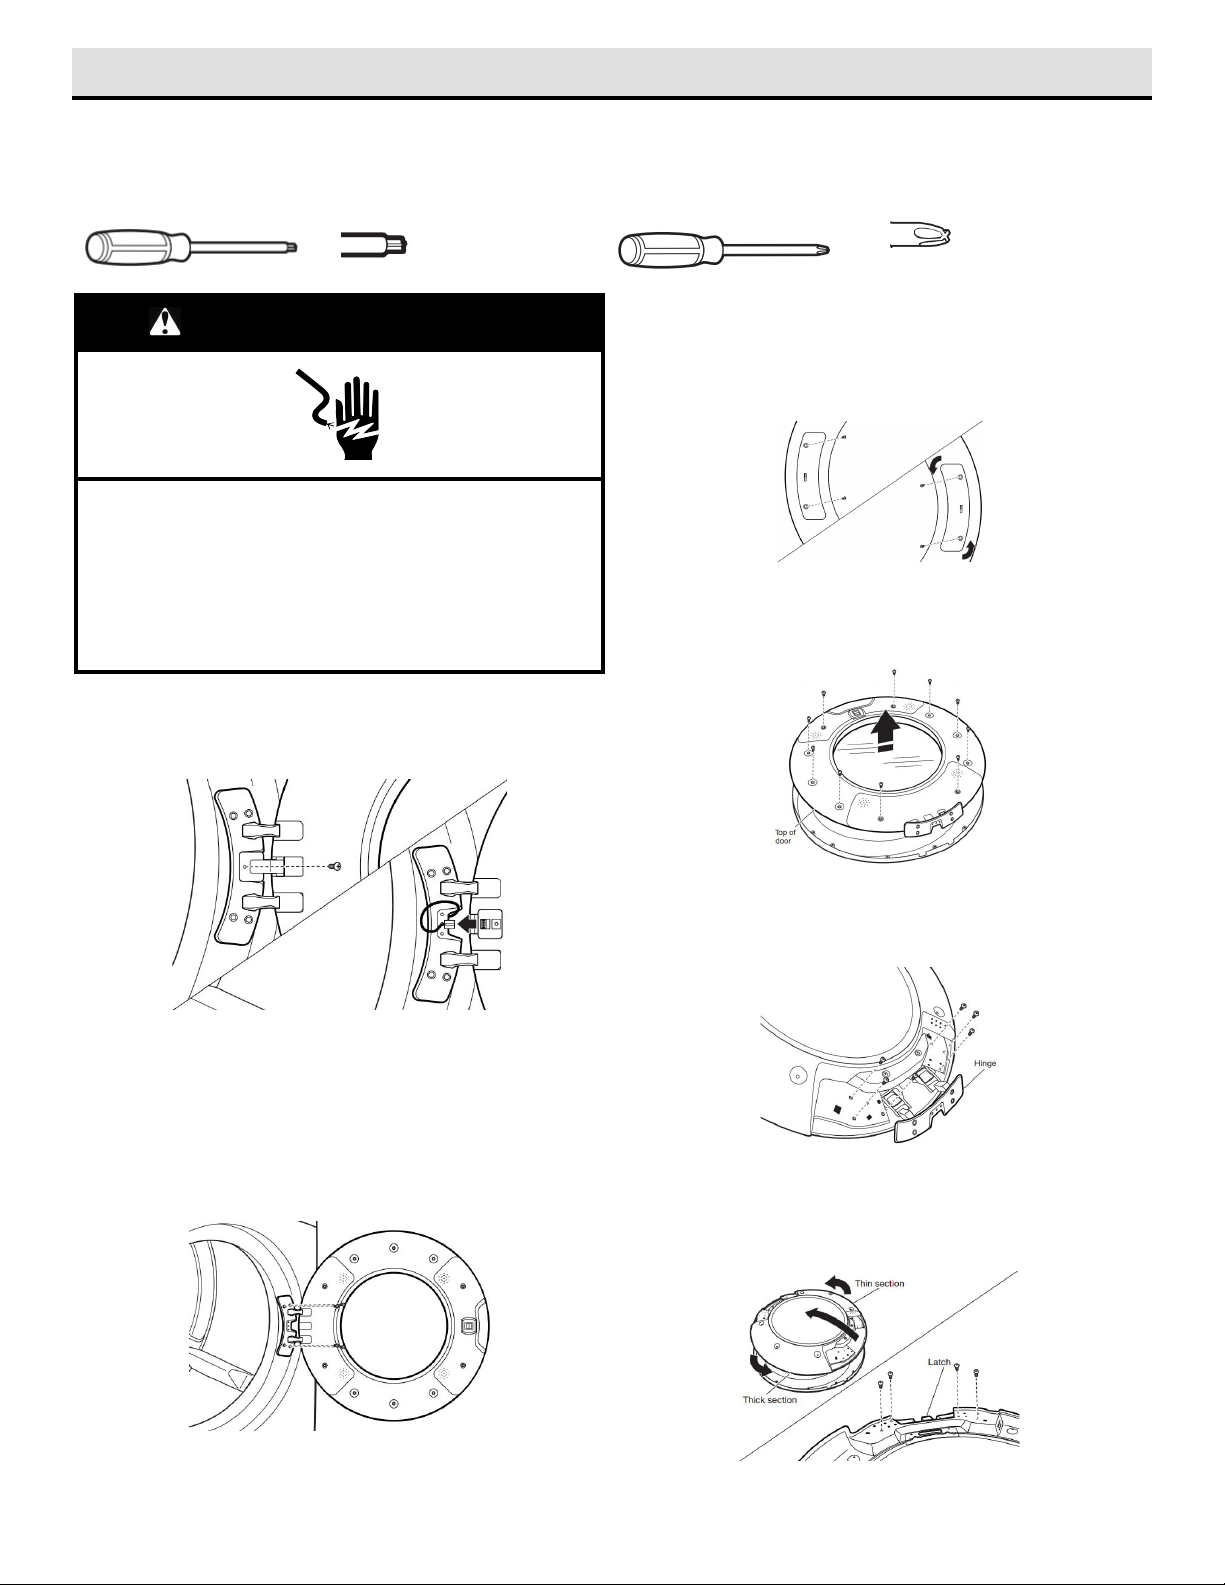
Round Doors with Electrical Wiring:
Tools Needed
Minimum 8" (203 mm) long TORX®, T20®, and T25®star drivers #2 Phillips screwdriver
3. Move the door strike
WARNING
Electrical Shock Hazard
Disconnect power before servicing.
Replace all parts and panels before operating.
Failure to do so can result in death or electrical shock.
1. Disconnect wiring from door
Using a Phillips screwdriver, remove middle screw in hinge.
Disconnect wiring. Tuck wiring into opening.
Using a T25®screwdriver, remove the two screws securing the
door strike to the door frame of the dryer. Rotate the strike 180°
and attach to the opposite side of dryer door frame with the two
screws removed earlier, as shown.
4. Remove inner door from outer door
Position the door with the inside of the door facing up. Using a
Phillips screwdriver, remove the 10 screws securing the inner door
to the outer door.
2. Remove door from dryer
IMPORTANT: If the protective film has not yet been removed from
the dryer, peel the film from the dryer door before proceeding.
Using a T25
door hinge to the dryer and lift the door up and out to remove. Place
the door on a soft towel or other non-scratch surface.
®
screwdriver, remove the four screws securing the
5. Remove hinge
Remove cover plate to reveal hinge assembly. Then, using a T20
screwdriver, remove the six screws holding the hinge assembly in
place.
6. Remove latch
Flip and rotate the inner door 180° so that the thin section is at the
top and the thick section is at the bottom. Using a T25
screwdriver, remove the four screws securing the latch plate in
place.
®
®
TORX, T20 and T25 are trademarks of Acument Intellectual Property, LLC.
1
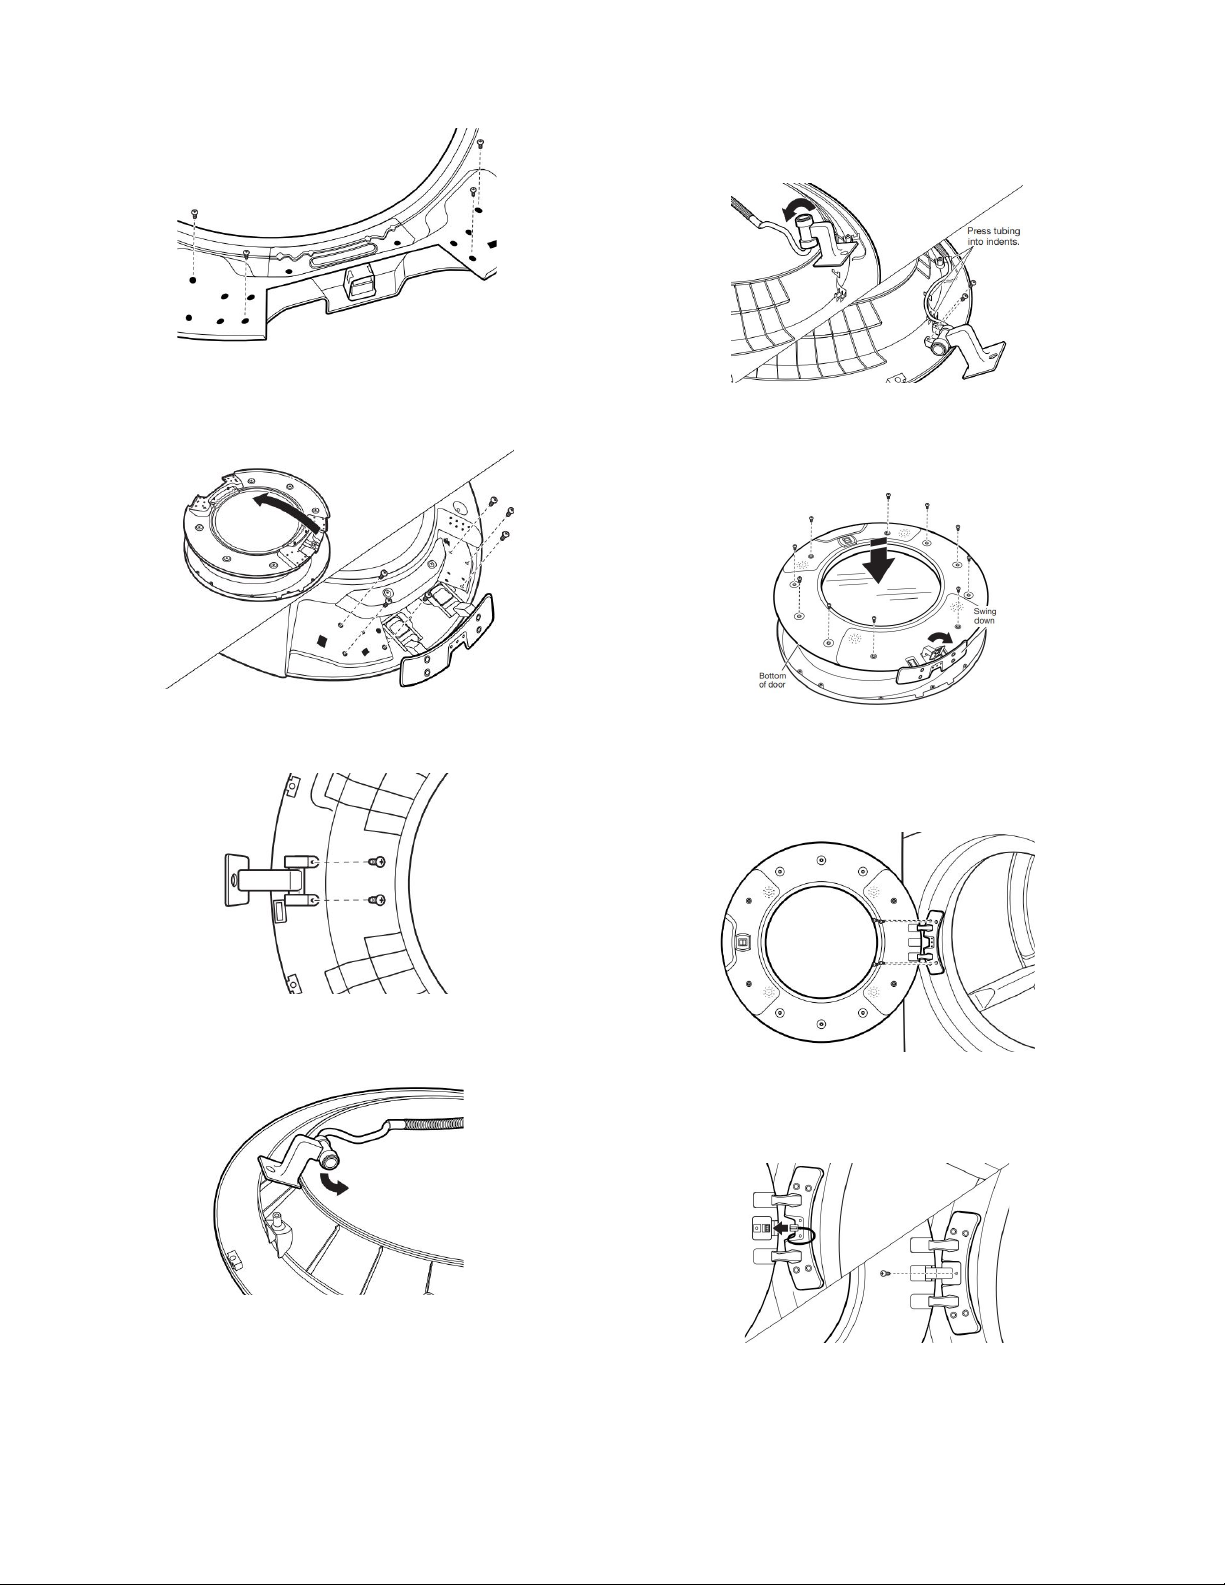
7. Reinstall latch on opposite side
Using a T25®screwdriver, reinstall the latch plate on the opposite
side from which it was removed with the four screws removed
earlier.
8. Reinstall hinge assembly on opposite side
Flip over the inner door to the left. Using a T20®screwdriver,
reinstall the hinge assembly on the opposite side from which it was
removed.
11. Rotate assembly bottom and fasten
IMPORTANT: Make sure to swing hinge down in front of rotating
assembly (see Step 12).
Rotate bottom of assembly 180° towards you and secure assembly
with the two screws removed earlier, using a Phillips screwdriver.
Press tubing into indents and reinstall hinge assembly cover plate.
12. Reinstall inner door assembly
Position the door with the inside of the door facing up. Using a
Phillips screwdriver, reinstall the 10 screws removed earlier,
securing the inner door to the outer door.
9. Remove rotating assembly
Lift off inner door assembly. Using a Phillips screwdriver, remove
the two screws securing the rotating assembly to the door.
10. Reposition rotating assembly and tubing
Reposition rotating assembly and tubing 180° to opposite side of
the door.
13. Reinstall door on dryer
Doors with electrical wiring: Pull the wire through the front panel
opening before reinstalling the door. Insert the tabs on the hinge
into the mounting slot and slide down to engage the top tab.
Secure in place with the four T25
®
screws removed earlier.
14. Reconnect wiring (doors with electrical
wiring)
Plug in wire. Using a Phillips screwdriver, secure the rotating
assembly to the hinge with the screw removed earlier.
Troubleshooting
See your Owner’s Manual or visit our website and reference Frequently Asked Questions to possibly avoid the cost of a service call.
2
IINNSSTTRRUUCCTTIIOONNSS PPOOUURR IINNVVEERRSSIIOONN DDEE PPOORRTTEE DDEE SSÉÉCCHHEEUUSSEE
Portes rondes avec câblage électrique :
Outils nécessaires
Tournevis mm) long TORX®, T20®et Tournevis Phillips n° 2 T25®†
de 8" (203 mm) min. de long
AVERTISSEMENT
Risque de choc électrique
Déconnecter la source de courant électrique avant
l’entretien.
Replacer pièces et panneaux avant de faire la mise en
marche.
Le non-respect de ces instructions peut causer un décès
ou un choc électrique.
Tournevis cruciforme no 2
3. Déplacer la gâche de la porte
À l’aide d’un tournevis T25®, retirer les deux vis fixant la gâche de
la porte au châssis de la porte de la sécheuse. Faire pivoter la
gâche de 180° et la fixer au côté opposé du châssis de la porte de
la sécheuse à l’aide des deux vis enlevées précédemment,
comme indiqué.
4. Dégager la porte interne de la porte externe
Positionner la porte de façon à ce que l’intérieur de la porte soit
orienté vers le haut. À l’aide d’un tournevis cruciforme, retirer les
10 vis fixant l’intérieur de porte à l’extérieur de porte.
1. Déconnecter le câblage de la porte
À l’aide d’un tournevis cruciforme, retirer la vis centrale de la
charnière. Débrancher le câblage. Passer le câblage dans
l’ouverture.
2. Retirer la porte de la sécheuse
IMPORTANT : Si l’on n’a pas encore retire la pellicule protectrice de
la sécheuse, la décoller de la porte de la sécheuse avant de
continuer.
À l’aide d’un tournevis T25
de porte à la sécheuse et soulever la porte vers le haut et l’extérieur
pour l’enlever. Placer la porte sur une serviette douce ou sur une
surface lisse.
®
, retirer les quatre vis fixant la charnière
5. Enlever la charnière
Retirer la plaque de couvercle pour révéler la charnière. À l’aide
d’un tournevis T20
charnière.
®
, retirer les six vis maintenant en place la
6. Enlever le loquet
Inverser et faire pivoter l’intérieur de porte de 180° pour que la
section mince se situe en haut et la section épaisse en bas. À
l’aide d’un tournevis T25
place la plaque du loquet.
®
, retirer les quatre vis maintenant en
TORX, T20 et T25 sont les marques de commerce déposées de Acument Intellectual Properties, LLC.
3