

Whirlpool WDF550SAFW, WDF550SAAW, WDF550SAAB, WDF550SAAS Installation Instructions

UNDERCOUNTER DISHWASHER
INSTALLATION INSTRUCTIONS
INSTRUCTIONS D’INSTALLATION DU LAVE-
VAISSELLE ENCASTRÉ
Table of Contents / Table des matières
DISHWASHER SAFETY ................................................................................2
INSTALLATION REQUIREMENTS ............................................................... 2
Location Requirements .............................................................................. 3
Electrical Requirements.............................................................................. 4
Water Supply Requirements.......................................................................5
Drain Requirements.................................................................................... 5
INSTALLATION INSTRUCTIONS .................................................................5
Prepare Cabinet Opening—Existing Utility Hookups ................................5
Prepare Cabinet Opening—No Existing Utility Hookups...........................7
Install Dishwasher.....................................................................................10
Make Electrical Connections—Direct Wire Method ................................12
Make Electrical Connections—Power Supply Cord Method................... 12
Connect Dishwasher to Water Supply .....................................................13
Connect Dishwasher to Drain...................................................................13
Attach Dishwasher to Cabinet..................................................................14
Complete Installation................................................................................14
IMPORTANT:
Save for local electrical inspector’s use.
Installer: Leave installation instructions with the homeowner.
Homeowner: Keep installation instructions for future reference.
IMPORTANTE:
Guarde para tenerlas a disposición del inspector de electricidad local.
Instalador: Deje las instrucciones de instalación con el propietario.
Propietario: Conserve las instrucciones de instalación para referencia futura.
SÉCURITÉ DU LAVE-VAISSELLE.............................................................. 16
EXIGENCES D'INSTALLATION.................................................................. 16
Outillage et composants .......................................................................... 16
Exigences d’emplacement....................................................................... 17
Spécifications électriques ........................................................................ 18
Spécifications de l'alimentation en eau ................................................... 19
Évacuation de l'eau de lavage—Critères à respecter ............................. 19
INSTRUCTIONS D’INSTALLATION ........................................................... 19
Préparation de l’espace d’installation entre les placards—Utilisation
des modes de raccordement existants pour canalisations et câblage... 21
Préparation de l’emplacement d’installation entre les placards
lorsque les canalisations et câbles n’ont pas été installés...................... 21
Installation du lave-vaisselle..................................................................... 24
Raccordement au réseau électrique—Câblage direct ............................ 26
Raccordement au réseau électrique—Cordon d’alimentation................ 27
Raccordement à la canalisation d’arrivée d’eau...................................... 28
Raccordement à l’évacuation .................................................................. 28
Immobilisation du lave-vaisselle dans la cavité d’encastrement ............ 28
Achever l’installation................................................................................. 29
IMPORTANT :
Conserver pour consultation par l’inspecteur local des installations électriques.
Installateur : Remettre les instructions d’installation au propriétaire.
Propriétaire : Conserver les instructions d’installation pour référence ultérieure.
Models/Modèles WDF550SAAW WDF550SAAB WDF550SAAS
W10518038
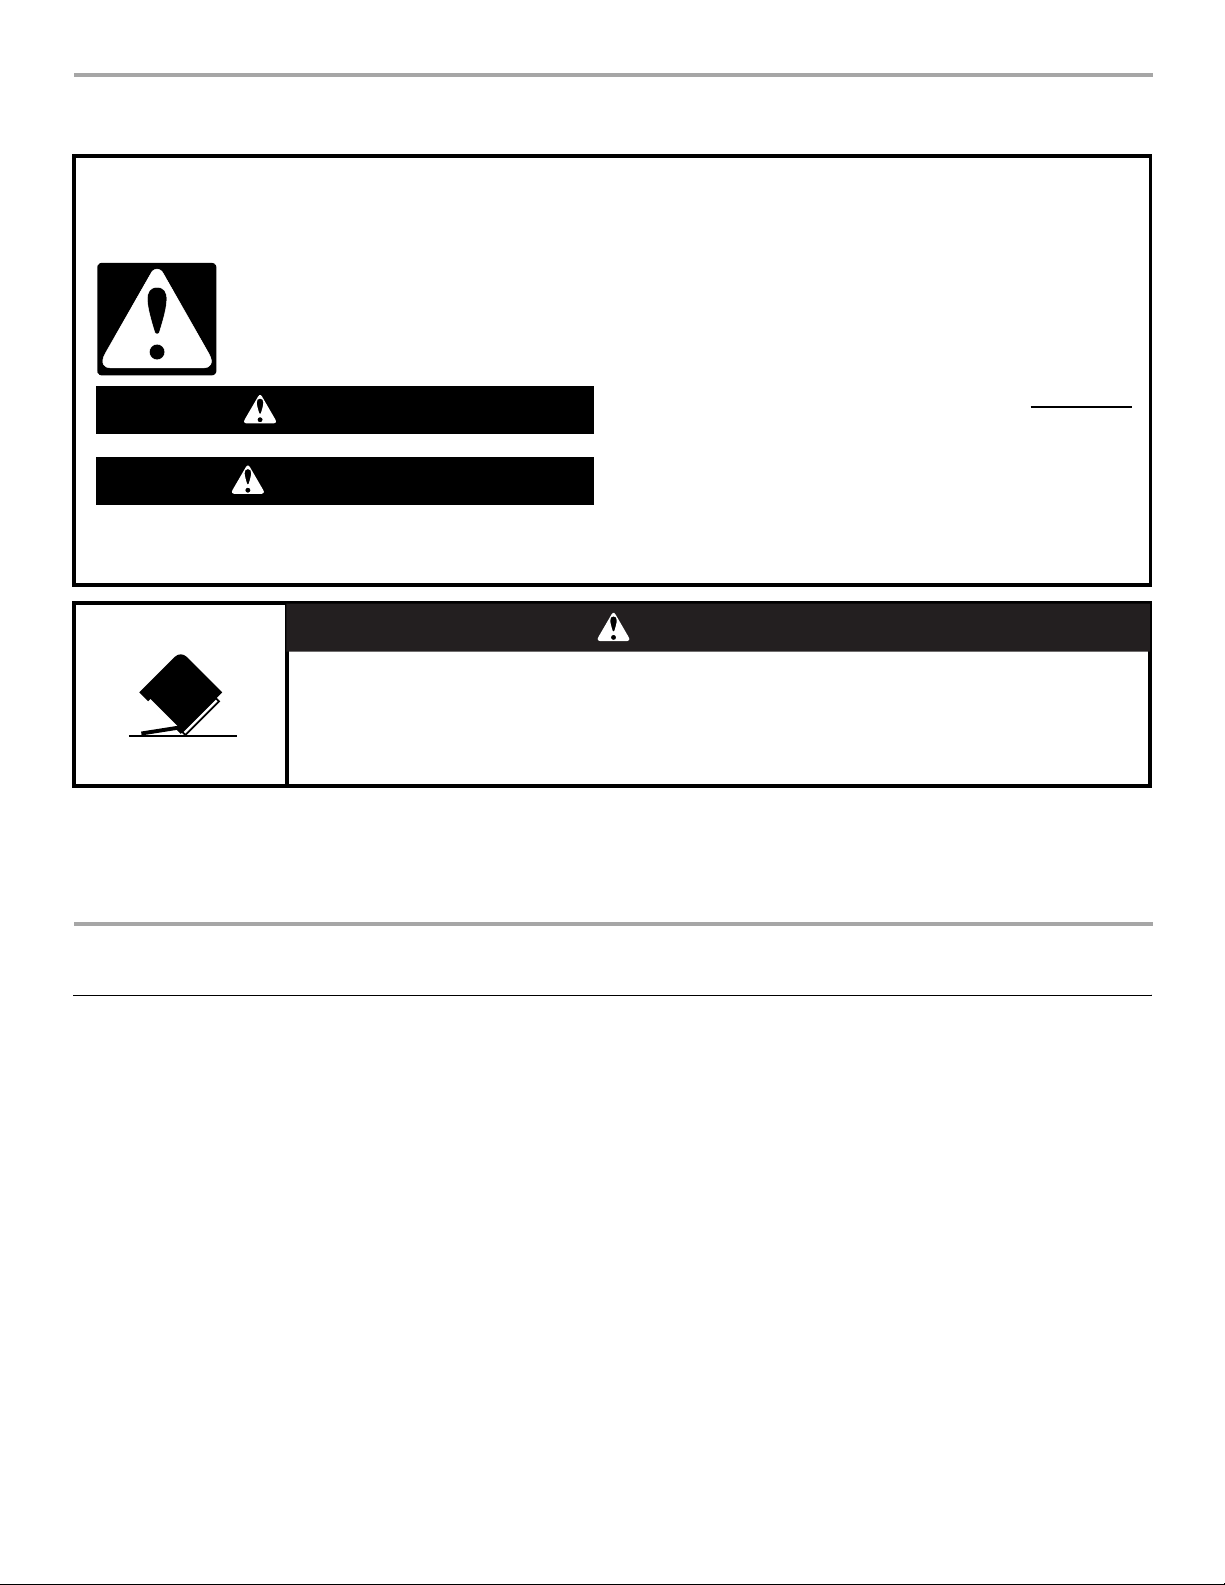
DISHWASHER SAFETY
Your safety and the safety of others are very important.
We have provided many important safety messages in this manual and on your appliance. Always read and obey all safety
messages.
This is the safety alert symbol.
This symbol alerts you to potential hazards that can kill or hurt you and others.
All safety messages will follow the safety alert symbol and either the word “DANGER” or “WARNING.”
These words mean:
You can be killed or seriously injured if you don't immediately
DANGER
follow instructions.
You can be killed or seriously injured if you don't
WARNING
All safety messages will tell you what the potential hazard is, tell you how to reduce the chance of injury, and tell you what can
happen if the instructions are not followed.
instructions.
WARNING
Tip Over Hazard
Do not use dishwasher until completel
Do not push down on open door.
Doing so can result in serious injury or cuts.
You need to:
■
Slowly open dishwasher door while someone grasps the rear
of the dishwasher. Remove shipping materials. Close
dishwasher door. Latch the dishwasher door shut.
■
Observe all governing codes and ordinances.
y installed.
■
Install this dishwasher as specified in these instructions.
Have everything you need to properly install dishwasher.
■
■
Contact a qualified installer to ensure that dishwasher is
installed to meet all electrical and plumbing national and local
codes and ordinances.
INSTALLATION REQUIREMENTS
Tools and Parts
Gather the required tools and parts before starting installation.
Read and follow the instructions provided with any tools listed
here.
Tools Needed
Phillips screwdriver
■
■
Flat-blade screwdriver
■
Measuring tape or ruler
¹⁄₂", ³⁄₄" and 1½" (1.3 mm,
■
1.9 mm and 3.8 cm) hole
saw bits
Shallow pan
■
6" (15.2 cm) adjustable
■
wrench
Small tubing cutter
■
Level
■
■
Cordless drill
¹⁄₈" drill bit
■
■
Flashlight
Parts Needed
■
90º elbow with ³⁄₈" N.P.T.
external threads on one
end
NOTE: The other end
must fit the water supply
line.
■
Thread seal tape
■
3 UL listed wire nuts
■
Copper tubing
(³⁄₈" recommended)
■
1¹⁄₂" to 2" (3.8 cm to
5.1 cm) screw-type clamp
■
Clamp connector (strain relief)
to fit
⁷⁄₈" (22.2 cm) diameter
hole
■
1¹⁄₂" to 2" (3.8 cm to
5.1 cm) screw-type clamp
if connecting to waste-tee
follow
2

Parts Supplied
Check that all parts are included. See separate parts list for
accessories available for your dishwasher.
AB
A. #8 x
⁵⁄₈
B. Phillips color-matched toekick screws
" Phillips flat-head wood screws
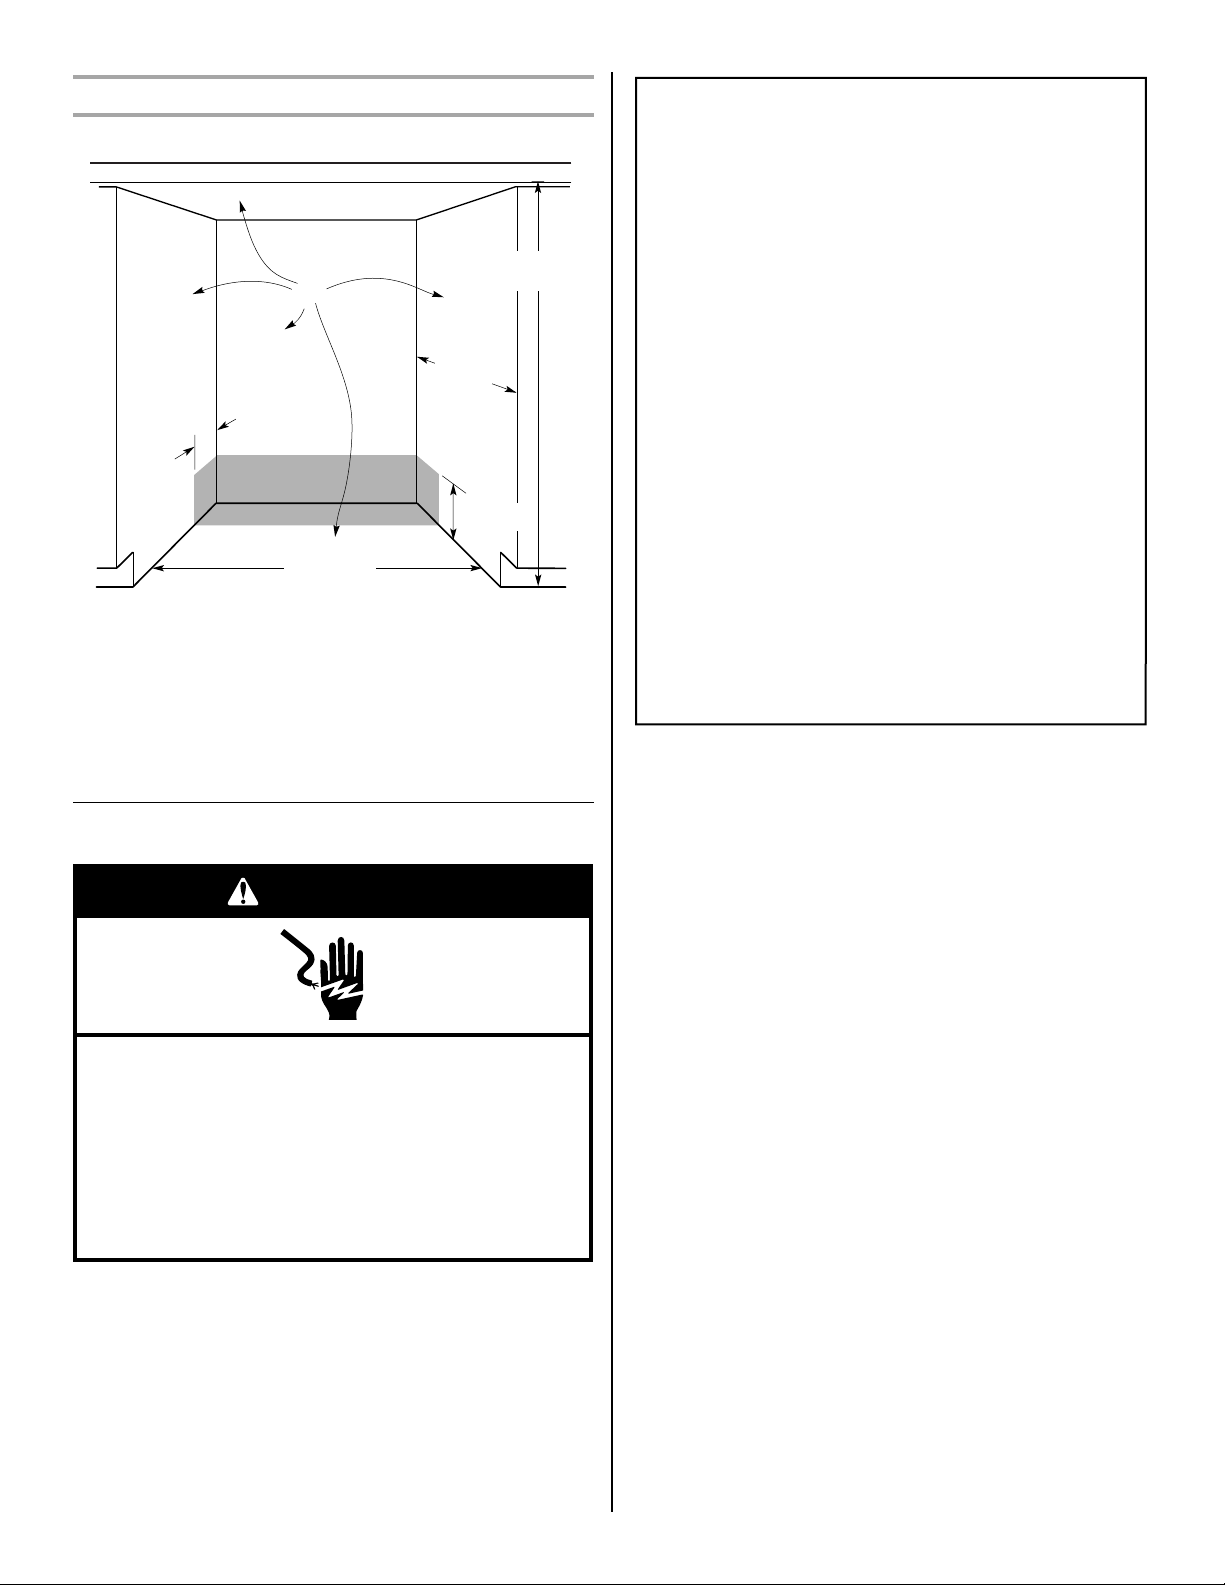
Location Requirements
IMPORTANT: Observe all governing codes and ordinances.
Failure to meet codes and ordinances could lead to fire or
electrical shock.
Proper installation is your responsibility.
■
Contact a qualified installer to ensure that the dishwasher is
installed to meet all electrical and plumbing national and local
codes and ordinances.
Install the dishwasher as specified in these instructions.
■
■
Have everything you need to properly install dishwasher.
Protect dishwasher and water lines leading to dishwasher
■
against freezing. Damage from freezing is not covered by the
warranty.
This dishwasher is manufactured for indoor use only.
■
■
In
stall and level dishwasher on a floor that will hold the weight,
and in an area suitable for its size and use.
■
Install dishwasher in a location with easy access to water,
electricity and drain.
■
Fully enclosed on both sides, back, and top.
Product Dimensions
Side View
24" (61 cm)*
16 5/8"(42.2 cm)
* To front of door frame
Rear View
*
32¹⁄₂" to 34¹⁄₂"
(82.6 to 87.6 cm)
2 ¹⁄₂" (6.2 cm)
23 5/9"(59.8cm)
Minimum Clearances
NOTES:
■
Corner locations require 2" (5.1 cm) minimum clearance
between the side of the dishwasher door and the wall or
cabinet.
■
A minimum of 25⁵⁄₈" (65.1 cm) is required in front of the
dishwasher to allow the door to open fully.
Opening should be square, and the floor should be level.
■
C
B
A
D
A. 2" (5.1 cm) minimum clearance
for door opening
B. Dishwasher
C. Countertop
⁵⁄₈
" (65.1 cm) minimum
D. 25
3
Installation Clearances
Cutout Dimensions
A
4"
(10.2 cm)
24 (61 cm)
maximum
A. All surfaces free from intrusions
(86.4 cm to 88.9 cm)
24" (61 cm)
minimum
* Underside of countertop to floor
NOTES:
■
Cut holes in shaded area of cabinet walls or floor for plumbing
and electrical service.
■
ADA installation—32¹⁄₂" (82.5 cm) beneath 34" (86.4 cm) high
countertops may be accomplished by adjusting the toekick
and leveling legs.
34" to 35"
6"
(15.2 cm)
Electrical Requirements
WARNING
GROUNDING INSTRUCTIONS
■
For a grounded, cord-connected dishwasher:
The dishwasher must be grounded. In the event of a
malfunction or breakdown, grounding will reduce the
risk of electric shock by providing a path of least
resistance for electric current. The dishwasher is
equipped with a cord having an equipment-grounding
conductor and a grounding plug. The plug must be
plugged into an appropriate outlet that is installed and
grounded in accordance with all local codes and
ordinances.
WARNING:
Improper connection of the
equipment-grounding conductor can result in a risk of
electric shock. Check with a qualified electrician or
service representative if you are in doubt whether the
dishwasher is properly grounded. Do not modify the
plug provided with the dishwasher; if it will not fit the
outlet, have a proper outlet installed by a qualified
electrician.
■
For a permanently connected dishwasher:
The dishwasher must be connected to a grounded
metal, permanent wiring system, or an equipmentgrounding conductor must be run with the circuit
conductors and connected to the equipmentgrounding terminal or lead on the dishwasher.
SAVE THESE INSTRUCTIONS
Contact a qualified electrician.
Ensure that the electrical installation is adequate and in
conformance with all national and local codes and ordinances.
Requirements:
■
120-volt, 60 Hz, AC-only, 15- or 20-amp fused electrical
supply
■
Copper wire only, 2 wire with ground
Recommended:
Time-delay fuse or circuit breaker
■
Separate circuit
■
Electrical Shock Hazard
Plug into a grounded 3 prong outlet.
Do not remove ground prong.
Do not use an adapter.
Do not use an extension cord.
Failure to follow these instructions can result in death,
fire, or electrical shock.
4
Direct Wire Connection
■
Use flexible, armored or nonmetalic sheathed, copper wire
with grounding wire that meets the wiring requirements for
your home and local codes and ordinances.
Power Supply Cord Connection
Use Power Supply Cord Kit (Part Number 4317824) marked for
use with dishwashers. Kit contents include:
UL listed 16 gauge 3-wire power supply cord with
■
3 prong grounding plug
Neer C-500 ⁷⁄₈" strain relief
■
■ 3 wire connectors
■
Part No. 302797 grommet
Follow the kit instructions for installing the power supply cord.
NOTE: Power supply cord must plug into a mating three prong,
grounded outlet, located in the cabinet next to the dishwasher
opening. Outlet must meet all local codes and ordinances.
IMPORTANT: If you plan to install a garbage disposal, an
additional separate 120-volt, 60 Hz, AC-only, 15- or 20-amp fused
electrical supply is required.
Water Supply Requirements
■
A hot water line with 20-120 psi (138-862 kPa) water pressure.
■
120°F (49°C) water temperature at dishwasher.
■
³⁄₈" O.D. copper tubing with compression fitting or flexible
braided water supply line
NOTE: ½" minimum plastic tubing is not recommended.
90º elbow with ³⁄₈" N.P.T. external pipe threads on one end.
■
IMPORTANT: Do not solder within 6" (15.2 cm) from water inlet
valve.
.
Drain Requirements
Use the new drain hose supplied with your dishwasher.
■
NOTE: If a longer drain hose is required:
Use a new drain hose with maximum length of 10 ft (3 m)
■
that meets all current AHAM/IAPMO test standards
■
Use a new drain hose that is resistant to heat and
detergent
Use a new drain hose that fits the 1" (2.5 cm) drain
■
connector on the dishwasher.
INSTALLATION INSTRUCTIONS
WARNING
■
Connect drain hose to waste tee or disposal inlet above drain
trap in house plumbing.
■
Connect drain hose to house plumbing 20" (50.8 cm)
minimum above the floor.
NOTE: It is recommended that the drain hose either be looped up
and securely fastened to the underside of the counter, or be
connected to an air gap.
■
Use a drain air gap if the drain hose is connected to house
plumbing lower than 18" (45.7 cm) above the subfloor or floor.
Drain Air Gap
■
Use ½" (1.3 cm) minimum I.D. drain line fittings.
NOTE: Do not connect drain lines from other devices to the
dishwasher drain hose.
3. Drill a 1¹⁄₂" (3.8 cm) diameter hole in the cabinet wall or floor on
the side of the opening closest to the sink.
-
Electrical Shock Hazard
Disconnect electrical power at the fuse box or circuit
breaker box before installing dishwasher.
Failure to do so can result in death or electrical shock.
1. Disconnect power.
2. Turn off water supply.
Prepare Cabinet Opening—
Existing Utility Hookups
Follow the steps in this section if you are installing the dishwasher
in an existing cabinet opening with utility hookups.
1. Check that the water supply line reaches to the front left-hand
side of the opening where the water connection will be made.
2. Check that the direct wire reaches to the front right-hand side
of the opening where the electrical connection will be made.
6" (15.2 cm)
A
B
A. Water supply line
B. Direct wire
Connect Drain Hose to Air Gap—Waste Disposal
1. Remove the waste disposal knockout plug. Cut the end of the
drain hose, if needed.
NOTE: Do not cut the ribbed section.
2. Attach the drain hose to the air gap with the large spring-type
clamp.
NOTE: If the drain hose was cut, use 1¹⁄₂" to 2 " (3.8 to 5 cm)
screw-type clamp (not provided).
3. Use a rubber hose connector (not provided) with spring- or
screw-type clamps (not provided) to connect the air gap to the
waste disposal inlet above the drain trap and at least
20" (50.8 cm) above the floor.
IMPORTANT: Always use a new drain hose even when installing
a new replacement dishwasher.
5
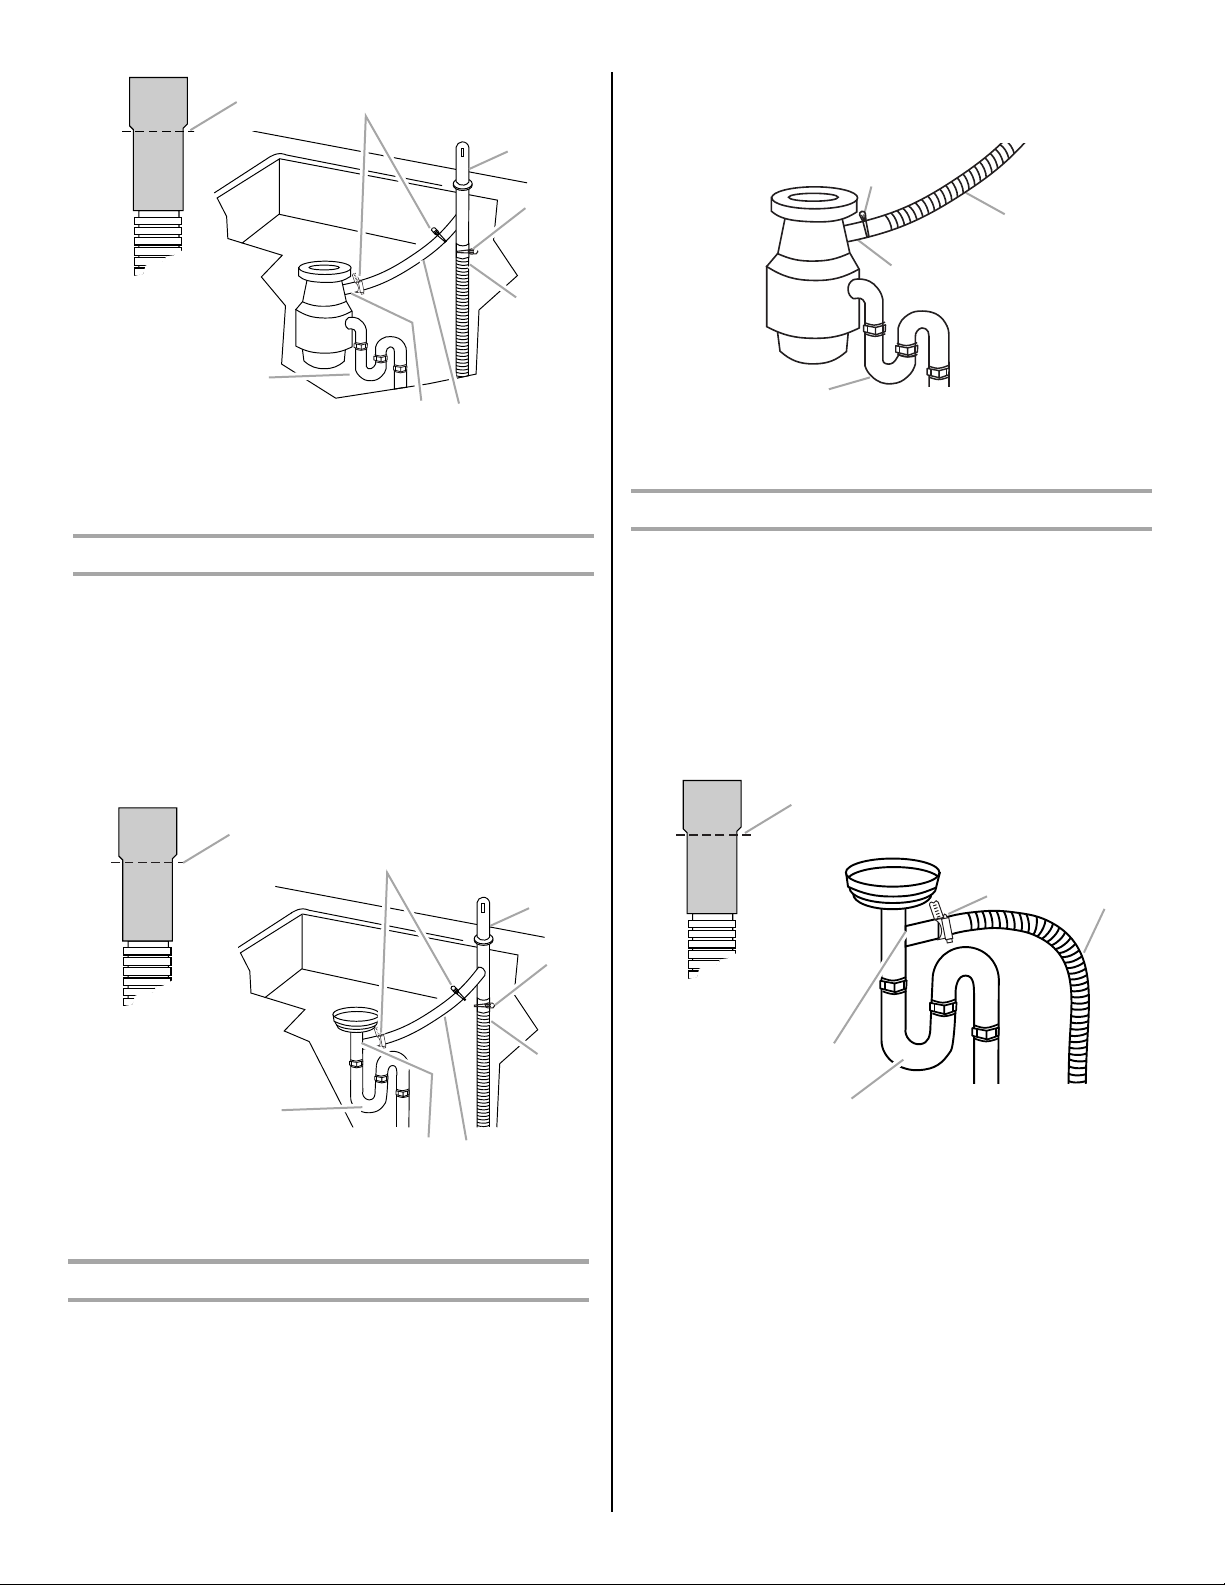
A
B
NOTE: It is recommended that the drain hose be looped up
and securely fastened to the underside of the counter.
C
A
D
B
C
E
H
F
G
A. Drain hose—cut here, if needed
B. Spring- or screw-type clamps
C. Air gap
D. Large spring-type clamp
E. Drain hose
F. Rubber hose connector
G. Disposal inlet
H. Drain trap
Connect Drain Hose to Air Gap—No Waste Disposal
1. Cut the end of the drain hose, if needed.
NOTE: Do not cut the ribbed section.
2. Attach the drain hose to the air gap with the large spring-type
clamp.
NOTE: If the drain hose was cut, use 1¹⁄₂" to 2 " (3.8 to 5 cm)
screw-type clamp (not provided).
3. Use a rubber hose connector (not provided) with spring- or
screw-type clamps (not provided) to connect the air gap to the
waste tee above the drain trap and at least 20" (50.8 cm)
above the floor.
A
B
C
D
D
A. Large spring-type clamp
B. Drain hose
C. Disposal inlet
D. Drain trap
Connect Drain Hose—No Waste Disposal or Air Gap
1. Cut the end of the drain hose, if needed.
NOTE: Do not cut the ribbed section.
2. Attach the drain hose to the waste tee with the 1¹⁄₂" to
2" (3.8 cm to 5 cm) screw-type clamp (not provided).
This connection must be before the drain trap and at least
20" (50.8 cm) above the floor.
NOTE: It is recommended that the drain hose be looped up
and securely fastened to the underside of the counter.
A
B
C
E
H
F
G
A. Drain hose—cut here, if needed
B. Spring- or screw-type clamps
C. Air gap
D. Large spring-type clamp
E. Drain hose
F. Rubber hose connector
G. Waste tee
H. Drain trap
Connect Drain Hose to Waste Disposal—No Air Gap
1. Remove the waste disposal knockout plug.
NOTE: Do not cut the end of the drain hose.
2. Attach the drain hose to the waste disposal inlet with the large
spring-type clamp.
This connection must be before the drain trap and at least
20" (50.8 cm) above the floor.
6
E
D
A. Drain hose—cut here, if needed
B. Screw-type clamp
C. Drain hose
D. Drain trap
E. Waste tee
Prepare Cabinet Opening—No Existing
Utility Hookups
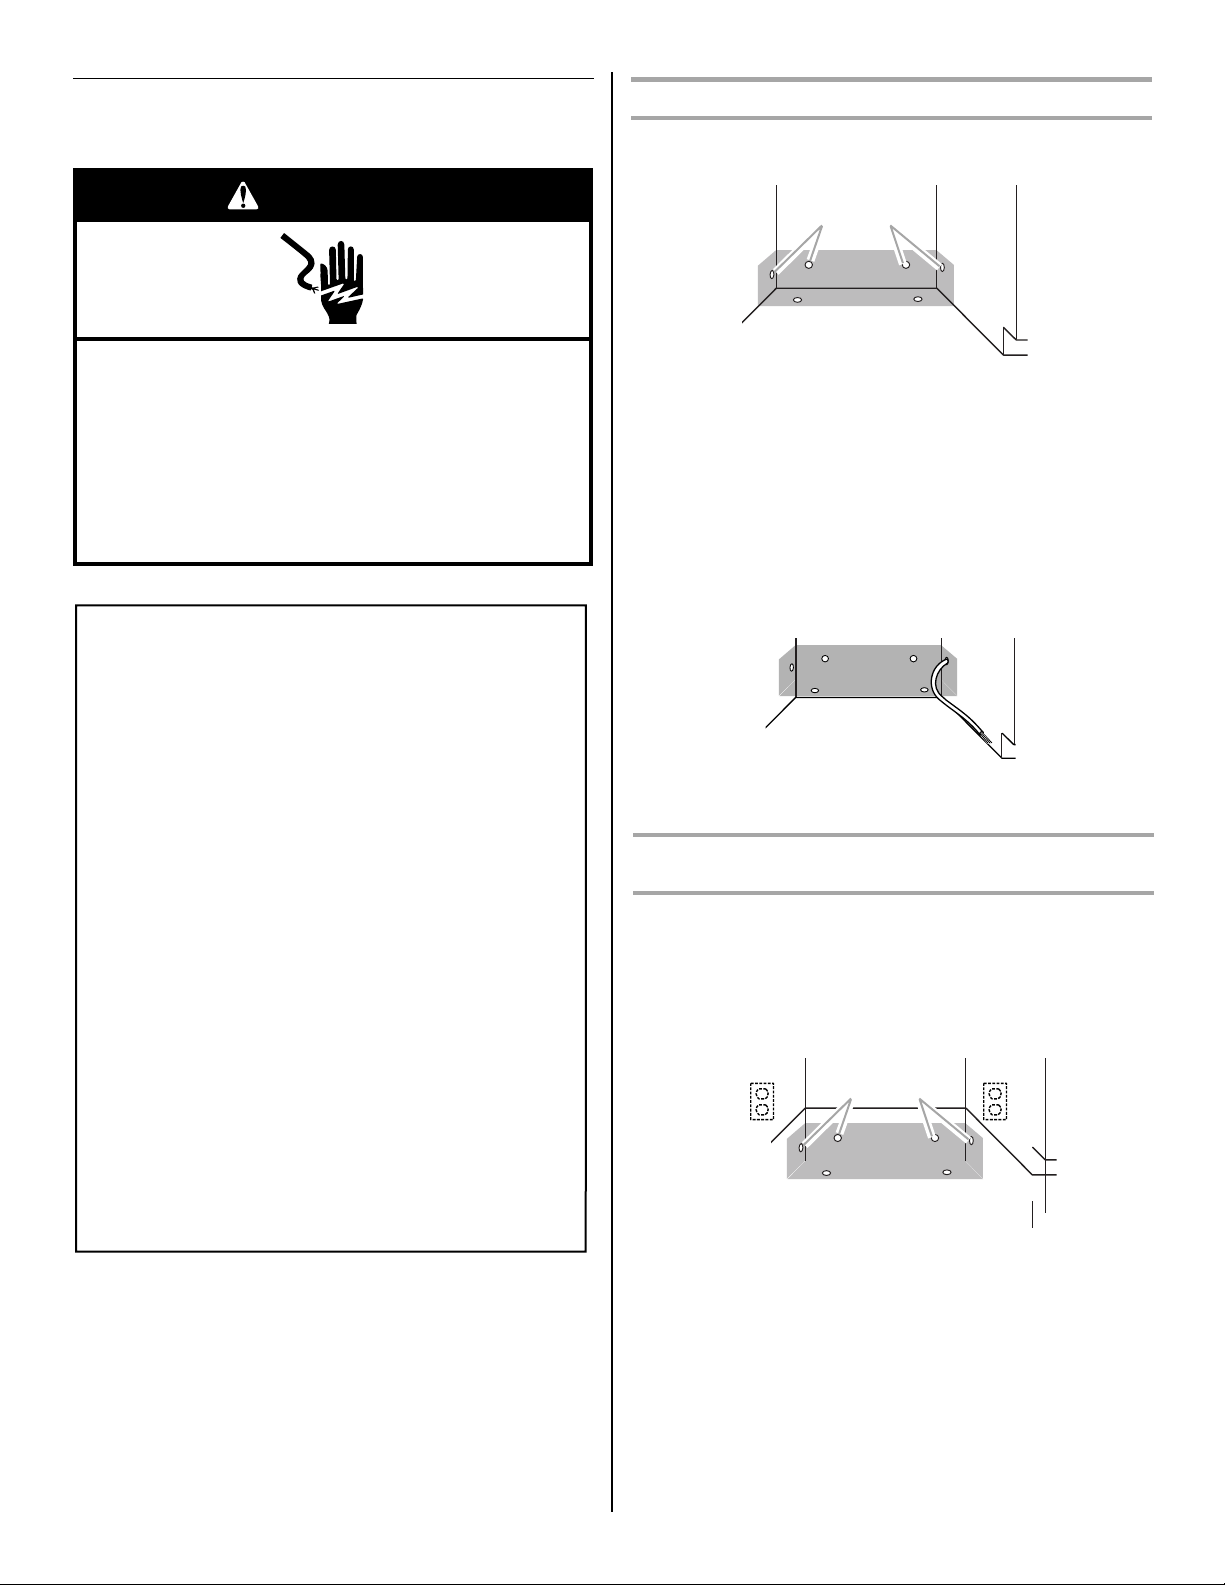
Install Electrical Connection—Direct Wire Method
1. Drill
a ³⁄₄" (1.9 cm) hole in the right-hand cabinet side, the rear
or floor of opening.
WARNING
Electrical Shock Hazard
Plug into a grounded 3 prong outlet.
Do not remove ground prong.
Do not use an adapter.
Do not use an extension cord.
Failure to follow these instructions can result in death,
fire, or electrical shock.
GROUNDING INSTRUCTIONS
■
For a grounded, cord-connected dishwasher:
The dishwasher must be grounded. In the event of a
malfunction or breakdown, grounding will reduce the
risk of electric shock by providing a path of least
resistance for electric current. The dishwasher is
equipped with a cord having an equipment-grounding
conductor and a grounding plug. The plug must be
plugged into an appropriate outlet that is installed and
grounded in accordance with all local codes and
ordinances.
WARNING:
equipment-grounding conductor can result in a risk of
electric shock. Check with a qualified electrician or
service representative if you are in doubt whether the
dishwasher is properly grounded. Do not modify the
plug provided with the dishwasher; if it will not fit the
outlet, have a proper outlet installed by a qualified
electrician.
■
For a permanently connected dishwasher:
The dishwasher must be connected to a grounded
metal, permanent wiring system, or an equipmentgrounding conductor must be run with the circuit
conductors and connected to the equipmentgrounding terminal or lead on the dishwasher.
Improper connection of the
A
A. Optional locations
B. Preferred locations
2. If the cabinet is wood, sand hole until smooth. If the cabinet is
metal, cover the hole with a grommet (not provided).
3. Route cable from power supply through cabinet hole (cable
must extend to the right front side of cabinet opening). Tape
cable to the floor 6" in front of unit. This will prohibit cable
from moving when dishwasher is moved into cabinet opening".
Install E
Metho
NOTE: A mating, 3 prong grounded outlet is required in a cabinet
next to the dishwasher opening.
1. Drill a ³⁄₄" (1.9 cm) hole in the right-hand cabinet side, the rear
lectrical Connection—Power Supply Cord
d
or floor of opening.
B
A
B
SAVE THESE INSTRUCTIONS
A. Optional locations
B. Preferred locations
2. If the cabinet is wood, sand hole until smooth. If the cabinet is
metal, cover the hole with a grommet (Part Number 302797)
included with power supply cord kit.
7

ll Water Line
Insta
1. Drill a ¹⁄₂" (1.3 cm) hole in the left-hand cabinet side, the rear or
floor of opening.
A
B
C
A
A. Optional locations
B. Preferred locations
B
2. Measure the overall length of the copper tubing required.
3. Attach the copper tubing to the water supply line with a
manual shutoff valve.
4. Slowly feed the copper tubing through the hole in the cabinet.
NOTE: The copper tubing will bend and kink easily.
The copper tubing should be far enough into the cabinet
opening to connect it to the dishwasher inlet on the front lefthand side of the dishwasher.
5. Turn on the water shutoff valve. Run water into a shallow pan
to flush the copper tubing of particles that may clog the inlet
valve.
6. Turn off the shutoff valve.
Connec
t Drain Hose to Air Gap—Waste Disposal
IMPORTANT: Always use a new drain hose even when installing
a new replacement dishwasher.
1. Drill a 1
" (3.8 cm) diameter hole in the cabinet wall or floor on
¹⁄₂
the side of the opening closest to the sink.
D
E
H
F
G
A. Drain hose—cut here, if needed
B. Spring- or screw-type clamps
C. Air gap
D. Large spring-type clamp
E. Drain hose
F. Rubber hose connector
G. Disposal inlet
H. Drain trap
Connect Drain Hose to Air Gap—No Waste Disposal
IMPORTANT: Always use a new drain hose even when installing
a new replacement dishwasher.
1. Drill a 1¹⁄₂" (3.8 cm) diameter hole in the cabinet wall or floor on
the side of the opening closest to the sink.
-
2. Remove the waste disposal knockout plug. Cut the end of the
drain hose, if needed.
NOTE: Do not cut the ribbed section.
3. Attach the drain hose to the air gap with the large spring-type
clamp.
NOTE: If the drain hose was cut, use 1¹⁄₂" to 2 " (3.8 to 5 cm)
screw-type clamp (not provided).
4. Use a rubber hose connector (not provided) with spring- or
screw-type clamps (not provided) to connect the air gap to the
waste disposal inlet above the drain trap and at least
20" (50.8 cm) above the floor.
8
2. Cut the end of the drain hose, if needed.
NOTE: Do not cut the ribbed section.
3. Attach the drain hose to the air gap with the large spring-type
clamp.
NOTE: If the drain hose was cut, use 1¹⁄₂" to 2 " (3.8 to 5 cm)
screw-type clamp (not provided).
4. Use a rubber hose connector (not provided) with spring- or
screw-type clamps (not provided) to connect the air gap to the
waste tee above the drain trap and at least 20" (50.8 cm)
above the floor.
A
B
C
D
E
H
F
G
A. Drain hose—cut here, if needed
B. Spring- or screw-type clamps
C. Air gap
D. Large spring-type clamp
E. Drain hose
F. Rubber hose connector
G. Waste tee
H. Drain trap
Connect Drain Hose to Waste Disposal—No Air Gap
IMPORTANT: Always use a new drain hose even when installing
a new replacement dishwasher.
1. Drill a 1¹⁄₂" (3.8 cm) diameter hole in the cabinet wall or floor on
the side of the opening closest to the sink.
Connect Drain Hose—No Waste Disposal or Air Gap
IMPORTANT: Always use a new drain hose even when installing
a new replacement dishwasher.
1. Drill a 1¹⁄₂" (3.8 cm) diameter hole in the cabinet wall or floor on
the side of the opening closest to the sink.
-
2. Cut the end of the drain hose, if needed.
NOTE: Do not cut the ribbed section.
3. Attach the drain hose to the waste tee with the 1¹⁄₂" to
2" (3.8 cm to 5 cm) screw-type clamp (not provided).
This connection must be before the drain trap and at least
20" (50.8 cm) above the floor.
NOTE: It is recommended that the drain hose be looped up
and securely fastened to the underside of the counter.
A
-
2. Remove the waste disposal knockout plug.
NOTE: Do not cut the end of the drain hose.
3. Attach the drain hose to the waste disposal inlet with the large
spring-type clamp.
This connection must be before the drain trap and at least
20" (50.8 cm) above the floor.
NOTE: It is recommended that the drain hose be looped up
and securely fastened to the underside of the counter.
A
B
C
E
D
A. Drain hose—cut here, if needed
B. Screw-type clamp
C. Drain hose
Install Dishwasher
WARNING
B
D. Drain trap
E. Waste tee
C
D
A. Large spring-type clamp
B. Drain hose
C. Disposal inlet
D. Drain trap
Tip Over Hazard
Do not use dishwasher until completely installed.
Do not push down on open door.
Doing so can result in serious injury or cuts.
9
 Loading...