

Page 1
GB QUICK REFERENCE GUIDE
THE FIRST TIME THE APPLIANCE IS USED:
• FOLLOW THE “INSTALLATION INSTRUCTIONS”
• REMOVE THE TRANSIT BOLTS BEFORE USING THE APPLIANCE
• First wash cycle without laundry:
Turn on the tap(s).
1.
Close the appliance door.
2.
Pour a small amount of detergent (about 100 ml) into the detergent dispenser
3.
compartment .
Select a short programme (see programme chart).
4.
The pilot lamp lights up to sh ow th at t he ap pl ia nce i s s wit ch ed on .
Press the “Start” button for about one second.
5.
This initial cycle serves to eliminate any water remaining after your appliance was tested
at the factory.
NORMAL DAILY USE:
Turn on the tap(s).
1.
Sort the laundry according to fabric type and colour and load the appliance.
2.
Close the door.
3.
Supply detergent and any additives you intend to use.
4.
Select the programme, the temperature and any special functions required.
5.
Press the “Start” button for about one second.
6.
IMPORTANT:
During the first 15 minutes of the “Cotton” and “Eas y care/Synthetic” programmes (both without
prewash) the door can be opened f or a ddi ng laundry. This is not possible if “Sho rt /R api d” is
selected.
20
Page 2

CONTENTS GB
APPLIANCE AND ACCESSORIES
PROTECTING THE ENVIRONMENT
SAFETY INSTRUCTIONS
TRANSPORT / HANDLING
PREPARING THE WASH
DETERGENT AND ADDITIVES
DYEING AND BLEACHING
SELECTING THE PROGRAMME /
STARTING THE PROGRAMME
SPECIAL OPTIONS
PROGRAMME SEQUENCE INDICATOR
Page
22
Page
23
Page
23
Page
23
Page
24
Page
25+26
26
Page
26
Page
27
Page
28
Page
DOOR LOCK / PROGRAMME END
PROGRAMME RESELECTION / INTERRUPTION
REMOVING THE FILTER / DRAINING RESIDUAL WATER
CARE AND MAINTENANCE
CHILD SAFETY
TROUBLE SHOOTING GUIDE
AFTER SALES SERVICE
INSTALLATION INSTRUCTIONS
Page
Page
Page
Page
Page
Page
Page
Page
28
28
29
30
30
31
32
33
21
Page 3
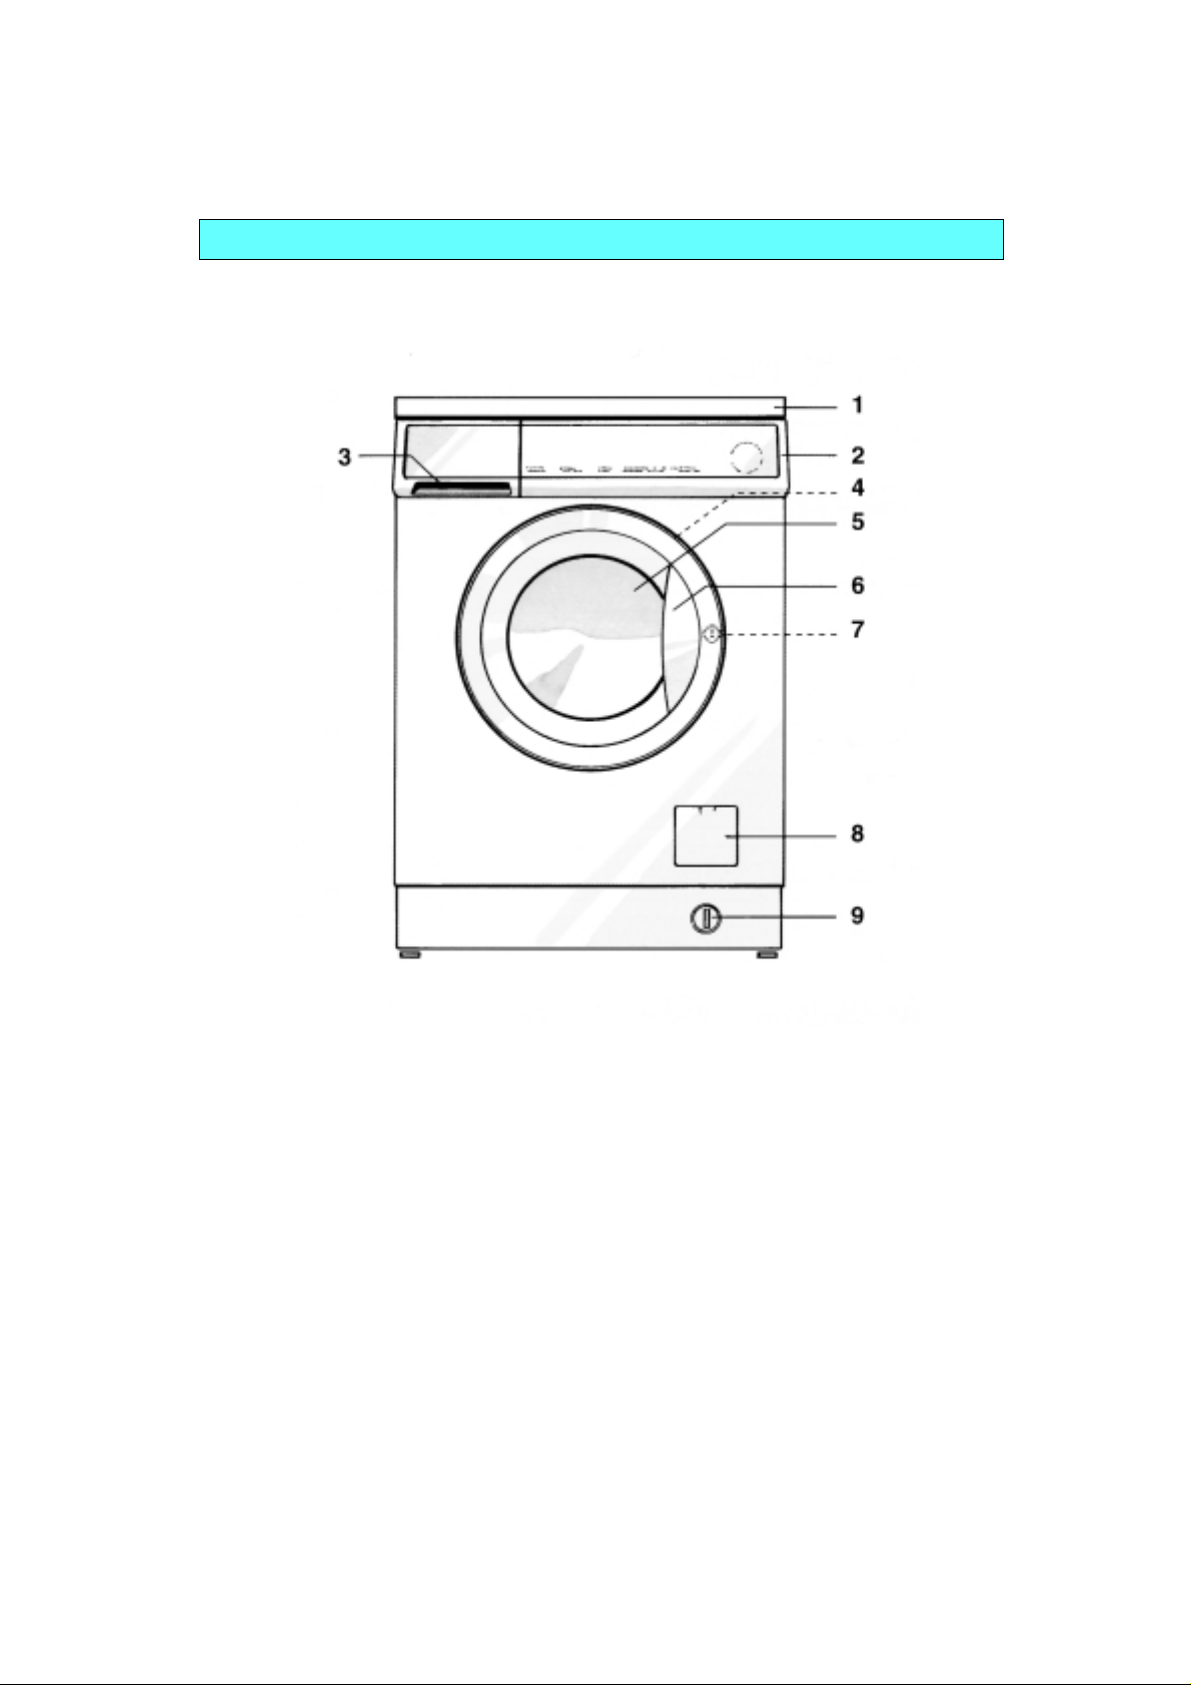
APPLIANCE AND ACCESSORIES
Worktop
1.
Control panel
2.
Detergent dispenser
3.
After Sales Service sticker (inside door)
4.
Door
5.
Door handle
6.
To open the door press the button on the inside of the handle and pull.
-
Close the door by pushing it firmly (the lock will click into place).
-
Child safety (inside door)
7.
Filter (behind cover)
8.
Residual water drain (depending on model).
9.
22
Page 4

PROTECTING THE ENVIRONMENT
• Packing
The packing material is 100% recyclable a s
indicated by the recycling symbol.
• Appliance
The appliance is built from recyclable materials.
If you decide to scrap the appliance ensure you
observe local waste disposal by laws.
Before scrapping, pull out the plug and cut off
the power cable so the appliance cannot be
connected to the mains.
• Environmental tips
If possible, always wash with a full load
-
(depending on the programme) to save water
and electricity.
For a lightly to averagely soiled laundry, use
-
a programme without a prewash cycle.
SAFETY INSTRUCTIONS
Use low temperatures or short programmes
-
for lightly soiled laundry.
Press the “Saving half load” (Lightly soiled)
-
button (depending on model) when washing
small loads, and reduce the amount of
detergent.
If you intend to dry the washing in a dryer,
-
select maximum spin speed (depending on
the selected programme) to reduce the
electricity consumption of the dryer.
Do not exceed the detergent doses indicated
-
in the Manufacturer’s instructions.
Use stain removal products only when strictly
-
necessary.
Use the appliance only for domestic washin g
•
and for its intended applications.
Ensure the installation and electrical and water
•
connections have been made in accordance
with the Manufacturer’s instructions and in
observance of local safety regulations (refer to
“Installation instructions”).
Before cleaning or maintaining the appliance ,
•
switch it off or unplug it.
When the appliance is not in use unplug it and
•
turn off the tap(s).
TRANSPORT / HANDLING
Unplug the appliance.
1.
Turn off the tap(s).
2.
Remove the water supply and drain hose.
3.
Do not attempt to force the door open.
•
Do not allow children to play with the appliance
•
or enter the drum. Do not rest any weight on the
door.
Packing materials can be dangerous for
•
children: keep all packing materials (plastic
bags, polystyrene, etc.) well out of their reach.
The appliance conforms to Europea n s af et y
•
regulations and to Directive n. 93/68/EEC and
standard EN 60555.
Eliminate all water from the hoses and from
4.
the appliance (see “Draining residual water”).
Fit the transit bolts (obligatory) (see
5.
“Installation instructions”).
23
Page 5

PREPARING THE WASH
1. Sort the laundry according to:
• Type of fabric / care label symbol
Cottons, mixed fibres, easy c are, wool.
• Colour
Separate whites and coloureds. Wash new
coloured items separately.
• Size
Wash items of different sizes in the same load to
improve washing efficiency and distribute the load
more evenly inside the drum.
• Fabric delicacy
Wash delicate articles separately: use a special
programme for Pure New Wool, curtains and
other delicates. Always remove curtain glides or
wash curtains with the glides inside a cotto n bag.
Only wash fabrics that are suitable for machine
washing.
Wash stockings, belts and other small items or
articles with hooks (e.g. bras) i n special cotton bags
for washing machines or in zipped p ill ow ca ses .
2. Empty pockets
Coins, safety pins and similar can damage your
laundry and the appliance drum and tub.
3. Fasteners
Close zips and fasten buttons or hooks; loose belts
or ribbons should be tied together.
STAIN REMOVAL
Blood, milk, egg and other organic substances are
•
generally removed by the enzyme phase of the
programme.
To remove red wine, coffee, tea, grass and fruit
•
stains etc. add a stain re mo ving agent in the
detergent dispenser compartment .
Particularly stubborn stains should be treated
•
before the wash.
LOADING THE LAUNDRY
Open the door.
1.
Unfold the laundry and place it loosely in the drum.
2.
Close the door.
3.
RECOMMENDED LOADS
See separate programme chart.
Note: Overloading will result in unsatisfac tory washi ng
results and creased laundry.
24
Page 6
DETERGENT AND ADDITIVES
CHOOSING THE RIGHT DETERGENT
The type of detergent depends o n:
•
type of fabric (cottons, easy care, delicate
items, wool);
Note:
use only specific detergents f or wo ol .
•
colour;
•
washing temperature;
•
degree and type of soiling.
Notes:
•
Whitish residues on dark fabrics are ca used
by insoluble water softeners used i n mod ern
phosphate-free powder detergents.
If you notice this problem, sha ke or b rush t he
affected items or use a liquid d et ergent .
•
Keep detergents and additiv es in a d ry p l a ce
and out of reach of children.
•
Use only detergents and addi tives specificall y
produced for domestic appliances.
If you use water softeners, de sc aling agents
and dyes, make sure they are suitable f or
washing machine use.
•
Do not use solvents (turpentine, benzine, etc.).
Do not machine wash fabrics that h av e bee n
treated with solvents or flammable l iqu id s.
WATER HARDNESS
DOSAGE
Follow the instructions on the detergent pack in
relation to:
•
the degree and type of soiling;
•
the size of the load;
-
full load: follow the detergent
manufacturer’s instructions;
-
half load: 3/4 the amount used for a full load;
-
minimum load (about 1 kg): half the
amount used for a full load;
•
water hardness in your area (ask for information
from your water company): soft water requires
less detergent than hard water.
Notes:
•
Too much detergent can result in excess fo am
formation, which reduces washing eff ici en cy.
If the appliance detects exces sive foam it may
prevent spinning.
•
The laundry will become grey if you use too little
detergent. Too little detergent will also lead to
increased scale deposits on the heating element
and drum.
Water hardness
class
1
2
3
4
Characteristics German scale
°dH
soft
average
hard
very hard
0-7
7-14
14-21
over 21
French scale
°fH
0-12
12-25
25-37
over 37
Clarke scale
°eH
0-9
9-17
17-26
over 26
Adjust the water hardness level marker in the detergent dispenser in accordance with the hardness
of the water in your area. Move the marker sideways to the required position.
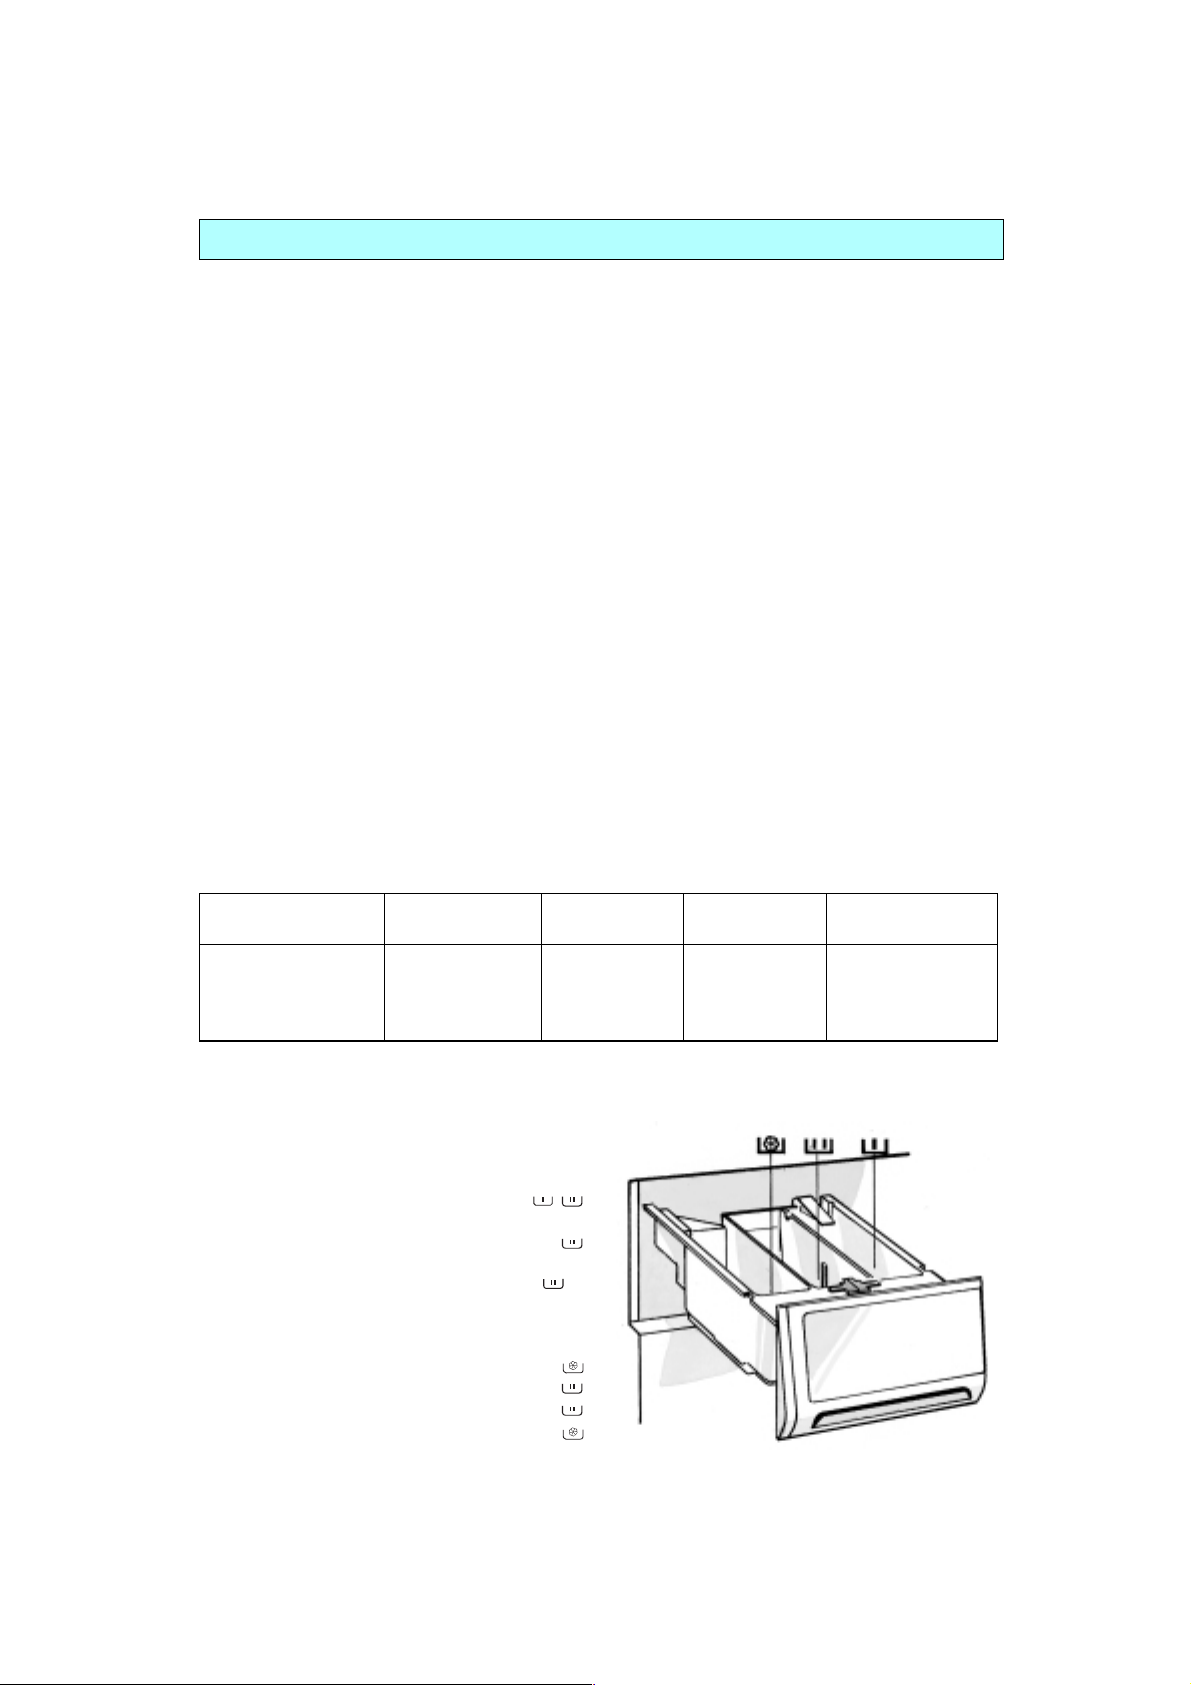
ADDING DETERGENT AND ADDITIVES
1.
Pull out the detergent dispenser
2.
Add the detergent
•
Programmes with pre and main wash
•
Programmes without prewash, main was h
only
When using liquid detergent, remove the
coloured insert and fit it in compartment .
The graduated scale on the insert make s
dosing easier.
•
Fabric softeners, etc. (no more than the "max"
mark)
•
Stain remover agents
•
Anti-scale agents (water hardness 4)
•
Starch (dissolved in water)
25
Page 7

DETERGENT AND ADDITIVES
Close the detergent dispenser completely.
3.
Notes:
To prevent dispensing problems when us i ng
•
highly concentrated washing powder, use the
special detergent ball supplied with the
detergent and place it inside the drum.
You can use liquid detergent in the prewash
•
phase for programmes with this special option.
DYEING AND BLEACHING
Dyeing:
consist of a dye colour, fixing agent and salt. Pour
the dye colour, the fixing a ge nt a nd t hen t he salt
directly into the empty drum. Fill in the laundry
only afterwards.
commercially available products usually
In this case use only powder detergent for the
main wash.
When using liquid detergent with the “St ar t
•
delay” option, use a detergent b al l f or liq ui d
detergent and place it directly in the drum.
When using concentrated fabric softeners,
•
add water in the detergent dispenser up to the
“max.” level mark.
Use exclusively products recommended for
•
washing machines.
Follow the Manufacturer’s instru ction s.
•
Plastic and rubber parts of the machin e ma y
•
be stained by dyes or bleaches.
SELECTING THE PROGRAMME /
STARTING THE PROGRAMME
(refer also to the separate programme chart and
the consumption data table)
Turn on the tap(s).
1.
Turn the programme selector to the
2.
programme required.
The pilot lamp lights up to indicate that the
appliance is switched on.
Turn the thermostat knob to the required
3.
temperature.
Select options or start delay (see the next
4.
chapter) if required.
Keep the “Start” button pressed for one
5.
second. (if the “Start Delay” option is in
use, the point after to the number of hours set
flashes. Also see “Start Delay” option).
3
2
26
Page 8

SPECIAL OPTIONS
(The special options available de pe nd on t he
model of your appliance, refer also to the
programme chart)
Each programme is automatically assigned a maximum spin speed .
Programme MAX. SPIN SPEED (RPM) (according to model)
Cottons
Easy care
Delicate
Wool
Rinse + spin
Gentle spin
* For improved garment care, spin speed is limited to 900 rpm.
Prewash button
Use the prewash option only for a h ea vil y
•
soiled wash (e.g. sand, stubborn soil).
The prewash option adds about 15 minutes to
•
the programme time.
Rinse hold button
The laundry remains in the rinse water
•
without progressing to the spin cycle to avoid
creasing and prevent colours from changing.
This option is particularly recommended for
•
programmes for “Wool”, “Easy care”
(synthetics) and “Delicates” or if the laundry
cannot be removed as soon as the
programme comes to an end.
To terminate the rinse hold option:
•
Press the Rinse hold button again; the
programme will terminate automatically with
the spin cycle for the preset wash programme.
Intensive rinse button
Rinse cycle time is extended and the water
•
level increases for improved rinsing efficiency.
The intensive rinse option is particularly suitable
•
for areas with very soft water when washing
baby linen and helps people with allergies.
Short / Rapid (Quick wash) button
(if available)
For quick, economical washes.
•
Ideal for minimum loads of lightly-soiled
•
articles.
/
1200 1100 1000 900 800 600
900* 900* 900* 900 800 600
900* 900* 900* 900 800 600
900* 900* 900* 900 800 600
1200 1100 1000 900 800 600
900* 900* 900* 900 800 600
Spin speed button
Press the button to set the s pin s pee d.
•
Indication:
•
The selected spin speed is indicated with a
coloured background.
Saving half load (Lightly soiled) button
Reduces water consumption, particularly
•
during the rinse.
Particularly suitable for a lightly soi le d wash
•
and for reduced loads, i.e. reduction of the
amount of detergent.
Energy Save / Eco button
The wash time is extended and the water
•
temperature is reduced.
This function saves about 30% in energy
without compromising the excellent results of
the wash.
Start delay
The start delay time can be set from 1 to 9
•
hours in advance:
Hold down the “Start delay” button or press it
repeatedly until the desired number of hours
appears on the digital display. If the setting
exceeds the maximum of 9 hours, the timer
starts at 0 next time the bu tt on i s p r ess ed .
After having selected the programme and
•
special options, hold down the the “Start” button
for about 1 second. The time remaining to the
programme start is shown in realtime.
The number of hours setting can be corrected
•
after the “Start” button has been pre ssed.
As before, repeatedly press the “Start delay”
button until the desired number of hours is
displayed.
When using liquid detergent with this option,
•
use a detergent ball for liquid deterg en t and
place it directly in the drum.
27
Page 9

PROGRAMME SEQUENCE INDICATOR
Indicates the current programme step .
The indicator moves from left to right after the
programme start through “Wash”, “Rinse” and
DOOR LOCK / PROGRAMME END
DOOR LOCK
When you start the programme the door is
automatically locked until the programme
terminates.
“Door closed” indicator lights up.
Exception:
care/Synthetics” programmes (without prewash)
the door can be opened for adding fu rther laundry
during the first 15 minutes. If “Short/Ra pi d” (Quick
wash) has been selected, however, this is not
possible.
If the programme selector knob is turned to the “0”
position or the power supply is interrupted, the door
unlocks automatically after about 2 minutes.
When running the “Cotton” and “Easy
PROGRAMME RESELECTION / INTERRUPTION
PROGRAMME RESELECTION
“Spin”. At the end of t he programme the indicator
returns to its initial position on the left side.
PROGRAMME END
1.
Programme end is indicated by the fact that
-
the programme sequence indicator is no
longer visible.
-
the “Door closed” indicator is switched off.
2.
Cancel the selected special functions by
pressing the appropriate button again.
3.
Set the programme selector on "0".
The pilot lamp switches off.
4.
Open the door and remove the load.
5.
Turn off the tap(s).
Note:
Leave the door ajar so that the drum can dry.
TO INTERRUPT/PAUSE A PROGRAMME
a.
CONTINUING WITH A NEW PROGRAMME
OR TEMPERATURE SETTING
1. Select the new programme or
temperature setting.
2. Hold down the “Start” button for about
one second.
The new programme continues with the
same programme step at which the previous
programme was interrupted.
b.
CANCELLING THE CURRENT PROGRAMME
AND RESTARTING WITH A NEW ONE
Do not put more detergent into the machine for
the new programme, since almost no water is
drained out when a programme is cancelled.
1. Hold down the “Start” button for 5 seconds,
or until the programme control audibly
restarts.
2. Wait until the programme sequence
indicator has returned to its initial (leftmost)
position and has disappeared.
3. Set the programme selector to “0”.
4. Select the new programme, temperature
and any special options desired.
5. Hold down the “Start” button for one second.
To interrupt the current programme for a certain
time and resume it later:
1.
Set the programme selector to “0”.
2.
After the desired time, reselect the programme.
3.
Hold down the “Start” button for about one
second.
The programme continues.
TO STOP A PROGRAMME BEFORE THE
END AND DRAIN
To stop a programme before t he e nd a nd dra in
the water:
1.
Set the programme selector to "Drain".
2.
Hold down the “Start” button for about one
second.
The machine drains.
Only open the door when the programme
sequence indicator has returned to its initial
(leftmost) position and the “Door Closed”
indicator is off.
28
Page 10

REMOVING THE FILTER / DRAINING RESIDUAL WATER
WHEN SHOULD THE FILTER BE REMOVED?
•
Check the filter regularly, two or t hre e times a y ear
and clean it if necessary.
•
Check the filter if the applian ce i s n ot d r ain in g
properly or if it fails to perform spin cycles.
•
Remove the filter if the pump is blocked by an ob ject
(buttons, coins, safety pins, etc.).
IMPORTANT:
cool before draining the appl ian ce .
REMOVING THE FILTER
1.
Switch off the appliance (set the programme
selector to “0”).
2.
Remove the coloured insert from the detergent
dispenser and use it to open the filter cover.
3.
Place a bowl beneath the filter.
4.
Turn the filter slowly anti-clockwise until the grip is
vertical; do not extract filter as yet.
5.
Wait until all the water has drained out.
6.
Now unscrew the filter completely and extract it.
7.
Remove any foreign material from the filter.
8.
Make sure the pump impeller is not obstructed.
9.
Insert the filter and screw it fully down in a
clockwise direction (until the grip is horizontal).
10.
Close the cover.
11.
Pour 0.5 l of water into the detergent dispenser to
reactivate the “Eco System”.
12.
Select the programme and hold down the “Start”
button about one second.
WHEN SHOULD THE RESIDUAL WATER BE
DRAINED?
•
Before transporting (moving) the machine.
•
If the appliance is installed in a room subjec t to subzero temperatures. It is best in this case to drain the
machine after every wash.
DRAINING RESIDUAL WATER
The residual water drain hose is accommod ated in t he
appliance plinth.
1.
Unscrew the plastic screw using the thick rounded
projection on the coloured insert from the detergent
dispenser or using a coin.
2.
Grip the end of the drain tube and pull out about a 12
inch length. Remove the cap from the end of the tube.
3.
Allow all the water to flow into a bowl, then refit the plug
and stow the drain tube bac k in its comp artment.
4.
Before using the machine again, pour about 1 litre
of water into the detergent dispenser to reactivate
the “Eco system”.
make sure the water has had time to
29
Page 11

CARE AND MAINTENANCE
APPLIANCE EXTERIOR AND CONTROL PANEL
•
Clean using normal household cleaner (do not use
abrasive products).
•
Dry with a soft cloth.
DETERGENT DISPENSER
1.
Disengage the detergent dispenser by pressing
the release lever in the prewash compartment, and
extract it.
2.
Remove the inserts (the siphon from the softener
compartment and the insert for liquid detergents).
3.
Wash all the parts under running water.
4.
Replace the parts and refit the detergent
dispenser. Push the siphon firmly into place.
DOOR SEAL
•
Clean with a damp cloth when necessary.
•
Check the fold of the seal for foreign objects
periodically.
WATER HOSE MESH FILTERS
•
Check and clean regularly.
For appliances with straight water h ose (see fi gu re )
1.
Turn off the tap(s).
2.
Unscrew the hoses from the tap(s).
3.
Remove the mesh filter and clean it.
4.
Refit the filter and screw the hose connection to
the tap.
5.
Unscrew the hose from the appliance.
6.
Remove the filter from the appliance connection
with pliers and clean it.
7.
Refit the filter and screw the hose connection to
the appliance.
8.
Turn on the tap(s)
are completely watertight
For appliances with Water Stop hose (s ee f igu re)
1.
Turn off the tap.
2.
Unscrew the hose from the tap.
3.
Remove only loose mesh filter and clean it.
4.
Refit the filter and screw the Water Stop hose
connection to the tap.
5.
Turn on the tap
are completely watertight
to check that the connections
.
to check that the connections
.
FILTER (OF THE PUMP)
Check and clean the filter regul arly, t wo or th ree ti me s
a year (see “Removing the filter”).
2
Straight hose Water Stop hose
1
2
CHILD SAFETY
To protect the appliance from improper use, turn the
plastic screw on the interior of the door using the thick
rounded plastic projection on th e col ou r ed in sert f rom
the detergent dispenser or usin g a coi n.
1.
Slot vertical: safety position, i.e. the door will not lock.
2.
Slot horizontal: normal position, i.e. the door can
be locked again.
30
Page 12

TROUBLE SHOOTING GUIDE
This appliance is equipped with safety func tions
which detect at an early stage faults and react
appropriately.
Often, however, the faults detect ed a re s ma ll
enough to be solved in a matte r of min ut es.
The appliance will not start.
Check whether:
•
the appliance is plugged in ,
•
the wall socket is functioning correctly (use a
table lamp or similar),
•
the appliance door is properly closed (child
lock?),
•
a programme has been selected,
•
"Start" has been pressed for at least one
second.
The appliance stops during the
programme.
Has the programme selection changed?
•
Yes: Press the “Start” button for one second to
continue with the new programme.
•
It has been changed by mistake (e.g. by a child):
Reselect the previous programme and press
the “Start” button for one second to cont inu e
the wash.
Water supply is insufficient.
•
Turn the programme selector knob to "0".
Check whether:
•
the water tap is completely open, and the
water supply pressure is sufficient,
•
the inlet hose is kinked,
•
the mesh filters are clogged (see “Care and
Maintenance”/ “Water hose mes h f il te rs ”),
•
the inlet hose is frozen.
Reselect the desired programme and press
the “Start” button for one second to cont inu e
with the programme (do not add detergent for
this programme).
The appliance does not drain out the
water.
•
Reset the programme selector to “0”.
Check whether:
•
drain hose is kinked (see “Installation
instructions”),
•
the pump/ filter are blocked (see “Removing
the filter”).
IMPORTANT:
water to cool down.
•
the drain hose is frozen.
Reselect the desired programme and press “Start”
again for one second (do not add detergent during
this programme). The programme continues.
before draining, allow the wash
If the fault recurs, contact After Sales Service (see
“After Sales Service”).
The “Water Stop” indicator lights up
(depends on model).
•
Turn off the tap and unplug t he a ppl ia nce .
-
The Water Stop can be tripped by:
a) too much foam;
b) a leak in the water hose or appliance;
-
Tilt the appliance forwards and let the
water drain out.
Then:
-
Turn on the tap; if the appliance
immediately fills with water before being
connected to the power supply, there is a
malfunction: turn off the tap and contact
After Sales Service.
-
Plug the appliance back in the
programme continues.
If the fault recurs, contact After Sales Service (see
“After Sales Service”).
The appliance vibrates during the spin
cycle.
Check whether:
•
the appliance is level and solidly installe d on
all four feet (see “Installation instructions”).
•
the transit bolts have been removed.
Before starting up the appliance, the transit
bolts must be removed (see “Installation
instructions”).
The laundry was not spun at the end of
the programme.
•
The appliance has an imbalance detection
and correction system. If individual heavy
articles are loaded (bathmat, bathrobe, etc.)
this system may reduce the spin speed
automatically to protect the appliance or even
interrupt the spin cycle altogether, if the
imbalance is too great even after several spin
starts.
•
If the laundry is too wet at the end of the cycle,
add more articles of laundry to balance the
load and repeat the spin cycle.
The additive product is not being fully
washed into the drum from the
detergent drawer.
Check whether:
•
the siphon is correctly installed and clean
(see “Care and Maintenance / “Detergent
dispenser”).
•
enough water is being supplied. The mesh
filters could be clogged (see “Care and
Maintenance”/ “Water hose mesh filters”).
31
Page 13

AFTER SALES SERVICE
Before contacting After Sales Service:
Try to solve the problem (see “Trouble Shooting
1.
Guide”).
Restart the programme to see if the fault is
2.
repeated.
If after the above checks the appliance does not
work properly, get in touch with the nearest AfterSales Service Centre.
Please give:
a short description of the fa ult,
•
the exact type and model of the appliance,
•
the number after the word SERVICE,
•
Your complete address and telep hone nu mb er.
•
32
Page 14

INSTALLATION INSTRUCTIONS
TRANSIT BOLTS
The appliance is fitted with transit bolts to prevent internal
damage during transport.
Before using the appliance you must remove the
transit bolts (figure 1).
1.
Slacken the four bolts with the spanner supplied
(figure 2).
2.
Unscrew the bolts by hand.
3.
Holding the bolt head, pull each bolt through the
wide part of the holes.
4.
Close the holes with the plastic covers supplied,
insert the covers in the wide part of the hole and
slide them toward the narrow part until they click
into place (figure 3).
5.
Keep the transit bolts for future use.
Important:
Whenever the appliance is transporte d, the transit bolts
must be refitted.
Pry up the plastic covers with a screwdriver, slide in the
opposite direction to the arrow and remove. Insert and
tighten the transit bolts, performing the steps for removal
in reverse order.
Fig. 1
Fig. 2
Fig. 3
33
Page 15

INSTALLATION INSTRUCTIONS
INSTALLATION
•
Install the appliance on a sol id and level floor surf ace,
preferably in a corner of the room.
•
Make sure that all four feet are stable and resting on
the floor and then check that the appliance is perfectly
level (use a spirit level).
•
If the floor is uneven, adjust the levelling feet as
required (do not insert pieces of wood etc. under
the feet).
1.
Slacken the locknut using the spanner supplied.
2.
Adjust the height of the foot, turning it by hand.
3.
Tighten the locknut by turning it anti-clockwise
towards the appliance casing.
•
If the appliance is to be installed on a wooden floor,
distribute the weight by placing it on a 60 x 60 cm
sheet of plywood at least 3 cm in thickness.
Secure the plywood sheet to the floor.
WORKTOP / COVER PANEL
The appliance must only be installed beneath a
continuous fitted kitchen worktop.
If the appliance will be built under it is mandatory
to use the cover panel UBS.
•
Unplug the appliance.
1.
Unscrew the worktop fixing screws from the rear of
the appliance.
2.
Slide the worktop fully backward and lift it upwards
to remove.
Install the cover panel following the relative
instructions.
3.
Refit the fixing screws and tighten them.
BUILD-UNDER OPENING DIMENSIONS
Width 600 mm
Height 825 mm
Depth 600 mm
WARNING:
Only plug the appliance int o th e mai ns p owe r so cke t
after you have fitted the cover panel or the appliance
worktop.
34
Page 16

INSTALLATION INSTRUCTIONS
WATER SUPPLY
•
Water supply: cold water only
•
Tap(s): 3/4" threaded hose connection
•
Pressure: 10-100 N/cm² (1-10 bar).
WATER INLET HOSE(S)
1.
The mesh filter supplied with the appliance must
be inserted in the connection between the inlet
hose(s) and the tap(s).
2.
Carefully screw the hose connection to the tap(s)
preferably by hand. Make sure there are no kinks
in the hose and that it is not crushed.
3.
Check water-tightness of tap(s) and appliance
connections by turning the tap(s) completely on.
•
If the hose is too short, replace it with a suitable
length of pressure resistant hose (10 b ar min.,
EN 50065 approved type).
•
Periodically check the hose for brittleness and
cracks and replace if necessary.
•
The appliance can be connected without a nonreturn valve.
•
Install the appliance in accordance with reg ulations
of your local water company.
WATER STOP ANTI-FLOODING SYSTEM
(depends on model)
•
The inlet hose and the plastic enclosure at th e tap
connection contain electrical co mp on en ts.
•
Do not cut the hose and do not immerse the plastic
enclosure in water.
•
If the flexible hose is damaged, unpl ug the
appliance from the mains immediately.
If the hose is too short, replace it wit h a 3 m Water Stop
hose (available from After Sales Service or from your
dealer). This operation must be carried out exclu sivel y
by a licensed electrician.
35
Page 17

INSTALLATION INSTRUCTIONS
DRAINING
•
Connecting the water drain hose.
Remove the “U” bend from the appl iance drum an d
fit it at the end of the drain hose.
Connect the drain hose to the siphon or hook it over
the edge of a sink by means of the “U” b end (se e
figure). The drain hose should not be h oo ked o nt o
small washbasins.
Max. drain height: 1.25 m (4 ft)
If you need to add an extension, use a flexible hose of
the same type and secure the union with screw-on
hose clips.
Max. drain hose length: 2.50 m (8 ft).
Important:
Make sure there are no kinks in the hose and that it
is not crushed. Secure the ho se so that it cannot fall
down while the appliance is running.
ELECTRICAL CONNECTIONS
•
Electrical connections must be made i n accordance
with local regulations.
•
The appliance must be connected t o th e mains
exclusively by means of a socket with an earth
connection in accordance with establi shed
regulations. The appliance must be earthed b y law.
The manufacturer declines all liability for damage to
property or injury to persons or animals deriving
either directly or indirectly from failure t o obs erve
the above directions.
•
The data of voltage, power consumption and the
required electrical protection are supplied on the
inside of the appliance door.
•
The electrical power cable must be rep laced , if
necessary, exclusively by a licensed electricia n.
•
The appliance conforms to European safety
regulations, EC directive 93/68/EEC and st anda rd
EN 60555.
•
Do not use extension leads or multisockets.
36
Page 18

INSTALLATION INSTRUCTIONS
1. ELECTRICAL CONNECTIONS
"Warning - this appliance must be earthed"
This appliance is normally supplied with a mains
lead having a plug fitted in t he f act ory whi ch ha s
been checked for correct earth continuity.
If the fitted plug is not s uitab le f or y our so cke t
outlet, or if the machine’s mains lead is not f itt ed
with a plug, you should fit a s uit ab le n ew, g ood
quality plug by following the instructions in (2)
below.
Any unsuitable plug should be cut o ff a nd
disposed of in order to avoid a possible shock
hazard should it be inserted into a socket.
2. CONNECTION TO A REWIRABLE PLUG to be carried out ONLY by a qualified
electrician
The wires in the mains lead are coloured in
accordance with the following code:
BLUE - “NEUTRAL” (“N”)
BROWN - “LIVE” (“L”)
GREEN AND YELLOW - “EARTH” (“E”)
To fit a new plug, proceed as follows:
2.1 Polarized Plugs ( e.g. 3 pin, 13 amp plug
conforming to BS 1363A)
The GREEN AND YELLOW wire must be
a.
connected to the terminal in the plug which is
marked with the letter “E” or by the Earth
symbol or coloured yellow or green and
yellow.
The BLUE wire must be connected to the
b.
terminal which is marked with the letter “N” or
coloured black.
The BROWN wire must be connected to the
c.
terminal which is marked with the letter “L” or
coloured red.
2.2 Non-polarized plugs (e.g. 2 pin with side
earth contact)
The wire which is coloured GREEN AND
YELLOW must be connected to the earth contact .
The other two wires should be connected to the
two pins, irrespective of colour.
3. FUSE REPLACEMENT
If the mains lead of this appli an ce is fitted with a
BS 1363A 13 amp fused plug, replace the fuse
only with an A.S.T.A. approved type conforming to
BS 1362 and proceed as follows:
Remove the fuse cover (A) and the fuse (B).
1.
Fit the replacement 13 A fuse into the fuse
2.
cover.
Refit both into the plug.
3.
For all other types of plug, the supply socket
should be protected by a 16 A fuse or circ uit
breaker at the distribution boa rd .
37
Page 19

INSTALLATION INSTRUCTIONS
MOBILITY WHEELS
Depending on model, your washing mac hin e is
provided with mobility wheels.
You will find these wheels in the access ory kit supplied
with the machine, or you can order them from our Aft erSales Service
(for UK only)
MOUNTING INSTRUCTIONS
1.
Tilt the machine forward.
2.
Loosen the two rear feet.
3.
Insert the wheels as close as possible to the screw (1).
4.
Tighten the screw completely (2).
5.
Put the machine in an upright position.
6.
Adjust the front feet making sure that the machine
is completely level with the floor.
Note:
Levelling is extremely important to avo id any risk
of instability and vibrations.
1
MOVING THE MACHINE
1.
Open the door of the machine.
2.
Lift the machine 1 or 2 cm (3).
3.
Push or pull the machine according to your need.
38
2
3
 Loading...