

Page 1

Stack Kit Installation Instructions
For use only with front load washers and dryers
Juego para lavadora y secadora instrucciones de instalación
Para uso sólo con lavadoras y secadoras de carga frontal
Enemble superposé instructions d’installation
Pour utilisation avec laveuses et sécheuses à chargement par l’avant seulement
Table of Contents/ Índice/ Table des matières...................................2
W10315355B
Page 2
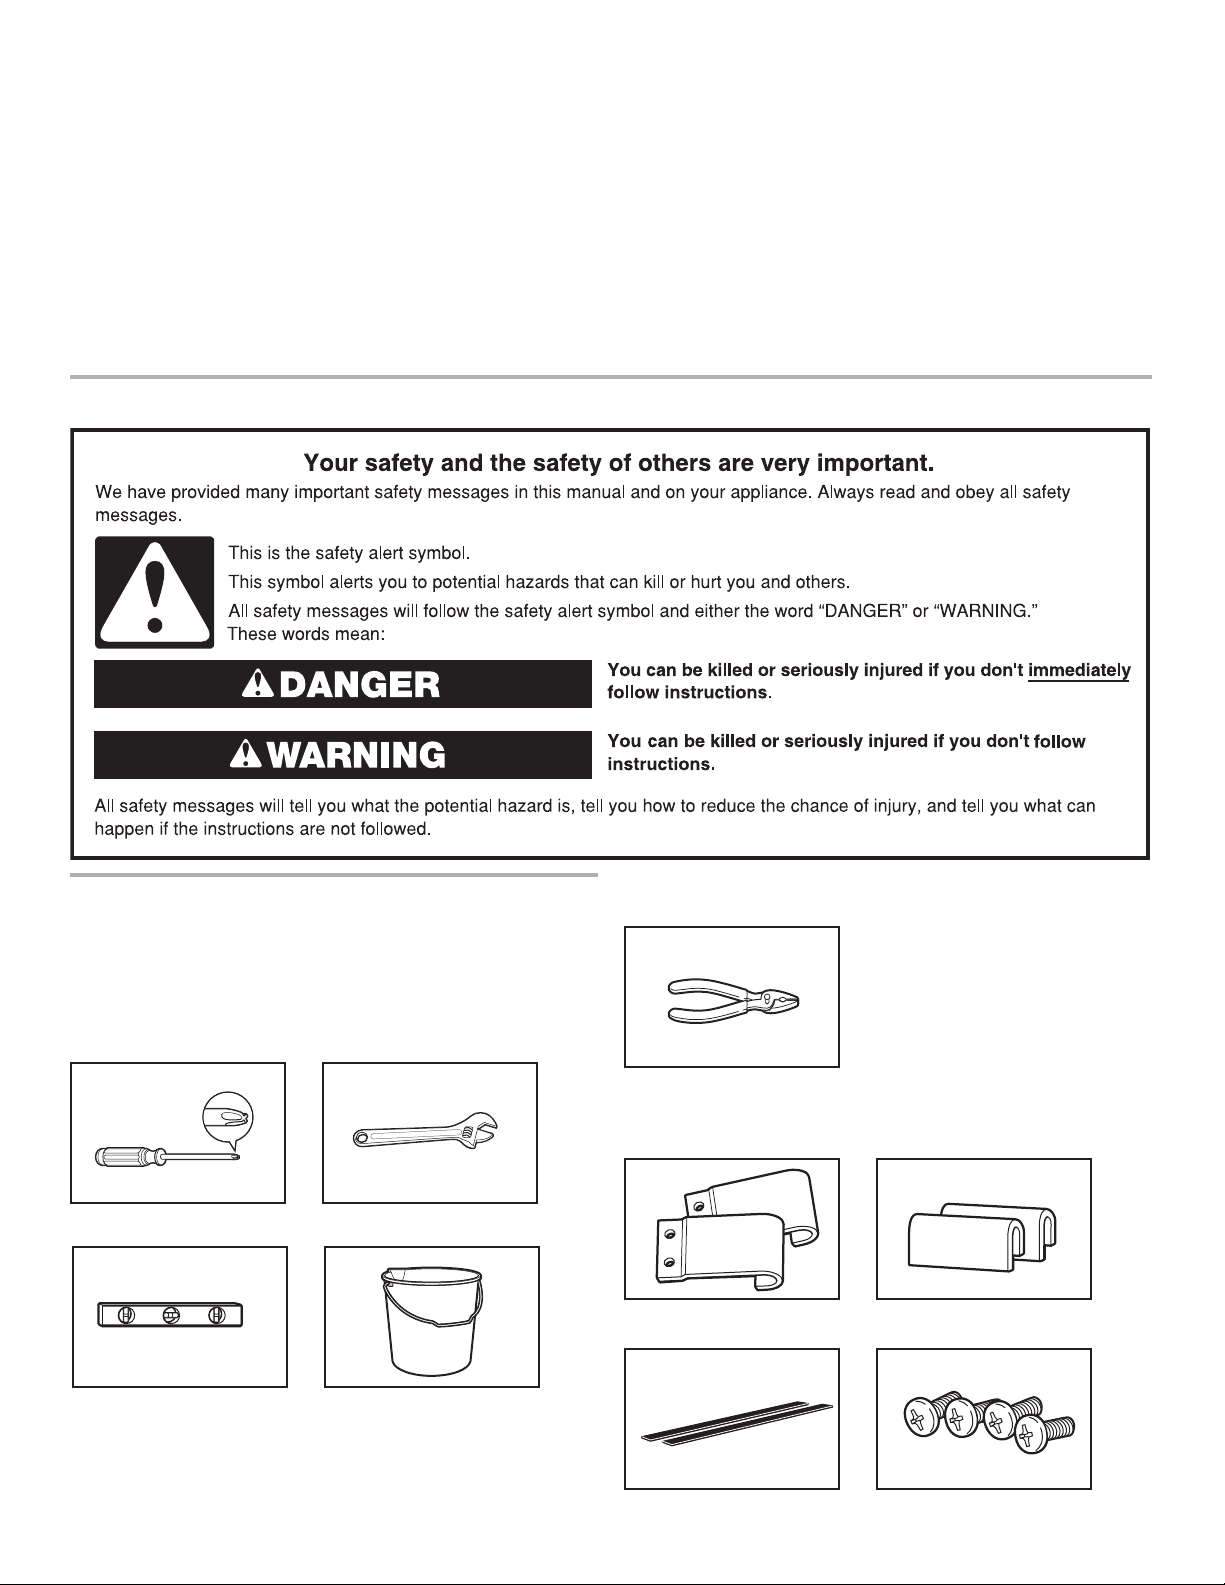
Table of Contents
Índice
Table des matières
STACK KIT SAFETY ...............................2
INSTALLATION REQUIREMENTS .........2
Tools and Parts .............................2
Location Requirements ................3
Uninstall Washer and Dryer .........4
If Your Washer or Dryer is Still
in Its Packaging ............................4
INSTALLATION INSTRUCTIONS ...........5
SEGURIDAD DEL JUEGO PARA
LAVADORA Y SECADORA
SUPERPUESTAS ........................................6
REQUISITOS DE INSTALACIÓN ...............6
Herramientas y piezas ......................6
Requisitos de ubicación ....................7
Como desinstalar la lavadora
y la secadora.......................................8
Si su lavadora o secadora está
aún en su empaque ............................8
INSTRUCCIONES DE INSTALACIÓN .......9
STACK KIT SAFETY
SÉCURITÉ DE L’ENSEMBLE
SUPERPOSÉ ........................................... 10
EXIGENCES D’INSTALLATION .............. 10
Outillage et pièces .......................... 10
Exigences d’emplacement ............. 11
Désinstallation de la laveuse
et de la sécheuse ............................ 12
Si la laveuse ou la sécheuse
est encore dans son emballage ..... 12
INSTRUCTIONS D’INSTALLATION ........ 13
INSTALLATION REQUIREMENTS
TOOLS AND PARTS
Gather the required tools and parts before starting
installation. Read and follow the instructions provided
with any tool listed here.
Tools needed:
Phillips screwdriver
Level
1" Adjustable wrench
Bucket
Pliers or slip-joint pliers
(for drain and inlet hoses)
Parts supplied:
Hooked brackets (2)
Plastic clips (2)
Rubber pads (2)
Pan-head screws (4)
2
Page 3
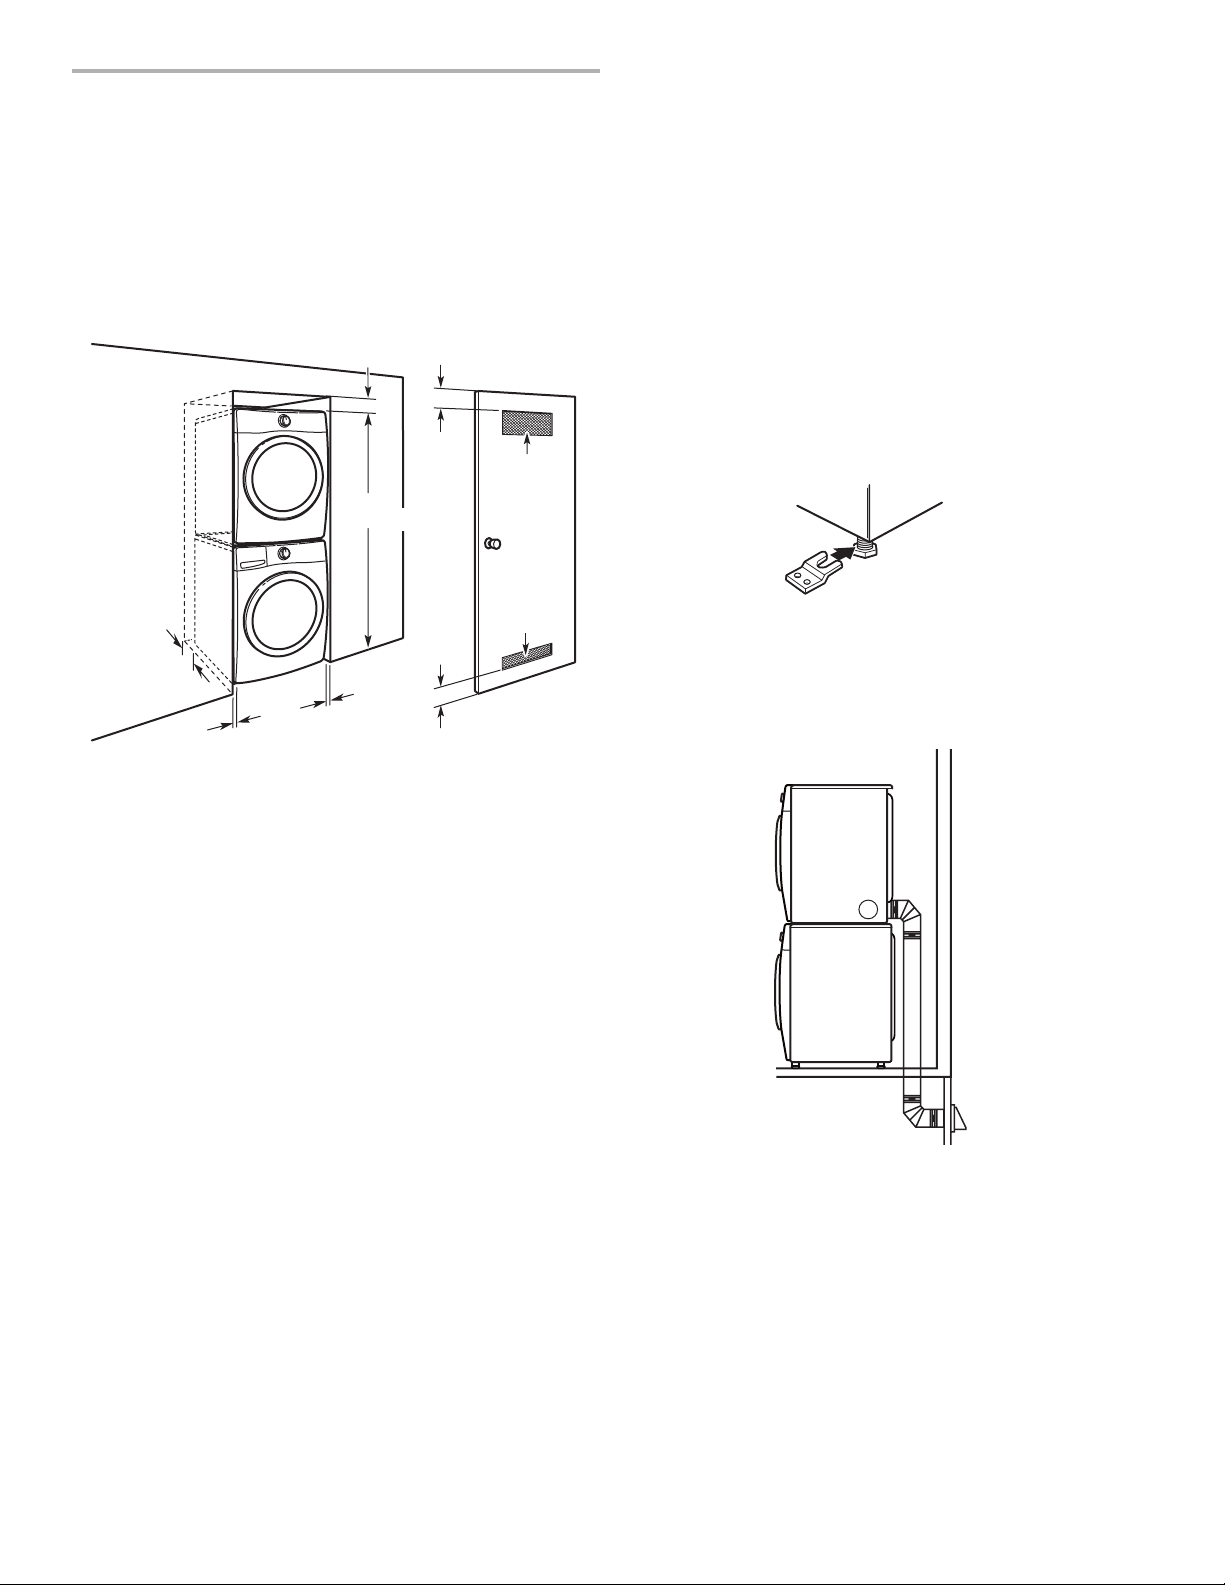
LOCATION REQUIREMENTS
1"
(25 mm)
5"
(127 mm)
24 in.
2
(155 cm2)
48 in.
2
(310 cm2)
3"
(76 mm)
3"
(76 mm)
77
1
/2"
(1969 mm)
6"
(152 mm)
1"
(25 mm)
Recessed Area and Closet Installation Instructions
IMPORTANT: The stacked washer/dryer can be installed in
an enclosure. Check the locations of the water supply faucets,
grounded electrical outlets, and gas supply line connection
(gas dryer only). Depending on your application, longer washer
ll hoses, longer electric power supply cords and a longer
exible stainless steel gas connector line than supplied with
the washer/dryer may be needed.
Mobile home - Additional installation requirements
This dryer is suitable for mobile home installations. The
installation must conform to the Manufactured Home
Construction and Safety Standard, Title 24 CFR, Part 3280
(formerly the Federal Standard for Mobile Home Construction and
Safety, Title 24, HUD Part 280) or the Canadian Manufactured
Home Standard CAN/CSA-Z240 MH.
Mobile home installations require special parts (listed following),
which are available for purchase from your local dealer or service
center.
Stacked pair must be securely fastened to the oor.
Parts Needed:
Mobile Home Installation Kit, Part Number 346764, needs to ■
be purchased to accomplish this. Order two kits to enable
you to secure both the front and the back of the unit to the
oor.
Metal exhaust system hardware. ■
Special provisions must be made in mobile homes to introduce
outside air into the dryer. The opening (such as a nearby window)
should be at least twice as large as the dryer exhaust opening.
If the water supply faucets, electrical outlets, gas supply line,
or power cord need modication, have a qualied plumber,
electrician, or gas technician make the changes.
The exhaust vent must be securely fastened to a noncombustible
portion of the mobile home structure and must not terminate
beneath the mobile home. Terminate the exhaust vent outside.
3
Page 4
UNINSTALL WASHER AND DRYER
IMPORTANT: If your washer and dryer are already installed, they
must be uninstalled.
If you need to uninstall your washer or dryer, see “Installation
Instructions” that came with your model for tools required.
Uninstalling Your Washer
1. Turn off the hot and cold water faucets.
2. Unplug the power supply cord.
3. Slowly loosen the ll hoses at the faucets to relieve the water
pressure. Use a sponge or towel to absorb the released water.
4. Remove the “HOT” and “COLD” ll hoses from the back
of the washer. Drain water in the hoses into a bucket.
5. Remove the drain hose from the wall drain pipe or utility sink
and drain any water in the hose into a bucket.
Uninstalling Your Electric Dryer
1. Unplug the power supply cord.
2. Pull the dryer away from the wall enough to loosen the vent
clamp. Loosen the clamp and gently remove the exhaust vent
from the dryer exhaust outlet.
Steam Models Only:
3. Turn off water faucet.
4. Disconnect the water inlet hose from faucet, then drain the
hose into a bucket.
IF YOUR WASHER OR DRYER IS
STILL IN ITS PACKAGING
Position the packaged washer or dryer close to its nal position.
cut the packaging as follows:
Washer: Cut plastic lm along dotted cut line around the ■
base. Remove the packaging. Do not remove the shipping
bolts.
Dryer: Cut around top and down corners along dotted cut ■
lines. Discard carton top, corner posts and sides. Leave
carton bottom underneath dryer.
Uninstalling Your Gas Dryer
1. Unplug the power supply cord.
2. Turn off the gas supply.
3. Pull the dryer away from the wall enough to loosen the vent
clamp. Loosen the clamp and gently remove the exhaust vent
from the dryer exhaust outlet.
4. Disconnect the exible gas supply line from the dryer. Put
a piece of tape over the open ends of the gas line connection
ttings.
Steam Models Only:
5. Turn off water faucet.
6. Disconnect the water inlet hose from faucet, then drain the
hose into a bucket.
4
Page 5
INSTALLATION INSTRUCTIONS
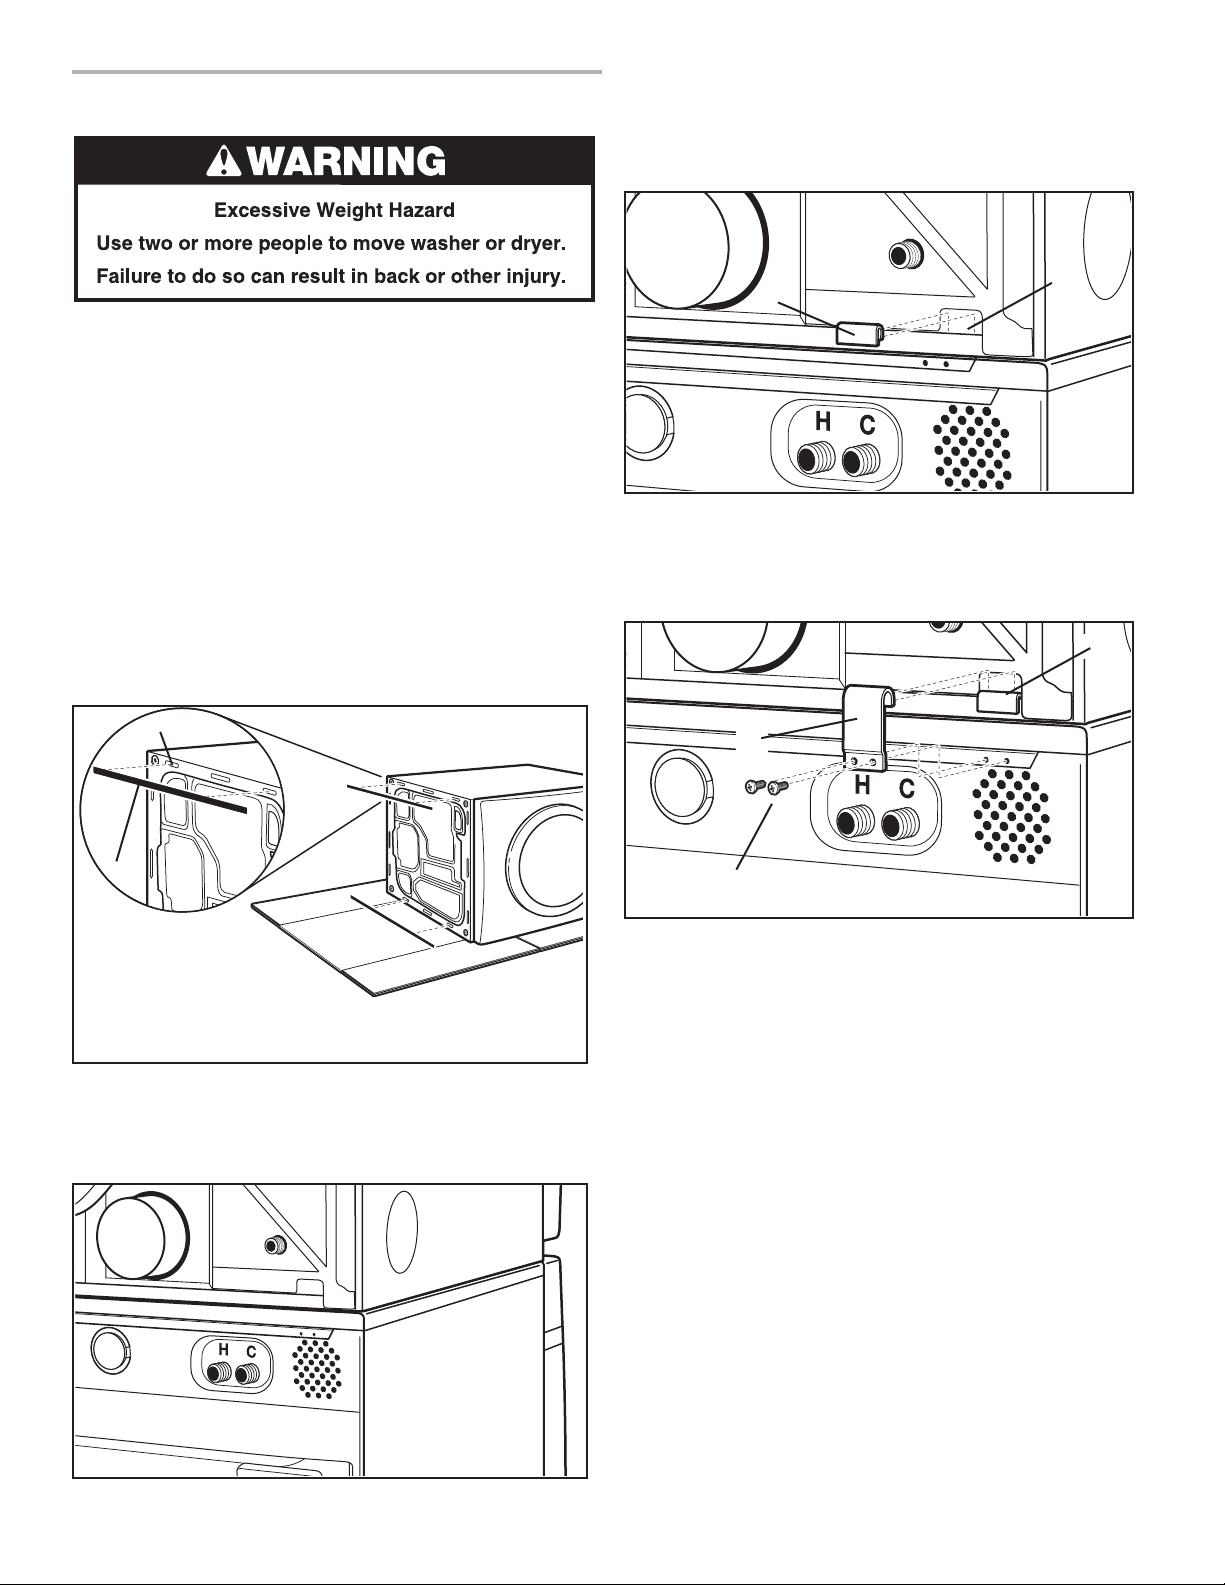
8. Remove the plastic clips (2), brackets (2), and pan-head
screws (4) from the parts bag.
9. Take a plastic clip (C) and with the at side facing out, push
it down onto the lower edge of the slot (D) in the dryer back.
Repeat on other side.
1. Move washer close to its nal location. Leave room to work
behind washer. Do not remove the shipping bolts.
2. Level washer as described in washer “Installation
Instructions”.
3. Place a covering, such as cardboard or a blanket on the oor,
to avoid damage. Gently lay the dryer down with its side on
the covering.
4. If the dryer has the feet already installed, remove them. Do
not install the dryer feet.
5. Remove the adhesive cover strip from one of the long
rubber pads. Starting from the top of the base and in about
1/2" (13 mm) from the edge (covering the small ridges), press
adhesive side of pad against dryer base. Pads run front
to back.
Repeat installation of remaining rubber pad on other side.
B
C
D
10. Place the hooked end of the bracket (E) over the plastic clip
(C). Rotate down against back of washer. Adjust the dryer
forward or backward as needed and attach bracket (E) to
washer with pan-head screws (F). Tighten screws securely.
Repeat on other side.
C
E
A
A. Rubber pad
B. Small ridges
6. Lift the dryer back to upright position and move to front
of the washer.
7. Lift the dryer up and set on top of washer so that the back
of the washer and dryer are lined up.
F
11. Follow the “Installation Instructions” that came with your
washer and dryer to remove the shipping bolts and complete
the installation.
5
Page 6

SEGURIDAD DEL JUEGO PARA LAVADORA
Y SECADORA SUPERPUESTAS
REQUISITOS DE INSTALACIÓN
HERRIMIENTAS Y PIEZAS
Reúna las herramientas y piezas necesarias antes de comenzar la
instalación. Lea y siga las instrucciones provistas con cualquiera
de las herramientas enlistadas aquí.
Herramientas necesarias:
Destornillador Phillips Llave de tuercas
ajustable de 1"
Nivel
Balde
Piezas suministradas:
Soporte en forma
de gancho (2)
Almohadillas de gomas (2)
Sujetador de plástico (2)
Tornillos de cabeza
de cono achatado (4)
Pinzas o pinzas de junta
movediza (para las
mangueras de desagüe
y de entrada)
6
Page 7

REQUISITOS DE UBICACIÓN
1"
(25 mm)
5"
(127 mm)
24 in.
2
(155 cm2)
48 in.
2
(310 cm2)
3"
(76 mm)
3"
(76 mm)
77
1
/2"
(1969 mm)
6"
(152 mm)
1"
(25 mm)
Instrucciones para la instalación empotrada o en clóset
IMPORTANTE: La lavadora/secadora superpuestas pueden
ser instaladas en un lugar encerrado. Verique la ubicación
de las llaves de suministro de agua, las instalaciones eléctricas
a tierra y la línea de conexión del suministro de gas (sólo para
secadora a gas). Según el modo de empleo, puede necisitar
mangueras de llenado, cables de suministro de energía
y una línea de conexión de gas de acero inoxidable exible
más largos que los suministrados con la lavadora/secadora.
Casas rodantes - Requisitos adicionales de instalación
Esta secadora es adecuada para su instalación en casas
rodantes. La instalación deberá cumplir con el Estándar de
Construcción y Seguridad de Casas Prefabricadas, Título 24
CFR, Sección 3280 (anteriormente el Estándar Federal de
Construcción y Seguridad de Casas Rodantes, Título 24, HUD
Sección 280).
Las instalaciones en casas rodantes requieren de piezas
especiales (listadas a continuación), las cuales están a la
disposición para su compra por medio de su distribuidor
o centro de servicio local.
Las unidades apiladas de lavadora y secadora deberán estar
jadas al piso de manera segura.
Partes Necesarias:
Habrá que comprar el juego de instalación para casas ■
rodantes, pieza número 346764, para llevar esto a cabo.
Pida dos juegos para permitirle asegurar al piso tanto
la sección delantera como trasera de la unidad.
Accesorios para el sistema de salida de aire de metal. ■
Si necesita modicar las llaves de suministro de agua,
las instalaciones eléctricas, la línea de suministro de gas
o el cable de alimentación eléctrica, haga que un plomero
calicado, un electricista o un técnico de gas hagan
los cambios.
Habrá que hacer modicaciones especiales en las casas
rodantes para introducir el aire exterior en la secadora.
La abertura (tal como una ventana cercana) deberá ser
de al menos dos veces el tamaño de la abertura del tubo
de salida de aire de la secadora.
Habrá que jar el ducto de escape de manera segura a una
sección no combustible de la estructura de la casa rodante
y no deberá terminar debajo de la casa rodante. Termine
el ducto de escape en un área exterior.
7
Page 8

CÓMO DESINSTALAR LAVADORA
Y LA SECADORA
IMPORTANTE: Si su lavadora y secadora ya están instaladas,
deben ser desinstaladas.
Si necesita desinstalar su lavadora o secadora, vea las
herramientas necesarias en las “Instrucciones de Instalación”
que vinieron con su modelo.
Cómo desinstalar su lavadora
1. Cierre las llaves de agua caliente y fría.
2. Desenchufe el cable de alimentación eléctrica.
3. Aoje lentamente las mangueras de llenado en las llaves
para aliviar la presión del agua. Use una esponja o una
toalla para absorber el agua derramada.
4. Retire las mangueras de llenado “HOT” (Caliente) y “COLD”
(Fría) de la parte posterior de la lavadora. Drene el agua
de las mangueras en un balde.
5. Quite la manguera de desagüe del tubo de desagüe o del
lavadero utilitario y drene en un balde el agua que pueda
haber en la manguera.
SI SU LAVADORA O SECADORA
ESTÁ AÚN EN SU EMPAQUE
Coloque la lavadora/secadora con su embalaje cerca de su
posición nal. Corte el embalaje de la siguiente manera:
Lavadora: Corte la película de plástico a lo largo de la línea ■
de corte punteada alrededor de la base. Quite el embalaje.
No quite los pernos de empaque.
Secadora: Corte el cartón alrededor de la parte superior ■
y de las esquinas hacia abajo a lo largo de las líneas
de corte punteadas. Descarte la parte superior, los postes
de cartón esquineros y los laterales. Deje el piso de cartón
debajo de la secadora.
Cómo desinstalar su secadora eléctrica
1. Desenchufe el cable de alimentacion eléctrica.
2. Retire la secadora de la pared lo necesario para aojar
la abrazadera de ventilación. Aoje la abrazadera y retire
con cuidado la salida de aire del escape de la secadora.
Modelos con vapor únicamente:
3. Cierre la llave del agua.
4. Desconecte la manguera de entrada de agua del grifo
y desagüe la manguera en una cubeta.
Cómo desinstalar su secadora a gas
1. Desenchufe el cordón de alimentación eléctrica.
2. Corte el suministro de gas.
3. Retire la secadora de la pared lo necesario para aojar
la abrazadera de ventilación. Aoje la abrazadera y retire
con cuidado la salida de aire del escape de la secadora.
4. Desconecte el suministro exible de gas de la secadora.
Coloque un pedazo de cinta adhesiva sobre los extremos
de las conexiones de la tubería de gas.
Modelos con vapor únicamente:
5. Cierre la llave del agua.
6. Desconecte la manguera de entrada de agua del grifo
y desagüe la manguera en una cubeta.
8
Page 9

INSTRUCCIONES DE
INSTALACIÓN
1. Traslade la lavadora cerca de su ubicación nal. Deje
espacio para trabajar detrás de la lavadora. No quite
los pernos de empaque.
2. Nivele la lavadora según se describe en las “Instrucciones
de instalación” de la misma.
3. Coloque una cubierta sobre el piso, como un trozo de cartón
o una cobija, para evitar daños. Coloque la secadora con
cuidado, con el costado sobre la cubierta..
4. Si las patas de la secadora ya están instaladas, retírelas.
No instale las patas de la secadora.
5. Quite la tira adhesiva de una de las almohadillas largas
de goma. Comenzando desde la parte superior de la base
a aproximadamente 1/2" (13 mm) del borde (cubriendo
las salientes pequeñas), presione el lado adhesivo de la
almohadilla contra la base de la secadora. Las almohadillas
se colocan del frente hacia atrás.
Repita la instalación de la almohadilla de goma restante
en el otro lado.
7. Levante la secadora y fíjela sobre la lavadora de manera tal
que la parte posterior de la lavadora y de la secadora estén
alineadas.
8. Quite los sujetadores de plástico (2), los soportes (2), y los
tornillos de metal de cabeza de cono atachado (4) de la bolsa
de partes.
9. Tome un sujetador de plástico (C) y con el lado plano mirando
hacia afuera, empújelo hacia abajo sobre el borde inferior de
la ranura (D) en la parte posterior de la secadora. Repita en
el otro lado.
D
C
B
A
A. Almohadillas de goma
B. Salientes pequeñas
6. Levante la secadora de manera que quede en posición
vertical y muévala hasta el frente de la lavadora.
10. Coloque el extremo en forma de gancho del soporte (E)
sobre el sujetador de plástico (C). Rótelo hacia abajo contra
la parte posterior de la lavadora. Ajuste la secadora hacia
adelante o hacia atrás según se necesite y sujete el soporte
(E) a la lavadora con 2 tornillos de metal de cabeza de cono
achatado (F). Apriete los tornillos hasta que queden seguros.
Repita en el otro lado.
C
E
F
11. Siga las “Instrucciones de instalación” que vinieron con
su lavadora y su secadora para quitar los pernos de empaque
y completar la instalación.
9
Page 10

SÉCURITÉ DE L’ENSEMBLE SUPERPOSÉ
EXIGENCES D’INSTALLATION
OUTILLAGE ET PIÈCES
Rassembler les outils et pièces nécessaires avant de commencer
l’installation. Lire et suivre les instructions fournies avec les outils
indiqués ici.
Outillages nécessaires:
Tournevis Phillips Clé à molette de 1"
Niveau
Seau
Pièces fournies:
Brides avec extrémité
en crochet (2)
Bandes de caoutchouc (2)
Attaches en plastique (2)
Vis à tête bombée (4)
Pince ou pince
articulée (pour tuyaux
d’alimentation et de
vidange)
10
Page 11

EXIGENCES D’EMPLACEMENT
1"
(25 mm)
5"
(127 mm)
24 in.
2
(155 cm2)
48 in.
2
(310 cm2)
3"
(76 mm)
3"
(76 mm)
77
1
/2"
(1969 mm)
6"
(152 mm)
1"
(25 mm)
Instructions d’installation dans un encastrement
ou un placard
IMPORTANT : On peut installer l’ensemble superposé laveuse/
sécheuse dans un encastrement. Identier la position des
robinets d’arrivée d’eau, des prises de courant électriques reliées
à la terre et de la canalisation d’arrivée de gaz (sécheuse à gaz
seulement). Selon l’application, il peut être nécessaire d’utiliser
des tuyaux d’arrivée d’eau, des cordons d’alimentation électrique
et un conduit exible d’acier inoxydable pour le raccordement
de canalisation de gaz plus longs que ceux qui sont fournis avec
l’ensemble laveuse/sécheuse.
Installation dans une résidence mobile - Exigences
additionnelles à respecter
Cette sécheuse peut être installée et utilisée dans une résidence
mobile. L’installation doit satisfaire aux critères de la norme
Manufactured Home Construction and Safety Standard / Normes
de construction et sécurité pour résidences préfabriquées, Titre
24 CFR, Partie 3280 (anciennement la norme fédérale Standard
for Mobile Home Construction and Safety,
Titre 24, HUD Partie 280) ou de la norme Canadian Manufactured
Home Standard CAN/CSA-Z240 MH.
L’installation dans une résidence mobile implique l’emploi
de composants spéciaux (voir la liste plus bas) que l’on
peut acquérir dans un commerce local ou auprès d’un
centre de service.
Un ensemble laveuse/sécheuse superposées doit être
solidement xé au sol.
Pièces nécessaires:
On doit acquérir l’ensemble d’installation en résidence ■
mobile - pièce n° 346764. Commander deux ensembles
pour pouvoir xer au sol l’avant et l’arrière de l’appareil.
Matériel pour circuit d’évacuation (conduits métalliques). ■
Si des modications sont nécessaires sur les robinets d’arrivée
d’eau, prises de courant électriques, canalisation d’arrivée de
gaz ou cordons d’alimentation, demander à un plombier, un
électricien ou un technicien du gaz d’exécuter ces modications.
Dans le cas de l’installation dans que résidence mobile, on doit
tenir compte des besoins d’admission d’air extérieur jusqu’à la
sécheuse. La taille de l’ouverture utilisée à cette n (par exemple
une fenêtre voisine) doit être au moins le double de la taille de
l’orice de la sécheuse.
Le conduit d’évacuation de l’air humide doit être solidement xé
à la partie non combustible de la charpente structurale de la
résidence mobile. Le point de décharge du conduit d’évacuation
doit se trouver àl’extérieur.
11
Page 12

DÉSINSTALLATION DE LA
LAVEUSE ET DE LA SÉCHEUSE
IMPORTANT : Si l’ensemble de laveuse et sécheuse est déjà
installé, on doit le désinstaller.
S’il est nécessaire de désinstaller la laveuse ou la sécheuse,
consulter les “Instructions d’installation” fournies avec l’appareil,
au sujet des outils nécessaires.
Désinstallation de la laveuse
1. Fermer les robinets d’arrivée d’eau chaude et d’eau froide.
2. Débrancher le cordon d’alimentation électrique.
3. Desserrer doucement les raccords des tuyaux d’alimentation
sur les robinets pour libérer la pression de l’eau. Utiliser une
éponge ou une serviette pour absorber l’eau libérée.
4. Déconnecter les tuyaux d’arrivée d’eau chaude et d’eau
froide de l’arrière de la laveuse. Laisser l’eau dans les tuyaux
s’écouler dans un seau.
5. Retirer le tuyau d’évacuation exible du tuyau rigide raccordé
à l’égout ou de l’évier adjacent, et vider dans un seau toute
l’eau présente dans le tuyau.
SI LA LAVEUSE OU LA
SÉCHEUSE EST ENCORE DANS
SON EMBALLAGE
Positionner l’appareil emballé à proximité de l’emplacement
d’installation nal. Découper l’emballage comme suit:
Laveuse : couper le lm de plastique le long de la ligne ■
pointillée autour de la base. Enlever l’emballage. Ne pas
enlever les vis de calage.
Sécheuse : Découper l’emballage de carton autour du ■
sommet et sur les angles en descendant le long des lignes
de découpage pointillées. Jeter le sommet de l’emballage
de carton, les garnitures d’angle et les côtés. Laisser le fond
de l’emballage de carton sous la sécheuse.
Désinstallation de la sécheuse électrique
1. Débrancher le cordon d’alimentation électrique.
2. Écarter la sécheuse du mur sufsamment pour pouvoir
desserrer la bride du conduit d’évacuation. Desserrer
la bride et déconnecter délicatement le conduit d’évacuation
de la bouche de décharge de la sécheuse.
Modèles vapeur uniquement :
3. Fermer le robinet d’eau.
4. Retirer le tuyau d’arrivée d’eau du robinet, et vider dans
un seau, l’eau présente dans le tuyau.
Désinstallation de la sécheuse à gaz
1. Débrancher le cordon d’alimentation électrique.
2. Fermer l’arrivée de gaz.
3. Écarter la sécheuse du mur sufsamment pour pouvoir
desserrer la bride du conduit d’évacuation. Desserrer
la bride et déconnecter délicatement le conduit
d’évacuation de la bouche de décharge de la sécheuse.
4. Déconnecter le conduit exible de la canalisation de gaz
de la sécheuse. Obturer avec du ruban adhésif l’ouverture
de chaque raccord de la canalisation de gaz.
Modèles vapeur uniquement :
5. Fermer le robinet d’eau
6. Retirer le tuyau d’arrivée d’eau du robinet, et vider dans
un seau, l’eau présente dans le tuyau.
12
Page 13

INSTRUCTIONS D’INSTALLATION
1. Rapprocher la laveuse de son emplacement d’installation
nal. Laisser un espace pour pouvoir travailler derrière
la laveuse. Ne pas enlever les vis de calage.
2. Régler l’aplomb de la laveuse - voir les “Instructions
d’installation” de la laveuse.
3. An d’éviter tout dommage, placer un matériau de protection
sur le sol – telle une feuille de carton ou une couverture.
Coucher la sécheuse sur le côté avec précaution, sur le
matériau de protection.
4. Si des pieds sont déjà installés sur la sécheuse, les enlever.
Ne pas installer les pieds de la sécheuse.
5. Ôter la bande adhésive de protection de l’une des bandes
de caoutchouc en longueur. En commençant par le haut
de la base et à environ 1/2" (13 mm) du bord, (en couvrant
les petites arêtes), appuyer le côté adhésif de la bande contre
la base de la sécheuse. Les bandes doivent être placées dans
le sens avant-arrière.
Répéter l’installation de la bande de caoutchouc restante
pour l’autre côté.
7. Soulever la sécheuse pour la placer sur le sommet de la
laveuse, de façon à ce que l’arrière de la laveuse soit aligné
avec celui de la sécheuse.
8. Prendre les attaches en plastique (2), les brides (2), et les vis
de tôlerie à tête bombée (4) dans le sachet de pièces.
9. Prendre une attache en plastique (C) et avec le côte plat vers
l’extérieur, la pousser vers le bas sur le bord inférieur de la
fente (D) à l’arrière de la sécheuse. Faire de même de l’autre
côté.
D
C
B
A
A. Bandes de caoutchouc
B. Petites arêtes
6. Soulever la sécheuse pour la remettre en position verticale
et la déplacer à l’avant de la laveuse.
10. Introduire l’extrémité en crochet (E) de la bride sur l’attache
en plastique (C). Faire pivoter contre l’arrière de la laveuse.
Ajuster la position de la sécheuse vers l’avant ou vers
l’arrière si nécessaire; xer la bride (E) à la laveuse avec
vis à tête bombée (F). Bien serrer les vis. Faire de même
de l’autre côté.
C
E
F
11. Suivre les instructions d’installation fournies avec la laveuse
et la sécheuse pour enlever les vis de calage et terminer
l’installation.
13
Page 14

NOTES
14
Page 15

NOTES
15
Page 16

W10315355B
© 2010
All rights reserved
Todos los derechos reservados.
Tous droits réservés
Printed in U.S.A.
Impreso en EE.UU.
Imprimé aux É.-U.
8/10
 Loading...