


W10240439A
Whirlpool W10240439A, WTW6800WL - Cabrio Lunar - Ing Washer, MVWB800VU - 28 Washer With SuperSize Capacity Plus, WTW6800WB - Cabrio - Ing Washer, Cabrio Installation Instructions Manual
...
Table of Contents/Table des matieres
W
ASHER SAFETY ..........................................................................2
INSTALLATION REQUIREMENTS................................................3
T
ools and Parts ............................................................................3
Location Requirements................................................................4
D
rain System................................................................................4
Electrical Requirements ...............................................................5
I
NSTALLATION INSTRUCTIONS..................................................6
Before You Start...........................................................................6
Remove Shipping Base and Packing Ring..................................6
Connect Drain Hose.....................................................................6
Connect the Inlet Hoses...............................................................7
Secure the Drain Hose.................................................................8
Level the Washer..........................................................................8
Complete Installation ...............................................................
... 9
SÉCURITÉ DE LA LAVEUSE........................................................10
EXIGENCES D'INSTALLATION ...................................................11
Outillage et pièces......................................................................11
Exigences d'emplacement .........................................................12
Système de vidange...................................................................12
Spécifications électriques ..........................................................13
INSTRUCTIONS D'INSTALLATION.............................................14
Avant de commencer.................................................................14
Retrait de la base d'expédition et de l'anneau d'emballage .....14
Raccordement du tuyau de vidange..........................................14
Raccordement des tuyaux d'alimentation.................................15
Immobilisation du tuyau de vidange
..........................................16
Réglage de l'aplomb de la laveuse............................................16
Achever l'installation ..................................................................17
WASHER INSTALLATION INSTRUCTIONS
INSTRUCTIONS POUR L’INSTALLATION DE LA LAVEUSE
W10240438A
2
WASHER SAFETY
You can be killed or seriously injured if you don't immediately
You
can be killed or seriously injured if you don't
follow
All safety messages will tell you what the potential hazard is, tell you how to reduce the chance of injury, and tell you what can
happen if the instructions are not followed.
Your safety and the safety of others are very important.
We have provided many important safety messages in this manual and on your appliance. Always read and obey all safety
messages.
This is the safety alert symbol.
This symbol alerts you to potential hazards that can kill or hurt you and others.
All safety messages will follow the safety alert symbol and either the word “DANGER” or “WARNING.”
These words mean:
follow instructions.
instructions.
DANGER
WARNING
IMPORTANT SAFETY INSTRUCTIONS
SAVE THESE INSTRUCTIONS
Read all instructions before using the washer.
Do not wash articles that have been previously cleaned
in, washed in, soaked in, or spotted with gasoline,
dry-cleaning solvents, other flammable, or explosive
substances as they give off vapors that could ignite or
explode.
Do not add gasoline, dry-cleaning solvents, or other
flammable, or explosive substances to the wash water.
These substances give off vapors that could ignite or
explode.
Under certain conditions, hydrogen gas may be
produced in a hot water system that has not been used
for 2 weeks or more. HYDROGEN GAS IS
EXPLOSIVE. If the hot water system has not been
used for such a period, before using the washing
machine, turn on all hot water faucets and let the water
flow from each for several minutes. This will release
any accumulated hydrogen gas. As the gas is
flammable, do not smoke or use an open flame during
this time.
Do not allow children to play on or in the washer. Close
supervision of children is necessary when the washer is used
near children.
Before the washer is removed from service or discarded,
remove the door or lid.
Do not reach into the washer if the drum, tub or agitator is
moving.
Do not install or store the washer where it will be exposed to
the weather.
Do not tamper with controls.
Do not repair or replace any part of the washer or attempt any
servicing unless specifically recommended in this manual or in
published user-repair instructions that you understand and
have the skills to carry out.
See “Electrical Requirements” for grounding instructions.
WARNING: To reduce the risk of fire, electric shock, or injury to persons when using the washer, follow basic precautions,
including the following:
3
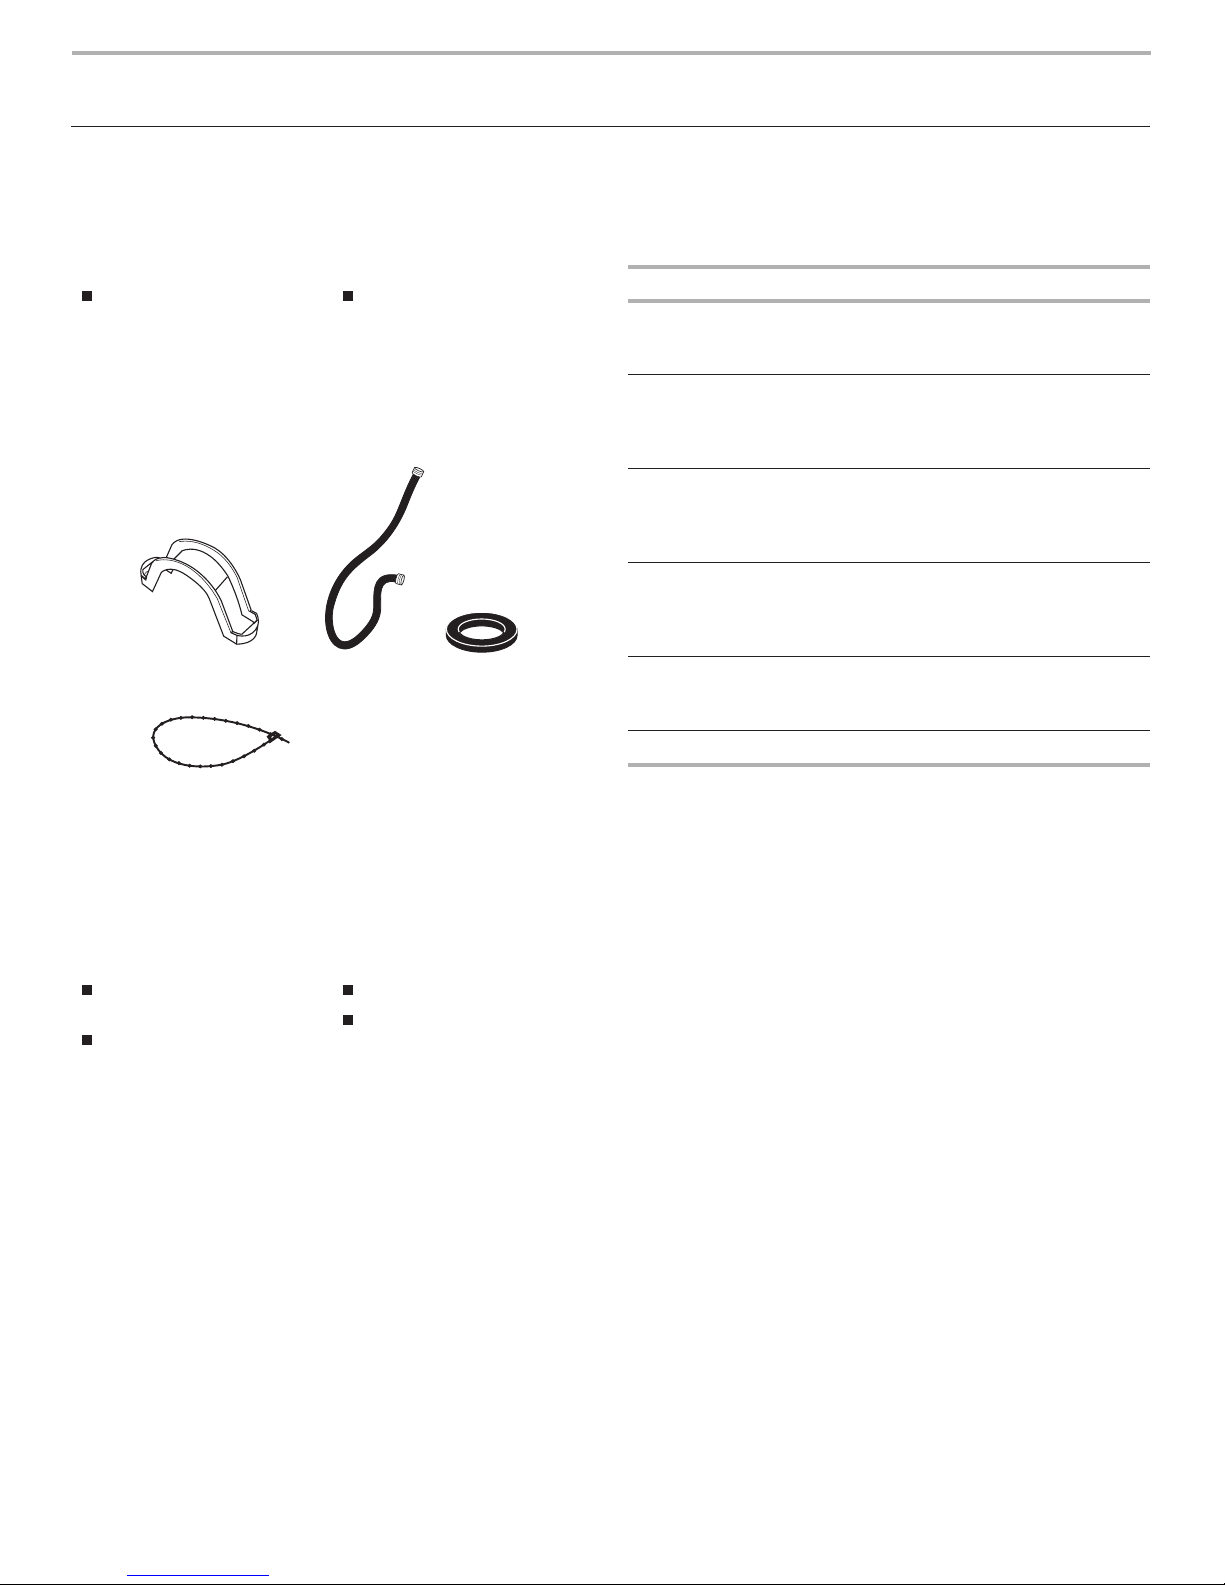
INSTALLATION REQUIREMENTS
Tools and Parts
G
ather the required tools and parts before starting installation.
T
he parts supplied are in the washer basket.
T
ools needed for connecting the drain hose and water
inlet hoses:
NOTE: Replace inlet hoses after 5 years of use to reduce the risk
of hose failure. Record hose installation or replacement dates for
future reference.
Parts supplied:
Tools needed for securing the drain hose and leveling
the washer:
A
lternate Parts
Your installation may require additional parts. If you are interested
in purchasing one of the items listed here, call the toll-free
number on the cover or in the “Assistance or Service” section.
Pliers that open to 1 "
(39.5 mm)
Flashlight (optional)
A. Drain hose form
B. Water inlet hoses (2)
C. Flat water inlet hose washers (4)
D. Beaded tie strap
Adjustable or open end
wrench " (14 mm)
Level
Wood block
Ruler or measuring tape
AB
C
D
If You Have: You Will Need to Buy:
Laundry tub or
standpipe taller
t
han 96" (2.4 m)
Sump pump system (if not already
available)
1" (25 mm)
d
iameter standpipe
2" (50 mm) diameter to 1” (25 mm)
d
iameter standpipe adapter,
Part Number 3363920 and connector kit
Part Number 285835
Overhead sewer Standard 20 gal. (76 L) 39" (990 mm) tall
drain tub or utility sink, sump pump and
connectors (available from local
plumbing suppliers)
Floor drain Siphon break, Part Number 285834;
addi
tional drain hose,
Part Number 8318155 and connector kit,
Part Number 285835
Water faucets
beyond reach of fill
hoses
2 longer water fill hoses:
6 ft (1.8 m) Part Number 76314,
10 ft (3.0 m) Part Number 350008
Lint clogged drain Drain protector, Part Number 367031
9
⁄1
6
9
⁄16

4
Location Requirements
Selecting the proper location for your washer improves
performance and minimizes noise and possible washer “walk.”
Your washer can be installed in a basement, laundry room,
closet, or recessed area. See “Drain System.”
IMPORTANT: Do not install or store the washer where it will be
e
xposed to the weather.
Proper installation is your responsibility.
Y
ou will need:
A water heater set to deliver 120°F (49°C) water to the
washer.
A grounded electrical outlet located within 4 ft (1.2 m) of
where the power cord is attached to the back of the washer.
See “Electrical Requirements.”
Hot and cold water faucets located within 3 ft (900 mm)of the
hot and cold water fill valves, and water pressure of
20-100 psi (138-690 kPa) for best performance.
A level floor with a maximum slope of 1" (25 mm) under entire
washer. Installing the washer on carpeting is not
recommended.
A sturdy floor to support the washer weight (washer, water,
and load) of 315 lbs (143 kgs).
Do not store or operate your washer in temperatures at or below
32°F (0°C). Some water can remain in the washer and can cause
damage in low temperatures. See “Washer Care” for information
on winterizing.
Installation spacing for recessed area and closet
installations
The following spacing dimensions are recommended for this
washer. This washer has been tested for installation with spacing
of 0" (0 cm) clearance on the sides. Recommended spacing
should be considered for the following reasons:
Additional spacing should be considered for ease of
installation and servicing.
Additional spacing should be considered on all sides of the
washer to reduce noise transfer.
For closet installation with a door, minimum ventilation
openings in the top and bottom of the door are required.
Louvered doors with equivalent ventilation openings are
acceptable.
Companion appliance spacing should also be considered.
*Required spacing
Drain System
The washer can be installed using the standpipe drain system
(floor or wall), the laundry tub drain system, or the floor drain
system. Select the drain hose installation method you need.
S
ee “Tools and Parts.”
Standpipe drain system—wall or floor (views A & B)
The standpipe drain requires a minimum diameter standpipe of
2" (51 mm) The minimum carry-away capacity can be no less than
17 gal. (64 L) per minute. A 2" (51 mm) diameter to 1" (25 mm)
diameter standpipe adapter kit is available. See “Tools and
Parts.”
The top of the standpipe must be at least 39" (990 mm) high
and no higher than 96" (2440 mm) from the bottom of the washer.
Laundry tub drain system (view C)
The laundry tub needs a minimum 20 gal. (76 L) capacity. The top
of the laundry tub must be at least 39" (990 mm) above the floor
and no higher than 96" (2440 mm
from the bottom of the washer.
Floor drain system (view D)
The floor drain system requires a siphon break that may be
purchased separately. See “Tools and Parts.”
The siphon break must be a minimum of 28" (710 mm)
from the
bottom of the washer. Additional hoses might be needed.
A. Front view
B. Side view
C. Closet door with vents
A
B
C
17"*
(431.8 mm)
1"
(25 mm)
1"
(25 mm)
27 "
(699 mm)
1"*
(25 mm)
27"
(686 mm)
5"*
(127 mm)
14"*max.
(356 mm)
3"*
(76 mm)
3"*
(76 mm)
24 in. *
(155 cm )
2
2
48 in. *
(310 cm )
2
2
A
B
39"
(990 mm)
C
D
39"
(990 mm)
28"
(710 mm)
1
⁄2
5
Electrical Requirements
A 120 volt, 60 Hz., AC only, 15- or 20-amp, fused electrical
supply is required. A time-delay fuse or circuit breaker is
recommended. It is recommended that a separate circuit
serving only this appliance be provided.
This washer is equipped with a power supply cord having a
3prong grounding plug.
To minimize possible shock hazard, the cord must be
plugged into a mating, grounded 3-prong outlet, grounded
in accordance with local codes and ordinances. If a mating
outlet is not available, it is the personal responsibility and
obligation of the customer to have the properly grounded
outlet installed by a qualified electrician.
If codes permit and a separate ground wire is used, it is
recommended that a qualified electrician determine that the
ground path is adequate.
Do not ground to a gas pipe.
Check with a qualified electrician if you are not sure the
washer is properly grounded.
Do not have a fuse in the neutral or ground circuit.
Electrical Shock Hazard
Plug into a grounded 3 prong outlet.
Do not remove ground prong.
Do not use an adapter.
Do not use an extension cord.
Failure to follow these instructions can result in death,
fire, or electrical shock.
WARNING
GROUNDING INSTRUCTIONS
For a grounded, cord-connected washer:
This washer must be grounded. In the event of a malfunction
or breakdown, grounding will reduce the risk of electrical
shock by providing a path of least resistance for electric
current. This washer is equipped with a cord having an
equipment-grounding conductor and a grounding plug. The
plug must be plugged into an appropriate outlet that is
properly installed and grounded in accordance with all local
codes and ordinances.
WARNING:
Improper connection of the equipmentgrounding conductor can result in a risk of electric shock.
Check with a qualified electrician or serviceman if you are in
doubt as to whether the appliance is properly grounded.
Do not modify the plug provided with the appliance – if it will
not fit the outlet, have a proper outlet installed by a qualified
electrician.
For a permanently connected washer:
This washer must be connected to a grounded metal,
permanent wiring system, or an equipment grounding
conductor must be run with the circuit conductors and
connected to the equipment-grounding terminal or lead on
the appliance.
6
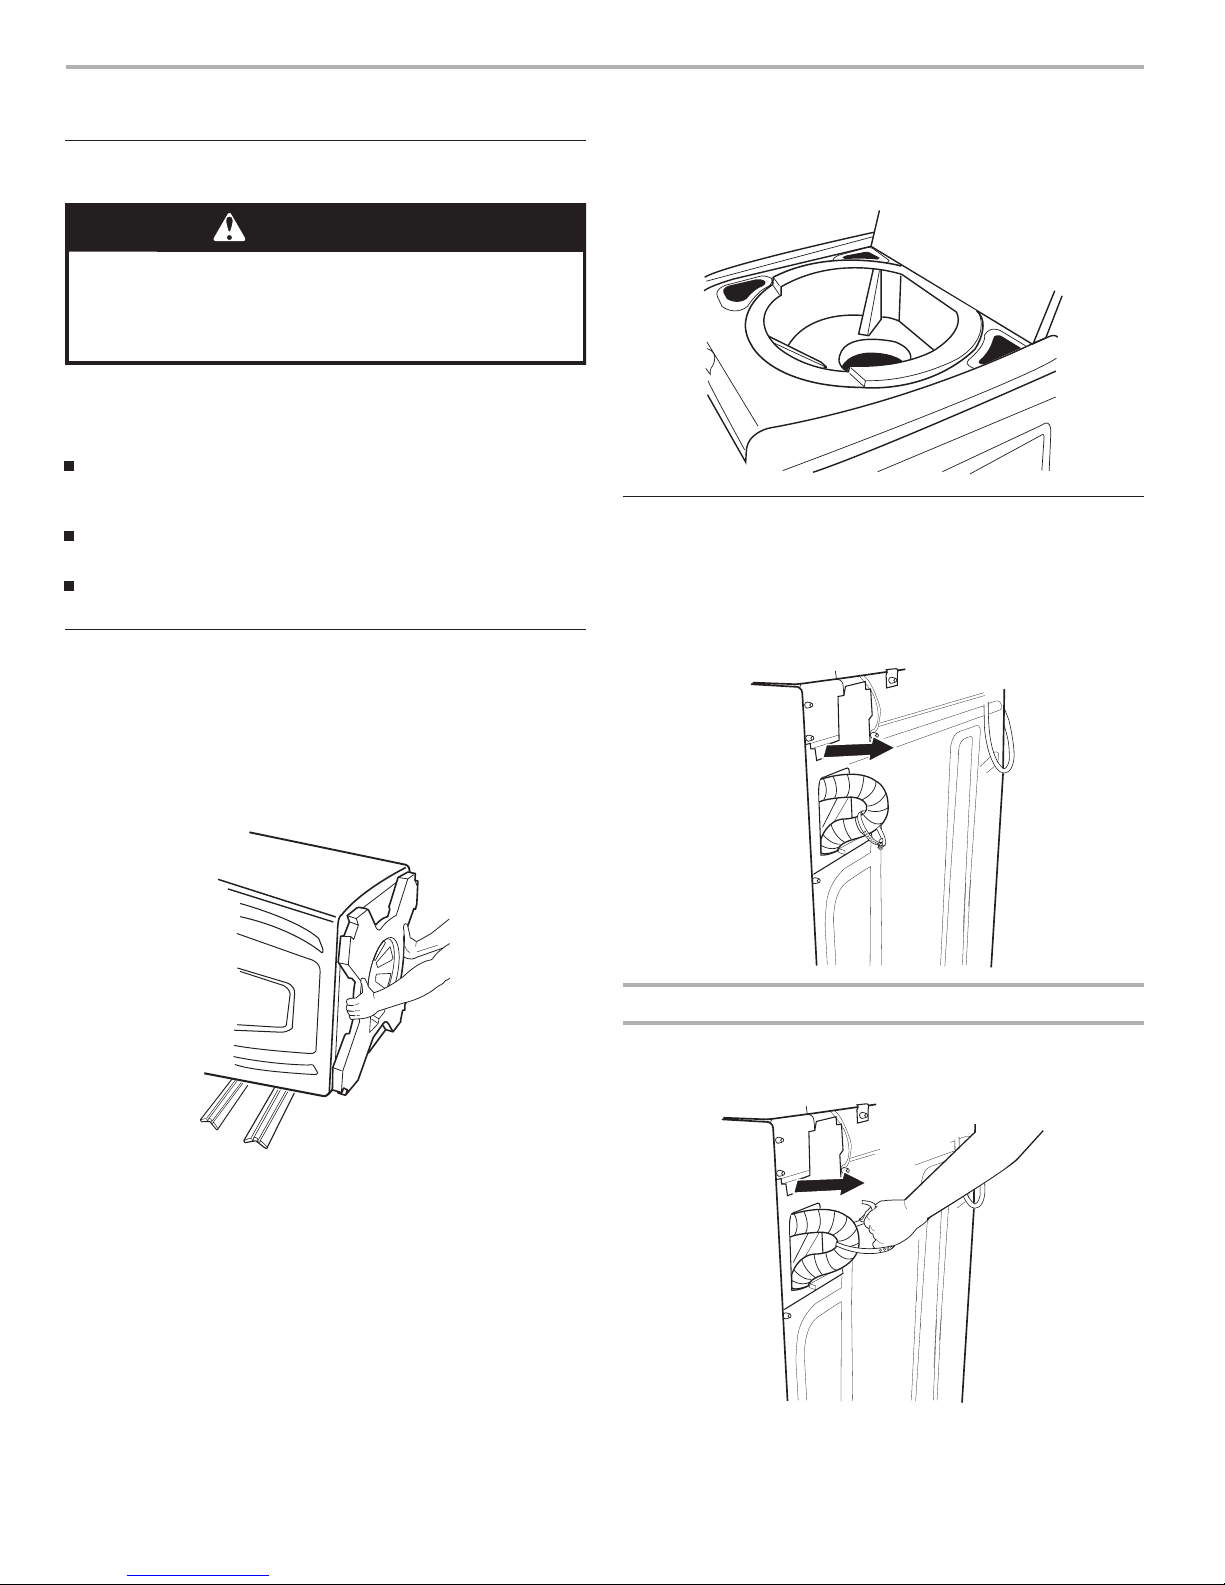
INSTALLATION INSTRUCTIONS
Before You Start
NOTE: To avoid floor damage during installation, set the washer
o
nto cardboard before moving across floor.
IMPORTANT:
Be sure the foam shipping base has been removed from the
bottom of the washer as directed in the Unpacking
Instructions.
If foam shipping base has not been removed, be sure lid is
secured with tape before laying washer on its back.
Removing the foam shipping base is necessary for proper
operation.
Remove Shipping Base and Packing Ring
1. Place cardboard supports from shipping carton on floor
behind washer for support.
2. Secure the lid with tape.
3. Using 2 or more people, tip the washer onto its back and
place on cardboard supports.
4. Remove foam shipping base.
5. Set washer upright.
6. Remove tape from lid. Open lid and remove foam packing
ring from washer tub. Keep foam packing ring in case you
need to move the washer in the future.
Connect Drain Hose
Proper connection of the drain hose protects your floors from
damage due to water leakage. Read and follow these
instructions.
The drain hose is connected to your washer and is stored inside
the washer cabinet.
Remove drain hose from washer cabinet
Pull the corrugated drain hose out of the washer by first grabbing
the pull tie. Continue to pull the hose until the end emerges. Do
not force excess drain hose back into the rear of the washer.
WARNING
Excessive Weight Hazard
Use two or more people to move and install washer.
Failure to do so can result in back or other injury.
 Loading...