

Whirlpool RB1005XY User Manual
/ Hon^^Anienoa
Use And Care
A Note To You 2
Important Safety
Instructions 3
Parts And Features 5
Using Your Oven 6
Caring For
Your Oven
If You Need
Assistance Or
Service 23
Warranty 28
1-800-253-1301
Call us with questions or comments.
STANDARD AND CONTINUOUS-CLEANING
ELECTRIC BUILT-IN OVENS
MODELS RB220PXB RB120PXY
16
RBIOOPXY RB1005XY

A NOTE TO YOU
A Note To You
Thank you for buying a Whirlpool® appliance.
You have purchased a quality, world-class home appliance. Years of engineering experience
have gone into its manufacturing. To ensure that you will enjoy many years of trouble-free
operation, we have developed this Use and Care Guide. It is full of valuable information on
how to operate and maintain your appliance properly and safely. Please read it carefully. Also,
please complete and mail the Ownership Registration Card provided with your appliance. This
will help us notify you about any new information on your appliance.
Your safety is important to us.
This guide contains safety symbols and statements. Please pay special attention to these
symbols and follow any instructions given. Here is a brief explanation of the use of each
symbol.
AWARNING
This symbol will help alert you to such
dangers as personal injury, burns, fire
and electrical shock.
This symbol will help you avoid actions
which could cause product damage
(scratches, dents, etc.) and damage to
your personal property.
ACAUTION
Our Consumer Assistance Center number, 1-800-253-1301, is toll-free, 24 hours a day.
If you ever have a question concerning your appliance's operation, or if you need service, first
see “If You Need Assistance Or Service” on page 23. If you need further help, feel free to call
our Consumer Assistance Center. When calling, you will need to know your appliance’s
complete model number and serial number. You can find this information on the model and
serial number plate (see diagram on page 5). For your convenience, we have included a
handy place below for you to record these numbers, the purchase date from the sales slip and
your dealer’s name and telephone number. Keep this book and the sales slip together in a
safe place for future reference.
Model Number
Serial Number
Purchase Date
Dealer Name
Dealer Phone

IMPORTANT SAFETY INSTRUCTIONS
Important Safety Instructions
^WARNING
General
' Read all instructions before
using the oven.
' Install or locate the oven only
in accordance with the pro
vided Installation Instructions.
The oven must be installed by a
qualified installer. The oven must
be properly connected to electri
cal supply and grounded.
’ CAUTION: Do not store things
children might want above the
oven. Children could be burned
or injured while climbing on it.
' Do not leave children alone or
unattended in area where the
oven is in use. They should
never be allowed to sit or stand
on any part of the oven. They
could be burned or injured.
Do not operate the oven if it is
damaged or not working prop
erly.
Do not use the oven for
warming or heating the room.
Persons could be burned or
injured, or a fire could start.
Use the oven only for its
intended use as described
in this manual.
To reduce the risk of fire, electrical shock, injury to
persons, or damage when using the oven, follow
basic precautions, including the following:
• Do not touch heating elements
or interior surfaces of oven.
Heating elements may be hot
even though they are dark in
color. Interior surfaces of an
oven become hot enough to
cause burns. During and after
use, do not touch, or let clothing
or other flammable materials
contact heating elements or
interior surfaces of oven until
they have had sufficient time to
cool. Other surfaces of the
oven, such as the oven vent
opening, the surface near the
vent opening, the oven door
and window, could also become
hot enough to cause burns.
•Do not wear loose or hanging
garments when using the oven.
They could ignite if they touch a
hot heating element and you
could be burned.
Use only dry potholders. Moist
or damp potholders on hot
surfaces may result in burns
from steam. Do not let potholder
touch hot heating elements. Do
not use a towel or bulky cloth
for a potholder. It could catch on
fire.
Keep oven vents unobstructed.
continued on next page

IMPORTANT SAFETY INSTRUCTIONS
• Do not heat unopened containers.
They could explode. The hot con
tents could cause burns and con
tainer particles could cause injury.
• Do not store flammable materials
on or near the oven. The fumes
can create an explosion and/or fire
hazard.
When using the oven
_____________
• Always position oven rack(s) in
desired location while oven is cool.
If a rack must be removed while
oven is hot, do not let potholder
contact hot heating element in
oven.
• Use care when opening oven door.
Let hot air or steam escape before
removing or replacing food.
Grease
_________________________
• Grease is flammable and should
be handled carefully. Let fat cool
before attempting to handle it.
• Do not use water on grease fires.
Never pick up a flaming pan.
Smother flaming pan by covering
with a well-fitted lid, cookie sheet
or flat tray. Flaming grease outside
of pan can be extinguished with
baking soda or, if available, a
multipurpose dry chemical or foam-
type extinguisher.
Care and cleaning
• Do not use oven cleaners in
continuous-cleaning oven model.
No commercial oven cleaner or
oven liner protective coating of
any kind should be used in or
around any part of the oven.
• Do not clean door heat seal.
It is essential for a good seal. Care
should be taken not to rub, damage
or move the seal. Clean only parts
recommended in this Use and Care
Guide.
• Do not repair or replace any part
of the oven unless specifically
recommended in this manual. All
other servicing should be referred
to a qualified technician.
• Disconnect the electrical supply
before servicing the oven.
- SAVE THESE INSTRUCTIONS -
PARTS AND FEATURES
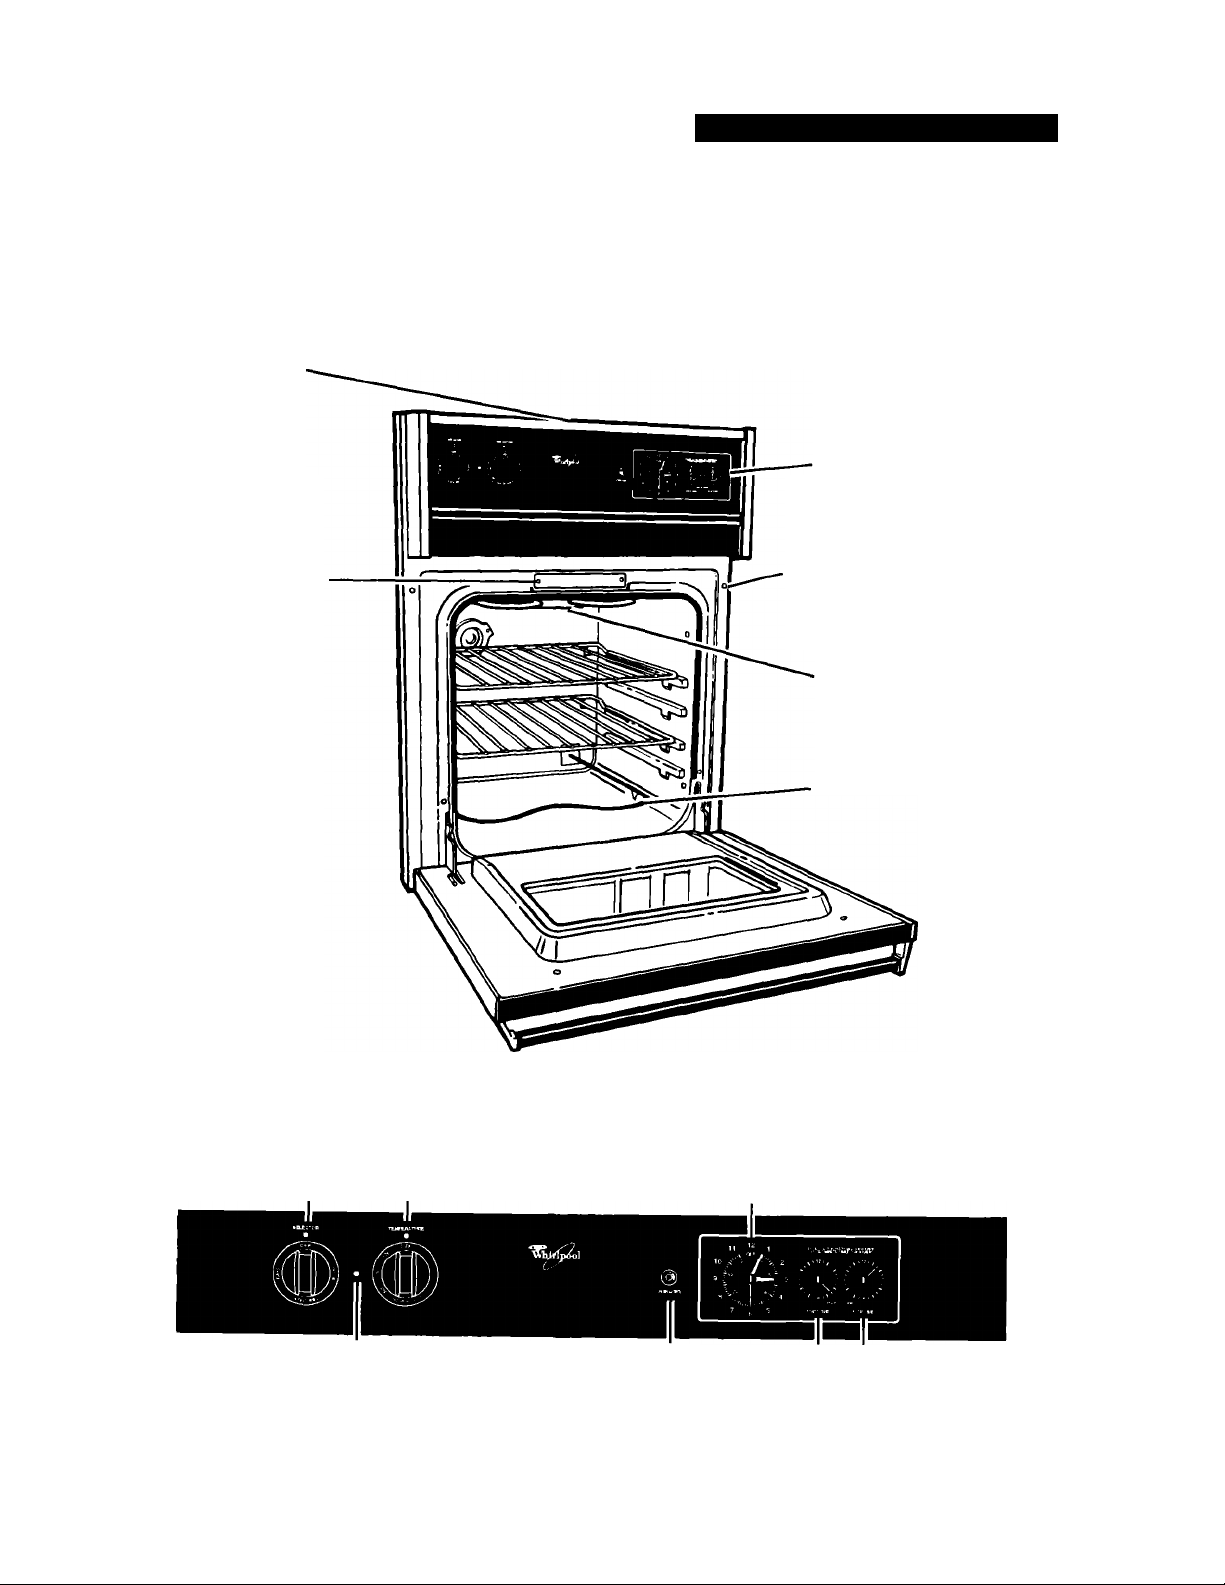
Parts And Features
This section contains captioned illustrations of your appliance. Use them to become familiar
with the location and appearance of all parts and features.
Oven vent
(on top)
Control panel
Model and
serial
number plate
Control panel
Automatic
oven light switch
(model
RB220PXB)
Broil element
Bake element
Oven Oven temperature
selector control
Oven on
indicator
light
Mealtimer^“
Clock/Minute
Timer
Manual oven
light switch
Start Stop
time time

USING YOUR OVEN
Using Your Oven
In This Section
Page
......
......
Using aluminum foil for baking.
To obtain the best cooking results possible, you must operate your oven properly. This
section gives you important information for efficient and safe use of your oven.
......
......
Positioning racks and pans
For baking/roasting with one rack, place
the rack so the top of the food will be
centered in the oven.
Rack placement for specific foods:
FOOD
Frozen pies, large
roasts, turkeys
Angel and bundt
cakes, most quick
breads, yeast
breads, casseroles,
meats
Cookies, biscuits,
muffins, cakes,
nonfrozen pies
RACK POSITION
Lowest level or
2nd level from
bottom
2nd level from
bottom
2nd or 3rd level
from bottom
Adjusting the oven
6
temperature control
7
Broiling.........................................
7
Broiling tips
8
Energy saving tips
8
Using the MEALTIMER^“ clock.
q
The oven vent
When baking on two racks, arrange racks
on bottom and third level from bottom.
NOTE: For recommended rack placement
when broiling, see “Broiling rack position
chart" on page 12.
.................................
....................
......................
..............................
^WARNING
Personal Injury Hazard
•Always position oven rack(s) in
desired location before turning oven
on. Be sure the rack(s) is level.
• If rack(s) must be moved while oven
is hot, use potholders or oven mitts to
protect hands.
Failure to follow the above precautions
could result in personal injury.
Page
.....
.....
.....
.....
.....
.....
10
11
13
13
14
15
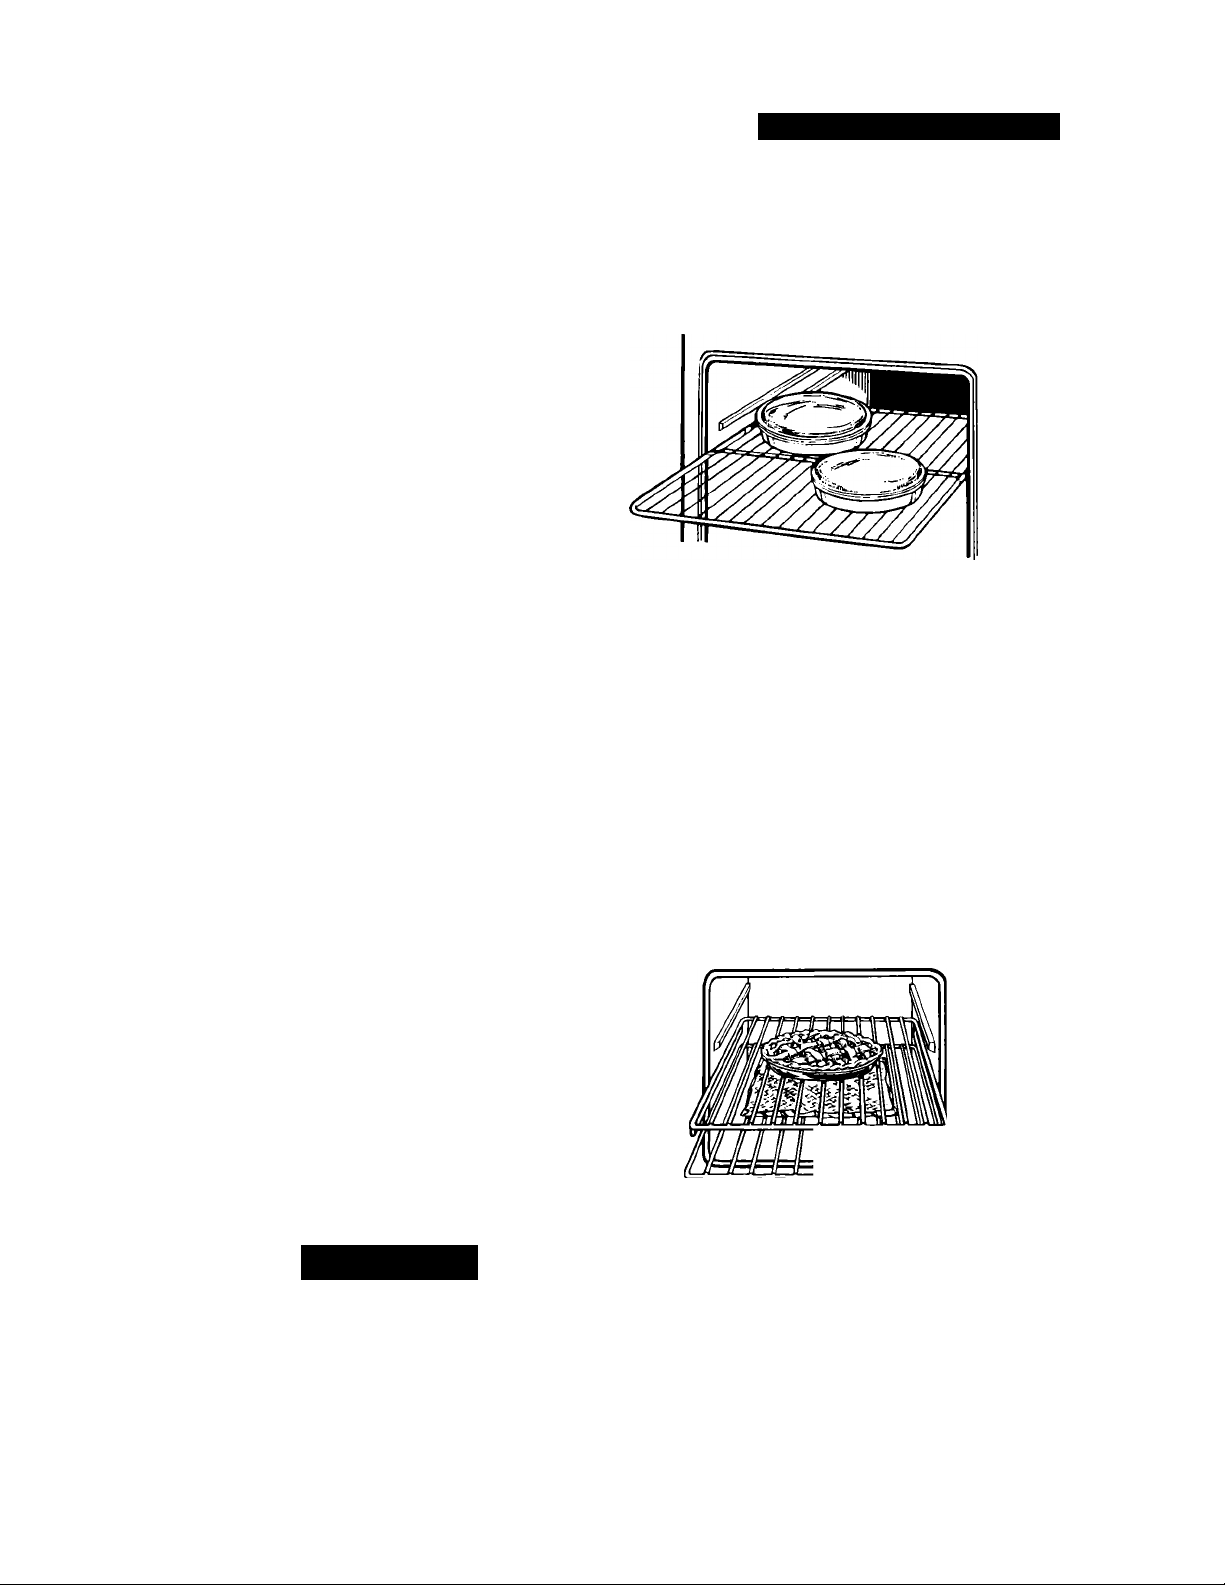
For best air circulation
Hot air must circulate around the pans in the
oven for even heat to reach all parts of the
oven. This results in better baking.
• Place the pans so that one is not directly
over the other.
• For best results, allow VA to 2 inches
(4-5 cm) of space around each pan and
between pans and oven walls. There must
be a minimum space of 1 inch (2.5 cm).
• Use only one cookie sheet in the oven at
one time.
Use the following as a guide to determine
where to place the pans:
One pan
Place in the center of the oven rack.
Two pans
Place in opposite corners of the oven rack.
Three or four pans
Place in opposite corners on each oven
rack. Stagger pans so no pan is directly over
another.
USING YOUR OVEN
Using aluminum foil for baking
Use aluminum foii to catch spiiiovers
from pies or casseroies:
• Place the foil on the oven rack below the
rack with the food. Turn up foil edges and
make sure foil is about 1 inch (3 cm)
larger all around than the dish holding the
food.
• Do not cover the entire rack with alumi
num foil. It will reduce air circulation and
cause poor cooking results.
• Do not line oven bottom or entire oven
rack with foil or other liners. Poor baking
will result.
^WARNING
Electrical Shock and Fire Hazard
Do not allow foil to touch the heating
elements.
Failure to follow this precaution could
result in electrical shock or fire hazard
and damage to the elements.
DBQH

USING YOUR OVEN
Setting the clock
Push in and turn the Minute Timer Knob to
set the clock.
1. Push in Minute Timer Knob and turn
ciockwise until clock shows the correct
time of day.
11 1 . TO -<rr Mr-
■ ' _ ' TO *7MTiUn II
2. Let the Minute Timer Knob pop out.
Turn clockwise until Minute Timer hand
points to OFF. The clock setting will
change if you push in the knob when
turning.
Using the Minute Timer
The Minute Timer does not start or slop the
oven. It works like a kitchen timer. Set it in
minutes up to an hour. You will hear a
buzzer when the set time is up.
NOTE: Do not push in the knob when setting
the Minute Timer or when stopping the
buzzer. Pushing in and turning the Minute
Timer Knob changes the clock setting.
1. Without pushing it in, turn the Minute
Timer Knob counterclockwise until the
timer hand passes the setting you want.
/^1 ’2
I''
2. Without pushing it in, turn the knob
back to the setting you want. When the
time is up, a buzzer will sound. To stop
the buzzer, turn the Minute Timer hand
to OFF.
 Loading...