


PORTABLEAIR CONDITIONER
PORTABLE
AIR CONDITIONER
Use & Care Guide
For questions about features, operation/performance, parts
or service, call:
1-877-465-3566
In Canada, call for assistance, installation
and service, call:
1-877-577-4105
Guía de instrucciones
AIRE ACONDICIONADO
PORTÁTIL
Para preguntas sobre características, funcionamiento,
rendimiento, piezas
o servicio, llame al:
1-877-465-3566
En Canadá, para asistencia, instalación
o servicio, llame al:
1-877-577-4105
1545063

ÍNDICE
SEGURIDAD DEL AIRE ACONDICIONADO.............................17
REQUISITOS DE INSTALACIÓN ..............................................17
Identificación de las piezas.........................................................18
Herramientas y piezas ................................................................18
Requisitos de ubicación.............................................................. 19
Requisitos eléctricos...................................................................19
INSTRUCCIONES DE INSTALACIÓN.......................................20
Desembalaje del aire acondicionado..........................................20
Instalación del aire acondicionado portátil ..................................20
Instalación completa...................................................................22
USO DEL AIRE ACONDICIONADO PORTÁTIL........................23
Primer uso de su aire acondicionado portátil..............................23
Uso del mando a distancia........................................................25
Cambiar la dirección del aire.....................................................27
Sonidos normales......................................................................27
CUIDADO DEL AIRE ACONDICIONADO PORTÁTIL.............28
Drenaje del aire acondicionado.................................................28
Limpiar los filtros de aire ...........................................................28
Limpiar el exterior......................................................................28
Guardar tras su uso...................................................................28
Problemas................................................................................29
ASISTENCIA O SERVICIO.......................................................30
En Estados Unidos ...................................................................30
En Canadá ................................................................................30
TABLE OF CONTENTS
AIR CONDITIONER SAFETY.....................................................3
INSTALLATION REQUIREMENTS.............................................3
Identification of Parts...................................................................4
Tools and Parts ...........................................................................4
Location Requirements ...............................................................5
Electrical Requirements ..............................................................5
INSTALLATION INSTRUCTIONS...............................................6
Unpack the Air Conditioner..................................................6
Install Portable Air Conditioner ...................................................6
Complete Installation ..................................................................8
PORTABLE AIR CONDITIONER USE.......................................9
Starting Your Portable Air Conditioner ........................................9
Using the Remote Control .......................................................11
Changing Air Direction .............................................................13
Normal Sounds.........................................................................13
PORTABLE AIR CONDITIONER CARE ................................14
Draining the Air Conditioner .....................................................14
Cleaning the Air Filter ..............................................................14
Cleaning the Outside................................................................14
Storing After Use .....................................................................14
TROUBLESHOOTING ............................................................15
ASSISTANCE OR SERVICE...................................................16
In the U.S.A. ............................................................................16
In Canada ..........................................................................16
AIR CONDITIONER SAFETY
You can be killed or seriously injured if you don't immediately
You
can be killed or seriously injured if you don't
follow
All safety messages will tell you what the potential hazard is, tell you how to reduce the chance of injury, and tell you what can
happen if the instructions are not followed.
Your safety and the safety of others are very important.
We have provided many important safety messages in this manual and on your appliance. Always read and obey all safety
messages.
This is the safety alert symbol.
This symbol alerts you to potential hazards that can kill or hurt you and others.
All safety messages will follow the safety alert symbol and either the word “DANGER” or “WARNING.”
These words mean:
follow instructions.
instructions.
DANGER
WARNING
IMPORTANT SAFETY INSTRUCTIONS
WARNING:
To reduce the risk of fire, electrical shock or injury when using your air conditioner, follow these basic precautions:
SAVE THESE INSTRUCTIONS
Unplug air conditioner before servicing.
Use two or more people to move and install air conditioner.
Plug into a grounded 3 prong outlet.
Do not remove ground prong.
Do not use an adapter.
Do not use an extension cord.
3
WARNING:
This product contains one or more chemicals known to the State of California to cause cancer.
State of California Proposition 65 Warnings:
WARNING:
This product contains one or more chemicals known to the State of California to cause birth defects or other
reproductive harm.
State of California Proposition 65 Warnings:State of California Proposition 65 Warnings:
Disposing of the unit:Disposing of the unit:Disposing of the unit:
INSTALLATION REQUIREMENTS
Tools and Parts
Gather the required tools and parts before starting installation.
Read and follow the instructions provided with any tools listed
here.
Too ls ne ed ed
Parts supplied
Check that all parts are included in the package containing parts.
■
Phillips screwdrivers
■
Saw
■
Pencil
■
Scissors
■
Tape measure
■
Cordless drill and ¹⁄₈" or
smaller bit
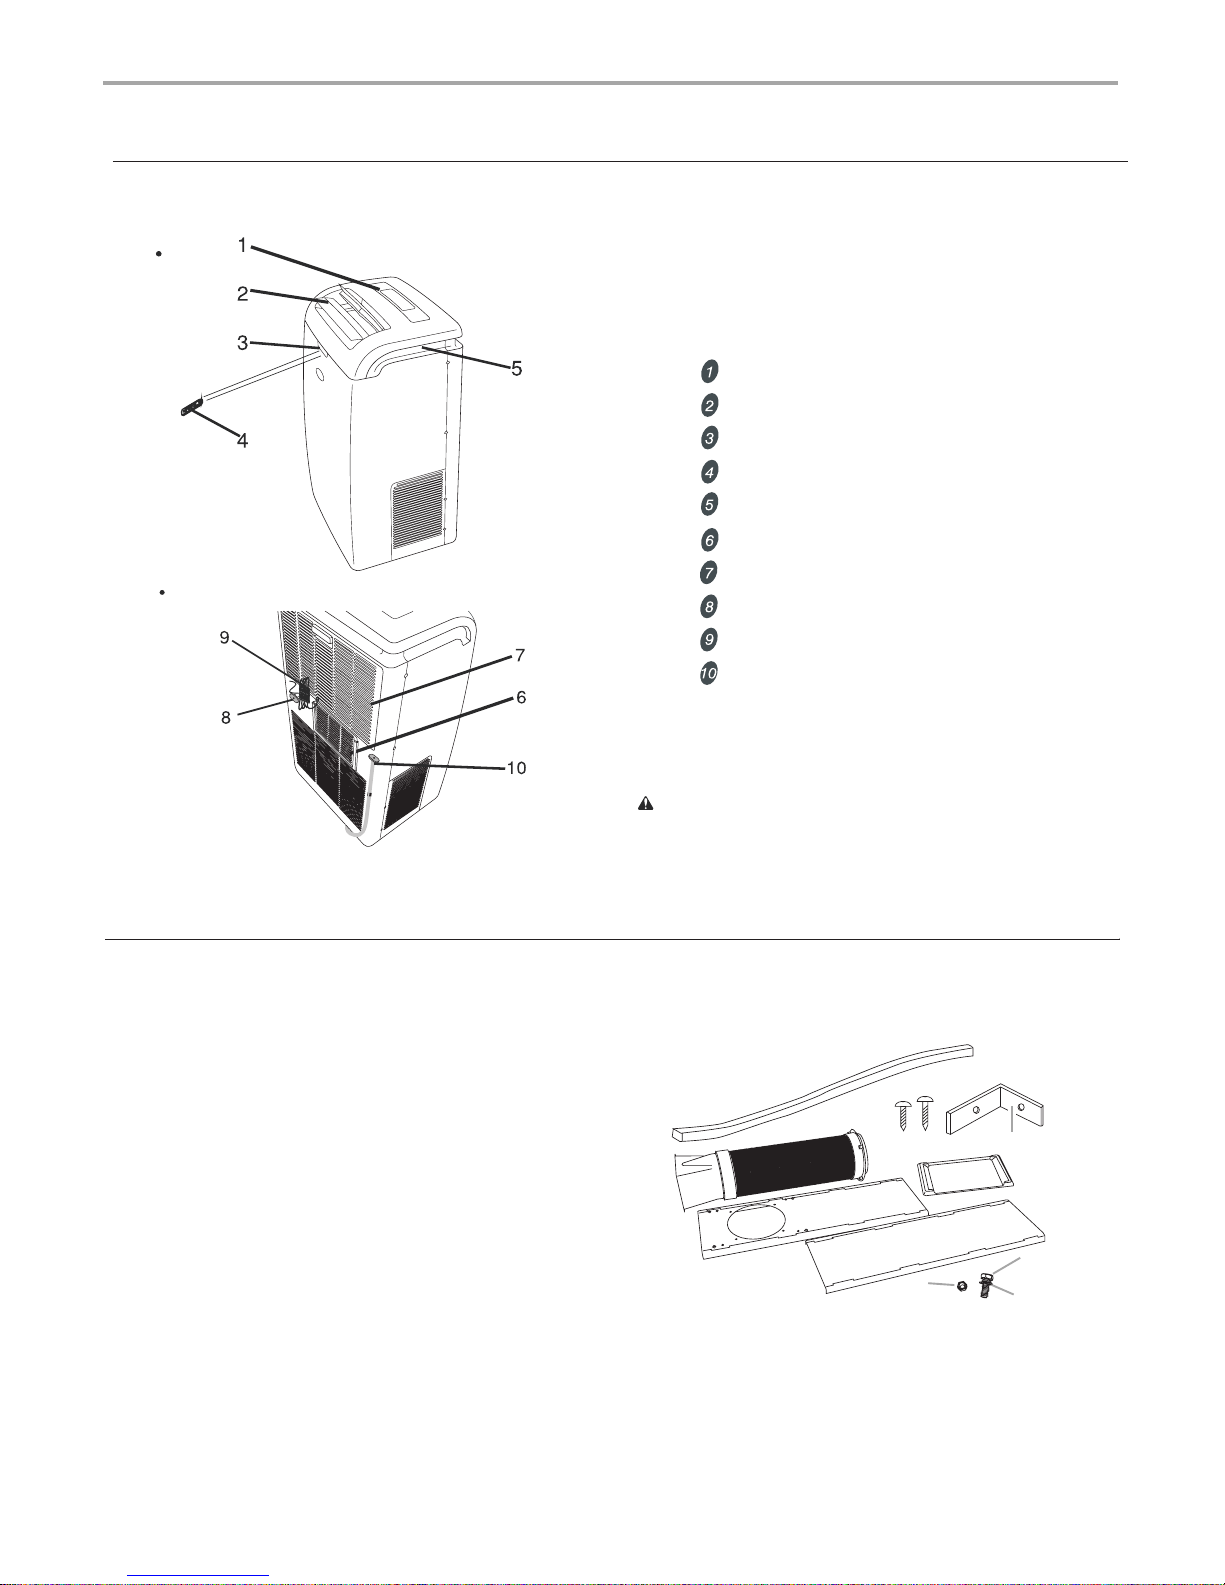
A. Foam seal
B. Flexible exhaust hose with
adapters attached
C.
¹⁄₂
" screws (8)
D.
³⁄₄
" screws (4)
E. Window lock bracket (2)
F. Ra i n c o v er
G. Outer window slider section
H. Inner window slider section
I. Bolts (4)
J. Nuts (4)
K. Washers (4)
B
F
G
H
A
C D
E
J
I
K
Control panel
Cold air outlet
Signal receptor
Remote controller
Transport handle
Hot air outlet
Evaporator air intake
Secondary drain port
Power supply
Primary drain port
Front
Back
The figures in this manual are based on the external view of a standard model.
Consequently, the shape may differ from that of the air conditioner you have selected.
Idenfication of Parts
4
Location Requirements
NOTES:
■
The flexible exhaust hose allows placement of the air
conditioner between 19⁵⁄₈" and 64¹⁄₈" (60 cm and 163 cm)
from window or door.
■
Portable air conditioners are designed as supplemental
cooling to local areas within a room.
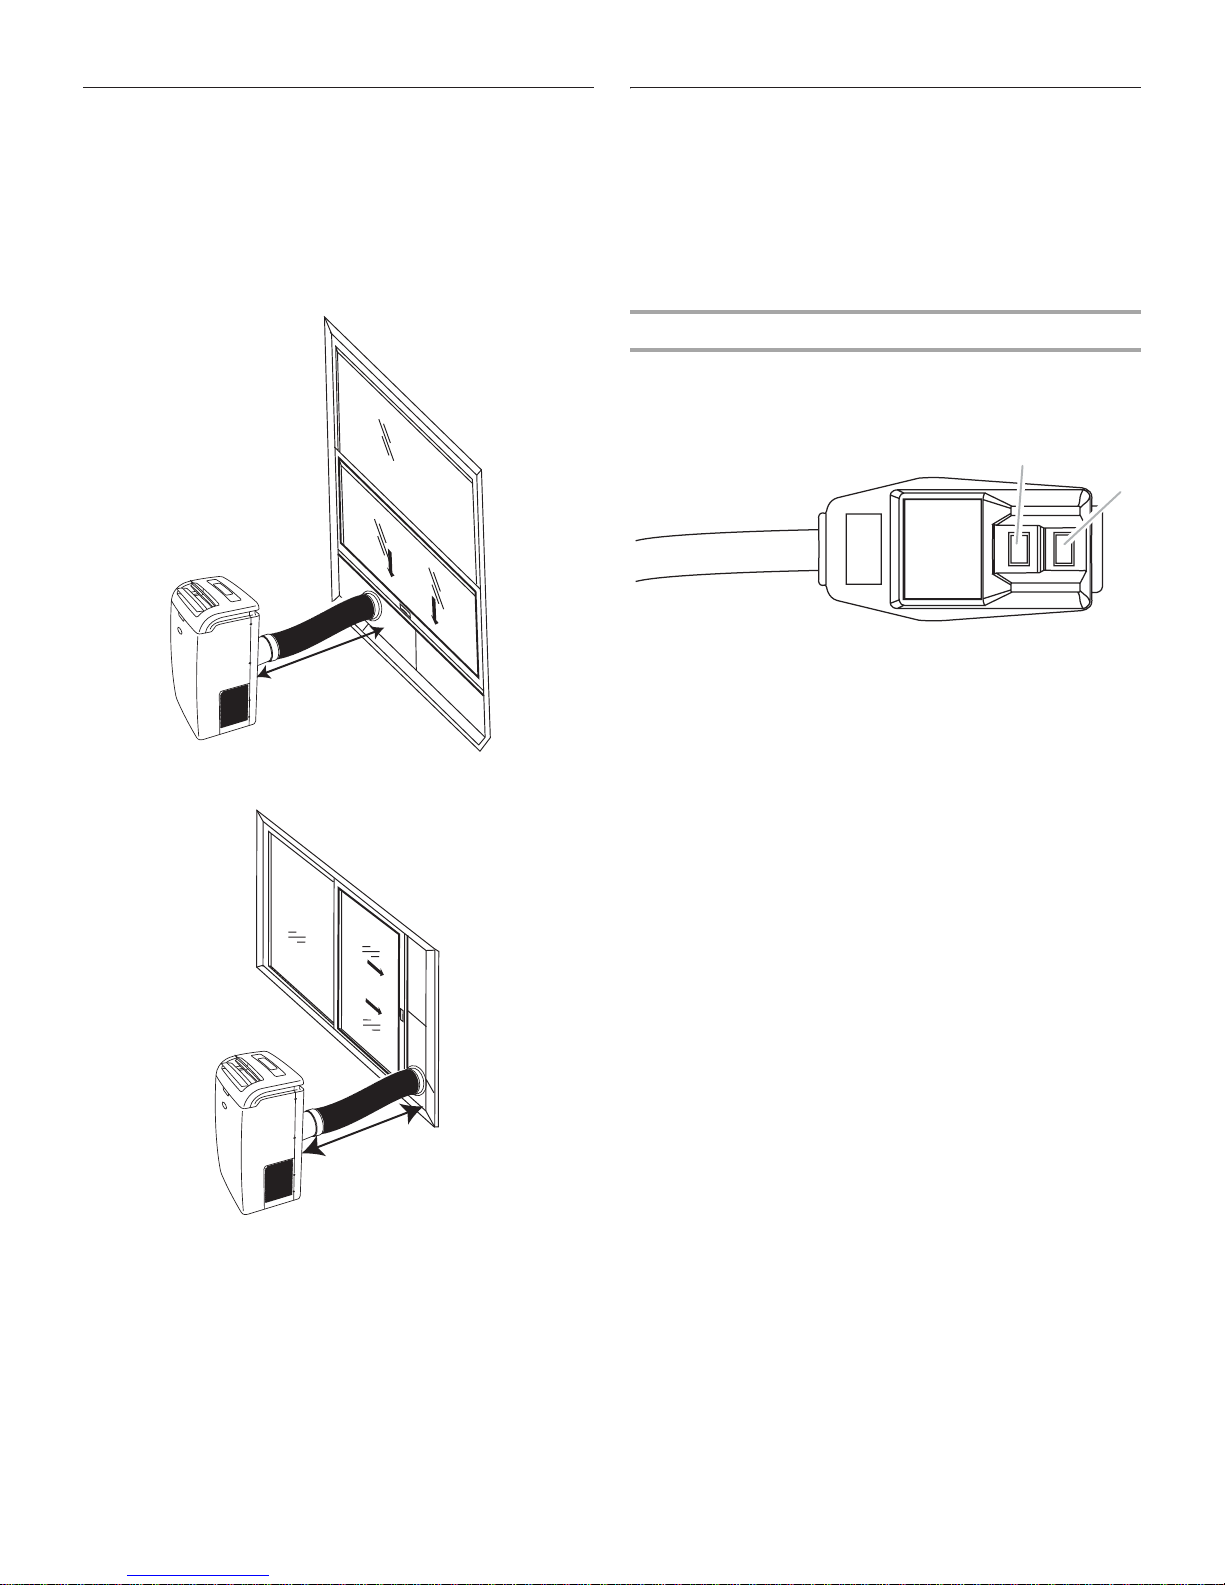
Vertical Slide Window
Horizontal Slide Window
■
To ensure proper ventilation, keep the required distance from
the return air outlet to the wall or other obstacles at least
19⁵⁄₈" (60 cm).
■
Do not block the air outlet.
■
Provide easy access to the grounded 3 prong outlet.
Electrical Requirements
■
The portable air conditioner should be connected to a 115 V,
60 Hz, 15-amp fused grounded 3 prong outlet.
■
The use of a time-delay fuse or time-delay circuit breaker is
recommended.
■
All wiring must comply with local and national electrical
codes and be installed by a qualified electrician. If you have
any questions, contact a qualified electrician.
Power Supply Cord
NOTE: Your air conditioner’s device may differ from the one
shown.
This room air conditioner is equipped with a power supply cord
required by UL. This power supply cord contains state-of-the-art
electronics that sense leakage current. If the cord is crushed, the
electronics detect leakage current and power will be
disconnected in a fraction of a second.
19⁵⁄₈" - 64¹⁄₈"
(60 cm - 163 cm)
19⁵⁄₈" - 64¹⁄₈"
(60 cm - 163 cm)
A. Test button
B. Reset button
TEST
RESET
A
B
5
To test your power supply cord:
1. Plug power supply cord into a grounded 3 prong outlet.
2. Press RESET (on some devices, a green light will turn on).
3. Press TEST (listen for click; Reset button will trip, and on
some devices, a green light will turn off).
4. Press and release RESET (listen for click; Reset button will
latch, and on some devices, a green light will turn on). The
power supply cord is ready for operation.
NOTES:
■
The Reset button must be pushed in for proper operation.
■
The power supply cord must be replaced if it fails to trip when
the test button is pressed or fails to reset.
■ Do not use the power supply cord as an off/on switch.
■
A damaged power supply cord must be replaced with a new
power supply cord obtained from the product manufacturer
and must not be repaired.
■
The power supply cord contains no user serviceable parts.
Opening the tamper-resistant case voids all warranty and
performance claims.
INSTALLATION INSTRUCTIONS
Unpack the Air Conditioner
Remove packaging materials
■
Remove and dispose of/recycle packaging materials.
Remove tape and glue residue from surfaces before turning
on the air conditioner. Rub a small amount of liquid dish soap
over the adhesive with your fingers. Wipe with warm water
and dry.
■
Do not use sharp instruments, rubbing alcohol, flammable
fluids, or abrasive cleaners to remove tape or glue. These
products can damage the surface of your air conditioner.
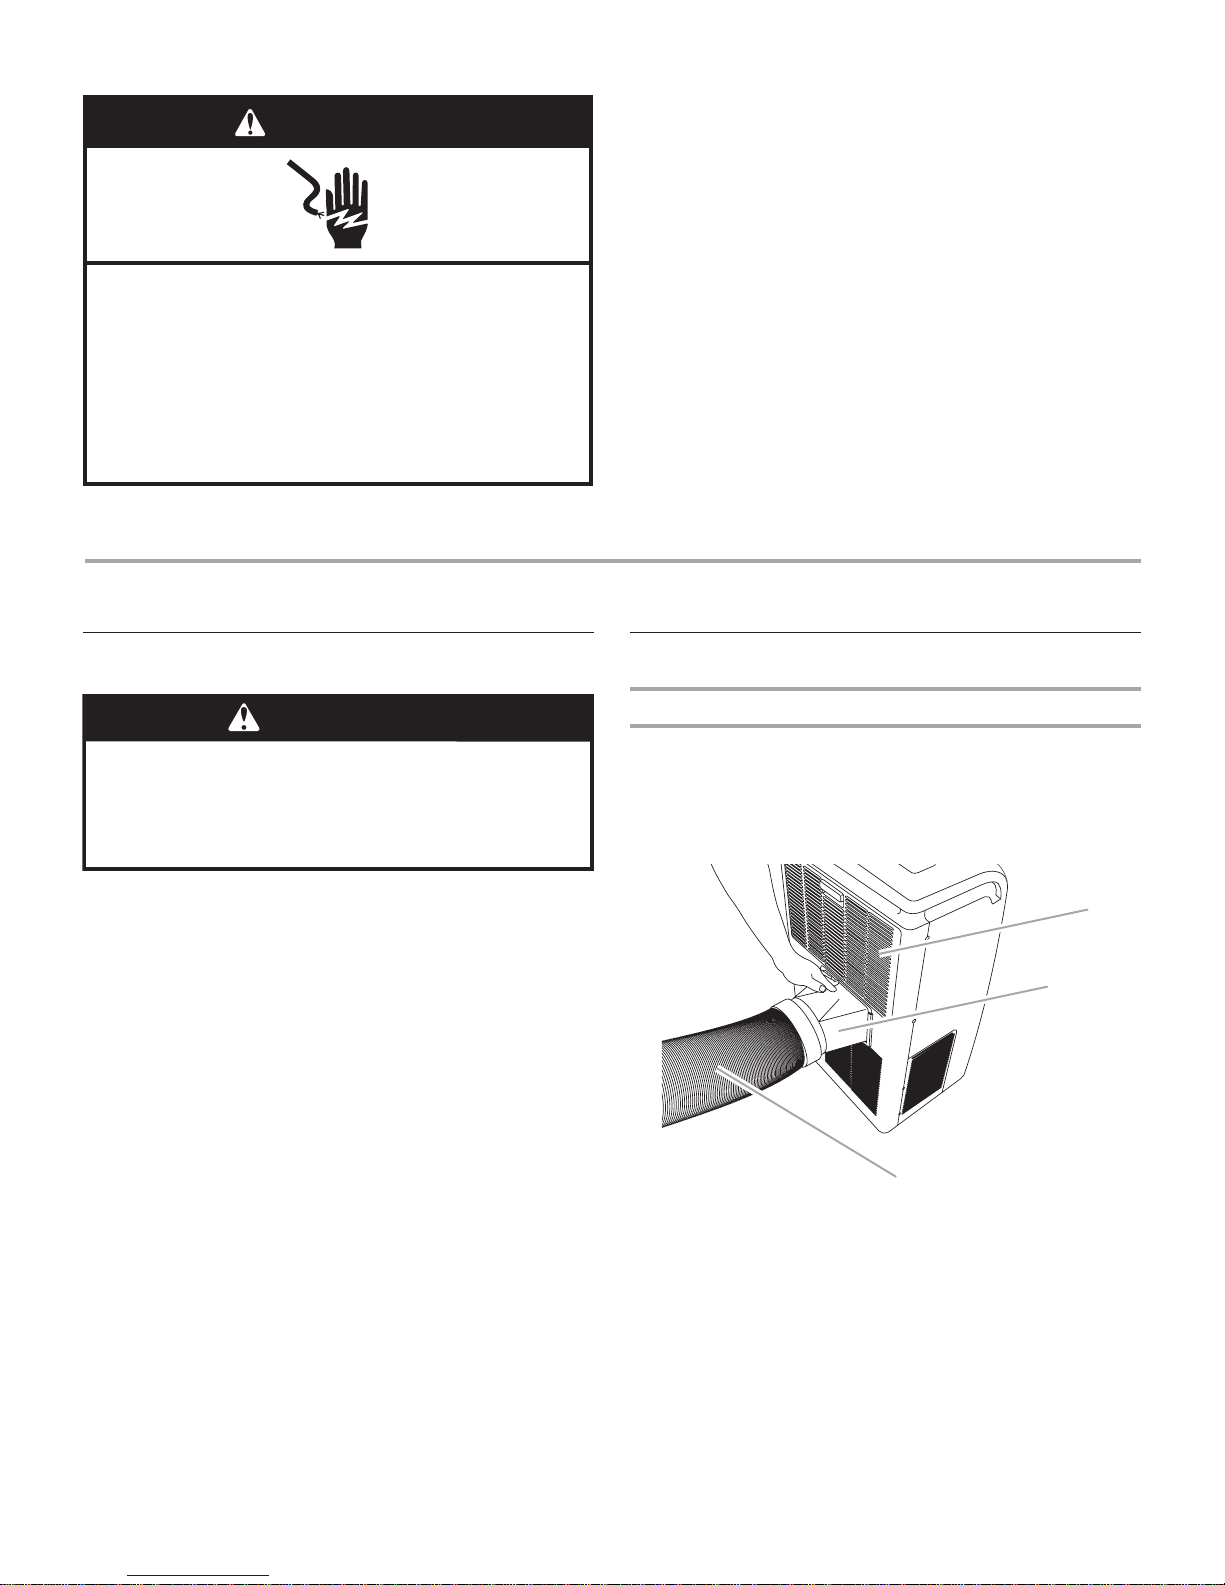
Install Portable Air Conditioner
Install Exhaust Hose and Adapter
1. Roll the air conditioner to selected location. See “Location
Requirements.”
2. Insert the hose adapter into the slot on the back of the air
conditioner.
3. Slide down to lock the hose into place.
Electrical Shock Hazard
Plug into a grounded 3 prong outlet.
Do not remove ground prong.
Do not use an adapter.
Do not use an extension cord.
Failure to follow these instructions can result in death,
fire, or electrical shock.
WARNING
WARNING
Excessive Weight Hazard
Use two or more people to move and install
air conditioner.
Failure to do so can result in back or other injury.
A. Evaporator air intake
B. Hose adapter
C. Flexible exhaust hose
A
C
B
6
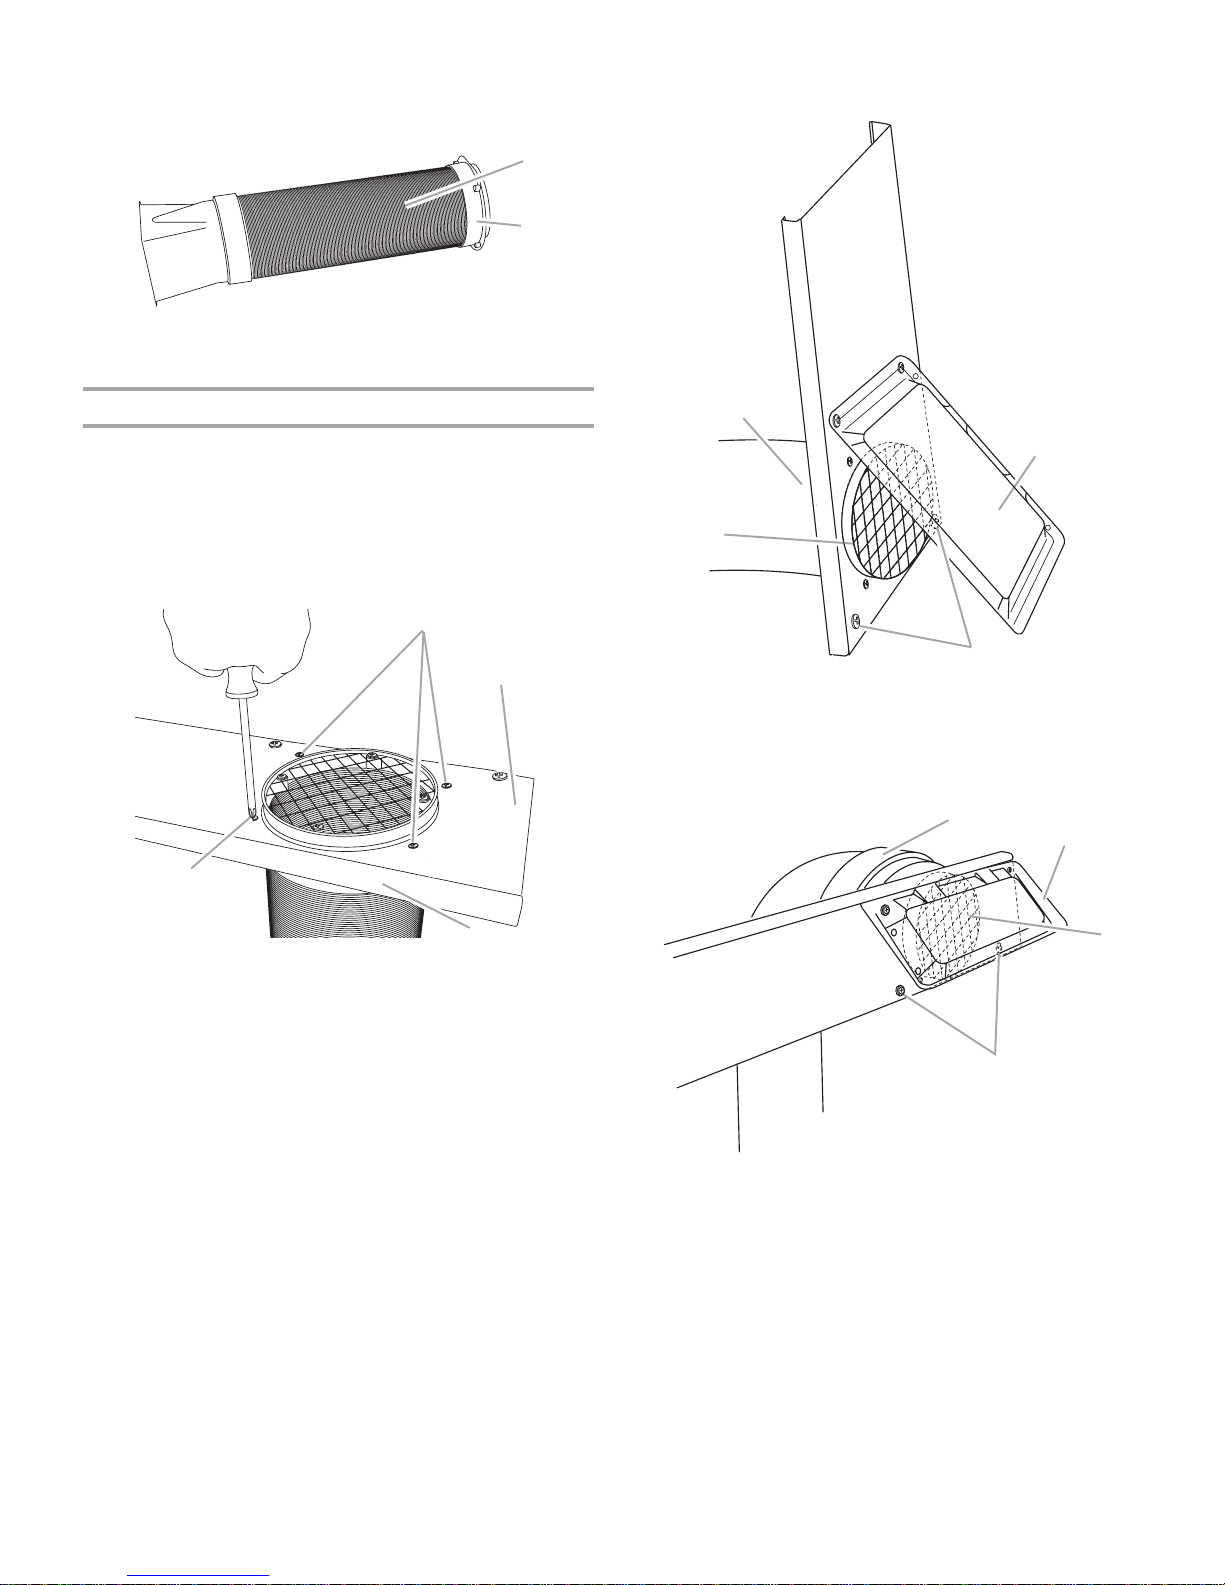
4. Attach the window exhaust adapter to the flexible exhaust
hose. Turn clockwise until securely locked into place.
Window Installation
Your window slider kit has been designed to fit most standard
vertical and horizontal window applications. However, it may be
necessary for you to modify some aspects of the installation
procedures for certain types of windows.
1. Insert the window exhaust adapter into the window slider kit.
2. Using 4 screws (provided), attach the window exhaust
adapter to the window slider kit.
3. Using the 2 bolts, washers and nuts (provided), attach the
rain cover to the window slider kit for either the vertical or
horizontal installation.
NOTES:
■
The holes in the window slider kit are positioned for
attaching the rain cover for vertical installation or
horizontal installation.
■
Insert the other 2 bolts, washers and nuts (provided) into
the unused holes in the window slider kit to keep moisture
from leaking through the window slider kit.
Rain Cover—Vertical Installation
Rain Cover—Horizontal Installation
4. Open the window.
5. Measure the window opening.
A. Flexible exhaust hose
B. Window exhaust adapter
A. Screw locations
B. Window slider kit
C. Window exhaust adapter
A
B
A
A
B
C
A. Window exhaust adapter
B. Rain cover
C. Outlet grille
D. Bolts inserted into unused holes
in window slider kit
A. Window exhaust adapter
B. Rain cover
C. Outlet grille
D. Bolts inserted into unused
holes in window slider kit
D
A
B
C
A
B
C
D
7
■
If the window opening is too narrow for the window slider
kit, remove the inner slider section from the window slider
kit.
■
Using a saw, cut the inner slider section to fit the window
opening.
■
Slide the inner slider section into the outer slider section
of the window slider kit.
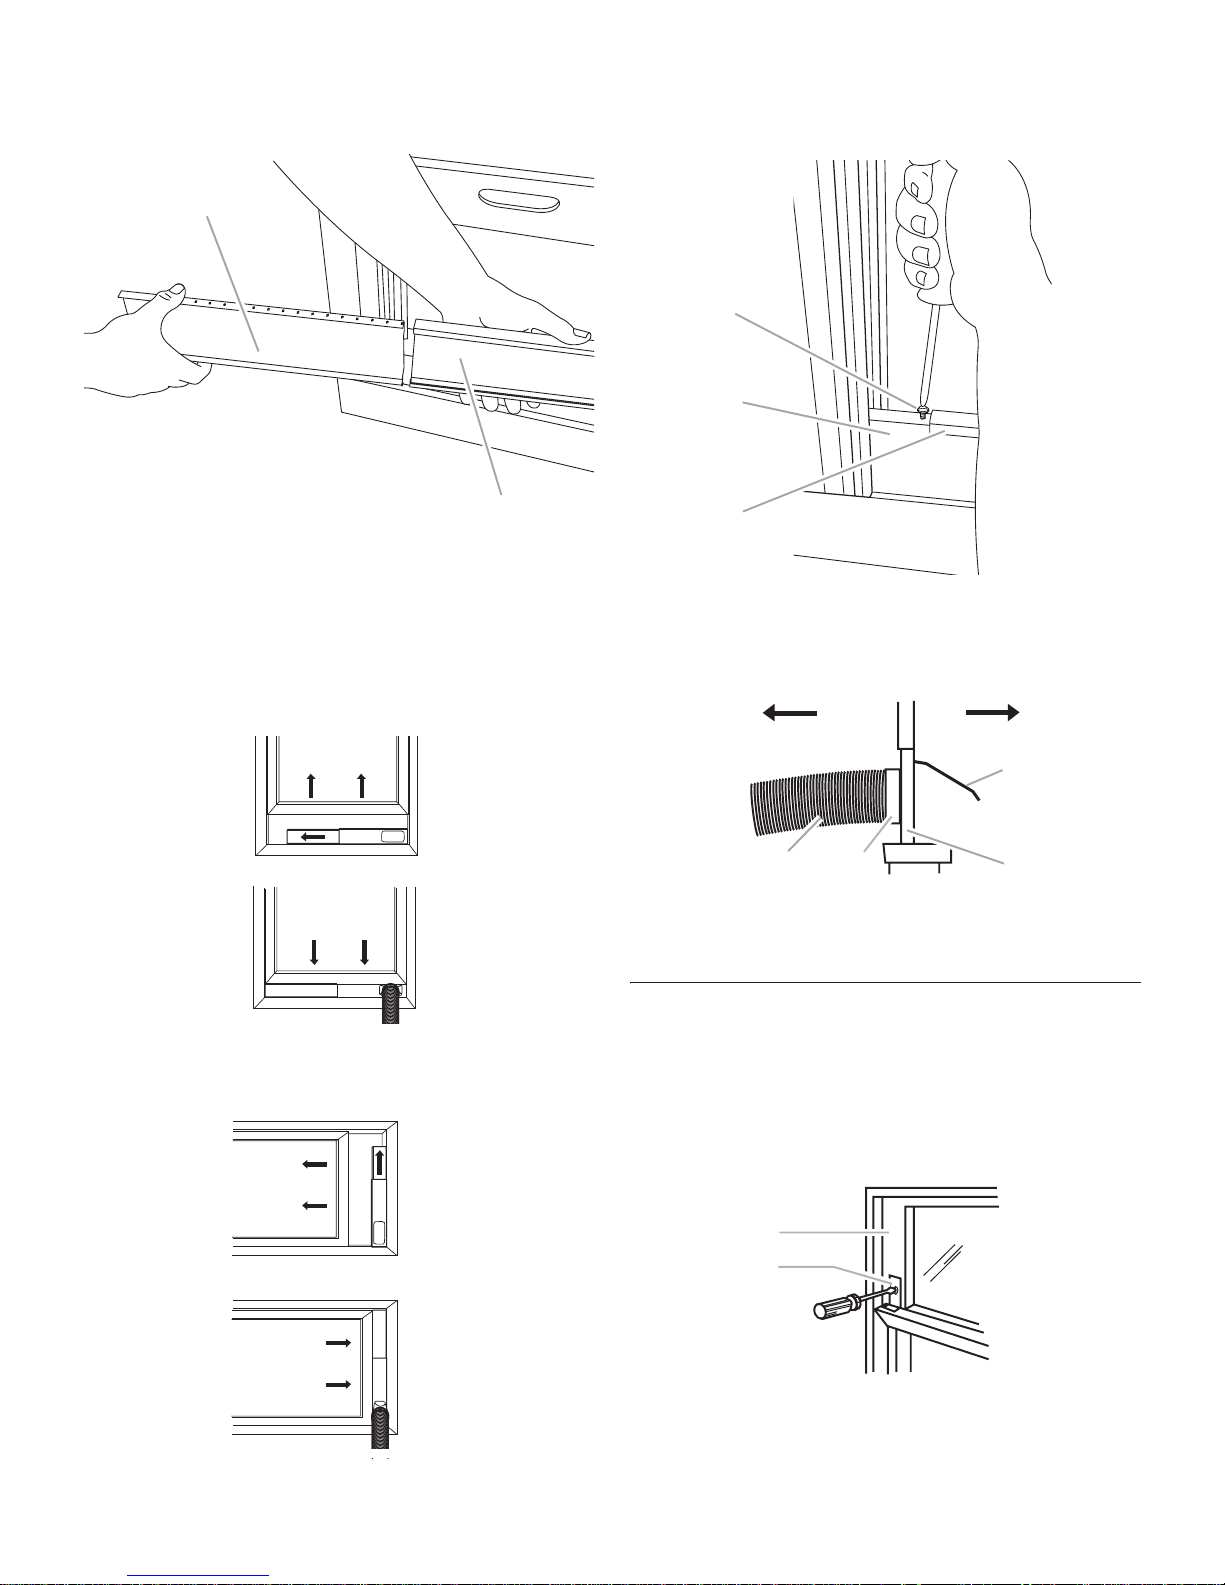
6. Place the window slider kit into the window, extending it to fit
the width of the window. Be sure the rain cover is on the
outside of the window.
NOTE: For casement window installation, the window slider
kit may be installed vertically with the window slider kit
opening at the bottom.
7. Insert ¹⁄₂" screw (provided) into the hole in the inner slider
section that is closest to the end of the outer slider section of
the window slider kit.
8. Close the window onto the window slider kit to secure.
Complete Installation
1. Place the window-lock bracket on top of the lower window
and against the upper window sash.
2. Use ¹⁄₈" drill bit to drill a starter hole through the hole in the
bracket.
3. Attach the window-lock bracket to the window sash with ³⁄₄"
screw to secure the window in place.
A. Inner slider section
B. Outer slider section
A
B
A.
¹⁄₂
" screw (provided)
B. Inner slider section
C. Outer slider section
A. To portable air conditioner
B. Outdoors
C. Rain cover
D. Window slider kit
E. Window exhaust adapter
F. Flexible exhaust hose
A. Upper window sash
B. Window-lock bracket
A
B
C
D
AB
C
E
F
A
B
8

4. Insert the foam seal behind the top of the lower window sash
and against the glass of the upper window.
5. Plug into a grounded 3 prong outlet.
6. Press RESET on the power supply cord. See “Electrical
Requirements.”
PORTABLE AIR CONDITIONER USE
Operating your portable air conditioner properly helps you to
obtain the best possible results.
This section explains proper portable air conditioner operation.
IMPORTANT:
■
The air conditioner display shows the current room
temperature and 24-hour clock.
■
When changing modes while the air conditioner is operating,
the compressor will stop for 3 to 5 minutes before restarting.
If a button is pressed during this time, the compressor will not
restart for another 3 to 5 minutes.
■
In Cooling or Dry mode, the compressor and condenser fan
will stop when the room temperature reaches the set
temperature.
NOTE: In the event of a power failure, your air conditioner will
operate at the previous settings when the power is restored.
Starting Your Portable Air Conditioner
1. Select the mode. See “Mode.”
2. Select the fan speed. See “Fan Speed.”
3. Set the temperature. See “Temperature.”
4. Press ON/OFF to start the air conditioner.
NOTE: When the air conditioner is turned on for the first time
after it is plugged in, it will run in the 6
th
Sense System
control. When the air conditioner is turned on at all other
times, it will run according to the previous settings. 6
th
Sense System control can be selected with the remote
control only.
5. When the WATER FULL indicator light glows red, the air
conditioner will turn off automatically. See “Portable Air
Conditioner Care” for directions on draining the air
conditioner.
A. Top of lower window sash
B. Foam seal
A
B
Electrical Shock Hazard
Plug into a grounded 3 prong outlet.
Do not remove ground prong.
Do not use an adapter.
Do not use an extension cord.
Failure to follow these instructions can result in death,
fire, or electrical shock.
WARNING
on
offonoff
On/Off
Water
Full
®
®
9
 Loading...