

Whirlpool MTSlGOXBB, MTSlGOXBQ Use And Care Manual
A Note To You
Understanding
Microwave Oven
safety
Installation
lnstfuctions
Gettinq To Know
~yrnMcrowave
Using Your
Microwave Oven
Caring For Your
Microwave Oven
Cooking Guide
Questions And
Answers
If You Need
Assistance
Or Service
Warranty
2
3
8
10
18
42
43
47
48
52
1-800-253-1301
Call us with questions or comments.
MICROWAVE OVEN
MODEL MTSlGOXBB/Q
LO \93
A Note To You
Thank you for buying a Whirlpool@ appliance.
You have purchased a quality, worMclass home appliance. Years of engineering experience
have gone into its manufacturing. To ensure that you will enjoy many years of trouble-free
operation, we have developed this Use and Care Guide. ft is full of valuable information on
how to operate and maintain your appliance properly and safely. Please read it carefully. Also,
please complete and mail the Ownership Registration Card provided with your appliance. This
will help us notify you about any new information on your appliance.
Your safety is important to us.
This guide contains safety symbols and statements. Please pay special attention to these
symbols and follow any instructions given. Here is a brief explanation of the use of each
symbol.
This symbol will help alert you to such
dangers as personal injury, burns, fire
1 and electrical shock.
This symbol will help you avoid actions
1 1 ~~rhp~~a~~fua damage (scratches, dents, etc.) and damage to
Our Consumer Assistance Center number, 1-800-253-1301,
is toll-free, 24 hours a day.
If you ever have a question concerning your appliance’s operation, or if you need service, first
see “If You Need Assistance Or Service” on page 48. If you need further help, feel free to call
our Consumer Assistance Center. When calling, you will need to know your appliance’s
complete model number and serial number. You can find this information on the model and
serial number plate (see diagram on page 12). For your convenience, we have included a
handy place below for you to record these numbers, the purchase date from the sales slip and
your dealer’s name and telephone number. Keep this book and the sales slip together in a
safe place for future reference.
Model Number
Serial Number
Purchase Date
Dealer Name
Dealer Phone
Understanding Microwave
Oven Safety
IMPORTANT SAFEnr lNSTRUCTlONS
Mkrowave ovens have been thoroughly tested for safe and efficient operation. However, as with any appliance, there are special Wtallation and safety precautions which
must be followed to ensure safe and satisfactory operation and prevent damage to the
unit.
To reduce the risk of burns, fire, electrical shock, Injury to
persons, exposure to excessive mlcrowave energy, or damage when using the mlcrowave
oven,
follow bask precau-
tions, Including the following:
l Read all instructions before using the
microwave oven.
l Read and follow the specific ‘PRECAU-
TIONS TO AVOID POSSIBLE EXPOSURE TO EXCESSIVE MICROWAVE
ENERGY” found on page 5.
l This appliance must be grounded. Con-
nect only to property grounded outlet.
See “GROUNDING INSTRUCTIONS”
found on page 9.
l Install or locate this appliance only in
accordance with the provided Installation
Instructions found on page 8.
l Some products such as whole eggs in the
shell and sealed containers-for example,
closed glass jars-may explode and
should not be heated in this oven.
l Do not heat, store or use flammable
materials in or near the oven. Fumes can
create a fire hazard or explosion.
l Use this appliance only for its intended
use as described in this manual. Do not
use corrosive chemicals or vapors in this
appliance. This type of oven is specifically
designed to heat or cook food. It is not
designed for industrial or laboratory use.
l As with any appliance, close supervision
is necessary when used by children.
l Do not operate this appliance if it has a
damaged cord or plug, if it is not working
properly, or if it has been damaged or
dropped. Electrical shock, fire or other
hazards may result.
l This appliance should be serviced only
by qualified service personnel. Call an
authorized Whirlpools service company
for examination, repair or adjustment.
l Do not cover or block any opening on the
appliance. Fire may result.
l Do not store or use this appliance
outdoors. Do not use this product near
water-for example, near a kitchen sink,
in a wet basement, or near a swimming
pool, and the like.
l Do not immerse cord or plug in water.
l Keep cord away from heated surfaces.
l Do not let cord hang over edge of table
or counter.
l See door surface and interior cleaning
instructions on page 42.
l To reduce the risk of fire in the oven
cavity:
-Do not overcook food. Carefully attend
appliance if paper, plastic, or other
combustible materials are placed inside
the oven to facilitate cooking. Paper
can char or burn, and some plastics
can melt if used when heating foods.
-Do not deep fry in oven. Microwavable
utensils are not suitable and it is difficult
to maintain appropriate deep frying
temperatures.
continued on next page
3
-Test dinnerware or cookware before
using. To test a dish for safe use, put
it into the oven with a cup of water
beside it. Cook at 100% Cook Power
for one minute.
If the dish gets hot
and water stays cool, do not use ft.
Some dishes (melamine, some
ceramic dinnerware, etc.) absorb
microwave energy, becoming too hot
to handle and slowing cooking times.
Cooking in metal containers not
designed for microwave use can
damage the oven,
as
can containers
with hidden metal (twist-ties, foil lining,
staples, metallic glaze or trim).
-Remove wire twist-ties from paper or
plastic bags before placing bag in
oven.
-Do not us8 the cavity
for storage
purposes. Do not leave paper products,
cooking utensils,
or food
in the cavity
when not in use.
-Do not mount over a sink.
-Do not store anything directly on top of
the appliance when appliance is in
operation.
- SAVE THESE INSTRUCTIONS -
l
Read and follow “Operating safety precautions” starting on page 6.
l
1. A short power-supply cord is provided
to reduce the risks resulting from
becoming entangled in or tripping over
a longer cord.
-If materials inside the oven should
ignite, keep oven door closed, turn
oven off, and disconnect the power
cord or shut off power at the fuse or
circuit breaker panel.
2. Longer cord sets or extension cords
are available and may be used if care
is exercised in their use.
3. If a long cord or extension cord is used
temporarily, (a) the marked electrical
rating of the cord set or extension cord
should be at least as great as the
electrical rating of the appliance, (b)
the extension cord must be a ground-
ing-type, 3-wire cord that has a 3-blade
grounding plug and a 3-slol receptacle
that will accept the plug on the appliance, and (c) the longer cord should be
arranged so that it will not drape over
the countertop or tabletop where it can
be pulled on by children or tripped over
accidentally.
4. A qualified electrician must install a
properly grounded and polarized
3-prong receptacle near the appliance.
4
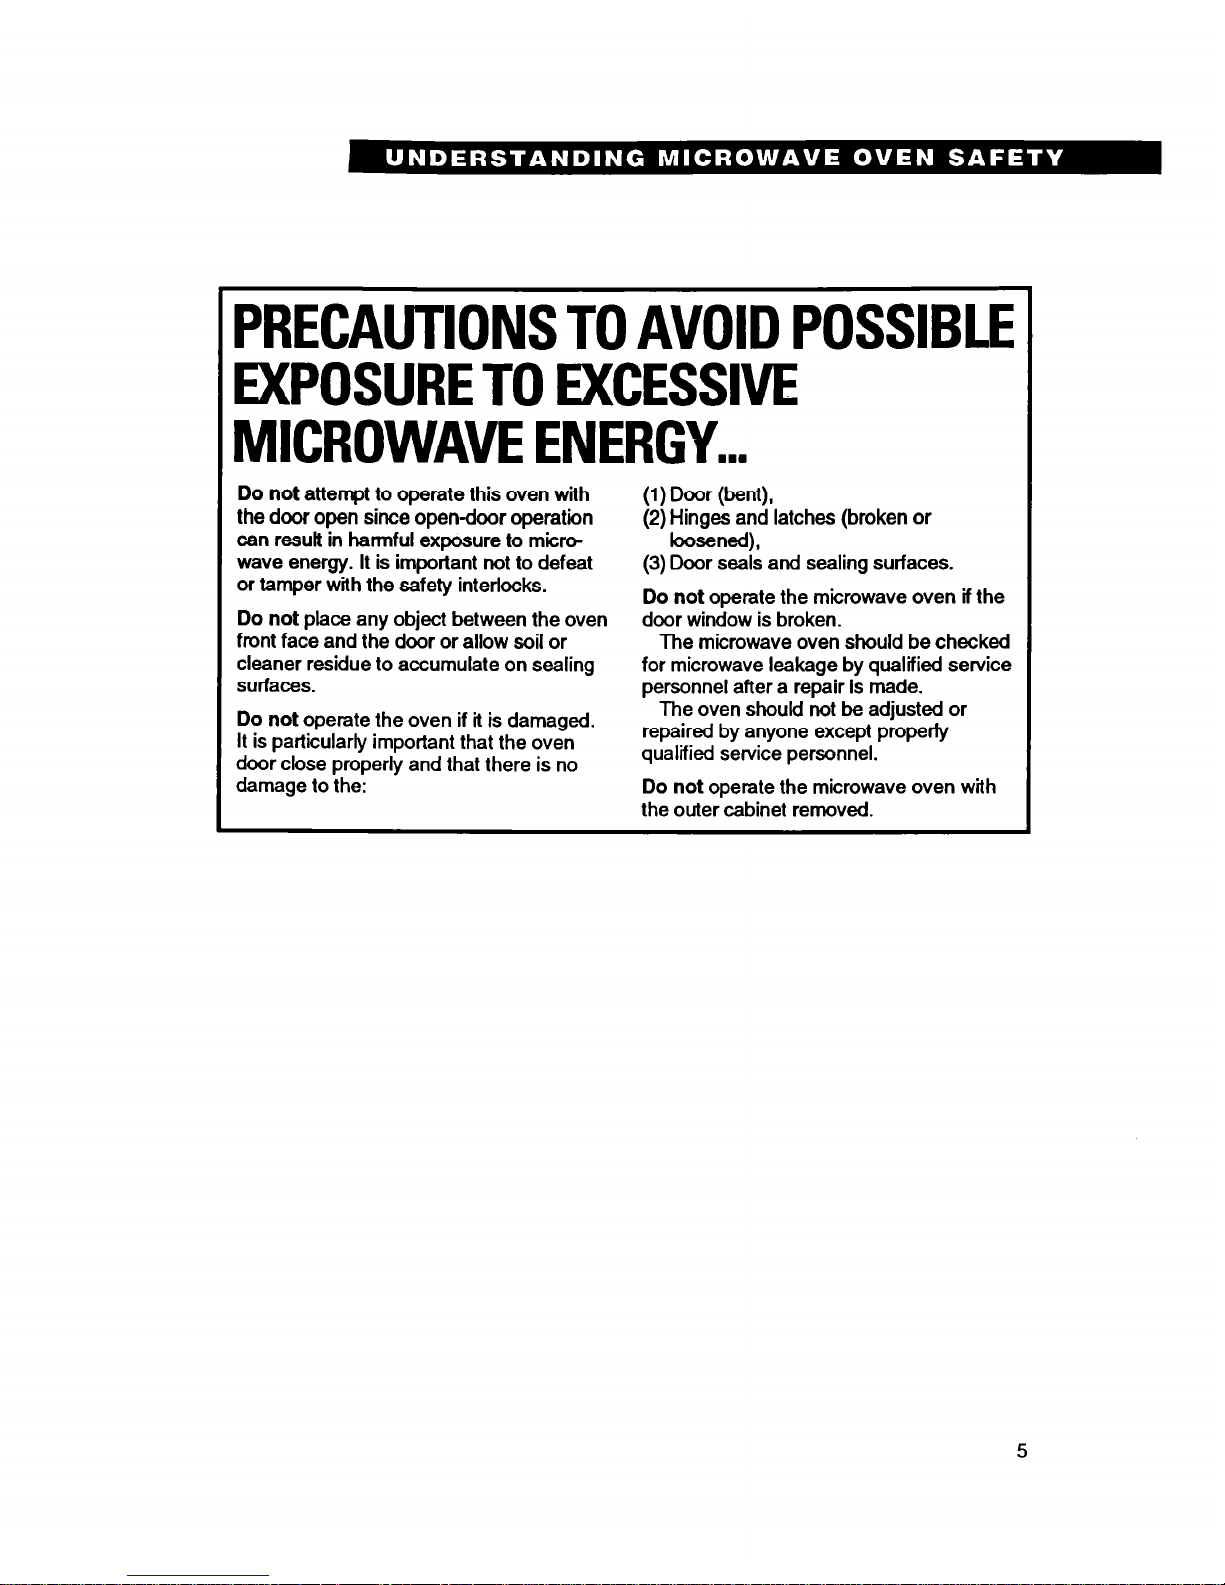
PRECAUTIONS TO AVOID POSSIBLE
EXPOSURE TO EXCESSIVE
MICROWAVE ENERGY...
Do
not
attempt to operate this oven with
(1)
Door (bent),
the door open since opendoor operation
(2) Hinges and latches (broken or
can resuft in harmful exposure to micro-
loosened),
wave
energy. It is important not to defeat
(3) Door seals and sealing surfaces.
or tamper with the safety interlocks.
Do
not
onerate the microwave oven if the
Do
not
place any object between the oven
door window is broken.
front face and the door or allow soil or
The microwave oven should be checked
cleaner residue to accumulate on sealing
for microwave leakage by qualified service
surfaces.
Dersonnel after a renair is made.
Do
not
operate the oven if it is damaged.
It is particularly important that the oven
door close properly and that there is no
The oven should not be adjusted or
repaired by anyone except properly
qualified service personnel.
damage to the:
Do not operate the microwave oven with
the outer cabinet removed.
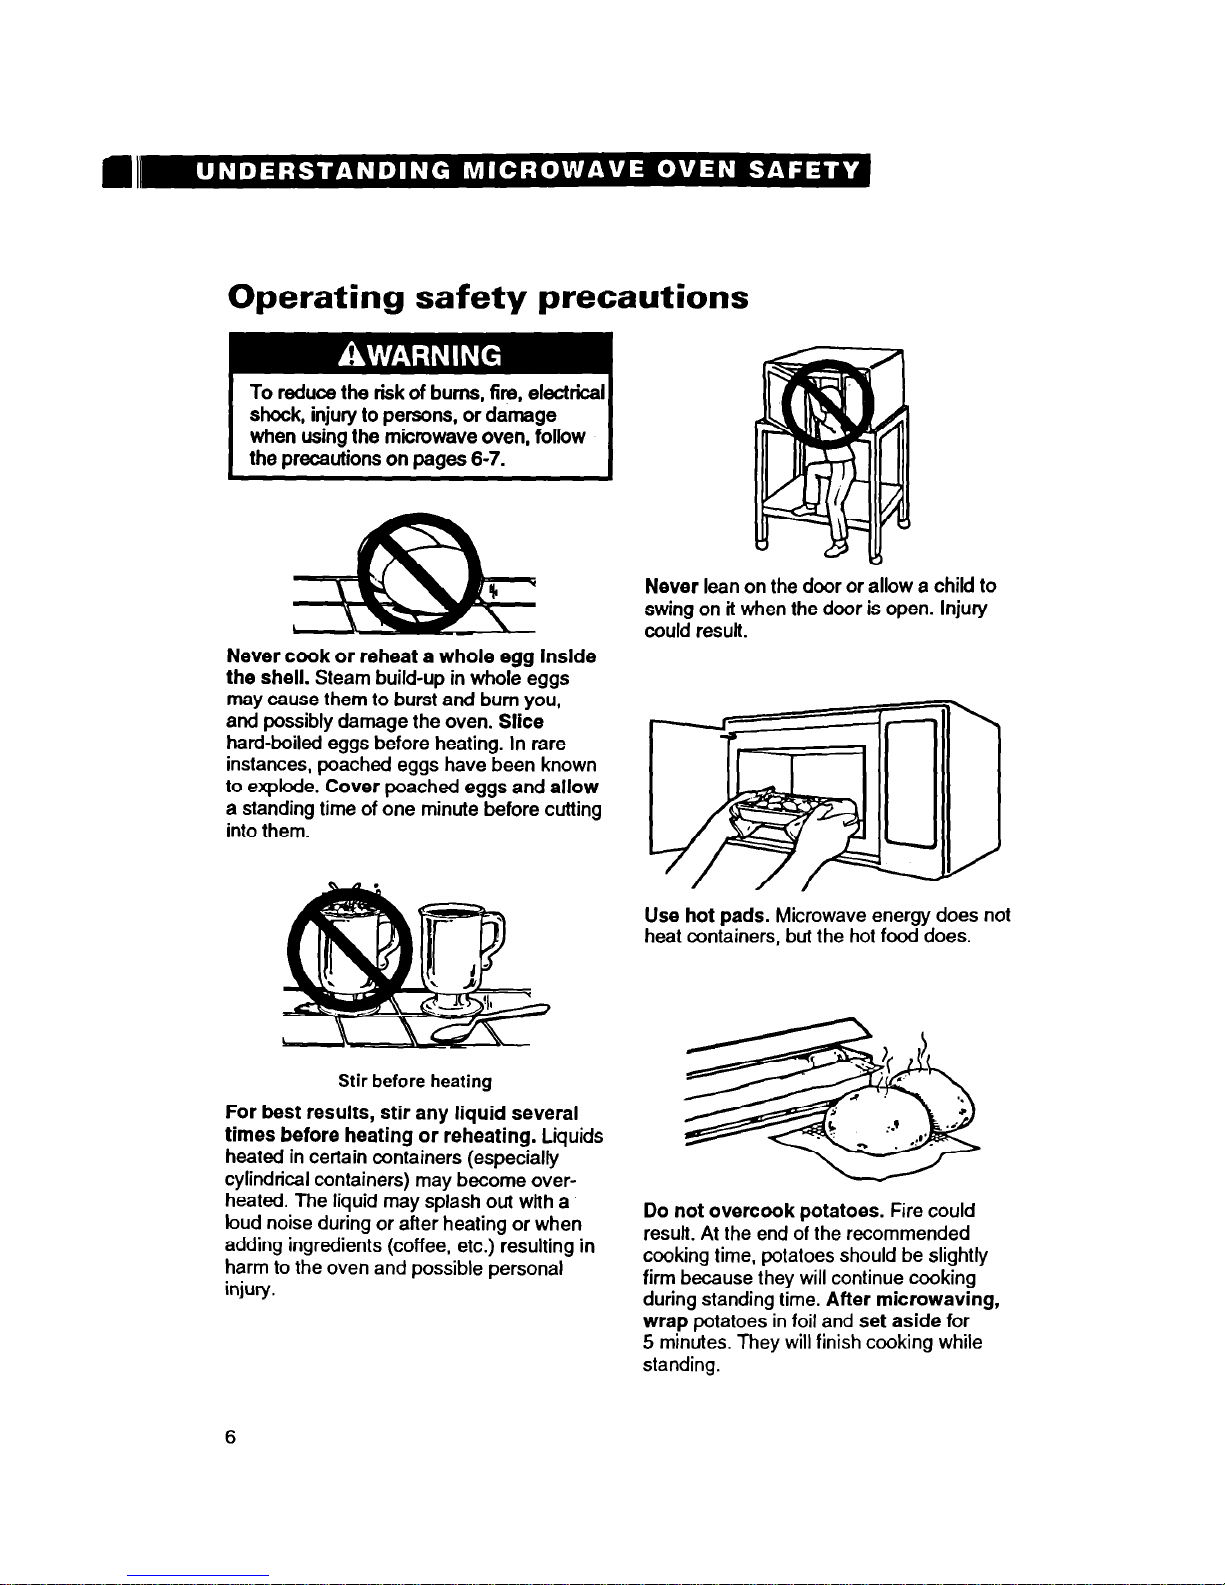
Operating safety precautions
To reduce the risk of bums, fire, electrical
shock, injury to persons, or damage
when
using the microwave oven, follow
the precautions on pages 6-7.
1
Never cook or reheat a whole egg inside
the shell.
Steam build-up in whole eggs
may cause them to burst and bum you,
and possibly damage the oven. Slice
hard-boiled eggs before heating. In rare
instances, poached eggs have been known
to explode.
Cover
poached eggs and
allow
a
standing time of one minute before cutting
into them.
Stir before heating
For best
results, stir any liquid several
times before heating or reheating.
Liquids
heated in certain containers (especially
cylindrical containers) may become overheated. The liquid may splash out with a
loud noise during or after heating or when
adding ingredients (coffee, etc.) resulting in
harm to the oven and possible personal
injury.
Never
lean on the door or allow a child to
swing on it when the door is open. injury
could result.
Use hot pads.
Microwave energy does not
heat containers, but the hot food does.
Do not overcook
potatoes. Fire could
result. At the end of the recommended
cooking time, potatoes should be slightly
firm because they will continue cooking
during standing time.
After microwaving,
wrap
potatoes in foil and
set aside
for
5 minutes. They will finish cooking while
standing.
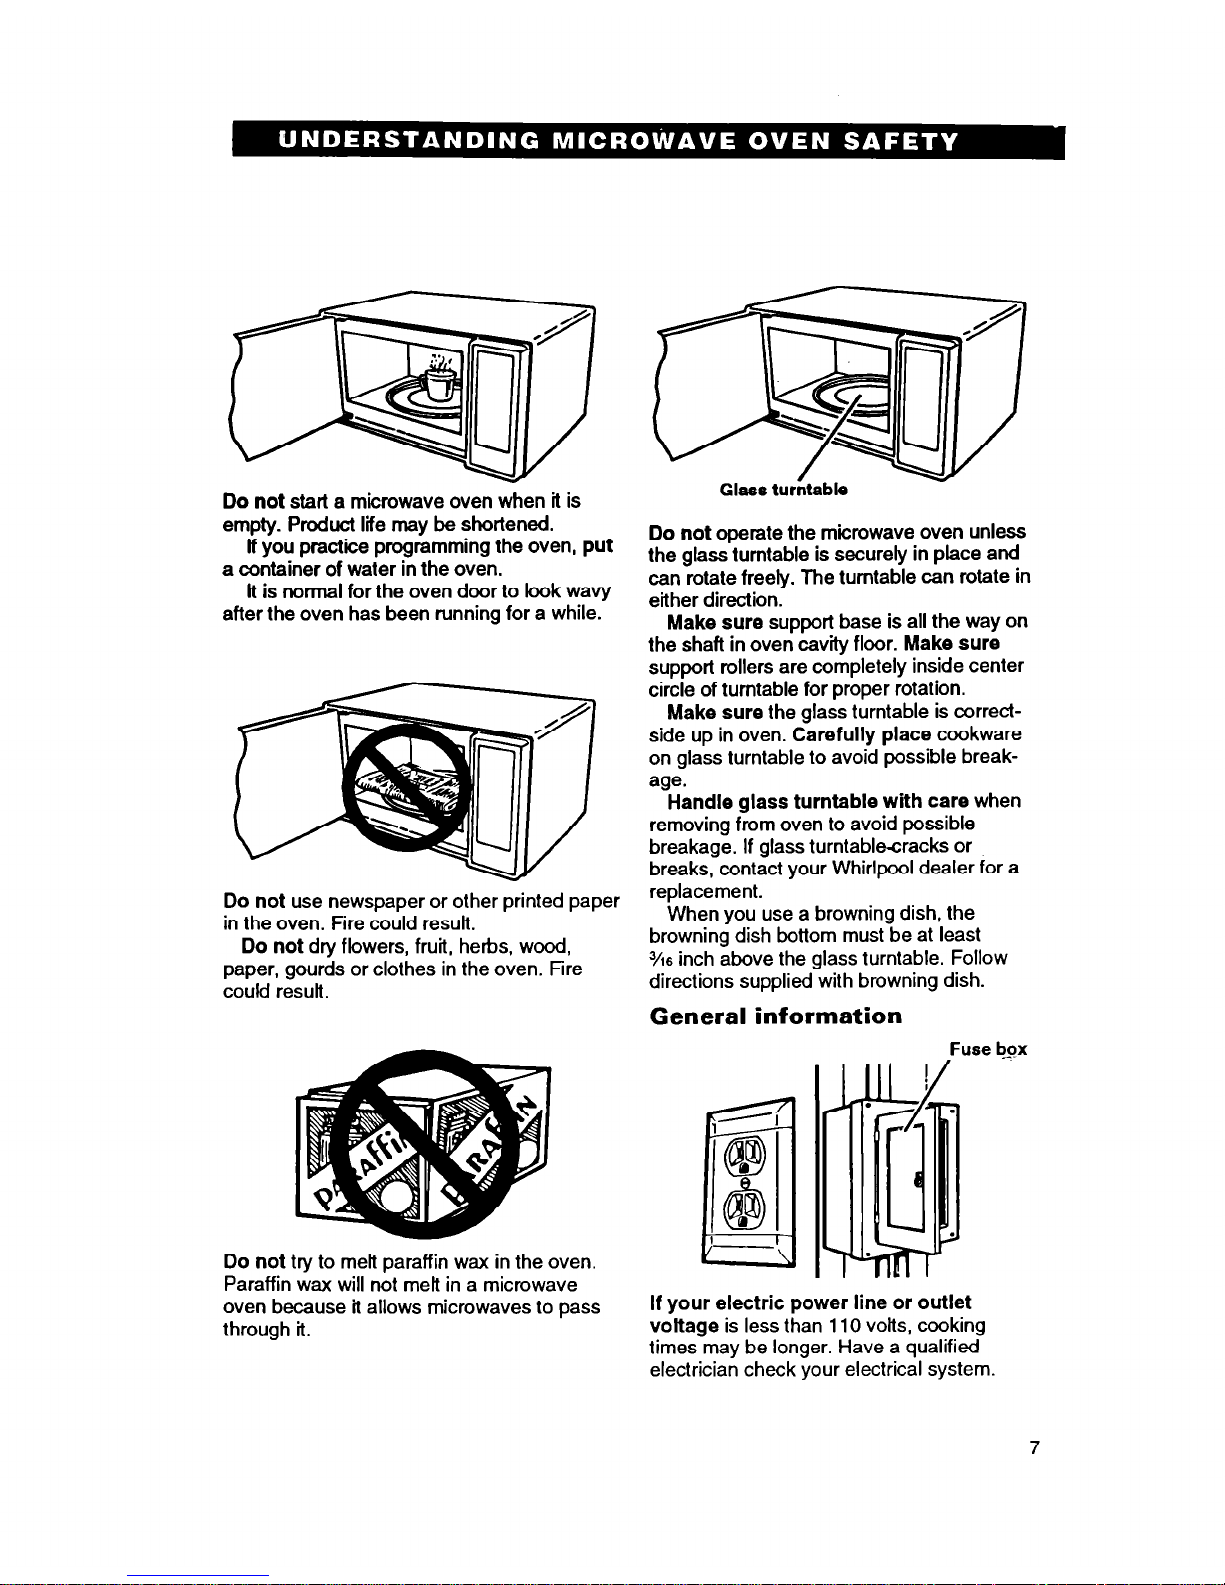
Do not start a
microwave oven when it is
empty.
Product life may be shortened.
lf you practice programming the oven,
put
a container of water in the oven.
It is normal for the oven door to look wavy
after the oven has been running for a while.
Do not
use newspaper or other printed paper
in the oven. Fire could result.
Do not
dry flowers, fruit, herbs, wood,
paper, gourds or clothes in the oven. Fire
could result.
Glass
turntable
Do not
operate the microwave oven unless
the glass turntable is securely in place and
can rotate freely. The turntable can rotate in
either direction.
Make sure
support base is all the way on
the shaft in oven cav.Q floor.
Make sure
support rollers are completely inside center
circle of turntable for proper rotation.
Make sure
the glass turntable is correctside up in oven. Carefully place cookware
on glass turntable to avoid possible breakage.
Handle glass turntable with care when
removing from oven to avoid possible
breakage. If glass turntable-cracks or
breaks, contact your Whirlpool dealer for a
replacement.
When you use a browning dish, the
browning dish bottom must be at least
%6
inch above the glass turntable. Follow
directions supplied with browning dish.
General information
Do not
try to melt paraffin wax in the oven.
Paraffin wax will not melt in a microwave
oven because it allows microwaves to pass
through it.
Fuse b_qx
.
if your electric power line
or
outlet
voltage is less than 110 volts, cooking
times may be longer. Have a qualified
electrician check your electrical system.
mIlm-l’-~r
8
.
m
.
@
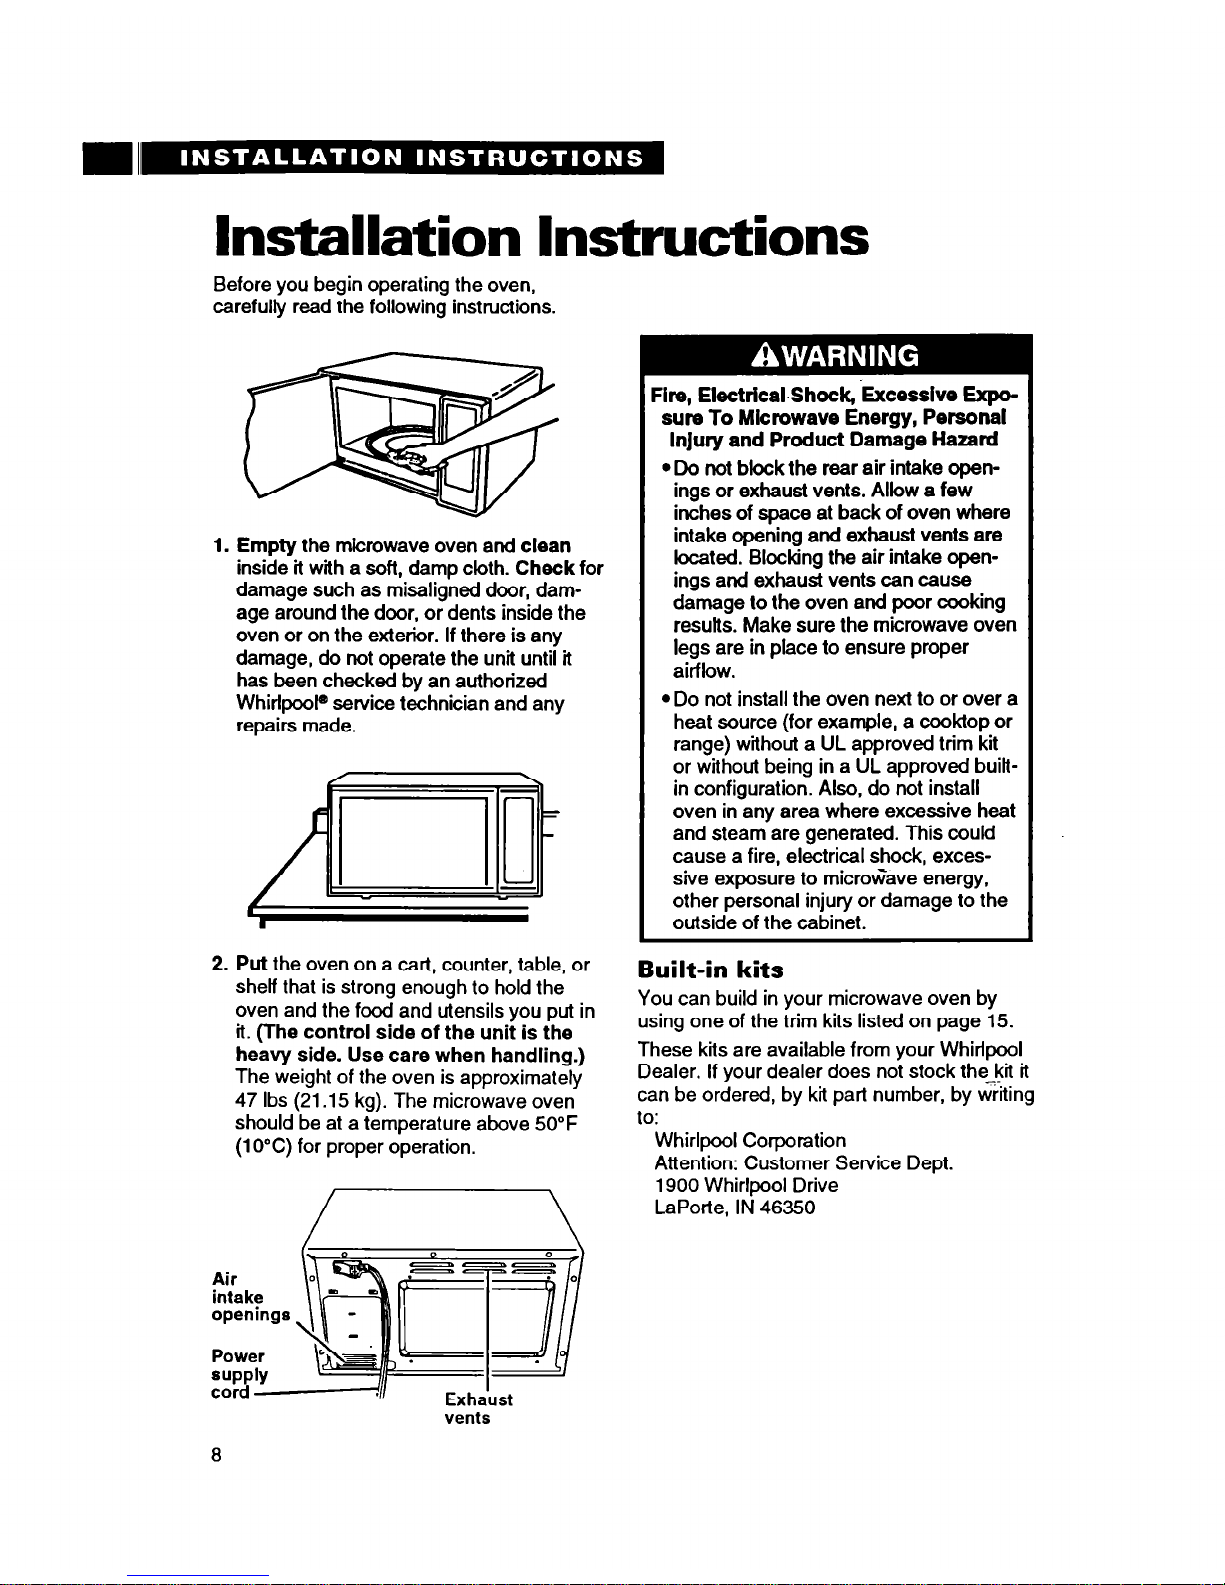
Installation Instructions
Before you begin operating the oven,
carefully read the following instructions.
1. Empty
the microwave oven and
clean
inside it with a soft, damp cloth.
Check for
damage such as misaligned door, damage around the door, or dents inside the
oven or on the exterior. if there is any
damage, do not operate the unit until it
has been checked by an authorized
Whirlpoole service technician and any
repairs made.
2. Put the oven on a cart, counter, table, or
shelf that is strong enough to hold the
oven and the food and utensils you put in
il. (The control side of the unit is the
heavy
side. Use care when handling.)
The weight of the oven is approximately
47 Ibs (21.15 kg). The microwave oven
should be at a temperature above 50°F
(10°C) for proper operation.
/
Fire, Electrical-Shock, ~Excesaive Ex~o-
sure To Microwave Energy, Personal
Injury and Product Damage Hazard
l
Do not block the rear air intake openings or exhaust vents. Allow a
few
inches of space at back of oven where
intake opening and exhaust vents are
located. Blocking the air intake openings and exhaust vents can cause
damage
to
the oven and poor cooking
results. Make sure the microwave oven
legs are in place to ensure proper
airflow.
l
Do not install the oven next to or over a
heat source (for example, a cooktop or
range) without a UL approved trim kit
or without being in a UL approved builtin configuration. Also, do not install
oven in any area where excessive heat
and steam are generated. This could
cause a fire, electrical shock, excessive exposure to microGave energy,
other personal injury or damage to the
outside of the cabinet.
Built-in kits
You can build in your microwave oven by
using one of the trim kits listed on page 15.
These kits are available from your Whirlpool
Dealer. If your dealer does not stock the& it
can be ordered, by kii part number, by wiiting
to:
Whirlpool Corporation
Attention: Customer Service Dept.
1900 Whirlpool Drive
LaPorte, IN 46350
vents
8
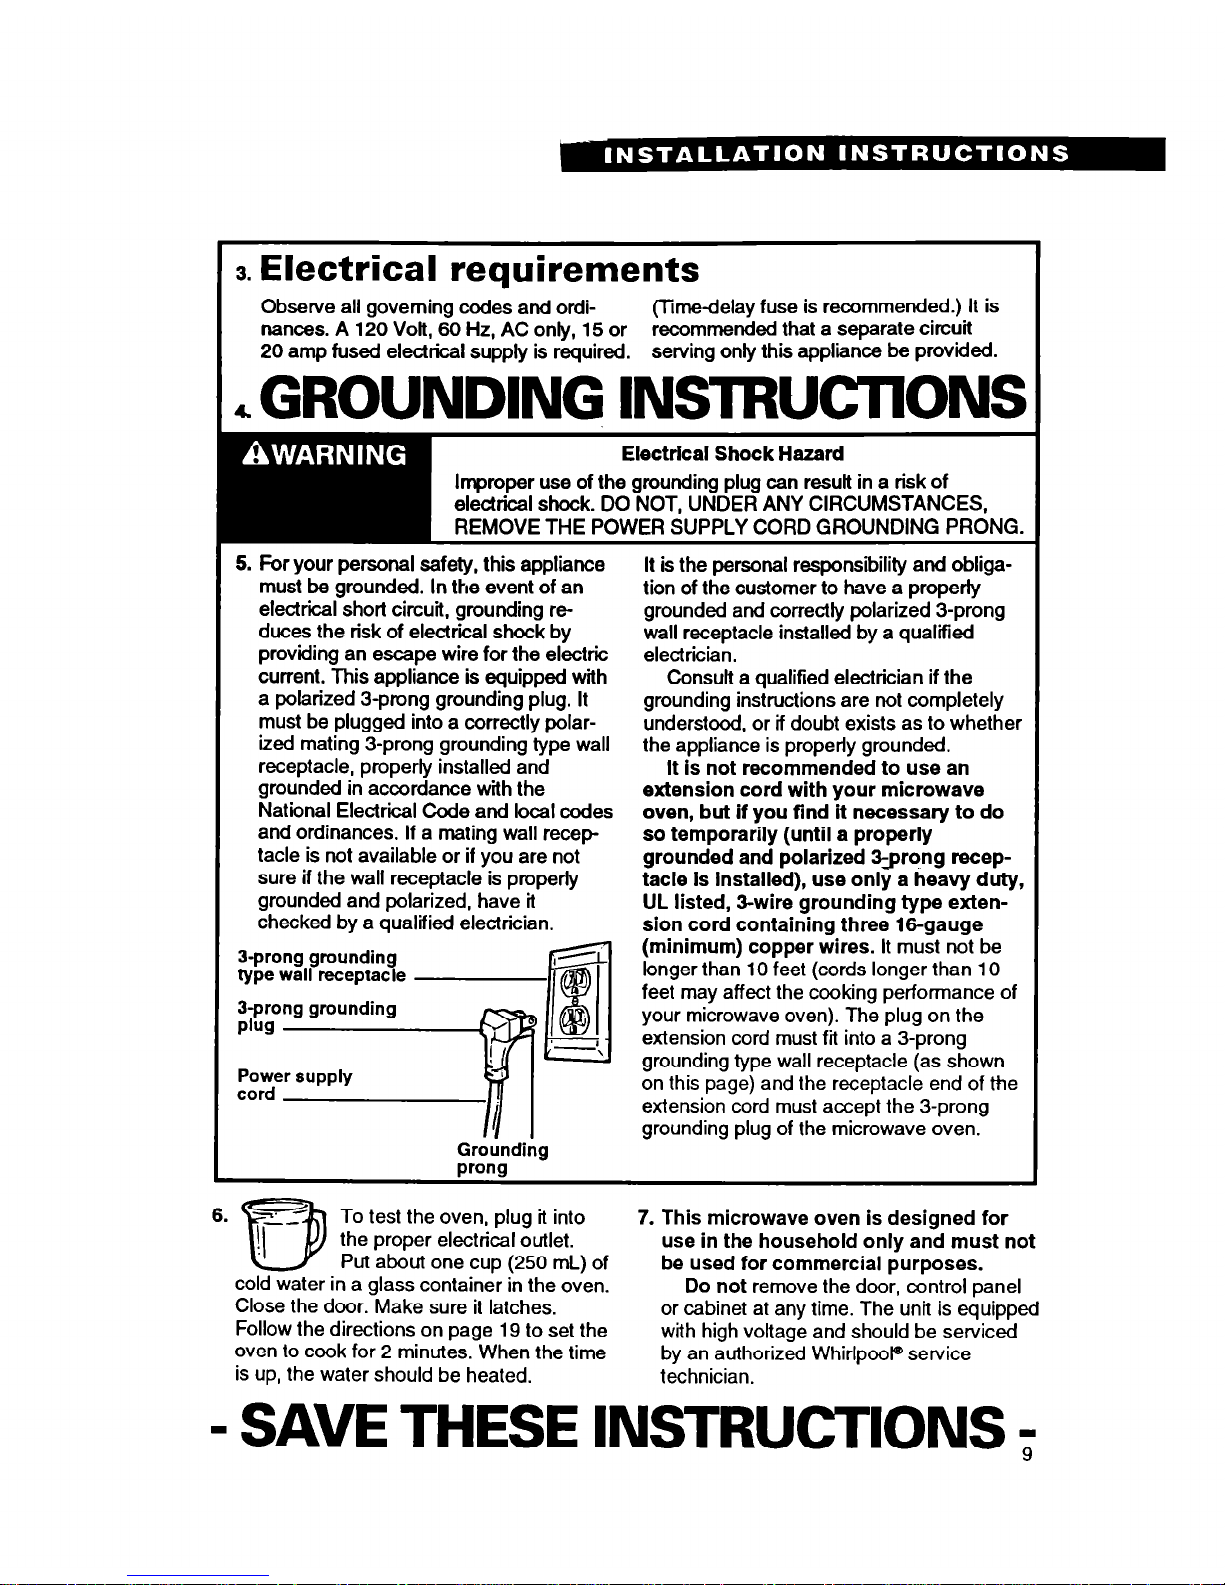
3. Electrical requirements
Observe all governing codes
and ordi-
(Time-delay fuse is recommended.) It is
nances. A 120 Volt, 60 Hz, AC only, 15 or
recommended that a separate circuit
20 amp fused electrical supply is required.
serving only this appliance be provided.
&GROUNDING INSlRUCTlONS
Electrical Shock Hazard
Improper use of the grounding plug can result in a risk of
electrical shock. DO NOT, UNDER ANY CIRCUMSTANCES,
REMOVE THE POWER SUPPLY CORD GROUNDING PRONG.
5. For your personal safety, this appliance
it is the personal responsibility and obliga-
must be grounded. In the event of an
tion of the customer to have a properly
electrical short circuit, grounding re-
grounded and correctly polarized 3-prong
duces the risk of elect&al shock by
wall receptacle installed by a qualified
providing an escape wire for the electric
electrician.
current. This appliance is equipped with
Consult a qualified electrician if the
a polarized 3prong grounding plug. it
grounding instructions are not completely
must be plugged into a correctly polar-
understood, or if doubt exists as to whether
ized mating 3-prong grounding type wall
the appliance is properly grounded.
receptacle, properly installed and
It is not recommended to use an
grounded in accordance with the
extension cord with your microwave
National Electrical Code and local codes
oven, but
if you find it necessary to do
and ordinances. If a mating wall recep-
so temporarily (until a properly
tacle is not available or if you are not
sure if the wall receptacle is properly
grounded and polarized 3-prqng receptacie is installed), use only a heavy duty,
grounded and polarized, have it
checked by a qualified electrician.
UL listed, Swire grounding type exten-
sion cord containing
three 16-gauge
3-prong grounding
type wall receptacle
3-prong grounding
PlKl
(minimum) copper wires.
It must not be
longer than 10 feet (cords longer than 10
feet may affect the cooking performance of
your microwave oven). The plug on the
extension cord must fit into a 3-prong
Power supply
cord
Grounding
prong
grounding type wall receptacle (as shown
on this page) and the receptacle end of the
extension cord must accept the 3-prong
grounding plug of the microwave oven.
& r=
D
To test the oven, plug it into
7. This microwave oven is designed for
the proper electrical outlet.
use in the household only and must not
Put about one cup (250 mL) of
be used for commercial purposes.
cold water in a glass container in the oven.
Do not remove the door, control panel
Close the door. Make sure it latches.
Follow the directions on page 19 to set the
or cabinet at any time. The unit is equipped
with high voltage and should be serviced
oven to cook for 2 minutes. When the time
by an authorized Whirlpool@ service
is up, the water should be heated.
technician.
- SAVE THESE INSTRUCTIONS ;

Getting To Know Your
Microwave Oven
This section discusses the concepts behind microwave cooking and introduces you to the
basics you need to know to operate your microwave oven. Please read this information
before use.
In This Section
Page
Page
How your microwave oven works . . . 10
Built-in kits
. . . . ..m...............................
15
Microwave
oven features . . . . . . . . . . . . . . . . . 12
Setting the clock
. . . . . . . . . . . . . . . . . . . . . . . . . . . .
16
Control
panel features . . . . . . . . . . . . . . . . . . . . . 13
Using the Minute
Timer . . . . . . . . . . . . . . . . . 17
How your microwave oven works
Magnetron
Microwave ovens are safe.
Microwave
energy is not hot. It causes food to make its
own heat, and it’s this heat that cooks the
food.
Microwaves are like TV waves or light
waves. You cannot see them, but you can
see what they do.
Ovdn cavity
A magnetron in the microwave oven
produces microwaves. The microwaves
move into the oven where they contact food
as it turns on the glass turntable.
10

Glass turntable
M&l floor
The glass turntable of
your microwave
oven lets microwaves pass through. Then
they bounce off a metal floor, back through
the glass turntable, and are absorbed by the
food.
Microwaves may not reach
the
center of a
roast. The heat
spreads to the center from
the outer, cooked areas just as in conventional cooking. This is one of the reasons for
letting some foods (for example, roasts or
baked potatoes) stand for a while after
cooking, or for stirring some foods during
the cooking time.
The microwaves disturb water molecules
in the food. As the molecules bounce
around bumping into each other, heat is
made, like rubbing your hands together.
This is the heat that does the cooking.
Microwaves
pass through most glass,
paper and plastics without heating them
so food absorbs the energy. Microwaves
bounce off metal pans so food does not
absorb the energy.
11
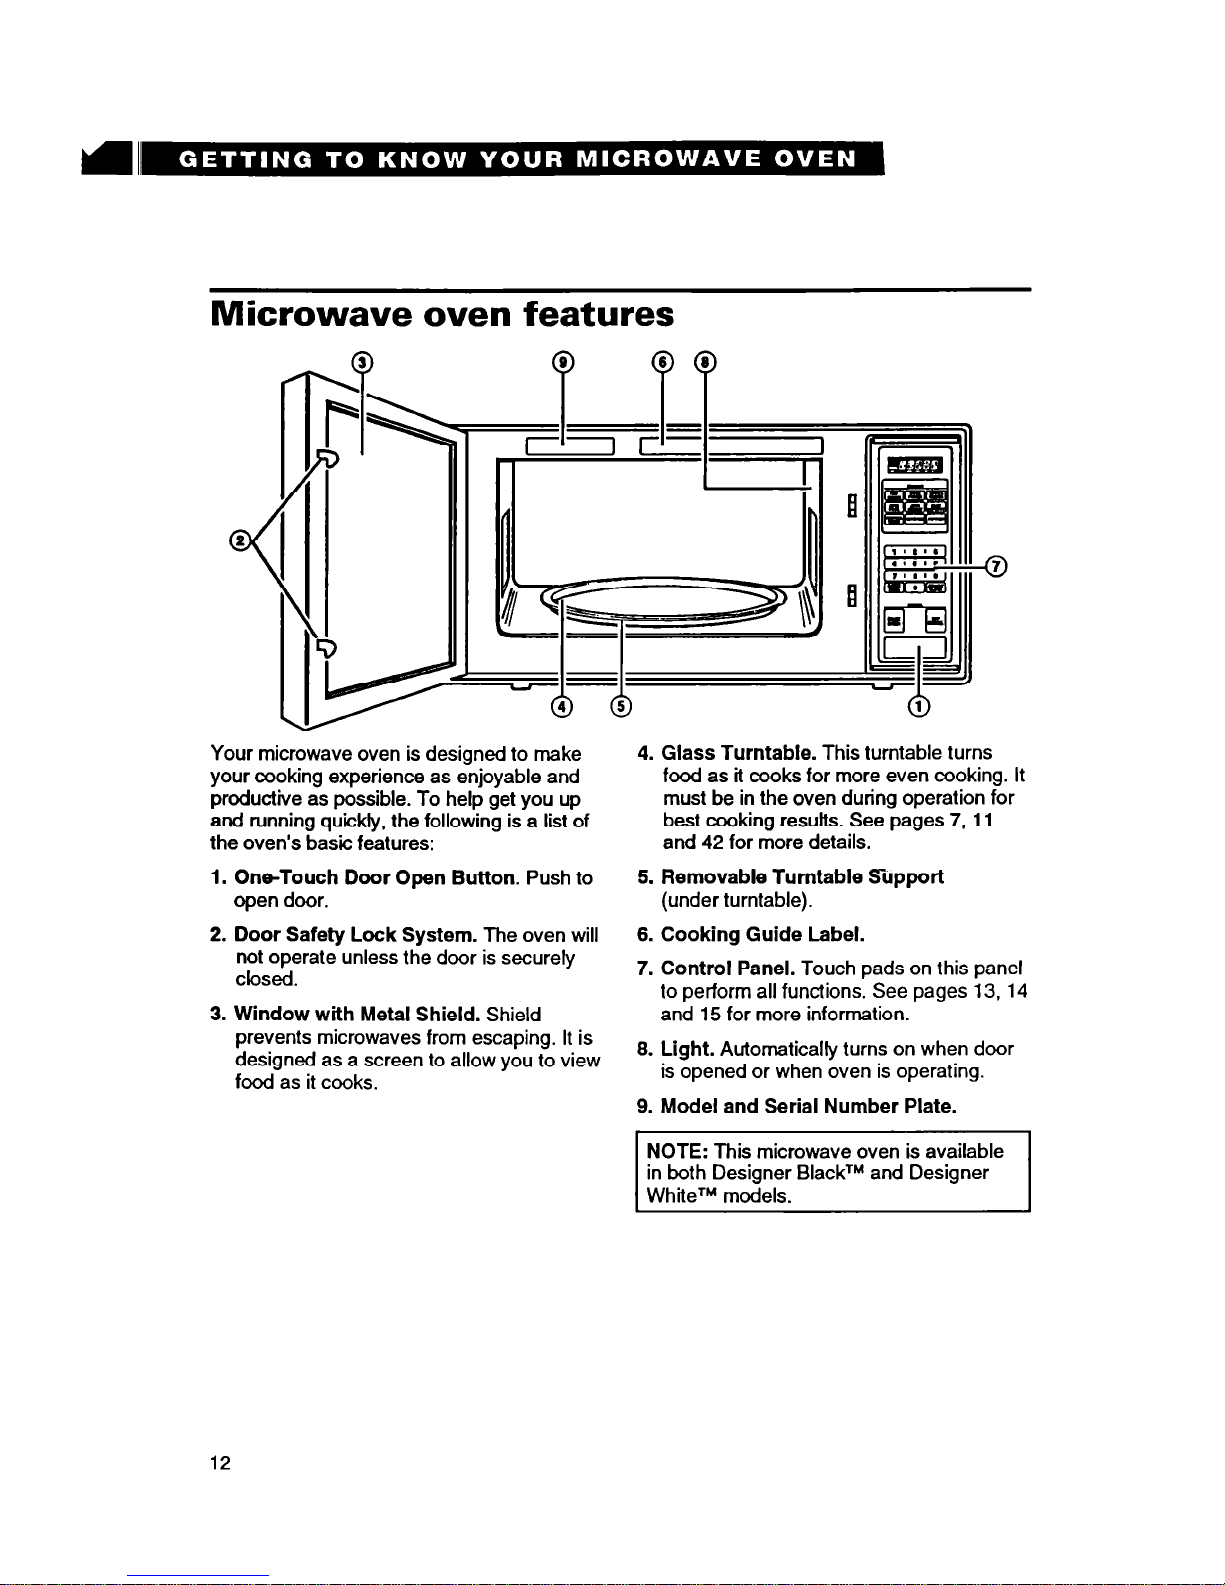
Microwave oven features
B
-
6
1
Your microwave
oven is designed to make
your cooking experience as enjoyable and
productive as possible. To help get you up
and
running quickly, the following is a list of
the oven’s basic features:
1. OneTouch Door Open Button.
Push to
open door.
2.
Door Safety Lock System.
The oven will
not operate unless the door is securely
closed.
3. Window with Metal Shield.
Shield
prevents microwaves from escaping. It is
designed as a screen to allow you to view
food as it cooks.
4. Glass Turntable.
This turntable turns
food as it cooks for more even cooking. It
must be in the oven during operation for
best cooking results. See pages 7, 11
and 42 for more details.
5. Removable Turntable Support
(under turntable).
6. Cooking Guide Label.
7. Control Panel.
Touch pads on this panel
to perform all functions. See pages 13,14
and 15 for more information.
8. Light.
Automaticalty turns on when door
is opened or when oven is operating.
9. Model and Serial Number Plate.
NOTE:
This microwave oven is available
12
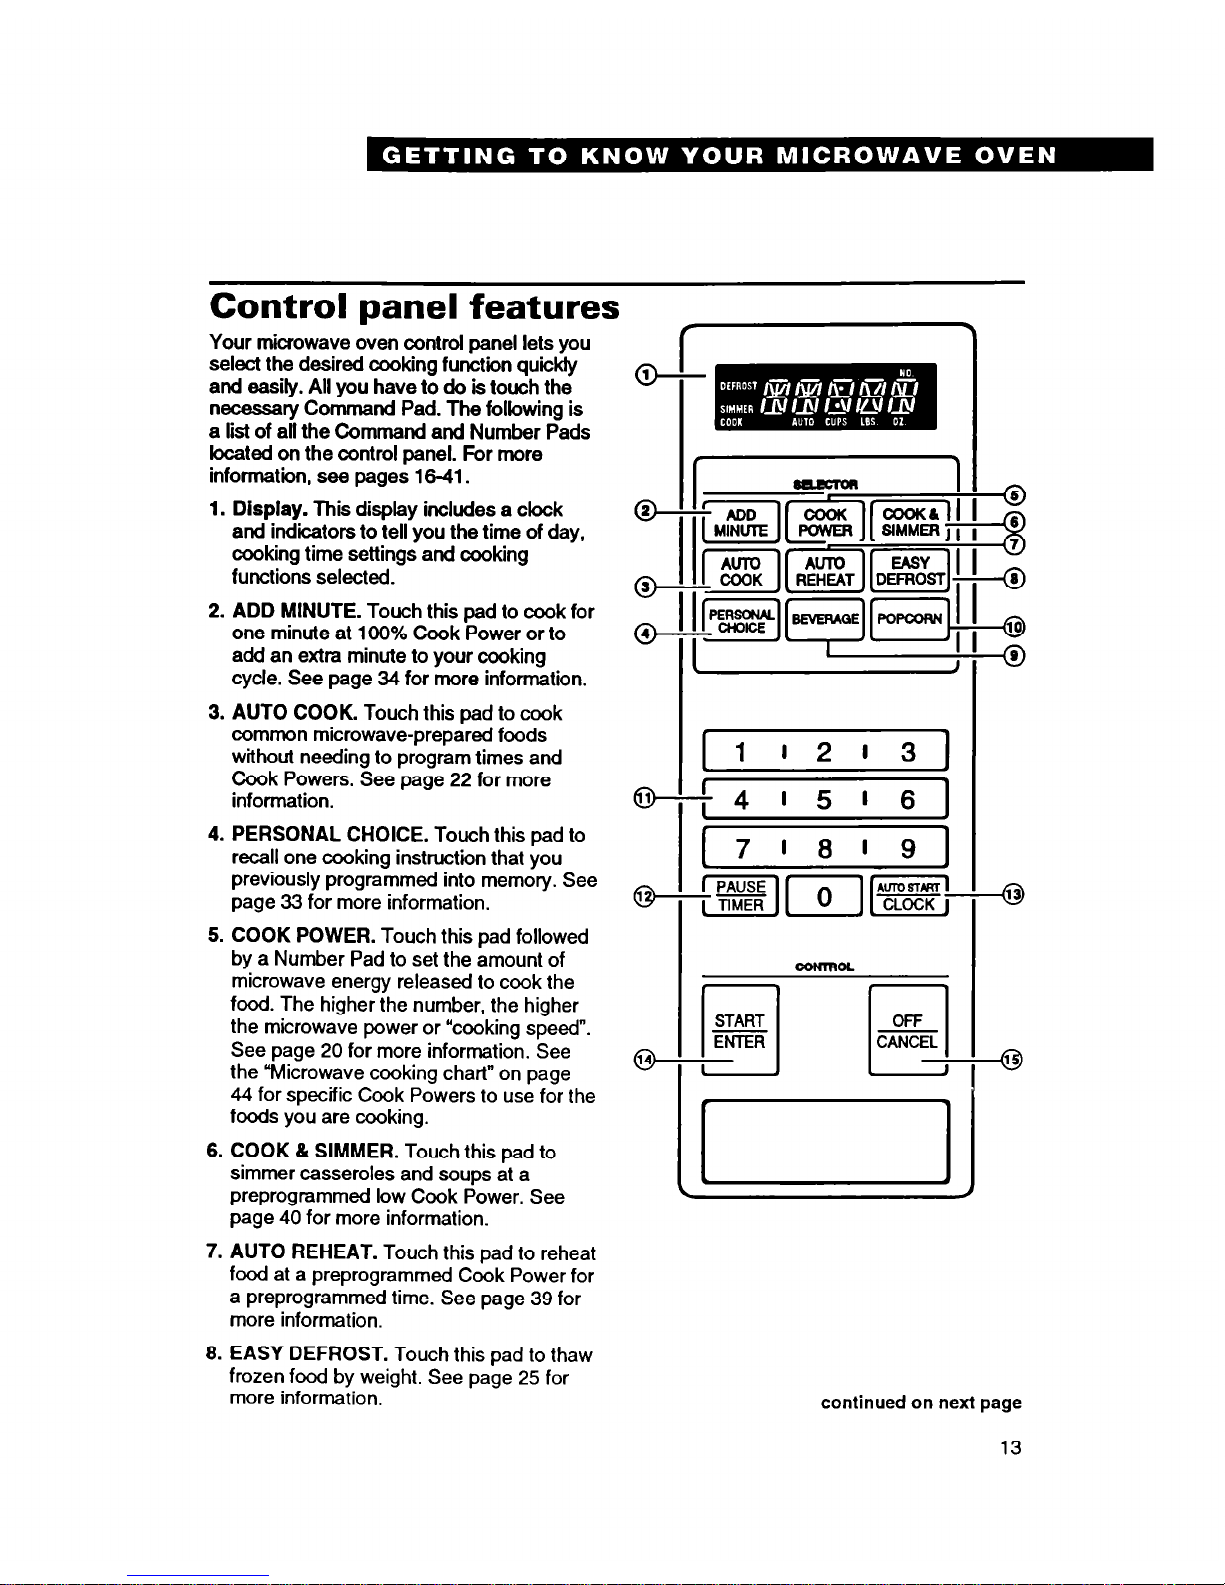
Control panel features
Your microwave oven control panel lets you
select the desired cooking function quickly
and easify. All you have
to do is touch the
necessary
Command Pad. The following is
a list of all the Command and Number Pads
located on the control panel. For more
information, see pages
1641.
1. Display. This
display
includes a clock
and indicators to tell you the time of day,
cooking time settings and cooking
functions selected.
2. ADD MINUTE.
Touch this pad to cook for
one minute at
100% Cook Power or to
add
an extra minute to your cooking
cycle. See page 34 for more information.
3. AUTO COOK.
Touch this pad to cook
common microwave-prepared foods
without needing to program times and
Cook Powers. See page 22 for more
information.
4. PERSONAL CHOICE.
Touch this pad to
recall one cooking instruction that you
previously programmed into memory. See
page 33 for more information.
5. COOK POWER.
Touch this pad followed
by a Number Pad to set the amount of
microwave energy released to cook the
food. The higher the number, the higher
the microwave power or “cooking speed”.
See page 20 for more information. See
the “Microwave cooking chart” on page
44 for specific Cook Powers to use for the
foods you are cooking.
6. COOK & SIMMER.
Touch this pad to
simmer casseroles and soups at a
preprogrammed low Cook Power. See
page 40 for more information.
7. AUTO REHEAT. Touch this pad to reheat
food at a preprogrammed Cook Power for
a preprogrammed time. See page 39 for
more information.
8. EASY DEFROST. Touch this pad to thaw
frozen food by weight. See page 25 for
more information.
continued on next page
13
9. BEVERAGE.
Touch this pad to reheat
one-half cup or one cup of a beverage.
The oven will automatically heat for a
preset time at a preset Cook Power. See
page 32 for more information.
10. POPCORN.
Touch this pad when
popping popcorn in your microwave
oven. The oven will automatically heat
for a preset time at a preset Cook
Power. See page 30 for more informa-
tion.
11. Number Pads.
Touch Number Pads to
enter cooking times, Cook Powers,
quantities or weights.
12. PAUSWIMER.
Touch this pad to set
the Minute Timer or to stop the oven
between cooking stages. See pages 17
and 36 for more information.
13. AUTO START/CLOCK.
Touch this pad
to enter the correct time of day or to
program your oven to begin cooking
automatically at a chosen time later in
the day. See pages 16 and 37 for more
information.
14. START/ENTER.
Touch this pad to start
a function. lf you open the door after the
oven begins to cook, retouch START/
ENTER.
15.OFF/CANCEL.
Touch this pad once to
erase an incorrect command, cancel the
Minute Timer or stop the oven temporarily during cooking. Touch it twice to
cancel a program during cooking or to
clear the Display.
NOTES:
l
If you touch two Command Pads for the
same cycle (for example, EASY DE-
FROST and AUTO COOK), the second
command will cancel the first.
l
If you attempt to enter unacceptable
instructions, “ERROR” will appear in the
Display.
Touch
OFF/CANCEL and re-
enter the instructions.
Audible signals
Audible signals are available to guide you
when setting and using your oven:
l
A programmlng tone will sound
each
time you touch a pad.
l
A single long tone
signals the end of
a
cooking cycle or Minute Timer function.
l
To cancel tones, touch
AUTO
START/
CLOCK followed by Number Pad 5 and
START/ENTER.
To turn tones back on,
touch AUTO START/CLOCK
followed by
Number Pad 5 and OFF/CANCEL.
Interrupting cooking
You can stop the oven during a cycle by
opening the door. The oven stops heating
and the fan stops, but the light stays on.
To
restart cooking,
close
the door
and
touch 1-1
m
I I
ENTER
1
J
If you do not want to continue cooking:
l
Close the door and the light goes off.
OR
l
Touch
OFF
cl
CANCEL
Using the safety lock
The safety lock prevents unwanted operation of the microwave oven by small children.
To lock or deactivate the control panel:
1. Touch AUTO START/CLOCK.
2. Touch
Number Pad 1.
3. Touch
START/ENTER.
“LOCK” will appear on the Display if a pad is
touched.
To cancel safety lock:
1. Touch AUTO START/CLOCK.
2. Touch Number Pad 1.
3. Touch OFF/CANCEL.
14
Using the demonstration
feature
You can program your microwave oven to
display your commands as you enter them
without turning the oven on. This feature
helps you learn to use your oven without
actually cooking food.
To set the demo
feature:
1. Touch
AUTO START/CLOCK.
2. Touch
Number Pad 0.
3. Touch
START/ENTER.
“DEMO” will appear on the Display.
To cancel the demo feature:
1. Touch
AUTO START/CLOCK.
2. Touch
Number Pad 0.
3. Touch
OFF/CANCEL.
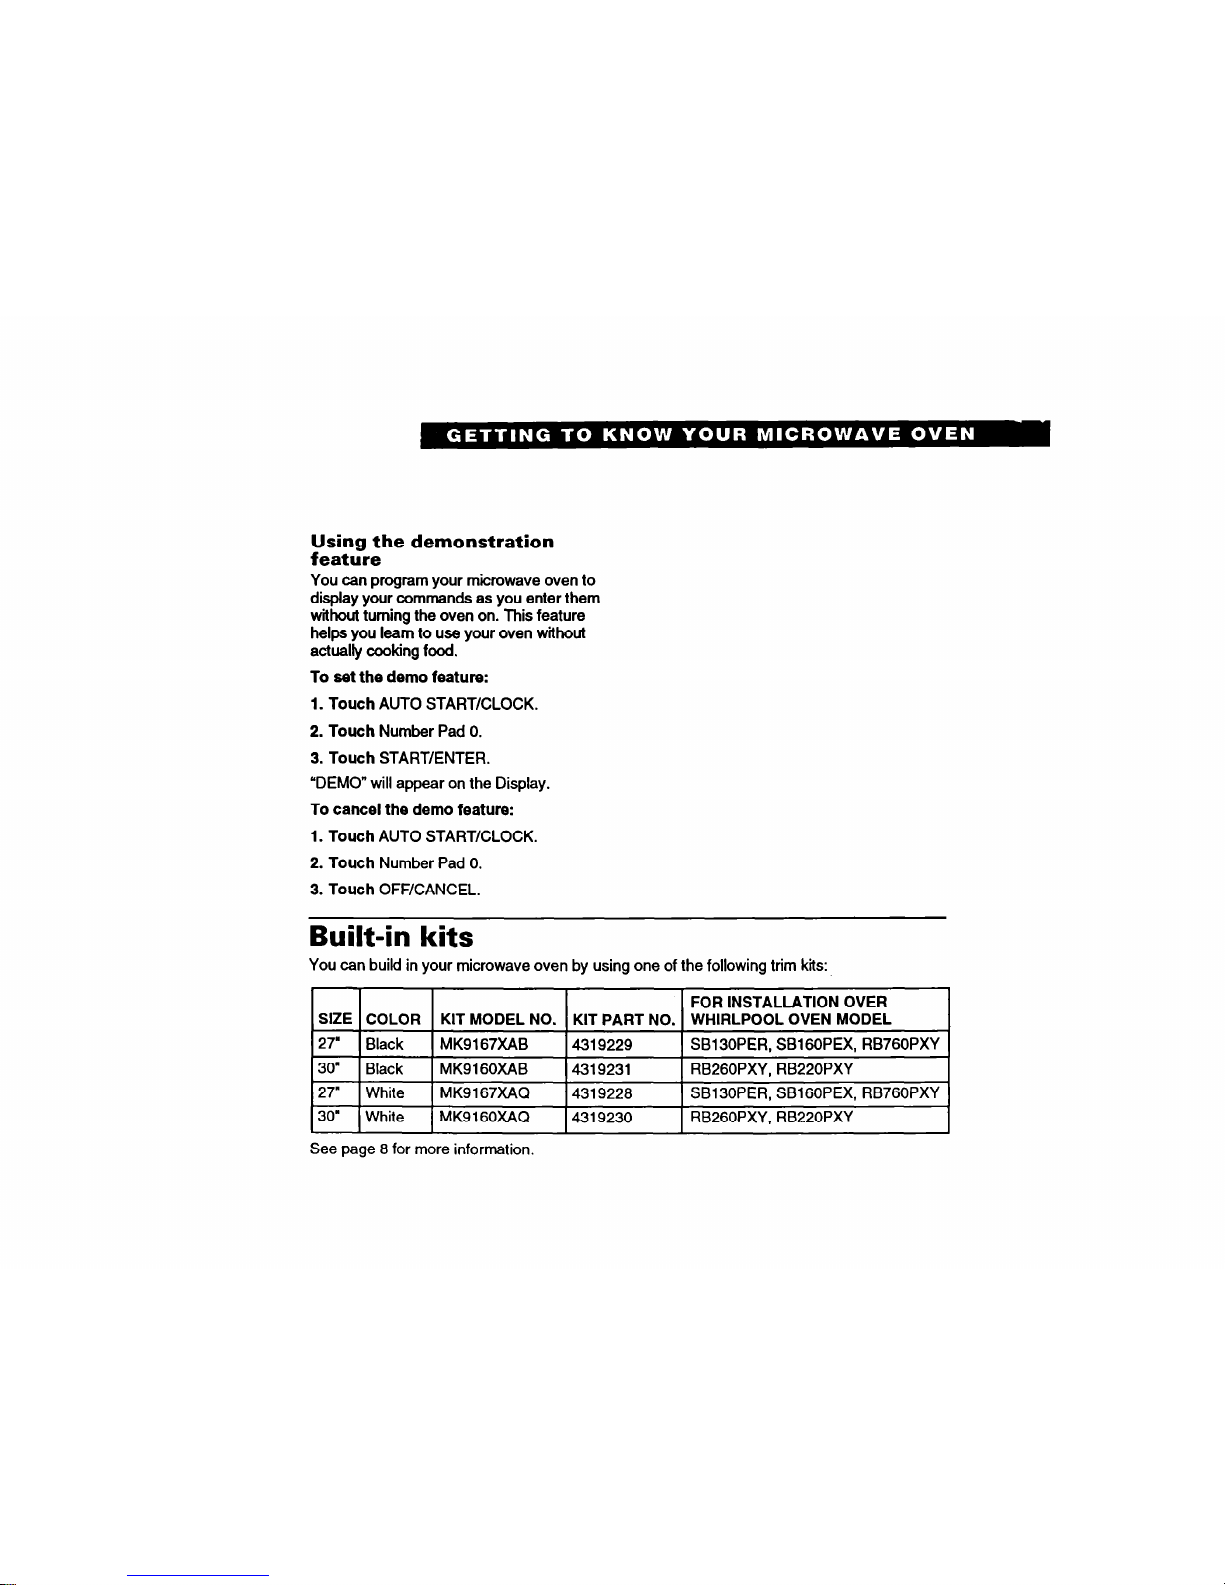
Built-in kits
You can build in your microwave oven by using one of the following trim kits:
1 SIZE ! COLOR
FOR INSTALLATION OVER
KIT MODEL NO. KIT PART NO. WHIRLPOOL OVEN MODEL
I+
See page 8 for m
MK9167XAB
4319229
MK91 GOXAB
4319231
MK9167XAQ
4319228
MK9 1 GOXAQ
4319230
SB130PER, SBl GOPEX, RB760PXY
RB260PXY, RB220PXY
SB130PER, SBlGOPEX, RB760PXY
RB260PXY, RB220PXY
I
I
Ire information.

Setting the clock
When you first plug in your microwave oven,
the Display flashes ‘88:88”. If the electric
power ever goes off, the Display will again
flash all 8’s when the power comes back on.
NOTES:
l
You can cook without
setting the clock,
but the Display will not show the correct
time of day after cooking.
l
To M the clock, touch AUTO START/
CLOCK. A V” will show on the Display.
Continue to set the clock as shown below.
l
If you have touched in
an incorrect time,
such as 12335, “ERROR” will show on the
Display. Touch OFF/CANCEL, then touch
AUTO START/CLOCK and start over.
To set time:
1. Choose setting.
TOUCH
YOU SEE
2. Enter time of day.
Example for 3:25:
TOUCH
YOU SEE
3. Complete entry.
TOUCH YOU SEE
16
 Loading...