

Page 1
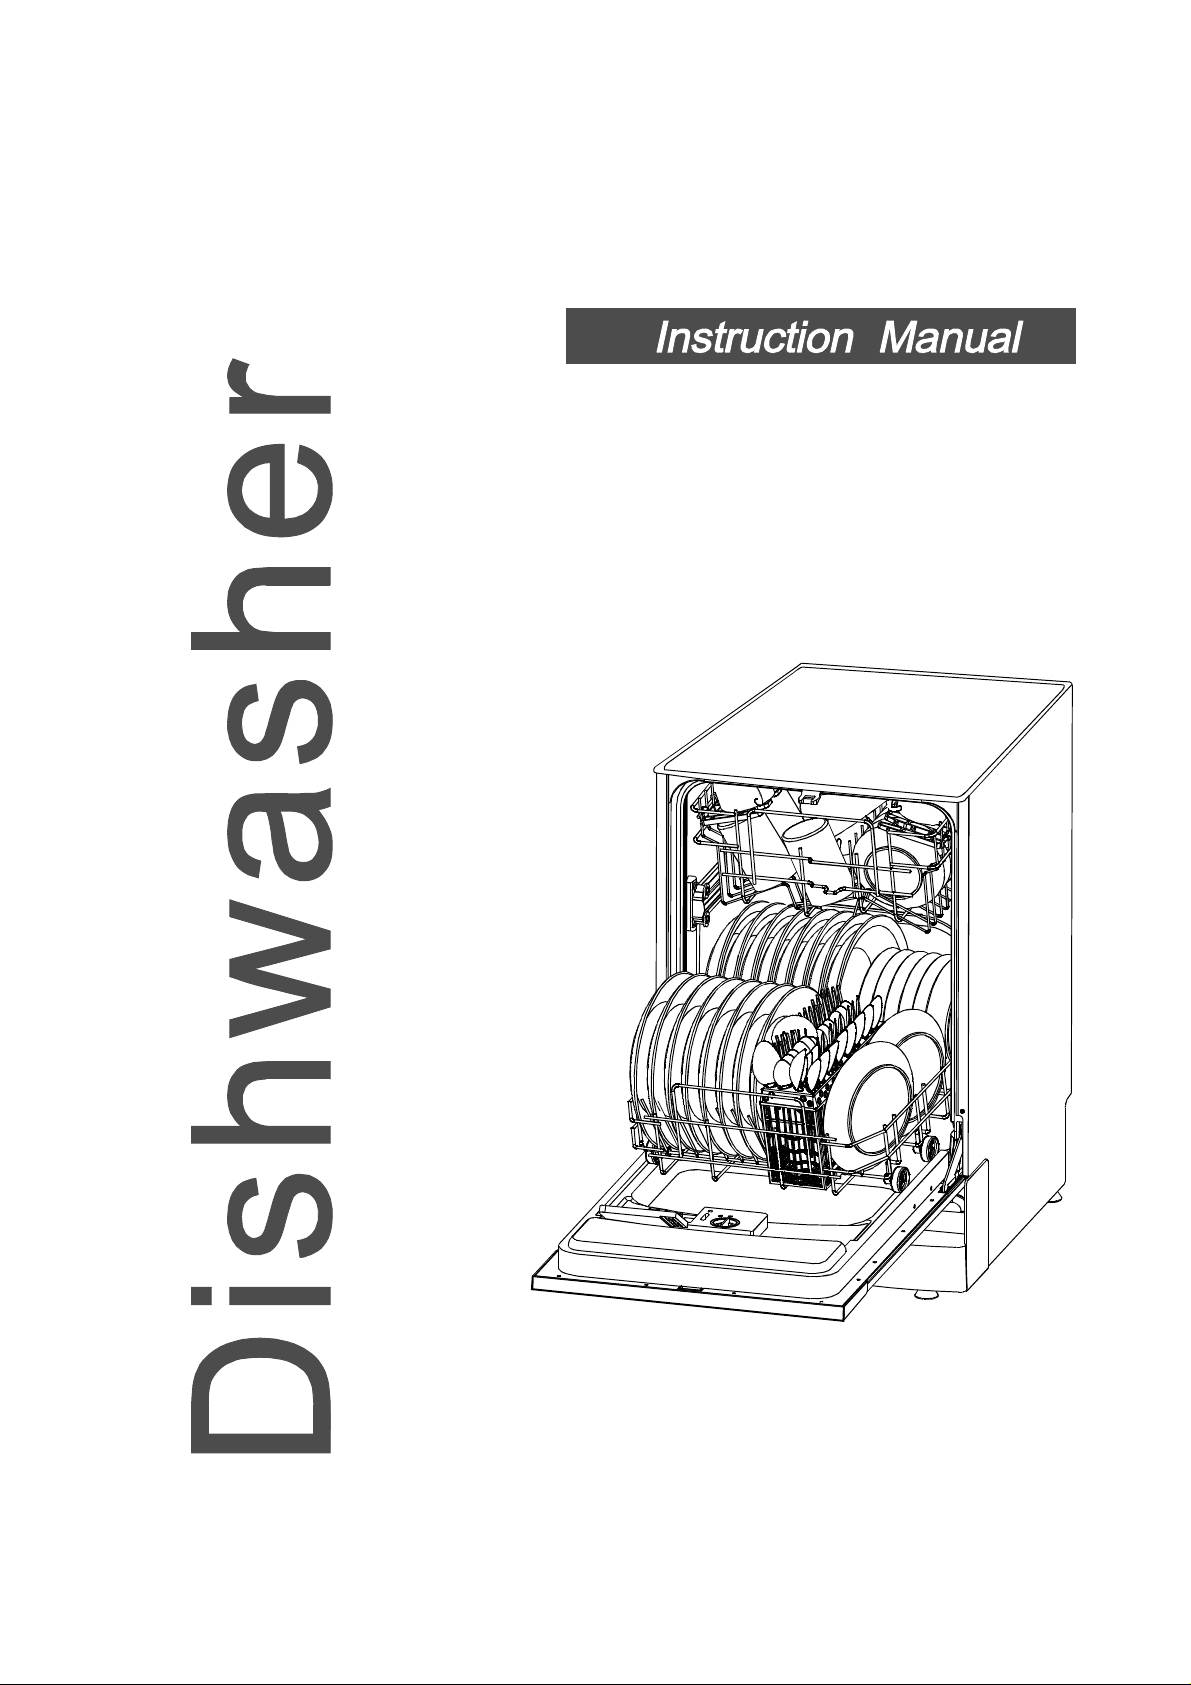
KFID45A
Page 2
Dear Customer,
Please carefully read this manual before using the
dishwasher, it will help you to use and maintain the
dishwasher properly.
Keep it torefer to it at a later date.
Pass it on to any subsequent owner of the appliance.
ControlPanel...................................................3
Dishwasher Features.................................... ...3
This manual contains sections on safety Instructions,
Operating Instructions, Installation Instructions and
Troubleshooting Tips, etc.
To review the section on troubleshooting Tips
will help you to solve some common problems
by yourself .
Ifyoucan not solvethe problemsby yourself,
pleaseask for the help of professional technicians.
A、Water Softener...........................................4
B、Loading the Salt into the Softener.................5
C、Fill the Rinse Aid Dispenser
D、Functionof Detergent
.........................5
.................................7
Attention before or after loading the Dishwasher
Baskets..........................................................9
Loading the upper Basket.................................9
Loading the Lower Basket...............................10
Cutlery Basket........................................... ...11
Wash Cycle Table...........................................12
Turning on the Appliance...............................13
Change the Programme..................................13
At the End of the Wash Cycle...........................13
Filtering System.............................................15
Caring for the Dishwasher...............................15
The manufacturer, following a policy of constant
development and updating of the product, may
make modifications without giving prior notice.
Please carefully read the installation instruction
.....................................................................
17
....17Aesthetic panel's dimensions and installation
Tension adjustment of the door spring 19..............
Connection of drain hoses.......................................19
Dishwasher installation steps..........................20
WaterConnection...........................................22
Before calling for service................. ................23
Technical information.....................................25
Page 3
When using your dishwasher, follow the p rec aut ions listed below:
This appliance must be grounded. In the event of a
malfunction or breakdown, grounding will reduce
the risk of anelectric shock by providing a path of
least resistance of electric current. This appliance
is equipped with a cord having an equipmentgrounding conductor and a grounding plug.
The plug must be plugged into an appropriate outlet
that is installed and grounded in accordance with
all local codes and ordinances.
Do not abuse, sit on, or stand on the door or dish
rack of the dishwasher.
Do not operate your dishwasher unless all
enclosure panels are properly in place. Open
the door very carefully if the dishwasher is
operating, there is a risk of water squirting out.
Do not place any heavy objects the
door when it is open. The appliance could tip
forward.
When load in g items to be washed :
1) L ocatesharp itemssothatthey arenotlikely
todamage thedoorseal;
)
2 Warn ing: Knives and othe r u tensils with
sh a rp po i n t s must be l oa de d in th e basket
with their pointsdown or placed in a
horizonta lposition.
When us ing your dishwasher,you should
prevent plastic items fro m coming i nto contact
with t he heating element.(This instru ction i s only
applicable to m achines with avisual heating
element.)
Check thatthedetergentcomparmentisempty
after completion o f the wash cycle.
Do not wash plastic items unless they are marked
dishwasher safe or the equivalent. For plastic items
n
ot so marked, check the manufacturer's
recommendations.
Use o nly detergent and rinse additives
designed for an automatic dishwasher.
Never use s oap, laundry detergent, or hand
washing detergent in you r dishwasher.Keep
these products out ofthe reach of chi ldren.
on or stand on
Improper connection of the equipment-grounding
conductor can result in the risk of an electric shock.
Check with a qualified electrician or service
representative if you are in doubt whether the
appliance is properly grounded. Do not modify the
plug provided with the appliance; If it does not fit
the outlet. Have a proper outlet installed by a
qualified electrician.
Keep children away from detergent and rinse aid, keep
child away from the opendoor of the dishwasher,
ren
there could still be some detergent left inside.
This appliance is not intended for use by persons
(including children with reduced physical, sensory or
mental capabilities, or lack of experience and
knowledge ,unless they have been given supervision
or instruction concerning use of the appliance by a
person responsible for their safety.
Children should be supervised to ensure that they do
not play with the appliance.
Dishwasherdetergents are stronglyalkaline, they
can be e xtremely dangerous if swallo we d.Avoi d
contact with skin and eyes an d ke ep children away
from th e dishwasher when the d oor is op en.
The doo r should not beleft open,
since th is could increase the risk of tr ipping.
If th e s upply cord is d amaged, it must be replaced
by th e manufacturer or itsse rvice agent ora
similar ly quali fie d person in order to avoid a
hazard.
Remove the door tothe washing compartmentwhen
removing an old dishwasher from service or discarding it.
Please d ispose of packing materials properly.
Use the dishwasher only for its intended function.
Duringinstallation, thepowersupply mustnot
beexcessiv ely or dangerously bentorflattened.
Do not tamper with controls.
The app liance is tobe connected tot he water
mains usingnewhose sets andthatoldhose- sets
sho ul d not be reused.
Themaximum number of placesettings tobe
washed i s 9.
Themaximum permissible inlet water pressure is
1Mp a .
Theminimum permissibleinlet w ater pressure is
0.04Mpa.
)
1
Page 4

Dispose of thedishwas her packaging m ater ial correctly.
All packaging materials can be recycled .
Plastic parts aremark ed w ith the s tandar d international abbreviations:
PE for polyethylene, e.g. sheet wrappingmater ial
PS forpolystyrene,e.g.paddingm aterial
POM po lyox ymethylene, e.g. plastic clips
PP polypropylene , e.g. Salt fill er
ABS Acrylonitri le B utad iene Styrene, e.g. Control Panel .
WARNING!
Packaging materialcouldbedangerousfor children!
For disposing ofpa ckage and thea ppliance please go t o a re cycling centre. Therefore cut
offthe pow er s upplycable and makethedoor closing deviceunusable.
Cardboard packaging is manufacturedfromrecycledpaper and should be disposedinthe
waste paper c ollect ion for re cycling .
By ensuring th is product i s disposed of correctly,you will helpprevent potential negative
consequences for the e nvironment and human h ealth, which could o therwise be caused
byinappropriate wastehandling of thisproduct.
For more de tailed informat ion a bout recycling of this product, please contact your loca l
city office and your household waste disposal se rvice.
DISPOSAL: Do no t dispose th is product as unsort ed municipal waste. Collection of such
waste separately for spec ial treatment is n ecessary.
2
Page 5
Toget the bestperformancefromyourdishwasher, readall
operating instructions beforeusingitforthe first time.
5
4
6
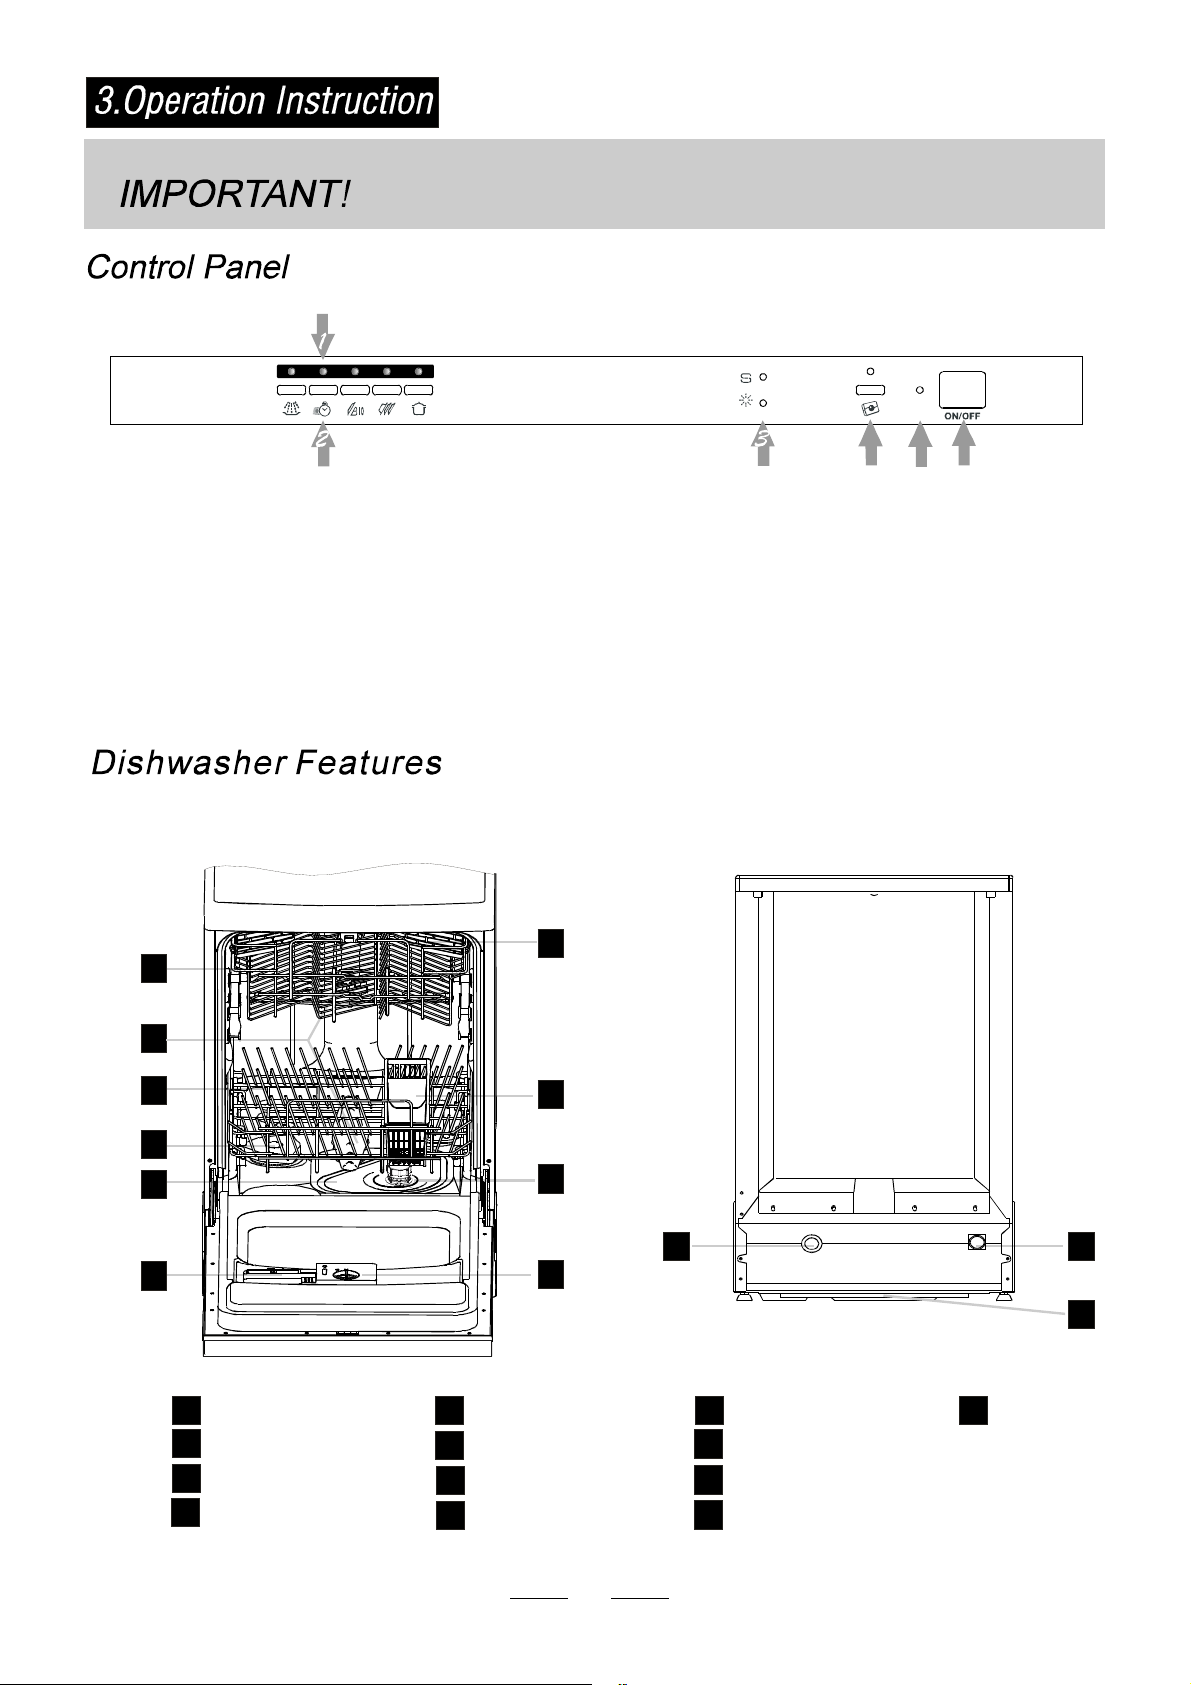
Programindicatorlight:when you select washing
1
program , the cor r espond light w ill di splay.
Program Ke y- pre s s:To select wash ing p rogram
2
when pressthe Key-press.
SaltandRinseAidWarning Light:To come on when
3
thesoftenero r dispenserneeds to be refilled.
Fro nt v iew
1
2
3
3in1 indicator light / 3in1
4
functionsButton:To selectand show 3in1
Power light:Tocome on w hen Power ON/OFF
5
button is pres seddown.
6
ON/OFF Button: To turn on/ off t he power supply.
Back View
7
8
4
5
9
11 12
6
10
13
on
Off
Upper Bask e t
1
Spray Arms
2
Lower Baske t
3
Salt C ontainer
4
MainFilter
5
Detergent Dispenser
6
CupShelf
7
CutleryBasket
8
Coarse Filter
9
Rins e Aid Disp enser
10
Drainpipe connector
11
Inletpipe connector
12
3
13
Tray ass
Page 6
Before u sing your di shwasher for the first time:
A. Set thewate r sof tener
B. Pour 1 2 li tre o f water i nside the sa lt container and then fill with dishwash er sa lt/
C. Fi l l the rinse aid d ispenser
D. Fillin detergent
A. WaterSoftener
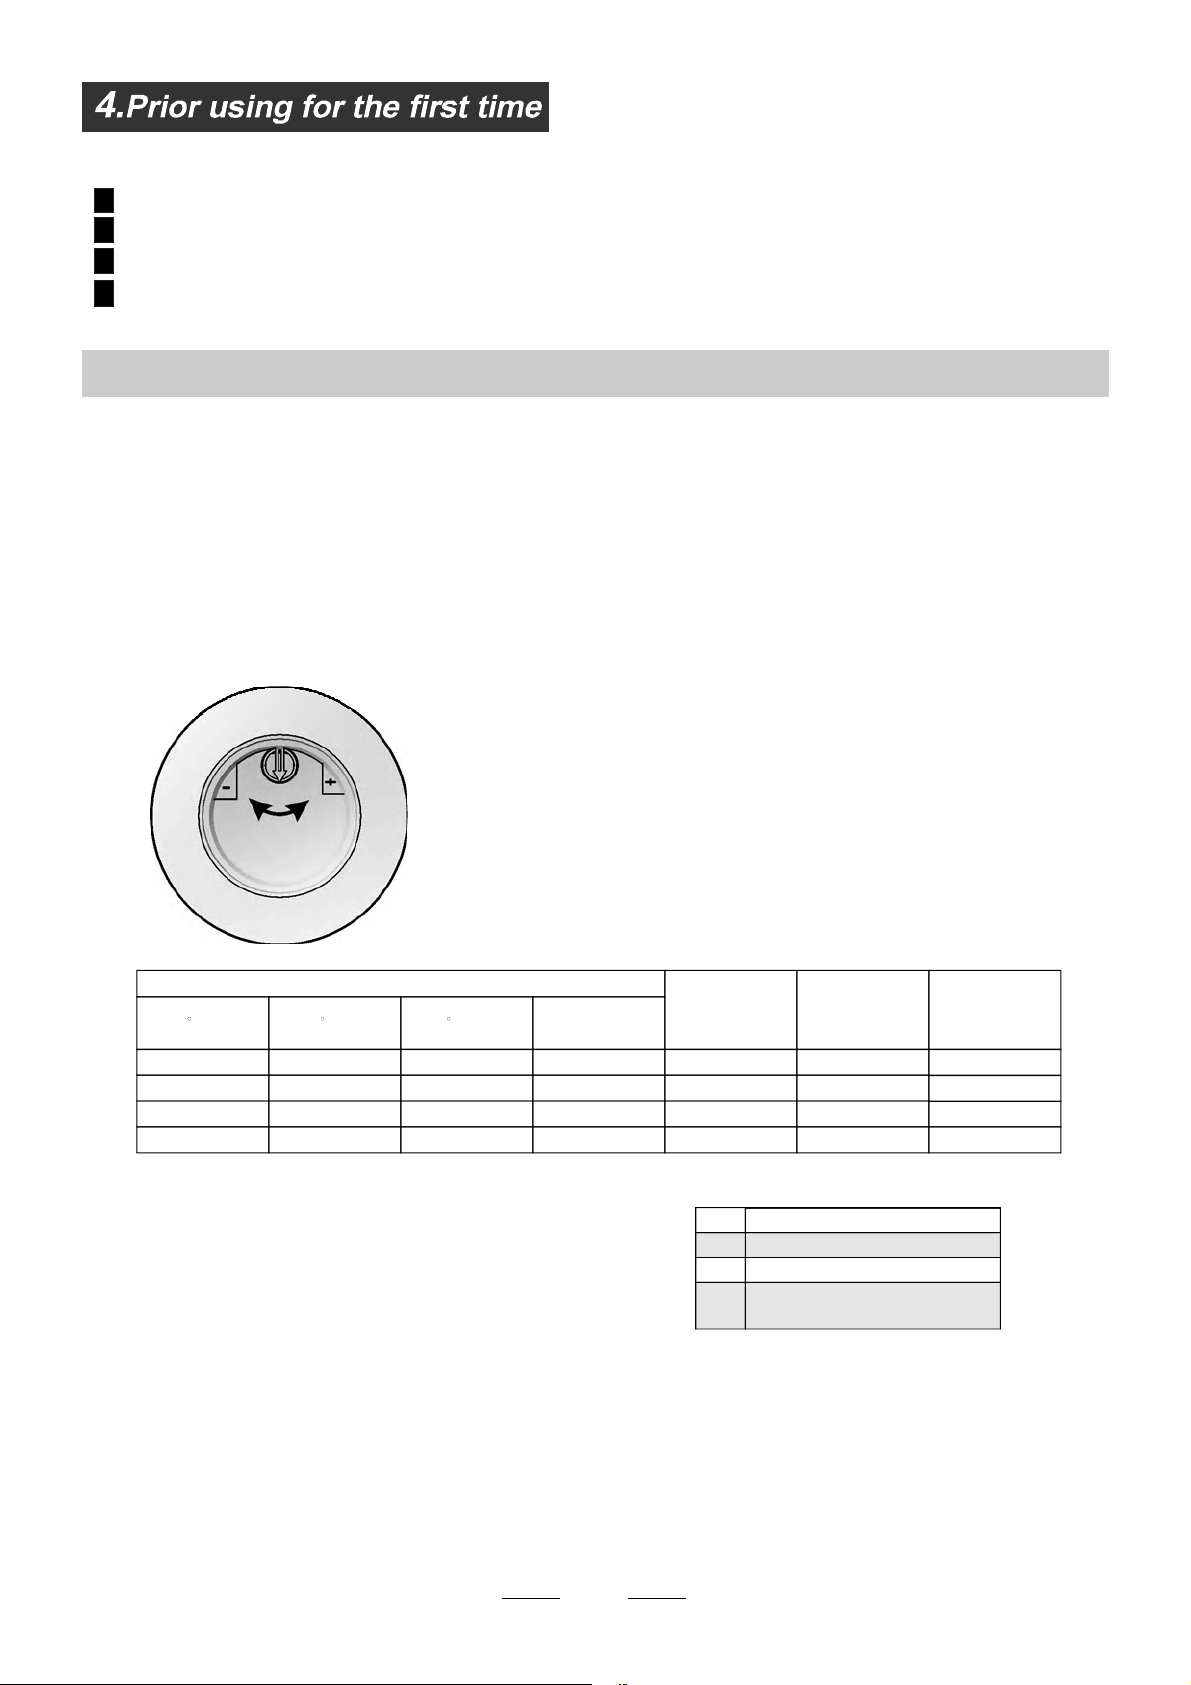
The wat er softener must beset manually, usin g th e water ha rdness dial.
The wat er so ftener is designed toremove mineral s andsalts from thewat er,wh ich w ould have
adetrim entalor adverse effectontheoperationofthe appliance.Thehigher the
content ofthese minerals and sa lts, the harder your water is. Thesofte ner s hould be
adjusted acco rding to thehar dness of the water in your area. Yourlocal Water A uthority
can advise you on the hardnessofthewater in yourarea.
Adjust ing Salt Co nsumpt ion
The dishwas her is de signed to allow for a djustment in the amo unt of sa lt consumed based onthe hardne ss of
the waterused.Thisisintendedtooptimise and customisethelevel o f salt consumption.
Pleas e follo w the s t eps below for adjus tment in salt consump tion .
1. Unscrew thecapfromthesaltcontainer.
2. T here is a ring on the containe r w ith an a rrow on it (see figure
onthe side),ifnecessary, rotate the ringinthe anticlockwise
direction fromthe"-" Setting toward the"+" sign, basedon the
hardness o f the w ater being used.
It is recomm ended t hat adjust ments should b e made in
accord ance with the followin g schem e:
WATER HARDNESS
dH
45~60 80~107 56~75 8~11
Note:1
°
dH=1.25 Clarke=1.78 fH=0.178mmol/l
DH: German degree
°
fH: Frenchdegree
°
Clark: Britishdegree
°
fH
0~140~8 0~1.4
14~398~22 1.4~3.9 - 20 50
39~8022~ 45 3.9~8 Mid 40 25
°°
Clarke
0~10
10~28
28~56
mmol/l
SelectorPosition
/
+
Note:2
""/
"-"
"+"
"Mid"
Salt consumption
(gram/cycle)
No sa lt need added
Settingtowardthe"-"sign
Settingtowardthe"+"sign
Settingtowardbetween
the "-"sign and "+" sign
Contact your l ocal water bo ard for i nformation on the hardness of your water supply.
Auto nomy
(cycles/1kgs)
0
60 16
/
4
Page 7
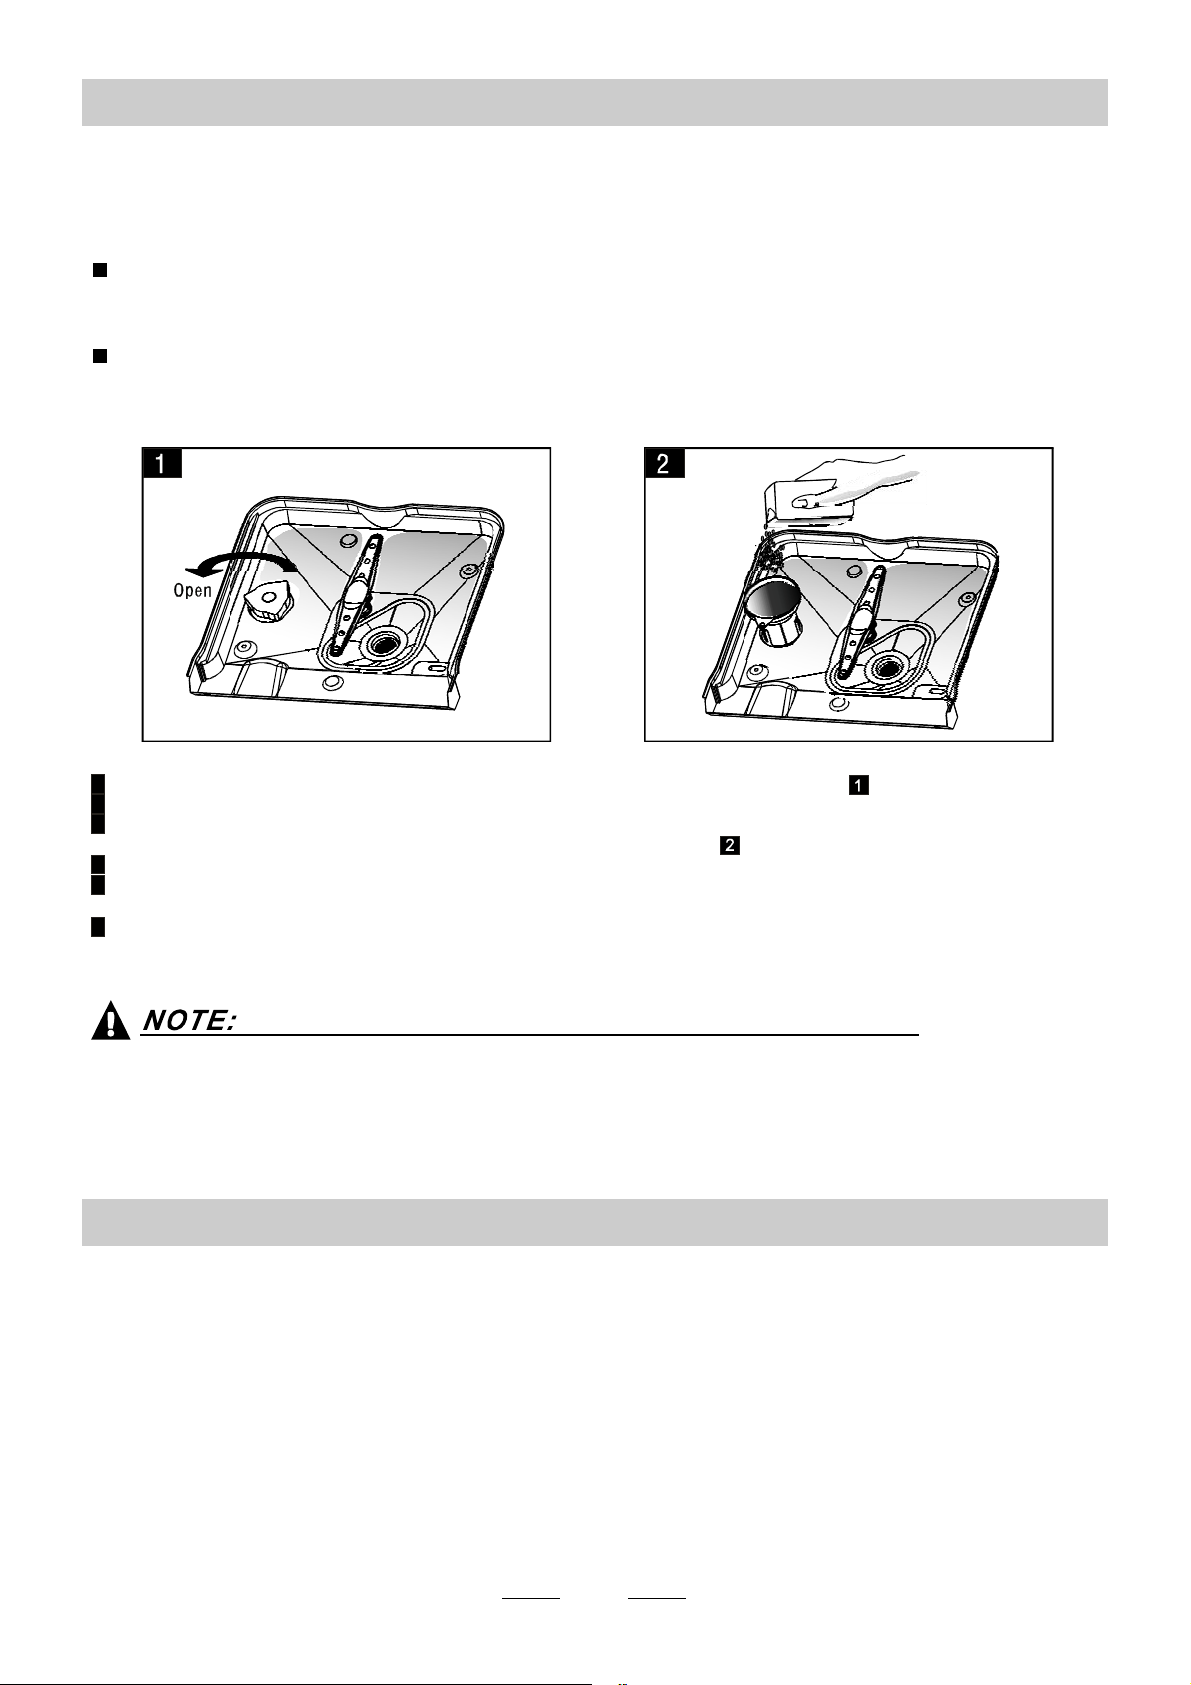
B. Loading the Sal t I nto the Softener
Always use thesalt intended for use w ith dishwasher.
The s alt container is located beneath the l ower basket and sh ould be filled a s explained in the
follow ing:
Attention!
Only usesalt specifically designed for t he use i n d ishwash ers! E very other type of
salt n ot specifically designed for theuse in ad ishwasher, especially tab le salt, will
damage thew ater softener.In case ofda mages caused by t he use of unsuitab le
salt t he manufacturer does notgi ve any wa rranty nor is liable for any damages caused.
Only fillwit hsal t justb efore starting one o f theco mplete washing p rogra ms.
This will p revent anyg rains of s alt or sa lty water,whi ch may have been spilled,
remaining on th e bottom o f the machine for any period of t ime, which may cause
corrosion.
A Removethe lowerbasketandthenunscrew and removethecapfrom thesaltcontainer.
B Beforethefirst wash,fill1lt. of water inthe saltcontainer of your machine.
C Place the e nd of thefun nel (supplied) into the hole and i ntroduce abou t 1kg ofsalt .
normal fo r a s mall am ount of water to co m e out of the sa l t con tainer.Itis
D After filling the container , screw the c ap tightly back clockwise.
E Usually,the salt warning light will stop being i llumi nated within 2-6 days after thesa lt container has been filled with
salt.
F Immediately after filling the salt into the sa lt container, awashin g program should be started (Wesu ggest to use t he
soak or rapidprogram).Otherwisethefilter system, pump or otherimportantpart sof themachinemaybedamaged
bysalty water.This isoutofwarranty.
1.The salt container must onl y be ref illed when the sal t warning light in the control panel comes on.
Depending on how well the salt dissolves, thes alt warning light maystill be on eventhough the
salt cont ainer is filled.
If the re isno salt warning light i n the con trol panel (f or some M odels),you can estimate whento fill
the s alt into thesoftene r by th e cycles t hat the di shwashe r has run.
2. If there are spi lls of the salt, a soakor a r apid program should be run to remove the excessive salt.
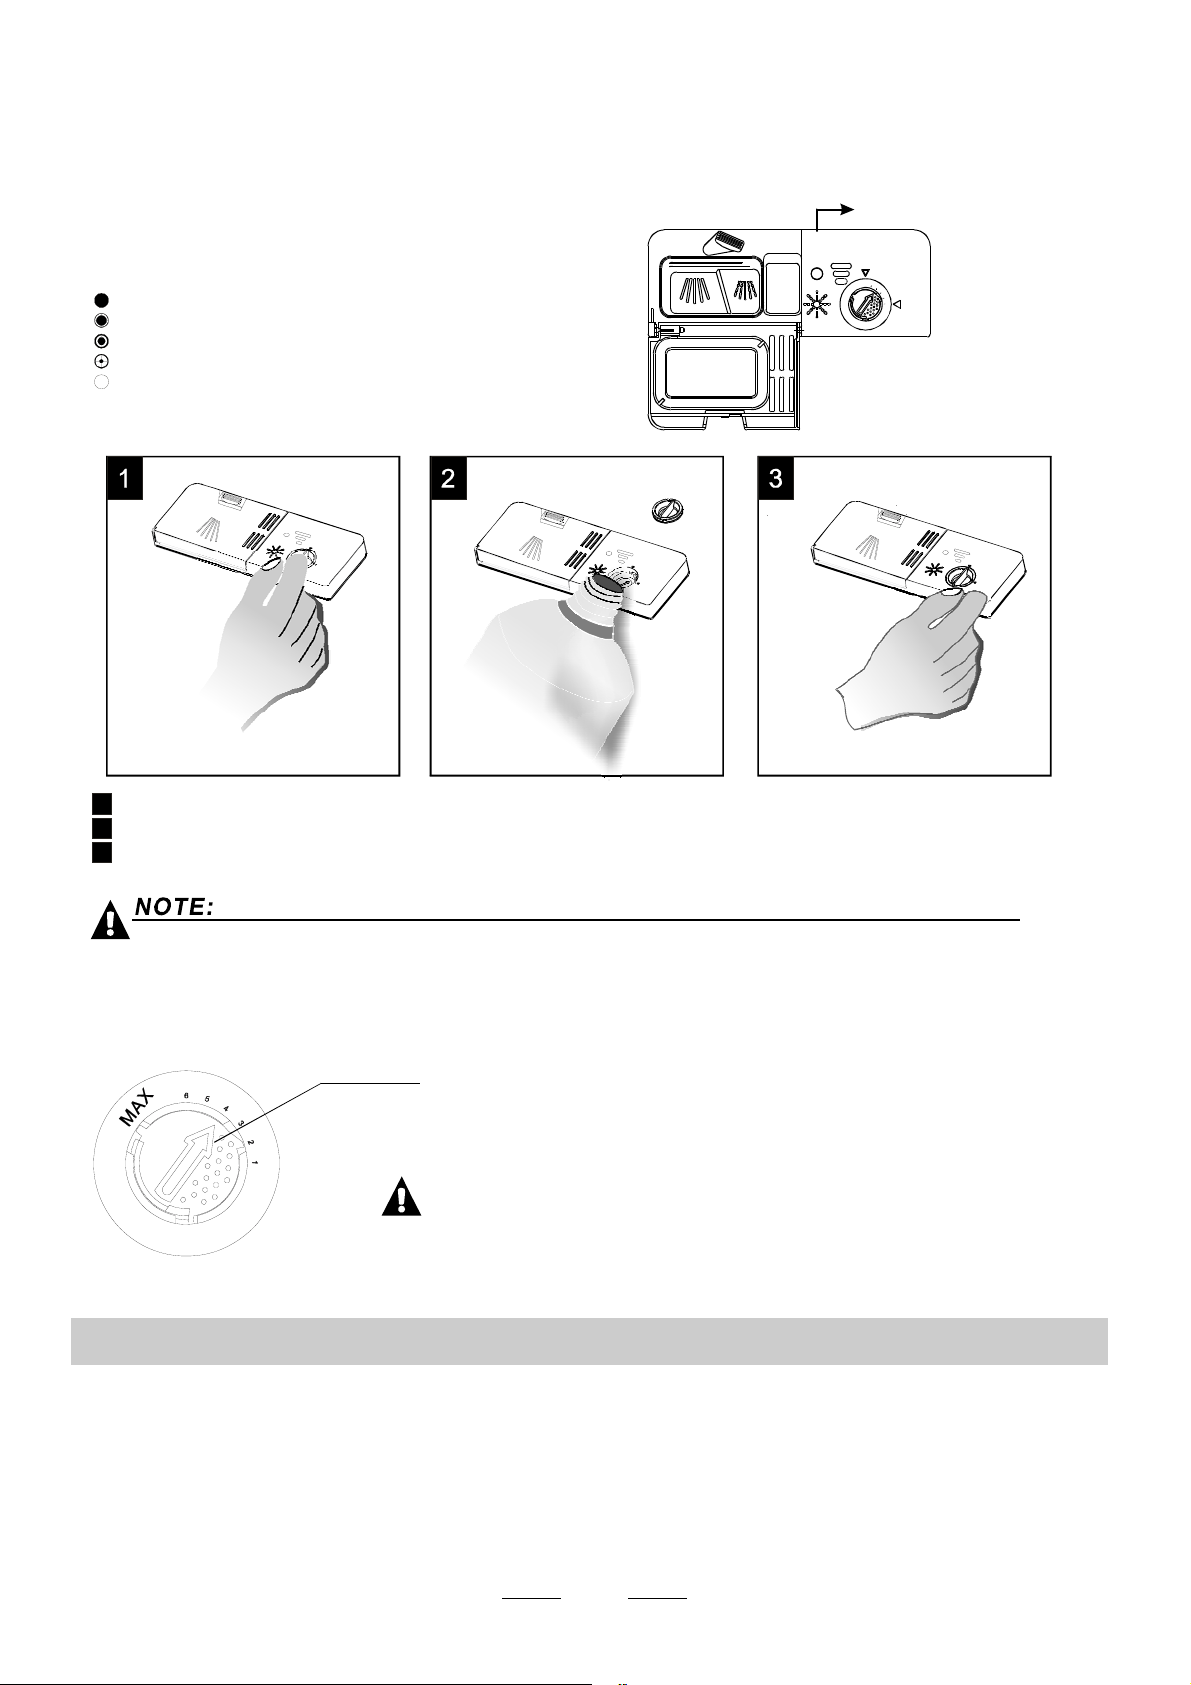
C. Fill the Rinse Ai d Di spenser
RinseAid Dispe nser
The r i nse aid isrel eas ed during the final rins e to prevent water from forming dr oplets on your dishe s, which can leave
spots andstreaks. It also improvesdrying by allowing water to roll off the dishes. Your dishwasher is designed t o
usel iquid r inse aids. The rinse aid di spenser is l ocated inside the d oor next tothe detergent dispenser.To fill the
dispenser, open the cap and pourthe rinseaidintothedispenser until the levelindicatorturns completelyblack.
Thevol ume of t he r inse aid container is about 110ml.
Function of RinseAid
Rinse ai d is automatically added during the last r inse, ensuring thorough rinsing, and spot and s treak free drying.
Attention!
Only usebranded rinseaidfordishwasher.Never filltherinseaid dispenserwith any o thersubstances
(e.g. Dishwasher cleaning agent, liqu id detergent). This would damage the app lian ce.
5
Page 8
Whento Refill the RinseAid Dispenser
Ifth ere i s no r inse-aid warning light in t he c ontr ol p anel, you can est imate the amount f rom the colo ur
ofthe optical level indicator C located next to t he cap. Whenthe rinse-aid container is fu ll, the whole
indicator will be dark .As therinse -aid diminishes, thesi ze of the dark dot decreases. Youshould never let
the r i nse ai d level fa ll 1 / 4 full.
Asth e rinse aid dimin ishes, the si ze of the black dot
ontherinse aid level indicator changes, asillustrated b elow.
Full
3/4full
1/2full
1/ 4 full- Should refill toeliminatespotting
Empty
""
C (Ri nse - Ai d ind ic at or )
6
To op en the dispens er, t urn the cap to t he "ope n" (left ) arrow and lift it out.
1
Pour the rinse aid into the dispense r, be ing caref ul not to overfill.
2
Replace the cap by inserting it a ligned with " open" arrow andturning it tot he cl osed (right) arrow.
3
Cl ean up an y ri ns e aid spil l ed while du rin g f illi ng with an ab sor be nt c lot h t o a v oid exce ssiv e f oaming
during the nextwa sh. Don't for get to re place the cap be fore you close dis hwasher door.
Adjusti ng RinseA id Disp enser
Adjust lever
(Rinse)
Increasethe doseif there aredropsofwater orlimespotsonthedishes afterwashing.
Reduce i tif there are sticky whitishstainson yourdishesora bl uishfilmonglassware or
knifeblades.
The r inse aid dispenser has six or four settings. Al ways start with the d ispens er
set o n "4". If spots and poor drying are a p roblem, increase the amount o f r i nse
aid d ispensed by removing the d ispens er lid an d rotating thedi al to "5". If the
dishes s till are not d rying properly or are show sp ots, adjust t he dial to t he n ext
higher lever until y our dishes a re spot-free. The recommended setting is "4".
(Factoryvalue is "4".)
NOTE:
D. Functio n of D etergen t
Detergents with its c hemic al ingredients are necessary to remove dirt, c rus h dirt an d transport it out of the dishw asher.
Mosto f the commercialquality detergentsaresuitablefor thispurpose.
Detergents
There are 3 sor t s of detergent s
1.With phosphateandwithch lorine
2.Withphosphate and wi thout chlorine
3.Withoutphosphate and without chlorine
6
Page 9
Normally ne w pulverised detergent is without phos phate. Thus the water softener function of
phosph ate is not gi ven. I n this case we recom men d t o f i ll sal t i n th e sal t co nt a i ner even w he n
the h ardness of wate r is o nly 6 dH. If detergents w itho ut ph osphate are usedin the case of hard water
often wh ite spots appear on dishes and glasses. I n this casepl ease add mo re detergent to r each
better resu l ts . Deterg en ts wi t h o ut ch l ori ne do only bl each a little. Stro ng and co l o u red spo ts will not
bere moved completely.In this c ase please choose a progr am with ahigher tempera ture.
°
Concentr ated Deter gent
Based ontheir chemical composition,detergents can be splitintwobasic types:
conventional, alkaline dete rgents withcausticcomponents
lo w alk al i ne concentra t ed det erge nt s with natu r al en zy mes
The use of normal washing programsincombinationwith concentrated detergents
reduces pollution a nd is good for your dishes; these wash p rogr ams ar e specifically matche d
to th e dirt-di ssol ving pro pert i es of the e nz yme s of the concent rated de terg ent. For this reas on
normal wash programsinwhichconce ntrateddetergentsareused can achieve the same
“”
resultsthatcanotherwise onlybe achievedusing intensive programs.
“”
“”
Detergent Tablets
Dete rgent tabletsofdifferentbrandsdisso lveat differentspeeds.For thisreason some
detergent t ablets cannot dissolve and dev elop theirfu ll cleaning power dur ing short
programs. T herefore please use l ong programs when u sin g de tergent tablets, to
ens ure t he compl et e r e moval of deter g e n t r e si du als .
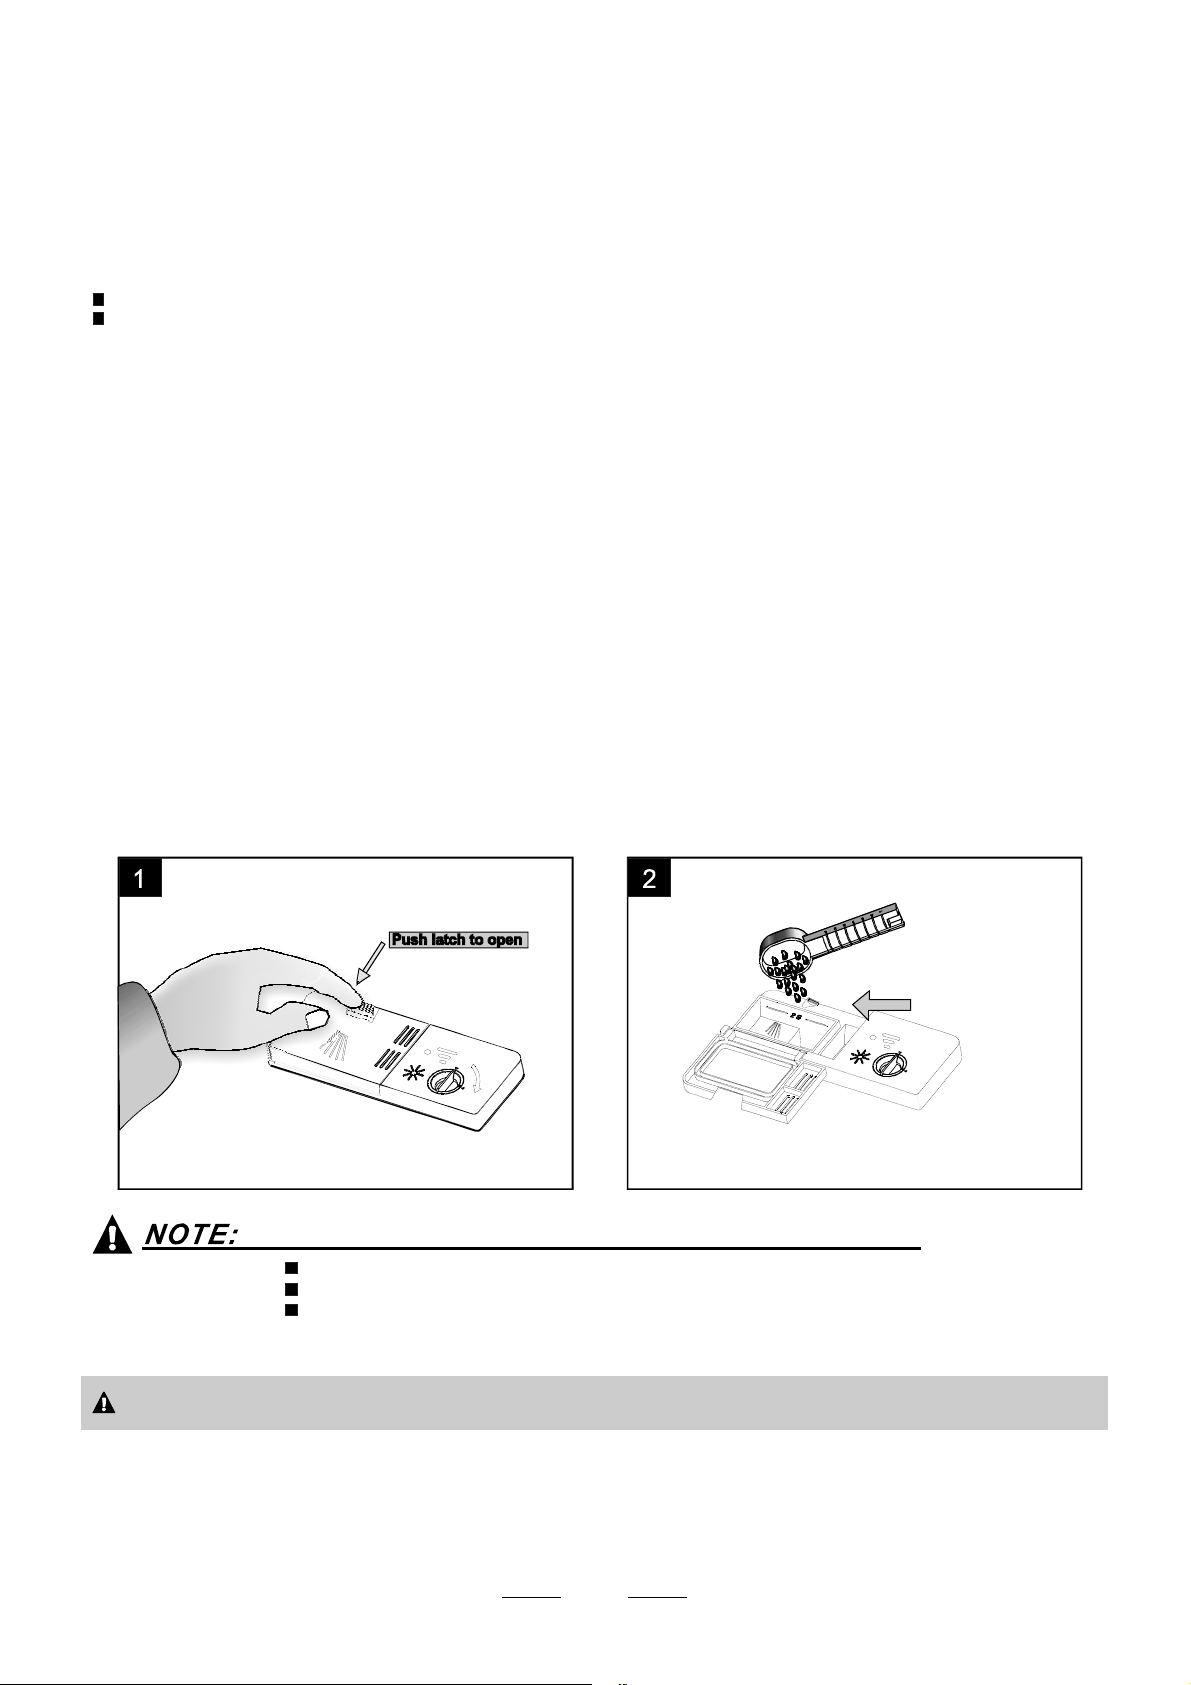
DetergentDispenser
The disp enser must b e refilled be fore the start of each wash cy cle following the instructions
provided i n the w ash cycle t able . Yourdis hwasher uses le ss detergent and ri nse aid tha n
Conventionaldishwa sher.Generally,onlyone tablespoon ofdetergent is neededfor
anormal washload. Moreheavily soiled itemsneedmoredetergent.Alwaysaddthe
detergen t just before star ting the dish was her, otherwis e it could get damp and will not
dissol v e proper ly.
Amountof Detergentto Use
If th e l id is cl osed: press release button.The lid will sp ring open.
Always a dd the dete rgent just b efore starting eachwash cycle.
Only usebrandeddetergent aidfordishwasher.
WARNING!
Proper U se of De tergent
Use o nly detergent specifically made for the use in dishwashers. Keep your det ergent f resh and dry.
Don't putpowdered detergent intothedispenseruntilyou're readytowashdishes.
Dishwasher detergent is co rrosive! Take care to kee p i t out ofreach of c hildren.
7
Page 10

Fill in Detergent
Fillthe detergent dispens er w ith detergent.
The m arking in d icate s th e dos ing leve l s , as
illus t ra ted on the right:
The p lace of main wash cycle dete rgent placed ,
A
MIN me ans approxim ately 20g o f detergent.“”
The p lace of pr e-wash cycle det ergent placed ,
B
approximately 5g o f detergent
Pleaseo bserve them anufact urers dosing and storage
Recommendationsas stated on the detergent packaging.
Closethe lid andpressuntilit locks inplace.
If the d i sh es are heavil y s o i l ed , pl ace a n a d ditional
detergent dosein the pre-wash detergent chamber.This detergent will take effe ct during the pre-wa sh p has e.
Youf ind information about the amounto f de tergent for thesi ngle programme on t he last page.
Please aware, that according t o the lev el so iling and the specific hardness of wa ter d ifference s a re possible.
Please observethemanufacturer'srecommendationson the detergent packaging.
6
How To Use T he 3 IN1 Functi on
Your dishwasher h as a3in1 function which needs n o salt a nd r inse aid b ut a 3 In1 tablet.
This dishwashercom esw ith a 3in 1 tablet cont ainer as an accessory.
Only the 3in1 fun ction(f or the program : int ensi ve/Norm al/ Eco. ) Can be used with 3in1 tablets.
If you use 3in1 tablets inother programs, the appliance will not achi eve ago od p erformance.
1.Thefigure below showshowto hangthe3in1tablet containeron theupperbasket.
2. Rotateth e upper s pray er an d change the location o f the container toen sure the uppersp rayer isno t
obstructed by the3in 1 tablet container. R eferto the figure below forreference.
3.Put the3in1tabletintothe container,thenstart the 3in1 program.
When us ing 3in1 combination / com pact Detergents ,please pay attention to make sure that
the sizeof the combination detergents fits tothe dispenser sothat combination
detergents c an be easily p ut into thedispense r, and the dispenser would not be broken.
,
8
Page 11

For b est performa nce oft he dishwashe r,foll ow these l oadi ng guidelines. Features and
appearance of baskets and cutlery baskets may vary fr om your m odel.
Attention before or after Loading the DishwasherBaskets
Scrape off any large amou nts of le ftover food. Soften remnan ts of b urnt food in p ans.
It isnot necess ary to r inse the dishes under running water.
Place objects int he dishwasher in following way:
1.Itemssuch as cups, glasses, pots/pan s, etc. a re faced downwards.
2.Curved i tems, or oneswith recesses , should bel oaded aslant so that water can run off.
3.All utensilsarestacked securely and can nottipover.
4.Allutensi ls are placedi n the way tha t the spray a rms can rotate freely during w ash ing.
Verysmall items should not be w ashed in thedi shwasher as they could easily fa ll out ofth e b askets.
Loadingthe Upper Rack
The u p per rack is design ed to hold m ore d el icate a nd ligh te r dis hw are such as gl as ses, cof fee
and t ea cupand saucers, as w ell as p lates, small bowls an d shallow pa ns (as lo ng as the y are
not too dirty).
Position the dishes and cookware so t hat they do not get m oved by t he sprayof water.
Bowl M Bowl L() ()
Glasses
Front
Dessert plate
(Egg)
Cups
Gravy ladle
Saucers
AdjustingtheUpper Basket
The hei ght of t he upper basket can b e a dj usted in order to create more space for l arge utensils
both for theupper/lowerbasket.Theheight of the upperbasketcanbe adjusted by placing the
wheels on di fferent height of ther ails. Long items, serving cutlery, salad server s a nd knives
should be pl aced on theshel f so t hat they d o not o bstr uct the rot ati on of the spr ay a rms.
The she lf can b e folded back or be removed when not required for us e.
Upper wheels
Lower wheels
9
Page 12

Loadingthe Lower Basket
Werecom mend thatyouplace largeitems which are mostdifficult to cleaninto the lowerbasket:
pots,pans, lids,serving dishesand bowls, as s hownin the figureto theright.
It ispr eferable to place serving dishes a nd lids onthe side of the rac ks in orderto avoi d b locking
therotationofthetopsprayarm.
Pots, servingbowls,etc.mustalways be placed topdown.
Deep pots sh ould bes lanted to allowwater to f low out.
The b ottom basket feature fold dow n t in ero ws sothat larger or m ore pots andpans can be lo aded.
1. Cutlery basket
2. Dessert plates
3. Soup plates
4. Dinner plates
5. Oval platter
6. Saucer
10
Page 13

Cutlery Bas ket
Cutlery should be place d in t he cutlery basket with th e handles at t he bottom. If therack has side b askets , the
spoons should be loade d separat ely into the ap pr opriate slots, especiall y long utensils should be pl aced in the
horizontal position at the f ron t ofthe uppe r ba sket as shown in thepictur e.
3553
1551
3553
3553
1561
3213
3244
1244
2244
2214
1214
7274
For washi ng in thedi shwashe r the f ol lowing cutlery/dishe s
1 2 3456 7
1. Tea spoons
2. Dessert spoons
3. Soup spoons
4. Forks
5. Knives
6. Serving forks
7. Serving spoons
Do not l eave any item exten d thro ugh bott om.
Knives and otherutensils withsharppoints
mustbe loaded in theba sket with their po ints
down or placed in an ho ri zon tal posit ion.
Always load s harp utensi ls with theshar p
point down!
Arenot suitable
Cutlery with wooden, horn china or
mother-of-pe arl handles
Are of limitedsuitability
Somety pes of g lass es canbeco me
dull after a largen umberofwashes
Plastic items that are n ot heat resistant
Older cutlery with glued p arts that are not
temperatureresistant
Sil ver a nd alu mi nu m parts have a
tendency t o discolour during washin g
Bondedcutleryitems or dishes
Pewter or c ooper items
Crystalglass
Glaze d pa tt er n s ma y fad e if mac h in e
washe d frequently
Steel items su bject to rusting
Woodenplatters
Itemsmade from syntheticfibres
NOTE:
Do n ot put i n items that are dirt y of c igarette ash, candle wax, l acquer or paint.
If you buy new dishes please make s ure that they are su itable for dishwashers .
NOTE:
Pl eas e d o not ov erl o ad your d ishwa she r. Th er e is on l y spa ce for 9 stand ard d i s he s. Do no t
use d ish that is no t suitable for dishwashers . T his is important for g ood results and for
reasonable energy consume.
Loadingcutlerya nd dishes
Before loading the dishes, you should:
Remove large left-over
Soften remnants of burnt food inpa ns
Whenloading the dishesand cutlery, pleasenote :
Dishes andcutlery must notimpedetherotationofthe spray arms
Load hollow items such as cups,gl asses, pans etc. with the ope ning downwa rds sot hat
water cannot collect i n the container or adeep base
Itisdangerous to open thedoor w hen washing, because t hehot w ater maybe scaldedtoyou.Thedoor should not be
leftintheopenpositionsincethiscouldpresentatrippinghazard.
11
Page 14

()
Meani ng: need t o fill r i ns e in to t he Ri nse-Ai d Dis pen s er.
*En50242:This program isthe test cycle, therinse-aid dispenser
sett ing is recom me nd ed t o be s et to p os it io n 6.
Intensive
Daily
EN 5 0242
Eco.
Express
Pre -wash
For th e heav i e st s o iled l oads,
such as pots, pa ns , cass erole
dishesanddishes thathave
beensitting with dried food
onthem f ora while.
For norm ally s oiled l oa ds,
such as , plat es,g l asses
and l ightly soiled pans.
Standar d dai ly cycle.
For li g htl y so ile d loa ds,such
as p lates,glasses,bowls a nd
lightl ysoiledpans.
Ashorterwashforlightly
soiled l oads that do no t
nee d drying.
pots
To rinse d ishesthat you
planto washlaterthatday.
Pre-was h 5 0
Pre
Wash (60 )
Rinse
Rinse
Rinse (70 )
Drying
Pre-wa sh
Wash(50 )
Rinse (60 )
Drying
Pre-was h
Wash (45 )
Rinse (60 )
Drying
Wash (40 )
Rinse(45 )
()
-wash
℃
℃
℃
℃
℃
℃
℃
℃
Pre-wash
℃
5/2 2g
5/22g
22g
15g15g
173
171
111
28
11
1.4
0.81
0.7
0.35
0.01
18.4
13. 0
11.0
7.0
6.0
+
Intensive
+
3in1
+
Daily
+
3in1
+
Eco.
+
3in1
For theheaviestsoiledloads,
such as pots, pans, casserole
dishes and dishe s that h ave
been sit ting with dried food
onthem for a wh ile.
For normally soiled l oads,
such a s ,plat es, glasses
and l ightl y soiled p ans.
standarddaily cycle.
For lightly s oiled loads,such
as pl ates, glasses ,bow ls and
lightly soiled pans.
pots
Pre-wash 60
Wash (70 )
Rinse
Rinse
Rinse (70 )
Drying
Pre -w a sh
Wash (50 )
Rinse (70 )
Drying
Pre -wash
Wash (45 )
Rinse(70 )
Drying
(℃)
℃
℃
℃
℃
℃
℃
3in1
3in1
3in1
161
148
128 0. 8
1.5
1.0
15.1
12. 7
12. 7
12
Page 15

TurningOn theAppliance
Startinga cycle wash
1 Draw outthelower andupper basket, loadthedishesand pushthemback.
It is commended to loadt he lower basketf irst, then theupper one (seethe s ection entitled
“”
Loading the Dishwasher ).
2 P our in the de te rg ent (se e t h e sec t ion entitle d Sal t, De t e rgent an d Rin s e Ai d ).
3 Insert the plu g into th e socket. The power supply is 220-240 VAC /50 HZ, the spe cification of the
socket is 10A 25 0VAC. Make sure thatthe water supply is turne d on tofull p ress ure.
Open the doo r,press the ON/OFF button, a nd t he ON/OFF light will turn on.
4
Press th e program button toa sired w ash cycle. and closeth ed oor . After 3se conds, the m achine will work.
“”
Change the P rogram...
Premise:
1. Acycle that is under way can on ly be modified ifit has only beenrunn ing
for a short time. Otherwise, the detergent may have alrea dy been released,
and t he appliance may have already drained the w ash water.If this is the case,
the detergent dispenser must be refil led ( se e t he section entitled " Loading the
Detergent" ).
2. Press current prog.Button morethan 3 seconds to cancel the program ,
then you can chan ge the program to the desired cycle setting (see the section
entitled " Star ting a washcyc le. . . " ).
3. Pre ss one ofothers prog. Button more than 3 s econds to cancel ther uning program ,
translase the pro gram which you pr ess.
4. Pre ss the display bu tton more tha n 3 seconds to re-e dit display time .
Forgot to Add a Dish?
Aforgotten dish can be added at any time before the detergent cup opens.
Open the door a little to stop the washing.
1
After the spray arms stop working,you can open the door
2
completely.
Load the forgotten dishes.
3
Close the door, the dishwasher will start running again
4
after 10 seconds.
AttheEndoftheWashCycle
Whe n the worki n g c ycle has f i nished, the b u z zer o f th e d i shw ash e r w ill s oun d fo r 8 seconds , t hen st op. Turn off
the a pp lia n ce us ing the ON/ OFF b utton, s hut of f the water s upp l y a n d o pen the door of the di sh was he r.
Wait for a few minutesbefore unloadingthe dishwashertoavoid handling thedishes and utensil swhile they
are still hot and m ore susceptible to b reakage. They w ill also d ry better.
Switch Off the Dishwasher
The b uzze r of the d ishwasher moos for 8se conds, only inth is ca se the p r ogramme has en ded .
1.Switch o ff the di shwa sher by pressing the ON/OFF button.
2.Tur n off the wat er ta p!
Openthedoorcarefully.
Hot d ishes are sensitive t o knocks. The dishes should therefore bea llowed to co ol down arou nd 15 mi nutes
before removing fr om the app liance.
Open the dish washer' s do or,leave it ajar and w ait afew minutes before removing the dis hes. In this way they
will be cooler and the dr ying will b e improved.
Unloadingthedishwasher
It is normal that the dishwasher is wet insid e.
Empty thelow er basket first and then the up per one.Th is w ill avoid water dri pping from t he upper Basket on to
the dishes in the lower one.
WARNING!
Itis dangerousto open thedoorwhen washing,becausethe hot watermay scald you.
13
Page 16

Filtering System
The filter prevents l arger remnants of food or other objects from getting inside th e p um.
Theresidues may blockthe filter, inthis casetheymustberemoved.
The fi lter systemc onsists ofa coarse filter,aflat (Main filter)
An d a microfilter( F i ne fi l ter).
1
2
3
2
1
3
Main filter
Foodandsoil particlestrap pedin thisfilterare pulverized by a
special jet onthe lower spray a rm andw ashed d own to d rain.
Coarse filter
Larger items, suc h as pie c es of bo ne s o r gl ass, that cou ld bl o ck
thedrainaretrapped in the coarse filter. To removethe items
caught by the fil ter,gently squeeze the tapon the t op of this
filterandlift out.
Fine filter
This filterholdssoilandfood residues inthesump areaand
prevents it frombeing r edepositonthedishes during wash cycle.
Filterassembly
Thefilter efficiently
For best p erformance and results, the filter mu st b e cleaned regularly. thisreaso n, it isa good i dea to
remove the la rger food particles t rapp ed in thefilter after each wash cyc le by rin sing the semicircular filter and
cup u nder running water.Tore move the fil ter device, pull t he c up handle in t he upward d irection.
WARNING!
removes f ood particles from t he wash w ater, all owing it tobe recycled during the cycle.
For
Th e dishwas her must n e ver be used wi tho ut t he fi lter s.
Improper replacement of thef ilter may re duce the performance level o f the appliance
anddamage dishesandutensils.
Step 1 Turnthe filter i n anti-clockwise direction,
:
then lif t it up.
Step 2 l ift the Main fil te r up:
Step3 lifttheFinefilterup:
When following this procedure from step1 to step 3, the filter system will be removed;
when followingit from Step3 to Step 1, the filter system willbe installed.
14
Page 17

Remarks:
- Inspec t the filters for blockin ga fter e ver y timethe dishwa sher has been used.
- By unscrewing the coarse filter,you can r emove the filter system. Removeany food remnants and
clean thefilters underrunni ngwater.
Theentirefilter assemblyshouldbe cleanedonce a week.
Cleaning the Filter
To clean th e coa rse filter a nd the f i ne fil t e r, us e a cl ean in g bru sh. R e as sem ble t he fi l t er par t s as sho wn in t h e figur es
on th e last page and reins ert the entire ass emb ly in the dishwasher, positio ning it in its seat and pressing dow nwa rds.
WARNING!
Whencleaning thefilters,don't knockon them.Otherwise,the filterscouldb e
contorted andtheperformance ofthe dishwashercouldbedecreased.
Caring for the Di shwasher
The cont rol panel can be cleaned by usinga lightly dampened cloth.
After cle aning, make sureto dry it tho roughly.
For t he exte ri or, use a go od appli ance pol i s h wax.
Neveruse sharp objects, scouring pads o r h arsh cleaners on a ny part o f t he dishwasher.
CleaningThe Door
To clean thee dge around thedoor, you sho uld use o nly a sof t warm, d amp cloth.
To avoid penetration o f water into t he door lock and electrical components, do not
usea spray cleaner of any kind.
Never u se a spr ay c leaner to cl ean the door panelas it m ay damage the doorloc k
WARNING!
and electrical components.
Abrasive ag ents or somepaper towels should notbe used because o f the ri sk o f
scra tching o r l eaving spots on th e s t ainless ste el surface.
Protec tAga inst Freez ing
please take frost pr otection measures onthe dishw asher in wint er.Every fter washing c ycles,
please operate as f ollows
1.Cut offtheelectricalpowertothedishwasher.
2.Turnoff thewater supply and disconnect the w ater inlet pipe from the water valve.
3.Drain thewater fromtheinlet pipeandwater valve.(Use a pantocatch thewater)
4.Reconnect the water inlet pipe to the water valve.
5.Remove the filter at the bott om o f the tub and use a spong e to soak up water in the sump.
:
If y ou r dis hwa sher can n ot work bec a u se of t he ice, ple a se co ntact pr o fes s ion al serv ic e perso ns.
timea
Cleani ng the Spra yArms
It is necessary to clean thespray arms regularly in orde r to
remove theaccumul ation of s cale from t he hard water
and t hus prevent blocking of spray arm jets and b earings.
We Suggestto poke the b locked spray arm jets with a needle
to e nsure good w ashing effect.
15
Unscrew
Page 18

AfterEveryWash
After every wash, turn off the w ater supply to th e
appliance and leave th e door s lightly open sotha t
moisture and odours a re not tra pped inside.
RemovethePlug
Before cleaning orper forming maintenance, always
remove theplug from the socket.
No Solvents orAbrasiveCleaning
Toclean the exteriorand rubber parts of the dishwasher,
donotusesolvents or abrasivecleani ngproducts.
Only use a clo th with war m so apy wate r.
Tor em ove spots or stain s from the surf ace of the
interior, usea clothdampenedwithwateran a little
vinegar,or a cleaning pro duct made s peci fically f or
dishwashers.
Whennot inUse for aLongTime
It isrecommend that yourunawash cycle with the
dishwasher e mpty and the n remove the plu g fr om the
socket, t urn offthe water supply and l eave the door of
the a pp li a n c e s l ightl y ope n. Th is w il l help the door
sealstolastlongerandpreventodours from forming
withinth e appliance.
Moving the Appl ianc e
If th e appliance must be moved, try to keepit in t he
vertical position. Ifabsolutelynecessary, it can be
positioned on its back.
Seals
Oneofthefactorsthatcauseodourstoforminthe
dishwasher isfoo d th at remains t rappe d in the seals.
Periodic cleaning with adamp sponge will prevent this
fro m oc curri ng.
Electrical Shock Hazard
Theinstallationofthe pipes
and electricalequipments
shouldbedonebyprofessionals.
Disc onne ct el ectri cal p ower befo re
installing dishwasher.
Failuretodosocanresultindeathor
electricals hock.
●
Installation preparation
Theinstallationpositionof dishwashershouldbeneartheexistinginlet and drainhosesand
powercord.
Oneside of the cabinet sink should be chosento facilitatethe connectionofdrain hoses of
thedishwasher.
Note:pleasecheck the accompanying installation accessories(hookforaestheticpanel
,screw)
16
Page 19

Please carefully read theinstallationinstruction.
●
Illustrationsofcabinetdimensions and installationpositionof thedishwasher
Preparations should be m ade before moving the dish washer to th e installation place.
Choose a placenear the sink tofac ilitate the installation of in let and d rain hoses (see f igure 1).
1
If dishwasher is install ed at t he corner o f the ca binet , th ere should b e some sp ace (illustrat ed in figu re 2)
2
when the door is opened.
【】Fi gure1
Cabinetdimensions
Lessthan5mm
betweenthetop
ofdishwasherand
cabinetand the
outerdooraligned
tocabinet.
【】Figure 2
Minimumspace when
the door is opened
820m m
580mm
90 °
Electrical, drain and
water supply line
entrances
Spacebetween cabinet
bottom and floor
450 mm
Dishwasher
Door of
dishwasher
Minimum space of 50mm
90 °
80
100
Cabinet
●
Aestheticpanel's dimensions and installation
1
Theaestheticwoodenpanel
390
couldbe processedaccordingto the figure 3
【】Figure3
418
Theaesthetic panelshould
beprocessedin accordance
withthe illustrated dimensions
38
19
52
179
444
(Unit: mm)
17
175
15
3.5
1.5
Page 20

2
Installthe hook on the aestheticwoodenpanel andputthe hookinto theslotoftheouterdoor of
dishwasher(seefigure4a).After positioning of the panel, fix the panelontotheouterdoorby
screws and bol ts( See figu re 4 b) .
Hop hook
【】Figure 4a
Installationof aesthetic panel
【】Figure4b
Installationof aesthetic
woodenpanel
.takeawaythecover
1
2
.pinupthescrew
. get bac k the c o ver
3
St4 countersunk
head screw
Lower hook
4X18 screw
Cover
Spacer for aesthetic panel
Outer door of
dishwasher
18
Hook for aesthetic panel
Aesthet ic panel
Page 21

●
Tension adjustment of the door spring
Thedoorsprings are set at the factoryto the propertension for the outer door. If aesthetic
woodenp anel are installed,youwillhave to adjustt hedoorspringtension. Rotate the adjusting
screwtodrivetheadjustortostrainorrelaxthesteelcable(seefigure5).
Doorspringtensionis correct when
the door rem ain s h oriz ontal in t he
fully opened position yet rises
toa close with the slightlift ofa
finger.
,
relax
【】Figure5
Tensionadjustment
ofthedoorspring
●
Connectionof drain hoses
Insertthedrainhose into a drain pipe with a minimumdiameterof 4cm,orlet it
runintothesink,makingsuretoavoidbendingorcrimpingit.Usethespe ial
plasti c suppor t that come s w ith the appl ianc e (figu re 6). Th e f ree and of the hose
mustbeata heightbetween400 and 1 000mmandmust not be immersed in water
toavoidtheback flowofit.ATTENTION:The special plastichosesupportm ustbe
solidlyfastened to the wallto preventthedrainhose frommovingand allowingwater
tospilloutsidethe drain.
c
【】Figu re6
Drainpipe connection
19
Page 22

●
Dishwash er instal lation ste ps
1 Install thefurnituredoortotheouterdoorof the dishwasherusingthe bracketsprovided.Refer
tothetemplatefor positioningof the brackets.
2 Adjustthetensionofthedoorspringsby u sin g anAllen key turninginaclockwisemotionto
tigh ten the left an d r igh t do or spr ings . F ail ure to do t hi s co uld cau se dama ge to y our dis hwas her
(Illustration2)
3 Connectthe i nlethose to the cold watersupply
4 Connectthe drain hose. Refertodiagram (Figure 6)
5 Connectthe power cord
6
Affix the condensationstripunder the work surfaceofc abinet.Pleaseensurethecondensation
.
.
.
.
stripisflushwithedgeof work surface.
7
Placethedishwasherinto position.
8
Lev elthe di shw asher. Th e r ear fee t can b e adjus ted fro m t he fro nt o f the dishw as her by turni ng
the sc rews on the left and ri ght hand side o f t he cabin et (Ill ust rat ion 5A ). Toa dj ust the fron t feet,
usea wrenchandturnthe front feet untilthedishwasheris level(Illustration 5B).
9Thedishwasher mustbesecuredin place.Therearetwowaystodothis:
A. Normalwork surface-secur eto the worksurfaceby using two woodscrewsensuringthe
dishwasherweightis not being hitby the surface(Illustration6).
B. Marble or gran ite wo rk top-s ecur e t he bra cket to the side pa nel of the d is hwas her and se cure
thedishwasherto the furniturehousing.Put therubbercapover the screw (Illustration 7).
SCREW
CONEGEAR
2
6
4
5A
5
5B
RUBBER
7
COVER
【Figure
20
SCREW
7】
Page 23

Dishw ashe r must be level for pr oper dish rac k operat ion and wa sh p erfo rman ce.
Placelevelon door andracktrackinside the tub as shown to check that the
1
dishwasheris level.
levelthe dishwasherby adjusting the four leveling legs individually.
2
3
Whenlevelthedishwasher,please payattentionnotto let the dishwashertip over.
【】Figu re 8
Illustra tion o f fe et ad justment
Check
Level
Front
to Back
NOTE:
Themaximumadjustment
heightof the feet is 60 mm.
Check level
side to side
for personal safety:
WARNING!
Please look at th e rating label t o know the rat ing v olta ge andconn ect t he dishwasher to the appropriate power s upply.
Use ther equired fuse 1 0 amp, timede lay fuse orc ircuit breaker r ecommended and provide separate circuit serving
only this appliance.
DO NOT USE AN EXTENSION CORD OR AN ADAPTER PLUG WITH THIS APPLIANCE.
DONOT, UNDERANY CIRCUMSTANCES, CUTOR REMOVETHE EARTHING
CONNECTION FROM THE POWER CORD.
Ensure the v oltage and fr equency of thepowe r be ing correspond s to
those on t he rating plate . Only in sert the p lug into an electrica l so cket which i s ea rthed
properly.If the el ectrical socket to wh ich thea ppliance must be c onnected is not
appropriate f or the plug, replace the socket, rather thanusing a a daptors or the likeas
theycouldcause overheatingandburns.
This appliance must be earthed. In the event of a malfunction or breakdown, earthing will reduce the risk of
electric shock by providing a path of least resistance for the electric current. This appliance is equipped with a
cord having an equipment-earthingconductor and an earthing plug. The plug mustbe plugged into an
appropriate outlet that is installed and earthed in accordance with all local standards and requirements.
21
Page 24

WARNING!
Improper connection of the equipment earthing conductor can result in the risk of an electric shock.
Check with a qualified electrician or service representative if you are in doubt whether the
appliance is properly earthed.
Do not modify the plug provided with the appliance. If the plug does not fit properly to the outlet,
please have a qualified electrician to install a proper outlet.
for personal safety:
DO NOT USE AN EXTENSION CORD OR AN ADAPTER PLUG WITH THIS APPLIANCE.
DO NOT ,UNDER ANY CIRCUMSTANCES, CUT OR REMOVE THE
CONNECTION
Water C onnectio n
Connect the c old water supply hose t o a thread ed 3/4(inch) connector and m ake sure
that it is fastened tightly in place.
If the wat er pipes arenew or haveno t been used for an extended period ofti me, let the
water run tomake sure that t he water is clear. This precaution is needed to avoid the
risk of the water inlet to beblocked and damage thea ppliance.
The w ater supply to the applianc e c an also beconnec ted to th e household hot water
line (such a s, c entral system, heatin g sy stem),as long as i t does no t exceed a
temperatur e of 60 C. In this case, the wa sh cycle timewill be shortened by about15
minutes and the washefficiencyslightlyreduced.
The co nnection must be made to the hot waterlin e fo llowi ng thesame procedures as
described i nthe sectionfortheconnectiontothe coldwaterline.
FROM THE POWER CORD.
EARTHING
WARNING!
In orderto avoidthat there ismore water staying in the inlethose, pleaseclose
theh ydrant afterusing.(Not applicable to appliances withoutaqua-stop.)
ExtensionHose
Ifyou need a dra in h ose extension, make sure t o use a similar drain hose.
Itmust be no lon ger than 4metres; otherwise the cleaning effectof the dishwasher could be reduced .
Syph on Conn ection
The waste connection mustbe at a height of between 5 0 cm (minimum) and 1 00 cm (max imum)
from thebotto m o f the dish.The water drainho se s hould be fixed by a h ose clip.
StartofDishwasher
Thefollowingthingsshouldbecheckedbeforestartingthedishwasher.
1
Thedishwasher is levelandfixedproperly
The inle t valv e is ope n
2
3
Thereisaleakageattheconnections of the conducts
Thewiresaretightlyconnected
4
5
The poweris switched on
6
The inlet and drai n hoses are knott ed
7
Allpackingmaterialsandprintings shouldbetakenoutfromthe dishwasher
Afteri nstallation, please make sure to keep this manual.
The content of this manual is very helpful to the users.
22
Page 25

BeforeCallingfor Service
Technical
problem s
Fuse blown, or the
circuit breaker acted
Power supply is not
turned on
Error code:E1;
Water pressure is low
Door of dishwasher
not properly closed.
Kink in drain hose
Filter clogged
Kitchen sink clogged
Improper detergent
Replace fuse or reset circuit breaker. Remove any other
appliance s sharing the same circuit with the dishwasher
Make sure the dishwasher is turned on and the door is
closed securely.
Make sure the power cord is properly plugged into the
wall socket.
Check that the water supply is connected properly and
the water is turned on.
Make sure to close the door properly and latch it.
Check drain hose.
Check coarse the filter
(see section titled )" Cleaning The Filter "
Check the kitchen sink to make sure it is draining well.
If the problem is the kitchen sink not draining ,you may
need a plumber rather than a serviceman for dishwashers.
Use only the special dishwasher detergent to avoid
suds. If this occurs, open the dishwasher and let suds
evaporate.Add 1 gallon of cold water to the tub. Close
and latch the dishwasher, then Start the "soak"wash
cycle to drain out the water . Repeat if necessary.
General
problem s
Noise
Spilled rinse-aid
Detergent with
colourant was used
Hard water minerals
The affected items are
notcorrosionresistant.
A programme was not
run after dishwasher
salt was added.
Traces of salt have
gotten into the wash cycle.
The lid of the softer
is loose
r
Aspayarmis
knocking against
an item in a basket
Items of crockery
are loose in the
wash cabinet
Always wipe up rinse-aid spills immediately.
Make sure that the detergent is the one without
colourant.
To clean the interior, use a damp sponge with
dishwasher detergent and wear rubber gloves.
Never use any other cleaner than dishwasher
detergent for the risk of foaming or suds.
Always run the quick wash programme .
without any crockery in the dishwasher and
without selecting the Turbo function (if present),
after adding dishwasher salt.
Check the lip .Ensure the fix is fine.
Interrupt the programme, and rearrange the items
which are obstructing the sp ay arm.r
Interrupt the programme,
and rearrange the items of crockery.
This m ay becaused
by on-site installation
or the cross-section of
the piping.
23
This has no influence on the dishwasher function.
if in doubt, contact a suitably qualified plumber.
Page 26

The dishes were not
loaded correctly.
See notes in " Loading the Dishwasher Baskets ".
Unsa ti s
-factory
washin g
resu lt
Theprogrammewas
notpowerful enough.
Not enough detergent
wasdispensed.
Items are blocking
the path of spray arms.
The filter combination
inthebaseofwash
cabinet is not clean or
is not correctly fitted.
This m ay cause
the sp ay arm jets
r
to get blocked.
Combination of soft
water andtoo much
detergent.
Aluminum utensils
have rubbed against
dishes.
Dishes block
detergent cups.
Improper loading
Too little rinse-aid
Select a more intensive programme.
See" Wash Cycle Table ."
Use more detergent,or change your detergent.
Rearrange the items so that the sp ay can rotate freely.r
Clean and/or fit the filter combination correctly.
Clean the sp ay arm jets. See "Cleaning the Spray
Arms".
Use less detergent if you have soft water and select
a shortest cycle to wash the glassware and to get
them clean.
Use a mild abrasive cleaner to eliminate those marks.
Re-loadin g the dishes properly.
Load the dishwasheras suggested in the directions.
Increase the amount of rinse-aid/refill the rinse-aid
dispenser.
r
Unsa ti s
-factory
dryi ng
resu lt
Dishes are removed
too soon
Wrong program
has been selected
Useof cutlery with
a low-quality coating
Do not empty your dishwasherimmediately after
washing. Open the door slightly so that the steam can
escape. Begin unloading the dishwasher only once t
he dishes are barely warm to the touch. Empty the low
basket first.This prevents water form dropping off
dishes in the upper basket.
In short program the washing temperature is lower.
This also lowers cleaning performance. Choose
a program with a long washingtime.
Water drainage is more difficult with these items.
Cutlery or dishes of this type are not suitable for
washing in the dishwasher.
24
Page 27

Height : 820mm(adjustable+60mm)
Width : 445mm
Dept h : 540mm
Voltage connected Load : see rating lab el
Waterpressure: 0.04-1.0MPa
Hot wat er co nnection : max 60 ņ
Power s upply: see r atingl abel
Capacity: 9 Pla ce s ettings
25
 Loading...