

Page 1
REFRIGERATOR USE & CARE GUIDE
MANUAL DE USO Y CUIDADO DEL REFRIGERADOR
GUIDE D’UTILISATION ET D’ENTRETIEN DU RÉFRIGÉRATEUR
Table of Contents / Índice / Table des matières
ASSISTANCE OR SERVICE ............................ 1
REFRIGERATOR SAFETY............................... 1
INSTALLATION INSTRUCTIONS ................... 2
REFRIGERATOR USE ..................................... 7
REFRIGERATOR CARE................................... 8
TROUBLESHOOTING...................................... 9
WARRANTY.................................................... 10
If you need assistance or service, first see the “Troubleshooting”
section. Additional help is available by calling us at
1-800-253-1301 from anywhere in the U.S.A., or write:
Whirlpool Corporation
Customer eXperience Center
553 Benson Road
Benton Harbor, MI 49022-2692
Please include a daytime phone number in your correspondence.
Keep this book and your sales slip together for future
reference. You must provide proof of purchase or installation
date for in-warranty service.
AYUDA O SERVICIO TÉCNICO.................... 11
SEGURIDAD DEL REFRIGERADOR ............ 11
INSTRUCCIONES DE INSTALACIÓN .......... 12
USO DE SU REFRIGERADOR ...................... 17
CUIDADO DE SU REFRIGERADOR............. 18
SOLUCIÓN DE PROBLEMAS....................... 19
GARANTÍA...................................................... 21
Assistance or Service
Write down the following information about your appliance to help
you obtain assistance or service if you ever need it. You will need
to know your complete model number and serial number. You can
find this information on the model and serial number label, located
on the inside wall of the refrigerator compartment.
Dealer name____________________________________________________
Serial number __________________________________________________
Address ________________________________________________________
Phone number __________________________________________________
Model number __________________________________________________
Purchase date __________________________________________________
ASSISTANCE OU SERVICE .......................... 22
SÉCURITÉ DU RÉFRIGÉRATEUR................ 22
INSTRUCTIONS D'INSTALLATION.............. 23
UTILISATION DU RÉFRIGÉRATEUR ........... 28
ENTRETIEN DU RÉFRIGÉRATEUR ............. 30
DÉPANNAGE.................................................. 30
GARANTIE...................................................... 32
REFRIGERATOR SAFETY
Your safety and the safety of others are very important.
We have provided many important safety messages in this manual and on your appliance. Always read and obey all safety
messages.
This is the safety alert symbol.
This symbol alerts you to potential hazards that can kill or hurt you and others.
All safety messages will follow the safety alert symbol and either the word “DANGER” or “WARNING.”
These words mean:
You can be killed or seriously injured if you don't immediately
DANGER
WARNING
All safety messages will tell you what the potential hazard is, tell you how to reduce the chance of injury, and tell you what can
happen if the instructions are not followed.
2314150
follow instructions.
can be killed or seriously injured if you don't
You
instructions.
follow
Page 2
IMPORTANT SAFETY INSTRUCTIONS
WARNING:
■ Plug into a grounded 3 prong outlet.
■ Do not remove ground prong.
■ Do not use an adapter.
■ Do not use an extension cord.
■ Disconnect power before servicing.
■ Replace all parts and panels before operating.
■ Remove doors from your old refrigerator.
To reduce the risk of fire, electric shock, or injury when using your refrigerator, follow these basic precautions:
SAVE THESE INSTRUCTIONS
■ Use nonflammable cleaner.
■ Keep flammable materials and vapors, such as gasoline,
away from refrigerator.
■ Use two or more people to move and install refrigerator.
■ Disconnect power before installing ice maker (on ice maker
kit ready models only).
■ Use a sturdy glass when dispensing ice or water (on some
models).
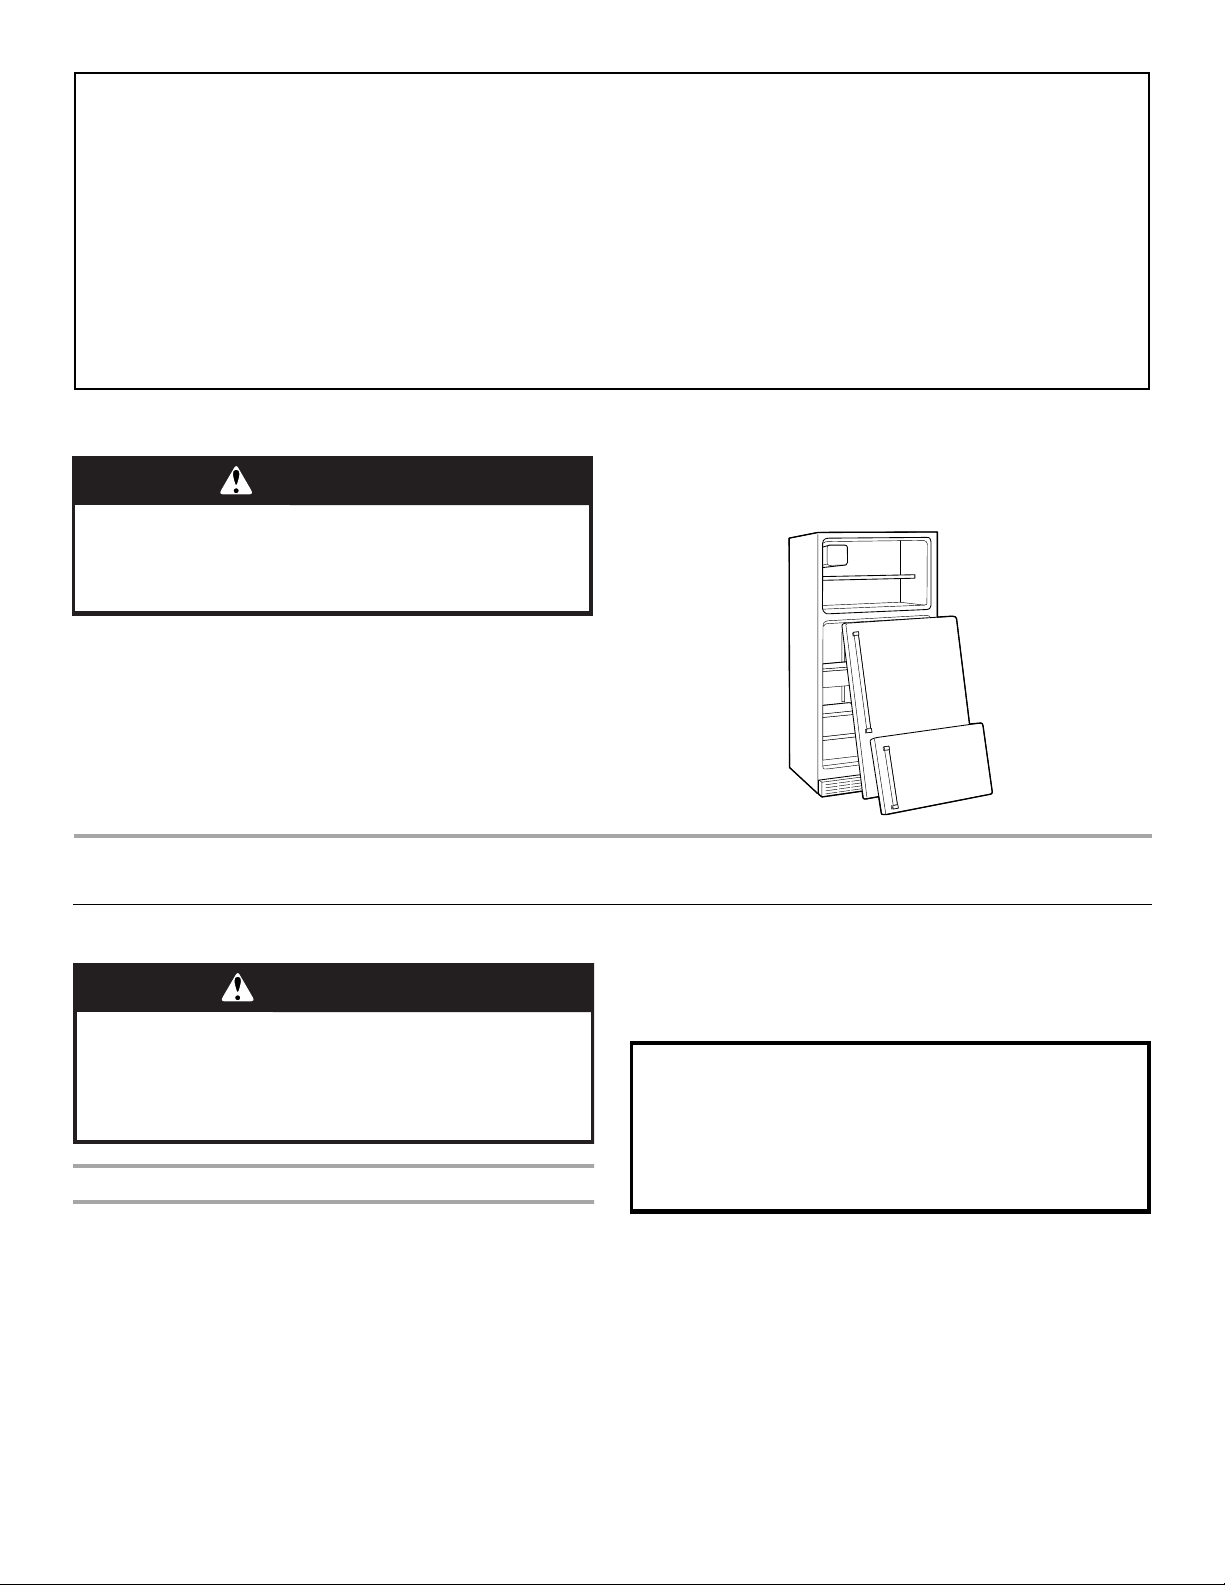
Proper Disposal of Your Old Refrigerator
WARNING
Suffocation Hazard
Remove doors from your old refrigerator.
Failure to do so can result in death or brain damage.
IMPORTANT: Child entrapment and suffocation are not problems
of the past. Junked or abandoned refrigerators are still dangerous
– even if they will sit for “just a few days.” If you are getting rid of
your old refrigerator, please follow these instructions to help
prevent accidents.
INSTALLATION INSTRUCTIONS
Unpack the Refrigerator
WARNING
Excessive Weight Hazard
Use two or more people to move and install
refrigerator.
Failure to do so can result in back or other injury.
Remove the Packaging
Before You Throw Away Your Old Refrigerator or Freezer:
■ Take off the doors.
■ Leave the shelves in place so that children may not easily
climb inside.
IMPORTANT: Do not remove the white foam air return insert from
behind the control panel on the ceiling of the refrigerator. If the
insert is removed, ice may migrate down from the freezer and
cause icicles to form.
When Moving Your Refrigerator:
Your refrigerator is heavy. When moving the refrigerator
for cleaning or service, be sure to protect the floor.
Always pull the refrigerator straight out when moving it.
Do not wiggle or “walk” the refrigerator when trying to move
it, as floor damage could occur.
Do not use sharp instruments, rubbing alcohol, flammable fluids,
or abrasive cleaners to remove tape or glue. These products can
damage the surface of your refrigerator. For more information, see
“Refrigerator Safety.”
2
Page 3
Clean Before Using
After you remove all of the package materials, clean the inside of
your refrigerator before using it. See the cleaning instructions in
“Refrigerator Care.”
Important information to know about glass shelves
and covers:
Do not clean glass shelves or covers with warm water when
they are cold. Shelves and covers may break if exposed to
sudden temperature changes or impact, such as bumping.
For your protection, tempered glass is designed to shatter
into many small, pebble-size pieces. This is normal. Glass
shelves and covers are heavy. Use special care when
removing them to avoid impact from dropping.
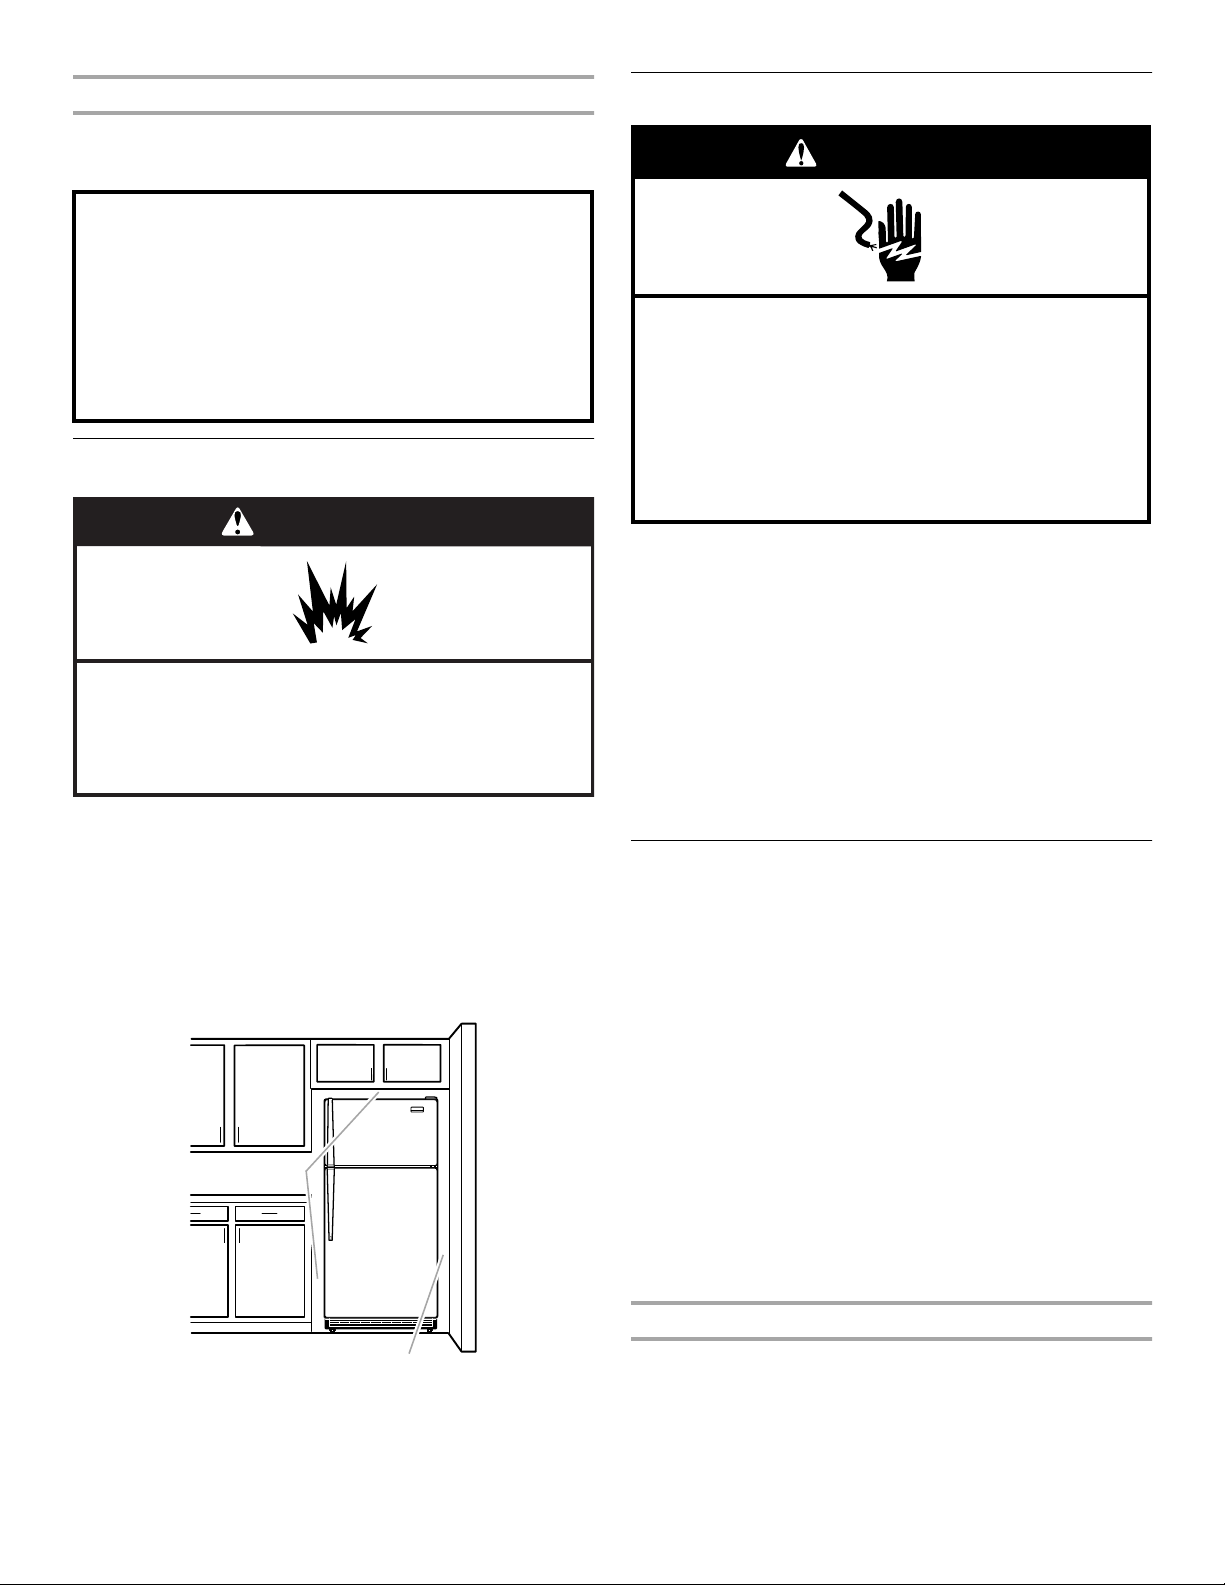
Location Requirements
WARNING
Explosion Hazard
Keep flammable materials and vapors, such as
gasoline, away from refrigerator.
Failure to do so can result in death, explosion, or fire.
To ensure proper ventilation for your refrigerator, allow for a ½"
(1.25 cm) space on each side and at the top. When installing your
refrigerator next to a fixed wall, leave 2" (5.08 cm) minimum
clearance on each side (some models require more) to allow for
the door to swing open. If your refrigerator has an ice maker, allow
extra space at the back for the water line connections.
NOTE: It is recommended that you do not install the refrigerator
near an oven, radiator, or other heat source. Do not install the
refrigerator in a location where the temperature will fall below 55°F
(13°C).
1
/
2" (1.25 cm)
Electrical Requirements
WARNING
Electrical Shock Hazard
Plug into a grounded 3 prong outlet.
Do not remove ground prong.
Do not use an adapter.
Do not use an extension cord.
Failure to follow these instructions can result in death,
fire, or electrical shock.
Before you move your refrigerator into its final location, it is
important to make sure you have the proper electrical connection.
Recommended Grounding Method
A 115 Volt, 60 Hz., AC only 15- or 20-amp fused, grounded
electrical supply is required. It is recommended that a separate
circuit serving only your refrigerator be provided. Use an outlet
that cannot be turned off by a switch. Do not use an
extension cord.
NOTE: Before performing any type of installation, cleaning, or
removing a light bulb, turn the control (Thermostat, Refrigerator or
Freezer Control depending on the model) to OFF and then
disconnect the refrigerator from the electrical source. When you
are finished, reconnect the refrigerator to the electrical source and
reset the control (Thermostat, Refrigerator or Freezer Control
depending on the model) to the desired setting.
Water Supply Requirements
Read all directions before you begin.
IMPORTANT:
■ If you turn the refrigerator on before the water line is
connected, turn the ice maker OFF.
■ All installations must meet local plumbing code requirements.
■ Use copper tubing and check for leaks. Install copper tubing
only in areas where the household temperatures will remain
above freezing.
TOOLS NEEDED: Gather the required tools and parts before
starting installation. Read and follow the instructions provided
with any tools listed. Flat-blade screwdriver, ⁷⁄₁₆" and ¹⁄₂" openend wrenches or two adjustable wrenches, ¹⁄₄" nut driver and drill
bit, hand drill or electric drill (properly grounded).
NOTE: Your refrigerator dealer has a kit available with a ¹⁄₄"
(6.35 mm) saddle-type shutoff valve, a union, and copper tubing.
Before purchasing, make sure a saddle-type valve complies with
your local plumbing codes. Do not use a piercing-type or ³⁄₁₆"
(4.76 mm) saddle valve which reduces water flow and clogs more
easily.
2" (5.08 cm)
Water Pressure
A cold water supply with water pressure of between 30 and
120 psi (207 - 827 kPa) is required to operate the water dispenser
and ice maker. If you have questions about your water pressure,
call a licensed, qualified plumber.
Reverse Osmosis Water Supply
IMPORTANT: The pressure of the water supply coming out of a
reverse osmosis system going to the water inlet valve of the
refrigerator needs to be between 30 and 120 psi (207 - 827 kPa).
3
Page 4
If a reverse osmosis water filtration system is connected to your
C
cold water supply, the water pressure to the reverse osmosis
system needs to be a minimum of 40 to 60 psi (276 - 414 kPa).
If the water pressure to the reverse osmosis system is less than
40 to 60 psi (276 - 414 kPa):
■ Check to see whether the sediment filter in the reverse
osmosis system is blocked. Replace the filter if necessary.
■ Allow the storage tank on the reverse osmosis system to refill
after heavy usage.
If you have questions about your water pressure, call a licensed,
qualified plumber.
Connect the Water Supply
Read all directions before you begin.
IMPORTANT: If you turn the refrigerator on before the water line is
connected, turn the ice maker OFF.
Connect to Water Line
1. Unplug refrigerator or disconnect power.
2. Turn OFF main water supply. Turn ON nearest faucet long
enough to clear line of water.
3. Locate a ½" to 1¹⁄₄" (1.25 cm to 3.18 cm) vertical cold water
pipe near the refrigerator.
IMPORTANT:
■ Make sure it is a cold water pipe.
■ Horizontal pipe will work, but drill on the top side of the
pipe, not the bottom. This will help keep water away from
the drill and normal sediment from collecting in the valve.
4. Determine the length of copper tubing you need. Measure
from the connection on the lower left rear of refrigerator to the
water pipe. Add 7 ft (2.1 m) to allow for cleaning. Use ¹⁄₄"
(6.35 mm) O.D. (outside diameter) copper tubing. Be sure both
ends of copper tubing are cut square.
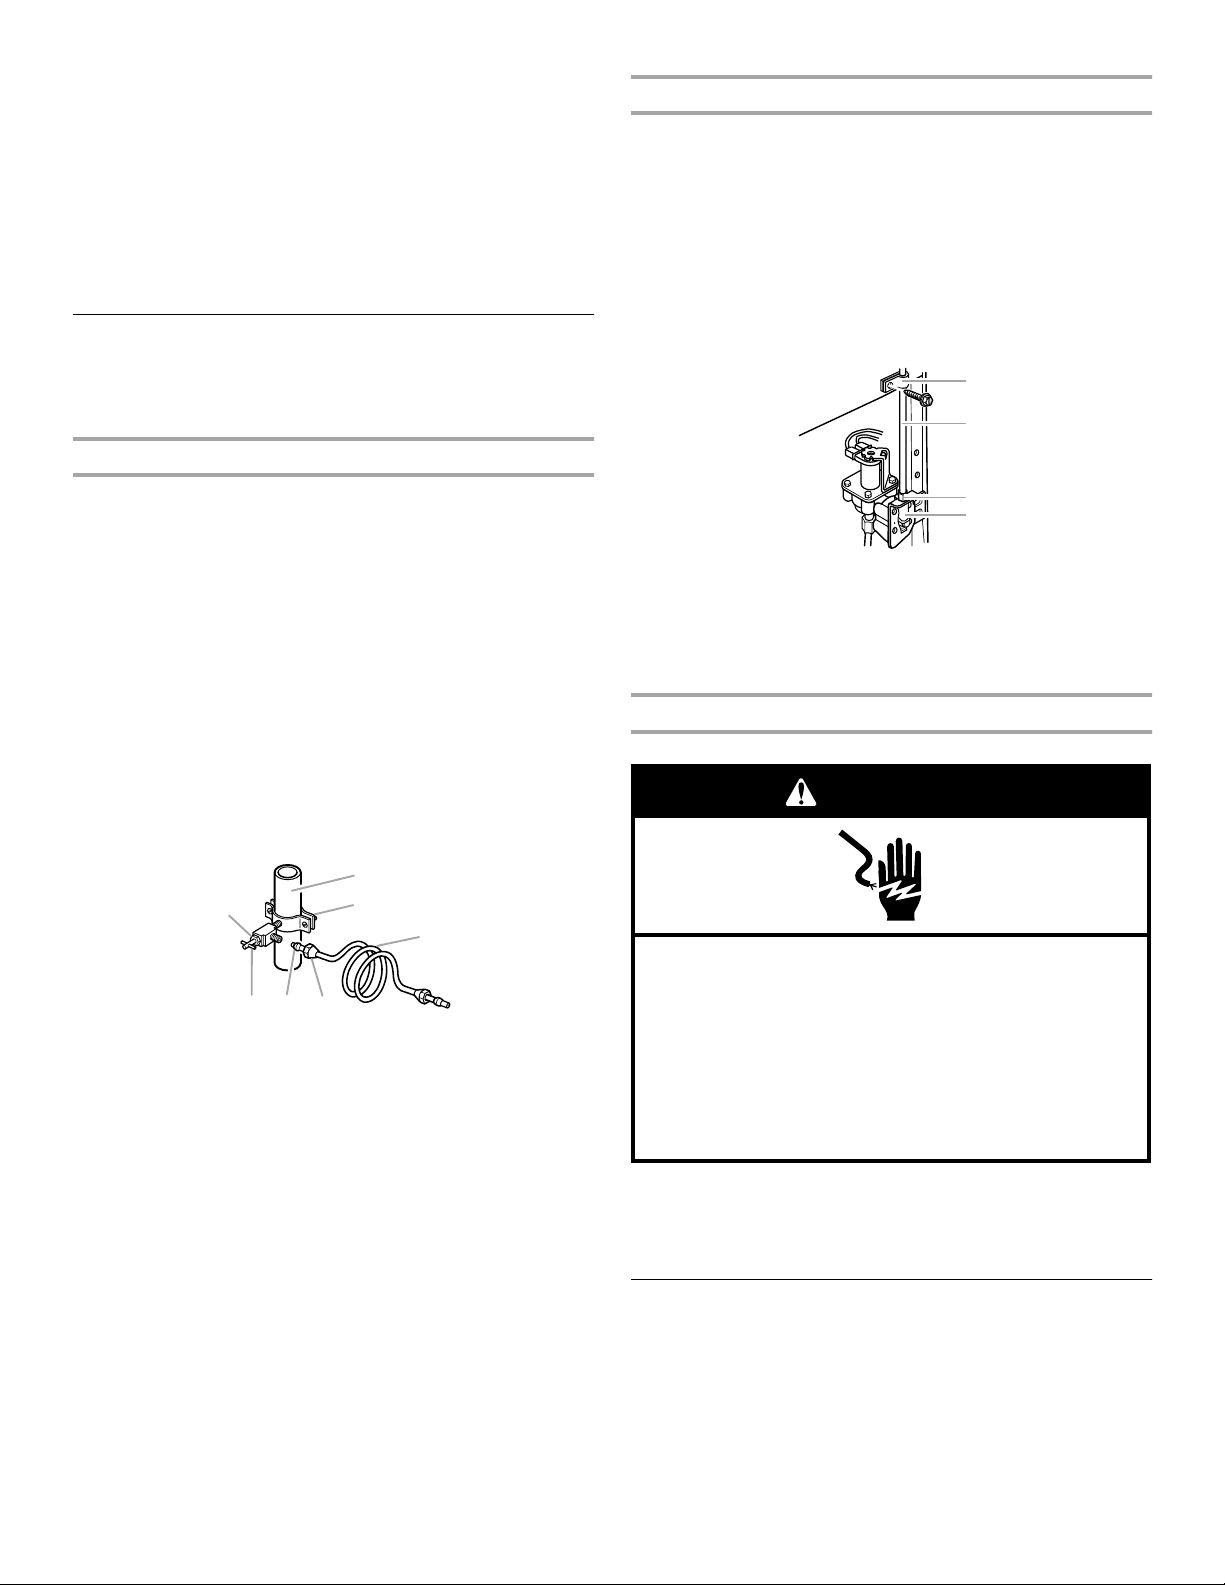
5. Using a grounded drill, drill a ¹⁄₄" hole in the cold water pipe
you have selected.
A. Cold water pipe
B. Pipe clamp
C. Copper tubing
D. Compression nut
6. Fasten the shutoff valve to the cold water pipe with the pipe
clamp. Be sure the outlet end is solidly in the ¹⁄₄" drilled hole in
the water pipe and that the washer is under the pipe clamp.
Tighten the packing nut. Tighten the pipe clamp screws slowly
and evenly so washer makes a watertight seal. Do not
overtighten or you may crush the copper tubing.
7. Slip the compression sleeve and compression nut on the
copper tubing as shown. Insert the end of the tubing into the
outlet end squarely as far as it will go. Screw compression nut
onto outlet end with adjustable wrench. Do not overtighten.
8. Place the free end of the tubing in a container or sink, and turn
ON the main water supply. Flush the tubing until water is clear.
Turn OFF the shutoff valve on the water pipe. Coil the copper
tubing.
A
G
B
C
DEF
E. Compression sleeve
F. Shutoff valve
G. Packing nut
Connect to Refrigerator
1. Unplug refrigerator or disconnect power.
2. Attach the copper tube to the valve inlet using a compression
nut and sleeve as shown. Tighten the compression nut. Do not
overtighten.
3. Use the tube clamp on the back of the refrigerator to secure
the tubing to the refrigerator as shown. This will help prevent
damage to the tubing when the refrigerator is pushed back
against the wall.
4. Turn shutoff valve ON.
5. Check for leaks. Tighten any connections (including
connections at the valve) or nuts that leak.
A
B
D
A. Tube clamp
B. Copper tubing
C. Compression nut
D. Valve inlet
6. The ice maker is equipped with a built-in water strainer. If your
water conditions require a second water strainer, install it in
the ¹⁄₄" (6.35 mm) water line at either tube connection. Obtain
a water strainer from your nearest appliance dealer.
Complete the Installation
WARNING
Electrical Shock Hazard
Plug into a grounded 3 prong outlet.
Do not remove ground prong.
Do not use an adapter.
Do not use an extension cord.
Failure to follow these instructions can result in death,
fire, or electrical shock.
Plug in refrigerator or reconnect power.
NOTE: Allow 24 hours to produce the first batch of ice. Discard
the first three batches of ice produced. Allow 3 days to completely
fill ice container.
Refrigerator Doors
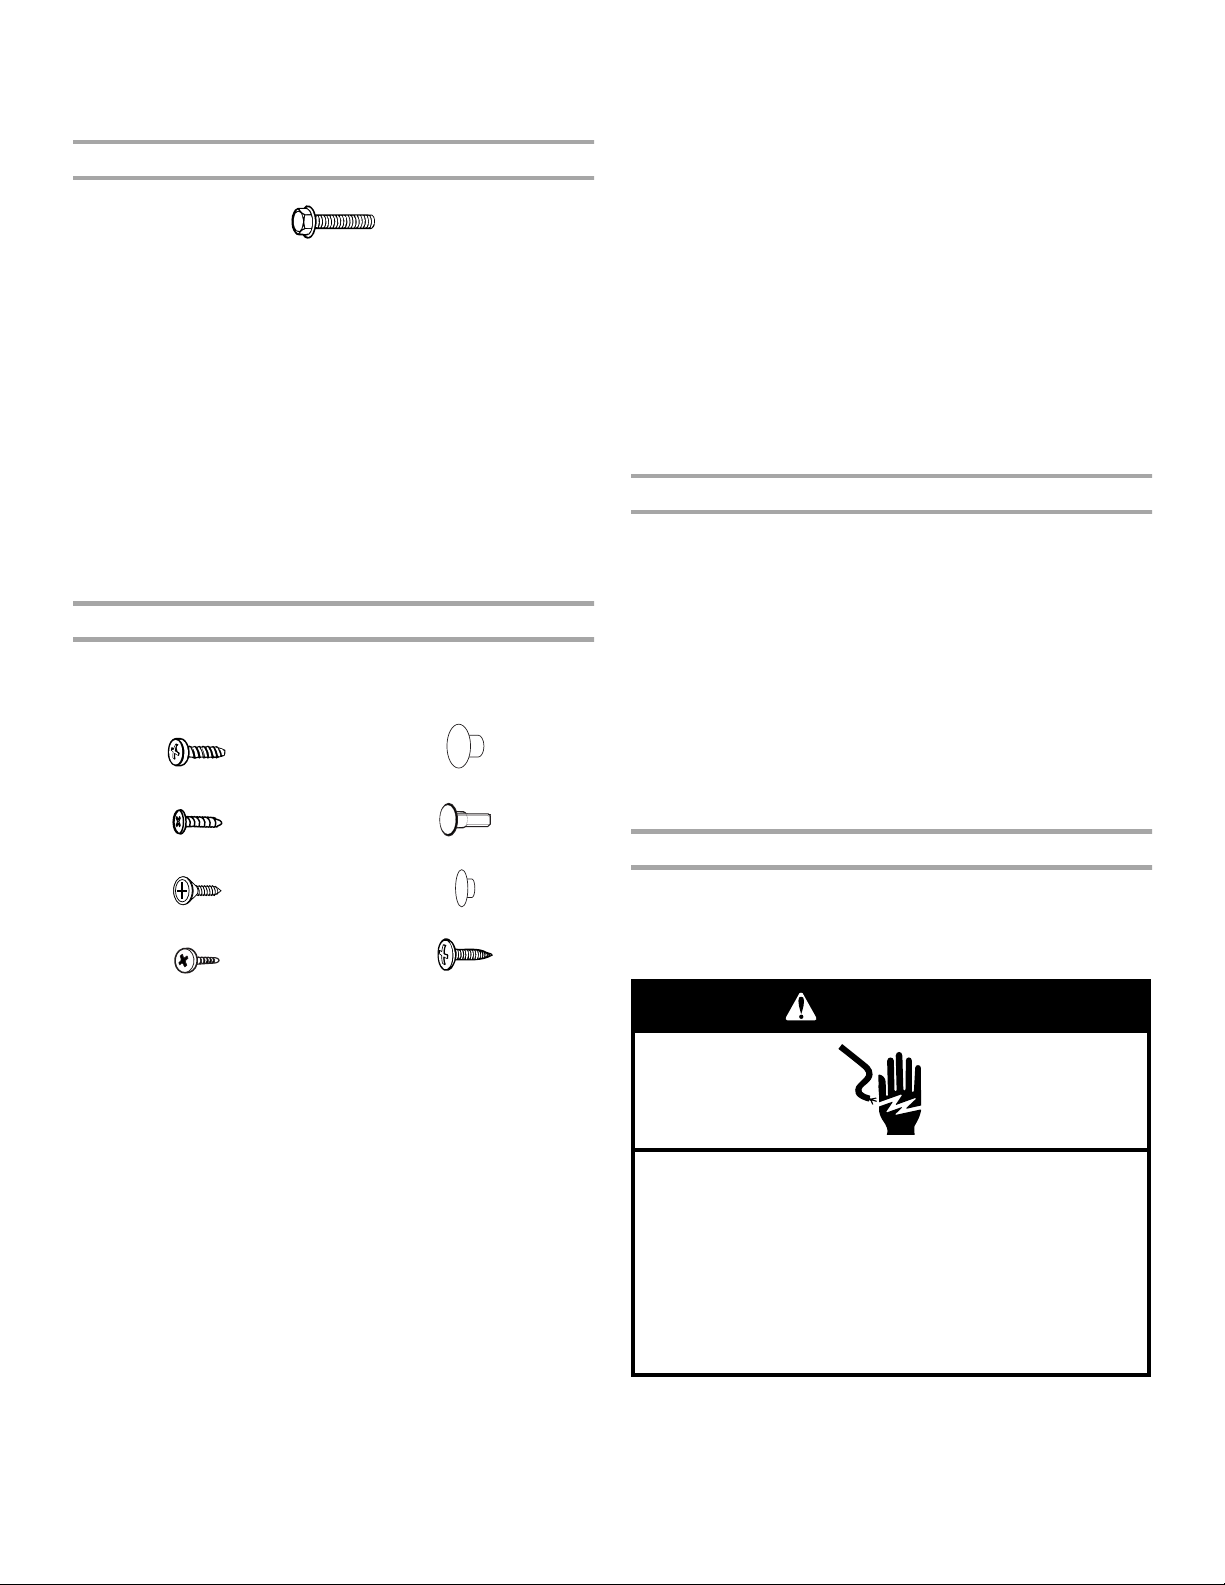
TOOLS NEEDED: ⁵⁄₁₆" hex-head socket wrench, #2 Phillips
screwdriver, flat-blade screwdriver, ⁵⁄₁₆" open-end wrench, flat 2"
putty knife.
IMPORTANT:
■ Unplug refrigerator or disconnect power.
■ Remove food and adjustable door or utility bins from doors.
4
Page 5
■ If you only want to remove and replace the doors, see
w
“Remove Doors and Hinges” and “Replace Doors and
Hinges.”
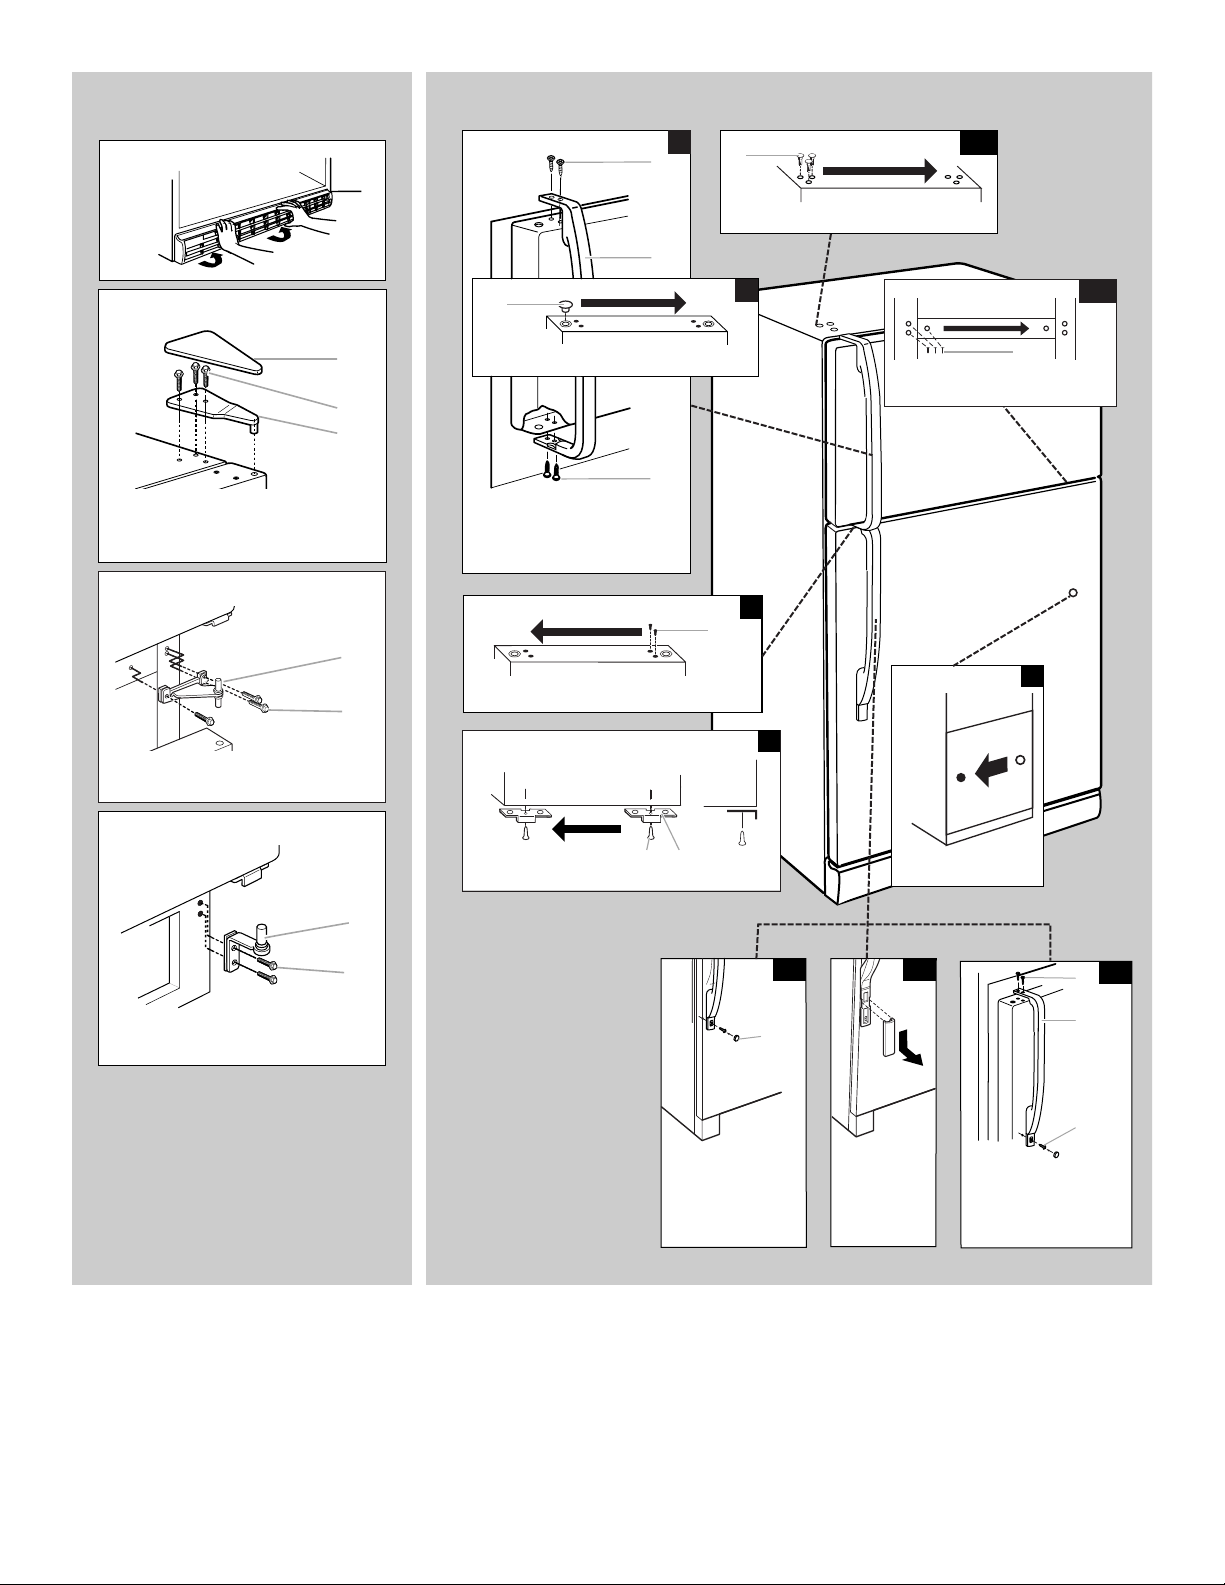
Remove Doors and Hinges
⁵⁄₁₆
'' Hex-Head Hinge Screw
1. Unplug refrigerator or disconnect power.
2. Open refrigerator door and remove base grille from the bottom
front of the refrigerator. See Base Grille graphic.
3. Close the refrigerator door and keep both doors closed until
you are ready to lift them free from the cabinet.
NOTE: Provide additional support for the doors while the
hinges are being moved. Do not depend on the door magnets
to hold the doors in place while you are working.
4. Remove the parts for the top hinge as shown in Top Hinge
graphic. Lift the freezer door free from the cabinet.
5. Remove the parts for the center hinge as shown in the Center
Hinge graphic. Lift the refrigerator door free from the cabinet.
6. Remove the parts for the bottom hinge as shown in the
Bottom Hinge graphic.
Reverse Doors (optional)
IMPORTANT: If you want to reverse your doors so that they open
in the opposite direction, follow these steps. If you are not
reversing the doors, see “Replace Doors and Hinges.”
Door Stop Screw
Door Hinge Hole Plug
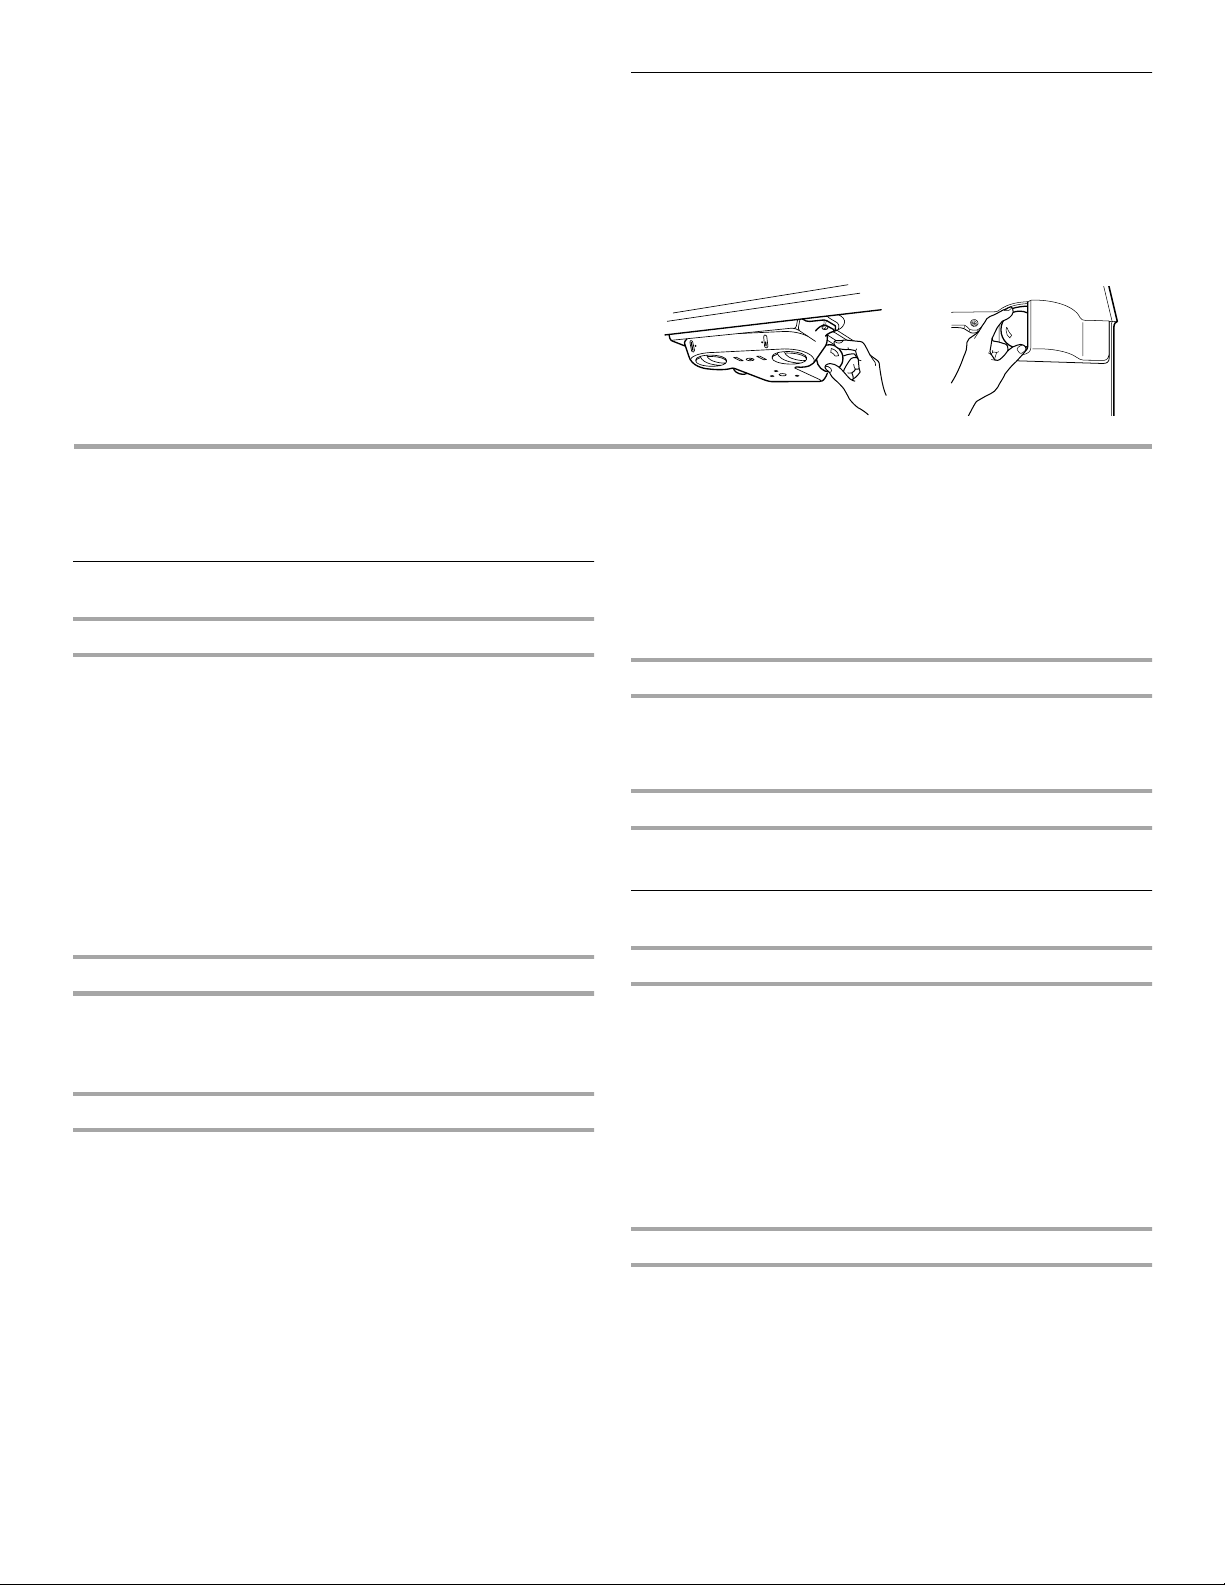
2. Remove the refrigerator handle assembly as shown. Keep all
parts together. See Graphic 6-3.
3. Remove the door hinge hole plug from refrigerator door. Move
it to the opposite side hinge hole as shown in Graphic 3.
4. Remove the door handle sealing screws. Move them to the
opposite side of the refrigerator door as shown in Graphic 4.
5. Remove the door handle seal screw front. Move it to the
opposite side of the refrigerator door as shown in Graphic 7.
6. Remove the door stop. Move it to the opposite side of the
refrigerator door as shown in Graphic 5.
7. Position the refrigerator handle on opposite side of the
refrigerator door as shown in Graphic 6-3. Drive the two top
screws in the handle first. Align the lower portion of the handle
and drive the bottom screw.
8. Align refrigerator bottom trim. For Style 1, replace the door
handle screw cover. See Graphic 6-1. For Style 2, slide trim
into place. See Graphic 6-2.
9. Tighten all screws. Set aside refrigerator door until bottom
hinge is installed on product.
Replace Doors and Hinges
NOTE: Graphic may be reversed if door swing is reversed.
1. Replace the parts for the bottom hinge as shown and tighten
screws. See Bottom Hinge graphic. Replace the refrigerator
door.
NOTE: Provide additional support for the doors while the
hinges are being moved. Do not depend on the door magnets
to hold the doors in place while you are working.
2. Assemble the parts for the center hinge as shown and tighten
all screws. See Center Hinge graphic. Replace the freezer
door.
3. Assemble the parts of the top hinge as shown in the Top
Hinge graphic. Do not tighten the screws completely.
4. Line up the doors so that the bottom of the freezer door aligns
evenly with the top of the refrigerator door. Tighten all screws.
Door Handle Sealing Screw
Flat-Head Handle Screw
Door Handle Seal Screw Front
Cabinet Hinge Hole Plug
Door Handle Screw Cover
Round-Head Handle Scre
Cabinet
1. Remove ⁵⁄₁₆" hex-head hinge screws from the handle side and
move them to the opposite side. See Graphic 1-1.
2. Remove the cabinet hinge hole plugs from the cabinet top and
move them to the opposite side hinge holes as shown in
Graphic 1-2.
Freezer door
1. Remove freezer handle assembly as shown. Keep all parts
together. See Graphic 2.
2. Remove the door hinge hole plug. Move it to the opposite side
as shown in Graphic 3.
3. Remove the door handle sealing screws. Move them to the
opposite side of the freezer door as shown in Graphic 4.
4. Remove the door stop. Move it to the opposite side of the
freezer door as shown in Graphic 5.
5. Position the freezer handle on opposite side of freezer door.
Assemble handles on the door as shown in Graphic 2.
6. Tighten all screws. Set aside the door until the hinges and
refrigerator compartment door are in place.
Refrigerator door
1. Remove refrigerator handle bottom trim. For Style 1, remove
the handle screw cover. See Graphic 6-1. For Style 2, slide
trim down as shown in Graphic 6-2.
Final Steps
1. Check all the holes to make sure that hole plugs and screws
are in place. Reinstall the top hinge cover as shown in the Top
Hinge graphic.
2. Replace the base grille. See Base Grille graphic.
WARNING
Electrical Shock Hazard
Plug into a grounded 3 prong outlet.
Do not remove ground prong.
Do not use an adapter.
Do not use an extension cord.
Failure to follow these instructions can result in death,
fire, or electrical shock.
3. Plug in refrigerator or reconnect power.
4. Return all removable door parts to doors and food to
refrigerator.
5
Page 6
Door Removal &
Replacement
Base Grille
Top Hinge
A. Top Hinge Cover
B. ⁵⁄₁₆" Hex-Head Hinge Screws
C. Top Hinge
Center Hinge
A. Center Hinge
B
. ⁵⁄₁₆"
Hex-Head Hinge Screws
Standard Door - Door Swing Reversal (optional)
2
A
A
A. Cabinet Hinge Hole Plugs
B
A
A
A. Door Hinge Hole Plug
3
A
B
C
A
A. Flat-Head Handle Screws
B. Freezer Handle
4
A
A
B
A. Door Handle Sealing Screws
Front View
Side View
5
1-2
. ⁵⁄₁₆"
Hex-Head Hinge
Screws
1-1
A
1
7
Bottom Hinge
A. Bottom Hinge
B. ⁵⁄₁₆" Hex-Head Hinge Screws
A. Door Stop Screw
B. Door Stop
A
B
B
A
A. Door Handle
Screw Cover
A
6-1
A. Door Handle
Seal Screw Front
6-2
A. Flat-Head
Handle Screw
6-3
A
B
C
B. Refrigerator Handle
C. Handle Screw
6
Page 7
Adjust the Doors
Door Closing
Your refrigerator has two front adjustable rollers – one on the right
and one on the left. If your refrigerator seems unsteady or you
want the doors to close easier, adjust the refrigerator's tilt using
the instructions below.
WARNING
5. Open both doors again and check to make sure that they
close as easily as you like. If not, tilt the refrigerator slightly
more to the rear by turning both leveling screws to the right. It
may take several more turns, and you should turn both
leveling screws the same amount.
6. Replace the base grille.
Align Doors
If the space between your doors looks uneven, you can adjust it
using the instructions below:
1. Pry off the top hinge cover.
2. Loosen the top hinge screws using a ⁵⁄₁₆" socket or wrench.
3. Have someone hold the door in place or put a spacer between
the doors while you tighten the top hinge screws.
4. Replace the top hinge cover.
Electrical Shock Hazard
Plug into a grounded 3 prong outlet.
Do not remove ground prong.
Do not use an adapter.
Do not use an extension cord.
Failure to follow these instructions can result in death,
fire, or electrical shock.
1. Plug into a grounded 3 prong outlet.
WARNING
Excessive Weight Hazard
Use two or more people to move and install
refrigerator.
Failure to do so can result in back or other injury.
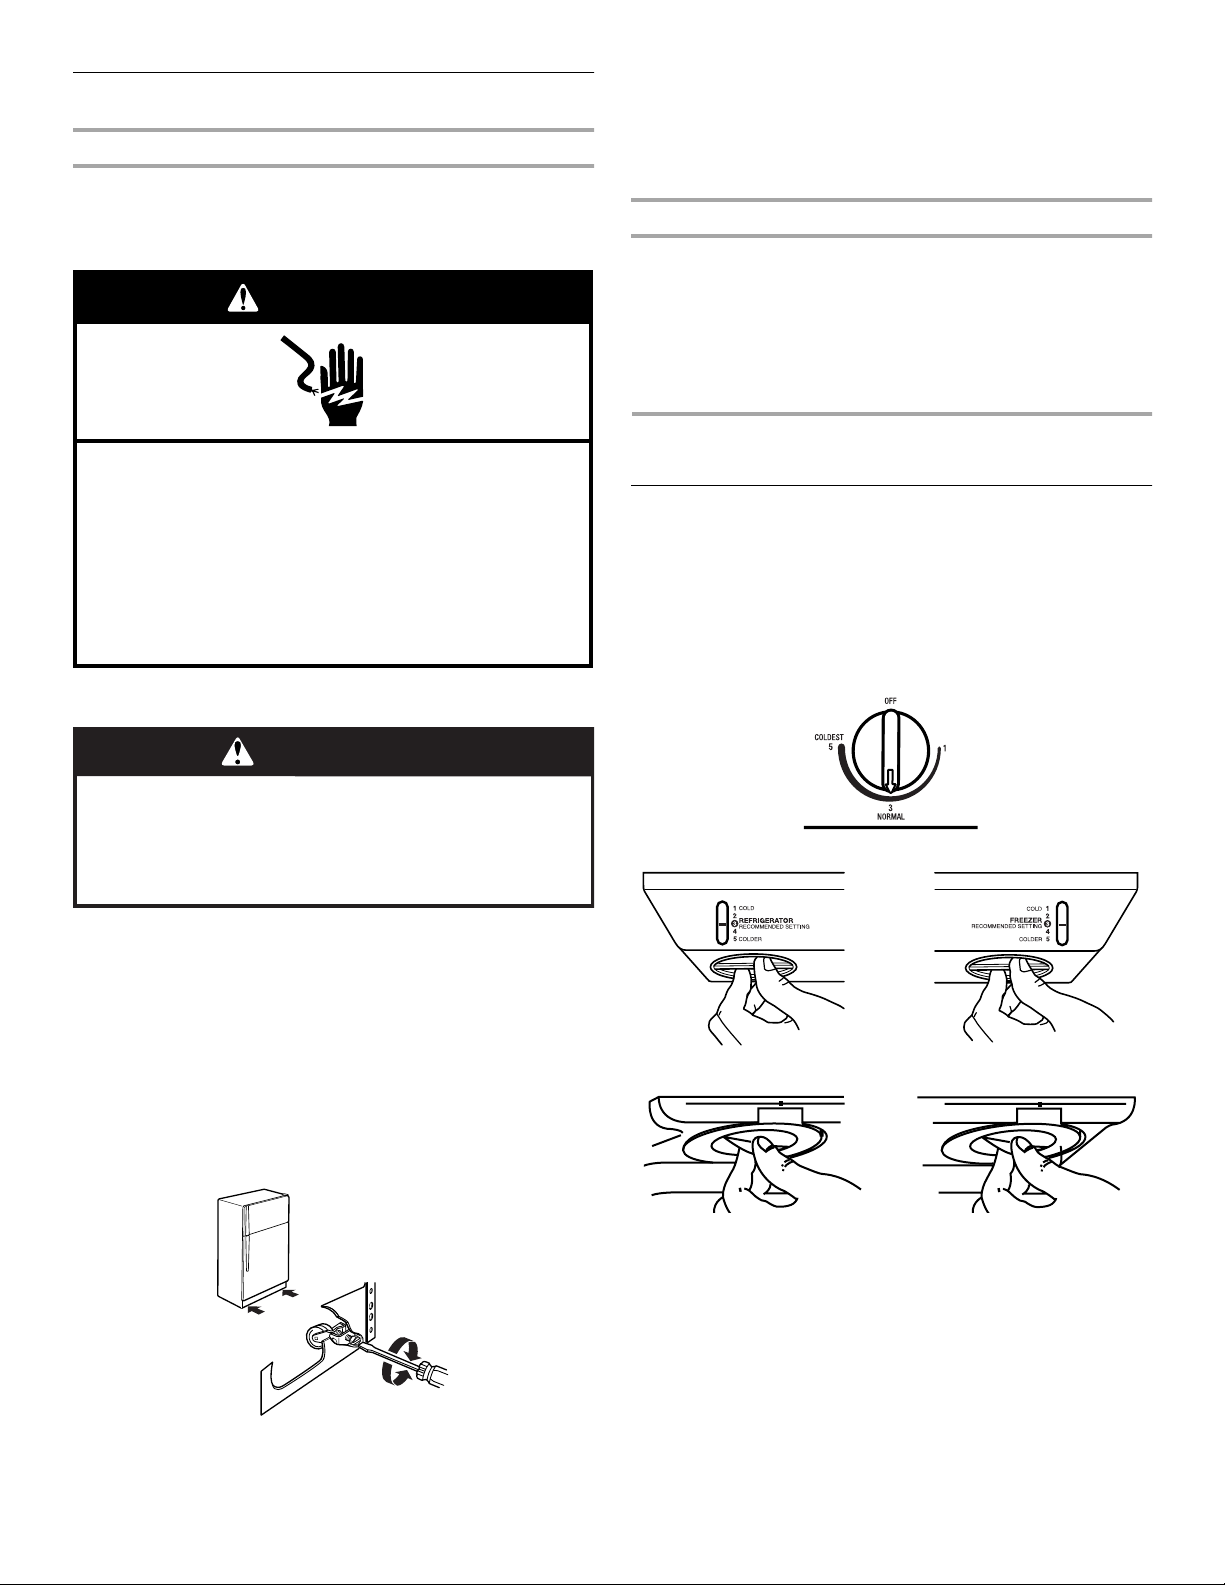
2. Move the refrigerator into its final location.
3. Remove the base grille. See Base Grille graphic. The two
leveling screws are part of the front roller assemblies which
are at the base of the refrigerator on either side.
4. Use a screwdriver to adjust the leveling screws. Turn the
leveling screw to the right to raise that side of the refrigerator
or turn the leveling screw to the left to lower that side. It may
take several turns of the leveling screws to adjust the tilt of the
refrigerator.
NOTE: Having someone push against the top of the
refrigerator takes some weight off the leveling screws and
rollers. This makes it easier to adjust the screws.
REFRIGERATOR USE
Using the Controls
For your convenience, your refrigerator controls are preset at the
factory. When you first install your refrigerator, make sure that the
controls are still preset to the mid-settings as shown.
NOTE: To turn your refrigerator off, turn the refrigerator control to
the word OFF or until the word OFF appears. Your product will not
cool when the refrigerator control is set to OFF.
Mid-setting “3”
Mid-setting “3”
Mid-setting “4”
REFRIGERATOR
4
FREEZER
4
IMPORTANT:
■ Give your refrigerator time to cool down completely before
adding food. It is best to wait 24 hours before you put food
into the refrigerator.
■ If you add food before the refrigerator has cooled completely,
your food may spoil. Adjusting the Refrigerator and Freezer
Controls to a higher (colder) than recommended setting will
not cool the compartments any faster.
7
Page 8
Adjusting Controls
Ice Production Rate
The mid-settings indicated in the previous section should be
correct for normal household usage. The controls are set correctly
when milk or juice is as cold as you like and when ice cream is
firm.
If the temperature is too warm or too cold in the refrigerator or
freezer, first check the air vents to be sure they are not blocked.
If you need to adjust temperatures, use the settings listed in the
chart below as a guide. On models with two controls, adjust the
refrigerator temperature first. Wait at least 24 hours between
adjustments and then recheck the temperatures.
CONDITION/REASON: ADJUSTMENT:
REFRIGERATOR too warm REFRIGERATOR or
FREEZER too warm/too
little ice
REFRIGERATOR too cold REFRIGERATOR or
FREEZER too cold FREEZER or TEMPERATURE
TEMPERATURE Control one
setting higher
FREEZER or TEMPERATURE
Control one setting higher
MAX ice production switch
TEMPERATURE Control one
setting lower
Control one setting lower
Crisper Humidity Control
(on some models)
You can control the amount of humidity in the moisture-sealed
crisper. Adjust the control to any setting between LOW and HIGH.
LOW (open) for best storage of fruits and vegetables with skins.
HIGH (closed) for best storage of fresh, leafy vegetables.
■ Allow 24 hours to produce the first batch of ice. Discard the
first three batches of ice produced.
■ The ice maker should produce approximately 8 to 12 batches
of ice in a 24-hour period.
■ To increase ice production, lower the freezer and refrigerator
temperature. See “Using the Controls.” Wait 24 hours
between adjustments.
■ For maximum ice production (on some models), push the
switch to ICE PLUS. The ice maker should produce 16 to
20 batches of ice in a 24-hour period in the Ice Plus mode.
Remember
■ The quality of your ice will be only as good as the quality of the
water supplied to your ice maker. Avoid connecting the ice
maker to a softened water supply. Water softener chemicals
(such as salt) can damage parts of the ice maker and lead to
poor quality ice. If a softened water supply cannot be avoided,
make sure the water softener is operating properly and is well
maintained.
■ Never use anything sharp to break up the ice in the bin. This
can cause damage to the ice container and the dispenser
mechanism.
■ Do not store anything on top of or in the ice maker or ice bin.
REFRIGERATOR CARE
Cleaning
WARNING
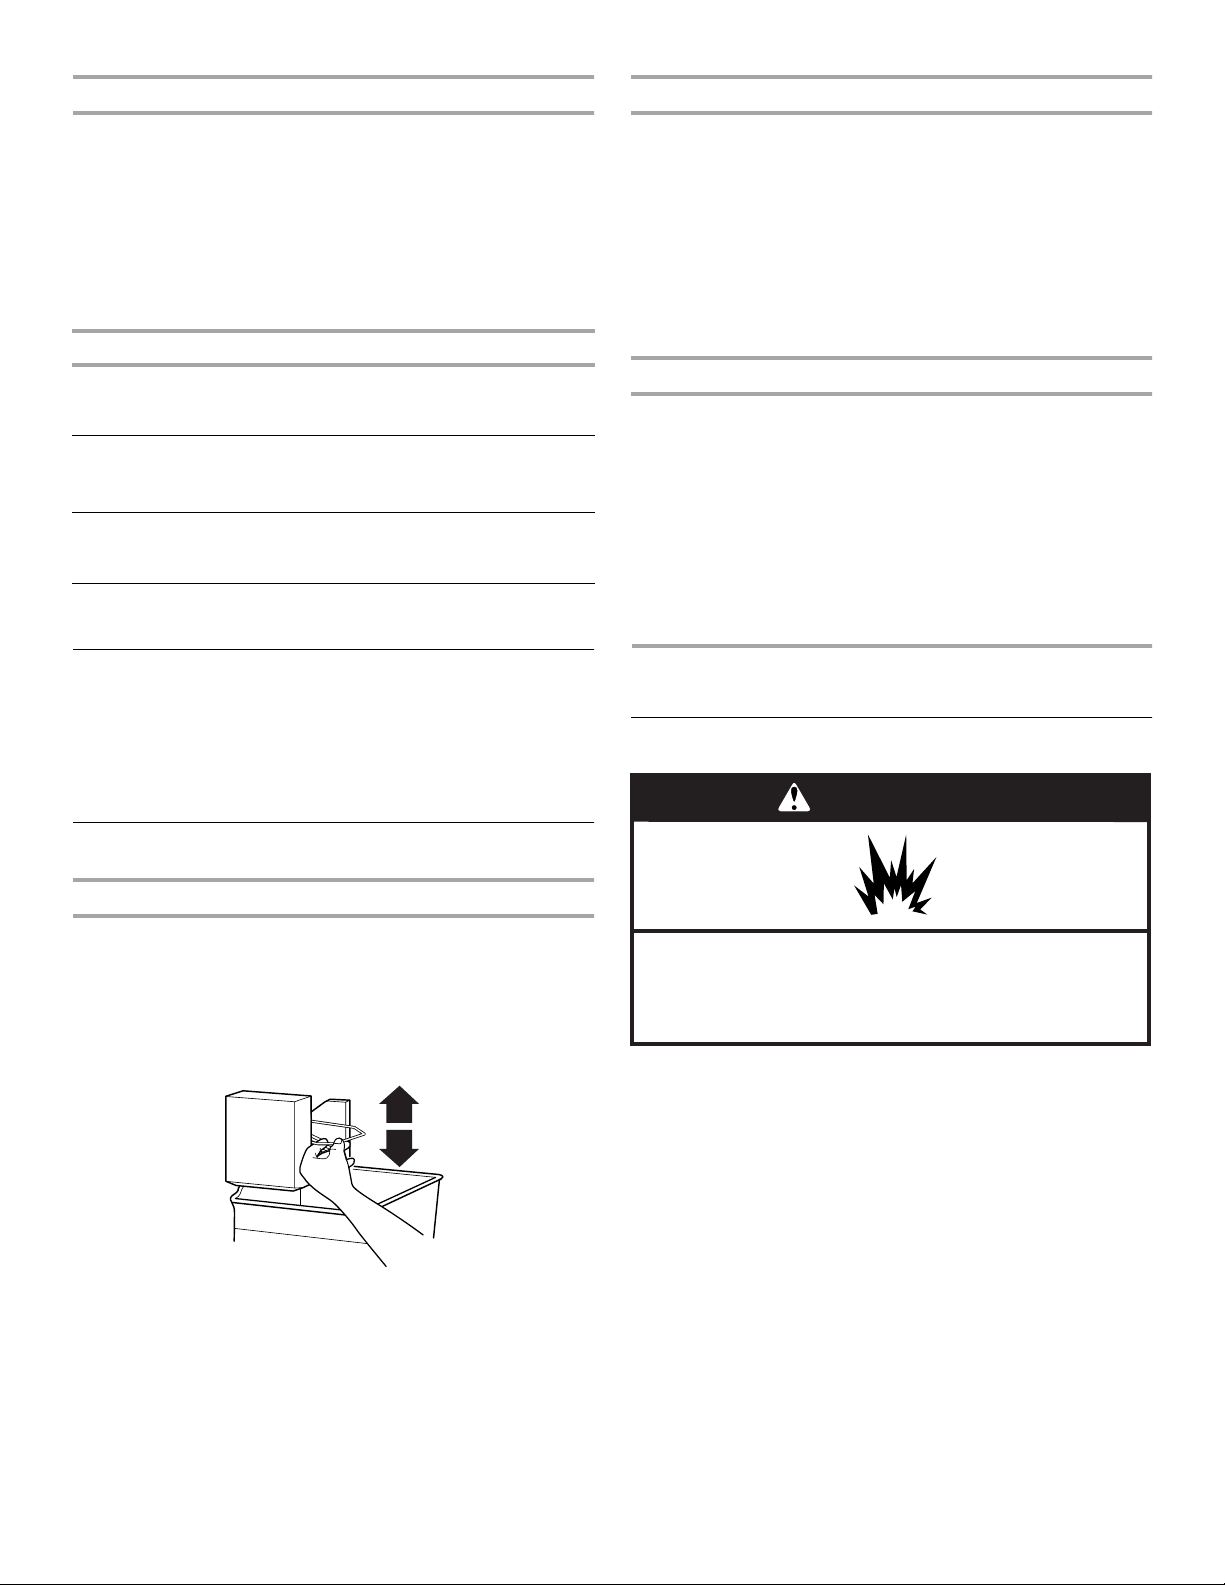
Ice Maker
Turning the Ice Maker On/Off
To turn the ice maker ON, simply lower the wire shutoff arm.
To manually turn the ice maker OFF, lift the wire shutoff arm to the
OFF (arm up) position and listen for the click.
NOTE: Your ice maker has an automatic shutoff. As ice is made,
the ice cubes will fill the ice storage bin and the ice cubes will
raise the wire shutoff arm to the OFF (arm up) position. Do not
force the wire shutoff arm up or down.
Explosion Hazard
Use nonflammable cleaner.
Failure to do so can result in death, explosion, or fire.
Both the refrigerator and freezer sections defrost automatically.
However, clean both sections about once a month to prevent
odors from building up. Wipe up spills immediately.
IMPORTANT: Because air circulates between both sections, any
odors formed in one section will transfer to the other. You must
thoroughly clean both sections to eliminate odors. To prevent
odor transfer and drying out of food, wrap or cover foods tightly.
To Clean Your Refrigerator:
NOTE: Do not use abrasive or harsh cleaners such as window
sprays, scouring cleansers, flammable fluids, cleaning waxes,
concentrated detergents, bleaches or cleansers containing
petroleum products on plastic parts, interior and door liners or
gaskets. Do not use paper towels, scouring pads, or other harsh
cleaning tools.
1. Unplug refrigerator or disconnect power.
2. Hand wash, rinse, and dry removable parts and interior
surfaces thoroughly. Use a clean sponge or soft cloth and a
mild detergent in warm water.
3. Wash stainless steel and painted metal exteriors with a clean
sponge or soft cloth and a mild detergent in warm water.
8
Page 9
4. There is no need for routine condenser cleaning in normal
WARMER
COOLER
RECOMMENDED SETTING
REFRIGERATOR
WARMER
COOLER
RECOMMENDED SETTING
FREEZER
ALLOW 24 HOURS BETWEEN ADJUSTMENTS
home operating environments. If the environment is
particularly greasy or dusty, or there is significant pet traffic in
the home, the condenser should be cleaned every 2 to
3 months to ensure maximum efficiency.
If you need to clean the condenser:
■ Remove the base grille.
■ Use a vacuum cleaner with a soft brush to clean the grille,
the open areas behind the grille and the front surface area
of the condenser.
■ Replace the base grille when finished.
5. Plug in refrigerator or reconnect power.
TROUBLESHOOTING
Try the solutions suggested here first in order to avoid the cost of an unnecessary service call.
Refrigerator Operation
The refrigerator will not operate
Changing the Light Bulbs
NOTE: Not all bulbs will fit your refrigerator. Be sure to replace the
bulb with one of the same size, shape, and wattage.
1. Unplug refrigerator or disconnect power.
2. Remove the bulb from behind the control panel in the
refrigerator or from behind the light shield in the freezer (on
some models). Replace it with a bulb of the same wattage.
3. Plug in refrigerator or reconnect power.
1
R
ARME
W
2
ER
WARM
1
FREEZER
3
2
R
F
E
R
3
3
EC
R
4
COOLER
5
■ Water running - may be heard when water melts during the
defrost cycle and runs into the drain pan.
■ Creaking/Cracking - occurs as ice is being ejected from the
ice maker mold.
3
ETTING
MMENDED S
R
RECO
O
T
A
R
E
G
I
4
G
IN
T
T
SE
D
E
D
EN
MM
O
5
LER
COO
S
T
N
E
M
T
S
U
J
D
A
N
E
E
W
T
E
B
S
R
U
O
H
4
2
W
O
L
L
A
■ Power cord unplugged? Plug into a grounded 3 prong outlet.
■ Is outlet working? Plug in a lamp to see if the outlet is
working.
■ Household fuse blown or circuit breaker tripped? Replace
the fuse or reset the circuit breaker. If the problem continues,
call an electrician.
■ Are controls on? Make sure the refrigerator controls are on.
See “Using the Controls.”
■ New installation? Allow 24 hours following installation for the
refrigerator to cool completely.
NOTE: Adjusting the temperature controls to coldest setting
will not cool either compartment more quickly.
The motor seems to run too much
Your new refrigerator may run longer than your old one due to its
high-efficiency compressor and fans. The unit may run even
longer if the room is warm, a large food load is added, doors are
opened often, or if the doors have been left open.
The refrigerator seems noisy
Refrigerator noise has been reduced over the years. Due to this
reduction, you may hear intermittent noises from your new
refrigerator that you did not notice from your old model. Below are
listed some normal sounds with explanations.
■ Buzzing - heard when the water valve opens to fill the ice
maker.
■ Pulsating - fans/compressor adjusting to optimize
performance.
■ Hissing/Rattling - flow of refrigerant, movement of water
lines, or from items placed on top of the refrigerator.
■ Sizzling/Gurgling - water dripping on the heater during
defrost cycle.
■ Popping - contraction/expansion of inside walls, especially
during initial cool-down.
The doors will not close completely
■ Door blocked open? Move food packages away from door.
■ Bin or shelf in the way? Push bin or shelf back in the correct
position.
The doors are difficult to open
■ Gaskets dirty or sticky? Clean gaskets and contact surfaces
with mild soap and warm water. Rinse and dry with soft cloth.
Temperature and Moisture
Temperature is too warm
■ New installation? Allow 24 hours following installation for the
refrigerator to cool completely.
■ Door(s) opened often or left open? Allows warm air to enter
refrigerator. Minimize door openings and keep doors fully
closed.
■ Large load of food added? Allow several hours for
refrigerator to return to normal temperature.
■ Controls set correctly for the surrounding conditions?
Adjust the controls a setting colder. Check temperature in
24 hours. See “Using the Controls.”
There is interior moisture buildup
NOTE: Some moisture build-up is normal.
■ Humid room? Contributes to moisture build-up.
■ Door(s) opened often or left open? Allows humid air to enter
refrigerator. Minimize door openings and keep doors fully
closed.
9
Page 10

Ice and Water
The ice maker is not producing ice or not enough ice
■ Refrigerator connected to a water supply and the supply
shutoff valve turned on? Connect refrigerator to water
supply and turn water shutoff valve fully open.
■ Kink in the water source line? A kink in the line can reduce
water flow. Straighten the water source line.
■ Ice maker turned on? Make sure wire shutoff arm or switch
(depending on model) is in the ON position.
■ New installation? Wait 24 hours after ice maker installation
for ice production to begin. Wait 72 hours for full ice
production.
■ Large amount of ice recently removed? Allow 24 hours for
ice maker to produce more ice.
■ Ice cube jammed in the ice maker ejector arm?
Remove ice from the ejector arm with a plastic utensil.
■ Reverse osmosis water filtration system connected to
your cold water supply? This can decrease water pressure.
See “Water Supply Requirements.”
INGLIS BY WHIRLPOOL CORPORATION™
The ice cubes are hollow or small
NOTE: This is an indication of low water pressure.
■ Water shutoff valve not fully open? Turn the water shutoff
valve fully open.
■ Kink in the water source line? A kink in the line can reduce
water flow. Straighten the water source line.
■ Reverse osmosis water filtration system connected to
your cold water supply? This can decrease water pressure.
See “Water Supply Requirements.”
■ Questions remain regarding water pressure? Call a
licensed, qualified plumber.
Off-taste, odor or gray color in the ice
■ New plumbing connections? New plumbing connections
can cause discolored or off-flavored ice.
■ Ice stored too long? Discard ice. Wash ice bin. Allow
24 hours for ice maker to make new ice.
■ Odor transfer from food? Use airtight, moisture proof
packaging to store food.
■ Are there minerals (such as sulfur) in the water? A water
filter may need to be installed to remove the minerals.
REFRIGERATOR WARRANTY
ONE-YEAR FULL WARRANTY ON REFRIGERATOR
For one year from the date of purchase, when this refrigerator (excluding the water filter) is operated and maintained according to
instructions attached to or furnished with the product, Whirlpool Corporation will pay for FSP
to correct defects in materials or workmanship. Service must be provided by a Whirlpool designated service company.
On models with a water filter: 30 day limited warranty on water filter. For 30 days from the date of purchase, when this filter is operated
and maintained according to instructions attached to or furnished with the product, Whirlpool Corporation will pay for replacement
parts to correct defects in materials and workmanship.
SECOND THROUGH FIFTH YEAR FULL WARRANTY ON SEALED REFRIGERATION SYSTEM PARTS AS LISTED
In the second through fifth years from the date of purchase, when this refrigerator is operated and maintained according to instructions
attached to or furnished with the product, Whirlpool Corporation will pay for factory specified replacement parts and repair labor costs
to correct defects in materials or workmanship in the sealed refrigeration system. These parts are: compressor, evaporator, condenser,
dryer, and connecting tubing. Service must be provided by a Whirlpool designated service company.
Whirlpool Corporation will not pay for:
1. Service calls to correct the installation of your refrigerator, to instruct you how to use your refrigerator, to replace house fuses or
correct house wiring or plumbing, to replace light bulbs, or replacement water filters other than as noted above.
2. Repairs when your refrigerator is used in other than normal, single-family household use.
3. Pickup and delivery. Your refrigerator is designed to be repaired in the home.
4. Damage resulting from accident, alteration, misuse, abuse, fire, flood, improper installation, acts of God, or use of products not
approved by Whirlpool Corporation.
5. Any food loss due to product failure.
6. Repairs to parts or systems resulting from unauthorized modifications made to the appliance.
7. Replacement parts or repair labor costs for units operated outside the United States.
®
replacement parts and repair labor costs
WHIRLPOOL CORPORATION SHALL NOT BE LIABLE FOR INCIDENTAL OR CONSEQUENTIAL DAMAGES
Some states do not allow the exclusion or limitation of incidental or consequential damages, so this exclusion or limitation may not
apply to you. This warranty gives you specific legal rights, and you may also have other rights which vary from state to state.
Outside the 50 United States, this warranty does not apply. Contact your authorized Whirlpool dealer to determine if another
warranty applies.
2/05
10
Page 11

MANUAL DE USO Y CUIDADO DEL REFRIGERADOR
Ayuda o Servicio Técnico
Si necesita ayuda o servicio técnico, vea primero la sección
“Solución de Problemas”. Puede obtener asistencia adicional
llamándonos al 1-800-253-1301 desde cualquier lugar de los
EE.UU., o escriba a:
Whirlpool Corporation
Customer eXperience Center
553 Benson Road
Benton Harbor, MI 49022-2692
Favor de incluir un número telefónico de día en su
correspondencia.
Guarde este libro y su comprobante de compra juntos para
referencia futura. Usted deberá proporcionar evidencia de la
compra o una fecha de instalación para obtener servicio bajo
la garantía.
SEGURIDAD DEL REFRIGERADOR
Su seguridad y la seguridad de los demás es muy importante.
Hemos incluido muchos mensajes importantes de seguridad en este manual y en su electrodoméstico. Lea y obedezca siempre
todos los mensajes de seguridad.
Este es el símbolo de advertencia de seguridad.
Este símbolo le llama la atención sobre peligros potenciales que pueden ocasionar la muerte o una lesión a
usted y a los demás.
Todos los mensajes de seguridad irán a continuación del símbolo de advertencia de seguridad y de la palabra
“PELIGRO” o “ADVERTENCIA”. Estas palabras significan:
Escriba la siguiente información acerca de su electrodoméstico
para ayudarle a obtener asistencia o servicio técnico si alguna vez
llegara a necesitarlo. Deberá tener a mano el número completo
del modelo y de la serie. Puede encontrar esta información en la
etiqueta con el número de modelo y de serie que está ubicada en
la pared interior del compartimiento del refrigerador.
Nombre del distribuidor _________________________________________
Número de serie ________________________________________________
Dirección_______________________________________________________
Número de teléfono _____________________________________________
Número del modelo _____________________________________________
Fecha de compra _______________________________________________
PELIGRO
ADVERTENCIA
Todos los mensajes de seguridad le dirán el peligro potencial, le dirán cómo reducir las posibilidades de sufrir una lesión y lo que
puede suceder si no se siguen las instrucciones.
Si no sigue las instrucciones de inmediato, usted puede
morir o sufrir una lesión grave.
Si no sigue las instrucciones, usted puede morir o sufrir
una lesión grave.
INSTRUCCIONES IMPORTANTES DE SEGURIDAD
ADVERTENCIA:
estas precauciones básicas:
■
No quite la terminal de conexión a tierra.
■
No use un cable eléctrico de extensión.
■
Desconecte el suministro de energía antes de darle servicio.
■
Vuelva a colocar todos los componentes y paneles antes de
hacerlo funcionar.
■
Remueva las puertas de su refrigerador viejo.
■
Use un limpiador no inflamable.
■
No use un adaptador.
Para reducir el riesgo de incendio, choque eléctrico, o lesiones personales al usar su refrigerador siga
■
Mantenga los materiales y vapores inflamables, tales como
gasolina, alejados del refrigerador.
■
Use dos o más personas para mover e instalar el
refrigerador.
■
Desconecte el suministro de energía antes de instalar la
fábrica de hielo (en aquellos modelos que incluyen el juego
de instalación de la fábrica de hielo).
■
Use un vaso resistente para recibir hielo o agua del
despachador (en algunos modelos).
■
Conecte a un contacto de pared de conexión a tierra de
3 terminales.
CONSERVAR ESTAS INSTRUCCIONES
11
Page 12

Cómo deshacerse adecuadamente de su
refrigerador viejo
ADVERTENCIA
Peligro de Asfixia
Remueva las puertas de su refrigerador viejo.
No seguir esta instrucción puede ocasionar la muerte
o daño al cerebro.
IMPORTANTE: El atrapamiento y asfixia de niños no es un
problema del pasado. Los refrigeradores tirados y abandonados
son un peligro, aún si van a quedar ahí “por unos pocos días”. Si
Ud. está por deshacerse de su refrigerador viejo, por favor siga
las instrucciones que se dan a continuación para prevenir
accidentes.
INSTRUCCIONES DE INSTALACIÓN
Antes de tirar su viejo refrigerador o congelador:
■ Saque las puertas.
■ Deje los estantes en su lugar para que los niños no puedan
meterse con facilidad.
Desempaque el refrigerador
ADVERTENCIA
Peligro de Peso Excesivo
Use dos o más personas para mover e instalar
el refrigerador.
No seguir esta instrucción puede ocasionar una
lesión en la espalda u otro tipo de lesiones.
Quitar los materiales de empaque
No use instrumentos filosos, alcohol para fricciones, líquidos
inflamables, o productos de limpieza abrasivos para eliminar los
restos de cinta o goma. Estos productos pueden dañar la
superficie de su refrigerador. Para más información, vea la
sección “Seguridad del refrigerador”.
IMPORTANTE: No quite el inserto de espuma blanca de
devolución de aire que está ubicado detrás del panel de control
en el techo del refrigerador. Si se quita el inserto, el hielo puede
bajar del congelador y hacer que se formen gotas de hielo.
Cómo mover su refrigerador:
Su refrigerador es muy pesado. Cuando mueva su
refrigerador para limpiarlo o darle servicio, proteja el piso.
Al mover el refrigerador, siempre tire directamente hacia
afuera. No menee el refrigerador de lado a lado ni lo haga
“caminar” cuando lo trate de mover ya que podría dañar
el piso.
Limpiar su refrigerador antes de usarlo
Una vez que usted haya quitado todos los materiales de
empaque, limpie el interior de su refrigerador antes de usarlo. Vea
las instrucciones de limpieza en la sección “Cuidado de su
refrigerador”.
Información importante para saber acerca de los estantes
y tapas de vidrio:
No limpie los estantes y tapas de vidrio con agua caliente
mientras están fríos. Los estantes y tapas pueden romperse
si se exponen a cambios bruscos de temperatura o impacto,
como sería un golpe brusco. Para su protección, el vidrio
templado se ha diseñado para hacerse añicos. Esto es normal.
Los estantes y tapas de vidrio son muy pesados. Tenga
mucho cuidado al sacarlos para evitar que se dañen al caer.
Requisitos de ubicación
ADVERTENCIA
Peligro de Explosión
Mantenga los materiales y vapores inflamables,
tales como gasolina, alejados del refrigerador.
No seguir esta instrucción puede ocasionar la muerte,
explosión, o incendio.
12
Para asegurar la adecuada ventilación para su refrigerador, deje
un espacio de ½" (1,25 cm) a cada lado y por encima. Si Ud.
instala el refrigerador próximo a una pared fija, deje como mínimo
2" (5,08 cm) a cada lado (algunos modelos necesitan más
espacio) para permitir que la puerta abra bien. Si su refrigerador
tiene una fábrica de hielo, asegúrese de que haya espacio
adicional atrás para las conexiones de la línea de agua.
Page 13

NOTA: No se recomienda instalar el refrigerador cerca de un
horno, radiador u otra fuente de calor. No instale el refrigerador
en un lugar donde la temperatura puede ser menor de
55°F(13°C).
1/
2" (1,25 cm)
2" (5,08 cm)
Requisitos eléctricos
ADVERTENCIA
Peligro de Choque Eléctrico
Conecte a un contacto de pared de conexión a tierra de
3 terminales.
No quite la terminal de conexión a tierra.
No use un adaptador.
No use un cable eléctrico de extensión.
No seguir estas instrucciones puede ocasionar
la muerte, incendio o choque eléctrico.
Antes de mover el refrigerador a su ubicación final, es importante
asegurarse de que tiene la conexión eléctrica adecuada.
Método de conexión a tierra recomendado
Se requiere una fuente de energía eléctrica de 115 Voltios, 60 Hz.,
CA solamente y con fusibles de 15 ó 20 amperios, debidamente
conectada a tierra. Se recomienda que use un circuito separado
sólo para su refrigerador. Use un tomacorriente que no se pueda
apagar con un interruptor. No use un cable de extensión.
NOTA: Antes de realizar cualquier tipo de instalación, limpieza o
de quitar un foco de luz, ponga el control (del termostato, del
refrigerador o del congelador dependiendo del modelo) en la
posición OFF (Apagado) y luego desconecte el refrigerador de la
fuente de energía. Cuando haya terminado, reconecte el
refrigerador a la fuente de energía eléctrica y vuelva a poner el
control (del termostato, del refrigerador o del congelador
dependiendo del modelo) en la posición deseada.
Requisitos del suministro de agua
Lea todas las instrucciones antes de comenzar.
IMPORTANTE:
■ Si usa el refrigerador antes de instalar la conexión del agua,
ponga la fábrica de hielo en la posición OFF (apagado).
■ Todas las instalaciones deben hacerse de acuerdo a los
requisitos de los códigos locales de plomería.
■ Use tuberías de cobre y revise si hay fugas. Instale tubería de
cobre sólo en áreas donde la temperatura va a permanecer
por encima del punto de congelación.
HERRAMIENTAS REQUERIDAS: Reúna las herramientas y
piezas necesarias antes de comenzar la instalación. Lea y siga
las instrucciones provistas con cualquiera de las herramientas
enlistadas. Destornillador de hoja plana, llaves de boca de ⁷⁄₁₆" y
¹⁄₂" o dos llaves ajustables, llave para tuercas y broca de barrena
de ¹⁄₄", taladro manual o eléctrico (debidamente conectado a
tierra).
NOTA: El distribuidor de su refrigerador tiene un juego disponible
con una válvula de cierre tipo montura de
unión y tubería de cobre. Antes de comprar, asegúrese que la
válvula tipo montura cumpla con los códigos de plomería de su
localidad. No use una válvula perforadora o una válvula de
montura de
obstruye con más facilidad.
Presión del agua
Se necesita un suministro de agua fría con presión de agua entre
30 y 120 lbs/pulg² (207 a 827 kPa) para hacer funcionar el
despachador de agua y la fábrica de hielo. Si usted tiene
preguntas acerca de la presión de agua, llame a un plomero
competente autorizado.
³⁄₁₆" (4,76 mm) que reduce el flujo de agua y se
¹⁄₄" (6,35 mm), una
Suministro de agua de ósmosis inversa
IMPORTANTE: La presión del suministro de agua que sale de un
sistema de ósmosis inversa y va a la válvula de entrada de agua
del refrigerador necesitará ser entre 30 y 120 lb/pulg² (207 a
827 kPa).
Si se conecta un sistema de filtración de agua de ósmosis inversa
al suministro de agua fría, la presión de agua al sistema de
ósmosis inversa necesitará ser de un mínimo de 40 a 60 lbs/pulg²
(276 a 414 kPa).
Si la presión del agua del sistema de ósmosis inversa es menor de
40 a 60 lbs/pulg² (276 a 414 kPa):
■ Fíjese si el filtro de sedimentos en el sistema de ósmosis
inversa está bloqueado y reemplácelo si fuera necesario.
■ Deje que se vuelva a llenar el tanque de almacenaje del
sistema de ósmosis inversa después del uso intenso.
Si tiene preguntas acerca de la presión del agua, llame a un
plomero competente autorizado.
Conexión del suministro de agua
Lea todas las instrucciones antes de comenzar.
IMPORTANTE: Si usa el refrigerador antes de instalar la conexión
del agua, ponga la fábrica de hielo en la posición apagado (OFF).
Conexión a la línea de agua
1. Desenchufe el refrigerador o desconecte el suministro de
energía.
2. CIERRE el suministro principal de agua. ABRA la llave de agua
más cercana el tiempo suficiente para que la tubería de agua
se vacíe totalmente.
3. Busque una tubería vertical de agua fría de
a 3,18 cm) cercana al refrigerador.
IMPORTANTE:
■ Asegúrese de que sea una tubería de agua fría.
■ Una tubería horizontal funcionará, pero taladre por el lado
superior de la tubería, no por debajo. Esto ayudará a
mantener el agua alejada del taladro. Esto también evita
que se junte sedimento normal en la válvula.
4. Para determinar la longitud de la tubería de cobre que va a
necesitar, mida desde la conexión baja de la parte trasera
izquierda del refrigerador hasta la tubería de agua. Agregue
7 pies (2,1 m) para la limpieza. Use tubería de cobre de
(6,35 mm) de diámetro externo. Asegúrese que ambos
extremos de la tubería de cobre estén cortados rectos.
¹⁄₂" a 1¹⁄₄" (1,25 cm
¹⁄₄"
13
Page 14

5. Usando un taladro conectado a tierra, haga un orificio de ¹⁄₄"
C
en la tubería de agua fría que Ud. eligió.
A
G
B
C
DEF
A. Tubería de agua fría
B. Abrazadera para tubería
C. Tubería de cobre
D. Tuerca de compresión
E. Manga de compresión
F. V álv ul a de ci e rr e
G. Tuerca de presión
6. Ajuste la válvula de cierre a la tubería de agua fría con la
abrazadera para tubería. Asegúrese que el extremo de salida
esté firmemente insertado en el orificio taladrado de
¹⁄₄" en la
tubería de agua y que la arandela esté por debajo de la
abrazadera para tubería. Ajuste la tuerca de presión. Apriete
los tornillos de la abrazadera para tubería lentamente y en
forma pareja de manera que la arandela provea un cierre
hermético. No apriete demasiado porque se puede quebrar la
tubería de cobre.
7. Deslice la manga de compresión y la tuerca de compresión
sobre la tubería de cobre como se muestra. Inserte el extremo
de la tubería en el extremo de salida hasta donde sea posible.
Atornille la tuerca de compresión sobre el extremo de salida
con una llave ajustable. No apriete demasiado.
8. Coloque el extremo libre de la tubería dentro de un recipiente
o fregadero, y ABRA la llave de agua principal para lavar la
tubería hasta que el agua salga limpia. CIERRE la válvula de
cierre del agua en la tubería de agua. Enrolle la tubería de
cobre en espiral.
Conexión al refrigerador
1. Desenchufe el refrigerador o desconecte el suministro de
energía.
2. Fije el tubo de cobre a la entrada de la válvula usando una
tuerca de compresión y manga de compresión como se
muestra. Ajuste la tuerca de compresión. No apriete
demasiado.
3. Use la abrazadera para tubería en la parte trasera del
refrigerador para afianzar la tubería al refrigerador según se
muestra. Esto ayudará a evitar daños a la tubería cuando el
refrigerador se empuje contra la pared posterior.
4. ABRA la válvula de cierre.
5. Revise si hay fugas. Ajuste las conexiones (incluso las de la
válvula) o tuercas que tienen fugas.
Cómo terminar la instalación
ADVERTENCIA
Peligro de Choque Eléctrico
Conecte a un contacto de pared de conexión a tierra de
3 terminales.
No quite la terminal de conexión a tierra.
No use un adaptador.
No use un cable eléctrico de extensión.
No seguir estas instrucciones puede ocasionar
la muerte, incendio o choque eléctrico.
Enchufe el refrigerador o reconecte el suministro de energía.
NOTA: Deje transcurrir 24 horas para la producción de la primera
tanda de hielo. Deshágase de los tres primeros lotes de hielo
producido. Deje pasar 3 días para que se llene completamente el
recipiente para hielo.
Puertas del refrigerador
HERRAMIENTAS NECESARIAS: Llave tubular de cabeza
hexagonal de ⁵⁄₁₆", destornillador Phillips No. 2, destornillador de
cabeza plana, llave ajustable de ⁵⁄₁₆", cuchillo plano para masilla
de 2".
IMPORTANTE:
■ Desenchufe el refrigerador o desconecte el suministro de
energía.
■ Quite los alimentos y la puerta ajustable o los recipientes de
uso múltiple de las puertas.
■ Si usted sólo quiere quitar las puertas y volverlas a colocar,
vea las secciones “Cómo quitar las puertas y las bisagras” y
“Cómo volver a colocar las puertas y las bisagras”.
Cómo quitar las puertas y las bisagras
A
B
D
A. Abrazadera para tubería
B. Tubería de cobre
C. Tuerca de compresión
D. Entrada de la válvula
6. La fábrica de hielo está equipada con un filtro de agua
incorporado. Si las condiciones del agua local requieren un
segundo filtro de agua, se debe instalar en la línea de agua de
¼" (6,35 mm) en cualquiera de las conexiones de la tubería.
Consiga un filtro de agua del distribuidor de
electrodomésticos más cercano a su domicilio.
14
Tornillo de cabeza hexagonal para bisagra de ⁵⁄₁₆''
1. Desenchufe el refrigerador o desconecte el suministro de
energía.
2. Abra la puerta del refrigerador y quite la rejilla de la base del
frente inferior del refrigerador. Vea la ilustración Rejilla de la
base.
3. Cierre la puerta del refrigerador y mantenga las dos puertas
cerradas hasta que esté listo para separarlas del gabinete.
NOTA: Mientras quita las bisagras disponga de un soporte
adicional para las puertas. No se confíe en que los imanes de
las puertas van a sostener las puertas mientras trabaja.
4. Quite los componentes de la bisagra superior como se
muestra en la ilustración Bisagra superior. Levante y quite la
puerta del congelador del gabinete.
5. Quite los componentes de la bisagra central como se muestra
en la ilustración de la Bisagra central. Levante y quite la puerta
del refrigerador del gabinete.
Page 15

6. Quite los componentes de la bisagra inferior como se muestra
en la ilustración Bisagra inferior.
Cambio del sentido de apertura de las puertas (opcional)
IMPORTANTE: Siga estas instrucciones si desea que las puertas
abran en el sentido opuesto. Si no desea cambiar el sentido de
apertura de las puertas, vea “Cómo volver a colocar las puertas y
las bisagras”.
Tornillo del retén
de la puerta
Tornillo sellador
de la manija de la puerta
Tornillo de cabeza
plana de la manija
Tornillo sellador frontal
de la manija de la puerta
Gabinete
1. Quite los tornillos de cabeza hexagonal para bisagra de ⁵⁄₁₆"
del lado de la manija y colóquelos del lado opueso. Vea la
ilustración 1-1.
2. Quite los tapones de los orificios de las bisagras de la parte
superior del gabinete y colóquelos en los orificios de la
bisagra del lado opuesto como se indica en la ilustración 1-2.
Puerta del congelador
1. Quite la ensambladura de la manija del congelador como se
indica. Conserve juntos todos los componentes. Vea la
ilustración2.
2. Quite el tapón del orificio de la bisagra de la puerta. Colóquelo
del lado opuesto como se indica en la ilustración3.
3. Quite los tornillos selladores de la manija de la puerta.
Colóquelos del lado opuesto de la puerta del congelador
como se indica en la ilustración 4.
4. Quite el retén de la puerta. Colóquelo del lado opuesto de la
puerta del congelador, como se indica en la ilustración 5.
5. Coloque la manija del congelador del lado opuesto de la
puerta del congelador. Instale las manijas en la puerta, como
se indica en la ilustración 2.
6. Apriete todos los tornillos. Ponga la puerta a un lado hasta
que las bisagras y la puerta del compartimiento del
refrigerador estén en su sitio.
Puerta del refrigerador
1. Quite el adorno inferior de la manija del refrigerador. Para el
Estilo 1, quite la cubierta del tornillo de la manija. Vea la
ilustración 6-1. Para el Estilo 2, deslice hacia abajo el adorno
como se ilustra en la ilustración 6-2.
2. Quite la ensambladura de la manija del refrigerador como se
indica. Mantenga todos los componentes juntos. Vea la
ilustración 6-3.
3. Quite el tapón del orificio de la bisagra de la puerta del
refrigerador. Colóquelo en el orificio de la bisagra del lado
opuesto como se indica en la ilustración 3.
4. Quite los tornillos selladores de la manija de la puerta.
Colóquelos del lado opuesto de la puerta del refrigerador
como se indica en la ilustración 4.
5. Quite el tornillo sellador frontal de la manija de la puerta.
Colóquelo del lado opuesto de la puerta del refrigerador como
se indica en la ilustración 7.
Tapón del orificio
de la bisagra de la puerta
Tapón del orificio
de la bisagra del gabinete
Tapa del tornillo de
la manija de la puerta
Tornillo de cabeza
redonda de la manija
6. Quite el retén de la puerta. Colóquelo del lado opuesto de la
puerta del refrigerador como se indica en la ilustración 5.
7. Coloque la manija del refrigerador del lado opuesto de la
puerta del refrigerador como se indica en la ilustración 6-3.
Enrosque primero los dos tornillos superiores de la manija.
Alinee la parte de abajo de la manija y enrosque el tornillo de
abajo.
8. Alinee el adorno inferior de la manija del refrigerador. Para el
Estilo 1, quite la cubierta del tornillo de la manija. Vea la
ilustración 6-1. Para el Estilo 2, deslice el adorno en su sitio.
Vea la ilustración 6-2.
9. Apriete todos los tornillos. Ponga la puerta del refrigerador a
un lado hasta que se haya instalado la bisagra inferior en el
producto.
Cómo volver a colocar las puertas y las bisagras
NOTA: Si se cambia el sentido de apertura de la puerta, la imagen
de la puerta pudiera quedar invertida.
1. Vuelva a poner los componentes de la bisagra inferior en su
sitio como se indica y apriete los tornillos. Vea la ilustración
Bisagra inferior. Vuelva a poner en su lugar la puerta del
refrigerador.
NOTA: Mientras quita las bisagras siempre disponga de un
soporte adicional para las puertas. No se confíe en que los
imanes de las puertas van a sostener las puertas mientras
trabaja.
2. Ensamble los componentes de la bisagra central como se
indica y apriete todos los tornillos. Vea la ilustración Bisagra
central. Vuelva a poner en su lugar la puerta del congelador.
3. Ensamble los componentes de la bisagra superior como se
indica en la ilustración Bisagra superior. No apriete
completamente los tornillos.
4. Alinee las puertas de tal manera que la parte inferior de la
puerta del congelador esté alineada uniformemente con la
parte superior de la puerta del refrigerador. Apriete todos los
tornillos.
Pasos finales
1. Revise todos los orificios para cerciorarse que los tapones de
los mismos y los tornillos estén en su lugar. Vuelva a colocar
en su lugar la tapa de la bisagra superior como se indica en la
ilustración Bisagra superior.
2. Vuelva a poner la rejilla de la base. Vea la ilustración Rejilla de
la base.
ADVERTENCIA
Peligro de Choque Eléctrico
Conecte a un contacto de pared de conexión a tierra de
3 terminales.
No quite la terminal de conexión a tierra.
No use un adaptador.
No use un cable eléctrico de extensión.
No seguir estas instrucciones puede ocasionar
la muerte, incendio o choque eléctrico.
3. Enchufe el refrigerador o reconecte el suministro de energía.
4. Regrese todas las partes movibles a las puertas y la comida al
refrigerador.
15
Page 16

Cómo quitar y volver a
poner la puerta en su lugar
Rejilla de la base
Bisagra superior
A
B
C
Cambio del sentido de apertura de las puertas -
Puerta estándar (opcional)
2
A
B
A
A.
Tapón del orificio
de la bisagra de la puerta
A
A. Tapones de los orificios
de las bisagras del gabinete
3
A.
Tornillos de cabeza
hexagonal de la bisagra
de 5/16"
1-2
1-1
A
1
A. Tapa de la bisagra superior
B. Tornillos de cabeza
hexagonal de la bisagra de
C. Bisagra superior
Bisagra central
A. Bisagra central
B. Tornillos de cabeza
hexagonal de la bisagra
de
Bisagra inferior
A. Bisagra inferior
B. Tornillos de cabeza
hexagonal de la bisagra
de
5
/
16
"
A
B
5
/
16
"
A
B
5
/
16
"
A.
Tornillos de cabeza plana
de la manija
B. Manija del congelador
A.
Tornillos selladores
de la manija de la puerta
Vista frontal
A. Tornillo del retén
de la puerta
B. Retén de la puerta
A
Vista lateral
B
A
4
A
7
5
A. Tornillo sellador
frontal de la
manija de la puerta
6-1
A
6-2
6-3
A
B
16
A. Tapa del tornillo
de la manija de
la puerta
C
A. Tornillo de cabeza
plana de la manija
B. Manija del
refrigerador
C. Tornillo de la
manija
Page 17

Ajuste las puertas
Cierre de la puerta
Su refrigerador tiene dos rodillos frontales regulables – uno a la
derecha y otro a la izquierda. Si su refrigerador parece inestable o
usted quiere que las puertas se cierren con mayor facilidad, ajuste
la inclinación del refrigerador usando las instrucciones siguientes.
ADVERTENCIA
Peligro de Choque Eléctrico
Conecte a un contacto de pared de conexión a tierra de
3 terminales.
No quite la terminal de conexión a tierra.
No use un adaptador.
No use un cable eléctrico de extensión.
No seguir estas instrucciones puede ocasionar
la muerte, incendio o choque eléctrico.
1. Conecte a un contacto de pared de conexión a tierra de
3terminales.
5. Abra ambas puertas nuevamente y verifique para asegurarse
que se cierran con la facilidad que usted desea. De lo
contrario, incline el refrigerador ligeramente más hacia la parte
posterior, girando ambos tornillos niveladores hacia la
derecha. Puede tomar varias vueltas más, y usted deberá
girar ambos tornillos niveladores la misma cantidad de veces.
6. Vuelva a colocar la rejilla de la base.
Alineamiento de las puertas
Si el espacio entre sus puertas parece desigual, puede ajustarlo
usando las instrucciones siguientes:
1. Quite la cubierta de la bisagra superior.
2. Afloje los tornillos de la bisagra superior usando una llave
inglesa o de boca tubular de ⁵⁄₁₆".
3. Ponga una persona para sostener la puerta en su lugar o
coloque entre las puertas algo que mantenga el espacio
mientras usted ajusta los tornillos de la bisagra superior.
4. Vuelva a colocar la cubierta de la bisagra superior.
USO DE SU REFRIGERADOR
Uso de los controles
Para su conveniencia, los controles del refrigerador vienen
programados desde la fábrica. Al instalar su refrigerador por
primera vez, cerciórese de que los controles aún estén prefijados
en los ajustes medios, como se ilustra.
NOTA: Para apagar su refrigerador, gire el control del refrigerador
hacia la palabra Apagado (OFF) o hasta que aparezca la palabra
OFF. Su electrodoméstico no se enfriará mientras el control del
refrigerador esté en OFF.
Ajuste medio “3”
ADVERTENCIA
Peligro de Peso Excesivo
Use dos o más personas para mover e instalar
el refrigerador.
No seguir esta instrucción puede ocasionar una
lesión en la espalda u otro tipo de lesiones.
2. Mueva el refrigerador hasta su ubicación final.
3. Quite la rejilla de la base. Vea la ilustración de la Rejilla de la
base. Los dos tornillos niveladores son parte de las piezas de
montaje del rodillo frontal, que están en la base del
refrigerador a cada lado.
4. Use un destornillador para ajustar los tornillos niveladores.
Gire el tornillo nivelador hacia la derecha para levantar ese
lado del refrigerador o gire el tornillo nivelador hacia la
izquierda para bajar ese lado. Puede precisar darle varias
vueltas a los tornillos niveladores para ajustar la inclinación
del refrigerador.
NOTA: Haga que alguien empuje la parte superior del
refrigerador, lo cual quita algo de peso de los tornillos
niveladores y los rodillos. Esto facilita el ajuste de los tornillos.
Ajuste medio “3”
Ajuste medio “4”
REFRIGERATOR
IMPORTANTE:
■ Deje que su refrigerador se enfríe por completo antes de
agregar alimentos. Es mejor esperar 24 horas antes de poner
alimentos en el refrigerador.
■ Si agrega alimentos antes de que el refrigerador se haya
enfriado por completo, sus alimentos podrían echarse a
perder. Girar los controles del refrigerador o congelador a un
ajuste más alto (más frío) que el recomendado no enfriará los
compartimientos con mayor rapidez.
4
FREEZER
4
17
Page 18

Cómo ajustar los controles
Ritmo de la producción de hielo
Los ajustes medios indicados en la sección previa deben ser los
correctos para el uso normal de un refrigerador familiar. Los
controles están ajustados correctamente cuando la leche o los
jugos están tan fríos como Ud. desea y cuando el helado tiene
consistencia firme.
Si la temperatura está demasiado caliente o demasiado fría en el
refrigerador o en el congelador, primero verifique los conductos
de ventilación para asegurarse de que no están bloqueados.
Si necesita regular las temperaturas, utilice como guía los ajustes
que se enumeran en la tabla siguiente. Para modelos con dos
controles, ajuste primero la temperatura del refrigerador. Espere
por lo menos 24 horas entre un ajuste y otro, y después vuelva a
verificar las temperaturas.
CONDICIÓN/MOTIVO: AJUSTE:
REFRIGERADOR
demasiado caliente
CONGELADOR
demasiado caliente/muy
poco hielo
REFRIGERADOR
demasiado frío
CONGELADOR
demasiado frío
Control del REFRIGERADOR o
de la TEMPERATURA un ajuste
más alto
Control del CONGELADOR o de
la TEMPERATURA un ajuste
más alto
Interruptor de la producción
máxima de hielo (MAX)
Control del REFRIGERADOR o
de la TEMPERATURA un ajuste
más bajo
Control del CONGELADOR o de
la TEMPERATURA un ajuste
más bajo
■ Deje transcurrir 24 horas para la producción del primer lote de
hielo. Deshágase de los tres primeros lotes de hielo
producidos.
■ La fábrica de hielo deberá producir aproximadamente de 8 a
12 tandas de hielo en un período de 24 horas.
■ Para aumentar la producción de hielo, baje la temperatura del
congelador y del refrigerador. Vea “Uso de los controles”. Deje
transcurrir 24 horas entre ajustes.
■ Para una máxima producción de hielo (en algunos modelos),
empuje el interruptor hacia ICE PLUS (más hielo). La fábrica
de hielo deberá producir entre 16 y 20 tandas de hielo en un
período de 24 horas en el modo Ice Plus.
Recuerde
■ La calidad del hielo dependerá de la calidad del agua que
suministre a su fábrica de hielo. Evite la conexión de su
fábrica de hielo a un suministro de agua blanda. Los químicos
para ablandar el agua (como la sal) pueden dañar ciertos
componentes de la fábrica de hielo y producir un hielo de muy
baja calidad. Si no se puede evitar el uso de un suministro de
agua blanda, asegúrese de que el ablandador de agua esté
funcionando correctamente y que goce de un buen
mantenimiento.
■ Nunca use instrumentos afilados para romper el hielo en el
depósito. Esto puede dañar el balde y el mecanismo de
despachado.
■ No guarde nada encima ni dentro de la fábrica de hielo o del
depósito de hielo.
Control de humedad del cajón para verduras
(en algunos modelos)
Usted puede controlar el nivel de humedad en el cajón hermético
para verduras. Regule el control a cualquier ajuste entre Bajo
(LOW) y Alto (HIGH).
LOW (Bajo - posición abierta) para el mejor almacenamiento de
frutas y verduras con cáscaras.
HIGH (Alto - posición cerrada) para el mejor almacenamiento de
vegetales de hoja frescos.
Fábrica de hielo
Para encender y apagar la fábrica de hielo
Para poner a funcionar (ON) la fábrica de hielo, sencillamente baje
el brazo de control de alambre.
Para apagar (OFF) la fábrica de hielo manualmente, levante el
brazo de control de alambre a la posición Apagada (OFF-brazo
elevado) y escuche el chasquido.
NOTA: Su fábrica de hielo tiene un apagado automático. A
medida que se produce el hielo, los cubitos de hielo llenarán el
depósito para hielo y éstos levantarán el brazo de control de
alambre a la posición de apagado (OFF - brazo elevado). No
fuerce el brazo de control de alambre hacia arriba o hacia abajo.
CUIDADO DE SU REFRIGERADOR
Limpieza
ADVERTENCIA
Peligro de Explosión
Use un limpiador no inflamable.
No seguir esta instrucción puede ocasionar la muerte,
explosión o incendio.
Tanto la sección del refrigerador como la del congelador se
descongelan automáticamente. No obstante, limpie ambas
secciones más o menos una vez al mes para evitar la
acumulación de olores. Limpie los derrames de inmediato.
IMPORTANTE: Debido a que el aire circula entre ambas
secciones, los olores que se formen en una sección pasarán a la
otra. Para eliminar los olores, limpie completamente ambas
secciones. Para evitar la transferencia de olores y la
deshidratación de los alimentos, envuelva o tape bien los
alimentos.
18
Page 19

Para limpiar su refrigerador:
WA
RMER
COOLER
RECOMMENDED SETTING
REFRIGERATOR
WARMER
COOLER
RECOMMENDED SETTING
FREEZER
ALLOW 24 HOURS BETWEEN ADJUSTMENTS
NOTA: No use productos de limpieza abrasivos o ásperos, como
aerosoles para ventanas, productos de limpieza para fregar,
líquidos inflamables, ceras para limpieza, detergentes
concentrados, blanqueadores o productos de limpieza que
contengan productos de petróleo en las partes de plástico, en el
interior y en los revestimientos o juntas de la puerta. No use
toallas de papel, estropajos para fregar u otros utensilios de
limpieza ásperos.
1. Desenchufe el refrigerador o desconecte el suministro de
energía.
2. Lave a mano, enjuague y seque todas las partes
desmontables y las superficies interiores meticulosamente.
Use una esponja limpia o un paño liso y un detergente suave
en agua tibia.
3. Lave las superficies externas metálicas pintadas y de acero
inoxidable con una esponja limpia o un paño liso y detergente
suave con agua tibia.
4. No es necesaria una limpieza rutinaria del condensador en
ambientes de funcionamiento normal en el hogar. Si el
ambiente es particularmente grasoso o polvoriento, o si hay
bastante tránsito de mascotas en el hogar, el condensador
deberá limpiarse cada dos o tres meses para asegurar la
máxima eficacia.
Si necesita limpiar el condensador:
■ Quite la rejilla de la base.
■ Use una aspiradora con un cepillo suave para limpiar la
rejilla, las áreas abiertas detrás de la rejilla y el área de la
superficie frontal del condensador.
■ Vuelva a colocar la rejilla de la base cuando termine.
5. Enchufe el refrigerador o reconecte el suministro de energía.
Cómo cambiar los focos
NOTA: No todos los focos son adecuados para su refrigerador.
Asegúrese de reemplazar un foco con otro del mismo tamaño,
forma y vatiaje.
1. Desenchufe el refrigerador o desconecte el suministro de
energía.
2. Quite el foco que se encuentra detrás del panel de control en
el refrigerador o detrás de la cubierta de la luz en el
congelador (en algunos modelos). Reemplace el foco con un
foco del mismo vatiaje.
3. Enchufe el refrigerador o reconecte el suministro de energía.
1
WARMER
RMER
WA
1
2
R
F
E
R
3
3
O
EC
R
4
OOLE
C
5
2
FREEZER
3
3
COMMENDED SETTING
R
RE
O
T
A
R
E
G
I
4
G
IN
TT
SE
ED
D
N
E
M
M
5
COOLER
S
T
N
E
M
T
S
U
J
D
A
N
E
E
W
T
E
B
S
R
U
O
H
4
2
W
O
L
L
A
R
SOLUCIÓN DE PROBLEMAS
Primero pruebe las soluciones sugeridas aquí para evitar el costo innecesario del servicio.
Funcionamiento del refrigerador
El refrigerador no funciona
■ ¿Está desenchufado el cable eléctrico? Conecte a un
contacto de pared de conexión a tierra de 3 terminales.
■ ¿Funciona el contacto? Enchufe una lámpara para ver si
funciona el contacto.
■ ¿Hay un fusible de la casa fundido o se disparó el
cortacircuitos? Reemplace el fusible o reposicione el
cortacircuito. Si el problema continúa, llame a un electricista.
■ ¿Están encendidos los controles? Asegúrese de que los
controles del refrigerador estén encendidos. Vea “Uso de los
controles”.
■ ¿Es nueva la instalación? Deje transcurrir 24 horas después
de la instalación para que el refrigerador se enfríe por
completo.
NOTA: El ajustar los controles de temperatura en la posición
más fría no enfría ningún compartimiento más rápido.
Parece que el motor funciona excesivamente
Es posible que su nuevo refrigerador funcione por períodos más
largos que su refrigerador anterior debido al compresor y los
ventiladores de alto rendimiento. Es posible que la unidad
funcione por más tiempo si la habitación está caliente, si se ha
agregado una gran cantidad de alimentos, si se abren las puertas
con frecuencia o si se han dejado las mismas abiertas.
Parece que el refrigerador es ruidoso
El ruido del refrigerador se ha ido reduciendo a lo largo de los
años. Debido a esta reducción, es posible que escuche ruidos
intermitentes en su nuevo refrigerador que no había notado en el
modelo viejo. A continuación se enumeran algunos sonidos
normales con explicaciones.
■ Zumbido - se escucha cuando la válvula de agua se abre
para llenar la fábrica de hielo.
■ Sonido pulsante - los ventiladores/el compresor se están
ajustando para obtener el máximo desempeño.
■ Sonido sibilante/vibraciones - flujo de líquido refrigerante,
movimiento de la tubería de agua o artículos guardados arriba
del refrigerador.
■ Chisporroteos/Gorgoteos - agua goteando en el calentador
durante el ciclo de descongelación.
■ Estallido - contracción/expansión de la paredes interiores,
especialmente durante el enfriamiento inicial.
■ Agua corriendo - puede escucharse cuando el hielo se
derrite durante el ciclo de descongelación y corre hacia la
bandeja recolectora.
■ Chirridos/Crujidos - esto ocurre cuando el hielo es
expulsado del molde de la fábrica de hielo.
Las puertas no cierran completamente
■ ¿Está bloqueada la puerta? Mueva los paquetes de
alimentos lejos de la puerta.
■ ¿Hay un recipiente o un estante bloqueando el paso?
Empuje el recipiente o el estante nuevamente a la posición
correcta.
19
Page 20

Es difícil abrir las puertas
■ ¿Están las empaquetaduras sucias o pegajosas? Limpie
las empaquetaduras y las superficies de contacto con jabón
suave y agua tibia. Enjuague y seque con un paño suave.
Temperatura y humedad
La temperatura está demasiado caliente
■ ¿Es una nueva instalación? Deje transcurrir 24 horas
después de la instalación para que el refrigerador se enfríe por
completo.
■ ¿Se abre(n) o se deja(n) abierta(s) la(s) puerta(s) a
menudo? Esto hace que entre aire tibio al refrigerador.
Reduzca al mínimo el número de veces que abre la puerta y
mantenga las puertas completamente cerradas.
■ ¿Se ha agregado una gran cantidad de alimentos? Deje
que transcurran varias horas para que el refrigerador vuelva a
la temperatura normal.
■ ¿Se han ajustado los controles correctamente de acuerdo
con las condiciones circundantes? Ajuste los controles un
ajuste más frío. Fíjese en la temperatura en 24 horas. Vea
“Uso de los controles”.
Hay acumulación de humedad en el interior
NOTA: Es normal que se acumule un poco de humedad.
■ ¿Está húmeda la habitación? Esto contribuye a la
acumulación de humedad.
■ ¿Se abre(n) o se deja(n) abierta(s) la(s) puerta(s) a
menudo? Esto hace que entre aire húmedo al refrigerador.
Reduzca al mínimo el número de veces que abre la puerta y
mantenga las puertas completamente cerradas.
Hielo y agua
La fábrica de hielo no produce hielo o no produce suficiente
hielo
■ ¿Se ha conectado el refrigerador a un suministro de agua
y se ha abierto la válvula de cierre? Conecte el refrigerador
al suministro de agua y abra completamente la válvula de
cierre.
■ ¿Hay un estrechamiento en la tubería de suministro de
agua? Un estrechamiento en la tubería puede reducir el flujo
de agua. Enderece la tubería de suministro de agua.
■ ¿Está encendida la fábrica de hielo? Asegúrese de que el
brazo o interruptor de cierre de alambre (dependiendo del
modelo) esté en la posición de ON (Encendido).
■ ¿Es nueva la instalación? Espere 24 horas después de la
instalación de la fábrica de hielo para que empiece a producir
hielo. Deje transcurrir 72 horas para la producción total de
hielo.
■ ¿Se acaba de sacar una gran cantidad de hielo? Deje
transcurrir 24 horas para que la fábrica de hielo produzca más
hielo.
■ ¿Se trabó un cubo de hielo en el brazo eyector de la
fábrica de hielo?
Saque el hielo del brazo eyector con un utensilio de plástico.
■ ¿Se ha conectado un sistema de filtración de agua de
ósmosis inversa al suministro de agua fría? Esto puede
hacer que disminuya la presión de agua. Vea “Requisitos del
suministro de agua”.
Los cubos de hielo son huecos o pequeños
NOTA: Esto es una indicación de baja presión de agua.
■ ¿No está abierta por completo la válvula de cierre de
agua? Abra completamente la válvula de cierre de agua.
■ ¿Hay un estrechamiento en la tubería de suministro de
agua? Un estrechamiento en la tubería puede reducir el flujo
de agua. Enderece la tubería de suministro de agua.
■ ¿Se ha conectado un sistema de filtración de agua de
ósmosis inversa al suministro de agua fría? Esto puede
hacer que disminuya la presión de agua. Vea “Requisitos del
suministro de agua”.
■ ¿Aún tiene preguntas acerca de la presión de agua? Llame
a un plomero competente autorizado.
El hielo tiene mal sabor, mal olor o un color grisáceo
■ ¿Son nuevas las conexiones de plomería? Las conexiones
nuevas de plomería pueden producir un hielo descolorido o
de mal sabor.
■ ¿Se han guardado los cubos de hielo por mucho tiempo?
Deseche ese hielo. Lave el recipiente de hielo. Deje transcurrir
24 horas para que la fábrica de hielo haga hielo nuevo.
■ ¿Ha habido una transferencia de olor de los alimentos?
Use empaques herméticos contra humedad para almacenar
comida.
■ ¿Contiene el agua minerales (como el azufre)? Podría ser
necesario instalar un filtro de agua para eliminar los minerales.
20
Page 21

GARANTÍA DEL REFRIGERADOR
INGLIS BY WHIRLPOOL CORPORATION
GARANTÍA TOTAL POR UN AÑO PARA EL REFRIGERADOR
Durante un año a partir de la fecha de compra, siempre y cuando se dé a este refrigerador (excluyendo el filtro de agua) un uso y
mantenimiento de conformidad con las instrucciones adjuntas o provistas con el producto, Whirlpool Corporation se hará cargo del
costo de las piezas de repuesto FSP
obra. El servicio deberá ser suministrado por una compañía de servicio designada por Whirlpool.
En los modelos con un filtro de agua: garantía limitada de 30 días del filtro de agua. Durante 30 días a partir de la fecha de compra,
siempre y cuando se dé al filtro un uso y mantenimiento de conformidad con las instrucciones adjuntas o provistas con el producto,
Whirlpool Corporation se hará cargo del costo de las piezas de repuesto para corregir defectos en los materiales o en la mano de obra.
®
y del gasto del trabajo de reparación para corregir defectos en los materiales o en la mano de
™
GARANTÍA TOTAL DEL SEGUNDO AL QUINTO AÑO PARA LAS PARTES DEL SISTEMA
Del segundo al quinto año de la fecha de compra, siempre y cuando se dé a este refrigerador un uso y mantenimiento de conformidad
con las instrucciones adjuntas o provistas con el producto, Whirlpool Corporation se hará cargo del costo de las piezas de repuesto
especificadas de fábrica y del gasto del trabajo de reparación para corregir defectos en los materiales o en la mano de obra del sistema
de refrigeración sellado. Estas partes son: compresor, evaporador, condensador, secador y los tubos conectores. El servicio deberá ser
suministrado por una compañía de servicio designada por Whirlpool.
Whirlpool Corporation no pagará por:
1. Visitas de servicio técnico para corregir la instalación de su refrigerador, para enseñarle a usar su refrigerador, para cambiar fusibles
domésticos o para corregir la instalación eléctrica o de la tubería de la casa, para cambiar focos de luz, o para reemplazar otros
filtros de agua diferentes de los que se mencionó antes.
2. Reparaciones cuando su refrigerador se use de un modo diferente al doméstico normal de una familia.
3. Recogida y entrega. Su refrigerador está diseñado para ser reparado en el hogar.
4. Daños causados por accidente, alteración, uso indebido, abuso, incendio, inundación, instalación incorrecta, actos fortuitos o el
empleo de productos no aprobados por Whirlpool Corporation.
5. Cualquier pérdida de comida debido a las fallas del producto.
6. Reparaciones de piezas o sistemas como resultado de modificaciones no autorizadas que se hayan efectuado en el
electrodoméstico.
7. Piezas de repuesto o gastos de reparación para unidades que se empleen fuera de los Estados Unidos.
Algunos estados no permiten la exclusión o limitación de daños incidentales o consecuentes, de modo que esta exclusión o limitación
quizás no le corresponda. Esta garantía le otorga derechos legales específicos, y es posible que usted tenga también otros derechos,
los cuales varían de un estado a otro.
Esta garantía no tiene vigor fuera de los cincuenta Estados Unidos. Póngase en contacto con el distribuidor autorizado de
Whirlpool para determinar si corresponde otra garantía. 2/05
DE REFRIGERACIÓN SELLADO COMO SE INDICA
WHIRLPOOL CORPORATION NO SE RESPONSABILIZARÁ
POR DAÑOS INCIDENTALES O CONSECUENTES
21
Page 22

GUIDE D’UTILISATION ET D’ENTRETIEN DU RÉFRIGÉRATEUR
Assistance ou service
Si vous avez besoin d'assistance ou de service, consulter d'abord
la section “Dépannage”. On peut obtenir de l'aide
supplémentaire. Nous appeler au 1-800-253-1301 de n'importe
où aux É.-U., ou en écrivant à :
Whirlpool Corporation
Customer eXperience Center
553 Benson Road
Benton Harbor, MI 49022-2692
Dans votre correspondance, veuillez indiquer un numéro de
téléphone où l'on peut vous joindre dans la journée.
Conservez ce manuel et votre reçu de vente ensemble pour
référence ultérieure. Pour le service sous garantie, vous
devez présenter un document prouvant la date d'achat ou
d'installation.
SÉCURITÉ DU RÉFRIGÉRATEUR
Votre sécurité et celle des autres est très importante.
Nous donnons de nombreux messages de sécurité importants dans ce manuel et sur votre appareil ménager. Assurez-vous de
toujours lire tous les messages de sécurité et de vous y conformer.
Voici le symbole d’alerte de sécurité.
Ce symbole d’alerte de sécurité vous signale les dangers potentiels de décès et de blessures graves à vous
et à d’autres.
Tous les messages de sécurité suivront le symbole d’alerte de sécurité et le mot “DANGER” ou
“AVERTISSEMENT”. Ces mots signifient :
Inscrivez les renseignements suivants au sujet de votre appareil
ménager pour vous aider à obtenir assistance ou service en cas
de besoin. Vous devrez connaître le numéro de modèle et le
numéro de série au complet. Vous trouverez ces renseignements
sur la plaque signalétique située sur la paroi interne du
compartiment de réfrigération.
Nom du marchand ______________________________________________
Numéro de série ________________________________________________
Adresse ________________________________________________________
Numéro de téléphone ___________________________________________
Numéro de modèle______________________________________________
Date d'achat____________________________________________________
Risque possible de décès ou de blessure grave si vous ne
DANGER
AVERTISSEMENT
Tous les messages de sécurité vous diront quel est le danger potentiel et vous disent comment réduire le risque de blessure et
ce qui peut se produire en cas de non-respect des instructions.
suivez pas immédiatement les instructions.
Risque possible de décès ou de blessure grave si vous
ne suivez pas les instructions.
IMPORTANTES INSTRUCTIONS DE SÉCURITÉ
AVERTISSEMENT :
réfrigérateur, prendre quelques précautions fondamentales, y compris les suivantes :
■ Brancher l'appareil sur une prise à 3 alvéoles reliée à la terre.
■ Ne pas enlever la broche de liaison à la terre.
■ Ne pas utiliser un adaptateur.
■ Ne pas utiliser un câble de rallonge.
■ Utiliser deux ou plus de personnes pour déplacer et installer
le réfrigérateur.
■ Débrancher la source de courant électrique avant l'entretien.
■ Replacer pièces et panneaux avant de faire la remise en
marche.
Pour réduire les risques d'incendie, de choc électrique ou des blessures lors de l'utilisation du
■ Utiliser un produit de nettoyage ininflammable.
■ Garder les matériaux et les vapeurs inflammables, telle que
l'essence, loin du réfrigérateur.
■ Débrancher le réfrigérateur avant l'installation de la machine
à glaçons (seulement pour modèles prêts à recevoir une
machine à glaçons).
■ Utiliser un verre robuste pour prendre des glaçons ou de
l'eau (sur certains modèles).
■ Enlever les portes de votre vieux réfrigérateur.
CONSERVEZ CES INSTRUCTIONS
22
Page 23

Mise au rebut de votre vieux réfrigérateur
AVERTISSEMENT
Risque de suffoquer
Enlever les portes de votre vieux réfrigérateur.
Le non-respect de cette instruction peut causer
un décès ou des lésions cérébrales.
IMPORTANT : L'emprisonnement et l'étouffement des enfants ne
sont pas un problème du passé. Les réfrigérateurs jetés ou
abandonnés sont encore dangereux, même s'ils sont laissés
abandonnés pendant “quelques jours seulement”. Si vous vous
débarrassez de votre vieux réfrigérateur, veuillez suivre les
instructions suivantes pour aider à éviter les accidents.
INSTRUCTIONS D'INSTALLATION
Avant de jeter votre vieux réfrigérateur ou congélateur :
■ Enlever les portes.
■ Laisser les tablettes en place de sorte que les enfants ne
puissent pas y pénétrer facilement.
Déballage du réfrigérateur
AVERTISSEMENT
Risque du poids excessif
Utiliser deux ou plus de personnes pour déplacer et
installer le réfrigérateur.
Le non-respect de cette instruction peut causer
une blessure au dos ou d'autre blessure.
Retirer les matériaux d’emballage
Ne pas utiliser d'instruments coupants, d'alcool à friction, de
liquides inflammables ou de nettoyants abrasifs pour enlever le
ruban adhésif ou la colle. Ces produits peuvent endommager la
surface de votre réfrigérateur. Pour plus de renseignements, voir
la section “Sécurité du réfrigérateur”.
IMPORTANT : Ne pas enlever le dispositif de refoulement de l’air
en mousse blanche de derrière le panneau de commande sur le
plafond du réfrigérateur. Si le dispositif est enlevé, de la glace peut
se former en provenance du congélateur et causer la formation de
glaçons.
Déplacement de votre réfrigérateur :
Votre réfrigérateur est lourd. Lors du déplacement du
réfrigérateur pour le nettoyage ou le service, veiller à protéger l
le plancher. Toujours tirer le réfrigérateur tout droit lors du
déplacement. Ne pas incliner le réfrigérateur d’un côté ou de
l’autre ni le “faire marcher” en essayant de le déplacer car le
plancher pourrait être endommagé.
.
Importants renseignements à savoir au sujet des tablettes
et des couvercles en verre :
Ne pas nettoyer les tablettes ou couvercles en verre avec de
l’eau tiède quand ils sont froids. Les tablettes et les
couvercles peuvent se briser s'ils sont exposés à des
changements soudains de température ou à un impact tel
que coup brusque. Pour votre protection, le verre trempé est
conçu pour éclater en d’innombrables pièces minuscules.
Ceci est normal. Les tablettes et les couvercles en verre sont
lourds. Un soin spécial s’impose lors de leur déplacement
pour éviter l’impact d’une chute.
Spécifications d'emplacement
AVERTISSEMENT
Risque d'explosion
Garder les matériaux et les vapeurs inflammables, telle
que l'essence, loin du réfrigérateur.
Le non-respect de cette instruction peut causer
un décès, une explosion ou un incendie.
Nettoyage avant l’utilisation
Après avoir enlevé tous les matériaux d’emballage, nettoyer
l’intérieur du réfrigérateur avant de l’utiliser. Voir les instructions de
nettoyage dans la section “Entretien du réfrigérateur”.
Pour obtenir une aération appropriée pour votre réfrigérateur,
laisser un espace de ½" (1,25 cm) de chaque côté et au sommet.
Si vous installez votre réfrigérateur près d'un mur fixe, laisser un
espace de 2" (5,08 cm) minimum de chaque côté (certains
modèles nécessitent davantage d'espace) pour permettre à la
porte de s'ouvrir sans obstruction. Si votre réfrigérateur comporte
une machine à glaçons, s'assurer qu'un espace additionnel est
prévu à l'arrière pour permettre les connexions des conduits
d'eau.
23
Page 24

REMARQUE : Il est recommandé de ne pas installer le
réfrigérateur près d'un four, d'un radiateur ou de toute autre
source de chaleur. Ne pas installer le réfrigérateur dans un
endroit où la température baissera au-dessous de 55°F (13°C).
1/
2" (1,25 cm)
2" (5,08 cm)
Spécifications électriques
AVERTISSEMENT
Risque de choc électrique
Brancher sur une prise à 3 alvéoles reliée à la terre.
Ne pas enlever la broche de liaison à la terre.
Ne pas utiliser un adaptateur.
Ne pas utiliser un câble de rallonge.
Le non-respect de ces instructions peut causer
un décès, un incendie ou un choc électrique.
Avant de placer le réfrigérateur à son emplacement final, il est
important de vous assurer d'avoir la connexion électrique
appropriée.
Méthode recommandée de mise à la terre
Une source d'alimentation de 115 volts, 60 Hz, type 15 ou
20 ampères CA seulement, protégée par fusible et adéquatement
mise à la terre, est nécessaire. Il est recommandé d'utiliser un
circuit distinct pour alimenter uniquement votre réfrigérateur.
Utiliser une prise murale qui ne peut pas être mise hors circuit à
l'aide d'un commutateur. Ne pas utiliser un câble de rallonge.
REMARQUE : Avant d'exécuter tout type d'installation, nettoyage
ou remplacement d'une ampoule d'éclairage, tourner la
commande (réglage du thermostat, du réfrigérateur ou du
congélateur selon le modèle) à OFF (arrêt) et débrancher ensuite
le réfrigérateur de la source d'alimentation électrique. Lorsque
vous avez terminé, reconnecter le réfrigérateur à la source
d'alimentation électrique et tourner de nouveau la commande
(réglage du thermostat, du réfrigérateur ou du congélateur selon
le modèle) au réglage désiré.
Spécifications de l’alimentation en eau
Lire toutes les instructions avant de commencer.
IMPORTANT :
■ Si on doit utiliser le réfrigérateur avant qu’il soit raccordé à la
canalisation d’eau, placer la commande de la machine à
glaçons à la position OFF (arrêt).
■ Toutes les installations doivent être conformes aux exigences
des codes locaux de plomberie.
■ Utiliser un tube en cuivre et vérifier s’il y a des fuites. Installer
les tubes en cuivre seulement à des endroits où la
température se maintient au-dessus du point de congélation.
OUTILLAGE REQUIS : Rassembler les outils et pièces
nécessaires avant de commencer l'installation. Lire et suivre les
instructions fournies avec les outils indiqués ici. Tournevis
standard, clés plates de ⁷⁄₁₆" et ¹⁄₂" ou deux clés à molette
réglables, tourne-écrou et foret de ¹⁄₄", perceuse manuelle ou
électrique (convenablement reliée à la terre).
REMARQUE : Votre marchand de réfrigérateurs présente une
trousse disponible avec un robinet d’arrêt à étrier de ¹⁄₄"
(6,35 mm), un raccord et un tube en cuivre. Avant l’achat,
s’assurer que le robinet d’arrêt à étrier est conforme à vos codes
locaux de plomberie. Ne pas employer de robinet d’arrêt à étrier
de ³⁄₁₆" (4,76 mm) ou de type à percer, ce qui réduit le débit d’eau
et cause une obstruction plus facilement.
Pression de l'eau
Une alimentation en eau froide avec une pression entre 30 et
120 lb/po
2
(207 - 827 kPa) est nécessaire pour faire fonctionner le
distributeur d'eau et la machine à glaçons. Si vous avez des
questions au sujet de la pression de votre eau, appeler un
plombier qualifié agréé.
Alimentation en eau par osmose inverse
IMPORTANT : La pression de l'alimentation en eau entre le
système d'osmose inverse et la valve d'arrivée d'eau du
réfrigérateur doit être entre 30 et 120 lb/po² (207 - 827 kPa).
Si un système de purification de l'eau par osmose inverse est
raccordé à votre alimentation en eau froide, la pression de l'eau
au système doit être d'un minimum de 40 à 60 lb/po² (276 414 kPa).
Si la pression de l'eau au système d'osmose inverse est inférieure
à 40 - 60 lb/po
■ Vérifier pour voir si le filtre à sédiments du système d'osmose
2
(276 - 414 kPa) :
inverse est bloqué et le remplacer si nécessaire.
■ Laisser le réservoir du système d'osmose inverse se remplir
après une utilisation intense.
Si vous avez des questions au sujet de la pression de votre eau,
appeler un plombier qualifié agréé.
Raccordement de la canalisation d'eau
Lire toutes les instructions avant de commencer.
IMPORTANT : Si on doit utiliser le réfrigérateur avant qu’il soit
raccordé à la canalisation d’eau, placer la commande de la
machine à glaçons à la position OFF (arrêt).
Raccordement à une canalisation d’eau
1. Débrancher le réfrigérateur ou déconnecter la source de
courant électrique.
2. FERMER le robinet principal d’arrivée d’eau. OUVRIR le
robinet de puisage le plus proche pendant une période
suffisante pour que la canalisation d’eau se vide.
3. Trouver une canalisation d’eau froide verticale de
¹⁄₂" à 1¹⁄₄" (1,25 cm à 3,18 cm) près du réfrigérateur.
IMPORTANT :
■ Assurez-vous qu'il s'agit d'un conduit d'eau froide.
■ Un conduit horizontal fonctionnera, mais percer par le
dessus de la canalisation et non pas par le dessous. Ainsi,
l’eau ne risquera pas d’arroser la perceuse. Ceci empêche
également les sédiments qu’on trouve normalement dans
l’eau de s’accumuler dans le robinet d’arrêt.
4. Pour déterminer la longueur du tube en cuivre, il faut mesurer
la distance entre le point de connexion inférieur gauche à
l’arrière du réfrigérateur et le tuyau d’arrivée d’eau. Ajouter
une longueur de 7 pi (2,1 m) pour permettre le déplacement
24
Page 25

du réfrigérateur pour le nettoyage. Utiliser un tube en cuivre
C
de ¹⁄₄" (6,35 mm) de diamètre extérieur. Veiller à ce que le tube
soit coupé d’équerre aux deux extrémités.
5. À l’aide d’une perceuse électrique reliée à la terre, percer un
trou de ¹⁄₄" dans le tuyau de canalisation d’eau froide choisi.
A
G
B
C
Achever l’installation
AVERTISSEMENT
DEF
A. Canalisation d’eau froide
B. Bride de tuyau
C. Tube en cuivre
D. Écrou de compression
E. Bague de compression
F. Robinet d’arrêt
G. Écrou de serrage
6. Fixer le robinet d’arrêt sur la canalisation d’eau froide avec la
bride de tuyau. Vérifier que le raccord du robinet est bien
engagé dans le trou de ¹⁄₄" percé dans la canalisation et que la
rondelle d’étanchéité est placée sous la bride de tuyau. Serrer
l’écrou de serrage. Serrer lentement et uniformément les vis
de la bride de tuyau afin que la rondelle forme une jonction
étanche. Ne pas serrer excessivement car ceci pourrait
provoquer l’écrasement du tube en cuivre.
7. Enfiler l’écrou et la bague de compression du raccord sur le
tube en cuivre comme on le voit sur l’illustration. Insérer
l’extrémité du tube aussi loin que possible dans l’ouverture de
sortie du robinet. Visser l’écrou de compression sur le raccord
de sortie avec une clé à molette. Ne pas serrer
excessivement.
8. Placer le bout libre du tube dans un contenant ou évier et
OUVRIR le robinet principal d’arrivée d’eau et laisser l’eau
s’écouler par le tube jusqu’à ce que l’eau soit limpide.
FERMER le robinet principal d’arrivée d’eau. Enrouler le tube
en cuivre en spirale.
Raccordement au réfrigérateur
1. Débrancher le réfrigérateur ou déconnecter la source de
courant électrique.
2. Connecter le tube en cuivre au robinet d’eau en utilisant un
écrou et une bague de compression tel qu’illustré. Serrer
l’écrou de compression. Ne pas serrer excessivement.
3. Utiliser la bride du tube à l'arrière du réfrigérateur pour fixer le
tube au réfrigérateur tel qu'illustré. Ceci aidera à empêcher les
dommages au tube lorsque le réfrigérateur est poussé contre
le mur.
4. OUVRIR le robinet d’arrêt.
5. Inspecter pour rechercher les fuites. Serrer tous les raccords
(y compris les raccordements de la valve d’entrée d’eau) ou
les écrous qui coulent.
A
B
D
A. Bride du tube
B. Tube en cuivre
C. Écrou de compression
D. Valve d'entrée d'eau
6. La machine à glaçons est équipée d’un filtre à eau incorporé.
Si la qualité de l’eau distribuée localement nécessite un
deuxième filtre à eau, il serait utile de l'installer dans le tube de
raccordement de ¹⁄₄" (6,35 mm). On peut obtenir un tel filtre à
eau chez le marchand d’appareils électroménagers le plus
proche.
Risque de choc électrique
Brancher sur une prise à 3 alvéoles reliée à la terre.
Ne pas enlever la broche de liaison à la terre.
Ne pas utiliser un adaptateur.
Ne pas utiliser un câble de rallonge.
Le non-respect de ces instructions peut causer
un décès, un incendie ou un choc électrique.
Brancher le réfrigérateur ou reconnecter la source de courant
électrique.
REMARQUE : Attendre 24 heures pour produire la première
quantité de glaçons. Jeter les trois premières quantités de
glaçons produites. Attendre 3 jours pour que le bac à glaçons se
remplisse entièrement.
Portes du réfrigérateur
OUTILLAGE REQUIS : Clé à douille avec douille hexagonale de
⁵⁄₁₆", tournevis Phillips n° 2, tournevis à lame plate, clé plate de
⁵⁄₁₆", couteau à mastic plat de 2".
IMPORTANT :
■ Débrancher le réfrigérateur ou déconnecter la source de
courant électrique.
■ Retirer les aliments et tout balconnet de la porte du
réfrigérateur.
■ Si vous désirez seulement enlever et réinstaller les portes, voir
“Démontage - Portes et charnières” et “Réinstallation - Portes
et charnières”.
Démontage - Portes et charnières
Vis de charnière à tête hexagonale de ⁵⁄₁₆"
1. Débrancher le réfrigérateur ou déconnecter la source de
courant électrique.
2. Ouvrir la porte du réfrigérateur; enlever la grille de la base en
bas à l’avant du réfrigérateur. Voir l'illustration de la grille de la
base.
3. Fermer la porte du réfrigérateur; maintenir les deux portes
fermées jusqu'au moment où on est prêt à les séparer de la
caisse de l'appareil.
REMARQUE : Prévoir un support additionnel des portes
pendant la réinstallation des charnières. La force d'attraction
des aimants des portes ne suffit pas à les maintenir en place.
4. Enlever les pièces de la charnière supérieure - voir l'illustration
de la charnière supérieure. Soulever la porte du compartiment
de congélation pour la séparer de la caisse.
5. Enlever les pièces de la charnière centrale - voir l'illustration
de la charnière centrale. Soulever la porte du réfrigérateur
pour la séparer de la caisse.
6. Enlever les pièces de la charnière inférieure - voir l'illustration
de la charnière inférieure.
25
Page 26

Inversion du sens d’ouverture des portes (facultative)
IMPORTANT : Si on souhaite inverser la position des portes pour
pouvoir les ouvrir dans la direction opposée, procéder comme
suit. S'il n'est pas nécessaire de changer l'orientation des portes,
voir la section “Réinstallation - Portes et charnières”.
Vis de butée de la porte
Bouchon obturateur
de charnière de porte
6. Enlever la butée de porte. La transférer du côté opposé de la
porte du réfrigérateur. Voir l'illustration 5.
7. Positionner la poignée de porte du réfrigérateur sur le côté
opposé de la porte. Voir l'illustration 6-3. Placer d'abord les
deux vis supérieures de la poignée. Aligner la partie inférieure
de la poignée, puis visser la vis inférieure.
8. Aligner la garniture inférieure de la poignée de porte. Pour le
Style 1, enlever le couvre-vis de la poignée. Voir
l’illustration 6-1. Pour le Style 2, faire glisser la garniture en
place. Voir l'illustration 6-2.
9. Serrer toutes les vis. Conserver la porte du réfrigérateur à part
jusqu'à ce que la charnière inférieure soit installée sur le
produit.
Vis de blocage
de la poignée de la porte
Vis de la poignée à tête plate
Vis frontale de scellement
de la poignée de la porte
Bouchon obturateur
de charnière de caisse
Couvre-vis
de la poignée de la porte
Vis de poignée
à tête ronde
Caisse
1. Enlever les vis à tête hexagonale de ⁵⁄₁₆" de la charnière (côté
poignée); transférer ces pièces du côté opposé. Voir
l'illustration 1-1.
2. Enlever les bouchons d'obturation des trous de la charnière
au sommet de la caisse; transférer ceux-ci dans les trous de
charnière du côté opposé. Voir l'illustration 1-2.
Porte du compartiment de congélation
1. Enlever la poignée de la porte du compartiment de
congélation tel qu'illustré. Conserver toutes les pièces
ensemble. Voir l'illustration 2.
2. Enlever le bouchon d'obturation du trou de la charnière de la
porte. Transférer le bouchon du côté opposé. Voir
l'illustration 3.
3. Enlever les vis de blocage de la poignée de la porte. Les
transférer du côté opposé de la porte du compartiment de
congélation. Voir l'illustration 4.
4. Enlever la butée de porte. Transférer la butée du côté opposé
de la porte du compartiment de congélation. Voir
l'illustration 5.
5. Positionner la poignée du compartiment de congélation du
côté opposé de la porte. Fixer la poignée sur la porte. Voir
l'illustration 2.
6. Serrer toutes les vis. Conserver la porte à part jusqu'à la mise
en place des charnières et de la porte du compartiment de
réfrigération.
Porte du réfrigérateur
1. Enlever la garniture inférieure de la poignée de porte. Pour le
Style 1, enlever le couvre-vis de la poignée. Voir
l’illustration 6-1. Pour le Style 2, faire glisser la garniture vers
le bas. Voir l'illustration 6-2.
2. Enlever la poignée de la porte du compartiment de
réfrigération. Voir l'illustration. Conserver toutes les pièces
ensemble. Voir l'illustration 6-3.
3. Enlever le bouchon obturateur de charnière de la porte du
réfrigérateur. Transférer le bouchon d'obturation au trou du
côté opposé. Voir l'illustration 3.
4. Enlever les vis de blocage de la poignée de la porte. Les
transférer du côté opposé de la porte du réfrigérateur. Voir
l'illustration 4.
5. Enlever la vis frontale de scellement de la poignée de porte. La
transférer du côté opposé de la porte du réfrigérateur. Voir
l'illustration 7.
Réinstallation - Portes et charnières
REMARQUE : Si on inverse le sens d'ouverture des portes,
considérer l'image symétrique.
1. Replacer les pièces de la charnière inférieure tel qu'illustré et
resserrer les vis. Voir l'illustration de la charnière inférieure.
Replacer la porte du réfrigérateur.
REMARQUE : Prévoir un support additionnel des portes
pendant la réinstallation des charnières. La force d'attraction
des aimants des portes ne suffit pas à les maintenir en place.
2. Assembler les pièces de la charnière centrale. Voir
l'illustration. Serrer toutes les vis. Voir l'illustration de la
charnière centrale. Replacer la porte du compartiment de
congélation.
3. Assembler les pièces de la charnière supérieure. Voir
l'illustration de la charnière supérieure. Ne pas complètement
serrer les vis.
4. Aligner correctement les portes au niveau du bas de la porte
du compartiment de congélation et du sommet de la porte du
réfrigérateur. Serrer toutes les vis.
Étapes finales
1. Inspecter tous les trous. Vérifier que tous les bouchons
d'obturation et vis sont en place. Réinstaller le couvercle de la
charnière supérieure. Voir l'illustration de la charnière
supérieure.
2. Réinstaller la grille de la base. Voir l'illustration de la grille de la
base.
AVERTISSEMENT
Risque de choc électrique
Brancher sur une prise à 3 alvéoles reliée à la terre.
Ne pas enlever la broche de liaison à la terre.
Ne pas utiliser un adaptateur.
Ne pas utiliser un câble de rallonge.
Le non-respect de ces instructions peut causer
un décès, un incendie ou un choc électrique.
3. Brancher le réfrigérateur ou reconnecter la source de courant
électrique.
4. Réinstaller toutes les pièces amovibles sur les portes; y ranger
les aliments.
26
Page 27

Démontage et réinstallation
de la porte
Grille de la base
Charnière supérieure
A
B
C
Porte standard - Inversion du sens d'ouverture des portes (facultatif)
1-2
A
1
A.
Vis de charnière à tête
hexagonale de
1-1
5
/
16
"
A
A. Bouchon obturateur
de charnière de porte
2
A
B
A
A. Bouchons obturateurs
de charnière de caisse
3
A. Couvercle de charnière supérieure
B. Vis de charnière à tête
hexagonale de
5
/
16
"
C. Charnière supérieure
Charnière centrale
A
B
A. Charnière centrale
B. Vis de charnière à tête
hexagonale de
5
/
16
"
Charnière inférieure
A. Charnière inférieure
B. Vis de charnière à tête
hexagonale de
5
/
16
"
A
A. Vis de la poignée à tête plate
B. Poignée de la porte du
compartiment de congélation
4
A. Vis de scellement de la
poignée de la porte
Vue avant
A. Vis de butée de la porte
A
A
Vue de côté
B
5
A. Vis frontale de
scellement de
la poignée de
la porte
7
B. Butée de la porte
A
B
6-1
A
6-2
6-3
A
B
A. Couvre-vis de
la poignée de
la porte
C
A. Vis de la poignée
à tête plate
B. Poignée du
compartiment
de réfrigération
C. Vis de poignée
27
Page 28

Ajustement des portes
Fermeture des portes
Votre réfrigérateur présente deux roulettes réglables à l’avant –
l’une du côté droit et l’autre du côté gauche. Si votre réfrigérateur
semble instable ou si vous désirez que les portes se ferment plus
facilement, faire le réglage de l’inclinaison du réfrigérateur en
suivant les instructions ci-dessous.
AVERTISSEMENT
Risque de choc électrique
Brancher sur une prise à 3 alvéoles reliée à la terre.
Ne pas enlever la broche de liaison à la terre.
Ne pas utiliser un adaptateur.
Ne pas utiliser un câble de rallonge.
Le non-respect de ces instructions peut causer
un décès, un incendie ou un choc électrique.
1. Brancher l’appareil sur une prise à 3 alvéoles reliée à la terre.
AVERTISSEMENT
Risque du poids excessif
Utiliser deux ou plus de personnes pour déplacer et
installer le réfrigérateur.
Le non-respect de cette instruction peut causer
une blessure au dos ou d'autre blessure.
5. Ouvrir les deux portes de nouveau et s’assurer qu’elles se
ferment aussi facilement que vous le désirez. Sinon, incliner le
réfrigérateur un peu plus vers l’arrière en tournant les deux vis
de nivellement vers la droite. Plusieurs tours peuvent être
nécessaires et vous devez tourner les deux vis de nivellement
d’un espace égal.
6. Réinstaller la grille de la base.
Alignement des portes
Si l’espace entre les portes semble inégal, on peut faire le réglage
en suivant les instructions ci-dessous :
1. Soulever et enlever le couvercle de la charnière supérieure.
2. Dégager les vis de la charnière supérieure en utilisant une
douille de ⁵⁄₁₆" ou une clé à molette.
3. Demander à une personne de tenir la porte en place ou placer
un espaceur entre les portes pendant que vous serrez les vis
de la charnière supérieure.
4. Réinstaller le couvercle sur la charnière.
UTILISATION DU
RÉFRIGÉRATEUR
Utilisation des commandes
Pour vous accommoder, les commandes du réfrigérateur ont été
préréglées à l’usine. Au moment de l’installation initiale du
réfrigérateur, s’assurer que les commandes sont encore
préréglées aux réglages moyens tel qu’illustré.
REMARQUE : Pour éteindre le réfrigérateur tourner le réglage au
mot OFF ou jusqu’à ce que le mot OFF (arrêt) apparaisse. Votre
appareil ne se refroidira pas lorsque la commande du réfrigérateur
est réglée à OFF (arrêt).
Réglage moyen “3”
2. Placer le réfrigérateur à son emplacement final.
3. Enlever la grille de la base. Voir l’illustration - Grille de la base.
Les deux vis de nivellement font partie des montages de
roulettes avant qui sont à la base du réfrigérateur d’un côté et
de l’autre.
4. Utiliser un tournevis pour ajuster les vis de nivellement.
Tourner la vis de nivellement vers la droite pour soulever ce
côté du réfrigérateur ou tourner la vis de nivellement vers la
gauche pour abaisser ce côté. Plusieurs tours des vis de
nivellement peuvent être nécessaires pour régler l’inclinaison
du réfrigérateur.
REMARQUE : Si une autre personne pousse le haut du
réfrigérateur, le poids devient moins lourd sur les vis de
nivellement et les roulettes, ce qui rend plus facile l’ajustement
des vis.
28
REFRIGERATOR
Réglage moyen “3”
Réglage moyen “4”
4
FREEZER
4
Page 29

IMPORTANT :
■ Donner au réfrigérateur le temps de se refroidir complètement
avant d’y ajouter des aliments. Il vaut mieux attendre
24 heures avant de placer des aliments dans le réfrigérateur.
■ Si vous ajoutez des aliments avant que le réfrigérateur ne soit
complètement refroidi, vos aliments peuvent se gâter. Tourner
les réglages du réfrigérateur et du congélateur à un niveau
plus élevé (plus froid) que les réglages recommandés ne
refroidira pas les compartiments plus vite.
Ajustement des commandes
Les réglages moyens indiqués à la section précédente devraient
être corrects pour l'utilisation normale du réfrigérateur
domestique. Les réglages sont faits correctement lorsque le lait
ou le jus est aussi froid que vous l'aimez et lorsque la crème
glacée est ferme.
Si la température est trop tiède ou trop froide dans le réfrigérateur
ou le congélateur, vérifier d'abord les évents pour vous assurer
qu'ils ne sont pas bloqués.
S'il est nécessaire d'ajuster les températures, utiliser les réglages
indiqués au tableau ci-dessous comme guide. Sur les modèles à
deux commandes, ajuster d'abord la température du réfrigérateur.
Attendre au moins 24 heures entre les ajustements, puis revérifier
les températures.
CONDITION/RAISON : AJUSTEMENT :
REFRIGÉRATEUR trop
tiède
Régler la commande du
RÉFRIGÉRATEUR ou de la
TEMPÉRATURE à un degré plus
haut
CONGÉLATEUR trop
tiède/trop peu de glaçons
Régler la commande du
CONGÉLATEUR ou de la
TEMPÉRATURE à un degré plus
haut
Commutateur de production de
glaçons à MAX.
RÉFRIGÉRATEUR trop
froid
Régler la commande du
RÉFRIGÉRATEUR ou de la
TEMPÉRATURE à un degré plus
bas
CONGÉLATEUR trop froid Régler la commande du
CONGÉLATEUR ou de la
TEMPÉRATURE à un degré plus
bas
Réglage de l'humidité dans le bac à légumes
(sur certains modèles)
On peut contrôler le degré d'humidité dans le bac à légumes
étanche. La commande peut être ajustée à n'importe quel réglage
entre LOW et HIGH.
LOW/bas (ouvert) pour une meilleure conservation des fruits et
légumes à pelures.
HIGH/haut (fermé) pour une meilleure conservation des légumes
à feuilles frais.
Machine à glaçons
Mise en marche/arrêt de la machine à glaçons
Pour mettre la machine à glaçons en marche, il suffit d'abaisser le
bras de commande en broche.
Pour arrêter manuellement la machine à glaçons, soulever le bras
de commande en broche à la position OFF (élevée) et attendre le
clic.
REMARQUE : Votre machine à glaçons a un arrêt automatique.
Au fur et à mesure de la fabrication de la glace, les glaçons
remplissent le bac d'entreposage de glaçons. Les glaçons
soulèvent le bras de commande en broche à la position OFF
(élevée). Ne pas forcer le commutateur du bras en broche vers le
haut ou vers le bas.
Taux de production des glaçons
■ Accorder 24 heures pour produire la première quantité de
glaçons. Jeter les trois premières quantités de glaçons
produites.
■ La machine à glaçons devrait produire environ 8 à 12 lots de
glaçons au cours d’une période de 24 heures.
■ Pour augmenter la production de glaçons, diminuer la
température du congélateur et du réfrigérateur. Voir
“Utilisation des commandes”. Attendre 24 heures entre les
ajustements.
■ Pour une production de glaçons maximale (sur certains
modèles), tourner l'interrupteur à ICE PLUS. La machine à
glaçons devrait produire environ 16 à 20 lots de glaçons au
cours d’une période de 24 heures en mode Ice Plus.
Rappelez-vous
■ La qualité de vos glaçons sera seulement aussi bonne que la
qualité de l'eau fournie à votre machine à glaçons. Éviter de
brancher la machine à glaçons à un approvisionnement d'eau
adoucie. Les produits chimiques adoucisseurs d'eau (tels que
le sel) peuvent endommager des pièces de la machine à
glaçons et causer une piètre qualité des glaçons. Si une
alimentation d'eau adoucie ne peut pas être évitée, s'assurer
que l'adoucisseur d'eau fonctionne bien et qu'il est bien
entretenu.
■ Ne jamais utiliser un objet pointu pour briser les glaçons dans
le bac. Cette action peut endommager le seau et le
mécanisme du distributeur.
■ Ne pas garder quoi que ce soit sur le dessus ou dans la
machine à glaçons ou dans le bac à glaçons.
29
Page 30

ENTRETIEN DU RÉFRIGÉRATEUR
WARMER
COOLER
RECOMMENDED SETTING
REFRIGERATOR
WARMER
COOLER
RECOMMENDED SETTING
FREEZER
ALLOW 24 HOURS BETWEEN ADJUSTMENTS
Nettoyage
AVERTISSEMENT
Risque d'explosion
Utiliser un produit de nettoyage ininflammable.
Le non-respect de cette instruction peut causer un décès,
une explosion ou un incendie.
Les sections de réfrigération et de congélation se dégivrent
automatiquement. Toutefois, nettoyer les deux sections au moins
une fois par mois pour empêcher une accumulation d'odeurs.
Essuyer les renversements immédiatement.
IMPORTANT : Comme l’air circule entre les deux sections, toutes
les odeurs formées dans une section seront transférées à l’autre.
Vous devez nettoyer à fond les deux sections pour éliminer les
odeurs. Pour empêcher le transfert d’odeurs et l’assèchement
des aliments, envelopper ou recouvrir hermétiquement les
aliments.
Nettoyage de votre réfrigérateur :
REMARQUE : Ne pas utiliser des nettoyants abrasifs tels que les
nettoyants à vitre en atomiseurs, nettoyants à récurer, liquides
inflammables, cires nettoyantes, détergents concentrés, eau de
Javel ou nettoyants contenant du pétrole sur les pièces en
plastique, les garnitures intérieures et de portes ou les joints de
portes. Ne pas utiliser d'essuie-tout, tampons à récurer ou autres
outils de nettoyage abrasifs.
1. Débrancher le réfrigérateur ou déconnecter la source de
courant électrique.
2. Laver à la main, rincer et sécher les pièces amovibles et les
surfaces internes à fond. Utiliser une éponge propre ou un
linge doux et un détergent doux dans de l'eau tiède.
3. Laver les surfaces extérieures en acier inoxydable ou en métal
peint avec une éponge propre ou un linge doux et un
détergent doux dans de l'eau tiède.
4. Le condenseur n'a pas besoin d'être nettoyé souvent dans
des conditions de fonctionnement normales. Si
l'environnement est particulièrement graisseux, poussiéreux,
ou s'il y a des animaux domestiques dans la maison, le
condenseur devrait être nettoyé tous les deux ou trois mois
pour assurer une efficacité maximum.
Si vous avez besoin de nettoyer le condenseur :
■ Retirer la grille de la base.
■ Utiliser un aspirateur à brosse douce pour nettoyer la
grille, les endroits ouverts derrière la grille et la surface à
l'avant du condenseur.
■ Replacer la grille de la base lorsqu’on a terminé.
5. Brancher le réfrigérateur ou reconnecter la source de courant
électrique.
Remplacement des ampoules d’éclairage
REMARQUE : Toutes les ampoules ne s'adaptent pas forcément
à votre réfrigérateur. S’assurer de remplacer l’ampoule par une
ampoule de grosseur, de forme et de puissance semblables.
1. Débrancher le réfrigérateur ou déconnecter la source de
courant électrique.
2. Saisir l’ampoule située derrière le tableau de commande dans
le réfrigérateur ou derrière le protège-ampoule dans le
congélateur (sur certains modèles) et la dévisser. Remplacer
l’ampoule par une ampoule de même puissance.
3. Brancher le réfrigérateur ou reconnecter la source de courant
électrique.
1
WARMER
WARMER
1
2
R
F
E
R
3
3
CO
RE
4
COOLER
5
2
FREEZER
3
3
R
RECOMMENDED SETTING
O
T
A
R
E
G
I
4
TTING
D SE
DE
EN
MM
5
COOLER
S
T
N
E
M
T
S
U
J
D
A
N
E
E
W
T
E
B
S
R
U
O
H
4
2
W
O
L
L
A
Essayer les solutions suggérées ici d'abord afin d'éviter le coût d'une visite de service non nécessaire.
Fonctionnement du réfrigérateur
Le réfrigérateur ne fonctionne pas
■ Le cordon d'alimentation électrique est-il débranché?
Brancher sur une prise à 3alvéoles reliée à la terre.
■ La prise électrique fonctionne-t-elle? Brancher une lampe
pour voir si la prise fonctionne.
■ Un fusible est-il grillé ou un disjoncteur s'est-il ouvert?
Remplacer le fusible ou réarmer le disjoncteur. Si le problème
persiste, appeler un électricien.
■ Les réglages sont-ils sur ON (marche)? S'assurer que les
commandes du réfrigérateur sont sur ON (marche). Voir
“Utilisation des commandes”.
30
DÉPANNAGE
■ S'agit-il d'une nouvelle installation? Accorder 24 heures
après l'installation pour que le réfrigérateur se refroidisse
complètement.
REMARQUE : Mettre les boutons de réglage de la
température sur la position la plus froide ne refroidira aucun
des compartiments plus rapidement.
Le moteur semble trop tourner
Il se peut que votre nouveau réfrigérateur fonctionne plus
longtemps que l'ancien grâce à son compresseur à haute
efficacité et ses ventilateurs. L'appareil peut fonctionner plus
longtemps encore si la température de la pièce est chaude, si une
importante quantité de nourriture y est ajoutée, si les portes sont
fréquemment ouvertes ou si elles ont été laissées ouvertes.
Page 31

Le réfrigérateur semble bruyant
Le bruit des réfrigérateurs a été réduit au cours des années. Du
fait de cette réduction, il est possible d'entendre des bruits
intermittents venant de votre nouveau réfrigérateur qui n'avaient
pas été décelés avec votre ancien modèle. Voici une liste des
sons normaux accompagnés d'explications.
■ Bourdonnement - entendu lorsque le robinet d'arrivée d'eau
s'ouvre pour remplir la machine à glaçons.
■ Pulsation - les ventilateurs/le compresseur se règlent afin
d'optimiser la performance.
■ Sifflement/cliquetis - écoulement de liquide réfrigérant,
mouvement des conduites d'eau ou d'objets posés sur le
dessus du réfrigérateur.
■ Grésillement/gargouillement - de l'eau tombe sur l'élément
de chauffage durant le programme de dégivrage.
■ Bruit d'éclatement - contraction/expansion des parois
internes, particulièrement lors du refroidissement initial.
■ Bruit d'écoulement d'eau - peut être entendu lorsque la
glace fond lors du programme de dégivrage et que l'eau
s'écoule dans le plateau de dégivrage.
■ Grincement/craquement - se produit lorsque la glace est
éjectée du moule à glaçons.
Les portes ne ferment pas complètement
■ La porte est-elle bloquée en position ouverte? Déplacer les
emballages d'aliments pour libérer la porte.
■ Un compartiment ou une tablette bloquent-ils le passage?
Replacer le compartiment ou la tablette en position correcte.
Les portes sont difficiles à ouvrir
■ Les joints d'étanchéité sont-ils sales ou collants? Nettoyer
les joints et les surfaces de contact au savon doux et à l'eau
tiède. Rincer et sécher avec un linge doux.
Température et humidité
La température est trop élevée
■ S'agit-il d'une nouvelle installation? Accorder 24 heures
après l'installation pour que le réfrigérateur se refroidisse
complètement.
■ La/Les porte(s) est/sont-elle(s) fréquemment ouverte(s) ou
laissée(s) ouverte(s)? Ceci permet à l'air chaud de pénétrer
dans le réfrigérateur. Minimiser les ouvertures de porte et
garder les portes complètement fermées.
■ Une importante quantité d'aliments a-t-elle été ajoutée?
Accorder quelques heures pour que le réfrigérateur revienne à
sa température normale.
■ Les réglages sont-ils corrects pour les conditions
existantes? Ajuster les commandes un cran plus froid.
Vérifier la température au bout de 24 heures. Voir “Utilisation
des commandes”.
Il y a une accumulation d'humidité à l'intérieur
REMARQUE : Une certaine accumulation d'humidité est normale.
■ La pièce est-elle humide? Ceci contribue à l'accumulation
de l'humidité.
■ La/Les porte(s) est/sont-elle(s) fréquemment ouverte(s) ou
laissée(s) ouverte(s)? Ceci permet à l'air humide de pénétrer
dans le réfrigérateur. Minimiser les ouvertures de porte et
garder les portes complètement fermées.
Glaçons et eau
La machine à glaçons ne produit pas ou pas suffisamment de
glaçons
■ Le réfrigérateur est-il connecté à l'alimentation en eau et
le robinet d'arrêt d'eau est-il ouvert? Brancher le
réfrigérateur à l'alimentation en eau et ouvrir le robinet d'arrêt
d'eau complètement.
■ La canalisation de la source d'eau du domicile comporte-
t-elle une déformation? Une déformation dans la
canalisation peut réduire l'écoulement d'eau. Redresser la
canalisation d'eau.
■ La machine à glaçons est-elle allumée? S'assurer que le
bras de commande en broche ou l'interrupteur (selon le
modèle) est en position ON.
■ S'agit-il d'une nouvelle installation? Attendre 24 heures
après l'installation pour le commencement de la production
de glaçons. Attendre 72 heures pour le commencement de la
production complète de glaçons.
■ Une grande quantité de glaçons vient-elle d'être enlevée?
Attendre 24 heures pour que la machine à glaçons produise
plus de glaçons.
■ Un glaçon est-il coincé dans le bras éjecteur? Enlever le
glaçon du bras éjecteur avec un ustensile en plastique.
■ Un système de filtration de l'eau à osmose inverse est-il
connecté à votre canalisation d'eau froide? Ceci peut
diminuer la pression de l'eau. Voir “Spécifications de
l'alimentation en eau”.
Les glaçons sont creux ou petits
REMARQUE : Cela indique une faible pression de l'eau.
■ La valve de la canalisation d'eau n'est-elle pas
complètement ouverte? Ouvrir la valve d'eau complètement.
■ La canalisation de la source d'eau du domicile comporte-
t-elle une déformation? Une déformation dans la
canalisation peut réduire l'écoulement d'eau. Redresser la
canalisation d'eau.
■ Un système de filtration de l'eau à osmose inverse est-il
connecté à votre canalisation d'eau froide? Ceci peut
diminuer la pression de l'eau. Voir “Spécifications de
l'alimentation en eau”.
■ Reste-t-il des questions concernant la pression de l'eau?
Appeler un plombier agréé et qualifié.
Goût, odeur ou couleur grise des glaçons
■ Les raccords de plomberie sont-ils neufs? Des raccords de
plomberie neufs peuvent causer une décoloration et un
mauvais goût des glaçons.
■ Les glaçons ont-ils été gardés trop longtemps? Jeter les
glaçons. Laver le compartiment à glaçons. Accorder
24 heures pour la fabrication de nouveaux glaçons.
■ Y a-t-il un transfert d'odeurs de nourriture? Utiliser des
emballages étanches à l'air et à l'humidité pour conserver les
aliments.
■ L'eau contient-elle des minéraux (tels que le soufre)?
L'installation d'un filtre peut être requise afin d'enlever les
minéraux.
31
Page 32

GARANTIE DU RÉFRIGÉRATEUR
INGLIS BY WHIRLPOOL
GARANTIE COMPLÈTE DE UN AN DU RÉFRIGÉRATEUR
Pendant un an à compter de la date d'achat, lorsque ce réfrigérateur (sauf le filtre à eau) est utilisé et entretenu conformément aux
instructions jointes à ou fournies avec le produit, Whirlpool Corporation paiera pour les pièces de rechange FSP® et les frais de maind'oeuvre pour corriger les vices de matériaux ou de fabrication. Le service doit être fourni par une compagnie de service désignée par
Whirlpool.
Sur les modèles avec un filtre à eau : garantie limitée de 30 jours sur le filtre à eau. Pendant 30 jours à compter de la date d'achat,
lorsque ce filtre est utilisé et entretenu conformément aux instructions jointes à ou fournies avec le produit, Whirlpool Corporation
paiera pour les pièces de rechange pour corriger les vices de matériaux ou de fabrication.
GARANTIE COMPLÈTE DE LA DEUXIÈME À LA CINQUIÈME ANNÉE INCLUSIVEMENT
SUR LES PIÈCES DU SYSTÈME DE RÉFRIGÉRATION SCELLÉ (VOIR LISTE)
De la deuxième à la cinquième année inclusivement à compter de la date d'achat, lorsque ce réfrigérateur est utilisé et entretenu
conformément aux instructions jointes à ou fournies avec le produit, Whirlpool Corporation paiera pour les pièces de rechange FSP
la main-d'oeuvre pour corriger les vices de matériaux ou de fabrication du système de réfrigération scellé. Il s'agit des pièces
suivantes : compresseur, évaporateur, condenseur, séchoir et conduits de connexion. Le service doit être fourni par une compagnie de
service désignée par Whirlpool.
Whirlpool Corporation ne paiera pas pour :
1. Les visites de service pour rectifier l'installation du réfrigérateur, montrer à l'utilisateur comment utiliser l'appareil, remplacer des
fusibles ou rectifier le câblage du domicile ou remplacer des ampoules électriques et des filtres à eau autrement qu’indiqué cidessus.
2. Les réparations lorsque le réfrigérateur est utilisé à des fins autres que l'usage unifamilial normal.
3. Le ramassage et la livraison. Le réfrigérateur est conçu pour être réparé à domicile.
4. Les dommages causés par : accident, modification, mésusage, abus, incendie, inondation, mauvaise installation, actes de Dieu ou
l'utilisation de produits non approuvés par Whirlpool Corporation.
5. Toute perte d’aliments due à une défaillance du produit.
6. Les réparations aux pièces ou systèmes résultant d'une modification non autorisée faite à l'appareil.
7. Le coût des pièces de rechange et de la main-d'œuvre pour les appareils utilisés hors des États-Unis.
CORPORATION™
®
et
WHIRLPOOL CORPORATION N'ASSUMENT AUCUNE RESPONSABILITÉ POUR LES DOMMAGES FORTUITS OU INDIRECTS
Certains États ne permettent pas l'exclusion ou la limitation des dommages fortuits ou indirects de sorte que cette exclusion ou
limitation peut ne pas être applicable dans votre cas. Cette garantie vous donne des droits légaux spécifiques, et vous pourriez aussi
avoir d'autres droits qui peuvent varier d'un État à l'autre.
À l'extérieur des 50 États des États-Unis, cette garantie ne s'applique pas. Contacter votre marchand Whirlpool autorisé pour
déterminer si une autre garantie s'applique. 2/05
2314150
© 2005 Whirlpool Corporation.
All rights reserved.
Todos los derechos reservados.
Tous droits réservés.
® Registered Trademark/TM Trademark of Whirlpool, U.S.A.
® Marca registrada/TM Marca de comercio de Whirlpool, EE.UU.
® Marque déposée/TM Marque de commerce de Whirlpool, U.S.A.
Printed in U.S.A.
Impreso en EE.UU.
Imprimé aux É.-U.
2/05
 Loading...