

Health & Safety, Use & Care and Installation guide
www.whirlpool.eu/register

ENGLISH
HEALTH & SAFETY, USE & CARE
and INSTALLATION GUIDES
THANK YOU FOR BUYING A WHIRLPOOL PRODUCT.
In order to receive a more complete assistance,
please register your appliance on www.whirlpool.eu/register
Index
Health and Safety guide
SAFETY INSTRUCTIONS .....................................................................4
Use and Care guide
PRODUCT DESCRIPTION ............................................................................6
APPLIANCE ...........................................................................................6
CONTROL PANEL ......................................................................................6
DOOR ................................................................................................7
DRUM LIGHT (if available) .............................................................................7
AVAILABLE ACCESSORIES .............................................................................7
HOW TO USE THE APPLIANCE .......................................................................8
FIRST TIME USE .......................................................................................8
DAILY USE ............................................................................................9
PROGRAMMES .......................................................................................10
OPTIONS ............................................................................................13
FUNCTIONS ..........................................................................................14
INDICATORS .........................................................................................15
ENERGY SAVING .....................................................................................16
CLEANING & MAINTENANCE .......................................................................17
EMPTYING THE WATER TANK ..........................................................................17
CLEANING THE DOOR FILTER .........................................................................18
2

CLEANING THE BOTTOM FILTER .......................................................................19
CLEANING THE OUTSIDE OF THE DRYER ...............................................................21
REVERSING THE DOOR STOP ..........................................................................22
TROUBLESHOOTING GUIDE & AFTER-SALES SERVICE .............................................24
FAILURE INDICATOR AND MESSAGES ..................................................................26
TRANSPORT AND HANDLING .........................................................................28
AFTER-SALES SERVICE ................................................................................29
Installation guide ...................................................................................30
Doing this will keep your machine working at its BEST ...............................................31
EN
3
SAFETY INSTRUCTIONS
IMPORTANT TO BE READ AND OBSERVED
This symbol reminds you to read this instruction
manual.
Before using the appliance, read these safety
instructions. Keep them nearby for future reference.
These instructions and the appliance itself provide
important safety warnings, to be observed at all
times. The manufacturer declines any liability for
failure to observe these safety instructions, for
inappropriate use of the appliance or incorrect
setting of controls.
Very young children (0-3years) should be kept
away from the appliance. Young children (3-8years)
should be kept away from the appliance unless
continuously supervised. Children from 8years old
and above and persons with reduced physical,
sensory or mental capabilities or lack of experience
and knowledge can use this appliance only if they
are supervised or have been given instructions on
safe use and understand the hazards involved.
Children must not play with the appliance. Cleaning
and user maintenance must not be carried out by
children without supervision.
WARNING: Never stop a tumble dryer before the
end of the drying cycle unless all items are quickly
removed and spread out so that the heat is
dissipated.
Items that have been soiled with substances such
as cooking oil, acetone, alcohol, petrol, kerosene,
spot removers, turpentine, waxes and wax removers
should be washed in hot water with an extra amount
of detergent before being dried in the tumble dryer.
Items such as foam rubber (latex foam), shower caps,
waterproof textiles, rubber-backed articles and
clothes or pillows tted with foam rubber pads
should not be dried in the tumble dryer. Remove all
objects from pockets, such as lighters and matches.
Do not use the tumble dryer if industrial chemicals
have been used to clean it.
Oil-soaked items should not be dried in the
tumble dryer due to their high ammability.
Never open the door forcibly or use it as a step.
PERMITTED USE
CAUTION: The appliance is not intended to be
operated by means of an external switching device,
such as a timer, or separate remote controlled system.
This appliance is intended to be used in household
and similar applications such as: sta kitchen areas
in shops, oces and other working environments;
farm houses; by clients in hotels, motels, bed &
breakfast and other residential environments.
Do not load the machine above the maximum
capacity (kg of dry cloth) indicated in the programme
table.
Do not dry unwashed items in the tumble dryer.
Take care that no lint or dust has accumulated
around the dryer.
Fabric softeners, or similar products, should be
used as specied by the fabric softener instructions.
This appliance is not for professional use. Do not
use the appliance outdoors.
Do not overdry the laundry.
INSTALLATION
The appliance must be handled and installed by
two or more persons- risk of injury. Use protective
gloves to unpack and install- risk of cuts.
Installation, including water supply (if any),
electrical connections and repairs must be carried
out by a qualied technician. Do not repair or replace
any part of the appliance unless specically stated in
the user manual. Keep children away from the
installation site. After unpacking the appliance, make
sure that it has not been damaged during transport.
In the event of problems, contact the dealer or your
nearest Af ter-sales Service. Once installed, packaging
waste (plastic, styrofoam parts etc.) must be stored
out of reach of children - risk of suocation. The
appliance must be disconnected from the power
supply before any installation operation - risk of
electric shock. During installation, make sure the
appliance does not damage the power cable- risk of
re or electric shock. Only activate the appliance
when the installation has been completed.
Install the dryer in rooms with adequate
ventilation (open door, ventilation grid or slot larger
than 500 cm
2
) in order to avoid the backow of
gases into the room from appliances burning other
fuels, including open res. If the dryer is installed
under a worktop, provide a ventilation grid
(minimum 45 cm x 8 cm), in the rear part of the
worktop under which the dryer is installed.
If the dryer is installed near to a gas or coal stove,
provide a heat insulating plate (85 cm x 57cm) in
between, as the side facing the stove is covered with
aluminium foil.
Exhaust air must not be discharged into a ue
which is used for discharging fumes from appliances
burning gas or other fuels.
The appliance must not be installed behind a
lockable door, a sliding door or a door with a hinge
on the opposite side to that of the tumble dryer, in
such a way that a full opening of the tumble dryer
door is restricted.
The appliance shall be placed against the wall to
limit access to its rear side.
Take care not to use a carpet which obstructs
ventilation openings in the base of the dryer.
If you want to stack the dryer on a washing
machine, rst contact our After-Sales Service or your
specialist dealer to verify the complete list of suitable
models. The stacking is only possible if the dryer is
attached to the washing machine by means of the
appropriate stacking kit available through our After-

Sales Service or your specialist dealer. Instructions
for the correct assembly are supplied with the
stacking kit.
ELECTRICAL WARNINGS
It must be possible to disconnect the appliance
from the power supply by unplugging it if plug is
accessible, or by a multi-pole switch installed
upstream of the socket in accordance with the
wiring rules and the appliance must be earthed in
conformity with national electrical safety standards.
Do not use extension leads, multiple sockets or
adapters. The electrical components must not be
accessible to the user after installation. Do not use
the appliance when you are wet or barefoot. Do not
operate this appliance if it has a damaged power
cable or plug, if it is not working properly, or if it has
been damaged or dropped.
If the supply cord is damaged, it must be replaced
with an identical one by the manufacturer, its service
agent or similarly qualied persons in order to avoid
a hazard- risk of electric shock.
CLEANING AND MAINTENANCE
WARNING: Ensure that the appliance is switched
o and disconnected from the power supply before
performing any maintenance operation; never use
steam cleaning equipment- risk of electric shock.
Make sure that all lint traps are cleaned before
starting any drying cycle.
DISPOSAL OF PACKAGING MATERIALS
The packaging material is 100% recyclable and is marked with the recycle
symbol
The various parts of the packaging must therefore be disposed of
responsibly and in full compliance with local authority regulations
governing waste disposal.
.
DISPOSAL OF HOUSEHOLD APPLIANCES
This appliance is manufactured with recyclable or reusable materials.
Dispose of it in accordance with local waste disposal regulations.
For further information on the treatment, recovery and recycling of
household electrical appliances, contact your local authority, the
collection service for household waste or the store where you purchased
the appliance. This appliance is marked in compliance with European
Directive 2012/19/EU, Waste Electrical and Electronic Equipment (WEEE).
By ensuring this product is disposed of correctly, you will help prevent
negative consequences for the environment and human health.
The symbol
indicates that it should not be treated as domestic waste but must be
taken to an appropriate collection center for the recycling of electrical
and electronic equipment.
on the product or on the accompanying documentation
EN
Doing this will keep your machine working
at its BEST!
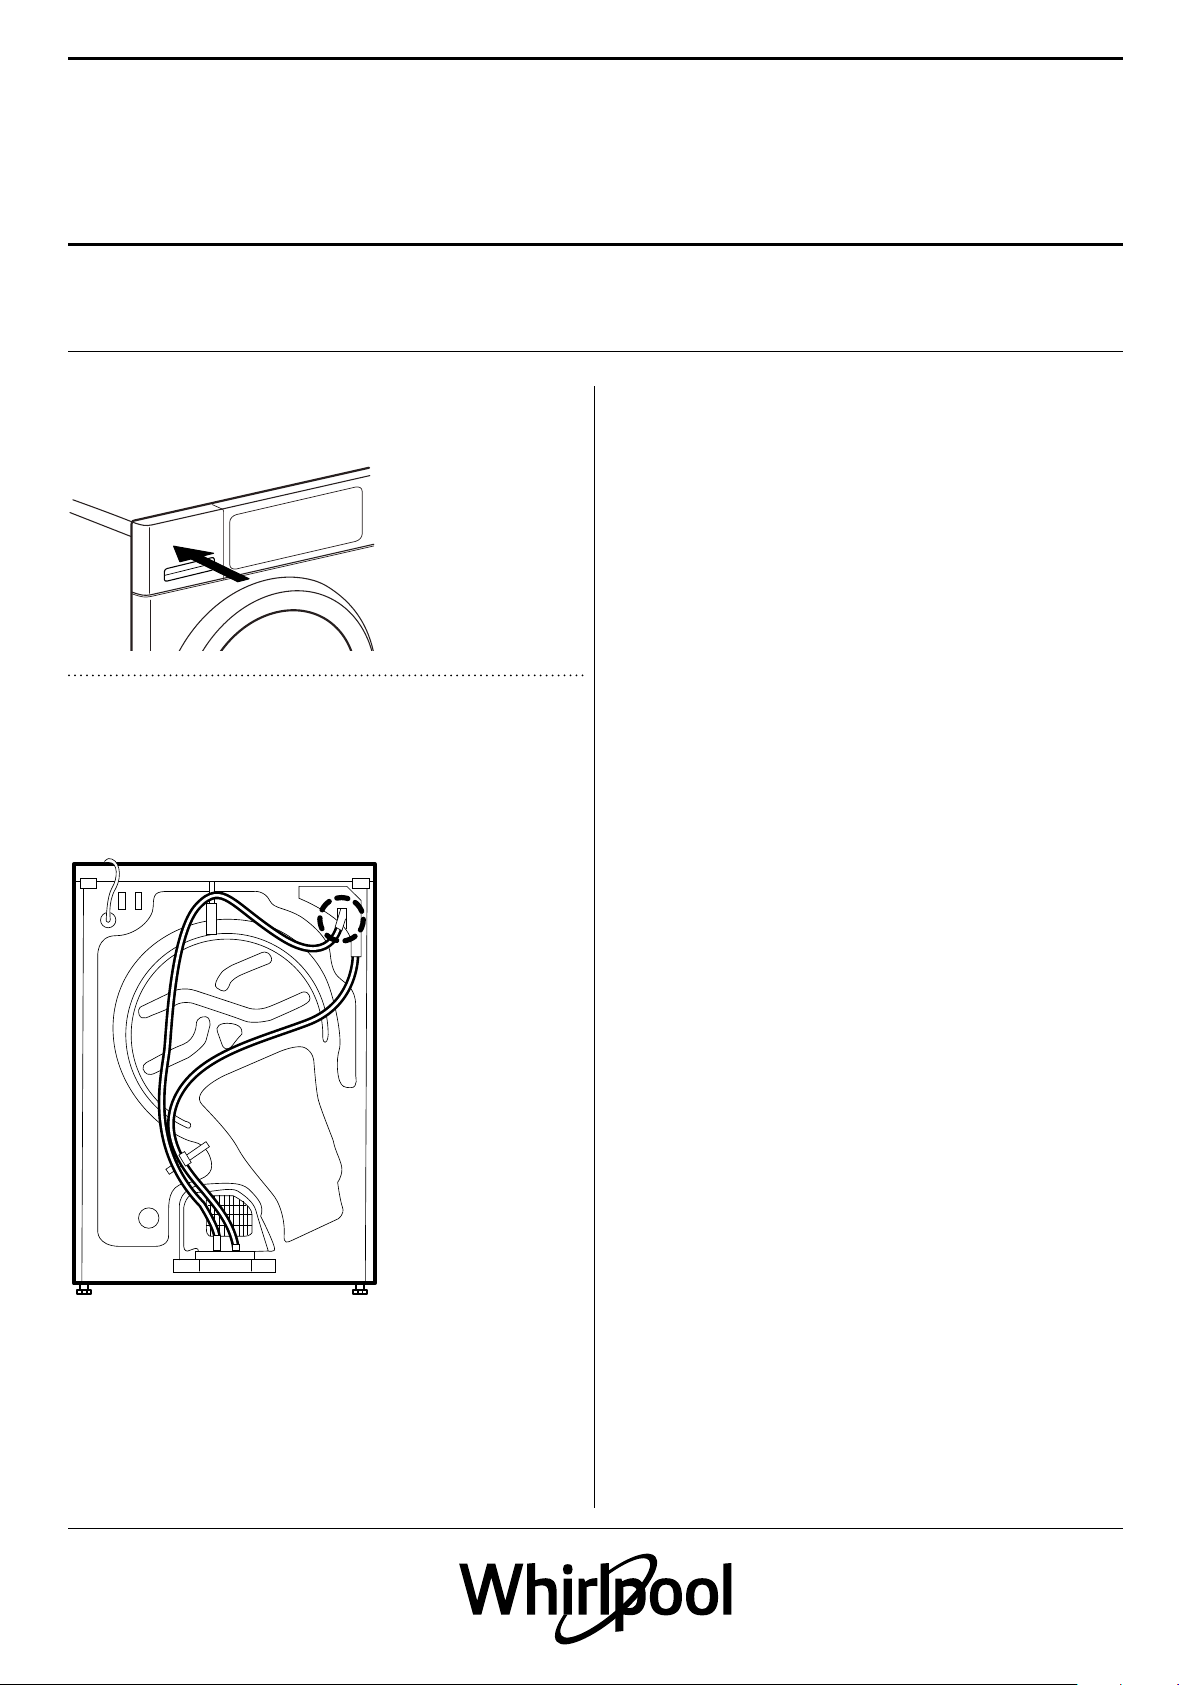
Remember to empty your water container after
each use (see gure 1 on the last page).
Remember to clean your door lter (see gure 2
on the last page) and bottom lter unit after each
use (see gure 3 on the last page) - Some models
are equipped with dierent lters, therefore
some drawings may dier from the lter
present in the dryer. All lters parts have to be
cleaned.
Use and Care guide
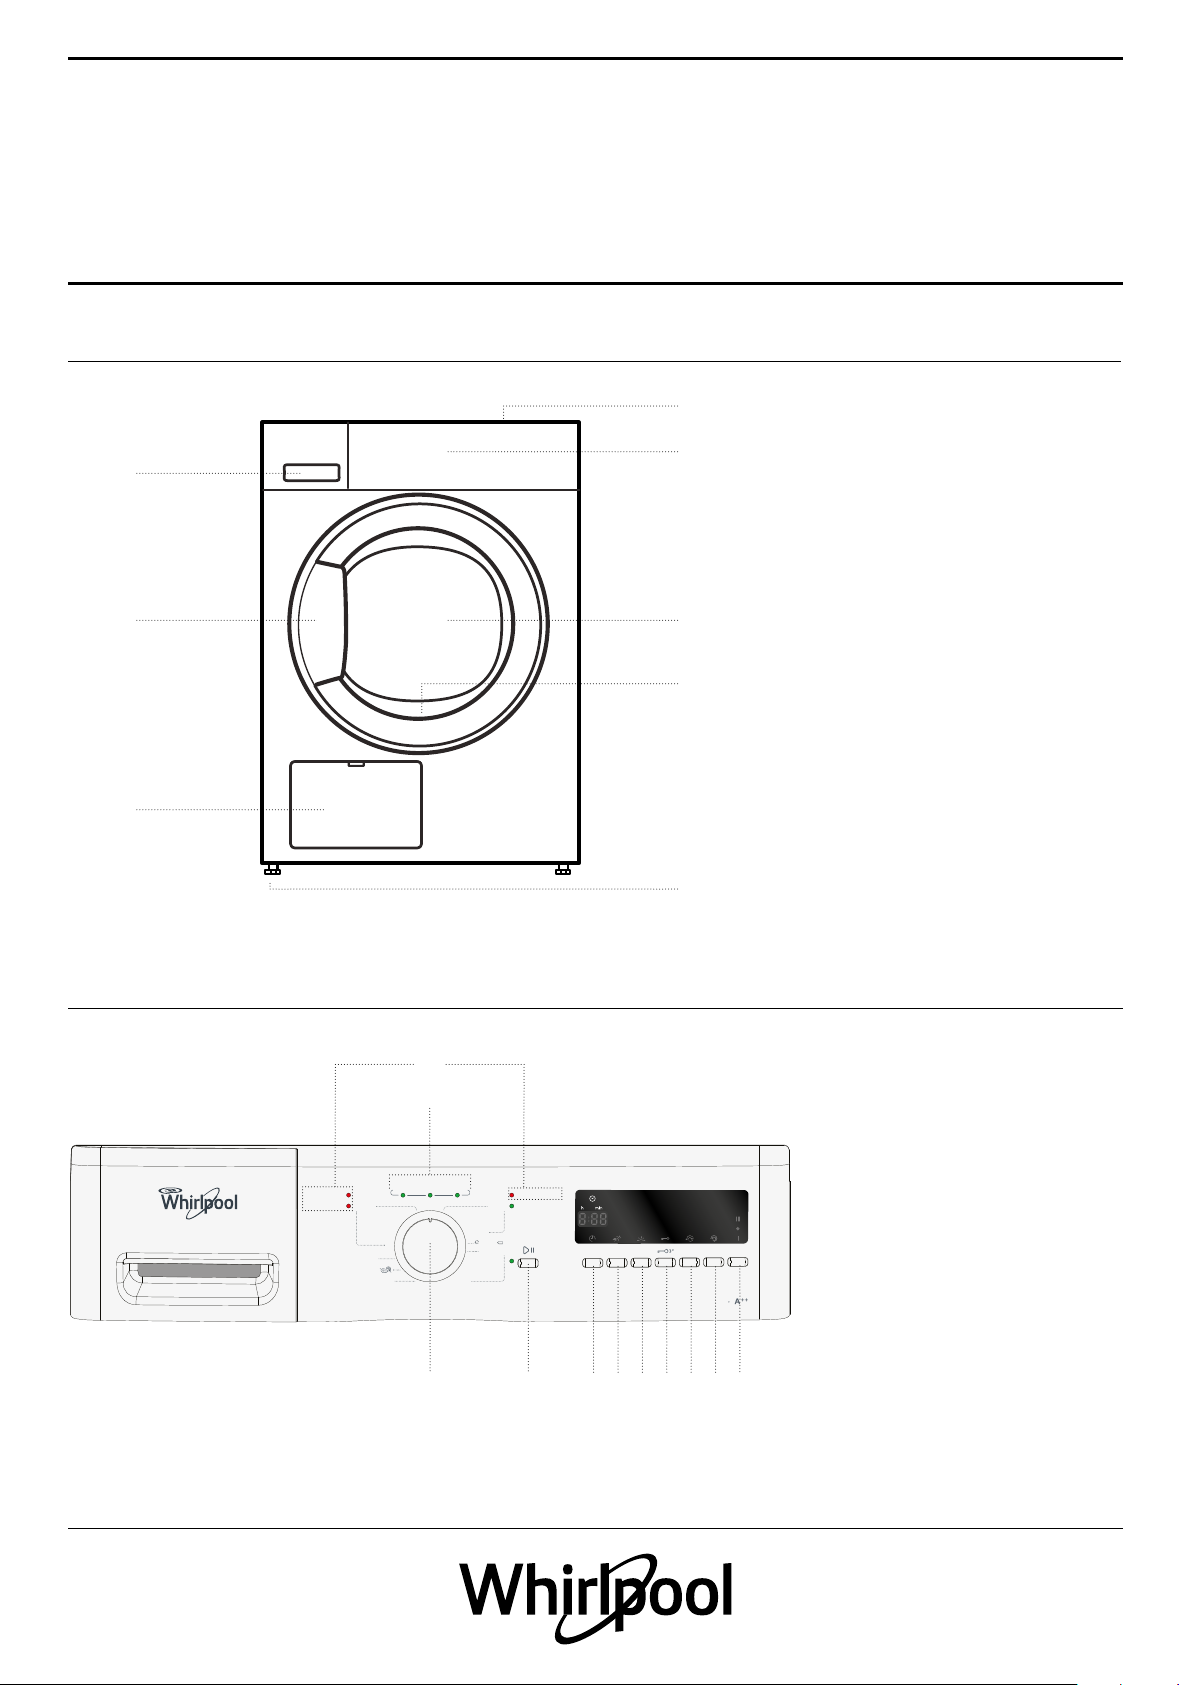
PRODUCT
DESCRIPTION
APPLIANCE
3.
5.
1.
1. Worktop
2.
2. Control panel
3. Water tank
4. Door
5. Door handle
6. Door lter (behind door)
7. Condenser (= bottom lter;
4.
behind ap)
8. Adjustable feet (4)
7.
CONTROL PANEL
Tiempo
Edredón
Lana Soft
Prendas Mixtas
Tejidos Mixtos
Sensing Secado Fin de ciclo
90’
60’
30’
15’
Limpiar filtro
Limpiar filtro inferior
10.
11.
6.
8.
1. Inicio Diferido / Start delay
function
2. Rápido / Rapid option
3. Suave / Gentle option
4. Key lock
5. Giro reversible / Drum
reverse option
6. Antiarrugas / Anti-crease
option
Guardar
Guardar
Planchar
Extra Seco
Algod.
Sintéticos
Algod.
Contenedor de agua
Antiarrugas
h.
Inicio
Rápido Suave
Diferido
reversible
Anti-
Giro
Nivel de
arrugas
secado
9Kg
0
Extra Seco
Planchar
7. NIvel de secado / Dry
nishing option
9.8.
1. 2.7.3. 4. 5. 6.
8. Programme selector
9. Start/Pause button
10. Failure indicators
11. Programme sequence
indicator
6
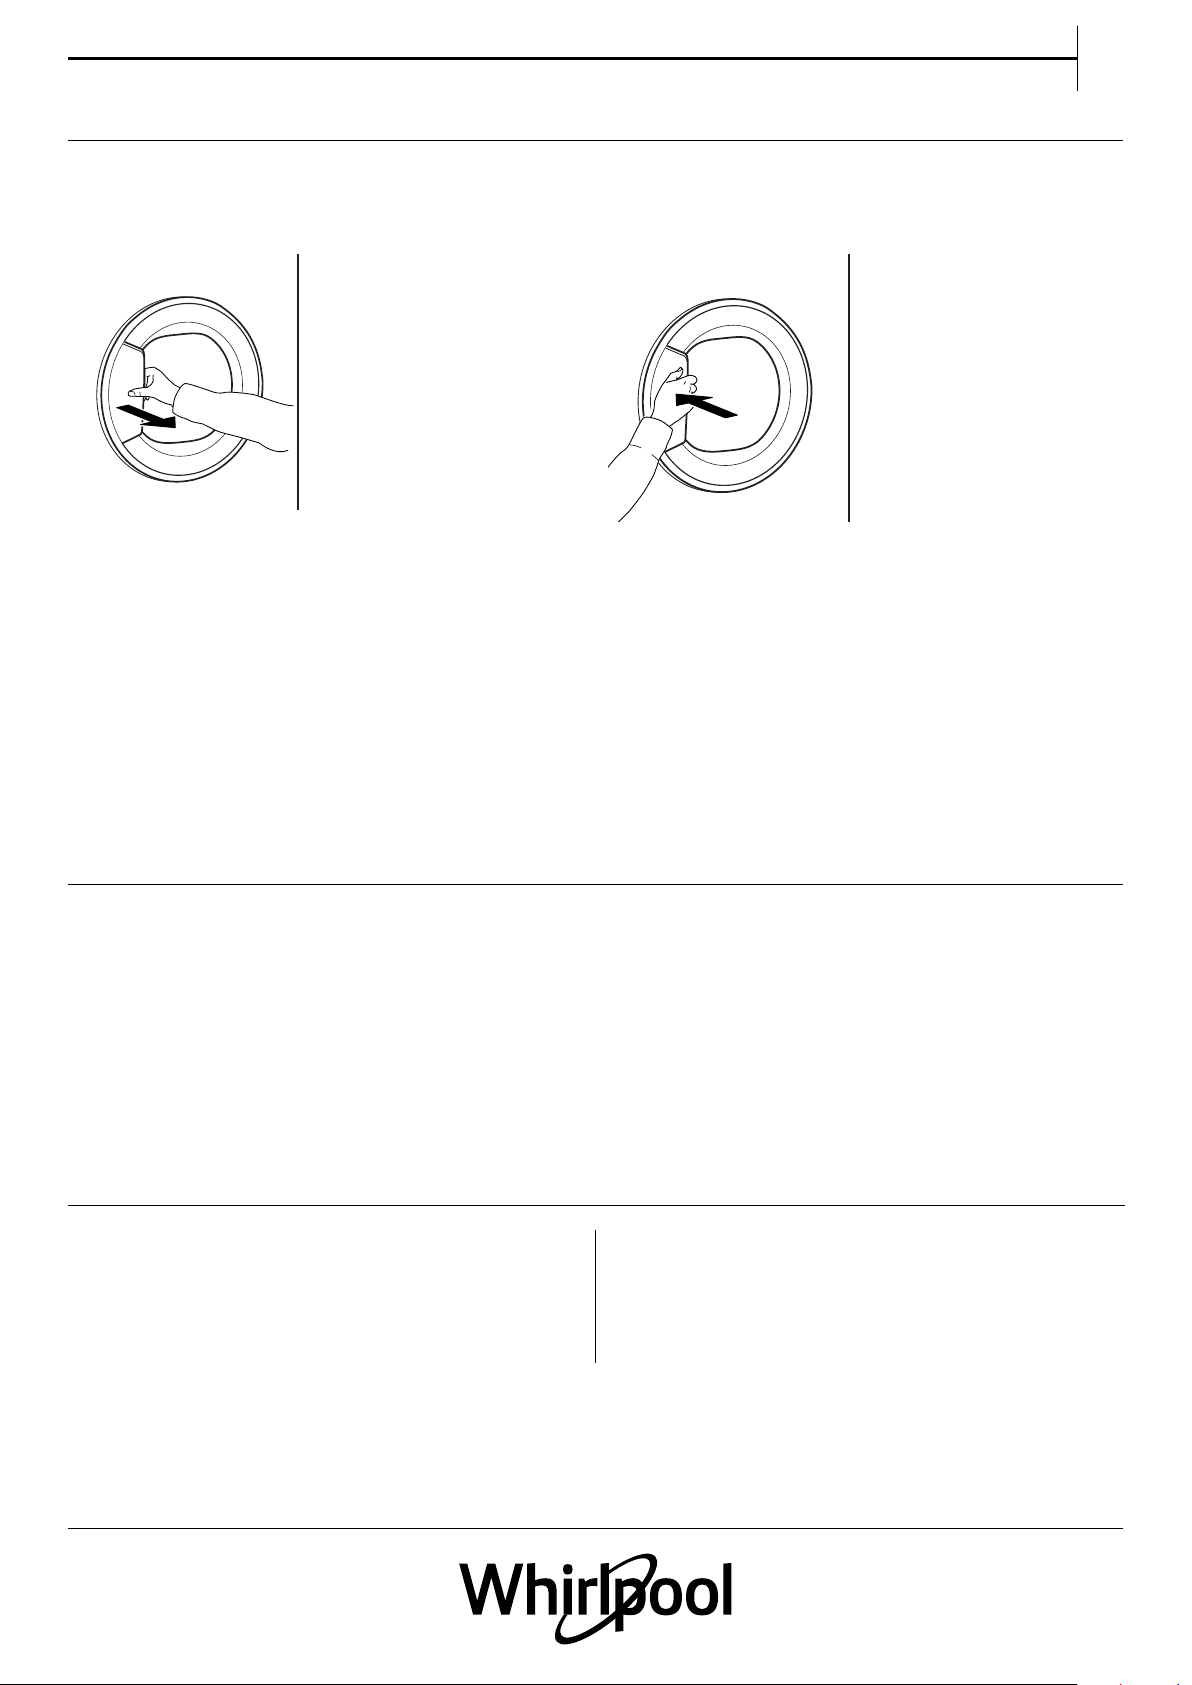
DOOR
EN
To open the door, pull the handle.
If you interrupt a running programme by opening
the door, the programme will be reset if the dryer
door is not closed again within one minute.
To close the door, hold the handle and push so that
you can hear it click shut.
DRUM LIGHT (if available)
• During programme selection: the light goes on for
laundry loading
• After programme start: the light fades on and o
while the laundry load is detected.
AVAILABLE
ACCESSORIES
STACKING KIT SHELF
by which your dryer can be xed on top of your
washing machine to save space and to facilitate
loading and unloading your dryer in the higher
position.
• After programme end, when you open the door,
the light goes on for a while for unloading the
laundry. Then it goes o to save energy; touch any
button to switch it on again.
Contact our After-Sales Service to check if the following
accessory is available for your dryer model.
7
HOW TO USE
THE APPLIANCE
FIRST TIME USE
1. CHECK WATER TANK
Make sure that the water tank is correctly inserted
2. CHECK DRAIN HOSE
Make sure that the drain hose on the back of the
dryer is xed, either to the dryer’s water tank or to
your domestic sewage system (see INSTALLATION
GUIDE).
8
DAILY USE
EN
Make sure that no lighters
WARNING
or matches remain in the
laundry.
1. LOAD THE LAUNDRY
Respect the care labels of your laundry; make
sure that it is appropriate for being treated in
a dryer.
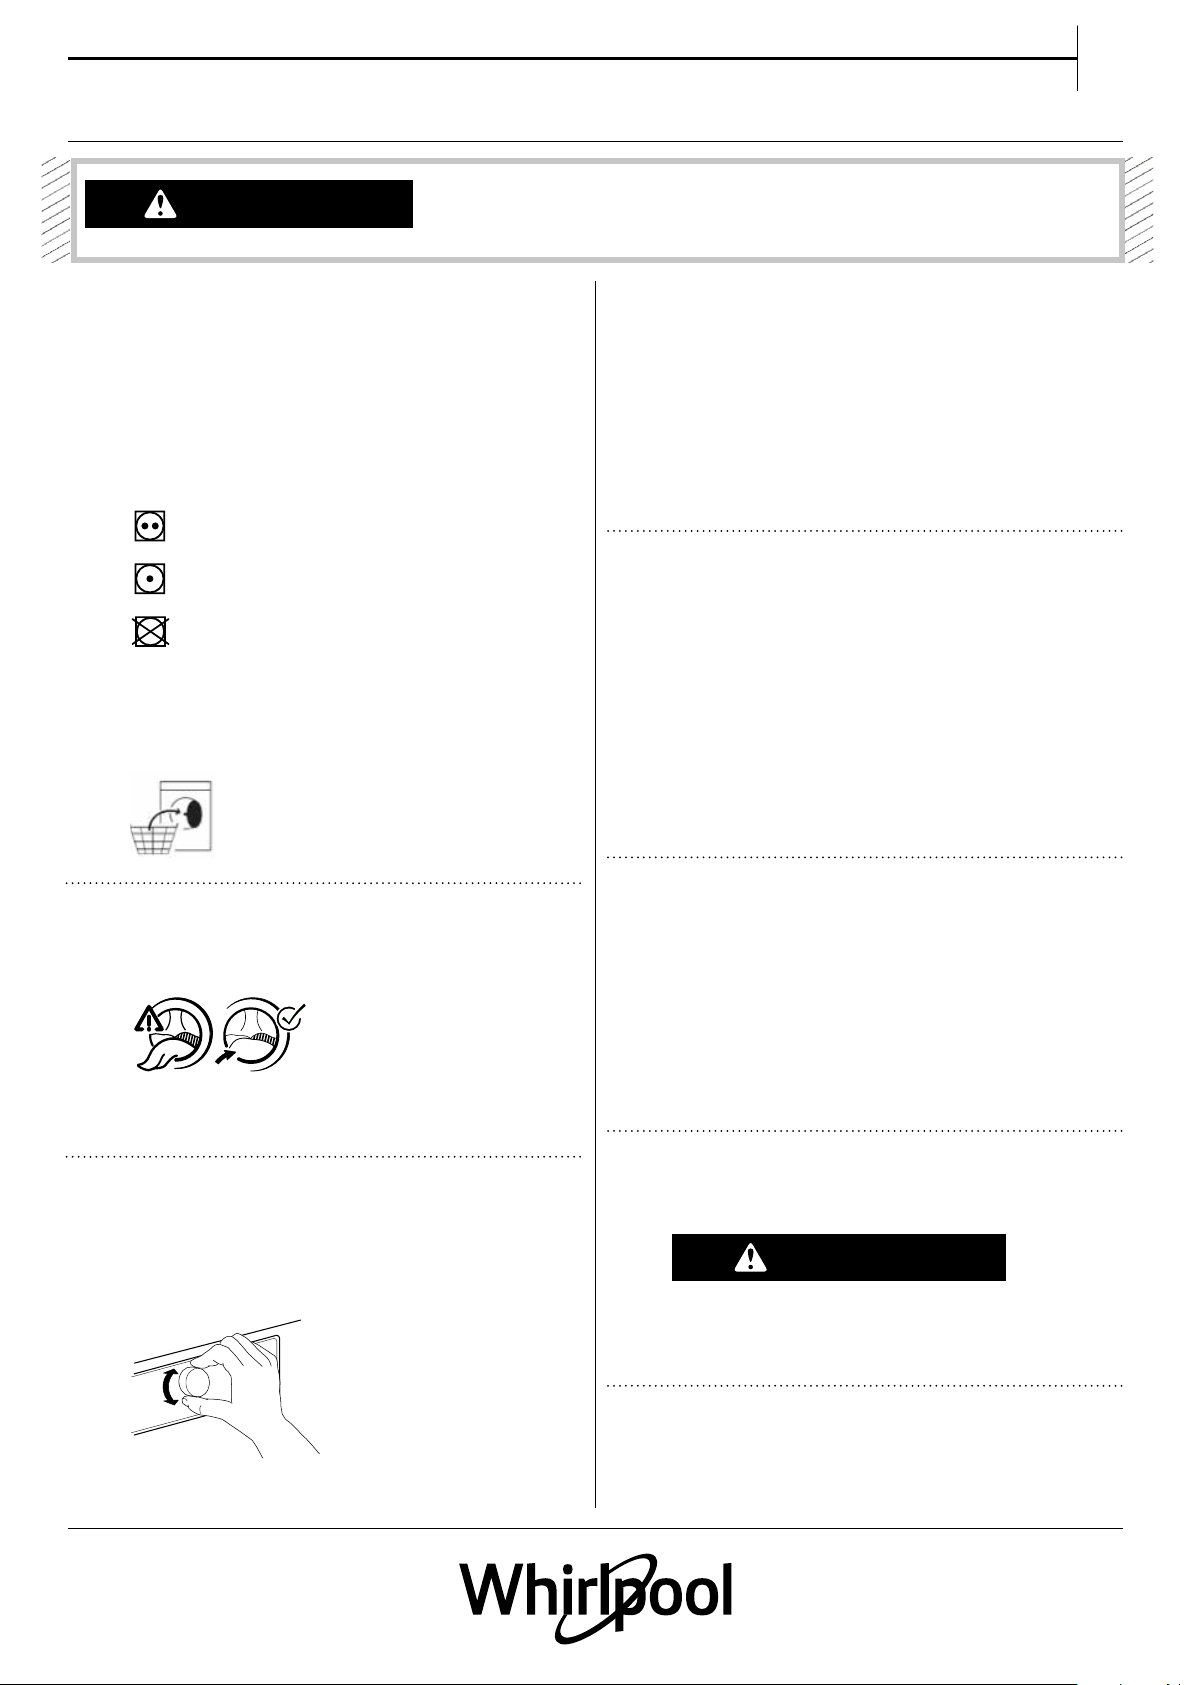
Drying Care Labels
The dots indicate the temperature degree for
drying the laundry.
Normal temperature
Reduced temperature
Do not tumble dry
Open the door and load the laundry. Observe
the maximum load sizes given in the section
Programmes.
Make sure that the
laundry is not soaked with
ammable liquids.
programmes in the PROGRAMMES section.
Select options, if needed
If you want to select additional options, press
the respective button - the symbol on the
display lights up.
Refer to section OPTIONS, FUNCTIONS
AND INDICATORS for more information.
4. START PROGRAMME
Press the Start/Pause button; the indicator
next to the button lights up. The drying
process starts.
The remaining programme duration
is indicated on the display. It can be
recalculated and adapted in the course of the
programme.
During such phases, an animation occurs on
the display.
2. CLOSE THE DOOR
Make sure that no laundry gets stuck between door glass and door lter.
Close the door so that you can hear it click
shut.
3. SET THE DESIRED PROGRAMME
Turn the knob to select the desired
programme.
The default programme duration appears on
the display.
Find more information regarding
5. CHANGE THE SETTINGS OF A RUN-
NING PROGRAMME, IF NEEDED
To change the settings of a running
programme or start delay:
• press Start/Pause to put the running
programme on pause
• change your settings
• press Start/Pause again to continue the
programme.
6. RESET A RUNNING PROGRAMME, IF
NEEDED
Turn the programme selector to O/O.
WARNING
Immediately open the door and unload the
laundry, so that eventual heat in the laundry
can dissipate.
7. SWITCH OFF THE DRYER AFTER PRO-
GRAMME END
At the end of the programme, „End“ appears
on the display. Turn the programme selector
9
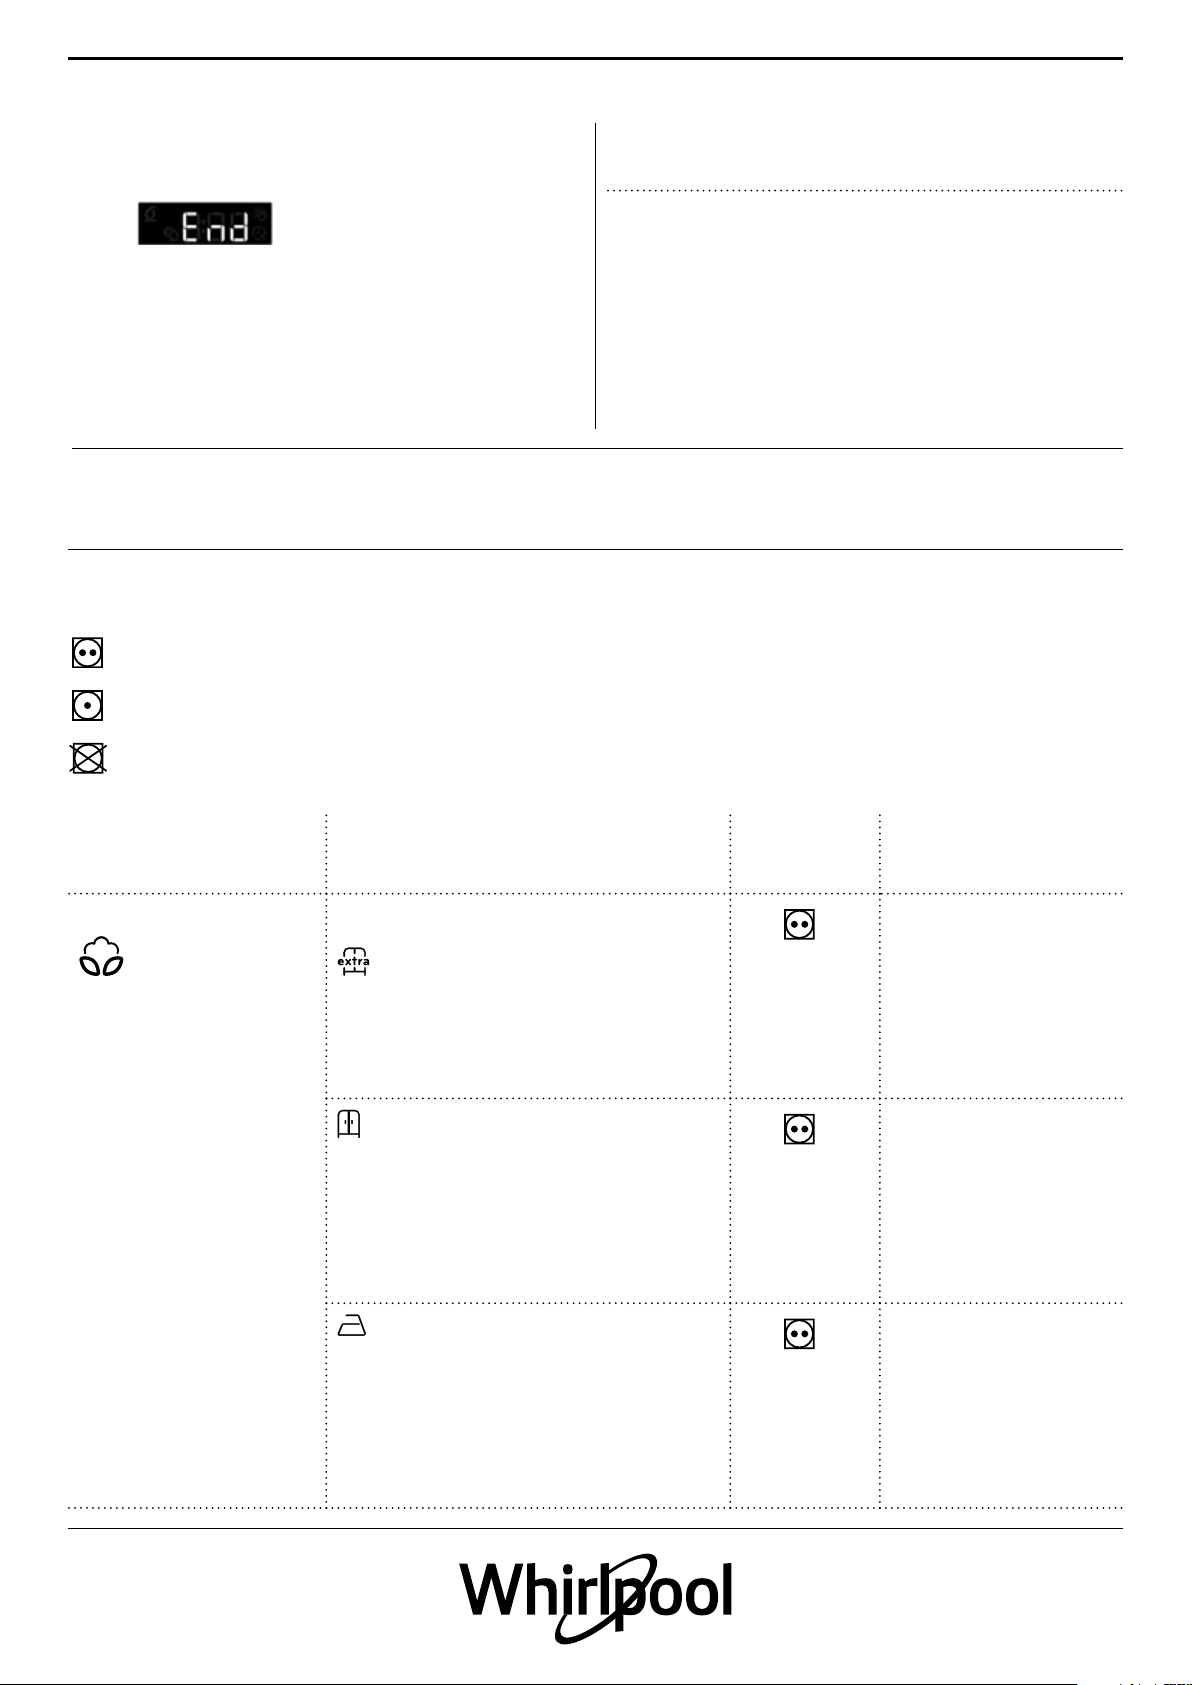
to O/O to switch o the dryer. Open the
door and take out your laundry.
If you do not switch the dryer o after
programme end, the dryer drum rotates
from time to time the next 10 minutes
after programme end, to reduce creasing
of the laundry. The dryer will switch o
PROGRAMMES
The dots indicate the temperature degree for drying
the laundry.
Normal temperature
automatically in about a quarter of an hour
after programme end, to save energy.
8. EMPTY WATER TANK / CLEAN DOOR
FILTER / CLEAN BOTTOM FILTER
Empty
• the water tank after each programme
• the door lter after each programme
Clean the bottom lter about every ve
cycles.
Refer to section CARE AND MAINTENANCE
Reduced temperature
Do not tumble dry
PROGRAMME Type of Drying and
Recommendations
ALGOD. / COTTON
For drying cotton laundry.
Extra Seco / Extra Dry (maximum
dryness level)
Guardar / Cupboard Dry (dry
enough to be put in a cupboard at the
end of the drying cycle)
Care
Labels
Regulations
max. load (kg): max
default programme
duration (h): 2:10
selectable options:
Rapid, Gentle, Drum
reverse, Anti‑crease,
Dry nishing
max. load (kg): max
default programme
duration (h): 1:55
selectable options:
Rapid, Gentle, Drum
reverse, Anti‑crease,
Dry nishing
10
Planchar / Iron Dry (suitable to be
ironed after the drying cycle, therefore
still slightly humid)
max. load (kg): max
default programme
duration (h): 1:25
selectable options:
Rapid, Gentle, Drum
reverse, Anti‑crease,
Dry nishing
 Loading...