

Whirlpool GU3100XTVB, GU3100XTVQ, GU3100XTVS Dimension Guide
Undercounter Dishwasher
PRODUCT MODEL NUMBERS
MINIMUM CLEARANCES
GU3100XTV
Requirements:
●
120-volt, 60 Hz, AC-only, 15- or 20-amp fused electrical supply
●
Copper wire only, 2 wire with ground
Recommended:
●
Time-delay fuse or circuit breaker
●
Separate circuit
Direct Wire Connection:
●
Use flexible, armored or nonmetalic sheathed, copper wire with
grounding wire that meets the wiring requirements for your home
and local codes and ordinances.
●
Use strain relief method provided with house wiring junction box
or install a UL-listed/CSA-certified clamp connector to the house
wiring junction box. If using conduit, use a UL-listed/CSAcertified conduit connector.
Power Supply Cord Connection:
Use Power Supply Cord Kit (Part Number 4317824) marked for
use with dishwashers. Kit contents include:
●
Voltex, Inc., UL listed 16 gauge 3-wire power supply cord with 3
prong grounding plug
●
Neer C-500 ⁷⁄₈" strain relief
●
3 wire connectors
●
Part Number 302797 grommet
Follow the kit instructions for installing the power supply cord.
NOTE: Power supply cord must plug into a mating three prong,
grounded outlet, located in the cabinet next to the dishwasher
opening. Outlet must meet all local codes and ordinances.
IMPORTANT: If you plan to install a garbage disposal, an
additional separate 120-volt, 60 Hz, AC-only, 15- or
20-amp fused electrical supply is required.
Water Supply Requirements:
●
A hot water line with 20-120 psi (138-862 kPa) water pressure.
●
120°F (49°C) water temperature at dishwasher.
●
³⁄₈" O.D. copper tubing with compression fitting or flexible braided
water supply line.
NOTE: ¹⁄₂" minimum plastic tubing is not recommended.
●
90º elbow with 3⁄8" N.P.T. external pipe threads on one end.
IMPORTANT: Do not solder within 6" (15.2 cm) from water inlet
valve.
Drain Requirements:
●
Use the new drain hose supplied with your dishwasher.
NOTE: If a longer drain hose is required:
●
Use a new drain hose with maximum length of 10 ft
(3 m) that meets all current AHAM/IAPMO test standards
●
Use a new drain hose that is resistant to heat and detergent
●
Use a new drain hose that fits the 1" (2.5 cm) drain connector
on the dishwasher.
●
Connect drain hose to waste tee or disposal inlet above drain trap
in house plumbing.
●
Connect drain hose to house plumbing 20" (50.8 cm) minimum
above the floor.
NOTE: It is recommended that the drain hose either be looped up
and securely fastened to the underside of the counter, or be
connected to an air gap.
●
Use a drain air gap if the drain hose is connected to house
plumbing lower than 18" (45.7 cm) above the subfloor or floor.
Because Whirlpool Corporation policy includes a continuous commitment to improve
our products, we reserve the right to change materials and specifications without notice.
Dimensions are for planning purposes only. For complete details, see Installation
Instructions packed with product. Specifications subject to change without notice.
Ref. W10167841-D-WH
09-17-09
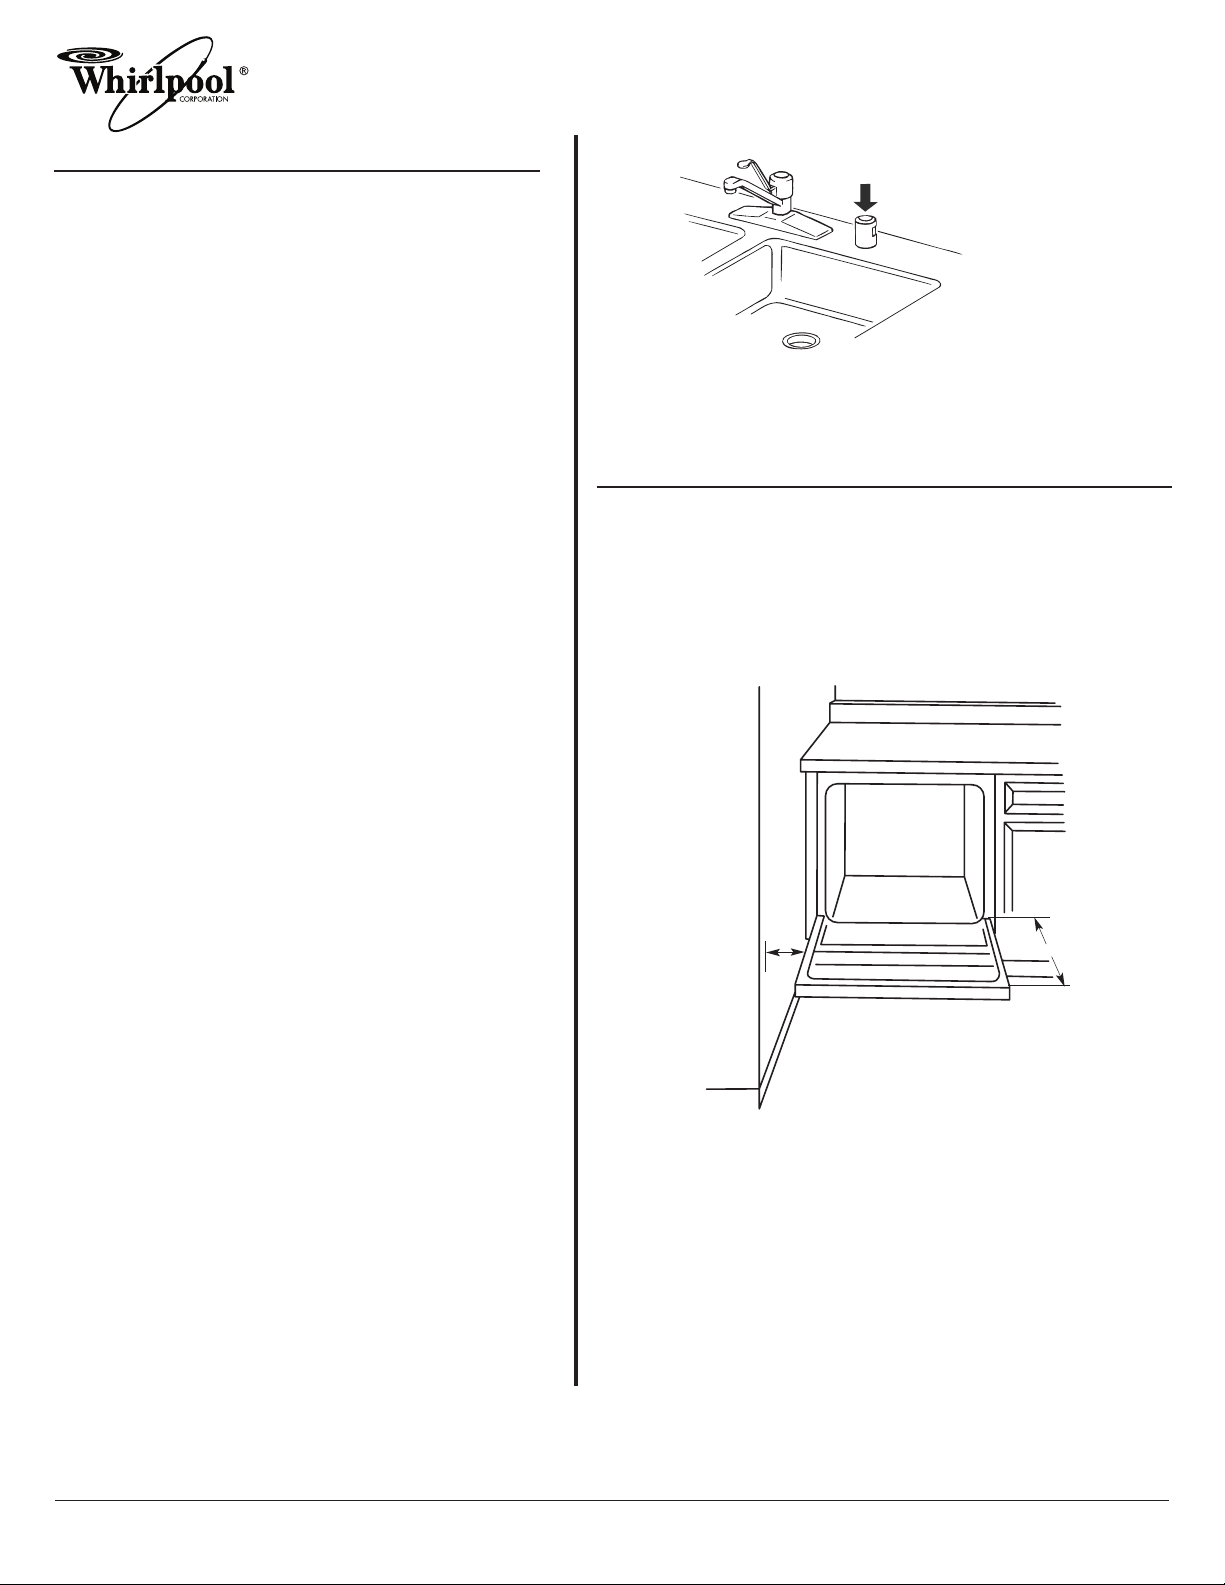
Drain Air Gap:
●
Use ¹⁄₂" (1.3 cm) minimum I.D. drain line fittings.
NOTE: Do not connect drain lines from other devices to the dishwasher
drain hose.
Check location where the dishwasher will be installed. the location must
provide:
●
Easy access to water, electricity and drain.
●
Convenient access for loading and unloading dishes. Corner locations require
2" (5.1 cm) minimum clearance between the side of the dishwasher door and
the wall or cabinet.
●
A minimum of 25⁵⁄₈" (65.1 cm) is required in front of the dishwasher to allow
the door to open fully.
●
Square opening for proper orientation.
●
Cabinet front perpendicular to floor.
●
Level floor. If the floor at the front of the dishwasher is not level with the rear
of the opening, shims may be needed to level the dishwasher.
NOTE: To avoid shifting during dishwasher operation, shims must be
securely attached attached to the
A
C
B
A
. 2" (5.1 cm) minimum clearance
for door opening
B. Dishwasher
C. Countertop
D. 25
⁵⁄₈
" (65.1 cm) minimum
D
Because Whirlpool Corporation policy includes a continuous commitment to improve
our products, we reserve the right to change materials and specifications without notice.
Dimensions are for planning purposes only. For complete details, see Installation
Instructions packed with product. Specifications subject to change without notice.
Ref. W10167841-D-WH
09-17-09
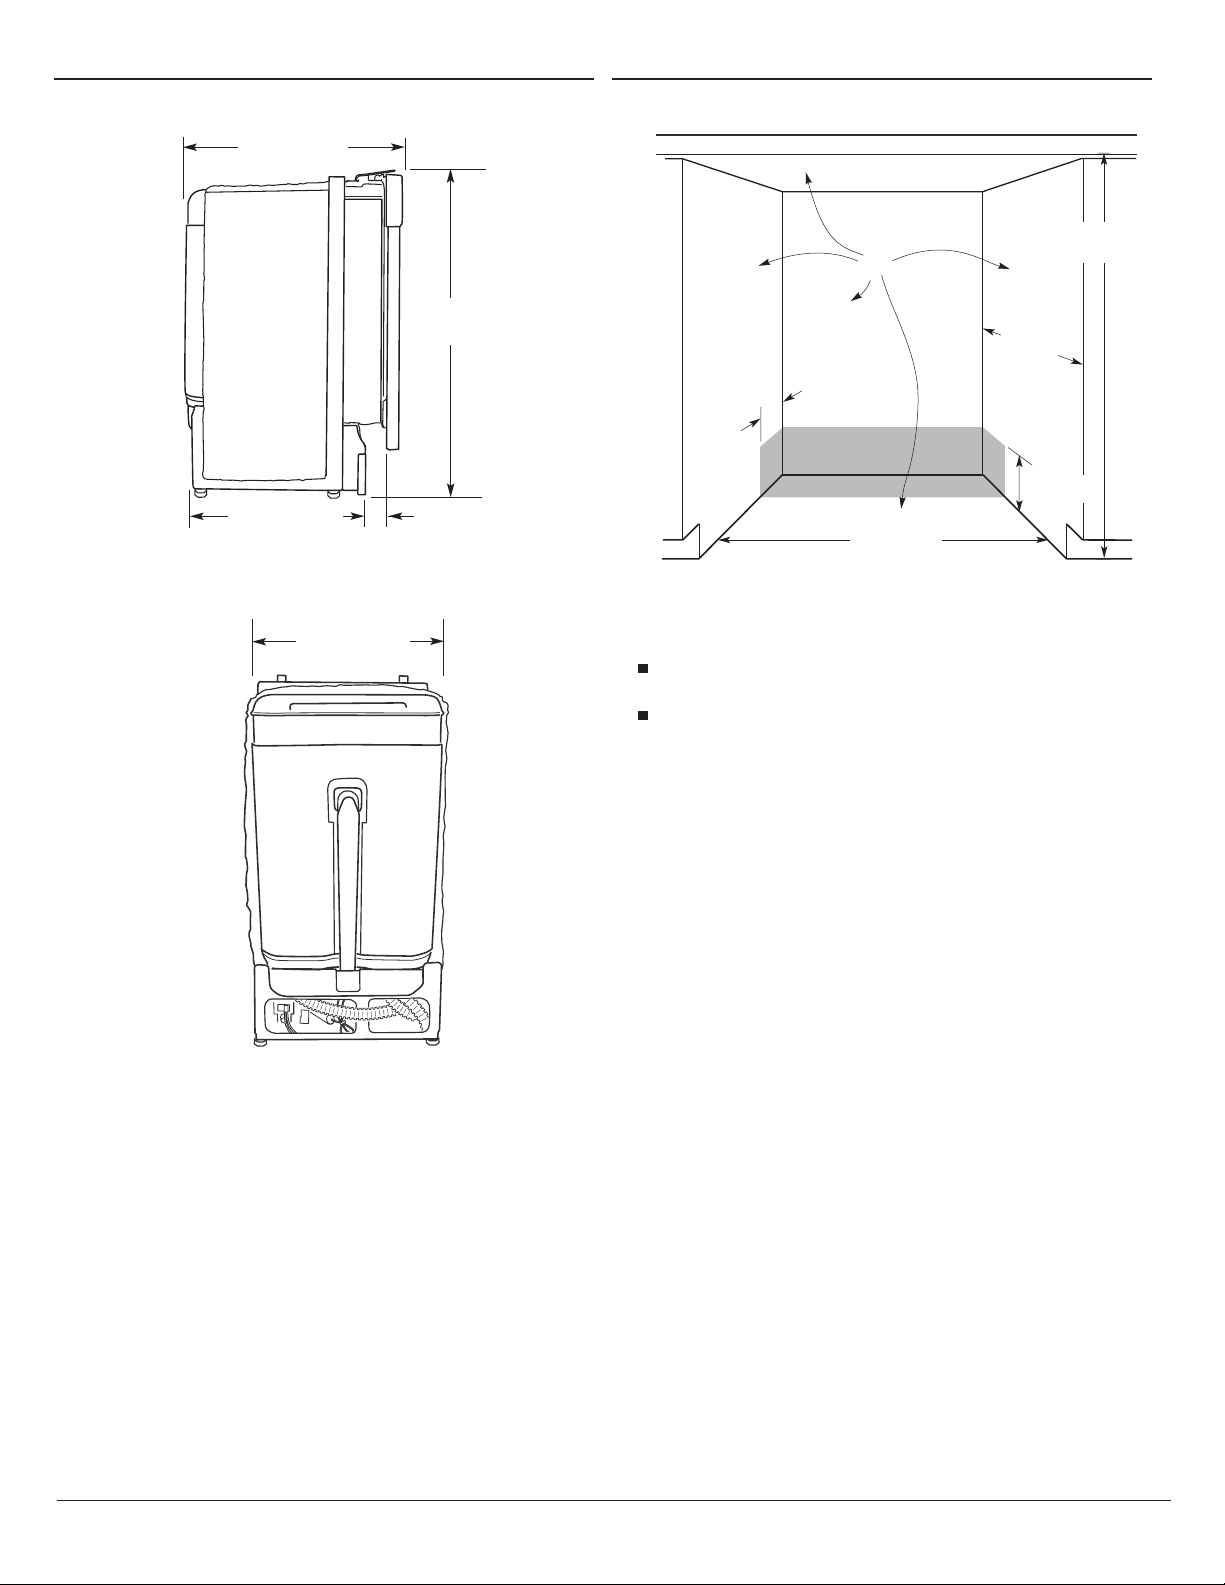
PRODUCT DIMENSIONS INSTALLATION CLEARANCES
Side View
24" (61 cm)*
20¹⁄₂" (52.1 cm)
* To front of door frame
Rear View
*
24" (61 cm)
max.
32¹⁄₂" to 34¹⁄₂"
(82.6 to 87.6 cm)
4" (10 cm)
Cutout Dimensions
A
"4
)mc 2
.01(
24 (61 cm)
maximum
A. All surfaces free from intrusions
(86.4 cm to 88.9 cm)
24" (61 cm)
* Underside of countertop to floor
NOTES:
Cut holes in shaded area of cabinet walls or floor for plumbing
and electrical service.
ADA installation—32¹⁄₂" (82.5 cm) beneath 34" (86.4 cm) high
countertops may be accomplished by adjusting the toekick
and leveling legs.
34" to 35"*
minimum
6"
(15.2 cm)
 Loading...