


1/1
o
\0
ON
O
KJ
o
o
go
so
o
o
O'
©
le
r\
/r\
Whirlpool Is a registered trademark of Whirlpool, USA
3
i/i
a
o
3
m
c:
m

INSTRUCTIONS FOR USE
BEFORE USING THE APPLIANCE.........................................PAGE 194
SAFEGUARDING THE ENVIRONMENT
.................................
PAGE 194
PRECAUTIONS AND GENERAL
RECOMMENDATIONS
CONTROL PANEL DESCRIPTION
USE OF ICE MAKER AND WATER DISPENSER
WATER FILTER (SELECT MODELS)
GUIDE TO INTERNAL COMPONENTS
............................................................
.........................................
...............
PAGE 199
.....................................
..................................
PAGE 195
PAGE 196
PAGE 200
PAGE 201
GUIDE TO STORAGE AND THAWING OF
FOOD........................................................................................PAGE 206
MAINTENANCE AND CLEANING...........................................PAGE 208
TROUBLESHOOTING GUIDE/AFTER-SALES
SERVICE
AFTER-SALES SERVICE
..................................................................................
........................................................
PAGE 209
PAGE 210
INSTALLATION.................................................................PAGE 211
WATER CONNECTION............................................................PAGE 218
ELECTRICAL CONNECTION..................................................PAGE 219
193

BEFORE USING THE APPLIANCE
• Your new appliance is designed exclusively for
domestic use
To get the most out of your new appliance,
read the user handbook thoroughly. The
handbook contains a description of the
appliance and useful tips for storing food.
Keep this handbook for future consultation.
1. After unpacking, make sure that the appliance
is undamaged and that the door closes
properly. Any damage must be reported to
your dealer within 24 hours after delivery of
the appliance.
2. Wait at least two hours before switching the
appliance on in order to ensure the refrigerant
circuit is fully efficient.
3. Installation of the appliance and electrical
connections must be carried out by a qualified
engineer, in accordance with the
manufacturer’s instructions and local safety
regulations.
4. Clean the inside of the appliance before using it.
SAFEGUARDING THE ENVIRONMENT
1. Packing
The packaging material is entirely recyclable,
and marked with the recycling symbol. Follow
local regulations for scrapping. Keep the
packaging materials (plastic bags, polystyrene
parts, etc.) out of reach of children, as they are
potentially dangerous.
2. Scrapping
The appliance is manufactured using recyclable
material.
This appliance is marked according to the
European directive 2002/96/EC on Waste
Electrical and Electronic Equipment (WEEE).
By ensuring this product is disposed of correctly,
you will help prevent potential negative
consequences for the environment and human
health, which could otherwise be caused by
inappropriate waste handling of this product.
The symbol M. on the product, or on the
documents accompanying the product, indicates
that this appliance may not be treated as
household waste. Instead it shall be handed over
to the applicable collection point for the
recycling of electrical and electronic equipment.
Before scrapping, make the appliance unusable
by cutting off the power cable and removing the
doors and shelves so that children cannot easily
climb inside the appliance.
Disposal must be carried out in accordance with
local environmental regulations for waste
disposal. Deliver the appliance immediately to
an authorized dump; do not leave it unattended
even for a few days, since it is potentially
dangerous for children. For more detailed
information about treatment, recovery and
recycling of this product, please contact your
local city office, your household waste disposal
service or the shop where you purchased the
product.
w
Information:
This appliance does not contain CFCs (replaced
with Rl 34a).
Appliances with Isobutane (R600a):
isobutane is a naturally occurring, low
environmental impact gas. Caution is required,
however, because isobutane is flammable.
Therefore, it is essential to ensure that
refrigerant pipelines are not damaged.
Declaration of conformity
• This appliance is designed to store food and is
manufactured in conformity with European
Directive 90/128/EEC, 02/72/EEC and
Regulation (EC) No. 1935/2004
C€
• This appliance is designed, manufactured, and
retailed in compliance with:
- the safety objectives of the Low Voltage
Directive 73/23/EEC;
- the protection requirements of the “EMC”
Directive 89/336/EEC
amended by Directive 93/68/EEC.
• The electrical safety of the appliance can only
be guaranteed if the product is connected to
an approved earth connection.
194
PRECAUTIONS AND GENERAL RECOMMENDATIONS
Use the refrigerator compartment only for
storing fresh food and beverages and use the
freezer compartment only for storing frozen
food, freezing fresh food and making ice
cubes.
After installation, make sure that the
appliance is not standing on the power supply
cable.
Do not store glass containers with liquids in
the freezer since they may burst.
Do not eat ice cubes or ice lollies immediately
after taking them out of the freezer since they
may cause cold burns.
Before carrying out any maintenance or
cleaning, always unplug the appliance or
disconnect the power supply.
Make sure that your appliance is not near a
heat source.
Do not store or use gasoline or other
flammable vapours and liquids in the vicinity of
this or any other appliance. The fumes can
create a fire hazard or explosion.
To ensure proper ventilation, leave a gap on
both sides and above the appliance.
Ensure that the vent outlets on the appliance
casing or housing unit are unobstructed in
order to allow correct air circulation.
All appliances equipped with an ice maker or
water dispenser must be connected to a
mains water supply that delivers potable
water only (with water pressure between 2.4
and 8.3 bar (35 and 120 PSI)). Ice makers and/
or water dispensers not directly connected to
a mains water supply must be filled with
potable water only.
Install and level the appliance on a floor strong
enough to take its weight and in an area
suitable for its size and use.
Install the appliance in a dry and wellventilated place The appliance is set for
operation at specific ambient temperature
ranges, according to the climatic class
indicated on the data plate: The appliance may
not work properly if it is left for a long period
at a temperature above or below the
indicated range
Climatic class Amb. T. (°C) Amb. T. (°F)
SN From 10 to 32 From 50 to 90
N From 16 to 32 From 61 to 90
ST From 18 to 38 From 64 to 100
T From 18 to 43 From 64 to 110
Be careful not to damage the floors when you
move the appliance (e.g. parquet flooring).
Do not use mechanical devices or any means
other than those recommended by the
manufacturer to speed up the defrosting
process.
Do not damage the refrigerant circuit.
Do not use electrical appliances inside the
freezer compartments, unless such appliances
are specifically recommended by the
manufacturer.
This appliance is not designed for use by
young children or the infirm.
To avoid the risk of children being trapped
and therefore suffocating, do not allow them
to play or hide inside the appliance.
The power cable may only be replaced by an
authorized person.
Do not use extension leads or adapters.
It must be possible to disconnect the
appliance from the mains by unplugging it or
by means of a two-pole switch fitted upline of
the socket.
Ensure that the voltage indicated on the
appliance data plate corresponds to the
domestic supply voltage
Do not ingest the contents (non-toxic) of the
ice packs (if provided).
Do not place fingers or hands on the
automatic ice making mechanism while the
refrigeration is plugged in. This will help
protect you from possible injury. It will also
prevent interference with moving parts of the
ejector mechanism and the heating element
that releases the cubes.
To prevent accidental child entrapment or
suffocation risk, do not remove the divider in
the top freezer basket.
Do not turn the ice maker on until it is
connected to the water supply.
195
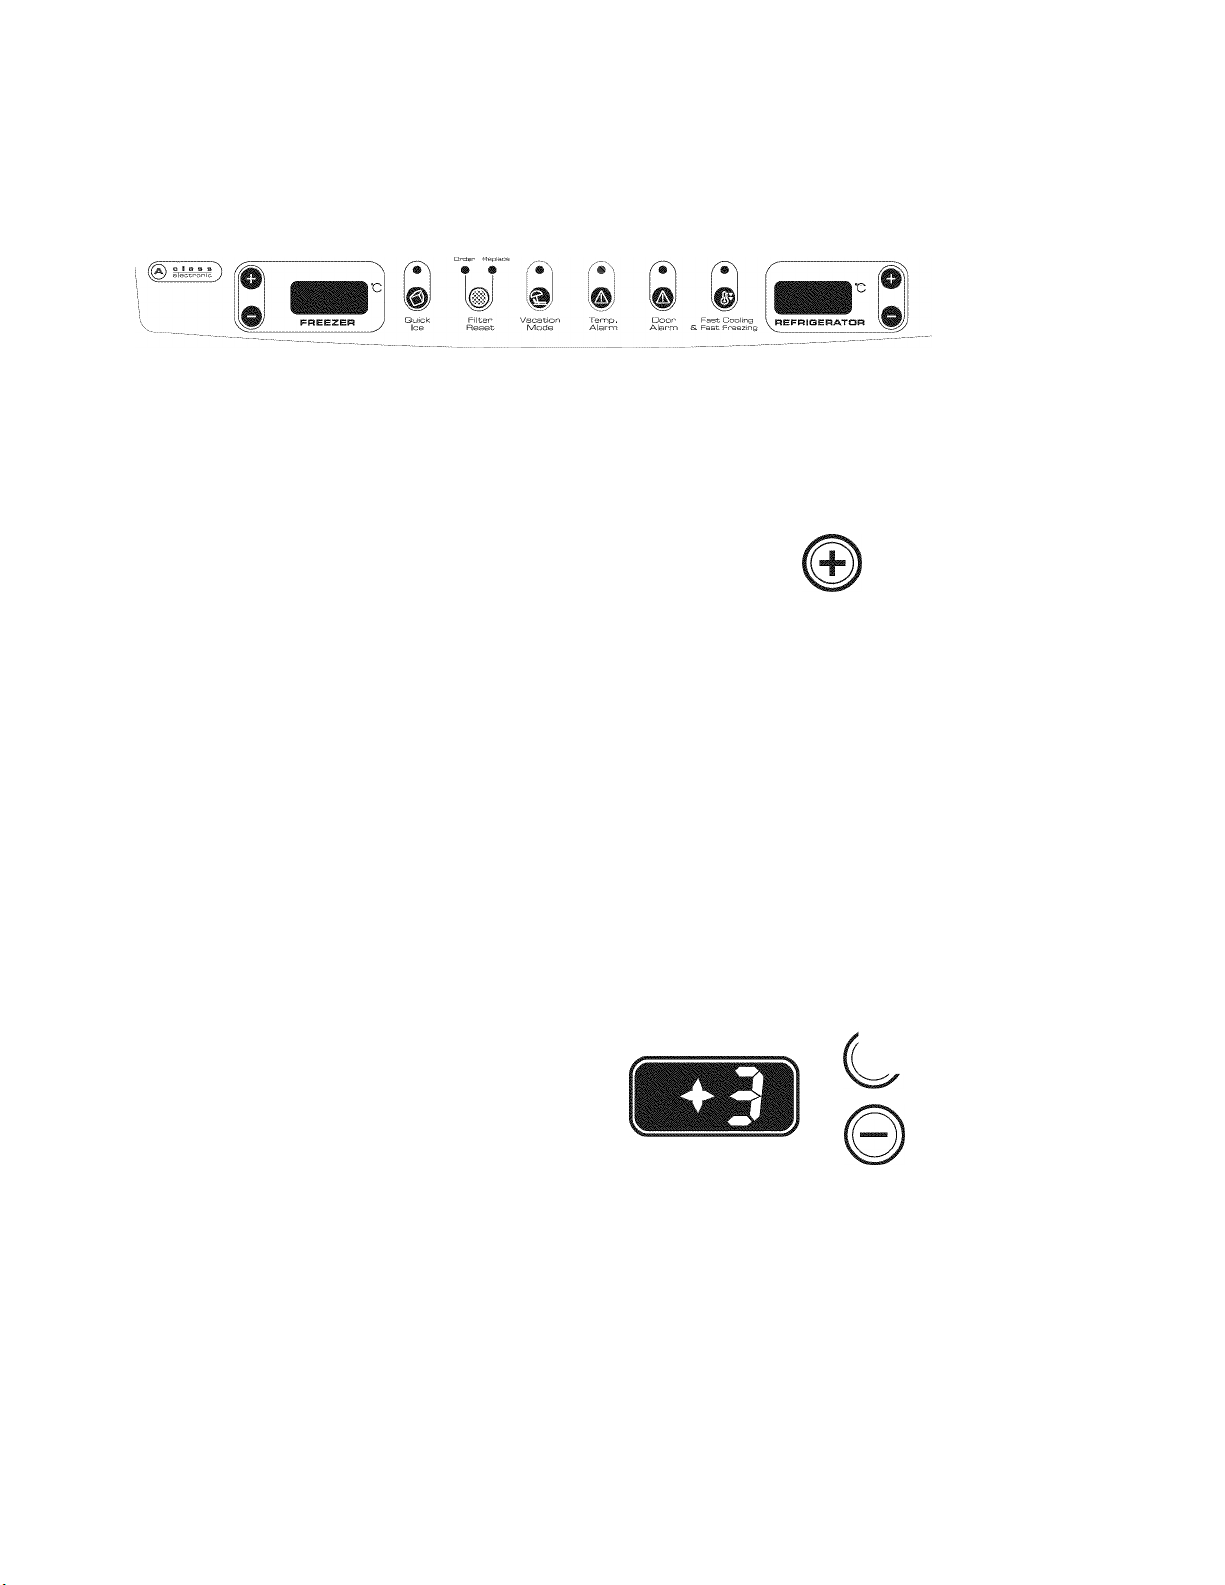
CONTROL PANEL DESCRIPTION
The control Panel is located at the top front of the refrigerator compartment.
Temperature Controls
For your convenience, your temperature controls are preset at the factory. When you first install your
refrigerator, make sure the controls are still set to the recommended set points as shown.
Recommended Settings
Warmer
Colder
Q
IMPORTANT:
• Wait 24 hours for your refrigerator to cool
completely before adding food. If you add food
before the refrigerator has cooled completely,
your food may spoil.
• If the temperature is too warm or too cold in the
refrigerator or freezer, first check the air vents to
be sure they are not blocked before adjusting the
controls. See “Ensuring Proper Air Circulation”.
To Turn Your appliance Off/On:
• Press the freezer (+) touch pad repeatedly until
“OFF” appears in the freezer display. Allow a few
seconds for the refrigerator to shut off. Neither
compartment will cool.
• Press either the refrigerator or freezer (-) touch
pad to turn on the appliance.
№ ra
FREEZER
Warmer
Colder
REFRIGERATOR
Adjusting Controls
The REFRIGERATOR control adjusts the
refrigerator compartment temperature. The
FREEZER control adjusts the freezer compartment
temperature. If you need to adjust the temperature
in either the refrigerator or freezer compartment,
use the settings listed in the chart as a guide.
To Adjust Set Point Temperatures:
• Press the (+) or (-) touch pads until the desired
temperature set point is displayed.
NOTE: Except when first turning on the refrigerator,
do not adjust either temperature control more than
one setting at a time. Wait 24 hours for the
temperature to stabilize between adjustments.
Warmer
Colder
REFRIGERATOR
196

Fast Cooling & Fast Freezing
The Fast Cooling & Fast Freezing feature assists with periods of high refrigerator
use, full grocery loads, or temporarily warm room temperatures.
• Press the Fast Cooling & Fast Freezing touch pad to set the freezer and
refrigerator to the lowest temperature settings. Press the Fast Cooling & Fast
Freezing touch pad again to return to the normal refrigerator set point.
NOTE: The Fast Cooling & Fast Freezing feature will automatically shut off in
approximately 12 hours.
Quick Ice
The Quick Ice Feature assists with temporary periods of heavy ice use by increasing
ice production.
• Press the Quick Ice Feature touch pad to set the freezer to the lowest
temperature setting. Press the Quick Ice Feature touch pad again to return to the
normal freezer set point.
NOTE: The Quick Ice Feature will automatically shut off in approximately 24
hours.
Vacation Mode
In Vacation Mode, the freezer will not automatically defrost as often to conserve
energy.
• Press the Vacation Mode touch pad until the indicator light is lit to turn on this
feature. Press the Vacation Mode touch pad again or open the refrigerator door
to turn off this feature.
NOTE: The refrigerator door may be opened within I hour of setting Vacation
Mode without turning off the feature.
Temp Alarm
The Temperature Alarm combines power outage and warm alarm features.
Power Outage
During a power outage, if the temperatures in the refrigerator and freezer
compartments exceed normal operating temperatures, the highest temperature
reached will be displayed.
• Press the Temp Alarm touch pad until the indicator light is lit,to turn on this
feature. Press and hold Temp Alarm for 3 seconds until the indicator light goes
off to turn off this feature.
Fast Cooling
S. Fast Freezing
Quick
Ice
Vacation
Mode
Temp.
Alarm
Warm Alarm
An alarm will sound repeatedly if the freezer or refrigerator compartment
temperatures exceed normal operating temperatures for an hour or more.
The temperature displays will alternately show the current temperatures and the
highest temperatures the compartments reached when the power was out.
Press the Temp Alarm touch pad once to stop the audible alarm and alternating
temperature displays. The Temp Alarm light will continue to flash until the
refrigerator temperature stabilizes.
Door Alarm
The Door Alarm feature sounds a chime every few seconds when the refrigerator
door has been left open for 5 continuous minutes.
The chime will sound until the door is closed or Door Alarm is turned off.
Press the Door Alarm touch pad to turn this feature on or off. The indicator light
will be lit when the Door Alarm feature is on.
Water Filter Status Lights and Filter Reset (select models)
The water filter status light will help you know when to change the water filter.
When the yellow (Qrder) light is on, it is almost time to change the water filter.
When the red (Replace) light is on, a new water filter should be installed. See
“Water Filtration System.”
After replacing the water filter, press and hold FILTER RESET for 3 seconds until
the Qrder or Replace light turns off.
A
Door
Alarm
Order Repiace
O O
197
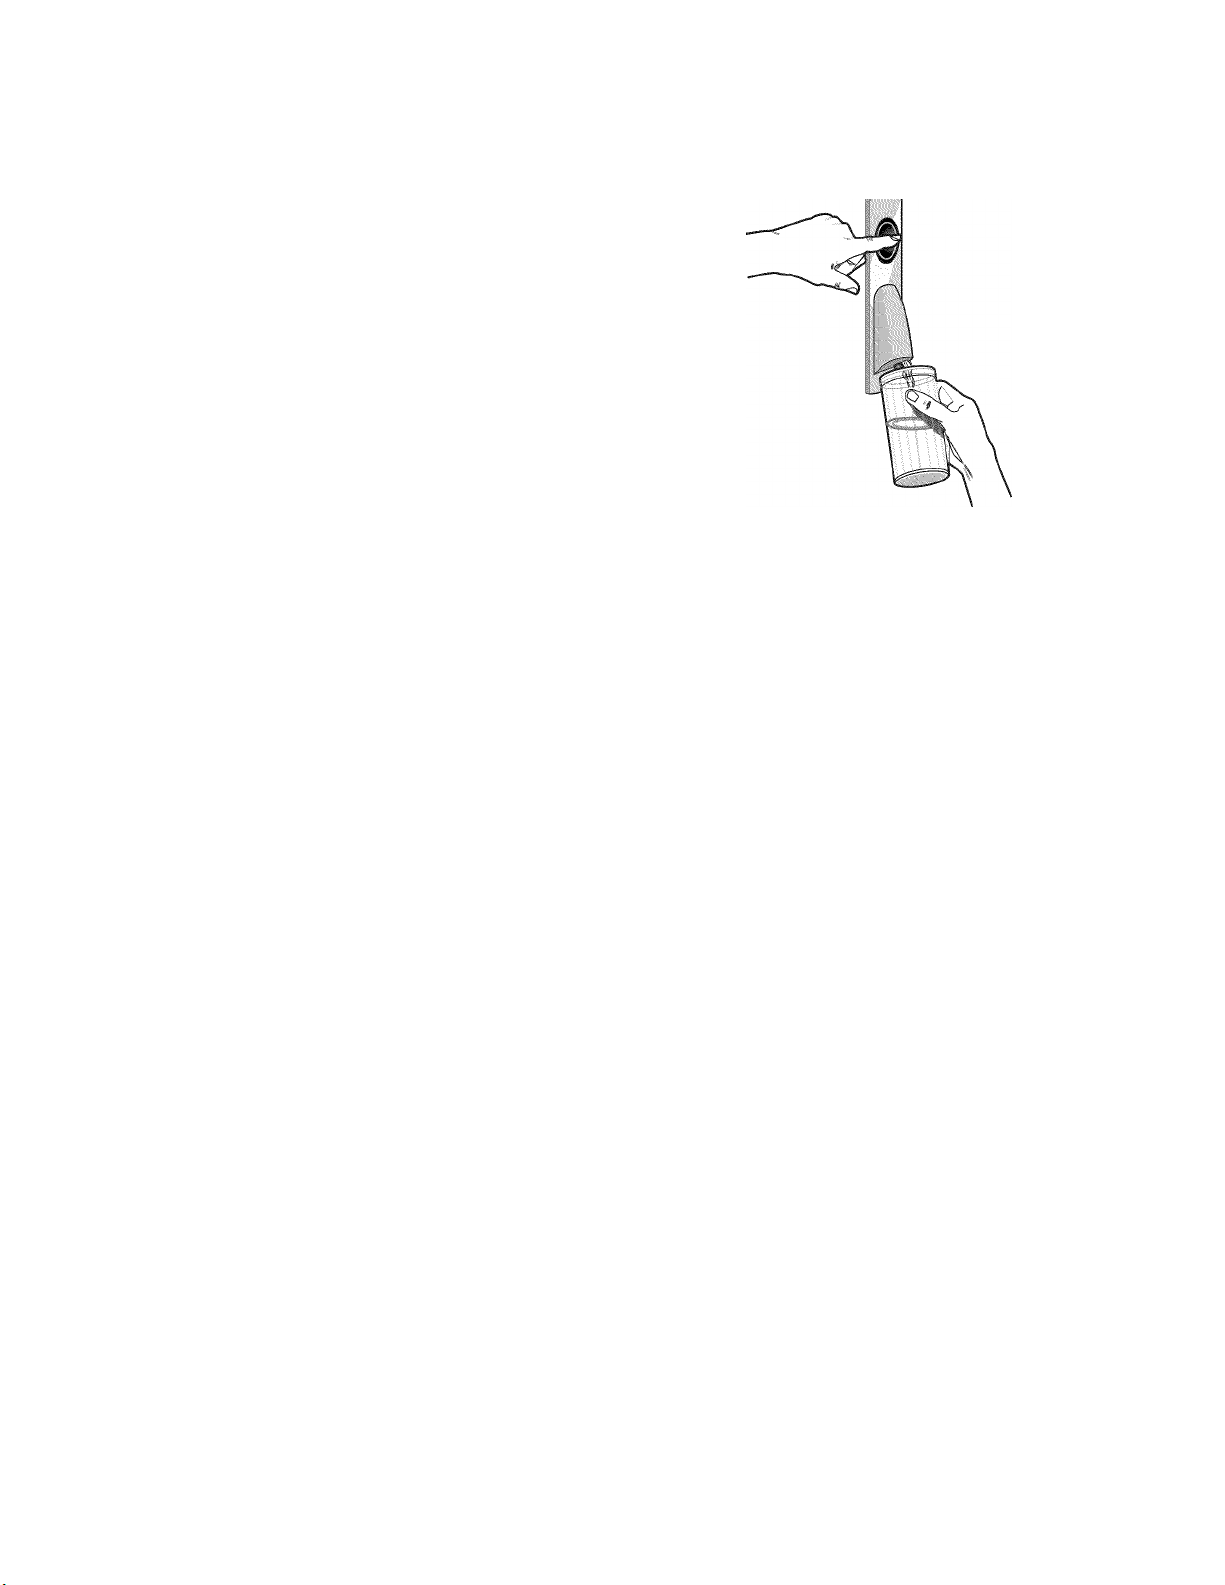
Water Dispenser
(select models)
If you did not flush the water system when the refrigerator was first
installed, dispense water into a container until you draw and discard 8
to 12 L (2 to 3 gal.) or for approximately 6 to 7 minutes after the water
begins dispensing. The water you draw and discard rinses the pipes.
Allow several hours for the refrigerator to cool down and chill water.
Dispensing Water
1. Hold a container under the dispenser while pressing the button.
2. Release the button to stop dispensing.
NOTE: Dispense enough water every week to maintain a fresh
supply.
User Preferences
The control center allows you to set user preferences, if desired.
Temperature Display (C_F)
This preference allows you to change the temperature display.
C - Temperature in degrees Celsius
F - Temperature in degrees Fahrenheit
Alarm (AL)
This preference allows you to turn off the sound of all alarms.
ON - You will hear the alarm sound.
OFF - You will not hear the alarm sound.
Sabbath Mode (SAB)
IMPORTANT: This preference does not disable interior lights.
ON - All control panel lights will be disabled.
OFF - All control panel lights will be enabled.
NOTE: Press any touch pad on the control panel to restore the
control panel lights.
To Access the User Preferences Menu:
1. Press and hold the Door Alarm touch pad for 3 seconds. The
preference name will appear in the Freezer display and the
preference status (C or F) or (ON or OFF) will appear in the
Refrigerator display.
2. Use the Freezer (+) or (-) touch pads to scroll through the
preference names. When the desired preference name is displayed,
press the Refrigerator (+) or (-) touch pads to change the
preference status.
3. Set your preferences by pressing and holding the Door Alarm touch
pad for 3 seconds, or by shutting the refrigerator compartment door.
198
USE OF ICE MAKER AND WATER DISPENSER
Automatic Ice Maker
Connect the ice maker to the water supply as instructed. Proper
water flow and a level refrigerator are essential for optimal ice
maker performance.
Ice Maker Operation
• To turn ice maker On push arm down from locked position.
• Lift arm up and lock into position to turn ice maker Off.
Operating Instructions
• Confirm ice bin is in place and ice maker arm is down.
• After freezer section reaches between -17" to -18" C (2" to 0" F),
ice maker fills with water and begins operating. You will have a
complete harvest of ice approximately every three hours.
• Allow approximately 24 hours after installation to receive first
harvest of ice.
• Discard ice created within first 12 hours of operation to assure
system is flushed of impurities.
• Stop ice production by raising ice maker arm until click is heard.
• Ice maker will remain in the off position until arm is pushed down.
• The first one or two batches will probably contain undersized and
irregular cubes because of air in the supply line.
• When the ice cubes are ejected it is normal for several cubes to be
joined together at the ends. They can easily be broken apart.
The ice maker will continue to make ice until the supply of ice cubes
raises the ice maker arm, shutting the ice maker off.
• Certain sounds may accompany the various cycles of the ice maker.
The motor may have a slight hum, the cubes will rattle as they fall
into an empty storage pan and the water valve may click or “buzz”
occasionally.
• If the ice is not used frequently, the ice cubes will become cloudy,
shrink, stick together and taste stale. Empty the ice storage bin
periodically and wash it in lukewarm water. Be sure to dry the bin
thoroughly before replacing it.
• Beverages and foods should not be placed in the ice storage bin for
quick chilling. These items can block the ice maker arm, causing the
ice maker to malfunction.
• Turn off (arm up) the ice maker when the water supply is to be shut
off for several hours.
To Remove the Ice Bin:
• Pull it forward, away from the ice maker. To avoid the ice maker
dumping ice while the bin is removed, turn the ice maker off by
raising the ice maker arm.
To Install the Ice Bin:
• Reverse the above procedure. Turn the ice maker on by lowering
the ice maker arm.
Water Dispenser (select models)
• The Water Dispenser is located on the left side wall of the fresh
food section. This design is for cold water dispensing only.
To Dispense Water:
• Hold container under spout and press dispenser pad.

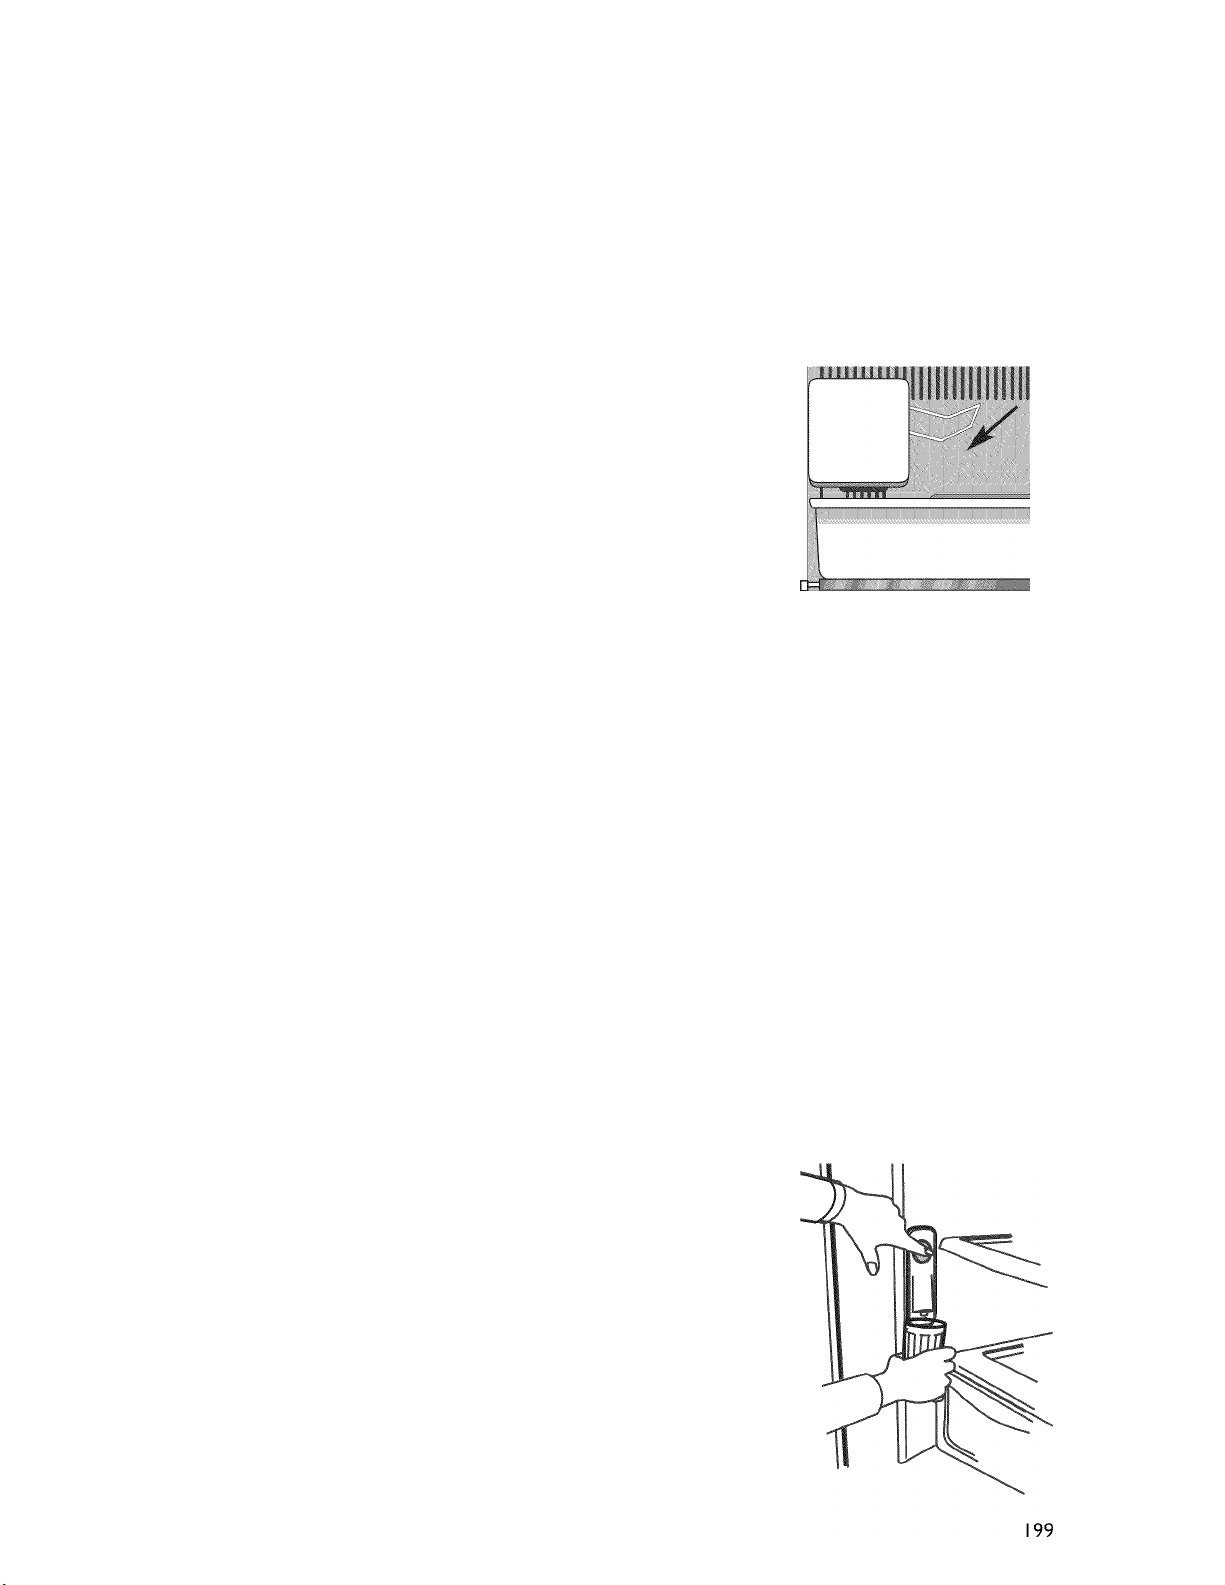
WATER FILTER (SELECT MODELS)
Water Filter Removal and Installation
If your appliance must be connected to the mains water supply to
operate the water dispenser and/or ice maker, it must be a water
supply which delivers potable water only. Ice makers not connected
to a mains water supply must be filled with potable water only.
Initial Installation
The water filter is located in the upper right-hand corner of the fresh
food compartment.
1. Remove blue bypass cap and retain for later use.
2. Remove sealing label from end of filter and insert into filter head.
3. Rotate gently clockwise until filter stops. Snap filter cover closed.
4. Reduce water spurts by flushing air from system. Run water
continuously for two minutes through dispenser until water runs
steady. During initial use, allow about a one- to two-minute delay in
water dispersal to allow internal water tank to fill.
• Additional flushing may be required in some households where
water is of poor quality.
Replacing Water Filter
IMPORTANT: Air trapped in system may cause water and
cartridge to eject. Always dispense water for at least 2 minutes
before removing the filter for any reason. Use caution when
removing.
I .Turn filter counterclockwise until it releases from filter head.
2. Drain water from filter into sink, and dispose in normal household
trash.
3. Wipe up excess water in filter cover and continue with Initial
Installation, steps 2 through 4.
IMPORTANT: Condit ion of water and amount used determines life
span of water filter cartridge. If water use is high, or if water is of poor
quality, replacement may need to take place more often.
To purchase a replacement water filter cartridge, contact your dealer.
The dispenser feature may be used without a water filter cartridge. If
you choose this option, replace filter with blue bypass cap.
NOTES:
1. The bypass cap does not filter water. Be sure to have replacement
cartridge available when filter change is required.
2. If water filtration system has been allowed to freeze, replace filter
cartridge.
3. If system has not been used for several months, or water has an
unpleasant taste or odor, flush system by dispensing water for two
to three minutes. If unpleasant taste or odor persists, change filter
cartridge.
200

GUIDE TO INTERNAL COMPONENTS
Shelves
• Never attempt to adjust a shelf that is loaded with food
(except in the case of the lift shelf).
• Confirm shelf is secure before placing items on shelf.
Your refrigerator has either spill guard glass shelf or non
sealed Shelves. The spill guard glass shelf shelves have a spill
retainer edge which allows for easier clean up and some are
equipped with the Easy Glide slide out feature. To slide out
(select models), grasp the front of the shelf and pull forward.
Push in the shelf to return to the original position.
To Remove a Shelf:
• Slightly tilt up the front and lift up the rear of the shelf, then
pull the shelf straight out.
To Lock the Shelf Into Another Position:
• Tilt up the front edge of the shelf.
• Insert the hooks into the desired frame openings and let the
shelf settle into place.
• Be sure the shelf is securely locked at the rear.
Lift Shelf (select models)
The fresh food compartment is equipped with an lift shelf.
This shelf can be adjusted up or down without having to be
unloaded of its contents. To adjust an lift shelf, pull out the knob
on the crank handle. Rotate the crank clockwise to raise the
height of the shelf, and counterclockwise to lower the height of
the shelf.
Note
• Do not raise the shelf to the very top of the vertical rails, as
the shelf may become jammed.
To Remove:
Completely unload the shelf and pull the shelf forward.
When the shelf stops, press up on the tabs located underneath
its outside edges, then continue pulling forward, clear of the
frame.
To Install:
Align the shelf to the frame and push it all the way back.
(There is no need to depress the tabs for reinstallation).
In ordinary use, the lift shelf frame assembly does not require
removal. Though unlikely, and not recommended, the correct
removal procedure is as follows:
To Remove:
• Unload the shelf completely.
• Remove glass shelf by pulling forward. When shelf stops lift up
and continue pulling forward.
• Manually move the two rear latches toward the shelf center.
• While supporting the entire shelf and frame from underneath,
lift slightly and rotate the assembly approximately 30° to allow
the rear mechanism to clear the vertical rear side rails.
• The entire assembly can then be moved forward and clear of
the refrigerator compartment.
■i
201

To Install:
• Reverse the removal procedure. Be sure the shelf is in a level
position.
• When the sliding shelf is pushed to the rear, it will reposition
the rear latches to their correct operating position.
The Crisper Top serves as the lower fresh food shelf.
To Remove the Crisper Top:
• Remove crisper drawers as indicated on page I I.
• Place hand under the frame to push up the glass. Lift glass out.
• Lift frame from refrigerator liner rails.
To Install:
• Repeat above instructions in reverse order.
Door Storage
Dairy Compartment
The Dairy Compartment provides convenient door storage
for spreadable items such as butter and margarine. This
compartment can be moved to different locations to
accommodate storage needs. To use the dairy compartment,
raise the cover.
To Remove:
• Raise the cover, pull upward and tilt out.
To Install:
• Reverse above procedure.
Door Buckets
Door Buckets can be moved to meet storage needs.
To Remove:
• Slide bucket up and pull straight out.
To Install:
• Slide bucket in and down until firmly seated in the door liner.
Full-width Door Shelf
Full-width Door Shelf removes for easy cleaning.
To Remove:
• Slide shelf up and pull straight out.
To Install:
• Reverse above procedure
Storage Drawers
Snack Drawer (select models)
The Snack Drawer can be used for storage of miscellaneous
items or extra produce.
To Remove:
• Pull drawer out to full extension. Tilt up front of drawer and
pull straight out.
To Install:
• Insert drawer into frame rails and push back into place.
y
,\
202

Party chiller
(select models)
The party chiller keeps beverages and other items cooler
than the rest of the fresh food section. A cold air inlet allows air
from the freezer section to pass into the beverage chiller.
The party chiller control is located on the left wall of the fresh
food compartment. The control adjusts the amount of cold air
allowed in to the beverage chiller. For a cooler temperature in
the party chiller slide the control down.
To Remove:
• First remove the pick off shelf to the left of the party chiller.
• Firmly hold each side of beverage chiller, lift up and away from
door liner.
To Install:
• Reverse above procedure.
Crisper Drawers
The Crisper Drawers provide a higher humidity environment
for fresh fruit and vegetable storage.
Controls
The Crisper Controls regulate the amount of humidity in the
crisper drawer. Slide the control toward the FRUIT setting for
produce with outer skins. Slide the control toward the
VEGETABLES setting for leafy produce.
Coldest
Chiller
Control
Cold
VEGETABLES FRUIT
HUMIDITY CONTROLLED
To Remove:
• Pull drawer out to full extension. Tilt up front of drawer and
pull straight out.
To Install:
• Insert drawer into frame rails and push back intoplace.
Note
For best results, keep the crisper drawers tightly closed.
Temperature-Controlled Drawer
The Temperature controlled drawer is a full-width drawer
with adjustable temperature control. This drawer can be used
for large party trays, deli items, beverages or miscellaneous
items and features a divider to organize the drawer into sections
if desired.
There is a temperature control which adjusts the amount of cold
air allowed into the drawer. The control is located on the right
side of the drawer, under the lid.
Set the control to the higher setting | to provide a normal
refrigerator temperature. Set the drawer on the lower setting
^ when a temperature colder than the main refrigerator
compartment is desired. Use the coldest setting when storing
meats.
203

Notes
• Cold air directed to the drawer can decrease refrigerator
temperature. Refrigerator control may need to be adjusted.
• Do not place leafy vegetables in the drawer.
Colder temperatures could damage leafy produce.
To Remove Drawer:
• Lift lid. Pull drawer out to full extension. Tilt up front of
drawer and pull straight out.
To Install Drawer:
• Push metal glide rails to the back of the refrigerator.
Place drawer onto rails and slide drawer back until it falls into
place.
To Remove Divider:
• Pull drawer completely out and raise the front of the divider
to unhook it from the rear wall of the drawer and lift it out.
To Install Divider:
• Hook back of divider over rear wall of drawer and lower into
place Upper Wire Basket.
Accessories (select models)
Wine Trivet/Can Rack
The Wine Trivet/Can Rack accessory fits in the deli drawer or
on a shelf.
Bottles or cans can be laid crosswise, or a single bottle may be
laid in the center depression.
Egg Cradle
The Egg Cradle (style may vary/select models) holds a “dozen-
plus” eggs. It can be removed to carry to work area or to be
washed.
Shelves and Baskets
Models with swing freezer door:
Freezer Shelf (select models)
Select models have a shelf divider.
To Remove:
• Pull shelf out to full extension. Tilt up front of shelf and pull
straight out.
To Install:
• Insert shelf into freezer liner rails and push to back of
compartment.
204

Wire Basket (select models)
To Remove:
• Pull basket out to full extension. Tilt up front of basket and pull
straight out.
To Install:
• Insert basket into freezer liner rails and push back into place.
Freezer Door Shelf (select models)
The Freezer Door Shelf provides convenient storage for frozen
food items in freezer door.
To Remove:
• Lift shelf from side liner tabs and pull out.
To Install:
• Fit ends of shelf on liner tabs and slide down.
Models with pullout freezer drawer:
Upper Wire Basket
To Remove:
• Pull upper basket out to full extension and lift out to remove.
To Install:
• Slide upper basket into freezer. Make sure that rear of basket
hooks behind rail catch.
Accessories (select models)
Ice Cube Tray
The Ice Cube Tray provides an area to freeze cubes for manual
dispensing of ice.
To release ice cubes from tray, hold tray upside down over a
storage container and twist both ends of tray until cubes release.
The Ice Service Rack (select models) holds the ice cube tray.
To Install:
• Slide L-shaped groove of shelf down over back wall screw.
Push rack back until screw is stopped in L-shaped groove (I).
Slide front portion of shelf over front wall screw (2).
To Remove:
• Perform above steps in reverse order.
205

GUIDE TO STORAGE AND THAWING OF
FOOD
The freezer compartment, marked with the symbol KH, is used for storing frozen food and freezing
fresh or cooked food.
The maximum quantity of food which can be frozen in a 24 hour period, at an ambient temperature of
25°C, is stated on the rating plate, inside the refrigerator compartment.
For more efficient freezing, activate fast cooling & fast freezing function.
PREPARING FRESH FOOD FOR FREEZING
It is important to wrap food so that no water, moisture, or vapour may penetrate; this avoids the transfer
of odours and flavours throughout the refrigerator and allows better storage of frozen food. Use plastic
containers with tight fitting lids, aluminium trays, aluminium foil, cling film and waterproof plastic
wrappings.
SEALING
When sealing the food in bags, squeeze out the air (liquids need head space to allow for expansion). Seal
the top of the bag with a fastener. Place labels on the inside of clear freezer bags; use self-adhesive labels
on the outside of opaque ones.
DEFROSTING
Here are some helpful tips.
Raw vegetables: do not thaw, put straight into boiling water and cook as usual.
Meat (large cuts): thaw in the refrigerator compartment without unwrapping. Before cooking, leave at
room temperature for a couple of hours.
Meat (small cuts): thaw at room temperature or cook from frozen.
Fish: thaw in the refrigerator compartment without unwrapping or cook before fully thawed.
In the event of a power failure, the freezer compartment maintains the appropriate storage temperature
for approximately 12 hours; during this time, we suggest you leave the door of the compartment closed.
Do not refreeze partially thawed food.
Previously cooked food: reheat in the oven without removing it from its aluminium container.
Fruit: thaw in the refrigerator compartment
NOTE: never place warm food in the freezer.
Allow hot foods to cool to room temperature for 30 minutes, then wrap and freeze. Cooling hot foods
before freezing saves energy and prolongs the life of the appliance.
206

FOOD STORAGE CHART
Storage time will vary according to the quality of the food, the type of packaging or wrap used (moisture and
vapour proof), and the storage temperature (which should be -18°C).
FOODSTUFF AND STORAGE TIME DAIRY PRODUCTS
Fruit
Concentrated fruit juice 12 months
Fruit (in general) 8 to 12 months
Citrus fruit and fresh fruit
juice
Vegetables
Commercially frozen 8 months
Home frozen 8 to 12 months
Meat
Sausages 4 weeks or less
Hamburgers 1 month
Beef, veal, lamb 2 to 3 months
Roasts
Beef 6 to 12 months
Lamb and veal 6 to 12 months
Pork 4 to 8 months
Fresh sausages 1 to 2 months
Steaks and chops
Beef 8 to 12 months
Lamb, veal, pork 2 to 4 months
Fish
Cod, flounder, sole 6 months
Salmon 2 to 3 months
Mackerel, perch 2 to 3 months
Dressed fish (purchased) 3 months
Clams, oysters 3 to 4 months
Boiled fish, crabs 3 to 4 months
Raw prawns 12 months
Poultry
Chicken or turkey (whole or
parts)
Duck and goose 6 months
Offal 2 to 3 months
Poultry cooked in a sauce 6 months
Sliced meat (no sauce) 1 month
Stews
Meat, poultry, and fish 2 to 3 months
4 to 6 months
12 months
Butter 6 to 9 months
Margarine 12 months
Cheese
Camembert, mozzarella,
spreading cheese
Cream cheeses do not freeze
Brie, Emmenthal, Swiss
cheese, etc.
(freezing may affect cheese
texture)
Ice cream, fruit juices, milk 12 months
3 months
6 to 8 months
Eggs
(Add sugar or salt to yolks or
whole beaten eggs)
Whole (beaten), whites, yolks 12 months
PASTRY AND BREAD
Leavened bread and rolls 3 months
Unbaked bread 1 month
Croissants 3 months
Cakes (not iced) 2 to 4 months
Cakes (iced) and biscuits 6 to 12 months
Fruit pies 12 months
Biscuit pastry 3 months
Pie pastry 4 to 6 months
207

MAINTENANCE AND CLEANING
Before any cleaning or maintenance operation, unplug the appliance from the mains or disconnect the
electrical power supply.
Periodically clean the refrigerator and freezer compartments with a cloth and a solution of lukewarm
water and neutral detergent specifically for refrigerator interiors.
Never use detergents or abrasives. Never clean refrigerator parts with flammable fluids. The fumes can
create a fire hazard or explosion.
Clean the outside of the appliance and the door seal with a damp cloth and dry with a soft cloth.
Important: the buttons and control panel display must not be cleaned with alcohol or alcohol-derived
substances, but with a dry cloth.
NOTE: The refrigeration system pipes are located near the defrost pan and can become hot. Periodically
clean them with a vacuum cleaner.
Always disconnect the refrigerator from the power supply before replacing any light bulbs.
Replacing Light Bulbs
Fresh Food Section (style of light shield varies)
1. Slide clear light shield toward back of compartment to release from
light assembly.
2. Remove light bulbs.
3. Replace with appliance bulbs no greater than 40 watts.
4. Replace light shield by aligning edge of shield with control housing.
Slide shield toward front of refrigerator until it locks into place on
‘T shape locking tab. Do not force shield beyond locking point.
Doing so may damage light shield.
Freezer (style of light shield varies)
1. Reach behind the light cover.
2. With firm pressure, press forward on the notches at the back of the
cover and pull down. The cover will open from the back.
3. Remove the cover.
4. Remove light bulb.
5. Replace bulb with appliance bulb no greater than 40 watts.
6. Insert front tabs of light cover into slots in freezer liner and snap
rear portion over light assembly until rear tab engages.
208

TROUBLESHOOTING GUIDE/AFTER-SALES SERVICE
When you hear these noises
..your appliance is alive!!!
Before contacting After-sales Service....
Performance problems often result from simple things you can find and solve yourself without tools of
any kind.
The appliance is not working
• Is the power plug plugged into a live socket with the proper voltage?
• Have you checked your home’s fuses?
Ice maker noises
Since your appliance has an ice maker, you may hear buzzing (from the water valve), trickling water and
the clatter of the ice falling into the bucket.
If your ice maker does not work:
• Has the freezer had enough time to become cold? With a new refrigerator this may take overnight.
• Is the ice maker ON/OFF?
• Is the water turned on? Is water getting to the ice maker?
• Is there a water filter installed on the refrigerator? This filter may be clogged or installed incorrectly.
First, check the filter installation instructions to ensure that the filter was installed correctly and is not
clogged. If installation or clogging is not a problem, call a qualified technician.
If the edges of the refrigerator cabinet, which come in contact with the door seal, are warm to
the touch:
• This is normal in hot weather and when the compressor is running.
If the light does not work:
• Have you checked your home’s fuses?
• Is the power plug plugged into a live socket with the proper voltage?
• Has the light bulb burnt out?
In the case of burnt-out bulbs:
I .Always unplug the appliance from the mains.
2. See chapter “Maintenance and Cleaning”.
209

If the motor seems to run too much:
• Are the doors properly closed?
• Are the door seals properly fitted?
• On hot days or if the room is warm, the motor naturally runs longer.
If the appliance door has been left open for a while or if large amounts of food have been stored, the
motor will run longer in order to cool down the interior of the appliance.
Remember
Motor running time depends on different things: number of door openings, amount of food stored,
temperature of the room, setting of the temperature controls.
If, after performing the above checks, your appliance still does not work properly, contact the After-sales
Service, explain the problem, specifying the model and appliance service number (stated on the data
plate).
If the refrigerator temperature is too high
• Are the refrigerator controls correctly set?
• Has a large amount of food been added to the refrigerator or freezer?
• Check that the doors are not opened too often.
• Check that the doors close properly.
• Make sure that air flow vents inside the compartment are not blocked, as this prevents the circulation
of cold air.
If there is moisture build-up
• Make sure that air flow vents inside the compartment are not blocked, as this prevents the circulation
of air.
• Make sure that the food is properly packaged. Dry any dampness on food containers before placing
them in the refrigerator.
• Check that the doors are not opened too often. When the door is opened, humidity from the room air
enters the refrigerator. The more often the door is opened, the faster humidity builds up, especially
when the room itself is very humid.
• If the room is very humid, it is normal for moisture to build up inside the refrigerator.
If the doors do not open and close properly
• Check that food packages are not blocking the door.
• Check that the pans, shelves, drawers or the ice maker are not out of position.
• Check that the door seals are not dirty or sticky.
• Ensure the appliance is level.
AFTER-SALES SERVICE
Before contacting After-Sales Service:
1. See if you can solve the problem yourself with the
help of the “Troubleshooting guide/After-sales
service”).
2. Switch the appliance on again to see if the
problem has been solved. If it has not, disconnect
the appliance from the power supply and wait for
about an hour before switching on again.
3. If the problem persists after this course of action,
contact After-sales Service.
210
Specify:
• the nature of the problem,
• the model,
• the Service number (the number after the word
SERVICE on the rating plate on the inside of the
appliance),
• your full address,
• your telephone number and area code.
SERVICE
Note:
The direction of door opening can be changed.
If this operation is performed by After-sales
Service it is not covered by the warranty.
0000 000 00000

INSTALLATION
Your new appliance is a FULL NO FROST model exclusively for
domestic use, i.e. both refrigerator and freezer compartments
are provided with an automatic defrosting function.
This manual contains indications and warnings for correct and
safe installation of the appliance - read it carefully before starting
installation operations.
Keep this manual for future consultation. If you sell the appliance
give it to the new buyer.
Because of the weight of the appliance, at least 2persons are
required to safely move/install it.
Installation of the appliance must be carried out by a qualified
engineer.
Your refrigerator was packed carefully for shipment.
Remove and discard shelf packaging and tape. Do not remove
the serial plate.
Measuring the Opening
When installing your refrigerator, measure carefully.
One-half inch (1.5 cm) of air space should be provided for the
top and back of the refrigerator.
Note: 60 cm deep models
Trim corners of countertop to a 45"’ angle if countertop has 25
mm overhang. Provide 5 mm clearance on both sides of
refrigerator, and allow 7 mm on top for ease of installation and
leveling. No minimum clearance is required at the rear of the
cabinet.
Subflooring or floor coverings (i.e. carpet, tile, wood floors,
rugs) may make your opening smaller than anticipated.
Some clearance may be gained by using the leveling procedure
under Leveling.
IMPORTANT: If refrigerator is to be installed into a recess
where the top of the refrigerator is completely covered, use
dimensions from floor to top of hinge cap to verify proper
clearance.
Transporting Your Refrigerator
• NEVER transport refrigerator on its side. If an upright position is
not possible, lay refrigerator on its back. Allow refrigerator to sit
upright for approximately 2 hours before plugging it in to assure
oil returns to the compressor. Plugging the refrigerator in
immediately may cause damage to internal parts.
• Use an appliance dolly when moving refrigerator.
ALWAYS truck refrigerator from its side or back-NEVER
from its front.
• Protect outside finish of refrigerator during transport by
wrapping cabinet in blankets or inserting padding between the
refrigerator and dolly.
• Secure refrigerator to dolly firmly with straps or bungee
cords. Thread straps through handles when possible. Do not
overtighten. Overtightening restraints may dent or damage
outside finish.
21 I

DOOR AND DRAWER REMOVAL
Some installations require door/drawer removal to transport the
refrigerator to its final location.
Disconnect power to refrigerator before removing doors or
drawer. Connect power only after replacing doors or drawer.
Door removal
To Remove:
1. Unplug power cord from power source.
2. Remove toe grille and bottom hinge cover (see page 214).
3. Remove top hinge cover from refrigerator door by removing
Phillips screw and retain screw and cover for later use.
4. Unscrew 5/16” hex head screws from top hinge to remove hinge
and retain all screws for later use.
5. Lift right side refrigerator door from center hinge pin. Remove
door closure from center hinge pin on the right side and retain for
later use.
6. Disconnect wire harness on top of left side refrigerator door top
hinge.
Release two-pin connector by pressing junction point with a flat
blade screwdriver or fingernail.
Green ground wire remains attached to the hinge.
7. Unscrew 5/16” hex head screws from top hinge to remove hinge
and retain for later use.
Lift left side refrigerator door, along with top hinge, from center
hinge pin.
Remove center hinge pin with a 5/16” hex head driver and retain
hinge pin for later use.
8. Remove Phillips screws to remove right and left hinges and retain
all screws for later use.
9. Remove both stabilizing brackets with 3/8” hex head driver and
retain screws for later use.
Door Reinstallation
1. Install hinge assemblies:
• Install top hinge loosely with 5/16” hex headscrews.
• Install center hinge with Phillips screws.
2. Place hinge side of refrigerator dooron center hinge pin.
3. While holding refrigerator doorupright, tighten down top
hingewith 5/16” hex head driver.
4. Reconnect two-pin connector.
5. Replace top hinge covers.
212

Drawer Removal
To avoid possible injury, product, or property damage, you will
need two people to perform the following instructions.
To Remove:
1. Pull drawer open to full extension.
2. Pull upper basket out to full extension and lift out to remove.
3. Lift lower basket straight up and out to remove.
4. On each side rail is a basket cradle with two snap attachments.
To release each cradle, unlatch the snaps by pushing them
inward, away from the side rail system. Lift the cradles off of
the rails.
5. Lift top of drawer front to unhook supports from rail system.
Lift door front out to remove.
To Install:
1. Pull both rails out to full extension.
2. While supporting door front, hook supports into tabs located
on inside of rail.
3. Lower door front into final position.
4. Place the basket cradles back onto the side rails.
Align snaps with the slots on the side rails and press each snap
towards the rail until it clicks.
5. With rails pulled out to full extension, set the basket straight
down into the basket cradles.
6. Slide upper basket into freezer. Make sure that rear of basket
hooks behind rail catch.
213

Leveling
• Do not use power tools when performing leveling procedure.
• To enhance the appearance and maintain performance, the
refrigerator should be level, (side to side)
Note
Complete any required door reversal, panel installation and/or a
water supply connection, before leveling.
Materials Needed
• 3/8” hex head driver
• Carpenter’s level
1. Remove toe grille.
• Grasp firmly and pull outward to unclip.
2. Remove bottom bracket cover(s).
• Place the eraser end of a pencil or similar blunt tool in the
cover notch.
• Use slight pressure to pry the cover loose.
• Continue to maintain downward pressure to the notched side
of the cover while swinging it off.
3. Using hex head driver, turn the front adjustment screws (A)
on each side to raise or lower the front of the refrigerator.
Note
• Some models only have adjustment screws “A”.
4. Select models also have rear adjustment screws (B). Using the
hex head driver, turn each of these adjustment screws (B) to
raise or lower the rear of the refrigerator.
5. Using the carpenter’s level, make sure front of refrigerator is
6 mm or half bubble higher than back of refrigerator and that
the refrigerator is level from side to side.
6. Turn stabilizing legs (C) clockwise until firmly against floor.
7. Freezer drawer models only: Turn adjustment screws (A)
counterclockwise to allow the full weight of the refrigerator
to rest on the stabilizing legs.
8. Replace bracket cover(s).
• Position cover into the outer edge of the hinge.
• Swing the cover toward the cabinet and snap it into place.
9. Replace the toe grille.
Note
• For proper reinstallation, ensure the “top” marking on the
interior of the toe grille is oriented correctly.
• Align the toe grille mounting clips with the lower cabinet slots.
• Snap bottom portion into place first. Press down on top
of grille until top portion snaps into place.
f
For pullout drawer only:
1. Turn both stabilizing legs clockwise until firmly against floor.
Turn roller adjustment screws 2 to 3 times counterclockwise
so that the full weight of refrigerator rests on stabilizing legs.
2. Replace toe grille and bracket cover(s). See markings on inside
of toe grille to insure proper placement.
214

Handles
If not installed, the handle is located in the interior of the fresh
food section or attached to the back of your refrigerator.
Remove and discard handle packaging and tape.
Handle design varies from refrigerator to refrigerator.
Please reference the appropriate instructions for your model
below.
Fresh Food Handles
Front Mount Handle - Style I
Materials Needed
• Phillips screwdriver
• 5/16” hex head driver
To Install:
1. Remove 0.6 cm hex head screws from door face with hex
head driver, and Phillips screw from top of door.
• If reversing door, remove door plugs from opposite side of
door and insert in screw holes.
2. Align handle holes with screw holes on door face and secure
with two door face screws from step I.
3. Locate handle trim in literature pack and install over top and
bottom of handle, as illustrated.
• Secure top handle trim with remaining screw removed in step I.
• Snap bottom trim over bottom portion of handle.
4
I
To Remove:
1. Remove top handle trim by removing top handle screw.
• Retain trim and screw for later replacement.
2. Pry bottom handle trim from handle with screwdriver flat
blade wrapped in masking tape.
• Retain trim for later replacement.
3. Remove two hex head screws.
• Retain screws for later replacement.
Side Mount Handle
Materials Needed
• Phillips screwdriver
To Install:
1. Remove screws from the side of the door.
2. Align the side mount handle with the predrilled holes in the
door panel.
3. Insert the screws in the sequence as shown.
4. Ensure the door handle is snug to the door panel.
To Remove:
Reverse installation procedure.
V 1
-1
215

Freezer Handles
Partial-Width Handle
Materials Needed
• Phillips screwdriver
To Install:
I. Install handle by fastening with screws removed from edge of
door.
• If reversing freezer door, remove door plugs from top edge of
door and insert into screw holes.
To Remove:
Remove handle screws with Phillips screwdriver and retain
screws for later use.
Front Mount Handle - style 2
Materials Needed
• Gloves to protect hands
• Phillips screwdriver
• Plastic door removal card (or 0.1 cm thick plastic card), retain
the card
,t
.....
i''
t.
1
Attach Extensions to Handle: (select models)
I .Align handle and extension as shown.
2. Place extension in handle opening.
3. Apply slight pressure to both sides of the extension piece.
4. Slide extension until it stops on inside edge of handle.
To Install:
I .The handles are to be oriented as shown.
2. Align front mount door handle clip with the door tabs.
3. Ensure the handle clips are positioned slightly above the door
tabs.
4. Rotate the handle so that the handle is flat against the door.
5. Push the handle down against the upper door tab just enough
to allow it to hang unsupported.
6. Align bottom of handle with lower door tab. Press upper
handle end to door surface and firmly grasp lower end of
handle. Gently slide handle upward until bottom of handle
settles on door surface, then reverse direction, sliding
downward to almost engaging tab with clip.
7. Grasp the handle firmly and slide down until it clicks. The
audible click indicates fastening clips are securely interlocked.
To Remove:
1. Flex the handle away from the door panel. Simultaneously
place door handle removal card underneath the base of the
lower handle. Insert the card to the line or until it stops.
2. Grasp the lower part of the handle firmly and lift to remove.
216

Front Mount Freezer Handle
Materials Needed
• Gloves to protect hands.
• Phillips screwdriver.
• Plastic handle removal card (or 0.1 cm thick plastic card).
Retain the card.
Notes
• There is a slight curve to this style of freezer handle.
For proper installation, be sure handle is oriented as shown.
To Install:
I .Align door handle clips slightly to the left of the tabs attached
to the freezer door.
2. Rotate the handle so the left base is flat against the door.
3. Push the left handle base against the left door tab and slightly
to the right, just enough to allow it to hang unsupported.
4. While firmly supporting the left handle base against the door,
align the right base of the handle with the right tabs that are
attached to the door.
5. Now, while firmly holding the handle at the left and right
bases, gently slide the handle towards the right until the right
base settles in. The handle should now be flat against the face
of the freezer door at both the left and right bases.
6. With hands still firmly keeping the handle flat against the
freezer door, you may have to reverse directions
momentarily to assure clip/tab engagement. Then firmly slide
the handle to the right until it clicks. The audible “click”
indicates that the fastening clips are securely interlocked.
To Remove:
I .At the right end, flex the handle base away from the surface
of the freezer drawer. Simultaneously slide the door handle
removal card that came with your refrigerator under the right
side base of the handle. Slide the card to the line indication or
until it stops.
2. With both hands, firmly grasp the handle towards the right
base.
3. Slide towards the left, lift and remove from the surface.
Handle Removal
Euro Handles
This handle style is installed at the factory
Materials Needed:
• 3/32” alien wrench
To Remove:
• Remove set screw from handle mounting post using 3/32”
alien wrench.
• Repeat the procedure on all posts to remove the handle.
To Replace:
• Align handle with the mounting posts.
• Fully tighten all set screws to secure handle in place.
217

Opening and Closing Your Fresh Food Doors
(select models)
Your new refrigerator is uniquely designed with two fresh food
doors. Either door can be opened or closed independently of
one another.
There is a vertically-hinged section on the left fresh food door.
When the left door is closed, the hinged section automatically forms
a seal between the two doors when both doors are closed.
WATER CONNECTION
Disconnect the appliance from the mains power supply
before starting operations.
• The ice maker and water circuit must be connected to a
water supply of potable and/or chemically purified water.
• The water connection must be carried out in compliance with
local regulations.
• The appliance is supplied with a water tube and with a
transition connector for connecting to the water tube and
supply, (some models)
• Remove the protective cap from the end of the gray water
tubing.
• Connect the water tube (I) to the transition connector (2).
Finger tightening and then I to 2 additional turns should be
adequate (for some models connector is placed directly on
water tube).
• Connect the transition connector (2) to the household water
supply (3).
• (4) Remove Plastic cap from water valve inlet port.
• (5) Place end of Plastic tubing into water valve inlet port.
• (6) Slide brass nut over sleeve and screw nut into inlet port.
Tighten nut with wrench. Do not overtighten. Connect tubing
to frame with water tubing clamp (C).
• Make sure that the water tube is not twisted.
• The appliance is pre-set for operation at pressures between
2.4 and 8.3 bar (35 and 120 PSI).
• Open the water tap. Check for and eliminate any leaks.
• The appliance does not require any adjustment or water drain.
218
 Loading...