

Whirlpool DU018DW User Manual
UNDERCOUNTER
DISHWASHER
Use & Care Guide
For questions about features, operation/performance,
parts, accessories or service call: 1-800-253-1301
In Canada, for assistance call: 1-800-461-5681,
for installation and service call: 1-800-807-6777
or visit our website at
www.whirlpool.com or www.whirlpool.com/canada
LAVE-VAISSELLE
ENCASTRÉ
Guide d'utilisation et d'entretien
Au Canada, pour assistance,
composer le 1-800-461-5681,
pour installation ou service 1-800-807-6777
Model/Modèle DU018DW
154424501/3381188
ou visitez notre site web à
www.whirlpool.com/canada
Table of contents/Table des matières ......................... 2

TABLE OF CONTENTS
TABLE DES MATIÈRES
Important Safety Instructions ....................... 3
Before Starting Your Dishwasher ................ 4
About Your Dishwasher............................... 5
Getting Started............................................. 6
Loading Your Dishwasher......................... 6,7
Loading Your Silverware Basket.................. 7
Using the Detergent Dispenser ................... 8
Operating the Dishwasher ...................... 9,10
Adding a Dish During a Cycle.................... 10
Caring for Your Dishwasher ................. 10,11
Getting the Best Results............................ 12
Solving Common Dishwashing Problems.. 13
Assistance or Service Information............. 14
Warranty .................................................... 15
Importantes instructions de sécurité.......... 17
Avant d'utiliser le lave-vaisselle ................. 18
Caractéristiques du lave-vaisselle............. 19
Préparatifs.................................................. 20
Chargement du lave-vaisselle .............. 20,21
Chargement du panier à ustensiles ........... 21
Distributeurs............................................... 22
Mode d'emploi ....................................... 23,24
Ajout d'un article......................................... 24
Entretien du lave-vaisselle.................... 24,25
Pour obtenir de meilleurs résultats ............ 26
Problèmes fréquents et solutions............... 27
Besoin d'aide ou du service après-vente .. 28
Garantie ..................................................... 29
2
DISHWASHER SAFETY
Your safety and the safety of others are very important.
We have provided many important safety messages in the manual and on your appliance. Always read
and obey all safety messages.
This is the safety alert symbol.
This symbol alerts you to potential hazards that can kill or hurt you and others.
All safety messages will follow the safety alert symbol and either the word
“DANGER” or “WARNING.” These words mean:
You can be killed or seriously injured if you don't
immediately follow instructions.
You can be killed or seriously injured if you don't
follow instructions.
All safety messages will tell you what the potential hazard is, tell you how to reduce the chance of
injury, and tell you what can happen if the instructions are not followed.
IMPORTANT SAFETY INSTRUCTIONS
WARNING: When using the dishw asher , f ollo w basic precautions , including the f ollowing:
■ Read all instructions before using the
dishwasher.
■ Use the dishwasher only for its intended
function.
■ Use only detergents or rinse agents
recommended for use in a dishwasher, and
keep them out of the reach of children.
■ When loading items to be washed:
1) Locate sharp items so that they are
not likely to damage the door seal; and
2) Load sharp knives with the handles
up to reduce the risk of cut-type
injuries.
■ Do not wash plastic items unless they are
marked "dishwasher safe" or the equivalent.
For plastic items not so marked, check the
manufacturer's recommendations.
■ Do not touch the heating element during or
immediately after use.
■ Do not operate your dishwasher unless all
enclosure panels are properly in place.
■ Do not tamper with controls.
■ Do not abuse, sit on, or stand on the door or
dish racks of the dishwasher.
■ To reduce the risk of injury, do not allow
children to play in or on a dishwasher.
■ Under certain conditions, hydrogen gas may be
produced in a hot water system that has not
been used for two weeks or more.
HYDROGEN GAS IS EXPLOSIVE. If the hot
water system has not been used for such a
period, before using the dishwasher turn on all
hot water faucets and let the water flow from
each for several minutes. This will release any
accumulated hydrogen gas. As the gas is
flammable, do not smoke or use an open flame
during this time.
■ Remove the door to the washing compartment
when removing an old dishwasher from service
or discarding it.
SAVE THESE INSTRUCTIONS
3
BEFORE USING YOUR DISHWASHER
GROUNDING INSTRUCTIONS
■ For a grounded, cord-connected
dishwasher:
The dishwasher must be grounded. In the
event of a malfunction or breakdown,
grounding will reduce the risk of electric
shock by providing a path of least resistance
Tip Over Hazard
Do not use dishwasher until completely
installed.
Do not push down on open door.
Doing so can result in serious injury or cuts.
for electric current. The dishwasher is
equipped with a cord having an equipmentgrounding conductor and a grounding plug.
The plug must be plugged into an appropriate
outlet that is installed and grounded in
accordance with all local codes and
ordinances.
WARNING: Improper connection of the
equipment-grounding conductor can result in
a risk of electric shock. Check with a
qualified electrician or service representative
if you are in doubt whether the dishwasher is
properly grounded. Do not modify the plug
provided with the dishwasher. If it will not fit
the outlet, have a proper outlet installed by a
qualified electrician.
Electrical Shock Hazard
Electrically ground dishwasher.
Connect ground wire to green ground nut in
terminal box.
Do not use an extension cord.
Failure to do so can result in death, fire or
electrical shock.
■ Install where dishwasher is protected from the
elements. Protect against freezing to avoid
possible rupture of fill valve. Such ruptures are
not covered by the warranty. See “Storage or
Seasonal Use” in the “Caring for Your
Dishwasher” section for winter storage
information.
■ Install and level dishwasher on a floor that will
hold the weight, and in an area suitable for its
size and use.
■ See Installation Instructions for complete
information.
■ For a permanently connected dishwasher:
The dishwasher must be connected to a
grounded metal, permanent wiring system, or
a equipment-grounding conductor must be
run with the circuit conductors and connected
to the equipment-grounding terminal or lead
on the dishwasher.
SAVE THESE INSTRUCTIONS
4

ABOUT YOUR DISHWASHER
Your dishwasher, illustrated below, cleans by spraying a mixture of hot, clean water, and
detergent against the soiled surfaces of your dishes and tableware. Each cycle starts with a
pre-drain. Next, the dishwasher fills with water to a level even with the heating element. This
water is constantly pumped through the rotating spray arm and center wash tower and sprayed
onto the dishes. Soiled water is pumped out and replaced with clean water during a cycle. The
number of water fills depends upon the cycle being used.
Side View
Upper Rack
Tower Assembly
Lower Rack
Lower Spray Arm
Heating Element
Motor
Console
Data Label
(on right side
of tub)
Float
Normal Water
Fill Level
Door Spring
Leveling Legs
5

GETTING STARTED
To start your dishwasher, refer to the following quick reference guide.
Starting Your Dishwasher
1. Load the dishwasher (see
pages 6-7).
2. Fill the detergent dispenser
(see page 8).
3. Fill the rinse aid dispenser
(see page 8).
4. Select desired energy option
(see page 10).
5. Turn cycle indicator knob
clockwise to the cycle you
want (see page 9).
6. Turn on hot water nearest
the dishwasher and let run
until water is hot. Turn water
off.
7. Firmly close door to latch
and start dishwasher.
Stopping Your Dishwasher
You can stop your dishwasher anytime during a cycle. Simply unlatch the door and wait for
the water action to stop.
Normal Operation
The following conditions are normal and indicate proper operation.
• Motor sounds will be heard before water enters the tub.
• Short time delays occur after a cycle is selected and between washes and rinses.
• A small amount of clean water will remain in the bottom of the tub after each cycle.
LOADING YOUR DISHWASHER
It is not necessary to rinse dishes before putting them into the dishwasher. Just remove large
pieces and quantities of food and bones. Empty cups and glasses. It may be necessary to
presoak or lightly scour firmly cooked-on or baked-on foods.
Always load dishes so soiled surfaces are reached by water spray from rotating spray arm or
center wash tower. Water must be able to drain off completely for best results.
6
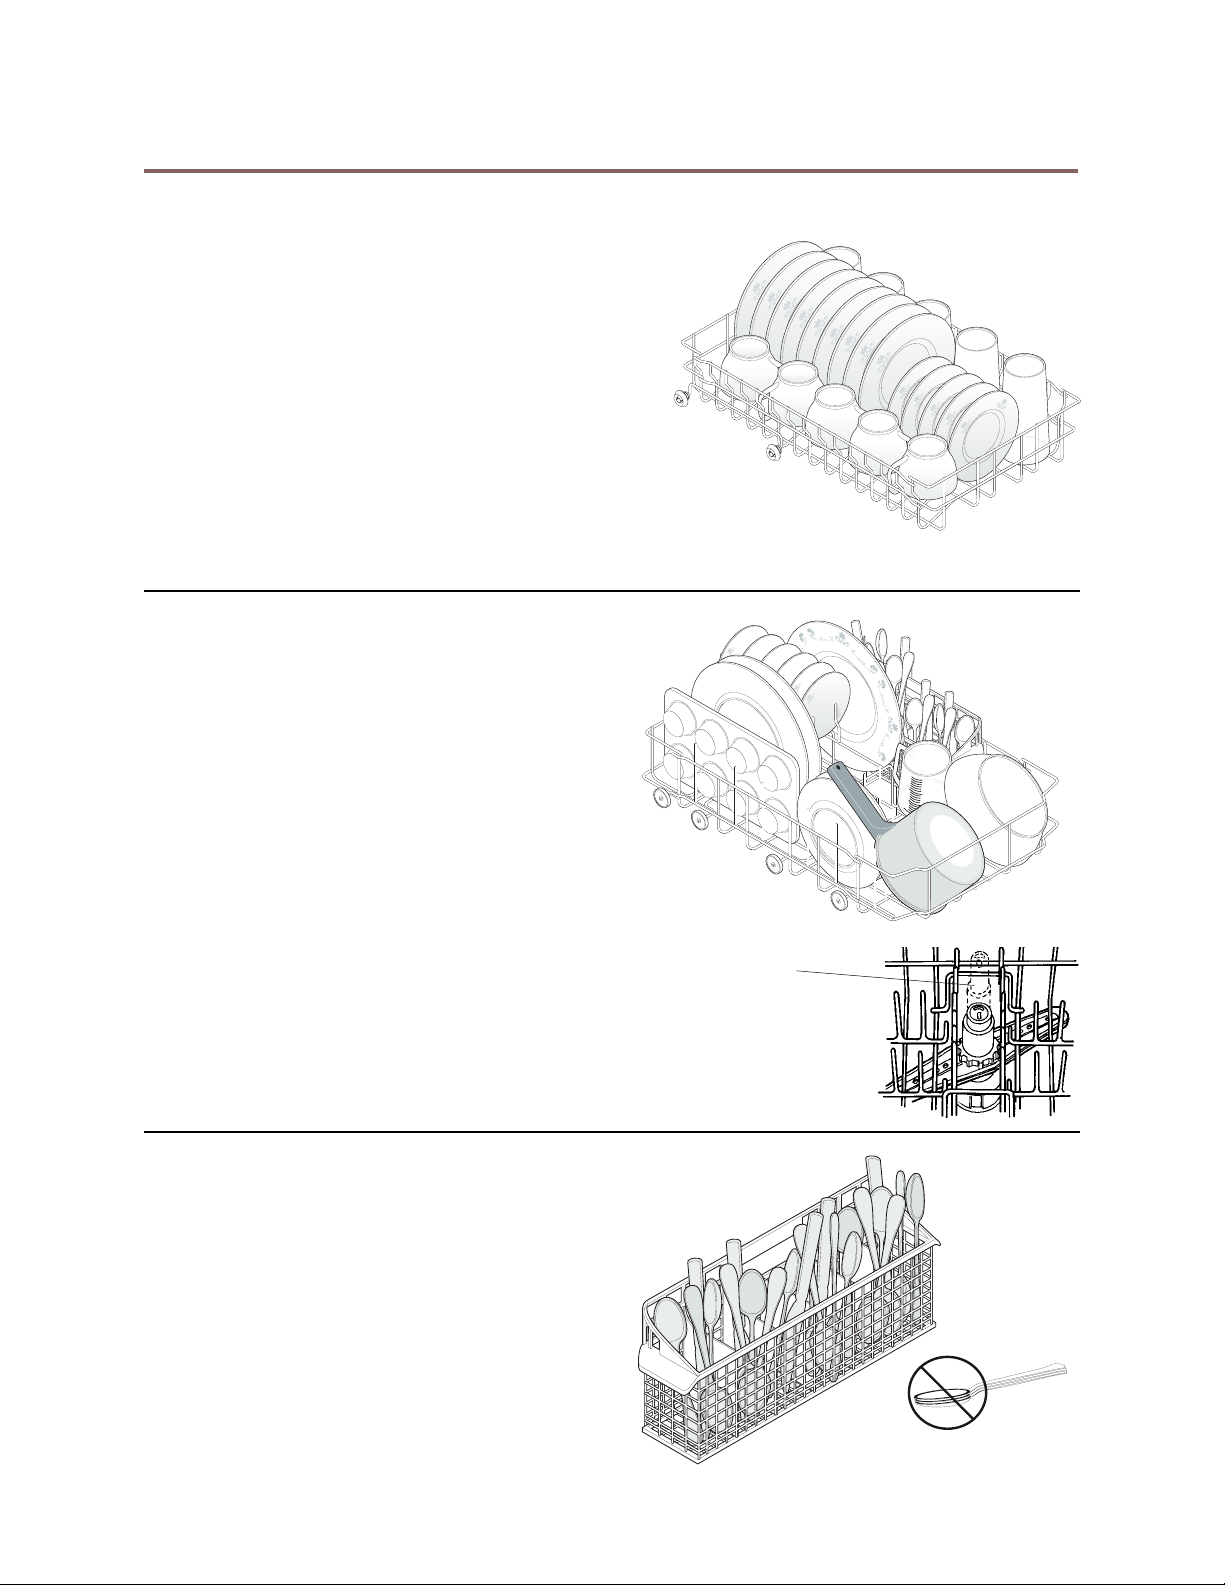
LOADING YOUR DISHWASHER
Upper Rack Loading
• Place items so open ends face down for cleaning and
draining.
• Load glasses in upper rack only between tines.
Lower rack is not designed for glasses and damage
may occur.
• Be sure lightweight items are held firmly in place.
• Load plastic items in the upper rack only. Plastic
items may melt in the lower rack. Only items
marked “Dishwasher Safe” or equivalent are
recommended.
• China, crystal, and other delicate items must not
touch other items during the dishwasher’s operation.
Lower Rack Loading
• Make sure pot handles and other items do not
stop rotation of the lower spray arm or block
the center wash tower from extending upward.
• Items with cooked-on or dried-on foods should
be loaded in the lower rack with soiled
surfaces facing the spray.
• Load cookie sheets, cake pans and other
large items at the sides. Do not place them
across the front where they will prevent water
from reaching the detergent dispenser.
• Place plates, soup bowls, etc. between tines
and facing the spray.
Do not block
NOTE: Do not block the center area of the
lower rack when loading. Because the center
wash tower extends through this area,
blockage may result in poor cleaning.
center area.
Silverware Basket Loading
• The silverware basket may be loaded while
positioned in the lower rack or on the counter
top.
• Be sure no items protrude through the holes
in the basket or extend high enough to stop
the spray arm’s rotation.
• Load sharp items with the points down.
• Load silverware so items are mixed in each
section to prevent
Water spray cannot effectively clean nested
items.
nesting
(see illustration).
Nested Utensils
7

USING THE DISPENSERS
Filling the Detergent Dispenser
• Use only fresh automatic dishwashing
detergent. Other types will cause
oversudsing.
• Add detergent just before starting cycle.
• Store detergent in a cool, dry location.
Moist or caked detergent will not dissolve
properly.
The detergent dispenser has one covered
and one uncovered cup. Detergent in the
uncovered cup falls into the dishwasher when
the door is closed. The covered cup opens
automatically in the main wash.
Cover
How much Detergent to use
The amount of detergent to use depends on
the water hardness. Water hardness is
measured in grains per gallon. Using too little
detergent can result in poor cleaning and hard water filming or spotting. Using too much
detergent in soft water can cause permanent etching on glassware. Your local water company,
water softener company or county extension agent can tell you the water hardness in your
area.
More detergent may be needed if the phosphorus content is 8.7% or less. The phosphorus
content is shown on the detergent label.
Cover Latch
Main Wash Cup
Fill both cups for Pots & Pans, Heavy
Wash and Normal Wash. Fill covered cup
only for Short Wash.
Note: If the cover is closed on the Main
Wash Cup, open by pressing the cover latch.
Pre Wash Cup
Rinse Aid Dispenser
Rinse aid greatly improves drying and
reduces water spots and filming. Water
“sheets” off dishes rather than forming water
droplets that cling and leave spots.
A dispenser, located next to the detergent
cup, automatically releases a measured
amount of rinse aid during the last rinse. If
spotting and poor drying are problems,
increase the amount of rinse aid dispensed by
rotating the dial to a higher number. The dial
is located under the dispenser cap. The
indicator will be dark when full and will show
clear when it is time to refill.
To add liquid rinse aid, turn dispenser cap 1/4
turn counterclockwise and lift out. Pour in
rinse aid until liquid touches the indicated fill
level. Replace cap.
Do not overfill since this can cause
oversudsing. Wipe up any spills with a
damp cloth.
Dispenser Opening
Dispenser Cap
Indicator
Adjustable setting
The dispenser holds enough for 35 to 140
washes, depending on setting.
8
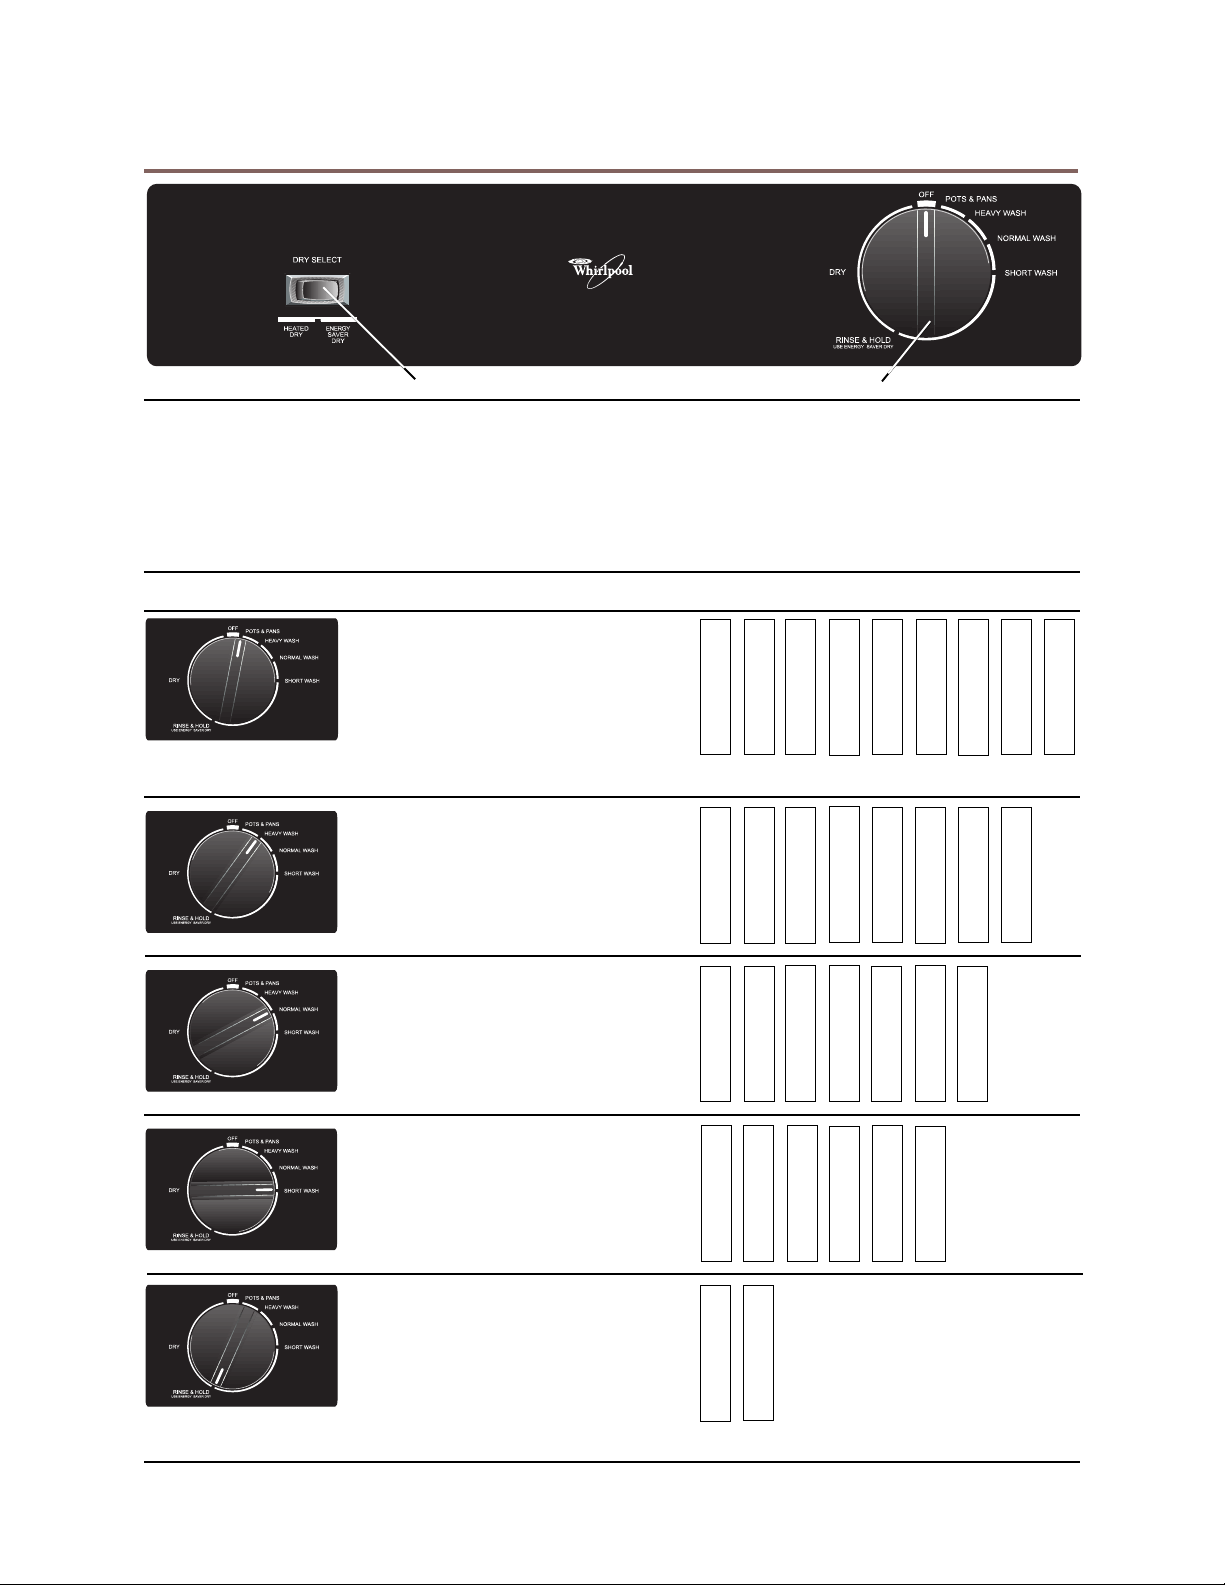
OPERATING INSTRUCTIONS DU018DW
Rocker Switch
Cycle Indicator Knob
Starting Your Dishwasher
1. Load dishwasher and add detergent (see
page 8).
2. Select desired energy option.
3. Turn the cycle indicator knob clockwise to
the desired cycle.
4. Turn on hot water faucet nearest the
dishwasher and let run until water is hot.
5. Firmly close dishwasher door to start
cycle.
Cycles Note: Cycle time and water usage shown are approximate.
POTS & PANS cycle
For pots, pans, casseroles and
dinnerware with dried-on or baked-on
soils.
Cycle Time: 90 min.
Water Usage: 9.3 gal.
35.2 liters
HEAVY WASH cycle
For heavily soiled dishes.
Cycle Time: 84 min.
Water Usage: 8.0 gal.
30.3 liters
W
A
S
H
W
A
S
H
R
I
N
S
E
R
I
N
S
E
R
R
I
I
N
N
S
S
E
E
R
W
I
A
N
S
S
H
E
W
A
S
H
R
N
S
E
R
R
I
N
S
E
R
I
I
N
S
E
D
I
N
S
E
D
R
Y
O
R
F
Y
F
O
F
F
NORMAL WASH cycle
For normally soiled dishes.
Cycle Time: 78 min.
Water Usage: 6.7 gal.
25.4 liters
SHORT WASH cycle
For pre-rinsed or lightly soiled dishes.
Cycle Time: 72 min.
Water Usage: 5.3 gal.
20.1 liters
RINSE & HOLD cycle
For rinsing dishes that will be washed
later. Use the Energy Saver Dry (air
dry) option. Do not use detergent.
Cycle Time: 9 min.
Water Usage: 1.3 gal.
4.9 liters
9
W
A
S
H
R
N
S
E
W
A
S
H
R
R
I
N
S
E
R
R
I
I
N
N
S
S
E
E
D
I
N
S
E
D
R
Y
O
R
F
Y
F
O
F
F
R
I
N
S
E
R
W
I
A
N
S
S
H
E
O
I
F
F
OPERATING INSTRUCTIONS DU018DW
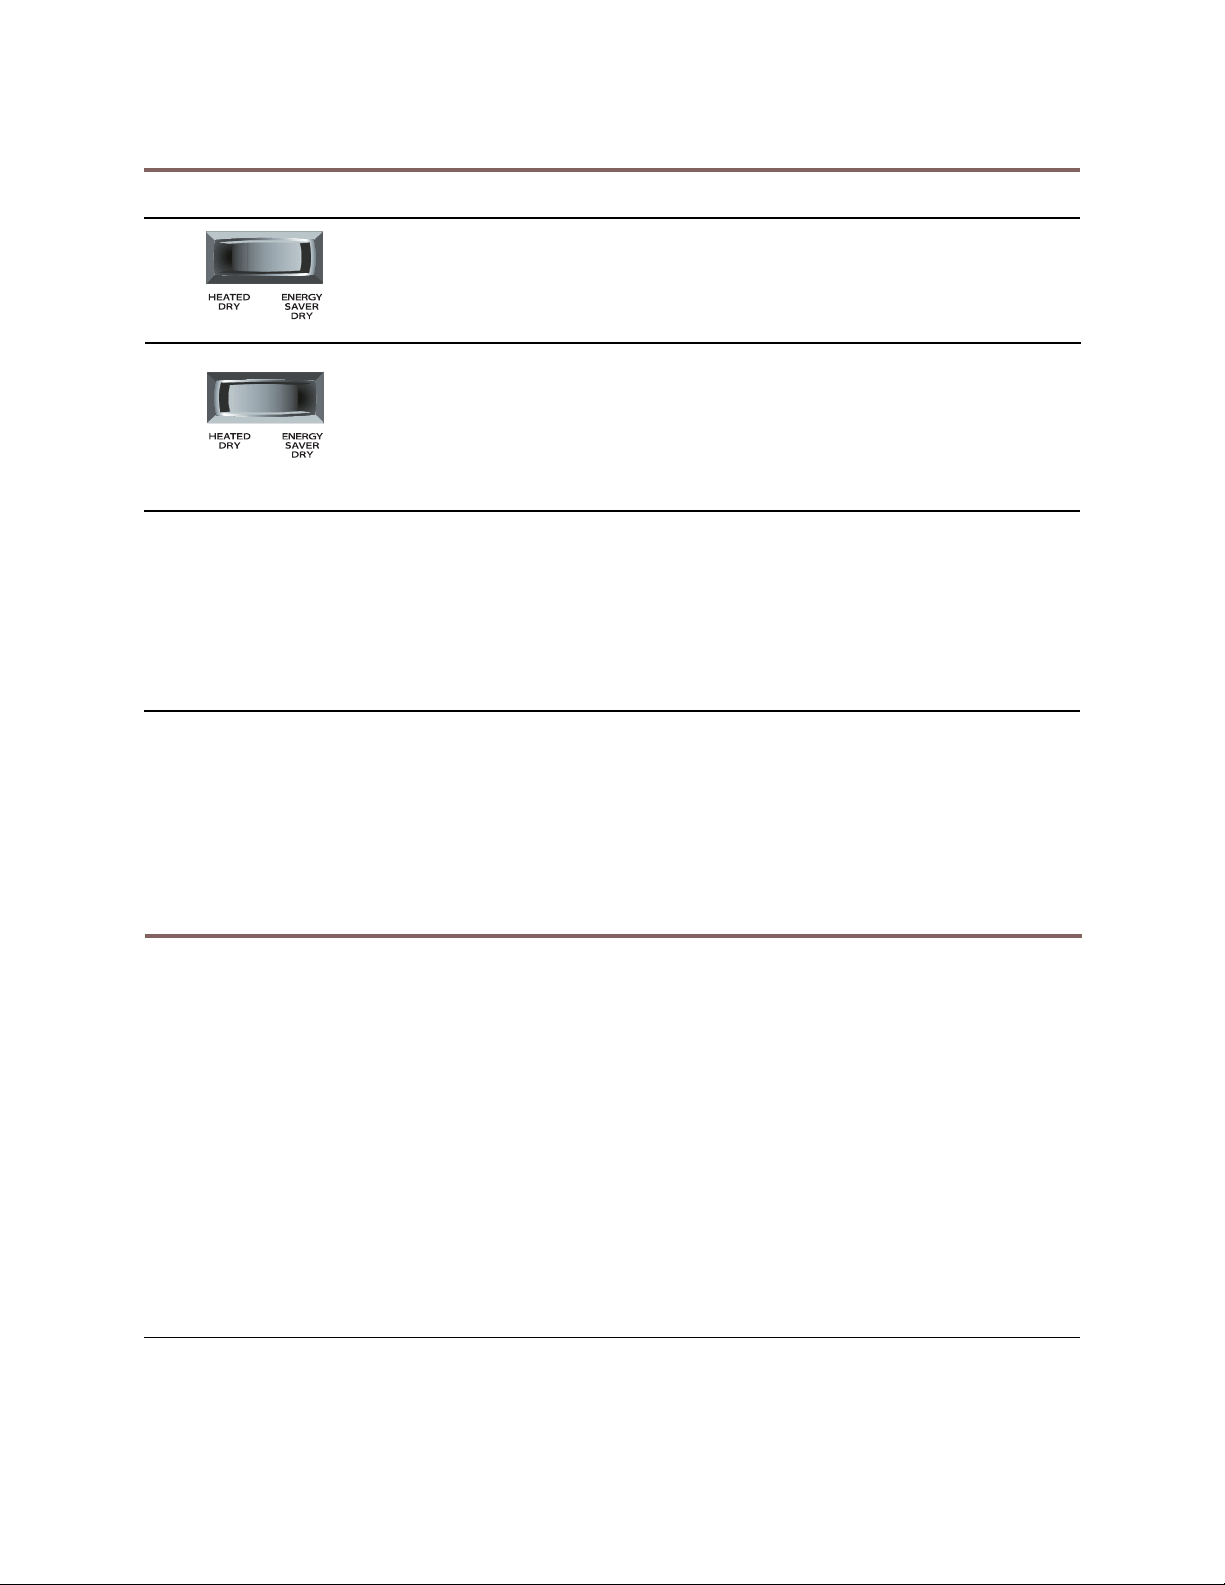
Options
HEATED DRY option
Heater is on for the entire drying period for faster drying.
ENERGY SAVER DRY (AIR DRY) option
Heater is off during the entire drying period, saving energy.
Note: If you wish to shorten the drying time and save energy, turn
the control knob to OFF at the beginning of the dry cycle and open
the dishwasher door slightly.
Changing a Setting
1. Unlatch door to stop cycle.
2. Turn cycle indicator knob clockwise to desired cycle.
3. Be sure detergent dispenser is filled properly for new cycle.
4. Firmly close door to start cycle.
Adding a Dish
1. Make sure there is a full wash cycle yet to be completed to ensure that any added items
are washed and rinsed.
2. Unlatch door to interrupt cycle and wait for water action to stop.
3. Open door and add dish.
4. Firmly close door to resume cycle.
CARING FOR YOUR DISHWASHER
Caring for Surfaces
Exterior
Wash with a mild, nonabrasive detergent and water. Rinse and dry.
Interior
Do not clean the dishwasher interior until it has cooled.
The interior is self-cleaning with normal use. If hard water causes lime deposit buildup, clean
using the following instructions:
1. After dishwasher begins to fill, open door and pour two (2) cups of vinegar into the
dishwasher. Do not add dishes or detergent.
2. Run the machine through any full wash cycle.
Cleaning the Drain Air Gap
If the installer of your built-in dishwasher installed an air gap in the drain system, it should be
checked periodically to make sure it is clean. Air gaps are usually mounted on the counter top
or in the wall above the dishwasher and can be inspected by removing the cover.
10
 Loading...