

Whirlpool Cme9010cab Owner's Manual

The Quick Cook Feature
The Quick Cook feature is a short-cut method to To Quick Cook your food or beverage:
set time for 1-5 minutes. Touch a number pad (from 1to 5) for 1to 5 minutes
of cooking at Power Level 10. For example, touch the
_1-] _ _3-] _-] _-_ 2 pad for 2 minutes of cooking time. No need to touch _,_
START, the oven will start immediately.
_6-] _] _-] _9-] _0-_ The oven will signal and tum off automatically
when finished. _,
fltQ
How to Use Auto Start _
The Auto Start feature allows you to program your Step 2: Enter the time you want the oven to start.
oven to begin cooking at a preset time of day--up (Be sure your microwave oven clock shows the _
to a 12-hour delay, correct time of day.)
¢D
START automatically start at the desired time. The display
| Step 1: Touch AUTO START pad. Step 3: Enter your desired cooking program.AUTO ] Step 4: Touch START pad. The oven will
will show the time you entered. The time of day may
be displayed by touching the CLOCK pad.
+ 30 Seconds
The + 30 Seconds feature provides a convenient way This pad may also be used as a quick cook for 30
to extend cooking time by 30 seconds while the oven seconds of cooking. No need to touch START, the
timer is counting down. It will add30 seconds to the oven will start immediately.
time shown each time the pad is touched.
POPCORN
Step 1: Remove the outer wrapper from the
NOTE: Do NOT use the metal shelf with the microwave popcorn.
Popcorn program. Step 2: Open oven door and place package of
popcorn in the center of the oven floor as directed by
The Popcorn feature is designed to be used only with the package instructions. Close oven door.
prepackaged microwave popcorn weighing 3.0 to Step 3: Touch POPCORN pad. No need to touch
3.5 ounces. START, the oven will start immediately.
How to Adjust the Popcorn Program to Provide a Shorter or Longer Cook Time
If your favorite popcorn is not completely popped, If your favorite popcorn is overcooked, there is a
there is a simple adjustment you can make. simple adjustment you can make.
Touch the POPCORN I Touch the POPCORN
pad. (The oven will start I
F'I
immediately.) Then touch I I_ _'_ _ _ pad. (The oven willstartimmediately.)Then touch l_
number pad 9. A plus sign [ I [.J _
wilt appear on the disp!ay signnumberwillPadappearl"aonminuSthe LJ I "_
beside the word POP . display beside the word
The plus sign indicates 20 seconds more cooking time "POP". The minus sign indicates 20 seconds less
is being provided, cooking time is being provided.
13

IMPORTANT INSTRUCTIONS
Read all instructions before using your appliance.
When using electrical appliances, basic safety • Do not let power cord hang over edge of table
precautions should be followed, including the or counter.
following: • Do not operate this appliance if it has a
damaged power cord or plug, if it is not
A WARNING Toreduce the risk of working properly, or if it has been damaged
burns,electric shock, fire, injury to persons or dropped.
or exposure to excessive microwave energy:
• Read and follow the specific "Precautions to and Cleaning section(s) of your guide.
Avoid Possible Exposure to Excessive Microwave
Energy" on the previous page. • This appliance should be serviced only by
• This appliance must be grounded. Connect authorized service facility foI examination,
only to properly grounded outlet. See Grounding repair or adjustment.
Instructions section in the back of this guide.
• Use this appliance only for,its intended use as necessary when used by children.
described in this guide. Do not use corrosive
chemicals orvapors in this appliance This . f . .
microwave oven is specifically designed to heat • To reduce the risk o fire in the oven cawty:
orcook food. and is not intended for laboratory. --Do not overcook food. Carefully attend
or industrialuse. applianceif paper, plastic orother combustible
• See door surface cleaning instructions in the Care
qualified service personnel. Contact nearest
• As with any appliance, close supervision is
• This over.the-range oven was designed materials are placedinside the oven to facilitate
for use over ranges no wider than 42 inches, cooking.
Itmay be installed over both gas and electric --Remove wire twist-ties and metal handles
cooking equipment, from paper or plastic containers before
• For best operation, plug this appliance into its placing them in the oven.
own electrical outlet, to prevent flickering of --Do not use your microwave oven to dry
lights, blowing of fuse or tripping of circuit newspapers.
breaker. --Do not use recycled paper products. Recycled
paper towels, napkins and waxed paper can
contain metal flecks which may cause arcing
• Install or locate this appliance only in or ignite. Paper products containing nylon or
accordance with the provided Installation nylon f'daments should be avoided, as they
Instructions. may also ignite.
• Do not cover or block any openings on the -.-Do not pop popcorn in your microwave oven
appliance, unless in a special rmcrowave popcornaccessory
• Do not store this appliance outdoors. Do not or unless you use popcorn labeled for use in
use this productnear water--for example, in a wet rmcrowaveovens.
basement, near a swimming pool ornear a sink. --Do not overcook potatoes. They could
• This microwave oven is not approved or tested dehydrateand catch fire, causing damage
for marine use. to your oven.
• Do not store anything directly on top of the --Do not operate the oven while empty to avoid
microwave oven surface when the oven is in damage to the oven and the danger of fire.
operation, minute or two. no harm is done. However. try to
• Do not immerse power cord or plug in water, avoid operating the oven empty at all times--it
If by accident the oven should run empty a
• Keep power cord away from heated surfaces, saves energy and prolongs the life of the oven.
• Do not mount this appliance over a sink. .continuednextpage/
3

IMPORTANT SAFETY INSTRUCTIONS
(continue.A}
---Do not use the oven for storage purposes. • Remove the temperature probe from the oven
Do not leave paperproducts, cooking utensils when not using it to cook with. If you leave the
or food in the oven when not an use, probe inside the oven without inserting it in food
--If materials inside oven should ignite, keep or liquid, and turn on microwave energy, it can
oven door closed, turn oven off, and disconnect create electrical arcing in the oven and damage
power cord. or shut off power at the fuse or oven walls.
circuil breaker panel. • Plastic eookware--Plastic cookware designed
for microwave cooking is very useful, but should
• Some products such as whole eggs and sealed be used carefully. Even microwave-safe plastic
containers--for example, closed jars--will may not be as tolerant of overcooking conditions
explode and should not be heated in this as are glass or ceramic materials and may
microwave oven. Such use of the microwave soften or char if subjected to short periods of
oven could result ill injury, overcooking, in longer exposures to overcooking,
• Avoid heating baby food in glass jars, even with reasons: 1)Use microwave-safe plastics only and
the lid off. Make sure all infant food is thoroughly use them in strict compliance with the cookware
cooked. Stir food to distribute the heat evenly, manufacturer's recommendations. 2) Do not
Be careful to prevent scalding when warming subjectempty cookware to microwaving.
formula or breast milk. The container may fee] 3) Do not permit children to use plastic
cooler than the milk really is. Always test the cookware without complete supervision.
milk before feeding the baby.
the food and cookware could ignite. For these
• Don't defrost frozen beverages in narrow • When cooking pork, follow the directions
necked bottles (especially carbonatedbeverages), exactly and always cook the meatto an internal
Even if the container is opened, pressure can build temperature of atleast I70°E This assures that.
up. This can cause the container to burst,possibly in theremote possibility thattrichina may be
resulting in injury, presentin the meat, it will be killed and meat
• Use foil only as directed in this guide. TV will be safe to eat.
dinners may be microwaved in foil trays less than • Do not boil eggs in a m/crowave oven.
3/4" high: remove the top foil cover and return the Pressurewill build up inside egg yolk and will
tray to the box. When using foil in the microwave cause it to burst,possibly resuking in injury.
oven. keep the foil (other than metal shelf) at
least I inch away from the sides of the oven. _ • Foods with unbroken outer "skin"
_. Cookware may become hot because apples, chicken livers and other
• Foods cooked in liquids (such as pasta) may tend
to boil over more rapidly than foods containing • Not all plastic wrap is suitable for use in
less moisture. Should this occur, refer to the Care microwave ovens. Check the package for
and Cleaning sectiun/s) for instructions on how to proper use.
clean the inside of the oven.
• ThermometerhDo not use a thermometer in liquids may start to boil during
food you are microwawng unless the thermometer or shortly afterremoval from
is designed or recommended for use inthe the microwave oven. To prevent
rmcrowave oven. burns from splashing liquid, stir the
of heat transferred from the heated giblets, and egg yolks _see previous
food. Pot holders may be needed to caution) should be pierced to allow
handle the eookware, steam to escape during cooking.
such as potatoes, sausages, tomatoes.
certainspecial circumstances.
. Spontaneous boiling--Under
liquidbriefly before removingthe
containerfrom the microwave oven.
4

• "Boilable" cooking pouches and tightly dosed The Exhaust Hood
plastic bags shouldbe slit, pierced or vented • Have it installed and properly grounded by a
as directed bypackage. If they are not. plastic
could burstduring orimmediately aftercooking, qualified installer, See the special installation
possibly resulting in injury. Also, plastic storage booklet packed with the microwave oven.
containers should be at least partially uncovered • The exhaust fan in the oven will operate
because they folrn a tight seal. When cooking automatically under certain conditions
with containerstightly covered with plastic wrap, (see Automatic Fan Feature). While the fan
remove covering carefully anddirectsteam away is operating, caution is required to prevent
fromhands and face. the starting and spreading of accidental
t, • Hot foods and steam can cause cooking fires while the exhaust fan is in
burns. Be careful when opening use. For this reason:
any containers of hot food, including --Never leave surface units unattended at high
popcornbags, cooking pouches and heat settings. Boilovers cause smoking and
boxes. To prevent possible injury, greasyspillovers that mayignite and spread if
direct steamaway from hands exhaust fan is operating. To minimize automatic
and face. fan operation,use adequate sized cookware and
use high heat only when necessary.
• Use of the shelf accessory. _ --In the event of a grease fire,
--Remove the shelf from oven when not in use. _ unitby covering pancompletely
-Do not store or cook with shelf on floor of oven, with well-fitting lid. cookie sheet
Product damage may result, or flat tray.
Use pot holders when handling the shelf and --Clean the vent hood often. Do not allow grease
cookware. They may be hot. to build up on the hood or the filter.
Do not use microwave browning dish on shelf. --Use care when cleaning the vent hood filter.
The shelf could overheat. Corrosive cleaning agents, such as lye-based
Use the shelf only when cooking on 2 levels, oven cleaners, may damage the filter.
Be sure that the shelf is positioned properly --When flaming foods are under the hood.
inside the oven to prevent product damage, turn the fan off. The fan. if operating, may
DO NOT use the metal shelf with the Popcorn spread the flame,
program (see the Popcorn section).
smotherflaming pan on surface
SAVE THESE
INSTRUCTIONS
Optional Accessory
A Charcoal FilterKit fornon-vented installation
is available atextra cost from your Maytag dealer.
Partnumber 05200037.
installation over electric and gas ranges.
I This microwave oven is UL listed for
5

REGISTRATION
Federal law requires registration of all microwave If you move or are not the original owner of this oven,
ovens. To comply with the law, please fill out the you must, by law, renew the registration. Send the
CUSTOMER REGISTRATION CARD packaged in renewal registration information to:
the oven. Maytag Warranty Administration
1. Check the model and serial numbers on the card to P.O. Box 4970
see that they match the numbers on the rating label. Cleveland, Tennessee 37320-4970
Rating label is located on the inside of the oven Renewal Registration information must provide:
cavity. If the numbers on the card are not the same as a) Your name and address and b) the microwave
those on the rating label cross out the numbers on the oven's model and serial numbers.
card and write in the numbers as they appear on the
rating label.
2. Mall the card. The return address is included on the
reverse side of card.
MICROWAVING TIPS
• Make sure all cookware used in your microwave • Paper towels, waxed paper and plastic wrap
oven is suitable for microwaving. Most glass can be used to cover dishes in orderto retain
casseroles, cooking dishes, measuring cups, custard moisture and prevent spattering. Be sure to vent
cups, potteryor china dinnerware which does not plastic wrap so steam can escape.
have metallic trim or glaze with a metallic sheen • Some microwaved foods require stirring, rotating
can be used. Some cookware is labeled "suitable or rearranging. Check the Cooking Guide.
for microwaving." °Steam builds up pressure in foods which are
• If you are not f_.._._.. _.._. tightly covered by a skin or membrane. Pierce
sure if a dish is potatoes, egg yolks and chicken livers to prevent
use this test: Place
in the oven both
the dish you are If you use a meatthermometer while cooking, make
testing and a glass sure it is safe for use in microwave ovens.
measuring cup
microwave-safe, __ bursting.
filled with 1cup of
water--set the measuring cup either in or next to the
dish. Microwave 1 minute at high. If the dish heats,
it should not be used for microwaving. If the dish
remains cool and only the water in the cup heats,
then the dish is microwave-safe.
6
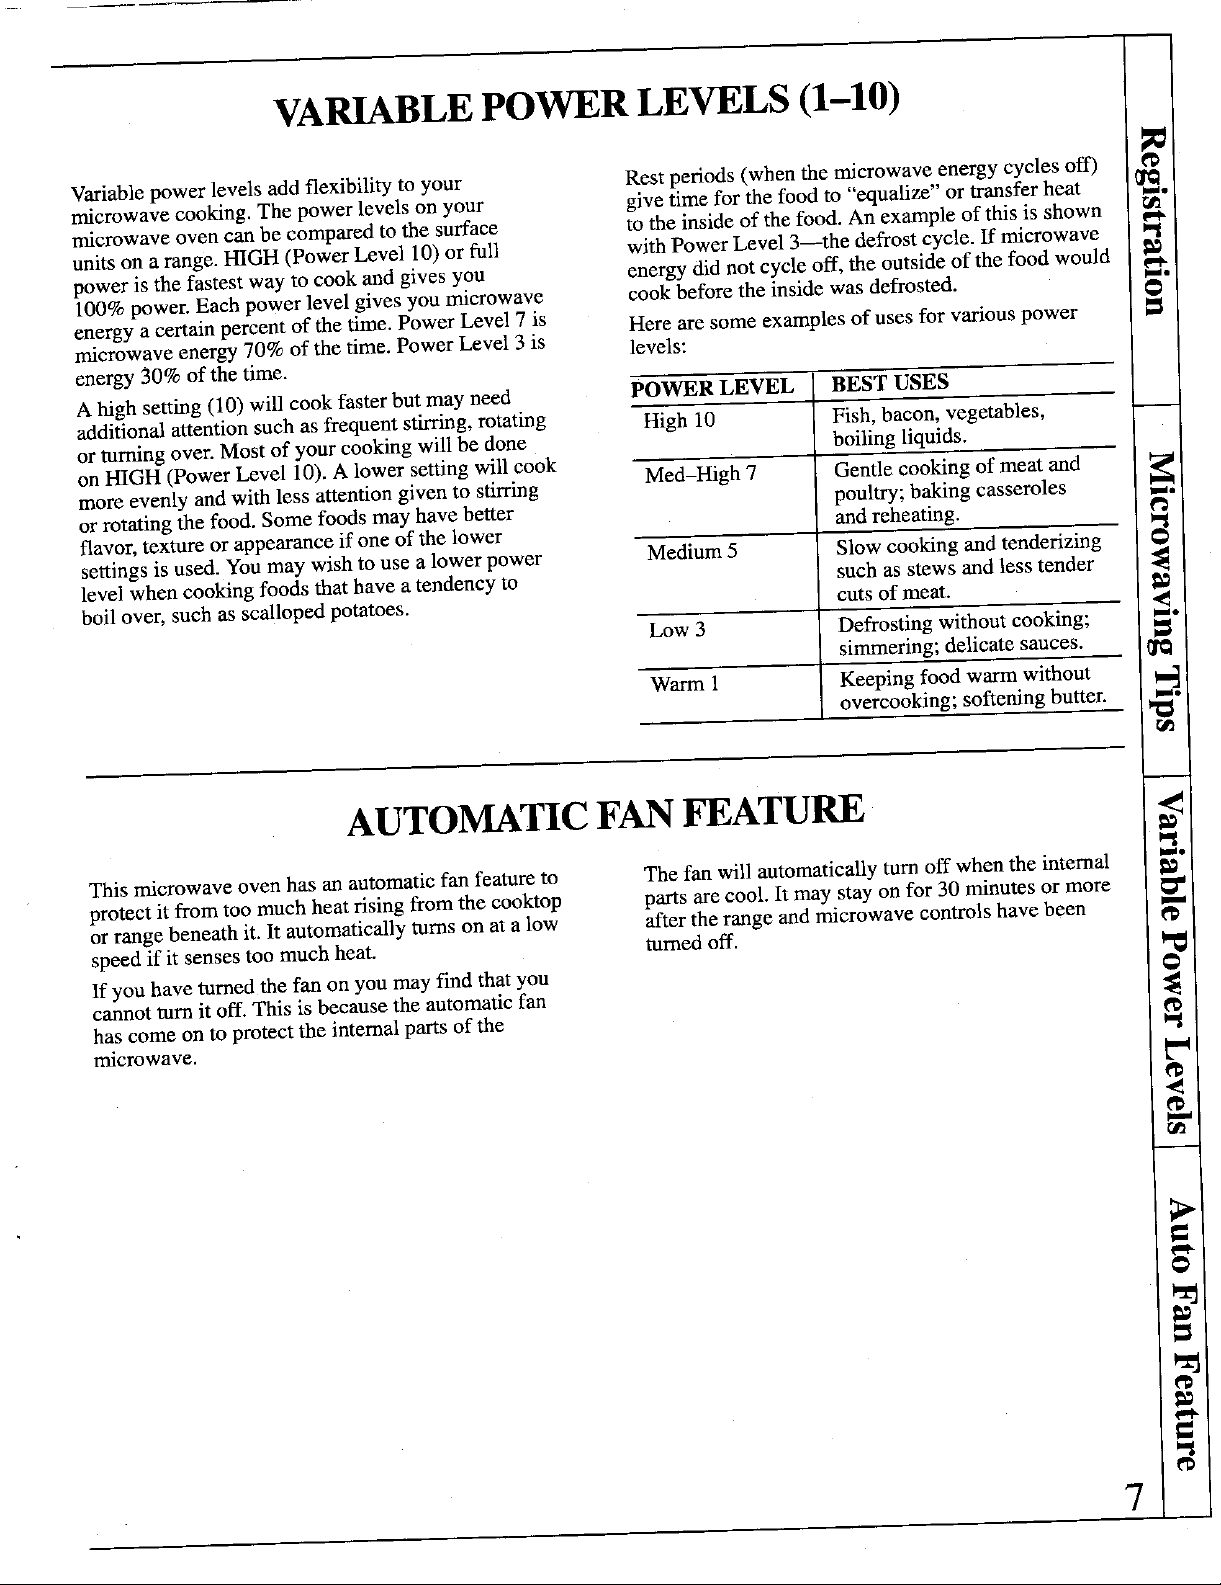
VARIABLE POWER LEVELS (1-10)
Variable power levels add flexibility to your Rest periods (when the microwave energy cycles off)
microwave cooking. The power levels on your give time for the food to "equalize" or transfer heat _,
microwave oven can be compared to the surface to the inside of the food. An example of this is shown
units on a range. HIGH (Power Level 10) or fuI1 with Power Level 3--the defrost cycle. If microwave
power is the fastest way to cook and gives you energy did not cycle off, the outside of the food would I,_,
100% power. Each power level gives you microwave cook before the inside was defrosted. O
energy a certain percent of the time. Power Level 7 is Here are some examples of uses for various power
microwave energy 70% of the time. Power Level 3 is levels:
energy 30% of the time.
A high setting (10) will cook faster but may need POWER LEVEL BEST USES
additional attention such as frequent stirring, rotating High 10 Fish, bacon, vegetables,
or turning over. Most of your cooking will be done boiling liquids.
on HIGH (Power Level 10). A lower setting will cook
more evenly and with less attention given to stirring Med-High 7 Gentle cooking of meat and
or rotating the food. Some foods may have better and reheating.
flavor, texture or appearance if one of the lower
settings is used. You may wish to use a lower power Medium 5 Slow cooking and tenderizing
level when cooking foods that have a tendency to such as stews and less tender
boil over, such as scalloped potatoes, cuts of meat. ,_
Low 3 Defrosting without cooking; _*
Warm 1 Keeping food warm without _._
poultry; baking casseroles _,,o
simmering; delicate sauces. CI_
overcooking; softening butter. _,_o
AUTOMATIC FAN FEATURE -.-
ill
This microwave oven has an automatic fan feature to The fan will automatically turn off when the internal ,,_°
protect it from too much heat rising from the cooktop parts are cool. It may stay on for 30 minutes or more
or range beneath it. It automatically turns on at a low after the range and microwave controls have been
speed if it senses too much heat. turned off. _,_
If you have turned the fan on you may find that you 0
cannot turn it off. This is because the automatic fan
has come on to protect the internal parts of the
microwave. _,_
,<
@
!,n
71
i

YOUR TOUCH CONTROL PANEL
The Touch Control Panel allows you to set the oven controls with
the touch of a finger. It's designed to he easy to use and understand.
1. DISPLAY. Displays time of day, cooking time 10. VENT FAN. Press HI, LO or OFF for the
or temperature, power level being used, cooking different fan speeds.
mode and instructions. 11. AUTO DEFROST. Touch this pad and food
2. TIME DEFROST. Gentle thawing at automatic weight, then START. The oven automatically
Power Level 3 (Low). sets power levels and defrosting time.
3. TIME COOK 1 AND 2. Microwave for a 12. TEMP COOK/HOLD. Use the temperature
selected amount of time using automatic Power probe to cook by using a preset temperature. Once
Level 10 (High). food reaches preset temperature, oven switches to
4. REHEAT. Use Reheat for quick reheating of HOLD setting and maintains that temperature
a variety of foods using different times and until you touch the CLEAR/OFF pad.
power levels. 13. COOK: Touch this pad, a code number and
5. POPCORN. Touch this pad to cook prepackaged weight of food for quick cooking of a variety of
microwave popcorn weighing 3.0 to 3.5 ounces, foods using different times and power levels.
No need to touch START, the oven will start 14. AUTO ROAST. Insert probe. Touch this pad,
immediately, the desired number pad for the code, then START.
6. POWER LEVEL, Touch this pad before entering The oven slow-cooks meat with the automatic
another power level number if you want to change preset program.
from automatic Power Level 10 (High) for 15. + 30 SECONDS. Press this pad for 30 seconds of
cooking or Power Level 3 (Low) for defrosting, cook time, to add 30 seconds to the cook time as
7. CLOCK SET. Touch this pad to enter time of day it's counting down or touch this pad for an
or check time of day while microwaving. To set "instant on" for 30 seconds.
clock, first touch CLOCK pad and then enter time 16. NUMBER PADS. Touch these pads to program
of day. For example, if time is 1:30, touch number the microwave.
pads 1, 3 and 0 and "1:30" will appear in display. 17. MINUTE. Use this with number pads to enter
Then touch START or CLOCK pad. To reset or whole minutes. For example, for 4 minutes touch
change time, simply repeat above process. 4 and MINUTE.
8. AUTO START. Allows you to program your 18. START. After all selections are made, touch this
oven to begin cooking at a preset time of day-- pad to start the oven.
up to a 12-hour delay,
9. MIN/SEC TIMER. This feature uses no oven and erases all settings (except time of day).
microwave energy. It functions as either a kitchen
timer, as a holding period after defrost or as a 20. LIGHT. Touch ON to turn on the surface light.
delay timer before time or temperature cooking. Touch NIGHT to turn on the night light.
19. CLEAR/OFF. When touched, it shuts off the
8

,m IB
0 _f _._ _f _f _D.ER
ENTERFOODTEMPCOOK NO SOUND
WEIGHTLB$. DEF TJME ) I] CODE
e ,t I ®
C TIME COOK TIME AUTO TEMP ®
O I I ®
1 AND 2 DEFROST DEFROST COOK/HOLD
POPCORN REHEAT COOK AUTO ROAST ®
C POWER 1 2 3 4 5 +30 ¢_
LEVEL SECONDS
I @ --
¢ CLOCK 6 7 8 9 0 MINUTE ® =-
G TIMER START OFF _
fl_ HI LO OFF ON NIGHT OFF
When You Plug in the Oven
The display panel displays "88888", "18 POWER" "PROBE" Appears on the Display:
and all of the oven functions. After 15 seconds, all • Probe has been forgotten when Auto Roast or
lights disappear and "RESET" appears in the upper Temp Cook/Hold function is being used.
portion. Touch the CLEAR/OFF pad, set the Clock
andoven is ready for use. • Probe is not securely seated in oven wall receptacle.
This will happen any time there is a power outage.
SET
MIN/SEC AUTO START C._
vent fan light _._
a
=
Clock Display On/Off Feature
The Clock Display On/Off Feature allows you to turn the clock display on
or off without changing the time on the clock. Touch the 0 number pad to
turn the clock display on or off. The Clock Display On/Off feature cannot
be used while a cooking feature is in use.
9
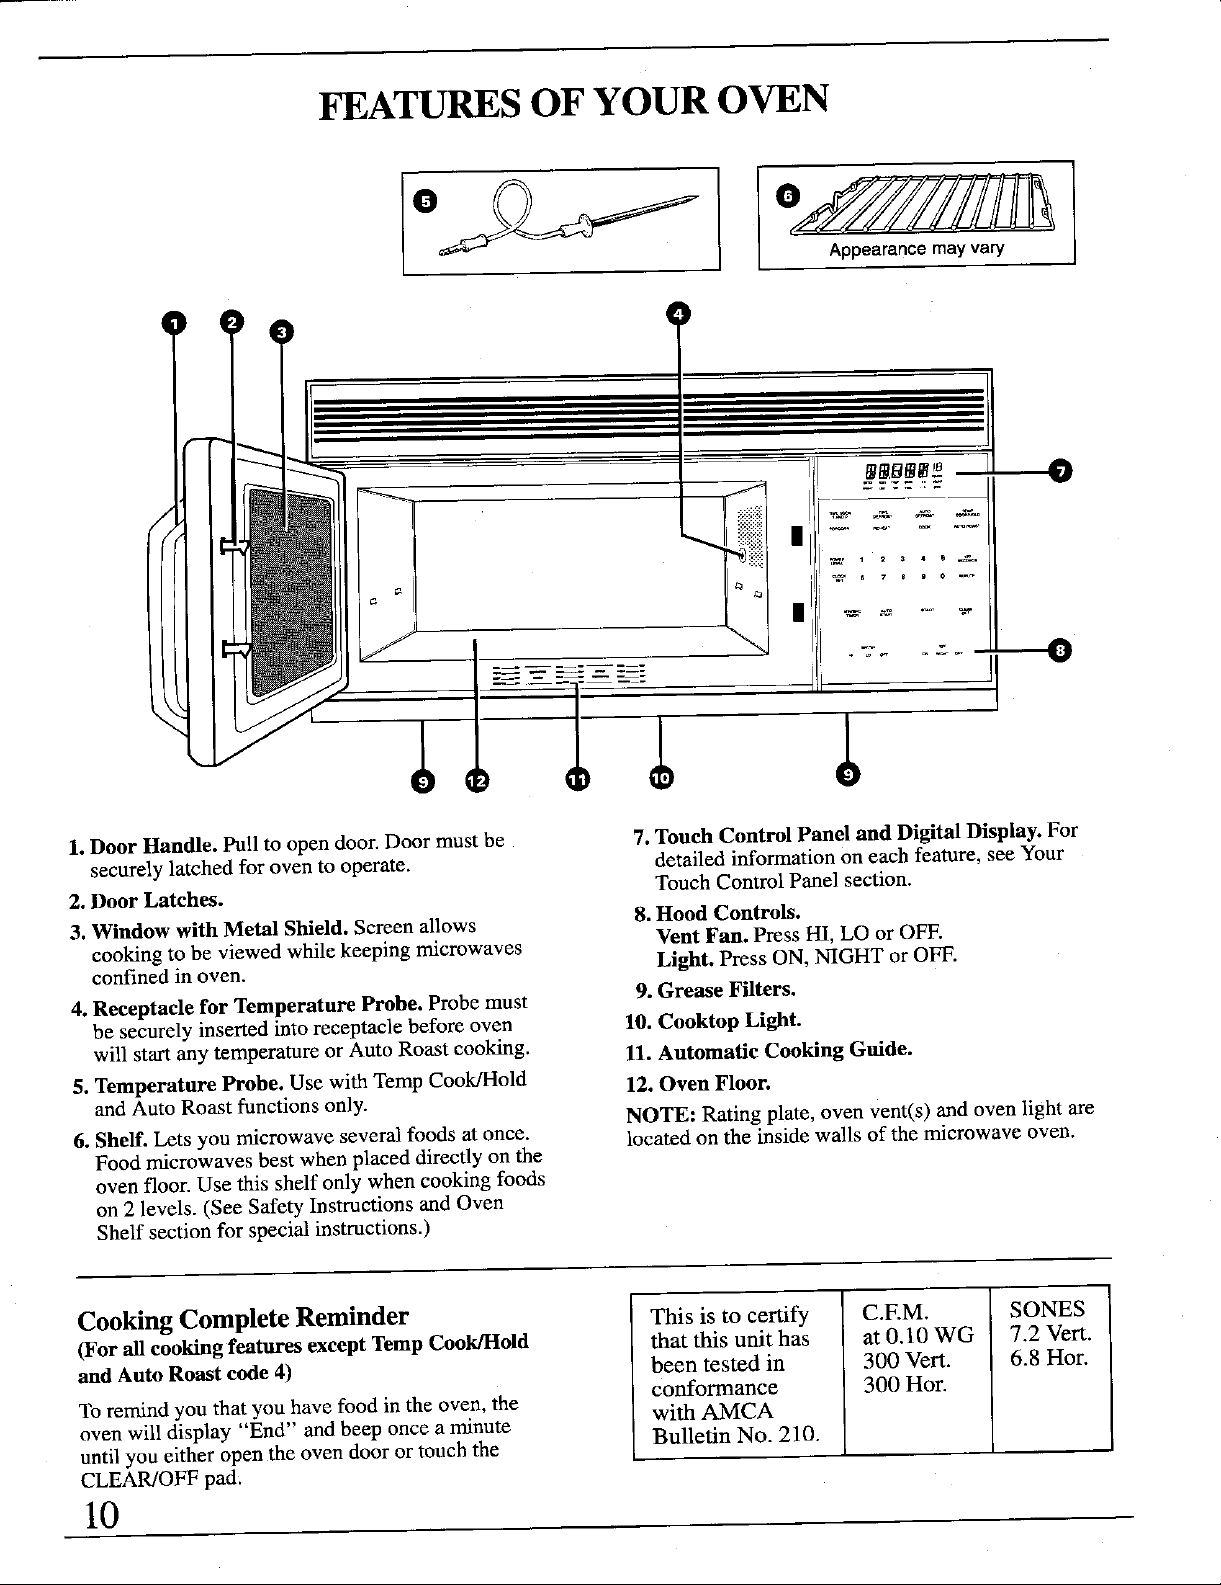
FEATURF,S OF YOUR OVEN
1. Door Handle. Pull to open door. Door must be 7. Touch Control Panel and Digital Display. For
securely latched for oven to operate, detailed information on each feature, see Your
2. Door Latches. Touch Control Panel section.
3. Window with Metal Shield. Screen allows 8. Hood Controls.
cooking to be viewed while keeping microwaves Vent Fan. Press HI, LO or OFF.
confined in oven. Light. Press ON, NIGHT or OFF.
4. Receptacle for Temperature Probe. Probe must 9. Grease Filters.
be securely inserted into receptacle before oven 10. Cooktop Light.
will start any temperature or Auto Roast cooking. 11. Automatic Cooking Guide.
5. Temperature Probe. Use with Temp Cook/Hold 12. Oven Floor.
and Auto Roast functions only.
6. Shelf. Lets you microwave several foods at once. located on the inside walls of the microwave oven.
Food microwaves best when placed directly on the
oven floor. Use this shelf only when cooking foods
on 2 levels. (See Safety Instructions and Oven
Shelf section for special instructions.)
NOTE: Rating plate, oven vent(s) and oven light are
Cooking Complete Reminder This is to certify C.EM. SONES
(For all cooking features except Temp Cook/Hold that this unit has at 0.10 WG 7.2 Vert.
and Auto Roast code 4) been tested in 300 Vert. 6.8 Hot.
conformance 300 Hor.
To remind you that you have food in the oven, the with AMCA
oven will display "End" and beep once a minute
until you either open the oven door or touch the Bulletin No. 210.
CLEAR/OFF pad.
10
 Loading...