

AIR CONDITIONERS
I Use & Care Guide
1159849 Rev. B

Contents
mportant Safety
Important Safety Instructions
Operating
Starting your air conditioner
The exhaust control
Changing air direction
Cleaning Your Air Conditioner..
Cleaning front panel and filter
Caring For Your Air Conditioner..
Annual
Energy
Troubleshooting
Requesting Assistance or Service
Warranty..
Thank you for buying this appliance. Please
complete and mail the Owner Registration
Card provided with this product. Then complete the form below. Have this information ready
if you need service or call with a question.
l
Copy model and serial numbers from label
(see diagram below) and purchase date from
sales slip.
l
Keep this book and sales slip together in a
handy place.
Model Number
Serial Number
Purchase Date
Service Company Phone Number
Instructions.. ...................................
........................................ 4
maintenance.. .....................................
saving tips ..........................................
...............................................
........................................................
......................... 2
........................... 3
....................................
...................... 5
........................ 5
................... 6
Page
............... 10
11
nstructions
3
4
To reduce the risk of fire, electrlcal shock,
or personal injury when using your air
6
8
9
conditioner, follow these basic precautions:
l
Read all instructions before using alr
conditioner.
l
Complete the installation requirements as
described in the Installation
Instructions.
l
Do Not operate the air conditioner with
the front panel removed.
l
Never clean air conditioner parts with
flammable fluids. The fumes can create a
fire hazard or explosion.
l
FOR YOUR SAFETY
DO NOT STORE OR USE GASOLINE OR
OTHER FLAMMABLE VAPORS AND
LIQUIDS IN THE VICINITY OF THIS OR ANY
OTHER APPLIANCE. THE FUMES CAN
CREATE A FIRE HAZARD OR EXPLOSION.
It is your responsibility to be sure your air
conditioner:
l
Is installed in a window that will hold the
weight, and is secured according to the
Installation Instructions.
l
Is connected only to the proper kind of outlet,
with the correct electrical supply and
grounding. (See Installation Instructions.)
l
Is the correct size for the area you want
to cool.
l
Is used only to do what window air conditioners are designed to do.
l
Is not used by anyone unable to operate
it properly.
l
Is properly maintained.
Also, remove Energy Label and Buy Guide.
Use a damp cloth to take off any glue residue.
Do not use sharp instruments, flammable
fluids or abrasive cleaners.
These can damage the material.
- SAVE THESE INSTRUCTIONS -
l
Model and serial
number label
2
Operating Instructions
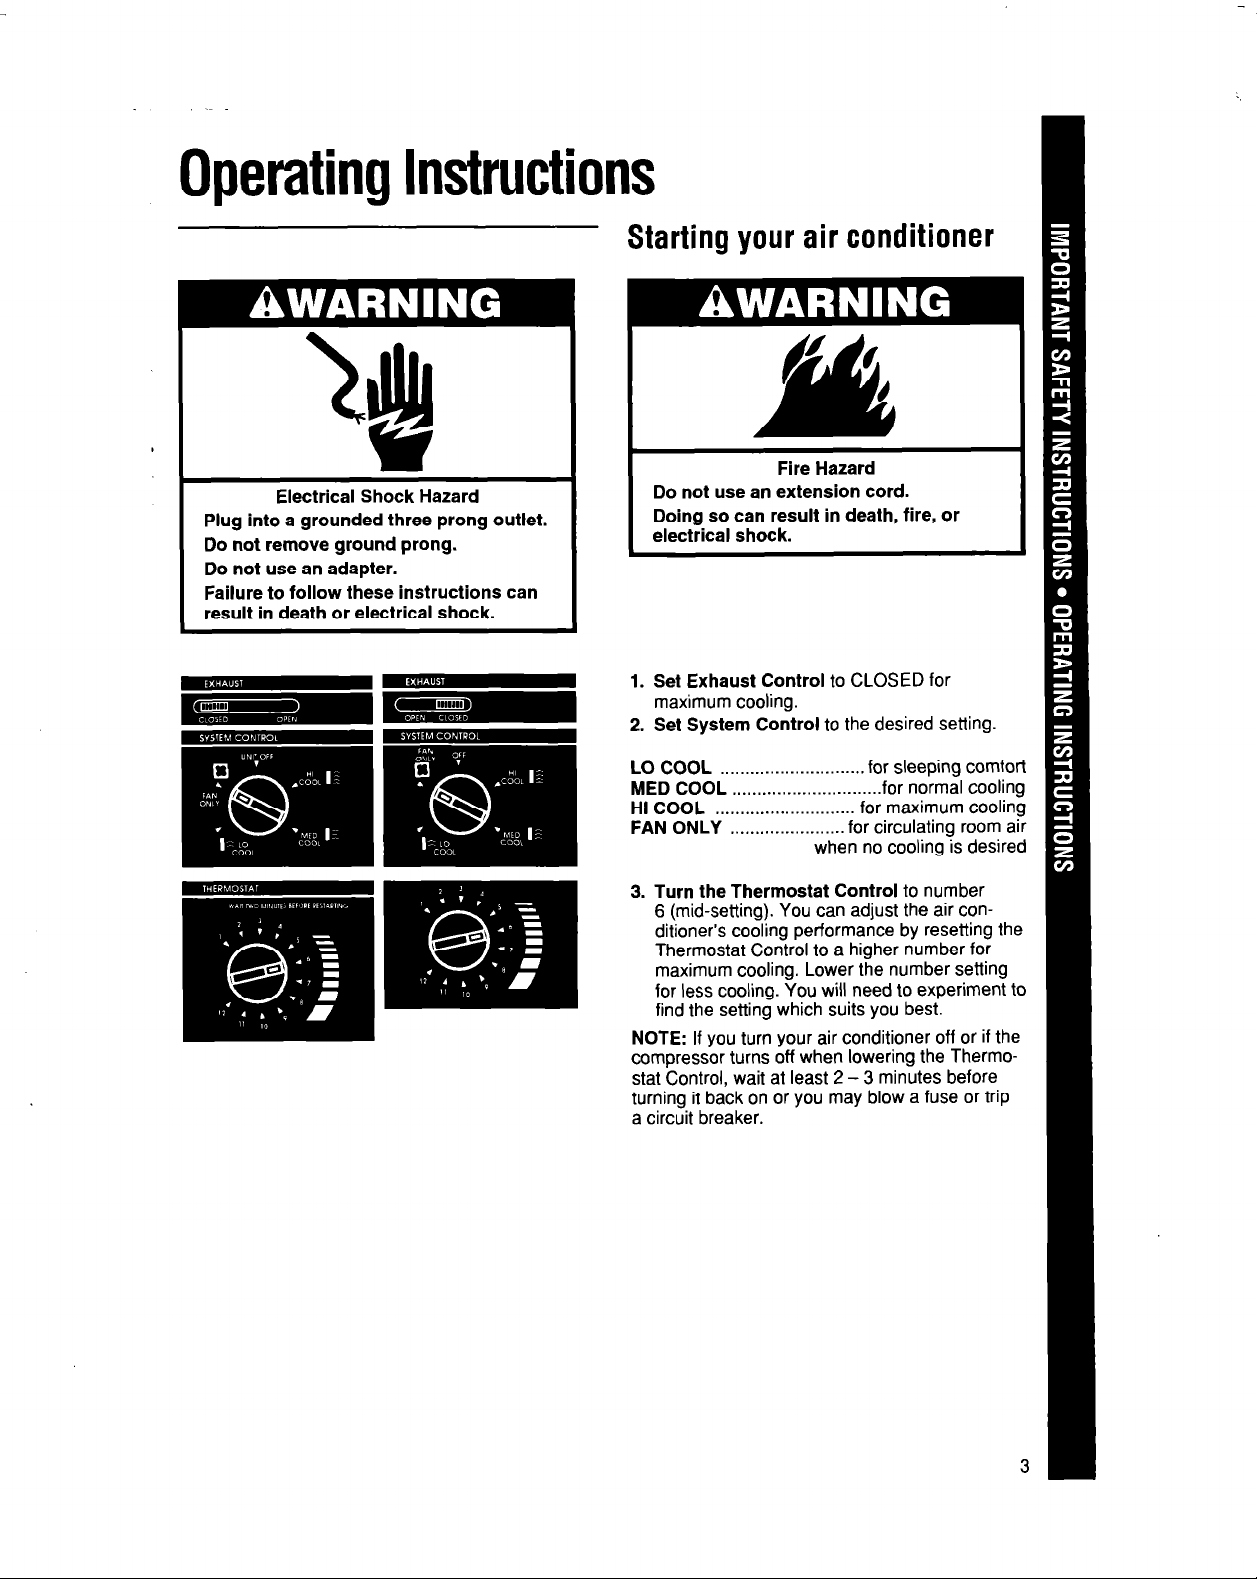
Starting your air conditioner
Electrical Shock Hazard
Plug into a grounded three prong outlet.
Do not remove ground prong.
Do not use an adapter.
Failure to follow these instructions can
result in death or electrical shock.
Do not use an extension cord.
Doing so can result in death, fire, or
electrical shock.
1. Set Exhaust Control to CLOSED for
maximum cooling.
2. Set System Control to the desired setting.
Fire Hazard
LO COOL ............................. for sleeping comfort
MED COOL
HI COOL ............................
FAN ONLY ....................... for circulating room air
3. Turn the Thermostat Control to number
6 (mid-setting). You can adjust the air con-
ditioner’s cooling performance by resetting the
Thermostat Control to a higher number for
maximum cooling. Lower the number setting
for less cooling. You will need to experiment to
find the setting which suits you best.
NOTE: If you turn your air conditioner off or if the
compressor turns off when lowering the Thermo-
stat Control, wait at least 2 - 3 minutes before
turning it back on or you may blow a fuse or trip
a circuit breaker.
.............................. for normal cooling
for maximum cooling
when no cooling is desired
Operating Instructions
Continued
The exhaust control
The Exhaust Control setting draws stale or
smoky air from the room.
1. To exhaust room air:
l
Set Exhaust Control to OPEN.
l
If no cooling is desired, use FAN ONLY setting.
l
For cooling, set System Control to desired
COOL setting.
2. To circulate room air:
l
Set Exhaust Control to CLOSED.
l
If no cooling is desired, use FAN ONLY setting.
l
For cooling, set System Control to desired
COOL setting.
NOTE: For maximum performance, the Exhaust
Control must be in the CLOSED position when
cooling or room air circulation is desired.
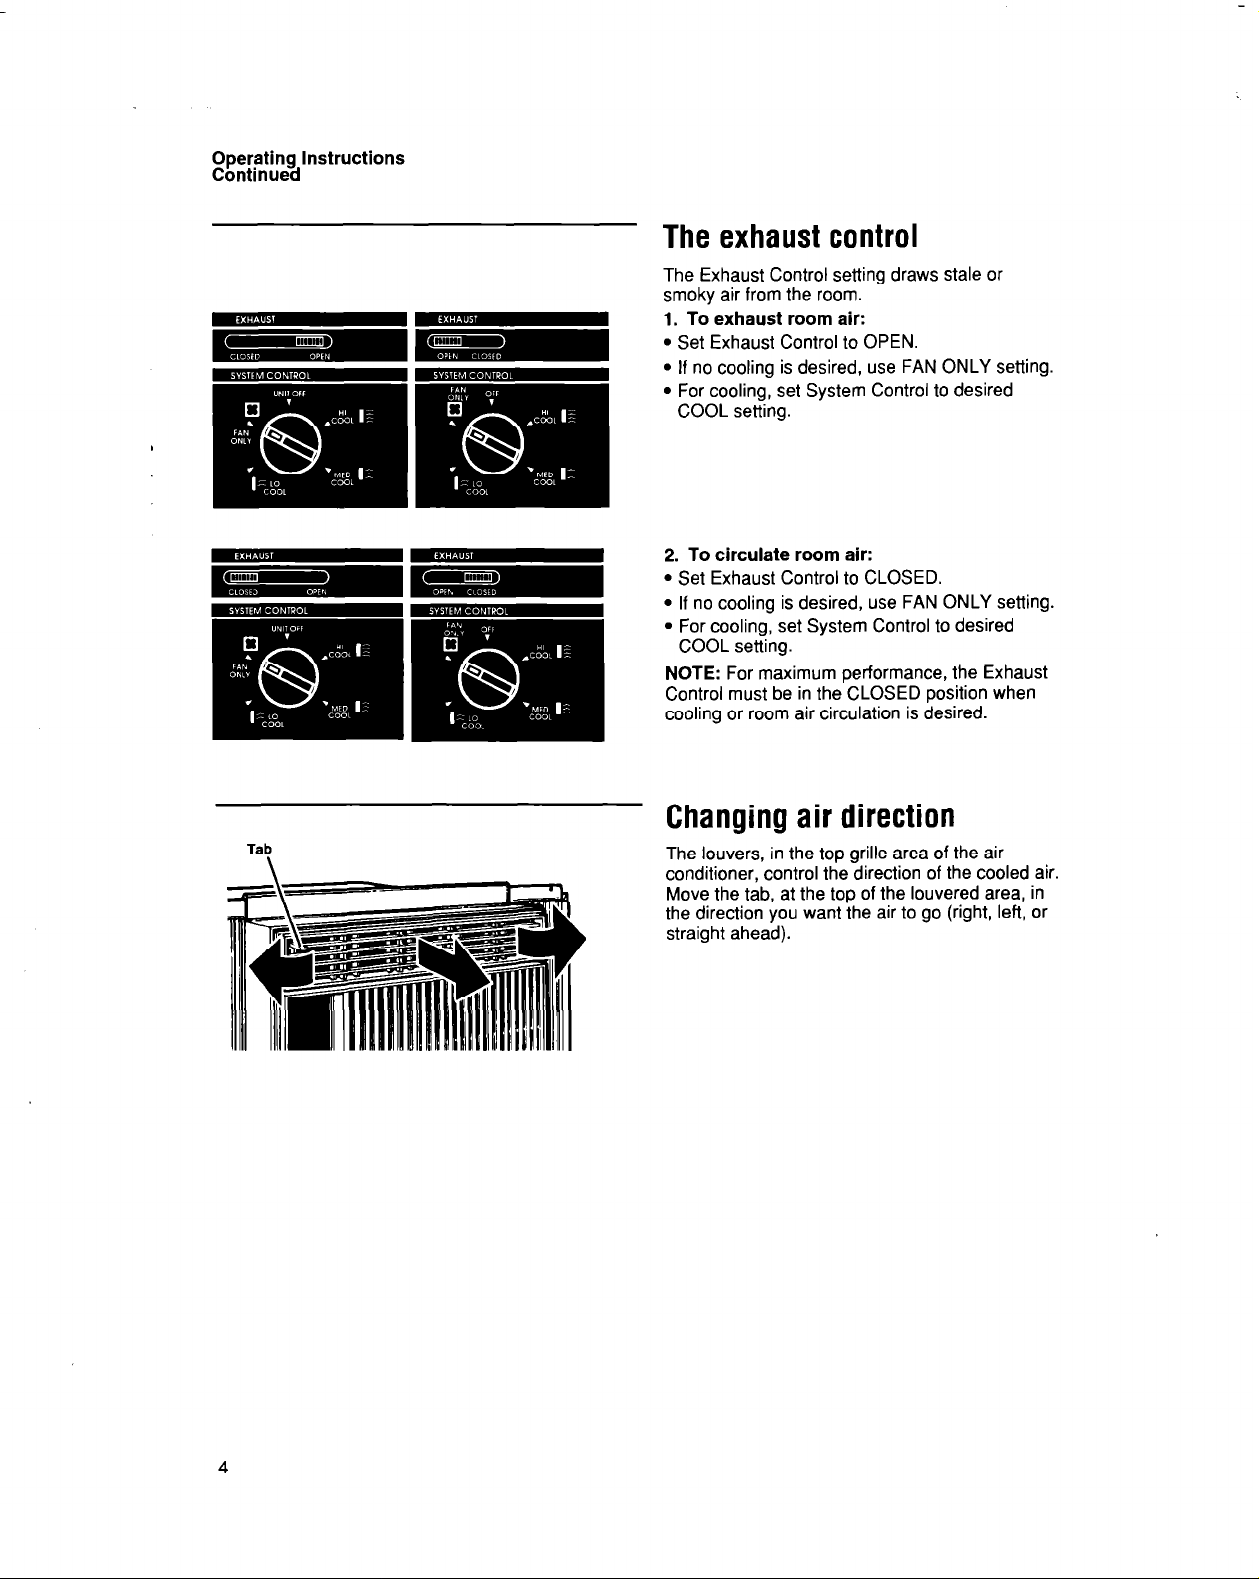
Tab
Changing air direction
The louvers, in the top grille area of the air
conditioner, control the direction of the cooled air.
Move the tab, at the top of the louvered area, in
the direction you want the air to go (right, left, or
straight ahead).

Cleaning Your Air Conditioner
Proper use and care of your air conditioner will
help ensure longer life of the unit and lower
operating costs. Follow these instructions
carefully. Call your authorized servicing dealer for
an annual checkup.
Cleaning front panel and filter
Explosion Hazard
Unplug power cord from outlet before
cleaning air conditioner.
Use only nonflammable cleaners.
Failure to follow these instructions can
result in death, explosion, fire, or
electrical shock.
Tabs
I. Unplug power cord.
2. Remove the front panel from unit for cleaning. Press down at top of front panel to
release it from top of cabinet. Watch out for
the sharp metal fins on the coils.
3. Pull top of front panel toward you.
4. Lift up and away from bottom spring clips.
5. Remove filter from front panel by removing
elastic band which holds it in place.
6. Clean filter by using a vacuum cleaner or, if
very dirty, wash filter with warm water and a
mild detergent. Air dry thoroughly before
replacing. Do not use a hot air dryer on filter.
7. Clean front panel using a soft cloth with
warm water and a mild detergent. Rinse
and dry.
8. Replace filter and hold it in place with
elastic band.
9. Wipe control panel clean with a soft, dry cloth.
10. Replace front panel. Locate bottom of panel
on the spring clips. Press down on top edge
of front panel and push front toward unit to
secure upper tabs.
11. Reconnect power supply.
5

Caring For Your Air Conditioner
Annual maintenance
Electrical Shock Hazard
Unplug power cord from outlet before
servicing.
Be sure no liquid gets into the motor,
electrical control box, or compressor
terminals.
Failure to follow these instructions
can result in death, electrical shock,
or serious injury.
Use two or more people to move and
Failure to do so can result in back or
Your air conditioner needs annual maintenance
to help ensure steady, top performance throughout the year.
Call the service company recommended by
your dealer to:
l
Inspect and clean the coils and condensate
water passages.
l
Check fan.
The compressor and fan motor are sealed and
need no oiling. The expense of an annual
inspection is the customer’s responsibility.
OR
If you are familiar with electrical appliances, you
can do the inspection and maintenance yourself.
If you choose to do so, follow the steps on
page 7.

NOTE: Do not lift, push, or pull any white beaded
foam (expanded polystyrene) parts.
Unplug power cord.
Remove the front panel. (See “Cleaning front
panel and filter” on page 5.)
Remove unit from window. Watch out for the
sharp metal fins on the front and rear coils.
Remove side curtains. Slide curtains out to
fullest width. From the back side, remove the
Phillips-head screws which attach the
curtains to the cabinet. (See A in illustration
at left.)
5.
Remove slotted-hex head screws holding top
channel. (See B in illustration at left.)
6.
Remove slotted-hex head screws on sides of
cabinet. (See C in illustration at left.)
7.
Holding the cabinet on both sides, carefully
lift cabinet off unit base. Watch out for the
sharp metal fins on the front and rear
condenser coils.
8.
Wrap the motor, electrical control box, and
compressor terminal box in plastic film to
make sure no water or other liquid gets
inside. Water or other liquids could damage
insulation and cause serious mechanical
problems.
9.
Clean and hose out the base, coils, and
condensate pans. Clean at least once a year,
or more often if the condenser coils and pans
collect dirt, sand, leaves, insects, or algae.
Also, clean if you detect an odor coming from
the air conditioner. Do not use the collected
water for drinking purposes. It is not sanitary.
10.
Remove plastic film from motor and electrical
parts.
11.
Replace unit in cabinet. Reattach top
channel and side curtains.
12.
Reinstall unit in window.
13.
Replace front panel.
14.
Plug in power cord.
NOTE: It is a good idea to wait 24 hours before
starting the unit again. This allows time for all
areas to dry thoroughly. The water from rainfall or
from normal operation does not harm these
components.

Caring For Your Air Conditioner
Continued
Energy saving tips
l
Improve home insulation. Seal doors and
windows. Close fireplace flue.
l
Close blinds or drapes on sunny side of house.
Add window awnings.
l
Keep air filter clean.
l
Do not block airflow with drapes or furniture.
l
Ventilate attic. High temperatures in the attic
add to the cooling load.
l
Try not to use heat-producing appliances during
the hottest par-t of the day.
l
Turn lights and appliances off when not
needed.
l
Keep heat registers and cool-air returns closed.
l
Use exhaust venting fans while cooking, doing
laundry, and bathing.
8

Troubleshooting
Before you call for service . . .
If you are having an operating problem, check
the chart to see what the cause might be before
you call for assistance.
PROBLEM
Unit won’t run.
Unit blows fuses or
trips circuit breaker.
Unit turns on and
off, or does not cool
room.
CHECK IF
l
Power cord is plugged into a live
circuit with proper voltage.
l
Fuse has blown or circuit breaker has
tripped. Also, check if a time-delay
fuse has been used.
l
System Control is set to OFF.
l
Local power has failed.
l
Time-delay fuse being used is of
correct capacity.
l
An extension cord is being used.
l
Cooling circuit was turned off and on
again quickly.
l
Filter is dirty.
l
Inside evaporator coils and
outside condenser coils are dirty.
l
There is excessive heat or moisture
in room.
l
Fan speed is too low.
l
Thermostat setting is too low.
WHAT TO DO
l
Firmly plug power cord into
electrical outlet. Check circuit
voltage at fuse/circuit breaker box.
l
Replace fuse with a time-delay
fuse of the correct capacity. Reset
circuit breaker.
l
Set System Control to another
setting.
l
Wait for power to be restored.
l
Replace fuse with a time-delay
fuse of the correct capacity.
l
Do not use an extension cord with
this or any other appliance.
l
Wait at least 2 - 3 minutes after
turning cooling circuit off before
trying to restart unit.
l
Clean filter. (See page 5.)
l
Clean coils. (See page 6.)
l
Use exhaust fans to reduce room
heat, or set Exhaust Control to
CLOSED to reduce moisture.
l
Set System Control to a higher
setting.
l
Set Thermostat Control to a higher
number.
Normal operating sounds . . .
When your room air conditioner is operating
normally, you will hear sounds such as:
l
Droplets of water hitting the condenser, causing
a “pinging” or “clicking” sound. Water droplets
help to cool the condenser.
l
Air movement from the fan, especially on high
fan speed setting.
l
Clicks from the cooling cycle.
Sounds also may be caused by house construction - such as vibration of the unit due to wall
construction or unsteady window mounting area.

Requesting Assistance or Service
For service in the U.S.
1. If you need assistance* . . .
Call our Consumer Assistance Center
telephone number. Dial toll free from anywhere in the U.S.A.:
1-800-253-l 301
and talk with one of our trained consultants. The
consultant can instruct you in how to obtain
satisfactory operation from your appliance or, if
service is necessary, recommend a qualified
service company in your area.
2. If you need service’ . . .
We have a nationwide network of authorized
service companies. Our service technicians are
trained to fulfill the product warranty and provide
after-warranty service, anywhere in the United
States. To locate the authorized service company
in your area, call our Consumer Assistance
Center telephone number (see Step 1) or look in
your telephone directory Yellow Pages under:
APPLIANCES - HOUSEHOLD -
MAJOR-SERVICE h REPAIR
3. If you need replacement parts’ . . .
To locate replacement parts in your area, refer to
Step 2 above or call our Consumer Assistance
Center number in Step 1.
4. If you are not satisfied with how the
problem was solved* . . .
l
Contact the Major Appliance Consumer Action
Program (MACAP). MACAP is a group of
independent consumer experts that voices
consumer views at the highest levels of the
major appliance industry.
l
Contact MACAP only when the dealer and
authorized servicer have failed to resolve your
problem.
Major Appliance Consumer Action Program
20 North Wacker Drive
Chicago, IL 60606
l
MACAP will in turn inform us of your action.
l
When requesting assistance, please provide:
model number, serial number, date of pur-
chase, and a complete description of the
problem. This information is needed to better
respond to your request.
10

Warranty
FNGTH OF
--..-... -.
FULL ONE-YEAR WARRANTY
From Date of Purchase
FULL FIVE-Y EAR WARRANTY
From Date of Purchase
WHIRLPOOL WILL NOT PAY FOR
A. Service calls to:
1. Correct the installation of your air conditioner.
2. Instruct you how to use your air conditioner.
3. Replace house fuses or correct house wiring.
4. Clean or replace air filter.
B. Pickup and delivery. Your air conditioner is designed to be repaired in the home.
C. Damage to your air conditioner caused by accident, misuse, fire, flood, acts of God, or use of
products not mentioned in this manual.
D. The removal and reinstallation of your air conditioner if it is installed in an overhead or other
inaccessible location or not installed in accordance with published installation instructions.
E. Repairs to parts or systems caused by unauthorized modifications made to the appliance.
Service under the full warranties must be provided by an authorized Whirlpool service company.
WHIRLPOOL CORPORATION SHALL NOT BE LIABLE FOR INCIDENTAL OR CONSEQUENTIAL
DAMAGES. Some states do not allow the exclusion or limitation of incidental or consequential damages
so this exclusion or limitation may not apply to you. This warranty gives you specific legal rights, and you
may also have other rights which vary from state to state.
Outside the United States or Canada, a different warranty may apply. For details, please contact
your authorized Whirlpool dealer.
If you need service, first see the “Troubleshooting” section of this book. After checking “Troubleshooting,”
additional help can be found by checking the “Requesting Assistance or Service” section, or by calling our
Consumer Assistance Center telephone number, l-800-253-1301, from anywhere in the U.S.A.
WARRANTY
.--- . . . . ~.._. .
I
WHIRLPOOL WILL PAY FOR
FSP’ replacement parts and repair labor to correct defects in
materials or workmanship.
FSP replacement pans and repair labor to correct defects in
materials or workmanship in the sealed refrigeration system.
These parts are:
1. Compressor 4. Drier-Strainer
2. Evaporator
3. Condenser
5. Connecting Tubing
6/94
1159849 Rev. B
0 1995 Whirlpool Corporation
Printed in U.S.A.
lZ95
11

ACONDICIONADORES DE AIRE
lnstrucciones para su
us0 y cuidado
R
1159849 Rev. B

Contenido
Pagina
lnstrucciones Importantes de Seguridad
lnstrucciones de Operation
Encendiendo el acondicionador de aire
El control de extraction de aire
Cambiando la direction del aire
Limpieza del Acondicionador de Aire
Limpieza del panel delantero y del filtro
Cuidado del Acondicionador de Aire
Mantenimiento
Consejos para ahorrar energia..
Diagnostico de Problemas
Solicitando Ayuda o Servicio T6cnico..
Garantfa
Gracias por comprar este aparato. Por favor
llene y envfe por correo la Tarjeta de Registro
del Propietario que se proporciona con este
producto. Luego llene el formulario que sigue.
Tenga esta information a mano si necesita
servicio o llame para recibir contestacion a
cualquier pregunta que pueda tener.
l
Copie 10s numeros de modelo y de serie de la
etiqueta (vea el diagrama mas abajo) y la fecha
de compra del recibo.
l
Mantenga este libro y el recibo juntos en un
lugar accesible.
Numero de modelo
Numero de serie
Fecha de la compra
Numero de telefono de la compaiifa
de servicio
...........................................................
anual ......................................
............................
...................... 4
..................... 4
..................... 9
............................
Etlqueta con el mimer0
de modelo y de serle
...... 2
......... 3
............ 5
......... 5
............. 7
....... 11
3
7
10
12
nstrucciones
mportantes de
Seguridad
Siga estas precauciones basicas para
reducir el riesgo de incendio, choque
electrico o heridas a las personas cuando
usa el acondicionador de aire:
) Lea todas las instrucciones antes de
usar el acondicionador de aire.
) Satisfaga todos 10s requerimientos de
instalacion que se describen en las
lnstrucciones de Instalacion.
) NO haga funcionar el acondicionador de
aire si no esta instalado el panel
delantero.
) Nunca limpie las piezas del
acondicionador de aire usando fluidos
inflamables. Los vapores pueden
producir un incendio o una explosion.
l
PARA SU SEGURIDAD
NO ALMACENE 0 USE GASOLINA U
DTROS VAPORES Y LIQUIDOS
INFLAMABLES CERCA DE ESTE 0
CUALQUIER OTRO APARATO. LOS
VAPORES PUEDEN PRODUCIR UN
INCENDIO 0 UNA EXPLOSION.
Es su responsabilidad de asegurarse que su
acondicionador de aire:
) Esta instalado en una ventana que puede
soportar su peso y que esta fijado en su
lugar de acuerdo a las lnstrucciones de
Instalacion.
) Esta conectado solamente a la clase debida
de enchufe electrico, con el suministro
electric0 y tierra que Sean correctas (vea las
lnstrucciones de Instalacion).
) Sea del tamano correct0 para el area que
quiere enfriar.
) Se usa solamente para lo que 10s
acondicionadores de aire de ventana fueron
diseriados.
B No es usado por ninguna persona que no
pueda o sepa usarlo debidamente.
l
Es debidamente mantenido.
Tambien, quite las etiquetas de Energia y
Guia de Compra. Use una tela humeda para
remover todo residuo de pegadura. No use
instrumentos aguzados, fluidos inflamables o
limpiadores abrasivos. Estos pueden danar
el material.
- GUARDE ESTAS INSTRUCCIONES -
l

Instrucciones de OperacMn
Encendiendo el
acondicionador de aire
Peligro de lncendio
Peligro de Choque Electrico
Enchufe en una salida de puesta a tierra
de tres puss.
No remueva la pus de puesta a tierra.
No use un adaptador.
Si no se siguen estas precauciones puede
resultar en la muerte o choque ektrico.
No use un cable electrico de extension.
Si no se sigue esta precaucidn puede
resultar en la muerte, incendio o choque
electrico.
1. Ajuste el Control de Extraction de aire a
CLOSED (cerrado) para maxim0
enfriamiento.
2. Ajuste el Control del Sistema para el
enfriamiento deseado.
LO COOL . . . . . . . . . . . . . . para dormir
(enfriamiento bajo)
MED COOL . . . . . . . . . . . . . . . .
(enfriamiento medio)
HI COOL . . . . . . . . . . . . . . . . . . .
(enfriamiento alto)
FAN ONLY . . . . . . . . . . . . . . . . . . . . . . . . . . .
(ventilador solamente) cuandonosedesee
3. Gire el Control del Termostato al numero 6
(position media). Usted puede ajustar el
enfriamiento moviendo el Control del
Termostato a un numero mas alto para
obtener el enfriamiento mkmo. Para menos
enfriamiento ponga el control en un numero
mas bajo. Conviene que pruebe diferentes
ajustes hasta que encuentre el que mejor
le convenga.
NOTA: Si apaga el acondicionador de aire o si
el compresor se apaga al reducir el control del
termostato, espere por lo menos 2 - 3 minutos
antes de volver a encenderlo. El encenderlo
antes puede quemar un fusible o cot-tar
el circuito.
par a enfriamiento normal
para maxim0 enfriamiento
para circular el aire
enfriamiento
3

lnstrucciones de Operackn
Continuaci6n
El control de extraccih
de aire
El Control de Extraction de aire remueve el aire
impuro o cargado de humo de la habitation.
1. Para remover el aire de la habitacibn:
l
Ajuste el Control de Extraction de aire a OPEN
(abierto).
l
Si no se desea enfriamiento, use FAN ONLY
(ventilador solamente).
l
Para enfriamiento, ajuste el Control del Sistema
al ajuste COOL (enfriamiento) deseado.
2. Para circular el aire de la habitacibn:
Ponga el Control de Extraction de aire en
CLOSED (cerrado).
Si no desea enfriamiento, use la position FAN
ONLY (ventilador solamente).
Para enfriamiento, ajuste el Control del
Sistema al ajuste COOL (enfriamiento)
deseado.
NOTA: Para maxim0 rendimiento, el Control de
Escape debe estar en la position CLOSED
(cerrado) cuando se desea enfriamiento o
circulation del aire de la habitation.
Lengtieta
\
Cambiando la direccih del
aire
Las persianas en la rejilla superior del
acondicionador de aire controlan la direction del
aire frio. Mueva la lengueta en la parte superior
de las persianas en la direction en que quiera
hater circular el aire (hacia la derecha, izquierda
o direct0 hacia adelante).

Acondicionador de Aire
El uso y cuidado debidos de su acondicionador
de aire ayudara a prolongar la duration de la
unidad y reducir 10s costos de operation. Siga
estas instrucciones cuidadosamente. Pidale a su
concesionario de servicio autorizado que haga
una verification cada ario.
Limpieza del panel delantero
y del filtro
Peligro de Explosidn
Desenchufe el cable ektrico del
tomacorriente antes de limpiar el
acondicionador de aire.
Use solamente limpiadores no inflamables.
Si no se siguen estas precauciones puede
resultar en la muerte, explosibn, incendio o
choque elrktrico.
Lengiietas
1. Desenchufe el cable electrico.
2. Remueva el panel delantero de la unidad para
limpiarlo. Empuje hacia abajo en la parte
superior del panel delantero para soltarlo del
gabinete. Tenga cuidado con las aletas de
metal aguzadas que se encuentran en las
bobinas del condensador.
3. Jale la pane superior del panel delantero
hacia usted.
4. Levante el panel para que salga de las grapas
de resorte en la parte inferior.
contintia en la siguiente pAgina

Limpieza del Acondicionador de Aire
Continuacibn
5. Remueva el filtro del panel delantero
quitando la banda elastica que lo mantiene
en su lugar.
8. Limpie el filtro usando una aspiradora o, si
esta muy sucio, lave el filtro con agua tibia y
un detergente suave. Antes de volver a
colocarlo, sequel0 cuidadosamente con aire.
No use un secador de aire caliente para
secar el filtro.
7. Limpie el panel delantero usando un paiio
suave con agua tibia y un detergente suave.
Enjuague y seque.
8. Reemplace el filtro y pongalo en su lugar
usando la banda elastica.
9. Use un pair0 suave y seco para limpiar el
panel de control.
10. Vuelva a colocar el panel delantero. Coloque
la parte inferior del panel en las grapas de
resorte. Empuje hacia abajo el borde
superior del panel delantero y empuje la
parte delantera hacia la unidad para
asegurar las lenguetas superiores.
11. Vuelva a conectar el cable electrico.

Cuidado del Acondicionador de Aire
Mantenimiento anual
Peligro de Choque Electrico
Desenchufe el cable electrico del
tomacorriente antes de dar mantenimiento.
Asegurese que ningun liquid0 entre en el
motor, caja del control electrico o
terminales del compresor.
Si no se siguen estas precauciones puede
resultar en la muerte, choque ekctrico o
herida grave.
Peligro de Peso Excesivo
Se necesitan dos personas o mas para
mover e instalar el acondicionador de aire.
Si no se sigue esta precaution puede
resultar en una herida a la espalda u otra
herida.
Su acondicionador de aire necesita un
mantenimiento anual para asegurar un
rendimiento superior constante durante todo
el atio.
Llame a la compariia de servicio recomendada
por su concesionario para:
l
lnspeccionar y limpiar las bobinas y 10s pasajes
del agua de condensation.
l
Comprobar el ventilador.
El compresor y el motor del ventilador estan
sellados y no necesitan ser lubricados. El gasto
ocasionado por la inspection anual es la
responsabilidad del consumidor.
0
Si esta familiarizado con aparatos electricos,
usted mismo puede hater la limpieza y el
mantenimiento. Si hate esto, siga 10s pasos en
la pagina 8.

Cuidado del Acondicionador de Aire
Continuacibn
NOTA: No levente empuje o tire de ninguna pieza
con espuma blance (poliestireno expandido).
4
I.
Desenchufe el cable electrico.
n
L.
Remueva el panel delantero. (Vea “Limpieza
del panel delantero y del filtro” en la pagina 5).
3.
Quite la unidad de la ventana. Tenga cuidado
con las aletas de metal aguzadas que se
encuentran en las bobinas delanteras y
traseras del condensador.
Quite las cortinas laterales. Deslice las
mismas hasta su ancho total. Desde la parte
trasera, remueva 10s tornillos phillips que fijan
las cortinas al gabinete. (Vea A en la
ilustracion a la izquierda.)
Quite 10s tornillos de cabeza hexagonal
ranurada que fijan el canal superior. (Vea B
en la ilustracion a la izquierda.)
Quite 10s tornillos de cabeza hexagonal
ranurada en 10s costados del gabinete. (Vea C
en la ilustracion a la izquierda.)
Sosteniendo el gabinete en ambos costados,
levante cuidadosamente el gabinete y saquelo
de la base de la unidad. Tenga cuidado con
las aletas de metal aguzadas que se
encuentran en las bobinas delanteras y
traseras del condensador.
8.
Envuelva el motor, la caja de control electrico
y la caja de terminales del compresor en un
material plastico para impedir que agua u
otros liquidos entren en contact0 con estos
elementos. El agua u otros liquidos pueden
datiar el aislamiento y causar problemas
mecanicos serios.
9.
Usando una manguera de agua limpie la
base, las bobinas y 10s colectores de la
condensation. Haga esta limpieza por lo
menos una vez al aAo,o con mas frecuencia
si las bobinas y 10s colectores del
condensador acumulan suciedad, arena,
hojarasca, insectos o alga. Asimismo, haga
esta limpieza si detecta algun olor proveniente
del acondicionador de aire. No beba el agua
que se acumula en la unidad. Esta no es
agua potable.
10. Quite el material plastic0 del motor y de las
piezas electricas.
11. Vuelva a colocar la unidad en el gabinete.
Vuelva a fijar el canal superior y las cortinas
laterales.
12. Coloque nuevamente la unidad en la ventana.
13. Reemplace el panel delantero.
14. Enchufe el cable electrico.
NOTA: Es conveniente esperar 24 horas antes de
usar esta unidad nuevamente. Esto permite que
todas las areas de la unidad se sequen
completamente. El agua de la lluvia o del
funcionamiento normal no daAa a estos
componentes.

Consejos para ahorrar energia
l
Mejore el aislamiento de su casa. Selle las
puertas y ventanas. Cierre el tubo humero
del hogar.
l
Cierre las persianas o las cortinas en el lado
soleado de la casa. Anada toldos a las
ventanas.
l
Mantenga limpio el filtro de aire.
l
No obstruya el flujo de aire con cortinas
o muebles.
l
Ventile el atico. Niveles altos de temperatura
anaden a las necesidades normales de
enfriamiento.
l
Trate de no usar aparatos que producen calor
durante las horas mas calientes del dia.
l
Apague las lutes y aparatos cuando no son
necesarios.
l
Mantenga cerradas o bloqueadas las salidas
de calefaccion y 10s retornos de aire.
l
Use un ventilador en las areas donde cocina,
lava la ropa o se bana.

DiaanMico de Problemas
- ~ - - - - -~_ ~ _~_~_~~~_~_
Antes de llamar para obtener asistencia . . .
Si tiene un problema de operation, revise la tabla
para ver si encuentra la causa antes de llamar por
asistencia.
PROBLEMA
El acondicionador
de aire no funciona
La unidad quema
10s fusibles o corta
el circuit0
La unidad se
prende y se apaga,
0 no enfria la
habitackn
VEA SI QUE HACER
l
Se enchufo la unidad en un circuit0
l
Enchufe firmemente el cable
“viva” con el voltaje debido. electrico a la salida. Revise el
voltaje del circuit0 en la caja de 10s
fusibles o del control electrico.
l
Se quemo el fusible o cortado el
circuito. Tambien vea si us6 fusibles
l
Reemplace el fusible con uno de
retard0 de la capacidad correcta.
con retardo.
l
El Control del Sistema esta en la
l
Coloque el Control del Sistema en
position “OFF” (apagado). una position diferente.
l
Hubo un apagon.
l
Espere hasta que vuelva la
corriente.
l
l
El fusible con retard0 que se us6
tiene la capacidad correcta.
l
Se us6 un cable electrico de
extension.
Reemplace el fusible con uno de
retard0 de la capacidad correcta.
l
No use un cable electrico de
extension con este 0 ningun otro
aparato.
l
l
Apago y volvio a encender
rapidamente el circuit0 de
enfriamiento.
Espere al menos 2 - 3 minutos
despues de apagar el circuit0 de
enfriamiento antes de volver a
encender la unidad.
l
Esta sucio el filtro.
l
Estan sucias las bobinas interiores
del evaporador y exteriores del
l
Limpie el filtro. (Vea la pagina 5.)
l
Limpie las bobinas. (Vea la
pagina 7.)
condensador.
l
Hay demasiado calor o humedad en l Use 10s ventiladores de escape
la habitation.
para reducir el calor de la
habitation, o coloque el Control de
Escape en “CLOSED” (apagado)
para reducir la humedad.
l
La velocidad del ventilador esta muy l Coloque el Control del Sistema en
baja. una position mas alta.
l
l
El control del termostato esta muy
Coloque el Control del Termostato en
bajo. un numero mas alto.
Ruidos normales durante el funcionamiento . . .
Cuando el acondicionador de aire esta
funcionando normalmente, oira ruidos tales
coma:
l
Gotas de agua que caen sobre el condensador,
causando un sonido de “ping” or “click”. Las
gotas de agua ayudan a enfriar el condensador.
l
Movimiento de aire proveniente del ventilador,
especialmente a velocidad alta del ventilador.
l
“Clicks” cuando empieza y termina el ciclo de
enfriamiento.
10
Ruido tambien puede ser causado por la
construction de la casa - tal coma la vibration
de la unidad debido a la construction de la pared
o un area de montaje desparejo de la ventana.

Solicitando Ayuda o Servicio Tknico
Para servicio en 10s EE.UU.
1. Si necesita asistencia’ . . .
Llame al Centro de Asistencia al Consumidor de
Whirlpool. Llame gratis desde cualquier lugar
en 10s Estados Unidos:
y hable con uno de nuestros consultantes
capacitados. Esta persona le puede dar
instrucciones para obtener el mejor funcionamiento
’
de su aparato o, si hate falta servicio, puede
recomendar una compania de servicio calificada en
su area.
2. Si necesita servicio’ . . .
Tenemos una red national de companias de
servicio autorizadas. Nuestros tecnicos de servicio
estan capacitados para dar setvicio de garantia al
product0 y proporcionar setvicio despues de la
garantia, en cualquier lugar de 10s Estados Unidos.
Para encontrar la compania de servicio autorizada
en su area, llame al numero de telefono de nuestro
Centro de Asistencia al Consumidor (vea el Paso
0 encuentre este numero en las paginas amarillas
de su directorio telefonico bajo:
3. Si necesita piezas de repuesto’ . . .
Para encontrar piezas de repuesto en su area,
consulte el paso 2 mas arriba o llame al numero del
Centro de Asistencia al Consumidor que se indica
en el pas0 1.
l-800-253-1 301
APPLIANCES - HOUSEHOLD -
MAJOR - SERVICE EL REPAIR
4. Si no est6 satisfecho con la forma en que
se resolvi6 el problema’ . . .
l
Pongase en contact0 con Major Appliance
Consumer Action Program (MACAP). MACAP
es un grupo de expertos independientes que
expresa las opiniones de 10s consumidores a
10s niveles mas altos de la industria de
aparatos domesticos principales.
l
Pongase en contact0 con MACAP solamente
cuando el concesionario, o tecnico de servicio
autorizado no hayan resuelto su problema.
Major Appliance Consumer Action Program
20 North Wacker Drive
Chicago, IL 60606
l
MACAP nos informara de su problema.
+ Cuando pida asistencia, por favor, proporcione:
10s numeros de modelo y de serie, la fecha de
1)
compra y una description completa del
problema. Esta information es necesaria para
poder responder mejor a su pedido.

Garantia
DURACldN DE LA GARANTiA
GARANTiA COMPLETA DE UN AfiO
Desde la fecha de compra defectos de materiales v mano de obra.
GARANTiA COMPLETA DE CINCO
AfiOS
Desde la fecha de compra
WHIRLPOOL NO PAGARA POR
A. Llamadas de setvicio para:
1. Corregir la instalacion del acondicionador de aire.
2. Para darle instrucciones acerca del uso del acondicionador de aire.
3. Reemplazar fusibles o corregir el alambrado electrico de la casa.
4. Limpiar o reemplazar el filtro de aire.
B. Recoger y entregar. Este product0 esta disefiado para ser reparado en su hogar.
C. Datios al acondicionador de aire causados por accidentes, mal uso, incendios, inundaciones,
actos de la naturaleza o el uso de productos que no fueron aprobados por Whirlpool.
D. El desmontaje y la reinstalacion del acondicionador de aire si esta instalado en una ubicacion
inaccesible o si no esta instalado de acuerdo con las instrucciones de instalacion que fueron
publicadas.
E. Reparaciones de piezas o sistemas del aparato que fueron necesarias debido a modificaciones
hechas sin autorizacion.
WHIRPOOL PAGARA POR
Piezas de repuesto FSP’ y la mano de obra para reparar
Piezas de repuesto FSP y la mano de obra para reparar
defectos de 10s materiales o mano de obra en el sistema de
refrigeration sellado. Estas piezas son:
1. Compresor
2. Evaporador
3. Condensador
4. Secador-colador
5. Tubos de conexion
ACHO:
s/94
Servicio al amparo de las garantias completas debe ser proporcionado por una compania de servicio
autorizada Whirlpool.
WHIRLPOOL CORPORATION NO SERA RESPONSABLE POR DAtiOS INCIDENTALES 0
CONSECUENTES. Algunos estados no permiten la exclusion o limitation de datios incidentales o
consecuentes, asi que esta exclusion o limitation pueda no aplicarse a usted. Esta garantia le da
derechos legales especificos y tambien puede tener otros derechos que varian de un estado al otro.
Fuera de 10s EE.UU., puede que aplique otra garantia. Para 10s detalles, por favor p6ngase en
contact0 con un distribuidor autorizado de Whirlpool.
Si necesita servicio, vea primer0 la section, “Diagnostico de Problemas” de este libro. Despues de
consultar el “Diagnostico de Problemas,” se puede obtener ayuda adicional si ve la section. “Solicitan
Ayuda o Servicio Tecnico” o llamando al numero de telefono de nuestro Centro de Servicio al Consumidor
al l-800-253-1301, desde cualquier lugar en 10s EE.UU.
1159849 Rev. B
0 1995 Whirlpool Corporation
12/95
lmpreso en EE.UU.
 Loading...