

Whirlpool BGS470W User Manual
Gas 24" Built-In Single Ovens
Use and
Care Guide
Home Appliances
Self-Cleaning BGS470W
Continuous-Cleaning BGC430W
Standard-Cleaning BGP430W
Thank you for choosing a
Roper appliance.
This Use and Care Guide will help you
operate and maintain your new. qualitybuilt Roper built-in oven. Keep this Use
and Ceire Guide in a seife place for future
reference.
Complete and mail the
Product Registration Card.
This card enters your warranty into our
warranty system that ensures efficient
claim processing, can be used as a proof
of purchase for insurance claims and
helps Roper to contact you immediately
in the uiilikely event of a product-safety
гесаЦ.
TO THE INSTALLER: PLEASE
LEAVE THIS INSTRUCTION
BOOK WITH THE UNIT.
TO THE CONSUMER: PLEASE
READ AND KEEP THIS BOOK
FOR FUTURE REFERENCE.
You are responsible for
It is your responsibility to be sure that
yom oven:
■ Is installed by a qualified installer.
■ Has been properly installed where it
is protected from the elements, and
in a wall or cabinet strong enough
to support its weight. (See the
Installation Instructions.)
■ Is not used by anyone unable to
operate it properly.
■ Is properly maintained.
■ Is used only for jobs expected of a
home oven.
Contents
ImDortant Safety liistTuctions
Parts And Features
Usina Your Oven
The electronic oven controls
Setting the clock
Usina the Minute Timer
Usina the Cancel button 6
The oven racks
Bakina with oreheatina
Bakina/roastina without oreheatina
Broiling
Adjusting the oven temperature control
Using the electronic Cook Timer clock
The oven vent
The storage drawer
Page
2
3
The control knobs and oommcmd buttons 12
5 The control oanel
5
Removing and replacing the oven door 12
5
Removing and replacing the oven bottom 12
5 The standard-cieaning oven
The continuous-cleaning oven
6
Using the Self-Cleaning cvcle
7
Cleaning chart
8 The oven liaht
8
Before You Call For Service
Warranty
9
10
How to get service or assistance
11
11
Carina For Your Oven 12
Page
20
20
12
13
13
14
16
18
19

Important Safety Instructions
Gas ranges have been thoroughly tested for safe and efficient operation. However, as with any appliance, there are specific
installation and safety precautions which must be followed to ensure safe and satisfactory operation.
ÂWARNING
To reduce the risk of fire, electrical shock, injury to persons, or damage when using the range, follow basic precautions, including the following:
WARNING: If the information in this manual is not followed exactly, a fire or
explosion may result causing property damage, personal injury or death.
DO NOT STORE OR USE GASOLINE OR OTHER FLAMMABLE VAPORS AND LIOUIDS
IN THE VICINITY OF THIS OR ANY OTHER APPLIANCE.
WHAT TO DO IF YOU SMELL GAS:
■ DO NOT TRY TO LIGHT ANY APPLIANCE.
■ DO NOT TOUCH ANY ELECTRICAL SWITCH; DO NOT USE ANY PHONE IN
YOUR BUILDING.
■ IMMEDIATELY CALL YOUR GAS SUPPLIER FROM A NEIGHBOR’S PHONE.
FOLLOW THE GAS SUPPLIER’S INSTRUCTIONS.
■ IF YOU CANNOT REACH YOUR GAS SUPPLIER, CALL THE FIRE DEPARTMENT.
INSTALLATION AND SERVICE MUST BE PERFORMED BY A QUALIFIED INSTALLER,
SERVICE AGENCY OR THE GAS SUPPLIER.
1. Install or locate the oven only in
accordance with the provided
Installation Instructions. It is
recommended that the oven be
installed by a qualified installer.
The oven must be properly
connected to the proper gas supply
and checked for leaks. The oven
must also be properly coimected to
electrical supply and grounded.
2. Gas fuels and their use in
appliances can cause minor
exposures to benzene,
formaldehyde, carbon monoxide
and soot, primarily from
incomplete combustion. Significant
exposure to these substances can
cause cancer or reproductive harm.
Properly adjusted burners with a
blue, rather than a yellow, flame
will minimize incomplete
combustion. Venting with a hood
or an open window will further
minimize exposure.
3. Do not operate the oven if it is not
working properly, or if it has been
damaged.
4. Do not use the oven for warming or
heating the room. Persons could be
binned or injured, or a fire could
start.
5. Do not attempt to light the oven
burner during a power failure.
Personal injury could result.
6. Use the oven only for its intended
use as described in this manual.
7. Do not wear loose or hanging
garments when using the oven.
They could ignite if they touch a
hot surface and you could be
burned.
8. Do not touch interior siufaces of
oven. Interior surfaces of an oven
become hot enough to cause bums.
During and after use, do not touch,
or let clothing or other flammable
materials contact interior surfaces
of oven until they have had
sufficient time to cool. Other
surfaces of the oven may become
hot enough to cause bums; such
as, the oven vent opening, the
surface near the vent opening, the
oven door and the oven door
window.
9. Use only dry potholders. Moist or
damp potholders on hot surfaces
may result in bums from steam. Do
not use a towel or bulky cloth for a
potholder. It could catch on fire.
10. Do not heat unopened containers.
They could explode. The hot
contents could cause bums and
container particles could cause
injury.
11. Grease is flammable and should be
handled carefully. Let fat cool
before attempting to handle it.
12. Do not use water on grease fires.
Never pick up a flaming pan.
Smother flaming pan by covering
with a well-fitted lid, cookie sheet
or flat tray. Flaming grease
outside of pan can be
extinguished with baking soda or,
if available, a multipurpose dry
chemical or foam-ti^
extinguisher.
13. Use care when opening oven
door. Let hot air or steam escape
before removing or replacing
food.
14. Always position oven rack(s) in
desired location while oven is
cool.
15. Do not store flammable materials
in or near the oven or in the
storage drawer. They could
explode or bum.
16. Do not store things children might
want above the oven. Children
could be burned or injured while
climbing on it.
17. Do not leave children alone or
unattended in area where the
oven is in use. They should never
be allowed to sit or stand on any
part of the oven. They could be
burned or injured.
18. Never use a match or other flame
to look for a gas leak. Explosion
and injury could result.
19. Know where your main gas shut
off valve is located.
Page 2
20. Keep oven vents unobstructed.
21. Clean your oven regularly. See
care and cleaning instructions in
this manual.
22. Be sure all oven parts are cool
before cleaning.
23. Do not clean door seal It is
essential for a good seal. Care
should be taken not to rub,
damage, or move the seal. Clean
only parts recommended in this
Use and Care Guide.
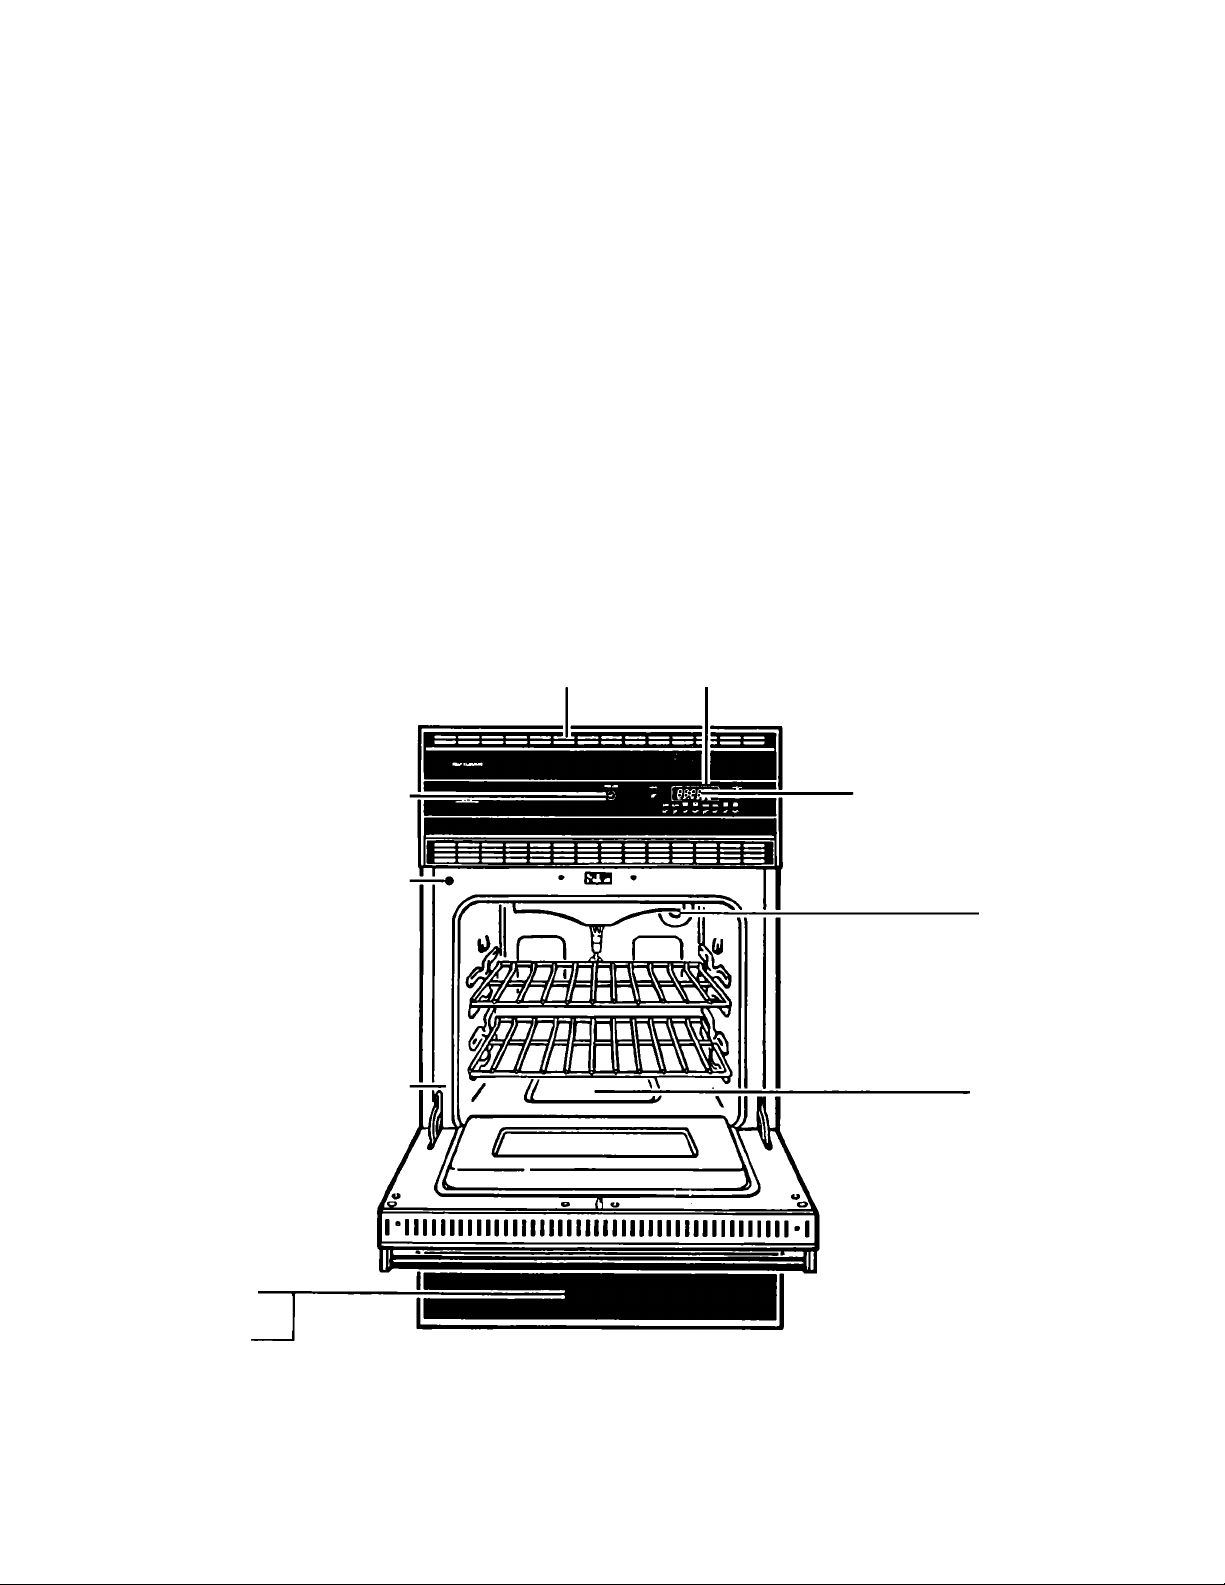
Parts & Features
Models BGS470W (shown), BGC430W and BGP430W
24. Do not use oven cleaners in
continuous- or self-cleaning ovens
(Models BGS470W and
BGC430W). No commercial oven
cleaner or oven liner protective
coating of einy kind should be used
in or around any part of the oven.
25. Before self-cleaning the oven
(Model BGS470W), remove broiler
pan, broiler grid, oven racks and
other utensils. Do not use your
oven to clean miscellaneous parts.
■ SAVE THESE INSTRUCTIONS
Oven vent Control panel
26. Do not repair or replace any part of
the oven unless specifically
recommended in this manual All
other servicing should be referred
to a qualified technician.
27. Discoimect the electrical supply
before servicing the oven.
Manual oven
light switch
Automatic oven
light switch
Model and serial
number plate
(on lower left side
of oven frame)
Removable
storage drawer
(Model BGS470W)
OR
Broiler drawer
(Models BGC430W
& BGP430W)
ESectronlc Cook Timer clock
(Model BGS470W)
(Other moidels have Minute
Timer Knob in this location.
See page 4 for Illustrations
of all control panels.)
Oven light
Oven burner
(not shown)
continued on next page
Page 3
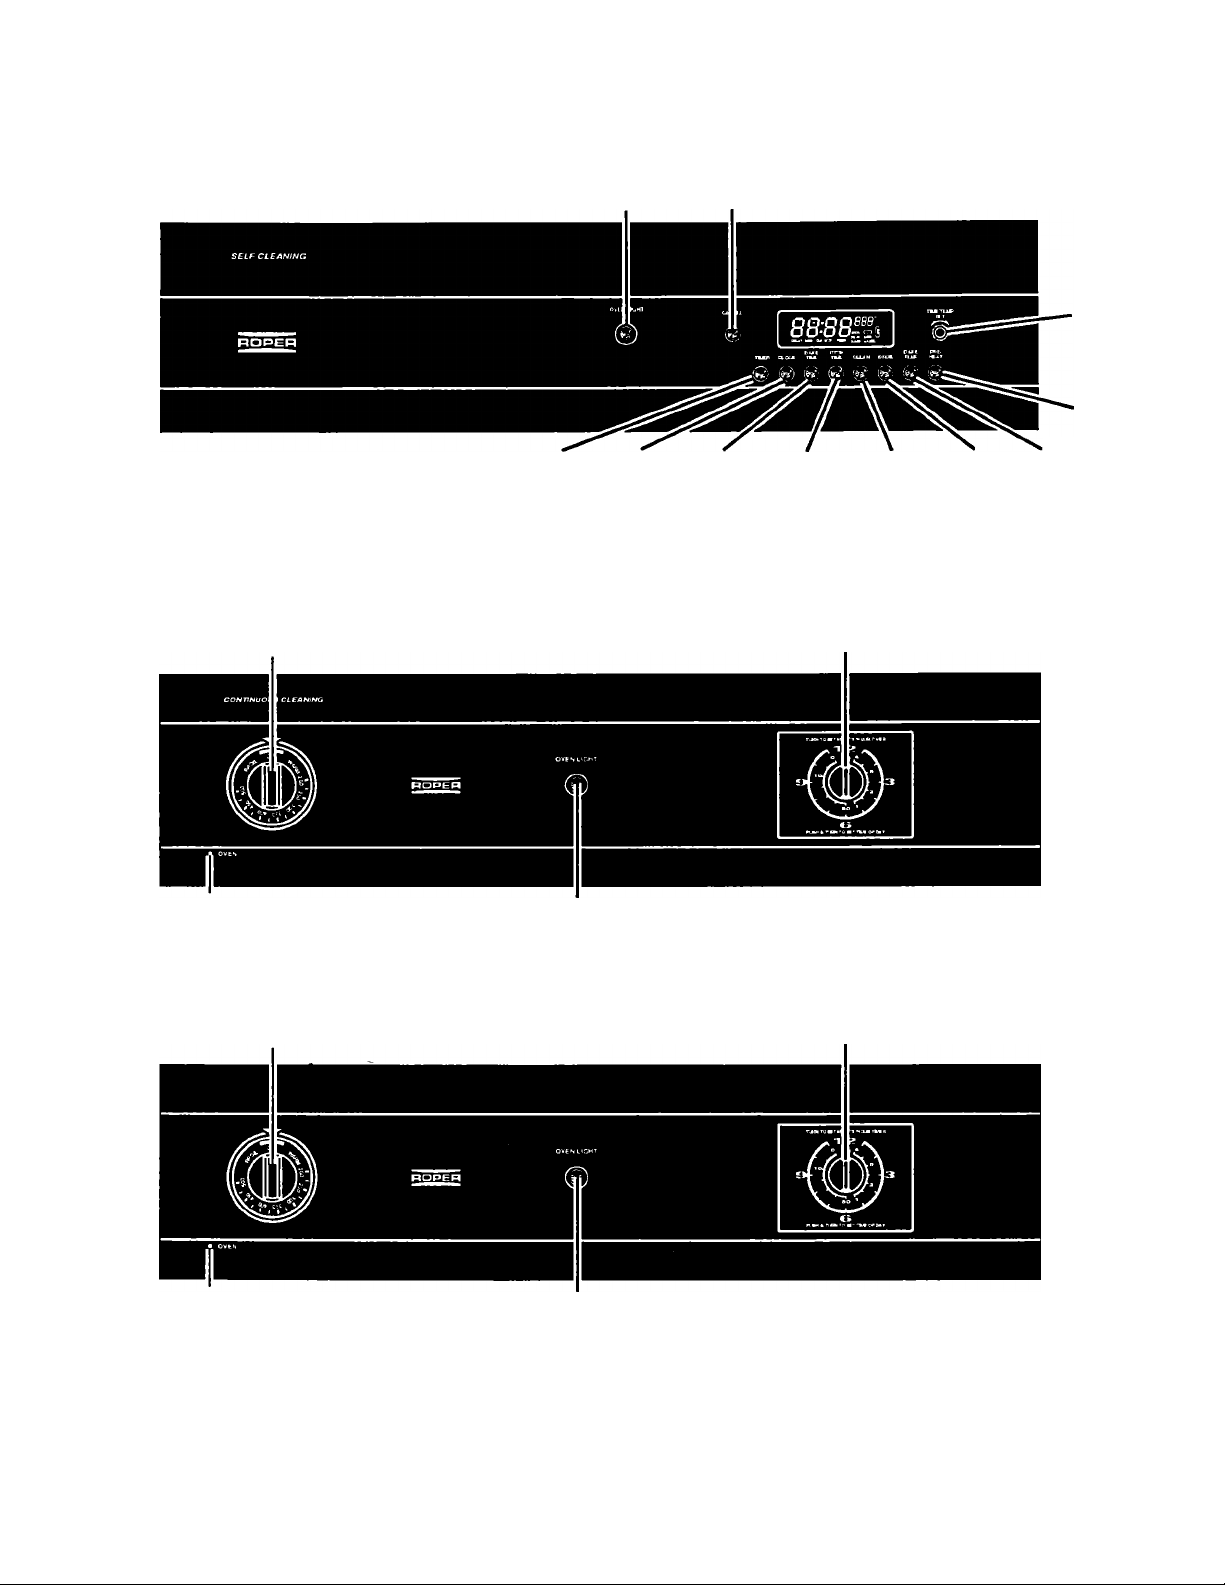
BGS470W control panel
Oven light Cancel
switch button
Tlme/temp
set knob
Preheat
button
BGC430W control panel
Oven temi>erature
control
Oven Indicator light Oven U(^t switch
BGP430W control panel
Oven temperature
control
Timer Clock Bake Stop
button button time time
button button
Clean
button
Minute timer
knob
Minute timer
knob
Broil Bake
button temp
button
Page 4
Oven Indicator light
Oven light switch
Using Your Oven
The electronic oven controls
(Model BGS470W)
There are three parts in the oven
control section:
- The display.
- The command buttons.
- The Time/Temp Set Knob.
Instructions for each oven control are
covered on the following pages. Read
them carefully.
When you first plug in the oven, the
time display will flash imtil you set a
new time. If, after you set the clock (see
below) the time display flashes, your
electricity was off for a while. Reset the
clock.
Display/clock
O0-O08SS'
U U'U §
DELAY BAKE CLN STOP TIMER CLEAN LXKED
When you are not using the oven, this is
an accurate digital dock. When using
the oven or Minute Timer, the display
will show the time, temperature
settings and what command buttons
have been pressed.
When showing the time of day, the
display will show the hour and minutes.
When using the Minute Timer, the
display shows minutes and seconds in
the following sequence:
■ For settings from 0 minutes to 1
minute 55 seconds, the display will
increase in 5-second increments.
■ For settings from 2 minutes to 9
minutes 50 seconds, the display
will increase in 10-second
increments.
■ For settings from 10-59 minutes,
the display will increase in
1-minute increments.
■ For settings from 1 hour to 1 hour
55 minutes, the display will
increase in 5-minute increments.
■ For settings from 2 hours to 9 hours
55 minutes, the display will
increase in 10-minute increments.
When using Bake Time, the display
shows hours and minutes.
DELilY BAKE U
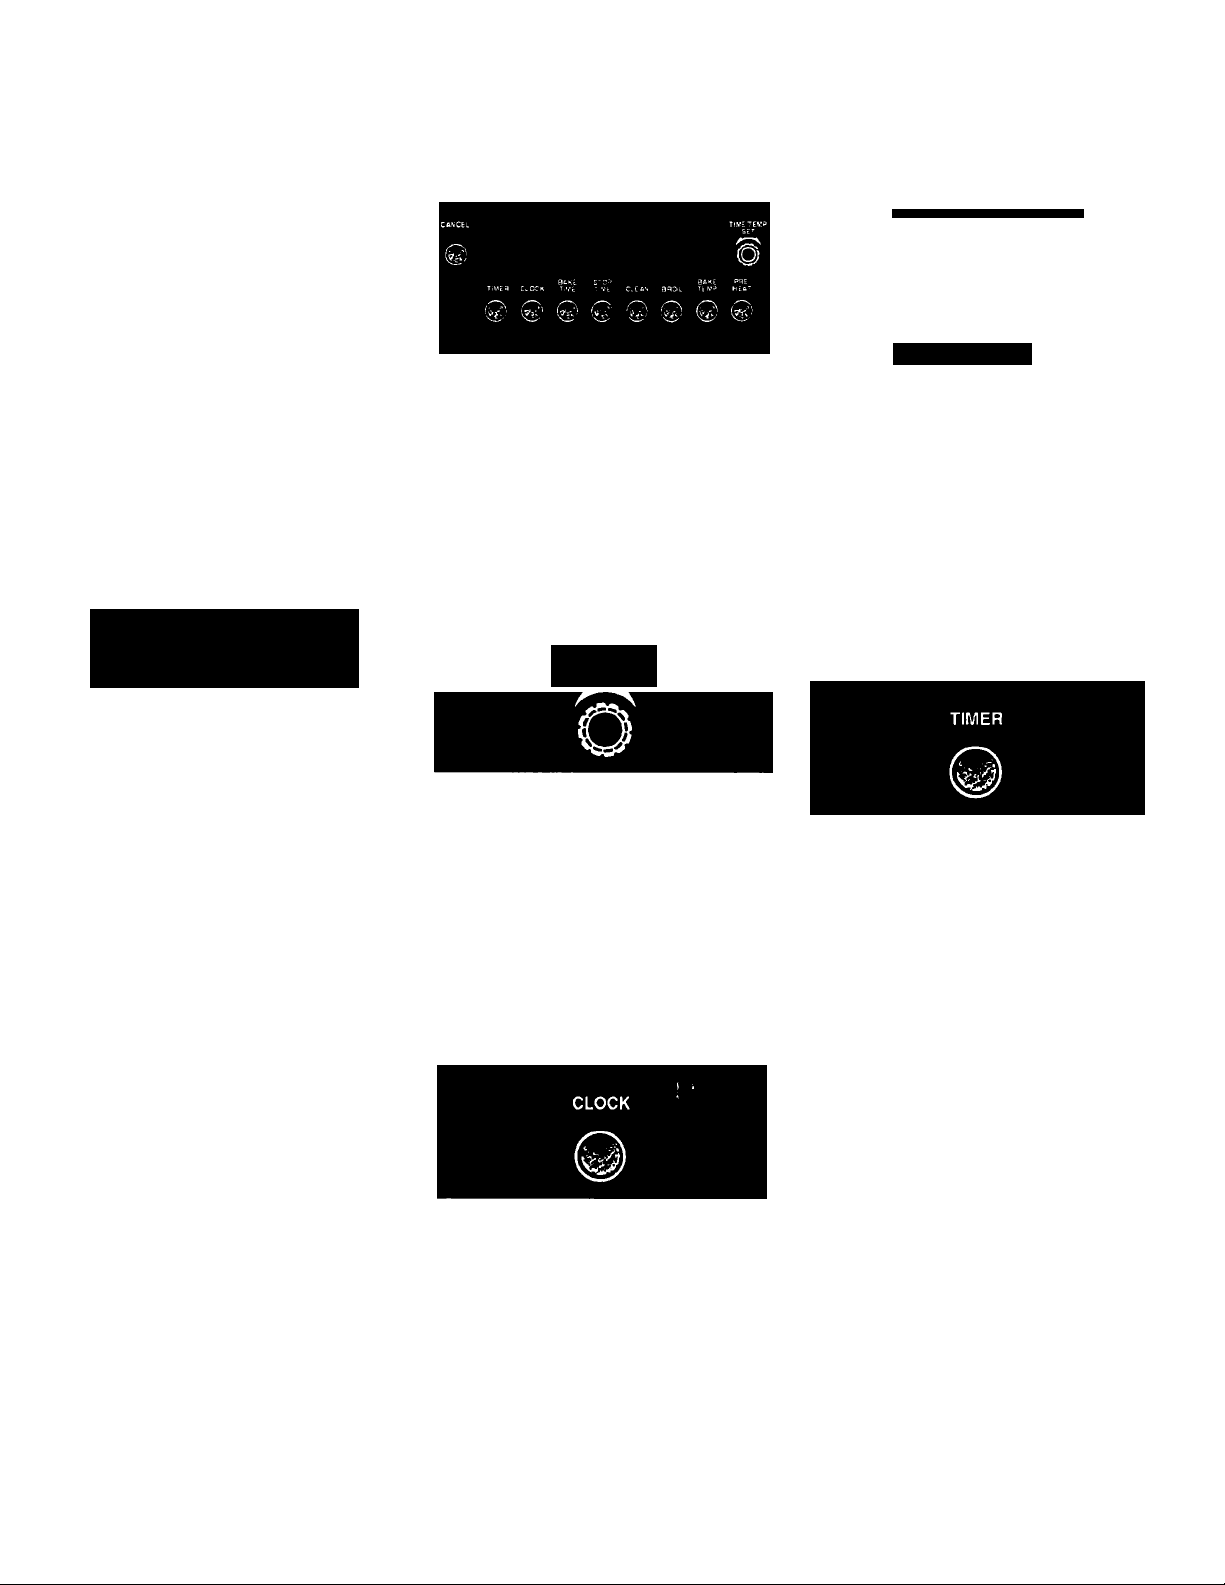
Command buttons
The command buttons tell the oven what
to do and in what order. A few
examples:
- Clock tells the oven you are going to
set the clock.
- Cancel tells the oven to turn off.
Each command button (except Cancel)
has its own indicator. The indicator
comes on when you touch the coimnand
buttons.
Time/temp set knob
TIME/TEMP
SET
Once you’ve pushed a command button
to tell the oven what you want it to do,
you'll use the Time/Temp Set Knob to set
a temperature or time. Turning the
Time/Temp Set Knob clockwise
increases the number on the display.
Turning the Time/Temp Set Knob
counterdockwise decreases the number
on the display.
Setting the clock
Model BGS470W:
1. Push the Clock button. The TIME
indicator will show in the display.
Release the Clock button.
2. Turn the Time/Temp Set Knob until
the correct time shows in the large
display.
Models BGC430W and BGP430W:
TUflNTO BFTMINUrTE/HOUR
6
PU3H g, TURN TO arr TPitt of oav
Push in and tum the Minute Timer
Knob to set the dock.
1. Push in Minute Timer Knob and
tum clockwise until dock shows
the correct time of day.
2. Let the Minute Timer Knob pop
out. Tum dockwise until Minute
Timer hand points to OFF. The
dock setting will change if you
push in the knob when turning.
Using the Minute Timer
Model BGS470W:
The Minute Timer does not start or stop
the oven. It works like a kitchen timer. It
can be set in minutes and seconds up to
9 hours, 55 minutes. You will hear three
beeps when the set time is up, then one
beep every 10 seconds for 5 minutes or
until the Timer button is pushed.
1. Push the Timer button. The TIMER
indicator will come on and the large
display will show “ :00".
2. Tum the Time/Temp Set Knob until
the desired time shows in the large
display. The Minute Timer will
begin counting down 2 seconds
after the time is set
When time is up, you will hear
three beeps.
To cancel the Minute Timer:
Push the Timer button.
continued on next page
Page 5
Models BGC430W and BGP430W:
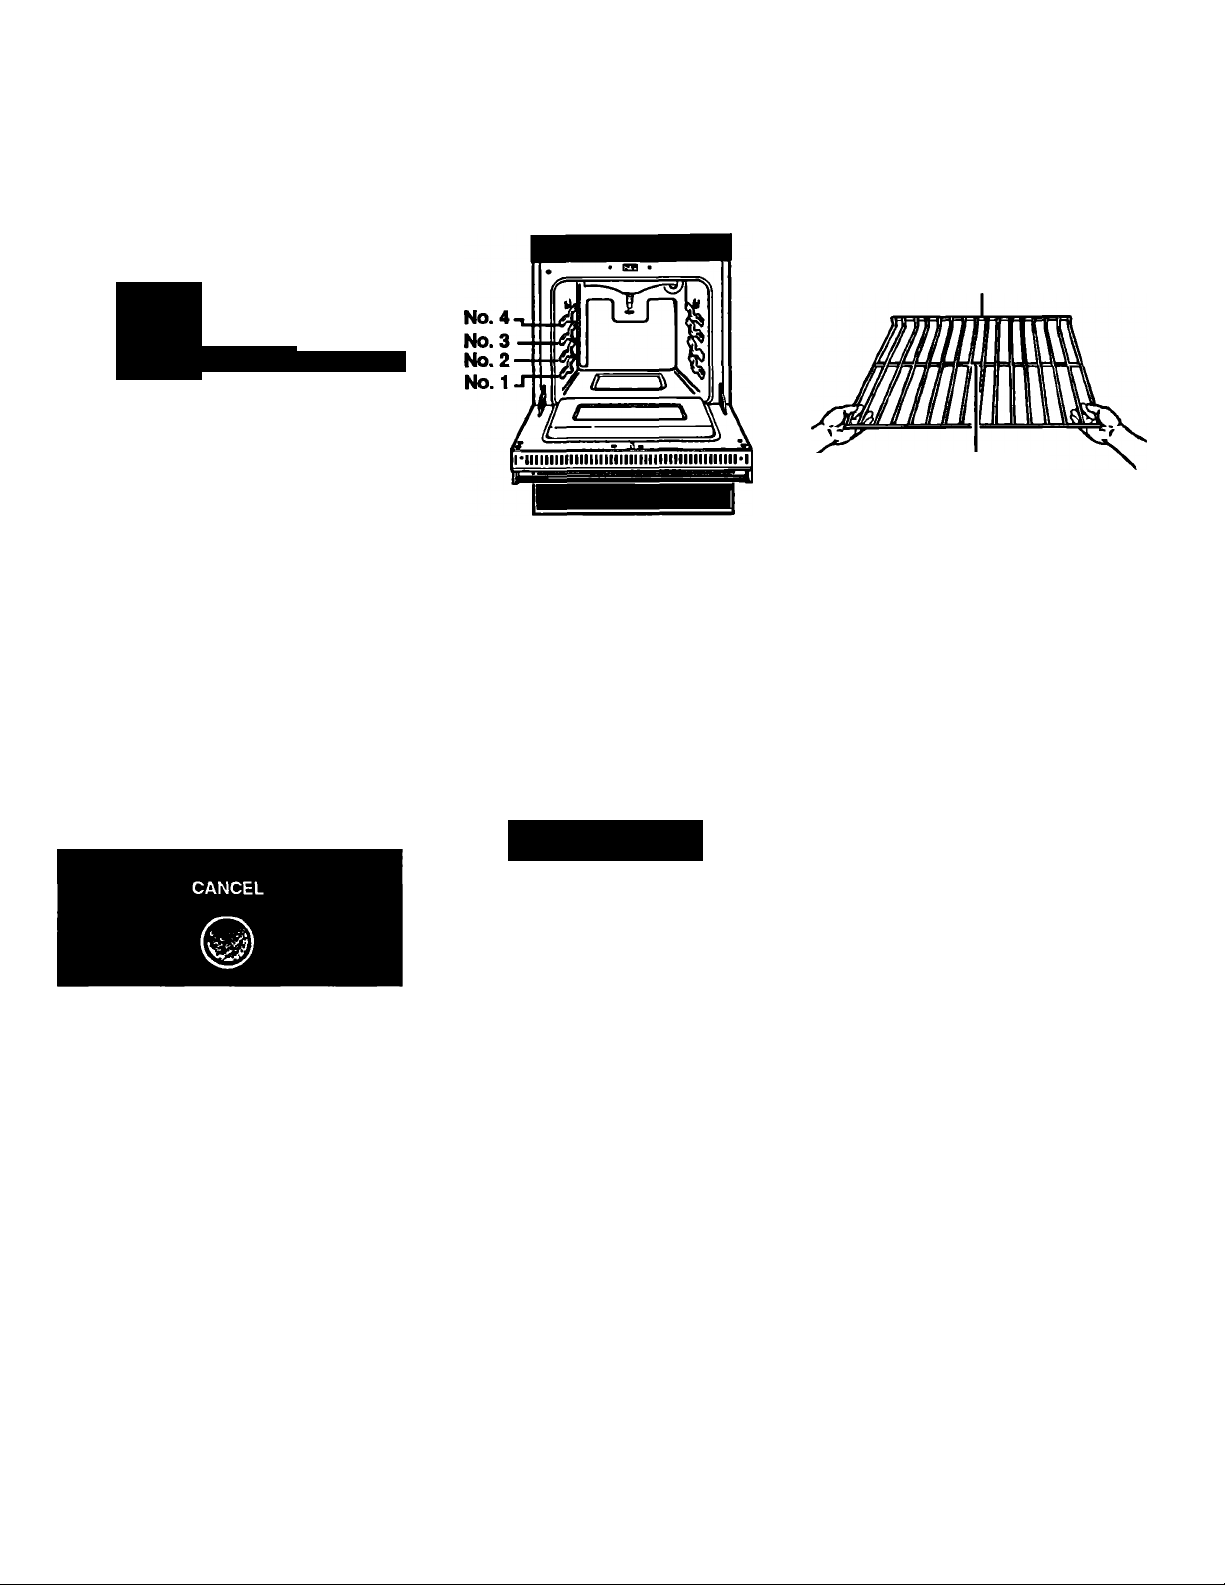
The oven racks
Rack positions
To remove oven racks:
1. Pull rack out until bar on back of
rack touches first stop.
2. Lift up the front and slide out.
Rear of rack
«
The Minute Timer does not start or stop
the oven. It works like a kitchen timer.
Set it in minutes up to an hour. You will
hear a buzzer when the set time is up.
Do not push in the knob when setting
the Minute Timer.
1. Without pushing it in, turn the
Minute Timer Knob until the timer
hand passes the setting you want.
2. Without pushing it in, turn the
knob back to the setting you want.
When the time is up, a buzzer will
sound. To stop the buzzer, turn the
Minute Timer hand to OFF.
NOTE: Pushing in and turning the
Minute Timer Knob changes the clock
setting.
<3
.&TUPf4TO OFOAt
Using the Cancel button (Model BGS470W)
The Cancel button will cancel any
conunand except for times set with the
Timer button. The large display will then
show the time of day or, if Minute Timer
is also being used, the time remaining.
Your oven has four rack positions. Rack
position 4 is the highest position, or
farthest from the bottom of the oven.
Rack position 1 is the lowest position, or
closest to the bottom of the oven.
There are two straight racks for the
overu When baking on two racks, place
one rack on the bottom and the other
rack on rack position 3.
Be sure to arrange the oven rack(s)
before putting food into the oven or
turning the oven on.
^WARNING
Fire And Personal Injury Hazard
■ Always position oven rack(s) in
desired location(s) before turning
oven on. Be sure the rack(s) is
level.
■If radc(s) must be moved while
oven is hot, use potholden or
oven mitts to protect hands.
■ Do not let potholders or oven
mitts contact hot burners.
■ Always use a dry potholder or
oven mitt to change rack(s) or
handle utensils in the oven. Do
not use a danqi potholder or oven
mitt. Steam bums could result.
Failure to follow the above
precautions may result in fire or
personal injury.
Center rack bar
To replace oven racks:
1. Place rear of rack on rack guides.
Make sure center rack bar is facing
down.
2. Tilt up front of rack and push into
place.
Rack and pan placement
When using one rack, the rack should be
placed so the top of the food will be
centered in the oven. Always leave at
least 1 1/2 to 2 inches (4-5 cm) between
the sides of the pan and the oven walls
and other pans.
For proper cooking, follow these guidelines for specific foods:
■ Angel and bundt cake pans, yeast
breads, frozen pies, large roasts and
turkeys-^ace rack on lowest level
■ Casseroles, muffins, most quick
breads and meats-place rack on
second level from bottom
■ Cookies, biscuits, cakes and non
frozen pies-place rack on second or
third level from bottom
Page 6
 Loading...