

Page 1
AP688
Page 2
安全注意事項
在使用之前,請仔細閱讀“安全注意事項”,以便能正確使用。
本節所述的注意事項,是為了安全、正確的使用本產品,使可能對您或他人產生的危害及
損害防止於未然。為了明確表示危害及損害的嚴重程度,這些注意事項根據由於操作不當
可能發生的現象區分為“警告”、“注意”。不管怎樣,這些都是與安全有關的內容,請
務必遵守。
警告
注意
禁止事項
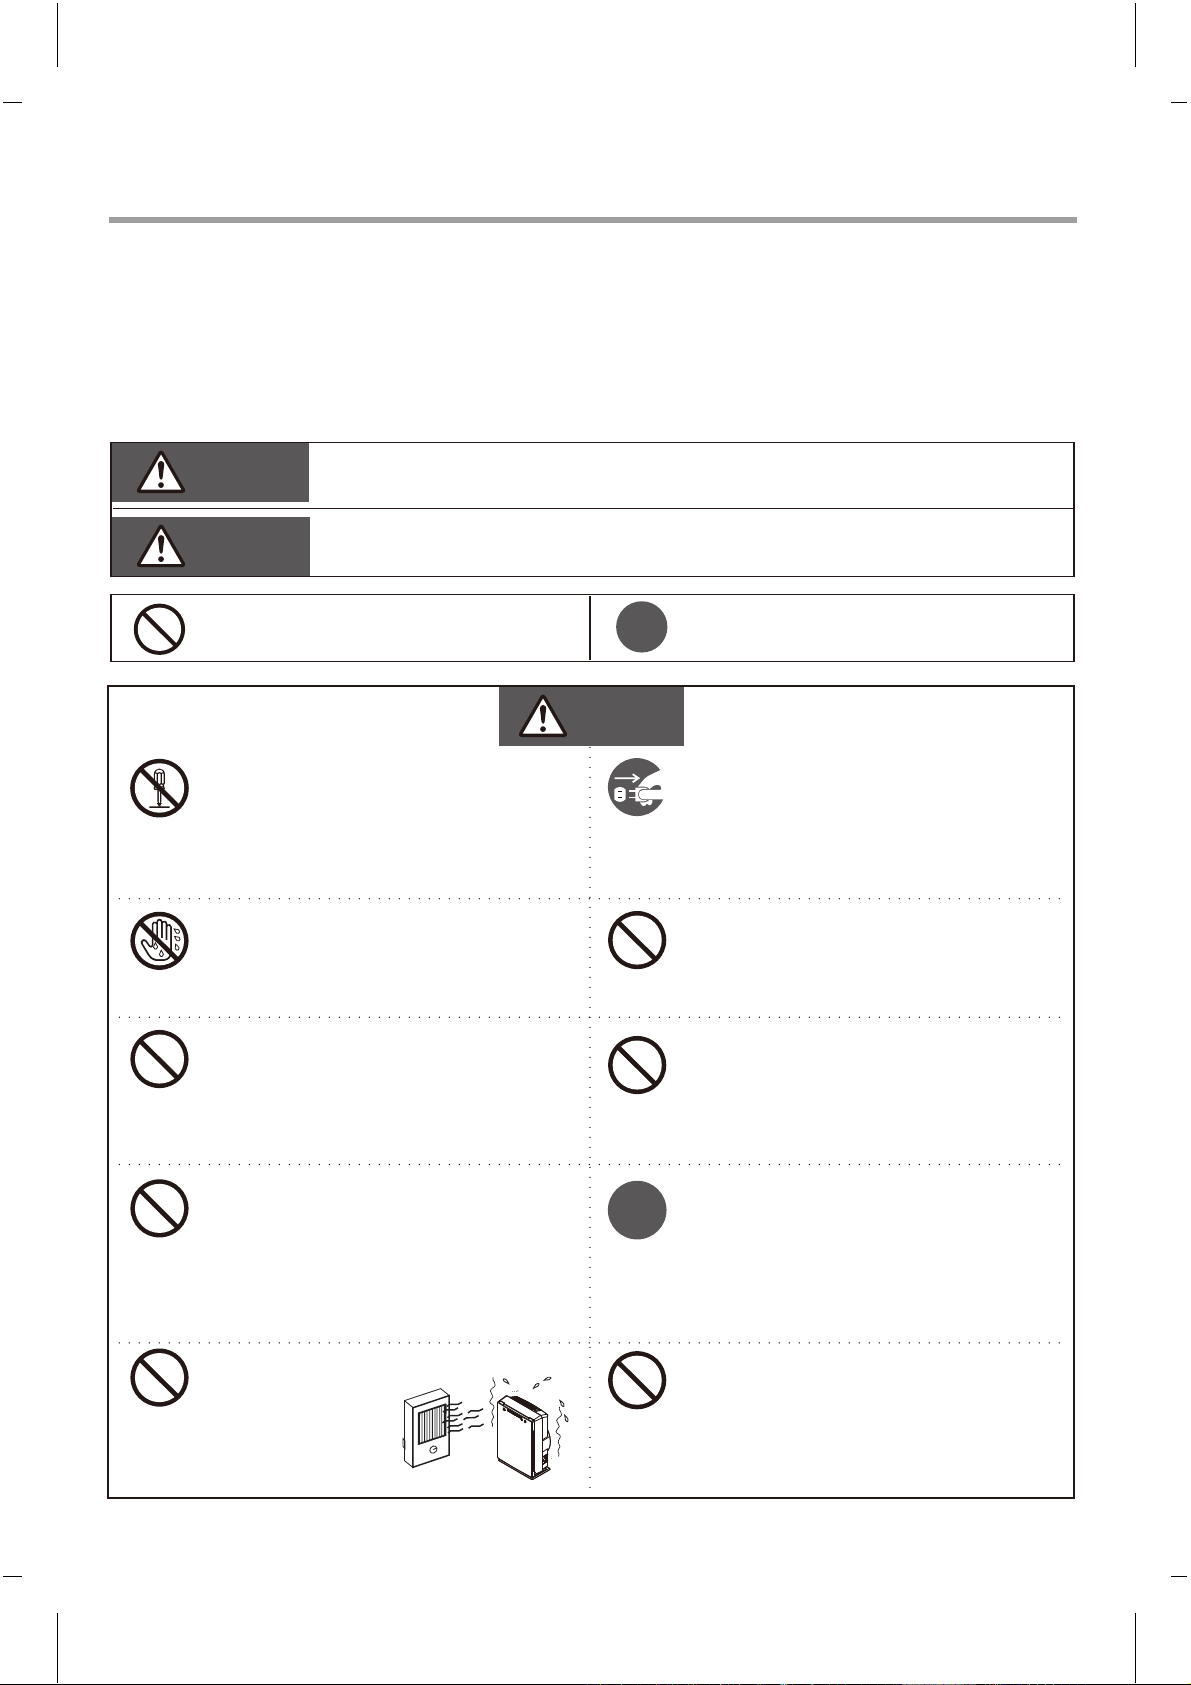
不要改裝本機器。
除了為修技術人員外,其他人
不得擅自進行分解、修理。
切勿手濕時拔插頭或操作本機。
若電源線或插頭有損毀,或插
座鬆脫時,請勿使用本產品。
可能會有死亡或嚴重受傷的危險
可能會造成人員傷害或財物損害
R
警告
應做事項
在清潔、檢查或移動本產品時
請先從電源插座中拔掉插頭。
拔插頭時,請握住插頭拔出。
切勿使用額定電壓以外的電源,
且不得使用超出電源插座功率
和線路的負荷。
不要用拔插頭的方式來停止機
器運轉。
請勿剪短或修改電源線,也
不要使用延長線。
不要放在發熱
設備附近。
確認電源插頭上沒有灰塵等髒
R
物,將它確實插到底,確認沒
有鬆動情況。
不要將手指或棒類等放入出、
入風口。
2
Page 3
注意
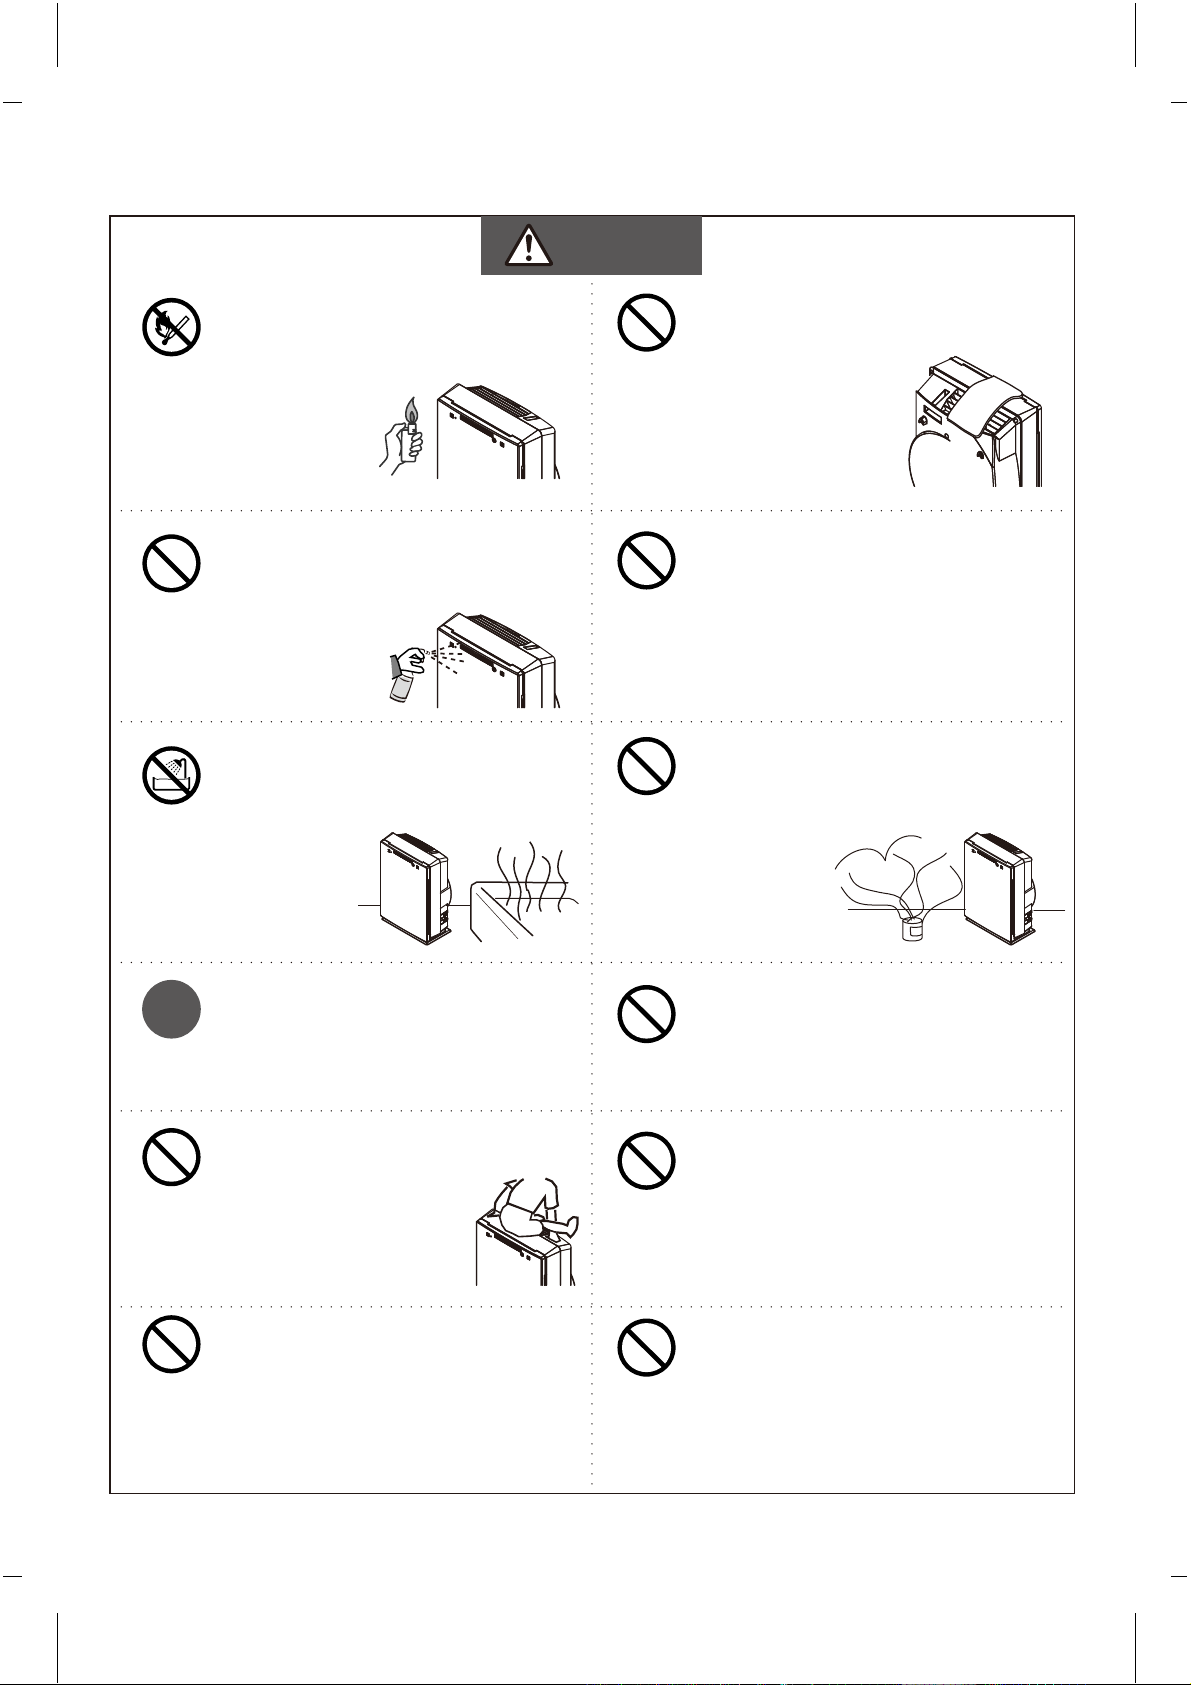
切勿將易燃物品,如香煙等,
靠近本機。
切勿使用汽油和溶劑擦拭,更
不可對本機噴灑殺蟲劑。
切勿在浴室等濕氣較多的地方
使用本產品。
切勿遮蓋出、入風口。
切勿在易燃氣體、腐蝕性氣體
或金屬性塵埃的地方使用本空
氣清新機。
切勿在釋放煙霧殺蟲劑時使用
本產品。
本產品不能吸走一氧化碳。若
R
室內使用火焰爐具,需要注意
換氣。
不要坐在本產品上。
切勿用水沖洗本機。
切勿將花瓶等盛水容器放在
本產品上方。
不要放在應用化學品的場所(
醫院、車間、實驗室、美容院
等)使用。
切勿將本產品放置在高牆或高
櫃上,以免掉落。
3
Page 4
注意
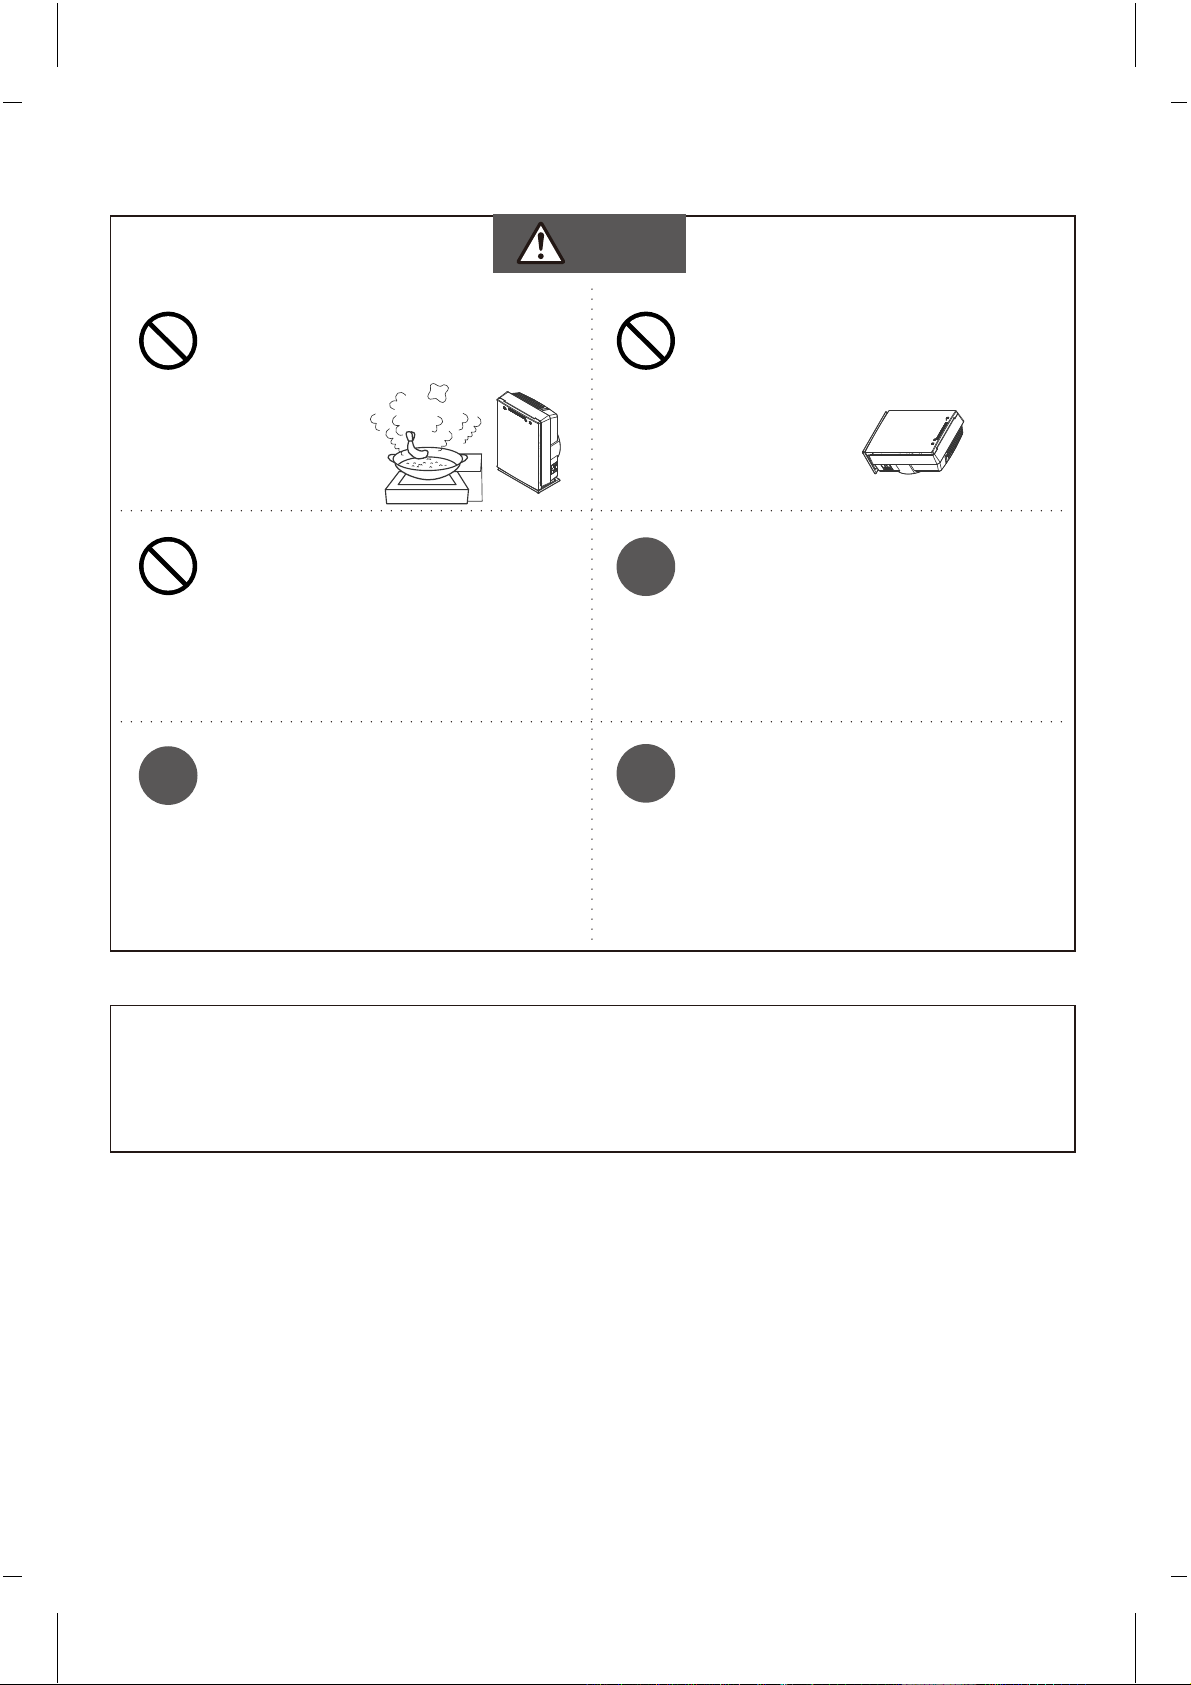
切勿在有油煙的地方使用本產
品。
勿讓本機直接吸入加濕器或類
似裝置產生的水氣。
R
遙控器須保存在兒童接觸不到
的安全地方。遙控器內含有細
小零件,若鬆脫可能會引致窒
息的危險。
切勿在不平穩、傾斜的地方使
用,以免傾倒。
R
R
為避免危險,損壞的電源線應
由生產商、服務代理商或其他
合格人士更換。
本機長時間不使用時,請拔下
插頭。
本機不得在沒有協助或監控下,給兒童或其他因身體、感官或心智能力無法
安全使用的人士使用。
應該監督兒童確保他們不玩本機。
4
Page 5
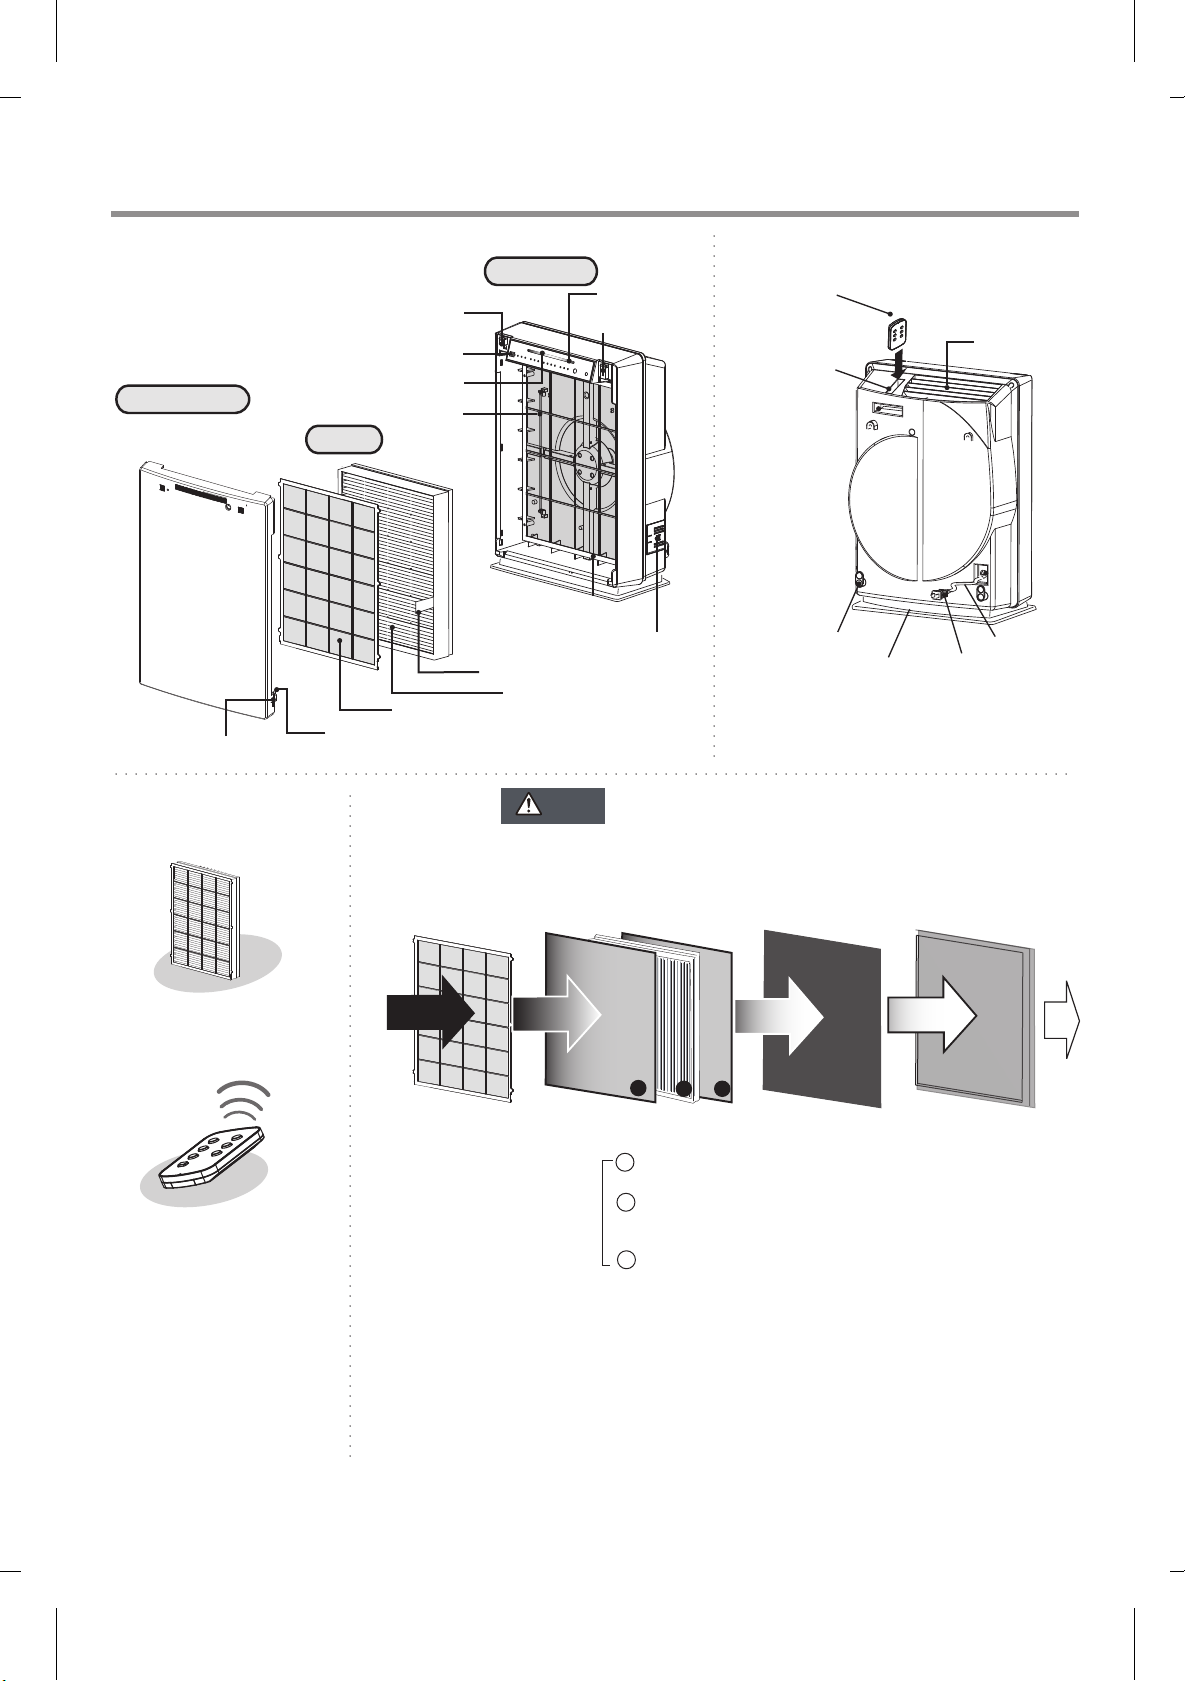
零件和各部名稱
■正面 ■背面
主機
控制板
安全開關掣
遙控器座
前面板
感應器開關
氣體感應器
清淨度指示燈
紫外燈
過濾器
光觸媒濾網
遙控器
出風口
指壓位
濾網
遙控器
使用前請移除透明紙。
帶子
前置濾網
鉤子
■濾網■配件
可清洗前置濾網(無需更換)
隔濾大顆粒物質如頭髮
及肉眼可見的塵埃
3合1濾網
注意
微塵感應器
使用前請將濾網塑膠袋拆掉,方可使用!
1
2 3
3合1濾網
1 納米銀濾網
壓抑細菌活動
2 醫療級HEPA濾網
*高效微粒 (高效微粒空氣過濾器)
過濾99.97%空氣中的微粒 (0.3微米)
3 NS 除臭濾網
*去除動物或食物發出的難聞氣味
電線座
活性碳濾網
*去除難聞氣味
底座
電線
插頭
光觸媒濾網(無需更換)
利用紫外線抑制細菌、
微生物、桿菌及病毒活動。
5
Page 6
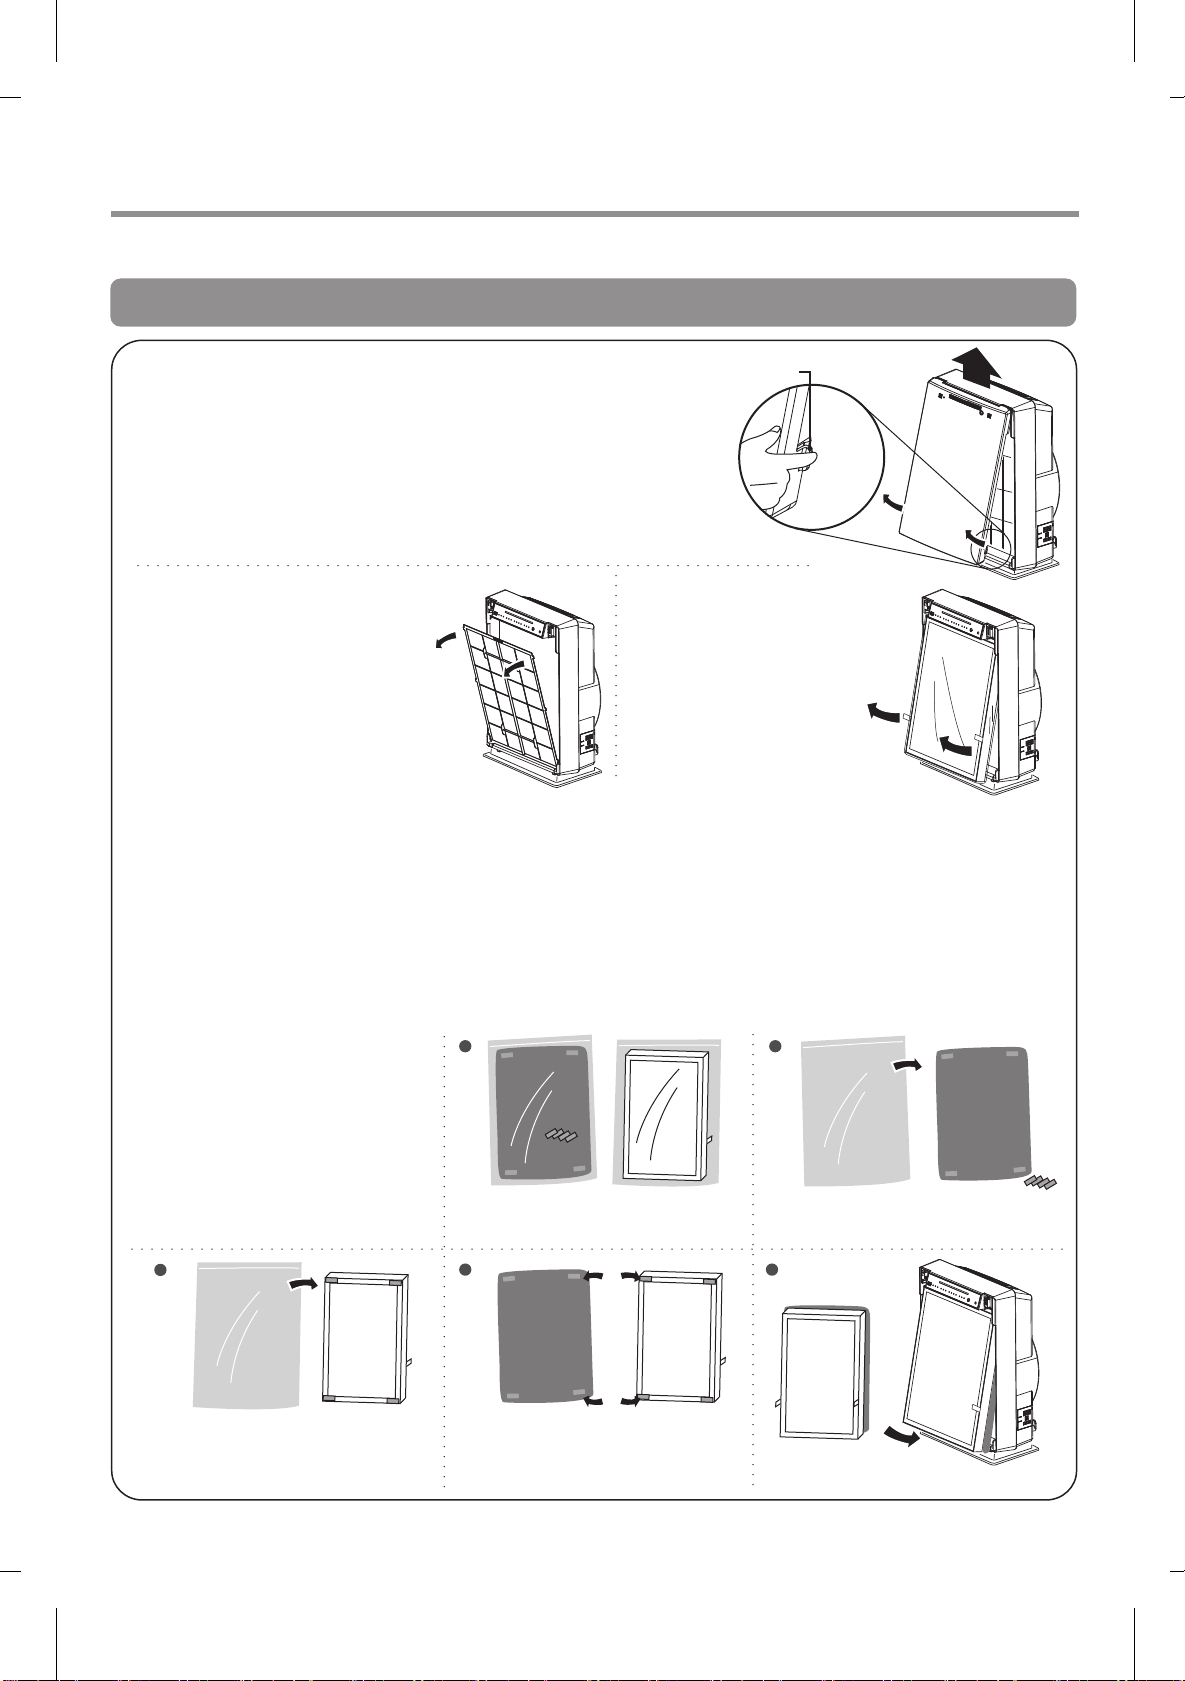
使用前的準備
※使用前,請確保已除去3合1濾網的包裝袋。
安裝濾網前,請確保已拔掉插頭
1. 移除3合1濾網
指壓位
*把本產品放置在平穩的地方。
1. 移除前面板
按下前面板下方的指壓位,令前面板下方鬆脫,
然後將它拉出。
2. 移除前置濾網
3.移除3合1濾網的包裝袋。
從主機的孔口,
移除濾網兩側的6個
卡爪。
2. 把3合1濾網安回主機
1. 將濾網的正面(FRONT)向外。切勿倒轉安裝或令濾網變形。
2. 安裝前置濾網
把前置濾網兩側的卡爪插入主機的孔中。
3. 安裝前面板
將前面板上方的兩側,鉤上主機的頂部,然後把鉤子繫緊在主機的下方。
*前面板還未裝妥時,本機不能運作。
3. 3合1濾網與活性碳濾網配合使用指引
*使用前請將濾網塑膠
1 2
袋拆掉,方可開機。
*閣下可選擇單獨使用
3合1濾網或加活性碳
濾網配合使用。
3
背面
如閣下想把3合1濾網與活性碳濾網配合
使用,請先把獨立的4張單面魔術貼,貼
在3合1濾網背面的4個角上。
4 5
完成貼合後,把3合1濾網及活性碳濾網
緊貼在一起。
背面
包裝袋內,放有1個4角貼上單面魔術貼的
活性碳濾網,及4張獨立擺放的單面魔術貼。
背面
正面
完成裝嵌後,
閣下便可把濾網放回主機。
正面
6
Page 7
Page 8
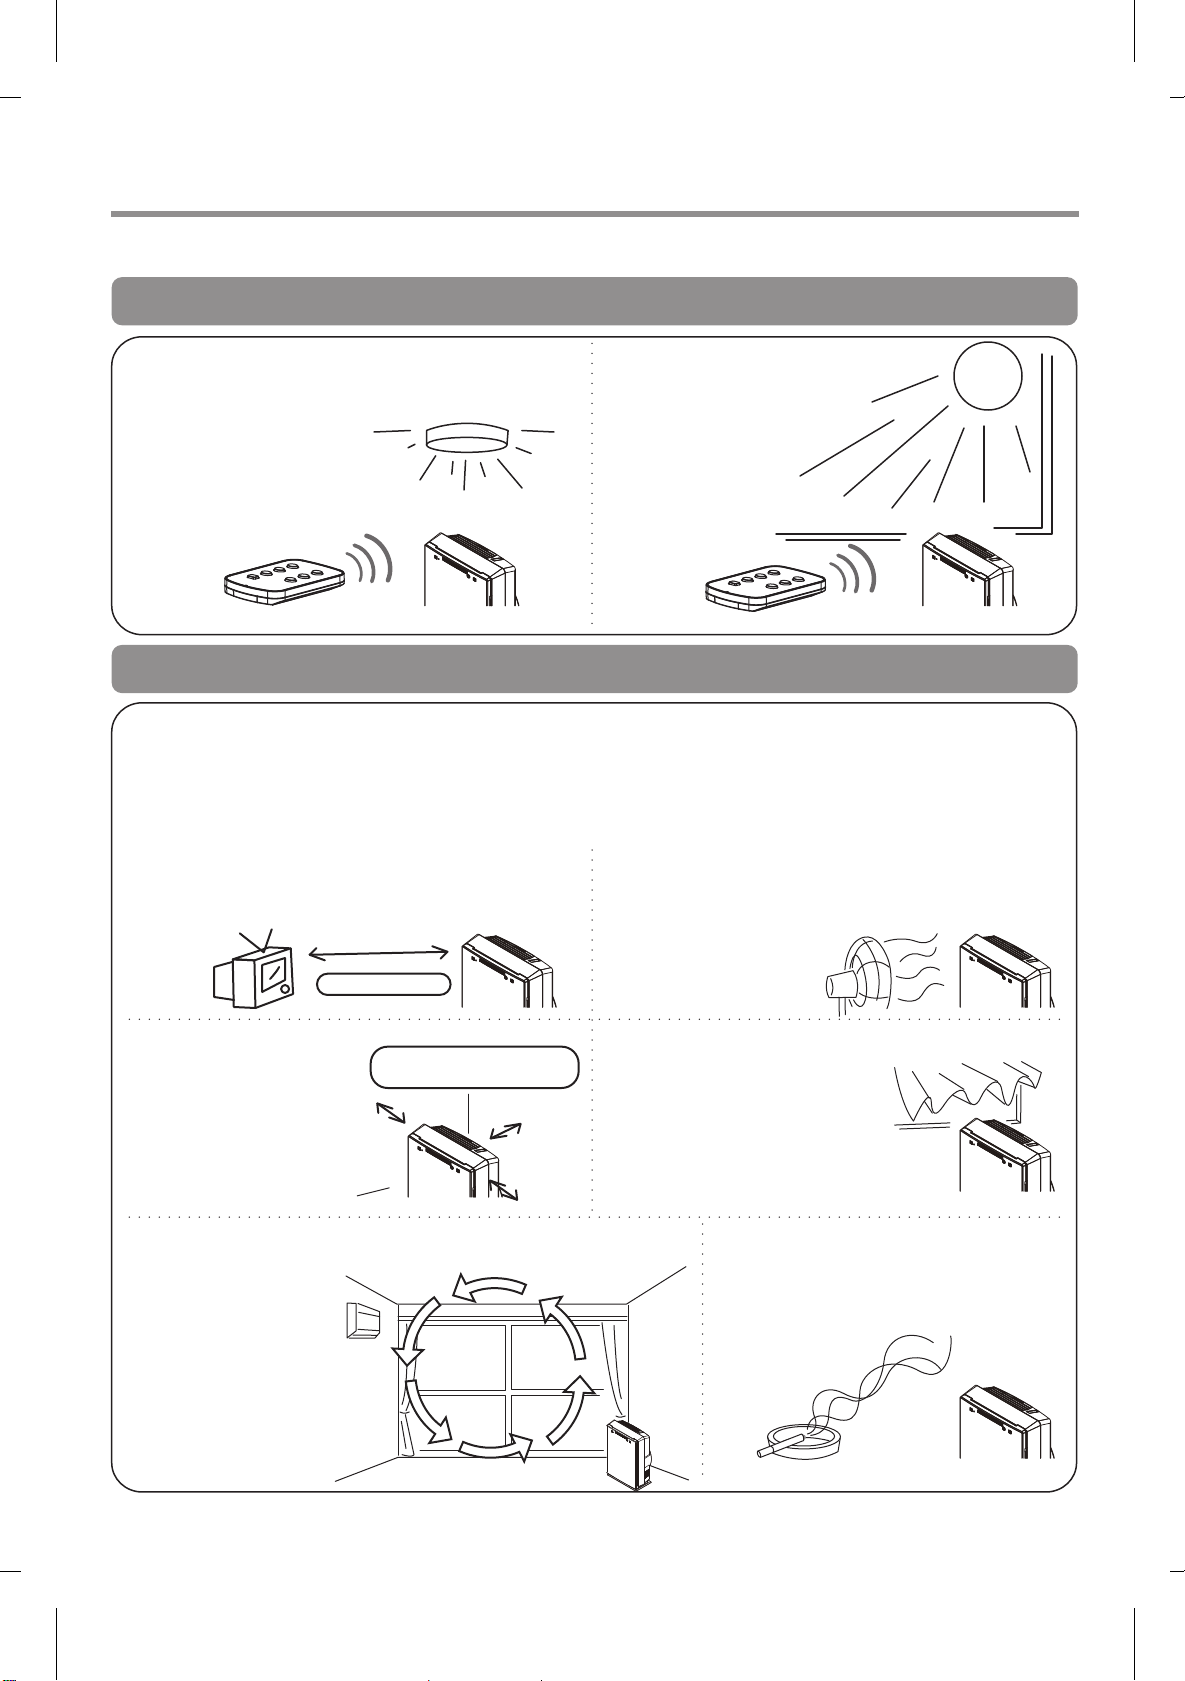
安裝
可以將本產品放置在地上或桌上
請避免在以下地方使用遙控器
裝有螢光燈,尤其是倒吊式照明工具的房間
這些照明產品可能會導致遙控器失效。請讓
遙控器與照明產品
保持適當距離,或
嘗試改變方向使用。
受陽光直接照射的房間
陽光照射可能令遙控器
失效。
安裝貼士
根據空氣污染程度及為了保持空氣清潔而安裝此機
*如果房間有微小灰塵或臭味如煙味等,請安裝在地面1米以上的位置。
*如果房間有較大顆粒的灰塵,如花粉、塵埃或類似灰塵,則安放在房間內接近地面的位置
與電視或收音機保持1米距離,以避免受電
波干擾。
避免放置在強風直接吹著感應器的地方,因
為可能會引起故障。
。
1米或以上
微塵感應器在主機的
右下位置。 避免把
它放置在牆壁或傢
俱附近。與牆壁保
持10厘米距離。
選擇空氣流通良好的地方放置本產品。如果安有冷氣
機,如右圖般放置
會令空氣流通效果
更佳,而且會改善
灰塵感應器的探測
效果。空氣循環效
果。
與離牆壁保持10cm距離
空氣循環效果
8
避免放置在窗簾或類似物
件附近,因本產品可能會
弄髒窗簾或發生故障。
把此機放置在吸煙區,此機便能快
速探測到污物。
Page 9
A
ir Quality
Page 10
A
ir Quality
Page 11
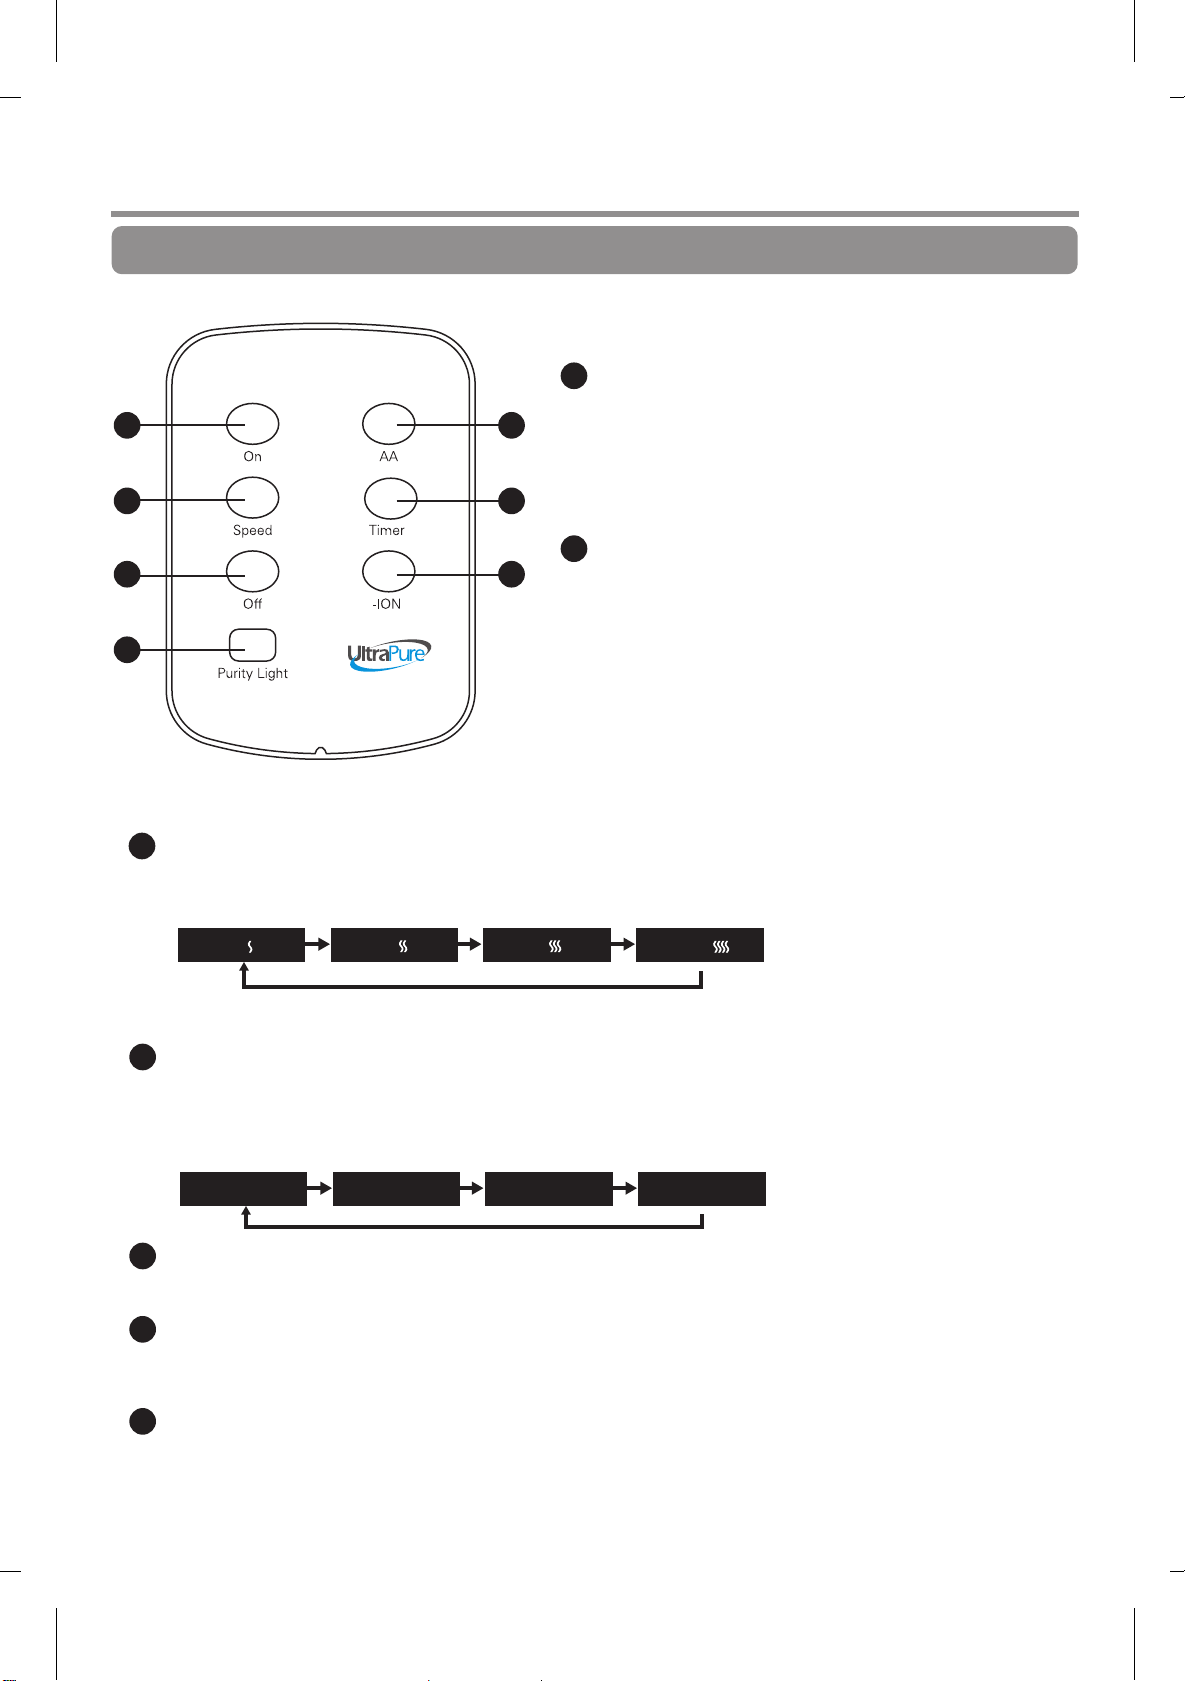
使用遙控器操作
1 2
3 4
5 6
7
*按下按鈕,然後放開時本機便會運作。
請按下按鈕及鬆開按鈕。
風速按鈕
3
. 按下按鈕把風量調節至低、中、高或極強級數。
1
開啟按鈕
. 按下自動啟動模式。
. 如在"關上"狀態按此按鈕,潔淨度指示燈
會閃動30秒,然後再顯示清淨度。
. 如果主機已設在手動運作模式,請按按鈕
切換至自動模式。
抗敏模式
2
. 在自動或手動模式時,按下本按鈕啟動抗
敏模式。
低( )
.無論內部潔淨狀態如何,本機都會根據選定的風量運作。
時間掣按鈕
4
. 在運作期間可設定本機的自動停止運作時間。可以設定1小時、4小時或8小時。
. 每按一下按鈕,設定時間便會隨之改變。
1小時 8小時 結束4小時
停止按鈕
5
. 按下按鈕停止運作。
負離子按鈕
6
. 啟動或關閉負離子釋放功能。
7
清淨度指示燈
. 如果想知道空氣潔淨度,可按下此按鈕以開啟或熄掉清淨度指示燈。
11
極強( )中( ) 高( )
Page 12
警告
警告
Page 13
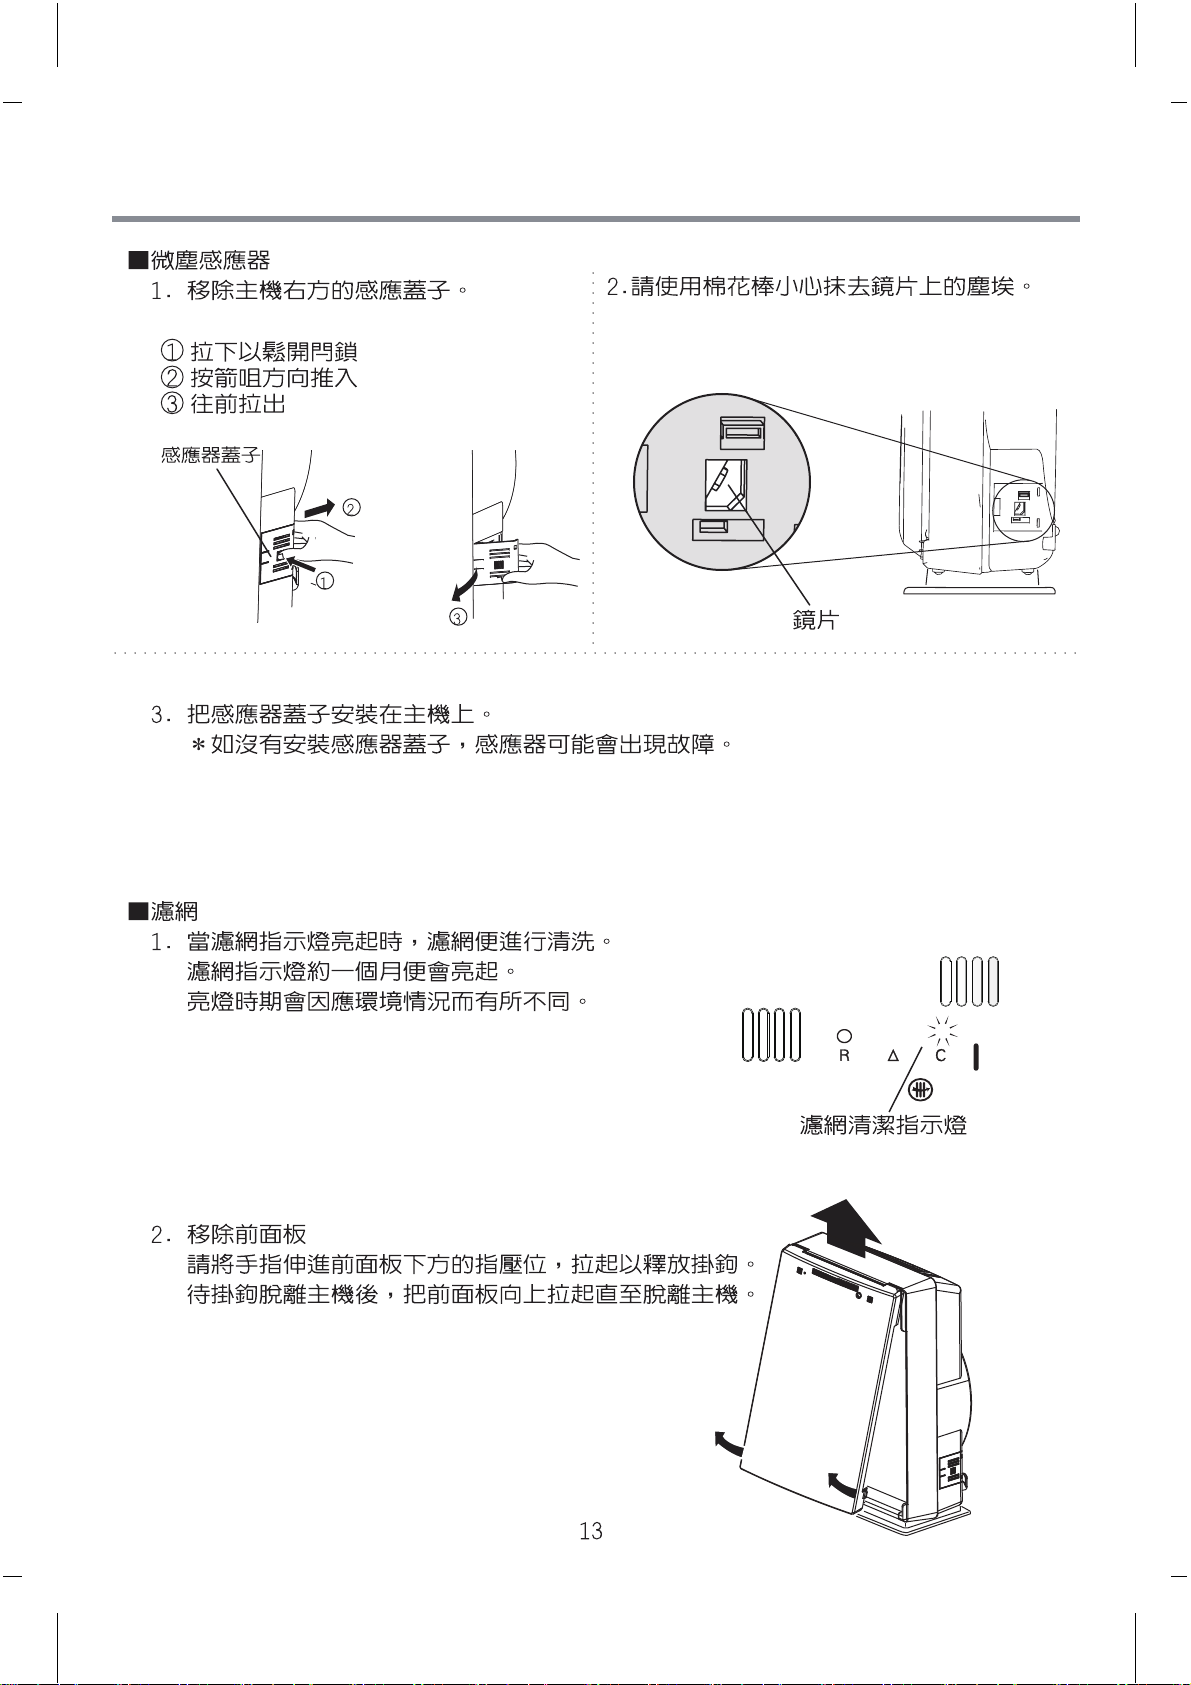
A
ir Quality
Page 14
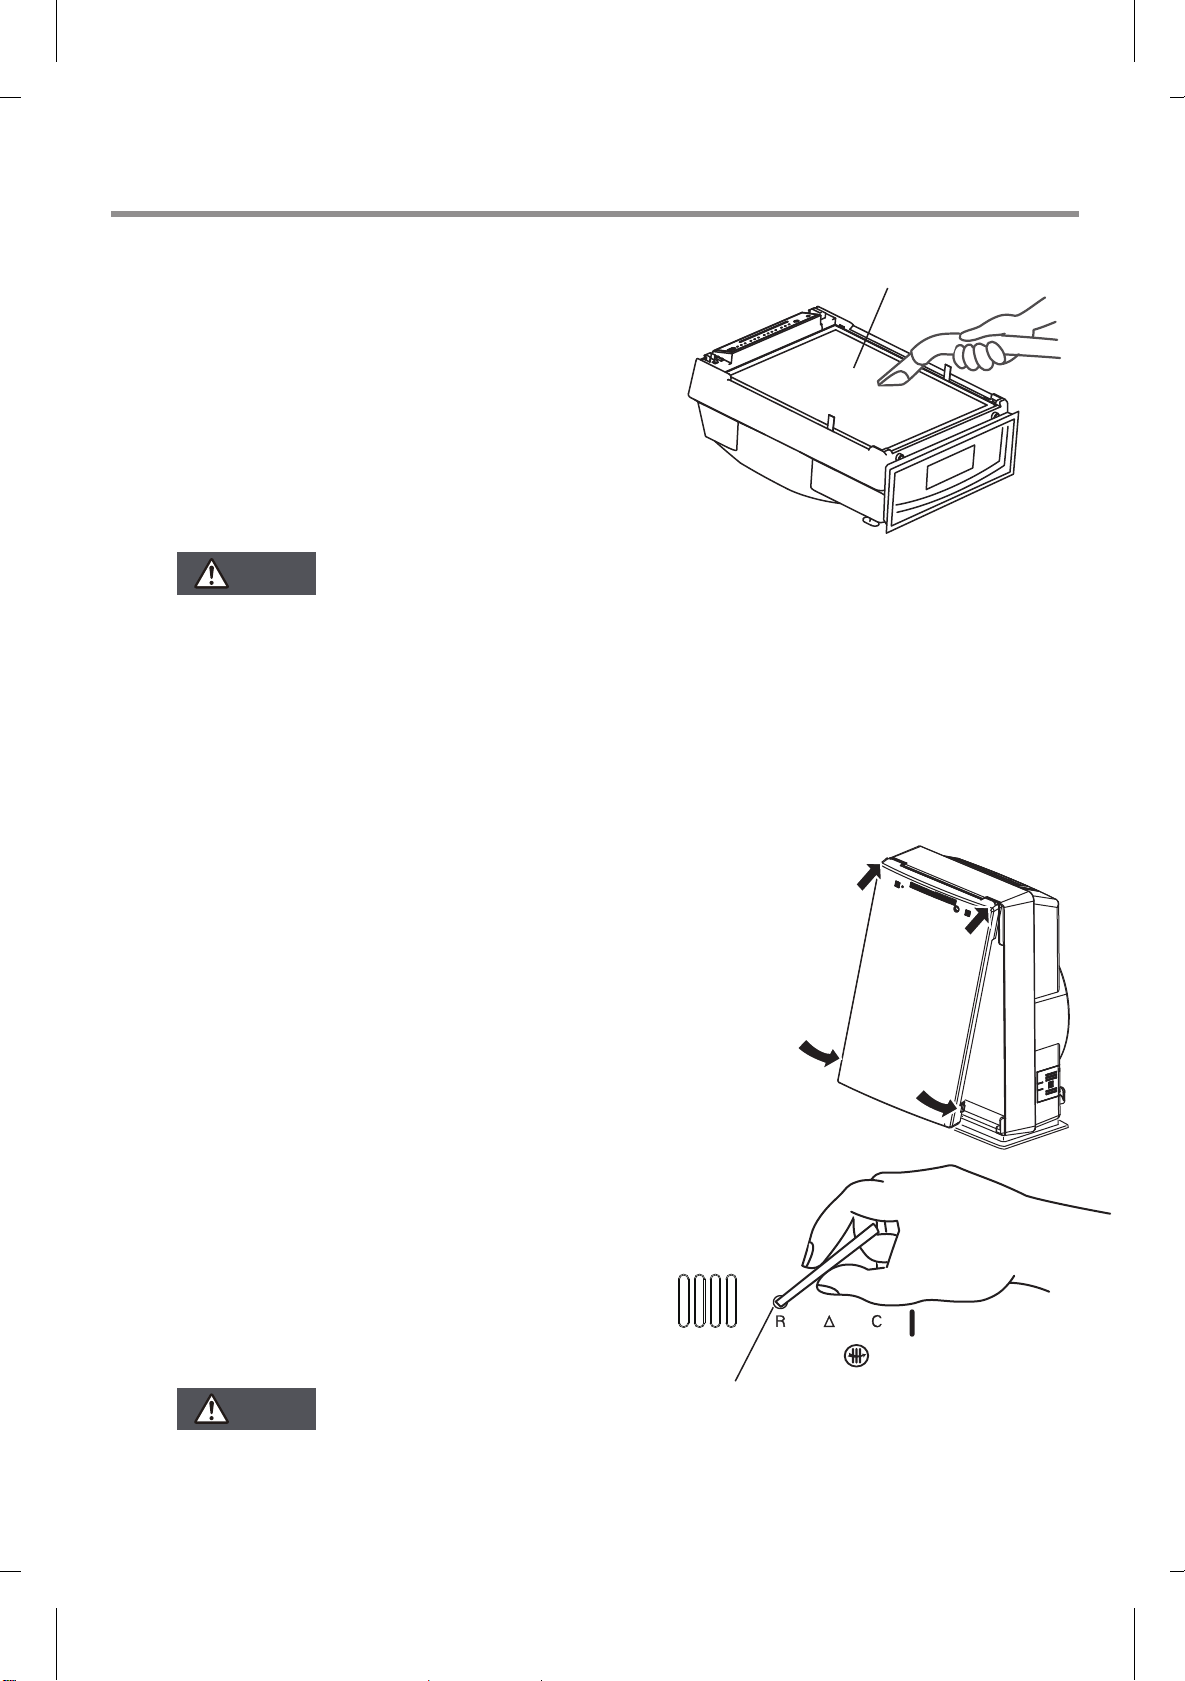
3. 清洗前置濾網
請把前置濾網從主機中移除,
及使用吸塵機清洗前置濾網。
如前置濾網堆積塵垢,請使用冷水清洗。
4. 清潔3合1濾網
請在3合1濾網並沒從主機移除的情況下,
使用吸塵機清潔濾網。
注意
為防損害濾網,切勿將吸塵機在濾網過份擠壓及以不要用水沖洗濾網。
5.安裝前置濾網
請把前置濾網兩側的卡爪插入主機兩側的孔內。
*請把緊扣在醫療級HEPA濾網的帶子小心地取出,切勿將它弄斷。
3合1濾網
6.緊扣前面板
請把前面板的上方與主機的上方緊合,然後按下兩邊直至下方
的掛鉤穩固插入主機。
7. 清洗濾網清潔指示燈
當您把插頭插入電源插座後,
請啟動電源/ 模式按鈕及濾網清潔指示燈,及使用曲別針按下重設按鈕。
取出曲別針時,會發出聲響。
請檢查取出曲別針時,有否發出聲響及濾網
清潔指示燈有否關閉。
A
* 請勿把按鈕按下5秒或以上的時間
(此做法會重設過濾器更換時間)
濾網重設按鈕
ir Quality
注意
清洗時間會因應房間骯髒情況而有所不同。請定期清理房間。
14
Page 15
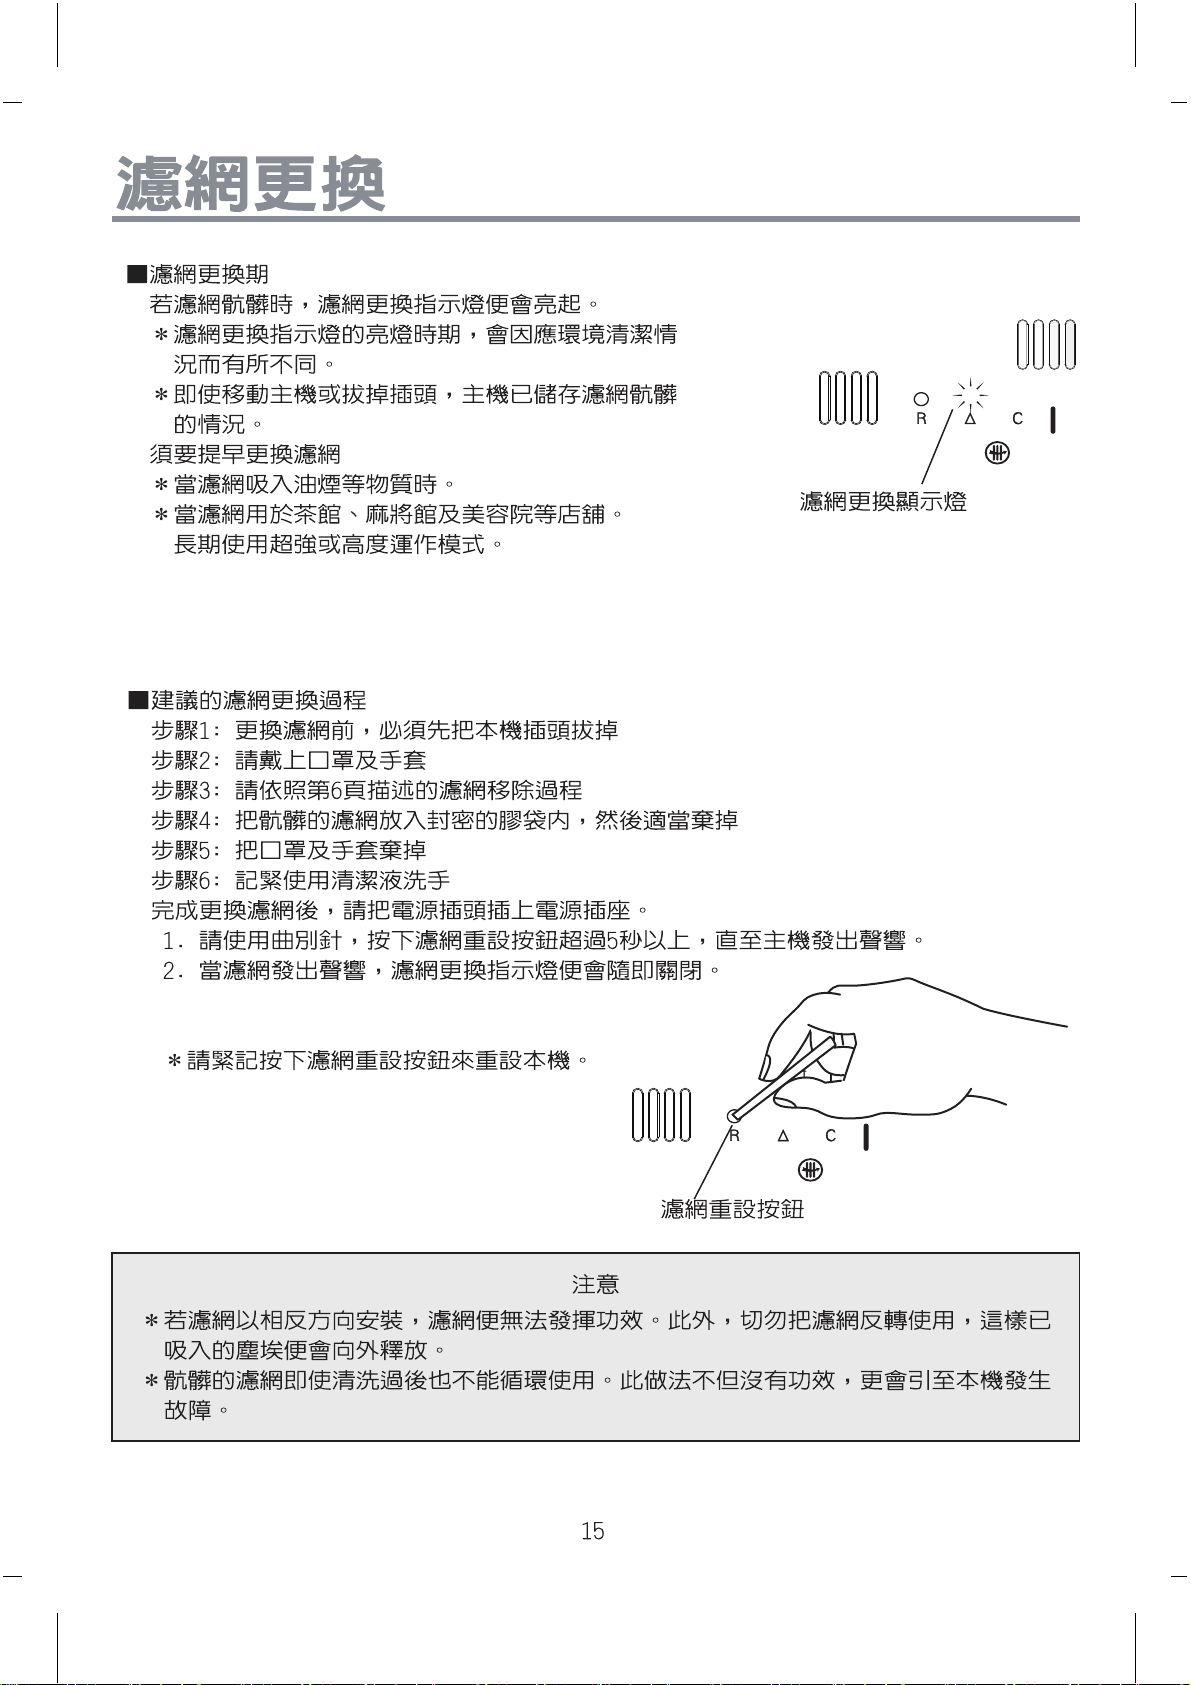
A
ir Quality
A
ir Quality
Page 16
疑難排解
警告
切勿自行維修及拆卸本機
疑難 請檢查
本機無法運作
難以去除氣味或煙味
.有否停電(保險絲、斷路器有否燒落) ?
.電源插頭是否鬆脫?
.濾網及前面板是否確實安裝妥當?
.濾網有否從袋中取出?
.3合1濾網是否反轉安裝?
.濾網是否骯髒?
.出風口有否堵塞?
.房間是否太大?(請進行手動超強操作)
.房間是否充斥大量煙味?
.本機運作期間,紫外線燈有否正常運作?
(如紫外線燈運作失靈,請聯絡本公司)
.請在相對清潔的房間,使用本機進行約8小時的運作,以恢
復光觸媒濾網的性能。(當本機吸入大量氣味,氣味分解能
力可能會暫時性減低)
即使用戶正在吸煙,
本機也不能清除煙味
即使空氣清潔,但本機的
清淨度仍顯示骯髒
運作聲音太大
遙控器無法運作
.本機是否安放在難以感應香煙等塵埃氣味的位置?
.氣體感應器孔口或微塵感應器孔口有否關閉或堵塞?
(請參閱第11及12頁的指引進行清洗)
.感應器的感應度是否調至 "低"的位置?
.感應器對化妝品、香水、酒精、滅蟲噴霧等物質會產生化
學作用。(請更改感應器設定及房間通風系統等)
.在剛接通電源後,本機的清潔指示燈會因感應探測而顯示
骯髒。
.當空氣回復潔淨,清潔指示器會會回復清潔水平。
.本機是否安裝在不穩定地方?
.濾網是否極度骯髒?
.電池是否耗盡?
.遙控器有否附上透明(絕緣)電池帶?
.電池是否放在錯誤方向?
.附近是否安裝了螢光燈?
16
Page 17
Ⴗᙱ ኛᑭߤ
ሒϯ፶ٕՀೱϯ፶
࿅ѝܪ
ளۏଫซ፟
፟జԘᒅ
ŎֹϡБາ۞ᕭშயݡĂזᅅঈק၁ᛳϒ૱Ąྍঈק၆ˠវĂ҃ͷົдֹϡ˘
!!ົޢঐεĄ
ኛᑭߤֹϡкѐ۞۩ঈາ፟"
ᑭߤͽ˭ଐڶѣӎனĈ
Ŏώ፟ୁજޢĂ֭՟ѣϒ૱ྻүĂٕมઃྻүĄ
ŎࢲྻᖼĂ൴؈ளᓏᜩٕன፟֗જĄ
Ŏ፟֗ள૱൴ሤٕ൴፵൏קĄ
Ŏன૱ன෪Ą
ࡶώ፟ϡٺاͽγ۞ᅻᝯಞٙĂሒϯ፶ܮΞ೩ѝ
!!ܪĄ
ώ፟ߏӎགྷ૱дૻፆүޘሀёྻүĉ
!!ӈֹٗมሒĂтགྷ૱ซҖޘྻүૻፆүĂሒ
!!ϯ፶Ϻົ೩ѝܪĄ
ኛઃྻүᏙྙჯ࣒நĄ
ኛઃྻүࢋՐჯ࣒ڇચĄ
ኛᙯౕᓑඛώΦĄ
28
Page 18
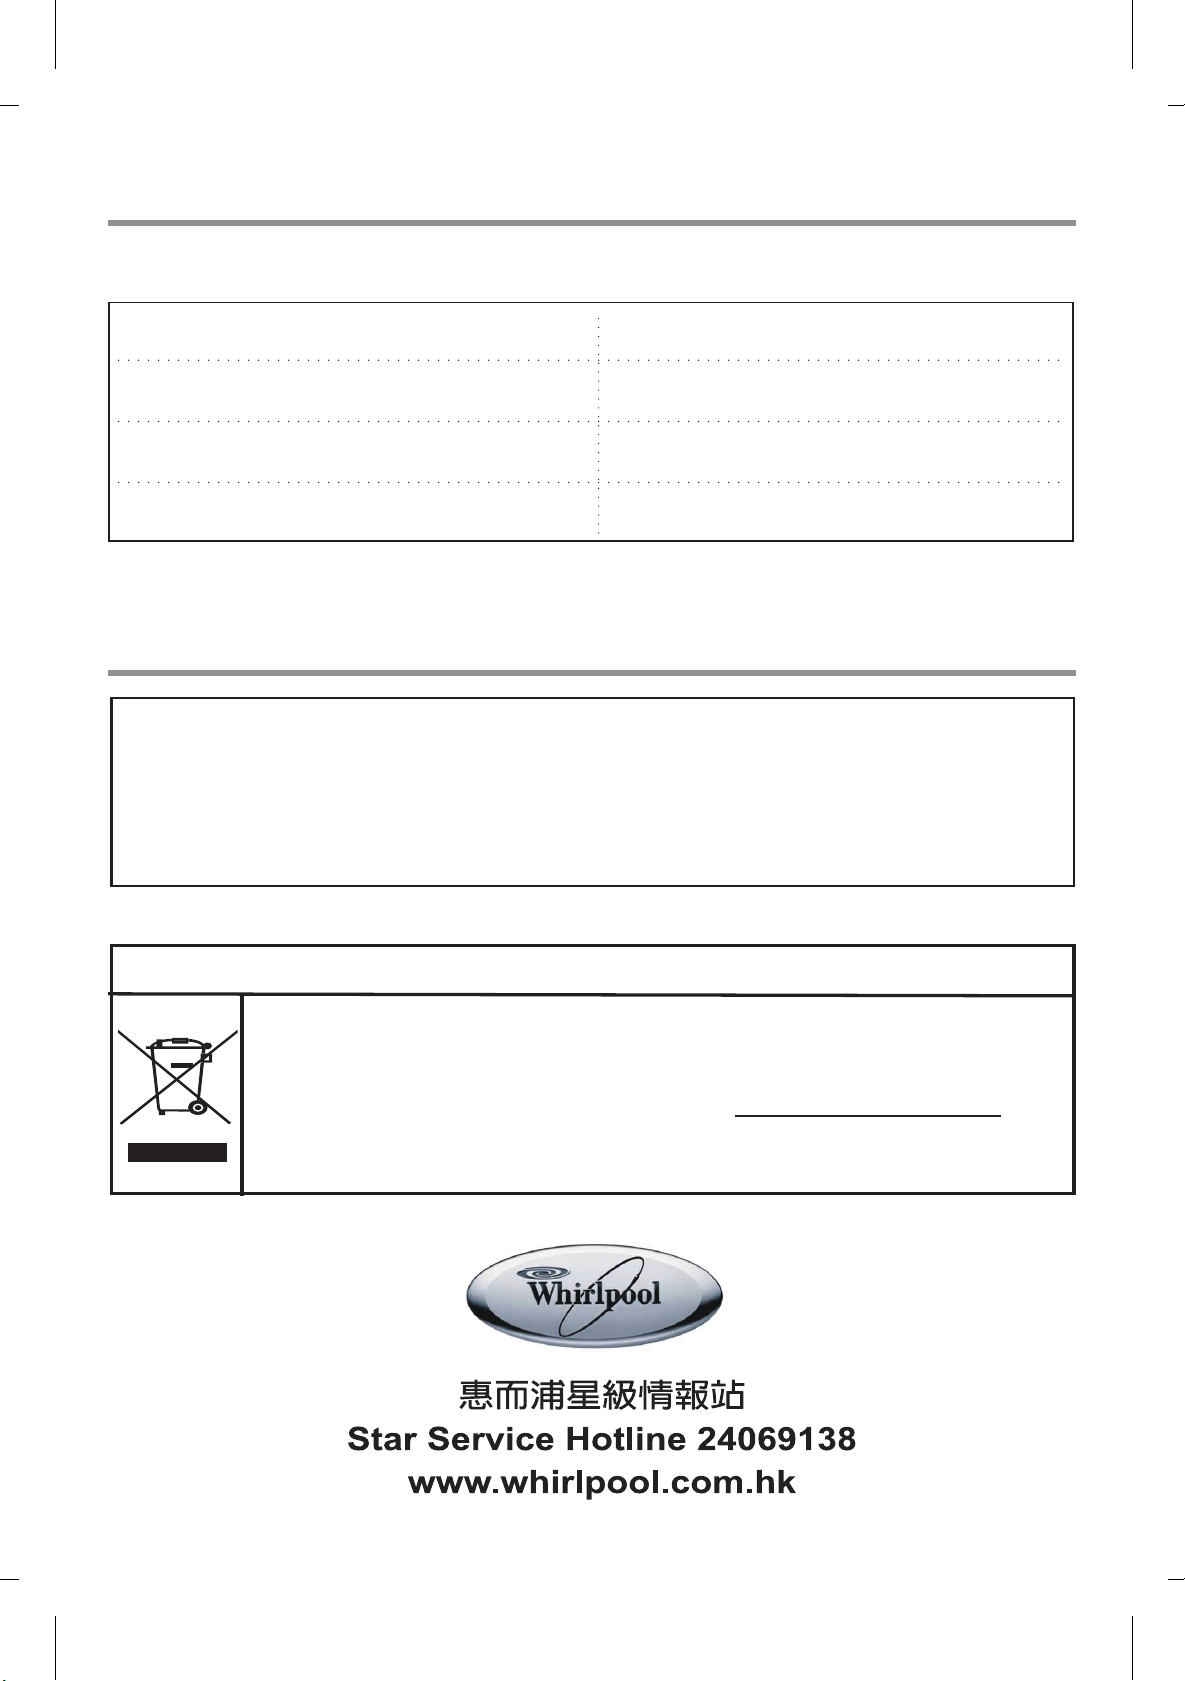
規格
當插上電源插頭時,電路會自動運作,約耗用2伏特的電量。
電量
瓦特 (超強/強/標準/低)
外觀尺寸
產品重量
配件
・AP688: 3合1濾網
型號: APF003H
・AP688 活性炭濾網
型號: APF002C
220-240V 50Hz
100/40/30/20 W
410 (闊) x 220 (深) x 583(高) 毫米
7.6 Kg
請在指定的惠而浦零件部購買
電話: 2406 3861 / 2406 3862
本產品的正確棄置方法
在歐盟國家,此標記表示本產品不能與其他家居廢物一同棄置。為防止未經
檢查的廢物有可能對環境或人體健康造成損害,請妥善把本產品循環再用,
以鼓勵原料的持續可用性。如欲回收舊產品,請把產品交回服務代理商。他
們會採取對環境不造成損害的方法,把產品循環再用。
18
Page 19
AP688
Page 20
Safety Precautions
Please read these safety precautions before using this machine to ensure correct operation.
The cautions shown here tell you how to use this unit safely and prevent harm to you and
other people. Furthermore, in order to differentiate between the magnitude and severity of
the precautions, the effects that may occur if the product is handled incorrectly are divided
into "Warnings" and "Cautions". In either case, all of these precautions are important to safety
and must be followed at all times.
May cause death or serious injury if you don't follow
WARNING
CAUTION
these instructions.
May cause injury or property damage if you don't follow
these instructions.
Actions prohibited
Do not modify the unit.
Disassembly and repairs
should only be carried out by
a qualified technician.
Do not touch the mains plug
or operate with wet hands.
Do not operate with damaged
power cord or plug or
loose electrical outlet.
R
Actions Recommended
WARNING
Unplug before cleaning,
inspecting or moving the unit.
Always grip the mains plug
when unplugging.
Do not use mains voltage other
than that specified. Do not
exceed the voltage specified for
the mains and the wiring.
Do not stop the unit from
operating by pulling out the
power plug from the electrical
outlet.
Do not shorten, damage or
process the power cord,
or use an extension cord.
Do not place near
a heat source.
Check that there is no dust
R
adhering to the power plug,
and insert it securely into the
electrical outlet so that it is
not loose.
Do not insert your fingers or
any other objects into the air
outlet.
2
Page 21
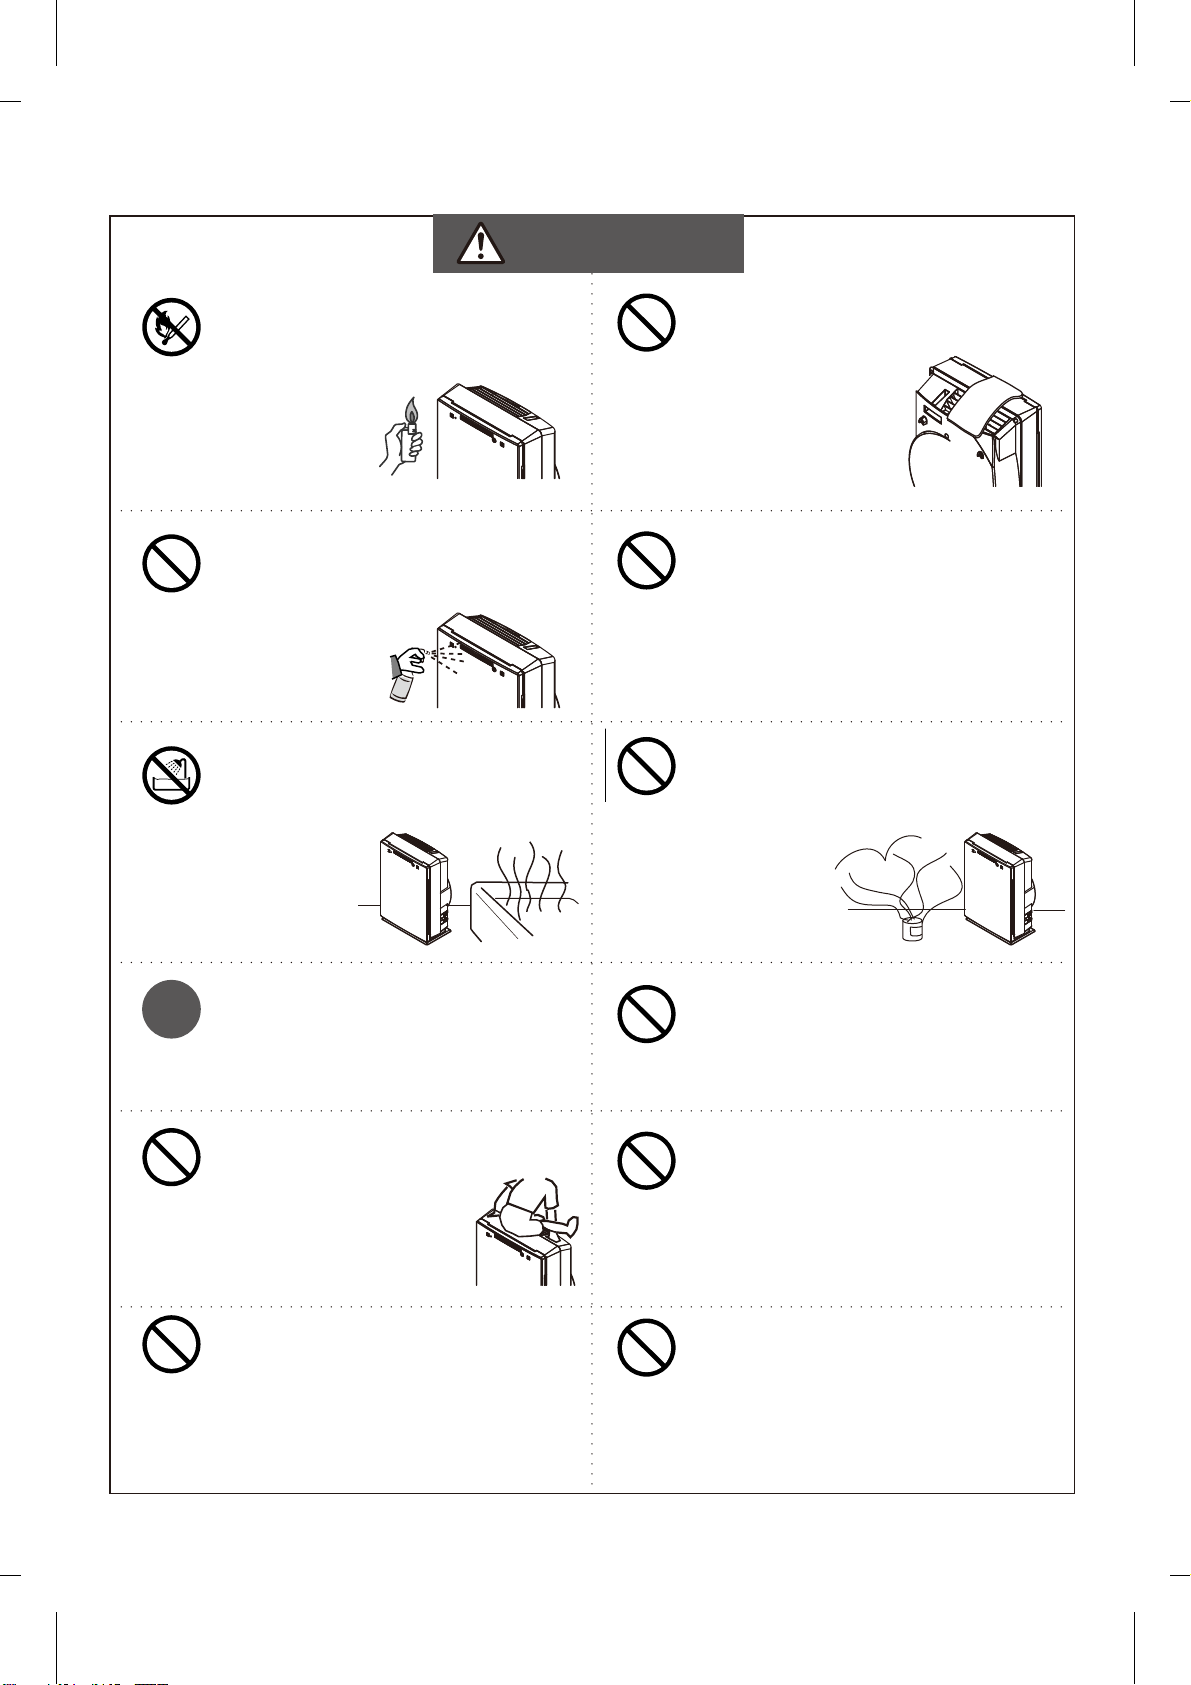
CAUTION
Do not expose to naked
flame, such as cigarettes.
Do not clean with petrol or
thinner or apply insecticide.
Do not use in wet places
such as the
bathroom.
Do not cover the air inlet or
outlet.
Do not use in the vicinity of
flammable or corrosive gases
or metal dust.
Do not operate in the vicinity
of smoke-producing
insecticide
machines.
This unit cannot eliminate
R
carbon monoxide. So if a fire
is lit in the same room,
ensure proper ventilation.
Do not sit on the unit.
Do not wash the unit with
water.
Do not place objects
containing water such as
vases on top of the unit.
Do not use in places where
chemicals may be drawn in.
(such as hospitals, factories,
laboratories and salons)
Do not mount high on wall
or shelf.
3
Page 22
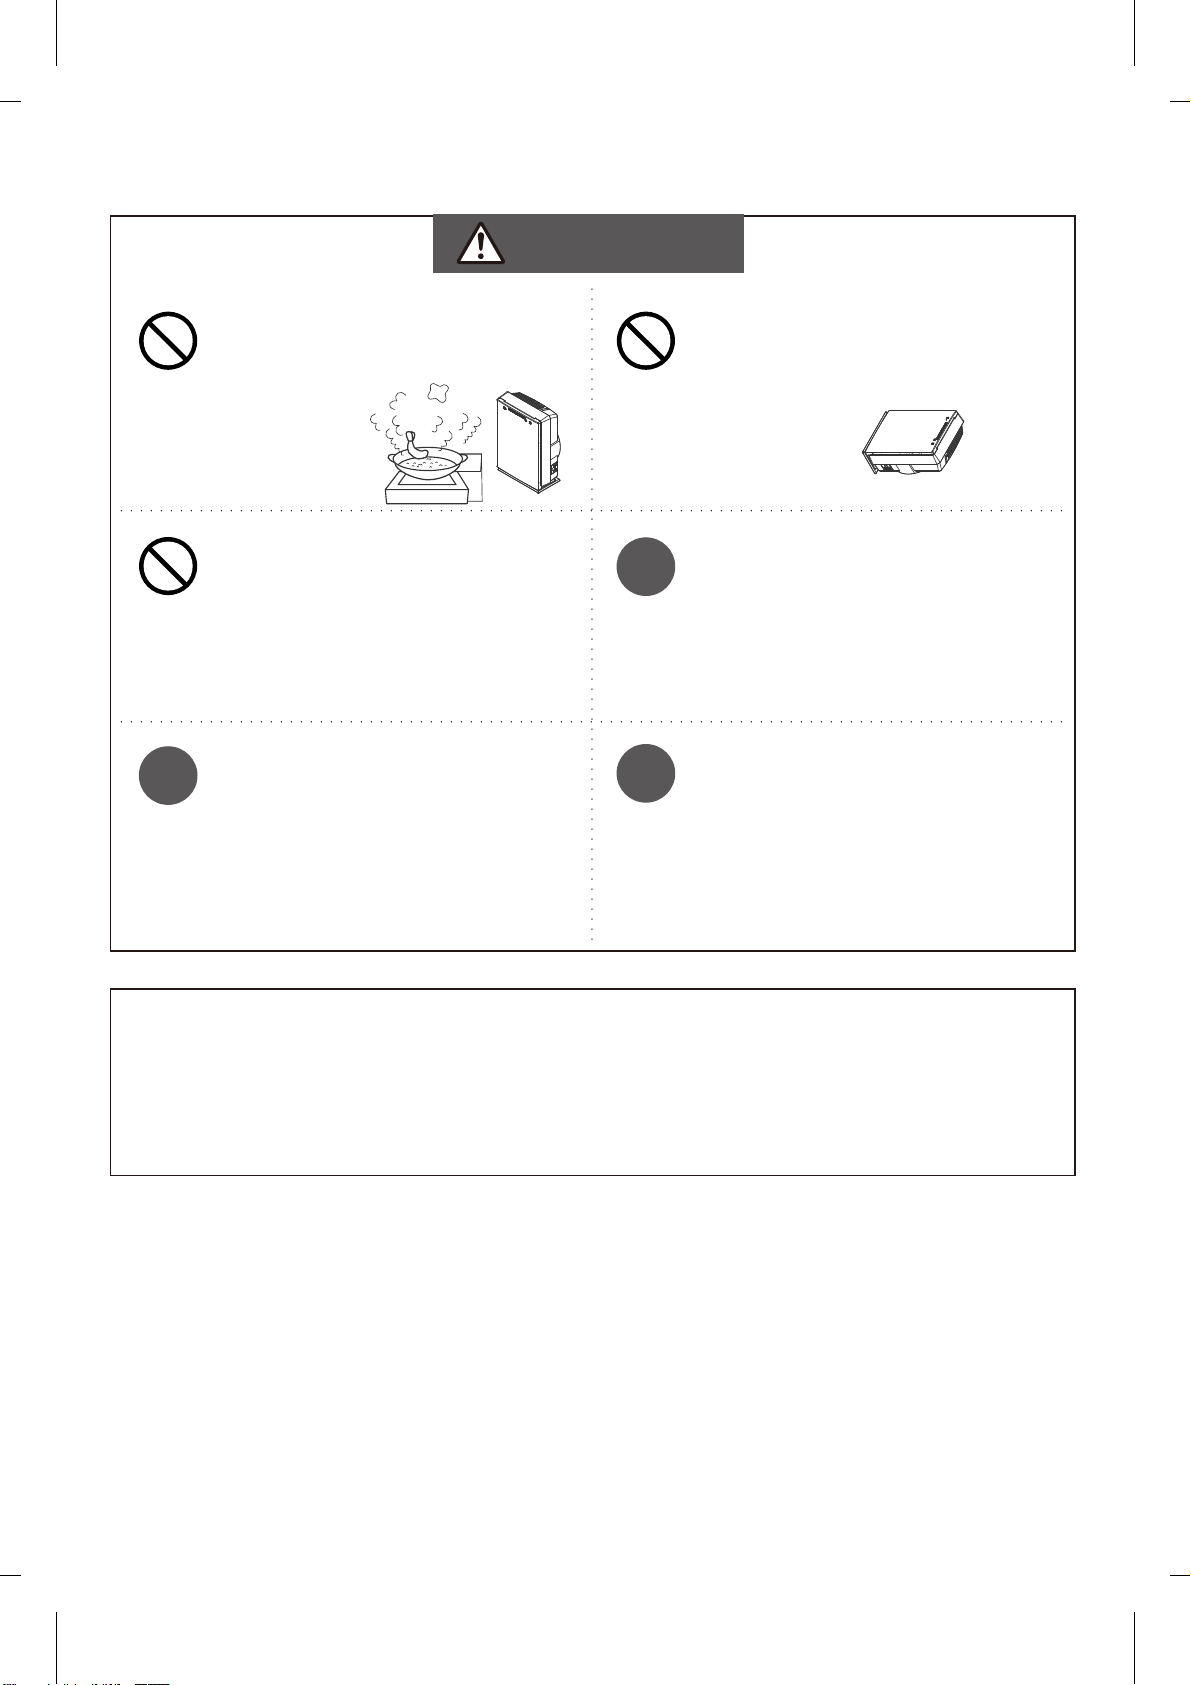
CAUTION
Do not expose to oily
vapours.
The machine must not be
allowed to ingest humidifier
steam.
R
Keep the remote in a safe
place out of the reach of
children. It contains
small parts that may cause
choking.
Do not use in an unstable
position where unit may tilt
or fall over.
R
R
If the power cable is
damaged, it must be replaced
by the manufacturer, their
service agent or other
qualified technicians in order
to prevent hazards.
If the unit will not be used
for a long time, always
unplug the power plug from
the electrical outlet.
The appliance is not to be used by children or persons with reduced physical,
sensory or mental capabilities, or lack of experience and knowledge, unless
they have been given supervision or instruction.
Children should be supervised to ensure that they do not play with the appliance.
4
Page 23
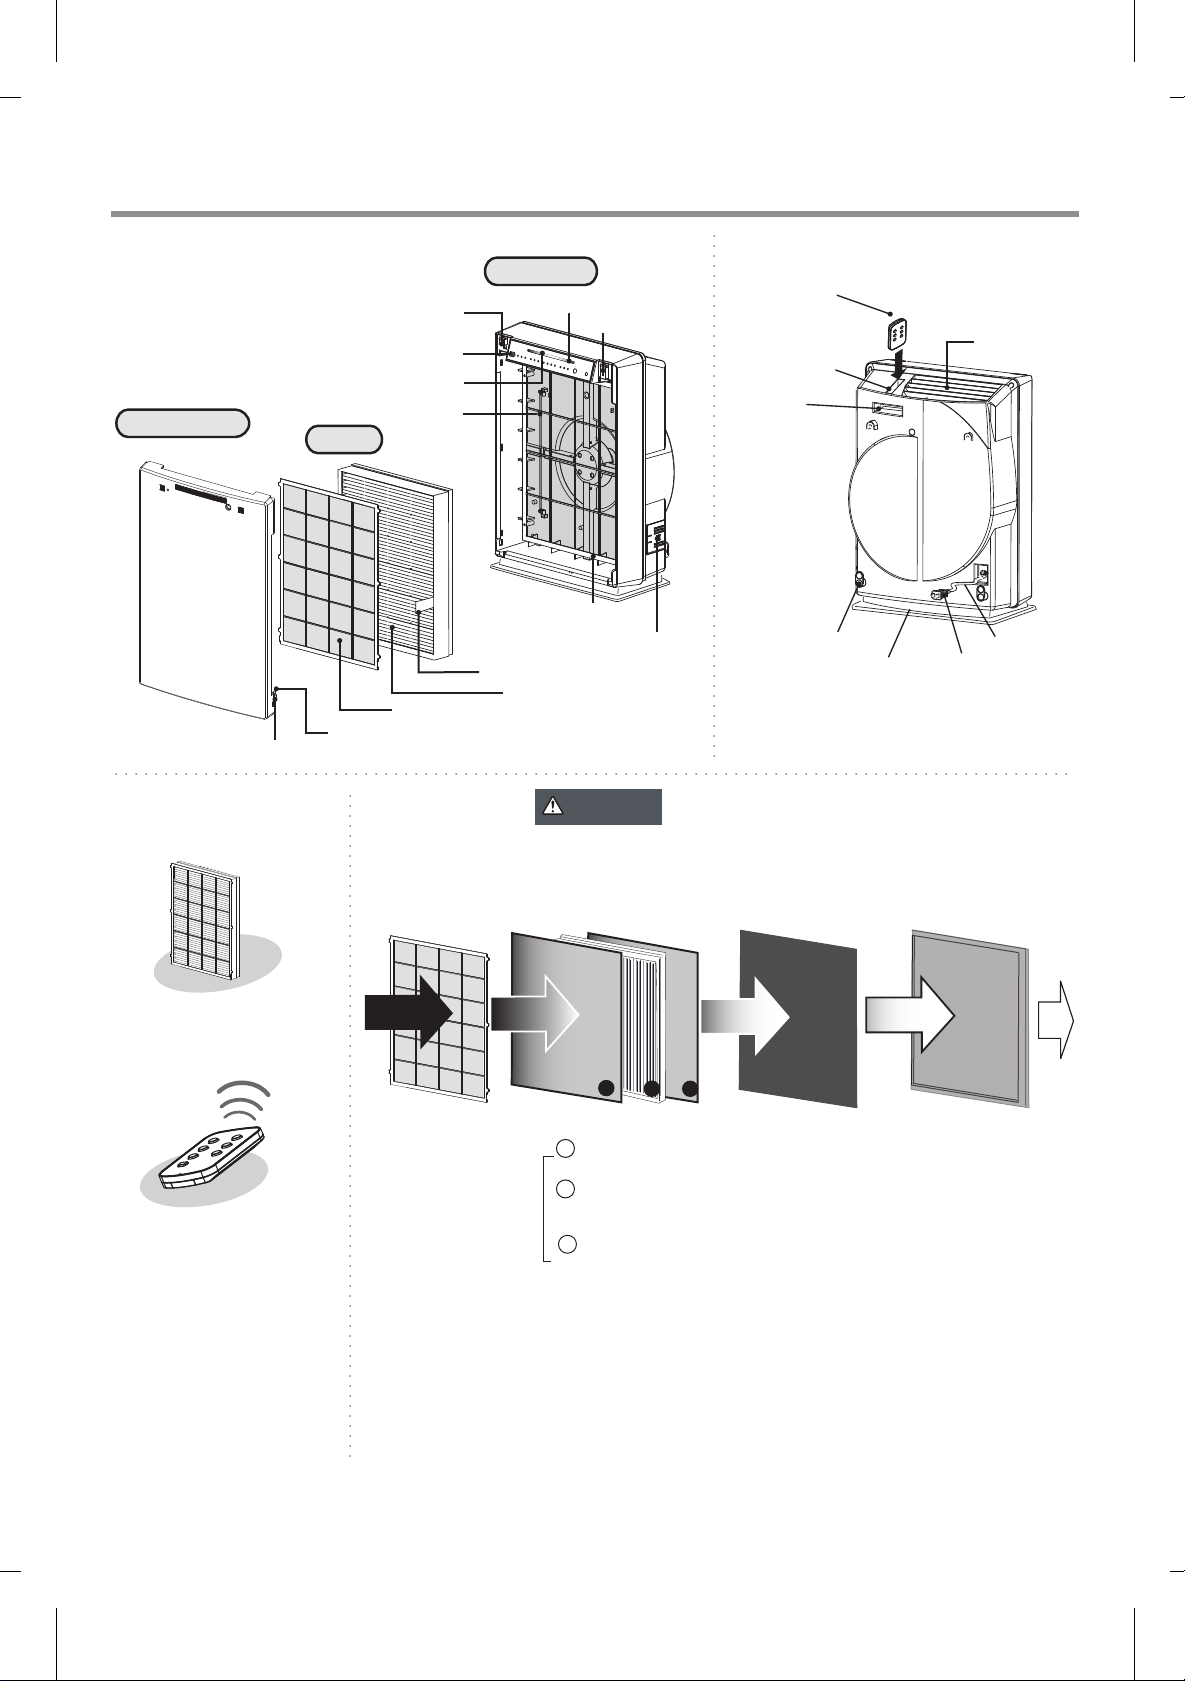
Parts and Terms
■Front ■Back
Front Cover
Finger piece
Sensor sensibility switch
Gas sensor
Cleanness level lamp
UV light
Filter
Pre-filter
Hook
Main Unit
Operation panel
Photocatalyst
filter
Dust sensor
Belt
3-in-1 filter
Safety switch
Remote control
Remote
control
holder
Cord holder
Base
Air outlet
Power cord
Plug
Filter
Remote
Please remove the transparent
sheet when using.
■Filters■Accessories
Can Clean Pre-filter
(Do not need to be
changed)
To remove rough
particles like hairs
and visible dust.
CAUTION
1
3-in-1 Filter
1 Nano-silver filter
suppresses germ activity.
Remove plastic bag of filter
before use.
2 3
Charcoal Filter
*Eliminates unpleasant
smells.
2 HEPA filter
*HEPA (High Efficiency Particulate Air);
removes 99.97% airborne particles. (at 0.3 micron)
3 NS deodorizing filter
*eliminates animal and food smells.
Photocatalyst filter
(Do not need to be changed)
Uses UV light to catch
germs,microbes and
bacilli and curb viruses.
5
Page 24
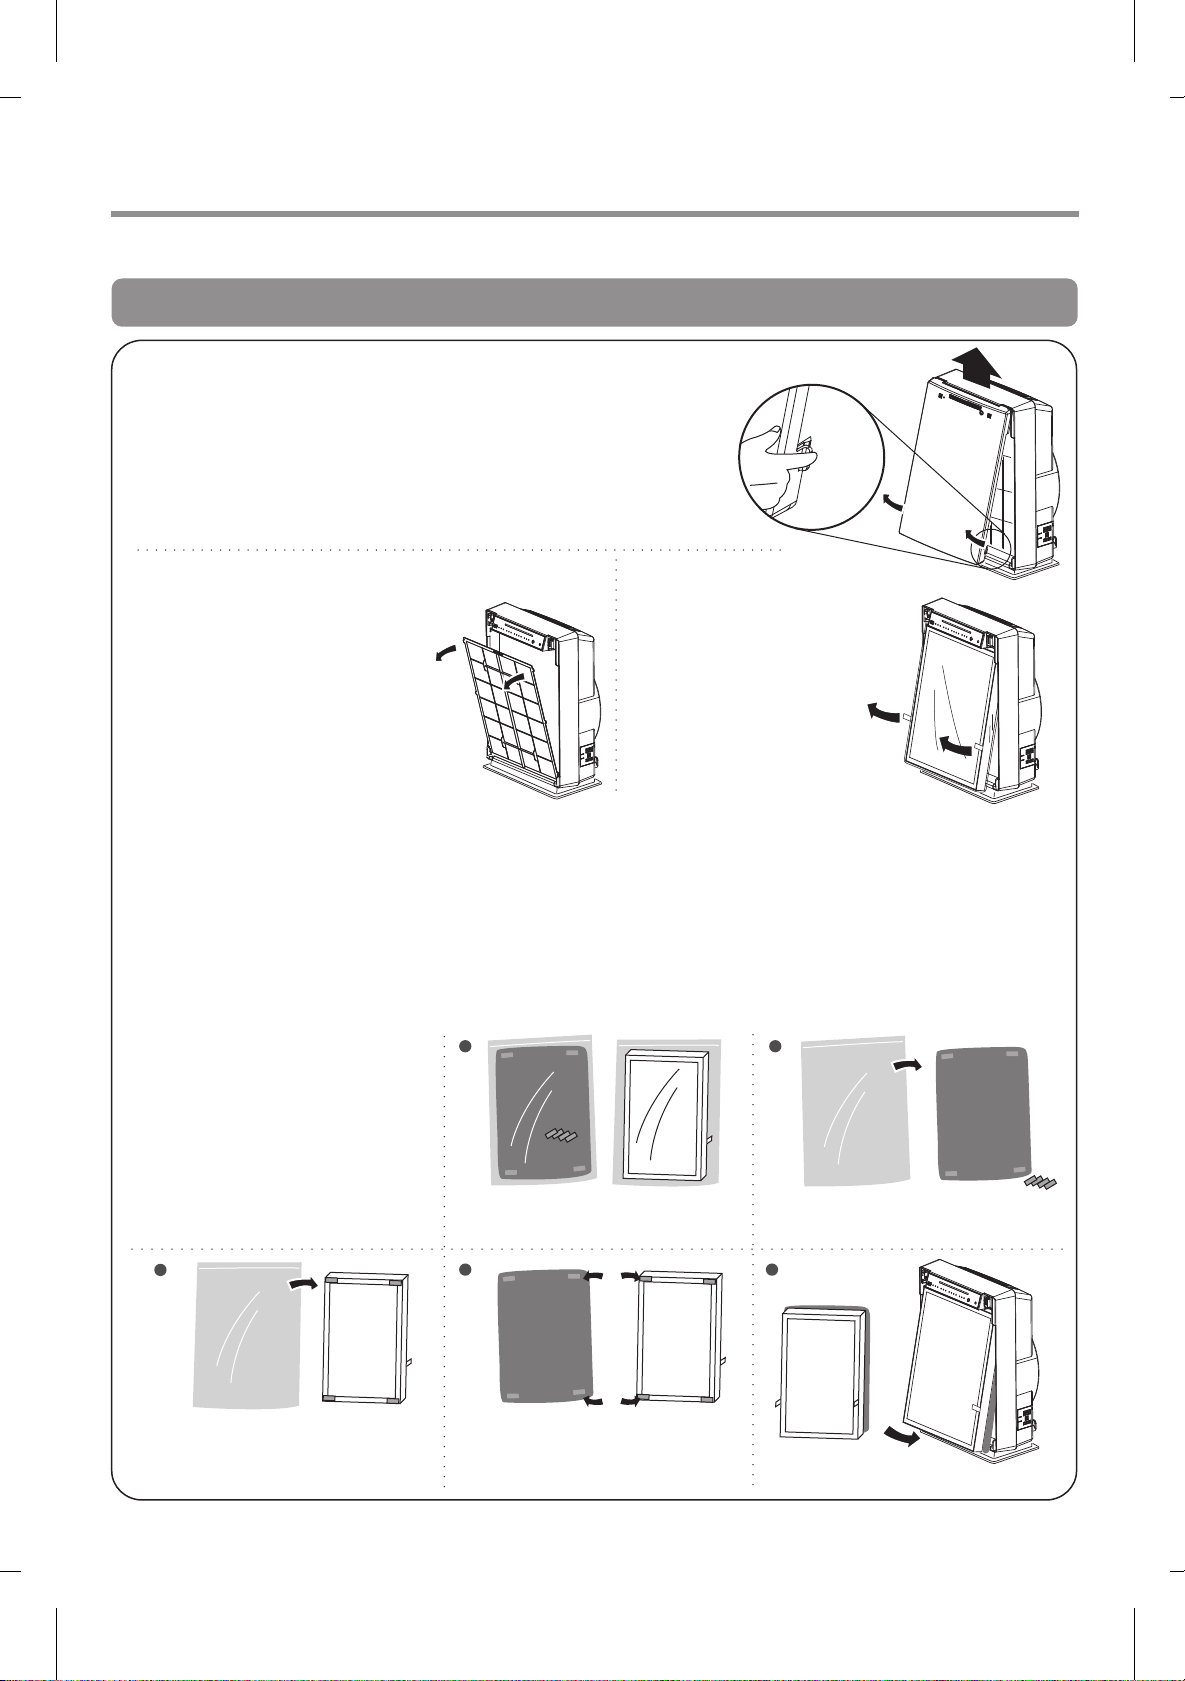
Preparation Before Using
※Before using be sure to remove the 3-in-1 filter from its bag
Unplug the unit before installing the filter
1. Removing the 3-in-1 filter
*Place the unit in a stable location.
1. To remove front coverDepress the finger
pieces at bottom of cover to release it,
then pull to remove.
2. Removing the pre-filterDetach
3.Remove 3-in-1 filter bag.
the 6 claws on both
sides from holes in
main unit.
2. Installing the 3-in-1 filter
1. Position with front facing outwards. Do not reverse or deform it.
2. Installing the pre-filter. Insert the claws on both sides into holes in
main unit.
3. Installing the front cover. Hook both sides to top of front cover on to
main body, then fasten the hooks on bottom.
*The unit does not operate without its front cover.
3. Instructions for use of 3-in-in Filter with Charcoal Filter
*
Please remove the
plastic of the filter
before use.
*
You can choose whether
use the 3-in-1 Filter only
or together with the
Charcoal Filter.
1 2
Back
In Charcoal Filter package, there is filter with
single-sided viscose tapes at the 4 corners and 4
separate single-sided viscose tapes.
3
back
if you wish to use 3-in-1 Filter with the Charcoal
Filter, please stick the 4 single-sided viscose tapes
to the 4 corners at the back of 3-in-1 filter.
4 5
back
After adhering, stick the 3-in-1 filter with
Charcoal Filter.
6
front
After assembling, you can
\install the filter into the main unit.
back
Page 25
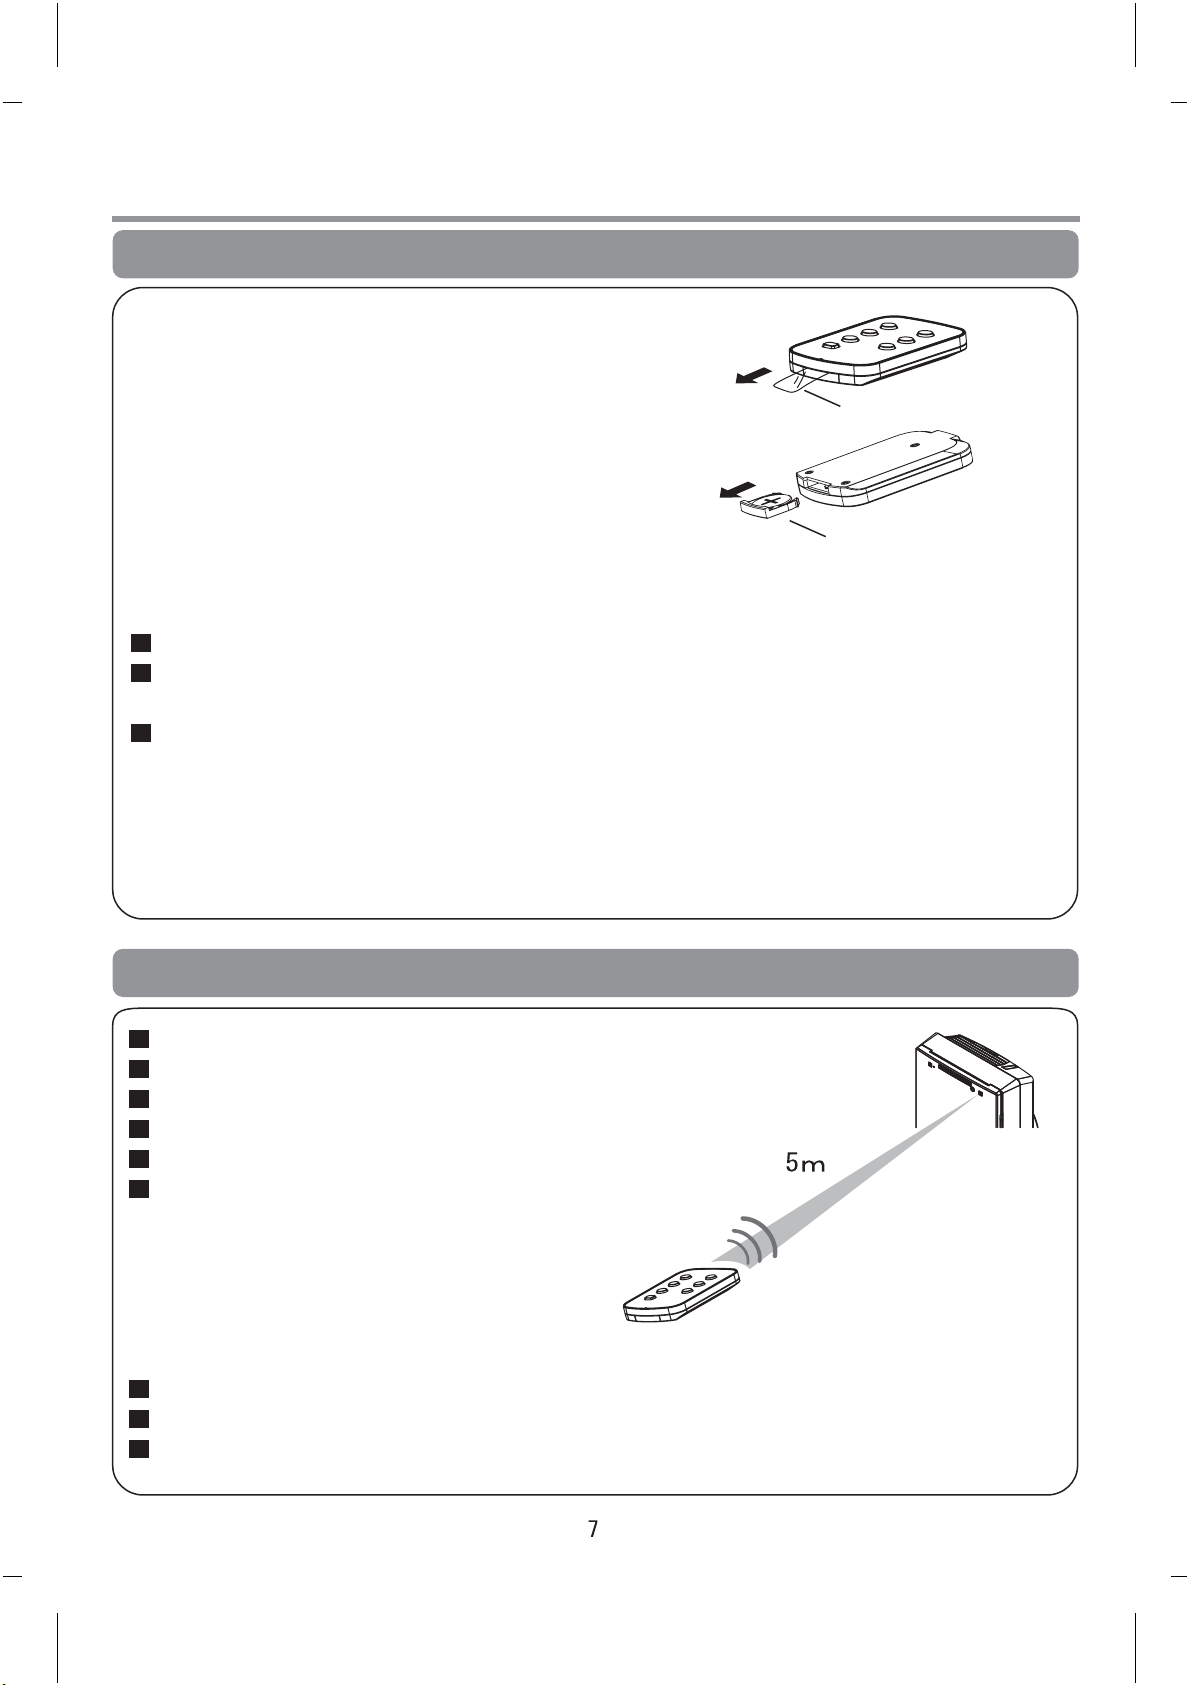
Installing remote control battery
Remove the transparent sheet protecting battery power.
The battery is pre-installed in the remote control.
Transparent sheet
Replacing battery
1. Remove battery holder from back of remote.
2. Insert new battery correct side up.
3. Replace cover.
Battery+pole must
align with mark on holder
About the battery
One CR2032 battery is required
Battery lifetime is about six months. It needs changing when remote signal fails.
As the battery will have been in stock for some time, its life may be less for first use.
Incorrect handling of battery may cause electric shock, fire, fluid leakage, heat or
explosion.
Do not short-circuit, disassemble, heat it or burn it.
Remove when not in use for long periods.
Using the remote control
Aim the remote at the main unit.
Signal range is about5metres (directly ahead).
Ensure there is no obstacle obstructing the signal.
Signal is sent when key is released.
Unit beeps when signal is received.
If there isalight in the way, range may be shorter.
To prevent damage:
Do not jolt.
Do not immerse in water.
Do not place near heat or expose to direct sunlight.
Receiver
Transmitter
Page 26
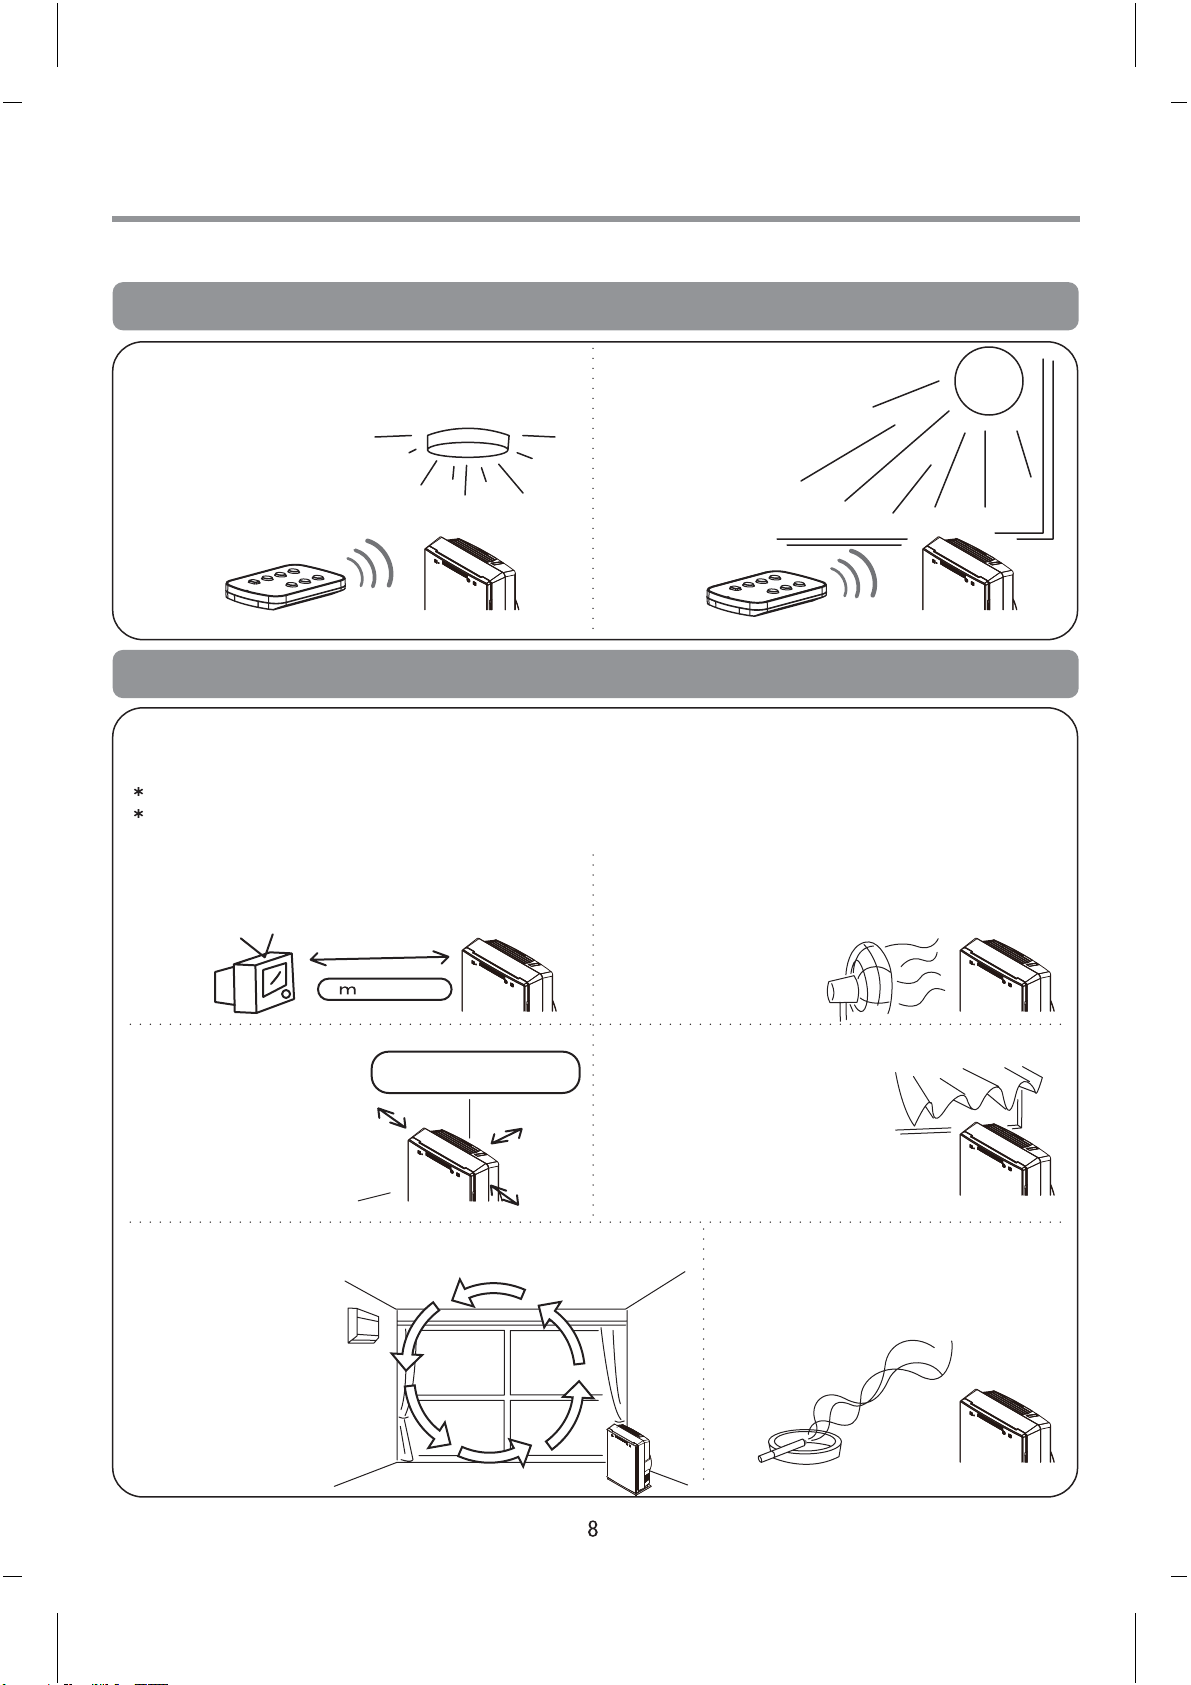
Installation
Can be put on the floor or the desk.
Do not use the remote control in the following places
Rooms with fluorescent light,
especially inverter typeThis
may cause remote
failure. Keep away
Rooms exposed to
direct sunlight.This
may cause remote
failure.
from the light or try
a different direction.
Installation hints
Set the unit in line with air quality required.
In rooms with small dust and smells such as smoke-install over 1m above floor.
In rooms with larger dust, such as pollen - install near floor.
Keep more than1metre from television and
radio to prevent interference.
Avoid places with wind blowing on the sensor.
This may cause malfunction.
1 or more
Dust sensor is on
bottom right. Keep
away from walls
and furniture.
Chooseawell-ventilated place. Air conditioning, as
pictured at right,
improves ventilation
and enhances dust
sensor performance.
Leave at least 10 cm
from walls
Good ventilation
Do not place near curtains,
which may be soiled or
cause malfunction.
Avoid placing in the vicinity of
smokers, since such fumes quickly
disable the unit.
Page 27
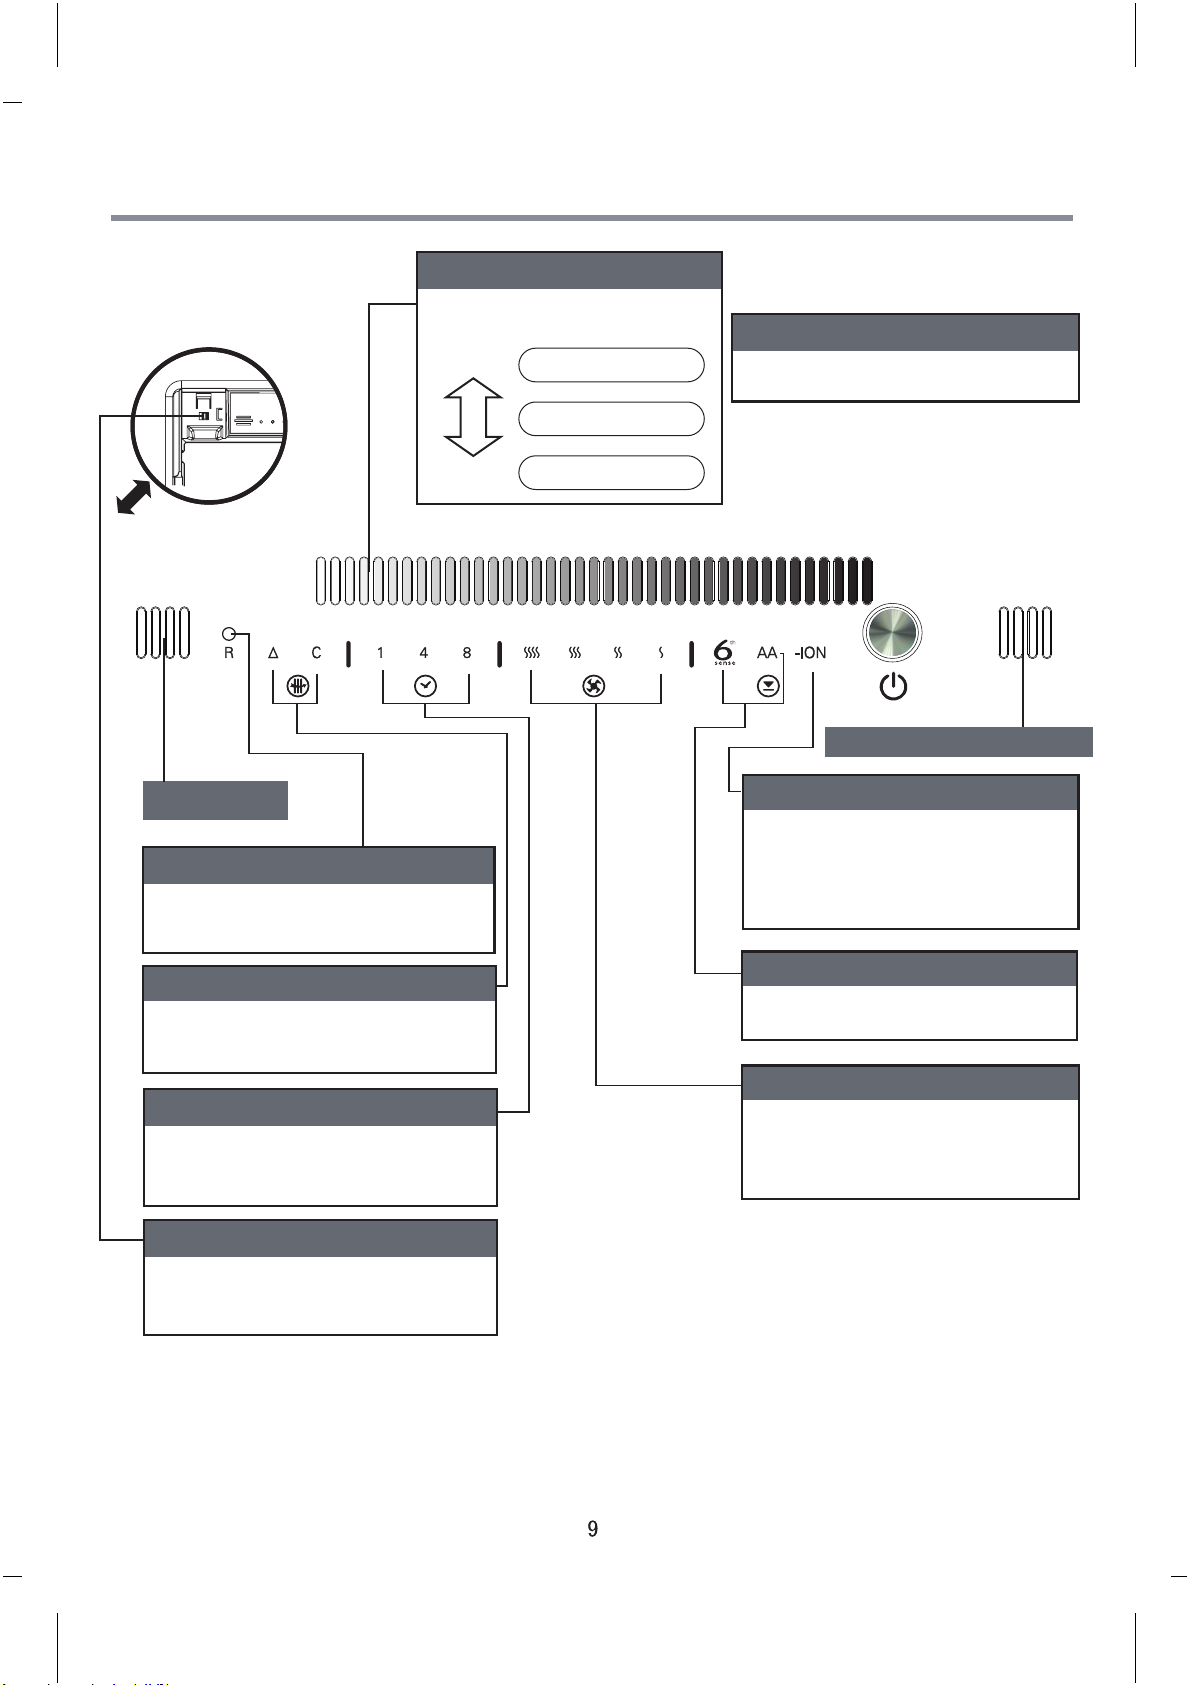
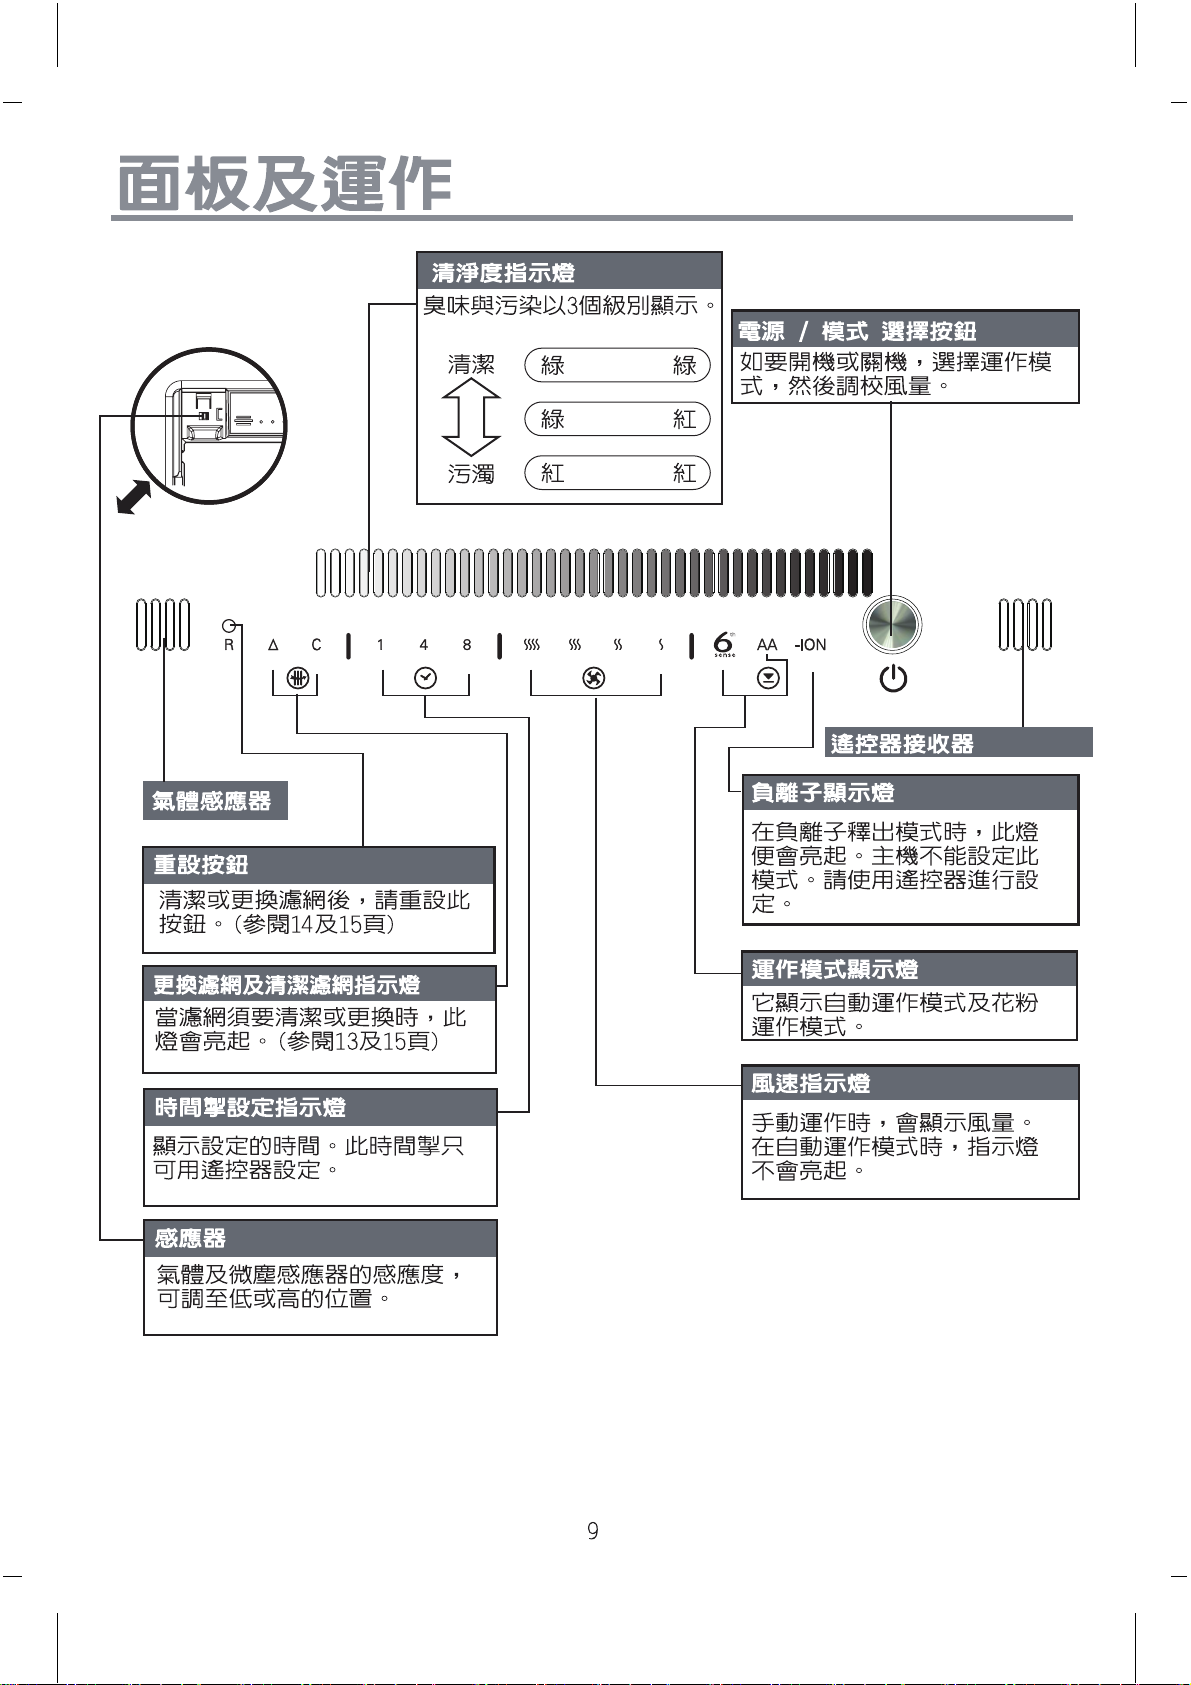
Panel and operation
Cleanness light
Smells and dirt are shown
in3levels
Clean
Green Green
Green Red
Power/mode key
To turn on and off, select operating
mode and change airflow.
Dirty
A
ir Quality
Gas sensor
Reset key (inside)
Reset after cleaning or after changing
filter (see page 14 and 15)
Filter change and cleaning light
Illuminates if filter needs cleaning or
changing (see pages 13 and 15)
Red Red
Remote control receiver
Negative ion light
Illuminates in ion generation mode.
Can only be set with the remote
control.
Mode light
Shows 6th sense or AA mode
Timer light
Shows time settingCan only be set
with the remote control.
Sensor sensitivity switch
Gas and dust sensor sensitivity can
be switched between low and high.
Speed light
Airflow is shown for manual
operation, but not shown in
automatic.
Page 28
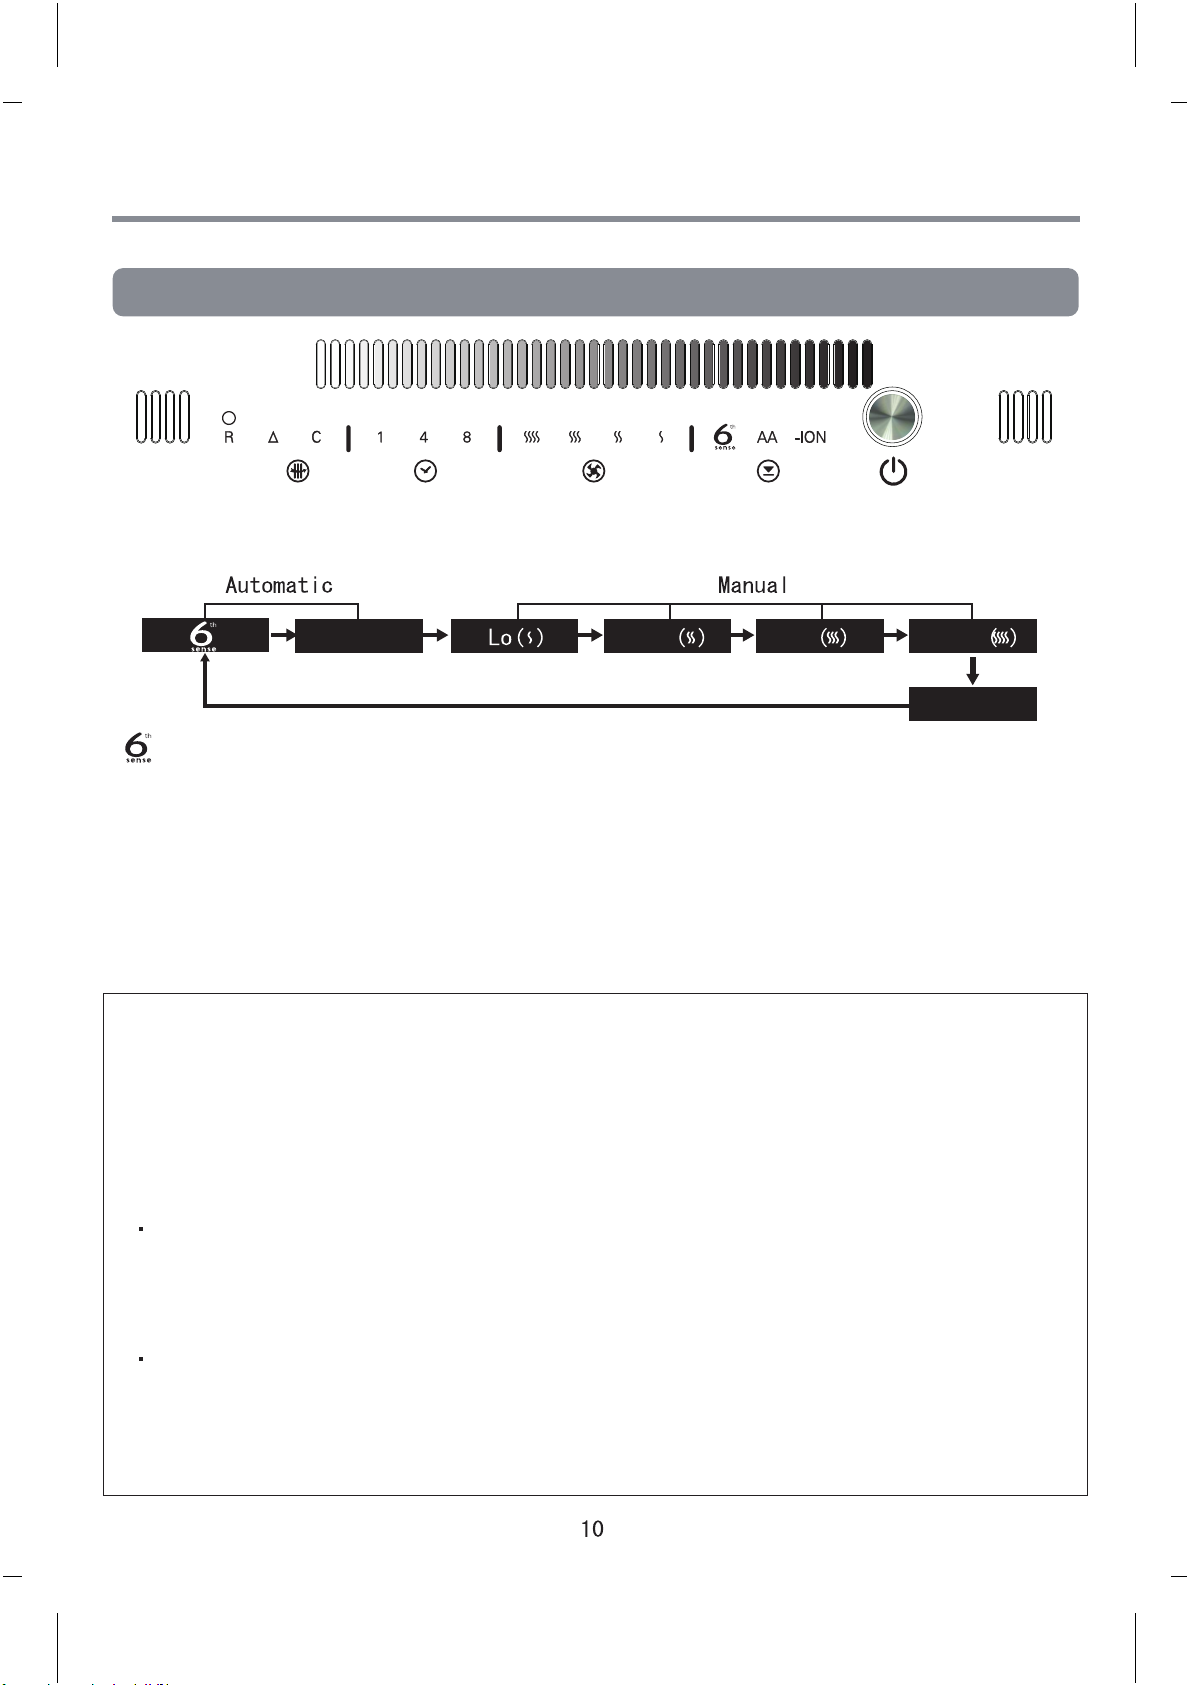
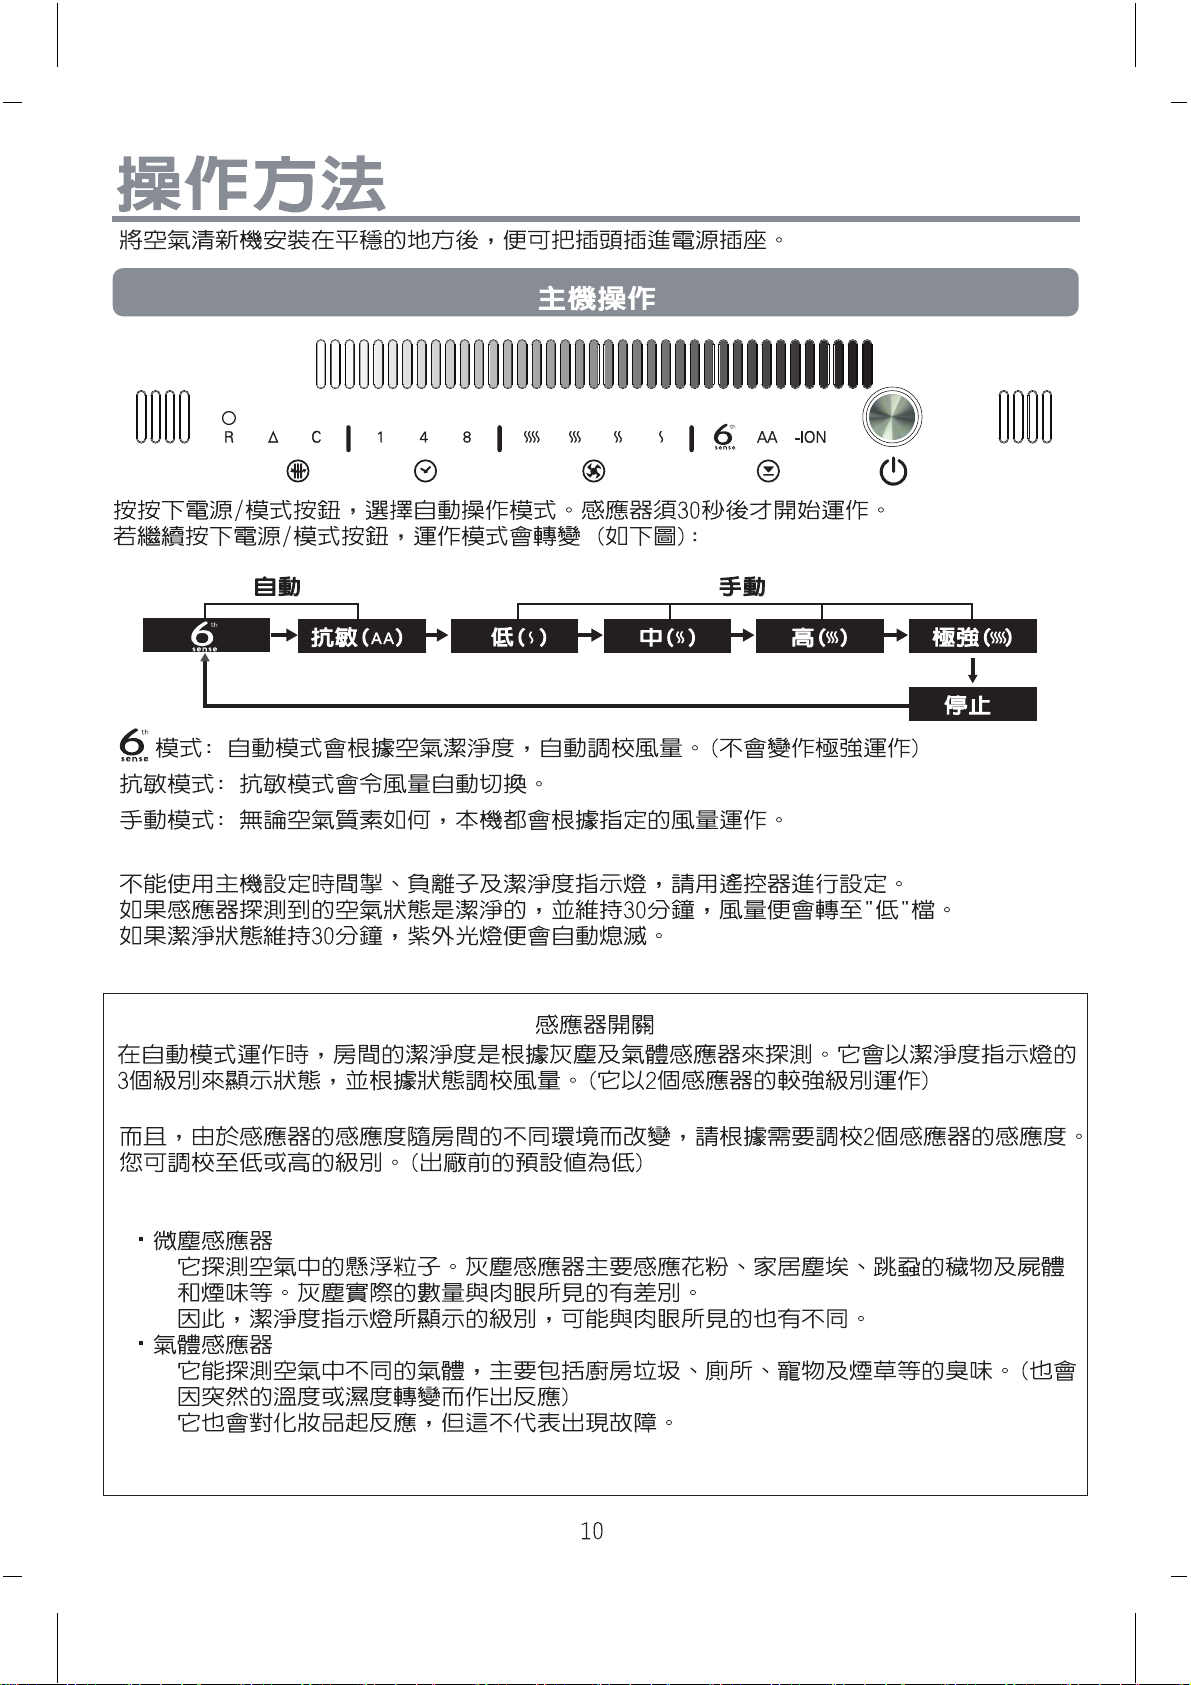
To Operate
Following stable installation, insert the mains plug.
Operation by the main unit
A
ir Quality
Press the power/mode key for automatic operation.
Sensors take about 30 seconds to start working.
Press the key again to change operation as follows:
Anti Allergy(AA)
mode: sets airflow according to air quality. (does not switch to turbo operation)
Anti Allergy (AA) mode: alternates airflow automatically.
Manual mode: runs at selected airflow irrespective of air quality.
Main unit cannot set timer, negative ions or cleanness level light. Use remote.
If sensor detects clean air quality for 30 minutes consecutively, 'Low' airflow is set and the
UV light extinguishes.
Mid Hi
Turbo
Stop
Sensor sensitivity switch
In auto mode the dust and gas sensors monitor air quality. These record quality in by the
3 stages of cleanness light and adjust airflow accordingly. (Unit operates at the higher of
the two readings)
Since sensor sensitivity varies according to the condition of the room, adjust sensors as
required between 'Lo' and 'Hi'
(Factory setting is 'Lo')
Dust sensor
Detects airborne particles such as pollen, domestic dust, tick bodies and droppings
and smoke.
Dust quantity differs from visible dust, so the cleanness level light indication may
appear different from that expected.
Gas sensor
Detects airborne gases such as kitchen rubbish, toilet, pet and smoke smells. (May
also react to rapid changes in temperature or humidity)
The sensor may react to, for example, makeup, but this does not cause failure of the
unit.
Page 29
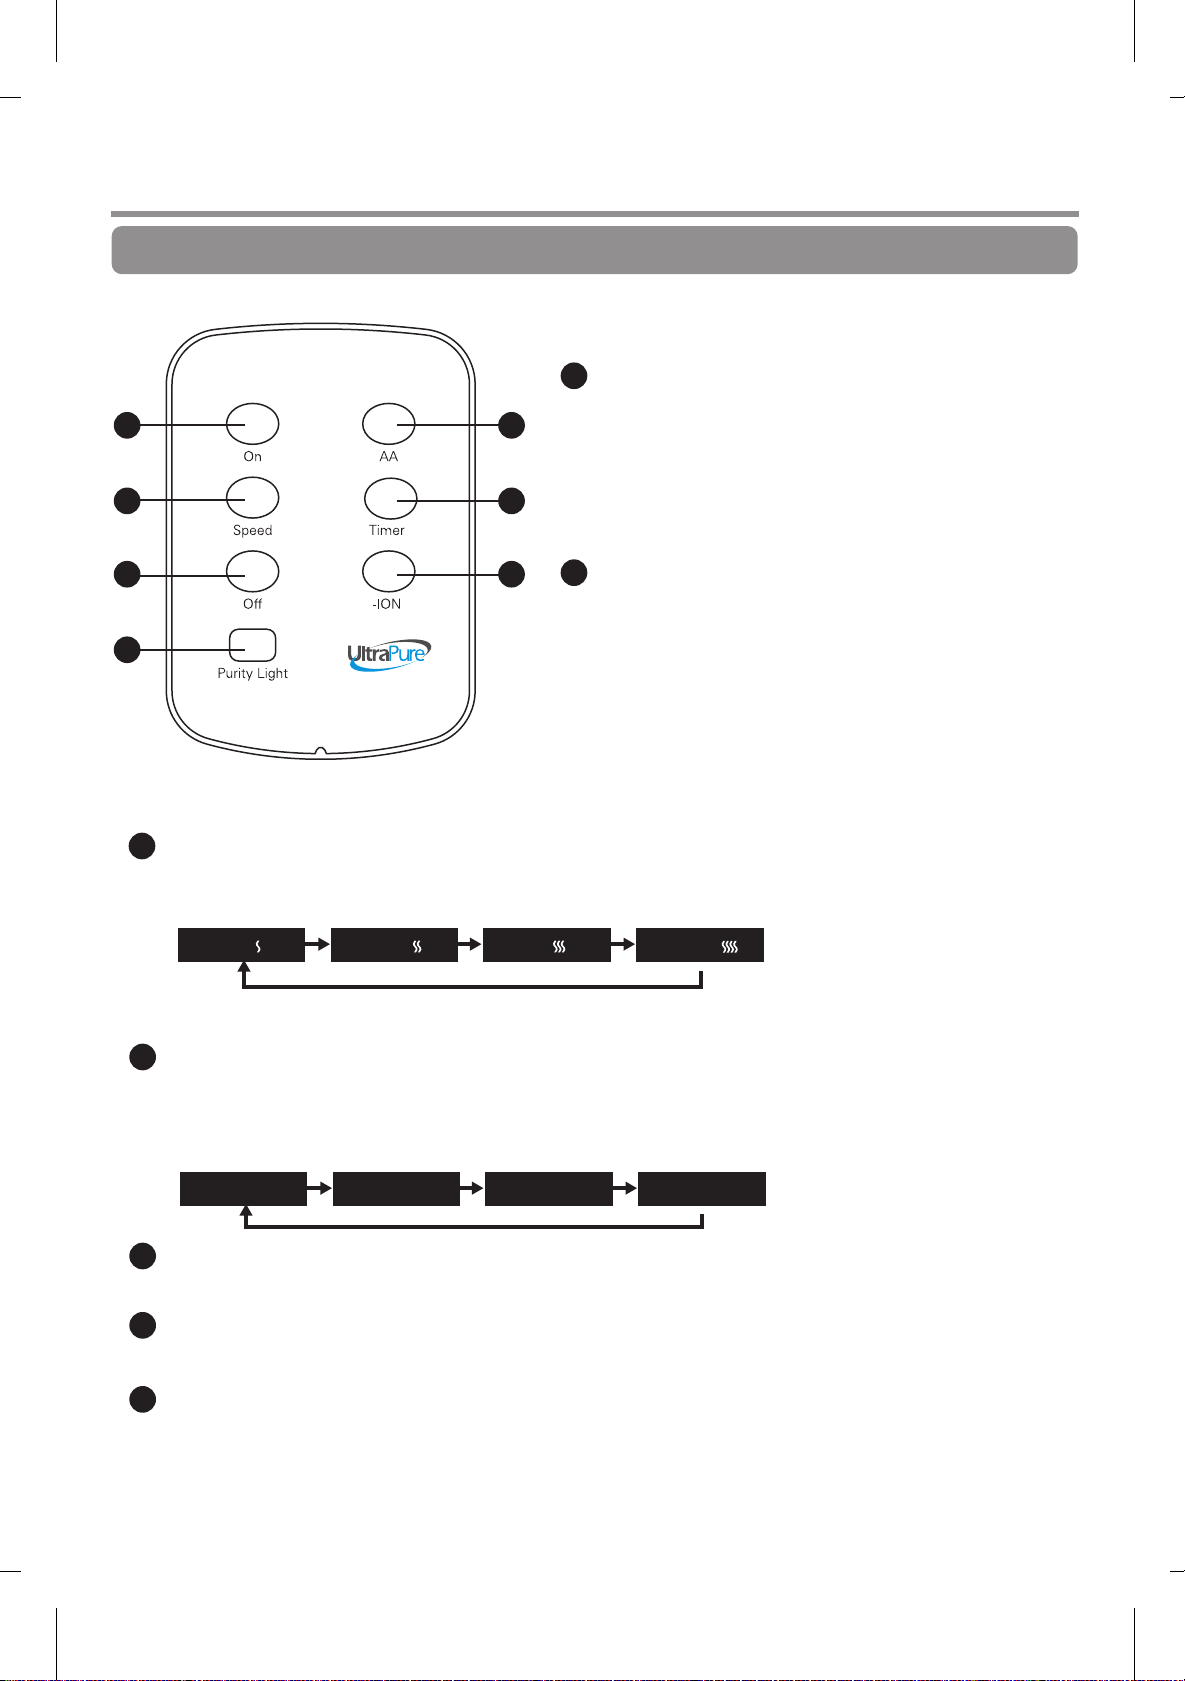
Operation with remote control
1
ON key
.Press to start automatic mode.
1 2
3 4
5 6
7
*The key must be pressed then released immediately.
.When first switching on, you will find the
cleanness level light flashes for 30 seconds
before display appears.
.If the main unit is set to manual, press this
key to change to automatic.
Anti ALLERGY (AA) key
2
. Press in automatic or manual mode to start
pollen operation.
3
SPEED key
.Press to switch airflow between 'Lo,' 'Mid,' 'Hi' and 'Turbo'.
Lo( )
.The selected airflow operates irrespective of air quality.
TIMER key
4
.Press to set the time when the machine is intended to stop. Choose between 1,
4 and 8 hours.
.Time changes each time key is pressed.
1hr 8hr Cancel
OFF key
5
.Press to stop the machine.
6
-ION key
. Switches negative ion generation on and off.
PURITY LIGHT
7
.switches cleanness level light on and off if necessary.
4hr
Turbo( )Mid( ) Hi( )
11
Page 30
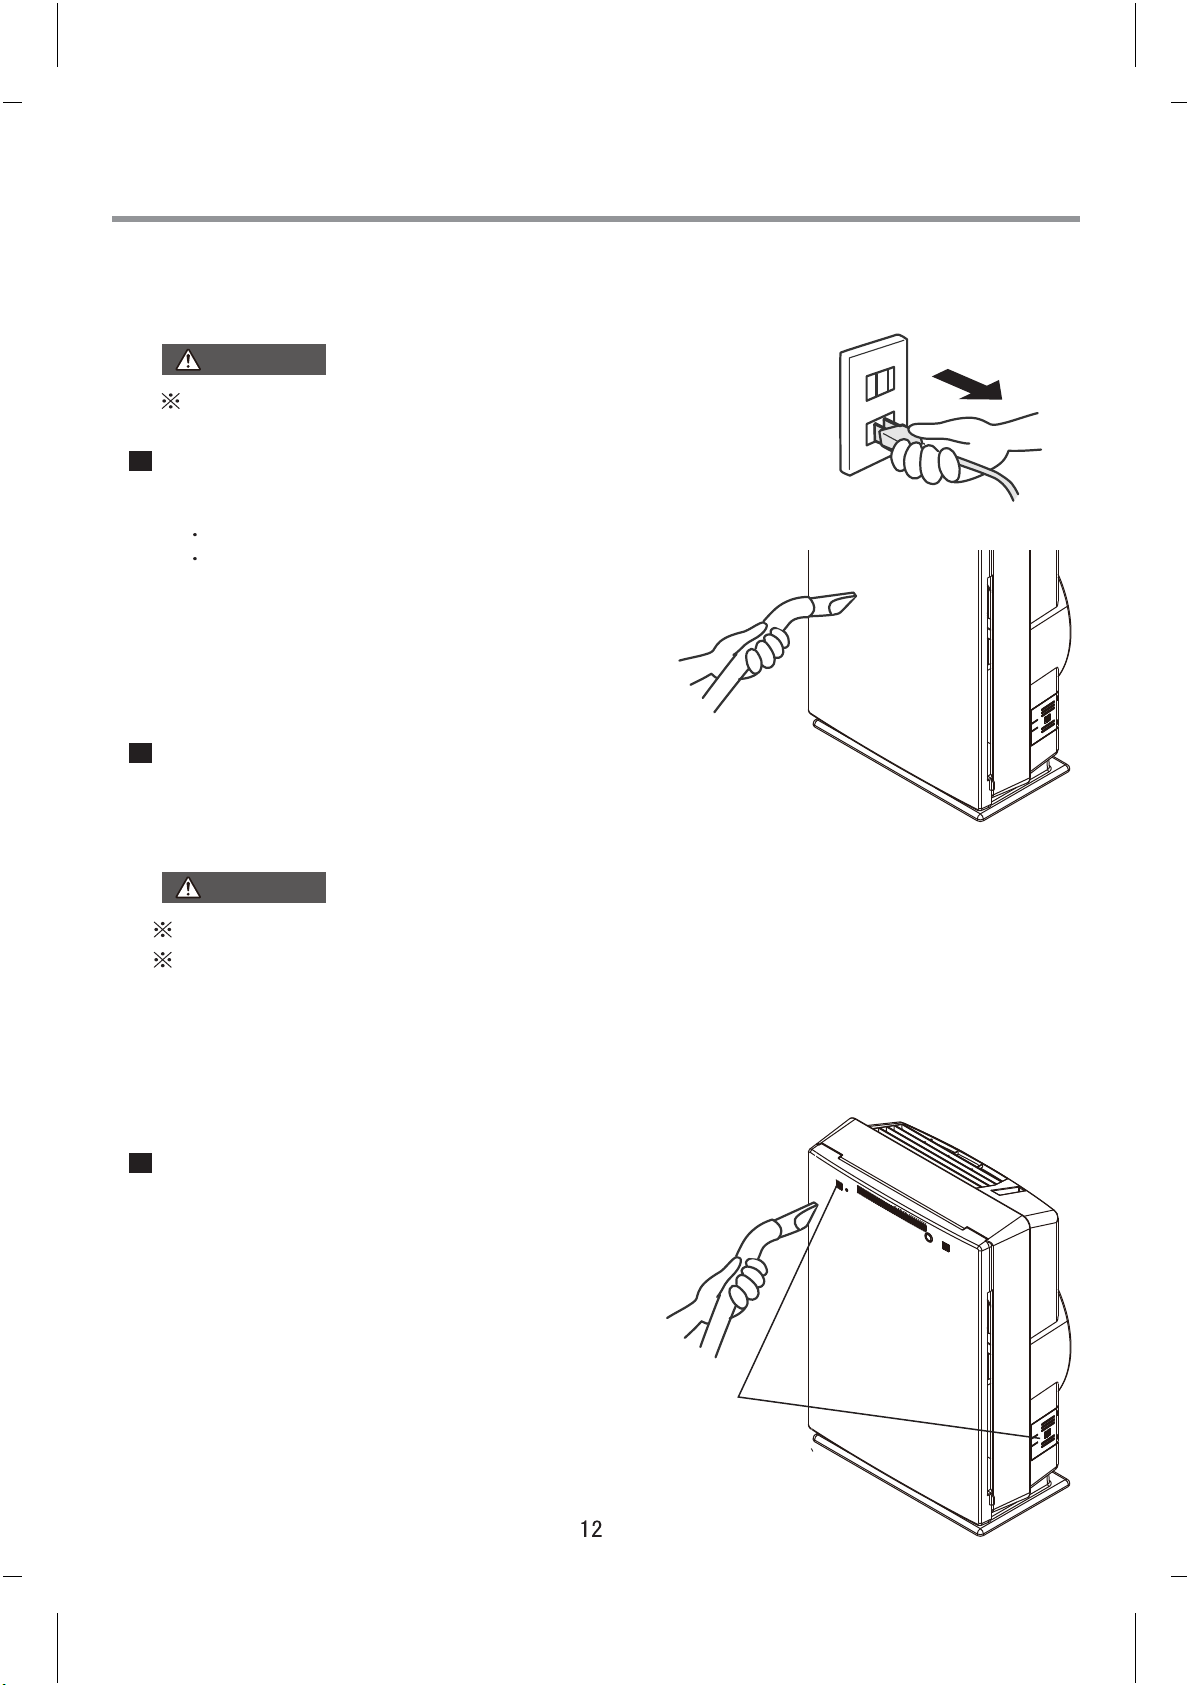
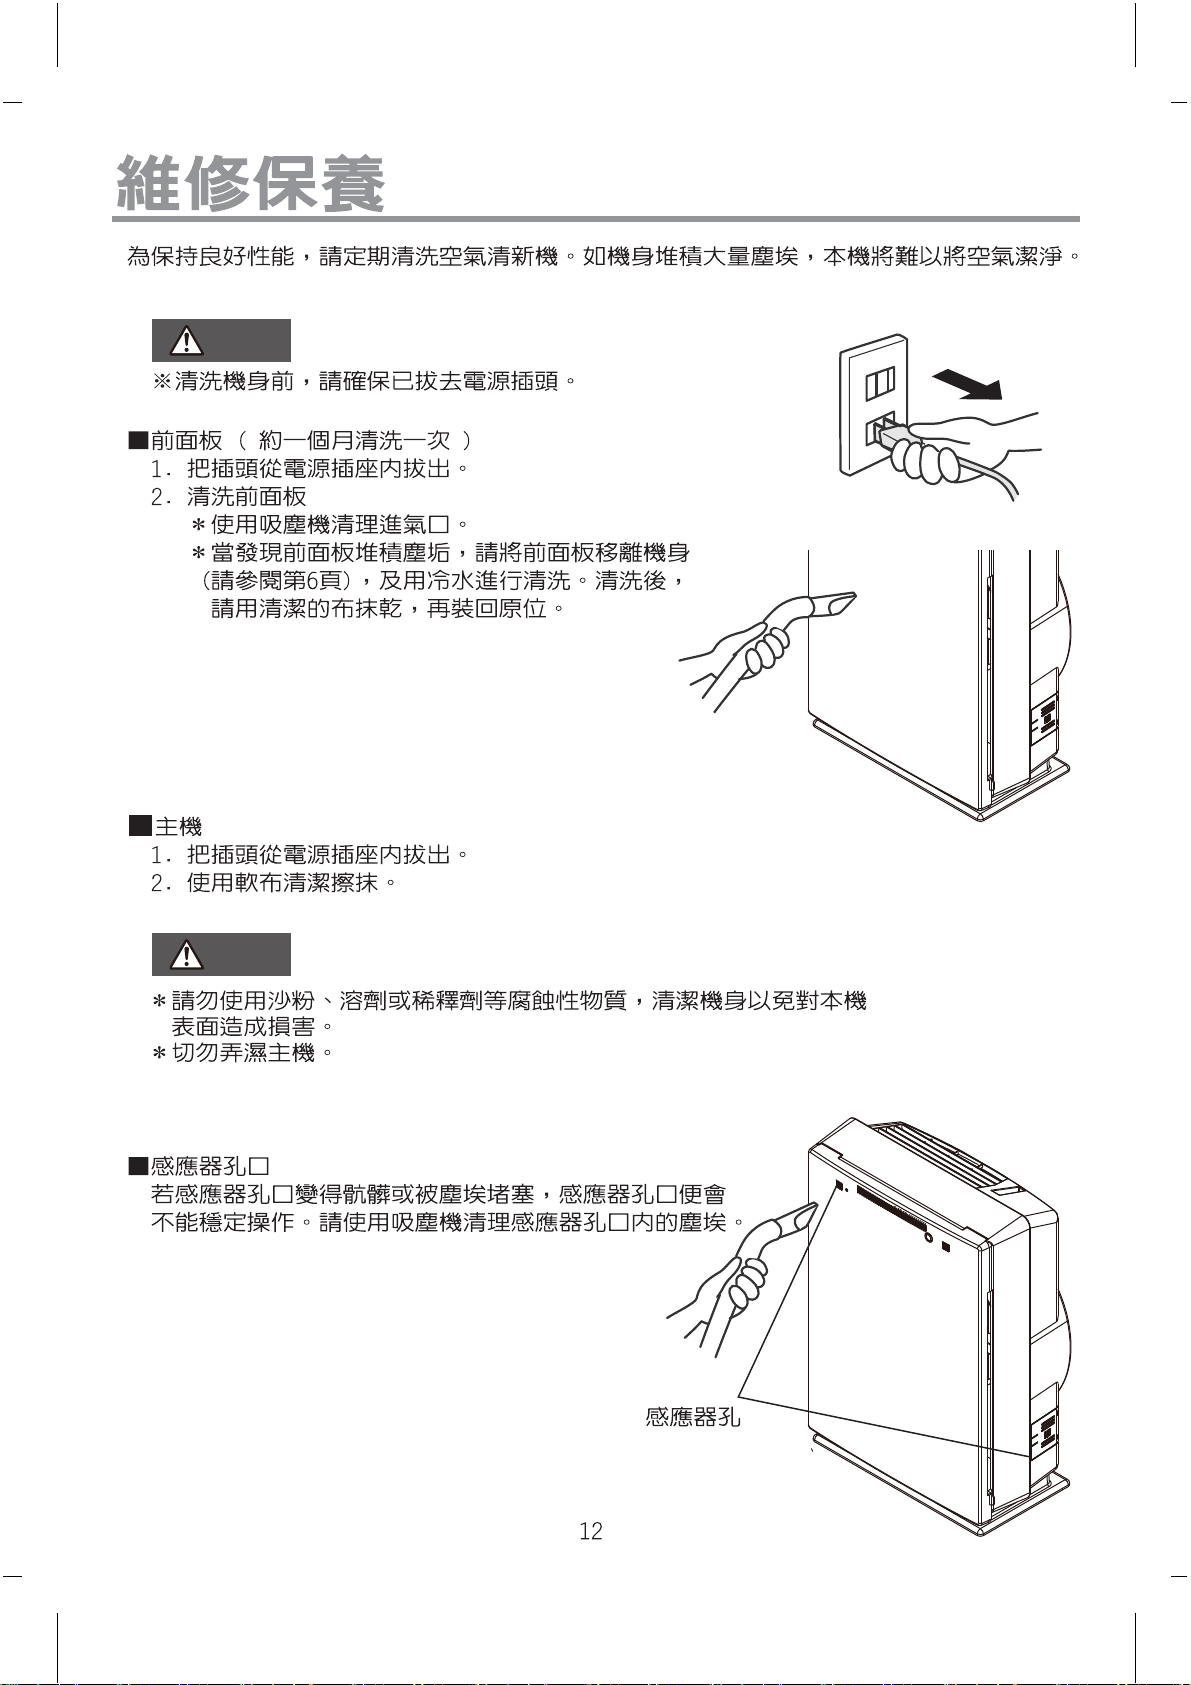
Maintenance
Cleaning the unit periodically maintains efficient operation. Proper cleaning function is
disrupted by accumulation of dirt, so clean frequently.
WARNING
Unplug before cleaning.
Front cover (onceamonth)
1. Unplug from the mains
2. Clean front cover
Clean air inlet with vacuum cleaner.
Remove if dirty (see page5, 6) and
wash in cold water. Wipe with clean cloth
and dry before replacing.
Main unit
1. Unplug from the mains.
2. Wipe with soft cloth.
WARNING
Do not use abrasives, solvent or thinner, since they damage the unit surface.
Never pour water on the unit.
Sensor hole
Sensitivity becomes unstable if this is dirty
or blocked.
Remove dust from sensor opening with vacuum
cleaner.
Sensor opening
Page 31
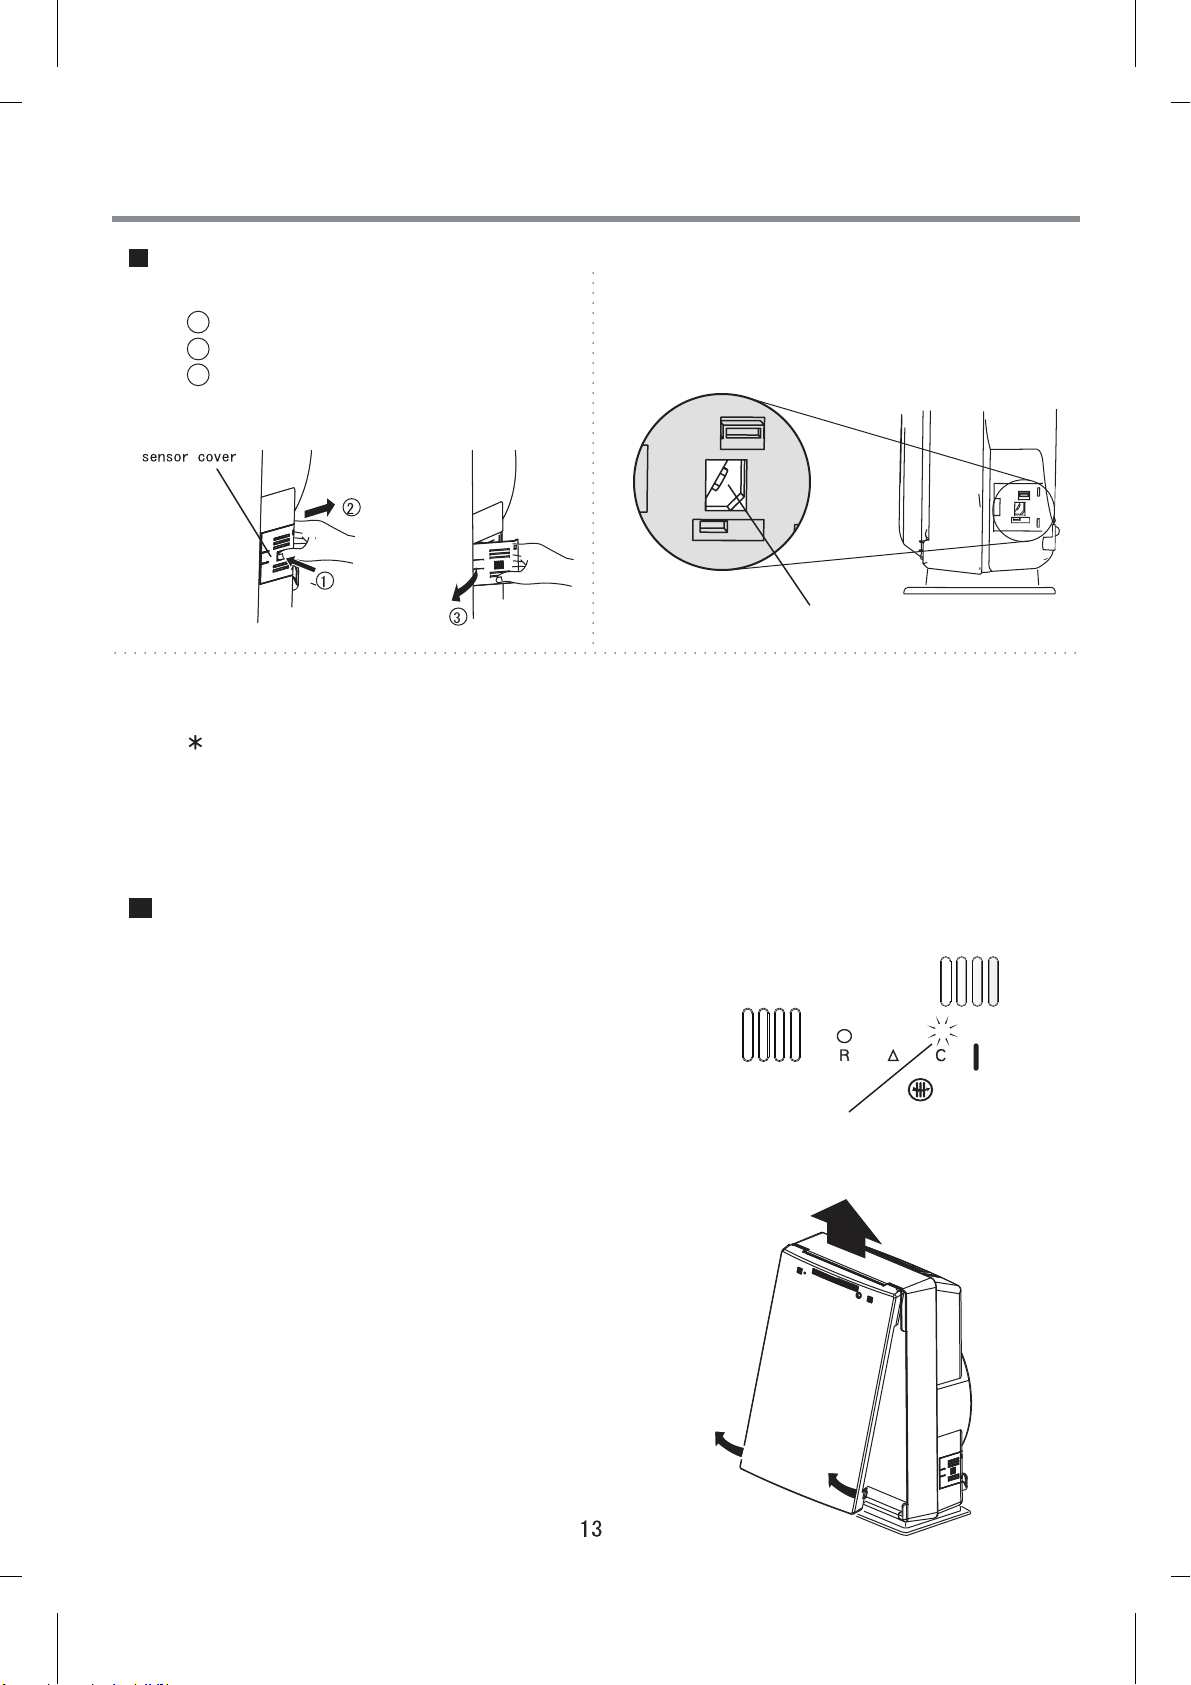
Dust sensor
1. Remove sensor cover on right of unit.
1 Push to release latch
2 Pull in arrow direction
3 Pull forwards
3. Replace sensor cover on unit
Sensor may malfunction without cover.
2. Carefully useaswab to wipe the shiny
surface of the lens.
Lens
Filter
1. When cleaning light illuminates, clean the filter.
If filter is not cleaned, light stays illuminated
about one month, depending on conditions.
2. Remove front cover
Grip finger pieces on lower front cover, pull to
release hook and raise to remove front cover.
A
ir Quality
Filter cleaning light
Page 32
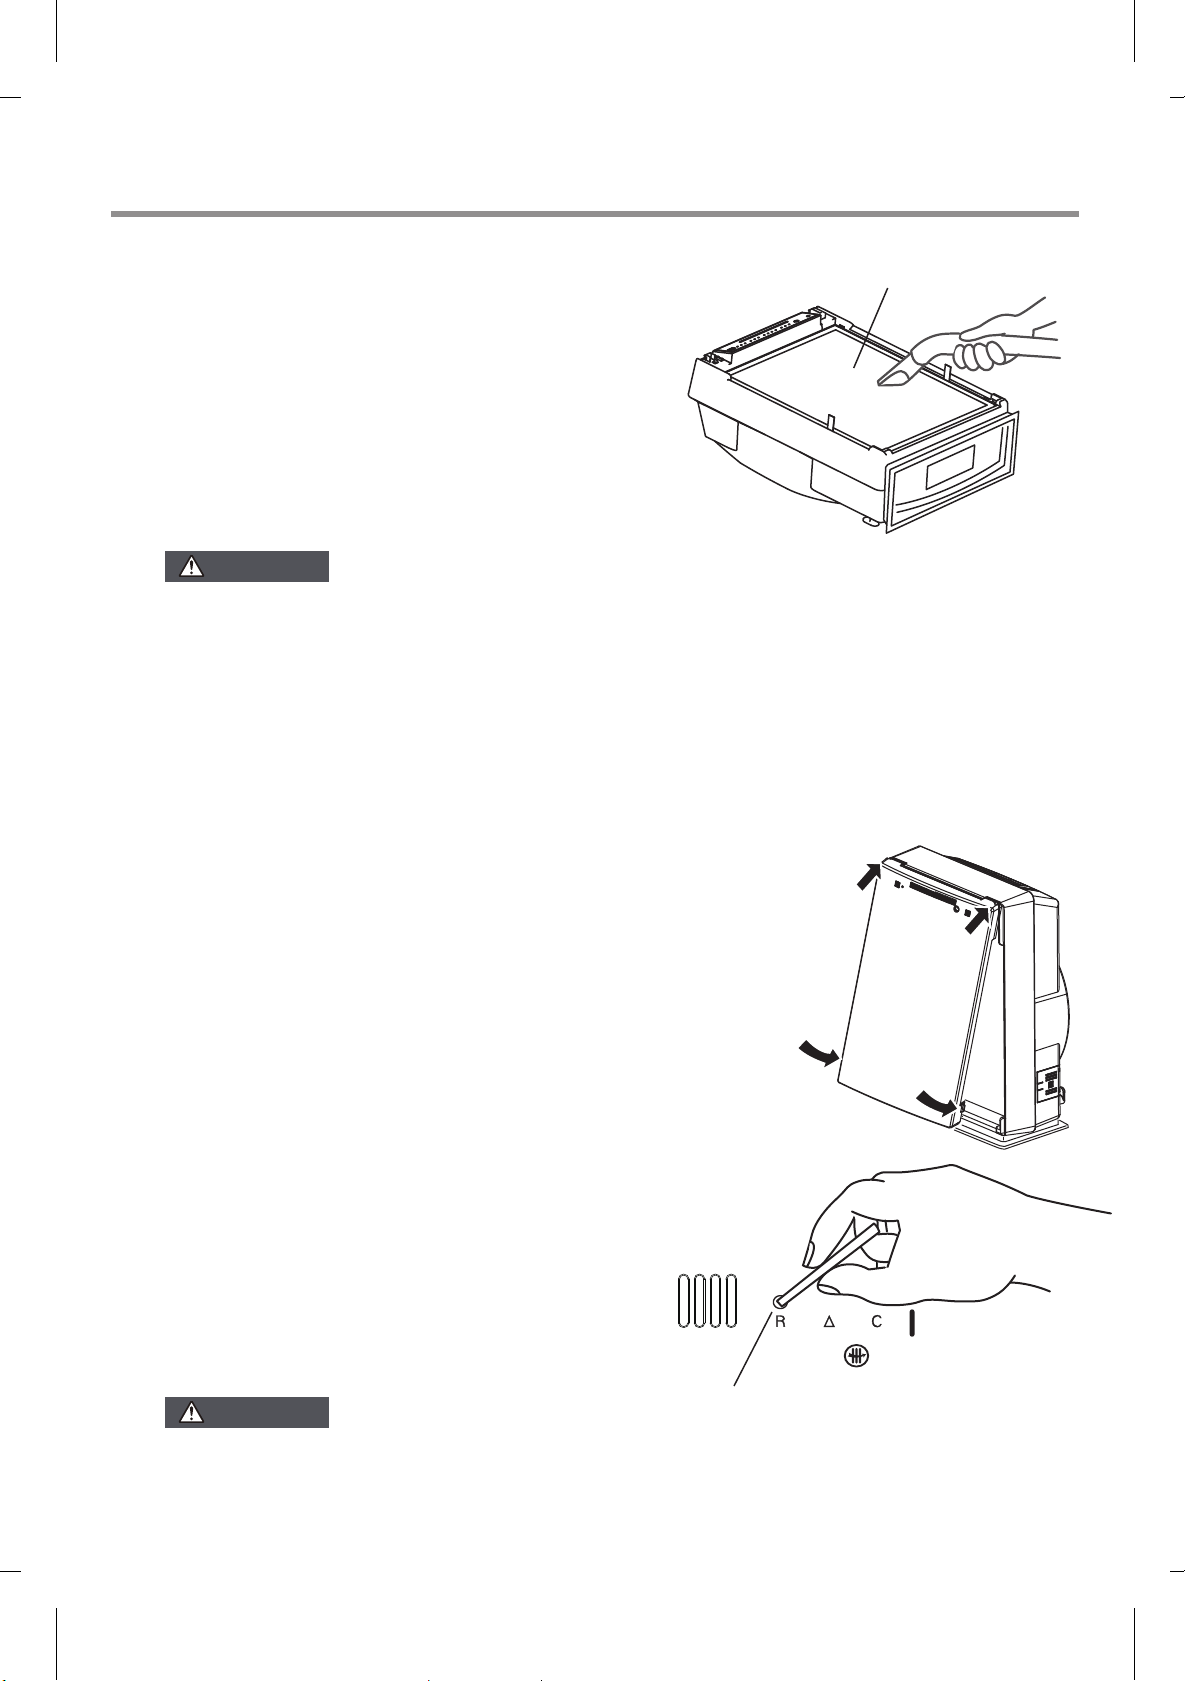
3. Clean the pre-filter
Remove pre-filter from unit and clean with
vacuum cleaner, or wash in cold water.
4. Clean the 3-in-1 filter
Clean with vacuum cleaner without removing
from unit.
CAUTION
Do not apply pressure with vacuum cleaner
, and do not damage the filter when
washing.
5. Install the pre-filter
Insert claws on both sides of pre-filter into holes on main unit.
*Take care not to break the belts attached to the HEPA filter.
3-in-1 filter
6. Attach the front cover
Fit the top of front cover into top of main unit and push both
sides in to lock lower hooks fully.
7. If you plug in and switch on and find the cleaning light
illuminated, push the reset button with a pin. When you
remove the pin, a sound is produced and the light extinguishes.
Do not push for over 5 seconds (otherwise
this changes filter replacement period)
CAUTION
Filter reset button
A
ir Quality
Cleaning time varies with air quality, so periodic cleaning should be carried out.
14
Page 33
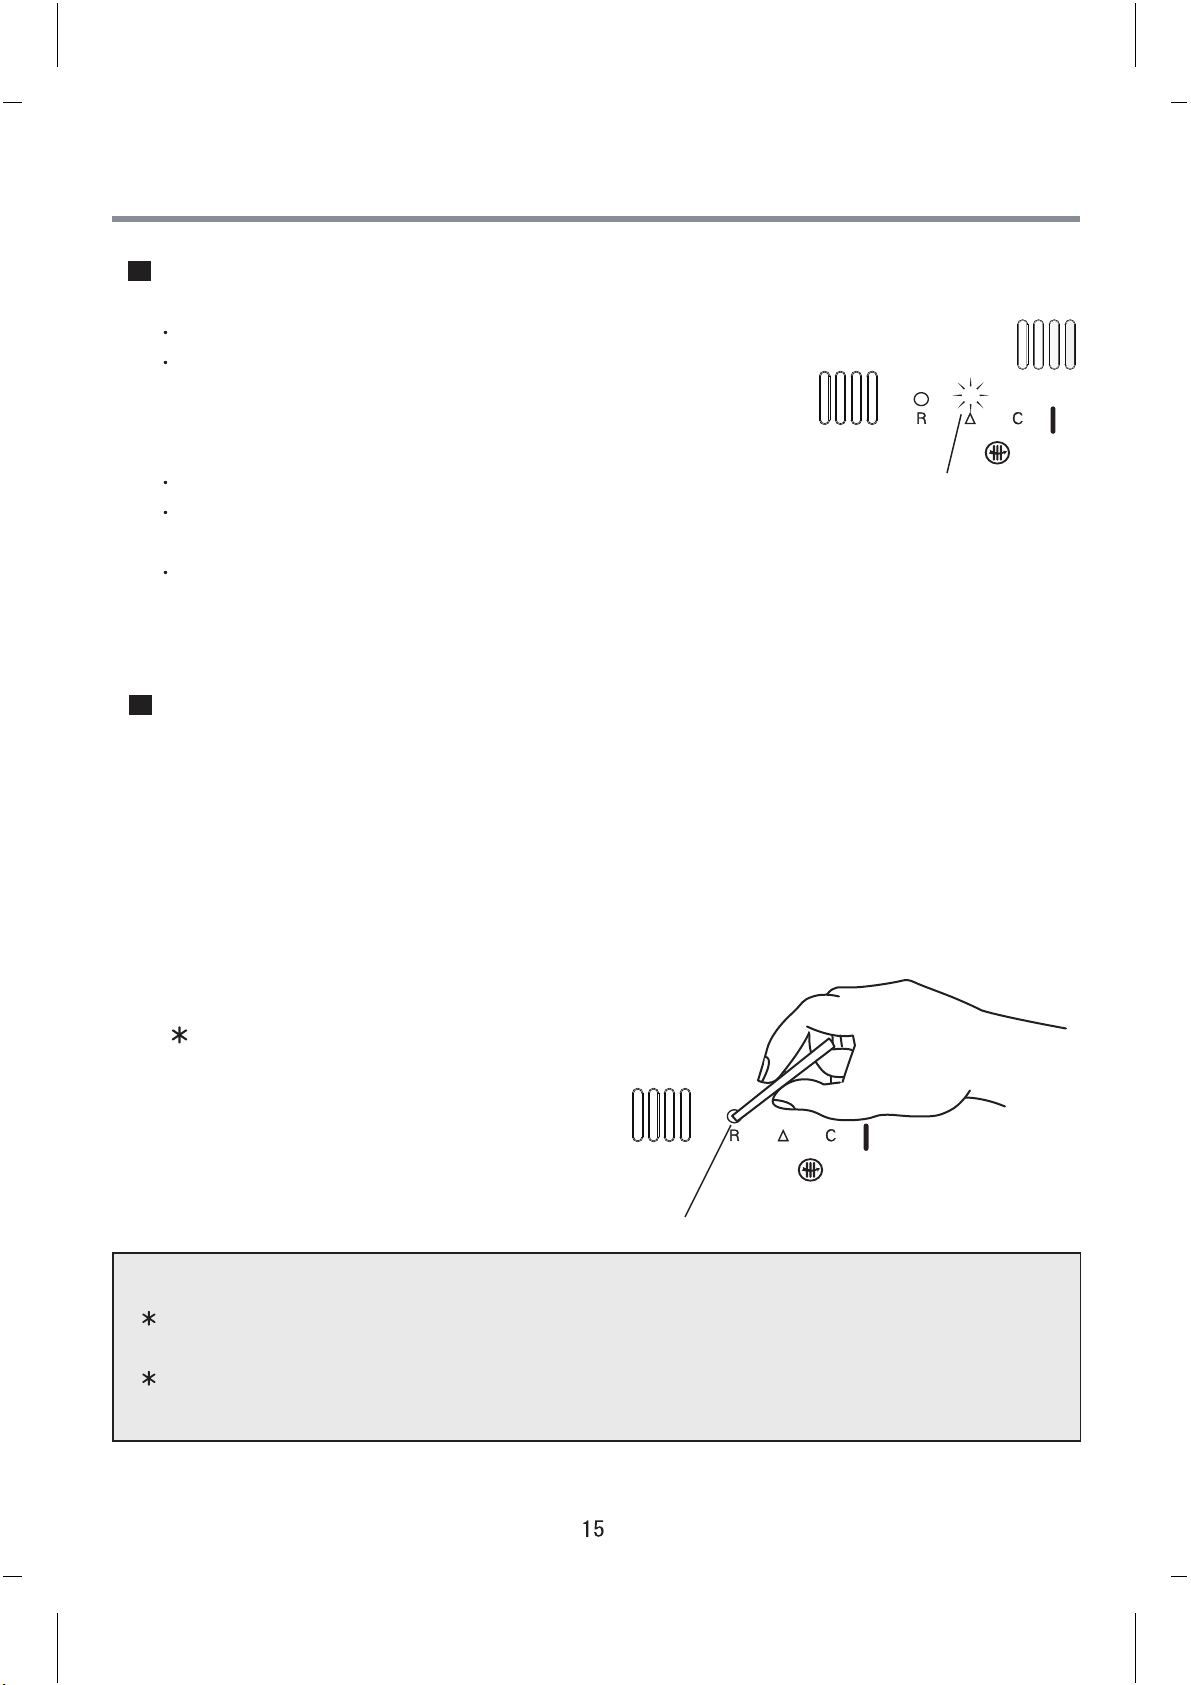
Filter Replacement
Filter replacement time
When the filter is dirty, the light illuminates.
Time until illumination depends on air quality.
A
The state of filter is saved even when unit is
unplugged or moved.
Conditions leading to shorter replacement period:
Soot or the like is ingested.
Filter replacement light
If used in busy places such as restaurants,
games halls and beauty salons.
If Turbo or High modes are frequently used.
Filter replacement
Step 1: Unplug the machine.
Step 2: Put on mask and gloves.
Step 3: Follow filter removal process on page 6.
Step 4: Place dirty filter inasealed bag and discard.
Step 5: Discard gloves and mask.
Step 6: Wash hands with soap.
Afterwards the machine should be plugged in.
1. Push filter reset button for more than5seconds until a sound is heard.
2. Filter replacement light extinguishes.
ir Quality
Remember to reset the filter
reset button
Filter reset button
A
ir Quality
Note
If filter is mounted in reverse, the unit will not work. Also never reuseadirty filter,
otherwise dust stuck to it will be emitted.
A dirty filter should not be reused even if washed. Not only is this ineffective,
but it may cause malfunction.
Page 34
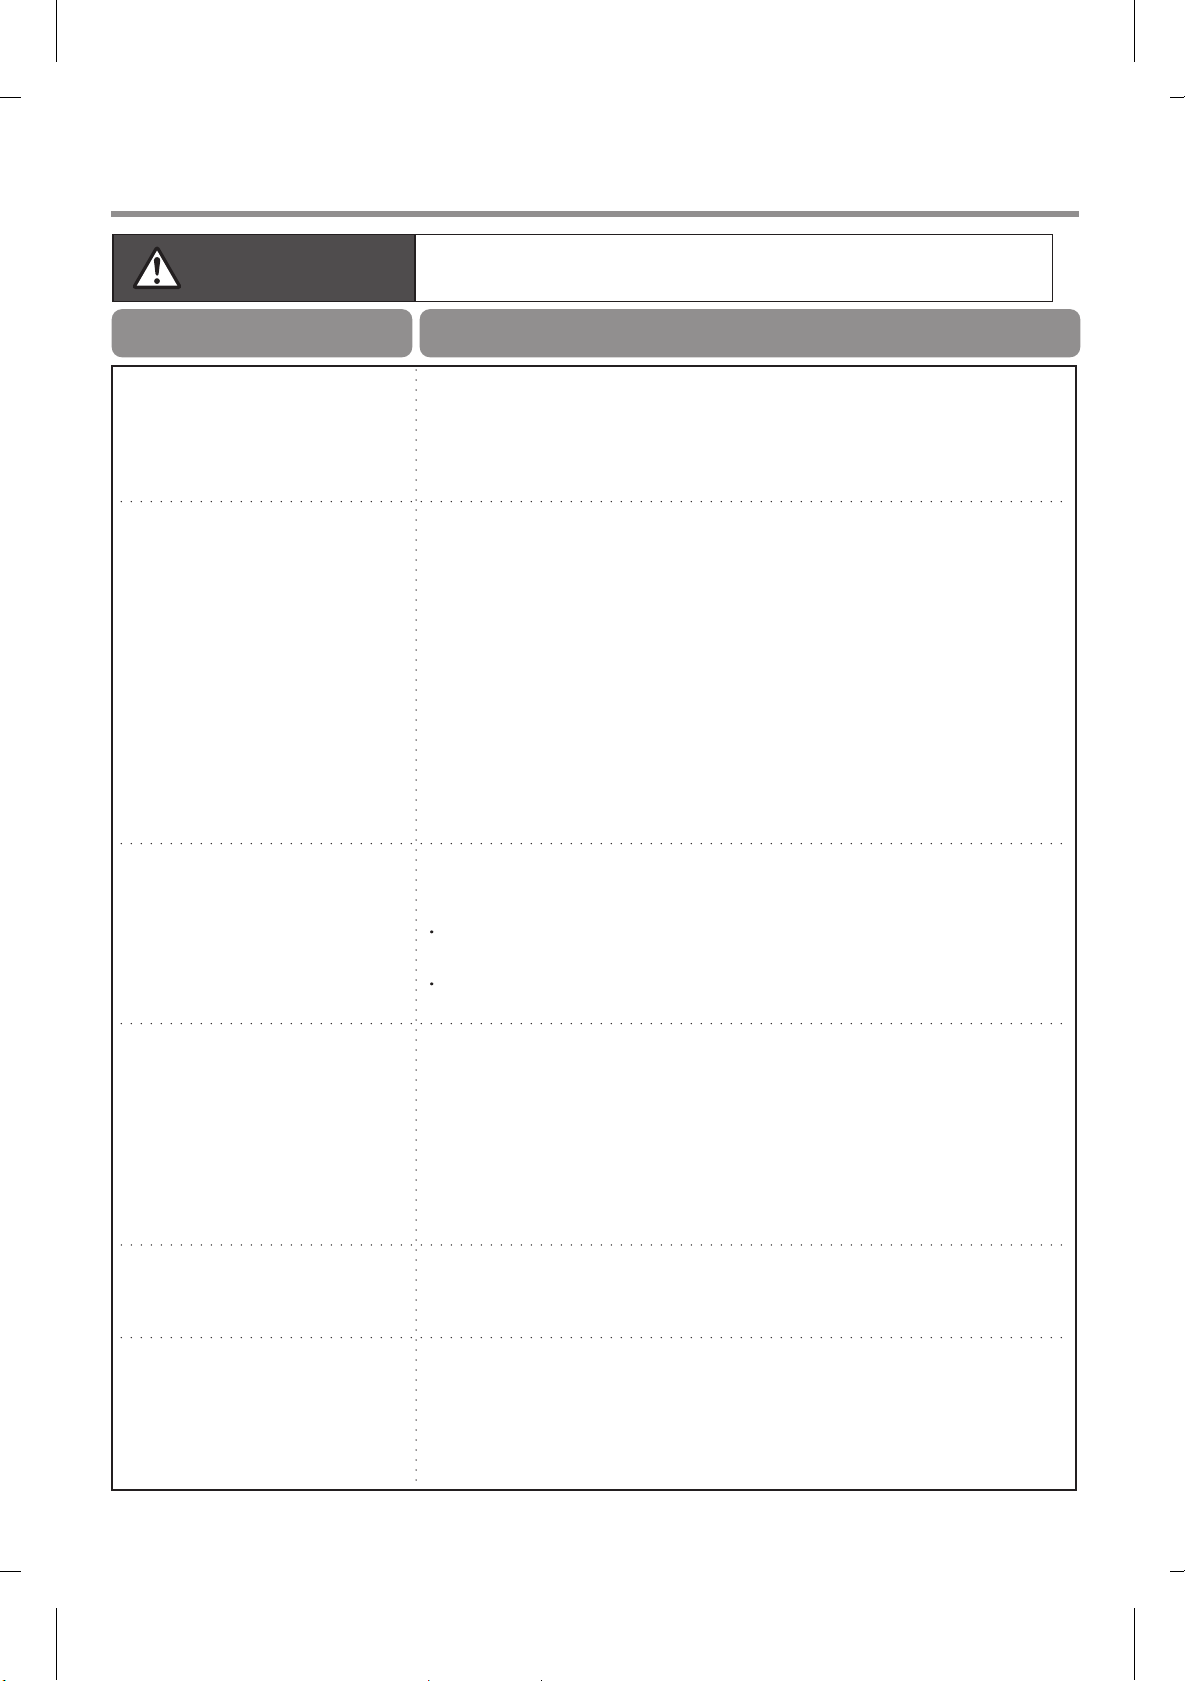
Troubleshooting
WARNING
Do not repair or disassemble without qualified assistance.
When this happens check
The unit does not work
Unit does not remove
smell or smoke
.Is there a power failure (perhaps caused by fuse or circuit
breaker)?
.Is it plugged in?
.Are filter and front cover securely fitted?
.Has filter been removed from bag?
.Has 3-in-1 filter been installed backwards?
.Is filter dirty?
.Is air outlet covered?
.Is the room too large? (Perform manual Turbo operation)
.Do people smoke in the room often?
.Is UV light illuminated? (In case of light failure, please
contact manufacturer)
.Operate the machine in a clean room for about eight hours
to refresh photocatalyst filter.
.(If large amount of smell has been cleaned, the machine
may temporarily be slow to eliminate smells)
It does not operate
even to remove
cigarette smoke
Cleanness light shows
dirty, though air seems
clean
Loud operation noise
Remote control doesn't
work
.Is the unit in a place not allowing smells and cigarette
smoke to be easily detected?
Are gas and dust sensor openings closed or clogged?
(clean them by referring to pages 11 and 12)
Is sensor sensitivity set at 'Lo'?
. The sensor reacts to cosmetics, perfume, alcohol and
insecticide spray. (Change sensitivity setting or room
ventilation)
. When connecting to the mains, the cleanness light may
show dirty at the beginning because the sensor is not
ready.
. This will read normally once the air becomes cleaner.
. Is unit set up in an unstable place?
. Is filter very dirty?
.Is the battery dead?
.Has transparent tape been removed from battery?
.Is the battery wrongly installed?
.Is the unit placed too close to fluorescent lighting?
16
Page 35
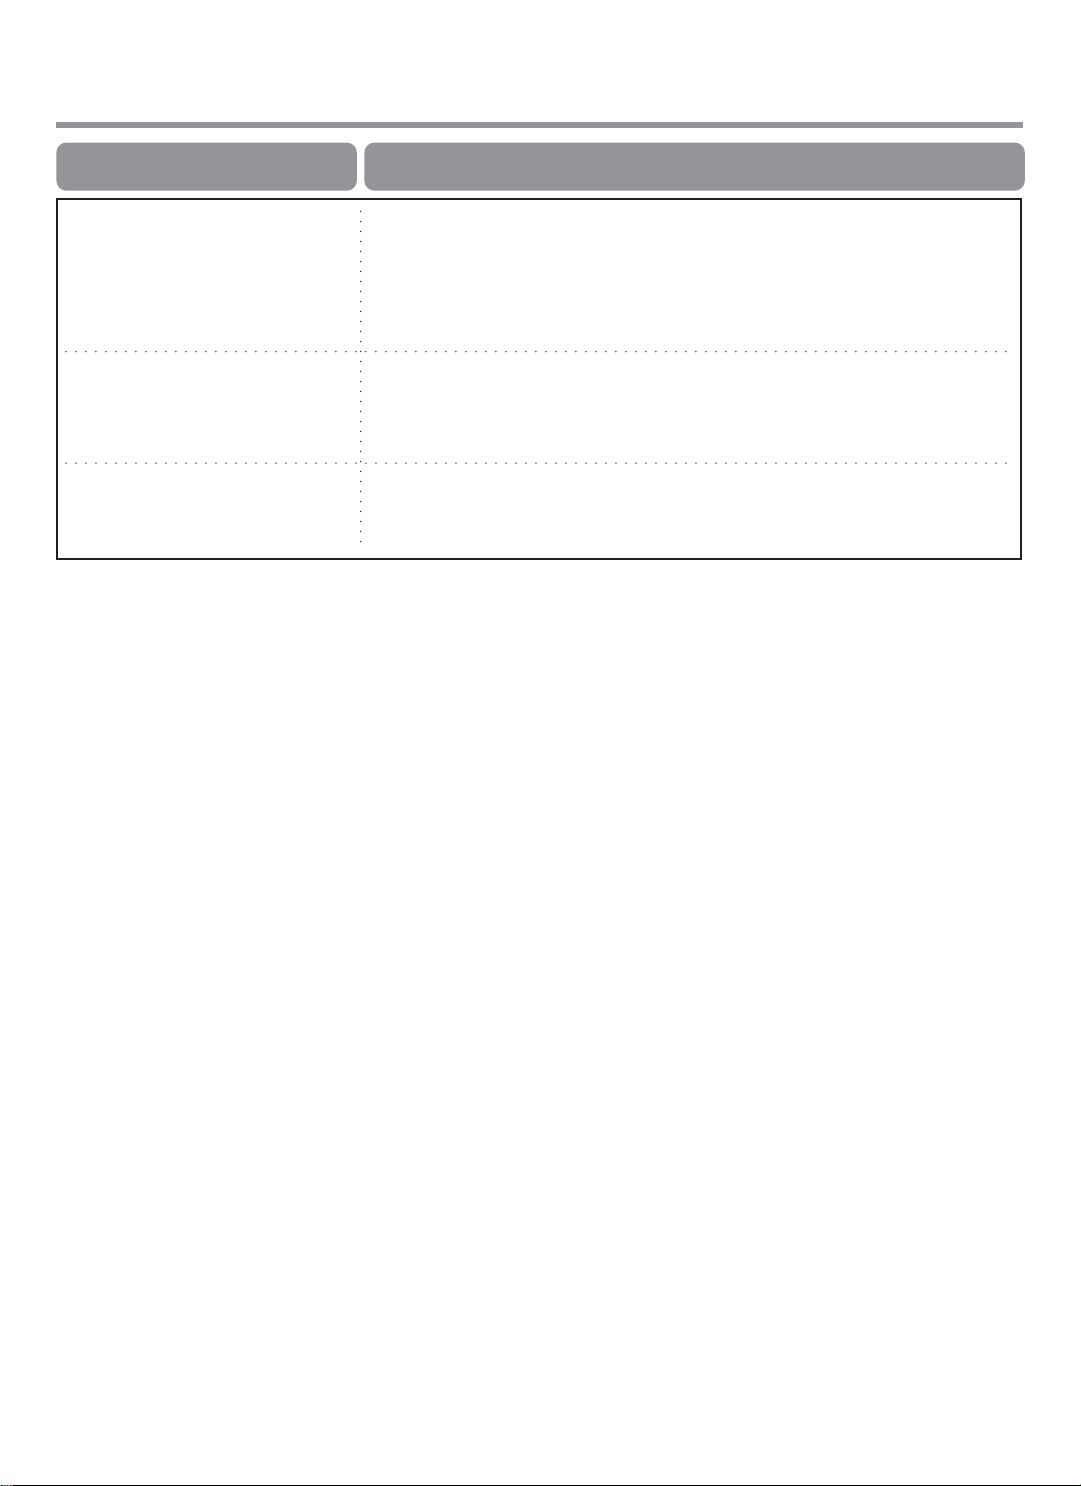
When it happens check
Cleaning light or
replacement reminder light
illuminates too soon
Foreign objects have
entered the unit
Water has been poured
on the unit
When using in a dirty place other than ordinary domestic
situations the light might illuminate early.
Are Turbo and High used frequently? Even if room is clean,
if operated on High or Turbo, light illuminates early
Switch off and seek help from your service agent.
Switch off and seek help from your service agent.
㧖It is normal to notice a slight smell when using a new product.
This causes no physical damage to humans, and the smell will soon fade.
Checking an air purifier after many years of use.
The following are signs of ageing:
Ŝ After switching on the unit, it doesn't operate, or stops intermittently.
Ŝ Fan rotation causes strange noises and vibration.
Ŝ The unit is unusually hot or there is a smell of burning.
Ŝ Other unusual signs.
Unplug and contact the manufacturer.
Page 36
Specifications
When you connect to the mains, about 2W is required to prime the circuit.
Voltage
Current (Turbo/High/Medium/Low)
Dimensions
Weight
components
.AP688 3-in-1 Filter
Model: APF003H
.AP688 Charcoal Filter
Model: APF002C
220-240V 50Hz
100/40/30/20 W
410W x 220D x 583H mm
7.6 Kg
please indicate which item you require to
Whirlpool spare parts department.
Tel: 24063861/24063862
Correct disposal of this product
This symbol indicates this product should not be disposed of with other
domestic waste anywhere in the EU. To prevent possible damage to the
environment or human health from uncontrolled waste disposal, help by
recycling responsibly. To return your used unit, please take it to the place
where it was purchased, and they will dispose of it safely.
18
 Loading...