

Whirlpool AKZM 663/IX User Manual
AKZM 663
User and maintenance manual
Návod k použití a údržbě
Návod na používanie a údržbu
Felhasználói és karbantartási kézikönyv


IMPORTANT SAFETY INSTRUCTIONS
YOUR SAFETY AND THAT OF OTHERS IS PARAMOUNT
This manual and the appliance itself provide important safety warnings, to be read and observed at all times.
This is the danger symbol, pertaining to safety, which alerts users to potential risks to themselves and others.
All safety warnings are preceded by the danger symbol and the following terms:
DANGER
WARNING
All safety warnings give specific details of the potential risk present and indicate how to reduce risk of injury, damage and electric
shock resulting from improper use of the appliance. Carefully observe the following instructions:
- The appliance must be disconnected from the power supply before carrying out any installation work.
- Installation and maintenance must be carried out by a qualified technician, in compliance with the manufacturer’s
instructions and local safety regulations. Do not repair or replace any part of the appliance unless specifically stated in the
user manual.
- Regulations require that the appliance is earthed.
- The power cable must be long enough for connecting the appliance, once fitted in its housing, to the power supply
socket.
- For installation to comply with current safety regulations, an all-pole disconnect switch with minimum contact gap of
3 mm must be utilized.
- Do not use multiple plug adapters or extension leads.
- Do not pull the power supply cable in order to unplug the appliance.
- The electrical components must not be accessible to the user after installation.
- Do not touch the appliance with any wet part of the body and do not operate it when barefoot.
- This appliance is designed solely for use as a domestic appliance for cooking food. No other type of use is permitted
(e.g.: heating rooms). The Manufacturer declines all responsibility for inappropriate use or incorrect setting of the controls.
- The appliance is not intended for use by persons (including children) with any physical, sensory or mental impairment, or
without experience and knowledge of the appliance, unless supervised or previously instructed in its use by those
responsible for their safety.
- The accessible parts of the appliance may become very hot during use. Young children should be kept away from the
appliance and supervised to ensure that they do not play with it.
- During and after use, do not touch the heating elements or interior surfaces of the appliance - risk of burns. Do not allow
the appliance to come into contact with cloths or other flammable materials until all the components have cooled
sufficiently.
- At the end of cooking, exercise caution when opening the appliance door, letting the hot air or steam exit gradually
before accessing the oven. When the appliance door is shut, hot air is vented from the aperture above the control panel.
Do not obstruct the vent apertures.
- Use oven gloves to remove pans and accessories, taking care not to touch the heating elements.
- Do not place flammable materials in or near the appliance: a fire may break out if the appliance is inadvertently switched
on.
- Do not heat or cook sealed jars or containers in the appliance. The pressure that builds up inside might cause the jar to
explode, damaging the appliance.
- Do not use containers made of synthetic materials.
- Overheated oils and fats catch fire easily. Always remain vigilant when cooking foods rich in fat and oil.
- Never leave the appliance unattended during food drying.
- If alcoholic beverages are used when cooking foods (e.g. rum, cognac, wine), remember that alcohol evaporates at high
temperatures. As a result, there is a risk that vapours released by the alcohol may catch fire upon coming into contact with
the electrical heating element.
Indicates a hazardous situation which, if not avoided, will cause serious injury.
Indicates a hazardous situation which, if not avoided, could cause serious injury.
Scrapping of household appliances
- This appliance is manufactured with recyclable or reusable materials. Dispose of it in accordance with local waste disposal
regulations. Before scrapping, cut off the power supply cable.
- For further information on the treatment, recovery and recycling of household electrical appliances, contact your
competent local authority, the collection service for household waste or the store where you purchased the appliance.
GB1
INSTALLATION
After unpacking the oven, make sure that it has not been damaged during transport and that the oven door closes properly. In
the event of problems, contact the dealer or your nearest After-sales Service. To prevent any damage, only remove the oven
from its polystyrene foam base at the time of installation.
PREPARING THE HOUSING UNIT
• Kitchen units in contact with the oven must be heat resistant (min 90°C).
• Carry out all cabinet cutting work before fitting the oven in the housing and carefully remove all wood chips and sawdust.
• After installation, the bottom of the oven must no longer be accessible.
• For correct appliance operation, do not obstruct the minimum gap between the worktop and the upper edge of the oven.
ELECTRICAL CONNECTION
Make sure the power voltage specified on the appliance dataplate is the same as the mains voltage. The dataplate is on the front
edge of the oven (visible when the door is open).
• Power cable replacement (type H05 RR-F 3 x 1.5 mm
authorized service centre.
GENERAL RECOMMENDATIONS
Before use:
- Remove cardboard protection pieces, protective film and adhesive labels from accessories.
- Remove the accessories from the oven and heat it at 200° for about an hour to eliminate the smell and fumes from the
insulating materials and protective grease.
During use:
- Do not place heavy objects on the door as they could damage it.
- Do not cling to the door or hang anything from the handle.
- Do not cover the inside of the oven with aluminium foil.
- Never pour water into the inside of a hot oven; this could damage the enamel coating.
- Never drag pots or pans across the bottom of the oven as this could damage the enamel coating.
- Make sure that the electrical cables of other appliances do not touch hot parts of the oven or become trapped in the door.
- Do not expose the oven to atmospheric agents.
2
) must be carried out by a qualified electrician. Contact an
SAFEGUARDING THE ENVIRONMENT
Disposal of packing material
The packing material is 100% recyclable and is marked with the recycle symbol ( ). The various parts of the packing must
therefore be disposed of responsibly and in full compliance with local authority regulations governing waste disposal.
Scrapping the product
- This appliance is marked in compliance with European Directive 2002/96/EC, Waste Electrical and Electronic Equipment
(WEEE).
- By ensuring this product is disposed of correctly, you will help prevent potential negative consequences for the
environment and human health, which could otherwise be caused by inappropriate waste handling of this product.
- The symbol on the product or on the accompanying documentation indicates that it should not be treated as
domestic waste but must be taken to an appropriate collection centre for the recycling of electrical and electronic
equipment.
Energy saving
- Only pre-heat the oven if specified in the cooking table or your recipe.
- Use dark lacquered or enamelled baking moulds as they absorb heat far better.
- Switch the oven off 10/15 minutes before the set cooking time. Food requiring prolonged cooking will continue to cook even
once the oven is switched off.
DECLARATION OF CONFORMITY
- This oven, which is intended to come into contact with foodstuffs, complies with European Regulation ( ) n.1935/2004
and has been designed, manufactured and sold in conformity with the safety requirements of the “Low Voltage” directive
2006/95/CE (which replaces 73/23/CEE and subsequent amendments), the protection requirements of “EMC” 2004/108/
CE.
GB2
TROUBLESHOOTING GUIDE
The oven does not work:
• Check for the presence of mains electrical power and if the oven is connected to the electrical supply.
• Turn off the oven and restart it to see if the fault persists.
The electronic programmer does not work:
• If the display shows the letter “ ” followed by a number, contact your nearest After-sales Service. Specify in this case the
number that follows the letter “ ”.
AFTER-SALES SERVICE
Before calling the After-Sales Service:
1. See if you can solve the problem yourself with the help of the suggestions given in the “Troubleshooting guide“.
2. Switch the appliance off and back on again it to see if the fault persists.
If after the above checks the fault still occurs, get in touch with the nearest After-sales Service.
Always specify:
• a brief description of the fault;
• the type and exact model of the oven;
• the service number (number after the word Service on the rating plate), located on the right hand edge of the oven cavity
(visible when the oven door is open). The service number is also indicated on the guarantee booklet;
• your full address;
• your telephone number.
If any repairs are required, please contact an authorised After-sales Service (to guarantee that original spare parts will be used
and repairs carried out correctly).
CLEANING
WARNING
Oven exterior
IMPORTANT: do not use corrosive or abrasive detergents. If any of these products accidentally comes into contact with
the appliance, clean immediately with a damp cloth.
• Clean the surfaces with a damp cloth. If it is very dirty, add a few drops of washing up detergent to the water. Finish off
with a dry cloth.
Oven interior
IMPORTANT: do not use abrasive sponges or metallic scrapers or scourers. Over time, these can ruin enamelled surfaces
and the oven door glass.
• After every use, allow the oven to cool then clean it preferably while it is still warm in order to remove built-up dirt and
stains caused by food residues (e.g. food with a high sugar content).
• Use proprietary oven detergents and follow the manufacturer’s instructions to the letter.
• Clean the door glass with a suitable liquid detergent. The oven door can be removed to facilitate cleaning (see
MAINTENANCE).
• The top heating element of the grill (see MAINTENANCE) can be lowered (some models only) to clean the roof of the oven.
N.B.: during prolonged cooking of foods with a high water content (e.g. pizza, vegetables, etc.) condensation may form
on the inside of the door and around the seal. When the oven is cold, dry the inside of the door with a cloth or sponge.
- Never use steam cleaning equipment.
- Only clean the oven when it is cool to the touch.
- Disconnect the appliance from the power supply.
Accessories:
• Soak the accessories in water with washing up detergent immediately after use, handling them with oven gloves if still
hot.
• Food residues can be easily removed using a brush or sponge.
Cleaning the rear wall and catalytic side panels of the oven (if present):
IMPORTANT: do not use corrosive or abrasive detergents, coarse brushes, pot scourers or oven sprays which could
damage the catalytic surface and ruin its self-cleaning properties.
• Operate the oven empty with the fan-assisted function at 200°C for about one hour
• Next, leave the appliance to cool down before removing any food residue with a sponge.
GB3

MAINTENANCE
WARNING
- Use protective gloves.
- Ensure the oven is cold before carrying out the following operations.
- Disconnect the appliance from the power supply.
REMOVING THE DOOR
To remove the door:
1. Open the door fully.
2. Lift the catches and push them forwards as far as they will go (Fig. 1).
3. Close the door as far as it will go (A), lift it up (B) and turn it (C) until it is released (D) (Fig. 2).
To refit the door:
1. Insert the hinges in their seats.
2. Open the door fully.
3. Lower the two catches.
4. Close the door.
Fig. 1 Fig. 2
MOVING THE TOP HEATING ELEMENT (SOME MODELS ONLY)
1. Remove the side accessory holder grilles (Fig. 3).
2. Pull the heating element out a little (Fig. 4) and lower it (Fig. 5).
3. To reposition the heating element, lift it up, pulling it slightly towards you, making sure it comes to rest on the lateral
supports.
Fig. 3 Fig. 4 Fig. 5
GB4
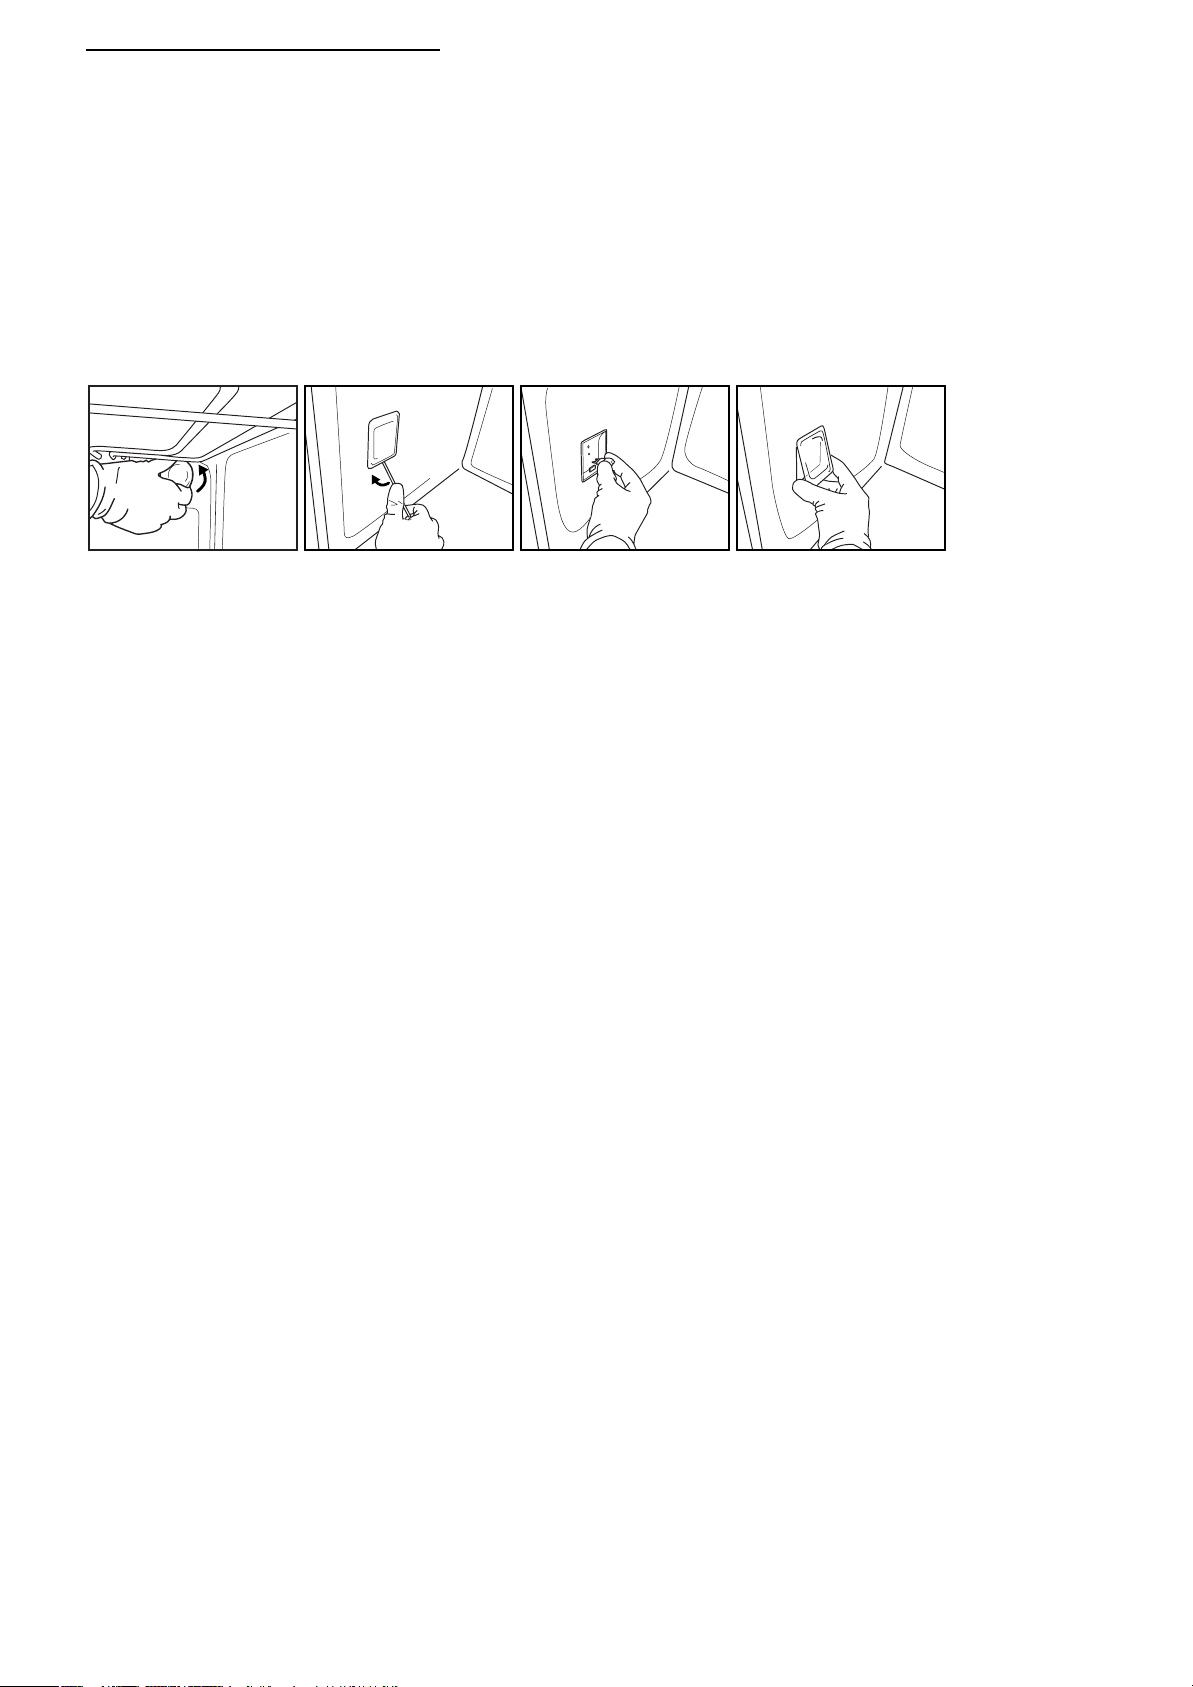
REPLACING THE OVEN LAMP
To replace the rear lamp (if present):
1. Disconnect the oven from the power supply.
2. Unscrew the lamp cover (Fig. 6), replace the lamp (see note for lamp type) and screw the lamp cover back on.
3. Reconnect the oven to the power supply.
To replace the side lamp (if present):
1. Disconnect the oven from the power supply.
2. Remove the side accessory holder grilles, if present (Fig. 3).
3. Use a screwdriver to prise off the lamp cover (Fig. 7).
4. Replace the lamp (see note for lamp type) (Fig. 8).
5. Reposition the lamp cover, pushing it on firmly until it snaps into place (Fig. 9).
6. Refit the side accessory holder grilles.
7. Reconnect the oven to the power supply.
Fig. 6 Fig. 7 Fig. 8 Fig. 9
N.B.:
- Only use 25-40W/230V type E-14, T300°C incandescent lamps, or 20-40W/230 V type G9, T300°C halogen lamps.
- Lamps are available from our After-sales Service.
IMPORTANT:
- If using halogen lamps, do not handle with bare hands since fingerprints can damage them.
- Do not use the oven until the lamp cover has been repositioned.
GB5
INSTRUCTIONS FOR OVEN USE
FOR ELECTRICAL CONNECTION, SEE THE PARAGRAPH ON INSTALLATION
3
6
7
11
10
1
2
5
12
4
8
5
9
1. Control panel
2. Upper heating element/grill
3. Cooling fan (not visible)
4. Dataplate (not to be removed)
5. Lamps
6. Circular heating element (not visible)
7. Fan
8. Turnspit (if present)
9. Lower heating element (not visible)
10. Door
11. Position of shelves (the number of shelves is indicated on the front of the oven)
12. Rear wall
N.B.:
- During cooking, the cooling fan may switch on at intervals in order to minimise energy consumption.
- At the end of cooking, after the oven has been switched off, the cooling fan may continue to run for a while.
- When the oven door is opened during cooking, the heating elements switch off.
ACCESSORIES SUPPLIED
Fig. A Fig. B Fig. C Fig. D Fig. E
A. WIRE SHELF (2): the wire shelf can be used to grill food or as a support for pans, cake tins and other ovenproof cooking
receptacles.
B. DRIP TRAY (1): the drip tray is designed to be positioned under the wire shelf in order to collect fat or as an oven tray for
cooking meat, fish, vegetables, focaccia, etc.
C. BAKING TRAY (2): for cooking all bread and pastry products, but also roasts, fish en papillotte, etc.
D. CATALYTIC PANELS (2): for easier and more thorough cleaning of the oven walls.
E. SLIDING RUNNERS: to facilitate insertion and removal of accessories.
ACCESSORIES NOT SUPPLIED
Other accessories can be purchased separately from the After-sales Service.
GB6
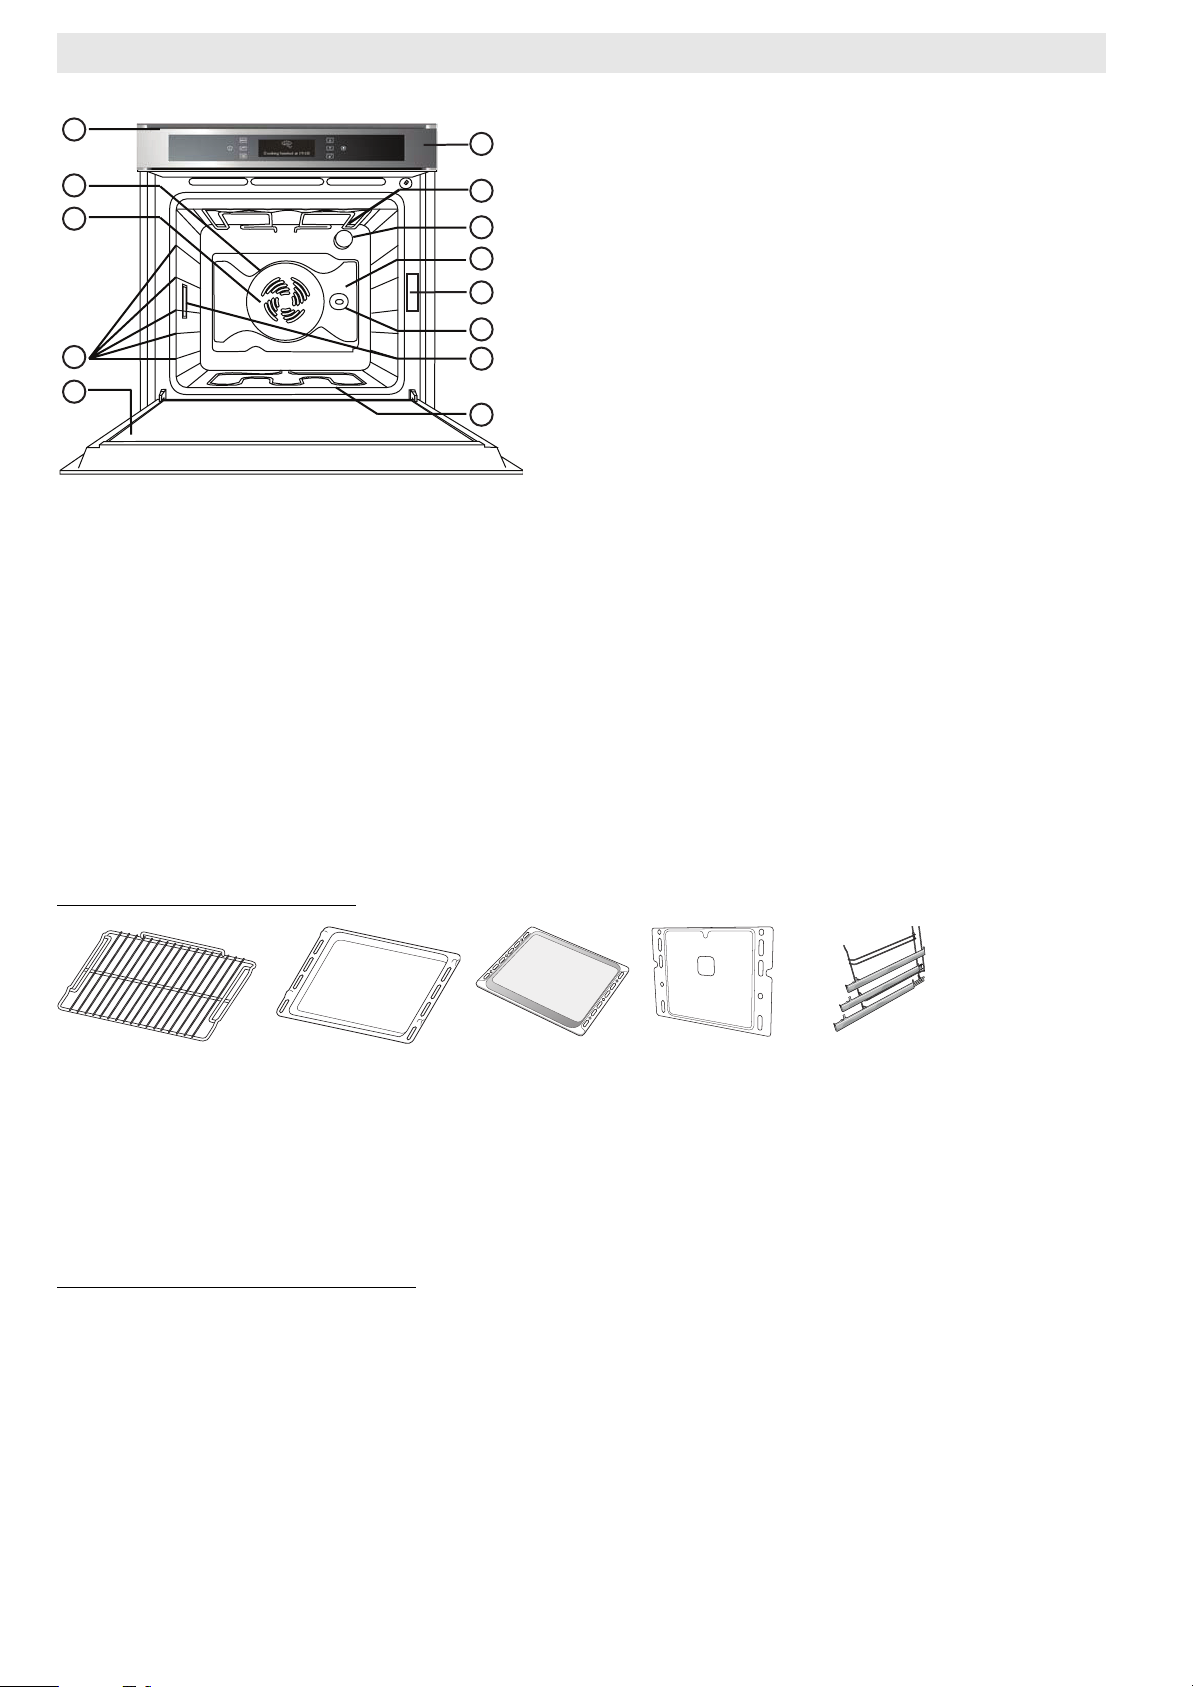
INSERTING WIRE SHELVES AND OTHER ACCESSORIES IN THE OVEN
The wire shelf and other accessories are provided with a locking mechanism to prevent their accidental removal.
Fig. 1
1. Insert the wire shelf horizontally, with the raised part “A” upwards (Fig. 1).
2. Angle the wire shelf when it reaches the locking position “B” (Fig. 2).
Fig. 2 Fig. 3
3. Return the wire shelf to the horizontal position and push it in fully to “C” (Fig. 3).
4. To remove the wire shelf proceed in reverse order.
The other accessories, like the drip tray and baking tray, are inserted in exactly the same way. The protrusion on the flat surface
enables the accessories to lock in place.
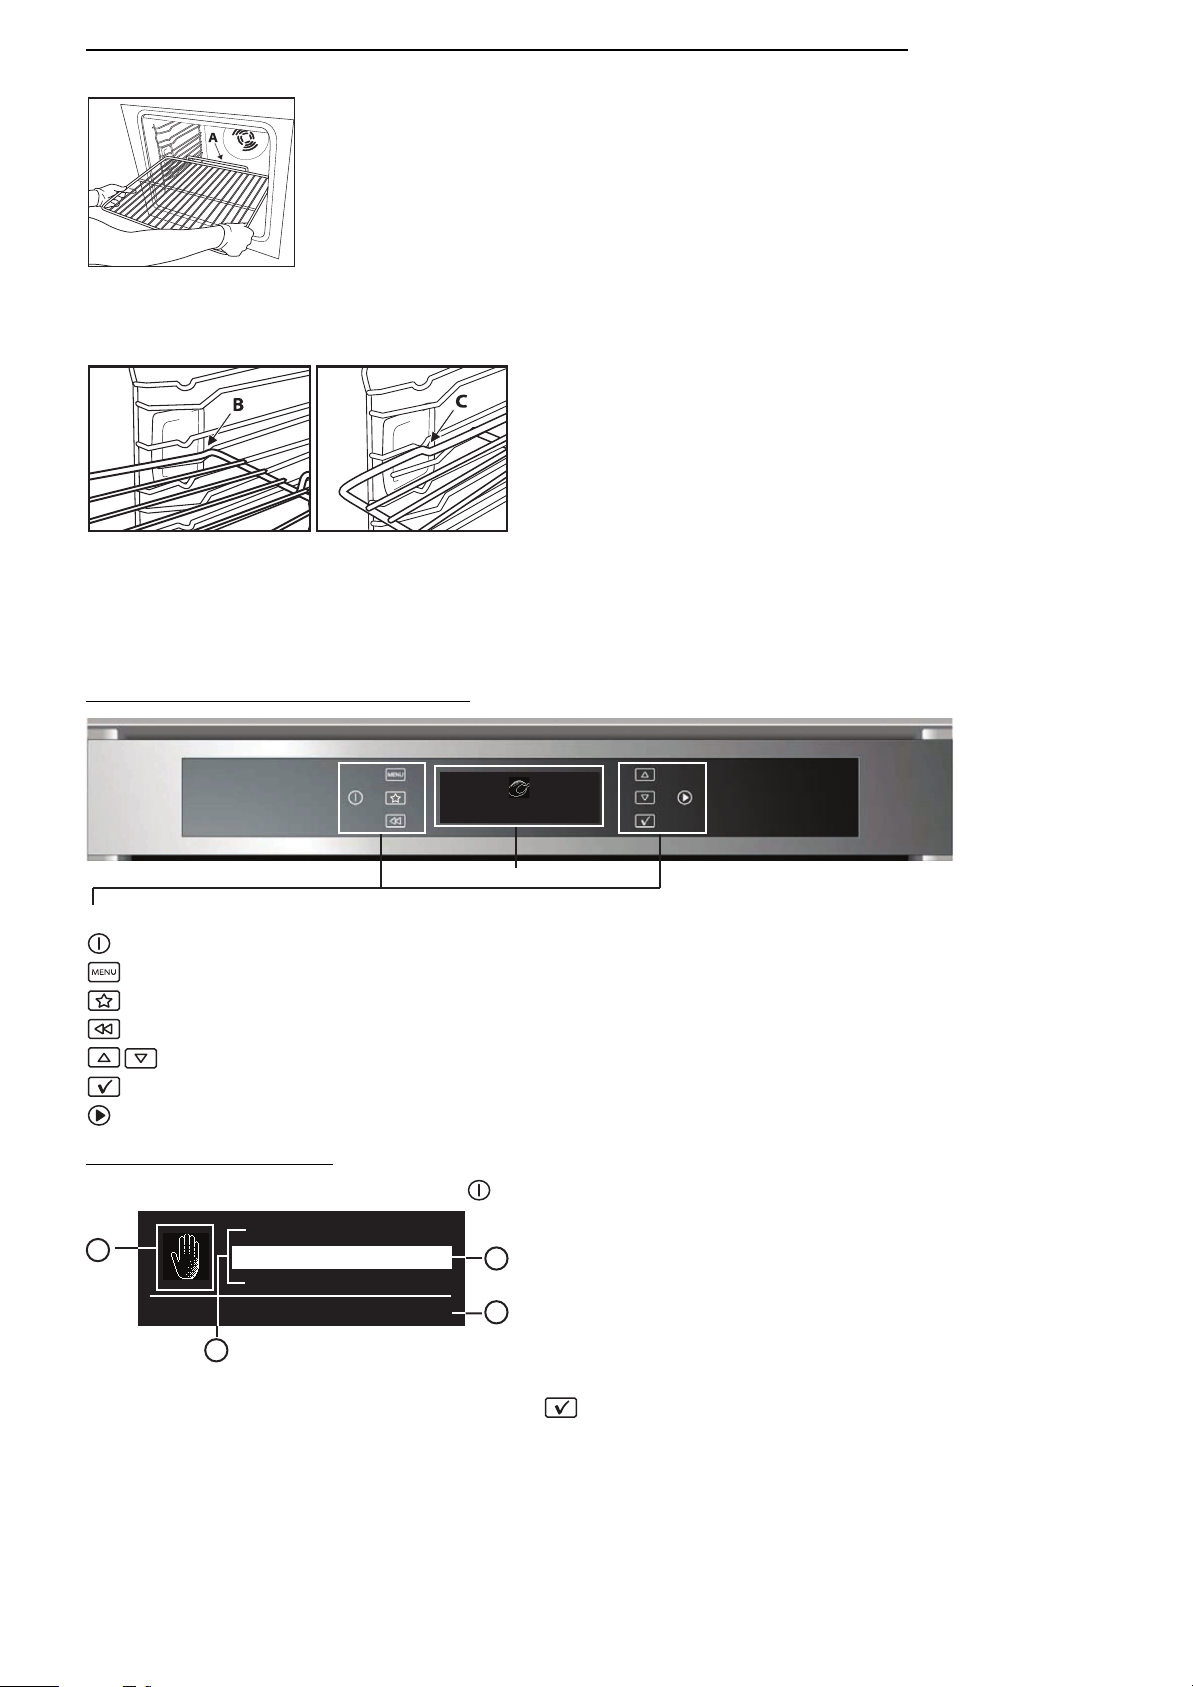
CONTROL PANEL DESCRIPTION
Cooking nished at 19:10
DISPLAY
TOUCH KEYS: to use, simply touch the corresponding symbol (a light touch is all that is required).
On/Off
to access the main MENU or return to the start screen
to access the 10 most used functions
to return to the previous screen
to browse the functions/options and change pre-set values
to select and confirm settings
to start cooking
LIST OF FUNCTIONS
After switching on the oven, press the symbol and the display will show the following indications.
A
Traditional manual cooking functions
Recipes
Traditional
Specials
B
C
D
A. Symbol for highlighted function
B. Highlighted function can be selected by pressing
C. Description of highlighted function
D. Further available, selectable information
GB7
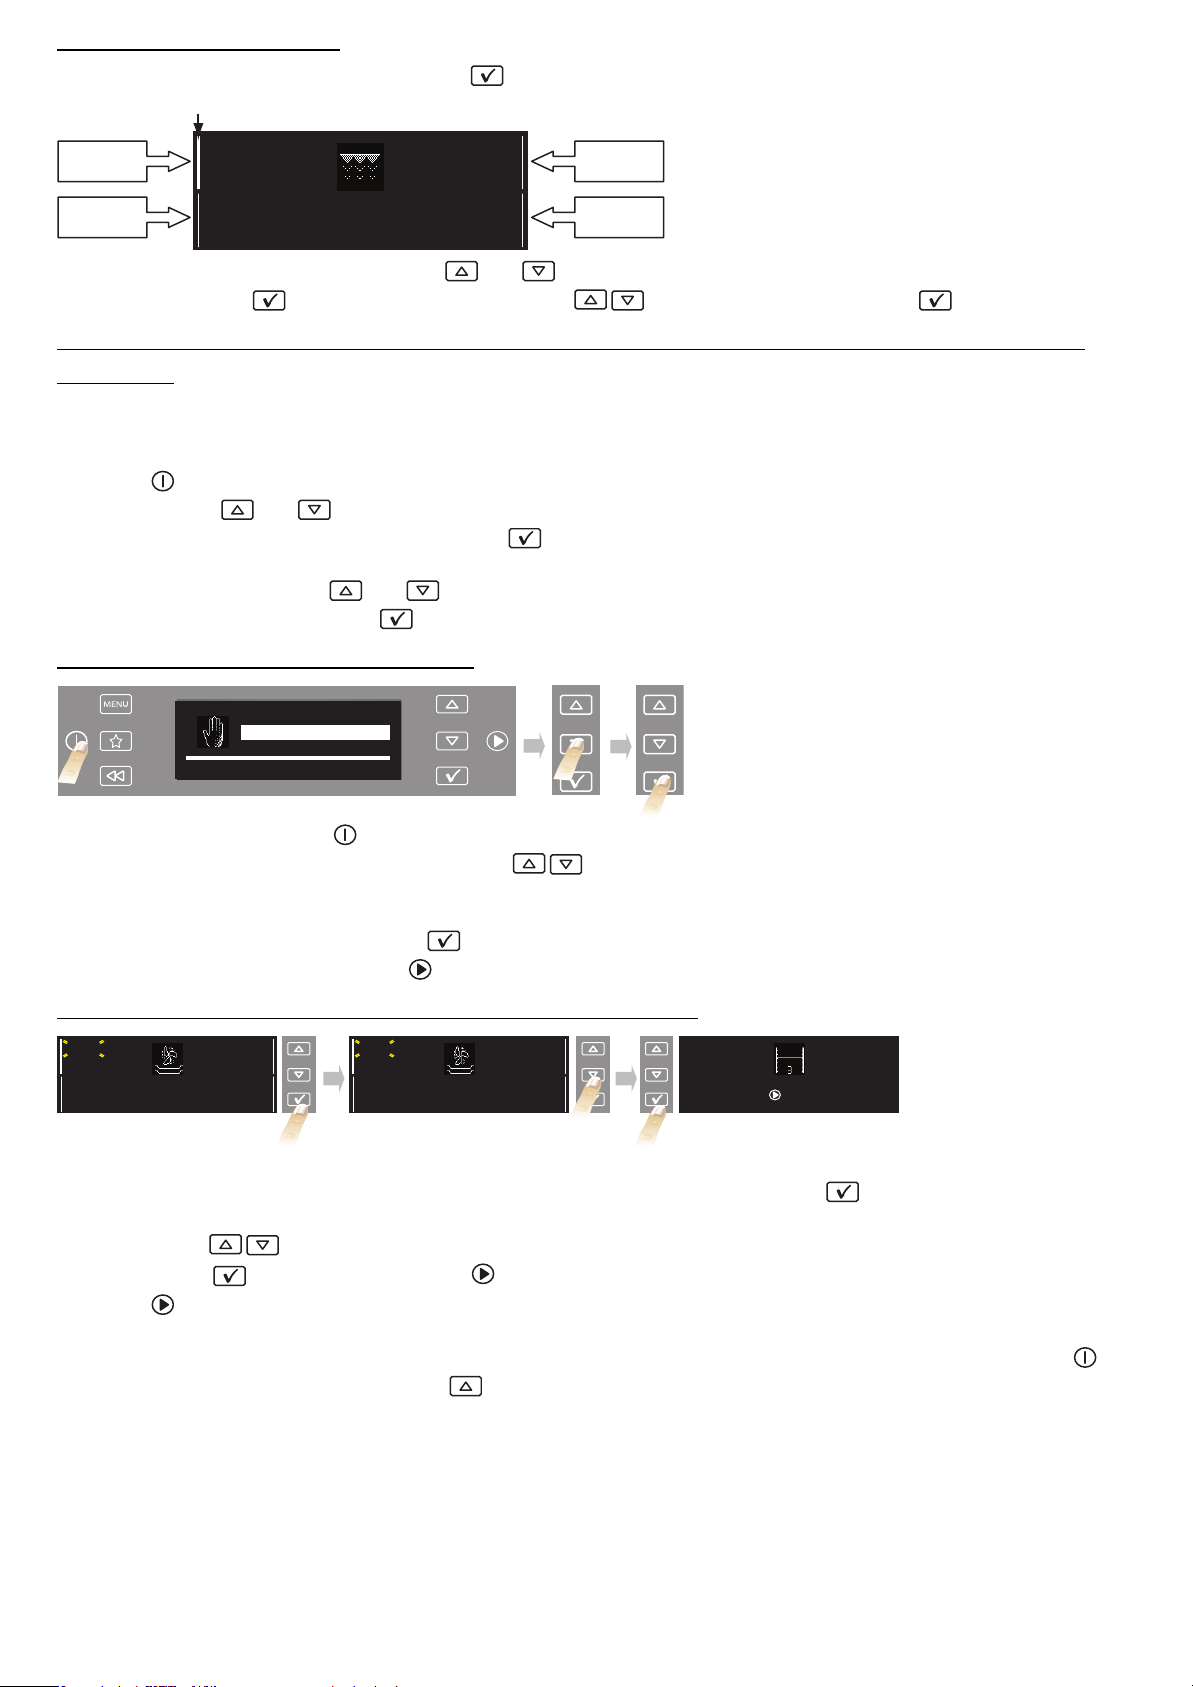
DETAILS OF FUNCTION
After selecting the desired function, press button and the display will show further options and related details.
Cursor
Zone 1 Zone 3
Zone 2
Medium
GRILL POWER
No
PREHEAT
Grill
--:--
COOK TIME
--:--
END TIME
Zone 4
To move between different areas, use buttons and : the cursor moves to the adjustable values, following the order
described above. Press to select the value, adjust it using and confirm by pressing button .
USING THE APPLIANCE FOR THE FIRST TIME - LANGUAGE SELECTION AND SETTING
THE TIME
For correct use of the oven, when it is switched on for the first time you will have to select the desired language and set the
correct time.
Proceed as follows:
1. Press : the display will show the list of the first three available languages.
2. Press buttons and to scroll down the list.
3. When the desired language is highlighted, press to select it.
After language selection, the display will flash 12:00.
4. Set the time using buttons and . To scroll through the numbers more quickly, keep the button pressed.
5. Confirm your setting by pressing : the display will show the list of functions.
SELECTING COOKING FUNCTIONS
Recipes
Traditional
Traditional manual cooking functions
Specials
1. If the oven off press button ; the display will show the cooking functions.
2. To browse the various possibilities, press buttons : the selectable function is highlighted in white in the centre of
the screen.
N.B.: for the list and description of functions, see the specific table at page 12 and at page 13.
3. Select the function by pressing button : the cooking settings are displayed on the screen. If the pre-set values are
those desired, press the start button , otherwise proceed as inidcated above to change them.
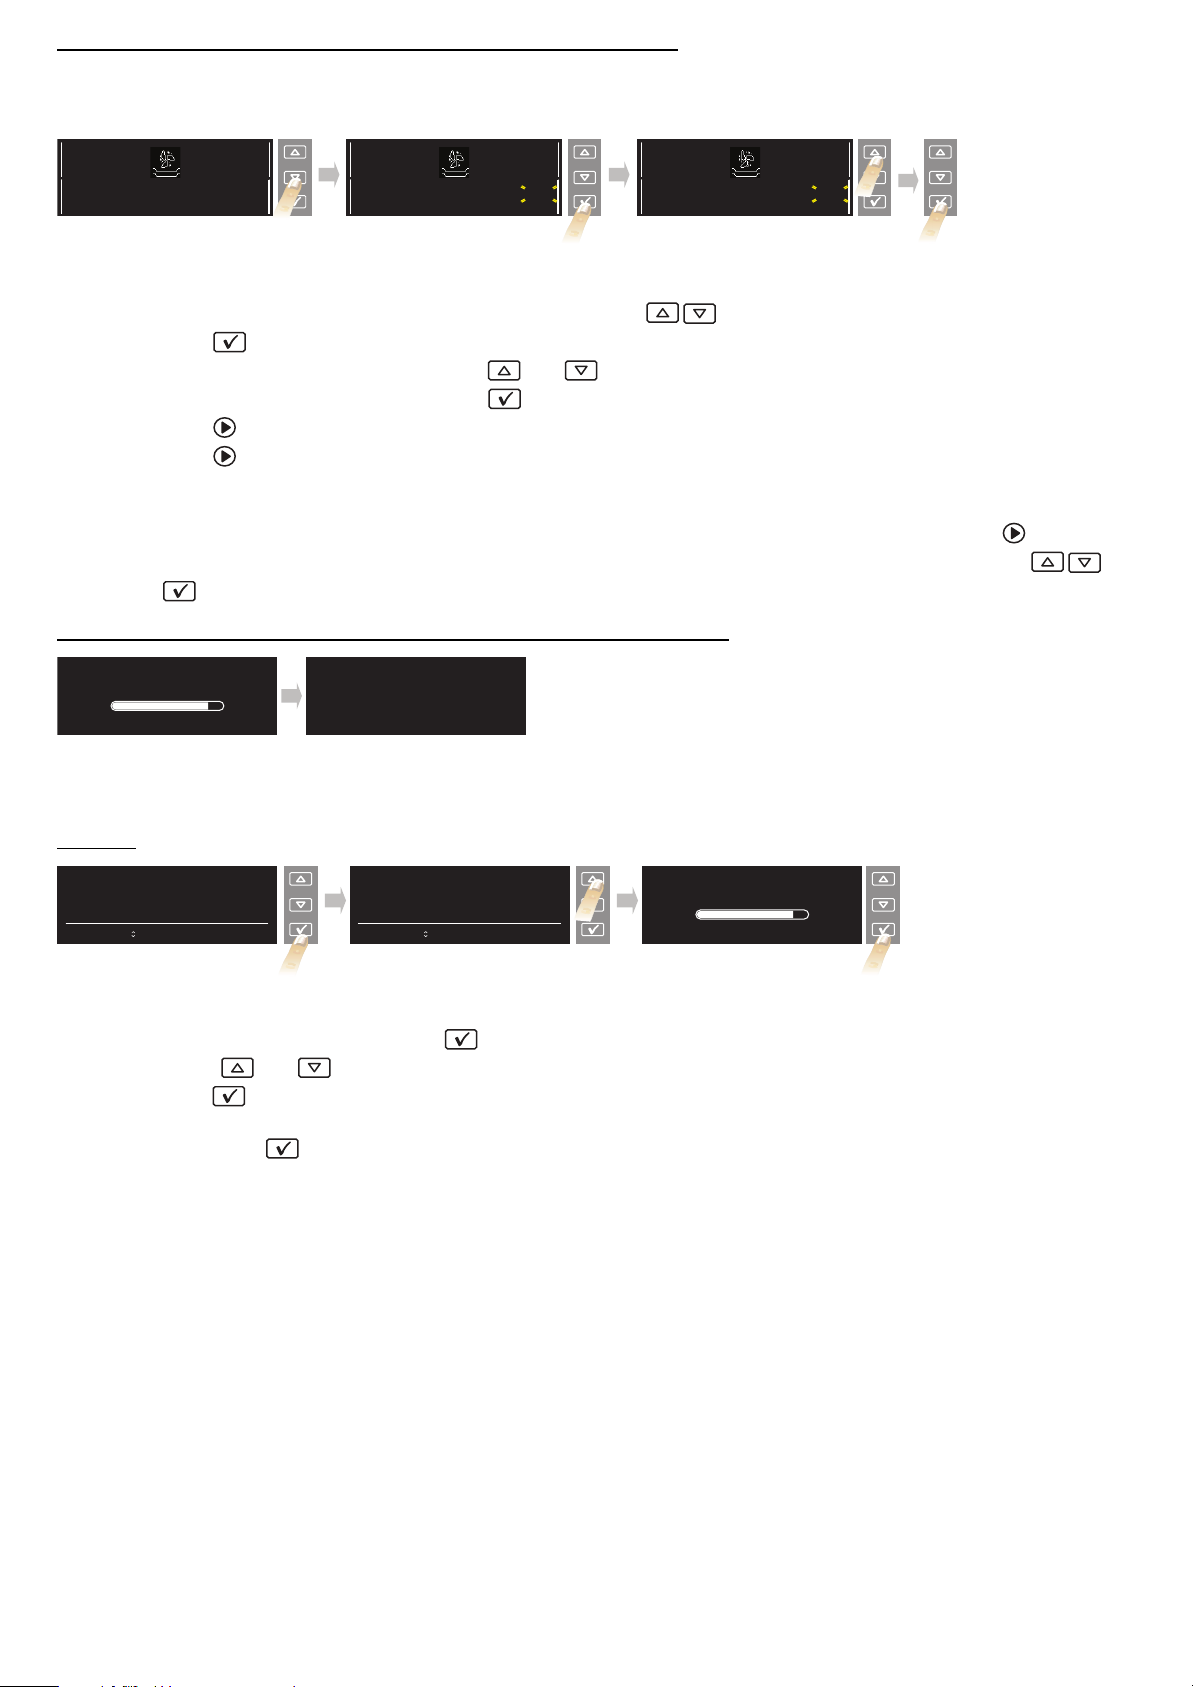
SETTING THE TEMPERATURE/OUTPUT OF THE GRILL
200°C
TEMPERATURE
No
PREHEAT
Forced Air
--:--
COOK TIME
--:--
END TIME
To change the temperature or output of the grill, proceed as follows:
1. Check that the cursor is positioned next to the temperature value (zone 1); press button to select the parameter to be
changed: the temperature values flash.
2. Use buttons to change to the desired value.
3. Press button to confirm and then press . The display indicates which shelf food should be placed on.
4. Press to start cooking.
The set temperature can also be changed during cooking by following the same procedure.
5. At the end of cooking, the end of cooking message is displayed. At this point the oven can be switched off by pressing ,
or cooking can be prolonged by pressing . When switched off, the display shows the cooling bar which indicates the
temperature inside the oven.
180°C
TEMPERATURE
No
PREHEAT
Forced Air
--:--
COOK TIME
--:--
END TIME
Insert food on level 3
Press when done
GB8
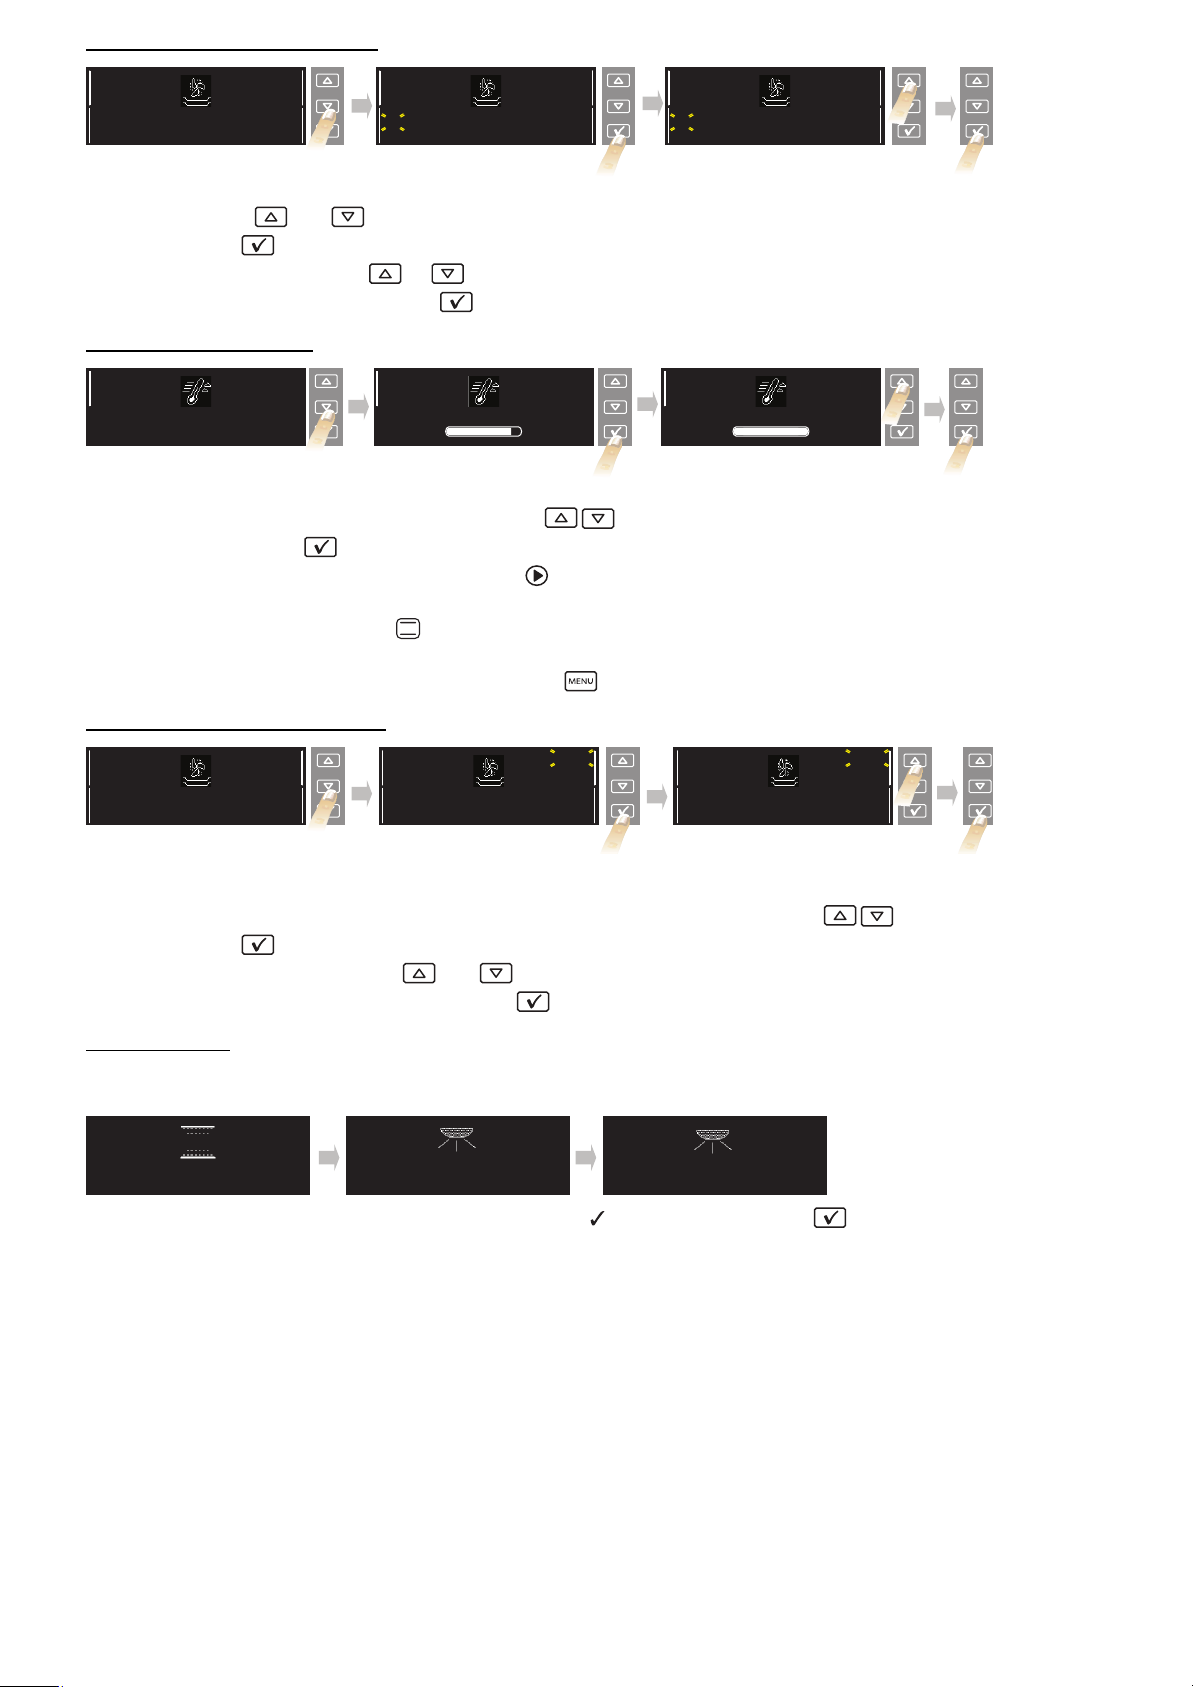
PREHEATING THE OVEN
180°C
TEMPERATURE
No
PREHEAT
Forced Air
--:--
COOK TIME
--:--
END TIME
180°C
TEMPERATURE
No
PREHEAT
Forced Air
--:--
COOK TIME
--:--
END TIME
180°C
TEMPERATURE
Yes
PREHEAT
Forced Air
--:--
COOK TIME
--:--
END TIME
If you wish to preheat the oven before inserting food, change the oven’s default selection as follows:
1. Using buttons and , move the cursor to preheating.
2. Press button to select the setting: “No” flashes on the display.
3. To change the setting, press or : the display shows “Yes”.
4. To confirm your choice, press button .
FAST PREHEATING
180°C
TEMPERATURE
Fast Preheating
If you wish to preheat the oven quickly before inserting food, change the oven’s default selection as follows:
1. Select the fast preheating function using buttons .
2. Confirm by pressing : the settings are displayed on the screen.
3. If the proposed temperature is that desired, press , otherwise proceed as described in previous paragraphs to change it. An
acoustic signal will sound when the oven has reached the set temperature. At the end of preheating, the oven automatically
selects the conventional function .
At this point food can be placed in the oven for cooking.
4. If you wish to set a different cooking function, press and select the desired function.
- 00:02
INSERT IN
180°C
TEMPERATURE
Preheating
- 00:02
INSERT IN
180°C
TEMPERATURE
Oven is Hot!
- 00:02
INSERT IN
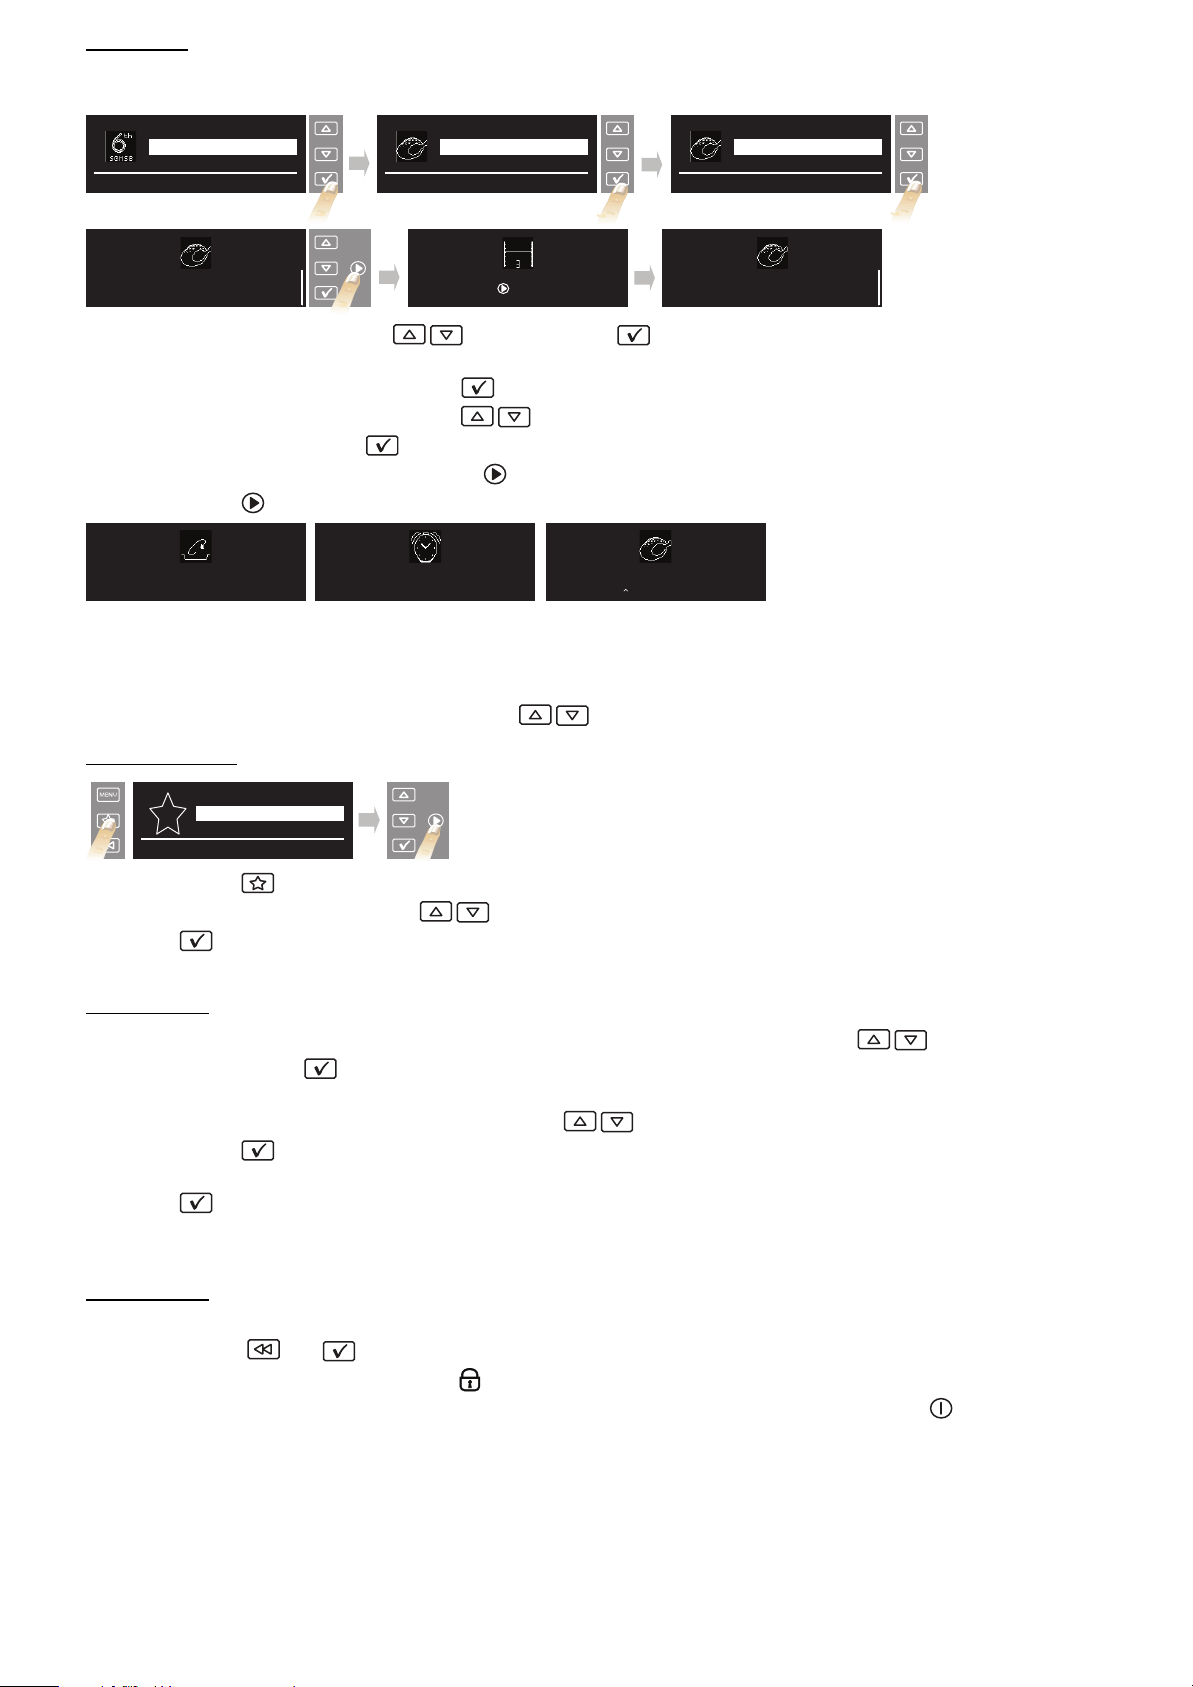
SETTING COOKING TIME
180°C
TEMPERATURE
No
PREHEAT
Forced Air
--:--
COOK TIME
--:--
END TIME
This function can be used to cook food for a set length of time, from a minimum of 1 minute to the maximum time allowed by
the selected function, after which the oven switches off automatically.
1. To select the function, position the cursor next to “cooking duration” using buttons .
2. Press button to select the setting; “00:00” flashes on the display.
3. Change the value using buttons and to display the desired cooking time.
4. Confirm the selected value by pressing button .
180°C
TEMPERATURE
No
PREHEAT
Forced Air
- 00:00
HH:MM
--:--
END TIME
180°C
TEMPERATURE
No
PREHEAT
Forced Air
- 00:20
HH:MM
19:20
END TIME
BROWNING
At the end of cooking, with certain functions, the display indicates the possibility of browning the surface of your dish. This function
can only be used when cooking time has been set.
- 00:05
COOK TIME
Cooking nished at 20:00
^ to prolong,
✓ to brown
Browning
At the end of cooking time, the display shows “^ to prolong, to brown”. Press button , and the oven starts a 5 minute
browning cycle. This function can only be used once after cooking.
20:05
END TIME
Browning nished at 20:05
GB9
SETTING END OF COOKING TIME / DELAYED START
The end of cooking time can be set, delaying the start of cooking by up to a maximum of 23 hours and 59 minutes. This can only
be done once cooking time has been set. This setting is only possible when pre-heating is not required for the selected
function.
180°C
TEMPERATURE
No
PREHEAT
Forced Air
- 00:20
HH:MM
19:20
END TIME
After setting cooking time, the display shows the end of cooking time (for example 19:20). To delay the end of cooking time, and
thus also the cooking start time, proceed as follows:
1. Position the cursor next to the end of cooking time using buttons .
2. Press button to select the setting: the end of cooking time flashes.
3. To delay the end of cooking time, use buttons and to set the desired value.
4. Confirm the selected value by pressing button .
5. Press button . The display indicates which shelf food should be placed on.
6. Press button to activate the function. The oven will start cooking after a period of time calculated so as to finish
cooking at the set time (for example, in the case of a dish which requires a cooking time of 20 minutes, if the end of
cooking time is set to 20:10, the oven will begin cooking at 19:50).
N.B.: during the interval before cooking starts, the oven can in any case be switched on by pressing button .
At any time during cooking, set values (temperature, grill setting, cooking time) can be changed using buttons
and button as described in previous paragraphs.
180°C
TEMPERATURE
No
PREHEAT
Forced Air
- 00:20
HH:MM
19:20
END TIME
180°C
TEMPERATURE
No
PREHEAT
Forced Air
- 00:20
HH:MM
20:10
END TIME
INDICATION OF THE RESIDUAL HEAT INSIDE THE OVEN
168°
Residual Heat
If at the end of cooking, or when the oven is switched off, the temperature inside the oven is over 50°C, the display shows the
current temperature and the bar indicating cooling in progress. When the residual heat reaches 50°C, the display shows the
current time.
19:42
TIMER
00 : 00 : 00
(HH) (MM) (SS)
Press to set Timer, ✓ to Start
This function can be used only with the oven switched off and is useful, for example, for monitoring the cooking time of pasta.
The maximum time which can be set is 1 hour 30 minutes.
1. With the oven switched off, press button : the display will show “00:00:00”.
2. Press buttons and to select the desired time.
3. Press button to start the countdown. When the set time has elapsed, the display will show “00:00:00” and an acoustic
signal will sound. At this point the time can be prolonged, proceeding as described above, or the timer can be deactivated
by pressing button (the time of day will be shown on the display).
01 : 10 : 00
(HH) (MM) (SS)
Press to set Timer, ✓ to Start
01 : 09 : 00
Timer
GB10
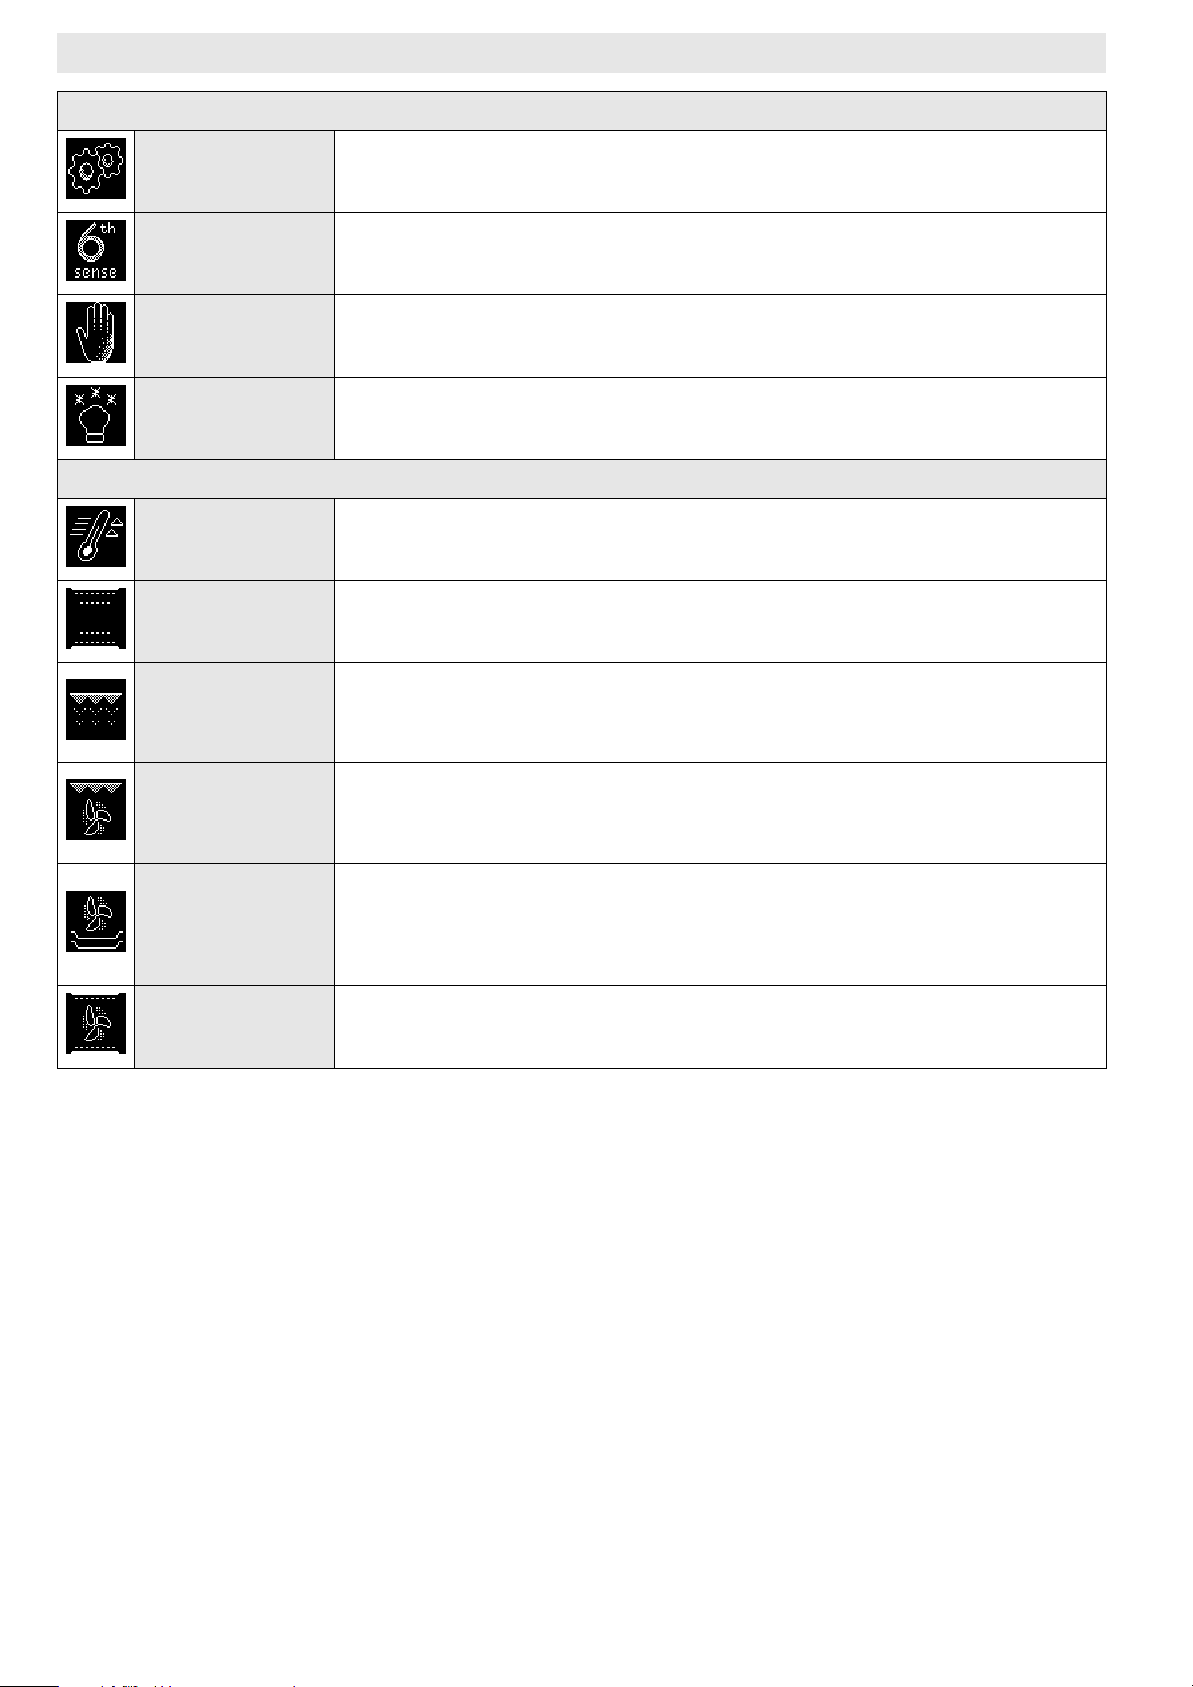
RECIPES
Thanks to “Sixth sense” technology, the oven offers 30 pre-set recipes with ideal cooking temperatures.
Simply follow the recipe as regards ingredients and the method of preparation. Then, proceed as follows:
Settings
Recipes
Traditional
Fully automatic 6th Sense recipes
Fish
Poultry
Vegetables
6th Sense: Press ✓ to view recipes
6th Sense: See cookbook for description
Chicken Breasts
Roast Chicken
Automatic
CONTROL
Roast Chicken
- 00:45
COOK TIME
19:45
END TIME
Insert food on level 3
Press when done
Automatic
CONTROL
Cooking
- 00:44
COOK TIME
19:45
END TIME
1. Select “RECIPES” using buttons and confirm with .
2. Select the dish to be cooked from the proposed list.
3. Confirm the selected dish using button .
4. Select the desired recipe using buttons .
5. Confirm by pressing button : the display shows the approximate cooking time.
6. Put the food in the oven and press button . The display indicates which shelf food should be placed on.
7. Press button to start cooking. To delay the start of cooking, see the relevant paragraph.
Please turn food
Cooking nearly nished
Please check on food
Cooking Finished at 19:45
Press to Prolong Cooking
NOTES: some dishes must be turned or stirred half way through cooking: the oven will emit an acoustic signal and the
display will indicate what action is required.
The initial cooking time displayed is merely for guidance: it can be prolonged automatically during cooking.
Shortly before cooking time finishes, the oven prompts you to check that the food is cooked to your satisfaction. If it is not, extra
time can then be added manually using the buttons .
SHORTCUTS
Lasagna
Pizza
Chicken Breasts
Your most used cooking functions
1. Press button : the display shows the 10 most used functions.
2. To scroll down the list, use buttons .
3. Press to select the desired function.
4. To change the settings of the selected function, proceed as shown in the previous paragraphs.
SETTINGS
1. To change some display settings, select “SETTINGS” from the main menu using buttons .
2. Confirm by pressing : the display shows which settings can be changed (language, volume of acoustic signal, display
brightness, time, energy saving function).
3. Select the setting you wish to change using buttons .
4. Press button to confirm.
5. Follow the instructions of the display to change the settings.
6. Press ; a message appears on the display confirming your selection.
N.B.: when the oven is switched off, if the ECOMODE (energy saving) function is selected (ON), the display switches off after a
few seconds. If, on the other hand, the function is not selected (OFF), after a few seconds the display is merely dimmed.
KEY-LOCK
This function can be used to lock the control panel buttons.
To activate it, press and at the same time for at least 3 seconds. If activated, the functions of the buttons are locked and
the display shows a message and the symbol . This function can also be activated during cooking. To deactivate it, repeat the
above procedure. When the key-lock function is activated, the oven can be switched off using button .
GB11
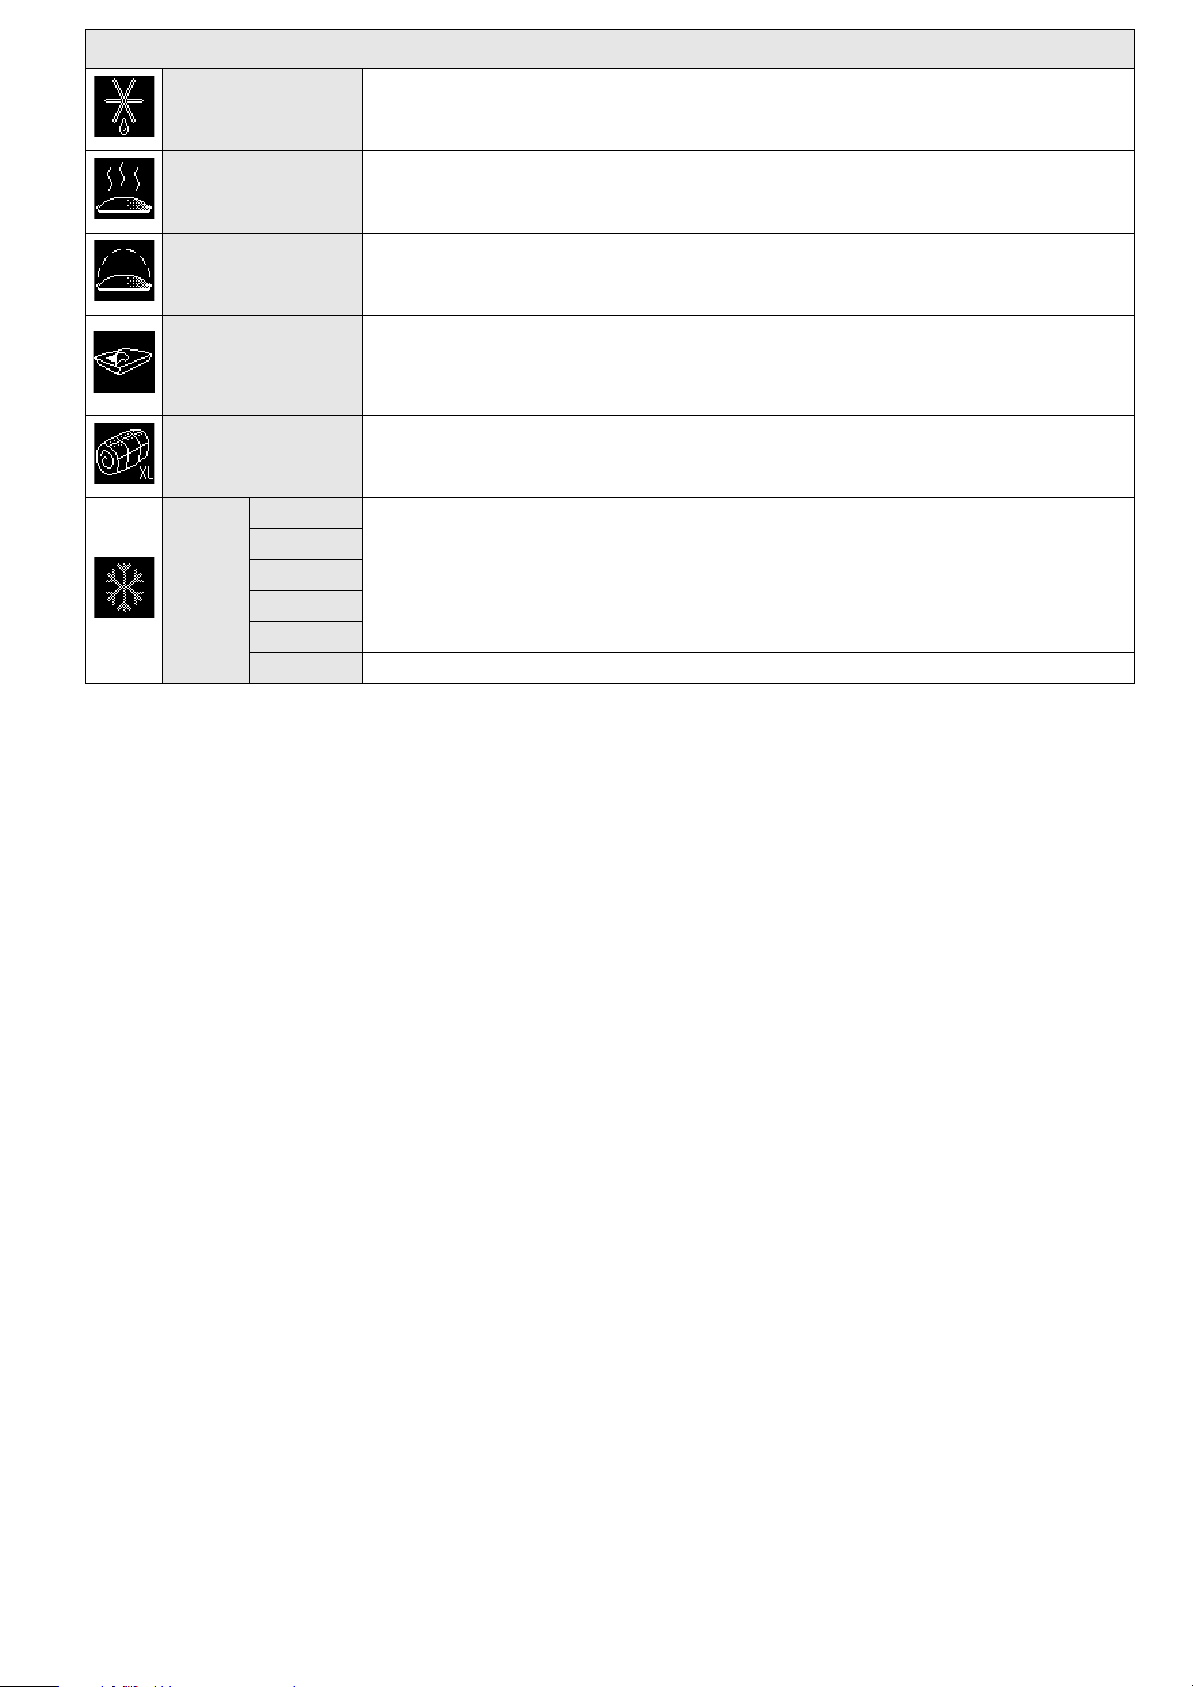
FUNCTION DESCRIPTION TABLE
MAIN MENU
SETTINGS
RECIPES
TRADITIONAL See TRADITIONAL FUNCTIONS.
SPECIALS See SPECIAL FUNCTIONS.
FAST PREHEATING To preheat the oven rapidly.
CONVENTIONAL
GRILL
TURBO GRILL
FORCED AIR
Setting the display (language, time, brightness, volume of acoustic signal, energy saving
function).
Selecting 30 different pre-set recipes (see enclosed recipe booklet). The oven automatically sets
the optimum cooking temperature, function and time. It is important to follow the instructions
given in the recipe book regarding preparation, accessories and which oven shelf to use.
TRADITIONAL FUNCTIONS
To cook any kind of dish on one shelf only. Use the 3rd shelf. To cook pizza, savoury pies and
sweets with liquid fillings, use the 1st or 2nd shelf. The oven does not have to be preheated.
To grill steak, kebabs and sausages; to cook vegetables au gratin and toast bread. Place food on
the 4th or 5th shelf. When grilling meat, use the drip tray to collect the cooking juices. Position it
on the 3rd/4th shelf, adding approx. half a litre of water. The oven does not have to be preheated.
During cooking the oven door must remain closed.
To roast large joints of meat (legs, roast beef, chickens). Position the food on the middle shelves.
Use the drip tray to collect the cooking juices. Position it on the 1st/2nd shelf, adding approx. half
a litre of water. The oven does not have to be preheated. During cooking the oven door must
remain closed. With this function you can also use the turnspit, if provided.
To cook a variety of food requiring the same cooking temperature on several shelves (maximum
three) at the same time (e.g.: fish, vegetables, cakes). This function can be used to cook different
foods without odours being transferred from one food to another. Use the 3rd shelf to cook on
one shelf only, the 1st and 4th to cook on two shelves, and the 1st, 3rd and 5th to cook on three
shelves. The oven does not have to be preheated.
CONVECTION BAKE
To cook meat and pies with liquid filling (savoury or sweet) on a single shelf. Use the 3rd shelf. The
oven does not have to be preheated.
GB12
SPECIAL
DEFROST
KEEP WARM
RISING
CONVENIENCE
MAXI COOKING
FROZEN
FOOD
French fries
To speed up defrosting of food. Place food on the middle shelf. Leave food in its packaging in
order to prevent it from drying out on the outside.
For keeping just-cooked food hot and crisp (e.g: meat, fried food or flans). Place food on the
middle shelf. The function will not activate if the temperature in the oven is above 65°C.
For optimal rising of sweet or savoury dough. To safeguard the quality of proving, the function
will not activate if the temperature in the oven is above 50°C. Place the dough on the 2nd shelf.
The oven does not have to be preheated.
Cooking ready meals kept at room temperature or from refrigerated cabinets (biscuits, liquid
cake mixtures, muffins, first courses and bakery products). This function gently cooks all food
quickly; it can also be used to reheat cooked food. Follow the instructions on the food packaging.
The oven does not have to be preheated.
To cook large joints of meat (above 2.5 kg). Use the 1st or 2nd shelves, depending on the size of
the joint. The oven does not have to be preheated.
Lasagne
Pizza
Strudel
Bread
Custom The temperature can be set from 50 to 250°C to cook other types of product.
The function automatically selects the ideal cooking temperature and mode for 5 different types
of ready frozen food. Use the 2nd or 3rd shelf. The oven does not have to be preheated.
GB13
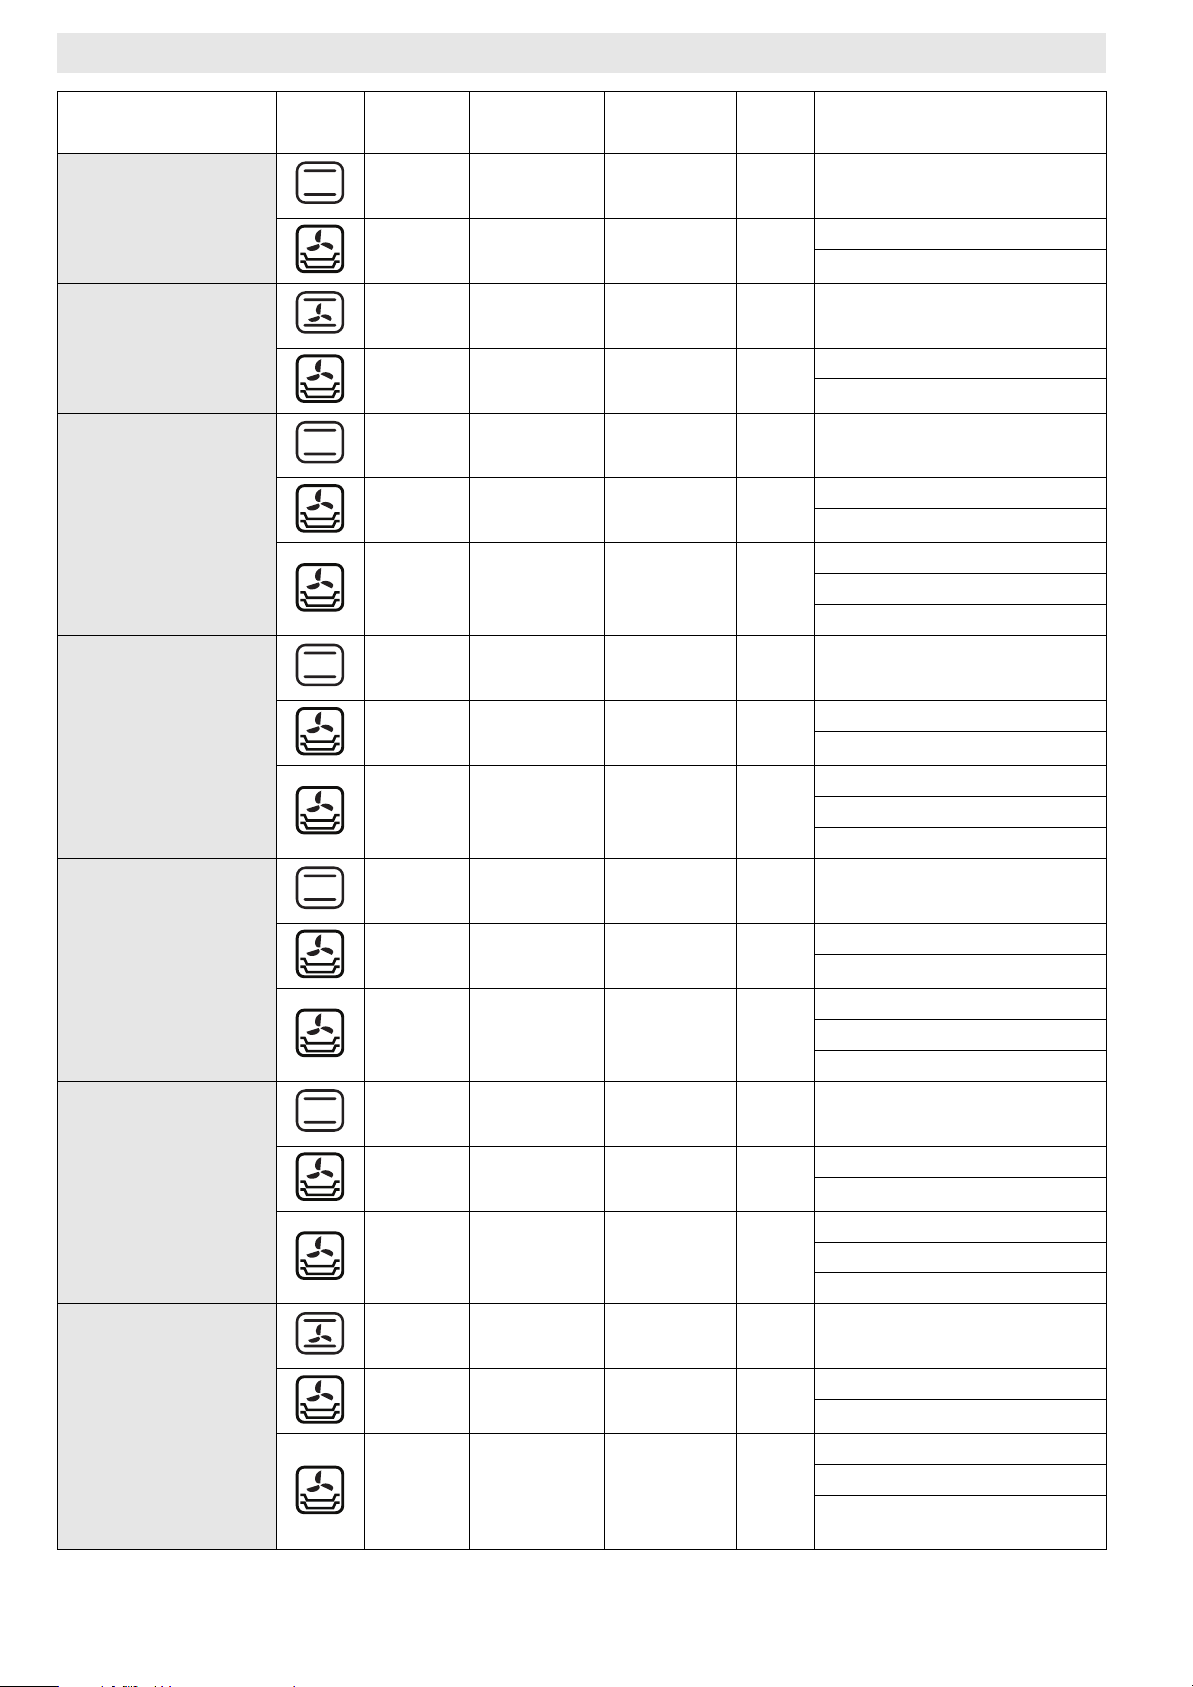
COOKING TABLES
Recipe Function Preheating Shelf
(from bottom)
- 2 / 3 160-180 30-90 Cake tin on wire shelf
Leavened cakes
- 1-4 160-180 30-90
- 3 160-200 35-90
Filled pies (cheesecake,
strudel, apple pie)
- 1-4 160-200 40-90
- 3 170-180 20-45 Drip tray or baking tray
Biscuits/Tartlets
- 1-4 160-170 20-45
- 1-3-5 160-170 20-45
- 3 180-200 30-40 Drip tray or baking tray
Temperature
(°C)
Time
(min)
Accessories
Shelf 4: cake tin on wire shelf
Shelf 1: cake tin on wire shelf
Drip tray/ baking tray or cake tin on
wire shelf
Shelf 4: cake tin on wire shelf
Shelf 1: cake tin on wire shelf
Shelf 4: wire shelf
Shelf 1: drip tray or baking tray
Shelf 5: oven tray on wire shelf
Shelf 3: oven tray on wire shelf
Shelf 1: drip tray or baking tray
Choux pastry
Meringues
Bread / Pizza / Focaccia
- 1-4 180-190 35-45
- 1-3-5 180-190 35-45
- 3 90 110-150 Drip tray or baking tray
- 1-4 90 140-160
- 1-3-5 90 140-160
-1 / 2190-250 20-50 Drip tray or baking tray
- 1-4 190-250 25-50
- 1-3-5 190-250 25-50
Shelf 4: oven tray on wire shelf
Shelf 1: drip tray or baking tray
Shelf 5: oven tray on wire shelf
Shelf 3: oven tray on wire shelf
Shelf 1: drip tray or baking tray
Shelf 4: oven tray on wire shelf
Shelf 1: drip tray or baking tray
Shelf 5: oven tray on wire shelf
Shelf 3: oven tray on wire shelf
Shelf 1: drip tray or baking tray
Shelf 4: oven tray on wire shelf
Shelf 1: drip tray or baking tray
Shelf 5: oven tray on wire shelf
Shelf 3: oven tray on wire shelf
Shelf 1: drip tray or baking tray
Savoury pies (vegetable
pie, quiche lorraine)
- 3 180-190 40-55 Cake tin on wire shelf
- 1-4 180-190 45-60
- 1-3-5 180-190 45-60
Shelf 4: cake tin on wire shelf
Shelf 1: cake tin on wire shelf
Shelf 5: cake tin on wire shelf
Shelf 3: cake tin on wire shelf
Shelf 1: drip tray or baking tray +
cake tin
GB14

Recipe Function Preheating Shelf
(from bottom)
- 3 190-200 20-30 Drip tray or baking tray
Temperature
(°C)
Time
(min)
Accessories
Vols-au-vent / Puff
pastry crackers
Lasagna / Baked pasta /
Cannelloni / Flans
Lamb / Veal / Beef / Pork
1Kg
Chicken / Rabbit / Duck
1Kg
Turkey / Goose 3 Kg - 2 190-200 80-130 Drip tray or oven tray on wire shelf
Baked fish / en papillote
(fillet, whole)
Stuffed vegetables
(tomatoes, courgettes,
aubergines)
To as t - 5 High 3-5 Wire shelf
- 1-4 180-190 20-40
- 1-3-5 180-190 20-40
- 3 190-200 45-55 Oven tray on wire shelf
- 3 190-200 80-110 Drip tray or oven tray on wire shelf
- 3 200-230 50-100 Drip tray or oven tray on wire shelf
- 3 180-200 40-60 Drip tray or oven tray on wire shelf
- 2 180-200 50-60 Oven tray on wire shelf
Shelf 4: oven tray on wire shelf
Shelf 1: drip tray or baking tray
Shelf 5: oven tray on wire shelf
Shelf 3: oven tray on wire shelf
Shelf 1: drip tray or baking tray
Shelf 4: wire shelf (turn food
Fish fillets / steaks - 3-4 Medium 20-30
Sausages / Kebabs /
Spare ribs / Hamburgers
Roast chicken 1-1.3 Kg
Roast Beef rare 1 Kg - 3 Medium 35-45
Leg of lamb / Shanks - 3 Medium 60-90
Roast potatoes - 3 Medium 45-55
Vegetables au gratin - 3 High 10-15 Oven tray on wire shelf
- 4-5 Medium - High 15-30
- 1-2 Medium 55-70
- 1-2 High 60-80
halfway through cooking)
Shelf 3: drip tray with water
Shelf 5: wire tray (turn food halfway
through cooking)
Shelf 4: drip tray with water
Shelf 2: wire tray (turn food two
thirds of the way through cooking)
Shelf 1: drip tray with water
Shelf 2: Turnspit
Shelf 1: drip tray with water
Oven tray on wire shelf (turn food
two thirds of the way through
cooking if necessary)
Drip tray or oven tray on wire shelf
(turn food two thirds of the way
through cooking if necessary)
Drip tray or baking tray (turn food
two thirds of the way through
cooking if necessary)
Lasagna & Meat - 1-4 200 50-100
Meat & Potatoes - 1-4 200 45-100
GB15
Shelf 4: oven tray on wire shelf
Shelf 1: drip tray or oven tray on
wire shelf
Shelf 4: oven tray on wire shelf
Shelf 1: drip tray or oven tray on
wire shelf

Recipe Function Preheating Shelf
(from bottom)
Fish & Vegetables - 1-4 180 30-50
- 3 Auto 10-15 Drip tray / baking tray or wire shelf
- 1-4 Auto 15-20
Frozen pizza
- 1-3-5 Auto 20-30
- 1-3-4-5 Auto 20-30
Temperature
(°C)
Time
(min)
Accessories
Shelf 4: oven tray on wire shelf
Shelf 1: drip tray or oven tray on
wire shelf
Shelf 4: oven tray on wire shelf
Shelf 1: drip tray or baking tray
Shelf 5: oven tray on wire shelf
Shelf 3: drip tray or baking tray
Shelf 1: oven tray on wire shelf
Shelf 5: oven tray on wire shelf
Shelf 4: drip tray or baking tray
Shelf 3: drip tray or baking tray
Shelf 1: oven tray on wire shelf
GB16

Table of Tested Recipes (in compliance with IEC 60350:99+A1:05 +A2:08 and DIN 3360-12:07:07)
Recipe Function Preheating Shelf
(from bottom)
IEC 60350:99+A1:05 +A2:08 § 8.4.1
- 3 170 20-30 Drip tray / baking tray
Shortbread
- 1-4 160 20-30
IEC 60350:99+A1:05 +A2:08 § 8.4.2
- 3 170 25-35 Drip tray / baking tray
- 1-4 160 30-40
Small cakes
- 1-3-5 160 35-45
IEC 60350:99+A1:05 +A2:08 § 8.5.1
Fatless sponge cake - 2 170 30-40 Cake tin on wire shelf
IEC 60350:99+A1:05 +A2:08 § 8.5.2
- 2 / 3 185 70-90 Cake tin on wire shelf
Two apple pies
- 1-4 175 75-95
IEC 60350:99+A1:05 +A2:08 § 9.1.1
Temperature
(°C)
Time
(min)
Accessories and Notes
Shelf 4: baking tray
Shelf 1: drip tray
Shelf 4: baking tray
Shelf 1: drip tray
Shelf 5: oven tray on wire shelf
Shelf 3: baking tray
Shelf 1: drip tray
Shelf 4: cake tin on wire shelf
Shelf 1: cake tin on wire shelf
Toast - 5 Hig h 3-5 Wire s hel f
IEC 60350:99+A1:05 +A2:08 § 9.2.1
Shelf 5: wire tray (turn food
Burgers - 5 High 20-30
DIN 3360-12:07 § 6.5.2.3
- 3 180 35-45 Drip tray / baking tray
Apple cake, yeast tray cake
- 1-4 160 55-65
DIN 3360-12:07 § 6.6
Roast pork - 3 190 150-170
DIN 3360-12:07 annex C
- 3 170 40-50 Drip tray / baking tray
Flat cake
- 1-4 170 45-55
halfway through cooking)
Shelf 4: drip tray with water
Shelf 4: baking tray
Shelf 1: drip tray
Shelf 3: wire shelf
Shelf 2: drip tray with water
(top up when necessary)
Shelf 4: baking tray
Shelf 1: drip tray
The cooking table advises the ideal function and cooking temperature to ensure the best results with all recipes. If you wish to
cook on one shelf only using the fan-assisted function, place food on the third shelf and select the temperature recommended
for the “FORCED AIR” function when cooking on more than one shelf.
When grilling food, leave a space of 3-4 cm at the front to facilitate removal from the oven.
GB17

RECOMMENDED USE AND TIPS
How to read the cooking table
The table indicates the best function to use for any given food, to be cooked on one or more shelves at the same time. Cooking
times start from the moment food is placed in the oven, excluding pre-heating (where required). Cooking temperatures and
times are purely for guidance and will depend on the amount of food and type of accessory used. Use the lowest recommended
values to begin with and, if the food is not cooked enough, then move on to higher values. Use the accessories supplied and
preferably dark coloured metal cake tins and oven trays. You can also use pans and accessories in pyrex or stoneware, but bear
in mind that cooking times will be slightly longer. To obtain best results, carefully follow the advice given in the cooking table
for the choice of accessories (supplied) to be placed on the various shelves.
Cooking different foods at the same time
Using the “CONVECTION BAKE” function, you can cook different foods which require the same cooking temperature at the same
time (for example: fish and vegetables), using different shelves. Remove the food which requires less cooking time and leave
food which requires longer cooking time in the oven.
Desserts
- Cook delicate desserts with the conventional function on one shelf only. Use dark coloured metal cake tins and always
position them on the wire shelf supplied. To cook on more than one shelf, select the forced air function and stagger the
position of the cake tins on the shelves, aiding optimum circulation of the hot air.
- To check whether a raising cake is cooked, insert a wooden toothpick into the centre of the cake. If the toothpick comes
out clean, the cake is ready.
- If using non-stick cake tins, do not butter the edges as the cake may not rise evenly around the edges.
- If the cake “sinks” during cooking, set a lower temperature the next time, perhaps reducing the amount of liquid in the
mixture and mixing more gently.
- For sweets with moist fillings (cheesecake or fruit pies) use the “CONVECTION BAKE” function. If the base of the cake is
soggy, lower the shelf and sprinkle the bottom of the cake with breadcrumbs or biscuit crumbs before adding the filling.
Meat
- Use any kind of oven tray or pyrex dish suited to the size of the piece of meat being cooked. For roast joints, it is best to
add some stock to the bottom of the pan, basting the meat during cooking for added flavour. When the roast is ready, let
it rest in the oven for another 10-15 minutes, or wrap it in aluminium foil.
- When you want to grill meat, choose cuts with an even thickness all over in order to achieve uniform cooking results. Very
thick pieces of meat require longer cooking times. To prevent the meat from burning on the outside, lower the position of
the wire shelf, keeping the food farther away from the grill. Turn the meat two thirds of the way through cooking.
To collect the cooking juices it is advisable to place a drip-tray with half a litre of water directly under the grill on which the meat
is placed. Top-up when necessary.
Turnspit (only in some models)
Use this accessory to evenly roast large pieces of meat and poultry. Place the meat on the spit rod, tying it with string if chicken,
and check that it is secure before inserting the rod in the seat located on the front wall of the oven and resting it on the respective
support. To prevent smoke and to collect cooking juices, it is advisable to place a drip-tray with half a litre of water on the first
level. The rod has a plastic handle which must be removed before starting to cook, and used at the end of cooking to avoid burns
when taking the food out of the oven.
Pizza
Lightly grease the trays to ensure the pizza has a crispy base. Scatter the mozzarella over the pizza two thirds of the way through
cooking.
Dough proving function
It is always best to cover the dough with a damp cloth before placing it in the oven. Dough proving time with this function is
reduced by approximately one third compared to proving at room temperature (20-25°C). Proving time for a 1 Kg batch of pizza
dough is around one hour.
GB18

DŮLEŽITÉ BEZPEČNOSTNÍ POKYNY
VAŠE BEZPEČNOST I BEZPEČNOST DALŠÍCH OSOB JE VELMI DŮLEŽITÁ
V tomto návodu a na samotném spotřebiči jsou důležitá bezpečnostní upozornění, která si musíte přečíst a dodržovat je.
Toto je symbol nebezpečí týkající se bezpečnosti, který upozorňuje uživatele na možná nebezpečí, jež by mohla hrozit
jim nebo dalším osobám.
Před každým bezpečnostním upozorněním je symbol nebezpečí a následující slova:
NEBEZPEČÍ
VAROVÁNÍ
Všechna bezpečnostní upozornění udávají konkrétní podrobnosti o možném nebezpečí a obsahují pokyny, jak snížit nebezpečí
poranění, poškození a úrazu elektrickým proudem zpsobené nesprávným použitím trouby. Dodržujte pečlivě následující
pokyny:
- Spotřebič je před každým instalačním postupem nutné odpojit od sítě.
- Instalaci nebo údržbu musí provést kvalifikovaný technik podle pokynů výrobce a v souladu s platnými místními
bezpečnostními předpisy. Neopravujte ani nevyměňujte žádnou část spotřebiče, pokud to není výslovně doporučeno v
tomto návodu.
- Uzemnění spotřebiče je podle zákona povinné.
- Napájecí kabel musí být tak dlouhý, aby umožnil připojení spotřebiče, zabudovaného do skříňky, k síti.
- Instalace musí být v souladu s platnými bezpečnostními předpisy, a proto je nutné použít jednopólový vypínač s
minimálním vzdáleností mezi kontakty 3 mm.
- Nepoužívejte rozdvojky ani prodlužovací šňůry.
- Chcete-li vytáhnout zástrčku ze síťové zásuvky, netahejte za napájecí kabel spotřebiče.
- Po provedení instalace nesmí být elektrické prvky spotřebiče pro uživatele přístupné.
- Spotřebiče se nedotýkejte vlhkými částmi těla a nepoužívejte ho bosi.
- Tento spotřebič je určen výlučně k pečení jídel v domácnosti. Není přípustné používat ho jiným způsobem (např. k
vytápění místnosti). Výrobce odmítá jakoukoli odpovědnost za škody vzniklé nevhodným použitím nebo nesprávným
nastavením ovladačů.
- Tento spotřebič nesmí používat osoby ani děti s jakoukoli fyzickou, smyslovou nebo duševní vadou, nebo bez patřičných
zkušeností a znalostí, pokud je nesledují osoby odpovědné za jejich bezpečnost, nebo jim nedaly příslušné pokyny k
použití spotřebiče.
- Přístupné části spotřebiče se při použití mohou zahřát na velmi vysokou teplotu. Malé děti se nesmí ke spotřebiči
přibližovat, a je třeba dohlédnout, aby si se spotřebičem nehrály.
- Během používání ani po něm se nedotýkejte topných těles nebo vnitřních ploch spotřebiče - hrozí nebezpečí popálení.
Spotřebič se nesmí dotýkat utěrek nebo jiných hořlavých materiálů, dokud dostatečně nevychladne.
- Po upečení jídla otvírejte opatrně dveře, aby mohl postupně uniknout horký vzduch nebo horká pára. Jestliže jsou dveře
zavřené, horký vzduch se odvádí ven otvorem nad ovládacím panelem. Větrací otvory proto nikdy nezakrývejte.
- Při vytahování nádob a příslušenství používejte kuchyňské chňapky a dávejte pozor, abyste se nedotkli topných těles.
- Do trouby nebo její blízkosti nedávejte hořlavý materiál. Při náhodném zapnutí trouby hrozí nebezpečí požáru.
- V troubě neohřívejte ani nepřipravujte jídla v uzavřených skleničkách nebo nádobách. Přetlakem uvnitř nádoby by
nádoba mohla explodovat a troubu poškodit.
- Nepoužívejte nádoby vyrobené ze syntetického materiálu.
- Přehřáté tuky a oleje se mohou snadno vznítit. Při pečení jídel s vysokým obsahem tuku nebo oleje troubu pečlivě
sledujte.
- Při sušení potravin nikdy nenechávejte spotřebič bez dozoru.
- Používáte-li při pečení masa nebo moučníků alkohol (např. rum, koňak, víno atd.) nezapomeňte, že se alkohol při
vysokých teplotách vypařuje. Hrozí nebezpečí, že se mohou alkoholové výpary ve styku s elektrickým topným tělesem
vznítit.
Označuje nebezpečnou situaci, kterou je třeba odvrátit, jinak způsobí vážná poranění.
Označuje nebezpečnou situaci, kterou je třeba odvrátit, jinak by mohla způsobit vážné
poranění.
Likvidace domácích elektrospotřebičů
- Tento spotřebič byl vyroben z recyklovatelných nebo opakovaně použitelných materiálů. Při jeho likvidaci se řiďte
místními předpisy pro odstraňování odpadu. Před likvidací spotřebič znehodnoťte odříznutím napájecího kabelu.
- Další informace o zpracování, rekuperaci a recyklaci domácích elektrických spotřebičů zjistíte u příslušného místního
úřadu, úřadu pro likvidaci domovního odpadu, nebo v obchodě, kde jste spotřebič zakoupili.
CZ19
INSTALACE
Po vybalení trouby se přesvědčte, že trouba nebyla při dopravě poškozena a že se dveře dobře zavírají. V případě problémů se
obraťte se na svého prodejce nebo na nejbližší servisní středisko. Aby se trouba nepoškodila, doporučujeme odstranit
polystyrénový podstavec až před instalací.
PŘÍPRAVA SKŘÍŇKY K VESTAVBĚ TROUBY
• Kuchyňský nábytek, který je v přímém kontaktu s troubou, musí být odolný vůči vysokým teplotám (min 90 °C).
• Je-li nutné skříňku přiříznout, proveďte tyto práce ještě před zasunutím trouby do skříňky a pečlivě odstraňte všechny
dřevěné třísky a piliny.
• Dno trouby nesmí být po provedené instalaci přístupné.
• Ke správnému provozu trouby je nutná minimální mezera mezi pracovní deskou a horním okrajem trouby.
PŘIPOJENÍ K ELEKTRICKÉ SÍTI
Zkontrolujte, zda napětí uvedené na typovém štítku spotřebiče odpovídá napětí ve vašem bytě. Typový štítek je umístěný na
předním okraji trouby (je viditelný při otevřených dveřích).
• Napájecí kabel (typ H05 RR-F 3 x 1,5 mm
autorizované servisní středisko.
OBECNÁ DOPORUČENÍ
Před použitím:
- Odstraňte ochranné lepenkové obaly, ochrannou fólii a nálepky z příslušenství.
- Vyjměte z trouby příslušenství a zahřejte ji asi na jednu hodinu na 200 °C, abyste odstranili pach a výpary z ochranného
tuku a izolačních materiálů.
2
) smí v případě potřeby vyměnit jen kvalifikovaný elektrikář. Obraťte se na
Během použití:
- Na troubu nepokládejte žádné těžké předměty, které by ji mohly poškodit.
- Neviste na dveřích a nic nezavěšujte ani za držadlo.
- Dno trouby nezakrývejte hliníkovou fólií.
- Nikdy nelijte vodu do vnitřku horké trouby; mohla by se poškodit smaltová vrstva.
- Nikdy neposunujte po dně trouby nádoby, mohli byste poškrábat smaltovaný povrch.
- Přesvědčte se, že se elektrické kabely jiných spotřebičů používaných v blízkosti trouby nedotýkají horkých částí, a že se
nemohou zachytit ve dveřích trouby.
- Troubu nevystavujte atmosférickým vlivům.
RADY K OCHRANĚ ŽIVOTNÍHO PROSTŘEDÍ
Likvidace obalového materiálu
Obal je ze 100% recyklovatelného materiálu a je označen recyklačním symbolem ( ). Obalový materiál proto nevyhazujte s
domácím odpadem, ale zlikvidujte ho podle platných místních předpisů.
Likvidace spotřebiče
- Tento spotřebič je označen v souladu s evropskou směrnicí 2002/96/ES o likvidaci elektrického a elektronického zařízení
(WEEE).
- Zajištěním správné likvidace tohoto výrobku pomůžete zabránit případným negativním důsledkům na životní prostředí a
lidské zdraví.
- Symbol na spotřebiči nebo příslušných dokladech udává, že tento výrobek nepatří do domácího odpadu, ale je nutné
ho odevzdat do příslušného sběrného centra pro recyklaci elektrických a elektronických zařízení.
Úspora energie
- Troubu předehřívejte pouze tehdy, je-li to výslovně uvedeno v tabulce pro pečení nebo ve vašem receptu.
- Používejte tmavé lakované nebo smaltované formy na pečení, které mnohem lépe pohlcují teplo.
- Troubu vypněte 10/15 minut před koncem doby pečení. Jídlo, které vyžaduje delší pečení, se bude dál péct i po vypnutí
trouby.
PROHLÁŠENÍ O SOULADU S PŘEDPISY
- Tato trouba, která je určena pro kontakt s potravinami, je ve shodě s evropským nařízením ( ) č. 1935/2004 a byla
navržena, vyrobena a prodána v souladu s bezpečnostními požadavky směrnice pro nízké napětí 2006/95/ES (která
nahrazuje 73/23/EHS a její další znění), s požadavky na ochranu směrnice “EMC” 2004/108/CE.
CZ20
JAK ODSTRANIT PORUCHU
Trouba nefunguje:
• Zkontrolujte, zda je v síti proud a zda je trouba elektricky připojená.
• Vypněte a opět zapněte troubu, abyste zjistili, zda porucha stále trvá.
Elektronický programátor nefunguje:
• Jestliže se na displeji objeví “ “ a po něm následuje číslo, obraťte se nejbližší poprodejní servis. V tomto případě sdělte
číslo, které následuje za písmenem “ “.
SERVIS
Než zavoláte do servisu:
1. Ověřte si, zda nemůžete vyřešit problémy sami pomocí bodů popsaných v “Jak odstranit poruchu”.
2. Vypněte a znovu zapněte spotřebič, abyste zjistili, zda porucha stále trvá.
Projevuje-li se závada i po provedení výše uvedených úkonů, zavolejte do nejbližšího servisu.
Vždy uveďte:
• stručný popis poruchy;
•typ a přesný model trouby;
• servisní číslo (číslo za slovem Service na typovém štítku), které je uvedeno na pravém okraji vnitřku trouby (je vidět při
otevřených dveřích trouby). Servisní číslo je uvedeno i na záručním listu;
•svoji úplnou adresu;
• své telefonní číslo s předvolbou.
Jestliže je oprava nutná, obraťte se na autorizované servisní středisko (které je zárukou použití originálních náhradních dílů a
správné opravy).
ČIŠTĚNÍ
VAROVÁNÍ
Vnější plochy trouby
DŮLEŽITÉ UPOZORNĚNÍ: nepoužívejte korozivní nebo abrazivní čisticí prostředky. Jestliže se tyto prostředky přesto
náhodně na troubu dostanou, ihned je otřete vlhkým hadříkem.
• Plochy trouby otřete vlhkým hadříkem. Jsou-li velmi zašpiněné, omyjte je roztokem vody s několika kapkami mycího
prostředku na nádobí. Nakonec troubu otřete suchým hadříkem.
Vnitřek trouby
DŮLEŽITÉ UPOZORNĚNÍ: nepoužívejte abrazivní houbičky ani kovové škrabky nebo drátěnky. Postupem času by mohly
zničit smaltovaný povrch a skleněné dveře trouby.
• Po každém použití nechte troubu částečně vychladnout a vlažnou troubu vyčistěte; lépe tak odstraníte přilepené
nečistoty a skvrny od zbytků jídel (např. potraviny s vysokým obsahem cukru).
• Používejte pouze značkové čisticí prostředky pro trouby a dodržujte pokyny výrobce.
• Sklo dveří omyjte speciálním tekutým prostředkem. Dveře trouby je možné při čištění sejmout ze závěsů (viz ÚDRŽBA).
• Horní topné těleso grilu (viz ÚDRŽBA) lze sklopit (jen u některých modelů) a vyčistit také strop trouby.
POZNÁMKA: při delším pečení jídel s vysokým obsahem vody (např. pizza, zelenina apod.) může na vnitřní straně dveří
a okolo těsnění kondenzovat voda. Po vychladnutí trouby vysušte vnitřní část dveří hadříkem nebo houbou.
- Spotřebič nikdy nečistěte čisticím zařízením na páru.
- Troubu čistěte, až když vychladne.
- Odpojte spotřebič od elektrické sítě.
Příslušenství:
• Příslušenství vložte ihned po použití do roztoku mycího prostředku na nádobí s vodou; je-li ještě horké, použijte
kuchyňské chňapky.
• Zbytky jídel snadno odstraníte vhodným kartáčkem nebo houbičkou.
Čištění zadní stěny a katalytických bočních panelů trouby (jsou-li u modelu):
DŮLEŽITÉ UPOZORNĚNÍ: nepoužívejte agresivní anebo abrazivní čisticí prostředky, drsné kartáčky, drátěnky nebo
spreje do trouby, které by mohly poškodit katalytický povrch a zničit jeho samočisticí vlastnosti.
• Nechte zahřát prázdnou troubu na 200 °C pomocí funkce s ventilátorem na asi jednu hodinu.
• Potom nechte troubu vychladnout a zbytky jídel odstraňte houbičkou.
CZ21
 Loading...