

Page 1

AKZ 184
GB FR
PRODUCT DESCRIPTION SHEET
To p
shelf
Bottom
shelf
1)
The fan will come on when the oven reaches a certain
temperature and may continue for a few minutes after the oven has
been switched off.
During the pyro-clean cycle the oven fan runs faster than during
normal cooking functions in order to ensure more efficient cooling.
2)
Prevents food from coming into direct contact with the grill.
Nevertheless, you are advised not to touch the safety guard whilst
the oven is on.
ACCESSORIES
Wire Shelf:
Baking tray:
CONTROL PANEL
1. ON/OFF - Function Selector Knob.
2. Selection cancellation or back button.
3. Confirmation button.
4. Pre-set values modification knob (temperature,
time, shelves). For browsing through the
functions.
1. Control panel
1)
2. Cooling fan
3. Grill safety guard
4. Door lock
(hidden)
2)
3)
5. Catalyser
6. Upper heating element safety guard
7. Upper heating element
8. Rear oven lamp
9. Turnspit slot
10. Round heating element
11. Oven fan
12. Lower heating element (hidden)
13. Oven cool door
3)
An automatic "door lock" mechanism activates during pyro-clean
and the indicator lamp lights up on the display .
4)
Opening the oven door when the oven is off, the internal light will
come on.
*Reduces the temperature of the outer oven surface and is strongly
recommended if there are children in the house
It is nonetheless advisable to keep children away from the
oven
.
Tu r n s p i t : Drip tray:
41 2 3
Retractable knobs
• To use this type of knob, press it in the middle.
• The knob comes out.
• Turn it to the required position.
Once cooking is over, turn the knob to 0 and press it
again to restore it to its original position.
Function
OOVEN OFF
RAPID PRE-HEAT
CONVENTIONAL
GRILL/TURBOGRILL
GRILL + TURNSPIT
FORCED AIR 160°C
MAXI COOKING
PASTRY
PYROLYTIC
SPECIAL FUNCTIONS
SETTING
AUTO RECIPES
Oven function chart
Preset
temperature
- - -
200°C 50°C - 250°C
200°C 50°C - 250°C
3 1-5
180°C 50°C - 250°C
175°C 50°C - 250°C
- - Consult the programmer description sheet
Temperature
range
50°C - 250°C
Description of function
To preheat the oven rapidly. As the temperature increases, the
thermostat indicators will light up in sequence. The booster
function cuts out automatically when the programmed temperature
is reached. The acoustic signal will sound and the appliance switches
to the CONVENTIONAL cooking function. Use for meat, fish and
poultry.
To cook meat, fish and poultry on the middle shelf. Preheat the
oven to the required cooking temperature and place the food in the
oven when the acoustic signal indicates the oven has reached the
preset temperature.
To grill steak, kebabs and sausages, to cook vegetables au
gratin and to toast bread.
The Grill function can be set to different power levels.
The oven door must be kept closed during the cooking cycle.
When cooking meat, pour a little water into the drip tray to reduce
smoke and fat spatters.
Ideally the meat should be turned during cooking
To grill large joints of meat (roast beef and other roast meats).
This function can be set to different power levels.
Preheat the oven for 3 - 5 min.
The oven door must be kept closed during the cooking cycle.
When cooking meat, pour a little water into the drip tray (on the
bottom shelf) to reduce smoke and fat spatters.
Ideally the meat should be turned during cooking.
The turnspit can be added to the grill function. To roast meat and
poultry. Fit the cradle into the second shelf level and thread the
food onto the spit, securing it with the prongs provided. Push the
spit all the way into the hole at the right of the back wall of the oven
and rest it on the cradle. Pour a little water into the drip tray (on
the first shelf level) to reduce smoke and fat spatters. Don't forget
to remove the plastic handle before closing the oven door and
replace it again when removing meat at the end of the cooking time.
To cook (without preheating) foods that require the same cooking
temperature on one or more levels (e.g.: fish, vegetables, sweets),
without transferring odours from one foodstuff to the other
To cook mostly large joints of meat (large roasts, turkey),
ideally on one shelf only, preferably the first or second shelf from
the bottom.
To cook pastry or confectionery on one or more levels. It is not
necessary to preheat the oven. Switch the position of the dishes
inside the oven during cooking time.
Consult the programmer description sheet
Consult the programmer description sheet
Consult the programmer description sheet
5019 310 56608
Page 2
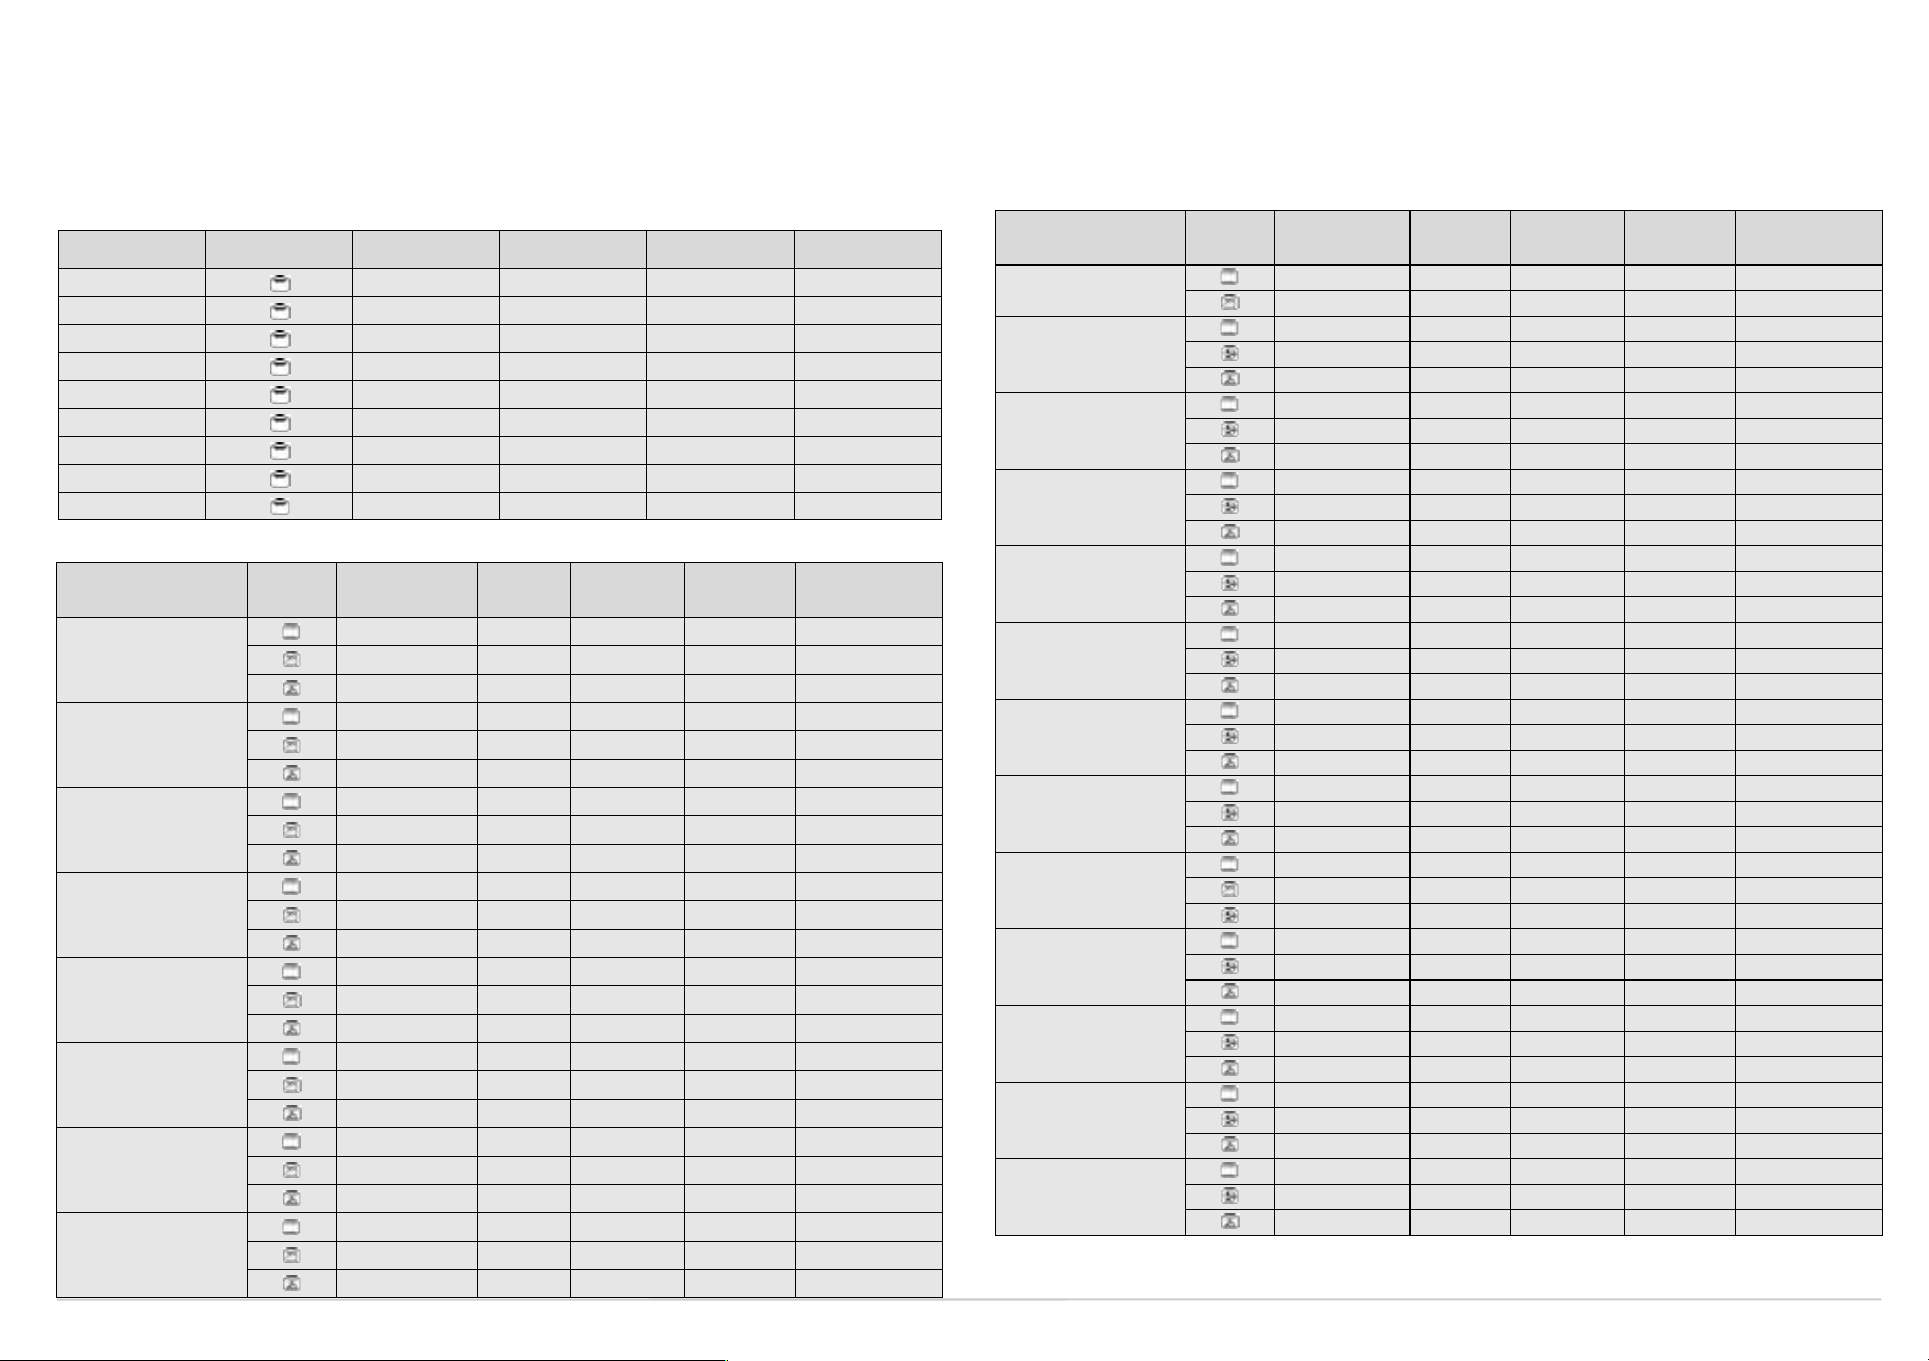
COOKING TABLE FOR GRILL FUNCTION
FOOD Function
Steak X 4 5 30 - 40
Cutlets X 4 5 30 - 40
Sausages X 3 - 4 5 30 - 40
Chops
Fish (steaks) X 3 - 4 5 30 - 40
Chicken legs X 3 - 4 5 40 - 50
Kebabs X 3 - 4 5 35 - 45
Spare ribs X 3 - 4 5 35 - 45
1/2 chicken X 3 5 45 - 55
Preheating
(5 minutes)
X
Shelf
(from the bottom)
4 5 35 - 45
Power
level
COOKING TABLES
FOOD Function Preheating
MEAT
Lamb, Kid, Mutton
Roast (Veal, Pork, Beef)
(kg.
1)
Chicken, Rabbit,
Duck
Turkey (kg. 4-6) + level 3
browning
Goose (kg. 2)
FISH
(WHOLE) (1-2 kg)
Gilt-head, Bass, Tuna,
Salmon, Cod
FISH (CUTLETS)
(1 kg)
Sword Fish, Tuna
VEGETABLES
Stuffed peppers and tomatoes
Shelf
(from the
bottom)
X 2 2 200 95 - 110
X 2 2 200 100 - 110
- 2 - 200 100 - 110
X 2 2 200 95 - 110
X 2 3 200 100 - 110
- 2 - 200 90 - 100
X 2 3 200 80 - 90
X 2 3 200 80 - 90
- 2 - 200 85 - 95
X 1 3 200 160 - 180
X 1 3 200 160 - 180
- 1 - 210 180 - 190
X 2 3 210 100 - 130
X 2 3 200 100 - 130
- 2 - 200 100 - 130
X 2 1 200 45 - 55
X 2 1 200 45 - 55
- 2 - 200 50 - 60
X 2 2 190 40 - 50
X 2 2 190 40 - 50
- 2 - 190 40 - 50
X 2 - 220 50 - 60
X 2 - 200 50 - 60
- 2 - 200 50 - 60
Level
Extra
browning
Temperature
(°C)
Cooking time
(minutes)
Cooking time
(minutes)
FOOD Function Preheating
Roast potatoes
SWEETS, PASTRIES, ETC.
Leavened cakes
Filled pies
(with cheese)
Ta rt s
Apple strudel
Biscuits
Choux buns
Savoury pies
Lasagna
Filled fruit pies
e.g. Pineapple, Peach
Meringues
Vol -au-v ents
Soufflés
Shelf
(from the
bottom)
X 2 3 220 50 - 60
X 2 3 200 50 - 60
X
- 1 - 170 40 - 50
- 2 - 170 40 - 50
X 2 - 180 80 - 90
- 2 - 170 70 - 80
- 2 - 170 80 - 90
X 2 - 190 40 - 50
- 2 - 180 40 - 50
- 2 - 180 40 - 50
X 2 - 200 50 - 55
- 1 - 3 - 200 50 - 55
- 2 - 200 50 - 55
X 2 - 180 20 - 30
- 1 - 3 - 170 20 - 30
- 2 - 170 20 - 30
X 2 - 180 35 - 45
- 1 - 3 - 180 35 - 45
- 2 - 180 40 - 50
X 2 - 200 40 - 50
- 2 - 190 40 - 50
- 2 - 190 40 - 50
X 2 1 200 45 - 60
X 2 1 200 45 - 60
- 2 - 200 45 - 60
X 2 - 190 50 - 60
- 2 - 190 40 - 50
- 2 - 190 40 - 50
- 2 - 90 120 - 150
- 1 - 3 - 90 120 - 150
- 2 - 90 120 - 150
X 2 - 220 35 - 45
- 1 - 3 - 200 35 - 45
- 2 - 200 35 - 45
X 2 - 190 40 - 50
- 2 - 180 45 - 55
- 2 - 180 45 - 55
2 - 180 40 - 50
Level
Extra
browning
Temperature
(°C)
Cooking time
(minutes)
NB.: When cooking meat with Forced air or Conventional functions, it is advisable to add the Browning function, using level 1 to 3.
Cooking times and temperatures are for guidance only.
Page 3

GB
p
Follow the instructions on the display
Description of control panel
The Function knob is used to select the various oven functions. Each click
of the knob corresponds to a function:
Displays
Auto Recipes
Setting (set)
Special functions
Turn the F knob two clicks
to the left.
the message SETTINGS
appears on the display
Remove the protective film, if present,
F
If the “<<” cancel
button is pressed the
operation set is cancelled
and the previous screen is
restored.
from the display.
Demo Mode
If the display shows the message "Demo Mode in progress" , the
heating elements of the cavity are disconnected.
To exit the "Demo" mode and restore normal oven operation, proceed
as follows:
1. Disconnect the oven from the mains and reconnect it within 60
seconds:
2. turn the Functions knob to the “Lamp” position”
3. press the “<<” button,
4. turn the Functions knob to the “0” - Stand by position,
5. Press the "OK" button”.
To enter the "Demo" sequence, proceed in the same manner.
The "-/+" browser knob has
different uses, depending on the
function chosen:
• For browsing through the
menus and the submenus
• For increasing/reducing the
indicated values
-/+
Once the desired setting appears
on the display it can be confirmed
pressing the "OK" button and the
next step in the programming can
be carried out.
• For browsing through the
cooking functions
• For selecting the Turbogrill
option
• For increasing/reducing the
cooking time and temperature
• For browsing through the
Safety Features
Child Safety with control panel lock
To activate or deactivate the "Child Safety Lock" press simultaneously on
the "<<" and "OK" buttons for 5 seconds. If activated, the functions of the
knobs and the buttons are locked and the display shows the symbol
Automatic switch-off device
For safety reasons, the oven switches off automatically (except for the
Special function) after 4.5 hours of continuous operation.
Door lock device during Self-cleaning.
For safety reasons, when the Self-cleaning function begins the door is
automatically locked by means of a mechanical device, and remains
locked as long as the message “Door locked” remains on the display.
For safety reasons, should the door lock device fail to activate properly,
the Self-cleaning function will not work. In this case, will show on
the display. This malfunction requires the intervention of the After-sales
Service before the Self-cleaning function is used again. The oven can
however be used as normal for cooking.
To save energy in Stand By mode, press button << to deactivate the
display (display in OFF mode). To switch the display back on, press the
button<< again.
Using the appliance for the first time
Setting the clock
The clock appears on the display.
Highlight the desired time using the "-/+" knob and
confirm your choice pressing the "OK" button”.
SETTINGS
Turn the knob two clicks to the left. The following message appears on the dis
language:
ENGLISH*
DEUTSCH
FRANCAIS
ITALIANO
ESPAÑOL
PORTUGUES
NEDERLANDS
SVENSKA
NORSK
DANSK
SUOMI
* factory setting
Reset brightness and
contrast settings
Set the Function
knob to OFF
Turn the Function
knob to settings
Press and hold “OK”
for 5 seconds.
Original factory
settings will be
restored.
Restoring a language
To change a language that has been set mistakenly, proceed as follows:
1. Turn the Function knob to the “SETTINGS” position, turn to
Language and confirm by pressing the “OK” button”.
2. Reselect the desired language using the "-/+" knob and confirm
pressing the "OK" button”.
Page 4

GB
Follow the instructions on the display
Timer
The minute minder can only be set when the oven is not in use and allows a maximum setting of 3 hours
and 59 minutes.
To set the timer:
1. Leave the Function knob at “0”.
2. Press the "OK" button”: the “TIMER” flashes on the display.
3. Turn the "-/+" knob to set the desired time.
4. Press the "OK" button to confirm the setting.
The minute minder starts its countdown; when the set time has elapsed, an acoustic signal sounds and the
word "END" appears on the display”. If the "OK" confirmation button is pressed, the acoustic signal stops
and the time of day appears on the display.
In any case, the minute minder can be deactivated at any time pressing the “<<” button twice.
Selecting the cooking time/delayed start:
Cooking time can be selected in order to turn the oven for a specified period of time. The maximum
programmed cooking time is 3 hours and 59 minutes.
When the oven is on, press the OK button to set cooking time. The symbol appears on the display.
Turn the knob “-/+” to display the desired cooking time. Confirm by pressing the OK button.
At this point, end of cooking time can be set so that food is ready at the desired time.
Press the “OK” button, appears on the display. Turn the knob “-/+” to display the desired end of
cooking time.
At the end of cooking “-/+ ADD TIME" appears on the display. Turn the “+/-” knob to prolong the
cooking time as desired.
Special functions
KEEP. WARM To maintain a constant temperature inside the oven
- 60°C: for heating food.
Ideally, the first shelf should be used.
Both cooking time and end of cooking time can be selected.
DOUGH PROVING To maintain constant temperature inside the oven
- 35°C: to raise pasta, bread and pizza.
DEFROSTING Ideal for thawing frozen food at room temperature.
- Leave the food in its wrapping to prevent it drying out.
Additional Options with Manual Functions
These functions are only available with the selection of cooking time and/or end of cooking time.
Keep. Warm
This function is used to maintain an oven temperature of 60°C at the end of cooking.
After setting cooking time and end of cooking time, press the OK button during cooking and select the
Keep Warm function.
At the end of the desired time, return the Function knob to 0 to switch the oven off.
Extra browning
This function is used for browning food at the end of cooking time.
At the end of cooking, extra cooking time can be added, or the Extra browning function selected. This
function is preset to last 5 minutes: press button << to deactivate the function at any time.
Auto Recipes
Turn the Function knob to the memory mode position to access the 15 auto recipes. Select the desired
recipe by scrolling through the recipes with the “-/+” knob “-/+”.
N.B: at the end of the set cooking time, extra cooking time can be added
At the end of cooking, “+/-” ADD TIME appears on the display. Turn the “+/-” knob to prolong the
cooking time as desired.
The oven features 15 auto recipes.
After selecting a recipe, press the OK confirmation button to start cooking.
Self-cleaning
Turning the Function knob to the Self-cleaning position (pyro), you can use the “-/+” knob to choose one
of the oven's two self-cleaning options “Rapid” or “Normal” .
These two functions differ in terms of set cycle duration (1 hour 15 minutes for the Rapid function and 3
hours for the Normal function).
With the normal self-cleaning function, duration can be changed from 2 to 3 hours.
By means of a guided sequence of operations, the oven allows you to set the Self-cleaning function end time
(delay start). The oven will switch to stand-by mode and the Self-cleaning will begin automatically after the
time calculated, in order to end the function at the set time.
N.B: before the self-cleaning cycle you are advised to remove the oven accessories.
 Loading...