

Page 1
AKP 951 AKP 925 PRODUCT DESCRIPTION SHEET
GB IE
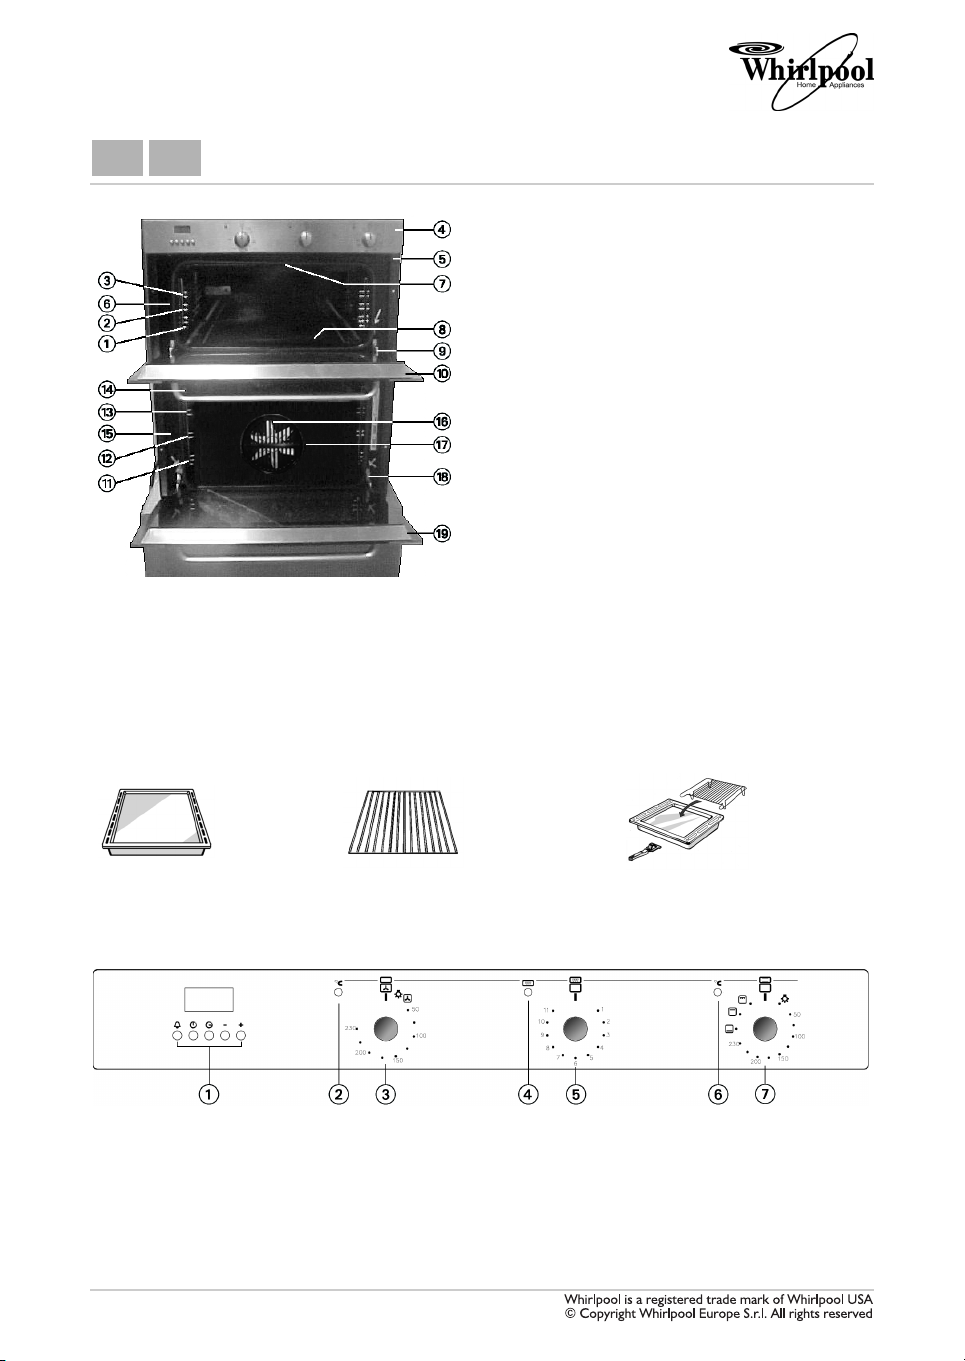
1.2.3. Top oven runner positions
11.12.13.14. Bottom oven runner positions
4. Control panel
5. Top oven cooling fan (not visible)*
6. Top oven light
7. Top oven grill heating element
8. Top oven bottom heating element
(not visible)
9. Top oven door hinges
10. Top oven door
15. Bottom oven light
16. Bottom oven fan
17. Bottom oven round heating element
18. Bottom oven door hinges
19. Bottom oven cool door
Accessories
• 2 wire shelves
• 2 drip trays
• Kit “Grill Pan Set”
Drip tray
1. Programmer (for bottom oven only)
2. Bottom oven temperature light
3. Bottom oven function selector
4. Top oven grill control light
5. Top oven grill control knob
6. Top oven temperature light
7. Top oven function selector
5019 310 66075/A
ACCESSORIES
Wire shelf
CONTROL PANEL
*Warning: The cooling fan (not visible)
still works for a few minutes after the
oven is switched off to allow an optimal
cooling of the appliance.
Grill Pan Set
Page 2

ELECTRONIC PROGRAMMMER
(FOR BOTTOM OVEN ONLY)
Settings
If a function button is briefly pressed and released, the
selected function is displayed for 5 seconds. Within this time,
it is possible to select a function. Five seconds after the
function button is released or after setting is completed, the
display returns to the time of the day. When a programme has
been set, it automatically starts immediately. The selection of
a function is accompanied by an acoustic signal.
Digital clock
• The programmer is complete with a digital clock which
has an illuminated display showing the hours and minutes.
When the appliance is first connected to the power
supply, and after any power failures or disconnections, the
time can be set with the +/- buttons.
• The counting-up/counting-down speed increases/
decreases when the buttons are held down.
• Select the time of the day function by pressing the
cooking time and end of cooking time buttons
simultaneously, and set the time of day with the +/buttons. When you set the clock, all previously set
programmes are cancelled.
Semi-automatic operation with cooking time
• Turn the oven on and set the desired temperature.
• Press the cooking time button and set the required time
with the + button (e.g. for 30 minutes cooking time, enter
30 minutes). The ”A” indicator and cooking pot symbol
come on. When the cooking time has elapsed, the oven
switches off, the acoustic signal sounds and the “A”
indicator starts blinking. To mute the alarm, press the
cooking time and end of cooking time buttons
simultaneously. The oven will then return to manual mode.
Semi-automatic operation with end of cooking time
• Turn the oven on and set the desired temperature.
• Press the end of cooking time button and set the
required end time with the + button (e.g. if the actual
time of the day is 14.00 and you require 30 minutes
cooking, enter 14.30). The “A” indicator and cooking
pot symbol will come on. When the time of the day
reaches the end of cooking time, the oven switches off,
the acoustic signal sounds and the “A” indicator starts
blinking. To mute the alarm, press the cooking time and
end of cooking time buttons simultaneously. The oven
will then return to manual mode.
Timer
Cooking time with automatic operation
End of cooking time
Decreases the current value (all functions)
Increases the current value (all functions)
Automatic operation
Cooking time and manual mode
Minute minder
Fully automatic operation
• Turn the oven on and set the desired temperature.
• Press the cooking time button and set the required time
with the +/- buttons (e.g. for 30 minutes cooking, enter
30 minutes). The “A” indicator comes on.
• Select the end of cooking time. The earliest possible end
time is displayed. Set the required end of cooking time
with the + button (e.g. to finish cooking at 14.00, enter
14.00). The oven switches on at the specified time
(e.g. if the end of cooking time is 14.00 and the cooking
time 30 minutes, the cooking cycle will start at 13.30)
and switches off when the established cooking time has
elapsed. After the automatic cooking cycle has ended,
the “A” indicator starts blinking accompanied by the
acoustic signal. To mute the alarm, press the cooking
time and end of cooking time buttons simultaneously.
The oven will then return to manual mode.
Minute minder
Press the minute minder button and set the required time
with the +/- buttons.
As the set time elapses the bell symbol remains alight.
When the set time has elapsed, the acoustic signal sounds.
To mute the alarm press the timer button. The minute
minder does not control any oven function.
Acoustic signal
The acoustic signal sounds at the end of a minute minder
cycle or a cooking cycle for a period of 7 minutes. Once
you have set the clock on the time of day (with all the
other functions cancelled), you can set the level of the
acoustic alarm by pressing the - button.
Three levels are available (low - medium - high).
Setting error
This will be indicated by the acoustic signal and by the
blinking auto symbol. The faulty setting can be corrected
by resetting either the cooking time or the end of cooking
time or by cancelling the programme.
Cancelling a programme
To cancel a programme press the cooking time and end of
cooking time buttons simultaneously. This will select the
manual function. Every programme will be automatically
cancelled, once it has come to an end.
Page 3

OVEN FUNCTIONS
Top oven functions table
Function Description of function
1OVEN OFF
LAMP
STATIC
BOTTOM
HEATING
ELEMENT
TOP HEAT ONLY
DOUBLE GRILL
SWITCHING ON THE OVEN
Please operate as follows:
• Turn the selector knob “7” clockwise to the symbol of the required function.
• The oven light switches on.
• When the required temperature has been reached, the light will switch off.
• At the end of cooking turn the selector knob “7” anti-clockwise to Position “1”.
COOKING TABLES
FOOD Function Preheating
Chicken yes 1 200 55 - 65
Steak and kidney pie yes 1 180 110 - 120
Victoria sandwich cake yes 2 180 25 - 35
Semi-rich fruit cake yes 2 140 170 - 200
COOKING TABLE FOR GRILL FUNCTION
FOOD Function Preheating Grill power level
To a s t yes 11 1 - 3
Pork chops yes 11 30 - 35
Spits yes 11 35 - 40
Bacon rasher yes 11 15 - 20
Sausages yes 11 25 - 35
N.B.: Cooking times are indicative.
-
• To switch on the oven light.
• To cook meat, fish and poultry in the oven.
• Preheat the oven to the required cooking temperature and place the food
inside as soon as the red thermostat light turns off.
• It is advisable to use the second or third level.
• Turn the selector knob “7” clockwise and set the desired cooking
temperature between 50°C and 230°C.
• The thermostat light “6” switches on.
• The oven light switches on.
• When the required temperature has been reached, the thermostat light
will switch off.
• At the end of cooking.
• Turn the selector knob “7” anticlockwise to position “1”.
• To finish cooking fruit or cheese cakes or to thicken sauce.
• Use this function for the last 10/15 minutes of cooking time.
• For browning food.
• Use the upper heating element for the last 10 or 15 minutes of cooking time.
• To cook meat (smoked bacon, steaks, sausages, etc.) and for making toast.
• Preheat the oven for 5 min. with the door closed.
• For best results, leave the oven door open when grilling.
• Arrange food on the wire shelf. When cooking meat, to avoid spatters of
fat and smoke, pour a little water into the drip tray.
• Turn the food during grilling.
• Once the function has been selected, turn the power knob “5” clockwise
to the required power level (1-11). The thermostat indicator light switches
on; when the required cooking power is reached it will turn off.
Level
(from the bottom)
Temperature
(°C)
Cooking time
min.
Cooking time
min.
Page 4

OVEN FUNCTIONS
Bottom oven functions table
Function Description of function
1OVEN OFF
LAMP
FORCED AIR
FUNCTION
-
• To switch on the oven light.
• To cook (without preheating) foods that require the same cooking temperature
on one or more levels (e.g.: fish, vegetables, sweets), without transferring odours
from one foodstuff to the other.
SWITCHING ON THE OVEN
• Tu r n t h e kn ob “3” clockwise to the required temperature. The thermostat light switches on. When the required
temperature has been reached, the light will switch off.
• The oven light switches on.
At the end of cooking time:
• Turn the knob to “1” position.
COOKING TABLES
FOOD Function Preheating
Apple plate no 2 180 35 - 45
Small cakes no 1 + 3 175 35 - 40
Scones yes 1 + 3 200 10 - 15
Roast beef + potatoes + fruit pie no
Yorkshire pudding (12 buns) no 2 200 25 - 30
N.B.: Cooking times are indicative.
Level
(from the
bottom)
1
3 35 - 40
Temperature
(°C)
190
Cooking
time
min.
60 - 70
 Loading...