

Whirlpool ADG 4551 IX, ADG 4551 NB, ADG 4551 WH User Manual

ADG 4551 IX/NB/WH
To review the section on tro ubleshooting Tips
will helpyouto solve somecommon problems
byyour self .
Dear Cus tom er ,
Pleasecarefully readthis manualbeforeu singthe
dishwasher, itwill helpyou to use andmaintainthe
dishw ash er proper ly.
Passit on toany subsequentownerof the applianc e.
This ma nua l c on tain s section s on safety Instruct ions ,
Operating Instructions, InstallationInstructions and
Troubles hooting Tips, et c.
The manufacturer, following a policy of constant
development and updati ng of the product, may
make modifications witho ut giving prior notice .
Dishw as h er Fe at u re s............ . .. .......... .. . ... .. ... ...3
A WaterS oft ener......... ...... ...... ....... ...... ..... ..4、 ..
Attentio n befor e or after loading the Dish wash er
Baskets. .........................................................9
FilteringSystem. ............................................14
Caring forthe Dishwash er..................... .........15.
Howto use the 3in1 function............................8
B Loadi n g th e S al t intothe Soft en er.......... .. . .. ..5、
C Fill the Rinse Aid Dispenser..... ...... .. .. .. 5、 ..... ...
D Fun ctionofDetergent .........................6
、
........
Loadingthe upper ...............................9Basket
Loading the Lower ...............................10Basket
CutleryBasket........................................... ...11
WashCycleTable...........................................12
Turning on the Appliance................................13
Changethe Programme.............. ................13....
At theEnd ofthe WashCycle...........................13
ControlPanel...................................................3
Keepit to referto it ata later date.
Ifyo u can not solv e the problems by yourself ,
please ask for the help of professiona l techn icians.
Beforecallingfor service.................................23
Errorcodes. ..................................................24
Technicalin formation.....................................25
WaterConnection...........................................22
16
Please carefully rea d the installation inst ruction
.....................................................................
....17Aesthetic panel's dim ensions and inst allation
Tension adjus tment of the door spring .19..... . .. ... . ..
Connectionof drainhoses.......................................19
Dishwasherinstallation s teps..........................20
1
This appliance must be grounded. In the event of a
malfunction or breakdown, grounding wil l reduce
the risk of anelectric shock by providinga path of
least resistance of electric current. This appliance
is equipped with a cord having an equipment-
grounding conductor and a groundingplug.
The plugmust be plugged into an appropriate outlet
that is installed and grounded in accordance with
all local codes andordinances.
Improper connection of the equipment-grounding
conductor canresult in the riskofan electric shock.
Check with a qualified electrician or service
representative if you are in doubt whether the
appliance isproperly grounded. Do not modify the
plug provided with the appliance; If it does not fit
the outlet. Have a proper outlet inst alled by a
qualified electrician.
Keep children away from detergent and rinse aid, keep
child awayfrom the opendoor of the dishwasher,
there could still be some detergent left inside.
ren
Do not abuse, sit on, or stand on the door ordish
rack of the dishwasher.
Do not wash plastic items unless they are marked
dishwasher safe or the equivalent. For plastic items
n
ot so marked, check the manufacturer's
recommendations.
Use only detergent and rinse additives
designed for an automatic dishwash er.
Never use soap, laun dry de tergent, or hand
washing detergent inyour d ishwasher.K eep
these products out oft he reach of childr en.
During installation,thepowersupplymust not
beexcessively or dangerously bentor flattened.
Do not tamper withcontrols.
Do not operate your dishwasher unless all
enclosure panels are properly in place. Open
the door very carefully if thedishwasher is
operating, there is a risk of water squirting out.
Do not place any heavy objects the
door when it is open. The appliance could tip
forward.
on or stand on
When lo ad ing it e m s to b e washe d:
1) L ocate sharp items so that theyarenot likely
todamage the door seal;
2 Warn ing: Knives and other ute nsils with
sh a rp poi n ts mu st be l oa ded in the bas k et
with their poi nts down or placed in a
horizontal position.
)
When using your dishwasher, you should
prevent plastic items fro m coming into contac t
with the heating element .(This instru ction is only
applicable to machines with a visual h eating
element.)
If the supply cord is damaged, it must be repl aced
by the manufacturer or it s service agent or a
similar ly qual ifi e d person i n orde r to av oid a
hazard.
Please dispose of packing m aterials properl y.
Use the dishwasher only for its intended functi on.
Remove the door tothe washing compartmentwhen
removing an old dishwasherfromservice or discarding it.
Dishwasher detergents are stronglyalkaline,they
can be ext remelyd angerous if swa llowed.Av oi d
contact with skin and eyes and keep children away
from th e dishwasher when t he door is open.
Check thatthe detergent comparment is empty
after completio no f the wash cycle.
The appliance is to be connected to the water
mainsu sing new hose sets and that oldhose-sets
sho ul d not be reu sed.
Themaximumnumberof place settings to be
washed is 9.
Themaximumpermissibleinletwaterpressureis
1Mp a .
Theminimumpermissibleinletwaterpressureis
0.04Mpa.
Children should be supervised toensure that they do
not play with the appliance.
This applianceis not intended for use by persons
(including children with reduced physical, sensory or
mental capabilities,or lack of experience and
knowledge ,unlessthey have been given supervision
or instruction concerning us eof the appliance by a
person responsible for their safety.
)
When usin g your dishwasher, follow the precautions listed below:
The door should not be left open,
since this could increase the risk of trippi ng.

2
Dispose of the dishwas her packaging mater ial correctly.
All packaging mate rials can be recy cled.
Plastic parts ar em arked w ith the standard inter national abbrevi ations:
PE for polyethylen e, e.g. sheet wrapping m aterial
PS forpolysty rene, e.g. padding material
POM po lyoxymethyle ne, e.g. plastic clips
PP polypropylene , e.g. Salt filler
ABS Acrylonitri le Butadiene Sty rene, e.g . Control Panel .
Packagingmaterial could bedangerous for children!
For disposing of pa ckage and the appliance please got o a recycling cen tre. Therefore cut
offthepower s upplycableand mak ethe door closingdevice unusable.
Cardboardpackagingis manufactured from recycled paper andshould bedispos edin the
waste paper collec tion for recyc ling.
By ensuring this produ ct is disposed of corr ectly,you wil l help prevent potent ial negati ve
consequences f or the environment a nd human health, which cou ld otherwise be caus ed
byinappropriate wastehandling ofthisproduct.
For more detail ed informatio n about recycli ng of this product , please contact your local
city office and your househo ld waste disposal servic e.
DISPOSAL: Do not dispose this pr oduct as unsorted m unicipal waste . Collection of such
waste separately for spe cial treatment is neces sary.
WARNING!
Back View
Front view
5
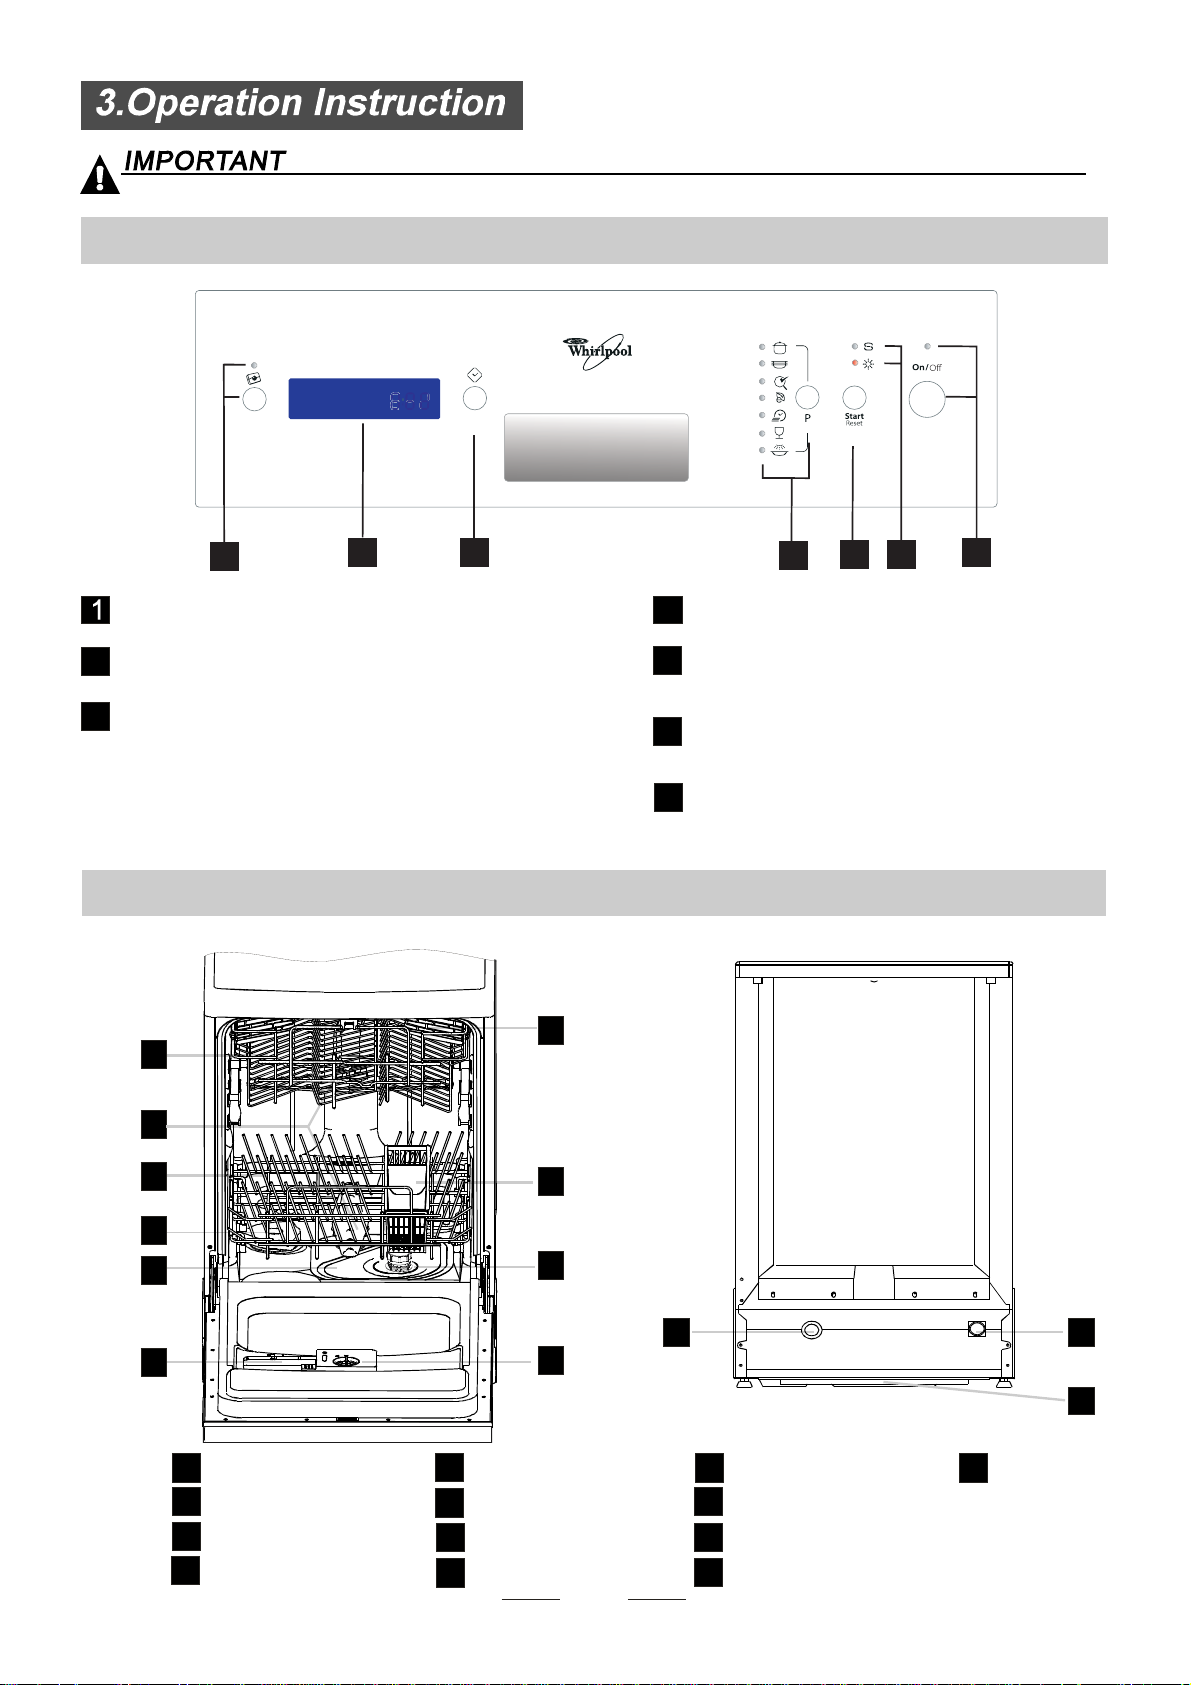
Program indicat or lights and bu tton: To select
one of t he seven and show the washing program.
2
3
4
3in1 indicator light / 3in1
functionbutton: Toselect and show 3in1 .
Start and rese t button: To start the s elected washing
program or reset th e washing program when the
machine is working.
Display wi ndow : Program r emaini ng ti me, delay t im e,
running ind i cator, temper ature of water, Error c odes, et c.
6
Salt and rinse aid warn ing light s: Tosh o w
when the salt cont ainer or disp enser need to be
refille d
7
Power indicatorlightandswitch: To turnon/off
and show the powe r supply.
Delayed Start Button: Topreset the wash ti mer and delay
the starting time up to 24 hours. Every press of this butt on
increases the time by 60 minutes.
3
Dishwasher Features
Control Panel
beforeusingitforthe firsttime.
To get the bestperformance fromyour dishwasher, r ead all operatinginstructions
MainFilter
Detergent Dispense r
CupShelf
CutleryBasket
Coarse Filter
Rinse Aid Di spenser
Inlet pipe connector
Drainpipeconnector
Lower Bask et
Spray Arms
Upper B ask e t
1
Salt Container
5
6
7
8
9
10
12
11
3
2
4
11 12
1
2
3
4
5
6
7
8
9
10
on
Off
13
Tray ass
13
1
2
3
4
5
6
7
Before using your dishwasher for the first ti me:
The water softener must be set manu ally, usingth e water hard ness dial.
The water softener is designed to remove min erals and salts from t he water,wh ich would have
a detrimental or adverse effect on the operation of the appliance. Theh igher the
content of these minerals and salts, the harde r your water is. The softener shou ld be
adjusted according to the hardness o f the water in your area. Yourloca l Water A uthority
can advise youon thehardnesso fthewaterinyourarea.
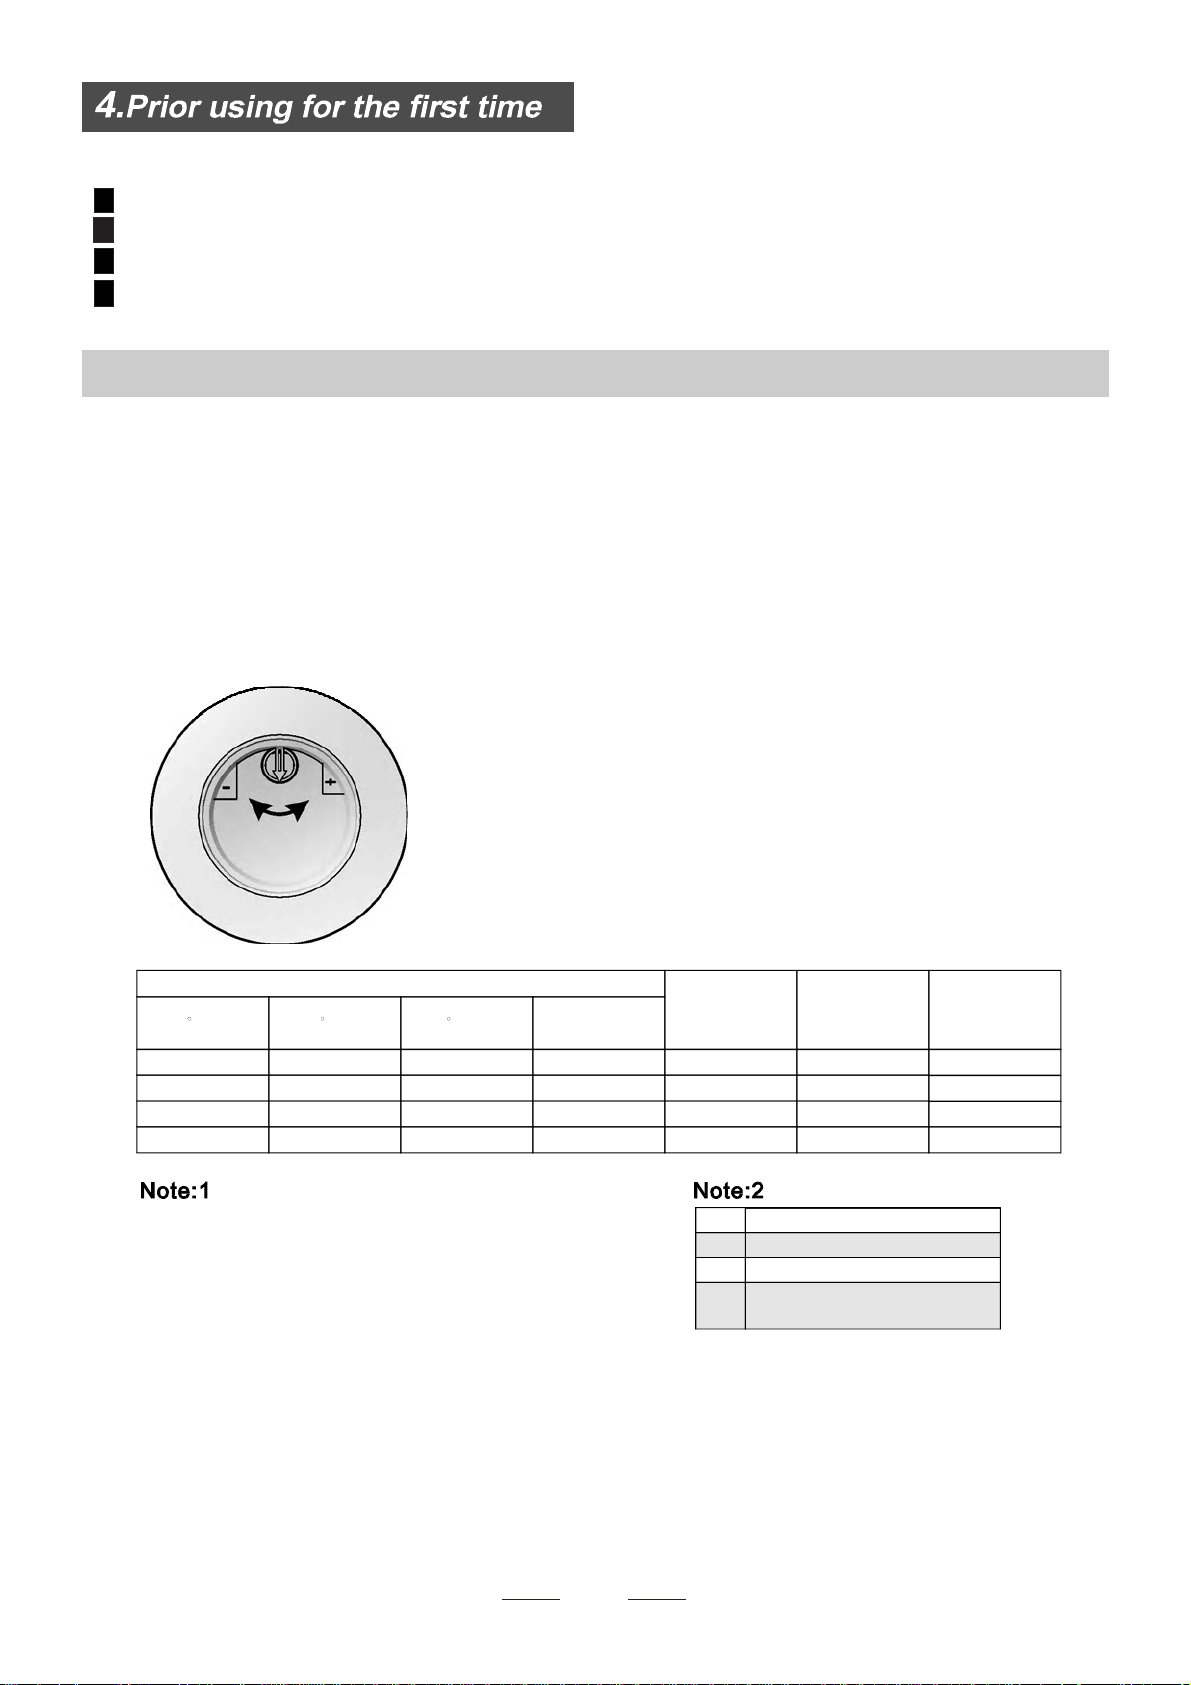
Adjusting Salt Consumption
The dishwasher is designed to all ow for adjustment i n the amount of sa lt consumed bas ed on the hardness o f
the waterused. Thisis intendedto optimiseandcustomise thelevel o f saltconsumption.
1. Unscrew thecapfrom the salt container.
2. Ther e is ar i ng on the container wit h an arrow on it (see figure
ontheside), if necessary, rotate theringin the anticlockwise
direction from the "-"Setting towardthe "+"si gn,b asedon the
hardness of the water being used.
It is recommended that a djustments shou ld be made in
accord ance wit h the f ollowin g sc hem e:
Contact your local water bo ard for information on the har dness of your water suppl y.
dH
mmol/l
0~140~8 0~1.4
/
0
/
14~398~22 1.4~3.9 - 20 50
39~8022~45 3.9~8 Mid 40 25
+
60 16
fH
0~10
10~28
28~56
Clarke
°
Clark: Britishdegree
°
fH: Frenchdegree
°
DH: Ger man degree
dH=1.25 Clarke=1.78 fH=0.178mmol/l
°°
WATER HARDNESS
Selector Po sition
Salt consumption
(gram/cycle)
Auto nomy
(cycles/1kgs)
Pleas e fol low thes t eps bel ow f or adjus tment in salt cons umpt ion .
°
""/
"-"
"+"
"Mid"
Settingtowardthe"+"sign
Settingtowardthe"-"sign
Settingtowardbetween
the "-" sign and "+" sign
No salt need added
45~60 80~107 56~75 8~11
4
A. Water Softener
A. Set thew ater softener
C. Fil l the rins e aid dispenser
D. Fill indetergent
B. Add 1.5Kg dishwa sher sa lt and th en full f ill the s alt container with water
1.The sal t container must only be refil led when the salt warning l ight in the control pan el comes on.
Depending on how well the salt dissolves, the salt warnin g light may still be on even tho ugh the
salt container is filled.
If there is no salt warning light in the con trol panel (for some Mode ls),you can estimate when to f ill
the salt into the softener by the cyc les that the dishwashe r has run.
2. If there are spills o f the salt, a soak or a rapid program should be run to remo ve the excessive sa lt.
Always use the salt intende d for use with dishw asher.
The salt container i s located ben eath the lower bas ket and should b e filled as explaine d in the
follow ing:
Attention!
Only use salt specifically desi gned for the use in dishwashers! Every other type of
salt not specifically de signed for the use in a dishwas her, especially table salt, will
damage the water softener. In case of damages caused by the use of unsuitable
salt the manufacturer doe s not give any warrant y nor is liable for any damages caused.
Only fill with salt just before start ing one of the complete wa shing programs.
This will prevent any grai ns of salt or salty wate r,whi ch may have been spi lled,
remaining on the bottom of the machine for any period of time, which may cause
corrosion.
5
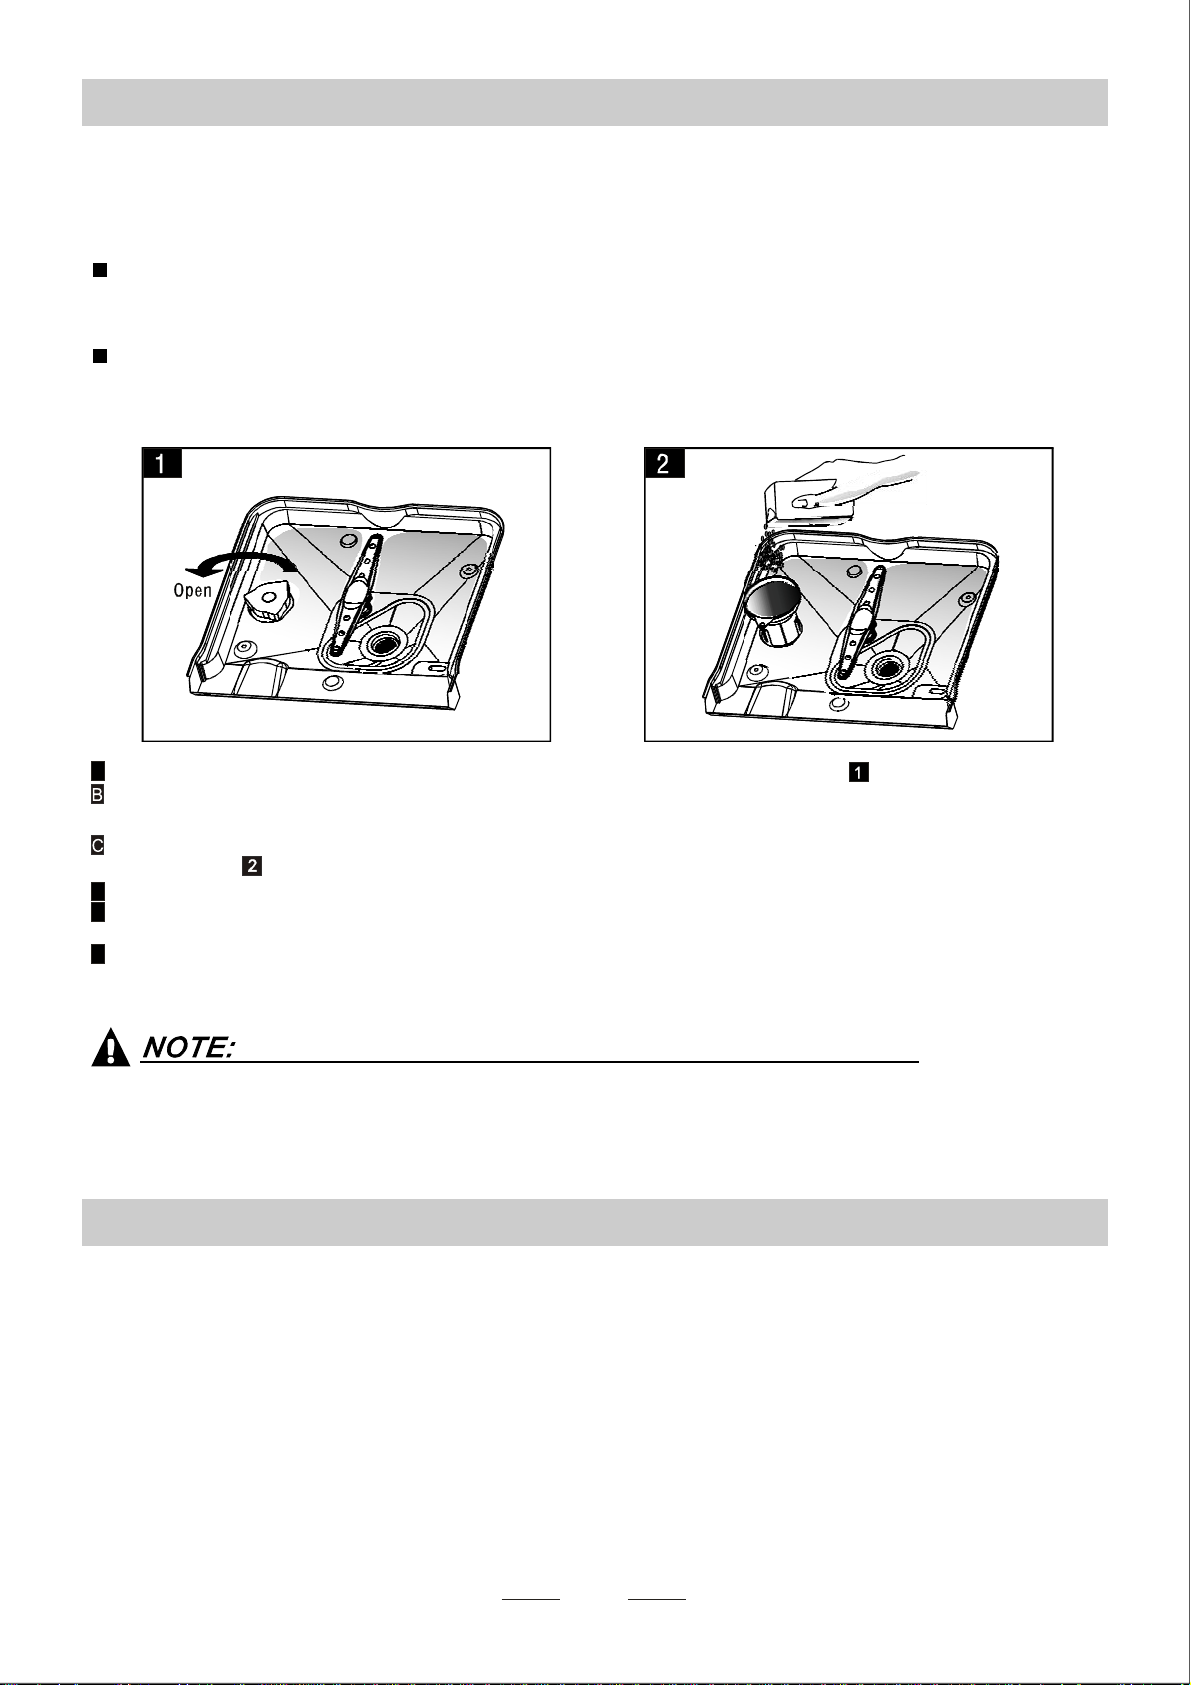
B. Loading the Salt Int o the Softener
C. Fill the Rinse Ai d Dispenser
The rinse a id is relea se d during the final rins e to preve nt wat er from forming dr oplets o n your dis he s, whic h can l eave
spots and streaks. It also improves drying by allowing water t o roll off thed ishes . Your dishwasher is desi gned to
usel iquid rins e aids. The rinse aid dispenser is located inside the do or next tot he detergent di spenser.Tofill the
dispenser, openthe cap and pourthe rinse aidintothe dispenseruntilthelevel indicator turns completely black.
Thevo lume of the rins e aid container is about 110ml.
RinseAid Dispenser
Function of RinseAid
Rinse aid is automa tically added d uring t he last rinse, ensuring thorough rinsing, and spo t and streak free drying.
Attention!
Only usebranded rinse aidfor dishwasher.Never fillthe rinse aid dis penserwithanyo ther substances
(e.g. Dishwasher cleaning agent, liquid deterge nt). This would damag e the app liance.
A Remove thelowerbasket and then unscrew andremove the capfromthesaltcontainer.
D Afte r filling th e contain er , screw the cap t ightly b ack cloc kwise.
E Usually,the salt war ning light will stop being illumi nat ed within 2-6 days after the salt co ntainer ha s been filled wit h
salt.
F Immediately after f illing t he salt into th e salt cont ainer, a washing program should be started (W es u ggest to use t he
soak orr apid program). Otherwisethefiltersystem, pump or other importantpartsof the machine may bedamaged
bysalty water.This isoutof warranty.
B use a funnel to fill the salt container with about 1.5kg of dishwasher salt,then please remove
the salt funnel from all production.
C Full fill the salt container with water.It is normal for a small amount of water to come out of the
salt container.
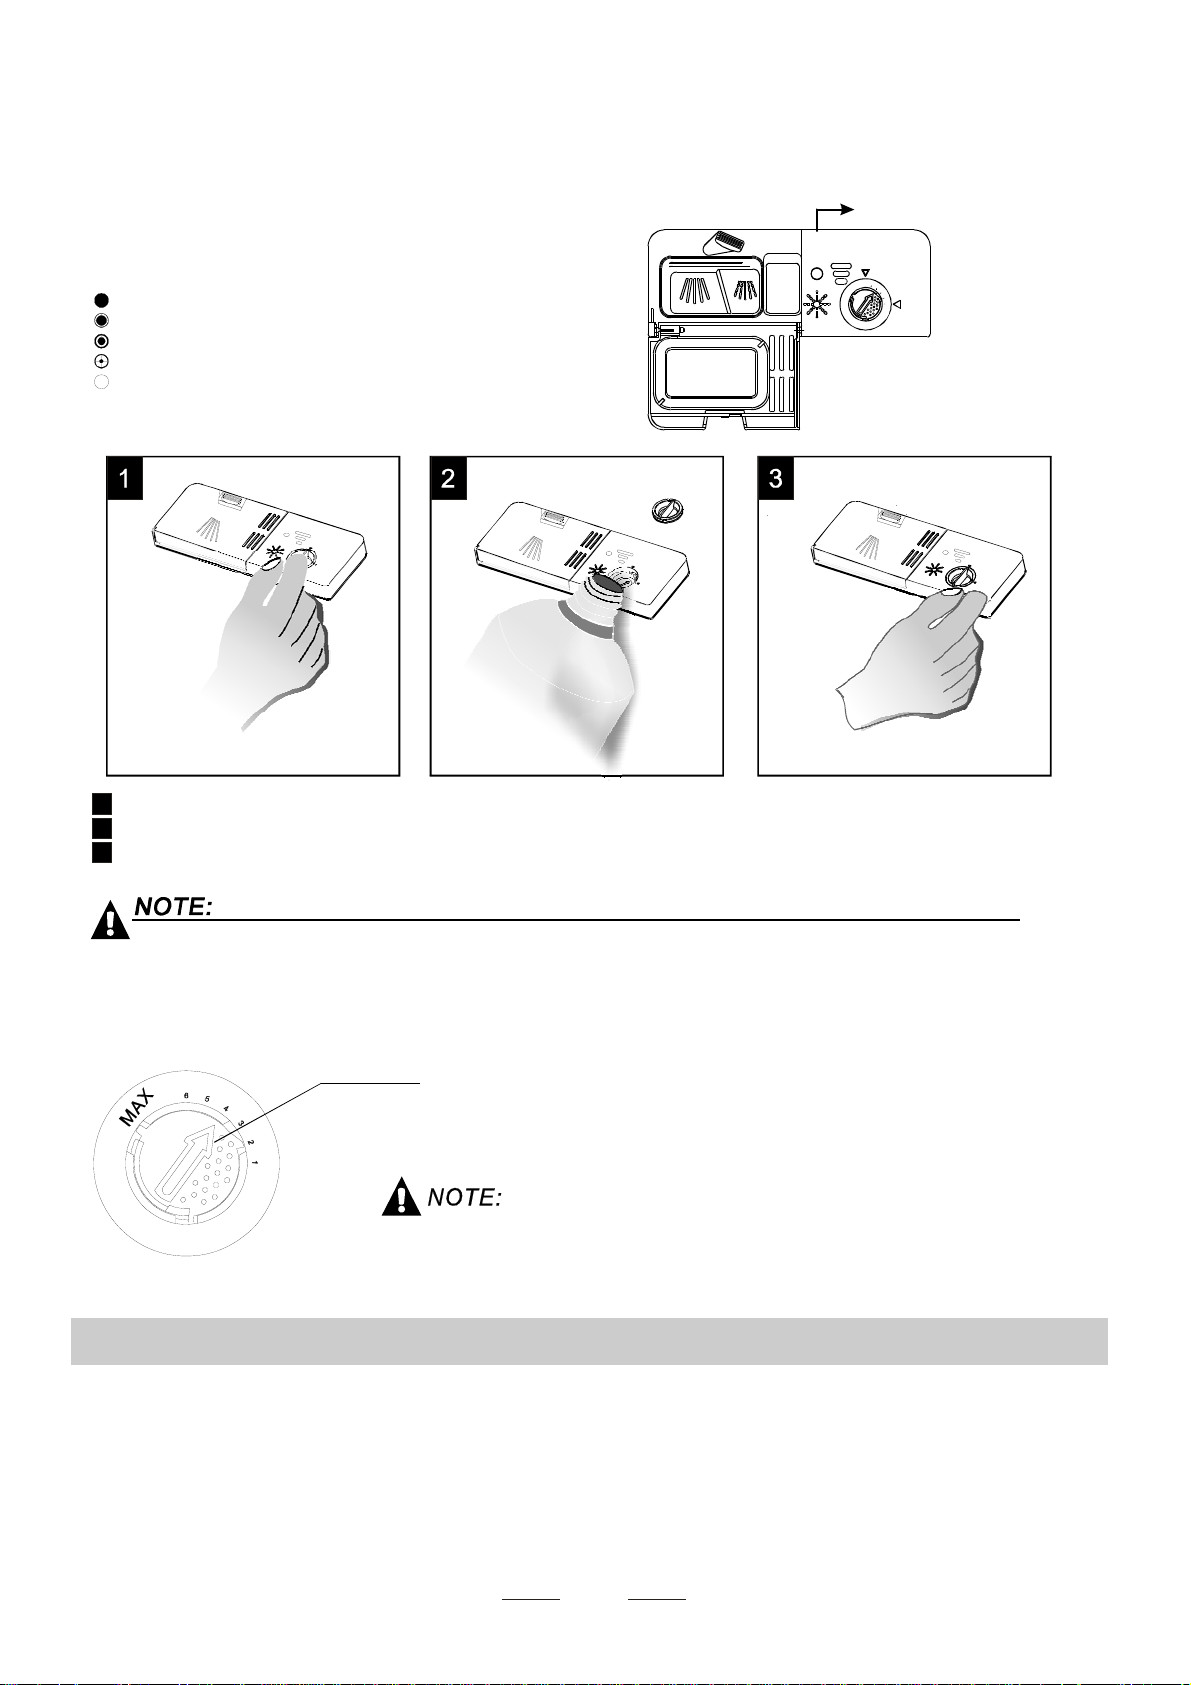
To op en the di spen ser, turn the cap tot he "ope n" (le ft) ar row an d lift i t out.
Pour the ri nse ai d int o the dis pen ser, being car eful not to overfi ll .
Replace the cap by inserting it aligned with "open" arrow and turning it to the closed (righ t) arrow.
Adjusti ng RinseAid Di spenser
The rinse aid dispe nser has six or four s ettings. Always start wi th the dispens er
set on "4". If spots and poor dr ying are a problem, increase the amoun t of rinse
aid dispensed by remov ing the dispe nser lid and rotatin g the dial to "5". If t he
dishes still are not dryi ng prope rly or are show spots , adjust the dial to the next
higher lever until your dishes are spot-free. The recomm ended set ting is "4".
(Factoryvalue is "4".)
Increasethe dose iftherearedropsofwater o rlimespots on thedishes after washing.
Reduce it ifthere aresticky whitish stainson your dishesor abluish filmon glasswareor
knifeblades.
1
2
3
Ast he rinse aid d iminishes, the siz e of the black dot
ontherinse aid level indicatorchanges,as illustrated below.
Full
3/4full
1/2full
1/ 4 full - Should refill toeliminatespotting
Empty
Adjust lever
(Rinse)
6
Whento Refillthe RinseAid Dispen ser
Ifth ere is no rinse- aid warning ligh t in the control panel, you can estimate the amount from the colour
ofth e optical l evel indicator C loca ted next to the cap. When the rinse-a id contai ner isf ul l, the whole
indicator will be dark .As the rinse -aid diminishes, th es ize of the dar k dot decreases. You shouldn ever let
the rins e aid level fall 1 / 4 f ull.
during the next wash. Don 't forget to re place the cap before you clos e dishwasher do or.
Cl ean up a n y rinse aid spilled while duri n g fi ll i ngwith a n abs o r bent c loth t o avoid exc e ssive f oamin g
Detergents wi th its chemic al ingredie nts ar e necessary to rem ove dirt, c rush dirt an d transport it ou t of the di shwasher.
Mostof thecommercial qu ality d eterge ntsare suitable forthis purpose.
D. Functio n of D etergen t
Deterg ents
The reare 3 s orts of detergents
1.Withphosphateandwithchlorine
2.Withphosph ate and without chlo rine
3.Withoutphosph ate and without chlorine
""
C (R ins e- Ai d i n d ic ato r)
6

AmountofDetergentto Use
Proper Use of Detergent
Use only detergent specif ically made for the us e in dishwashers . Keep your detergent fr esh and dry.
Don't putpowdereddetergentinto the dispenser u ntil you're ready towash dishes.
Dishwasher detergent i s corrosive! Take care to keep it out ofreach of c hildren.
WARNING!
Based ontheir chemicalcomposition,detergents canbe split in two basictypes:
The use of normal washingprogramsin combination withconcentrateddetergents
reduces pollution and is g ood for your dishes; these washp rog rams are specificall y matche d
tothe dirt- diss olving propert ies o f the enz yme s of the concent rated de terg ent . For this reason
normal wash programs inwhichconcentrated detergents are used canachieve thesame
resultsthatcanotherwise only be achievedusing intensive programs.
“”
“”
“”
Detergent tablets of differentbrandsdissolve atdifferentspeeds. Forthisreasonsome
detergent tablets cannot dissolve and develop theirf ul l cleaning power during short
programs. Therefore please use l ong programs wh en using deterg ent tablets, to
ens ure the com plete rem oval of detergent res idual s.
The dispenser must be refilled before the star t of each wash cycle following the instructions
provided in the wash cycle table . Yourdis hwasher uses less detergent and rinse aid than
Conventional dis hwa sher.Generally, only one tablespoon ofdetergent is neededfor
anormalwash load.Moreheavily soiled items needmore detergent.Alway saddthe
detergen t jus t be fore star ting the dish was her, otherwis e it could get damp a nd w ill not
dissolve properly.
Concentr ated Deter gent
DetergentTablets
Detergent Dispenser
Always add the detergent just before starting ea ch wash cycle.
Only usebranded detergentaidfor dishwasher.
If the lid is closed: press release butt on.T he lid will sp ring open.
conventional, alkalinedetergents w ith caustic components
lo w a lkali nec once ntrat ed det ergents wi t h natur a l enzymes
Normally new pulverised dete rgent is without phos phate. Thus the water soften er function of
phospha te is not giv en. In th is case we re commend to f i l l sal t in the salt container even whe n
the hardness of water is only 6 d H. If detergents w ithout phosphate are usedin the caseof hard wat er
often white spots appear on dishe s and glasses. In this case pl ease add more detergent tor each
better re sults . Deter gents wit h o ut chl or ine do onl y bleach a li ttle. Strongand coloured spots will not
ber emoved com pletely.I n this case pleas e choose a program with a hi gher tempera ture.
°
7
 Loading...