

ACM 936/1 IX PRODUCT DESCRIPTION SHEET
GB FR AR
e
b
a
c
d
1
2
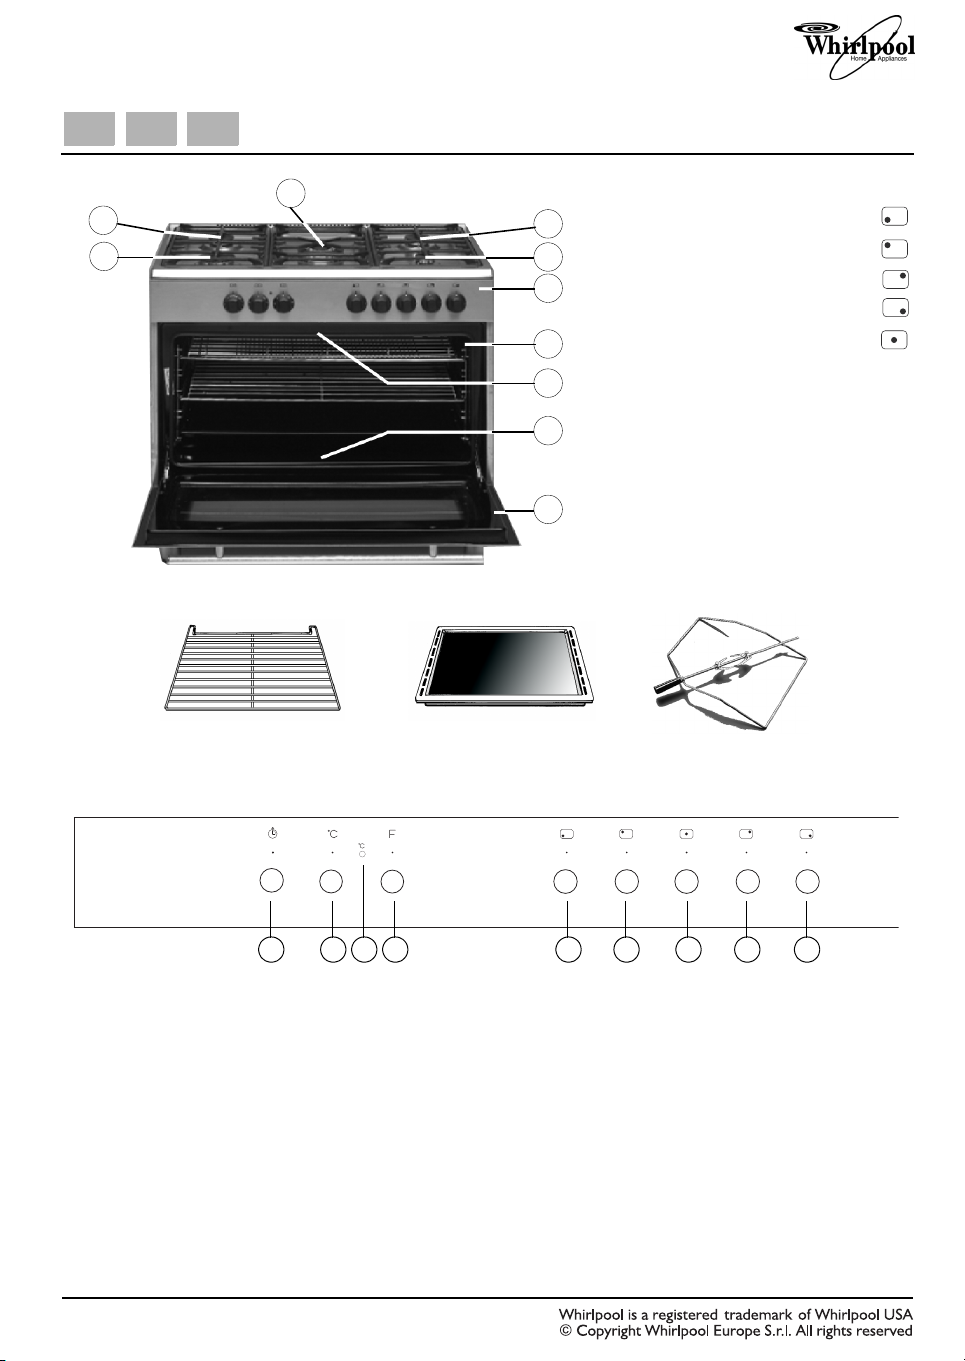
a. Rapid burner (front left)
b. Semi rapid burner (rear left)
c. Semi rapid burner (rear right)
d. Auxiliary burner (front right)
e. Triple crown burner (centre)
HOB
3
OVEN
1. Control panel
2. Oven light
3. Grill and upper heating element
4. Lower heating element
5. Oven door
Wire shelf:
4
5
ACCESSORIES
Baking tray: Turnspit:
CONTROL PANEL
1 2 3 4 5 6 7 8 9
ACM 936/1 IX
1. Minute minder knob
2. Thermostat knob
3. Thermostat indicator lamp
4. Oven function selector knob
5. Front left hotplate/cooking zone control knob
6. Rear left hotplate/cooking zone control knob
7. Centre hotplate/cooking zone control knob
8. Rear right hotplate/cooking zone control knob
* The hob control knobs are not interchangeable. After cleaning or servicing, they must be returned to their original positions.
5019 310 66137
9. Front right hotplate/cooking zone control knob
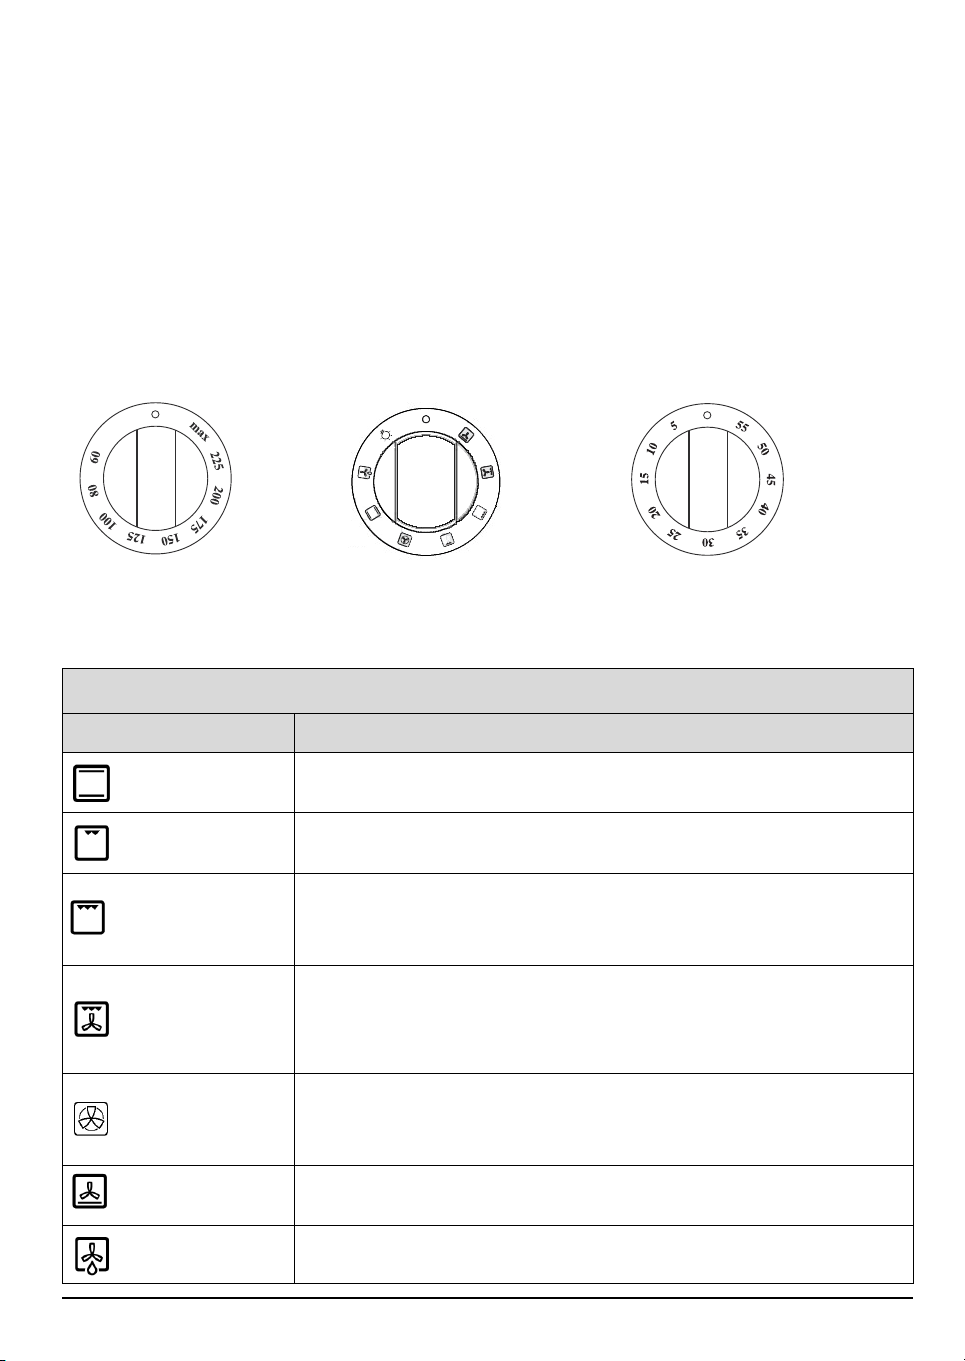
USING THE OVEN
Oven thermostat knob (fig. 1)
to obtain an oven temperature between 60° and MAX°C, turn the knob clockwise.
Oven function knob (fig. 2)
It is possible to select one of following functions turning the commutator knob clockwise.
Note:
All the functions mentioned above switch the internal light of the oven on.
A warning light on the control panel will stay lit until the temperature is reached. Afterwards, it will light up
intermittently.
Minute minder knob (fig. 3)
Turn the knob clockwise to set the cooking time.
The minute minder can be set between 5 and 60 minutes.
At the end of the fixed time it marks them acoustic informs of the end cooking.
fig. 1 fig. 2 fig. 3
ATTENTION:
The temperature shown on the control panel corresponds to the temperature in the centre of the oven only when
the function is selected.
NOTE: The oven door MUST always be closed when using the oven, in all functions.
Function Description Table
Function Description of Function
To cook any kind of dish on one shelf only. Use the 2nd level. Preheat the oven to the
CONVENTIONAL
MEDIUM GRILL
GRILL
TURBOGRILL
FORCED AIR
BOTTOM HEATING
ELEMENT + FAN
DEFROST
required temperature. the oven is ready for introducing food when the thermostat
light goes off.
To grill small pieces of meat, under the smaller grill. It is advisable to place food on the
4th level at max. temperature. Preheat the oven for 3 - 5 min. The oven door must
remain closed during cooking.
To grill chops, kebabs and sausages using all the grill; to gratinate vegetables or toast
bread. It is advisable to place food on the 4th level. When grilling meat, use the driptray to collect the cooking juices. Position it on the 3rd level, adding about half a litre
of water. Preheat the oven for 3 - 5 min. The oven door must remain closed during
cooking.
To roast large pieces of meat (legs, roast beef, chickens). Position the food on the
middle levels. Use a drip-tray to collect the cooking juices. Position it on the 1st/2nd
level, adding about half a litre of water. The oven does not have to be preheated. It is
advisable to turn the meat over during cooking, to obtain even browning on both sides.
The oven door must remain closed during cooking.
With this function it is possible to use the rotisserie, if provided.
To cook different foods requiring the same cooking temperature on a maximum of two
shelves at the same time (e.g. fish, vegetables, cakes). This function can be used to
cook different foods without odours being transferred from one food to another. Use
the 2nd level to cook on one shelf only. To cook on two shelves, use the 2nd and 4th
levels, preheating the oven first.
To finish cooking food with a very liquid consistency and to obtain crisp, golden bases.
Also useful for thickening sauces.
It is advisable to place food on the 2nd cooking level. Preheat the oven.
To speed up defrosting of food. Place food on the middle level. It is advisable to leave
food in its packaging to prevent it from drying out on the outside.

HOW TO OPERATE THE COOKTOP
USING THE GAS BURNERS
The following symbols are given near each knob on the front panel:
Disk full Tap closed
Large flame Max. opening
Small flame Min. opening
The minimum position is when the knob is turned fully anticlockwise. All the operating positions must be chosen
between the min. and max. positions, and never between max. and off.
AUTOMATIC ELECTRIC IGNITION
To light one of the burners, press the knob corresponding to the burner and turn it anticlockwise to Max. Keep the
knob pressed for automatic lighting of the burner. In case of a power failure or no current, the burner can also be lit
with a match.
APPLIANCES WITH SAFETY VALVE
To light the burners, carry out the same operations given above. In this case, however, once the knobs are turned to
the opening position they must be kept pressed for about 10 seconds.
If for any reason the burner flame goes out, the safety valve automatically cuts in, shutting off the gas to the relevant burner.
INJECTOR TABLE CATEGORY II2H3B/P
Type of gas used Type of
NATURAL GAS
(Methane) G20
G.P.L
BUTANE GAS G30
PROPANE GAS G31
(cylinder)
burner
triple ring
rapid
semirapid
auxiliary
triple ring
rapid
semirapid
auxiliary
Injector
marking
130
115
97
72
96
85
65
50
Rated heat
capacity
kW
3.60
3.00
1.75
1.00
3.60
3.00
1.75
1.00
Rated
consumption
343 l/h
286 l/h
167 l/h
95 l/h
262 g/h
219 g/h
128 g/h
73 g/h
Reduced heat
capacity kW
1.30
0.75
0.48
0.33
1.30
0.75
0.48
0.33
Gas pressure mbar
min. rated max.
17 20 25
25 28-30 37
Type of gas used Appliance model Total rated heat
capacity kW
G20 20 mbar 5 burners 11.10 1058 l/h 21.6
G30/31 28-30 mbar 5 burners 11.10 810 g/h 21.6
ELECTRICAL POWER SUPPLY: 230 V
~ 50 Hz
Total rated
consumption
Air required for
burning m
Tu r n s p i t
For utilizzation of the turnspit follow the instructions
described.
Put the food in spit L (see fig. 4), paying attention to
block it within the two forks F and to balance it, in order
to avoid any unnecessary effort in motor R.
Put the spit on support G, after having put its opposite
end into hole P of motor R.
Place the drip-tray with a little water under the spit.
To remote the spit, operate in the opposite direction
using protecting glove in isolating wool.
The turnspit can be operated turning the knob clockwise
on position .
Number of shelves
fig. 4
5
4
3
2
1
3
/h

COOKING TABLES
Recipe Funcion Preheating
Leavened cakes
Filled pies (cheesecake, strudel, fruit
pie)
Biscuits/Tartlets
Choux pastry
Meringues
Bread / Pizza / Focaccia
Frozen pizza
Savoury pies (vegetable pie, quiche
lorraine)
Vols-au -v en t / Crackers
Lasagne / Baked pasta / Cannelloni /
Flans
Lamb / Veal / Beef / Pork 1 kg Ye s 2 190 - 200 70 - 100
Chicken / Rabbit / Duck
1 kg
Tu rk e y / G o o s e
3 kg
Baked fish / en papillote (fillet,
whole)
Stuffed vegetables (tomatoes,
courgettes, aubergines)
To a s t Ye s 4 max. 3 - 5
Fish fillets / steaks Ye s 4 200 20 - 35
Sausages / Kebabs / Spare ribs /
Hamburgers
Roast chicken 1 - 1.3 kg - 2 200-220 50 - 65
Roast Beef rare 1 kg - 2 230 35 - 45
Leg of lamb / Knuckle - 2 180-200 60 - 90
Roast potatoes - 2 200 45 - 55
Gratinated vegetables - 2 200 10 - 15
Lasagna & Meat Ye s 1 - 3 200 50 - 100
Meat & Potatoes Ye s 1 - 3 200 45 - 100
Fish & Vegetables Ye s 1 - 3 180 30 - 50
Ye s 2 160 - 180 30 - 90
Ye s 2 - 4 160 - 180 30 - 90
Ye s 2 - 4 160 - 200 35 - 90
Ye s 2 170 - 180 15 - 45
Ye s 2 - 4 160 - 170 20 - 45
Ye s 2 180 - 200 30 - 40
Ye s 2 - 4 180 - 190 35 - 45
Ye s 2 100 110 - 150
Ye s 2 - 4 100 130 - 150
Ye s 2 190 - 250 15 - 50
Ye s 2 - 4 190 - 250 25 - 50
Ye s 2 250 10 -15
Ye s 2 - 4 250 10 -20
Ye s 2 180 - 190 35 - 45
Ye s 2 - 4 180 - 190 45 - 60
Ye s 2 190 - 200 20 - 30
Ye s 2 - 4 180 - 190 20 - 40
Ye s 2 190 - 200 45 - 55
Ye s 2 200 - 230 50 - 100
Ye s 1 / 2 190 - 200 80 - 130
Ye s 2 180 - 200 40 - 60
Ye s 2 180 - 200 50 - 60
Ye s 4 200-220 15 - 40
Level
(from the bottom)
NB: Cooking times and temperatures are approximate.
Te m p e r u r e
(°C)
Cooking time
(minutes)

Advice and tips regarding use
How to read the cooking table:
The table indicates the best function to use for a given food, to be cooked on one or more shelves at the same time.
Cooking times start from the moment food is placed in the oven, excluding preheating (where required). Cooking
temperatures and times are only approximate and depend on the amount of food and type of accessory used. Use the
lowest recommended values initially and, if cooking results are not those desired, use higher values. It is advisable to
use the accessories supplied and preferably dark-coloured metal cake tins and pans. Pots and accessories in Pyrex or
porcelain can also be used, but cooking times will be slightly longer.
Cooking different foods at the same time
Using the FORCED AIR function it is possible to cook different foods requiring the same cooking temperature at the
same time (e.g. fish and vegetables) on different shelves. Remove the food requiring shorter cooking times and leave
food requiring longer cooking times in the oven.
Cakes
- Bake delicate cakes with the conventional function on one level only. Use dark-coloured metal cake tins and always
position them on the rack supplied. To cook on more than one shelf, select the forced air function and arranged the
cake tins in a staggered way on the racks, to favour air circulation.
- To know if a raising cake is baked, insert a wooden toothpick in the top part of the cake. If the toothpick comes out
dry, the cake is ready.
- If using non-stick cake tins do not butter the edges, as the cake may not rise evenly at the sides.
- If the cake goes "flat" during baking, set a lower temperature the next time, even reducing the amount of liquid in
the mixture and mixing more gently.
- For cakes with juicy fillings (cheesecake or fruit pies) use the “FAN-ASSISTED” function. If the base of the cake is
soggy, lower the shelf and sprinkle the bottom of the cake with breadcrumbs or biscuit crumbs before adding the
filling.
Meat
- Use any kind of pan or Pyrex dish suitable for the size of the meat being cooked. For roasts, it is best to pour a little
stock on the bottom of the pan, basting the meat during cooking for added flavour. Pay attention to the steam
created during this operation. When the roast is ready, leave it in the oven for another 10-15 minutes, or wrap it in
aluminium foil.
- To grill pieces of meat, choose cuts of the same thickness to obtain even cooking. Very thick pieces of meat require
longer cooking times. To prevent the meat from burning on the outside, move it away from the grill by placing the
rack at a lower level. Turn the meat two thirds of the way through cooking, paying attention to the steam when
opening the door.
- To collect the cooking juices it is advisable to place a drip-tray with half a litre of water directly under the rack on
which the food is placed. Top-up when necessary.
Rotisserie (only in some models)
Use this accessory to evenly roast large pieces of meat and poultry. Place the support on the second level. Place the
meat on the rotisserie rod, tying it with string if poultry, fix the two special forks in the two ends of the piece of meat
and make sure it is secure. Insert the rod in the hole located on the front wall of the oven and rest it on the support.
To prevent smoke and to collect the cooking juices, it is advisable to place the drip-tray with at least half a litre of water
on the first level. The rod has a plastic handle which must be removed before starting to cook, and can be used at the
end of cooking to avoid burns when taking the food out of the oven.
Pizza
Lightly grease the trays to ensure the pizza has a crispy base. Add the mozzarella two thirds of the way through baking.
Proving function (present only in specific models)
It is always best to cover the dough with a damp cloth before placing it in the oven. With this function, dough proving
times are reduced by about one third compared to proving at room temperature (20-25°C). Proving time for 1 kg of
pizza dough is approx. one hour.
 Loading...