

Page 1
ACM 224
Page 2
Please read this manual first.
Dear Customer,
We would like you to obtain best performance with your product that has been
manufactured in modern facilities and passed through strict quality control
procedures.
Therefore, we advise you to read through this User Manual carefully before using
your product and keep it for future reference. If you hand over the product to
someone else, deliver the User Manual as well.
The User Manual will help you use the product in a fast and safe way.
• Read the User Manual before installing and operating the product.
• You must strictly observe the safety instructions.
• Keep this User Manual within easy reach for future reference.
• Also read other documents supplied with the product.
Remember that this User Manual may also be applicable for several other
models.
Differences between models are explicitly identified in the manual.
Explanation of symbols
Throughout this User Manual the following symbols are used:
Important information or useful hints about usage.
Warning for hazardous situations with regard to life and property.
Warning for electric shock.
Warning for risk of fire.
Warning for hot surfaces.
Page 3
3 | EN
Table of Contents
1 General information 4
Overview ............................................... 4
Technical specifications ........................ 5
Accessories supplied with the unit ........ 6
2 Safety instructions 7
General safety ...................................... 7
Safety when working with electricity .. 9
Intended use ...................................... 9
Safety for children .............................. 9
3 Installation 10
Before installation ............................... 10
Installation and connection ................. 11
Disposal .............................................. 12
Disposing of packaging material ...... 12
Disposing of the old product ............ 12
Future Transportation ...................... 13
4 Preparation 14
Tips for saving energy ........................ 14
Initial use ............................................. 14
First cleaning of the appliance ......... 14
Initial heating ................................... 14
5 How to use the hob 16
General information about cooking ..... 16
Using the hobs .................................... 16
6 How to operate the oven 18
General information on baking, roasting
and grilling ..................................... 18
How to use the electric oven ............... 18
Operating modes ............................. 19
Cooking times table ......................... 20
How to operate the grill ....................... 22
7 Maintenance and care 23
General information ............................ 23
Cleaning the hob ................................. 23
Cleaning the control panel .................. 23
Cleaning the oven ............................... 24
Removal of oven door ......................... 24
Replacing the oven lamp .................... 24
8 Troubleshooting 26
Page 4
4 | EN
1 General information
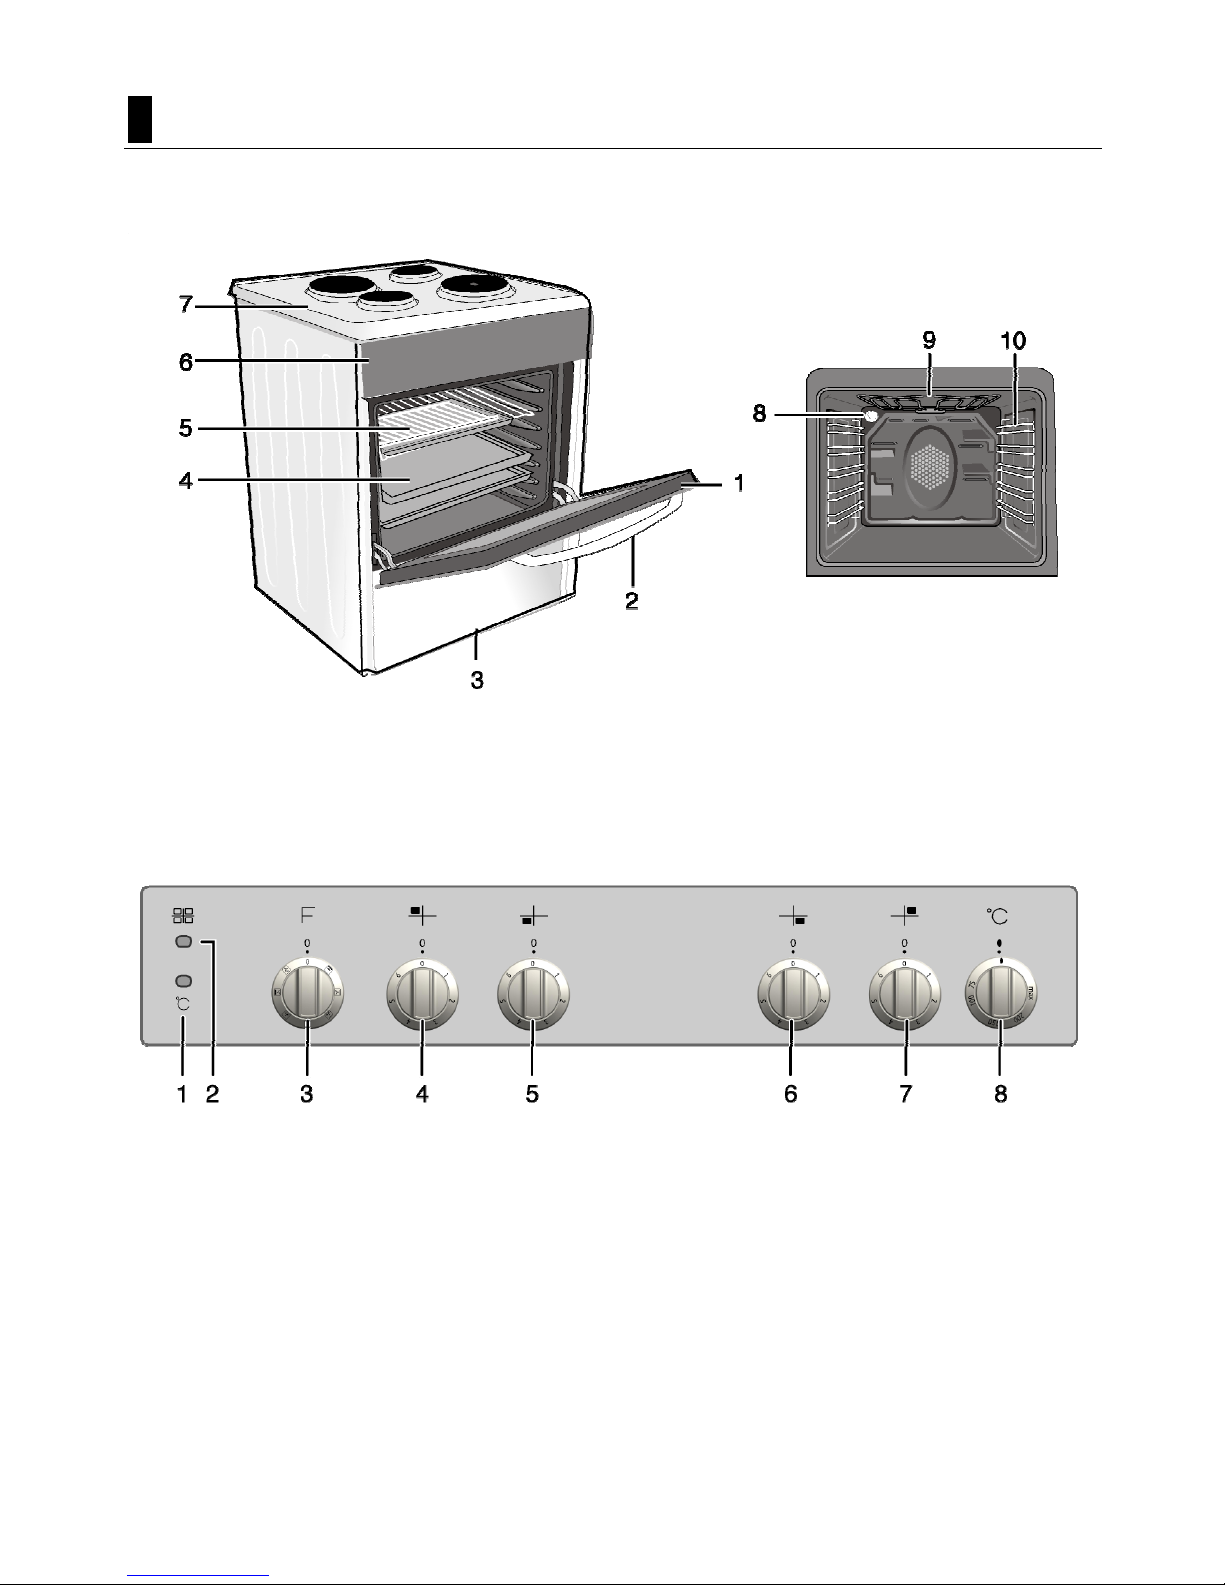
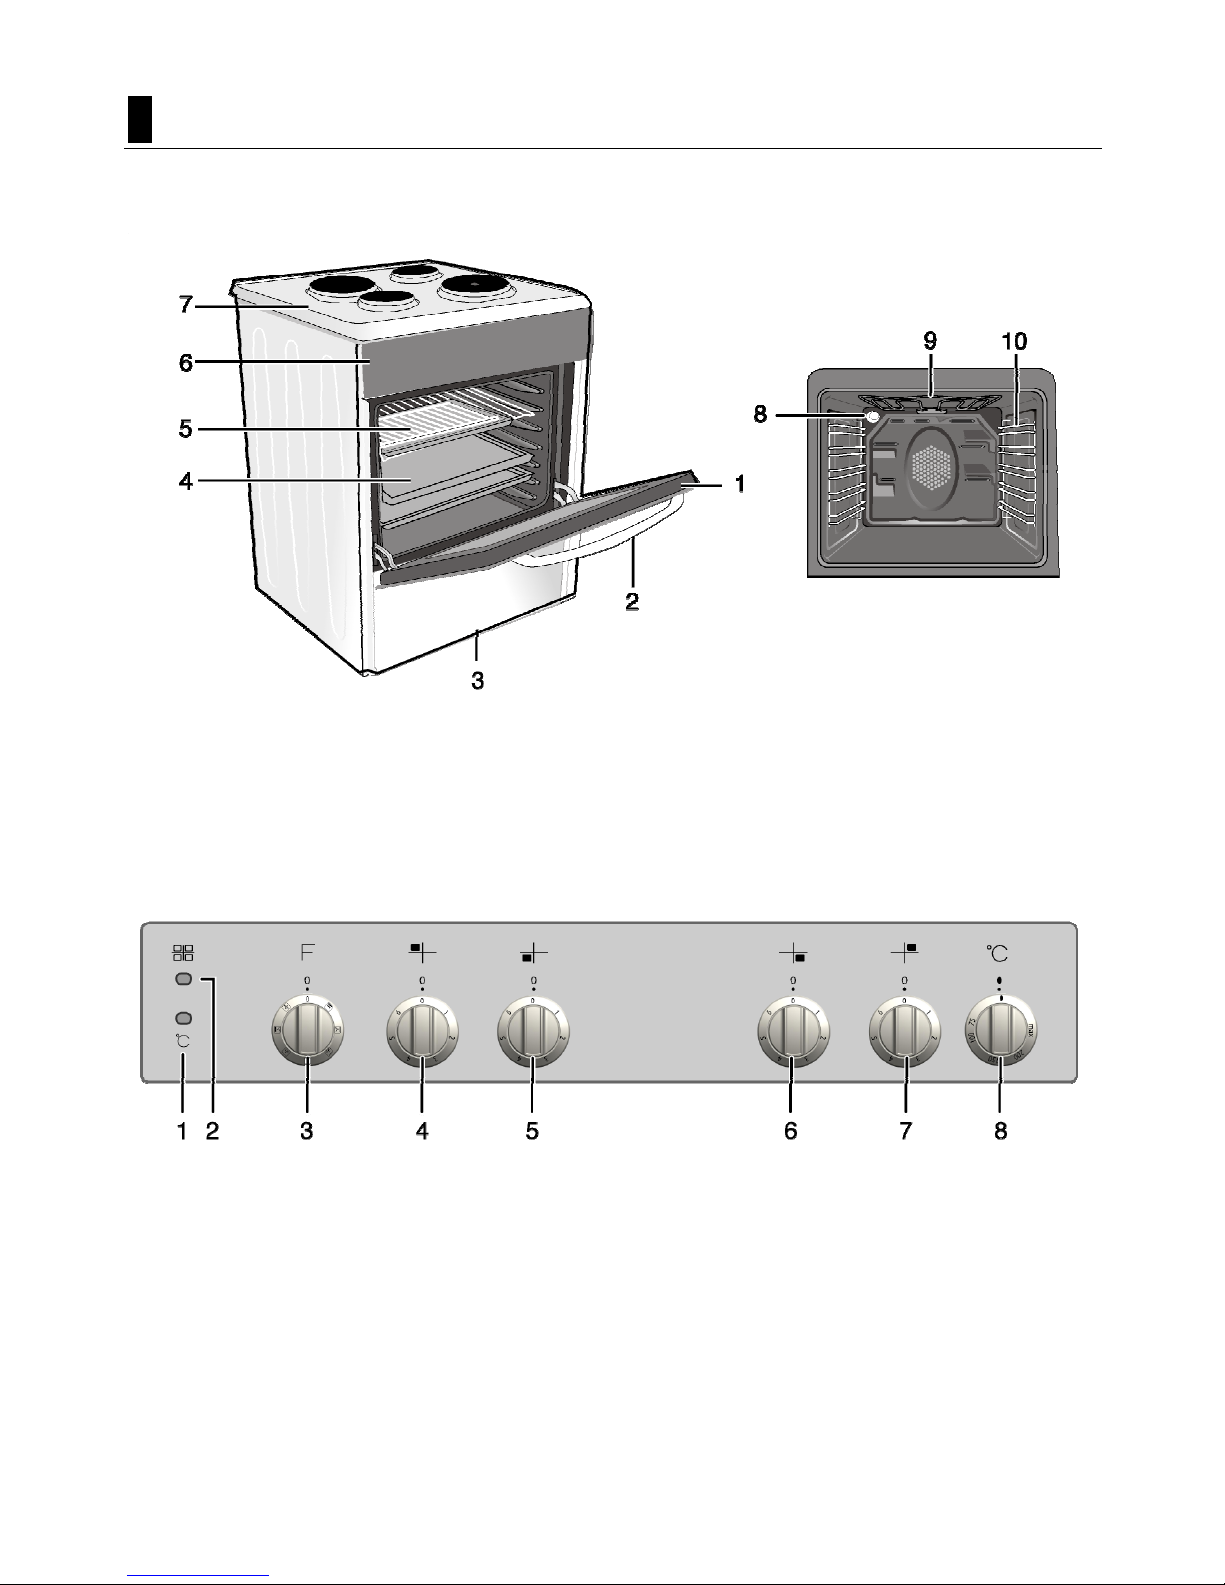
Overview
1 Front door
2 Handle
3 Bottom drawer
4 Tray
5 Wire shelf
6 Control panel
7 Burner plate
8 Lamp
9 Grill heating element
10 Shelf positions
1 Thermostat lamp
2 Warning lamp
3 Function knob
4 Hotplate Rear left
5 Hotplate Front left
6 Hotplate Front right
7 Hotplate Rear right
8 Thermostat knob
Page 5
5 | EN
Technical specifications
GENERAL
External dimensions (height / width / depth) 900 mm/600 mm/600 mm
Voltage / frequency 220/240 V ~/380-415 V 3N ~ 50 Hz
Total power consumption 8.3 kW
Fuse min. 16 A x 3
Cable type / section H05VV-FG 3 x 2,5 mm2
Cable length max. 2 m
HOB
Burners
Rear left
Hotplate
Dimension 145 mm
Power 1000 W
Front left
Hotplate
Dimension 180 mm
Power 2000 W
Front right
Hotplate
Dimension 145 mm
Power 1500 W
Rear right
Hotplate
Dimension 180 mm
Power 1500 W
OVEN/GRILL
Main oven
Fan assisted oven
Energy efficiency class# A
Inner lamp 15–25 W
Grill power consumption 2.2 kW
#
Basics: Information on the energy label of electrical ovens is given in accordance with
the EN 50304 standard. Those values are determined under standard load with
bottom-top heater or fan assisted heating (if any) functions.
Energy efficiency class is determined in accordance with the following prioritization
depending on whether the relevant functions exist on the product or not. 1-Cooking
with eco-fan, 2- Turbo slow cooking, 3- Turbo cooking, 4- Fan assisted bottom/top
heating, 5-Top and bottom heating.
Page 6
6 | EN
Important
Technical specifications may be
changed without prior notice to
improve the quality of the product.
Important
Figures in this manual are
schematic and may not exactly
match your product.
Important
Values stated on the product labels
or in the documentation
accompanying it are obtained in
laboratory conditions in accordance
with relevant standards. Depending
on operational and environmental
conditions of the product, these
values may vary.
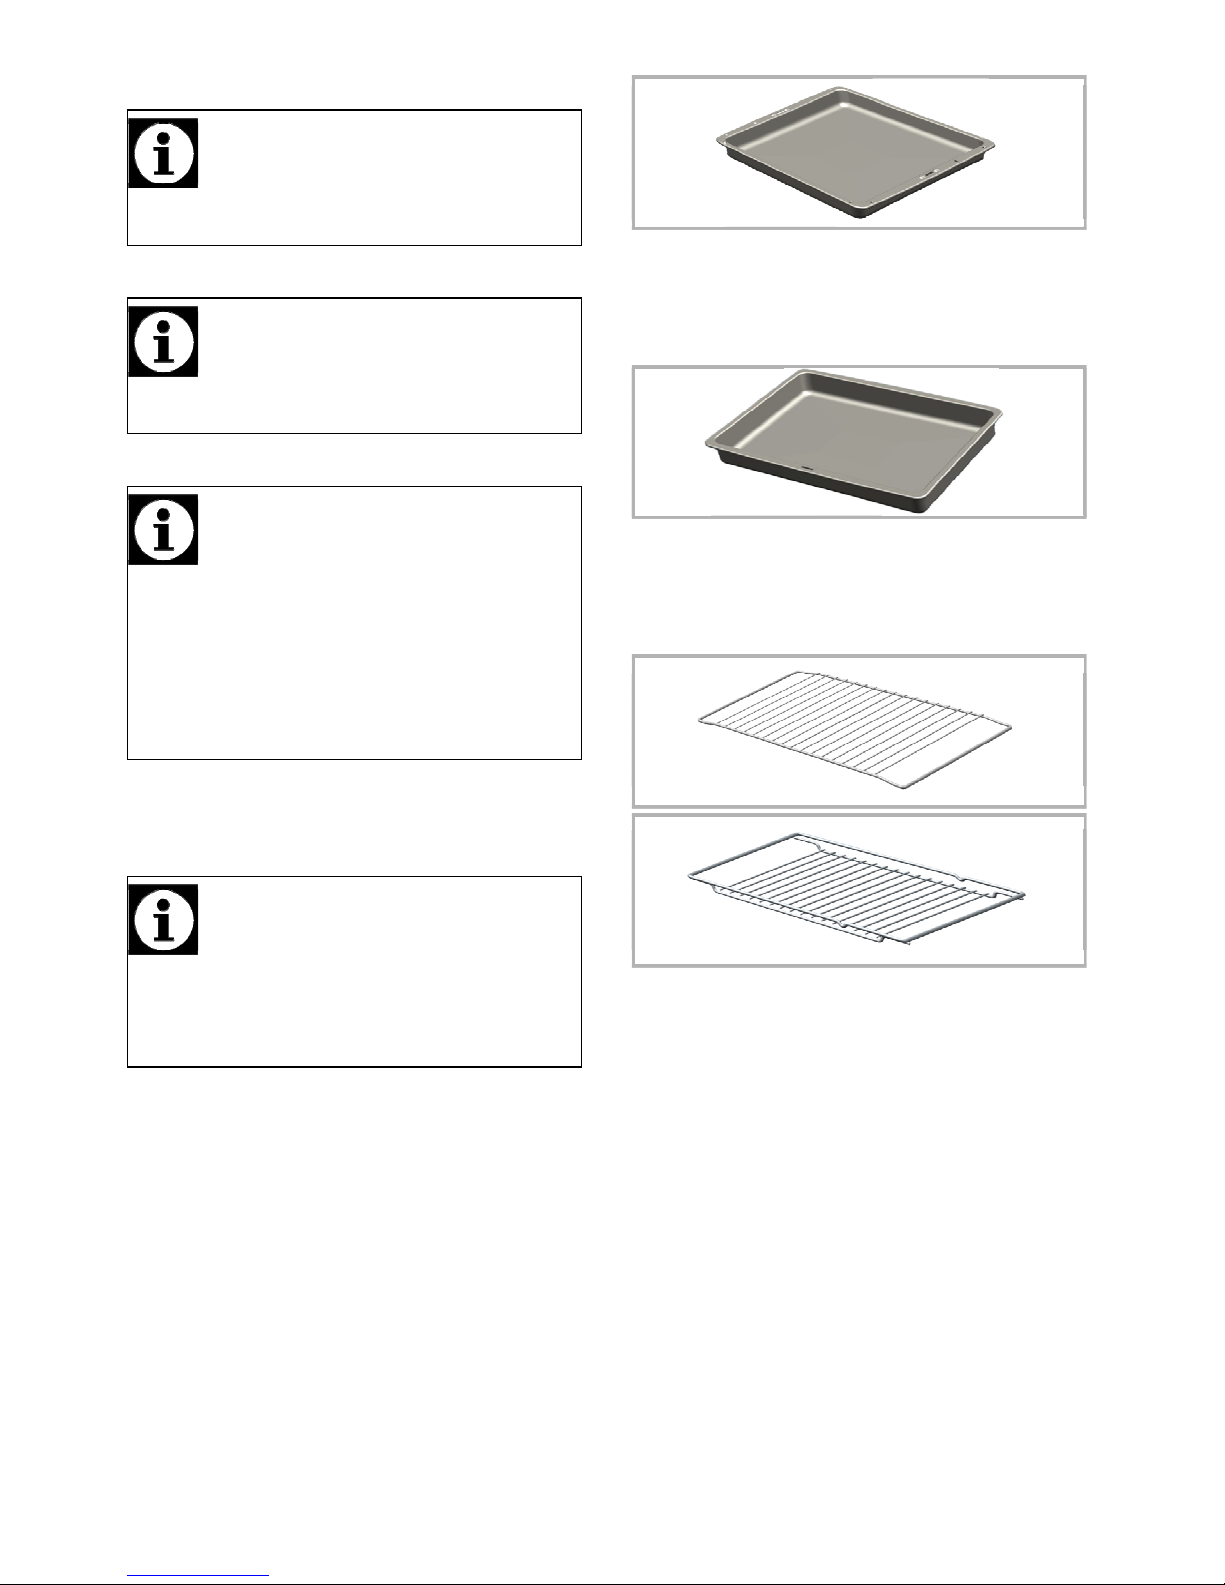
Accessories supplied with the
unit
Important
A
ccessories supplied can vary
depending on the product model.
A
ll the accessories described in the
user manual may not exist on your
product.
Baking tray
Can be used for pastries, frozen foods
and big roasts.
Deep roasting tray
Can be used for pastries, big roasts,
foods with liquid content and during
grilling as dripping pan.
Wire shelf
Can be used for roasting and as
deposit for baking, roasting and
casserole dishes.
Page 7

7 | EN
2 Safety instructions
General safety
WARNING: The appliance
and its accessible parts
become hot during use.
Care should be taken to
avoid touching heating
elements.
Children less than 8 years
old shall be kept away,
unless continuously
supervised.
This appliance can be used
by children aged from 8
years and above and
persons with reduced
physical, sensory or mental
capabilities or lack of
experience and knowledge
if they have been given
supervision or instruction
concerning use of the
appliance in a safe way and
understand hazards
involved. Children shall not
play with the appliance.
Cleaning and user
maintenance shall not be
made by children without
supervision.
WARNING: Accessible
parts may become hot
during use. Young children
should be kept away.
Do not use harsh abrasive
cleaners or sharp metal
scrapers to clean the oven
door glass since they can
scratch the surface, which
may result in shattering of
the glass.
WARNING: Ensure that the
appliance is switched off
before replacing the lamp to
avoid the possibility of
electric shock.
WARNING: Unattended
cooking on a hob with fat or
oil can be dangerous and
may result in fire. NEVER
try to extinguish a fire with
water, but switch off the
appliance and then cover
flame e.g. with a lid or a fire
blanket.
WARNING: Danger of fire:
do not store items on the
cooking surface. This
appliance is not intended
to be operated by means
of an external timer or
separate remote-control
system.
Page 8

8 | EN
WARNING: If the surface is
cracked, switch off the
appliance to avoid
possibility of electric shock.
• Connect the product to an earthed
outlet/line protected by a fuse of
suitable capacity as stated in the
"Technical specifications" table.
Have the earthing installation made
by a qualified electrician while
using the product with or without a
transformer. Our company shall not
be liable for any problems arising
due to the product not being
earthed in accordance with the
local regulations.
• If the supply cord is damaged, it
must be replaced by the
manufacturer, its service agent or
similary qualified persons in order
to avoid a hazard.
• Do not operate the product if it is
defective or has any visible
damage.
• Do not carry out any repairs or
modifications on the product.
However, you may remedy some
troubles that do not require any
repairs or modifications. See
Troubleshooting, page 26.
• Never wash down the product with
water! There is the risk of electric
shock!
• Never use the product when your
judgment or coordination is
impaired by the use of alcohol
and/or drugs.
• Product must be disconnected
from the mains during installation,
maintenance, cleaning and repair
procedures.
• Be careful when using alcoholic
drinks in your dishes. Alcohol
evaporates at high temperatures
and may cause fire since it can
ignite when it comes into contact
with hot surfaces.
• Do not heat closed tins and glass
jars in the oven. The pressure that
would build-up in the tin/jar may
cause it to burst.
• Do not place any flammable
materials close to the product as
the sides may become hot during
use.
• Do not place baking trays, dishes
or aluminium foil directly onto the
bottom of the oven. The heat
accumulation might damage the
bottom of the oven.
• Keep all ventilation slots clear of
obstructions.
• Product may be hot when it is in
use. Never touch the hot burners,
inner sections of the oven, heaters
and etc.
• Always use heat resistant oven
gloves when putting in or removing
dishes into/from the hot oven.
• Do not use the product with front
door glass removed or cracked.
• Rear surface of the oven gets hot
when it is in use. Make sure that
the gas/electrical connection does
not contact the rear surface;
otherwise, connections can get
damaged.
• Do not trap the mains cable
between the oven door and frame
and do not route it over hot
surfaces. Otherwise, cable
insulation may melt and cause fire
as a result of short circuit.
• Make sure that the product function
knobs are switched off after every
use.
Page 9
9 | EN
Important
The appliance is not intended to
be operated by means of an
external timer or seperate remote
control.
Safety when working with
electricity
Defective electric equipment is one of
the major causes of house fires.
• Any work on electrical equipment
and systems should only be carried
out by authorized and qualified
persons.
• In case of any damage, switch off
the product and disconnect it from
the mains. To do this, turn off the
fuse at home.
• Make sure that fuse rating is
compatible with the product.
Intended use
This product is designed for domestic
use. Commercial use will void the
guarantee.
"CAUTION: This appliance is for
cooking purposes only. It must not be
used for other purposes, for example
room heating."
This product should not be used for
warming the plates under the grill,
drying towels, dish cloths etc. by
hanging them on the oven door
handles. This product should also not
be used for room heating purposes.
The manufacturer shall not be liable for
any damage caused by improper use
or handling errors.
The oven can be used for defrosting,
baking, roasting and grilling food.
Safety for children
• Electrical and/or gas products are
dangerous to children. Keep
children away from the product
when it is operating and do not
allow them to play with the product.
• Accessible parts of the appliance
will become hot whilst the
appliance is in use. Children
should be kept away until the
product has cooled down.
• "CAUTION: Accessible parts may be
hot when the grill is in use. Young
children should be kept away."
• Do not place any items above the
appliance that children may reach
for.
• When the door is open, do not
load any heavy object on it and do
not allow children to sit on it. It
may overturn or door hinges may
get damaged.
• The packaging materials will be
dangerous for children. Keep the
packaging materials away from
children. Please dispose of all
parts of the packaging according to
environmental standards.
Child lock
The cooker has child lock system on
the oven door.
To open the oven door, pull to the
plastic button slightly up and pull the
door handle.
When close the door, child lock will be
locked itself.
SAVE THESE INSTRUCTIONS
Page 10
10 | EN
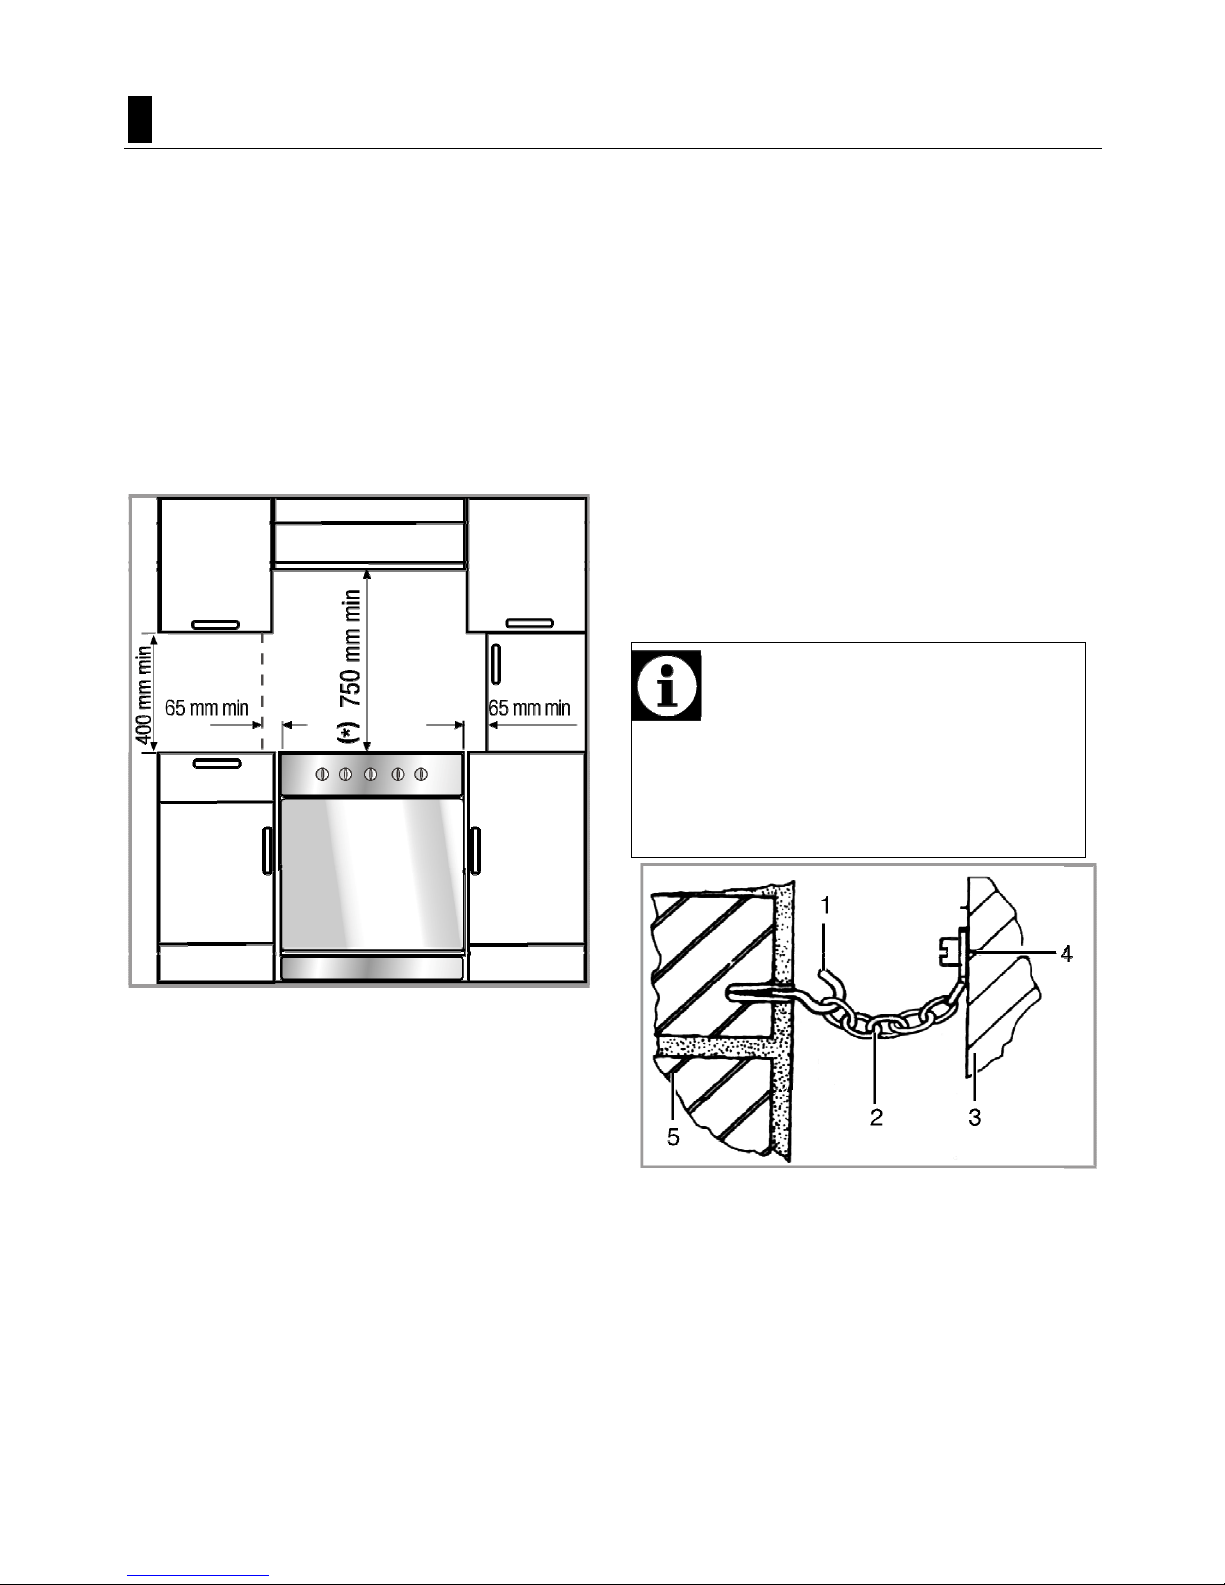
3 Installation
Before installation
To ensure that critical air gaps are
maintained under the appliance, we
recommend that this appliance is
mounted on a solid base and that the
feet do not sink into any carpet or soft
flooring.
The kitchen floor must be able to carry
the weight of the appliance plus the
additional weight of cookware and
bakeware and food.
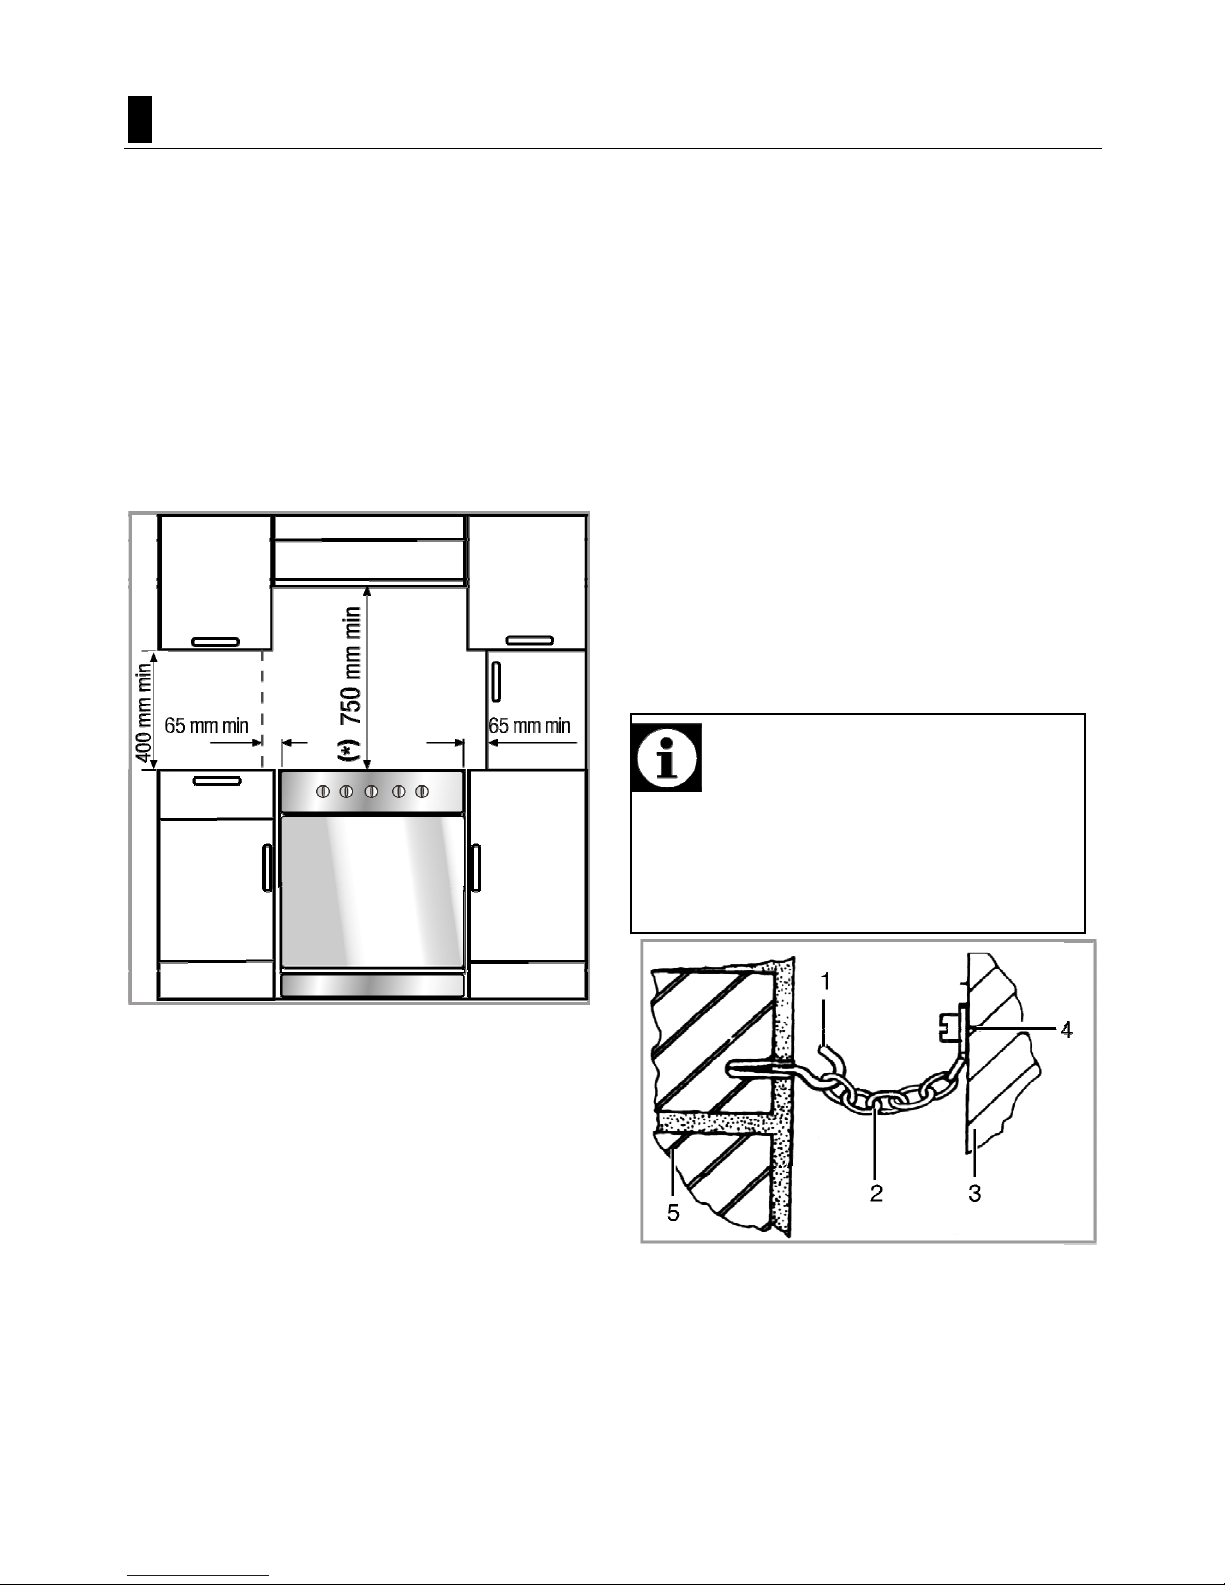
A safety distance must be left between
the appliance and the kitchen walls and
furniture. See figure (values in mm).
• It can be used with cabinets on
either side but in order to have a
minimum distance of 400 mm
above hotplate level allow a side
clearance of 65 mm between the
appliance and any wall, partition or
tall cupboard.
• It can also be used in a free
standing position. Allow a minimum
distance of 750 mm above the hob
surface.
• (*) If a cooker hood is to be
installed above the cooker, refer to
cooker hood manufacturer’
instructions regarding installation
height (min 650mm).
• The appliance corresponds to
device class 1, i.e. it may be
placed with the rear and one side
to kitchen walls, kitchen furniture or
equipment of any size. The kitchen
furniture or equipment on the other
side may only be of the same size
or smaller.
• Any kitchen furniture next to the
appliance must be heat-resistant
(100 °C min.).
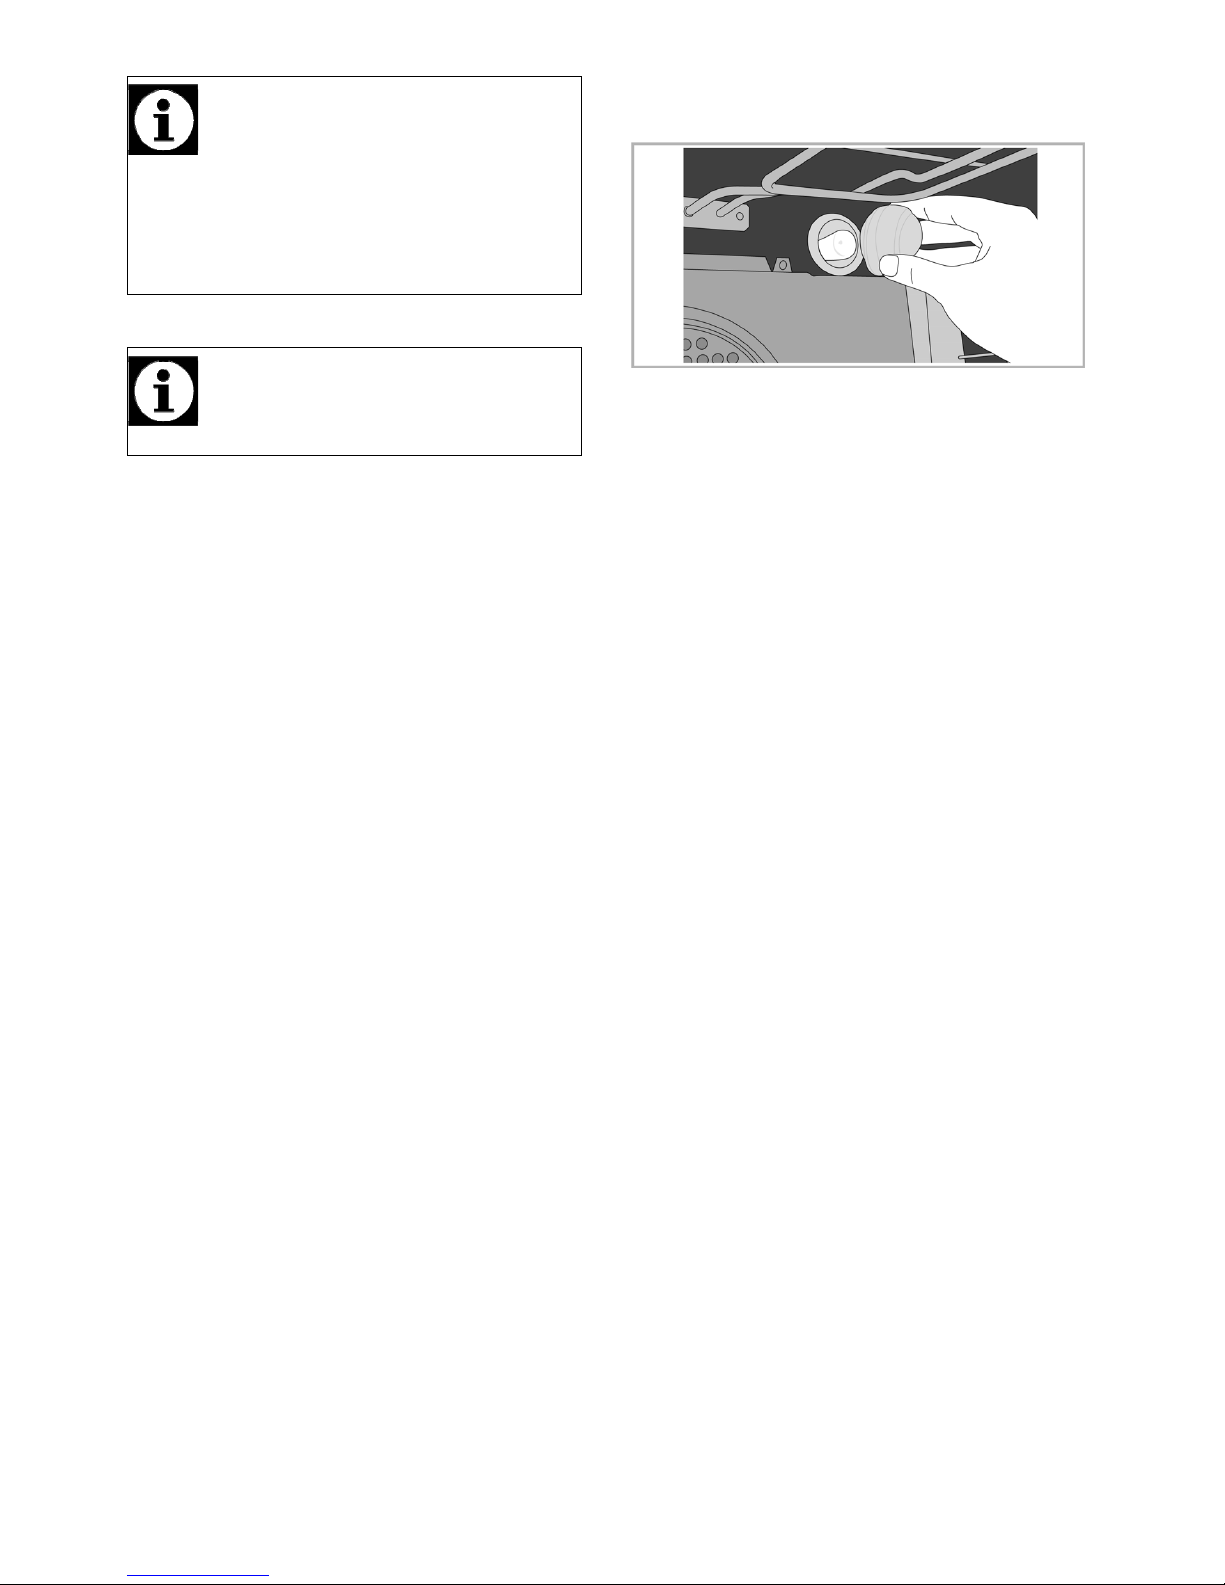
Important
The appliance must be secured
against overbalancing by using the
supplied chain on your oven.
Fasten hook (1) to the kitchen wall
(5) and connect safety chain (2) to
the hook.
1 Hook (is not supplied)
2 Safety chain (supplied and mounted
to oven)
3 Rear of cooker
4 Firmly fix chain to cooker rear
5 Kitchen wall
Page 11
11 | EN
Installation and connection
Important
Do not install the appliance next to
refrigerators or freezers. The heat
emitted by the appliance will lead to
an increased energy consumption
of cooling appliances.
• Appliance to be installed in
accordance with the local authority
requirements for gas, electricity
and any other authority having
jurisdiction.
• Carry the appliance with at least
two persons.
NOTICE
Material damage!
The door and/or handle must not be
used for lifting or moving the
appliance.
• The appliance must be placed
directly on the floor. It must not be
placed onto a base or a pedestal.
DANGER
Risk of explosion by damage of
the safety tube!
The safety tube must not be
clamped, bent or trapped or come
into contact with hot parts of the
appliance.
Connection to the mains supply
Important
This appliance must be earthed!
Our company shall not be held
responsible for any damage caused
by using the appliance without
earthed socket.
DANGER
Risk of electric shock, short
circuit or fire by unprofessional
installation!
The appliance may be connected
to the mains supply only by an
authorized qualified person and the
appliance is only guaranteed after
correct installation.
DANGER
Risk of electric shock, short
circuit or fire by damage of the
mains lead!
The mains lead must not be
clamped, bent or trapped or come
into contact with hot parts of the
appliance.
If the mains lead is damaged, it
must be replaced by a qualified
electrician.
The mains supply data must
correspond to the data specified on the
rating plate of the appliance. The rating
plate is either seen when the door or
the lower cover is opened or it is
located at the rear wall of the appliance
depending on the appliance type.
The supply cable of the appliance must
correspond to the specifications; see
technical data table Technical
specifications, page 5.
DANGER
Risk of electric shock!
Before starting any work on the
electrical installation, please
disconnect the appliance from the
mains supply.
1. If no all-pole separation from the
mains supply is possible, a
separation unit must be connected
with a contact distance of 3 mm min.
(fuses, line safety switches,
contactors) all poles which should
Page 12

12 | EN
be adjacent to (but not above) the
appliance in accordance with IEE
regulations. Failure to observe this
instruction may result in operational
problems and invalidation of the
appliance warranty.
Additional protection by a residual
current circuit breaker is recommended.
If a mains lead without a plug is not
supplied with the appliance;
2. For single phase connection,
Take care to connect as below:
• Brown cable = L (Live)
• Blue cable = N (Neutral)
• Green/yellow cable must be
connected to ground (E)
line.
3. For two phase connection, Take
care to connect as below:
• Brown cable = L1 (Live 1)
• Black cable = L2 (Live 2)
• Blue cable = N (Neutral)
• Green/yellow cable must be
connected to ground (E)
line.
4. For three phase connection, Take
care to connect as below:
• Brown cable = L1 (Live 1)
• Black cable = L2 (Live 2)
• Black cable = L3 (Live 3)
• Blue cable = N (Neutral)
• Green/yellow cable must be
connected to ground (E)
line.
• Position appliance up to the
kitchen wall.
• Securely attach safety chain to the
wall behind the cooker.
• To align the appliance with the
worktop, adjust the feet turning
right or left hand as required.
Final check
1. Switch electricity supply on.
2. Check electrical functions.
Disposal
Disposing of packaging material
Packaging materials are dangerous to
children. Keep packaging materials in a
safe place out of reach of children.
Packaging materials of the product are
manufactured from recyclable
materials. Dispose of them properly
and sort in accordance with recycled
waste instructions. Do not dispose of
them with normal domestic waste.
Disposing of the old product
Dispose of the old product in an
environmentally friendly manner.
This equipment bears the selective
sorting symbol for waste electrical and
electronic equipment (WEEE). This
means that this equipment must be
handled pursuant to European
Directive 2002/96/EC in order to be
recycled or dismantled to minimize its
impact on the environment. For further
information, please contact local or
regional authorities.
Page 13
13 | EN
Refer to your local dealer or solid
waste collection centre in your area to
learn how to dispose of your product.
Before disposing of the product, cut off
the power cable plug and make the
door lock (if any) unusable to avoid
dangerous conditions to children.
Future Transportation
• Keep the product's original carton
and transport the product in it.
Follow the instructions on the
carton. If you do not have the
original carton, pack the product in
bubble wrap or thick cardboard and
tape it securely.
• To prevent the wire grill and tray
inside the oven from damaging the
oven door, place a strip of
cardboard onto the inside of the
oven door that lines up with the
position of the trays. Tape the oven
door to the side walls.
• Do not use the door or handle to lift
or move the product.
NOTICE
Do not place other items on the top
of the appliance. The appliance
must be transported upright.
Important
Check the general appearance of
your product for any damages that
might have occurred during
transportation.
Page 14
14 | EN
4 Preparation
Tips for saving energy
The following information will help you
to use your appliance in an ecological
way, and to save energy:
• Use dark coloured or enamel
coated cookware in the oven since
the heat transmission will be better.
• While cooking your dishes, perform
a preheating operation if it is
advised in the user manual or
cooking instructions.
• Do not open the door of the oven
frequently during cooking.
• Try to cook more than one dish in
the oven at the same time
whenever possible. You can cook
by placing two cooking vessels
onto the wire shelf.
• Cook more than one dish one after
another. The oven will already be
hot.
• You can save energy by switching
off your oven a few minutes before
the end of the cooking time. Do not
open the oven door.
• Defrost frozen dishes before
cooking them.
• Use pots/pans with cover for
cooking. If there is no cover,
energy consumption may increase
4 times.
• Select the burner which is suitable
for the bottom size of the pot to be
used. Always select the correct pot
size for your dishes. Larger pots
require more energy.
• Pay attention to use flat bottom
pots when cooking with electric
hobs.
Pots with thick bottom will provide
a better heat conduction. You can
obtain energy savings up to 1/3.
• Vessels and pots must be
compatible with the hotplates.
Bottom of the vessels or pots must
not be smaller than the hotplate.
• Keep the hotplates and bottom of
the pots clean. Dirt will decrease
the heat conduction between the
hotplate and bottom of the pot.
• For long cookings, turn off the
hotplate 5 or 10 minutes before the
end of cooking time. You can
obtain energy savings up to 20%
by using the residual heat.
Initial use
First cleaning of the appliance
NOTICE
The surface may get damaged by
some detergents or cleaning
materials.
Do not use aggressive detergents,
cleaning powder/cream or any
sharp objects.
1. Remove all packaging materials.
2. Wipe the surfaces of the appliance
with a damp cloth or sponge and
dry with a cloth.
Initial heating
Heat up the product for about 30
minutes and then switch it off. Thus,
any production residues or layers will
be burnt off and removed.
Page 15
15 | EN
WARNING
Hot surfaces may cause burns!
Do not touch the hot surfaces of
the appliance. Use oven gloves.
Keep children away from the
appliance.
Electric oven
1. Take all baking trays and the wire
grill out of the oven.
2. Close the oven door.
3. Select Static position.
4. Select the highest grill power; See
How to use the electric oven,
page 18.
5. Operate the oven for about 30
minutes.
6. Turn off your oven; See How to use
the electric oven, page 18
Grill oven
1. Take all baking trays and the wire
grill out of the oven.
2. Close the oven door.
3. Select the highest grill power; see
How to operate the grill, page 22.
4. Operate the oven about 30 minutes.
5. Turn off your grill; see How to
operate the grill, page 22
Hot plate
1. Any production residues or
conservation layers must be burnt
before the first use. Operate the
hotplate at middle temperature level
for 8 minutes without any vessel on
it. No pots or containers should be
placed onto the hotplate during this
procedure.
Important
Smell and smoke may emit during
first heating. Ensure that the room
is well ventilated.
Page 16
16 | EN
5 How to use the hob
General information about
cooking
DANGER
Risk of fire by overheated oil!
When you heat oil, do not leave it
unattended.
Never try to extinguish the fire
with water! When oil has caught
fire, immediately cover the pot or
pan with a lid. Switch off the hob if
safe to do so and phone the fire
service.
• Before frying foods, always dry
them well and gently place into the
hot oil. Ensure complete thawing of
frozen foods before frying.
• Do not cover the vessel you use
when heating oil.
• Place the pans and saucepans in a
manner so that their handles are
not over the hob to prevent heating
of the handles. Do not place
unbalanced and easily tilting
vessels on the hob.
• Do not place empty vessels and
saucepans on cooking zones that
are switched on. They might get
damaged.
• Operating a cooking zone without a
vessel or saucepan on it will cause
damage to the product. Turn off the
cooking zones after the cooking is
complete.
• As the surface of the product can
be hot, do not put plastic and
aluminum vessels on it.
Such vessels should not be used
to keep foods either.
• Use flat bottomed saucepans or
vessels only.
• Put appropriate amount of food in
saucepans and pans. Thus, you
will not have to make any
unnecessary cleaning by
preventing the dishes from
overflowing.
Do not put covers of saucepans or
pans on cooking zones.
Place the saucepans in a manner
so that they are centered on the
cooking zone. When you want to
move the saucepan onto another
cooking zone, lift and place it onto
the cooking zone you want instead
of sliding it.
Using the hobs
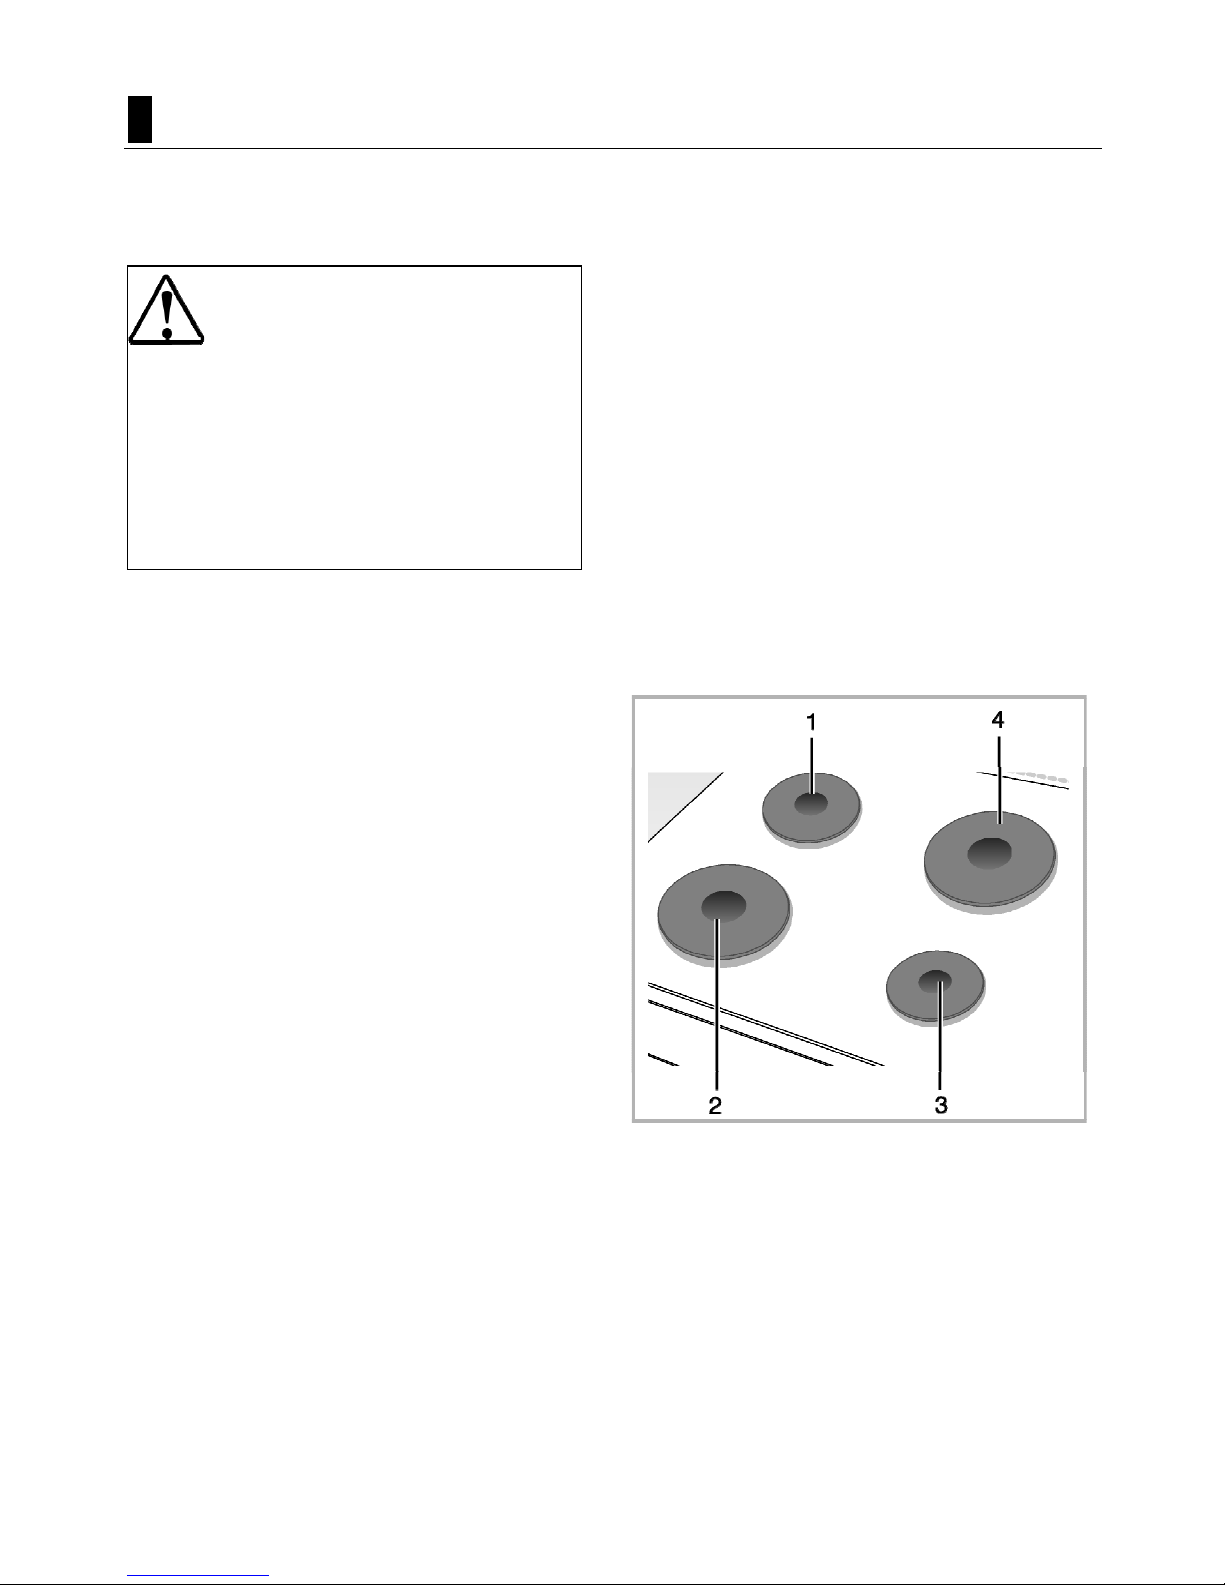
1 Hotplate 14-16 cm
2 Hotplate 18-20 cm
3 Hotplate 14-16 cm
4 Hotplate 18-20 cm is list of advised
diameter of pots to be used on
related burners.
Using hotplates
Hob knobs can be turned in both
directions in a way that will provide
temperature control in steps.
Page 17

17 | EN
NOTICE
If the hob is equipped with hotplates
featuring Booster function, relevant
hotplate will be marked with a red
dot.
Overheating protection
1000 Hotplates that have a power
above 1000 W are equipped with an
overheating protection. Overheating
protection decreases the power of the
hotplate in following cases:
• There is no vessel or saucepan on
the hotplate.
• There is an empty vessel or
saucepan on the hotplate.
• The bottom of the vessel or
saucepan is not flat.
Turning on the hotplates
Use hotplate knobs to operate the
hotplates. Move the hotplate knobs to
the relevant level in order to obtain the
desired cooking level.
Cooking
level
1 2 —3 4 —6
heating boiling,
resting
cooking,
frying
Turning off the hotplates
Turn the hotplate knob to OFF (upper)
position.
Page 18
18 | EN
6 How to operate the oven
General information on baking,
roasting and grilling
DANGER
Risk of scalding by hot steam!
Take care when opening the oven
door as steam may escape.
Tips for baking
• Use non-stick coated appropriate
metal plates or aluminum
containers or heat-resistant
silicone moulds.
• Make best use of the space on the
rack.
• It is recommended to place the
baking mould in the middle of the
rack.
• Select the correct shelf position
before turning the oven or grill on don’t move oven shelves when hot.
• Keep the oven door closed.
Tips for roasting
• Seasoning with lemon juice and
black pepper will improve the
cooking performance when
cooking a whole chicken, turkey or
a large piece of meat.
• Meat with bones takes about 15 to
30 minutes longer before it is
cooked than a roast of the same
size without bones.
• You should calculate about 4 to 5
minutes cooking time per
centimeter height of the meat.
• Let meat rest in the oven for about
10 minutes after the cooking time.
The juice is better distributed all
over the roast and does not run out
when the meat is cut.
• Fish in a fire-resistant dish should
be placed on the rack at the
medium or lower level.
Tips for grilling
Grilling is ideal for cooking meat, fish
and poultry and will achieve a nice
brown surface without it drying out to
much. Flat pieces, meat skewers and
sausages are particularly suited for
grilling as are vegetables with a high
water content such as tomatoes and
onions.
• Distribute the pieces to be grilled
on the wire shelf.
• If the grilling is on the wire shelf,
locate a dripping pan under it in
order to collect the fat.
• Add some water in the dripping
pan for easy cleaning.
NOTICE
Fire danger due to food which is
unsuitable for grilling!
Only use food for grilling which is
suitable for intensive grilling heat.
Do not place the food too far in the
back of the grill. This is the hottest
area and fat food may catch fire.
How to use the electric oven
Select temperature and operating
mode
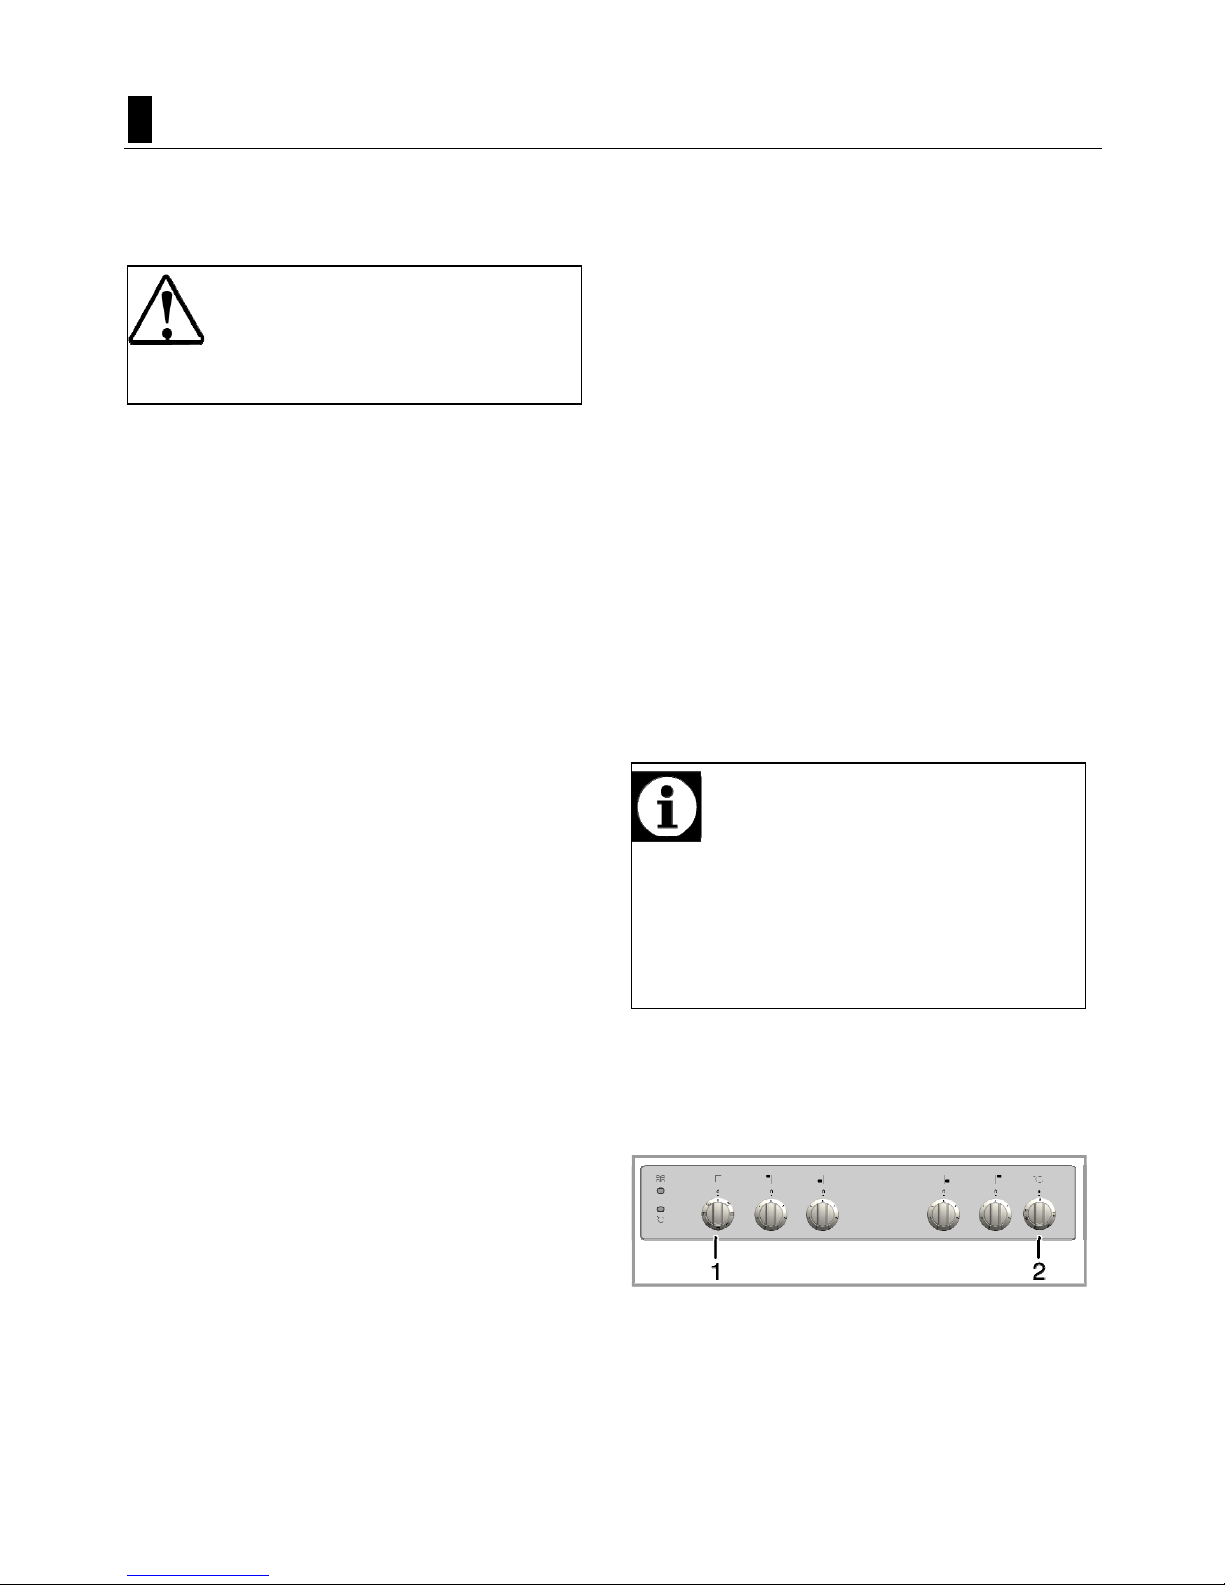
1 Function knob
2 Thermostat knob
The operating modes of the electric
oven are selected with the function
Page 19
19 | EN
knob. The temperature is adjusted with
the thermostat knob.
All oven functions are turned off by
turning the relevant knob to off (upper)
position.
1. Set thermostat knob to the desired
temperature.
2. Set function knob to the required
operating mode.
» The oven heats up to the adjusted
temperature and maintains it. During
heating, temperature lamp stays on.
Switch off electric oven
Turn function knob and thermostat
knob to off position (top).
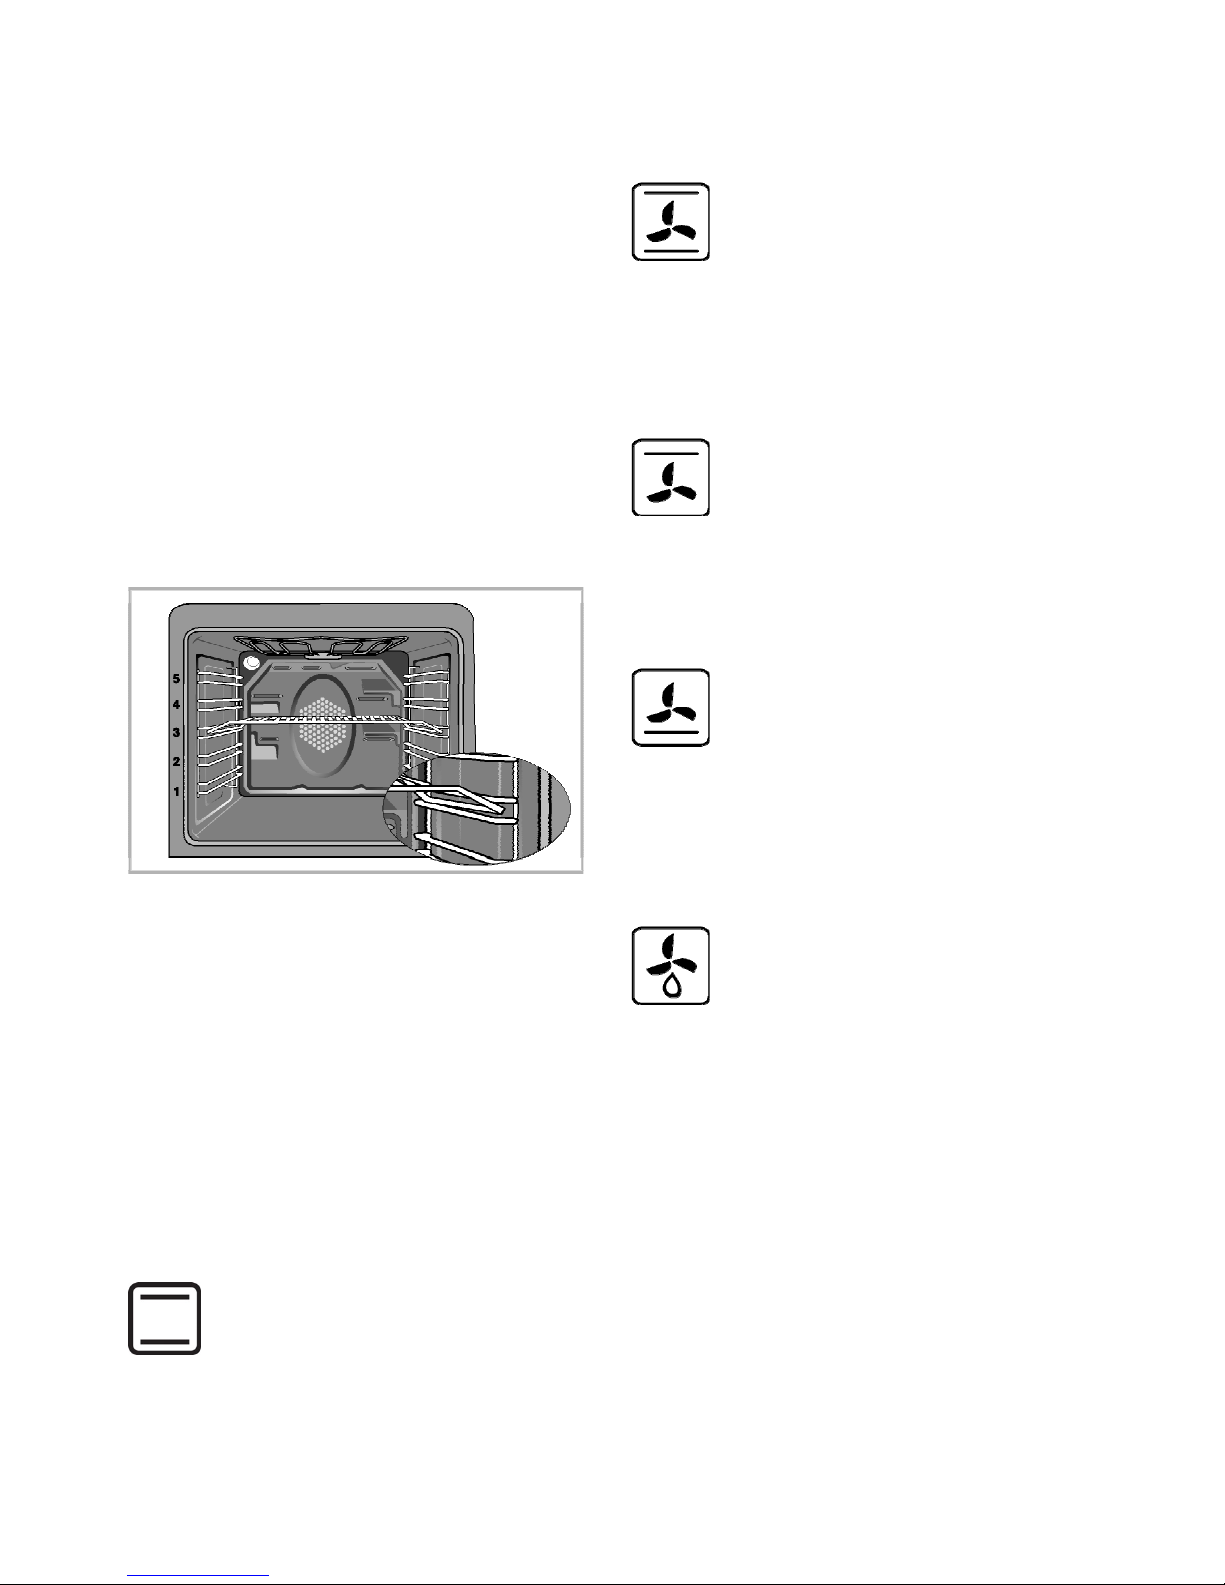
Shelf positions (model dependant)
It is important to position the wire grill
on wire shelf correctly. The wire grill
must be placed so that it will fit into the
opening of the wire shelf as illustrated
in the figure.
Operating modes
The order of operating modes shown
here might deviate from the
arrangement on your appliance.
Top and bottom heat
Top and bottom heat are on.
The foodstuffs are heated
simultaneously from the upper
and lower part. Suitable e.g.
for cakes, cookies and
casseroles in baking moulds.
Cook with one tray only.
Top and bottom heat with convection
air
Top and bottom heat plus fan
(in the rear wall) are on. The
hot air is distributed evenly
and quickly all over the oven
by the fan. Cook with one tray
only.
Top heat and convection ai
r
Top heat plus fan (in the rear
wall) are on. Hot air is spread
more evenly with the fan
compared to only top heat.
Bottom heat and convection ai
r
Bottom heat plus fan (in the
rear wall) are on. Hot air is
spread more evenly with the
fan compared to only bottom
heat.
Operating with fan
The oven is not heated. Only
the fan (in the rear wall) is in
operation. Frozen granular
food is thawed slowly at room
temperature and cooked food
is cooled down.
Page 20
20 | EN
Surface grill
The large grill (under the oven
roof) is in operation. Suitable
for grilling larger quantities.
• Put big or mediumsized portions in
correct shelf position
under the grill heater
for grilling.
• Set the temperature to
maximum level.
• Turn the food after half
of the grilling time.
Grill with convection ai
r
The grill effect is not as strong
as with normal grilling.
• Put small or mediumsized portions in
correct shelf position
under the grill heater
for grilling.
• Set the temperature to
maximum level.
• Turn the food after half
of the grilling time.
Cooking times table
Important
The values indicated in the table
below are data indicative. They may
vary according to the type of food
as well as your preferences of
cooking.
Baking and roasting
Important
Level 1 is the bottom level in the
oven.
Recipe Function Preheating
Cooking level
(from bottom)
Temperature
(°C)
Time (min) Accessories
Leavened cakes
CONVENTIONAL Yes 3 175 20 - 35 drip-tray
FORCED AIR Yes 1 - 5 175 15 - 30
Level 5: deep drip-tray
Level 1: drip-tray
Biscuits/Tartlets
CONVENTIONAL Yes 3 175 20 - 40 drip-tray
FORCED AIR Yes 1 - 5 175 20 - 35
Level 5: deep drip-tray
Level 1: drip-tray
Pizza
CONVENTIONAL Yes 2 225 12 - 20 drip-tray
FORCED AIR Yes 1 - 5 225 15- 30
Level 5: deep drip-tray
Level 1: drip-tray
Sponge cake
CONVENTIONAL Yes 3 200 5 -15 Level 3: cake tin on rack
FORCED AIR Yes 1 - 5 175 10 -25
Level 5: cake tin on rack
Level 1: cake tin on rack
Meat & potato pies
(vegetable pie,
quiche lorraine)
FAN Yes 2 175 - 200 30 - 50 cake tin on rack
FORCED AIR Yes 1 - 3 175 - 200 35 - 55
Level 3: cake tin on rack
Level 1: cake tin on rack
Page 21

21 | EN
Lasagna CONVENTIONAL Yes 2 - 3 200 30 - 45 Pan on rack
Lamb / Veal / Beef /
Pork 1Kg
FAN - 3
25 min at 250,
then at 180 - 190
80 - 120 Drip-tray or pan on rack
Turkey / Goose 3 Kg" FAN - 2
25 min at 250,
then at 180 - 190
140 - 210 Drip-tray or pan on rack
Roast chicken 1 - 1.3
Kg
FAN - 2
15 min at 250,
then at 180 - 190
55 - 70
Level 2: rack (turn food two
thirds of the way through
cooking if necessary)+ Pyrex
Level 1: l drip-tray with water
Leg of lamb / Shanks FAN - 3
25 min at 250,
then at 180 - 190
60 - 90
Drip-tray or pan on rack (turn
food two thirds of the way
through cooking if necessary)
Fish fillets / steaks FAN - 3 200 10 - 25
Level 3: rack (turn food
halfway through cooking) /
drip-tray
Level 2: drip-tray with water
Fish fillets / steaks GRILL Yes 4 / 5 200 - 225 20 - 30
Level 4 / 5: rack (turn food
halfway through cooking)
Level 3: drip-tray with water
Roast Beef
underdone
GRILL Yes 4 / 5 200 - 225 25 - 35
pan on rack (turn food two
thirds of the way through
cooking if necessary)
Toast GRILL Yes 4 200 - 225 1 - 4 rack
Sausages / Kebabs /
Spare ribs / Hamburgers
GRILL Yes 5 200 - 250 20 - 40
Level 5: rack (turn food
halfway through cooking)
Level 4: drip-tray with water
Vegetables au gratin GRILL Yes 3 200 10 - 20 pan on rack
The times given in the table are approximate. Cooking times may vary depending on the dish and food pieces.
When grilling it is advisable to arrange the food so as to leave the front portion of the rack free (6-7 cm).
For grilled meat it is advisable to turn the food halfway through cooking.
In a cooking that requires preheating,
preheat at the beginning of cooking
until the thermostat lamp turns off.
Tips for baking cake
• If the cake is too dry, increase the
temperature by 10 and decrease
the cooking time.
• If the cake is wet, use less liquid or
lower the temperature by 10°C.
• If the cake is too dark on top, place
it on a lower rack, lower the
temperature and increase the
cooking time.
• If cooked well on the inside but
sticky on the outside use less liquid,
lower the temperature and
increase the cooking time.
Tips for baking pastry
• If the pastry is too dry, increase the
temperature by 10 and decrease
the cooking time. Dampen the
layers of dough with a sauce
composed of milk, oil, egg and
yoghurt.
• If the pastry takes too long to bake,
pay care that the thickness of the
pastry you have prepared does not
exceed the depth of the tray.
• If the upper side of the pastry gets
browned, but the lower part is not
cooked, make sure that the amount
of sauce you have used for the
pastry is not too much at the
bottom of the pastry. Try to scatter
the sauce equally between the
dough layers and on the top of
pastry for an even browning.
Page 22
22 | EN
Important
Cook the pastry in accordance with
the mode and temperature given in
the cooking table. If the bottom part
is still not browned enough, place it
on one lower rack next time.
Tips for cooking vegetables
• If the vegetable dish runs out of
juice and gets too dry, cook it in a
pan with a lid instead of a tray.
Closed vessels will preserve the
juice of the dish.
• If a vegetable dish does not get
cooked, boil the vegetables
beforehand or prepare them like
canned food and put in the oven.
How to operate the grill
WARNING
Hot surfaces may cause burns!
Close oven door during grilling.
Switch on grill
1. Set the function knob onto the grill
symbol.
2. Set grill temperature.
3. Preheat for approximately 5 minutes,
if it is necessary.
» The thermostat lamp is switched on.
Switch off grill
1. Turn grill control knob to off position
(top).
Shelf positions
For optimum grill coverage, position
the wire shelf towards the front of the
oven just out of contact with the glass
door. Placing the wire shelf fully to the
rear of the oven will reduce the grill
coverage.
Page 23
23 | EN
7 Maintenance and care
General information
Service life of the product will extend
and the possibility of problems will
decrease if the product is cleaned at
regular intervals.
DANGER
Risk of electric shock!
Switch off the electricity before
cleaning appliance to avoid an
electric shock.
DANGER
Hot surfaces may cause burns!
A
llow the appliance to cool down
before you clean it.
• Clean the product thoroughly after
each use. In this way it will be
possible to remove cooking
residues more easily, thus avoiding
these from burning the next time
the appliance is used.
• No special cleaning agents are
required for cleaning the product.
Use warm water with washing
liquid, a soft cloth or sponge to
clean the product and wipe it with a
dry cloth.
• Always ensure any excess liquid is
thoroughly wiped off after cleaning
and any spillage is immediately
wiped dry.
• Do not use cleaning agents that
contain acid or chloride to clean
the stainless or inox surfaces and
the handle. Use a soft cloth with a
liquid detergent (not abrasive) to
wipe those parts clean, paying
attention to sweep in one direction.
NOTICE
The surface may get damaged by
some detergents or cleaning
materials.
Do not use aggressive detergents,
cleaning powder/cream or any
sharp objects.
Important
Do not use steam cleaners for
cleaning.
Cleaning the hob
Electric hobs
1. Turn off the hotplates and wait until
they cool down.
2. If necessary, clean the plates with
a cleaning agent (you can obtain
cleaners/softeners from specialty
stores).
3. Warm only for a few minutes after
cleaning in order to have their top
section dried.
4. Apply a thin layer of machine oil
onto the top surface of the hob
regularly in order to protect it.
Cleaning the control panel
Clean the control panel and control
knobs with a damp cloth and wipe
them dry.
NOTICE
Damage of the control panel!
Do not remove the control knobs for
control panel cleaning.
Page 24

24 | EN
Cleaning the oven
No oven cleaner or any other special
cleaning agent is required for cleaning
the oven. It is recommended to wipe
the oven with a damp cloth while it is
still warm.
To clean the side wall,
1. Remove the front section of the
side rack by pulling it in the
opposite direction of the side wall.
2. Remove the side rack completely
by pulling it towards you.
Clean oven door
Don't use any harsh abrasive cleaners
or sharp metal scrapers for cleaning
the oven door. They could scratch the
surface and destroy the glass.
Removal of oven door
1. Open the front door.
2. Open the clips at the hinge housing
on the right and left hand sides of
the front door by pressing them
down as illustrated in the figure.
1 Front door
2 Hinge
3 Oven
3. Move the front door to half-way.
4. Remove the front door by pulling it
upwards to release it from the right
and left hinges.
NOTICE
Steps carried out during removing
process should be performed in
reverse order (steps 4, 3, 2 and 1)
to reattach the door. Do not forget
to close the clips at the hinge
housing when reinstalling the door.
Replacing the oven lamp
DANGER
Hot surfaces may cause burns!
Make sure that the appliance is
switched off and cooled down in
order to avoid the risk of an
electrical shock.
Page 25
25 | EN
Important
The oven lamp is a special electric
light bulb that can resist up to
300 °C. See Technical
specifications, page 5 for details.
Oven lamps can be obtained from
A
uthorised Service Agents.
NOTICE
Position of lamp might vary from
the figure.
If your oven is equipped with a
round lamp:
1. Disconnect the product from mains.
2. Turn the glass cover counter
clockwise to remove it.
3. Remove the oven lamp by turning it
counter clockwise and replace it
with the new one.
4. Install the glass cover.
Page 26
26 | EN
8 Troubleshooting
Oven emits steam when it is in use.
Important
It is normal that steam escapes
during operation. This is not a fault.
Product emits metal noises while heating and cooling.
Important
When the metal parts are heated,
they may expand and cause noise.
This is not a fault.
Product does not operate.
• The mains fuse is defective or has tripped. >>> Check fuses in the fuse box.
If necessary, replace or reset them.
• Product is not plugged into the (grounded) socket. >>> Check the plug
connection.
Oven light does not work.
• Oven lamp is defective. >>> Replace oven lamp.
• Power is cut. >>> Check if there is power. Check the fuses in the fuse box. If
necessary, replace or reset the fuses.
Oven does not heat.
• Function and/or Temperature are not set. >>> Set the function and the
temperature with the Function and/or Temperature knob/key.
• Power is cut. >>> Check if there is power. Check the fuses in the fuse box. If
necessary, replace or reset the fuses.
Important
Consult the Authorised Service Agent or the dealer where you have purchased the
product if you can not remedy the trouble although you have implemented the
instructions in this section. Never attempt to repair a defective product yourself.
Page 27
Läs denna bruksanvisning först.
Bästa kund,
Vi vill att du ska få bästa möjliga prestanda på din produkt, som har tillverkats i
moderna fabriker och gått igenom strikta kvalitetskontroller.
Därför råder vi dig att läsa igenom denna bruksanvisning innan du använder
produkten och sparar den för framtida referens. Om du ger produkten till någon
annan ska du se till att bruksanvisning också följer med.
Bruksanvisningen hjälper dig att använda produkten på ett snabbt och
säkert sätt.
• Läs bruksanvisningen innan du installerar och startar produkten.
• Du måste följa säkerhetsinstruktionerna.
• Förvara bruksanvisningen lättåtkomlig för framtida referens.
• Läs även de övriga dokumenten som följer med produkten.
Kom ihåg att den här bruksanvisningen även kan gälla flera andra modeller.
Skillnader mellan modeller är uttryckligen angivna i den här bruksanvisningen.
Förklaring av symboler
I den här bruksanvisningen används följande symboler:
Viktig information eller användbara användartips.
Varning för situationer som kan vara livsfarliga eller farliga för egendom.
Varning för elektrisk stöt.
Varning för brandrisk.
Varning för heta ytor.
Page 28
28 | SV
Innehållsförteckning
1 Allmän Information 29
Översikt ................................................. 29
Tekniska specifikationer ....................... 30
Tillbehör som medföljer enheten ......... 31
2 Säkerhetsanvisningar 32
Allmän säkerhet .................................... 32
Säkerhet vid arbete med el .............. 34
Avsedd användning .......................... 34
Barnsäkerhet ..................................... 34
3 Installation 35
Före installation ..................................... 35
Installation och anslutning .................... 36
Avyttring ................................................. 37
Avfallshantering av emballage .......... 37
Avfallshantering av den uttjänta
produkten ...................................... 37
Framtida transport ............................. 38
4 Förberedelser 39
Tips för att spara energi ....................... 39
Initial användning .................................. 39
Den första rengöringen av produkten39
Initial uppvärmning ............................ 39
5 Så här använder du hällen 41
Allmän information om tillagning .......... 41
Använda hällen ..................................... 41
6 Så här använder du ugnen 43
Allmän information om bakning, stekning
och grillning ....................................... 43
Så här använder du den elektriska
ugnen ............................................... 43
Användningslägen ............................. 44
Tabell över tillagningstider ................ 44
Så här förebereder du grillen ............... 46
7 Underhåll och rengöring 47
Allmän information ................................ 47
Rengöra hällen ...................................... 47
Rengöra kontrollpanelen ...................... 47
Rengöra ugnen ..................................... 48
Demontering av ugnsluckan ................ 48
Byta ugnslampan .................................. 48
8 Felsökning 50
Page 29
29 | SV
1 Allmän Information
Översikt
1 Främre lucka
2 Handtag
3 Nedre låda
4 Tråg
5 Trådhylla
6 Kontrollpanel
7 Brännarplatta
8 Lampa
9 Grillvärmeelement
10 Hyllpositioner
1 Termostatlampa
2 Varningslampa
3 Funktionsreglage
4 Hetplatta Vänster bak
5 Hetplatta Vänster fram
6 Hetplatta Höger fram
7 Hetplatta Höger bak
8 Termostatreglage
Page 30
30 | SV
Tekniska specifikationer
ALLMÄNT
Yttre mått (höjd/bredd/djup) 850 mm/600 mm/600 mm
Volt/frekvens 220-240 V 50 Hz
Total energiförbrukning 8.3 kW
Säkring min. 16 A x 3
Kabeltyp/sektion H05VV-FG 3 x 2,5 mm2
Kabellängd max. 2 m
HÄLL
Brännare
Vänster bak
Hetplatta
Dimension 145 mm
Energi 1000 W
Vänster fram
Hetplatta
Dimension 180 mm
Energi 2000 W
Höger fram
Hetplatta
Dimension 145 mm
Energi 1500 W
Höger bak
Hetplatta
Dimension 180 mm
Energi 1500 W
UGN/GRILL
Huvudugn
Traditionell ugn
Energieffektivitet klass# A
Innerlampa 15–25 W
Grillenergiförbrukning 2.2 kW
#
Grundläggande information: Information om energiangivelser för elektriska ugnar
anges i enlighet med EN 50304-standard. Dessa värden bestäms under
standardladdning med över-undervärme eller varmluftsfunktioner (om det finns).
Energieffektivitetsklass bestäms i enlighet med följande prioritering, beroende på om
produkten har funktionerna eller inte. 1-Tillagning med eko-fläkt, 2- Turbo långsamt
tillagning, 3- Turbotillagning, 4- Varmlufts under/över, 5-Över- och undervärme.
Viktigt
De tekniska specifikationerna kan
ändras utan föregående
meddelande, för att förbättra
produktens kvalitet.
Viktigt
Siffrorna i den här
bruksanvisningen är endast i
beskrivande syfte och kanske inte
exakt stämmer överens med din
produkt.
Page 31

31 | SV
Viktigt
Värden på produktetiketter och i
medföljande dokumentation är
hämtade från
laboratorieförhållanden i enlighet
med relevanta standarder. Dessa
värden kan variera beroende på
användnings- och
miljöförhållanden.
Tillbehör som medföljer
enheten
Viktigt
Vilka tillbehör som medföljer kan
variera beroende på modell. Alla
tillbehör som beskrivs i den här
bruksanvisningen kanske inte följer
med din produkt.
Bakplatta
Kan användas för bakverk, fryst mat
och stora stekar.
Djup stekplatta
Kan användas för bakverk, stora stekar,
mat med mycket vätska eller som
dropplatta under grillning.
Trådhylla
Kan användas vid stekning och som
underlägg för bakning, stekning och
grytor.
Page 32

32 | SV
2 Säkerhetsanvisningar
Allmän säkerhet
VARNING: Denna apparat
och dess åtkomliga delar
hettas upp under
användning. Var försiktig så
att du inte rör vid
värmeelementen.
Barn under 8 års ålder skall
hållas borta från apparaten,
såvida de inte är under
uppsyn.
Denna apparat kan
användas av barn från 8 år
och uppåt och av personer
med reducerad psykisk,
fysisk, sensoriell eller
mental kapacitet, såväl som
av personer helt utan
erfarenhet och kunskap, så
länge de övervakas eller får
instruktioner angående
säker användning av
apparaten och förstår de
faror som kan uppstå. Barn
får ej leka med apparaten.
Rengöring och
användarunderhåll skall inte
utföras av barn utan
översyn
VARNING: Apparatens
tillgängliga delar kan bli
mycket heta under
användning. Unga barn skall
hållas borta från apparaten.
Använd inte aggressiva,
slipande rengöringsmedel
eller vassa metallredskap för
att rengöra ugnens glaslucka,
eftersom dessa kan repa
ytan, något som kan resultera
i att glaset splittras.
VARNING: Se till att
apparaten stängs av innan
du byter ut lampan, detta för
att undvika eventuell
elchock.
VARNING: Tillagning utan
uppsyn med fett och olja
kan vara farlig och kan
resultera i brand. Försök
ALDRIG att släcka sådan
brand med vatten, utan
stäng av apparaten och täck
över eldslågan med ett lock
eller en brandfilt.
VARNING: Brandfara:
förvara inte saker på
tillagningsytan. Produkten
får inte användas med
hjälp av en extern timer
eller ett separat
fjärrstyrningssystem.
Page 33

33 | SV
VARNING: Om ytan är
spräckt, stäng av apparaten
för att undvika eventuell
elchock.
• Anslut produkten till ett jordat uttag
som är skyddat av en säkring av
lämplig kapacitet, i enlighet med
"Tekniska specifikationer". Den
jordade installationen ska göras av
en kvalificerad elektriker medan
produkten används med eller utan
transformator. Vårt företag kan inte
hållas ansvarig för skador som
uppstått på grund av att produkten
har används utan en jordad
installation, i enlighet med lokala
lagar och regler.
• Om strömsladden är skadad måste
den bytas av tillverkaren, dess
serviceombud eller liknande
behöriga personer för att undvika
fara.
• Använd inte produkten om den är
defekt eller har några synliga
skador.
• Utför inga reparationer eller
modifieringar på produkten. Du kan
åtgärda vissa fel som inte kräver
reparationer eller modifieringar. Se
Felsökning, sidan 50.
• Skölj inte produkten med vatten!
Du kan få en elektrisk stöt!
• Använd aldrig produkten vid
nedsatt omdöme eller koordination
på grund av alkoholintag och/eller
användning av droger.
• Produkten måste kopplas från
strömkällan under installation,
underhåll, rengöring och reparation.
• Var försiktig vid användning av
alkoholhaltiga drycker i maten.
Alkohol omvandlas till ånga i höga
temperaturer och kan antända om
den kommer i kontakt med heta
ytor.
• Värm inte oöppnade konservburkar
eller glasburkar i ugnen. Trycket
som bildas i burken kan göra att
den spricker.
• Se till att inga antändbara material
finns i närheten av produkten,
eftersom sidorna kan bli heta under
användningen.
• Placera inga bakplåtar, tallrikar
eller aluminiumfolie direkt på
ugnens botten.
Värmeackumulationen kan skada
ugnens underdel.
• Håll alla ventiler fria från hinder.
• Produkten kan bli het när den
används. Rör aldrig vid de heta
brännarna, innersektionerna på
ugnen, värmeelement etc.
• Använd alltid värmetåliga
ugnsvantar när du sätter in mat i
eller tar ut mat från den heta ugnen.
• Använd inte produkten om glaset
på ugnsluckan är borttaget eller
sprucket.
• Den bakre ytan på ugnen blir
mycket varm när den används. Se
till att ingen gas-/elanslutning har
kontakt med den bakre ytan, det
kan orsaka skador.
• Kläm inte strömsladden mellan
ugnsluckan och ramen, och låt den
aldrig löpa över de heta ytorna.
Annars kan kabelisoleringen
smälta och orsaka brand som
resultat av kortslutning.
• Kontrollera att produkten är
avstängd efter varje användning.
Viktigt
Enheten är inte avsedd att
användas på något annat sätt än
med en extern timer eller separat
fjärrkontroll.
Page 34

34 | SV
Säkerhet vid arbete med el
Fel i den elektriska utrustningen är en
av de främsta orsakerna till brand i
privata hushåll.
• Allt arbete med elektrisk utrustning
och elsystem får bara utföras av
behöriga fackmän.
• Vid skada slår du av produkten och
kopplar bort den från strömkällan.
För att göra detta stänger du av
säkringen hemma.
• Kontrollera att säkringen är
kompatibel med produkten.
Avsedd användning
Den här produkten är avsedd för
användning i hemmet. Kommersiell
användning är inte tillrådligt.
”OBS: Den här enheten är endast till
för tillagning. Den får inte användas i
andra syften, exempelvis för
rumsuppvärmning.”
Den här produkten ska inte användas
för att värma tallrikar under grillen,
hänga handdukar och disktrasor etc på
handtag, eller för torkning och
värmning.
Tillverkaren ansvarar inte för någon
skada som orsakas av felaktig
användning eller felhantering.
Ugnen kan användas för avfrostning,
bakning, stekning och grillning av mat.
Barnsäkerhet
• Elektriska produkter är farliga för
barn. Barn ska inte vara nära
produkten när den används och de
får inte leka med produkten.
• Enhetens delar blir heta under
tiden den används och innan den
har svalnat ska barn hållas borta.
• "OBSIÅtkomliga delar kan bli
varma när grillen används. Små
barn ska hållas borta."
• Förvara inga föremål ovanpå
enheten som barn kan nå.
• När luckan är öppen ska du inte
lägga några tunga föremål på den
och inte låta barn sätta sig på den.
Ungen kan välta eller så kan
luckan skadas.
• Förpackningsmaterial är farliga för
barn. Håll barn borta från
förpackningsmaterial. Avyttra alla
delar på förpackningen enligt
miljöstandarder.
Barnlås
Spisen har ett barnlåssystem på
ugnsluckan.
För att öppna luckan trycker du på
plastknappen lätt nedåt och drar i
luckans handtag.
När du stänger luckan så aktiveras
barnlåset automatiskt.
Page 35
35 | SV
3 Installation
Före installation
För att säkerställa att kritiska glapp
bevaras under produkten
rekommenderar vi att den här
produkten monteras på ett stabilt
underlag och att fötterna inte sjunker
ned i någon matta eller mjukt underlag.
Köksgolvet måste kunna bära vikten av
enheten plus den extra vikten av spis
och ugn och mat.
Ett säkerhetsavstånd måste lämnas
mellan enheten och köksväggarna och
-möblerna. Se bilden (värden in mm).
• Den kan användas med sidoskåp
på vardera sidan, men med ett
minsta avstånd på 400mm ovanför
spisplattans nivå för att medge ett
spel på 65mm mellan enheten och
valfri vägg, utskjutande del eller
stort skåp.
• Den kan även användas i fritt
stående position. Tillåt ett minsta
avstånd på 750mm från hällens yta
till intilliggande ytor ovanför hällens
yta.
• *Om en matlagningsfläkt ska
installeras ovanför spisen, se
tillverkaranvisningarna för spisen
gällande installationshöjd (minst 65
cm).
• Enheten överensstämmer med
enhet klass 1, dvs. den kan
placeras med bakre och ena sidan
av köksväggarna, köksmöbler eller
annan utrustning. Köksmöbler eller
utrustning på andra sidean får
bara vara av samma storlek eller
mindre.
• Alla köksmöbler intill enheten
måste vara värmeresistenta (minst
100 °C).
Viktigt
Enheten måste säkras mot
överbalansering genom att
använda medföljande kedja för
ugnen. Fäst krok (1) i köksväggen
(5) och anslut säkerhetskedjan (2) i
kroken.
1 Krok
2 Säkerhetskedja
3 Spisens baksida
4 Fixera kedjan ordentligt mot bakre
delen av spisen
5 Köksvägg
Page 36

36 | SV
Installation och anslutning
Produkten får bara installeras och
anslutas i enlighet med gällande
installationskrav.
Viktigt
Installera inte enheten intill kylskåp
eller frys. Den värme som utsänds
från enheten leder till en ökad
energiförbrukning av kylenheter.
• Bär produkten tillsammans med
minst två personer.
• Produkten måste placeras direkt
på golvet. Den får inte placeras på
en basenhet eller pedestal.
ANMÄRKNING
Materialskada!
Dörrhandtaget får inte användas
för att lyfta i eller flytta enheten.
Elanslutning
Anslut produkten till ett jordat uttag
som är skyddat av en säkring av
lämplig kapacitet, i enlighet med
"Tekniska specifikationer". Den jordade
installationen ska göras av en
kvalificerad elektriker medan produkten
används med eller utan transformator.
Vårt företag kan inte hållas ansvarig för
skador som uppstått på grund av att
produkten har används utan en jordad
installation, i enlighet med lokala lagar
och regler.
FARA
Risk för elektrisk kortslutning,
eller brand på grund av felaktig
installation!
Enheten kan bara anslutas till
strömkällan av en behörig fackman
och då garanteras fullgod funktion.
FARA
Risk för kortslutning, eller brand
till följd av skada på elsladden!
Elsladden får inte klämmas, böjas
eller klämmas eller komma i
kontakt med enhetens heta delar.
Om elsladden skadas måste den
bytas av en kvalificerad elektriker.
Strömdata måste överensstämma med
de data som anges på märkplåten på
produkten. Märkplåten finns antingen
på dörren eller så öppnar du den nedre
kåpan som finns på enhetens bakre
vägg beroende på enhetstypen.
Produktens strömsladd måste följa
värdena i "Tekniska specifikationer".
FARA
Risk för elektrisk kortslutning!
Koppla ur produkten från
strömkällan innan du påbörjar
något arbete på elinstallationen.
Ansluta strömkabeln
1. Det är inte möjligt att koppla från
alla poler i strömförsörjningen, en
frånkopplingsenhet med minst 3
mm kontaktfri yta (säkringar,
säkerhetsväxlar, kontraktor) måste
vara anslutna och alla poler på
denna frånkopplingsenhet måste
vara angränsande till (inte ovan)
produkten enlighet med IEEdirektiven. Om instruktionerna inte
följs kan det orsaka
användarproblem och det
ogiltigförklarar produktgarantin.
Ytterligare skydd genom en
jordfelsbrytare rekommenderas.
Om en kabel medföljer produkten:
Page 37

37 | SV
2. För enfasanslutning, anslut efter
beskrivningen nedan:
• Brun kabel = L (fas)
• Blå kabel = N (Neutral)
• Grön/gul kabel = (E)
(jord)
3. För tvåfasanslutning, anslut
kablarna efter beskrivningen nedan:
• Brun kabel = L1 (fas 1)
• Svart kabel = L2 (fas 2)
• Blå kabel = N (Neutral)
• Grön/gul kabel = (E)
(jord)
4. För trefasanslutning, anslut
kablarna efter beskrivningen nedan:
• Brun kabel = L1 (fas 1)
• Svart kabel = L2 (fas 2)
• Svart kabel = L3 (fas 3)
• Blå kabel = N (Neutral)
• Grön/gul kabel = (E)
(jord)
• Tryck produkten mot köksväggen.
• Haka på säkerhetskedjan.
• Ändra ugnens ben
Vibrationer under användning kan
göra att matlagningskärl flyttar sig.
Denna farliga situation kan
undvikas genom att se till att
produkten är vågrät och
balancerad.
För din egen säkerhet ska du se till
att produkten är vågrät genom att
justera de fyra fötterna. Det gör du
genom att vrida åt höger eller åt
vänster.
Slutkontroll
1. Anslut produkten till strömmen igen.
2. Kontrollera de elektriska
funktionerna.
Avyttring
Avfallshantering av emballage
Emballaget är farligt för barn. Förvara
emballaget på en säker plats utom
räckhåll för barn.
Emballaget till den här produkten är
tillverkat av återvinningsbart material.
Sortera och avfallshantera det i
enlighet med lokala lagar och regler
gällande avfallshantering. Släng dem
inte i hushållssoporna.
Avfallshantering av den uttjänta
produkten
Avfallshantera den uttjänta produkten
på ett så miljövänligt sätt som möjligt
Den här produkten bär den utvalda
sorteringssymbolen för elektrisk och
elektronisk utrustning (WEEE). Detta
innebär att produkten måste hanteras i
enlighet med EU-direktivet 2002/96/EC
för att återvinnas eller avyttras på ett
sätt som innebär minimal påverkan på
miljön. För ytterligare information,
kontakta din kommun.
Kontakta din lokala återförsäljare eller
avfallshanteringsstation för mer
Page 38

38 | SV
information om hur du avfallshanterar
produkten.
Innan du slänger produkten ska du
klippa av strömkabelns kontakt och
låsa luckan (om det finns något lås) för
att undvika farliga situationer för barn.
Framtida transport
• Spara produktens originalkartong
för framtida transport av produkten.
Följ instruktionerna på kartongen.
Om du inte har originalkartongen
kvar ska du packa in produkten i
bubbelplast eller tjock kartong, och
tejpa ordentligt.
• För att förhindra att gallret ioch
plåten nuti ugnen skadar
ugnsluckan ska du placera en bit
kartong på insida av ugnsluckan
som ligger mot gallren. Tejpa
ugnsluckan mot sidoväggarna.
• Använd inte luckan eller handtaget
när du lyfter eller flyttar produkten.
Viktigt
Kontrollera produktens allmänna
utseende, om det finns några
skador som kan ha uppstått under
transport.
Page 39

39 | SV
4 Förberedelser
Tips för att spara energi
Följande information hjälper dig att
använda enheten på ett ekologiskt sätt
och spara energi:
• Använd mörka eller emaljerade
kärl i ugnen eftersom
värmeöverföringen blir bättre.
• När du tillagar dina rätter utför du
en förvärmning om detta
rekommenderas i
bruksanvisningen eller receptet.
• Öppna inte luckan för ofta under
tillagningen.
• Försök att inte tillaga mer än en
rätt i ugnen samtidigt. Du kan
tillaga eller placera två kokkärl på
ugnsgallret.
• Tillaga mer än en rätt i följd. Ugnen
är då redan varm.
• Du kan spara energi genom att
stänga av ugnen i några minuter
innan tillagningstiden är slut.
Öppna inte ugnsluckan.
• Tina upp fryst mat före tillagning.
• Använd kastruller/pannor med lock
för tillagningen. Om det inte finns
några lock kan energiförbrukningen
öka med 4 gånger.
• Välj den brännare som passar bäst
för kastrullens undersida. Välj alltid
rätt kastrullstorlek för dina rätter.
Stora kastruller kräver mer energi.
• Se till att använda kastruller med
platt botten vid tillagning med
elektriska hällar.
Kastruller med tjock botten ger
bättre värmeledning. Du kan få
energibesparingar på upp till 1/3.
• Kastruller och kärl måste passa
med brännarna. Undersidan av
kastruller och kärl får inte vara
mindre än brännaren.
• Håll brännarna och kastrullernas
undersida rena. Smuts minskar
värmeledningen mellan brännaren
och kastrullens undersida.
• För långa tillagningar kan du
stänga av brännaren 5 eller 10
minuter före tillagningstidens slut.
Du kan uppnå energibesparingar
på upp till 20 % genom att använda
restvärme.
Initial användning
Den första rengöringen av
produkten
ANMÄRKNING
Ytan kan skadas av vissa
rengöringsmedel.
A
nvänd inte aggressiva
rengöringsmedel, skurpulver/-mjölk
eller några vassa föremål.
1. Avlägsna allt förpackningsmaterial.
2. Torka av ytorna på produkten med
en fuktig trasa eller svamp och torka
sedan med en torr trasa.
Initial uppvärmning
Värm upp enheten i omkring 30
minuter och slå sedan av den. På det
här sättet bränns matrester bort och
avlägsnas.
VARNING
Heta ytor kan orsaka
brännskador!
Rör inte vid enhetens heta ytor.
Håll barn borta från enheten och
använd ugnshandskar.
Page 40

40 | SV
Elektrisk ugn
1. Ta ut alla bakplåtar och galler från
ugnen.
2. Stäng ugnsluckan.
3. Välj positionen Fast.
4. Välj den högsta effekten för grillen;
se Så här använder du den
elektriska ugnen, sidan 43.
5. Kör ugnen i cirka 30 minuter.
6. Stänga av ugnen; se Så här
använder du den elektriska ugnen,
sidan 43
Grillugn
1. Ta ut alla bakplåtar och galler från
ugnen.
2. Stäng ugnsluckan.
3. Välj den högsta effekten för grillen;
se Så här förebereder du grillen,
sidan 46.
4. Kör ugnen i cirka 30 minuter.
5. Stänga av grillen, se Så här
förebereder du grillen, sidan 46
Platta
1. Alla produktionsrester eller lager
måste brännas bort före första
användningen. Använd plattan med
medeltemperaturnivå i 8 minuter
utan någon kastrull. Inga kastruller
eller behållare ska placeras på
plattan under den här processen.
Viktigt
Doft och rök kan utvecklas vid
första uppvärmningen. Se till att
ventilationen är god.
Page 41

41 | SV
5 Så här använder du hällen
Allmän information om
tillagning
FARA
Brandrisk vid för het olja!
När du värmer olja ska du inte
lämna den obevakad.
Försök aldrig släcka elden med
vatten! Om olja fattar eld ska du
omedelbart täcka över kastrullen
eller pannan med ett lock. Slå av
hällen om det är säkert att göra
detta och ring larmcentralen.
• Innan du steker eller friterar mat
ska du alltid torka dem väl och
placera försiktigt i het olja. Se till att
frusen mat har tinat helt före
stekningen.
• Täck inte över kastrullen du
använder när du hettar upp oljan.
• Placera pannor och kastruller på
ett sätt så att handtagen inte ligger
över hällen för att förhindra att de
hettas upp. Placera inte
obalanserade kärl och de som lätt
välter på hällen.
• Placera inte tomma kärl på
plattorna som är påslagna. De kan
skadas.
• Om en platta används utan att en
kastrull eller panna står på den kan
det orsaka skada på produkten.
Slå av plattorna efter att
tillagningen är klar.
• Eftersom produktens yta kan bli het
ska du inte placera kärl i plast eller
aluminium på den.
Sådana kärl ska inte användas för
att förvara mat heller.
• Använd bara kastruller och kärl
med plan botten.
• Placera rätt mäng mat i
kastrullerna och pannorna. Detta
gör att du inte behöver utföra
någon rengöring i onödan genom
att förhindra att något kokar över.
Placera inte lock på plattorna.
Placera kärlen på ett sätt så att de
är centrerade över plattan. När du
vill flytta kärlet från en platta till en
annan ska du lyfta i det och
placera det på plattan istället för att
dra i det.
Använda hällen
1 Hetplatta 14-16 cm
2 Hetplatta 18-20 cm
3 Hetplatta 14-16 cm
4 Hetplatta 18-20 cm är en lista med
rekommenderad diameter för kärl
som ska användas för respektive
brännare.
Använda plattorna
Hällens knappar kan vridas i båda
riktningarna på ett sätt så att
temperaturkontrollen sker stegvis.
Page 42

42 | SV
ANMÄRKNING
Om hällen är försedd med
hällplattor med
snabbvärmningsfunktion kommer
relevant platta att markeras med en
röd punkt.
Överhettningsskydd
1000 Plattor med en effekt som
överstiger 1 000 W är utrustade med
överhettningsskydd.
Överhettningsskyddet minskar effekten
för plattorna i följande fall:
• Det finns ingen kastrull eller panna
på hällen.
• Det finns en tom kastrull eller
panna på hällen.
• Undersidan av kastrullen eller
pannan är inte plan.
Slå på plattorna
Använd plattornas knappar för
använda plattorna. Flytta plattornas
knappar till relevant nivå för att få
önskad tillagningsnivå.
Tillagningsnivå
1 2 —3 4 — 6
Uppvär-
mning
kokning,
värmehållning
kokning,
stekning
Slå av plattorna
Vrid plattans knapp till positionen AV
(överst).
Page 43

43 | SV
6 Så här använder du ugnen
Allmän information om bakning,
stekning och grillning
FARA
Risk för skållning till följd av het
ånga!
Var försiktig när du öppnar luckan,
eftersom det kan komma ut ånga.
Tips för bakning
• Använd material som inte utsätts
för beläggning, exempelvis metalleller aluminiumbehållare.
• Använd gallret på bästa sätt.
• Vi rekommenderar att du placerar
bakformen i mitten av gallret.
• Välj rätt falsposition innan du slår
på ugnen eller grillen - flytta inte
ugnsplåtarna när de är varma.
• Håll ugnsluckan stängd.
Tips för stekning
• Om du kryddar med citronjuice och
svartpeppar förbättras
tillagningseffekten vid tillagning av
en hel kyckling, kalkon eller en stor
köttbit.
• Kött med ben tar omkring 15 till 30
minuter längre att steka än samma
mängd utan ben.
• Du ska räkna med omkring 4 till 5
minuters tillagningstid per
centimeter kött på höjden.
• Låt kötten vila i ungen i omkring
10 minuter efter att du har tillagat det.
Saften fördelas bättre över steken
och rinner inte ut när du skär i köttet.
• Fisk i en brandresistent form ska
placeras på gallret på mellannivå
eller lägre.
Tips för grillning
Grillning passar perfekt vid tillagning av
kött, fisk och kyckling och får en fin,
brun yta utan att torka för mycket,
Platta delar, köttbitar och korvar passar
speciellt bra för grillning, samt
grönsaker med högt vatteninnehåll,
såsom tomater och lök.
• Fördela delarna som ska grillas på
stekplattan eller stek dem i en form
som inte överskrider anpassade
mått och lägg ut dem.
• För grillgallret eller plåten in i
ugnen på önskad nivåOm
grillstycket är på stekplattan
placerar du droppannan under den
för att samla fett.
• Tillsätt lite vatten i droppannan för
enkel rengöring.
ANMÄRKNING
Brandrisk på grund av att mat
inte passar för grillning!
A
nvänd bara mat för grillning som
är lämplig för grillvärme.
Placera inte maten för långt bak på
grillen. Det här är det hetaste
stället och maten kan fatta eld.
Så här använder du den
elektriska ugnen
Välj temperatur och användarläge
1 Funktionsreglage
2 Termostatreglage
Användarlägena för den elektriska
ugnen väljs med funktionsvredet.
Temperaturen justeras med
termostatvredet.
Alla ugnsfunktioner stängs av när du
vrider på respektive knapp i position
uppåt.
1. Ställ in termostatvredet till önskad
temperatur.
2. Ställ in funktionsvredet till önskat
användarläge.
» Ugnen värms upp till inställd temperatur
och bibehåller den. Under uppvärmning
förblir temperaturlampan på.
Page 44

44 | SV
Slå av elugnen
Vrid funktionsvredet och
termostatvredet i position av (överst).
Hyllpositioner (modellberoende)
Det är viktigt att placera gallret korrekt
på falsen. Gallret måste vara placerat
så att det passar in i öppningen på
falsen så som visas på bilden,
Användningslägen
Arbetslägenas ordning som visas här
kan skilja sig från de på din enhet.
Över- och undervärme
Över- och undervärmen är på.
Mat värms upp samtidigt från
övre och nedre regionen.
Passar exempelvis för kakor,
småkakor eller grytor i
bakformar. Tillaga maten med
endast en långpanna.
Över- och undervärme med varmluft
Över- och undervärmefläktar
(i bakre väggen) är på. Den
varma luften fördelas jämnt
och snabbt över ugnen med
en fläkt. Tillaga maten med
endast en långpanna.
Övervärme och varmluft
Övervärmefläktar (i bakre
väggen) är på. Varm luft
sprids jämnare med fläkten
jämföt med enbart övervärme.
Undervärme och varmluft
Undervärmefläktar (i bakre
väggen) är på. Varm luft sprids
jämnare med fläkten jämfört
med enbart undervärme.
Drivning med fläkt
Ugnen värms inte upp. Endast
fläkten (i bakre väggen)
används. Frusen mat tinas
långsamt i rumstemperatur
och tillagad mat kyls ned.
Ytgrillning
Den stora grillen (under
ugnstaket) används. Passar
för grillning i större kvantiteter.
• Placera små och
medelstora portioner
på rätt nivå under
grillvärmaren för
grillning.
• Ställ in temperaturen
på maximal nivå.
• Vänd på maten efter
halva grillningstiden.
Grillning med varmluft
Grilleffekten är inte lika stark
som vid normal grillning.
• Placera små och
medelstora portioner
på rätt nivå under
grillvärmaren för
grillning.
• Ställ in temperaturen
på maximal nivå.
• Vänd på maten efter
halva grillningstiden.
Tabell över tillagningstider
Viktigt
Värdena har fastställts på labb.
Dina egna värden kan variera från
dessa värden.
Bakning och stekning
Viktigt
Nivå 1 är den nedersta nivån i
ugnen.
Page 45

45 | SV
Recept Funktion Förvärmning
Ugnsfals
(underifrån)
Temperatur (°C) Tid (min) Tillbehör
Sockerkakor
ÖVER/
UNDERVÄRME
Ja 3 175 20 - 35 långpanna
VARMLUFT Ja 1 - 5 175 15 - 30
Ugnsfals 5: djup långpanna
Ugnsfals 1: långpanna
Småkakor
ÖVER/
UNDERVÄRME
Ja 3 175 20 - 40 långpanna
VARMLUFT Ja 1 - 5 175 20 - 35
Ugnsfals 5: djup långpanna
Ugnsfals 1: långpanna
Pizza
ÖVER/
UNDERVÄRME
Ja 2 225 12 - 20 långpanna
VARMLUFT Ja 1 - 5 225 15- 30
ugnsfals 5. djup långpanna
Ugnsfals 1: långpanna
Sockerkaka
ÖVER/
UNDERVÄRME
Ja 3 200 5-15 ugnsfals 3. tårtform på galler
VARMLUFT Ja 1 - 5 175 10-25
Ugnsfals 5: tårtform på galler
Ugnsfals 1: tårtform på galler
Kött- och
grönsakspajer
(quiche)
Fläkt Ja 2 175 - 200 30 - 50 tårtform på galler
VARMLUFT Ja 1 - 3 175 - 200 35 - 55
Ugnsfals 3: tårtform på galler
Ugnsfals 1: tårtform på galler
Lasagne
ÖVER/
UNDERVÄRME
Ja 2 - 3 200 30 - 45 Ugnsfast form på galler
Lamm/Kalv/Nöt/Fläsk
1 kg
Fläkt - 3
25 min vid 250, sedan
vid 180 - 190
80 - 120
Långpanna eller ugnsfast form
på galler
Kalkon/Gås 3kg Fläkt - 2
25 min vid 250, sedan
vid 180 - 190
140 - 210
Långpanna eller ugnsfast form
på galler
Grillad kyckling, 1 1,3 kg
Fläkt - 2
15 min vid 250, sedan
vid 180 - 190
55 - 70
Ugnsfals 2: galler (vänd maten
efter 2/3 av tiden om
nödvändigt) + Pyrex
Ugnsfals 1: långpanna med vatten
Lammlägg/Ben Fläkt - 3
25 min vid 250, sedan
vid 180 - 190
60 - 90
Långpanna eller ugnsfast form
på galler (vänd maten efter 2/3
av tiden om nödvändigt)
Fisk i skivor, filéer Fläkt - 3 200 10 - 25
Ugnsfals 3: galler (vänd maten
efter 2/3 av tiden om
nödvändigt)
Ugnsfals 2: långpanna med vatten
Fisk i skivor, filéer GRILL Ja 4 / 5 200 - 225 20 - 30
Ugnsfals 4/5: galler (vänd maten
efter halva tiden)
Ugnsfals 3: långpanna med vatten
Rostbiff, blodig GRILL Ja 4 / 5 200 - 225 25 - 35
Ugnsfast form på galler (vänd
maten efter 2/3 av tiden om
nödvändigt)
Rostat bröd GRILL Ja 4 200 - 225 1 - 4 galler
Korv/grillspett/revben
sspjäll/hamburgare
GRILL Ja 5 200 - 250 20 - 40
Ugnsfals 5: galler (vänd maten
efter 2/3 av tiden om
nödvändigt)
Ugnsfals 4: långpanna med
vatten
Gratinerade
grönsaker
GRILL Ja 3 200 10 - 20 Ugnsfast form på galler
Tiderna i tabellen är ungefärliga. Tillagningstider kan variera beroende på maträtt och storlek på matvaran.
Då du grillar är det bäst att placera matvarorna så att den främre delen av gallret är fritt (6-7 cm).
Då du grillar kött är det bäst att vända på köttstycket efter halva tillagningstiden.
Page 46

46 | SV
Vid tillagning som kräver förvärmning,
ska du förvärma i början av tillagningen
tills termostatlampan slocknar.
Tips för bakning av bakverk i formar
• Om bakverket är för torrt ska du
öka temperaturen med 10 och
minska tillagningstiden.
• Om kakan är kladdig ska du
använda en mindre vätskemängd
och sänka temperaturen med
10 °C.
• Om kakan blir för mörk ska du
placera den längre ner i ugnen,
sänka temperaturen och öka
tillagningstiden.
• Om den är välgräddad på insidan
med kladdig på utsidan ska
använda en mindre vätskemängd,
sänka temperaturen och öka
tillagningstiden.
Tips vid tillagning av bakverk
• Om bakverket är för torrt ska du
öka temperaturen med 10 och
minska tillagningstiden. Pensla
degen med en blandning av mjölk,
olja, ägg och yoghurt.
• Om bakverket tar för lång tid att
grädda ska du kontrollera
tjockleken så att den inte
överskrider plåtens djup.
• Om den övre sidan av bakverket
blir mörkt men den undre delen är
inte färdiggräddad ska du
kontrollera att mängden sås för
bakverket inte är för stor på
undersidan av bakverket. Försök
att fördela såsen jämnt mellan och
på lagren av det, och överst, för att
få en jämn gräddning.
Viktigt
Tillaga bakverket enligt det läge
och den temperatur som är
angiven i tillagningstabellen. Om
botten inte har tillräckligt med färg
ska du placera den på en lägre fals
nästa gång.
Tips vid tillagning av grönsaker
• Om grönsaksrätten blir för torr ska
du tillaga den i en form med lock.
Ett stängt kärl förhindrar att
vätskan ångar bort.
• Om grönsaksrätten inte blir
färdigkokt ska du förkoka
grönsakerna eller förbereda dem
som konserverad mat och placera
dem i ugnen.
Så här förebereder du grillen
VARNING
Heta ytor kan orsaka
brännskador!
Stäng ugnsluckan under grillning.
Slå på grillen
1. Ställ in funktionsratten till
grillsymbolen.
2. Ställ in grilltemperaturen.
3. Förvärm i omkring 5 minuter om det
behövs.
» Termostatlampan slås på.
Slå av grill
1. Vrid grillvredet i position av (överst).
Hyllpositioner
För optimal grilltäckning ska du placera
gallret mot ugnens framsida precis så
att det inte kommer i kontakt med
glasluckan. Placera gallret helt mot
ugnens baksida för att minska
grilltäckningen.
Page 47

47 | SV
7 Underhåll och rengöring
Allmän information
Produktens servicelivslängd ökar och
vanliga problem minskar i omfattning
om produkten rengörs med jämna
mellanrum.
FARA
Risk för elektrisk kortslutning!
Koppla från elektriciteten för
rengöring av enheten för att
undvika elektrisk kortslutning.
FARA
Heta ytor kan orsaka
brännskador!
Låt enheten svalna före rengöring.
• Rengör produkten noggrant efter
varje användning. På detta sätt är
det möjligt att enklare ta bort
tillagningsrester genom att undvika
att de bränns in nästa gång
apparaten används.
• Inga speciella rengöringsmedel
behövs för rengöring av produkten.
Använd varmvatten med diskmedel,
en mjuk trasa eller svamp när du
rengör produkten, och torka den
sedan med en torr trasa.
• Se alltid till att överskottsvätska
torkas bort ordentligt efter
rengöring och att eventuellt spill
omedelbart torkas torrt.
• Använd inte rengöringsmedel som
innehåller syra eller klor när du
rengör rostfria ytor eller inox-ytor
och handtaget. Använd en mjuk
trasa med diskmedel (utan
slipmedel) för att torka dessa delar
rena, var noga med att torka i en
riktning.
ANMÄRKNING
Ytan kan skadas av vissa
rengöringsmedel.
A
nvänd inte aggressiva
rengöringsmedel, skurpulver/-mjölk
eller några vassa föremål.
Viktigt
A
nvänd inte ångrengörare för
rengöring.
Rengöra hällen
Elektriska hällar
1. Vrid av plattorna och vänta tills de
svalnar.
2. Vid behov rengör du plattorna med
ett rengöringsmedel (finns att köpa i
utvalda butiker).
3. Värm bara några minuter efter
rengöringen för att säkerställa att
övre delen har torkat.
4. Applicera ett tunt lager maskinolja
på hällens yta med jämna
mellanrum för att skydda den.
Rengöra kontrollpanelen
Rengör kontrollpanelen och
kontrollknapparna med en våt trasa
och torka dem torra.
ANMÄRKNING
Skada på kontrollpanelen!
Ta inte bort kontrollknapparna för
rengöring av kontrollpanelen.
Page 48
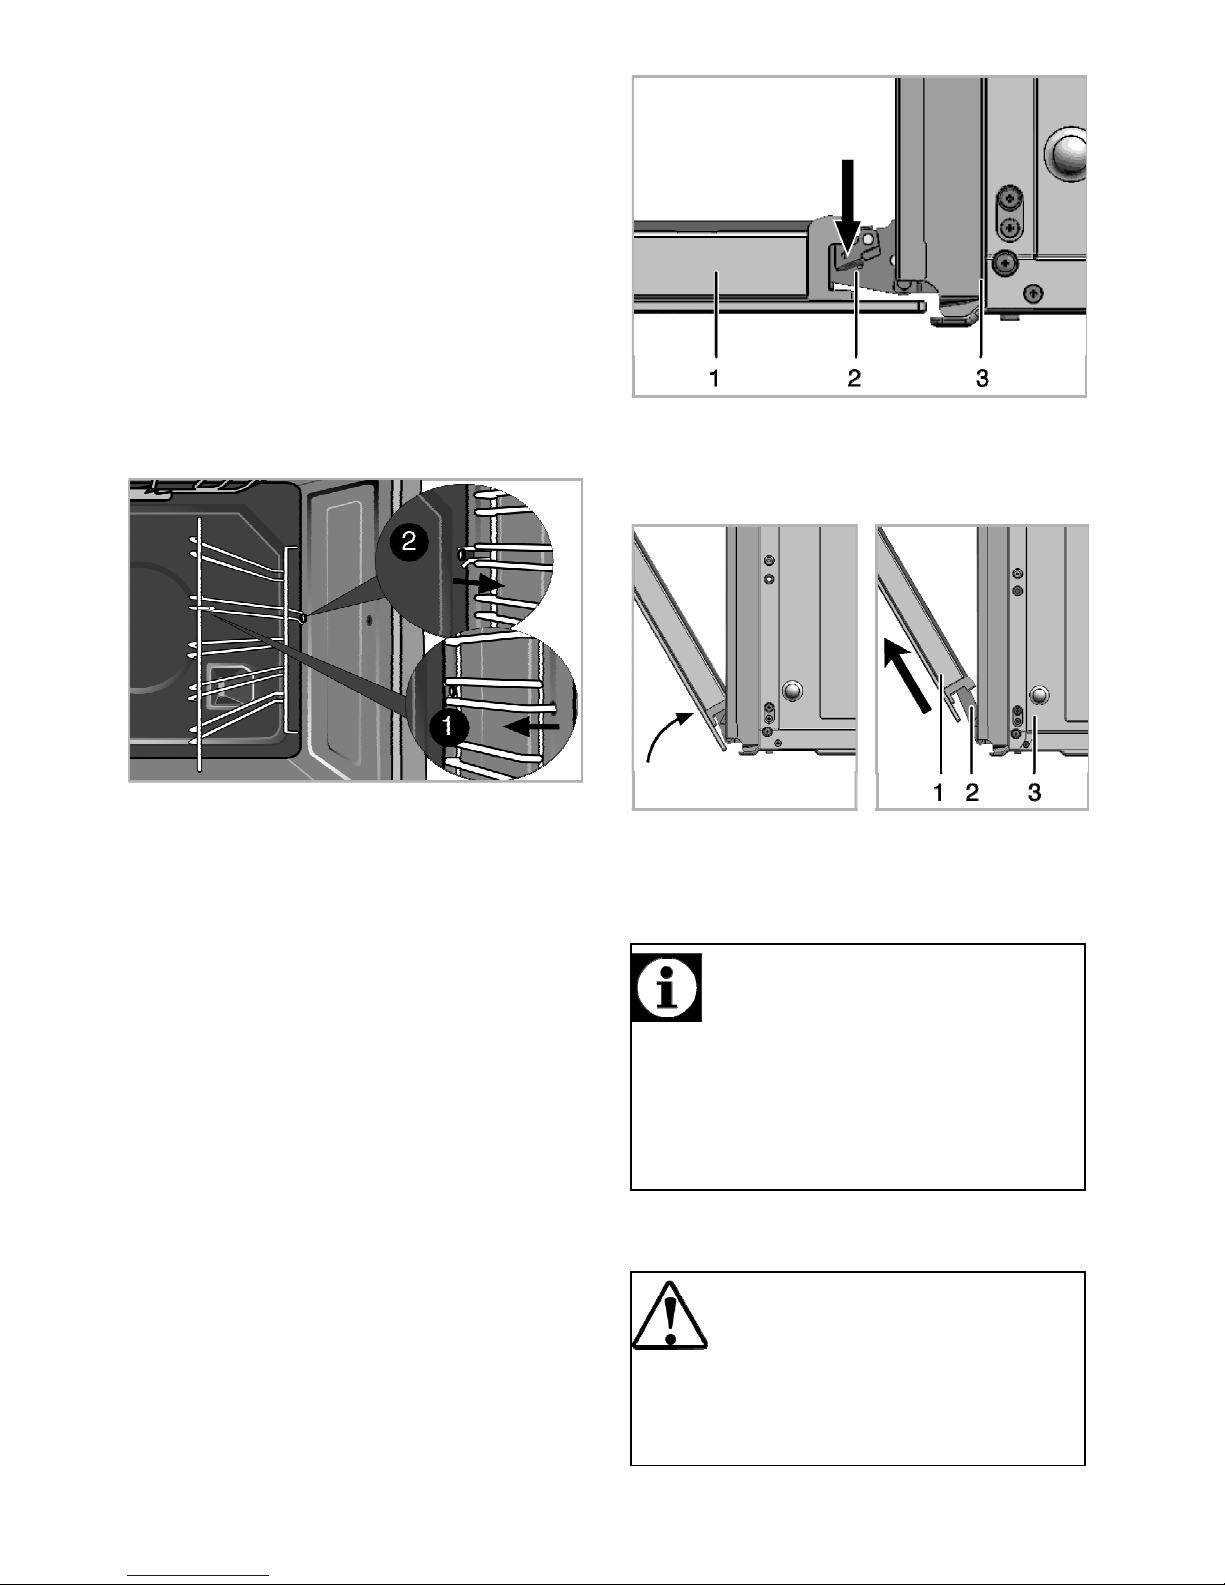
48 | SV
Rengöra ugnen
Det behövs ingen ugnsrengöring eller
annat speciellt rengöringsmedel för att
rengöra ugnen. Vi rekommenderar att
du torkar ugnen med en fuktig trasa
medan den fortfarande är varm.
Så här rengör du sidoväggarna.
1. Ta bort den främre delen av
sidogallret genom att dra den i
motsatt riktning mot sidoväggen.
2. Ta bort sidogallret genom att dra
det mot dig.
Rengör ugnsluckan
Använd rengöringsmedel med
slipeffekt, eller hårda metallskrapor för
att rengöra ugnsluckan. Det kan skada
ytan och förstöra glaset.
Demontering av ugnsluckan
1. Öppna framluckan.
2. Öppna klämmorna i
gångjärnshusen på höger och
vänster sida om framluckan genom
att trycka dem nedåt så som visas
på bilden.
1 Framlucka
2 Gångjärn
3 Ugn
3. För framluckan halvvägs ned.
4. Avlägsna framluckan genom att dra
den uppåt för att släppa den från
höger och vänster gångjärn.
ANMÄRKNING
De steg som du gick igenom vid
borttagning ska användas i
omvänd ordning (steg 4, 3, 2 och
1) för att sätta tillbaka skyddet.
Glöm inte att stänga klämmorna vid
gångjärnshuset när du installerar
luckan igen.
Byta ugnslampan
FARA
Heta ytor kan orsaka
brännskador!
Se till att enheten är frånslagen
och kyls ned för att undvika risk för
elektrisk kortslutning.
Page 49

49 | SV
Viktigt
Ugnslampan är en speciallampa
som klarar upp till 300 °C. Mer
information finns under Tekniska
specifikationer, sidan 30.
Ugnslamporna kan köpas av
auktoriserade serviceombud.
ANMÄRKNING
Lampans placering kan skilja sig
något från bilden.
Om ugnen är utrustad med en rund
lampa:
1. Koppla bort produkten från elen.
2. Vrid glasskyddet moturs för att
avlägsna det.
3. Skruva loss ugnslampan genom att
vrida moturs och byt den mot en ny.
4. Montera glasplattan på nytt.
Page 50

50 | SV
8 Felsökning
Det kommer ånga från ugnen när den används.
Viktigt
Det är normalt att ånga sipprar ut
under användning. Detta beror inte
på något fel.
Det kommer metalliska oljud under uppvärmning och nedkylning.
Viktigt
När metalldelarna värms upp kan
de öka i storlek och orsaka ljud.
Detta beror inte på något fel.
Produkten fungerar inte.
• Huvudsäkringen är defekt eller har gått. >>> Kontrollera säkringarna i
säkringsboxen. Byt eller återställ dem vid behov.
• Produkten är inte kopplad till det (jordade) uttaget. >>> Kontrollera
strömanslutningen.
Ljuset i ugnen fungerar inte.
• Ugnslampan är defekt. >>> Byt ut ugnslampan.
• Strömmen är bruten. >>> Kontrollera om det finns ström. Kontrollera
säkringarna i säkringsboxen. Byt eller återställ dem vid behov.
Ugnen värms inte upp.
• Funktionen och/eller temperaturen är inte inställda. >>> Ställ in funktionen
och temperaturen med funktions- och/eller temperaturratten/-knappen.
• Strömmen är bruten. >>> Kontrollera om det finns ström. Kontrollera
säkringarna i säkringsboxen. Byt eller återställ dem vid behov.
Viktigt
Kontakta ett auktoriserat
serviceombud eller den
återförsäljare som sålde produkten
till dig, om du inte kan lösa
problemet med hjälp av
instruktionerna i det här avsnittet.
Försök aldrig att reparera en defekt
produkt på egen hand.
Page 51

Vennligst les denne håndboken først.
Kjære kunde,
Vi vil gjerne at du oppnår best mulig ytelse med produktet som har blitt produsert
ved moderne fasiliteter og gjennomgått strenge kvalitetskontrollprosedyrer.
Derfor ber vi deg lese nøye gjennom denne brukerveiledningen før du bruker
produktet og beholde denne for fremtidig bruk. Hvis du gir produktet til noen
andre, gi brukerhåndboken videre, også.
Brukerhåndboken vil hjelpe deg til å bruke produktet på en hurtig og sikker
måte.
• Vennligst les brukerhåndboken før du installerer og starter produktet.
• Du må strengt overholde sikkerhetsinstruksjonene.
• Oppbevar denne bruksanvisningen lett tilgjengelig for fremtidig bruk.
• Les også andre dokumenter som medfølger produktet.
Vennligst merk at denne bruksanvisningen også kan gjelde for flere andre
modeller.
Forskjeller mellom modellene er uttrykkelig identifisert i veiledningen.
Symbolforklaringer
I denne bruksanvisningen brukes følgende symboler:
Viktig informasjon eller nyttige tips om bruk.
Advarsel for farlige situasjoner med hensyn til liv og eiendom.
Advarsel om elektrisk støt.
Advarsel mot risiko for brann.
Advarsel om varme overflater.
Page 52

52 | NO
Innholdsfortegnelse
1 Generell informasjon 53
Oversikt ................................................. 53
Tekniske spesifikasjoner ...................... 54
Tilbehør som leveres med enheten ..... 55
2 Sikkerhetsanvisninger 56
Generell sikkerhet ................................. 56
Sikkerhet ved arbeid med
elektrisitet ...................................... 57
Beregnet bruk .................................... 58
Sikkerhet for barn .............................. 58
3 Installasjon 59
Før installasjon ...................................... 59
Installasjon og tilkobling ....................... 60
Avhending ............................................. 61
Bortskaffing av emballasjen ............. 61
Bortskaffing av det gamle produktet 61
Framtidig transport ............................ 62
4 Forberedelser 63
Tips for energisparing ........................... 63
Første gangs bruk ................................. 63
Første rengjøring av produktet ......... 63
Første oppvarming ............................ 63
5 Slik brukes komfyren 65
Generell informasjon om koking .......... 65
Bruk av komfyren .................................. 65
6 Slik bruker du ovnen 67
Generell informasjon om baking,
steking og grilling ............................ 67
Slik brukes den elektriske ovnen ......... 67
Driftsmodi ........................................... 68
Tidstabell for matlaging ..................... 69
Slik bruker du grillen ............................. 71
7 Vedlikehold og stell 72
Generell informasjon ............................ 72
Rengjøre komfyren ............................... 72
Rengjøring av kontrollpanel ................. 72
Rengjøre ovnen .................................... 73
Demonter ovnsdør ................................ 73
Utskifting av ovnspæren ....................... 73
8 Feilsøking 75
Page 53

53 | NO
1 Generell informasjon
Oversikt
1 Frontdør
2 Håndtak
3 Nederste skuff
4 Stekebrett
5 Stekerist
6 Kontrollpanel
7 Brennerplate
8 Lampe
9 Grillvarmeelement
10 Hylleposisjoner
1 Termostatlampe
2 Varsellampe
3 Funksjonsvelger
4 Varmeplate Venstra bak
5 Varmeplate Venstre fremre
6
armeplate Høyre fremre
7 Varmeplate Høyre bak
8 Termostatbryter
Page 54

54 | NO
Tekniske spesifikasjoner
GENERELT
Eksterne mål (høyde/bredde/dybde) 850 mm/600 mm/600 mm
Spenning/frekvens 220-240 V 50 Hz
Totalt energiforbruk 8.3 kW
Sikring min. 16 A x 3
Kabeltype/tverrsnitt H05VV-FG 3 x 2,5 mm2
Kabellengde maks. 2 m
KOMFYR
Brennere
Venstra bak
V
armeplate
Mål 145 mm
Effekt 1000 W
Venstre fremre
V
armeplate
Mål 180 mm
Effekt 2000 W
Høyre fremre
V
armeplate
Mål 145 mm
Effekt 1500 W
Høyre bak
V
armeplate
Mål 180 mm
Effekt 1500 W
OVN/GRILL
Hovedovn
Tradisjonell ovn
Energieffektivitetsklasse# A
Indre lampe 15–25 W
Grillstrømforbruk 2.2 kW
#
Grunnleggende: Informasjon om energimerket for elektriske ovner er gitt i samsvar
med EN 50304-standarden. Disse verdiene er fastsatt ved standard belastning med
funksjonene under-over-varme eller vifteoppvarming (hvis aktuelt).
Energieffektivitetsklassen er fastsatt i overensstemmelse med de følgende
prioritiseringene avhengig av om de relevante funksjonene finnes på produktet eller
ikke. 1-Matlaging med øko-vifte, 2- Turbo langsom matlaging, 3- Turbo matlaging, 4Vifteassistert under/overvarme, 5-Over- og undervarme.
Viktig
Tekniske spesifikasjoner kan
endres uten varsel for å forbedre
kvaliteten på produktet.
Viktig
Figurer i denne veiledningen er
skjematiske og kan derfor være litt
forskjellige fra ditt produkt.
Page 55

55 | NO
Viktig
Verdiene som er oppgitt i
merkingene på produktet eller i
dokumentasjonen som medfølger
er oppnådd i laboratoriemiljø ifølge
relevante standarder. Avhengig av
drifts- og miljøforhold for produktet,
kan disse verdiene variere.
Tilbehør som leveres med
enheten
Viktig
Tilbehør som medfølger varierer,
avhengig av produktmodellen. Alt
tilbehør som beskrives i
brukerhåndboken finnes kanskje
ikke på produktet ditt.
Bakeplate
Kan brukes til bakevarer, frossenmat
og stor stek.
Dypstekingsbrett
Kan brukes til bakevarer, stor stek, mat
med væskeinnhold og under grilling
som dryppepanne.
Stekerist
Kan brukes til steking og til
oppbevaring av bakevarer, steking og
gryteretter.
Page 56

56 | NO
2 Sikkerhetsanvisninger
Generell sikkerhet
ADVARSEL Apparatet og
tilgjengelige deler kan bli
svært varme under bruk.
Vær forsiktig så du ikke
berører varmeelementene.
Barn under 8 år må holdes
på avstand med mindre de e
r
under tilsyn hele tiden.
Dette apparatet kan brukes
av barn fra 8 år og personer
med reduserte fysiske,
sensoriske eller mentale
evner eller manglende
erfaring og kunnskap, hvis
de har fått tilstrekkelig
opplæring eller tilsyn
vedrørende bruk av
apparatet på en trygg måte,
og forstår farene som er
involvert. Barn skal ikke leke
med apparatet. Rengjøring
og brukervedlikehold må ikke
utføres av barn uten tilsyn.
ADVARSEL Tilgjengelige
deler kan bli svært varme
under bruk. Små barn må
holdes på avstand.
Ikke rengjør glassdøren med
slipende rengjøringsmidler
eller metallskrape. Dette kan
lage riper i overflaten og
glasset kan sprekke og
knuses.
ADVARSEL Påse at
apparatet er slått av før du
skifter ut lyspæren for å
unngå fare for elektrisk støt.
ADVARSEL Steking med
fett eller olje uten tilsyn på
platetoppen kan være farlig
og forårsake brann. Du må
ALDRI forsøke å slukke en
brann med vann, men slå
av apparatet og dekke
flammene med f.eks. et lokk
eller et brannteppe.
ADVARSEL Brannfare:
Ikke oppbevar
gjenstander på
kokeoverflatene.
Apparatet er ikke
beregnet på å settes
igang ved hjelp av en
ekstern timer eller et
separat
fjernkontrollsystem.
ADVARSEL Dersom
overflaten har sprekker, må
du slå av apparatet for å
unngå fare for elektrisk støt.
• Tilkople produktet til et jordet
uttak/linje, beskyttet av en sikring
med riktig kapasitet, slik som
oppgitt i tabellen over tekniske
spesifikasjoner. Få
jordingsinstallasjonen utført av en
kvalifisert elektriker mens produktet
brukes med eller uten en
transformer. Selskapet vil ikke
Page 57

57 | NO
være ansvarlig for noen skader
som oppstår hvis produktet brukes
uten en jordingsinstallasjon i
overensstemmelse med de lokale
forskriftene.
• Hvis strømledningen er skadet, må
den byttes ut av produsenten, et
tilhørende serviceverksted eller av
en kvalifisert person for å unngå
fare.
• Ikke ta enheten i bruk hvis den er
defekt eller viser tegn på tydelig
skade.
• Ikke utfør noen reparasjoner eller
endringer på produktet. Du kan
imidlertid utbedre noen problemer
som ikke trenger reparasjoner eller
endringer. Se Feilsøking, side 75.
• Vask aldri produktet med vann! Det
er fare for elektrisk sjokk!
• Produktet skal aldri brukes hvis
bedømmelsesevnen eller
koordinasjonen er redusert på
grunn av bruk av alkohol og/eller
narkotika.
• Produktet må frakobles
strømuttaket under installasjon,
vedlikehold, rengjøring og
reparasjon.
• Vær forsiktig ved bruk av
alkoholholdige drikkevarer i rettene
dine. Alkohol fordamper ved høye
temperaturer og kan forårsake
brann, siden den kan ta fyr når den
kommer i kontakt med varme
overflater.
• Ikke varm opp lukket hermetikk og
glass i ovnen. Trykk som kan
oppstå i krukken kan gjøre at den
sprekker.
• Ikke plasser noen brennbare
materialer i nærheten av produktet,
etter som sidene blir varme under
bruk.
• Ikke plasser bakebrett, service eller
aluminiumfolie rett på bunnen av
ovnen. Varmeakkumuleringen kan
skade bunnen av ovnen.
• Hold alle ventilasjonsåpninger fri
for hindringer.
• Produktet kan bli varmt under bruk.
Berør aldri de varme brennerne,
indre deler av ovnen,
varmeelementer osv.
• Bruk alltid varmebestandige
grytehansker når du setter inn eller
tar ut retter fra den varme ovnen.
• Ikke bruk produktet med
frontglasset fjernet eller sprukket.
• Bakre overflate på ovnen blir varm
når den er i bruk. Se til at
gass/elektrisk tilkobling ikke
berører bakre overflate, da dette
kan skade tilkoblingene.
• Ikke klem strømkabelen mellom
ovnsdøren og rammen, og ikke
legg den over de varme
overflatene. Dette kan gjøre at
isolasjonen smelter og forårsaker
brann på grunn av kortslutning.
• Se til at produktet slås av etter hver
bruk.
Viktig
Apparatet er ikke beregnet til å
betjenes ved hjelp av en ekstern
timer eller separat fjernkontroll.
Sikkerhet ved arbeid med
elektrisitet
Defekt elektrisk utstyr er en av
hovedårsakene til brann i private
husholdninger.
• Alt arbeid på elektrisk utstyr og systemer skal kun utføres av
autoriserte, kvalifiserte personer.
• I tilfelle skade, slå av produktet og
koble det fra strømforsyningen. For
å gjøre dette, slå av sikringen
hjemme.
Page 58

58 | NO
• Sørg for at sikringsstrømmen er
kompatibel med produktet.
Beregnet bruk
Dette produktet er designet for
hjemmebruk. Kommersiell bruk er ikke
tillatt.
"FORSIKTIG: Dette apparatet er kun
beregnet til matlagingsformål. Det må
ikke brukes til andre formål, for
eksempel romoppvarming."
Dette apparatet skal ikke brukes til
oppvarming av tallerkener under grillen,
til å tørke håndklær, oppvaskklutet osv.
ved å henge dem på håndtakene, eller
til oppvarmingsformål.
Produsenten skal ikke være ansvarlig
for noen skader som forårsakes ved
feil bruk eller håndtering.
Ovnen kan brukes til opptining, baking,
steking og grilling av mat.
Sikkerhet for barn
• Elektriske apparater og
gassprodukter er farlige for barn.
Hold barn på avstand fra produktet
når det er i bruk, og ikke la dem
leke med produktet.
• Deler som er tilgjengelige på
apparatet vil bli svært varme under
bruk og inntil at apparatet er kjølt
ned, skal barn holdes på avstand.
• "FORSIKTIG Tilgjengelige deler
kan bli varme når grillen er i bruk.
Små barn må holdes unna."
• Ikke lagre gjenstander over
komfyren slik at barn kan forsøke å
nå dem.
• Mens døren er åpen, må du ikke
plassere tunge gjenstander på den
og du må ikke la barn sitte på den.
Ovnen kan velte, eller
dørhengslene kan bli skadet.
• Pakkematerialet kan være farlig for
barn. Hold barn på avstand fra
innpakningsmaterialene. Vennligst
kast alle deler av innpakningen
etter miljøforskriftene.
Barnelås
Komfyren har et barnelåssystem på
ovnsdøren.
For å åpne ovnsdøren, trekk
plastknotten lett opp, og trekk i
dørhåndtaket.
Når du lukker døra, vil barnelåsen
låses av seg selv.
Page 59

59 | NO
3 Installasjon
Før installasjon
For å sikre at kritiske lufteåpninger
opprettholdes under produktet,
anbefaler vi at dette produktet
monteres på en solid base og at
føttene ikke synker inn i et teppe eller
mykt gulvbelegg.
Kjøkkengulvet må være i stand til å
bære vekten av enheten pluss den
ekstra vekten av kokekar og bakevarer
og mat.
En sikkerhetsavstand må overholdes
mellom enheten og kjøkkenveggene og
møblene. Se figur (verdier i mm).
• Den kan brukes med skap på
begge sider, men det skal være en
minimumsavstand på 400mm over
komfyren og en sideklaring på
65mm mellom apparatet og alle
vegger, deler eller høye skap.
• Den kan også brukes frittstående.
La det være en klaring på 750mm
fra komfyrens overflate til
tilgrensende overflater over
komfyrens overflate.
• *Hvis det skal monteres en
kjøkkenvifte over komfyren, se
produsentens instruksjoner for
installasjonshøyden (min. 65 cm).
• Enheten tilsvarer innretning i
klasse 2, dvs. den kan plasseres
med bakenden og én side til
kjøkkenveggene, kjøkkeninventar
eller utstyr av hvilken som helst
størrelse. Kjøkkeninventar eller
utstyr kan på den andre siden kun
være av samme størrelse eller
mindre.
• Alt kjøkkeninventar ved siden av
enheten må være varmebestandig
(minimum 100 °C).
Viktig
A
pparatet må sikres mot velting
ved bruk av den medfølgende
kjettingen på ovnen. Fest kroken
(1) til kjøkkenveggen (5), og koble
sikkerhetskjettingen (2) til kroken.
1 Krok
2 Sikkerhetskjede
3 Baksiden av komfyren
4 Fest lenken skikkelig til komfyrens
bakside
5 Kjøkkenvegg
Page 60

60 | NO
Installasjon og tilkobling
Produktet kan kun installeres og
tilkobles i overensstemmelse med
aktuelle installasjonsforskrifter.
Viktig
Ikke installer enheten ved siden av
kjøleskap eller frysere. Varmen
som utstråles fra enheten vil føre til
økt energiforbruk for
kjøleapparatene.
• Det skal være minst to personer til
å bære enheten.
• Produktet må plasseres rett på
gulvet. Den må ikke plasseres på
en sokkel eller pidestall.
MERK
Skade på gjenstander!
Døren og/eller håndtaket må ikke
brukes til løfting eller flytting av
apparatet.
Elektrisk tilkopling
Tilkople produktet til et jordet uttak/linje,
beskyttet av en sikring med riktig
kapasitet, slik som oppgitt i tabellen
over tekniske spesifikasjoner. Få
jordingsinstallasjonen utført av en
kvalifisert elektriker mens produktet
brukes med eller uten en transformer.
Selskapet vil ikke være ansvarlig for
noen skader som oppstår hvis
produktet brukes uten en
jordingsinstallasjon i
overensstemmelse med de lokale
forskriftene.
FARE
Fare for elektrisk sjokk,
kortsslutning eller brann ved
uprofesjonell installasjon!
A
pparatet kan tilkobles strømnettet
kun av en autorisert kvalifisert
person, og apparatet garanteres
kun etter riktig installasjon.
FARE
Fare for elektrisk sjokk,
kortsslutning eller brann ved
skade på forsyningsledningen!
Strømledningen må ikke klemmes,
bøyes eller fastklemmes eller
komme i kontakt med varme deler
av apparatet.
En ødelagt strømledning skal
skiftes ut av en kvalifisert
elektriker.
Strømforsyningsdata må tilsvare data
som er spesifisert på typeskiltet på
enheten. Typeskiltet ses enten når
døren eller det nedre dekselet åpnes
eller plasseres ved bakveggen på
enheten, avhengig av enhetstypen.
Strømledningen på produktet må
stemme overens med verdiene i
tabellen over de tekniske
spesifikasjonene.
FARE
Fare for elektrisk sjokk!
Før arbeidet påbegynnes på den
elektriske installasjonen, vennligst
frakoble produktet fra strømnettet.
Koble til strømledningen
1. Hvis det ikke er mulig å koble fra
alle poler i forsyningsstrømmen, må
en frakoblingsenheten med minst 3
mm kontaktklaring (sikringer,
linjesikkerhetsbrytere, kontakter)
kobles til, og alle polene på denne
frakoblingsenheten må være
tilgrensende (ikke over) til produktet
i overensstemmelse med IEEdirektiver. Hvis denne instruksjonen
ikke overholdes kan det resultere i
driftsproblemer og produktgarantien
kan bli ugyldig.
Ekstra beskyttelse fra en kretsbryter for
reststrøm anbefales.
Page 61

61 | NO
Hvis kabelen leveres med produktet:
2. For enkeltfasetilkobling koble til
som vist nedenfor:
• Brun leder = L (fase)
• Blå leder = N (nøytral)
• Grønn/gul leder = (E)
(jord)
3. For dobbeltfasetilkobling koble til
ledningene slik som vist nedenfor:
• Brun leder = L1 (fase 1)
• Svart kabel = L2 (fase 2)
• Blå leder = N (nøytral)
• Grønn/gul leder = (E)
(jord)
4. For trefasetilkobling koble til
ledningene slik som vist nedenfor:
• Brun leder = L1 (fase 1)
• Svart kabel = L2 (fase 2)
• Svart kabel = L3 (fase 3)
• Blå leder = N (nøytral)
• Grønn/gul leder = (E)
(jord)
• Skyv produktet mot kjøkkenveggen.
• Fest sikkerhetskjeden.
• Juster føttene på ovnen
Vibrasjoner under bruk kan
forårsake at kokekarene flytter seg.
Denne farlige situasjonen kan
unngås hvis produktet står i vater
og er balansert.
For din egen sikkerhets skyld bør
du sikre at produktet står i vater
ved å justere de fire føttene på
bunnen ved å dreie dem til venstre
eller høyre og innjustere nivået
med arbeidsbenken.
Siste kontroll
1. Kople produktet til strømuttaket
igjen.
2. Kontroller de elektriske funksjonene.
Avhending
Bortskaffing av emballasjen
Innpakningsmaterialer er farlige for
barn. Behold innpakningsmaterialene
på et trygt sted utilgjengelig for barn.
Pakkematerialer for produktet er
produsert av resirkulerbare materialer.
Kast dem på riktig måte og sorter i
overensstemmelse med instruksjoner
for resirkulering av avfall. Ikke kast
dem sammen med normalt
husholdningsavfall.
Bortskaffing av det gamle
produktet
Kast det gamle produktet på en
miljøvennlig måte.
Dette produktet har utvalgt
sorteringssymbol for avfall elektrisk og
elektronisk utstyr (WEEE). Dette betyr
at dette produktet må håndteres etter
EU-direktivet 2002/96/EC for å
resirkuleres eller demonteres for å
redusere virkningen på miljøet. For
ytterligere informasjon, vennligst ta
kontakt med lokale eller regionale
myndigheter.
Page 62

62 | NO
Du kan forhøre deg med den lokale
agenten eller faste
avfallssorteringssentre i nærheten for å
få informasjon om riktig bortskaffing av
produktet.
Før bortskaffing av det gamle produktet
skal strømstøpselet kuttes av og
dørlåsen (hvis aktuelt) gjøres ubrukelig,
for å unngå faresituasjoner for barn.
Framtidig transport
• Oppbevar apparatets opprinnelige
eske og transporter apparatet i
denne. Følg rettledningen som er
trykt på kartongen. Hvis du ikke har
den originale esken, pakk
produktet i bobleplast eller tykk
papp og tape godt.
• For å forhindre at stekerist og brett
inne i ovnen skal skade ovnsdøren,
sette en stripe kartong på innsiden
av ovnsdøren slik at det samsvarer
med plasseringen av brettene. Lim
fast ovnsdøren til sideveggene.
• Ikke bruk døren eller håndtaket til å
løfte eller flytte produktet.
MERK
Ikke plasser andre gjenstander på
toppen av komfyren. Apparatet må
transporteres stående.
Viktig
Kontroller det generelle utseendet
til produktet for skader som kan ha
oppstått under transport.
Page 63

63 | NO
4 Forberedelser
Tips for energisparing
Følgende informasjon vil hjelpe deg til
å bruke apparatet på en økologisk
måte og spare energi:
• Bruk mørkfargede og
emaljebelagte kokekar i ovnen,
siden varmeoverføringen vil være
bedre.
• Ved koking av måltidene, utfør en
forvarmingsoperasjon hvis det
anbefales i brukerhåndboken eller
kokebeskrivelsen.
• Ikke åpne døren på ovnen for
hyppig under matlagingen.
• Prøv å tilbered mer enn én rett i
ovnen samtidig, når det er mulig.
Du kan tilberede mat ved å
plassere to kokekar på stekeristen.
• Lag mer enn én rett etter
hverandre. Ovnen vil allerede være
varm.
• Du kan spare energi ved å slå av
ovnen i noen minutter før
sluttkoketiden. Ikke åpne
ovnsdøren.
• Tin opp de frosne måltidene før de
tilberedes.
• Bruk kokekar/panner med lokk ved
matlaging. Energiforbruket kan øke
4 ganger hvis det ikke er noe
deksel.
• Velg brenneren som er egnet for
dimensjonen av bunnen på gryten
som skal brukes. Velg alltid riktig
grytestørrelse for rettene. Større
gryter trenger mer energi.
• Vær oppmerksom på at du må
bruke gryter med flat bunn når du
tilbereder mat på elektriske
koketopper.
Gryter med tykk bunn gir bedre
varmeledning. Du kan oppnå
energibesparelse på opptil 1/3.
• Kar og gryter må være kompatible
med varmeplatene. Bunnen på
karet/gryten må ikke være mindre
enn platen.
• Sørg for at kokesonene og
grytebunnene holdes rene. Smuss
reduserer varmeledningen mellom
varmesonen og grytebunnen.
• For koking over lengre tid, slå av
varmeplaten 5 eller 10 minutter før
slutten på koketiden. Du kan oppnå
energibesparelser på opptil 20 %
vedå bruke restvarme.
Første gangs bruk
Første rengjøring av produktet
MERK
Overflaten kan skades av
rengjøringsmidler eller
rengjøringsmaterialer.
Ikke bruk aggressive
rengjøringsmidler,
rengjøringspulver/melk eller skarpe
gjenstander.
1. Fjern alle pakningsmaterialer.
2. Tørk av overflatene på produktet
med en fuktig klut eller svamp, og
tørk med en klut.
Første oppvarming
Varm opp produktet i omtrent 30
minutter, og slå det deretter av.
Dermed vil alle produksjonsrester eller
-lag brennes av og fjernes.
Page 64

64 | NO
ADVARSEL
Varme overflater kan forårsake
forbrenninger!
Ikke berør de varme overflatene på
enheten. Hold barn på avstand fra
enheten, og bruk ovnshansker.
Elektrisk komfyr
1. Fjern alle bakebrett og stekeristen
fra ovnen.
2. Lukk ovnsdøren.
3. Velg posisjonen "Statisk".
4. Velg høyeste effekt på grillen; se
Slik brukes den elektriske ovnen,
side 67.
5. Bruk ovnen i omtrent 30 minutter.
6. Slå av ovnen, se Slik brukes den
elektriske ovnen, side 67
Grillovn
1. Fjern alle bakebrett og stekeristen
fra ovnen.
2. Lukk ovnsdøren.
3. Velg høyeste effekt på grillen; se
Slik bruker du grillen, side 71.
4. Bruk ovnen i omtrent 30 minutter.
5. Slå av grillen, se Slik bruker du
grillen, side 71
Varmeplate
1. Alle produksjonsrester eller
beskyttelseslag må brennes av før
første gangs bruk. Bruk
varmeplaten ved middels
temperatur i 8 minutter uten at det
står noen gryte på den. Ingen
grytere eller beholdere skal settes
på varmeplaten under denne
prosedyren.
Viktig
Lukt og røyk kan oppstå ved første
oppvarming. Sørg for god
utluftning.
Page 65

65 | NO
5 Slik brukes komfyren
Generell informasjon om
koking
FARE
Fare for brann ved overopphetet
olje!
Når du varmer olje, ikke la den stå
uten tilsyn.
Gjør aldri forsøk på å slukke
brannen med vann! Når olje
antennes, dekk straks til kokekaret
eller pannen med et lokk. Slå av
komfyren hvis det er trygt å gjøre
dette, og ring brannvesenet.
• Før du steker mat, skal den alltid
tørkes godt og plasseres i varm
olje. Frossen mat skal tines helt før
steking.
• Ikke dekk til kokekaret du bruker
når du varmer opp olje.
• Plasser pannene og karene på en
måte slik at håndtakene ikke er
over komfyren for å forhindre
oppvarmingen av håndtakene. Ikke
plasser ubalanserte kar og kar som
lett velter på komfyren.
• Ikke plasser tomme kar og panner
på kokesoner som er påslått. De
kan bli skadet.
• Hvis du slår på en kokesone uten
en kasserolle eller panne på den,
vil dette forårsake skade på
produktet. Slå av kokesonene etter
at matlagingen er fullført.
• Etter som overflaten på produktet
kav være varm, ikke plasser plastog aluminiumkar på det.
Slike kasseroller skal ikke brukes til
å beholde maten, heller.
• Bruk kun flatbunnede panner eller
kokekar.
• Tilsett passende mengde mat i
panner og kar. Dermed trenger du
ikke å gjøre noen unødvendig
rengjøring ved å forhindre at
rettene koker over.
Ikke legg lokk fra kar eller panner
på kokesonene.
Plasser pannene på en slik måte at
de sentreres på kokesonen. Når du
vil flytte pannen til en annen
kokesone, løft den og plasser den
på kokesonen du ønsker i stedet
for å skyve den.
Bruk av komfyren
1 Varmeplate 14-16 cm
2 Varmeplate 18-20 cm
3 Varmeplate 14-16 cm
4 Varmeplate 18-20 cm er liste for
anbefalt diameter på kjelene som skal
brukes med de tilhørende brennerne.
Bruke kokeplater
Komfyrknottene kan dreies i begge
retninger på en måte som vil gi
temperaturkontroll i trinn.
Page 66

66 | NO
MERK
Hvis komfyren er utstyrt med
varmeplater med booster-funksjon,
vil den relevanten varmeplaten
markeres med en rød prikk.
Overopphetingsvern
1000 Plater med en effekt på mer enn
1000 W er utstyrt med et
overopphetingsvern.
Overopphetingsvernet reduserer
effekten til varmeplaten i de følgende
tilfellene:
• Det er ingen kar eller kasserolle på
varmeplaten.
• Det finnes et tomt kar eller
kasserolle på varmeplaten.
• Bunnen av karet eller kasserollen
er ikke flat.
Slå på varmeplatene
Bruk varmeplateknottene til å betjene
varmeplatene. Flytt
varmeplateknottene til det relevante
nivået for å oppnå det ønskede
matlagingsnivået.
Kokenivå 1 2 —3 4 — 6
oppvarming koking,
varming
koking,
frittering
Slå av varmeplatene
Drei varmeplateknotten til AV-stilling
(opp).
Page 67

67 | NO
6 Slik bruker du ovnen
Generell informasjon om
baking, steking og grilling
FARE
Risiko for skolding ved varm
damp!
Vær forsiktig ved åpning av døren,
siden det vil komme ut damp.
Baketips
• Bruk belegg som ikke kleber,
passende metallplater eller
aluminiumsbeholdere eller
varmeresistente silikonformer.
• Utnytt plassen på stativet på best
mulig måte.
• Det anbefales å plassere
bakeformen i midten av stativet.
• Velg riktig hylleposisjon før du slår
på ovnen eller grillen - ikke flytt
ovnshyller når de er varme.
• Hold ovnsdøren lukket.
Steketips
• Krydring med sitronjuice og svart
pepper vil forbedre kokeytelsen
ved tilberedning av en hel kylling,
kalkun eller et stort stykke kjøtt.
• Kjøtt med bein tar omtrent 15 til 30
minutter lenger før det er
ferdiglaget enn en stek av samme
størrelse uten bein.
• Du bør kalkulere omtrent 4 til 5
minutter koketid per
høydecentimeter på kjøttet.
• La kjøttet stå i ovnen i omtrent
10 minutter etter koketiden. Saften
fordeles bedre over hele steken og
kommer ikke ut når kjøttet kuttes.
• Fisk i en brannbestandig form skal
plasseres på stativet på midtre
eller nedre nivå.
Grilltips
Grilling er ideelt for å tilberede kjøtt,
fisk og fjærkre ogvil oppnå en fin brun
overflate uten å tørke det ut for mye.
Flate stykker, kjøtt og pølser, men
også grønnsaker med høyt
vanninnhold (f.eks. tomater og løk) er
spesielt egnet for grilling.
• Fordel stykkene som skal grilles på
stekeristen eller stekeristen på
brett på en måte at de ikke
kommer utenfor varmemålene og
sett dem inn.
• Skyv stekeristen eller brettet inn i
ovnen på ønsket nivå. Hvis
grillmaten ligger på stekeristen,
plasser en dryppepanne på
bunnen for å samle fettet.
• Tilfør noe vann i dryppepannen for
enkel rengjøring.
MERK
Brannfare på grunn av mat som
ikke egner seg til grilling!
Bruk kun mat til grilling som egner
seg for intensiv grillvarme.
Ikke plasser maten for langt bak i
grillen. Dette er det varmeste
området, og fet mat kan ta fyr.
Slik brukes den elektriske
ovnen
Velg temperatur og driftsmodus
1 Funksjonsvelger
2 Termostatbryter
Page 68

68 | NO
Driftsmodus for den elektriske ovnen
velges med funksjonsbryteren.
Temperaturen justeres med
termostatbryteren.
Alle ovnens funksjoner slås av ved å
vri den relevante knappen til avposisjon (opp).
1. Still termostatbryteren til ønsket
temperatur.
2. Still funksjonsbryteren til ønsket
driftsmodus.
» Ovnen vil varmes opp til og
opprettholde den innstilte temperaturen.
Under oppvarming holder
temperaturlampen seg på.
Slå av den elektriske ovnen
Vri funksjonsbryteren og
termostatbryteren til av-stillingen (topp).
Hylleposisjoner (avhengig av modell)
Det er viktig å posisjonere gittergrillen
riktig på gitterhyllen. Gittergrillen må
plasseres slik at den vil passe inn i
åpningen på gitterhyllen, slik som
illustrert på figuren.
Driftsmodi
Rekkefølgen på driftsmodusene som
vises her kan avvike fra tilordningen på
din enhet.
Over- og undervarme
Over- og undervarme er på.
Matvarene oppvarmes
samtidig fra øvre og nedre
del. Egner seg til f.eks. kaker,
kjeks eller formkaker og
gryteretter. Tilbered mat kun
med ett brett.
Over- og undervarme med viftemotor
Over- og undervarme pluss
vifte (i bakveggen) er på. Den
varme luften fordeles jevnt og
hurtig over hele ovnen av
viften. Tilbered mat kun med
ett brett.
Overvarme og varmluft
Overvarme pluss vifte (i
bakveggen) er på. Varmluften
spres jevnere med viften,
sammenlignet med kun
overvarme.
Undervarme og varmluft
Undervarme pluss vifte (i
bakveggen) er på. Varmluften
spres jevnere med viften,
sammenlignet med kun
undervarme.
Brukes med vifte
Ovnen varmes ikke opp. Kun
viften (i bakveggen) er i drift.
Frossen kornet mat tines opp
langsomt ved romtemperatur,
kokt mat nedkjøles.
Page 69

69 | NO
Overflategrill
Den store grillen (under
ovnstaket) er i drift. Egner seg
til grilling av større mengder.
• Legg store eller
middels store
porsjoner i riktig
hylleposisjon under
grillvarmen for å grille.
• Still temperaturen på
maksimalt nivå.
• Snu maten etter halve
grilltiden.
Grill med varmluft
Grilleffekten er ikke så sterk
som ved normal grilling.
• Legg små eller middels
store porsjoner i riktig
hylleposisjon under
grillvarmen for å grille.
• Still temperaturen på
maksimalt nivå.
• Snu maten etter halve
grilltiden.
Tidstabell for matlaging
Viktig
De spesifiserte verdiene har blitt
bestemt i laboratoriet. Verdiene
som egner seg for deg kan avvike
fra disse verdiene.
Baking og steking
Viktig
Nivå 1 er bunnivået til ovnen.
Oppskrift Funksjon Forvarming
Rille
(nedenfra)
Temperatur
(°C)
Tid (min) Tilbehør
Kaker av gjærdeig
OVER-
UNDERVARME
Ja 3 175 20 - 35 langpanne
MED VARMLUFT Ja 1 - 5 175 15 - 30
Rille 5: dypt dryppebrett
Rille 1: dryppebrett
Kjeks/småkaker
OVER-
UNDERVARME
Ja 3 175 20 - 40 langpanne
MED VARMLUFT Ja 1 - 5 175 20 - 35
Rille 5: dypt dryppebrett
Rille 1: dryppebrett
Pizza
OVER-
UNDERVARME
Ja 2 225 12 - 20 langpanne
MED VARMLUFT Ja 1 - 5 225 15- 30
Rille 5: dypt dryppebrett
Rille 1: dryppebrett
Sukkerbrød
OVER-
UNDERVARME
Ja 3 200 5-15 Rille 3: kakeform på rist
MED VARMLUFT Ja 1 - 5 175 10-25
Rille 5: kakeform på rist
Rille 1: kakeform på rist
Kjøtt og potetpaier
(grønnsakspai,
quiche)
VIFTE Ja 2 175 - 200 30 - 50 kakeform på rist
MED VARMLUFT Ja 1 - 3 175 - 200 35 - 55
Rille 3: kakeform på rist
Rille 1: kakeform på rist
Lasagne
OVER-
UNDERVARME
Ja 2 - 3 200 30 - 45 Panne på rist
Page 70

70 | NO
Lam/kalv/okse/svin 1
kg
VIFTE - 3
25 min på 250,
deretter på 180 -
190
80 - 120 Dryppebrett eller panne på rist
Kalkun /gås 3 kg VIFTE - 2
25 min på 250,
deretter på 180 -
190
140 - 210 Dryppebrett eller panne på rist
Grillet kylling 1 - 1,3
kg
VIFTE - 2
15 min på 250,
deretter på 180 -
190
55 - 70
Rille 2: rist (snu om nødvendig
maten når 2/3 av tiden er gått)
+ Pyrex
Rille 1: l dryppebrett med vann
Lammelår/skanker VIFTE - 3
25 min på 250,
deretter på 180 -
190
60 - 90
Dryppebrett eller panne på rist
(snu om nødvendig maten når
2/3 av tiden er gått)
Fiskefileter/-koteletter VIFTE - 3 200 10 - 25
Rille 3: rist (snu maten
halvveis i stekingen) /
dryppebrett
Rille 2: dryppebrett med vann
Fiskefileter/-koteletter GRILL Ja 4 / 5 200 - 225 20 - 30
Rille 4 / 5: rist (snu maten
halvveis i stekingen)
Rille 3: dryppebrett med vann
Roastbiff, blodig GRILL Ja 4 / 5 200 - 225 25 - 35
panne på rist (snu om
nødvendig maten når 2/3 av
tiden er gått)
Ristet brød GRILL Ja 4 200 - 225 1 - 4 rist
Spekepølser/grillspyd
/svineribbe/hamburg
ere
GRILL Ja 5 200 - 250 20 - 40
Rille 5: rist (snu maten
halvveis i stekingen)
Rille 4: dryppebrett med vann
Grønnsaksgrateng GRILL Ja 3 200 10 - 20 panne på rist
Tidene i tabellen er kun veiledende. Tilberedningstidene kan variere avhengig av retten og størrelsen på matstykkene.
Når du griller anbefaler vi at du ikke legger mat på den fremre delen av risten (6-7 cm).
Ved grilling av kjøtt anbefales det å snu maten halvveis i stekingen.
Ved tilberedning som krever
forhåndsoppvarming, skal
forhåndsoppvarmingen skje ved
begynnelsen av matlagingen til
termostatlampen slukker.
Baketips for kake
• Hvis kaken er for tørr, øk
temperaturen med 10 og reduser
steketiden.
• Hvis kaken er våt, bruk mindre
væske eller senk temperaturen
med 10 °C.
• Hvis kaken er for mørk på toppen,
plasser den på en lavere hylle,
senk temperaturen og øk
steketiden.
• Hvis den er godt stekt på innsiden,
men klisset på utsiden, bruk
mindre væske, senk temperaturen
og øk steketiden.
Bakevaretips
• Hvis bakevarene er for tørre, øk
temperaturen med 10 °C og
reduser steketiden. Damp
deiglagene med en saus som
består av melk, olje, egg og
yoghurt.
• Hvis bakevarene tar for lang tid til å
bake, vær ekstra oppmerksom så
tykkelsen på bakevarene du har
tilberedt ikke overskrider dybden
på brettet.
• Hvis den øvre siden av bakevarene
blir brune, men den lavere delen
ikke er stekt, se til at sausmengden
du har brukt til bakevarene ikke er
for lang mot bunnen av
bakevarene. Prøv å spre sausen
jevnt mellom deiglagene og på
Page 71

71 | NO
toppen av bakevarene for en jevn
bruning.
Viktig
Stek baksten i overensstemmelse
med modus og temperatur som
finnes i koketabellen. Hvis den
nedre delen fortsatt ikke brunes
nok, plasser den på en lavere hylle
neste gang.
Tips for koking av grønnsaker
• Hvis grønnsaksretten mister all
væske og blir for tørr, tilbered den i
en panne med lokk i stedet for et
brett. Lukkede kar vil beholde
saften i retten.
• Hvis en grønnsaksrett ikke blir kokt,
kok grønnsakene på forhånd, eller
klargjør dem som hermetisert mat
og legg dem i ovnen.
Slik bruker du grillen
ADVARSEL
Varme overflater kan forårsake
forbrenninger!
Lukk ovnsdøren under grilling.
Slå på grill
1. Still funksjonsbryteren til
grillsymbolet.
2. Still deretter inn ønsket
grillinnstilling.
3. Forvarm i omtrent 5 minutter, ved
behov.
» Termostatlampen er slått på.
Slå av grill
1. Vri grillkontrollbryteren til avstillingen (topp).
Hylleposisjoner
For optimal grilldekning, posisjoner
trådhyllen mot fronten på ovnen, uten å
berøre glassdøren. Hvis risten
plasseres helt bak mot veggen av
ovnen, vil grilldekningen reduseres.
Page 72

72 | NO
7 Vedlikehold og stell
Generell informasjon
Levetiden på produktet blir lengre og
problemer som oppstår hyppig,
reduseres hvis det rengjøres ved
regelmessige intervaller.
FARE
Fare for elektrisk sjokk!
Koble fra strømmen før rengjøring
av apparatet for å unngå elektrisk
sjokk.
FARE
Varme overflater kan forårsake
forbrenninger!
La enheten kjøles ned før
rengjøring.
• Rengjør produktet grundig etter
hver gangs bruk. På denne måten
er det lettere å fjerne kokerester,
og dermed unngås det at de
brenner fast neste gang produktet
brukes.
• Ingen spesielle rengjøringsmidler
er nødvendige for å rengjøre
produktet. Bruk varmt vann med
flytende vaskemiddel, en myk klut
eller svamp til å rengjøre produktet
og tørke det med en tørr klut.
• Sikre alltid at overflødig væske
tørkes godt av etter rengjøring og
at alt søl tørkes opp umiddelbart.
• Ikke bruk rengjøringsmidler som
inneholder syre eller klorid til å
rengjøre overflatene i rustfritt stål
eller inox, samt håndtaket. Bruk en
myk klut med et flytende
rengjøringsmiddel (ikke skurende)
til å tørke rent på disse delene,
pass på å tørke i én retning.
MERK
Overflaten kan skades av
rengjøringsmidler eller
rengjøringsmaterialer.
Ikke bruk aggressive
rengjøringsmidler,
rengjøringspulver/melk eller skarpe
gjenstander.
Viktig
Ikke bruk damprengjørere til
rengjøringen.
Rengjøre komfyren
Elektriske komfyrer
1. Slå av varmeplatene og vent inntil
de kjøles ned.
2. Ved behov, rengjør platene med et
rengjøringsmiddel
(rengjøringsmiddel/mykningsmiddel
er tilgjengelig spesialbutikker).
3. Varm opp kun i noen få minutter
etter rengjøring for å få toppdelen
tørket.
4. Påfør regelmessig et tynt lag
maskinolje på toppoverflaten av
komfyren for å beskytte den.
Rengjøring av kontrollpanel
Rengjør kontrollpanelet og
kontrollknottene med en våt klut, og
tørk så de blir tørre.
Page 73

73 | NO
MERK
Skade på kontrollpanelet!
Ikke fjern kontrollbryterne for
rengjøring av kontrollpanelet.
Rengjøre ovnen
Det er ikke nødvendig med
ovnrengjøringsmiddel eller noen andre
spesielle rengjøringsmidler for å
rengjøre ovnen. Det anbefales å tørke
ovnen med en fuktig klut mens den
fortsatt er varm.
For å rengjøre sideveggen:
1. Fjern frontdelen av sidestøtten ved
å trekke det i motsatt retning av
sideveggen.
2. Fjern sidestativet helt ved å trekke
det mot deg.
Rengjør ovnsdøren
Ikke bruk aggressive skurende
rengjøringsmidler eller skarpe
metallskraper for å rengjøre ovnsdøren,
da disse kan lage riper på overflaten
og ødelegge glasset.
Demonter ovnsdør
1. Åpne front døren.
2. Åpne klemmene ved hengselhuset
på høyre og venstre side av
frontdøren ved å trykke dem ned
slik som vist på figuren.
1 Frontdør
2 Hengsel
3 Ovn
3. Flytt frontdøren til halvveis.
4. Fjern frontdøren ved å trekke den
oppover for å frigjøre den fra høyre
og venstre hengsler.
MERK
Trinnene som utføres under
fjerningsprosessen skal utføres i
motsatt rekkefølge (trinn 4, 3, 2 og
1) for å feste dekselet. Ikke glem å
lukke klemmene ved hengselhuset
ved remontering av døren.
Utskifting av ovnspæren
FARE
Varme overflater kan forårsake
forbrenninger!
Pass på at apparatet er skrudd av
og nedkjølt for å unngå risikoen for
elektrisk støt.
Page 74

74 | NO
Viktig
Ovnslampen er en spesiell elektrisk
lyspære som kan tåle opp til
300 °C. Se Tekniske
spesifikasjoner, side 54 for detaljer.
Ovnspærene kan fås fra den
autoriserte serviceagenten.
MERK
Posisjonen på lampen kan variere
fra figuren.
Hvis ovnen din er utstyrt med en
rund pære:
1. Koble produktet fra
strømforsyningen.
2. Drei glassdekselet mot klokken for å
fjerne det.
3. Fjern ovnslampen ved å dreie den
mot klokken, og skift den ut med en
ny.
4. Sett på plass glassdekselet.
Page 75

75 | NO
8 Feilsøking
Ovnen avgir damp når den er i bruk.
Viktig
Det er normalt at damp kommer ut
under bruk. Dette er ingen feil.
Produktet avgir metallstøy under oppvarming og nedkjøling.
Viktig
Når metalldelene varmes opp, kan
de utvide seg og lage støy. Dette
er ingen feil.
Produktet virker ikke.
• Strømsikringen er defekt eller har blitt utløst. >>> Kontroller sikringene i
sikringsboksen. Ved behov, skift ut eller tilbakestill dem.
• Produktet er ikke tilkoplet (det jordede) strømuttaket. >>> Kontroller
kontakttilkoplingen.
Ovnslyset virker ikke.
• Ovnslampen er defekt. >>> Skift ut ovnspæren.
• Strømmen er frakoblet. >>> Kontroller om det finnes strøm. Kontroller
sikringene i sikringsboksen. Ved behov, skift ut eller tilbakestill sikringene.
Ovnen varmes ikke opp.
• Funksjone og/eller temperaturen er ikke innstilt. >>> Still inn funksjonen og
temperaturen med funksjons- og/eller temperaturknotten/tasten.
• Strømmen er frakoblet. >>> Kontroller om det finnes strøm. Kontroller
sikringene i sikringsboksen. Ved behov, skift ut eller tilbakestill sikringene.
Viktig
Forhør deg med den autoriserte
serviceagenten eller forhandleren
der du har kjøpt produktet hvis du
ikke kan ordne problemet selv om
du har gjennomført instruksjonene i
dette avsnittet. Gjør aldri forsøk på
å reparere et defekt produkt selv.
Page 76

Læs denne manual inden du tager ovnen i brug.
Kære kunde,
Vi ønsker at præsentere vores produkt, der er fremstillet i moderne faciliteter og
gennemgik vores strenge procedurer inden for kvalitetskontrol.
Vi anbefaler, at denne brugsanvisning læses grundigt inden ovnen tages i brug og
manualen opbevares til fremtidig reference. Hvis du giver produktet en anden
bruger, husk også at aflevere manualen.
Brugsanvisningen hjælper dig med at bruge produktet på en forsvarlig og
sikker måde.
• Læs manualen inden ovnen installeres og tages i brug.
• Følg nøje sikkerhedsvejledninger..
• Opbevar manualen ved hånden for hurtig reference.
• Læs også andre dokumenter vedlagt produktet.
Husk på, at manualen også gælder andre modeller.
Forskelle mellem modeller er synligt anmærket i manualen.
Symbolforklaringer
Følgende symboler er blevet brugt i denne manual:
Vigtige informationer eller brugertips.
Advarsel mod farlige situationer med hensyn til liv og ejendomskader.
Advarsel mod elektrisk stød.
Advarsel mod brandrisiko.
Advarsel mod varme overflader.
Page 77

77 | DA
Indhold
1 Generelle informationer 78
Oversigt ................................................. 78
Tekniske specifikationer ....................... 79
Tilbehør der følger med apparatet ....... 80
2 Sikkerhedsinstruktioner 81
Generelle sikkerhedsregler .................. 81
Sikkerhed under arbejde med
elektricitet ..................................... 83
Brug af ovnen .................................... 83
Sikkerhed for børn ............................. 83
3 Installation 84
Inden installation ................................... 84
Installation og tilslutning ....................... 85
Bortskaffelse ......................................... 87
Bortskaffelse af transportemballage 87
Bortskaffelse af gammelt apparat .... 87
Transport ............................................ 87
4 Forberedelser 88
Gode råd om energibesparelser .......... 88
Første anvendelse ................................ 88
Første rengøring af produktet .......... 88
Første opvarmning ............................ 88
5 Brug af kogepladen 90
Generelle informationer om
madlavning ...................................... 90
Anvendelse af komfuret ........................ 90
6 Betjening af ovnen 92
Generelle informationer om bagning,
stegning og grillning ........................ 92
Brug af den elektriske ovn .................... 92
Betjeningsmodus ............................... 93
Tabel over koge-/stegetider .............. 94
Betjening af grillen ................................ 96
7 Vedligeholdelse og pleje 97
Generelle informationer ........................ 97
Rengør omkring blusset. ...................... 97
Rengøring af kontrolpanel .................... 97
Rengøring af ovnen .............................. 98
Skille ovnlågen ad ................................. 98
Udskiftning af ovnpære ........................ 98
8 Fejlafhjælpning 100
Page 78
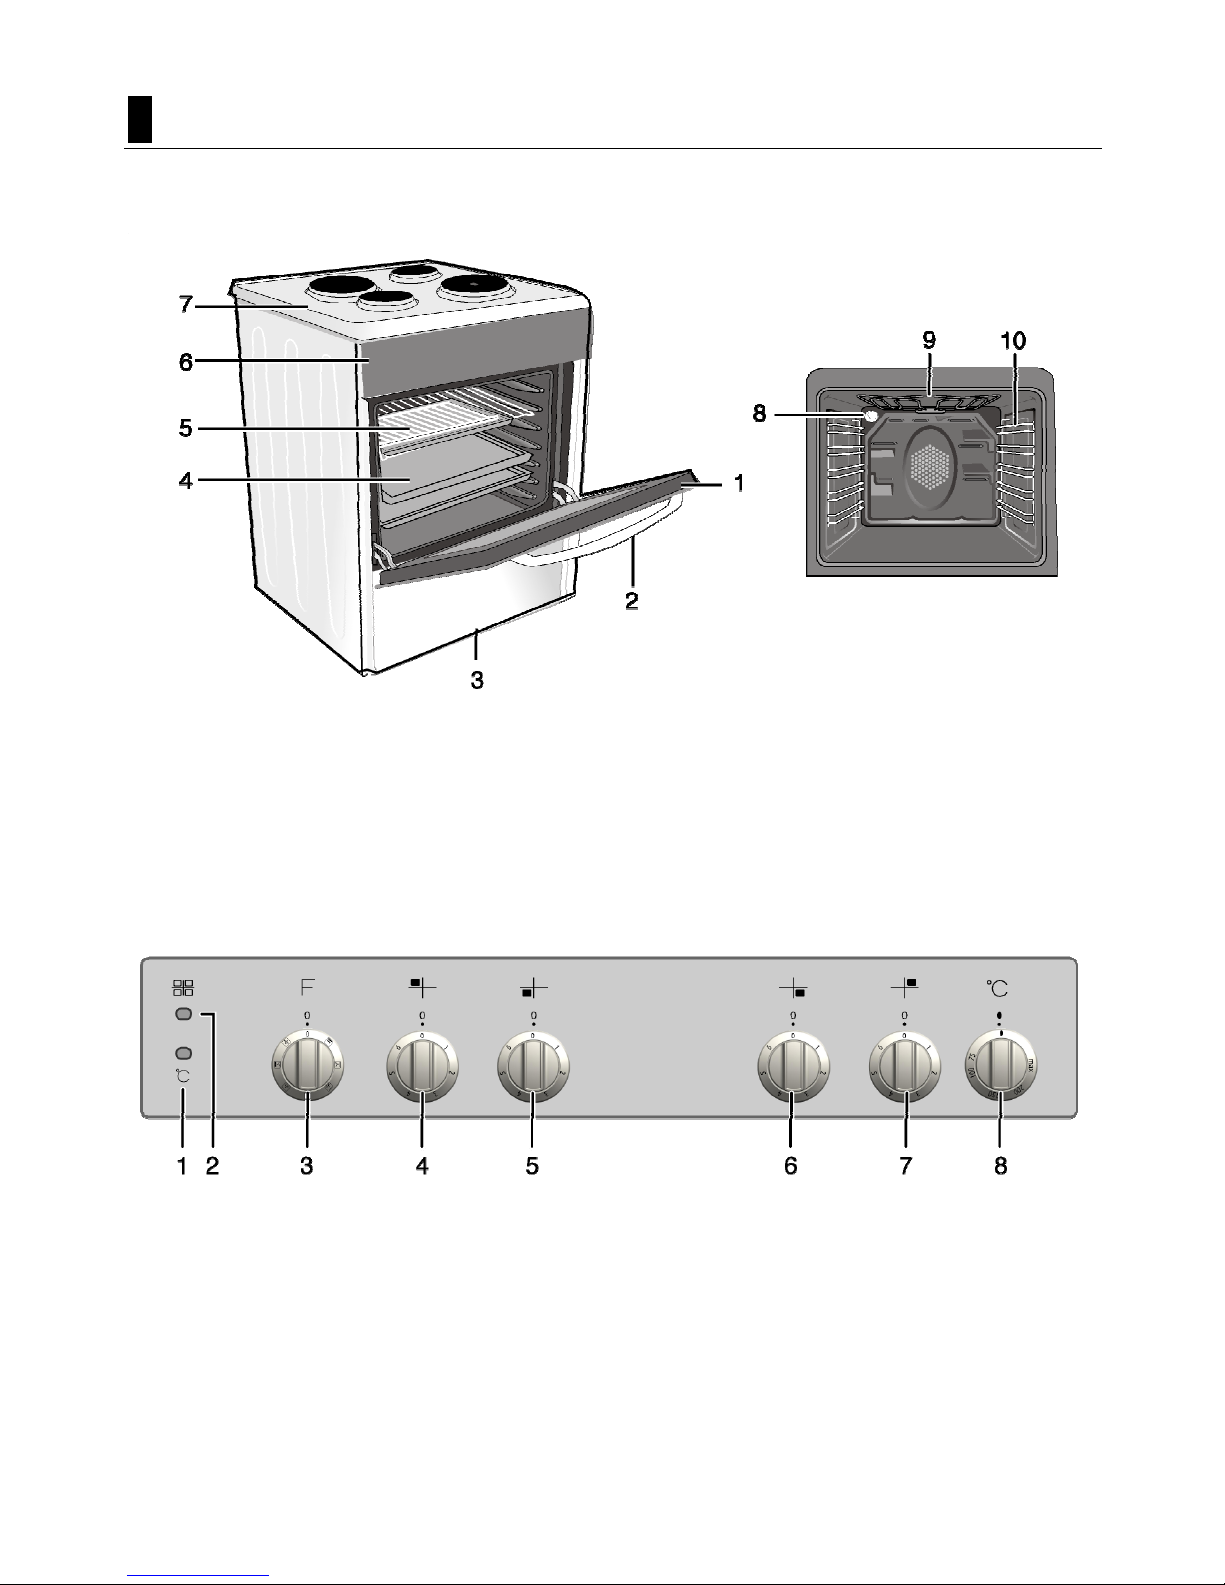
78 | DA
1 Generelle informationer
Oversigt
1 Frontlåge
2 Håndtag
3 Nederste skuffe
4 Bradepande
5 Trådhylde
6 Betjeningspanel
7 Plade til brænder
8 Lampe
9 Grillvarmeelement
10 Hyldeskinnepositioner
1 Termostatlampe
2
A
dvarselslampe
3 Funktionsdrejeknap
4 Varmeplade Bagest til venstre
5 Varmeplade Forrest til venstre
6 Varmeplade Forrest til højre
7 Varmeplade Bagest til højre
8 Termostatdrejeknap
Page 79

79 | DA
Tekniske specifikationer
GENERELT
Eksterne mål (højde/bredde/dybde) 850 mm/600 mm/600 mm
Spænding / frekvens 220-240 V 50 Hz
Total strømforbrug 8.3 kW
Sikring min. 16 A x 3
Ledningstype/størrelse H05VV-FG 3 x 2,5 mm2
Ledningslængde maks. 2 m
KOGEPLADE
Brændere
Bagest til venstre
V
armeplade
Dimension 145 mm
Ydelse 1000 W
Forrest til venstre
V
armeplade
Dimension 180 mm
Ydelse 2000 W
Forrest til højre
V
armeplade
Dimension 145 mm
Ydelse 1500 W
Bagest til højre
V
armeplade
Dimension 180 mm
Ydelse 1500 W
OVN/GRILL
Hovedovn
Konventionel ovn
Energiklasse# A
Belysning 15–25 W
Grill strømforbrug 2.2 kW
#
Grundregler: Information om energimærkning af elektrisk ovn er givet i henhold til EN
50304 standarder. Disse værdier er fastsat i henhold til standard belastning med overog undervarme eller varmluft (hvis indbygget) funktioner.
Energiklassen er fastsat i henhold til følgende prioritering afhængig af, hvorvidt de
relevante funktioner findes i produktet eller ej. 1-Madlavning med eco-varmluft, 2Turbo langtidsstegning/kogning, 4- Over- under varmluft, 5- Over- og undervarme.
Vigtigt
Tekniske specifikationer kan blive
ændret uden forvarsel med henblik
på forbedring af produktets kvalitet.
Vigtigt
Tallene i manualen er skematiske
og kan afvige fra det aktuelle
produkt.
Page 80

80 | DA
Vigtigt
Værdier angivet i produktmærkat
eller i dokumentationen vedlagt
produktet er målt i laboratorium i
overensstemmelse med relevante
standarder. Afhængig af drifts- og
miljøforhold kan disse værdier
variere.
Tilbehør der følger med
apparatet
Vigtigt
Det medfølgende tilbehør kan
variere afhængigt af produktmodel.
Det er ikke sikkert, at alt tilbehøret,
der er beskrevet i
brugsvejledningen, findes til dit
produkt.
Bageplade
Kan bruges til bagværk, frossen mad
og store stege.
Bradepande
Kan bruges til bagværk, store stege,
mad med højt væskeindhold og under
grillning som dryppande.
Trådhylde
Kan bruges til at stege og til at
anbringe bage-, stege- og ildfaste fade
på.
Page 81

81 | DA
2 Sikkerhedsinstruktioner
Generelle sikkerhedsregler
ADVARSEL: Apparatet og
de tilgængelige dele kan
blive varme, når apparatet
er i brug. Sørg for ikke at
berøre varmeelementerne.
Børn under 8 år må ikke
opholde sig i nærheden af
apparatet, medmindre de er
under konstant opsyn.
Apparatet må udelukkende
betjenes af børn på 8 år og
derover samt af personer,
der er fysisk, sensorisk og
mentalt funktionshæmmede
eller uden forudgående
erfaring og viden, hvis de er
under opsyn og har fået den
nødvendige oplæring i
sikker brug af apparatet
samt forstår farerne ved
forkert brug. Børn må ikke
lege med apparatet.
Rengøring og
vedligeholdelse må ikke
foretages af børn,
medmindre de er under
opsyn.
ADVARSEL: Tilgængelige
dele kan blive meget varme
under brug. Børn må derfor
ikke opholde sig i nærheden
af apparatet, når det er i brug.
Anvend ikke slibende
rengøringsmidler eller skarpe
metalskrabere til rengøring af
ovndørens rude, da de kan
ridse overfladen, så glasset
kan gå i stykker.
ADVARSEL: Sørg for at
slukke for apparatet, inden
pæren udskiftes, så risikoen
for elektrisk stød undgås.
ADVARSEL: Hold øje med
kogesektionen, når der
tilberedes med fedtstoffer
eller olie, da de kan komme i
brand. Forsøg ALDRIG at
slukke en brand med vand,
men tag stikket ud af
stikkontakten, og dæk
derefter flammen til med for
eksempel et låg eller et
brandtæppe.
ADVARSEL: Risiko for
brand: Opbevar ikke
genstande på
kogezonernes overflade.
Apparatet er ikke beregnet
til at blive startet ved hjælp
af en ekstern timer eller en
separat fjernbetjening.
Page 82

82 | DA
ADVARSEL: Hvis der er en
revne i overfladen, skal
stikket tages ud af
stikkontakten for at undgå
risikoen for elektrisk stød.
• Tilslut produktet til jordforbundet
stikkontakt beskyttet af en sikring
med passende kapacitet som
beskrevet i tabellen Tekniske
specifikationer. Jordforbindelsen
skal udføres af kvalificeret
elektriker til brug af produktet med
eller uden en transformer. Vores
firma kan ikke stilles til ansvar for
eventuelle skader, der opstår som
følge af forkert brug af produktet
eller af forkert installeret
jordforbindelse.
• Hvis ledningen er beskadiget, skal
den udskiftes af producenten,
forhandleren eller lignende
kvalificerede personer for at undgå
farer.
• Tag ikke produktet i brug hvis det
er defekt eller hvis det har synlige
fejl.
• Du må ikke selv foretage
reparationer eller ændringer på
produktet. Du kan dog selv
afhjælpe nogle fejl, der ikke kræver
reparationer eller ændringer. Se
Fejlafhjælpning, side 100.
• Spul aldrig produktet med vand! da
det kan medføre elektrisk stød.
• Brug aldrig produktet når din
dømmekraft eller
koordinationsevner er påvirkede af
alkohol og/eller stoffer.
• Under installationen,
vedligeholdelsen, rengøringen og
reparationen skal produktet
frakobles elnettet.
• Vær forsigtig når du bruger
alkoholiske drikke i dine retter.
Alkohol fordamper i høje
temperaturer og kan forårsage
brand da den kan selvantænde når
den kommer i kontakt med varme
overflader.
• Sæt ikke lukkede dåser og glas til
opvarmning i ovnen. Der kan
opstår et tryk inde i dåsen/glasset,
der får den/det til at eksplodere.
• Stil ikke brændbare materialer i
nærheden af produktet da siderne
kan blive meget varme.
• Placer ikke bageplader, service
eller aluminiumsfolie direkte på
bunden af ovnen. Den
akkumulerede varme kan
beskadige bunden af ovnen.
• Hold alle ventilationsåbninger frie
for forhindringer.
• Apparatet kan være varmt under
brugen. Rør aldrig varme
varmelegemer, indersiden af ovnen
osv.
• Brug altid varmebeskyttende
handsker når du sætter retter ind
eller ud af en varm ovn.
• Brug ikke apparatet hvis glasset i
døren er fjernet eller beskadiget.
• Bagsiden af ovnen bliver varm når
apparatet er under benyttelse.
Sørg for, at gasrør/netledning ikke
rører bagsiden af ovnen da det kan
medføre skader på forbindelser.
• Sæt ikke netledningen mellem
ovndøren og rammen og læg den
ikke på varme overflader.
Isoleringen på netledningen kan
smelte og medføre kortslutning.
• Sørg for, at apparatet er slukket
når det ikke er taget i brug.
Vigtigt
Dette apparat er ikke beregnet til
betjening med en ekstern timer
eller en separat fjernbetjening.
Page 83

83 | DA
Sikkerhed under arbejde med
elektricitet
Defekt elektrisk udstyr er en af de
største årsager til brand i private
husholdninger.
• Al arbejde på elektrisk udstyr må
kun udføres af autoriseret
fagperson.
• I tilfælde af skader skal produktet
slukkes og frakobles strømmen.
Slå sikringen fra.
• Sørg for, at sikringen er passende
til apparatet.
Brug af ovnen
Apparatet er fremstillet til brug i private
husholdninger. Brug i erhvervsmæssigt
øjemed er ikke tilladt.
"ADVARSEL: Dette apparat er kun til
madlavning. Det kan ikke anvendes til
andre formål, for eksempel til
opvarmning af rummet."
Apparatet er ikke beregnet til
opvarmning af tallerkener, tørring af
håndklæder, opvaskekluder og lignede
ved hængning dem på håndtag og til
opvarmning.
Producenten fraskriver sig ethvert
ansvar for skader forårsaget af forkert
brug eller håndtering af maskinen.
Ovnen kan bruges til optøning, bagning,
stegning og grilning af mad.
Sikkerhed for børn
• El- og gasprodukter produkter er
farlige for børn. Hold børn væk fra
produktet, når det kører, og lad
dem ikke lege med produktet.
• Tilgængelige dele af apparatet vil
blive varme, når apparatet er i brug,
og indtil apparatet er kølet ned,
skal børn holdes væk.
• "CAUTION ITilgængelige dele kan
blive varme når grillen benyttes.
Små børn skal holdes væk."
• Opbevar ikke noget over apparatet,
som børn gerne vil have fat i.
• Når lågen er åben, skal du ikke
lægge tunge genstande oven på
den og ikke lade børn sidde på
den. Det kan forårsage væltning,
eller lågehængslerne kan blive
beskadigede.
• Emballagematerialerne vil være
farlige for børn. Hold
emballagematerialerne væk fra
børn. Sørg for at bortskaffe alle
emballagedelene i henhold til
miljøstandarderne.
Børnelås
Komfuret har et børnesikringssystem
på ovnlågen.
For at åbne ovnlågen skal du skubbe
plasticknappen let ned og trække i
lågehåndtaget.
Når lågen lukkes, låses børnelåsen af
sig selv.
Page 84

84 | DA
3 Installation
Inden installation
For at sikre at de kritiske luftspalter
bevares under produktet anbefaler vi,
at dette produkt monteres på en fast
bund, og at fødderne ikke synker ned i
et tæppe eller et blødt gulv.
Køkkengulvet skal kunne bære
enhedens vægt samt den ekstra vægt
fra gryder, potter, pander, bagepader
og mad.
Der skal være en sikkerhedsafstand
mellem enheden og køkkenvæggene
og -inventar. Se figur (værdier i mm).
• Det kan anvendes med kabinetter
på hver side, men for at få en
mindsteafstand på 400 mm over
kogepladeniveau skal der tillades
en sideafstand på 65mm mellem
apparatet og væg, skillevæg eller
højt skab.
• Kan også anvendes fritstående.
Tillad en mindsteafstand på 750
mm fra komfurets overflade til
tilgrænsende overflade over
komfurets overflade.
• *Hvis der skal installeres en
udsugning over komfuret, skal du i
producenten af udsugningens
brugsvejledning læse dig til
installationshøjden (min. 65 cm).
• For modeller med låger, der åbner
til siden, anbefaler vi en
sideafstand på 60mm mellem
komfur og nærmeste sidevæg for
at gøre det muligt for lågen at åbne
helt.
• Apparaterne er beregnet til
installation i køkkenkabinetter, der
kan fås i handlen.
• Enheden svarer til udstyr klasse 1,
dvs. det kan placeres med bageste
og den ene side mod
køkkenvægge, køkkenmøbler eller
udstyr af enhver størrelse.
Køkkeninventar eller -udstyr på
den anden side kan være af
samme størrelse eller mindre.
• Alt køkkeninventar ved siden af
enheden skal være
varmebestandigt (mindst 100 °C).
Vigtigt
Enheden skal sikres mod
overbalance ved at bruge den
medfølgende kæde til ovnen. Sæt
krogen (1) fast på køkkenvæggen
(5) og sæt sikkerhedskæden (2)
fast på krogen.
Page 85

85 | DA
1 Krog
2 Sikkerhedskæde
3 Bagsiden af kogepladen
4 Fastgør kæden fast til bagsiden af
kogepladen
5 Køkkenvæg
Installation og tilslutning
Produktet kan kun installeres og
tilsluttes i overensstemmelse med de
lovmæssige regler for installation.
Vigtigt
Undlad at installere enheden ved
siden af køleskabe eller frysere.
Varmen, der udsendes fra
enheden, vil føre til et øget
energiforbrug af de kølende
enheder.
• Der skal mindst 2 personer til at
bære produktet.
• Produktet skal placeres direkte på
gulvet. Den skal ikke placeres på
en sokkel eller en fod.
BEMÆRK
Materiel skade!
Lågehåndtaget må ikke bruges til
at løfte eller flytte enheden.
Elektrisk tilslutning
Tilslut produktet til jordforbundet
stikkontakt beskyttet af en sikring med
passende kapacitet som beskrevet i
tabellen "Tekniske specifikationer".
Jordforbindelsen skal udføres af
kvalificeret elektriker til brug af
produktet med eller uden en
transformer. Vores firma kan ikke stilles
til ansvar for eventuelle skader, der
opstår som følge af forkert brug af
produktet eller af forkert installeret
jordforbindelse.
FARE
Risiko for elektrisk stød,
kortslutning eller brand som
følge af uprofessionel
installation!!
A
pparatet må kun tilsluttes
strømforsyningen af en autoriseret
kvalificeret person, og apparatet er
kun garanteret efter korrekt
installation.
FARE
Risiko for elektrisk stød,
kortslutning eller brand ved
beskadigelse af
strømforsyningsledningen!
Strømforsyningsledningen må ikke
blive beskadiget, bøjet eller fanget
eller komme i kontakt med varme
dele på apparatet.
Hvis strømforsyningsledningen er
beskadiget, skal den udskiftes af
en autoriseret, kvalificeret
elektriker.
Strømtilførselsdataene skal svare til de
data, der er angivet på enhedens
typeskilt. Mærkepladenkan ses, enten
når lågen eller det nederste dæksel
åbnes, eller den er placeret på
enhedens bagvæg, afhængigt af
produkttype.
Produktets strømkabel skal overholde
værdierne i tabellen "Tekniske
specifikationer".
Page 86

86 | DA
FARE
Risiko for elektrisk stød!
Inden der startes noget arbejde
med den elektriske installation,
skal produktet afbrydes fra
strømforsyningsnettet.
Tilslutning af strømkabel
1. Hvis det ikke er muligt at afbryde
alle polerne i forsyningsstrømmen,
skal der tilsluttes en
afbrydelsesenhed med mindst 3
mm berøringsfrigang (sikringer,
ledningssikkerhedskontakter,
kontaktorer), og alle polerne til
denne afbrydelse skal være
tilstødende til (ikke over) produktet i
overensstemmelse med IEE
direktiverne. Undladelse af at følge
denne instruktion kan forårsage
driftsmæssige problemer og
udgyldiggøre produktgarantien.
Der anbefales ekstra beskyttelse ved
en reststrømsafbryder.
Hvis der følger et kabel med
produktet:
2. For enkeltfaset tilslutning,skal
ledningerne tilsluttes som
identificeret nedenfor:
• Brunt kabel = L (fase)
• Blåt kabel = N (neutralt)
• Grøn/gul ledning = (E) (Jord)
3. Ved dobbeltfaset tilslutning skal
ledningerne tilsluttes som
identificeret nedenfor:
• Brunt kabel = L1 (fase 1)
• Brunt kabel = L2 (fase 2)
• Blåt kabel = N (neutralt)
• Grøn/gul ledning = (E) (Jord)
4. Ved trefaset tilslutning skal
ledningerne tilsluttes som
identificeret nedenfor:
• Brunt kabel = L1 (fase 1)
• Brunt kabel = L2 (fase 2)
• Brunt kabel = L3 (fase 3)
• Blåt kabel = N (neutralt)
• Grøn/gul ledning = (E) (Jord)
• Skub produktet mod
køkkenvæggen.
• Hægt sikkerhedskæden.
• Justering af ovnen ben
Vibrationer under brug kan
forårsage, at
madlavningsbeholderne flytter sig.
Denne farlige situation kan undgås,
hvis produktet er i vater og
balanceret.
For din egen sikkerheds skyld skal
du sørge for, at produktet er i vater
ved at justere de fire fødder i
bunden ved at dreje dem til venstre
eller og højre og ensrette højden
med arbejdspladen.
Slutkontrol
1. Tilslut produktet til strømmen igen.
2. Kontroller de elektriske funktioner.
Page 87

87 | DA
Bortskaffelse
Bortskaffelse af
transportemballage
Transportemballagen kan være farlig
for børn. Opbevar emballagen et
sikkert sted uden for børns rækkevidde.
Transportemballagen består af
materialer, der kan genbruges. Sorter
dem i henhold til genbrugsanvisninger.
Blænd dem ikke sammen med
husholdningsaffald.
Bortskaffelse af gammelt apparat
Bortskaffelse af et gammelt produkt
skal ske på en miljøvenlig måde.
Maskinen er mærket med WEEE
symbol for bortskaffelsesregler af
elektrisk og elektronisk udstyr. Det
betyder, at produktet skal behandles i
henhold til EU direktivet 2002/96/EC
om genvinding eller bortskaffelse på en
miljøvenlig mode. Kontakt lokale
myndigheder for yderligere information.
Kontakt din lokale forhandler eller
affaldscenter før aflevering samt for at
få yderligere information.
Før bortskaffelsen af produktet skal
netledningen klippes af og dørlåsen
(hvis eksisterer) gøres ubrugelig for at
sikre, at de ikke udgør fare for børn.
Transport
• Behold original emballage til at
transportere produktet. Følg
instruktioner på emballagen. Hvis
du mangler den originale
emballage, pak apparatet i
bobleplast eller tyk pap og tape det
forsvarligt.
• For at sikre, at grillrist og
bradepander ikke ødelægger
ovndøren, placer en stribe pap på
indersiden af døren så det holder
riste på plads. Tape ovndøren til
sidevægge.
• Brug ikke døren eller håndtaget til
at løfte eller flytte apparatet.
BEMÆRK
Placer ikke andre genstande oven
på apparatet. Apparatet skal
transporteres opret.
Vigtigt
Undersøg, om der opstod
eventuelle skader på apparatet
under transporten.
Page 88

88 | DA
4 Forberedelser
Gode råd om
energibesparelser
Brugsanvisningen hjælper dig med at
bruge produktet på en
energibesparende mode:
• Brug mørkfarvet eller emaljebelagt
køkkentøj i ovnen for at forbedre
varmeoverførslen.
• Brug opvarmningen af ovnen hvis
det er påkrævet i brugermanualen
eller kogebogen.
• Undgå at åbne døren under
tilberedning af mad.
• Forsøg at tilberede flere retter på
en gang. Du kan placere to gryder
på grillriste.
• Du kan tilberede flere retter lige
efter hinanden og udnytte ovnens
varme i længere tid.
• Du kan spare energi ved at slukke
ovnen nogle minutter inden retten
er færdig. Åbn ikke ovndøren.
• Optø frosne retter inden
tilberedelsen.
• Brug gryder/pander med låg for
madlavning. Hvis der ikke bruges
låg, stiger energiforbrug firedobbelt.
• Vælg kogepladen/brænderen, der
passer bedst til grydens størrelse.
Vælg altid den rigtige størrelse af
gryden til den tilberedte ret. Store
gryder forbruger mere energi.
• Sørg for at bruge gryder med flade
bunde når du tilbereder mad på
elektriske kogeplader.
Gryder med tyk bund yder bedre
varmeledning. Du kan dermed
spare op til en tredjedel af energien.
• Gryder og pande skal passe til
kogeplader. Bunden af gryden eller
panden bør ikke være mindre end
pladen.
• Hold bunden af gryden og
kogepladen rene. Snavs vil
mindske varmeledningen mellem
kogepladen og bunden af gryden.
• Ved langtidskogning, sluk for
kogepladen 5 eller 10 minutter
inden endt tilberedningstid. Du vil
dermed spare op til 20 % energi
ved udnyttelsen af eftervarmen.
Første anvendelse
Første rengøring af produktet
BEMÆRK
Overfladen kan blive ødelagt af
nogle rengøringsmidler eller
rengøringsmaterialer.
Brug ikke aggressive
rengøringsmidler,
skurepulver/rensemælk eller nogle
skarpe genstande.
1. Fjern al emballage.
2. Tør produktets overflader med en
fugtig klud eller svamp og tør med
en klud.
Første opvarmning
Varm ovnen op i ca. 30 minutter, og
sluk så for det. På den måde vil
produkter anvendt til beskyttelse blive
brændt og fjernet.
ADVARSEL
Varme overflader kan forårsage
forbrændinger!
Berør ikke enhedens varme
overflader. Hold børn væk fra
enheden og brug ovnhandsker.
Page 89
89 | DA
Elektrisk ovn
1. Tag alle bageplader og riste ud af
ovnen.
2. Luk ovndøren.
3. Vælg indstillingen "Statisk"
4. Vælg den højeste grilltemperatur.
Se Brug af den elektriske ovn,
side 92.
5. Lad ovnen køre i ca. 30 minutter.
6. Sluk for ovnen; se Brug af den
elektriske ovn, side 92
Grill
1. Tag alle bageplader og riste ud af
ovnen.
2. Luk ovndøren.
3. Vælg den højeste grilltemperatur.
Se Betjening af grillen, side 96.
4. Lad den køre i ca. 30 minutter.
5. Sluk for grillen; se Betjening af
grillen, side 96
Kogeplade
1. Evt. produktionsrester eller
beskyttelseslag skal brændes af
inden den første anvendelse. Tænd
for kogepladen ved
mellemtemperatur i 8 minutter inden
du stiller en gryde på den. Der må
ikke placeres beholdere eller gryder
på kogepladen under denne
procedure.
Vigtigt
Der kan afgives lugt og røg under
den første opvarmning. Sørg for
god ventilation.
Page 90

90 | DA
5 Brug af kogepladen
Generelle informationer om
madlavning
FARE
Risiko for brand ved
overophedet olie!
Hvis du varmer olie, må du ikke
efterlade det uden opsyn.
Forsøg aldrig at slukke ilden
med vand! Hvis der er gået ild i
olien, skal man straks tildække
gryden eller panden med et låg.
Sluk for kogepladen, hvis det er
sikkert, og ring til brandvæsnet.
• Inden mad steges, skal de altid
tørres godt og placeres forsigtigt
ned i den varme olie. Sørg for
komplet optøning af frossen mad
inden stegning.
• Tildæk ikke beholderen, du bruger,
når der varmes olie.
• Placer pander og gryder på en
måde, så deres håndtag ikke er
over kogepladen for at forhindre
opvarmning af håndtagene. Undlad
at placere ubalancerede og
beholdere, der nemt vælter, på
komfuret.
• Undlad at placeres tomme gryder
og pander på kogezoner, der er
tændt. De kan blive ødelagt.
• Betjening af en kogezone uden en
gryde eller pande på den vil
forårsage skade på produktet. Sluk
for kogezonerne, når
madlavningen er afsluttet.
• Da produktets overflade kan være
varm, skal der ikke sættes plasticog aluminiumsbeholdere på det.
Sådanne beholdere bør heller ikke
bruges til opbevaring af mad.
• Brug kun fladbundede gryder eller
pander.
• Put en passende mængde mad i
gryder eller pander. Så behøver du
ikke lave unødvendig rengøring,
idet du hermed forhindrer maden i
at koge over.
Put ikke gryde- eller pandelåg på
kogezonerne.
Placer gryderne på en sådan måde,
at de står midt på kogezonen. Når
du vil flytte gryden hen på en
anden kogezone, så løft den og
placer den på den kogezone, du vil,
istedet for at lade den glide.
Anvendelse af komfuret
1 Varmeplade 14-16 cm
2 Varmeplade 18-20 cm
3 Varmeplade 14-16 cm
4 Varmeplade 18-20 cm er en liste
over anbefalet diameter for gryder,
der bruges på de relaterede
brændere.
Page 91

91 | DA
Anvendelse af kogeplader
Komfurets knapper kan drejes i begge
retninger på en måde, der giver
temperaturbetjeningen i trin.
BEMÆRK
Hvis komfuret er udstyret med
varmeplader med Boosterfunktion,
vil den relevante kogeplade være
markeret med en rød prik.
Overophedningsbeskyttelse
1000 Kogeplader med en effekt på
over 1000 W er udstyret med en
overophedningsbeskyttelse.
Overophedningsbeskyttelsen reducerer
kogepladens effekt i følgende tilfælde:
• Der er ingen gryde eller pande på
kogepladen.
• Der er en tom gryde eller pande på
kogepladen.
• Bunden på gryden eller panden er
ikke flad.
Tænd for kogepladerne
Brug kogepladernes knapper til at
betjene kogepladerne. Flyt
kogepladernes knapper til det
relevante niveau for at opnå det
ønskede madlavningsniveau.
Madlavningsniveau 1 2 —3 4 — 6
varmer
koger,
hviler
koger,
steger
Sluk for kogepladerne
Drej kogeplade knappen til OFF
(øverst) position.
Page 92

92 | DA
6 Betjening af ovnen
Generelle informationer om
bagning, stegning og grillning
FARE
Risiko for skoldning af varm
damp!
Vær opmærksom på, at der ved
åbning af ovnlågen kan udslippe
damp.
Tips til bagning
• Anvend egnede metalplader,
aluminiumsbeholdere eller
varmebestandige silikone form
med non-stick belægning.
• Udnyt pladsen på
bagepladestativet bedst muligt.
• Det anbefales at placere
bageformen midt på stativet.
• Vælg den rette hylde før du tænder
for ovnen eller grillen - flyt ikke
ovnhylderne når de er varme.
• Hold ovnlågen lukket.
Tips om stegning
• Krydring med citronsaft og sort
peber vil forbedre
madlavningspræstationen ved
stegning af en hel kylling, kalkun
eller et stort stykke kød.
• Det tager omkring 15 til 30 minutter
længere at koge kød med ben i
forhold til en steg på samme
størrelse, men uden ben.
• Regn med ca. 4-5 minutters koge/stegetid pr. cm af kødets højde.
• Lad kødet hvile i ovnen i omkring
10 minutter efter, det er stegt.
Saften fordeles bedre over hele
stegen og løber ikke ud, når kødet
skæres.
• Fisk i et ildfast fad skal placeres på
ovnens nederste eller midterste
rille.
Tips om grillning
Grill er ideelt til tilberedning af kød, fisk
og fjerkræ, og giver en dejlig brun
overflader uden at udtørre for meget.
Flade stykker, kødspyd og pølser er
specielt velegnede til grill samt
grøntsager med et højt vandindhold
som f.eks. tomater og løg.
• Fordel stykkerne, der skal grilles,
på grillristen eller på grillristen på
en bradepande på en sådan måde,
at de ikke kommer ud over
varmelegemets dimensioner.
• Skub grillristen eller bradepanden
ind i ovnen på det ønskede niveau.
Hvis der grilles på grillristen, så
placer en dryppande underneden
for at samle fedtet op.
• Tilføj noget vand i dryppanden for
nemmere rengøring.
BEMÆRK
Brandfare pga. mad, der er
uegnet til at grille!
Brug kun mad til grill, der er egnet
til intensiv grillvarme.
Placer ikke maden alt for langt
tilbage i grillen. Det er det varmeste
areal og fedtholdig mad kan
antændes.
Brug af den elektriske ovn
Vælg temperatur og betjeningsmåde
1 Funktionsdrejeknap
Page 93

93 | DA
2 Termostatdrejeknap
Betjeningsmåderne for den elektriske
ovn vælges med funktionsknappen.
Temperaturen justeres med
termostatknappen.
Alle ovnfunktioner slukkes ved at sætte
den relevante knap på slukket (øverste)
position.
1. Indstil termostatknappen på den
ønskede temperature.
2. Indstil funktionsknappen på den
ønskede betjeningsmåde.
» Ovnen varmer op til den justerede
temperatur og holder den. Under
opvarmning forbliver temperaturlampen
tændt.
Sluk for den elektriske ovn
Drej funktions- og termostatknappen
hen på slukket position (øverst).
Hyldeskinnepositioner (závisí na
modelu)
Det er vigtigt at placere trådgrillen
korrekt over trådhylden. Trådgrillen
skal placeres, så den passer i
trådhyldens åbning som illustreret på
figuren.
Betjeningsmodus
Rækkefølgen af betjeningsmodus der
er vist her, kan afvige fra
arrangementet på dit produkt.
Over- og undervarme
Over- og undervarme er
tændt. Maden opvarmes på
samtidigt på over- og
underside. Egnet til f.eks.
kager, småkager eller kager
og gryderetter i bageforme.
Madlavning med kun en
plade.
Over- og undervarme med
konvektionsluft
Over- og undervarme plus
ventilator (i bagvæggen) er
tændt. Den varme luft fordeles
jævnt og hurtigt overalt i
ovnen af blæseren.
Madlavning med kun en
plade.
Overvarme og konvektionsluft
Overvarme plus ventilator (i
bagvæggen) er tændt. Varm
luft spredes mere jævnt med
blæseren i forhold til kun
overvarme.
Undervarme og konvektionsluft
Undervarme plus ventilator (i
bagvæggen) er tændt. Varm
luft spredes mere jævnt med
blæseren i forhold til kun
undervarme.
K
ører med ventilato
r
Ovnen er ikke opvarmet. Kun
blæseren (i bagvæggen)
kører. Frossen grynet mad
tøes langsomt op ved
rumtemperatur og tilberedt
med køles ned.
Page 94

94 | DA
Overflade grill
Den store grill (under
ovnloftet) kører. Egnet for
grillning af større mængder.
• Put store eller
mellemstore portioner på
korrekt hyldeposition
under grillvarmeren for
grillning.
• Sæt temperaturen på
højeste niveau.
• Drej maden, når
halvdelen af grilltiden er
gået.
Grill med konvektionsluft
Grilleffekten er ikke så stærk
som med normal grillning.
• Put små eller
mellemstore portioner på
korrekt hyldeposition
under grillvarmeren for
grillning.
• Sæt temperaturen på
højeste niveau.
• Drej maden, når halvdelen
af grilltiden er gået.
Tabel over koge-/stegetider
Vigtigt
Værdierne, der er angivet, er blevet
fastlagt i laboratoriet. Værdierne,
der er passende for dig, kan afvige
fra disse værdier.
Bagning og stegning
Vigtigt
Niveau 1 er bundniveauet i ovnen.
Opskrift Funktion Forvarme
Ribbe (fra
bunden)
Temperatur
(°C)
Tid (min) Tilbehør
Kager med
hævemiddel
OVER-
/UNDERVARME
Ja 3 175 20 - 35 bradepande
VARMLUFT Ja 1 - 5 175 15 - 30
Ribbe 5: dyb bradepande
Ribbe 1: bradepande
Småkager
OVER-
/UNDERVARME
Ja 3 175 20 - 40 bradepande
VARMLUFT Ja 1 - 5 175 20 - 35
Ribbe 5: dyb bradepande
Ribbe 1: bradepande
Pizza
OVER-
/UNDERVARME
Ja 2 225 12 - 20 bradepande
VARMLUFT Ja 1 - 5 225 15- 30
Ribbe 5: dyb bradepande
Ribbe 1: bradepande
Sukkerbrødskage
OVER-
/UNDERVARME
Ja 3 200 5-15 Ribbe 3: kageform på rist
VARMLUFT Ja 1 - 5 175 10-25
Ribbe 5: kageform på rist
Ribbe 1: kageform på rist
Grøntsagstærter,
quiche
VARMLUFT Ja 2 175 - 200 30 - 50 kageform på rist
VARMLUFT Ja 1 - 3 175 - 200 35 - 55
Ribbe 3: kageform på rist
Ribbe 1: kageform på rist
Lasagne
OVER-
/UNDERVARME
Ja 2 - 3 200 30 - 45 Fad på rist
Page 95

95 | DA
Lam/kalv/okse/svin 1
kg
VARMLUFT - 3
25 min på 250,
derefter på 180 -
190
80 - 120 bradepande eller fad på rist
Kalkun/gås 3 kg VARMLUFT - 2
25 min på 250,
derefter på 180 -
190
140 - 210 bradepande eller fad på rist
Stegt kylling 1-1,3 kg VARMLUFT - 2
15 min på 250,
derefter på 180 -
190
55 - 70
Ribbe 2: rist (vend om
nødvendigt maden, når 2/3 af
tilberedningstiden er gået) +
Pyrex
Ribbe 1: bradepande med
vand
Lammekølle/skank VARMLUFT - 3
25 min på 250,
derefter på 180 -
190
60 - 90
bradepande eller fad på rist
(vend om nødvendigt maden,
når 2/3 af tilberedningstiden er
gået)
Fiskefileter/-koteletter VARMLUFT - 3 200 10 - 25
Ribbe 3: rist (vend maden, når
halvdelen af tilberedningstiden
er gået) / bradepande
Ribbe 2: bradepande med
vand
Fiskefileter/-koteletter GRILL Ja 4 / 5 200 - 225 20 - 30
Ribbe 4/5: rist (vend maden,
når halvdelen af
tilberedningstiden er gået)
Ribbe 3: bradepande med
vand
Roastbeef - rød GRILL Ja 4 / 5 200 - 225 25 - 35
fad på rist (vend om
nødvendigt maden, når 2/3 af
tilberedningstiden er gået)
Ristet brød GRILL Ja 4 200 - 225 1 - 4 rist
Medisterpølse/grillsp
yd/spareribs/hakkebø
f
GRILL Ja 5 200 - 250 20 - 40
Ribbe 5: rist (vend maden, når
halvdelen af tilberedningstiden
er gået)
Ribbe 4: bradepande med
vand
Gratinerede
grøntsager
GRILL Ja 3 200 10 - 20 fad på rist
Tiderne i tabellen er vejledende. Tilberedningstiderne kan variere afhængigt af retten og madstykkerne.
Når der grilles, anbefales det at undlade at anbringe mad på ristens forreste del (6-7 cm).
Det anbefales at vende grillet kød, når halvdelen af tilberedningstiden er gået.
Hvis madlavningen kræver en
forvarmet ovn, så forvarmes der i
starten af madlavningen, indtil
termostatlampen slukker.
Tips til at bage kager
• Hvis kagen er for tør, forøg
temperaturen ca. 10°C og forkort
bagetiden.
• Hvis kagen er fugtig, brug mindre
væske eller sænk temperaturen
med 10°C.
• Hvis kagen er for mørk ovenpå,
placer den på en lavere hylde,
sænk temperaturen og forøg
bagetiden.
• Hvis den er bagt godt indvendigt
med klistret uden, brug mindre
væske, sænk temperaturen og
forøg bagetiden.
Tips til bagning af butterdej
• Hvis butterdejen er for tør, forøg
temperaturen ca. 10°C og nedsæt
bagetiden. Fugt dejlagene med en
sovs lavet af mælk, olie, æg og
youghurt.
• Hvis det tager for lang tiden at
bage butterdejen, sørg for at
Page 96

96 | DA
butterdejens tykkelse ikke går ud
over bakkens dybde.
• Hvis den øverste side af
butterdejen brunes, men den
nederste del ikke bages, så sørg
for, at mængden af sovs, du har
brugt til butterdejen, ikke er for stor
på butterdejens bund. Prøv at
sprede sovsen jævnt mellem
dejlagene og ovenpå på
butterdejen for en jævn bruning.
Vigtigt
Bag butterdejen i
overensstemmelse med de
anvisninger og den temperatur, der
står i bagetabellen. Hvis den
nederste del stadig ikke brunes
nok, skal den placeres på hylden et
trin længere nede i ovnen næste
gang.
Tips til tilberedning af grøntsager
• Hvis grøntsagsretten løber tør for
saft og bliver for tørt, skal den
tilberedes i en pande med låg i
stedet for i en bakke. Lukkede
beholdere vil holde på rettens saft.
• Hvis en grøntsagsret ikke bliver
tilberedt, skal grøntsagerne koges
på forhånd eller tilberedes som
dåsemad og derefter puttes i
ovnen.
Betjening af grillen
ADVARSEL
Varme overflader kan forårsage
forbrændinger!
Luk ovnlågen under grillning.
Tænd for grillen
1. Sæt funktionsknappen på
grillsymbolet.
2. Sæt så den ønskede grillindstilling.
3. Forvarm i omkring 5 minutter, hvis
det er nødvendigt.
» Termostatlampen er tændt.
Sluk for grillen
1. Drej grillbetjeningsknappen til
slukket position (øverst).
Hyldeskinnepositioner
For at grillen skal dække maksimalt,
skal trådhylden placeres mod ovnens
forside, således at den ikke kontakter
glasdøren. Hvis trådhylden placeres
helt mod ovnens bagside, bliver
grillens dækkeevne reduceret.
Page 97

97 | DA
7 Vedligeholdelse og pleje
Generelle informationer
Produktets levetid øges og frekvente
problemer vil nedsættes, hvis produktet
rengøres med regelmæssige intervaller.
FARE
Risiko for elektrisk stød!
A
fbryd elektriciteten før rengøring
af apparatet for at undgå elektrisk
stød.
FARE
Varme overflader kan forårsage
forbrændinger!
Lad enheden køle ned, før du
rengør den.
• Rengør produktet grundigt efter
hver brug. På den måde vil det
være muligt at fjerne
madlavningsrester nemmere, og
på den måde undgå, at de
brænder på næste gang, komfuret
bruges.
• Der skal ikke bruges specielle
rengøringsmidler for at rengøre
enheden. Brug varmt vand med
opvaskemiddel, en blød klud eller
svamp til at rengøre produktet og
tør det efter med en tør klud.
• Sørg altid for, at al overskydende
væske bliver tørret grundigt af efter
rengøring og at spild bliver tørret af
straks.
• Undlad at bruge rengøringsmidler,
der indeholder syre eller klor, til at
rengøre rustfri stål overflader og
håndtaget. Brug en blød klud med
et flydende rengøringsmiddel (ikke
skurende) til at tørre disse dele
rene, idet man skal være
opmærksom på kun at tørre i én
retning.
BEMÆRK
Overfladen kan blive ødelagt af
nogle rengøringsmidler eller
rengøringsmaterialer.
Brug ikke aggressive
rengøringsmidler,
skurepulver/rensemælk eller nogle
skarpe genstande.
Vigtigt
Brug ikke damprensere til
rengøring.
Rengør omkring blusset.
Elektriske plader
1. Sluk for kogepladerne og vent, til de
køler ned.
2. Om nødvendigt, rengør pladerne
med en rengøringsmiddel (du kan
købe
rengøringsmindler/blødgøringsmidle
r i specialbutikker).
3. Varm kun op i et par minutter efter
rengøring for at få topsektionen
tørret.
4. Påsmør regelmæssigt et tyndt lag
maskinolie på kogepladens øverste
overflade for at beskytte den.
Rengøring af kontrolpanel
Rengør kontrolpanelet og taster med
en våd klud og tør dem af.
Page 98

98 | DA
BEMÆRK
Beskadigelse af betjeningspanelet!
Tag ikke betjeningsknapperne af
for at rengøre betjeningspanelet.
Rengøring af ovnen
Der kræves ikke noget
ovnrengøringsmiddel eller specielt
rengøringsmiddel til at rengøre ovnen.
Det anbefales at tørre ovnen med en
fugtig klud, mens den stadig er varm.
For rengøring af siden,
1. Tag frontsektion af sidestativet ud
ved at trække det i modsat retning
af sidevæggen.
2. Tag sidestativet helt ud ved at
trække det mod dig selv.
Rens ovnlågen
Brug ikke skrappe skurerensemidler
eller skarpe metalgenstande til at rense
ovnlågen; disse midler kan ridse
overfladen og ødelægge glasset.
Skille ovnlågen ad
1. Åbn frontlågen.
2. Åbn klemmerne på hængselboksen
på højre og venstre sider af
frontlågen ved at trykke dem ned
som illustreret på figuren.
1 Frontlåge
2 Hængsel
3 Ovn
3. Flyt frontlågen til halvvejs.
4. Tag frontlågen af ved at trække den
opad for at løsne den af de højre og
venstre hængsler.
BEMÆRK
De trin, der blev udført under
processen med at fjerne, skal
foretages i modsat rækkefølge (trin
4, 3, 2 og 1) for at montere dækslet
igen. Husk at lukke klemmerne på
hængselsboksen, når lågen
installeres igen.
Udskiftning af ovnpære
FARE
Varme overflader kan forårsage
forbrændinger!
Sørg for at apparatet er slukket og
kølet ned for at undgå risikoen for
et elektrisk stød.
Page 99

99 | DA
Vigtigt
Lampen består af en speciel pære,
der kan tåle opvarmning op til
300 °C. Se Tekniske
specifikationer, side 79 for detaljer.
Pæren kan fås hos autoriserede
serviceagenter.
BEMÆRK
Lampens position kan variere fra
den viste.
Hvis din ovn er udstyret med en
rund lampe:
1. Afbryd produktet fra lysnettet.
2. Drej glasdækslet mod uret for at
fjerne det.
3. Fjern ovnpæren ved at dreje den
mod uret og skift den ud.
4. Sæt glasdækslet tilbage på plads.
Page 100

100 | DA
8 Fejlafhjælpning
Ovnen udlede damp, når den er i brug.
Vigtigt
Det er normalt, at der kommer
damp ud under betjening. Dette er
ikke en fejl.
Produktet afgiver metallyde, under opvarmning og afkøling.
Vigtigt
Når metaldelene varmes op, kan
de udvide sig og lave lyde. Dette er
ikke en fejl.
Produktet virker ikke.
• Hovedsikringen er defekt eller er slået fra. >>> Kontroller sikringerne i
sikringsskabet. Udskift eller nulstil dem, hvis det er nødvendigt.
• Produktet er ikke sat i stikkontakten (jordforbundet). >>> Kontroller stikkets
tilslutning.
Ovnlyset virker ikke.
• Ovnlampen er defekt. >>> Udskift ovnlampen.
• Strømmen er afbrudt. >>> Kontroller om der er strøm. Kontroller sikringerne i
sikringsskabet. Udskift eller nulstil dem, hvis det er nødvendigt.
Ovnen varmer ikke.
• Funktion og/eller Temperatur er ikke indstillet. >>> Indstil funktion og
temperatur med knappen/tasten Funktion og/eller Temperatur.
• Strømmen er afbrudt. >>> Kontroller om der er strøm. Kontroller sikringerne i
sikringsskabet. Udskift eller nulstil dem, hvis det er nødvendigt.
Vigtigt
Konsulter den autoriserede
servicemand eller forhandler, hvor
du har købt produktet, hvis du ikke
kan afhjælpe problemet, selv om
du har udført instruktionerne i dette
afsnit. Forsøg aldrig selv at
reparere et defekt produkt.
 Loading...