

Whirlpool 8ED0WTKXKT, 8ED0GTKXKT, 8ED0GTKXKQ Owner's Manual

SIDE BY SIDE REFRIGERATOR
Use & Care Guide
2308045

TABLE OF CONTENTS
REFRIGERATOR SAFETY .............................................................3
Proper Disposal of Your Old Refrigerator....................................3
INSTALLATION INSTRUCTIONS..................................................4
Unpack the Refrigerator...............................................................4
Location Requirements................................................................ 4
Electrical Requirements ...............................................................5
Base Grille ....................................................................................5
Refrigerator Doors........................................................................6
Adjust the Doors...........................................................................7
Connect the Water Supply...........................................................8
Prepare the Water System...........................................................8
Normal Sounds ............................................................................8
REFRIGERATOR USE....................................................................8
Ensuring Proper Air Circulation....................................................8
Using the Controls .......................................................................9
Adjusting Control Settings ...........................................................9
Water and Ice Dispensers..........................................................10
Water Filter Status Light.............................................................11
Water Filtration System..............................................................11
Ice Maker and Storage Bin ........................................................12
REFRIGERATOR FEATURES ......................................................13
Refrigerator Shelves...................................................................13
Flip-up Shelf ...............................................................................14
Adjustable Flip-up Shelf.............................................................14
Deli Drawer.................................................................................14
Convertible Vegetable/Meat Drawer, Crisper and Covers........14
Convertible Vegetable/Meat Drawer Temperature Control.......14
Crisper Humidity Control ...........................................................15
Wine or Can/Bottle Rack ...........................................................15
Utility Bin ....................................................................................15
FREEZER FEATURES..................................................................15
Freezer Shelf ..............................................................................15
Freezer Basket or Bin.................................................................15
DOOR FEATURES........................................................................16
Door Rails...................................................................................16
Can Racks and Door Bins..........................................................16
REFRIGERATOR CARE ...............................................................16
Cleaning......................................................................................16
Changing the Light Bulbs...........................................................17
Power Interruptions....................................................................18
Holiday and Moving Care ..........................................................18
TROUBLESHOOTING ..................................................................19
ASSISTANCE OR SERVICE.........................................................22
Accessories................................................................................22
WARRANTY ..................................................................................24
2
REFRIGERATOR SAFETY
Your safety and the safety of others are very important.
We have provided many important safety messages in this manual and on your appliance. Always read and obey all safety
messages.
This is the safety alert symbol.
This symbol alerts you to potential hazards that can kill or hurt you and others.
All safety messages will follow the safety alert symbol and either the word “DANGER” or “WARNING.”
These words mean:
You can be killed or seriously injured if you don't immediately
DANGER
WARNING
All safety messages will tell you what the potential hazard is, tell you how to reduce the chance of injury, and tell you what can
happen if the instructions are not followed.
IMPORTANT SAFETY INSTRUCTIONS
To reduce the risk of fire, electric shock, or injury to persons when using your refrigerator, follow these basic
WARNING:
precautions:
■ Plug into a grounded (earthed) outlet.
■ Do not remove ground prong.
■ Do not use an adapter.
■ Do not use an extension cord.
■ Disconnect power before servicing.
■ Replace all panels before operating.
■ Remove doors from your old refrigerator.
■ Use nonflammable cleaner.
■ Keep flammable materials and vapors, such as gasoline,
away from refrigerator.
■ Use two or more people to move and install refrigerator.
SAVE THESE INSTRUCTIONS
follow instructions.
can be killed or seriously injured if you don't
You
instructions.
■ Disconnect power before installing ice maker (on ice maker
kit ready models only).
■ Use a sturdy glass when dispensing ice or water (on some
models).
■ The appliance is not intended for use by young children or
infirm persons without supervision.
■ Young children should be supervised to ensure that they
do not play with the appliance.
■ If the supply cord is damaged, it must be replaced by the
manufacturer, its service agent or similar qualified persons
in order to avoid a hazard.
follow
Proper Disposal of Your Old Refrigerator
WARNING
Suffocation Hazard
Remove doors from your old refrigerator.
Failure to do so can result in death or brain damage.
IMPORTANT: Child entrapment and suffocation are not problems
of the past. Junked or abandoned refrigerators are still dangerous
– even if they will sit for “just a few days.” If you are getting rid of
your old refrigerator, please follow these instructions to help
prevent accidents.
Before you throw away your old refrigerator or freezer:
■ Take off the doors.
■ Leave the shelves in place so that children may not easily
climb inside.
3

INSTALLATION INSTRUCTIONS
Unpack the Refrigerator
WARNING
Excessive Weight Hazard
Use two or more people to move and install
refrigerator.
Failure to do so can result in back or other injury.
Remove the Packaging
■ Remove tape and glue residue from surfaces before turning
on the refrigerator. Rub a small amount of liquid dish soap
over the adhesive with your fingers. Wipe with warm water
and dry.
■ Do not use sharp instruments, rubbing alcohol, flammable
fluids, or abrasive cleaners to remove tape or glue. These
products can damage the surface of your refrigerator. For
more information see “Refrigerator Safety.”
When Moving Your Refrigerator:
Your refrigerator is heavy. When moving the refrigerator
for cleaning or service, be sure to protect the floor.
Always pull the refrigerator straight out when moving it.
Do not wiggle or “walk” the refrigerator when trying to move
it, as floor damage could occur.
Location Requirements
WARNING
Explosion Hazard
Keep flammable materials and vapors, such as
gasoline, away from refrigerator.
Failure to do so can result in death, explosion, or fire.
To ensure proper ventilation for your refrigerator, allow for ¹⁄₂"
(1.25 cm) space on each side and at the top. When installing your
refrigerator next to a fixed wall, leave 2" (5.08 cm) minimum on
each side (depending on your model) to allow for the door to
swing open. If your refrigerator has an ice maker, allow extra
space at the back for the water line connections.
NOTE: Do not install the refrigerator near an oven, radiator, or
other heat source, nor in a location where the temperature will fall
below 55°F (13°C).
Clean Before Using
After you remove all of the packaging materials, clean the inside
of your refrigerator before using it. See the cleaning instructions
in “Refrigerator Care.”
Important information to know about glass shelves
and covers:
Do not clean glass shelves or covers with warm water when
they are cold. Shelves and covers may break if exposed to
sudden temperature changes or impact, such as bumping.
For your protection, tempered glass is designed to shatter
into many small, pebble-size pieces. This is normal. Glass
shelves and covers are heavy. Use special care when
removing them to avoid impact from dropping.
1
/
2
" (1.25 cm)
2" (5.08 cm)
4
Electrical Requirements
WARNING
Electrical Shock Hazard
Plug into a grounded (earthed) outlet.
Do not remove ground prong.
Do not use an adapter.
Do not use an extension cord.
Failure to follow these instructions can result in death,
fire, or electrical shock.
Before you move your refrigerator into its final location, it is
important to make sure you have the proper electrical
connection:
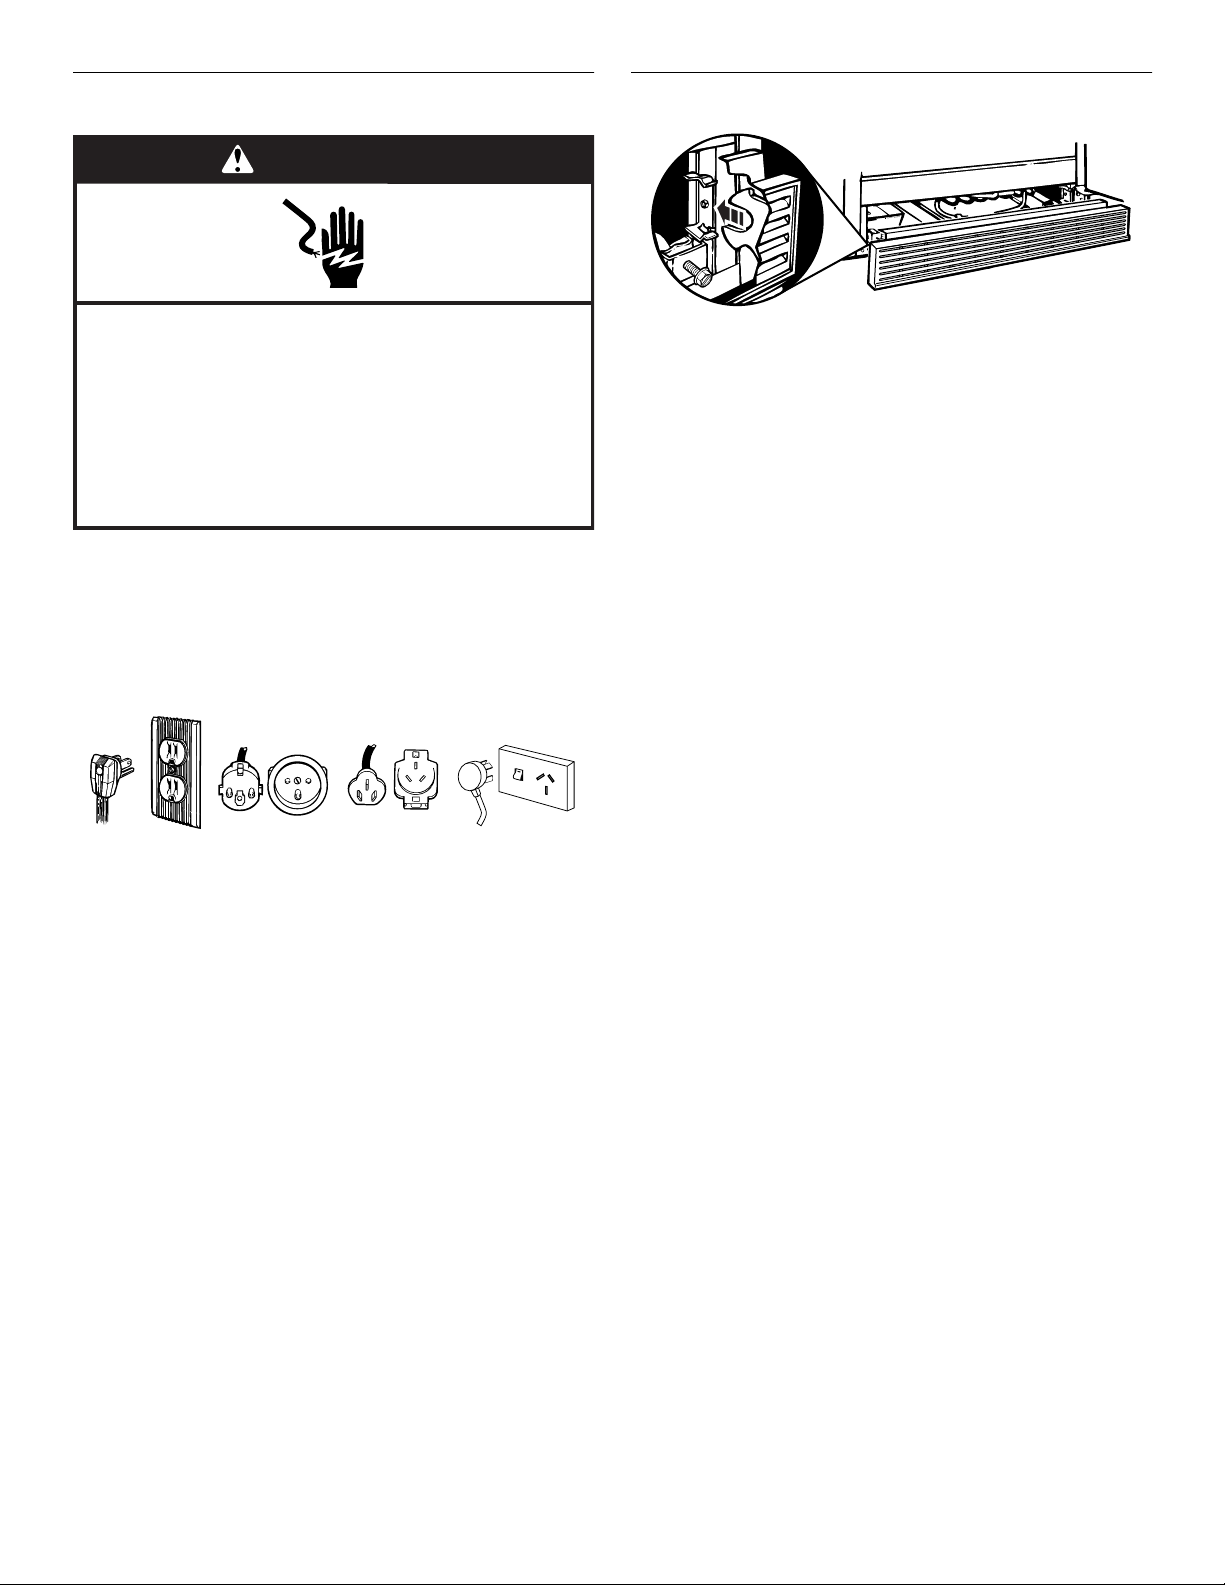
Recommended Grounding Method
A 115 Volt, 60 Hz. (Plug 1), 220/240 Volt/50 Hz (Plugs 2 or 3), or
220 Volt/60Hz (Plug 3) AC only 10 ampere fused and grounded
(earthed) electrical supply is required.
Base Grille
Remove the Base Grille:
1. Open both doors.
2. Place hands along the ends of the grille. Push in on the top of
the base grille and pull up on the bottom.
NOTE: Be sure to refasten the Tech Sheet behind the base grille
after cleaning.
Replace the Base Grille:
1. Open both doors.
2. Line up the grille support tabs with the metal clips.
3. Push the grille firmly to snap it into place.
Plug 1
It is recommended that a separate circuit serving only your
refrigerator be provided. Use an outlet that cannot be turned off
by a switch or pull chain. Do not use an extension cord.
NOTE: Before performing any type of installation, cleaning, or
removing a light bulb, turn the control, (Thermostat, Refrigerator
or Freezer Control depending on the model) to OFF and then
disconnect the refrigerator from the electrical source. When you
are finished, reconnect the refrigerator to the electrical source
and reset the control (Thermostat, Refrigerator or Freezer Control
depending on the model) to the desired setting.
Plug 2
Plug 3
Plug 4
5
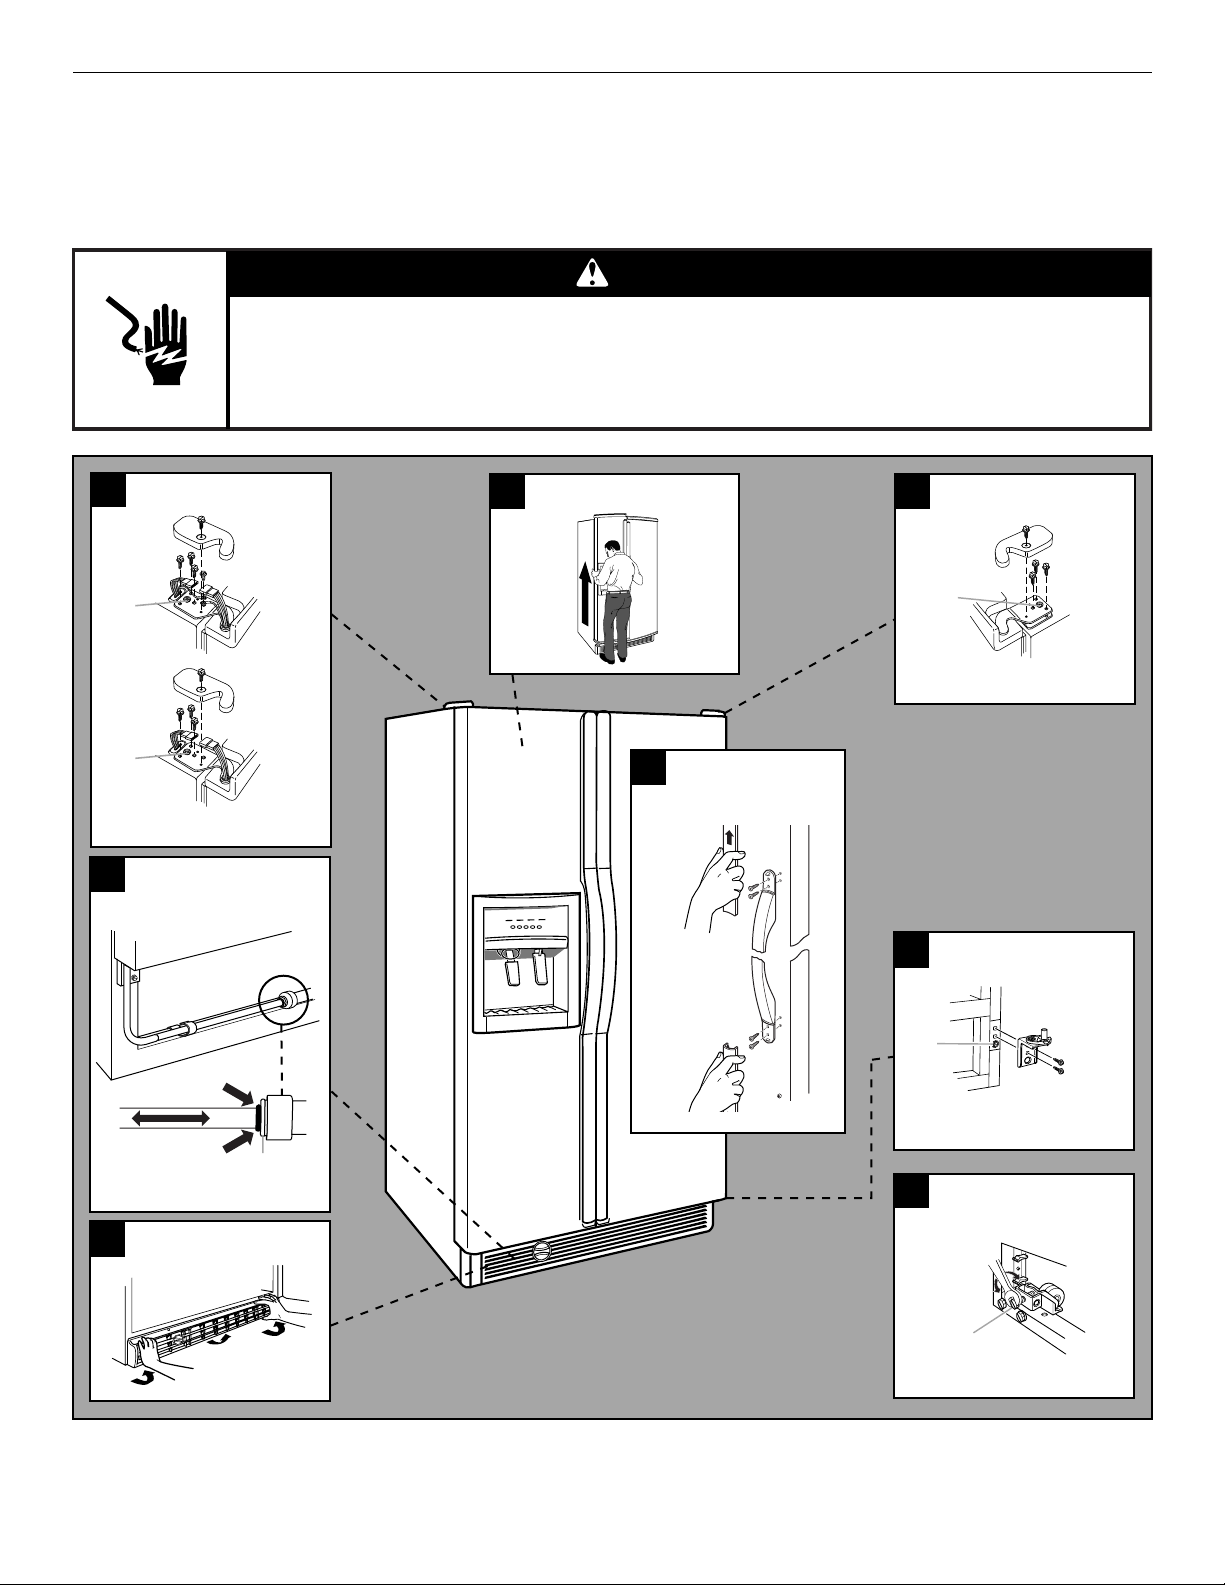
Refrigerator Doors
TOOLS NEEDED: ¹⁄₄" hex-head socket wrench, ⁵⁄₁₆" hex-head socket wrench and a flat-head screwdriver.
IMPORTANT: Before you begin, turn the refrigerator control OFF. Unplug refrigerator or disconnect power. Remove food and any
adjustable door or utility bins from doors.
NOTE: It may only be necessary to remove either the door handle or the doors to get your refrigerator through the doorway of your
home. Measure the door opening to see if you need to remove the refrigerator handles or the doors.
WARNING
Electrical Shock Hazard
Disconnect power before removing doors.
Reconnect both ground wires before operating.
Failure to do so can result in death or electrical shock.
4
Top Left Hinge
Style 1
A
5
Door Removal
6
Top Right Hinge
A
A. Do Not Remove Screw
Style 2
A
A. Do Not Remove Screw
3
Water Dispenser
Tubing Connection
A
A. Face of fitting
2
Base Grille
1
Handle Removal
(Optional)
7
Bottom Hinge
A
A. Do Not Remove Screw
8
Door Alignment
A
A. Leveling Screw
6
Handle Removal (optional)
Door and Hinge Replacement
1. Apply firm pressure with your hand on the face of trim. Slide
top trim up and bottom trim down away from handle. Lift trim
pieces off shoulder screws. See Graphic 1.
NOTE: Some models include accent pieces between the handle
and the handle trim. If your model includes the accents, you will
need to carefully remove them with a flat-head screwdriver
before removing the handle screws. The accent pieces are
optional and can be reinstalled or left off of the handle assembly.
2. Remove handle screws and handles. See Graphic 1.
3. Move refrigerator into place. Replace handles as shown. See
Graphic 1.
Door Removal
WARNING
Electrical Shock Hazard
Disconnect power before removing doors.
Failure to do so can result in death or electrical shock.
1. Replace both bottom hinges, if removed. Tighten screws.
2. Assistance may be needed to feed the water dispenser
tubing through the bottom hinge while reinstalling the freezer
door. Carefully feed the dispenser tubing through the bottom
left hinge before replacing the door on the hinge.
NOTE: Provide additional support for the doors while the top
hinges are being replaced. Do not depend on the door magnets
to hold the doors in place while you are working.
3. Reconnect water dispenser tubing by pushing tubing into
fitting until it stops and black mark touches face of fitting. See
Graphic 3. On some models, replace tubing in hose clip.
4. Align and replace the top left hinge as shown. See Graphic 4.
Tighten screws.
WARNING
Electrical Shock Hazard
Reconnect both ground wires.
Failure to do so can result in death or electrical shock.
1. Unplug refrigerator or disconnect power.
2. Open both refrigerator doors. Remove the base grille by
pulling up on the bottom outside corners. See Graphic 2.
3. Close both doors and keep them closed until you are ready to
lift them free from the cabinet.
4. If you have a dispenser (ice or water), disconnect the water
dispenser tubing located behind the base grille on the freezer
door side. See Graphic 3.
■ Press the red outer ring against the face of fitting and pull
the dispenser tubing free.
■ On some models, remove tubing from hose clip.
5. Remove top left hinge cover and screws as shown. See
Graphic 4. Do not remove Screw A.
6. Disconnect wiring plug and both ground wires. See
Graphic 4.
7. Carefully lift freezer door straight up off bottom hinge. See
Graphic 5. The water dispenser tubing remains attached to
the freezer door and pulls through the bottom left hinge.
Make sure you protect the dispenser tubing from damage.
8. Remove top right hinge cover and screws as shown. See
Graphic 6. Do not remove Screw A.
9. Lift the refrigerator door straight up off bottom hinge.
10. It may not be necessary to remove the bottom hinge to move
the refrigerator through a doorway. Both bottom hinges have
similar construction.
■ Disassemble the hinges as shown. See Graphic 7. Do not
remove Screw A.
5. Reconnect both ground wires.
6. Reconnect wiring plug.
7. Replace left hinge cover and screws.
8. Replace the refrigerator door by carefully lifting the door onto
the bottom right hinge.
9. Align and replace the top right hinge as shown. See
Graphic 6. Tighten screws.
10. Replace hinge cover and screws. Tighten screws.
11. Plug into a grounded (earthed) outlet.
Adjust the Doors
Your refrigerator has two front adjustable rollers — one on the
right and one on the left. If your refrigerator seems unsteady or if
you want the doors to close more easily, adjust the refrigerator's
tilt using the instructions below:
1. Move the refrigerator into its final position.
2. The two leveling screws are part of the front roller assemblies
which are at the base of the refrigerator on either side. See
Graphic 8.
3. Use a screwdriver to adjust the leveling screws. Turn the
leveling screw to the right to raise that side of the refrigerator
or turn the leveling screw to the left to lower that side. It may
take several turns of the leveling screws to adjust the tilt of
the refrigerator. See Graphic 8.
NOTE: Having someone push against the top of the
refrigerator takes some weight off the leveling screws and
rollers. This makes it easier to adjust the screws.
4. Open both doors again and check to make sure that they
close as easily as you like. If not, tilt the refrigerator slightly
more to the rear by turning both leveling screws to the right. It
may take several more turns, and you should turn both
leveling screws the same amount.
5. Replace the base grille.
NOTE: Be sure to refasten the Tech Sheet behind the base grille.
7
Connect the Water Supply
(on some models)
Read all directions carefully before you begin.
IMPORTANT:
■ All installations must be in accordance with local plumbing
code requirements.
■ Contact your dealer or Whirlpool designated service
company for proper installation and parts.
■ Connect to potable water only.
■ Water pressure: 30 to 150 psi (207 KPa - max. 1030 KPa).
■ Install ice maker tubing in areas where temperatures are
above freezing.
■ If operating the refrigerator before installing the water
connection, turn ice maker to the OFF position to prevent
operation without water. See “Water System Preparation.”
■ It may take up to 24 hours for your ice maker to begin
producing ice.
Prepare the Water System
(on some models)
Please read before using the water system.
Immediately after installation, follow the steps below to make
sure that the water system is properly cleaned.
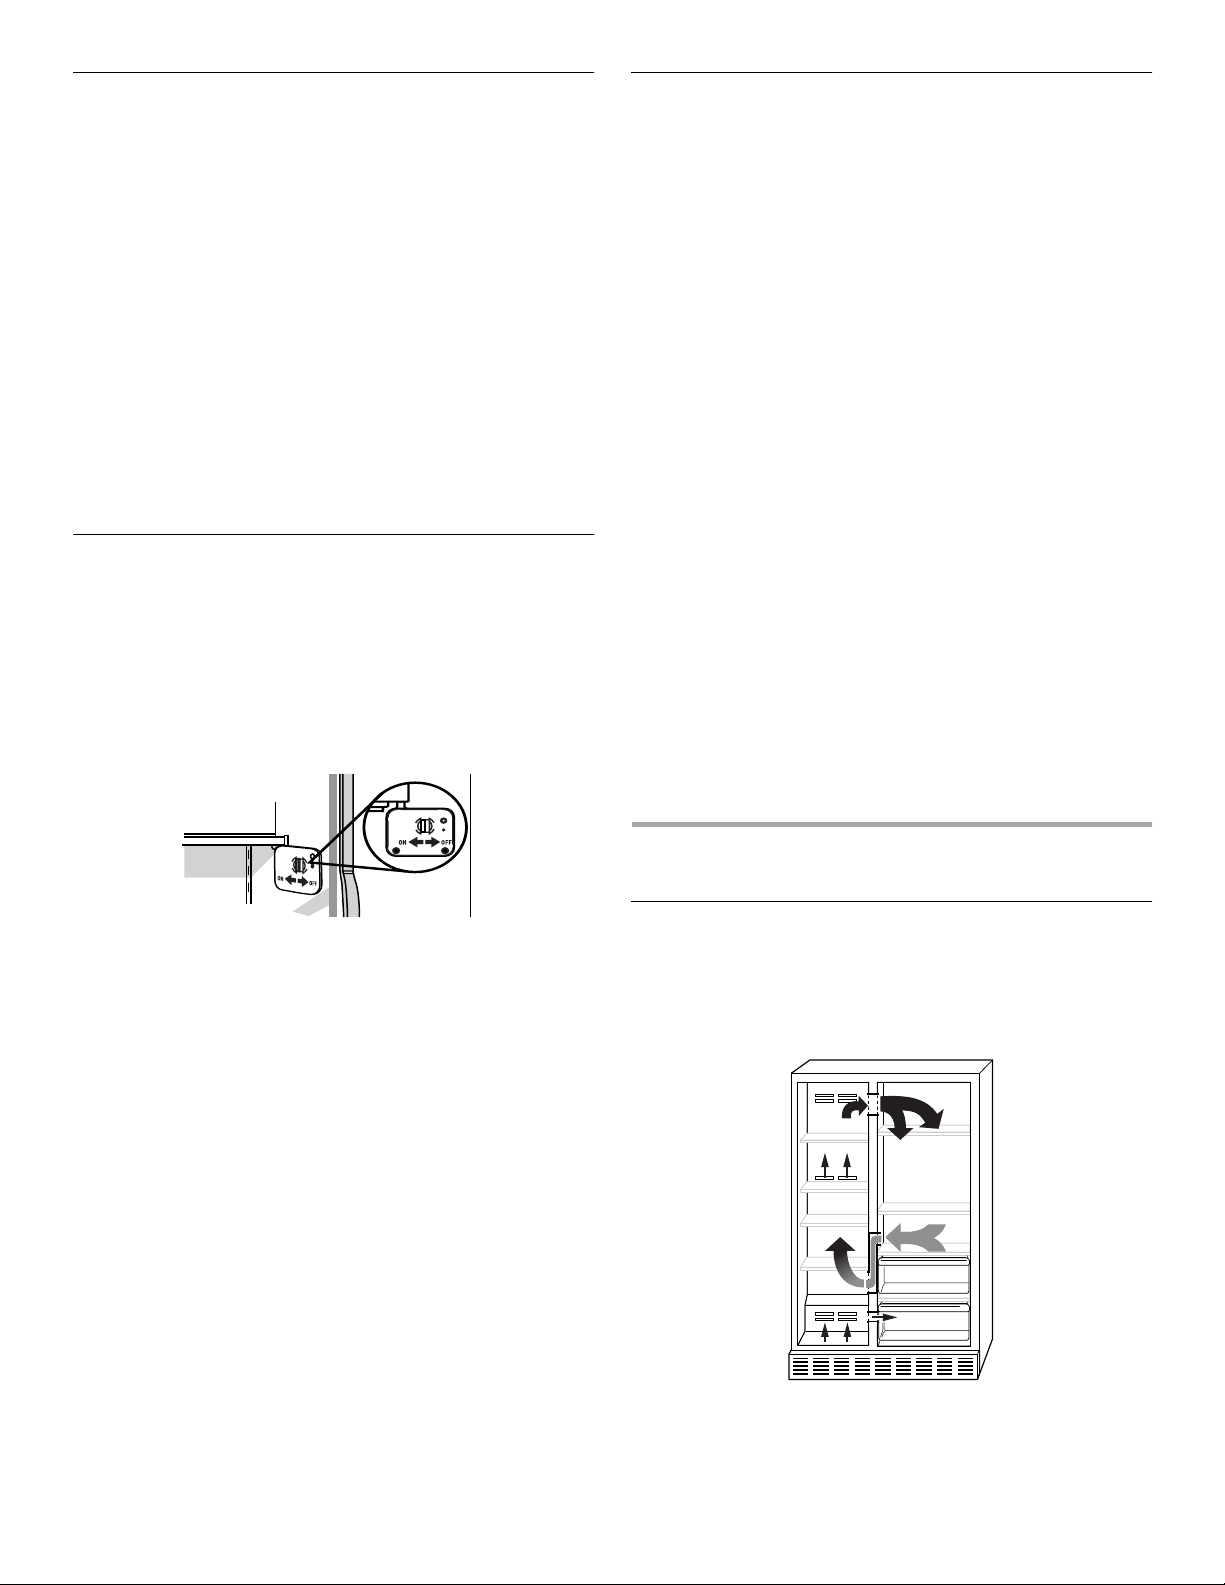
1. Open the freezer door and turn off the ice maker. Move the
switch to the OFF (right) setting as shown. The ON/OFF
switch is located on the top right side of the freezer
compartment.
Normal Sounds
Your new refrigerator may make sounds that your old one didn’t
make. Because the sounds are new to you, you might be
concerned about them. Most of the new sounds are normal. Hard
surfaces, such as the floor, walls, and cabinets, can make the
sounds seem louder. The following describes the kinds of sounds
and what may be making them.
■ If your refrigerator is equipped with an ice maker, you will hear
a buzzing sound when the water valve opens to fill the ice
maker for each cycle.
■ Your refrigerator is designed to run more efficiently to keep
your food items at the desired temperatures and to minimize
energy usage. The high efficiency compressor and fans may
cause your refrigerator to run longer than your old one. You
may also hear a pulsating or high-pitched sound from the
compressor or fans adjusting to optimize performance.
■ You may hear the evaporator fan motor circulating air through
the refrigerator and freezer compartments. The fan speed
may increase as you open the doors or add warm food.
■ Rattling noises may come from the flow of refrigerant, the
water line, or items stored on top of the refrigerator.
■ Water dripping on the defrost heater during a defrost cycle
may cause a sizzling sound.
■ As each cycle ends, you may hear a gurgling sound due to
the refrigerant flowing in your refrigerator.
■ Contraction and expansion of the inside walls may cause a
popping noise.
■ You may hear air being forced over the condenser by the
condenser fan.
■ You may hear water running into the drain pan during the
defrost cycle.
NOTES:
■ If your model has a base grille filter system, make sure the
base grille filter is properly installed and the cap is in the
horizontal position.
■ Do not use with water that is microbiologically unsafe or
of unknown quality without adequate disinfection before
or after the system.
2. Use a sturdy container to depress the water dispenser bar
until the water begins to flow. Flush the water system by
dispensing and discarding 2 to 3 gal. (8 to 12 L) of water.
Cleaning the system will take approximately 6 to 7 minutes
and will help clear air from the line. Additional flushing may be
required in some households.
NOTE: As air is cleared from the system, water may spurt out
of the dispenser.
3. Open the freezer door and turn on the ice maker by moving
the switch to the ON (left) setting. Please refer to the “Ice
Maker and Storage Bin” section for further instructions on the
operation of your ice maker.
Allow 24 hours to produce the first batch of ice. Discard the
first three batches of ice produced.
REFRIGERATOR USE
Ensuring Proper Air Circulation
In order to ensure proper temperatures, you need to permit air to
flow between the two sections. Cold air enters the bottom of the
freezer section and moves up. It then enters the refrigerator
section through the top vent. Air then returns to the freezer as
shown.
Do not block any of these vents with food such as soda, cereal,
bread, etc. If the vents are blocked, airflow will be prevented and
the temperature controls will not function properly.
8
 Loading...