

Page 1
If any components of this unit are broken, do not operate properly, or for product returns,
Phone: 1-800-814-4895 (Outside the U.S. 440-638-3131)
Mail: 20365 Progress Drive, Strongsville, Ohio 44149
E-Mail: CustomerService@WestonProducts.com
All Trademarks and Registered Trademarks are property of the respective companies.
ATTENTION!
please contact Weston Products LLC
Web Site: WestonProducts.com
SAVE THESE INSTRUCTIONS!
Refer to them often and use them to instruct others.
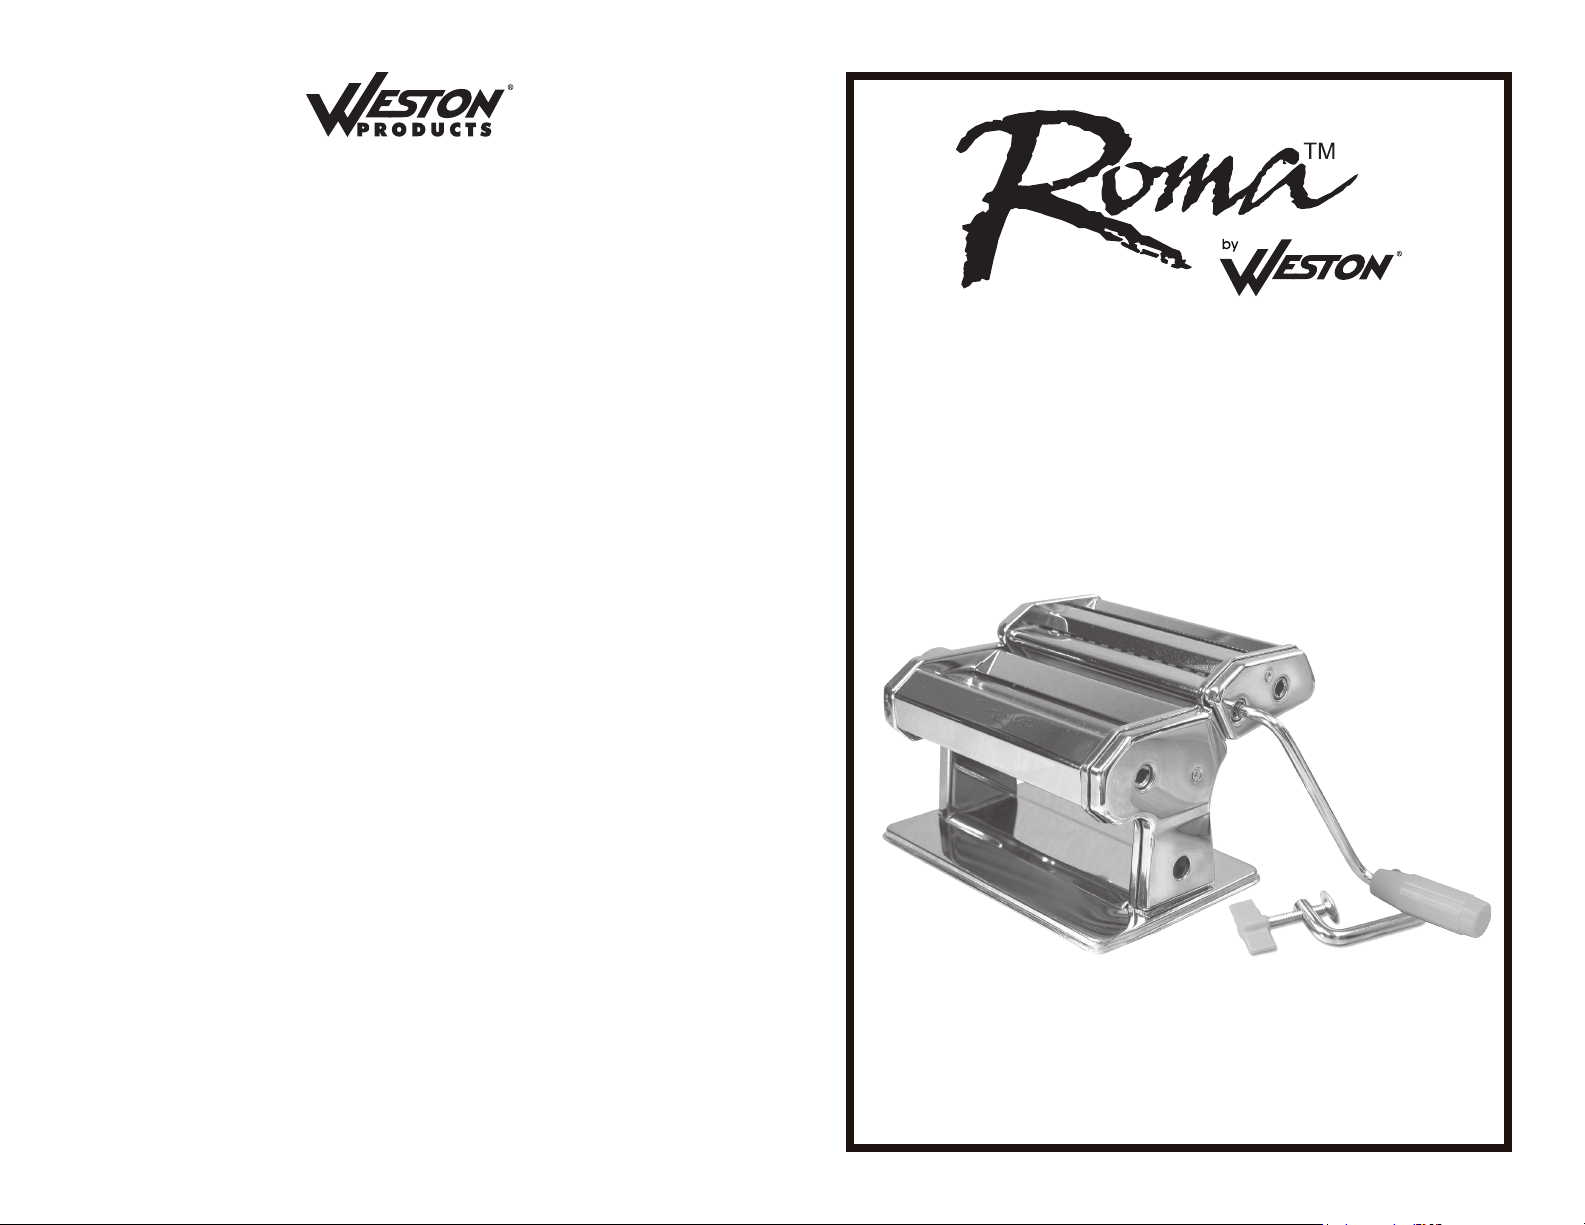
Traditional Style
Pasta Machine
MODEL NO. 01-0201
Due to constant factory improvements, the product pictured
might differ slightly from the product received.
REV062612
Page 2
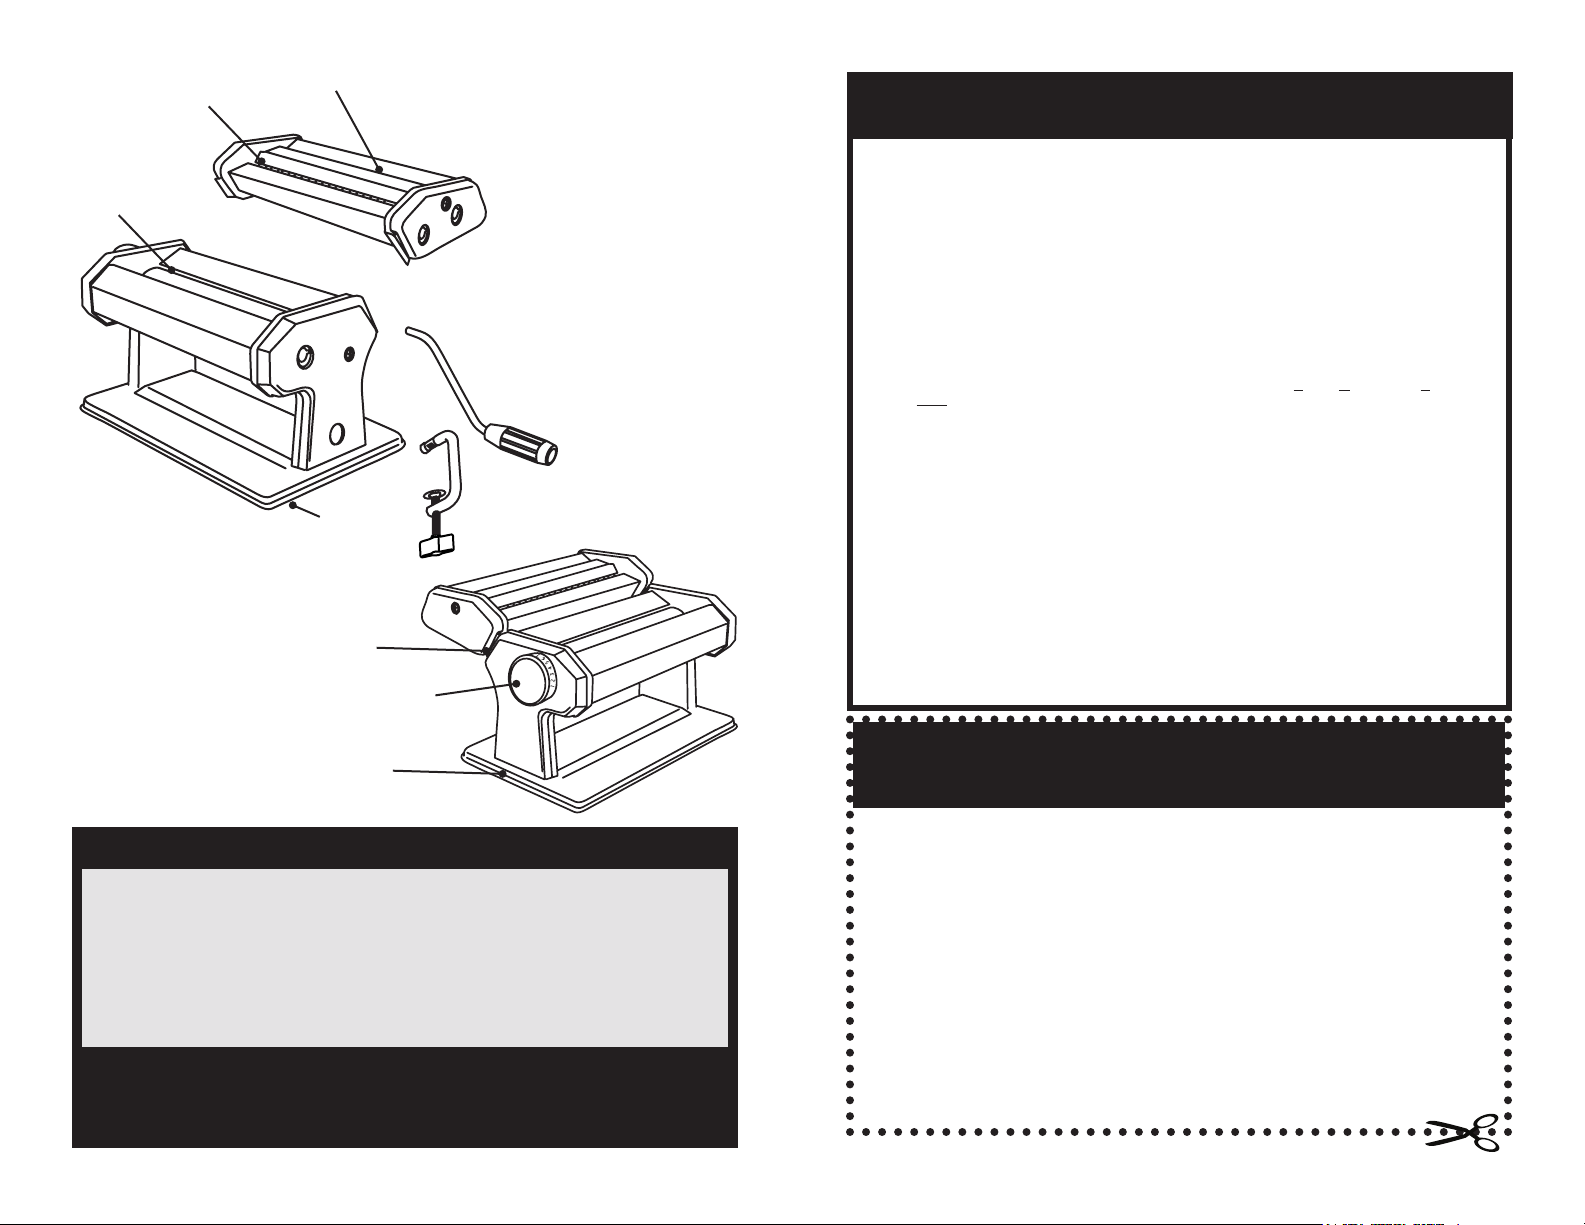
Fettuccini Rollers
Sheet Rollers
Spaghetti Rollers
4
Underneath
Attachment Clip
Regulator
Knob
WESTON WARRANTY INFORMATION
SAVE THIS WARRANTY INFORMATION FOR YOUR RECORDS!
Weston Products LLC warrants to the ORIGINAL RETAIL PURCHASER of this product that if operated in
accordance with the printed instruction accompanying it, then for a period of 1 year from the date of purchase,
3
1
2
the product shall be free from defects in material and workmanship.
The Warranty Card, along with a copy of the original receipt, must be received by Weston Products LLC
within 30 days from purchase date for the warranty to apply. Failure to send the completely lled out Warranty
Card, along with a copy of the original receipt, will void the warranty.
The product must be delivered to or shipped freight prepaid to Weston Products LLC for warranty services,
in either its original packaging or similar packaging affording an equal degree of protection. Damage due to
shipping is not the responsibility of the company. Weston Products LLC charges a $35.00 per hour bench
charge. NOTE: No repairs will be started without the authorization of the customer. The return shipping cost
to the customer will be added to the repair invoice.
Weston Products LLC will repair (or at its discretion, replace) the product free of charge, if in the judgment
of the company, it has been proven to be defective as to seller’s labor and material, within the warranty period.
New or rebuilt replacements for factory defective parts will be supplied for one (1) year from the date of
purchase. Replacement parts are warranted for the remainder of the original warranty period.
For non-warranty repairs, contact Weston Products LLC’s Customer Service at 1-800-814-4895 M-F
8am-5pm EST (outside of the United States 440-638-3131) to obtain a Return Merchandise Authorization
Number (RMA Number). Weston Products LLC will refuse all returns that do not contain this number. DO
NOT RETURN THE UNIT WITHOUT PROPER AUTHORIZATION FROM WESTON PRODUCTS LLC.
LIMITATIONS: The warranty is void if the product is used for any purpose other than that for which it is
designed. The product must not have been previously altered, repaired, or serviced by anyone else other
than Weston Products LLC. If applicable, the serial number must not have been altered or removed. The
product must not have been subjected to accident in transit or while in the customer’s possession, misused,
abused, or operated contrary to the instructions contained in the instruction manual. This includes failure
caused by neglect of reasonable and necessary maintenance, improper line voltage and acts of nature. This
warranty is not transferable and applies only to U.S. and Canadian sales.
Except to the extent prohibited by applicable law, no other warranties whether expressed or implied,
including warranty merchantability and tness for a particular purpose, shall apply to this product. Under no
circumstances shall Weston Products LLC be liable for consequential damages sustained in connection with
said product and Weston Products LLC neither assumes nor authorizes any representative or other person to
assume for it any obligation or liability other than such as is expressly set forth herein. Any applicable implied
warranties are also limited to the one (1) year period of the limited warranty.
This warranty covers only the product and its specic parts, not the food or other products processed in it.
CUT ALONG THE DOTTED LINE AND SEND THE WARRANTY CARD ALONG WITH A COPY OF YOUR ORIGINAL
PURCHASE RECEIPT TO:
Weston Products LLC
20365 Progress Drive, Strongsville, OH 44149
Base
COMPONENT LIST
DIAGRAM PART PART
NUMBER DESCRIPTION NUMBER
1 Handle 01-0216
2 C-Clamp 01-0217
3 Fettuccini/Spaghetti Cutter Attachment 01-0218
4 Rubber Feet (4) 01-0211
If any components of this unit are broken, the unit does not operate properly or you
need a replacement instruction manual, visit us on the web at
WestonProduct.com/support
Or call Weston Products LLC Toll Free at 1-800-814-4895
Monday thru Friday 8:00am-5:00pm EST. Outside the U.S. call 440-638-3131
-2-
WESTON WARRANTY CARD
SEND THIS CARD ALONG WITH A COPY OF YOUR ORIGINAL PURCHASE RECEIPT TO:
WESTON WARRANTY, WESTON PRODUCTS LLC, 20365 PROGRESS DRIVE, STRONGSVILLE, OH 44149
Customer Name: _________________________________
Address: _______________________________________
City/State/Zip: ___________________________________
Telephone Number: (_________) ____________________
E-Mail Address: _________________________________
Original Date of Purchase: ______/________/________
Product Model #: _________________________________
Serial # (if applicable): ______________________
Page 3

FOOD SAFETY
There are basic rules to follow when handling food.
They are COOK, SEPARATE, CLEAN, and CHILL.
COOK
It’s crucial to cook food to a safe internal temperature to destroy bacteria that is present.
The safety of hamburgers and other foods made with ground meat has been receiving a lot
of attention lately, and with good reason. When meat is ground, the bacteria present on the
surface is mixed throughout the ground mixture. If this ground meat is not cooked to at least
160oF to 165oF (71oC to 74oC), bacteria will not be destroyed and there’s a good chance you
will get sick.
Solid pieces of meat like steaks and chops don’t have dangerous bacteria like E. coli on the
inside, so they can be served more rare. Still, any beef cut should be cooked to an internal
temperature of at least 145oF (63oC) (medium rare). The safe temperature for poultry is 180oF
(82oC) and solid cuts of pork should be cooked to 160oF (71oC). Eggs should be thoroughly
cooked too. If you are making a meringue or other recipe that uses uncooked eggs, buy
specially pasteurized eggs or use prepared meringue powder.
SEPARATE
Foods that will be eaten uncooked and foods that will be cooked before eating MUST ALWAYS
be separated. Cross-contamination occurs when raw meats or eggs come in contact with
foods that will be eaten uncooked. This is a major source of food poisoning. Always doublewrap raw meats and place them on the lowest shelf in the refrigerator so there is no way juices
can drip onto fresh produce. Then use the raw meats within 1-2 days of purchase, or freeze for
longer storage. Defrost frozen meats in the refrigerator, not on the counter.
When grilling or cooking raw meats or sh, make sure to place the cooked meat on a clean
platter. Don’t use the same platter you used to carry the food out to the grill. Wash the utensils
used in grilling after the food is turned for the last time on the grill, as well as spatulas and
spoons used for stir-frying or turning meat as it cooks.
Make sure to wash your hands after handling raw meats or raw eggs. Washing hands with
soap and water, or using a pre-moistened antibacterial towelette is absolutely necessary after
you have touched raw meat or raw eggs. Not washing hands and surfaces while cooking is a
major cause of cross-contamination.
CLEAN
Wash your hands and work surfaces frequently when you are cooking. Washing with soap
and warm water for at least 15 seconds, then dry with a paper towel.
CHILL
Chilling food is very important. The danger zone where bacteria multiply is between 40oF and
140oF (4oC and 6oC). Your refrigerator should be set to 40oF (4oC) or below; your freezer should
be 0oF (-17oC) or below. Simple rule: serve hot foods hot, cold foods cold. Use chang dishes
or hot plates to keep food hot while serving. Use ice water baths to keep cold foods cold. Never
let any food sit at room temperature for more than 2 hours - 1 hour if the ambient temperature
is 90oF (32oC) or above. When packing for a picnic, make sure the foods are already chilled
when they go into the insulated hamper. The hamper won’t chill food - it just keeps food cold
when properly packed with ice. Hot cooked foods should be placed in shallow containers and
immediately refrigerated so they cool rapidly. Make sure to cover foods after they are cool.
NOTE: Special considerations must be made when using venison or other wild game, since it
can become heavily contaminated during eld dressing. Venison is often held at temperatures
that could potentially allow bacteria to grow, such as when it is being transported. Refer to
the USDA Meat and Poultry Department for further questions or information on meat and food
safety.
CAUTION! It is important to follow the “Food Safety” guidelines outlined in this
manual. For the most up to date instruction visit the USDA website.
PASTA!
Pasta may be the ultimate comfort food. And it’s certainly one of the most versatile
foods there is. It can be a main dish, side dish, salad or even a dessert!
Buying pasta in a store is a nice convenience, but there is something special about
making it at home. Not only is it a healthy, preservative free option, but most people
agree that homemade pasta has a better avor. You can even enhance the avor by
adding things to the pasta itself … spinach, beets, peppers, herbs, saffron. Plus you
can’t beat the prep time: homemade pasta only takes 3 minutes to cook!
The process is easy. It can be a fun family project that kids enjoy helping with.
Just follow these steps:
. Form a mound with the dry ingredients and make a well in the center.
. Add the liquid ingredients into the well. Using a fork or bench scraper, mix the dry
and liquid ingredients by dragging the dry ingredients into the center. Keep doing this
until you have formed a sticky dough ball.
. On a oured surface, knead the dough ball by pushing down with the heel of your
hand then give the dough a quarter turn. Repeat this until the dough is smooth,
elastic, even in color and no longer sticky.
PASTA TIPS
.
DOUGH CONSISTENCY You know when you’re nished kneading the dough when
the ball of dough has a soft texture. It should feel moist, but not stick to your ngers.
.
LET IT REST! When you have your dough ball, set it aside to rest for 15-30 minutes.
While resting, wrap it in cellophane wrap or cover it with a damp towel (or paper towel) to
keep it from drying out. Resting gives the our time to fully absorb the water.
.
WATER If the recipe that you are using calls for water, add it last in portions. Depending
on egg size and accuracy of our measurement, you may not need the entire amount of
water in the recipe.
.
FLOUR & WATER RATIO Don’t be afraid to use our. If after resting, the dough feels
too damp add a little our and knead it a little more (don’t worry, if you add too much you
can add more water or olive oil to balance it).
.
FLOUR IS YOUR BEST TOOL Before rolling out the dough or cutting the sheets,
sprinkle the rollers with our to keep the dough from sticking. This will also help the
dough separate when you cut the pasta.
.
Before cutting the dough and between changing the roller settings, dredge the dough
sheet in some our. This will also help to cut the dough better.
-3--18-
Page 4

PASTA MACHINE ASSEMBLY
1. Position the Pasta Machine Base
on a table or countertop, near the
edge of the work surface.
2. Silde the C-Clamp into the
C-Clamp Hole in the side of the
Pasta Machine Base. The threaded
screw portion of the C-Clamp will be
underneath the table or countertop
(Figure A).
3. Tighten the Thumbscrew on
the C-Clamp to secure the Pasta
Machine to the table or countertop
(Figure B).
Base
C-Clamp Port
Figure A
C-Clamp
ADDITIONAL ACCESSORIES AVAILABLE
PART PART
DESCRIPTION NUMBER
Square Ravioli Attachment (50mm) 01-0209
Angel Hair Attachment (1mm) 01-0202
Spaghetti Noodle Attachment (2mm) 01-0203
Linguini Attachment (3mm) 01-0204
Lasagna Attachment (50mm wide) 01-0206
Lasagnette Attachment (12mm wide) 01-0205
Half Moon Ravioli Attachment (50mm) 01-0208
Bamboo Pasta Drying Rack 53-0201
4. Align the Clips of the Cutter
Attachment with the Clips on the
Pasta Machine. Slide the Cutter
Attachment onto the Pasta Machine
until fully seated (Figure C).
Cutter Attachment
Clips
Figure B
C-Clamp
Thumbscrew
Figure C
Clips
These products and many more products can be ordered by visit ing
WestonProducts.com or by calling
Weston Products LLC Toll Free at 1-800- 814-489 5
Monday thru Friday 8:00am-5:00pm EST. Outside the U.S. call 440-638-3131
E-Mail: CustomerService@WestonProducts.com
-4- -17-
Page 5

CLEANING
The Pasta Machine and the Cutter Attachment may have some excess oil on it from the
factory. This is to protect the machine during shipping. THIS OIL MUST BE REMOVED
BEFORE USING THE MACHINE!
.
Using a clean dry cloth, wipe all the surfaces clean. DO NOT USE WATER! Never
wash the Pasta Machine or the Cutter Attachment with water, place it in water, or put
it into the dishwasher. Simply wipe it clean with a dry cloth.
.
To clean the inner surfaces of the Pasta Machine and the Cutter Attachment
pass a piece of dough through the Rollers and Cutters several times, making sure the
dough touches all the surfaces, especially the sides where machine oil can accumulate.
Discard this dough when nished.
.
Use a dry pastry brush to remove any our or bits of dough from the hard to reach
places.
.
Lightly sprinkle some our on the Rollers and Cutters. Using a dry brush, work the
our into the edges of the Pasta Machine and into the Cutter Attachment. Brush all the
our away and wipe the machine clean again with a clean, dry cloth.
.
NEVER INSERT KNIVES BETWEEN THE ROLLERS OR THE CUTTERS!
5. Align the notches on the Handle
with the notches in the Drive Slot
of choice. Slide the Handle into the
Drive Slot of the Roller or the Cutter
Attachment to be used (Figure D).
NOTE: Be sure to notice when the
Handle turns, it passes below the
edge of the work surface and turns
freely, it should not hit the work
surface. If the Handle comes in
contact with the work surface, loosen
the C-Clamp and reposition the
Pasta Machine to allow more space
(Figure E).
Roller
Drive Slot
Figure D
Spaghetti
Cutter Drive
Slot
Fettuccini
Cutter Drive
Slot
Handle
Figure E
NOTE: The Pasta Machine and the Cutter Attachment may have some
excess oil on it from the factory. This is to protect the machine during shipping.
THIS OIL MUST BE REMOVED BEFORE USING THE MACHINE! Follow
the “Cleaning Instructions” to clean the Pasta Machine prior use.
-5--16-
Page 6

ROLLING DOUGH INSTRUCTIONS
RECIPES FOR THE DOUGH WILL
FOLLOW THESE INSTRUCTIONS.
THESE INSTRUCTIONS START
WITH FULLY MIXED DOUGH,
READY TO BE USED.
1. Follow the “Pasta Machine
Assembly Instructions.” Align the
notches on the Handle with the
notches in the Roller Drive Slot.
Slide the Handle into the Roller
Drive Slot (Figure F).
2. Locate the Regulator Knob
on the left side of the Pasta
Machine. The Regulator Knob
is numbered 1-7. The number 1
setting is the narrowest setting for
the Sheet Rollers; the number 7
is the widest setting for the Sheet
Rollers (Figure G). To adjust the
Regulator Knob, pull out on the
Knob and turn it to the desired
setting. As you turn the Regulator
Knob you will be able to see the
Sheet Rollers moving closer
together or further apart.
Regulator
Knob
Sheet Rollers
Roller
Drive Slot
Figure F
Handle
Figure G
FAMILY FAVORITE RAVIOLI MEAT STUFFING
1-1/4 lb lean ground beef 2 tsp salt olive oil
1 medium onion, nely chopped 1 extra large egg
2 cloves, garlic, nely minced 1/4 cup parsley, nely chopped
1 Tbsp nely minced oregano 1/4 tsp ground pepper
10 oz chopped cooked greens of your choice
1/2 cup greated Parmesan cheese
.
Film a large sauté pan with olive oil
.
Over medium heat, add the chopped onion and sauté until limp but not brown, four or ve minutes
.
Add garlic and sauté another minute
.
Crumble the beef into the pan and sauté until cooked and no red is visible
.
Turn heat to high and boil away as much of the liquid thrown off by the beef as you are
able to in 5 minutes
.
Turn into a strainer and discard all fat and any liquid left
.
Return meat mixture to sauté pan and add the chopped greens, parsley, oregano, salt and pepper
.
Toss and stir until well combined and heated through, 3 or 4 minutes. Turn into a bowl to cool slightly
.
Add egg and cheese and mix well
.
Cover and chill at least one hour
.
May be made up to one day ahead
CHEESE AND SPINACH RAVIOLI FILLING
8-3/4 oz chopped spinach 5-1/4 oz ricotta cheese salt
2 cups grated Parmesan ground pepper 2 egg yolks
2-1/2 oz melted butter
.
Boil spinach until tender. Squeeze the excess liquid from the spinach, until dry
.
In large bowl, combine all ingredients and mix well
.
Cover and refrigerate until ready to ll ravioli
3. Lightly our your work space.
See “Pasta Tips” for more
instruction on making dough and
pasta.
4. With the Regulator Knob in
the “7” position, turn the Handle
clockwise while feeding a piece of
dough into the Rollers (Figure H).
Once the dough has gone through
the Rollers lightly our it, fold it in
half and run it through the Rollers
again. Repeat this process several
times: lightly our, fold in half, run
through Rollers.
5. As the dough exits the Rollers, it
will get longer with each pass. Lay
the strip of dough out at on your
work space.
-6-
Figure H
-15-
Page 7

RAVIOLI
Half Moon Ravioli Additional Accessory
Part # 01-0208 Sold Separately
This attachment cuts & stuffs pasta into 1.785” / 4.4cm ravioli.
Half Moon Ravioli Additional Accessory
Part # 01-0209 Sold Separately
This attachment cuts & stuffs pasta into 2” / 5cm ravioli.
1. Prepare the lling of your preference. It should be rather soft
to allow the pasta sheets to conform the lling without breaking.
2. Attach the Ravioli Maker Attachment to the pasta machine
following the “Pasta Machine Assembly” instructions.
3. Prepare a pasta sheet to the desired thickness following the
“Rolling Dough Instructions”. Dust lightly with our. Let the pasta
sheet rest until it is slightly dry.
4. Trim the sheet past to the proper width with the Wheel Cutter
(Figure L).
5. Divide the sheet in two. This will give you two sheets of
the same width and length.
6. Place one pasta sheet on each of the Wooden Rollers of the
Ravioli Maker Attachment (Figure M) and turn the Pasta
Machine Handle slowly, making sure both sheets of pasta are
being pulled into the Ravioli Maker Attachment. Test a short
length to make sure the dough sticks together (if the sheets
do not stick, lightly brush with an egg wash, if using a non-egg
dough, use water).
7. Spoon the lling in between the two sheets of pasta into
the cavities of the Ravioli Maker Attachment.
Do not place lling between the cavities or the
sheets of pasta will not seal properly. Be careful
not to put too much in, you want the pasta sheets too
close around the lling without compressing it.
8. Turn the Pasta Machine Handle slowly in a
clockwise direction to seal the rst row of ravioli.
If the ravioli break, add less lling; if they seem at or
too empty add a little more lling.
9. Allow the ravioli to dry slightly before cutting them apart.
10. Boil ravioli in plenty of salted water for approximately 4 to 5
minutes. After tasting to make sure they are adequately cooked,
remove from the heat and drain.
Wooden
Rollers
Figure L
Wheel
Cutter
Figure M
6. Now set Regulator Knob to the “6” position. Run the dough through the Rollers.
Repeat this process several times, each time setting the Regulator Knob to the next
setting until the dough reaches the thickness you desire. If the sheet gets too long to
manage, simply cut it with a knife.
7. After reaching the desired thickness, leave the sheet to rest for about 10 minutes
so that it will dry slightly and be hard enough for cutting, without sticking to the
Cutting Rollers.
CUTTING DOUGH INSTRUCTIONS
1. Follow the “Pasta Machine
Assembly Instructions.” Align the
notches on the Handle with the
notches in the Cutter Drive Slot of
choice. Slide the Handle into the
Cutter Drive Slot (Figure I).
2. Cut a piece of rolled out dough, long
enough to be easily handled.
3. Lightly our your work space and
the pasta sheet. See “Pasta Tips”
for more instruction on making dough
and pasta.
4. While slowly turning the Handle
clockwise, carefully start the dough into
the Cutter Attachment.
5. As the cut noodles exit the machine
from underneath, continue to carefully
guide the dough into the Pasta
Machine while slowly turning the
Handle (Figure J).
Figure K
Spaghetti
Cutter Drive
Slot
Fettuccini
Cutter Drive
Slot
Figure I
Handle
Figure J
6. Lay your freshly cut noodles out on a lightly oured
surface or on a drying rack (Sold Separately) to dry before
cooking (Figure K).
-7--14-
Page 8

PASTA COOKING TIPS
.
Always use plenty of boiling water so the pasta does not stick.
.
1/2 lb (0.22 kg) of noodles will require at least 2 quarts of water, 1 lb (0.5 kg) of pasta
will require 6 quarts.
.
Add 1 teaspoon of salt for each quart of water.
.
Always bring the water to a full, rolling boil before adding pasta or it will not cook
properly.
.
Cooking time will vary based on the size, weight and ingredients of the noodles.
.
Homemade noodles take very little time to cook and should be tested after 3-4 minutes.
.
Pasta should be cooked “Al Dente.” This means it should not be mushy, but tender, yet
slightly hard to bite. Test the pasta frequently to test for doneness.
.
It is better that the noodles be slightly undercooked than overcooked.
.
Once pasta is cooked, drain it but never rinse.
.
For the best pasta dishes, add sauce to the drained noodles and serve immediately.
BASIC LASAGNA
1 lb Lasagna noodles 1-1/2 lbs ground beef
16 oz Ricotta cheese 2 eggs pepper to taste
1/4 cup grated Parmesan 1 Tbsp basil 1 diced onion
16 oz marinara sauce 1 Tbsp parsley
4 cloves garlic, minced 8 oz grated Mozzarella
.
Boil Lasagna noodles about 8 minutes, do not overcook
.
Brown the ground beef, onion and garlic in a deep pan
.
Add marinara and simmer
.
Mix the Parmesan, Ricotta and the Mozzarella (reserving 1/2 cup) with the eggs in a
separate bowl with parsley and spices
.
In a 9”x13” (23 x 33 cm) pan spread a thin layer of the sauce mixture then place a
layer of noodles on top
.
Over this layer evenly spread a layer of the cheese and a little sauce
.
Top with another layer of noodles. Repeat this process layering
.
Add the remaining Mozzarella to the top
.
Cover dish with foil and bake at 375ºF (191ºC) for approximately one hour
.
Let stand 10 minutes before serving
LASAGNA BOLOGNESE
1 lb Lasagna noodles 1/4 cup olive oil 1/2 onion
dried mushrooms, soaked & drained 2-1/4 oz butter
2 fresh ripe tomatoes, mashed 10-1/4 oz minced beef
2 -1/4 oz grated Parmesan 2-1/4 oz chicken livers
.
Boil Lasagna noodles about 8 minutes, do not overcook
.
Brown the onion in the olive oil and half of the butter
.
When golden, remove from pan
.
Place the minced beef and chicken livers in the saucepan, together with the tomato
and mushrooms
.
Cook slowly for about an hour
.
Arrange layers of Lasagna noodles and sauce in a buttered baking dish, sprinkle with
Parmesan and put the pieces of remaining butter on top.
.
Bake at 375º F (191ºC) for approximately 15 minutes, and serve
-8-
-13-
Page 9

LINGUINI PASTA
Additional Accessory Part # 01-0204 Sold Separately
This attachment cuts pasta into ne round noodles strands
approximately 0.12” / 3mm.
LINGUINI WITH WHITE CLAM SAUCE
1 lb Linguini, cooked & drained 3/4 cup olive oil
4 cloves chopped garlic 2 Tbsp chopped parsley
1-1/2 dozen Cherrystone Clams, shelled and chopped with juices reserved
.
Heat olive oil in large saute pan over medium heat. Add garlic, cook until lightly browned
.
Add Clams with their juices, bring to a boil, then lower heat to a simmer and cook for 5 more minutes
.
Add some of the sauce to the Linguini and mix well
.
Plate the past, spooning remaining sauce over top
.
Garnish with chopped parsley
LINGUINI WITH RED CLAM SAUCE
4 to 6 cloves fresh garlic, minced 4 Tbsp butter olive oil
1 large can tomato sauce pepper 2 Tbsp basil
2 cans minced clams 2 handfuls chopped fresh parsley
1 lb Linguini, cooked and drained
.
Cover bottom of saucepan with oil and brown the garlic. Add butter and melt.
.
Add parsley, basil and pepper; stir well.
.
Add clams and tomato sauce.
.
Stir well and cover. Let sauce simmer for 20 minutes. Pour over Linguini.
PASTA DOUGH RECIPES
BASIC PASTA DOUGH
2 cups all purpose our 1 tsp salt
2 eggs 4 Tbsp water (use as needed)
TRADITIONAL PASTA DOUGH
2 cups all-purpose our, sifted 1 cup semolina our, sifted
1 tsp salt 3 eggs plus 3 additional egg yolks
2 Tbsp olive oil 1/2 cup water (use as needed)
DOUGH INSTRUCTIONS
.
Form a mound with the our and salt. Make a well in the center of the mound.
.
Add the eggs and oil (depending on the recipe used) into the well. Using a fork or bench
scraper, mix the dry and liquid ingredients by dragging the dry ingredients into the center.
Keep doing this until you have formed a sticky dough ball. Add water as needed, the
dough should have a soft texture. It should feel moist, but not stick to your ngers.
.
On a oured surface, knead the dough ball by pushing down with the heel of your hand
then give the dough a quarter turn. Repeat this until the dough is smooth, elastic,
even in color and no longer sticky.
.
Set the dough aside to rest for 15-30 minutes. While resting, wrap it in cellophane wrap or
cover it with a damp towel (or paper towel) to keep it from drying out.
FLAVORED PASTA DOUGH
Pureed vegetables can be added to pasta dough to enhance the noodle color. Generally,
the avor of the vegetable is not very pronounced in the pasta.
LASAGNA & LASAGNETTE PASTA
Lasagna Additional Accessory
Part # 01-0206 Sold Separately
This attachment cuts pasta into 3 fancy strip noodles
approximately 1.7” / 4cm wide.
Lasagette Additional Accessory
Part # 01-0205 Sold Separately
This attachment cuts pasta into 11 fancy strip noodles
approximately 0.4” / 1cm wide.
GREEN LASAGNETTE
1-1/4 lb spinach Lasagna 8-3/4 oz meat & tomato sauce
4-1/4 oz grated Parmesan 1 oz melted butter
.
Cook the Lasagnette in a wide, low pan in salted water
.
Drain and allow to cool
.
Lay the pasta on a moist, warm tea towel
.
Butter an oven dish and layer with Lasagnette, covering each layer with a few tablespoons
of meat and tomato sauce, a sprinkle of Parmesan, and a drizzle of melted butter
.
Brown in a 375ºF (191ºC) oven
.
Sprinkle with the remaining Parmesan and serve
-12-
LEMON PASTA DOUGH
2 Tbsp lemon juice 3 Tbsp nely grated lemon zest
.
Follow the recipe for the basic “TRADITIONAL EGG PASTA DOUGH” substituting 2
eggs and one egg yolk
.
Add the lemon juice and the lemon zest to the our and egg mixture and continue recipe
SPINACH PASTA DOUGH
8 oz fresh spinach
.
Remove the stems from 8 oz. of fresh spinach
.
Cook the spinach in boiling water for about 2 minutes or until the spinach is wilted
.
Rinse the spinach to cool it quickly
.
Squeeze the spinach dry, then puree it in a blender Add the 2 eggs to the pureed spinach
and blend well
.
Follow the recipe for the basic “Traditional Egg Pasta Dough” using only 2 eggs
.
Pour our into a mixing bowl and make a “well” or pit into the center
.
Pour the spinach and egg mixture into well and continue as in “Traditional Egg Pasta Dough” recipe
-9-
Page 10

PASTA ATTACHMENTS / RECIPES
SHEET PASTA
Sheets pasta can be used for many recipes or run through a Pasta Cutter Attachment
to form a multitude of noodles.
NEAPOLITAN CANNELLONI FILLING
10-1/4 oz diced Mozzarella 10-1/4 oz ripe tomatoes
4 salted anchovies, rinsed 2-3/4 oz grated Parmesan
SAUCE
4-1/2 lb ripe tomatoes 1-3/4 oz oil salt & pepper
sprig of basil
.
Peel and slice the tomatoes
.
Follow the recipe for the “Traditional Egg Pasta Dough”
.
Cut the pasta sheet into 12 rectangles, so that each is about 3” x 6” (7.6 cm x 15.2 cm)
.
Cook the cut rectangles for a few minutes, drain and lay on a moist tea towel
.
Fill the pasta with Mozzarella, anchovies and the Parmesan, then roll carefully to seal
.
Heat the oil in a saucepan, add the tomato pulp, add salt, and cook, avoring with
minced basil
.
Align the cannelloni in a buttered, oven-proof baking dish
.
Cover with the tomato sauce, pepper to taste, sprinkle with grated Parmesan, and
bake for about 20 minutes in a preheated 350ºF (180ºC) oven
_______________________________
ANGEL HAIR PASTA
Additional Accessory Part # 01-0202 Sold Separately
This attachment cuts pasta into ne round noodles strands
approximately 0.04” / 1mm.
ANGEL HAIR SOUFFLÉ
10-1/4 oz Angel Hair, cooked & drained 3 eggs, separated
1/2 cup grated Parmesan
Béchamel Sauce
.
Boil the pasta in salted water for 1 minute and drain
.
Carefully stir the egg yolks and Parmesan in a bowl
.
Whisk the egg whites in another bowl, then combine with the egg yolk mixture
.
Pour over the Angel Hair and mix well, adding the Béchamel Sauce
.
Pour into a well-buttered soufé mold
.
Bake at 300°F (150°C) until the soufé rises
ANGEL HAIR WITH MUSHROOMS Serves 4 people
1-1/4 lb Angel Hair, cooked & drained olive oil
10-1/4 oz mushrooms salt & pepper 1 Tbsp chopped parsley
lemon juice
.
Clean and thinly slice the mushrooms
.
Cook in a saucepan with a little oil for a few minutes
.
Remove the saucepan from the heat, then add salt, pepper, parsley and a few drops of lemon juice
.
Flavor the Angel Hair with olive oil and pepper
.
Pour the mushroom sauce over the pasta and mix
-10-
SPAGHETTI PASTA
Attached to the Fettucinni/Spaghetti Cutter Attachment
that is included with the Pasta Machine and also
sold separatly as an
Additional Accessory Part # 01-0203 Sold Separately
This attachment cuts pasta into round noodles strands
approximately 0.08” / 2mm.
SPAGHETTI WITH TOMATO & BASIL
1 lb Spaghetti, cooked & drained basil
4 Tbsp olive oil 1 oz grated Parmesan 1 clove garlic, nely minced
salt and pepper 10-1/4 oz tomato puree
.
Heat the oil in a wide saucepan, add the garlic and basil, and gently saute
.
Add the tomato puree and allow to thicken
.
Pour the Spaghetti into the saucepan, sprinkle with Parmesan and ground pepper
.
Combine well, serve hot
SPAGHETTI WITH GARLIC, OIL & CHILI PEPPER
1/4 cup olive oil 5 cloves minced garlic 1/2 red chili pepper
1 lb Spaghetti, cooked & drained chopped parsley
salt to taste
.
Saute the garlic in a saucepan with the olive oil
.
Finely slice the chili pepper, add to the olive oil and heat over very low heat for 2 minutes
.
Pour Spaghetti into the saucepan
.
Add parsley, toss and serve
_______________________________
FETTUCCINE PASTAS
Attached to the Fettucinni/Spaghetti Cutter Attachment
that is included with the Pasta Machine
This attachment cuts pasta into noodles into strands
approximately 0.3” / 8mm.
CREAMY FETTUCCINE ALFREDO
1/2 cup milk 1/2 cup butter
1/4 cup grated Parmesan 0.5 lb Fettuccine, cooked & drained
8 oz cream cheese, cubed
.
In large saucepan, combine cream cheese, Parmesan cheese, butter and milk
.
Stir over low heat until smooth
.
Add Fettuccine and toss lightly
FETTUCCINE WITH BUTTER & SAGE
1-1/4 lb Fettuccine, cooked & drained 3-1/2 oz butter
7 oz grated Parmesan pepper sage leaves
.
Put Fettuccine in a hot serving dish
.
Sprinkle immediately with Parmesan and pieces of butter, mix well
.
Sprinkle with a pinch of pepper and decorate with small sage leaves
-11-
 Loading...