

Page 1
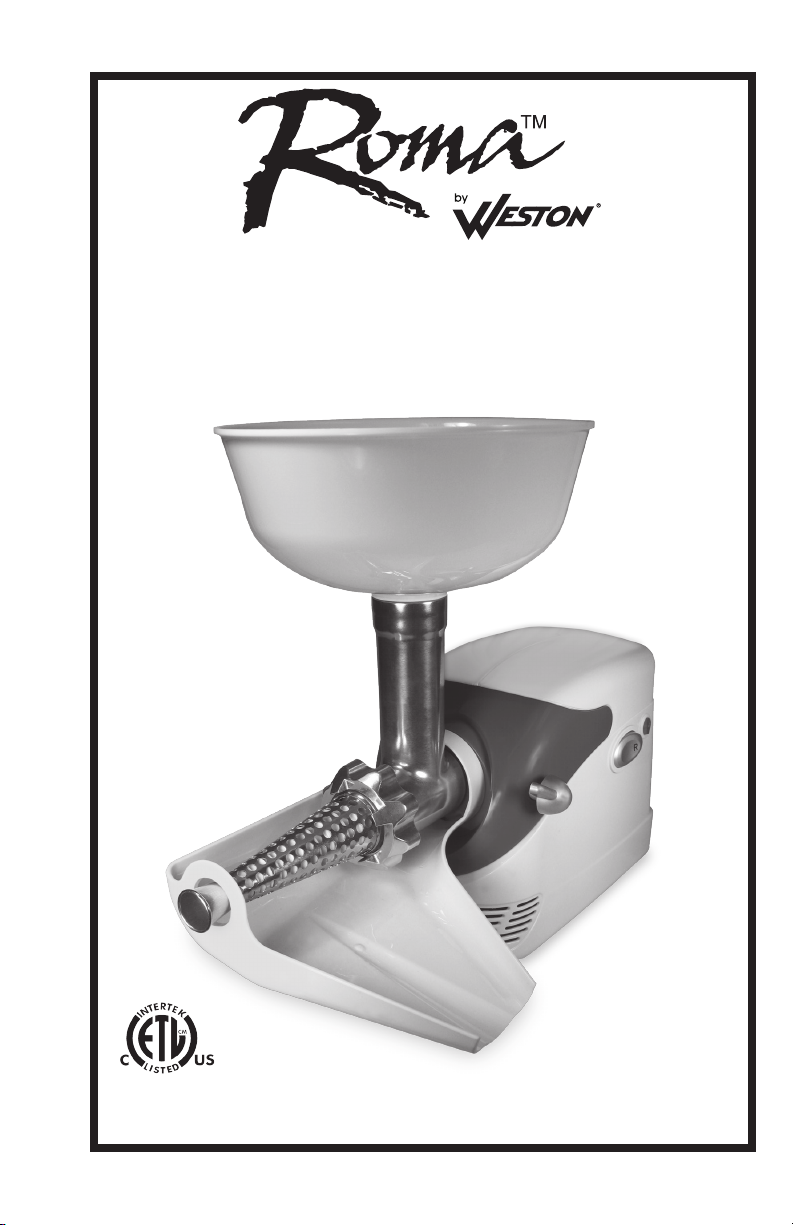
Deluxe Electric
Tomato Strainer
MODEL NO. 82-0202-W
3080265
Due to constant factory improvements, the product pictured
might differ slightly from the product received.
REV112113
Page 2
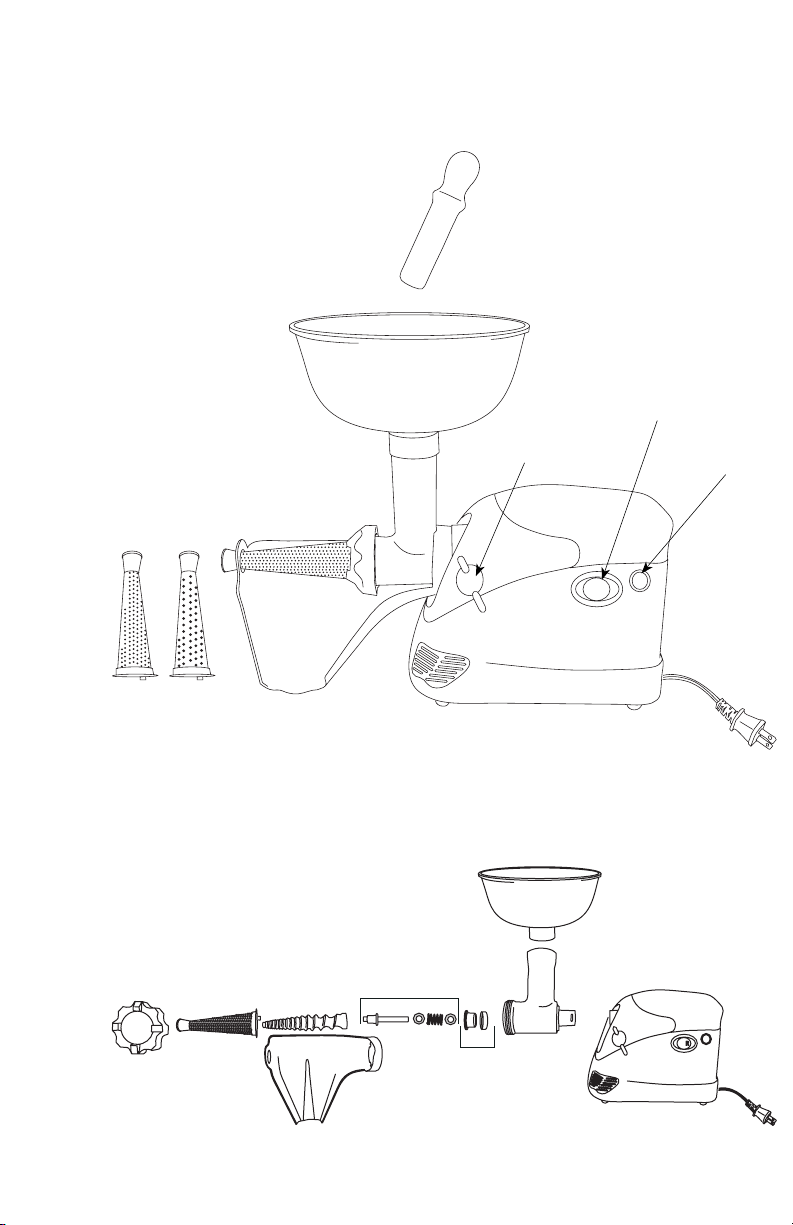
7 8
1
Reverse
Button
Head Locking
Knob
On/Off
Switch
6
-O
R
10
Screen
2
4
3
Main Body
5
4a
9
-2-
Page 3

COMPONENT LIST
DIAGRAM PART PART
NUMBER DESCRIPTION NUMBER
1 Stomper 82-0109
2 Hopper 82-0210
3 Head 82-0111
Spring
4
Metal Washer (2) 82-0124
Assembly
Drive Shaft
Drive Shaft
Plastic Bushing 82-0114
4a
Set
Beveled Rubber Washer
Bushing
5 Plastic Auger 82-0125
6 Standard Tomato/Berry Screen 82-0129
7 Pumpkin Screen 82-0211
8 Salsa Screen 82-0212
9 Chute 82-0130
10 Front Ring Nut 82-0118
If any components of this unit are broken, the unit does not operate properly or you
need a replacement instruction manual, visit us on the web at
WestonProduct.com/support
Or call Weston Products LLC Toll Free at 1-800-814-4895
Monday thru Friday 8:00am-5:00pm EST. Outside the U.S. call 440-638-3131
CAUTION! It is important to follow the “Food Safety” guidelines outlined in this
manual. For the most up to date instruction visit the USDA website.
-3-
Page 4
GENERAL SAFETY RULES
READ AND FULLY UNDERSTAND ALL INSTRUCTIONS
AND WARNINGS PRIOR TO USING THIS PRODUCT.
YOUR SAFETY IS MOST IMPORTANT! FAILURE TO
COMPLY WITH PROCEDURES AND SAFE GUARDS MAY
RESULT IN SERIOUS INJURY OR PROPERTY DAMAGE.
WARNING!
1. Thoroughly inspect the Tomato Strainer
before each use. DO NOT use the Tomato
Strainer if any part (including the Power Cord
and Plug) is broken or damaged. If the Tomato
Strainer is damaged in any way, contact Customer
Service at the telephone number listed on the back
of this booklet.
2. BEFORE using the Tomato Strainer for
the rst time, thoroughly wash all parts that will
contact food in warm soapy water. Rinse with
clean water. Dry all parts before assembling the
Tomato Strainer. Only the plastic parts of the
Tomato Strainer are top rack dishwasher safe. DO
not place metal parts or the Motor of the Tomato
Strainer in the dishwasher.
3. NEVER immerse the Motor in water or other
liquid. Clean it by wiping with a damp cloth.
4. ONLY plug the Tomato Strainer into a 120
Volt, 60 Hz outlet. AVOID using extension cords.
5. ALWAYS DISCONNECT the Tomato Strainer
from the power source when not in use.
6. Before cleaning, assembling or disassembling
the Tomato Strainer, make sure it is turned
off “O” and disconnected from the power
source. Test to make sure there is no power
to the Motor by switching the Motor on “ and off “O”.
7. KEEP FINGERS AND OTHER FOREIGN
OBJECTS AWAY from the Tomato Strainer inlet
REMEMBER: YOUR PERSONAL SAFETY IS YOUR
RESPONSIBILITY!
during operation.
8. ONLY use the Stomper to push items into the
Tomato Strainer. DO NOT use your ngers!
9. KEEP CHILDREN AWAY FROM THE
TOMATO STRAINER. DO NOT LEAVE THE
TOMATO STRAINER UNATTENDED.
10. To prevent unintentional starting, make sure
the power switch is in the off “O” position before
connecting the Tomato Strainer to the power
source.
11. DO NOT grind bones, nuts or other hard items
into the Tomato Strainer.
12. DO NOT use accessories from other
manufacturers. Use of unauthorized accessories
will void the warranty.
13. Tie back loose hair and clothing, roll up long
sleeves, and remove ties and jewelry including
watches, rings and bracelets before operating the
Tomato Strainer.
14. If the Tomato Strainer becomes jammed,
briey engage in reverse to clear blockage.
15 DO NOT use the Tomato Strainer while under
the inuence of drugs or alcohol.
16. For indoor use only.
17. Household use only.
SAVE THESE INSTRUCTIONS!
Refer to them often and use them to instruct others.
-4-
Page 5
OUTLET INSTRUCTIONS
This appliance has a polarized plug (one prong is
wider than the other). To reduce the risk of electric
shock, the plug must fully t into the electrical outlet.
If the plug does not t, turn it over and try again. If the
plug still does not t, contact a qualied electrician
in regards to updating the electrical outlets in your
home. DO NOT modify the plug in any way.
DISASSEMBLY & CLEANING INSTRUCTIONS
WARNING! Before cleaning, assembling or disassembling the Tomato Strainer,
make sure it is turned off “O” and disconnected from the power source. Test to make
sure there is no power to the Motor by switching the Motor on “-” and off “O”.
Before using the Tomato Strainer for the rst time, thoroughly clean all parts (including
accessories) as instructed below. DO NOT immerse the Motor in water or other liquid.
1. Turn the Motor Unit off “O” and disconnect it from the power supply.
2. Remove the Hopper from the Head.
3. Turn the Head Locking Nut counter-clockwise to loosen the Head from the Motor.
Push the Head/Screen Assembly forward slightly while lifting out the back end of the
Head/Screen Assembly removing it from the Motor.
4. Turn the Front Ring Nut counter-clockwise to remove it from the Head.
5. Disassemble all the parts from the Head/Screen Assembly.
6. Gently turn the Chute clockwise to unhook the tabs on the Motor.
7. WARNING! DO NOT immerse the Motor in water or other liquid. Clean the Motor
with a damp cloth or towel then wipe dry. Wash all parts that contact food in warm soapy
water. Rinse with clean water. Dry all parts immediately.
NOTE! Only plastic parts of the Tomato Strainer are top-rack dishwasher safe.
8. Coat the Screens, Head and Drive Shaft Assembly with a food-grade silicone spray.
NEVER immerse the Motor
in water or other liquid.
Clean it by wiping with a
damp cloth.
-5-
Page 6

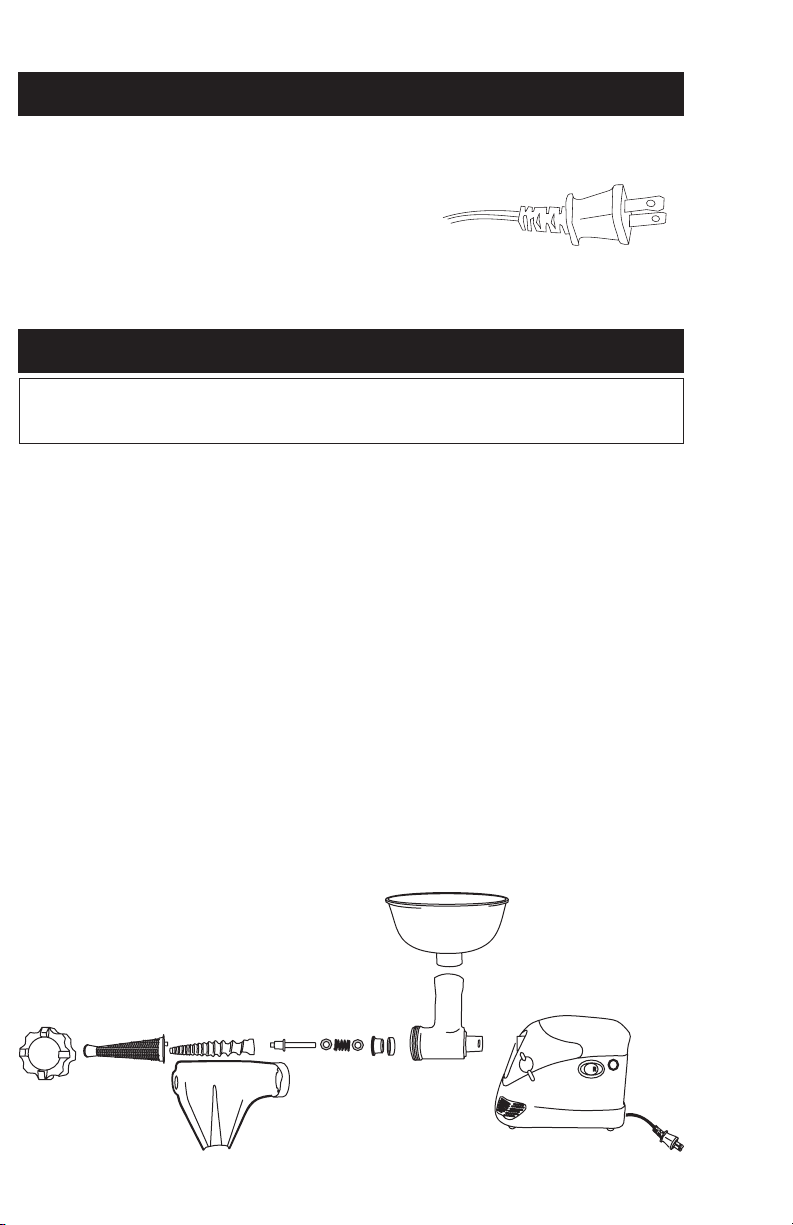
ASSEMBLY
WARNING! Before cleaning, assembling or disassembling the Tomato Strainer,
make sure it is turned off “O” and disconnected from the power source. Test to make
sure there is no power to the Motor by switching the Motor on “-” and off “O”.
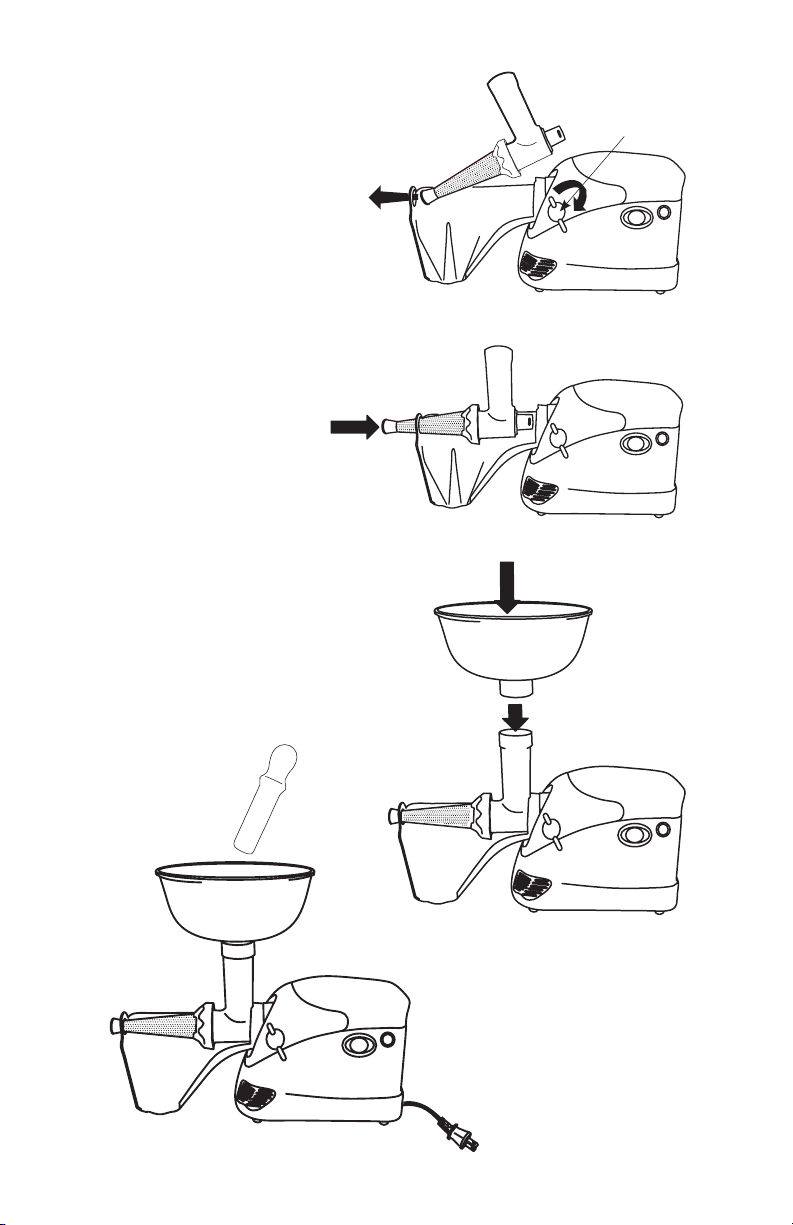
1. Hold the Chute with the outlet tilted almost
fully downward and the head ring facing the Motor
(gure 1).
2. Place the head ring of the Chute over the round
raised face on the front of the Motor. Position
the tabs on the head ring next to the slots in the
corresponding tabs extending from the round face
(gure 2).
3. Rotate the Plastic Chute counterclockwise
until the tabs t into the slots. The Plastic Chute
should now be rmly held in place. When properly
positioned, the outlet of the Chute should dip
slightly downward.
4. Assemble the round end of the Drive Shaft
with a Metal Washer, Spring, Metal Washer,
Plastic Bushing and the Beveled Rubber
Washer. (gure 3). NOTE: The Beveled
Rubber Washer has two sides, a at side and the
beveled side. The beveled side ts onto the top of
the Plastic Bushing like a cap (gure 3b).
5. Insert the square end of the Drive Shaft into the
corresponding slot in the Auger (gure 4).
6. Insert the Auger/Drive Shaft Assembly into
the Head.
Chute
Round, raised face on
Chute
Tabs on
Motor
Motor
the front of Motor
Head
Ring
Figure 1
Figure 2
7. Position the Screen over the Auger. Line
up the tabs on the Screen with the notches in the
Head. Hold the Screen in place.
8. Slide the Front Ring Nut over the Screen
assembly and turn clockwise to rmly tighten
(make sure the tabs on the Screen remain aligned
with the notches on the Head). DO NOT overtighten the Front Ring Nut to avoid damaging the
Motor during operation.
Front
Ring Nut
Screen
Auger
-6-
Drive Shaft Assembly
Figure 3b
Beveled
Plastic
Bushing
Drive Shaft
Assembly
Rubber
Washer
Figure 3
Figure 4
Head
Page 7
9. Turn the Head Locking Knob
counterclockwise to loosen (gure 5).
10. Insert the Screen end of the fully-assembled
Screen/Head Assembly through the outlet
end of the Chute (gure 5).
11. Slide the Screen/Head
Assembly horizontally into the Head
onto the Motor (gure 6).
Screen/Head
Assembly
Figure 5
Head
Locking Knob
12. Turn the Head Locking Knob clockwise
to tighten the Screen/Head Assembly to the
Motor.
13. Install the Hopper onto the Head. Press
the Hopper down until fully seated (gure 7).
14. ALWAYS us the Stomper to
push food into the Head/Hopper,
NEVER use hands or ngers (gure 8).
Stomper
Hopper
Chute
Head
Figure 6
Figure 7
Figure 8
-7-
Page 8

INSTRUCTIONS FOR USE
NOTE: The Tomato Strainer cannot be used with meat products.
1. Cut large fruits and vegetables into quarters and small fruits and vegetables in half.
IMPORTANT: Remove pits, stems, hard shells and hard seeds before placing
fruits or vegetables into the Tomato Strainer to avoid damaging the Screen.
2. Be sure the Power Switch is in the off “O” position. Connect the power cord for the
Tomato Strainer to the power source.
3. Place the fruits/vegetables in the Hopper. Do not overll the Hopper. DO NOT
operate the Tomato Strainer without the Hopper in place.
4. Place a bowl under the Chute to collect juice and pulp. Place a bowl under the
Screen outlet to collect skin and seeds (gure 9).
5. Turn the Power Switch to the on “-” position.
6. Feed the fruits/vegetables into the Head. Use the Stomper to push the fruits/
vegetables into the Head. ALWAYS us the Stomper to push food into the Head/
Hopper, NEVER use hands or ngers.
HELPFUL HINTS:
A. Rerun the skin and seeds through the Tomato Strainer to extract any
leftover pulp & juice. Repeat as necessary.
B. Use a rubber spatula to scrape pulp from the Screen into the Chute.
7. When straining is complete, turn the Motor o the off “O” position and disconnect it
from the power source.
-8-
Page 9
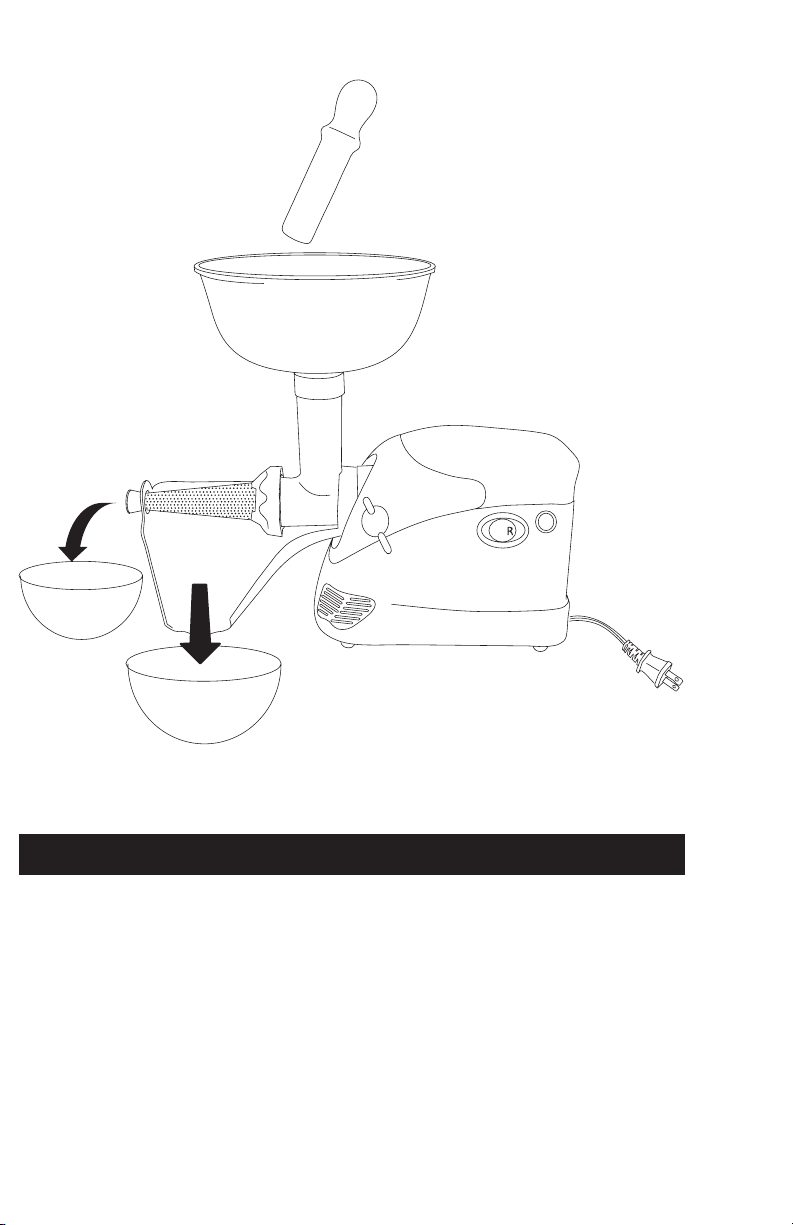
Bowl to collect the
skins and seeds
Stomper
Figure 9
Bowl to collect the
juice and pulp
REVERSE FUNCTION
The “R” Reverse Toggle is used primarily for clearing jams. In event of a jam;
• Turn the Power Switch to the off “O” position. Allow the Motor to come to a
COMPLETE STOP before toggling the “R” Reverse Toggle to clear a jam.
• Allow the Motor to come to a COMPLETE STOP before turning the Power Switch
to the on “-” position after using the reverse function.
• NEVER operate the Motor in reverse for more than 5 seconds at a time.
If the jam does not clear, disconnect the Tomato Strainer from the power source and
follow the “Disassembly & Cleaning Instructions” to clean the unit.
-9-
Page 10

RECIPES
LARGE BATCH ITALIAN TOMATO SAUCE
1/2 cup olive oil 3 medium onions, chopped 2 cloves garlic, minced
3 Tbsp brown sugar 1 Tbsp dried oregano 4 tsp salt
2 tsp dried basil 1 tsp black pepper 12 cups fresh tomato puree
• Heat the olive oil in a large pan
• Sauté the onions and garlic until tender, do not overly brown
• Add the rest of the ingredients
• Bring mixture to a boil, reduce heat and simmer partially covered for 2 hours or until
sauce has reduced to desired consistency
• Stir occasionally
• Serve or allow to cool then refrigerate or freeze
• Ingredients like sliced mushrooms, cooked/drained sausage, hamburger,
etc. can be added to taste
MARINARA SAUCE
1 cup carrots, nely minced 6 lbs ripe Italian-style tomato puree
1 cup onion, nely minced 1/2 cup celery, nely minced
1/2 cup olive oil 1 tsp sugar ground white pepper, to taste
Optional seasoning (any one of the following):
2 tsp ground coriander 1/2-1 tsp dried marjoram 1 tsp dried basil
1/4 to 1/2 tsp dried oregano 1 to 2 tsp salt
• Heat the olive oil in a large saucepan
• Cover and cook the onions, celery, and carrots over medium-low heat for about 15
minutes, stir occasionally
• Uncover and stir over heat for an additional 5 to 10 minutes, or until the vegetables
are soft and slightly golden
• Add the tomato sauce, sugar, and pepper
• Cover and simmer gently for 15 minutes
• Serve or allow to cool then refrigerate or freeze
-10-
Page 11

FOOD SAFETY
There are basic rules to follow when handling food.
They are COOK, SEPARATE, CLEAN, and CHILL.
COOK
It’s crucial to cook food to a safe internal temperature to destroy bacteria that is present. The safety of
hamburgers and other foods made with ground meat has been receiving a lot of attention lately, and with
good reason. When meat is ground, the bacteria present on the surface is mixed throughout the ground
mixture. If this ground meat is not cooked to at least 160oF to 165oF (71oC to 74oC), bacteria will not be
destroyed and there’s a good chance you will get sick.
Solid pieces of meat like steaks and chops don’t have dangerous bacteria like E. coli on the inside, so they
can be served more rare. Still, any beef cut should be cooked to an internal temperature of at least 145oF
(63oC) (medium rare). The safe temperature for poultry is 180oF (82oC) and solid cuts of pork should be
cooked to 160oF (71oC). Eggs should be thoroughly cooked too. If you are making a meringue or other
recipe that uses uncooked eggs, buy specially pasteurized eggs or use prepared meringue powder.
SEPARATE
Foods that will be eaten uncooked and foods that will be cooked before eating MUST ALWAYS be
separated. Cross-contamination occurs when raw meats or eggs come in contact with foods that will
be eaten uncooked. This is a major source of food poisoning. Always double-wrap raw meats and place
them on the lowest shelf in the refrigerator so there is no way juices can drip onto fresh produce. Then
use the raw meats within 1-2 days of purchase, or freeze for longer storage. Defrost frozen meats in the
refrigerator, not on the counter.
When grilling or cooking raw meats or sh, make sure to place the cooked meat on a clean platter. Don’t
use the same platter you used to carry the food out to the grill. Wash the utensils used in grilling after the
food is turned for the last time on the grill, as well as spatulas and spoons used for stir-frying or turning
meat as it cooks.
Make sure to wash your hands after handling raw meats or raw eggs. Washing hands with soap and water,
or using a pre-moistened antibacterial towelette is absolutely necessary after you have touched raw meat
or raw eggs. Not washing hands and surfaces while cooking is a major cause of cross-contamination.
CLEAN
Wash your hands and work surfaces frequently when you are cooking. Washing with soap and warm
water for at least 15 seconds, then dry with a paper towel.
CHILL
Chilling food is very important. The danger zone where bacteria multiply is between 40oF and 140oF (4oC
and 6oC). Your refrigerator should be set to 40oF (4oC) or below; your freezer should be 0oF (-17oC) or
below. Simple rule: serve hot foods hot, cold foods cold. Use chang dishes or hot plates to keep food hot
while serving. Use ice water baths to keep cold foods cold. Never let any food sit at room temperature for
more than 2 hours - 1 hour if the ambient temperature is 90oF (32oC) or above. When packing for a picnic,
make sure the foods are already chilled when they go into the insulated hamper. The hamper won’t chill
food - it just keeps food cold when properly packed with ice. Hot cooked foods should be placed in shallow
containers and immediately refrigerated so they cool rapidly. Make sure to cover foods after they are cool.
NOTE: Special considerations must be made when using venison or other wild game, since it can become
heavily contaminated during eld dressing. Venison is often held at temperatures that could potentially
allow bacteria to grow, such as when it is being transported. Refer to the USDA Meat and Poultry
Department for further questions or information on meat and food safety.
-11-
Page 12

ADDITIONAL ACCESSORIES
ACCESSORY PART
DESCRIPTION NUMBER
Food Grade Silicone Spray 03-0101-W
Electric Pasta Machine 01-0601-W
Traditional Pasta Machine 01-0201
5-Piece Canning Kit 83-2017-W
Pro 2300 Vacuum Sealer 65-0201
These products and many more products can be ordered by visiting
Monday thru Friday 8:00am-5:00pm EST. Outside the U.S. call 440-638-3131
WestonProducts.com or by calling
Weston Products LLC Toll Free at 1-800-814-4895
-12-
Page 13

WESTON WARRANTY INFORMATION
SAVE THIS WARRANTY INFORMATION FOR YOUR RECORDS!
Weston Products LLC warrants to the ORIGINAL RETAIL PURCHASER of this product that if operated in
accordance with the printed instruction accompanying it, then for a period of 1 year from the date of purchase,
the product shall be free from defects in material and workmanship.
The Warranty Card, along with a copy of the original receipt, must be received by Weston Products LLC
within 30 days from purchase date for the warranty to apply. Failure to send the completely lled out Warranty
Card, along with a copy of the original receipt, will void the warranty.
The product must be delivered to or shipped freight prepaid to Weston Products LLC for warranty services,
in either its original packaging or similar packaging affording an equal degree of protection. Damage due to
shipping is not the responsibility of the company. Weston Products LLC charges a $35.00 per hour bench
charge. NOTE: No repairs will be started without the authorization of the customer. The return shipping cost
to the customer will be added to the repair invoice.
Weston Products LLC will repair (or at its discretion, replace) the product free of charge, if in the judgment
of the company, it has been proven to be defective as to seller’s labor and material, within the warranty period.
New or rebuilt replacements for factory defective parts will be supplied for one (1) year from the date of
purchase. Replacement parts are warranted for the remainder of the original warranty period.
For non-warranty repairs, contact Weston Products LLC’s Customer Service at 1-800-814-4895 M-F
8am-5pm EST (outside of the United States 440-638-3131) to obtain a Return Merchandise Authorization
Number (RMA Number). Weston Products LLC will refuse all returns that do not contain this number. DO
NOT RETURN THE UNIT WITHOUT PROPER AUTHORIZATION FROM WESTON PRODUCTS LLC.
LIMITATIONS: The warranty is void if the product is used for any purpose other than that for which it is
designed. The product must not have been previously altered, repaired, or serviced by anyone else other
than Weston Products LLC. If applicable, the serial number must not have been altered or removed. The
product must not have been subjected to accident in transit or while in the customer’s possession, misused,
abused, or operated contrary to the instructions contained in the instruction manual. This includes failure
caused by neglect of reasonable and necessary maintenance, improper line voltage and acts of nature. This
warranty is not transferable and applies only to U.S. and Canadian sales.
Except to the extent prohibited by applicable law, no other warranties whether expressed or implied,
including warranty merchantability and tness for a particular purpose, shall apply to this product. Under no
circumstances shall Weston Products LLC be liable for consequential damages sustained in connection with
said product and Weston Products LLC neither assumes nor authorizes any representative or other person to
assume for it any obligation or liability other than such as is expressly set forth herein. Any applicable implied
warranties are also limited to the one (1) year period of the limited warranty.
This warranty covers only the product and its specic parts, not the food or other products processed in it.
CUT ALONG THE DOTTED LINE AND SEND THE WARRANTY CARD ALONG WITH A COPY OF YOUR ORIGINAL
PURCHASE RECEIPT TO:
20365 Progress Drive, Strongsville, OH 44149
Weston Products LLC
WESTON WARRANTY CARD
SEND THIS CARD ALONG WITH A COPY OF YOUR ORIGINAL PURCHASE RECEIPT TO:
WESTON WARRANTY, WESTON PRODUCTS LLC, 20365 PROGRESS DRIVE, STRONGSVILLE, OH 44149
Customer Name: _________________________________
Address: _______________________________________
City/State/Zip: ___________________________________
Telephone Number: (_________) ____________________
E-Mail Address: _________________________________
Original Date of Purchase: ______/________/________
Product Model #: _________________________________
Serial # (if applicable): ______________________
Page 14

Colador de tomates
eléctrico de lujo
MODELO N° 82-0202-W
3080265
Debido a constantes mejoras en la fábrica, el producto que se muestra puede
ser ligeramente diferente del producto recibido.
REV112113
Page 15

7 8
1
Botón de
Perilla para
trabar el
cabezal
6
reversa
de encendido y
-O
R
Interruptor
apagado
INSTRUCCIONES EN ESPAÑOL
10
Pantalla
2
Cuerpo
5
4
9
-15-
3
4a
principal
Page 16

LISTA DE COMPONENTES
NÚMERO EN DESCRIPCIÓN NÚMERO
DIAGRAMA DE PARTE DE PARTE
1 Pisón 82-0109
2 Tolva 82-0210
3 Cabezal 82-0111
Resorte
4
Arandela de metal (2) 82-0124
Eje de
transmisión
Ensamblado
Eje de transmisión
Cojinete de plástico 82-0114
4a
Arandela de caucho biselada
cojinetes
Juego de
5 Taladro de plástico 82-0125
6 Pantalla estándar para tomates y bayas 82-0129
7 Pantalla para calabaza 82-0211
8 Pantalla para salsas 82-0212
9 Vertedero 82-0130
10 Tuerca de aro frontal 82-0118
Si cualquier componente de esta unidad está descompuesto, si la unidad no funciona debidamente o si
INSTRUCCIONES EN ESPAÑOL
O llame a Weston Products LLC larga distancia sin costo 1-800-814-4895
De lunes a viernes, de 8:00 am a 5:00 pm EST Fuera de Estados Unidos llame al 440-638-3131
necesita un reemplazo del instructivo, visítenos en la Web en
WestonProduct.com/support
ADVERTENCIA Es importante seguir los lineamientos "Seguridad en alimentos" establecidos
en este manual. Visite el sitio Web de USDA para ver las instrucciones actualizadas.
¡ADVERTENCIA!
¡MANTENGA LOS DEDOS, LAS MANOS
Y CUALQUIER PARTE DEL CUERPO Y
OBJETOS EN GENERAL ALEJADOS DEL
¡SIEMPRE UTILICE EL PISÓN
PARA EMPUJAR LOS ALIMENTOS
DENTRO DEL CABEZAL O LA TOLVA!
¡NUNCA MANEJE ESTE APARATO
SIN LA TOLVA INSTALADA EN EL CABEZAL!
¡MANTÉNGALO ALEJADO DE LOS NIÑOS!
¡DESCONÉCTELO SIEMPRE DE LA TOMA
DE CORRIENTE CUANDO NO LO ESTÉ
CABEZAL!
USANDO!
Antes de limpiar, ensamblar o desarmar el aparato, cerciórese de que
esté APAGADO y que LA CLAVIJA ESTÉ RETIRADA DEL TOMACORRI-
-16-
¡PELIGRO! 120 volts
¡PELIGRO! 120 volts
¡PARA EVITAR CHOQUES ELÉCTRICOS NO
ABRA NI QUITE EL PANEL TRASERO!
¡NO SUMERJA EL CUERPO DEL APARATO EN AGUA!
¡NUCA USE APARATOS ELÉCTRICOS CERCA DEL AGUA!
¡NUNCA DEJE SIN SUPERVISIÓN ESTE APARATO!
¡Desconéctelo de la toma de corriente cuando no lo esté usando!
ENTE O FUENTE DE ENERGÍA.
Page 17

REGLAS GENERALES DE SEGURIDAD
LEA Y ENTIENDA COMPLETAMENTE TODAS LAS
INSTRUCCIONES Y ADVERTENCIAS ANTES DE UTILIZAR
ESTE PRODUCTO. ¡SU SEGURIDAD ES LO MÁS
IMPORTANTE! NO SEGUIR LOS PROCEDIMIENTOS Y
PRECAUCIONES PUEDE PROVOCAR LESIONES GRAVES
¡ADVERTENCIA!
1. Inspeccione meticulosamente el colador de
tomates antes de cada uso. NO USE el colador
de tomates si cualquiera de sus partes (incluso el
cable de corriente y la clavija) está rota o dañada.
Si el colador de tomates está dañado en cualquier
sentido, comuníquese al Centro de Servicio al
Cliente, en el número telefónico indicado en la parte
nal de este folleto.
2. ANTES de usar el colador de tomates por
primera vez, lave cuidadosamente con
agua caliente y jabonosa todas las partes
que vayan a estar en contacto con los
alimentos. Enjuague con agua limpia. Seque
todas las partes antes de volver a armar el colador
de tomates. Solo las partes de plástico del colador
de tomates pueden lavarse en la rejilla superior del
lavavajillas NO COLOQUE las partes metálicas del
motor del colador de tomates en el lavavajillas.
3. Nunca sumerja el motor en agua u otro líquido.
Límpielo frotándolo con un paño húmedo.
4. Conecte el colador de tomates
únicamente a un tomacorriente de 120
voltios y 60 Hz. EVITE usar cables de extensión.
5. Siempre desconecte el colador de tomates de
la toma de corriente cuando no lo esté usando.
6. Antes de limpiar, ensamblar o desarmar
el colador de tomates revise que esté
apagado y desconectado de la toma de
corriente. Para asegurarse de que no haya
corriente en el motor, pase el interruptor de
apagado a encendido y viceversa.
Y DAÑOS MATERIALES. RECUERDE: ¡SU SEGURIDAD
PERSONAL ES RESPONSABILIDAD DE USTED!
7. MANTENGA LOS DEDOS Y OTROS
OBJETOS AJENOS ALEJADOS de la entrada del
colador de tomates mientras esté funcionando.
8. Utilice SOLAMENTE el pisón para empujar
los alimentos dentro del colador de tomates. ¡NO
USE los dedos!
9. MANTENGA EL COLADOR DE TOMATES
ALEJADO DE LOS NIÑOS. NO DEJE EL
COLADOR DE TOMATES SIN SUPERVISIÓN.
10. Para impedir que arranque inadvertidamente,
revise que el interruptor este en la posición "0"
antes de conectar el colador de tomates en el
tomacorriente.
11. NO MUELA huesos, nueces u otros artículos
duros en el colador de tomates.
12. NO USE accesorios de otros fabricantes. Usar
accesorios no autorizados anula la garantía.
13. Recójase el pelo suelto y la ropa, enróllese las
mangas y quítese corbatas y joyería como relojes,
anillos y brazaletes antes de operar el colador de
tomates.
14. Si se atora el colador de tomates préndalo
brevemente en reversa para desatascarlo.
15 NO USE el colador de tomates bajo los efectos
de drogas o alcohol
16. Para uso exclusivo en interiores.
17. Para uso doméstico únicamente.
INSTRUCCIONES EN ESPAÑOL
¡GUARDE ESTAS INSTRUCCIONES!
¡MANTENGA LOS DEDOS, LAS MANOS
Y CUALQUIER PARTE DEL CUERPO Y
OBJETOS EN GENERAL ALEJADOS DEL
¡SIEMPRE UTILICE EL PISÓN
PARA EMPUJAR LOS ALIMENTOS
DENTRO DEL CABEZAL O LA TOLVA!
¡NUNCA MANEJE ESTE APARATO
SIN LA TOLVA INSTALADA EN EL CABEZAL!
¡MANTÉNGALO ALEJADO DE LOS NIÑOS!
¡DESCONÉCTELO SIEMPRE DE LA TOMA
DE CORRIENTE CUANDO NO LO ESTÉ
Consúltelas con frecuencia y úselas para enseñarles a otros.
¡ADVERTENCIA!
¡NO SUMERJA EL CUERPO DEL APARATO EN AGUA!
CABEZAL!
USANDO!
¡NUCA USE APARATOS ELÉCTRICOS CERCA DEL AGUA!
¡Desconéctelo de la toma de corriente cuando no lo esté usando!
Antes de limpiar, ensamblar o desarmar el aparato, cerciórese de que
esté APAGADO y que LA CLAVIJA ESTÉ RETIRADA DEL TOMACORRI-
-17-
¡PELIGRO! 120 volts
¡PELIGRO! 120 volts
¡PARA EVITAR CHOQUES ELÉCTRICOS NO
ABRA NI QUITE EL PANEL TRASERO!
¡NUNCA DEJE SIN SUPERVISIÓN ESTE APARATO!
ENTE O FUENTE DE ENERGÍA.
Page 18

INSTRUCCIONES PARA LA CORRIENTE
Este aparato tiene una clavija polarizada (una pata
es más ancha que la otra). Para reducir el riesgo
de choque eléctrico, esta clavija debe estar bien
metida en el tomacorriente. Si la clavija no entra,
dele la vuelta y vuelva a intentar. Si aun así no
entra, comuníquese con un electricista calicado
para que actualice los tomacorrientes de su casa.
NO modique la clavija de ninguna manera.
INSTRUCCIONES DE DESARMADO Y LIMPIEZA
¡ADVERTENCIA! Antes de limpiar, ensamblar o desarmar el colador de tomates revise
que esté apagado y desconectado de la toma de corriente. Para asegurarse de que no haya
corriente en el motor, pase el interruptor de apagado a encendido y viceversa.
Antes de usar por primera vez el colador de tomates, lave cuidadosamente todas
las partes y accesorios como se indica a continuación. NO sumerja el Motor en
agua ni en ningún otro líquido.
1. Apague la unidad del motor y desconéctela de la toma de corriente.
2. Quite la tolva del cabezal.
3. Gire la tuerca de bloqueo del cabezal en sentido contrario a las manecillas para
aojar el cabezal del motor. Jale el conjunto de cabezal y pantalla ligeramente
hacia adelante, al tiempo que levanta la parte trasera para retirarla del motor.
INSTRUCCIONES EN ESPAÑOL
4. Gire la tuerca de aro frontal en sentido contrario a las manecillas para quitarla
del cabezal.
5. Desarme todas las piezas del conjunto de cabezal y pantalla.
6. Gire suavemente el vertedero en sentido de las manecillas para desenganchar
las pestañas del motor.
7. ¡ADVERTENCIA! NO sumerja el motor en agua ni en ningún otro líquido.
Limpie el motor con una toalla o un paño húmedo y después frótelo para secarlo.
Lave en agua caliente y jabonosa todas las partes que entren en contacto con los
alimentos. Enjuague con agua limpia. Seque todas las piezas de inmediato.
NOTA: Solo las partes de plástico del colador de tomates pueden lavarse en la
rejilla superior del lavavajillas.
8. Cubra las pantallas, el cabezal y el
conjunto del eje de transmisión con un
rocío de silicona para cocina.
NUNCA SUMERJA
el motor en agua u
otro líquido. Límpielo
frotándolo con un paño
húmedo.
-18-
Page 19

ENSAMBLE
¡ADVERTENCIA! Antes de limpiar, ensamblar o desarmar el colador de
tomates revise que esté apagado y desconectado de la toma de corriente. Para
asegurarse de que no haya corriente en el motor, pase el interruptor de apagado
a encendido y viceversa.
1. Sostenga el vertedero con la salida
inclinada casi totalmente hacia abajo y el aro del
cabezal viendo hacia el motor (gura 1).
2. Coloque el aro del cabezal del vertedero
encima de la cara redonda levantada en el
frente del motor. Coloque las pestañas del aro
del cabezal junto a las ranuras en las pestañas
correspondientes que se extienden de la cara
redonda (gura 2).
3. Gire el vertedero de plástico en sentido
contrario a las manecillas hasta que las pestañas
se ajusten en las ranuras. El vertedero de
plástico ahora debe estar rmemente jo en su
posición. Cuando está colocado debidamente,
la salida del vertedero debe caer ligeramente
hacia abajo.
4. Ensamble el extremo redondo del eje de
trasmisión con una arandela de metal, resorte,
arandela de metal, cojinete de plástico y la
arandela de goma biselada. (gura 3) NOTA:
La arandela de goma biselada tiene dos lados:
el lado plano y el biselado. El lado biselado
se ajusta en la parte superior del cojinete de
plástico como tapa (gura 3b).
5. Inserte el extremo cuadrado del eje de
trasmisión en la ranura correspondiente del
taladro (gura 4).
6. Inserte el conjunto de taladro y eje de
trasmisión en el cabezal.
7. Coloque la pantalla sobre el taladro.
Alinee las pestañas de la pantalla con las
muescas del cabezal. Sostenga la pantalla en
su lugar.
8. Deslice la tuerca de aro frontal sobre el
conjunto de la pantalla y gírela en el sentido de
las manecillas para apretarla rmemente (revise
que las pestañas de la pantalla se mantengan
alineadas con las muescas del cabezal). NO
apriete demasiado la tuerca de aro frontal
para evitar daños en el motor durante su
funcionamiento.
frontal
del cabezal
Pantalla
Taladro
Vertedor
Vertedero
Pestañas en el
motor
Conjunto del eje
de transmisión
Figura 3b
Cojinete
de plástico
Conjunto del
eje de trasmisión
Aro del
cabezal
Motor
redondo, cara
levantada en el
frente del motor
Arandela
biselada
de goma
Figura 1
Figura 2
Tuerca
de aro
Figura 3
Figura 4
INSTRUCCIONES EN ESPAÑOL
-19-
Page 20

9. Gire la perilla de bloqueo del cabezal
en sentido contrario a las manecillas para
aojarla (gura 5).
10. Inserte el extremo de la pantalla en
el conjunto de pantalla y cabezal ya
ensamblado a través del extremo de salida
del vertedero (gura 5).
11. Deslice el conjunto de cabezal y
pantalla horizontalmente en el cabezal hacia
el motor (gura 6).
12. Gire la perilla de bloqueo del cabezal
en el sentido de las manecillas para apretar el
conjunto de cabezal y pantalla en el Motor.
13. Instale la tolva en el cabezal. Presione
la tolva hacia abajo hasta que se asiente
perfectamente (gura 7).
14. SIEMPRE use el pisón para empujar los
alimentos en el cabezal o la tolva. NUNCA
usa las manos o los dedos (gura 8).
Conjunto de
pantalla y cabezal
Vertedor
Figura 5
Perilla de bloqueo
del cabezal
Figura 6
INSTRUCCIONES EN ESPAÑOL
Pisón
Figura 8
-20-
Tolva
Perilla de
bloqueo
Figura 7
Page 21

INSTRUCCIONES DE USO
NOTA: El colador de tomates no puede usarse con productos de carne.
1. Corte las frutas y verduras grandes en cuartos y las pequeñas en mitades.
IMPORTANTE: Elimine los tallos, semillas, cáscaras duras y semillas
duras antes de colocar las frutas y verduras en el colador de tomates para
evitar dañar la pantalla.
2. Revise que el interruptor esté apagado en la posición "0". Conecte el cable de
corriente del colador de tomates en el tomacorriente.
3. Coloque las frutas y verduras en la tolva. No sobrecargue la tolva. NO opere
el colador de tomates sin la tolva en su lugar.
4. Coloque un cuenco bajo el vertedero para recoger el jugo y la pulpa. Coloque
un cuenco bajo la salida de la pantalla para recoger la piel y las semillas (gura 9).
5. Ponga el interruptor de corriente en la posición de encendido "-".
6. Coloque las frutas y verduras en el cabezal. Siempre use el pisón para empujar
las frutas y verduras en el cabezal. SIEMPRE use el pisón para empujar los
alimentos en el cabezal o la tolva, NUNCA use las manos o los dedos.
CONSEJOS ÚTILES
A. Vuelva a pasar la piel y las semillas por el colador de tomates para extraer
el jugo y la pulpa que pudieran haber quedado. Repita si es necesario.
B. Use una espátula de goma para raspar la pulpa de la pantalla hacia el
vertedero.
7. Cuando haya terminado de colar, apague el motor poniéndolo en la posición "0"
y desconéctelo del tomacorriente.
INSTRUCCIONES EN ESPAÑOL
¡ADVERTENCIA!
¡MANTENGA LOS DEDOS, LAS MANOS
Y CUALQUIER PARTE DEL CUERPO Y
OBJETOS EN GENERAL ALEJADOS DEL
¡SIEMPRE UTILICE EL PISÓN
PARA EMPUJAR LOS ALIMENTOS
DENTRO DEL CABEZAL O LA TOLVA!
¡NUNCA MANEJE ESTE APARATO
SIN LA TOLVA INSTALADA EN EL CABEZAL!
¡MANTÉNGALO ALEJADO DE LOS NIÑOS!
¡DESCONÉCTELO SIEMPRE DE LA TOMA
DE CORRIENTE CUANDO NO LO ESTÉ
CABEZAL!
USANDO!
¡PELIGRO! 120 volts
¡PELIGRO! 120 volts
¡PARA EVITAR CHOQUES ELÉCTRICOS NO
ABRA NI QUITE EL PANEL TRASERO!
¡NO SUMERJA EL CUERPO DEL APARATO EN AGUA!
¡NUCA USE APARATOS ELÉCTRICOS CERCA DEL AGUA!
¡NUNCA DEJE SIN SUPERVISIÓN ESTE APARATO!
¡Desconéctelo de la toma de corriente cuando no lo esté usando!
Antes de limpiar, ensamblar o desarmar el aparato, cerciórese de que
esté APAGADO y que LA CLAVIJA ESTÉ RETIRADA DEL TOMACORRI-
-21-
ENTE O FUENTE DE ENERGÍA.
Page 22

Cuenco para recibir
la piel y las semillas
INSTRUCCIONES EN ESPAÑOL
Pisón
Figura 9
Cuenco para recibir
el jugo y la pulpa
FUNCIÓN DE REVERSA
El interruptor de reversa "R" sirve básicamente para solucionar atascos. En caso
de atasco:
• Apague el interruptor de corriente en la posición "0".. Permita que el motorse
DETENGA POR COMPLETO antes de oprimir el interruptor de reversa “R” para
solucionar un atasco.
• Permita que el motor se DETENGA POR COMPLETO antes de encender el
interruptor en la posición “-” después de haber usado la función de reversa.
• Nunca opere el motor en reversa durante más de 5 segundos seguidos.
Si no se despeja el atasco, desconecte el colador de tomates del tomacorriente y
siga las "Instrucciones de desarmado y limpieza" para limpiarlo.
-22-
Page 23

RECETAS
CONVERSIONES DE UNIDADES DE
VOLUMEN
1 cucharadita 5 ml
1 cucharada 15 ml
1/8 de taza o 1 onza 30 ml
1/4 de taza o 2 onzas 60 ml
1/3 de taza 80 ml
1/2 de taza o 4 onzas 120 ml
2/3 de taza 160 ml
3/4 de taza o 6 onzas 180 ml
1 taza, 8 onzas o 1/2 pinta 240 ml
1 1/2 tazas o 12 onzas 350 ml
2 tazas, 16 onzas o 1 pinta 475 ml
3 tazas, o 1 1/2 pintas 700 ml
4 tazas, 2 pintas o 1 cuarto 950 ml
4 cuartos o 1 galón 3.8L
CONVERSIONES DE UNIDADES
DE PESO
1 onza 28 g
1/4 libra o 4 onzas 113 g
1/3 libra 150 g
1/2 libra u 8 onzas 230 g
2/3 libra 300 g
3/4 libra o 12 onzas 340 g
1 libra o 16 onzas 450 g
2 libras 900 g
ANTES DE USAR: Es mejor ablandar algunos alimentos
antes de usarlos. Si el alimento es rme, como las papas,
manzanas y peras, no olvide ablandarlo al vapor o cociéndolo
antes de usarlo en el colador.
LOTE GRANDE DE SALSA ITALIANA DE TOMATE
1/2 taza de aceite de oliva 3 cebollas medianas picadas
2 dientes de ajo picados 3 cucharadas de azúcar morena
1 cucharada de orégano seco 4 cucharaditas de sal
2 cucharaditas de albahaca seca 1 cucharadita de pimienta negra tomates frescos
• Pase los tomates frescos por el colador de alimentos y salsera usando el disco
multiusos para sacar 12 tazas de puré de tomate fresco.
• Caliente el aceite de oliva en un sartén grande.
• Saltee las cebollas y el ajo hasta que estén blandos sin que se oscurezcan.
• Vierta el resto de los ingredientes.
• Deje que hierva la mezcla, baje la llama y deje cocinando a fuego lento con el
sartén parcialmente cubierto durante dos horas o hasta que la salsa haya adquirido la
consistencia deseada.
• Remueva ocasionalmente.
• Sírvala caliente o permita que se enfríe y refrigérela.
• Puede reforzar el sabor con ingredientes como champiñones rebanados, salchichas
cocidas y drenadas, hamburguesas, etc.
INSTRUCCIONES EN ESPAÑOL
SALSA MARINARA
1 taza de zanahorias namente picadas 6 libras de puré de tomate maduro estilo italiano
1 taza de cebolla namente picada 1/2 taza de apio namente picado
1/2 taza de aceite de oliva
1 tsp sugar ground white pepper, to taste
Condimentos adicionales (cualquiera de los siguientes):
2 cucharaditas de cilantro molido 1/2 a 1 cucharadita de mejorana seca
1 cucharadita de albahaca seca 1/4 a 1/2 cucharadita de orégano seco
1 a 2 cucharaditas de sal
• Caliente el aceite de oliva en una sartén grande.
• Cocine las cebollas, el apio y las zanahorias a fuego mediano durante unos 15 minutos
con el sartén tapado; revuelva ocasionalmente.
• Destape y agite sobre el fuego durante 5 a 10 minutos más, o hasta que las verduras
estén suaves y ligeramente doradas.
• Vierta la salsa de tomate, el azúcar y la pimienta.
• Cubra y cueza a fuego lento durante 15 minutos más.
• Sírvala caliente o permita que se enfríe y refrigérela.
-23 -
Page 24

INFORMACIÓN DE GARANTÍA WESTON
¡GUARDE ESTA INFORMACIÓN DE GARANTÍA PARA SUS REGISTROS!
Weston Products LLC garantiza al COMPRADOR AL DETALLE ORIGINAL de este producto que si funciona en cumplimiento con
las instrucciones impresas adjuntas, entonces por un período de 1 año desde la fecha de compra, el producto se considerará libre de
La Tarjeta de Garantía, junto con una copia del recibo original debe ser recibida por Weston Products LLC dentro de 30 días desde la
fecha de compra para hacer efectiva la garantía. Si no se envía la Tarjeta de Garantía completamente llena, junto con una copia del
El producto debe ser enviado o despachado mediante ete prepagado a Weston Products LLC para efectuar los servicios establecidos
en la garantía, en su envase original o en un envase similar que garantice igual grado de protección. El daño producto del despacho no
es responsabilidad de la compañía. Weston Products LLC cobra $35.00 por concepto de mesón por hora. NOTA: Las reparaciones no
se iniciarán sin la autorización del cliente. El costo por despacho de devolución al cliente se agregará a la factura por reparación.
Antes de devolver el producto para la Reparación según la Garantía, el producto debe estar completamente limpio y libre de partículas
de alimentos u otros fragmentos. El incumplimiento del comprador respecto de esta norma resultará en el envío de la unidad sin
Weston Products LLC reparará (o a su decisión, cambiará) el producto sin cobro, si a juicio de la compañía, se ha demostrado que está
Los cambios de productos nuevos o reacondicionados por partes defectuosas de fábrica serán suministrados por un (1) año desde la
Para las reparaciones que no estén cubiertas en la garantía, comuníquese con Servicio al Cliente de Weston Products LLC al 1-800-
814-4895 de lunes a viernes, desde las 8 a.m. hasta las 5pm EST (Desde fuera de los Estados Unidos comuníquese al 440-638-3131)
para solicitar un Número de Autorización de Devolución de la Mercadería (Número RMA). Weston Products LLC rechazará todo envío
que no contenga este número. NO DEVUELVA LA UNIDAD SIN LA AUTORIZACIÓN DE WESTON PRODUCTS LLC.
LIMITACIONES: La garantía queda invalidada si el producto se utiliza para algún objetivo que no sea aquél para el cual está diseñado.
El producto no debe haber sido previamente alterado, reparado, ni tampoco se le debe haber hecho servicio técnico por cualquier
otra persona que no sea de Weston Products LLC. Si corresponde, no se debe alterar o eliminar el número de serie. El producto no
debe estar sujeto a accidentes durante el transporte o estando en posesión del cliente, no debe ser mal usado, mal tratado, u operado
en forma contraria a las instrucciones de este manual. Esto incluye toda falla causada por negligencia de mantención razonable o
necesaria, voltaje de línea inadecuado o actos de la naturaleza. Esta garantía es intransferible y sólo se aplica a ventas realizadas en
Salvo en la medida en que lo prohíba la ley correspondiente, ninguna otra garantía expresa o implícita, incluyendo comerciabilidad o
aptitud de la garantía para un objetivo en particular, aplicará a este producto. Bajo ninguna circunstancia Weston Products LLC será
responsable de daños emergentes sostenidos en conexión con dicho producto y Weston Products LLC no asume ni autoriza a ningún
representante u otra persona a asumir por él ninguna obligación o responsabilidad que no sea aquella expresamente establecida en
esta tarjeta de garantía. Toda garantía correspondiente implícita también se limita a un período de un (1) año de la garantía limitada.
Esta garantía cubre sólo el producto y sus partes especícas, no cubre los alimentos u otros productos procesados en él.
CORTE POR LA LÍNEA PUNTEADA Y ENVÍE LA TARJETA DE GARANTÍA JUNTO CON UNA COPIA DE SU RECIBO DE COMPRA
reparación. En algunos casos, podría aplicar un sobrecargo de $50 por concepto de limpieza.
defectuoso respecto de la mano de obra y material del vendedor, dentro del período de garantía.
fecha de compra. Las partes cambiadas están garantizadas por el resto del período original de garantía.
20365 Progress Drive, Strongsville, OH 44149 U.S.A.
defectos respecto del material y mano de obra.
recibo original, anulará la garantía.
Estados Unidos y Canadá.
Weston Products LLC / WARRANTY
ORIGINAL A
TARJETA DE GARANTÍA WESTON
ENVÍE ESTA TARJETA JUNTO CON UNA COPIA DE SU RECIBO DE COMPRA ORIGINAL A: WESTON
PRODUCTS LLC/WARRANTY, 20365 PROGRESSS DRIVE. STRONGSVILLE, OH 44149 U.S.A
Nombre del Cliente: _______________________________
Dirección: ______________________________________
Ciudad/Estado/Código Zip/País: ______________________
Número Telefónico: (_________) ____________________
Dirección de Correo Electrónico: _____________________
Fecha de Compra Original: ______/________/___________
Modelo del Producto #: _____________________________
# de Serie (Si corresponde): ________________________
Page 25

Tamis électrique de luxe
pour tomates
MODÈLE Nº 82-0202-W
3080265
En raison des améliorations constantes apportées à l'usine, le produit illustré peut
légèrement différer de celui que vous avez acheté.
RÉV. 112113
Page 26

1
Bouton de
verrouillage de
la tête
6
d'inversion
R
INSTRUCTIONS EN FRANÇAIS
7 8
Bouton
Commutateur
Marche/Arrêt
-O
10
Crépine
2
Corps principal
5
4
9
-26-
3
4a
Page 27

LISTE DES PIÈCES
Nº DESCRIPTION Nº
SCHÉMA PIÈCE PIÈCE
1 Pilon 82-0109
2 Bol 82-0210
3 Tête 82-0111
Ressort
4
Rondelle métallique (2) 82-0124
d'entraînement
Arbre d'entraînement
Ensemble arbre
Douille en plastique 82-0114
4a
Rondelle bisautée en caoutchouc
Jeu de
bagues
5 Vis sans n en plastique 82-0125
6 Crépine standard pour tomates/baies 82-0129
7 Crépine pour potiron 82-0211
8 Crépine pour salsa 82-0212
9 Chute 82-0130
10 Écrou à ailette avant 82-0118
Si l'un des composants de cette unité est endommagé ou si l'unité ne fonctionne pas
ou si vous avez besoin d'un manuel d'instruction de remplacement, visitez notre site Web à
INSTRUCTIONS EN FRANÇAIS
WestonProduct.com/support
Vous pouvez également contacter Weston Products LLC au numéro sans frais suivant+
Du lundi au vendredi de 8h00 à 17h00 (Heure de New York). En dehors des États-Unis, appelez le 440-638-3131
ATTENTION! Il est important de respecter toutes les consignes de sécurité concernant les aliments
qui sont stipulées dans ce manuel. Consultez les instructions mises à jour sur le site Internet de l'USDA.
AVERTISSEMENT!
TENIR LES DOIGTS, LES MAINS ET
AUTRES PARTIES DU CORPS AINSI QUE
TOUT OBJET À L’ÉCART DE LA TÊTE!
TOUJOURS UTILISER LE PILON
FOURNI POUR POUSSER LES
ALIMENTS DANS LE
BOL/LA TÊTE!
NE JAMAIS UTILISER CET
APPAREIL SANS LE BOL INSTALLÉ SUR LA TÊTE!
TENIR LES ENFANTS À L’ÉCART!
TOUJOURS DÉBRANCHER L’APPAREIL DE LA
SOURCE D’ALIMENTATION LORSQU’IL N’EST
PAS UTILISÉ!
POUR ÉVITER TOUT RISQUE D’ÉLECTROCUTION,
NE PAS OUVRIR NI RETIRER LE PANNEAU ARRIÈRE!
NE JAMAIS IMMERGER LE CORPS DE L’APPAREIL DANS L’EAU!
NE JAMAIS UTILISER D’APPAREILS ÉLECTRIQUES PRÈS DE L’EAU!
NE JAMAIS LAISSER CET APPAREIL SANS SUPERVISION!
Avant de procéder au nettoyage, au montage ou au démontage de
l’appareil, s’assurer que l’appareil est HORS TENSION et que la FICHE
-27-
DANGER! 120 V
Débranchez l’appareil de la source d’alimentation
lorsqu’il n’est pas utilisé!
A ÉTÉ RETIRÉE DE LA PRISE/SOURCE D’ALIMENTATION!
1 (800) 814-4895
Page 28

CONSIGNES DE SÉCURITÉ GÉNÉRALES
LIRE ET BIEN COMPRENDRE TOUTES LES INSTRUCTIONS
ET TOUS LES AVERTISSEMENTS AVANT DE SE SERVIR DE
CE PRODUIT. VOTRE SÉCURITÉ EST CE QUI COMPTE LE
PLUS! SI CES PROCÉDURES ET CONSIGNES DE SÉCURITÉ
NE SONT PAS RESPECTÉES, DE GRAVES BLESSURES ET
AVERTISSEMENT!
1. Inspectez soigneusement le tamis pour
tomates avant chaque utilisation. NE PAS utiliser
le tamis pour tomates si une partie quelconque (y
compris le cordon d'alimentation et la che) est
brisée ou endommagée. Si le tamis pour tomates
est endommagé de quelque façon, contactez le
Service à la clientèle au numéro de téléphone
indiqué au verso de cette brochure.
2. AVANT d'utiliser le tamis pour tomates pour
la première fois, lavez soigneusement dans de l'eau
chaude savonneuse, toutes les pièces qui seront en
contact avec les aliments. Rincez à l'eau fraîche.
Séchez toutes les pièces avant d'assembler le
tamis pour tomates. Seules les pièces en plastique
du tamis pour tomates peuvent être lavées dans le
panier supérieur du lave-vaisselle. NE PAS placer
de pièces métalliques ni le moteur du tamis pour
tomates dans le lave-vaisselle.
3. NE JAMAIS immerger le moteur dans l'eau
ou tout autre liquide. Nettoyez-le avec un chiffon
humide.
INSTRUCTIONS EN FRANÇAIS
4. Branchez le tamis pour tomates
UNIQUEMENT dans une prise 120 V, 60 Hz. NE
PAS utiliser de rallonge.
5. TOUJOURS DÉBRANCHER le tamis pour
tomates de la source d'alimentation lorsque l'unité
n'est pas utilisée.
6. Avant le nettoyage, le montage ou le démontage
du tamis pour tomates, assurez-vous qu'il est éteint
(O) et déconnecté de la source d'alimentation. Faites
un essai an de garantir que le moteur n'est plus
sous tension en mettant le moteur sous tension (-)
puis hors tension (O).
DES DOMMAGES MATÉRIELS PEUVENT EN RÉSULTER.
RAPPELEZ-VOUS: VOUS ÊTES RESPONSABLE DE
VOTRE SÉCURITÉ!
7. TENIR LES DOIGTS ET TOUT AUTRE OBJET
À L'ÉCART du tamis pour tomates pendant le
fonctionnement.
8. Utilisez le pilon UNIQUEMENT pour pousser
dans le tamis pour tomates. NE JAMAIS utiliser
les doigts!
9. TENIR LES ENFANTS À L'ÉCART DU TAMIS
POUR TOMATES. NE PAS LAISSER LE TAMIS
POUR TOMATES SANS SURVEILLANCE.
10. Pour éviter tout démarrage accidentel,
assurez-vous que le commutateur de marche/arrêt
est en position d'arrêt (O) avant de brancher le
tamis pour tomates à la source d'alimentation.
11. NE PAS broyer d'os, de noix ou d'autres objets
durs dans le tamis pour tomates.
12. NE PAS utiliser d'accessoires d'autres
fabricants. L'utilisation d'accessoires non autorisés
annule la garantie.
13. Attachez les cheveux et les vêtements,
retroussez les manches longues et enlevez les
cravates et les bijoux, y compris montres, bagues
et bracelets avant d'utiliser le tamis pour tomates.
14. Si le tamis pour tomates se coince,
enclenchez-le brièvement en marche arrière pour
dégager l'obstruction.
15 NE PAS utiliser le tamis pour tomates sous
l'inuence de l'alcool ou d'une drogue quelconque
16. Pour utilisation à l'intérieur uniquement.
17. Utilisation domestique uniquement.
CONSERVER CES INSTRUCTIONS!
TENIR LES DOIGTS, LES MAINS ET
AUTRES PARTIES DU CORPS AINSI QUE
TOUT OBJET À L’ÉCART DE LA TÊTE!
TOUJOURS UTILISER LE PILON
FOURNI POUR POUSSER LES
ALIMENTS DANS LE
BOL/LA TÊTE!
APPAREIL SANS LE BOL INSTALLÉ SUR LA TÊTE!
TENIR LES ENFANTS À L’ÉCART!
TOUJOURS DÉBRANCHER L’APPAREIL DE LA
SOURCE D’ALIMENTATION LORSQU’IL N’EST
Se reporter souvent à ces instructions et les communiquer aux autres.
AVERTISSEMENT!
NE JAMAIS UTILISER CET
POUR ÉVITER TOUT RISQUE D’ÉLECTROCUTION,
NE PAS OUVRIR NI RETIRER LE PANNEAU ARRIÈRE!
NE JAMAIS IMMERGER LE CORPS DE L’APPAREIL DANS L’EAU!
NE JAMAIS UTILISER D’APPAREILS ÉLECTRIQUES PRÈS DE L’EAU!
NE JAMAIS LAISSER CET APPAREIL SANS SUPERVISION!
Avant de procéder au nettoyage, au montage ou au démontage de
l’appareil, s’assurer que l’appareil est HORS TENSION et que la FICHE
DANGER! 120 V
Débranchez l’appareil de la source d’alimentation
lorsqu’il n’est pas utilisé!
A ÉTÉ RETIRÉE DE LA PRISE/SOURCE D’ALIMENTATION!
-28-
PAS UTILISÉ!
Page 29

INSTRUCTIONS SUR LES PRISES
Cet appareil dispose d'une che polarisée (une
broche est plus large que l'autre). Pour réduire
le risque d'électrocution, cette che doit être
totalement introduite dans la prise. Si la che ne
rentre pas, retournez-le et essayez à nouveau. Si la
che ne rentre toujours pas, contactez un électricien
qualié pour une mise à jour des prises électriques
dans votre maison. NE PAS modier la che d'une
quelconque manière.
INSTRUCTIONS DE DÉMONTAGE ET DE NETTOYAGE
AVERTISSEMENT! Avant le nettoyage, le montage ou le démontage du tamis pour tomates,
assurez-vous qu'il est éteint (O) et déconnecté de la source d'alimentation. Faites un essai an
de garantir que le moteur n'est plus sous tension en le mettant en marche (-) puis sur arrêt (O).
Avant d'utiliser le tamis pour tomates pour la première fois, nettoyez soigneusement
toutes les pièces (y compris les accessoires) conformément aux instructions ciaprès. NE JAMAIS immerger le moteur dans l'eau ou tout autre liquide.
1. Mettez le bloc moteur sur arrêt (O) et débranchez l'unité de l'alimentation.
2. Retirez le bol de la tête.
3. Tournez l' écrou de blocage de la tête dans le sens anti-horaire pour desserrer
la tête du moteur. Poussez l'ensemble tête/crépine légèrement vers l'avant tout en
soulevant l'extrémité arrière de l'ensemble tête/crépine pour le dégager du moteur.
4. Tournez l'écrou à ailette avant dans le sens anti-horaire pour le retirer de la tête.
5. Démontez toutes les pièces de l'ensemble tête/crépine.
6. Tournez soigneusement la chute dans le sens anti-horaire pour dégager les
attaches du moteur.
7. AVERTISSEMENT! NE JAMAIS immerger le moteur dans l'eau ou tout autre
liquide. Nettoyez le moteur avec un chiffon humide ou une serviette puis essuyez.
Lavez à la main toutes les pièces qui entrent en contact avec les aliments dans
de l'eau chaude savonne use. Rincez à l'eau fraîche. Séchez toutes les pièces
immédiatement.
REMARQUE: Seules les pièces en plastique du tamis pour tomates peuvent être
lavées dans le panier supérieur du lave-vaisselle.
8. Enduisez les crépines, la tête et de l'ensemble de l'arbre d'entraînement avec
un spray de silicone de qualité alimentaire.
INSTRUCTIONS EN FRANÇAIS
-29-
NE JAMAIS immerger le
moteur dans l'eau ou tout
autre liquide. Nettoyez-le
avec un chiffon humide.
Page 30

MONTAGE
AVERTISSEMENT! Avant le nettoyage, le montage ou le démontage du tamis pour
tomates, assurez-vous qu'il est éteint (O) et déconnecté de la source d'alimentation. Faites
un essai an de garantir que le moteur n'est plus sous tension en le mettant en marche (-)
puis sur arrêt (O).
1. Maintenez la chute avec la sortie inclinée
presque entièrement vers le bas et la bague de
la tête face au moteur (gure 1).
Chute
2. Placez la bague de la tête de la chute sur
la face arrondie relevé à l'avant du moteur.
Placez les attaches sur la bague de la tête à côté
des fentes dans les attaches correspondantes
sortant de la face ronde (gure 2).
3. Tournez la chute en plastique dans le sens
anti-horaire jusqu'à ce que les attaches se logent
Moteur
dans les fentes. La chute en plastique doit
être fermement maintenue en place. Lorsque
la chute est correctement positionnée, la sortie
de la chute doit légèrement échir vers le bas.
Face relevée, arrondie
à l'avant du moteur
4. Assemblez l'extrémité ronde de l'arbre
d'entraînement avec rondelle métallique,
ressort, rondelle métallique, bague
Chute
en plastique et rondelle biseautée en
caoutchouc. (gure 3). REMARQUE: La
rondelle biseautée en caoutchouc a deux
côtés, un côté plat et le côté biseauté. Le côté
biseauté s'adapte sur le dessus de la bague en
INSTRUCTIONS EN FRANÇAIS
plastique comme un capuchon (gure 3b).
5. Insérez l'extrémité carrée de l'arbre
d'entraînement dans la fente correspondante
de la vis sans n (gure 4).
6. Insérez l'ensemble vis sans n/arbre
Attaches sur le
moteur
d'entraînement dans la tête.
7. Placez la crépine sur la vis sans n/.
Alignez les attaches sur la crépine aux encoches
de la tête. Tenez la crépine en place.
Arbre d'entraînement
8. Faites glisser l'écrou à ailette avant sur
la crépine et tournez dans le sens horaire
pour serrer fermement (assurez-vous que
les attaches sur la crépine sont toujours bien
alignées aux encoches de la tête). NE PAS
Figure 3b
serrer avec excès l'écrou à ailette avant pour
ne pas endommager le moteur pendant le
fonctionnement.
Bague
de la
tête
Figure 1
Figure 2
Figure 3
Écrou à
ailette avant
Crépine
Vis sans n
-30-
Bague en
plastique
Ensemble
crépine/tête
Rondelle
en
caoutchouc
biseautée
Figure 4
Tête
Page 31

9. Tournez le bouton de blocage de la
tête dans le sens anti-horaire pour desserrer
(gure 5).
10. Insérez l'extrémité de la crépinede
l'ensemble crépine/tête par l'extrémité de
sortie de la chute (gure 5).
11. Faites glisser l'ensemble
crépine/tête horizontalement dans la tête
sur le moteur (gure 6).
Ensemble
crépine/tête
Figure 5
Bouton de
blocage de la tête
12. Tournez le bouton de blocage de la
tête dans le sens anti-horaire pour resserrer
l'ensemble crépine/tête sur le moteur.
13. Installez le bol sur la tête. Appuyez le bol
pour l'enfoncer et bien le loger (gure 7).
14. TOUJOURS utiliser le pilon pour
pousser la nourriture dans la tête/bol.
NE JAMAIS utiliser les mains ni les doigts
(gure 8).
Pilon
Bol
Chute
Tête
Figure 6
INSTRUCTIONS EN FRANÇAIS
Figure 7
Figure 8
-31-
Page 32

MODE D'EMPLOI
REMARQUE: Le tamis pour tomates peut pas être utilisé avec des produits
à base de viande.
1. Coupez les gros fruits et légumes en quartiers et les petits fruits et légumes en
deux.
IMPORTANT: Retirez les noyaux, les queues, les coques dures et les
graines avant de placer des fruits ou des légumes dans le tamis pour tomates
pour ne pas endommager la crépine.
2. Assurez-vous que le commutateur d'alimentation est en position d'arrêt (O).
Branchez le cordon d'alimentation du tamis pour tomates à la source d'alimentation.
3. Placez les fruits/légumes dans le bol. Ne pas remplir le bol avec excès. NE
PAS faire fonctionner le tamis pour tomates sans le bol.
4. Placez un bol sous la chute pour recueillir le jus et la pulpe. Placez un bol sous
la sortie de la crépine pour recueillir la peau et les graines (gure 9).
5. Mettre l'interrupteur de Marche/Arrêt en position de marche (-).
6. Placez les fruits/légumes dans la tête. Utilisez le pilonpousser les fruits /
légumes dans la tête. TOUJOURS utiliser le pilon pour pousser les aliments dans
la tête/le bol et NE JAMAIS utiliser les mains ou les doigts.
CONSEILS UTILES:
A. Repassez la peau et les graines par le tamis pour tomates an d'extraire
INSTRUCTIONS EN FRANÇAIS
la pulpe et le jus restants. Répétez au besoin.
B. Utilisez une spatule en caoutchouc pour transférer la pulpe de la crépine
dans la chute.
7. Une fois terminé, mettez le moteur en position d'arrêt (O) et débranchez l'unité
de la source d'alimentation.
AVERTISSEMENT!
TENIR LES DOIGTS, LES MAINS ET
AUTRES PARTIES DU CORPS AINSI QUE
TOUT OBJET À L’ÉCART DE LA TÊTE!
TOUJOURS UTILISER LE PILON
FOURNI POUR POUSSER LES
ALIMENTS DANS LE
BOL/LA TÊTE!
NE JAMAIS UTILISER CET
APPAREIL SANS LE BOL INSTALLÉ SUR LA TÊTE!
TENIR LES ENFANTS À L’ÉCART!
TOUJOURS DÉBRANCHER L’APPAREIL DE LA
SOURCE D’ALIMENTATION LORSQU’IL N’EST
PAS UTILISÉ!
POUR ÉVITER TOUT RISQUE D’ÉLECTROCUTION,
NE PAS OUVRIR NI RETIRER LE PANNEAU ARRIÈRE!
NE JAMAIS IMMERGER LE CORPS DE L’APPAREIL DANS L’EAU!
NE JAMAIS UTILISER D’APPAREILS ÉLECTRIQUES PRÈS DE L’EAU!
NE JAMAIS LAISSER CET APPAREIL SANS SUPERVISION!
Avant de procéder au nettoyage, au montage ou au démontage de
l’appareil, s’assurer que l’appareil est HORS TENSION et que la FICHE
A ÉTÉ RETIRÉE DE LA PRISE/SOURCE D’ALIMENTATION!
-32-
DANGER! 120 V
Débranchez l’appareil de la source d’alimentation
lorsqu’il n’est pas utilisé!
Page 33

Bol pour recueillir les
peaux et les graines
Pilon
Figure 9
INSTRUCTIONS EN FRANÇAIS
Bol pour recueillir le
jus et la pulpe
FONCTION D'INVERSION
Le bouton à bascule d'inversion R est principalement utilisé pour l'élimination des
bourrages. En cas de bourrage;
• Mettez le commutateur de Marche/Arrêt en position d'arrêt (O). Attendez que le
moteur ait atteint un ARRÊT COMPLET avant d'utiliser le commutateur d'inversion
R pour dégager un bourrage.
• Attendez que le moteur ait atteint un ARRÊT COMPLET avant de mettre le
commutateur de Marche/Arrêt en position de marche (-) après avoir utilisé la
fonction d'inversion.
• NE JAMAIS utiliser le moteur en marche arrière pendant plus de 5 secondes à la
fois.
Si le bourrage n'est toujours pas dégagé, débranchez le tamis pour tomates de la
source d'alimentation et procédez selon les Instructions de démontage et de nettoyage
pour nettoyer l'unité.
-33-
Page 34

RECETTES
CONVERSIONS POUR VOLUME É.-U
1 c.à thé 5 ml
1 c.à.s. 15 ml
1/8 de tasse ou 1 once liquide 30 ml
1/4 de tasse ou 2 onces liquides 60 ml
1/3 de tasse 80 ml
1/2 de tasse ou 4 onces liquides 120 ml
2/3 de tasse 160 ml
3/4 de tasse ou 6 onces liquides 180 ml
1 tasse ou 8 onces liquides ou
1/2 pinte
1 tasse et 1/2 ou 12 onces liquides
2 tasses ou 16 onces liquides ou 1 pinte
3 tasses ou 1 pinte et 1/2 700 ml
4 tasses ou 2 pintes ou 1 quart 950 ml
4 quarts ou 1 gallon 3.8L
240 ml
350 ml
475 ml
CONVERSIONS POUR POIDS
1/4 lb ou 4 onces 113 g
1/2 lb ou 8 onces 230 g
1 lb ou 16 onces 450 g
É.-U
1 oz 28 g
1/3 lb 150 g
2/3 lb 300 g
3/4 lb ou 12
onces
2 lb 900 g
340 g
AVANT TOUTE
UTILISATION: Il est
recommandé de ramollir
certains aliments avant
de les utiliser. Si les
aliments sont durs
comme par exemple,
les pommes de terre, les
pommes ou les poires, il
est recommandé de les
ramollir en les cuisant
à la vapeur ou au four
pour qu’ils soient plus
tendes avant de les
placer dans la passoire.
GRANDE QUANTITÉ DE SAUCE ITALIENNE À LA TOMATE
1/2 de tasse d’huile d’olive 3 oignons de taille moyenne, coupés
2 gousses d’ail, émincées 3 c.à.s. de sucre brun 1 c.à.s. d’origan séché
4 c.à thé de sel 2 c.à thé de basilic séché
1 c.à thé de poivre noir Tomates fraîches
INSTRUCTIONS EN FRANÇAIS
• Passez les tomates fraîches par la passoire et la machine à faire de la sauce à l’aide
du tamis universel pour 12 tasses de purée de tomates fraîches
• Chauffez l’huile d’olive dans une poêle de grande taille
• Faites revenir les oignons et l’ail jusqu’à ce qu’ils soient dorés (mais pas trop marron).
• Ajoutez les autres ingrédients
• Portez le mélange à ébullition, réduisez le feu et laissez mijoter en couvrant partiellement
pendant 2 heures ou jusqu’à ce que la sauce ait réduit et atteint la consistance souhaitée.
• Remuez de temps en temps
• Servez ou laissez refroidir puis réfrigérez ou congelez
• Vous pouvez ajouter des ingrédients, tels que champignons, saucisses cuites/
asséchées, burger, etc. pour ajouter du goût.
SAUCE MARINARA
1 tasse de carottes, nement coupées
2,72 kg (6 lb) de purée de tomate bien mûres à l’italienne
1 tasse d’oignon, nement coupé 1/2 tasse de céleri, nement coupé
1/2 de tasse d’huile d’olive
1 c. à thé de sucre et du poivre blanc moulu pour le goût
Assaisonnement facultatif (au choix):
2 c. à thé de coriandre moulu 1/2-1 c. à thé de marjolaine séchée
1 c.à thé de basilic séché 1/4 à 1/2 c. à thé origan séché
1 à 2 c. à thé de sel
• Chauffez l’huile d’olive dans une poêle de grande taille
• Recouvrez les oignons, les céleris et les carottes et laissez mijoter à feu moyen
pendant 15 minutes en remuant de temps à autre.
• Retirez le couvercle et remuez sur le feu pendant 5 à 10 minutes en plus ou jusqu’à ce
que les légumes soient bien tendres et légèrement dorés.
• Ajoutez la sauce tomate, le sucre et le poivre
• Recouvrez et laissez mijoter pendant 15 minutes
• Servez ou laissez refroidir puis réfrigérez ou congelez
-34-
Page 35

INFORMATION SUR LA GARANTIE
CONSERVEZ CETTE INFORMATION SUR LA GARANTIE POUR VOS DOSSIERS!
Weston Products LLC garantit à l’ACHETEUR AU DÉTAIL D’ORIGINE de ce produit contre tout défaut en matériau
et en main-d’œuvre pendant un (1) an a partir de la date d’achat à condition qu’il soit utilisé conformément aux directives
La Carte de Garantie, avec une copie du reçu original, doivent être reçus par Weston Products LLC dans les trente
(30) jours à partir de la date d’achat pour que la garantie puisse s’appliquer. Le manque d’envoyer la Carte de Garantie
Le produit doit être livré à ou expédié franco de port à Weston Products LLC pour les services de garantie, soit dans
son emballage d’origine ou un emballage similaire offrant un degré de protection équivalent. Les dommages causés par
l’expédition ne sont pas la responsabilité de la société. Weston Products LLC charge 35,00 $ par heure pour frais de
service. REMARQUE : Aucune réparation ne sera commencée sans l’autorisation du client. Les frais d’expédition de retour
Avant de renvoyer le produit pour une réparation sous garantie, bien nettoyer le produit pour qu’il soit exempt de toute
particule alimentaire ou autres débris. Si l’acheteur ne respecte pas cette consigne, le produit lui sera renvoyé sans avoir
Weston Products LLC réparera (ou à sa discrétion, remplacera) le produit sans frais, si à l’opinion de la société, il a été
Des remplacements neufs ou remis en état pour les pièces d’usine défectueuses seront fournis pendant un (1) an à partir
de la date d’achat. Les pièces de remplacement sont garanties pour le reste de la période de garantie originale.
Pour les réparations non garanties, veuillez contacter le Service à la clientèle de Weston Products LLC au numéro sans
frais 1-800-814-4895, du lundi au vendredi, de 8h00 à 17h00 EST (en dehors des États-Unis : 440-638-3131) pour obtenir
une Autorisation de retour d’article (Numéro RMA). Weston Products LLC refusera tous les retours qui ne contiennent pas
ce numéro. NE PAS RENVOYER CET APPAREIL SANS L’AUTORISATION CORRECTE DE Weston Products LLC.
LIMITATIONS : La garantie est annulée si le produit est utilisé pour toute raison autre que pour laquelle il est conçu. Le
produit ne doit pas avoir été antérieurement modié, réparé, ou entretenu par quelqu’un autre que Weston Products LLC.
Le cas échéant, le numéro de série ne doit pas être modié ou enlevé. Le produit ne doit pas avoir été soumis à un accident
en transit ou pendant qu’il est en la possession du client, mal utilisé, mal traité, ou utilisé contrairement aux directives
contenues dans le manuel d’utilisation. Ceci comprend la défaillance causée par la négligence d’un entretien raisonnable
et nécessaire, une tension de secteur incorrecte et des catastrophes naturelles. Cette garantie n’est pas transférable et
À l’exception des cas où la loi en vigueur l’interdit, aucune autre garantie, expresse ou implicite, y compris les garanties
relatives au caractère adéquat pour la commercialisation ou un usage particulier, ne s’appliquera à ce produit. Weston
Products LLC ne sera en aucun cas responsable des dommages indirects liés au dit produit et Weston Products LLC
n’a aucune obligation ni responsabilité autre que celles expressément établies dans la présente, et n’autorise aucun
représentant ou autre personne à les assumer pour lui. Toutes garanties implicites applicables sont aussi limitées à la
Cette garantie couvre seulement le produit et ses pièces spéciques, pas les aliments ou autres produits traités dans
DÉCOUPEZ LE LONG DE LA LIGNE POINTILLÉE ET ENVOYEZ CETTE CARTE DE GARANTIE AVEC UNE
complètement remplie avec une copie du reçu original annulera la garantie.
été réparé. Dans certains, la somme de 50 dollars sera facturée pour le nettoyage.
prouvé être défectueux en matériau et en main d’œuvre dans la période de garantie.
s’applique seulement aux ventes américaines et canadiennes.
COPIE DE VOTRE REÇU D’ACHAT ORIGINAL À :
20365 Progress Drive, Strongsville, OH 44149 U.S.A.
imprimées qui y sont jointes.
seront ajoutés à la facture de réparation.
période d’un (1) an de la garantie limitée.
celui-ci.
Weston Products LLC / WARRANTY
CARTE DE GARANTIE
ENVOYEZ CETTE CARTE DE GARANTIE AVEC UNE COPIE DE VOTRE REÇU D’ACHAT ORIGINAL À :
WESTON PRODUCTS LLC / WARRANTY, 20365 PROGRESS DRIVE, STRONGSVILLE, OH 44149 U.S.A.
Nom du Client: _______________________________________
Adresse: ___________________________________________
Province/Code postal/Région: ____________________________
Numéro de téléphone: (_________) ________________________
Adresse de courrier électronique: __________________________
Date d’achat d’origine: ____/______/_____
No de modèle du produit: _______________________________
No de série (s’il y a lieu): _______________________________
J’ai lu les informations relatives à la garantie. Initiales ici:
Copie du reçu
incluse
____________
Page 36

If any components of this unit are broken, do not operate properly, or for product returns,
Phone: 1-800-814-4895 (Outside the U.S. 440-638-3131)
Mail: 20365 Progress Drive, Strongsville, Ohio 44149
E-Mail: CustomerService@WestonProducts.com
All Trademarks and Registered Trademarks are property of the respective companies.
SAVE THESE INSTRUCTIONS!
Refer to them often and use them to instruct others.
Revise completamente el envase y compruebe que no falten partes o que algún producto esté dañado.
Para todas aquellas preguntas referentes al uso del producto, partes faltantes, daño del producto, dicultad
o activación de la garantía, comuníquese con el equipo de servicio al cliente de weston products:
Línea de Servicio al Cliente para Residentes de EE.UU.: 1.800.814.4895 (Fuera de EE.UU., llame al:
NO devuelva este artículo al vendedor minorista antes de comunicarse con Servicio al Cliente de Weston
si el producto está dañado por el transporte, solicite asistencia al distribuidor.
desde las 8:00 am hasta las 5:00 pm est, de lunes a viernes
1.440.638.3131) Weston Products LLC, 20365 Progress Drive, Strongsville, Ohio 44149
ATTENTION!
please contact Weston Products LLC
Web Site: WestonProducts.com
¡ATENCIÓN!
CustomerService@WestonProducts.com
WestonProducts.com
Products.
Consulte estas instrucciones y úselas para enseñar sobre el uso de este producto a otras personas.
Si des pièces ont été endommagées pendant le transport, veuillez communiquer avec le détaillant pour
Pour toutes les autres questions concernant l’utilisation du produit, les pièces manquantes, les problèmes
ou l’activation de la garantie, veuillez communiquer avec l’équipe du service clientèle des produits Weston:
Veuillez communiquer avec le service clientèle des produits Weston AVANT de retourner cet appareil au
¡GUARDE ESTAS INSTRUCCIONES!
Veuillez inspecter cet emballage avec soin pour y détecter
Numéro de téléphone du service clientèle pour les résidents des É.-U. : 1.800.814.4895
Numéro de téléphone à l’extérieur des É.-U. : 1.440.638.3131
Weston Products LLC, 20365 Progress Drive, Strongsville, Ohio 44149
CONSERVER CES DIRECTIVES!
Veuillez les consulter fréquemment et les utiliser pour la formation.
ATTENTION!
toute pièce manquante ou endommagée.
obtenir de l’aide.
de 8:00 à 17:00 HNE, du lundi au vendredi.
CustomerService@WestonProducts.com
WestonProducts.com
détaillant.
 Loading...