

Page 1
u.s.a.
LLC
If any components of t hi s un it a re broken,
ATTENTION
do not operate prope rl y, o r fo r pr oduct returns,
please contact Prago tr ad e LL C at
1-800-814-4895
Outside the U.S. cal l 44 0- 63 8- 31 31 .
For the online catal og , lo g on to w ww.westonsupply.com.
Exc lu siv ely i mpo rted by Pr ago trade LL C Str ong sv ill e, Oh io
www.pragotrade.com
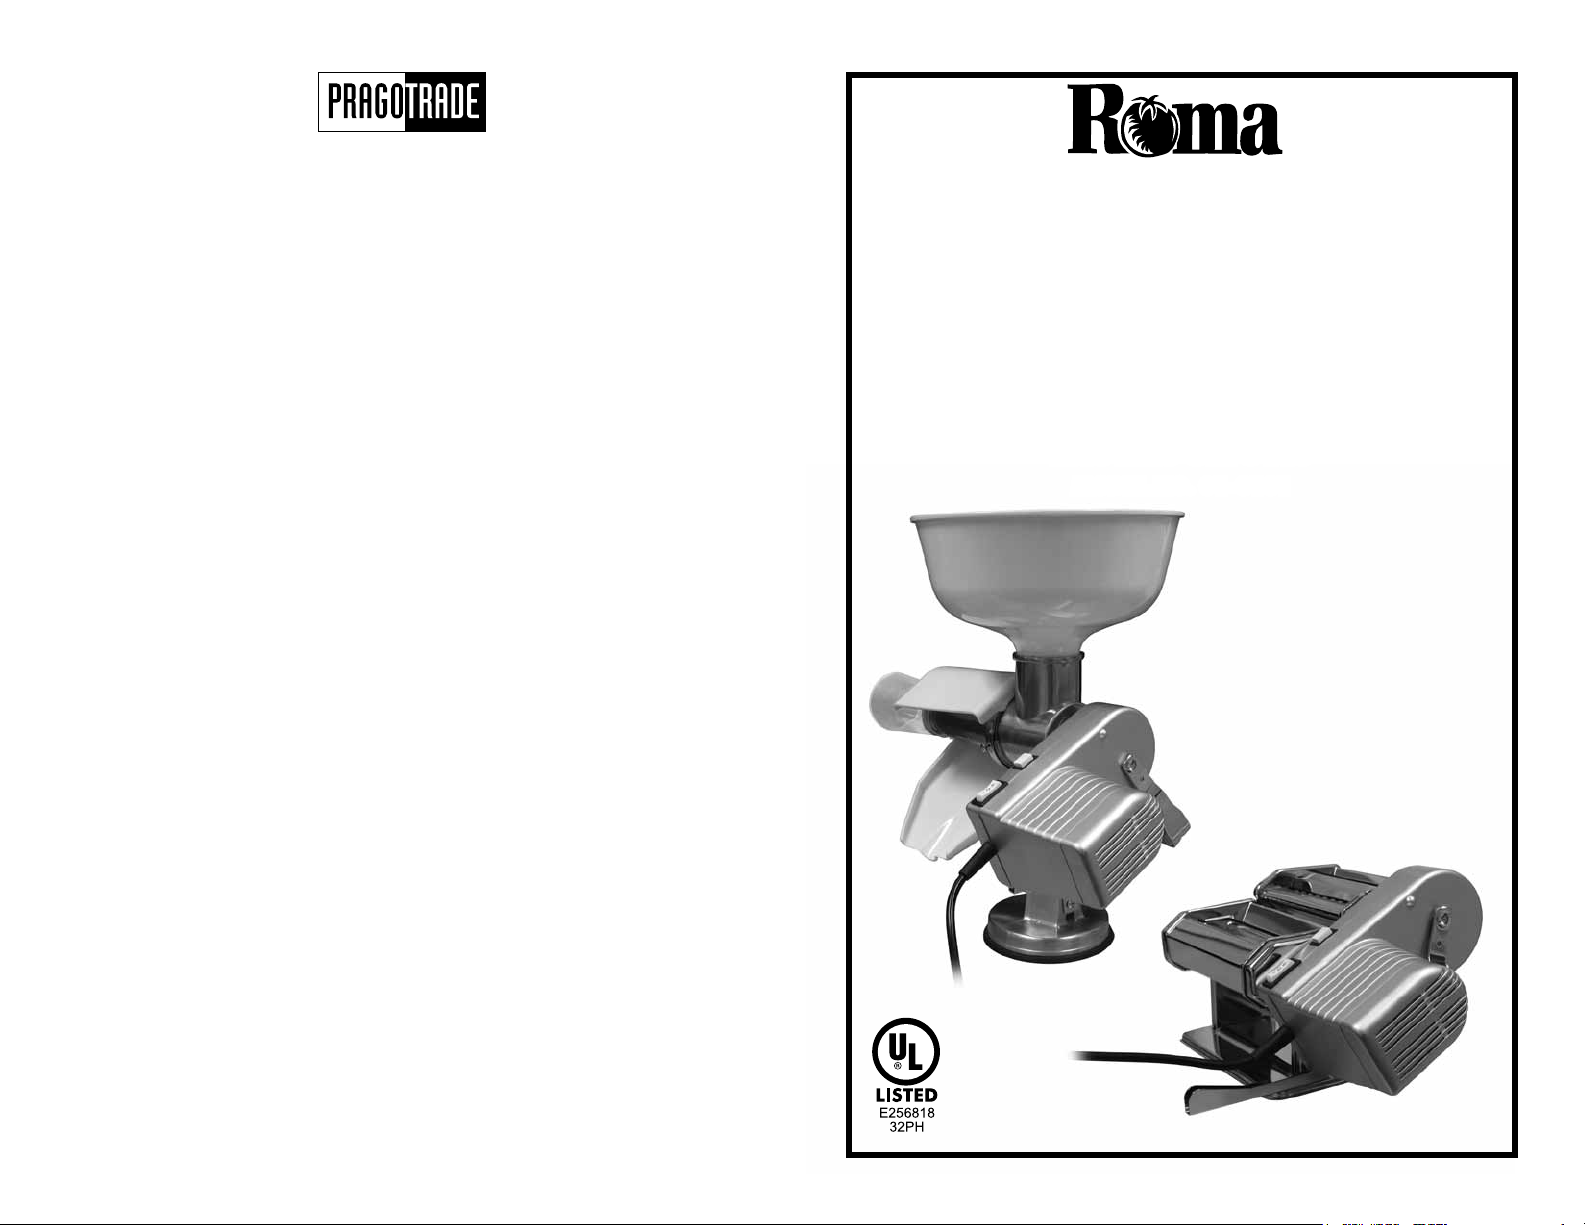
TWO-SPEED
ELECTRIC MOTOR
ATTACHMENT
....easily attaches directly to the
Roma Food Strainer & Sauce Maker
or the 6” or 7” Pasta Machines Sold separately
INSTRUCTIONS
MODEL NO. 01-0101
REV 050109
Page 2
GENERAL SAFETY RULES
READ AND FULLY UNDERSTAND ALL INSTRUCTIONS
AND WARNINGS PRIOR TO USING THIS UNIT. YOUR
SAFETY IS MOST IMPORTANT! FAILURE TO COMPLY
WITH PROCEDURES AND SAFE GUARDS MAY
WARNING!
1. ALWAYS DISCONNECT motor
from power source before servicing,
changing accessories, mounting,
dismoutning or cleaning the unit.
2. Plug the motor into a standard 120
Volt wall outlet. Avoid using extension
cords.
3. DO NOT USE this motor if the
power cord, plug or any other parts are
damaged. DO NOT ATTEMPT TO
REPLACE THE CORD. DO NOT allow
the power cord to hang into your work
area. Check that all parts are operating
properly, and perform the intended
functions. Check for alignment of
moving parts or any other conditions
that may affect the operation.
4. NEVER use any accessories or parts
from other manufacturers. Doing so will
void your warranty. Use this motor for
its intended use only.
5. Thoroughly clean all parts that
will come in contact with food before
using. DO NOT SUBMERGE THE
MOTOR BODY INTO WATER OR
LIQUID. BE SURE THE MOTOR IS
DISCONNECTED FROM THE POWER
SOURCE BEFORE CLEANING. Wash
all parts by hand and thoroughly dry.
Never rinse motor under faucet, only
use a moist cloth to clean the motor
unit.
6. Reduce risk of unintentional starting.
Make sure the power switch is in the
“OFF” position before attaching to the
power source.
RESULT IN SERIOUS INJURY OR PROPERTY DAMAGE.
REMEMBER: YOUR PERSONAL SAFETY IS YOUR
RESPONSIBILITY!
7. Keep ngers clear of the moving
parts at all times. NEVER REACH
INTO the appliance. Doing so may
cause serious injury.
8. KEEP CHILDREN AWAY. NEVER
LEAVE THE MOTOR UNATTENDED.
Be safe, DISCONNECT from power
source before leaving the work area.
9. Wait until all moving parts have
stopped before you remove any part of
the appliance.
10. TIE BACK loose hair and clothing,
and roll up long sleeves before
operating the appliance. REMOVE
ties, rings, watches, bracelets or other
jewelry before operating the appliance.
11. Be sure the appliance is on a stable
work surface.
12. DO NOT use outdoors. DO NOT
use or store on, in, or near stove or
oven.
13. WEAR EYE PROTECTION. Wear
safety glasses. Everyday eye glasses
are not safety glasses. Safety glasses
conform to ANSI Z87.1 requirements.
Note: approved safety glasses have
Z87 printed or stamped on them.
14. DO NOT use the motor while under
the inuence of drugs or alcohol.
WARRANTY INFORMATION
SAVE THIS WARRANTY INFORMATION FOR YOUR RECORDS!
Pragotrade LLC warrants to the ORIGINAL RETAIL PURCHASER of this product that if operated in accordance
with the printed instruction accompanying it, then for a period of 1 year from the date of purchase, the product shall be
free from defects in material and workmanship.
The Warranty Card, along with a copy of the original receipt, must be received by Pragotrade LLC within 30 days
from purchase date for the warranty to apply. Failure to send the completely lled out Warranty Card, along with a copy
of the original receipt, will void the warranty.
The product must be delivered to or shipped freight prepaid to Pragotrade LLC for warranty services, in either its
original packaging or similar packaging affording an equal degree of protection. Damage due to shipping is not the
responsibility of the company. Pragotrade LLC charges a $35.00 per hour bench charge. NOTE: No repairs will be
started without the authorization of the customer. The return shipping cost to the customer will be added to the repair
invoice.
Pragotrade LLC will repair (or at its discretion, replace) the product free of charge, if in the judgment of the company,
it has been proven to be defective as to seller’s labor and material, within the warranty period.
New or rebuilt replacements for factory defective parts will be supplied for one (1) year from the date of purchase.
Replacement parts are warranted for the remainder of the original warranty period.
For non-warranty repairs, contact Pragotrade’s Customer Service at 1-800-814-4895 M-F 8am-5pm EST (outside of
the United States 440-638-3131) to obtain a Return Authorization Number (RMA Number). Pragotrade will refuse all
returns that do not contain this number. DO NOT RETURN THE UNIT WITHOUT PROPER AUTHORIZATION
FROM PRAGOTRADE LLC.
LIMITATIONS: The warranty is void if the product is used for any purpose other than that for which it is designed.
The product must not have been previously altered, repaired, or serviced by anyone else other than Pragotrade LLC.
If applicable, the serial number must not have been altered or removed. The product must not have been subjected
to accident in transit or while in the customer’s possession, misused, abused, or operated contrary to the instructions
contained in the instruction manual. This includes failure caused by neglect of reasonable and necessary maintenance,
improper line voltage and acts of nature. This warranty is not transferable and applies only to U.S. and Canadian sales.
Except to the extent prohibited by applicable law, no other warranties whether expressed or implied, including
warranty merchantability and tness for a particular purpose, shall apply to this product. Under no circumstances shall
Pragotrade LLC be liable for consequential damages sustained in connection with said product and Pragotrade LLC
neither assumes nor authorizes any representative or other person to assume for it any obligation or liability other than
such as is expressly set forth herein. Any applicable implied warranties are also limited to the one (1) year period of
the limited warranty.
This warranty covers only the product and its specic parts, not the food or other products processed in it.
CUT ALONG THE DOTTED LINE AND SEND THE WARRANTY CARD ALONG WITH A
COPY OF YOUR ORIGINAL PURCHASE RECEIPT TO:
20365 Progress Drive, Strongsville, OH 44149
Pragotrade LLC
WARRANTY CARD
SEND THIS CARD ALONG WITH A COPY OF YOUR ORIGINAL PURCHASE RECEIPT
Customer Name: ________________________________
Address: ______________________________________
City/State/Zip: ___________________________________
Telephone Number: (_________) ___________________
E-Mail Address: ___________________________________
Original Date of Purchase: _______/_________/__________
SAVE THESE INSTRUCTIONS!
Refer to them often and use them to instruct others.
-2-
Product Model #: __________________________________
Serial # (if applicable): ____________________________
-11-
Page 3

ADDITIONAL ACCESSORIES AVAILABLE
6
8
PART PART
DESCRIPTION NUMBER
Traditional Style (6”) Pasta Machine 01-0201
Square Ravioli Attachment (50mm) 01-0209
Angel Hair Attachment (1mm) 01-0202
Spaghetti Noodle Attachment (2mm) 01-0203
Linguini Attachment (3mm) 01-0204
Lasagna Attachment (50mm wide) 01-0206
Lasagnette Attachment (12mm wide) 01-0205
Fettuccini Noodle Attachment (8mm) 01-0207
Half Moon Ravioli Attachment (50mm) 01-0208
Wooden Pasta Drying Rack 53-0201
Roma Sauce Maker & Food Strainer 07-0801
Berry Screen 07-0855
Pumpkin Screen 07-0857
Salsa Screen 07-0869
Grape Spiral 07-0856
4-Piece Accessory Kit (3 Screens and 1 Spiral) 07-0858
Non-Stick Multi-Purpose Silicone Baking Mat
Black Border, White Center 16-1/4” x 24-1/2” 54-0101-W
Black Border, White Center 11” x 17” 54-0201-W
Black Border, White Center 11-7/8” x 16” 54-0502-W
4
5
2
3
7
Pulse Button
Selector Switch
1
COMPONENT LIST
DIAGRAM PART PART
NUMBER DESCRIPTION NUMBER
1 2-Speed Dual Purpose Motor 01-0101
2 Mounting Bracket for the Roma
Food Strainer & Sauce Maker N/A
These products and many more products can be ordered by visiting
w w w . w e s t o n s u p p l y . c o m or by calling
Pragotrade LLC Toll Free at 1-800-814-4895
Monday thru Friday 8:00am-5:00pm EST.
Outside the U.S. call 440-638-3131
-10-
3 Bracket Mounting Bolt N/A
4 Motor Mounting Bracket N/A
5 Enlongated Washer N/A
6 Movable Arm N/A
7 Allen Wrench N/A
8 Ravioli Attachment Adapter 01-0210
If an y compone nt s of th is u nit a re b roken o r the uni t does no t operate
prope rl y, call P ragotra de L LC Toll Free at
1-800-814-4895
Monday thru Friday 8:00am-5:00pm EST.
Outside the U.S. call 440-638-3131
-3-
Page 4

OUTLET INSTRUCTIONS
This appliance has a Polarized Plug (one blade of
the plug is wider than the other blade). To reduce
the risk of electric shock, this plug must t fully into
the outlet. If the blades do not t into the outlet, try
turning the plug around. If the plug still does not t
into the outlet, contact a qualied electrician. DO
NOT attempt to modify the plug in any way.
RAVIOLI ADAPTER INSTRUCTIONS
WARNING! Before cleaning, assembling or disassembling the Motor
Attachment, make sure the Motor is in the OFF Position (O) and the PLUG
IS REMOVED FROM THE OUTLET/POWER SOURCE!
The included Ravioli Adapter is to be used with
the ravioli attachment when using the Motor.
1. Follow instructions 1 through 5 of the
“INSTALLING THE MOTOR ONTO THE
PASTA MACHINE” instructions.
Male End of
Ravioli Adapter
Figure 8
SWITCH INSTRUCTIONS
WARNING! Before cleaning, assembling or disassembling the Motor
Attachment, make sure the Motor is in the OFF Position (O) and the PLUG
IS REMOVED FROM THE OUTLET/POWER SOURCE!
.
The Motor has a Selector Switch that has two speed
settings. The rst speed is the slow speed, marked “I”,
the second speed is the fast speed is marked “II”. The off
position is marked “O”.
.
The Motor also has a Pulse Button. Pressing this
Figure 1
button will engage the Motor in its slow speed until you
release the button. This feature is designed for use with
a ravioli attachment. It allows rapid starting and stopping
of the Motor when lling ravioli.
Figure 1
Pulse
Button
Selector
Switch
Figure 1
2. Install the Ravioli Adapter onto the Motor
by inserting the female end of the Ravioli
Female End of
Ravioli Adapter
Adapter onto the male end of the Motor
Shaft.
3. Line up the Motor and Adapter
Shaft with the drive hole of the ravioli
Figure 8
Ravioli
Adapter
Figure 9
attachment and rotate the Motor
into place, allowing the left part of the
Motor to come to rest on the Motor
Mounting Bracket.
4. After Motor is positioned on the Motor
Mounting Bracket, rotate the Movable
Arm counter-clockwise so it is positioned
Figure 9
Ravioli
Attachment
Motor
Shaft
on the Motor.
5. Once Motor is attached and you have
veried the Power Switch is in the off
position (O), plug the unit into the power
source.
NOTE: It is suggested when using the Motor with the ravioli attachment, only use
the intermittent Pulse Button. This will allow you to stop and start the Motor as you
ll the ravioli.
-4-
-9-
Page 5

ATTACHING THE MOTOR ONTO
THE PASTA MACHINE ATTACHMENTS
INSTALLING THE MOTOR ONTO
THE ROMA FOOD STRAINER & SAUCE MAKER
WARNING! Before cleaning, assembling or disassembling the Motor
Attachment, make sure the Motor is in the OFF Position (O) and the PLUG
IS REMOVED FROM THE OUTLET/POWER SOURCE!
1. Follow instructions 1 through 6 of the “INSTALLING THE MOTOR ONTO THE
PASTA MACHINE” instructions.
2. Line up the Motor Shaft with the drive hole on the pasta machine attachment
and rotate the Motor into place, allowing the left part of the Motor to come to
rest on the Motor Mounting Bracket.
3. After Motor is positioned on the Motor Mounting Bracket, rotate the Movable
Arm counter-clockwise so it is positioned on the Motor.
4. Once Motor is attached, and you have veried the Power Switch is in the off
position (O), plug the unit into the power source.
WARNING! Before cleaning, assembling or disassembling the Motor
Attachment, make sure the Motor is in the OFF Position (O) and the PLUG
IS REMOVED FROM THE OUTLET/POWER SOURCE!
1. Making sure that the Roma food strainer &
sauce maker is securely mounted to the
work surface, remove the two screws from
the neck of the Roma body.
Figure 2
Neck of
Roma
Figure 2
Remove
these
screws
2. Attach Roma Mounting Bracket to Roma
using the two screws that were removed in
Figure 3
#1.
3. Insert the Bracket Mounting Bolt through
the hole in the Motor Mounting Bracket.
Attach the Elongated Washer to the back
of the Bolt loosely.
4. Slide the Enlongated Washer on the
Motor Mounting Bracket into the large
Neck of
Roma
Figure 3
hole of the Roma Mounting Bracket by
inserting the long end of the Enlongated
Washer rst followed by the shorter end.
Figure 4
5. Position the Motor Mounting Bracket so
it is horizontal.
6. Using the supplied Allen Wrench, tighten
the Bracket Mounting Bolt rmly, securing
the Motor Mounting Bracket to the Roma
Mounting Bracket.
Enlongated
Washer
Roma
Mounting
Bracket
Figure 4
7. With the Power Switch of the Motor facing
up, line up the Motor Shaft with the drive
hole on the Roma, and rotate the Motor
into place. Allow the left side of the
Motor to come to rest on the Motor
Mounting Bracket.
Figure 5
8. After the Motor is positioned on the Motor
Mounting Bracket, rotate the Movable
Arm counter-clockwise so it is positioned
on the Motor.
Figure 5
9. Once Motor is attached and you have
veried the Power Switch is in the off
position (O), plug the unit into the power
source.
-5--8-
Roma
Mounting
Bracket
Motor
Mounting
Bracket
Bracket
Mounting
Bolt
Movable
Motor
Mounting
Bracket
Motor
Figure 5
Roma
Arm
Page 6

Follow all operating and assembly instructions for the Roma as before, except now
instead of turning the handle, simply turn the Motor ON by selecting either slow
speed (Setting I) or high speed (Setting II).
REMOVING A JAM FROM THE ROMA FOOD
STRAINER WITH THE MOTOR ATTACHMENT
WARNING! Before cleaning, assembling or disassembling the Motor
Attachment, make sure the Motor is in the OFF Position (O) and the PLUG
IS REMOVED FROM THE OUTLET/POWER SOURCE!
NOTE: This Motor DOES NOT have a reverse speed. If the Roma Tomato Strainer
should become jammed:
1. Switch the Motor off immediately
2. Unplug the Motor from the power source
3. Pivot the Movable Arm away from the Motor
4. Remove the Motor from the Roma Food Strainer and Sauce Maker.
5. Either insert the manual handle and rotate counter clockwise to free
the jam, or remove the splash guard/discharge chute and the stainless
screen to free the jam. If you remove the screen and squirt guard to
remove the jam, reassemble the Roma Food Strainer and Sauce Maker
before reattaching the Motor and connecting to the power source.
INSTALLING THE MOTOR ONTO
THE PASTA MACHINE
WARNING! Before cleaning, assembling or disassembling the Motor
Attachment, make sure the Motor is in the OFF Position (O) and the PLUG
IS REMOVED FROM THE OUTLET/POWER SOURCE!
The 2-Speed Electric Motor eliminates the need for the c-clamp when setting up
your pasta machine.
Drive
Hole
Figure 6
Movable
Arm
Motor
Mounting
Bracket
1. Position the pasta machine on your work
surface with the drive holes of the
rollers facing you.
Figure 6
2. Locate the Motor Mounting Bracket and
lay it on the work surface in front of the
drive holes.
3. Insert the Bracket Mounting Bolt through
the hole in the Motor Mounting Bracket
and position it into the hole that is used by
the c-clamp.
Figure 6
4. After aligning the Bracket Mounting
Bolt with the c-clamp hole, attach the
Elongated Washer to the back of the Bolt.
Using the included Allen Wrench,
securely tighten the Motor Mounting
Bracket to the pasta machine.
Figure 6
Drive
Hole
Enlongated
Washer
C-Clamp
Hole
Bracket
Mounting
Bolt
-6-
5. Next, rotate the Movable Arm clockwise to
the far right. This will allow easy access for
Motor placement.
6. Hold the Motor with the Power Switch
facing up and the Motor Shaft pointing
toward the pasta machine.
7. Line up the Motor Shaft with the drive hole
on the pasta machine and rotate the Motor
into place, allowing the left part of the
Motor to come to rest on the Motor
Mounting Bracket.
Figure 7
8. After Motor is positioned on the Motor
Mounting Bracket, rotate the Movable
Arm counter-clockwise so it is positioned
on the Motor.
Figure 7
9. Once Motor is attached and you have
veried the Power Switch is in the off
position (O), plug the unit into the power
source.
-7-
Motor
Motor
Mounting
Bracket
Figure 7
Pasta
Machine
Movable
Arm
 Loading...