

Page 1
If any components of this unit are broken, do not operate properly, or for product returns,
Phone: 1-800-814-4895 (Outside the U.S. 440-638-3131)
Mail: 20365 Progress Drive, Strongsville, Ohio 44149
E-Mail: CustomerService@WestonProducts.com
All Trademarks and Registered Trademarks are property of the respective companies.
ATTENTION!
please contact Weston Products LLC
Web Site: WestonProducts.com
FRENCH
SAVE THESE INSTRUCTIONS!
Refer to them often and use them to instruct others.
FRY CUTTER
and VEGETABLE DICER
MODEL NO. 36-3301-W
Due to constant factory improvements, the product pictured
might differ slightly from the product received.
REV072612
Page 2
WESTON WARRANTY INFORMATION
SAVE THIS WARRANTY INFORMATION FOR YOUR RECORDS!
Weston Products LLC warrants to the ORIGINAL RETAIL PURCHASER of this product that if operated in
accordance with the printed instruction accompanying it, then for a period of 1 year from the date of purchase,
5
4
7
6
Handle
3
1
2
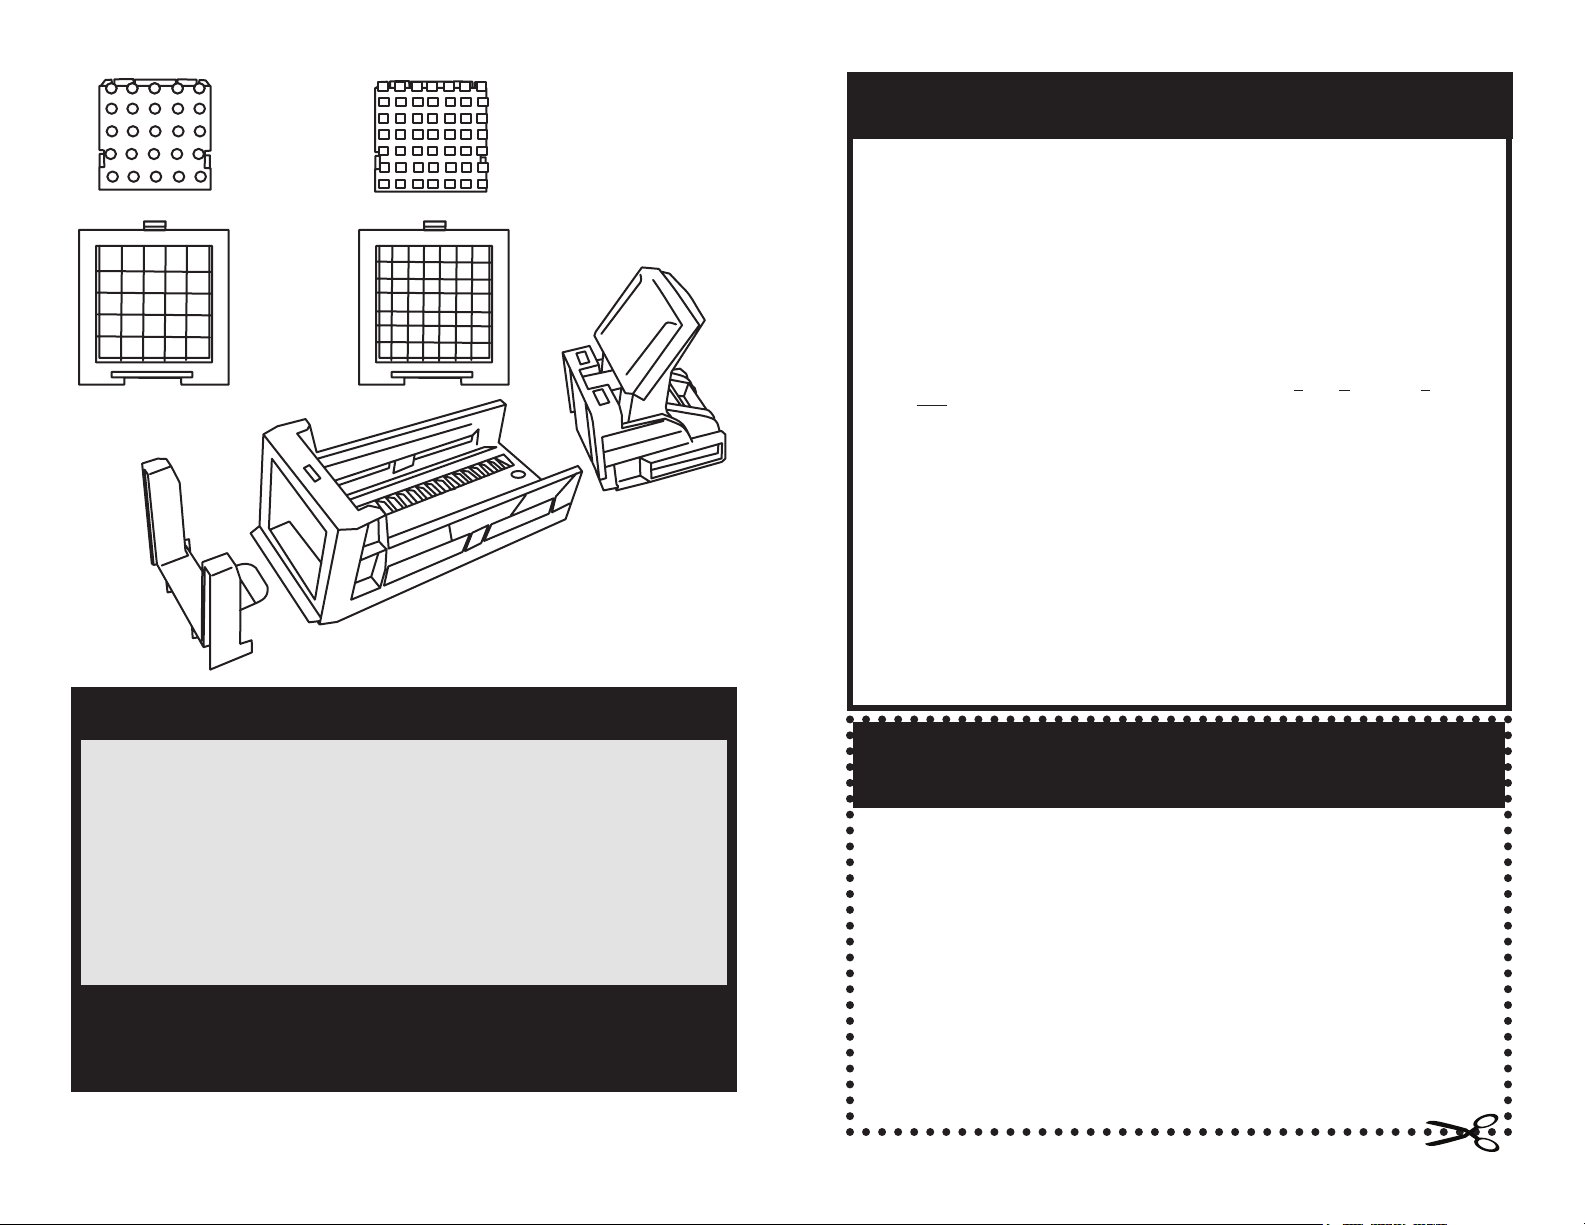
COMPONENT LIST
the product shall be free from defects in material and workmanship.
The Warranty Card, along with a copy of the original receipt, must be received by Weston Products LLC
within 30 days from purchase date for the warranty to apply. Failure to send the completely lled out Warranty
Card, along with a copy of the original receipt, will void the warranty.
The product must be delivered to or shipped freight prepaid to Weston Products LLC for warranty services,
in either its original packaging or similar packaging affording an equal degree of protection. Damage due to
shipping is not the responsibility of the company. Weston Products LLC charges a $35.00 per hour bench
charge. NOTE: No repairs will be started without the authorization of the customer. The return shipping cost
to the customer will be added to the repair invoice.
Weston Products LLC will repair (or at its discretion, replace) the product free of charge, if in the judgment
of the company, it has been proven to be defective as to seller’s labor and material, within the warranty period.
New or rebuilt replacements for factory defective parts will be supplied for one (1) year from the date of
purchase. Replacement parts are warranted for the remainder of the original warranty period.
For non-warranty repairs, contact Weston Products LLC’s Customer Service at 1-800-814-4895 M-F
8am-5pm EST (outside of the United States 440-638-3131) to obtain a Return Merchandise Authorization
Number (RMA Number). Weston Products LLC will refuse all returns that do not contain this number. DO
NOT RETURN THE UNIT WITHOUT PROPER AUTHORIZATION FROM WESTON PRODUCTS LLC.
LIMITATIONS: The warranty is void if the product is used for any purpose other than that for which it is
designed. The product must not have been previously altered, repaired, or serviced by anyone else other
than Weston Products LLC. If applicable, the serial number must not have been altered or removed. The
product must not have been subjected to accident in transit or while in the customer’s possession, misused,
abused, or operated contrary to the instructions contained in the instruction manual. This includes failure
caused by neglect of reasonable and necessary maintenance, improper line voltage and acts of nature. This
warranty is not transferable and applies only to U.S. and Canadian sales.
Except to the extent prohibited by applicable law, no other warranties whether expressed or implied,
including warranty merchantability and tness for a particular purpose, shall apply to this product. Under no
circumstances shall Weston Products LLC be liable for consequential damages sustained in connection with
said product and Weston Products LLC neither assumes nor authorizes any representative or other person to
assume for it any obligation or liability other than such as is expressly set forth herein. Any applicable implied
warranties are also limited to the one (1) year period of the limited warranty.
This warranty covers only the product and its specic parts, not the food or other products processed in it.
CUT ALONG THE DOTTED LINE AND SEND THE WARRANTY CARD ALONG WITH A COPY OF YOUR ORIGINAL
PURCHASE RECEIPT TO:
Weston Products LLC - WARRANTY DEPARTMENT
20365 Progress Drive, Strongsville, OH 44149
DIAGRAM PART PART
NUMBER DESCRIPTION NUMBER
1 Base N/A
2 Knife Guide N/A
3 Ratchet Handle N/A
4 1/2” (1.3 cm) Blade (25 Hole) 36-3302
5 Push Plate N/A
6 3/8” (0.95 cm) Blade (49 Hole) 36-3303
7 Push Plate N/A
If any components of this unit are broken, the unit does not operate properly or you
need a replacement instruction manual, visit us on the web at
WestonProduct.com/support
Or call Weston Products LLC Toll Free at 1-800-814-4895
Monday thru Friday 8:00am-5:00pm EST. Outside the U.S. call 440-638-3131
-2-
WESTON WARRANTY CARD
SEND THIS CARD ALONG WITH A COPY OF YOUR ORIGINAL PURCHASE RECEIPT TO:
WESTON PRODUCTS LLC-WARRANTY DEPT. , 20365 PROGRESS DRIVE, STRONGSVILLE, OH 44149
Customer Name: _________________________________
Address: _______________________________________
City/State/Zip: ___________________________________
Telephone Number: (_________) ____________________
E-Mail Address: _________________________________
Original Date of Purchase: ______/________/________
Product Model #: _________________________________
Serial # (if applicable): ______________________
-7-
Page 3

RECIPES
GENERAL SAFETY RULES
SWEET POTATO TIP!
To prepare sweet potatoes
for cutting, wrap the peeled
potatoes in napkins and
place on a microwave safe
plate and microwave on
high for up to 2 minutes, or
parboil for 10 minutes. Use
Caution when handling
the potatoes will be hot!
This will make the potatoes
easier to cut and shorten
the cooking time.
SWEET POTATO FRIES
5 sweet potatoes 3 Tbsp olive oil 2 Tbsp basil
2 tsp sea salt 1/2 tsp ground black pepper
.
Preheat the oven to 400oF (204oC)
.
Prepare then slice the potatoes
.
Toss the sliced sweet potatoes with the olive oil in a bowl
.
Spread the potatoes out on a foil-lined baking sheet
.
Sprinkle with basil, sea salt and pepper
.
Bake until golden, about 20-25 minutes
CARROT FRIES
1 lb carrots 1 Tbsp olive oil 1/4 tsp dried thyme
1/4 tsp salt
.
Preheat the oven to 400oF (204oC)
.
Slice the carrots into strips
.
Toss the sliced carrots with the olive oil, thyme and salt in a bowl
.
Spread the carrots out on a parchment paper-lined baking sheet
.
Bake 15-20 minutes, or until the carrots are soft
READ AND FULLY UNDERSTAND ALL INSTRUCTIONS
AND WARNINGS PRIOR TO USING THIS UNIT. YOUR
SAFETY IS MOST IMPORTANT! FAILURE TO COMPLY
WITH PROCEDURES AND SAFE GUARDS MAY
WARNING!
1. KEEP FINGERS CLEAR of the Blade at
all times. NEVER hold the product with your
hands in line of the Blade. Failure to keep
ngers and hands away from the Blade may
result in personal injury.
2. KEEP CHILDREN AWAY. NEVER
LEAVE THE SLICER UNATTENDED. This
appliance is not a toy.
3. CHECK FOR DAMAGED PARTS. Before
using the appliance, check that all parts are
operating properly, and perform the intended
functions. Check for alignment of moving
parts, binding of moving parts, mounting
and any other conditions that may affect the
operation.
4. When handling the blade, it is HIGHLY
RECOMMENDED to wear cut-resistant
Kevlar gloves.
SAVE THESE INSTRUCTIONS!
RESULT IN SERIOUS INJURY OR PROPERTY DAMAGE.
REMEMBER: YOUR PERSONAL SAFETY IS YOUR
RESPONSIBILITY!
5. The Manufacturer declines any
responsibility in the case of improper use of
this unit.
6. Be sure the appliance is stable during
use. The base should be on a level, sturdy,
work surface, and the appliance should not
move during the cutting process.
7. DO NOT USE this appliance for frozen
foods, meat, sh, fruits or vegetable with
pits, nuts, cheese or anything other than
food stuffs. The appliance is not suitable to
cut hard items.
8. DO NOT USE the appliance while under
the inuence of drugs or alcohol.
Refer to them often and use them to instruct others.
APPLE & SAUSAGE STUFFING
1 3/4 cup chicken broth ground black pepper
1/2 cup coarsely chopped celery 1/4 cup chopped onion 1/2 green apple
1/2 red apple 1/2 lb pork sausage, cooked & crumbled
2 cup prepared herb seasoned stufng
2 prepared dry corn bread stufng
.
Wash and dice the apples
.
Heat the broth, pepper, celery, onion & apples in a saucepan over a medium to
high heat, bring to a boil
.
Cover and cook for 5 minutes, until the vegetables are tender
.
Add the sausage and the stufng to the mixture
.
Stir lightly to coat
CAUTION! It is important to follow the “Food Safety” guidelines. For the most
up to date instruction visit the USDA website.
-6-
ADDITIONAL ACCESSORIES AVAILABLE
5-Piece Ravioli Maker Kit 16-0101-W
Food Strainer & Sauce Maker 07-0801
Apple Peeler 83-2015-W
Manual Kitchen Kit 16-0401-W
Multi-Function Manual Mixer 16-0301-W
6 Tray Food Dehydrator 75-0301-W
#8 Heavy-Duty Electric Meat Grinder 33-0201-W
These products and many more products can be ordered by visit ing
Monday thru Friday 8:00am-5:00pm EST. Outside the U.S. call 440-638-3131
WestonProducts.com or by calling
Weston Products LLC Toll Free at 1-800- 814-489 5
E-Mail: CustomerService@WestonProducts.com
-3-
Page 4

CAUTION! Use extreme care when handling the Blades! The Blades are
extremely SHARP! It is suggested that you wear Kevlar Cut-Resistant Gloves
when handling the Blades.
ASSEMBLY & CHANGING THE BLADE
1. Insert the Blade, Blade Tab end rst up
through the slot in the bottom of the Base. The
front of the Blade will face outwards (Figure 1).
The Blade will click into place.
2. Slide the Knife Guide Tab into the path
underneath the Base until it clicks securely into
place (Figure 2).
3. With the Pusher Tabs pointing upward,
and the Pusher Nubs facing outward, place
the Pusher at onto the face of the Ratchet
Handle and slide upward into place. The slots
on the Pusher will align with the slots on the
Ratchet Handle. The Pusher will click into
place (Figure 3).
4. Place the Ratchet Handle/Pusher
assembly onto the end of the Base (Figure 4).
5. Pull the Ratchet Handle forward slightly
and push down on the Handle. (This will allow
the Ratchet Clips to latch into the Ratchet
Brackets.) (Figure 5 & 5a).
6. To change the Blade, pull up on the Handle
to release the Ratchet Handle from the Base.
Remove the Ratchet Handle.
7. From the underside of the Base, gently pull
down on the Knife Guide Tab and pull the
Knife Guide off of the Base.
8. Push the Blade Tab down to release the
Blade from the Base.
Front of
Blade
Blade Tab
Knife Guide
Tab
Pusher Tabs
Front of Blade
Handle
Back of Blade
Figure 1
Base
Figure 2
Figure 3
SLICING & DICING INSTRUCTIONS
1. With the Base rmly on a clean table or countertop,
place the food to be cut into the Base between the Blade
and the Ratchet Handle (Figure 6).
2. Press the Handle of the Ratchet Handle down.
The Ratchet Clips should engaged with the Ratchet
Brackets. Each time the Handle is pushed down, the
Ratchet Handle will advance one notch. This will push
Blade
the food into the Blade and cut the food as it pushes
through.
3. Continue to push down on the Handle until the food
has completely pushed through the Blade.
4. Pull up on the Handle to disengage the Ratchet
Clips from the Ratchet Brackets. Pull the Ratchet
Handle back and continue slicing a new food.
5. To dice foods, after each click of the Ratchet
Handle, slide a knife between the Blade and the Knife
Guide. Cut down to slice cubes. Slide the knife up, click
down on the Ratchet Handle and slice down. Continue
to push down on the Handle and slice until the food has
completely pushed through the Blade.
SWEET POTATO TIP!
To prepare sweet potatoes for cutting,
wrap the peeled potatoes in napkins and
place on a microwave safe plate and
microwave on high for up to 2 minutes,
or parboil for 10 minutes. Use Caution
when handling-the potatoes will be
hot! This will make the potatoes easier
to cut and shorten the cooking time.
Knife
Guide
Blade
CAUTION! Use extreme care when handling the Blades! The Blades are
extremely SHARP! It is suggested that you wear Kevlar Cut-Resistant Gloves
when handling the Blades.
Ratchet
Handle
Figure 6
Base
Figure 7
9. Push the Pusher Tabs down to release the
Pusher from the Ratchet Handle.
10. Replace the Blade and the Pusher following
instructions 1-3 on this page.
Ratchet
Handle
Figure 4
Base
-4- -5-
Pusher
Nubs
Figure 5
Ratchet Handle
Ratchet
Brackets
Figure 5a
Ratchet
Clips
CLEANING INSTRUCTIONS
It is recommended to thoroughly clean the unit before and after each use. Clean with
hot, soapy water, then rinse with clean water and dry thoroughly.
1. Use the small cleaning brush to clean the crevasses of the Push Plate and the Blade.
NEVER use hands to push food through the Blade. NEVER touch the Blade.
NOTE: Do not allow food particles and or fruit/vegetable juices to dry prior to cleaning.
2. Wash all the parts in warm soapy water. Rinse with clear water. Dry thoroughly
before storing.
3. Top-rack dishwasher safe.
4. Dry all parts thoroughly.
5. Store the French Fry Cutter and Food Dicer in the original box in a cool dry location.
 Loading...