

Page 1
APPLE PEELER
83-2015-W
DUE TO CONSTANT FACTORY IMPROVEMENTS, THE PRODUCT PICTURED MIGHT DIFFER
SLIGHTLY FROM THE PRODUCT IN THIS BOX. 060315
Page 2

GENERAL SAFETY RULES
COMPONENT LIST
ASSEMBLY INSTRUCTIONS
CLEANING INSTRUCTIONS
PEELING, SLICING & CORING
SLICING & CORING
PEELING
ADJUSTING THE BLADES
RECIPES
WARRANTY
REGLAS IMPORTANTES DE SEGURIDAD
LISTA DE COMPONENTES
ENSAMBLADO
INSTRUCCIONES DE LIMPIEZA
PELAR, SACAR EL CENTRO Y REBANAR
REBANAR Y SACAR EL CENTRO
PELADO
AJUSTE DE LAS CUCHILLAS
RECTAS
INFORMACIÓN DE GARANTÍA WESTON
IMPORTANTES RÉGLES DE SÉCURITÉ
LISTE DES COMPOSANTS
ASSEMBLAGE
NETTOYAGE
ÉPLUCHER, COUPER ET ÉTROGNER
ÉPLUCHER ÉPLUCHER
ÉPLUCHER
RÉGLAGE DES COUTEAUX
RECETTES
INFORMATION SUR LA GARANTIE
3
4
5
5
6
6
7
8
9
10
12
13
14
14
15
15
16
17
18
20
22
23
24
24
25
25
26
27
28
31
TABLE OF CONTENTS / ÍNDICE / TABLE DES MATIÈRES
2
Page 3

1. Keep ngers clear of the Blades at all times. Never push the product with
your hands in line of the Blades.
2. Protective cut-resistant gloves are recommended whenever handling the
Blade assemblies.
3. KEEP CHILDREN AWAY. NEVER LEAVE THE APPLE PEELER
UNATTENDED. This is not a toy.
4. CHECK FOR DAMAGED PARTS. Before using the apple peeler, check
that all parts are operating properly, and perform the intended functions.
Check for alignment of moving parts, binding of moving parts, mounting and
any other conditions that may affect the operation.
5. The Manufacturer declines any responsibility in the case of improper use of
this machine.
6. Be sure the Apple Peeler is stable during use. The Suction Cup Base
should be secure and the machine should not move during the cutting
process.
7. Do not use the Apple Peeler while under the inuence of drugs or alcohol.
SAVE THESE INSTRUCTIONS
GENERAL SAFETY RULES
READ AND FULLY UNDERSTAND ALL INSTRUCTIONS AND WARNINGS
PRIOR TO USING THIS UNIT. YOUR SAFETY IS MOST IMPORTANT!
FAILURE TO COMPLY WITH PROCEDURES AND SAFE GUARDS MAY
RESULT IN SERIOUS INJURY OR PROPERTY DAMAGE. REMEMBER:
YOUR PERSONAL SAFETY IS YOUR RESPONSIBILITY!
3
ENGLISH INSTRUCTIONS
Page 4
ENGLISH INSTRUCTIONS
4
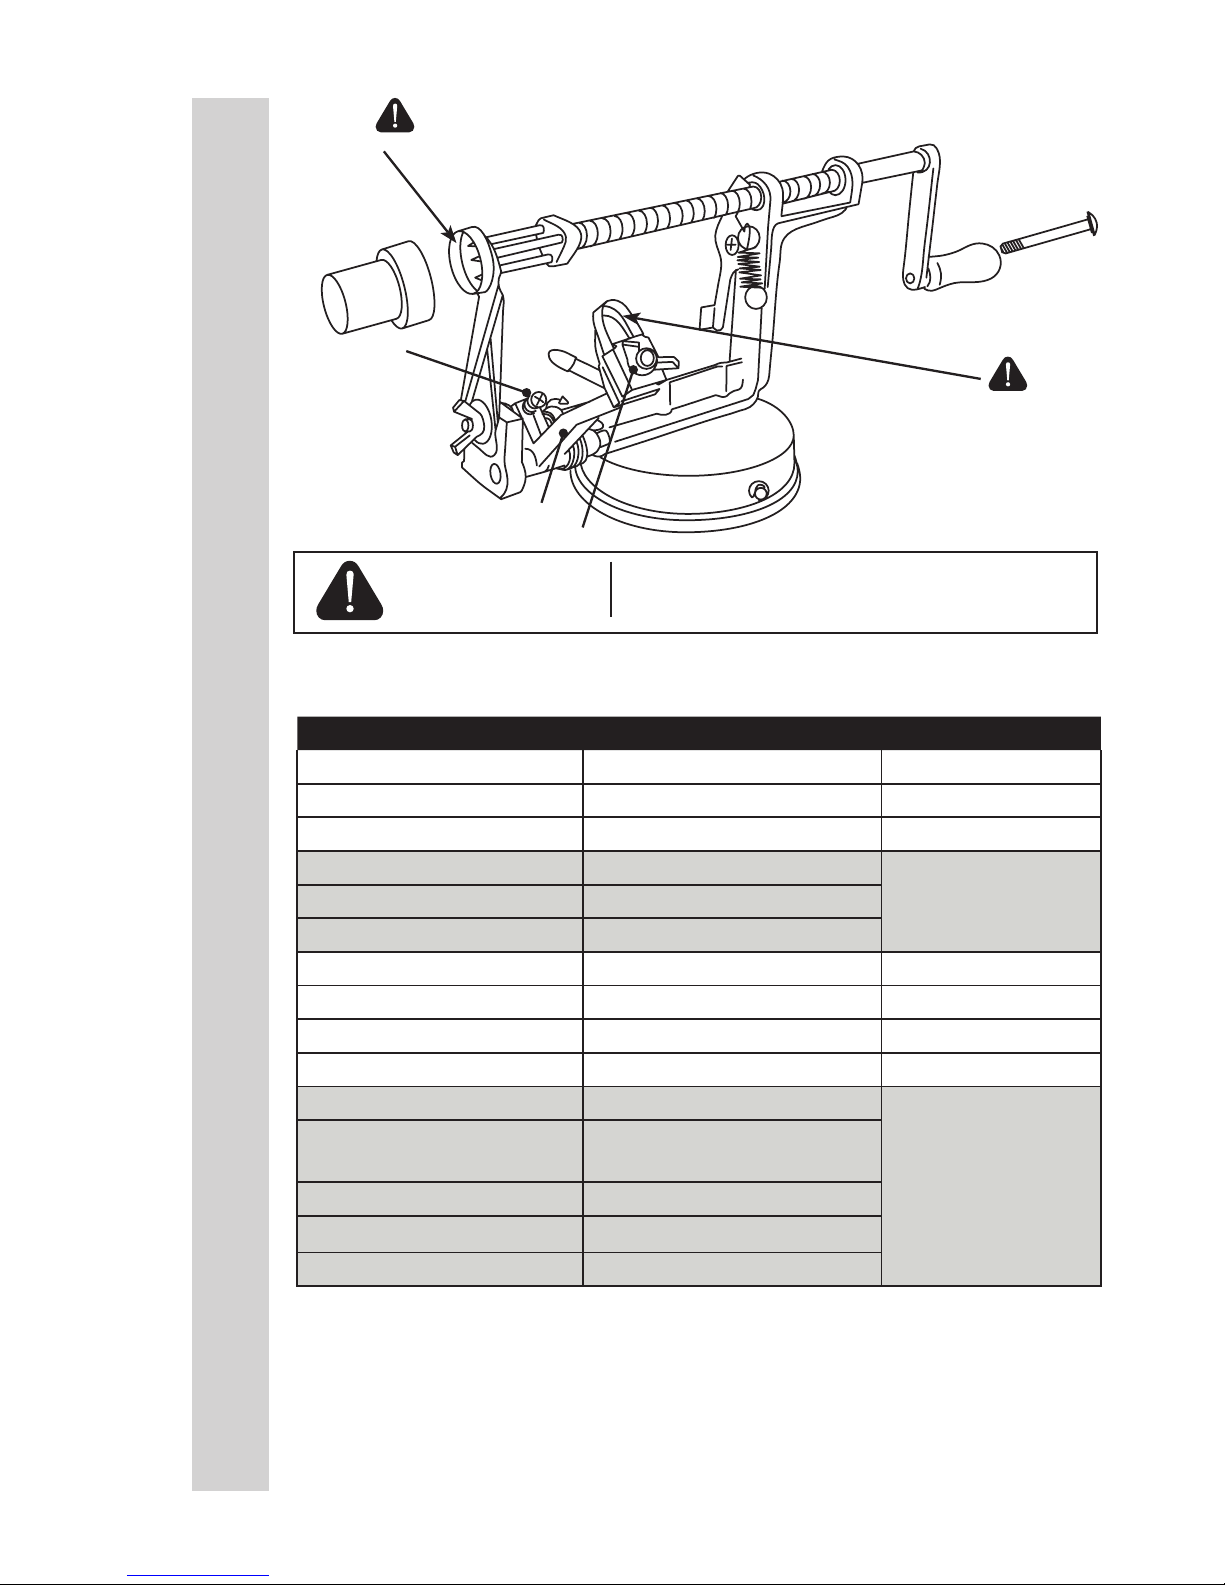
COMPONENT LIST
DIAGRAM NUMBER PART DESCRIPTION PART NUMBER
1 SUCTION CUP LEVER N/A
2 SUCTION CUP BASE N/A
3 SHAFT N/A
4 HANDLE
83-2119
4A 2” (5 CM) SCREW
5 HANDLE SHAFT
6 SHAFT REGULATOR THUMB LEVER N/A
7 FOOD PRONGS 83-2117
8 PROTECTIVE CAP N/A
9 PEELER BLADE ARM N/A
10 PEELING BLADE
83-2118
11 PEELING BLADE ADJUSTMENT
WING NUT
12 PEELING BLADE ADJUSTMENT SCREW
13 CORING/SLICING BLADE
14 CORING/SLICING BLADE WING NUT
11
2
1
3
4
6
7
8
9
10
12
13
14
5
4A
WARNING SHARP!
WARNING SHARP!
WARNING
SHARP BLADES
KEEP FINGERS CLEAR OF BLADE AREA!
Protective/cut-resistant gloves recommended whenever
handling the Blades!
If any components of this unit are broken, the unit does not operate properly or you
need a replacement instruction manual, visit us on the web at
WestonProducts.com
Or call Weston Brands LLC Toll Free at 1-800-814-4895
Monday thru Friday 8:00am-5:00pm ET. Outside the U.S. call 001-440-638-3131
Page 5
5
ENGLISH INSTRUCTIONS
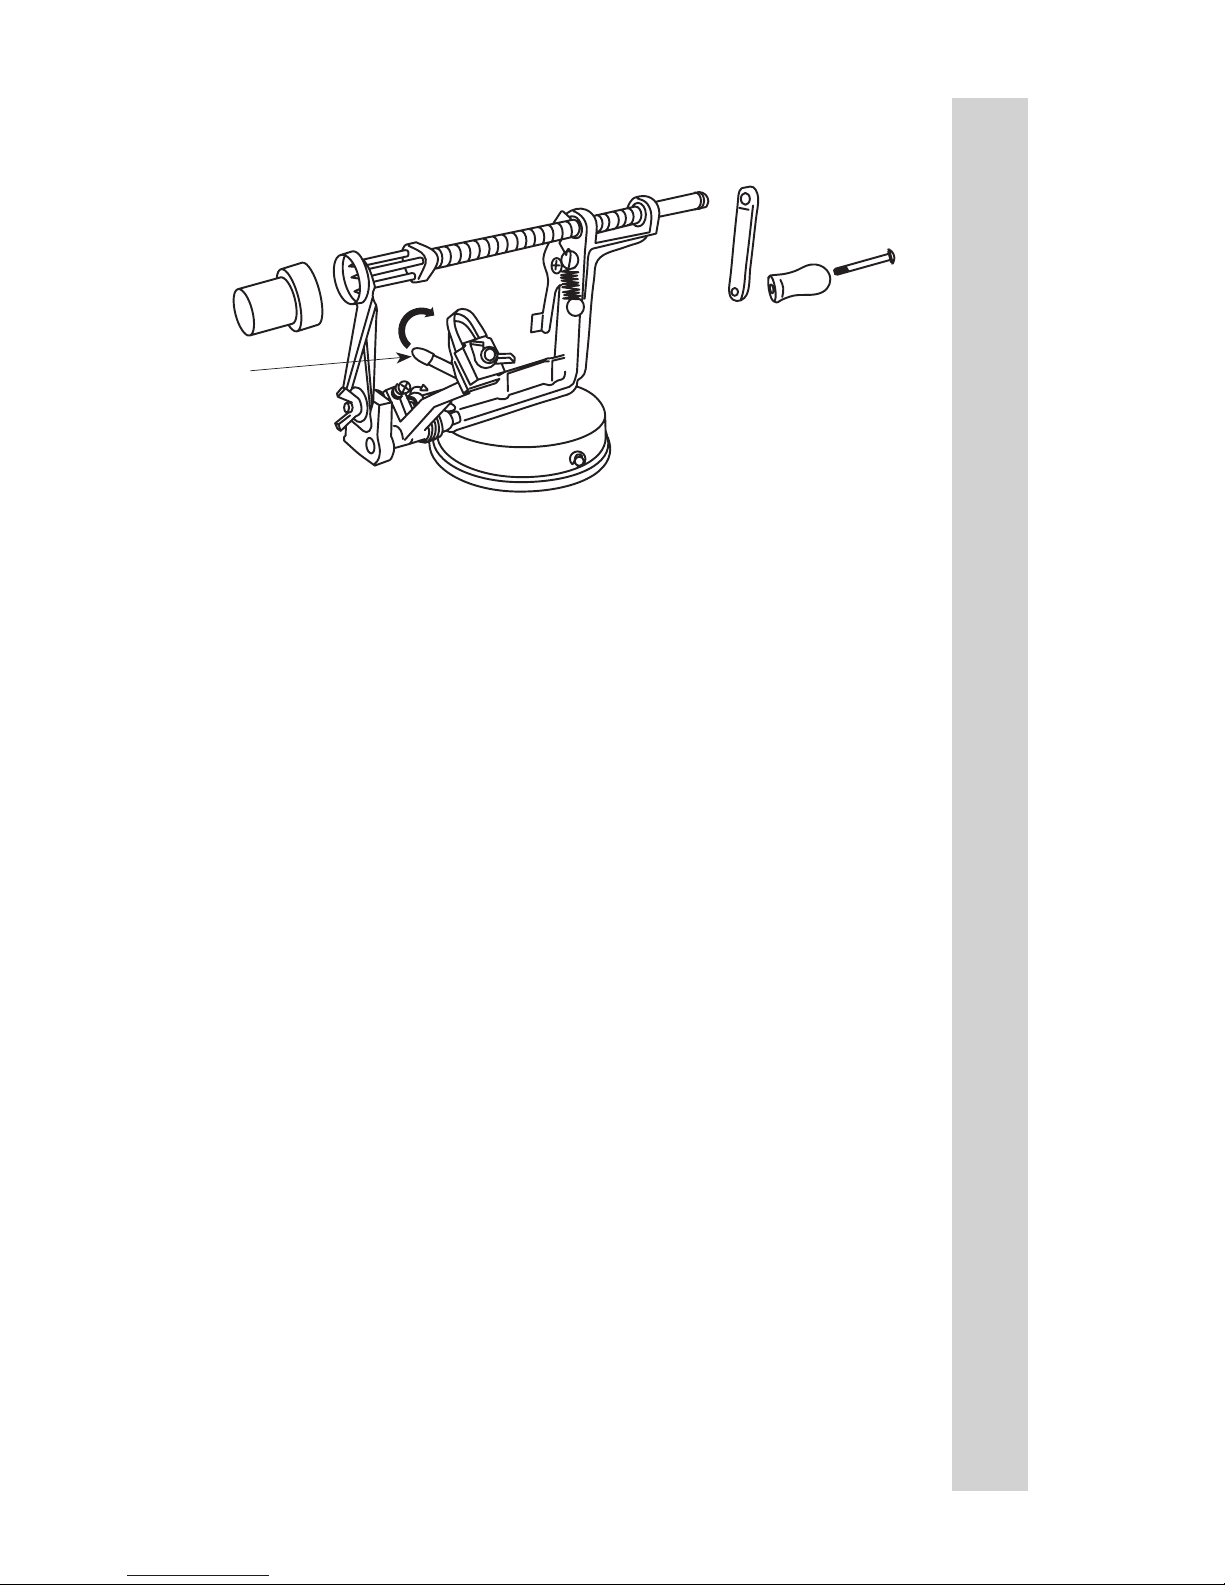
ASSEMBLY
1. Attach the Handle with included 2” (5 cm) Screw to the Handle Shaft using a
Phillips head screwdriver until tight.
2. Screw the Handle Assembly onto the end of the Shaft until tight.
3. When attached, the handle will spin freely.
4. Remove the Protective Cap from the Food Prongs. Do not discard the
Protective Cap, as it will be used to safely store the Apple Peeler.
5. Attach the Apple Peeler to any at, smooth surface. Flip the Suction Cup Lever
so that it points to the Peeling Blade end of the unit. Hold the Suction Cup
Base rm and at against the countertop with one hand and move the Suction
Cup Lever over towards the Handle end of the unit.
6. Check to make sure the Apple Peeler is rmly xed to the surface.
Handle
2” Screw
Handle Shaft
Shaft
Suction
Cup Lever
Suction
Cup Base
CLEANING
1. Hand wash all parts that come in contact with food in warm, soapy water.
Rinse thoroughly. Dry immediately.
NOTE: The Apple Peeler is NOT dishwasher safe.
2. It is suggested to coat all the unpainted metal parts of the Apple Peeler with a
food-grade silicone spray.
3. Turn the Handle to bring the Shaft all the way in and through the Coring/Slicing
Blade. Place the Protective Cap onto the Food Prongs.
4. Place the Apple Peeler in its box. Store in a cool, dry location.
Page 6
6
ENGLISH INSTRUCTIONS
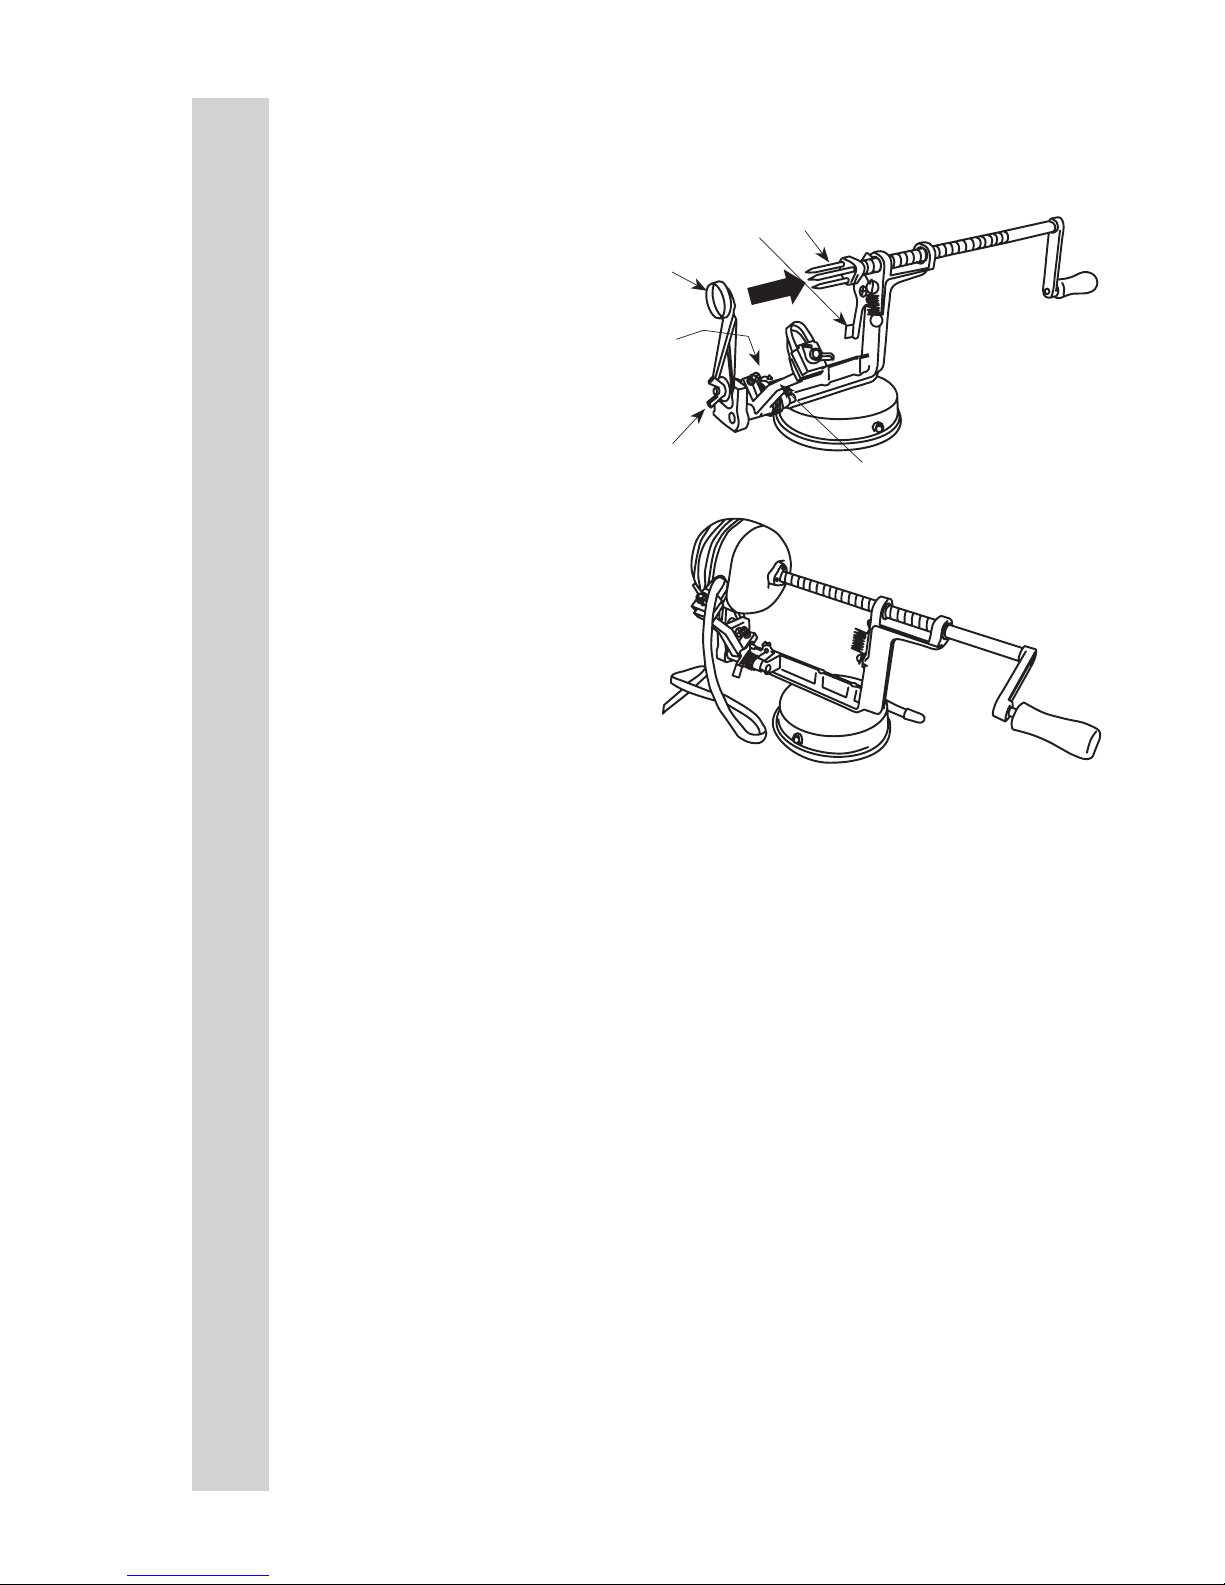
PEELING, SLICING & CORING
1. Pull the Peeler Blade Arm
back until the metal lever
catches and holds the Peeler
Blade Arm pulled back.
2. Press Shaft Regulator
Thumb Lever to release the
stopper from the Shaft. Pull
on the Handle until the Shaft
is completely pulled back
(FIGURE 1).
3. Carefully push an apple,
potato or pear, bottom rst, all
the way onto the Food Prongs.
4. Lift up on the metal lever
of the Peeler Blade Arm to
release the Peeler Blade.
5. Turn the Handle clockwise
to start peeling the apple
(FIGURE 2).
6. The apple will meet with the
Coring/Slicing Blade. This will
begin the slicing and coring of
the apple.
7. When the apple has been completely peeled, sliced and cored, gently pull the
apple off of the core.
8. The apple core and seeds will remain on the Food Prongs. Firmly grasp the apple
core and pull it off of the Food Prongs.
FIGURE 1
Peeler
Blade Arm
Shaft
Regulator
Thumb
Lever
Shaft
Handle
Food
Prongs
Metal Lever
of the
Peeler
Blade Arm
(Not Shown)
FIGURE 2
Coring/
Slicing
Blade
Coring/Slicing
Blade Wing Nut
SLICING & CORING
1. Pull the Peeler Blade Arm back until the metal lever catches and holds the
Peeler Blade Arm pulled back.
2. Press Shaft Regulator Thumb Lever to release the stopper from the Shaft. Pull
on the Handle until the Shaft is completely pulled back (FIGURE 1).
3. Carefully push an apple, potato or pear, stem end rst, all the way onto the Food
Prongs.
4. Turn the Handle clockwise to start slicing/coring the apple.
5. The apple will meet with the Coring/Slicing Blade. This will begin the slicing and
coring of the apple.
6. When the apple has been completely sliced and cored, gently pull the apple off
of the core.
7. The apple core and seeds will remain on the Food Prongs. Firmly grasp the
apple core and pull it off of the Food Prongs.
Page 7

7
ENGLISH INSTRUCTIONS
PEELING
1. Pull the Peeler Blade Arm back until the metal lever catches and holds the
Peeler Blade Arm pulled back.
2. Press Shaft Regulator Thumb Lever to release the stopper from the Shaft. Pull
on the Handle until the Shaft is completely pulled back (FIGURE 3).
3. Loosen the Coring/Slicing Blade Wing Nut. Turn the Coring/Slicing Blade away
from the Peeler Blade about 90 degrees. Re-tighten the Coring/Slicing Blade
Wing Nut until snug.
4. Carefully push an apple, potato or pear, stem end rst, all the way onto the
Food Prongs.
5. Lift up on the metal lever of the Peeler Blade Arm to release the Peeler Blade.
6. Turn the Handle clockwise to start peeling the apple (FIGURE 4).
7. When the apple has been completely peeled, rmly grasp the apple and pull it
off of the Food Prongs.
FIGURE 3
Peeler
Blade Arm
Shaft
Regulator
Thumb
Lever
Shaft
Handle
Food
Prongs
Metal Lever
of the
Peeler
Blade Arm
(Not Shown)
Coring/
Slicing
Blade
Coring/Slicing
Blade Wing Nut
FIGURE 4
Page 8

8
ENGLISH INSTRUCTIONS
ADJUSTING THE BLADES
CORING/SLICING BLADE ADJUSTMENT
1. Pull the Peeler Blade Arm back until the metal lever catches and holds the
Peeler Blade Arm pulled back. Press Shaft Regulator Thumb Lever to release
the stopper from the Shaft. Pull on the Handle until the Shaft is slightly pulled
back.
2. Loosen the Coring/Slicing Blade Wing Nut slightly. Turn the Coring/Slicing
Blade until the Food Prongs are in the center of the ring on the Coring/Slicing
Blade. Re-tighten the Coring/Slicing Blade Wing Nut until tight.
PEELING BLADE ADJUSTMENT
1. To adjust the Peeling Blade to different fruit diameters (this may be necessary
if you are peeling smaller or thinner apples or potatoes) use a at head
screw driver and turn the Peeling Blade Adjustment Screw clockwise or
counter clockwise until desired distance is achieved.
2. To adjust peeling depth, loosen Peeling Blade Wing Nut. Adjust Peeling Blade
to desired depth, and re-tighten Peeling Blade Wing Nut.
Page 9
Page 10

Weston Brands LLC warrants to the ORIGINAL RETAIL PURCHASER of this product that if operated in accordance
with the printed instruction accompanying it, then for a period of 2 years from the date of purchase, the product shall be
free from defects in material and workmanship.
The Warranty Card, along with a copy of the original receipt, must be received by Weston Brands LLC within 30 days
from purchase date for the warranty to apply. Failure to send the completely lled out Warranty Card, along with a copy of
the original receipt, will void the warranty.
The product must be delivered to or shipped freight prepaid to Weston Brands LLC for warranty services, in either
its original packaging or similar packaging affording an equal degree of protection. Damage due to shipping is not the
responsibility of the company. Weston Brands LLC charges a $35.00 per hour bench charge. NOTE: No repairs will
be started without the authorization of the customer. The return shipping cost to the customer will be added to the repair
invoice.
Prior to returning the product for Warranty Repair, the product must be thoroughly cleaned and free from any food
particles or other debris. Failure of the purchaser to comply with this standard will result in the unit being returned without
repair. In some cases, a $50 cleaning surcharge may apply.
Weston Brands LLC will repair (or at its discretion, replace) the product free of charge, if in the judgment of the
company, it has been proven to be defective as to seller’s labor and material, within the warranty period.
New or rebuilt replacements for factory defective parts will be supplied for two (2) year from the date of purchase.
Replacement parts are warranted for the remainder of the original warranty period.
For non-warranty repairs, contact Weston Brands LLC’s Customer Service at 1-800-814-4895 M-F 8am-5pm ET
(outside of the United States 001-440-638-3131) to obtain a Return Merchandise Authorization Number (RMA Number).
Weston Brands LLC will refuse all returns that do not contain this number. DO NOT RETURN THE UNIT WITHOUT
PROPER AUTHORIZATION FROM WESTON BRANDS LLC.
LIMITATIONS: The warranty is void if the product is used for any purpose other than that for which it is designed.
The product must not have been previously altered, repaired, or serviced by anyone else other than Weston Brands
LLC. If applicable, the serial number must not have been altered or removed. The product must not have been subjected
to accident in transit or while in the customer’s possession, misused, abused, or operated contrary to the instructions
contained in the instruction manual. This includes failure caused by neglect of reasonable and necessary maintenance,
improper line voltage and acts of nature. This warranty is not transferable and applies only to U.S. and Canadian sales.
Except to the extent prohibited by applicable law, no other warranties whether expressed or implied, including
warranty merchantability and tness for a particular purpose, shall apply to this product. Under no circumstances shall
Weston Brands LLC be liable for consequential damages sustained in connection with said product and Weston Brands
LLC neither assumes nor authorizes any representative or other person to assume for it any obligation or liability other than
such as is expressly set forth herein. Any applicable implied warranties are also limited to the two (2) year period of the
limited warranty.
This warranty covers only the product and its specic parts, not the food or other products processed in it. Weston is
not responsible for missing or damaged parts on discounted/clearance, resale or nal sale items where the seller may not
be able to guarantee full functionality or completeness of the unit.
CUT ALONG THE DOTTED LINE AND SEND THE WARRANTY CARD ALONG WITH A COPY OF YOUR
ORIGINAL PURCHASE RECEIPT TO:
Weston Brands LLC / WARRANTY
20365 Progress Drive, Strongsville, OH 44149 USA
Customer Name:
Address:
City/State/Zip/Country:
Telephone Number:
E-Mail Address:
Original Date of Purchase:
Product Model #:
Serial # (if applicable):
I have read the warranty information. Initial here:
WESTON WARRANTY INFORMATION
SAVE THIS WARRANTY INFORMATION FOR YOUR RECORDS!
WESTON WARRANTY CARD
SEND THIS CARD ALONG WITH A COPY OF YOUR ORIGINAL PURCHASE RECEIPT TO:
WESTON BRANDS LLC / WARRANTY, 20365 PROGRESS DRIVE, STRONGSVILLE, OH 44149 USA
Copy of Receipt
Included
Page 11

PELADOR DE
MANZANAS
83-2015-W
DEBIDO A CONSTANTES MEJORAS EN LA FÁBRICA, EL PRODUCTO QUE SE MUESTRA PUEDE
SER LIGERAMENTE DIFERENTE DEL PRODUCTO EN ESTA CAJA. 060315
Page 12

12
INSTRUCCIONES EN ESPAÑOLINSTRUCCIONES EN ESPAÑOL
1. Mantenga los dedos lejos de las navajas en todo momento. Nunca sostenga
el producto con las manos alineadas con la navaja.
2. Siempre que use conjuntos de navajas se recomienda usar guantes de
protectores y resistentes a los cortes.
3. MANTÉNGALO ALEJADO DE LOS NIÑOS. NUNCA DEJE SIN
SUPERVISIÓN EL PELADOR DE MANZANAS. No es un juguete.
4. REVISE SI TIENE PARTES DAÑADAS. Antes de usar la rebanadora revise
que todas las partes estén funcionando debidamente y realicen las funciones
deseadas. Revise la alineación de las partes móviles, si están atoradas,
encimadas o en cualquier otra situación que afecte su funcionamiento.
5. El fabricante rechaza cualquier responsabilidad en caso de uso indebido de
esta máquina.
6. Revise que el pelador de manzanas esté estable mientras lo usa. La base
de copa de succión debe estar segura y la máquina no debe moverse
durante el proceso de corte.
7. No use el pelador de manzanas bajo los efectos de drogas o alcohol.
¡GUARDE ESTAS INSTRUCCIONES!
REGLAS IMPORTANTES DE SEGURIDAD
LEA Y ENTIENDA COMPLETAMENTE TODAS LAS INSTRUCCIONES Y
ADVERTENCIAS ANTES DE UTILIZAR ESTA UNIDAD. ¡SU SEGURIDAD
ES LO MÁS IMPORTANTE! NO SEGUIR LOS PROCEDIMIENTOS
Y PRECAUCIONES PUEDE PROVOCAR LESIONES GRAVES Y
DAÑOS MATERIALES. RECUERDE: ¡SU SEGURIDAD PERSONAL ES
RESPONSABILIDAD DE USTED!
Page 13

13
INSTRUCCIONES EN ESPAÑOL
INSTRUCCIONES EN ESPAÑOL
LISTA DE COMPONENTES
NÚMERO DE DIAGRAMA DESCRIPCIÓN DE LA PIEZA NÚMERO DE PIEZA
1 PALANCA DE LA COPA DE SUCCIÓN N/A
2 BASE DE LA COPA DE SUCCIÓN N/A
3 EJE N/A
4 ASA
83-2119
4A TORNILLO DE 2” (5 CM)
5 EJE DEL MANGO
6 PALANCA DEL REGULADOR DEL EJE N/A
7 PINZAS PARA ALIMENTOS 83-2117
8 TAPA PROTECTORA N/A
9 BRAZO DE LA CUCHILLA DEL PELADOR N/A
10 CUCHILLA PELADORA
83-2118
11 TUERCA MARIPOSA DE AJUSTE
DE LA CUCHILLA PELADORA
12 TORNILLO DE AJUSTE DE LA
CUCHILLA PELADORA
13 CUCHILLA PARA SACAR EL
CENTRO/REBANAR
14 TUERCA MARIPOSA DE LA CUCHILLA
PARA SACAR EL CENTRO/REBANAR
¡ADVERTENCIA!
¡Se recomienda utilizar guantes de protectores y
resistentes a los cortes siempre que manipule
el conjunto de navajas!
11
2
1
3
4
6
7
8
9
10
12
13
14
5
4A
¡PRECAUCIÓN,
AFILADO!
¡PRECAUCIÓN,
AFILADO!
Si cualquier componente de esta unidad está roto, si no funciona debidamente, o si necesita
un instructivo de repuesto, visítenos en la Web en
WestonProducts.com
O llame a Weston Brands LLC larga distancia sin costo 1-800-814-4895
De lunes a viernes, de 8:00 am a 5:00 pm tiempo del ET. Fuera de Estados Unidos llame
al 001-440-638-3131
Page 14

14
INSTRUCCIONES EN ESPAÑOLINSTRUCCIONES EN ESPAÑOL
ENSAMBLADO
1. Fije el mango con el tornillo de 2” (5 cm), que se incluye, al eje del mango
utilizando un destornillador con cabeza Phillips hasta que esté apretado.
2. Atornille el conjunto del mango al extremo del eje hasta que esté apretado.
3. Una vez jo, el mango girará libremente.
4. Retire la tapa protectora de los dientes para alimentos. No tire la tapa
protectora, ya que se utilizará para almacenar el pelador de manzanas de
forma segura.
5. Fije el pelador de manzanas a cualquier supercie plana y lisa. Gire la
palanca de la copa de succión de manera que apunte hacia el extremo de
la cuchilla peladora de la unidad. Sostenga la base de la copa de succión
rme y plana contra el mesón con una mano y mueva la palanca de la copa
de succión hacia el extremo del mango de la unidad.
6. Asegúrese de que el pelador de manzanas esté jo de manera rme sobre
la supercie.
LIMPIEZA
1. Lave a mano todas las partes que entren en contacto con los alimentos con
agua caliente, jabonosa. Enjuague bien. Seque de inmediato.
NOTA: El pelador de manzanas no es seguro para utilizarlo en el
lavaplatos.
2. Se sugiere recubrir todas las partes metálicas sin pintar del pelador de
manzanas con un atomizador de silicona adecuado para alimentos.
3. Gire el mango para pasar el eje completamente a través de la cuchilla para
sacar el centro/rebanar. Coloque la tapa protectora sobre los dientes para
alimentos.
4. Coloque el pelador de manzanas en su caja. Guárdelo en un lugar fresco
y seco.
Mango
Tornillos
de 2”
Eje del mango
Eje
Palanca
de la copa de
succión
Base de la copa
Page 15

15
INSTRUCCIONES EN ESPAÑOL
INSTRUCCIONES EN ESPAÑOL
PELAR, SACAR EL CENTRO Y REBANAR
1. Jale el brazo de la
cuchilla del pelador hasta
que la palanca metálica
enganche y el brazo de
la cuchilla del pelador se
sostenga.
2. Presione la palanca
del regulador del eje para
liberar el detenedor del
eje. Jale el mango hasta
que el eje haya salido
completamente (FIGURA
1).
3. Con cuidado, presione
una manzana, una papa o
una pera, con la parte de
abajo primero, sobre los dientes para
alimentos.
4. Levante la palanca metálica del
brazo de la cuchilla del pelador para
liberar la cuchilla del pelador.
5. Gire el mango en el sentido de las
manecillas del reloj para comenzar a
pelar la manzana (FIGURA 2).
6. La manzana se reunirá con la
cuchilla para sacar el centro/rebanar.
Esto comenzará la operación de
rebanado y descorazonado de la
manzana.
7. Cuando la manzana esté completamente pelada, rebanada y sin el centro, jale
suavemente la manzana y sepárela del centro.
8. El centro de la manzana y las semillas permanecerán sobre los dientes para
alimentos. Tome rmemente el centro de la manzana y retírelo de los dientes para
alimentos.
FIGURA 1
Brazo de la
cuchilla del
pelador
Eje
Regulador
Palanca
para el
pulgar
Transmisión
Mango
Dientes para
alimentos
Palanca
metálica de
Brazo de la
cuchilla del
pelador
(No se
muestra)
FIGURA 2
Cuchilla
para
sacar el
Centro/
rebanar
Tuerca mariposa
de la cuchilla para
sacar el centro/
rebanar
REBANAR Y SACAR EL CENTRO
1. Jale el brazo de la cuchilla del pelador hasta que la palanca metálica
enganche y el brazo de la cuchilla del pelador se sostenga.
2. Presione la palanca del regulador del eje para liberar el detenedor del eje.
Jale el mango hasta que el eje haya salido completamente (gura A).
3. Con cuidado, presione una manzana, una papa o una pera, con la parte de
abajo primero, sobre los dientes para alimentos.
4. Gire el mango en el sentido de las manecillas del reloj para comenzar a
rebanar/sacar el centro de la manzana.
5. La manzana se reunirá con la cuchilla para sacar el centro/rebanar. Esto
comenzará la operación de rebanado y descorazonado de la manzana.
6. Cuando la manzana esté completamente rebanada y sin el centro, jale
suavemente la manzana y sepárela del centro.
7. El centro de la manzana y las semillas permanecerán sobre los dientes
para alimentos. Tome rmemente el centro de la manzana y retírelo de los
dientes para alimentos.
Page 16

16
INSTRUCCIONES EN ESPAÑOLINSTRUCCIONES EN ESPAÑOL
PELADO
1. Jale el brazo de la cuchilla del pelador hasta que la palanca metálica
enganche y el brazo de la cuchilla del pelador se sostenga.
2. Presione la palanca del regulador del eje para liberar el detenedor del eje.
Jale el mango hasta que el eje haya salido completamente (FIGURA 3).
3. Aoje la tuerca mariposa de la cuchilla para sacar el centro/rebanar Gire
la cuchilla para sacar el centro/rebanar y aléjela de la cuchilla peladora
aproximadamente 90 grados. Vuelva a apretar la tuerca mariposa de la
cuchilla para sacar el centro/rebanar hasta que quede rme.
4. Con cuidado, presione una manzana, una papa o una pera, con la parte de
abajo primero, sobre los dientes para alimentos.
5. Levante la palanca metálica del brazo de la cuchilla del pelador para liberar
la cuchilla del pelador.
6. Gire el mango en el sentido de las manecillas del reloj para comenzar a
pelar la manzana (FIGURA 4).
7. Cuando la manzana esté completamente pelada, sostenga rmemente la
manzana y sáquela de los dientes para alimentos.
FIGURA 3
FIGURA 4
Brazo de la
cuchilla del
pelador
Transmisión
Regulador
Palanca
para el
pulgar
Transmisión
Mango
Dientes para
alimentos
Palanca
metálica de
Brazo de la
cuchilla del
pelador
(No se
muestra)
Cuchilla
para
Navaja
Tuerca mariposa
de la cuchilla
para sacar el
centro/rebanar
Page 17

17
INSTRUCCIONES EN ESPAÑOL
INSTRUCCIONES EN ESPAÑOL
AJUSTE DE LAS CUCHILLAS
AJUSTE DE LA CUCHILLA PARA SACAR EL CENTRO/REBANAR
1. Jale el brazo de la cuchilla del pelador hasta que la palanca metálica
enganche y el brazo de la cuchilla del pelador se sostenga. Presione la
palanca del regulador del eje para liberar el detenedor del eje. Jale el
mango hasta que el eje haya salido completamente.
2. Aoje ligeramente la tuerca mariposa de la cuchilla para sacar el centro/
rebanar. Gire la cuchilla para sacar el centro/rebanar hasta que los dientes
para alimentos estén en el centro del anillo sobre la cuchilla para sacar el
centro/rebanar. Vuelva a apretar la tuerca mariposa de la cuchilla para
sacar el centro/rebanar hasta que quede rme.
AJUSTE DE LA CUCHILLA PELADORA
1. Para ajustar la cuchilla peladora a diferentes diámetros de frutas (esto
puede ser necesario si está pelando manzanas o papas más pequeñas
o más delgadas) utilice un destornillador de pala y gire el tornillo de ajuste
de la cuchilla peladora en la dirección de las manecillas del reloj, o en la
dirección contraria, hasta que alcance la distancia deseada.
2. Para ajustar la profundidad del pelado, aoje la tuerca mariposa de la
cuchilla peladora. Ajuste la cuchilla peladora a la profundidad deseada y
vuelva a apretar la tuerca mariposa de la cuchilla peladora.
Page 18

Page 19

Page 20

Weston Brands LLC garantiza al COMPRADOR AL DETALLE ORIGINAL de este producto que si funciona en cumplimiento
con las instrucciones impresas adjuntas, entonces por un período de 1 año desde la fecha de compra, el producto se
considerará libre de defectos respecto del material y mano de obra.
La Tarjeta de Garantía, junto con una copia del recibo original debe ser recibida por Weston Brands LLC dentro de 30 días
desde la fecha de compra para hacer efectiva la garantía. Si no se envía la Tarjeta de Garantía completamente llena, junto
con una copia del recibo original, anulará la garantía.
El producto debe ser enviado o despachado mediante ete prepagado a Weston Brands LLC para efectuar los servicios
establecidos en la garantía, en su envase original o en un envase similar que garantice igual grado de protección. El daño
producto del despacho no es responsabilidad de la compañía. Weston Brands LLC cobra $35.00 por concepto de mesón por
hora. NOTA: Las reparaciones no se iniciarán sin la autorización del cliente. El costo por despacho de devolución al cliente se
agregará a la factura por reparación.
Antes de devolver el producto para la Reparación según la Garantía, el producto debe estar completamente limpio y libre de
partículas de alimentos u otros fragmentos. El incumplimiento del comprador respecto de esta norma resultará en el envío de
la unidad sin reparación. En algunos casos, podría aplicar un sobrecargo de $50 por concepto de limpieza.
Weston Brands LLC reparará (o a su decisión, cambiará) el producto sin cobro, si a juicio de la compañía, se ha demostrado
que está defectuoso respecto de la mano de obra y material del vendedor, dentro del período de garantía.
Los cambios de productos nuevos o reacondicionados por partes defectuosas de fábrica serán suministrados por un (1) año
desde la fecha de compra. Las partes cambiadas están garantizadas por el resto del período original de garantía.
Para las reparaciones que no estén cubiertas en la garantía, comuníquese con Servicio al Cliente de Weston Brands LLC al
1-800-814-4895 de lunes a viernes, desde las 8 a.m. hasta las 5pm ET (Desde fuera de los Estados Unidos comuníquese
al 001-440-638-3131) para solicitar un Número de Autorización de Devolución de la Mercadería (Número RMA). Weston
Brands LLC rechazará todo envío que no contenga este número. NO DEVUELVA LA UNIDAD SIN LA AUTORIZACIÓN DE
WESTON BRANDS LLC.
LIMITACIONES: La garantía queda invalidada si el producto se utiliza para algún objetivo que no sea aquél para el cual
está diseñado. El producto no debe haber sido previamente alterado, reparado, ni tampoco se le debe haber hecho servicio
técnico por cualquier otra persona que no sea de Weston Brands LLC. Si corresponde, no se debe alterar o eliminar el
número de serie. El producto no debe estar sujeto a accidentes durante el transporte o estando en posesión del cliente, no
debe ser mal usado, mal tratado, u operado en forma contraria a las instrucciones de este manual. Esto incluye toda falla
causada por negligencia de mantención razonable o necesaria, voltaje de línea inadecuado o actos de la naturaleza. Esta
garantía es intransferible y sólo se aplica a ventas realizadas en Estados Unidos y Canadá.
Salvo en la medida en que lo prohíba la ley correspondiente, ninguna otra garantía expresa o implícita, incluyendo
comerciabilidad o aptitud de la garantía para un objetivo en particular, aplicará a este producto. Bajo ninguna circunstancia
Weston Brands LLC será responsable de daños emergentes sostenidos en conexión con dicho producto y Weston Brands
LLC no asume ni autoriza a ningún representante u otra persona a asumir por él ninguna obligación o responsabilidad que no
sea aquella expresamente establecida en esta tarjeta de garantía. Toda garantía correspondiente implícita también se limita a
un período de un (1) año de la garantía limitada.
Esta garantía cubre sólo el producto y sus partes especícas, no cubre los alimentos u otros productos procesados en
él. Weston no se hace responsable por partes faltantes o dañadas en productos con descuento/en oferta, reventa, o en
promoción nal, sobre los cuales el vendedor puede no ser capaz de garantizar una funcionalidad completa, o la integridad de
la unidad.
CORTE POR LA LÍNEA PUNTEADA Y ENVÍE LA TARJETA DE GARANTÍA JUNTO CON UNA COPIA DE SU RECIBO DE
COMPRA ORIGINAL A
Weston Brands LLC / WARRANTY
20365 Progress Drive, Strongsville, OH 44149 USA
Nombre del Cliente:
Dirección:
Ciudad/Estado/Código Zip/País:
Número Telefónico:
Dirección de Correo Electrónico:
Fecha de Compra Original:
Modelo del Producto #:
# de Serie (Si corresponde):
INFORMACIÓN DE GARANTÍA WESTON
¡GUARDE ESTA INFORMACIÓN DE GARANTÍA PARA SUS REGISTROS!
TARJETA DE GARANTÍA WESTON
ENVÍE ESTA TARJETA JUNTO CON UNA COPIA DE SU RECIBO DE COMPRA ORIGINAL A:
WESTON BRANDS LLC/WARRANTY, 20365 PROGRESS DRIVE. STRONGSVILLE, OH 44149 USA
Copia del recibo
incluido
Page 21

ÉPLUCHE-POMMES
83-2015-W
PARCE QUE NOS PRODUITS BÉNÈFICIENT DE PERFECTIONNEMENTS CONSTANTS
APPORTÉS EN USINE, LES ILLUSTRATIONS PRÉSENTES PEUVENT ÊTRE LÉGÈREMENT
DIFFÉRENTES DU PRODUIT REÇU. 060215
Page 22

INSTRUCTIONS EN FRANÇAIS
22
1. Tenez toujours les doigts à l’écart des couteaux. Ne poussez jamais le
produit avec les mains dans la ligne des couteaux.
2. Des gants protecteurs résistant à la coupure sont recommandés chaque
fois que vous devez manipuler les couteaux.
3. TENIR LES ENFANTS À L’ÉCART. NE JAMAIS LAISSER L’ÉPLUCHE
POMME SANS SURVEILLANCE. Ce n’est pas un jouet.
4. INSPECTEZ POUR DÉTECTER TOUTE TRACE DE DOMMAGES DES
PIÈCES. Avant d’utiliser la machine à trancher, assurez-vous que toutes les
pièces fonctionnent correctement et effectuent les fonctions pour lesquelles
elles sont destinées. Vériez l’alignement des pièces mobiles, tout blocage
potentiel des pièces mobiles, le montage et tout autre état qui pourrait avoir une
incidence sur le fonctionnement.
5. Le fabricant décline toute responsabilité en cas d’utilisation inappropriée de
cette machine.
6. Assurez-vous que l’épluche pomme est stable pendant l’utilisation. La base
à ventouse doit être sécurisée et la machine ne doit pas bouger pendant la
coupe.
7. Ne pas utiliser l’épluche pomme sous l’inuence de l’alcool ou d’une drogue
quelconque.
CONSERVER CES DIRECTIVES!
IMPORTANTES RÈGLES DE SÉCURITÉ
LIRE ET COMPRENDRE COMPLÈTEMENT TOUTES LES DIRECTIVES
ET AVERTISSEMENTS AVANT D’UTILISER CE PRODUIT. LE PLUS
IMPORTANT EST VOTRE SÉCURITÉ! LE DÉFAUT D’OBSERVER LES
PROCÉDURES ET MISES EN GARDE PEUT ENTRAINER DES BLESSURES
GRAVES OU DES DOMMAGES MATÉRIELS. N’OUBLIEZ PAS : VOTRE
SÉCURITÉ PERSONNELLE EST VOTRE RESPONSABILITÉ!
Page 23

INSTRUCTIONS EN FRANÇAIS
23
LISTE DES COMPOSANTS
NUMÉRO DE SCHÉMA DESCRIPTION DE LA PIÉCE NUMÉRO DE LA PIÉCE
1 LEVIER À VENTOUSE N/A
2 BASE À VENTOUSE N/A
3 MANCHE N/A
4 AXE
83-2119
4A VIS DE 5 CM (2 PO)
5 AXE DE MANIVELLE
6 LEVIER À ACTIONNER AVEC LE POUCE POUR LE
RÉGULATEUR DE L’AXE
N/A
7 FOURCHES 83-2117
8 CAPUCHON PROTECTEUR N/A
9 BRAS DU COUTEAU ÉPLUCHEUR N/A
10 COUTEAU ÉPLUCHEUR
83-2118
11 ÉCROU À AILETTE DE RÉGLAGE DU COUTEAU
ÉPLUCHEUR
12 VIS DE RÉGLAGE DU COUTEAU ÉPLUCHEUR
13 COUTEAU POUR ÉTROGNER/COUPER EN TRANCHES
14 ÉCROU À AILETTE DU COUTEAU POUR ÉTROGNER/
COUPER EN TRANCHES
11
2
1
3
4
6
7
8
9
10
12
13
14
5
4A
AVERTISSEMENT TRANCHANTE!
AVERTISSEMENT TRANCHANTE!
AVERTISSEMENT!
Des gants en (bre aramide), résistants aux
coupures, sont recommandés lorsque l’on
manipule les rouleaux de lames !
N’hésitez pas à visiter notre site Web WestonProduct.com/support si un composant est
cassé, l’outil fonctionne mal, ou pour commander un nouveau mode d’emploi.
WestonProducts.com
Veuillez appeler Weston Brands, LLC au numéro sans frais : 1-800-814-4895
Du lundi au vendredi: de 8h00 à 17h00 ET. En dehors des États-Unis, veuillez
appeler le 001-440-638-3131
Page 24

INSTRUCTIONS EN FRANÇAIS
24
ASSEMBLAGE
1. Fixez la manivelle avec la vis de 5 cm (2 po) fournie à l’axe de la manivelle à
l’aide d’un tournevis à tête Phillips jusqu’au blocage.
2. Vissez la manivelle assemblée sur l’extrémité de l’axe jusqu’au blocage.
3. La manivelle xée tournera librement.
4. Retirez le capuchon protecteur des fourches. Ne pas jeter le capuchon
protecteur qui sera utilisé pour le rangement de l’épluche-pomme.
5. Fixez l’épluche-pomme sur une surface plate et lisse. Retournez le levier à
ventouse de manière à ce qu’il pointe vers l’extrémité du couteau éplucheur de
l’unité. Tenez fermement la base à ventouse à plat sur un comptoir d’une main
et déplacez le levier à ventouse vers l’extrémité de la manivelle de l’unité.
6. Assurez-vous que l’épluche pomme est solidement xé à la surface.
NETTOYAGE
1. Lavez à la main toutes les pièces qui entrent en contact avec les aliments dans
de l’eau chaude savonneuse. Rincez abondamment. Séchez immédiatement.
REMARQUE: L’épluche-pomme ne peut pas être lavé dans une machine à laver
la vaisselle.
2. Il est recommander de protéger toutes les pièces métalliques de l’épluchepomme qui ne sont pas peintes en les pulvérisant avec un vaporisateur en
silicone de qualité alimentaire.
3. Tournez la manivelle pour amener l’axe vers l’intérieur et par le couteau pour
étrogner/couper en tranches. Placez le capuchon protecteur sur les fourches.
4. Replacez l’épluche pomme dans sa boîte. Rangez dans un endroit sec et frais.
Manivelle
Vis de 2 po
Axe de manivelle
Axe
Levier à
ventouse
Base à
ventouse
Page 25

INSTRUCTIONS EN FRANÇAIS
25
ÉPLUCHER, COUPER ET ÉTROGNER
1. Déplacez le bras du couteau
éplucheur de l’épluche-pomme
vers l’arrière jusqu’à ce que
le levier métallique attrape et
retienne le bras du couteau
éplucheur de l’épluche-pomme à
l’arrière.
2. Appuyez sur le levier du
pouce du régulateur de l’axe
pour dégager la butée de l’axe.
Tirez sur la manivelle jusqu’à
ce que l’axe soit complètement
en retrait vers l’arrière
(FIGURE 1).
3. Poussez soigneusement
une pomme, pomme de terre
ou une poire, la partie de la
queue en premier, entièrement sur les
fourches.
4. Soulevez le levier métallique du bras
du couteau éplucheur pour dégager le
couteau éplucheur.
5. Tournez la manivelle dans le sens
horaire pour commencer à éplucher la
pomme (FIGURE 2).
6. La pomme entrera en contact avec
le couteau pour étrogner/couper en tranches. Une fois le contact établi, les
opérations (étrogner ou couper en tranches) commenceront.
7. Lorsque la pomme est complètement épluchée, coupée en tranches et
étrognée, tirez soigneusement la pomme pour la dégager du trognon.
8. Le trognon et les pépins de la pompe resteront sur les fourches. Tenez bien le
trognon de la pomme et tirez dessus pour le dégager des fourches.
FIGURE 1
FIGURE 2
ÉPLUCHER ET ÉTROGNER
1. Déplacez le bras du couteau éplucheur de l’épluche-pomme vers l’arrière
jusqu’à ce que le levier métallique attrape et retienne le bras du couteau
éplucheur de l’épluche-pomme à l’arrière.
2. Appuyez sur le levier du pouce du régulateur de l’axe pour dégager la butée de
l’axe. Tirez sur la manivelle jusqu’à ce que l’axe soit complètement en retrait vers
l’arrière (FIGURE 1).
3. Poussez soigneusement une pomme, pomme de terre ou une poire, la partie
de la queue en premier, entièrement sur les fourches.
4. Tournez la manivelle dans le sens horaire pour commencer à couper en
tranches/étrogner la pomme.
5. La pomme entrera en contact avec le couteau pour étrogner/couper en
tranches. Une fois le contact établi, les opérations (étrogner ou couper en
tranches) commenceront.
6. Lorsque la pomme est complètement coupée en tranches et étrognée, tirez
soigneusement la pomme pour la dégager du trognon.
7. Le trognon et les pépins de la pompe resteront sur les fourches. Tenez bien le
trognon de la pomme et tirez dessus pour le dégager des fourches.
Bras du
couteau
éplucheur
Levier actionné par
le pouce du
régulateur
de l’axe
Axe
Manivelle
Fourches
Levier
métallique
du bras du
couteau
éplucheur
(pas illustré)
Couteau
pour
étrogner/
couper en
tranches
Écrou à ailette
du couteau pour
étrogner/couper
en tranches.
Page 26

ÉPLUCHER
1. Déplacez le bras du couteau éplucheur de l’épluche-pomme vers l’arrière jusqu’à
ce que le levier métallique attrape et retienne le bras du couteau éplucheur de
l’épluche-pomme à l’arrière.
2. Appuyez sur le levier du pouce du régulateur de l’axe pour dégager la butée de
l’axe. Tirez sur la manivelle jusqu’à ce que l’axe soit complètement en retrait
vers l’arrière (FIGURE 3).
3. Desserrez l’écrou à ailette du couteau pour étrogner/couper en tranches.
Tournez le couteau pour étrogner/couper en tranches à l’écart du couteau
éplucheur sur 90 degrés environ. Resserrez l’écrou à ailette du couteau pour
étrogner/couper en tranches jusqu’au blocage.
4. Poussez soigneusement une pomme, pomme de terre ou une poire, la partie
de la queue en premier, entièrement sur les fourches.
5. Soulevez le levier métallique du bras du couteau éplucheur pour dégager le
couteau éplucheur.
6. Tournez la manivelle dans le sens horaire pour commencer à éplucher la
pomme (FIGURE 4).
7. Lorsque la pomme est totalement épluchée, tenez solidement la pomme que
vous retirez ensuite des fourches.
FIGURE 3
FIGURE 4
INSTRUCTIONS EN FRANÇAIS
26
Bras du
couteau
éplucheur
Levier
actionné par
le pouce du
régulateur
de l’axe
Axe
Manivelle
Fourches
Levier
métallique
du bras du
couteau
éplucheur
(pas illustré)
Couteau pour
étrogner/
couper en
tranches
Écrou à ailette
du couteau pour
étrogner/couper
en tranches.
Page 27

INSTRUCTIONS EN FRANÇAIS
27
RÉGLAGE DES COUTEAUX
RÉGLAGE DES COUTEAUX POUR ÉTROGNER ET COUPER EN
TRANCHES
1. Déplacez le bras du couteau éplucheur de l’épluche-pomme vers l’arrière
jusqu’à ce que le levier métallique attrape et retienne le bras du couteau
éplucheur de l’épluche-pomme à l’arrière. Appuyez sur le levier du pouce du
régulateur de l’axe pour dégager la butée de l’axe. Tirez sur la manivelle
jusqu’à ce que l’axe soit légèrement en retrait vers l’arrière.
2. Desserrez légèrement l’écrou à ailette du couteau pour étrogner/couper en
tranches. Tournez le couteau pour étrogner/couper en tranches jusqu’à ce
que les fourches se trouvent au centre de l’anneau du couteau pour étrogner/
couper en tranches. Resserrez légèrement l’écrou à ailette du couteau pour
étrogner/couper en tranches.
RÉGLAGE DU COUTEAU ÉPLUCHEUR
1. Pour régler le couteau éplucheur à divers diamètres de fruit (ce qui peut
s’avérer nécessaire lorsque vous épluchez des pommes ou des pommes
de terre de plus petite taille ou plus mince), utilisez un tournevis à tête plate et
tournez la vis de réglage du couteau éplucheur dans le sens horaire ou dans
le sens anti-horaire jusqu’à ce que la distance souhaitée soit atteinte.
2. Pour ajuster la profondeur d’épluchage, desserrez l’écrou à ailette du couteau
éplucheur. Ajustez le couteau éplucheur à la profondeur souhaitée et
resserrez l’écrou à ailette du couteau éplucheur.
Page 28

Page 29

Page 30

Page 31

Weston Brands LLC garantit à l’ACHETEUR AU DÉTAIL D’ORIGINE de ce produit contre tout défaut en matériau
et en main-d’œuvre pendant un (2) ans a partir de la date d’achat à condition qu’il soit utilisé conformément aux
directives imprimées qui y sont jointes.
La Carte de Garantie, avec une copie du reçu original, doivent être reçus par Weston Brands LLC dans les trente
(30) jours à partir de la date d’achat pour que la garantie puisse s’appliquer. Le manque d’envoyer la Carte de
Garantie complètement remplie avec une copie du reçu original annulera la garantie.
Le produit doit être livré à ou expédié franco de port à Weston Brands LLC pour les services de garantie, soit dans
son emballage d’origine ou un emballage similaire offrant un degré de protection équivalent. Les dommages causés
par l’expédition ne sont pas la responsabilité de la société. Weston Brands LLC charge 35,00 $ par heure pour frais
de service. REMARQUE : Aucune réparation ne sera commencée sans l’autorisation du client. Les frais d’expédition
de retour seront ajoutés à la facture de réparation.
Avant de renvoyer le produit pour une réparation sous garantie, bien nettoyer le produit pour qu’il soit exempt de
toute particule alimentaire ou autres débris. Si l’acheteur ne respecte pas cette consigne, le produit lui sera renvoyé
sans avoir été réparé. Dans certains, la somme de 50 dollars sera facturée pour le nettoyage.
Weston Brands LLC réparera (ou à sa discrétion, remplacera) le produit sans frais, si à l’opinion de la société, il a
été prouvé être défectueux en matériau et en main d’œuvre dans la période de garantie.
Des remplacements neufs ou remis en état pour les pièces d’usine défectueuses seront fournis pendant de (2)
ans à partir de la date d’achat. Les pièces de remplacement sont garanties pour le reste de la période de garantie
originale.
Pour les réparations non garanties, veuillez contacter le Service à la clientèle de Weston Brands LLC au numéro
sans frais 1-800-814-4895, du lundi au vendredi, de 8h00 à 17h00 ET (en dehors des États-Unis : 001-440-638-
3131) pour obtenir une Autorisation de retour d’article (Numéro RMA). Weston Brands LLC refusera tous les retours
qui ne contiennent pas ce numéro. NE PAS RENVOYER CET APPAREIL SANS L’AUTORISATION CORRECTE
DE Weston Brands LLC.
LIMITATIONS : La garantie est annulée si le produit est utilisé pour toute raison autre que pour laquelle il est
conçu. Le produit ne doit pas avoir été antérieurement modié, réparé, ou entretenu par quelqu’un autre que
Weston Brands LLC. Le cas échéant, le numéro de série ne doit pas être modié ou enlevé. Le produit ne doit pas
avoir été soumis à un accident en transit ou pendant qu’il est en la possession du client, mal utilisé, mal traité, ou
utilisé contrairement aux directives contenues dans le manuel d’utilisation. Ceci comprend la défaillance causée
par la négligence d’un entretien raisonnable et nécessaire, une tension de secteur incorrecte et des catastrophes
naturelles. Cette garantie n’est pas transférable et s’applique seulement aux ventes américaines et canadiennes.
À l’exception des cas où la loi en vigueur l’interdit, aucune autre garantie, expresse ou implicite, y compris les
garanties relatives au caractère adéquat pour la commercialisation ou un usage particulier, ne s’appliquera à ce
produit. Weston Brands LLC ne sera en aucun cas responsable des dommages indirects liés au dit produit et
Weston Brands LLC n’a aucune obligation ni responsabilité autre que celles expressément établies dans la présente,
et n’autorise aucun représentant ou autre personne à les assumer pour lui. Toutes garanties implicites applicables
sont aussi limitées à la période de (2) ans de la garantie limitée.
Cette garantie couvre seulement le produit et ses pièces spéciques, pas les aliments ou autres produits traités
dans celui-ci. Weston n’est pas responsable des pièces manquantes ou endommagées pour les articles réduits/
en solde ou les articles naux de vente où le vendeur peut ne pas être en mesure de garantir l’ensemble de la
fonctionnalité ou l’intégralité de l’unité.
DÉCOUPEZ LE LONG DE LA LIGNE POINTILLÉE ET ENVOYEZ CETTE CARTE DE GARANTIE AVEC UNE
COPIE DE VOTRE REÇU D’ACHAT ORIGINAL À :
Weston Brands LLC / WARRANTY
20365 Progress Drive, Strongsville, OH 44149 USA
INFORMATION SUR LA GARANTIE
CONSERVEZ CETTE INFORMATION SUR LA GARANTIE POUR VOS DOSSIERS!
Nom du Client:
Adresse:
Province/Code postal/Région:
Numéro de téléphone:
Adresse de courrier électronique:
Date d’achat d’origine:
No de modèle du produit:
No de série (s’il y a lieu):
J’ai lu les informations relatives à la garantie. Initiales ici:
CARTE DE GARANTIE
ENVOYEZ CETTE CARTE DE GARANTIE AVEC UNE COPIE DE VOTRE REÇU D’ACHAT ORIGINAL À:
WESTON BRANDS LLC / WARRANTY, 20365 PROGRESS DRIVE, STRONGSVILLE, OH 44149 USA
Copie du reçu incluse
Page 32

ATTENTION!
PLEASE INSPECT THIS PACKAGE THOROUGHLY FOR MISSING PARTS OR ANY PRODUCT DAMAGE.
IF YOUR PRODUCT CONTAINS SHIPPING DAMAGE, PLEASE CONTACT RETAILER FOR ASSISTANCE.
For all other questions regarding product usage, missing parts, product damage, difculty or warranty activation,
please contact the Weston Brands Customer Service Team:
8:00 am to 5:00 pm ET, Monday thru Friday
CustomerService@WestonProducts.com
U.S. Residents Customer Service Line: 1-800-814-4895 (Outside U.S. Call: 001-440-638-3131)
Weston Brands LLC, Cleveland, Ohio 44149
WestonProducts.com
Please DO NOT return this item to the retailer before contacting
Weston Brands Customer Service.
SAVE THESE INSTRUCTIONS!
Refer to them often and use them to instruct others.
ATTENTION!
VEUILLEZ INSPECTER CET EMBALLAGE AVEC SOIN POUR Y DÉTECTER
TOUTE PIÈCE MANQUANTE OU ENDOMMAGÉE.
SI DES PIÈCES ONT ÉTÉ ENDOMMAGÉES PENDANT LE TRANSPORT, VEUILLEZ
COMMUNIQUER AVEC LE DÉTAILLANT POUR OBTENIR DE L’AIDE.
Pour toutes les autres questions concernant l’utilisation du produit, les pièces manquantes, les problèmes ou
l’activation de la garantie, veuillez communiquer avec l’équipe du service clientèle des produits Weston:
de 8:00 à 17:00 HNE, du lundi au vendredi.
CustomerService@WestonProducts.com
Numéro de téléphone du service clientèle pour les résidents des É.-U. : 1-440-638-3131
Numéro de téléphone à l’extérieur des É.-U. : 001-440-638-3131 Weston Brands LLC,
Weston Brands LLC, Cleveland, Ohio 44149
WestonProducts.com
Veuillez communiquer avec le service clientèle des produits Weston AVANT de retourner cet appareil au détaillant.
CONSERVER CES DIRECTIVES!
Veuillez les consulter fréquemment et les utiliser pour la formation.
¡ATENCIÓN!
Revise completamente el envase y compruebe que no falten partes o que algún producto esté dañado.
si el producto está dañado por el transporte, solicite asistencia al distribuidor.
Para todas aquellas preguntas referentes al uso del producto, partes faltantes, daño del producto, dicultad
o activación de la garantía, comuníquese con el equipo de servicio al cliente de weston Brands:
desde las 8:00 am hasta las 5:00 pm ET, de lunes a viernes
CustomerService@WestonProducts.com
Línea de Servicio al Cliente para Residentes de EE.UU.: 1.800.814.4895 (Fuera de EE.UU., llame al: 001-
1-440-638-3131) Weston Brands LLC, Cleveland, Ohio 44149
WestonProducts.com
NO devuelva este artículo al vendedor minorista antes de comunicarse con Servicio al Cliente de
Weston Brands.
¡GUARDE ESTAS INSTRUCCIONES!
Consulte estas instrucciones y úselas para enseñar sobre el uso de este producto a otras personas.
 Loading...