

Page 1
FOOD DEHYDRATOR
75-0401-W 6 TRAY / 75-0501-W 5 TRAY
DUE TO CONSTANT FACTORY IMPROVEMENTS, THE PRODUCT PICTURED MIGHT DIFFER
SLIGHTLY FROM THE PRODUCT IN THIS BOX. 081015
Page 2

TABLE OF CONTENTS / ÍNDICE / TABLE DES MATIÈRES
2
GENERAL SAFETY RULES
COMPONENT LIST
HOW TO LOAD TRAYS AND SCREENS
HOW TO USE THE DEHYDRATOR
FOOD SAFETY TIPS
DEHYDRATING FRUITS AND VEGETABLES
STORING DEHYDRATED FOOD
DEHYDRATING CHART FOR FRUITS AT 135°F (60°C)
DEHYDRATING CHART FOR VEGETABLES AT 125°F (55°C)
DEHYDRATING FRESH HERBS
DEHYDRATING CHART FOR HERBS AT 100°F (40°C)
DEHYDRATING JERKY
CARE AND CLEANING
TROUBLESHOOTING
WARRANTY
REGLAS IMPORTANTES DE SEGURIDAD
LISTA DE COMPONENTES
CÓMO CARGAR LAS BANDEJAS Y LOS FILTROS
CÓMO USAR EL DESHIDRATADOR
CONSEJOS DE SEGURIDAD DE LOS ALIMENTOS
CÓMO DESHIDRATAR FRUTAS Y VEGETALES
CÓMO ALMACENAR ALIMENTOS DESHIDRATADOS
TABLA DE DESHIDRATACIÓN PARA FRUTAS A 135°F (60°C)
TABLA DE DESHIDRATACIÓN PARA VEGETALES A 125°F (55°C)
CÓMO DESHIDRATAR HIERBAS FRESCAS
TABLA DE DESHIDRATACIÓN PARA HIERBAS A 100°F (40°C)
CÓMO DESHIDRATAR CECINA
CUIDADO Y LIMPIEZA
RESOLVIENDO PROBLEMAS
INFORMACIÓN DE GARANTÍA WESTON
IMPORTANTES RÈGLES DE SÉCURITÉ
LISTA DE COMPONENTES
COMMENT RÉPARTIR LES ALIMENTS SUR LES PLATEAUX ET LES TAMIS
UTILISATION DU DÉSHYDRATEUR D’ALIMENTS
CONSEILS POUR L’INNOCUITÉ DES ALIMENTS
DÉSHYDRATATION DES FRUITS ET DES LÉGUMES
STOCKAGE DES ALIMENTS DÉSHYDRATÉS
TABLEAU DE DÉSHYDRATATION POUR LES FRUITS À 60 °C (135 °F)
TABLEAU DE DÉSHYDRATATION DES LÉGUMES À 55 °C (125 °F)
DÉSHYDRATATION DES HERBES FRAÎCHES
TABLEAU DE DÉSHYDRATATION DES HERBES À 40 °C (100 °F)
DÉSHYDRATATION DU BŒUF
ENTRETIEN ET NETTOYAGE
DÉPANNAGE
INFORMATION SUR LA GARANTIE
3
4
5
6-7
8
8-9
10
11
12
13
13
13
14
15
16
18
19
20
21-22
23
23-24
25
26
27
28
28
28
29
30
32
34
35
36
37-38
39
39-40
41
42
43
44
44
44
45
46
47
Page 3

CLEANING INSTRUCTIONS
3
ENGLISH INSTRUCTIONS
1. Read all instructions.
2. This appliance is not intended for
use by persons (including children) with
reduced physical, sensory, or mental
capabilities, or lack of experience and
knowledge, unless they are closely
supervised and instructed concerning
use of the appliance by a person
responsible for their safety.
3. Close supervision is necessary
when any appliance is used by or near
children. Children should be supervised
to ensure that they do not play with the
appliance.
4. Do not touch hot surfaces. Use
handles or knobs.
5. To protect against electric shock, do
not immerse cord, plug, or base in water
or other liquid.
6. Unplug from outlet when not in use
and before cleaning. Allow to cool before
putting on or taking off parts.
7. Do not operate any appliance with
a damaged cord or plug, or after the
appliance malfunctions or is dropped
or damaged in any manner. Call our
toll-free customer service number for
information on examination, repair, or
adjustment.
8. The use of accessory attachments
not recommended by the appliance
manufacturer may cause injuries.
9. Do not use outdoors.
10. Do not let cord hang over edge of
table or counter, or touch hot surfaces,
including stove.
GENERAL SAFETY RULES
READ AND FULLY UNDERSTAND ALL INSTRUCTIONS AND WARNINGS
PRIOR TO USING THIS UNIT. YOUR SAFETY IS MOST IMPORTANT!
FAILURE TO COMPLY WITH PROCEDURES AND SAFE GUARDS MAY
RESULT IN SERIOUS INJURY OR PROPERTY DAMAGE. REMEMBER:
YOUR PERSONAL SAFETY IS YOUR RESPONSIBILITY!
SAVE THESE INSTRUCTIONS
11. Do not place on or near a hot gas or
electric burner, or in a heated oven.
12. To disconnect, turn off the appliance
and then remove plug from wall outlet.
13. Do not use appliance for other than
intended use.
14. Electrical Shock Hazard: This product
is provided with a polarized plug (one wide
blade) to reduce the risk of electric shock.
The plug ts only one way into a polarized
outlet. Do not defeat the safety purpose of
the plug by modifying the plug in any way
or by using an adapter. If the plug does not
t fully into the outlet, reverse the plug. If it
still does not t, have an electrician replace
the outlet.
15. The length of the cord used on this
appliance was selected to reduce the
hazards of becoming tangled in or tripping
over a longer cord. If a longer cord is
necessary, an approved extension cord
may be used. The electrical rating of the
extension cord must be equal to or greater
than the rating of the appliance. Care must
be taken to arrange the extension cord so
that it will not drape over the countertop
or tabletop where it can be pulled on by
children or accidentally tripped over.
16. To avoid an electrical circuit overload,
do not use another high- wattage
appliance on the same circuit with this
appliance.
Page 4

COMPONENT LIST
DIAGRAM NUMBER PART DESCRIPTION PART NUMBER
1 LID 75-0402
2 MESH SCREEN 75-0403
3 FRUIT ROLL SHEET 75-0404
4 TOP TRAY WITH VENT COVER 75-0405
5 TRAY WTH VENT HOLE 75-0406
If any components of this unit are broken, the unit does not operate properly or you
need a replacement instruction manual, visit us on the web at
WestonProducts.com
Or call Weston Brands LLC Toll Free at 1-800-814-4895
Monday thru Friday 8:00am-5:00pm ET. Outside the U.S. call 001-440-638-3131
ENGLISH INSTRUCTIONS
4
4
1
2
5
3
Page 5
5
ENGLISH INSTRUCTIONS
HOW TO LOAD TRAYS AND SCREENS
Dehydrator Preparation
• The top tray must always be in the top
position for proper drying.
• All (5) or (6) trays should be used during each
drying, even if some are empty.
• It is best to dry one type of similar food at a
time; for example, all fruits or all vegetables.
• Always leave trays in place until drying is
complete. You may remove food from trays
when desired dryness is achieved.
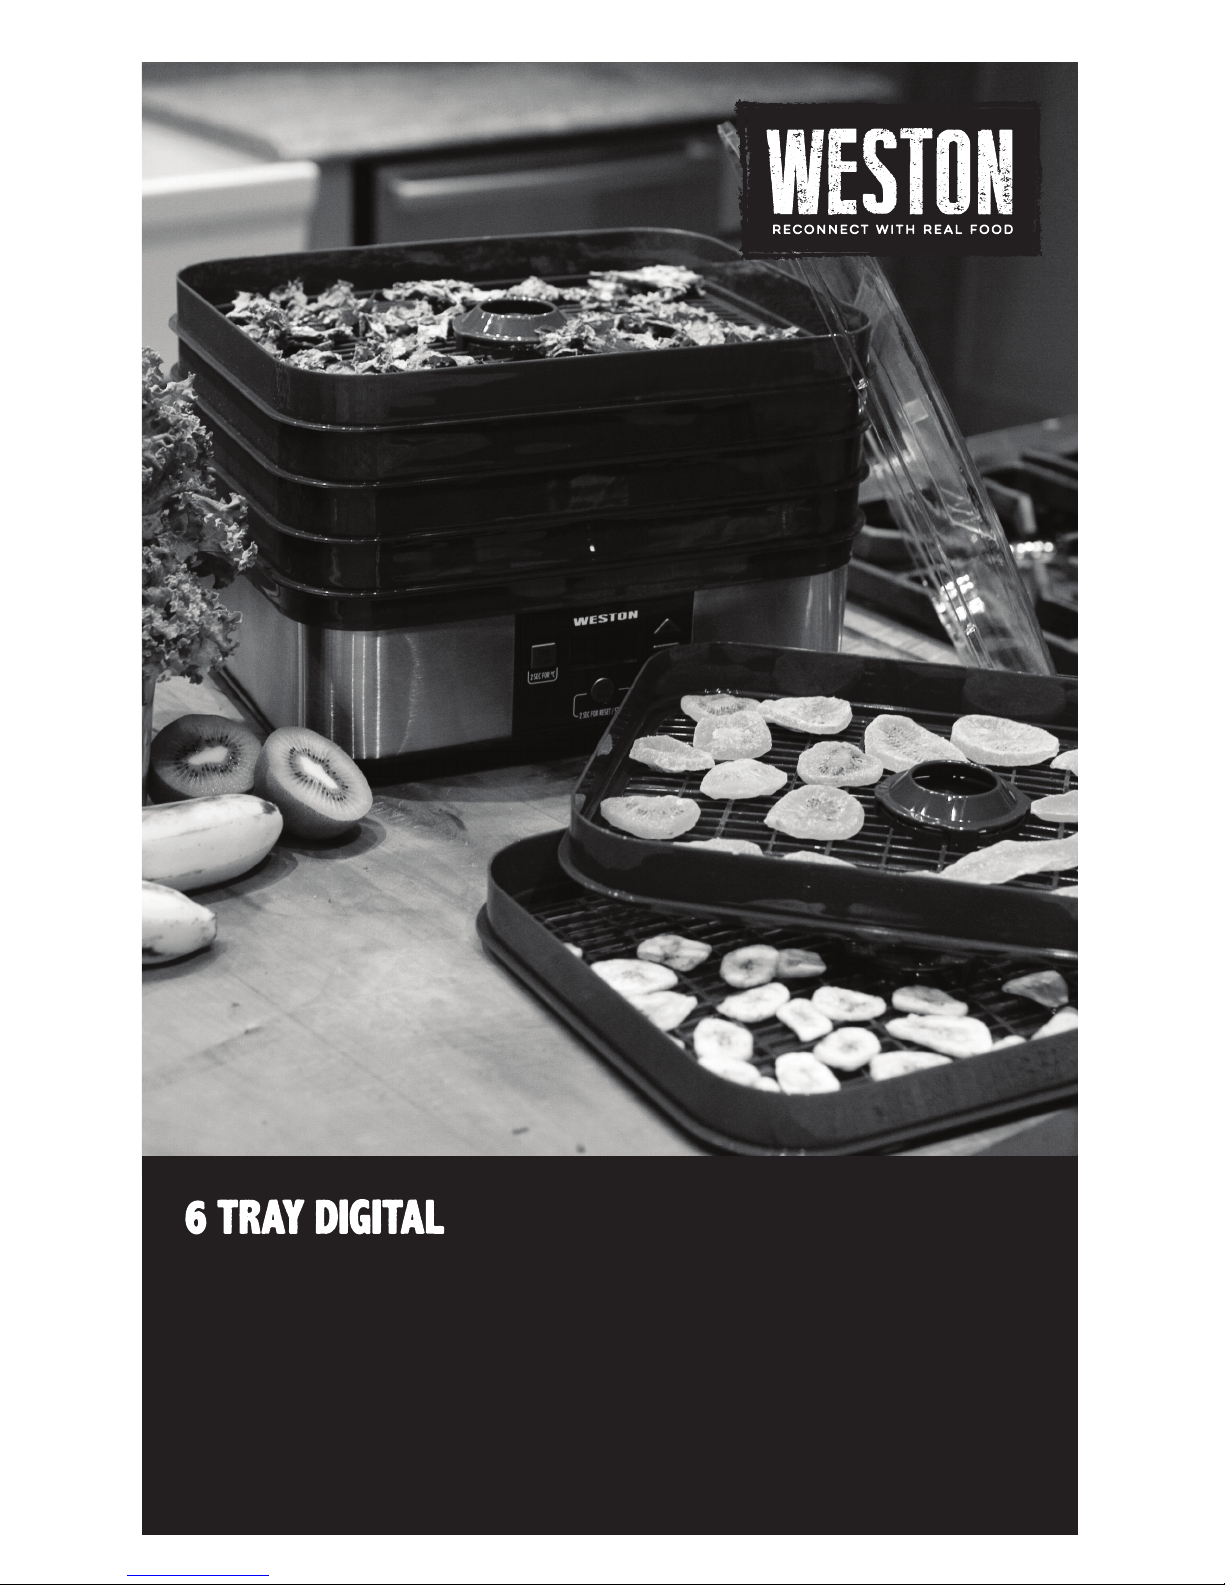
1. Always place food in a single layer on each
tray for even drying. Do not overlap fruits,
vegetables, or meats. Do not crowd product on
trays. FIGURE 1
2. Use the mesh screen for drying herbs and
small pieces of fruits or vegetables. FIGURE 2
3. If using a mesh screen, place screen in tray
before adding food. For best results, only use
mesh screens in the top two trays. FIGURE 3
4. Use the fruit roll sheet for drying purees from
fruits. FIGURE 4
5. If using the fruit roll sheet, place sheet in the
top tray. For best results, do not use more than
two fruit roll sheets and place in the top two
trays. Always stack the top tray last, before the
lid, for proper drying. FIGURE 5
FIGURE 1
FIGURE 2
FIGURE 3
FIGURE 4
FIGURE 5
Page 6

ENGLISH INSTRUCTIONS
6
HOW TO USE THE DEHYDRATOR
FIGURE 7
FIGURE 8
FIGURE 9
NOTES:
• Food should be stored in an airtight container
once properly cooled.
• To START, PAUSE, or RESET:
Press the START/PAUSE button.
• To Change Time or Temperature During
Drying Without Pausing or Resetting: Press
the TIME/TEMP button once for time or twice
for temperature. The last setting will ash.
Use arrows to adjust. Unit will continue drying
automatically at the new setting.
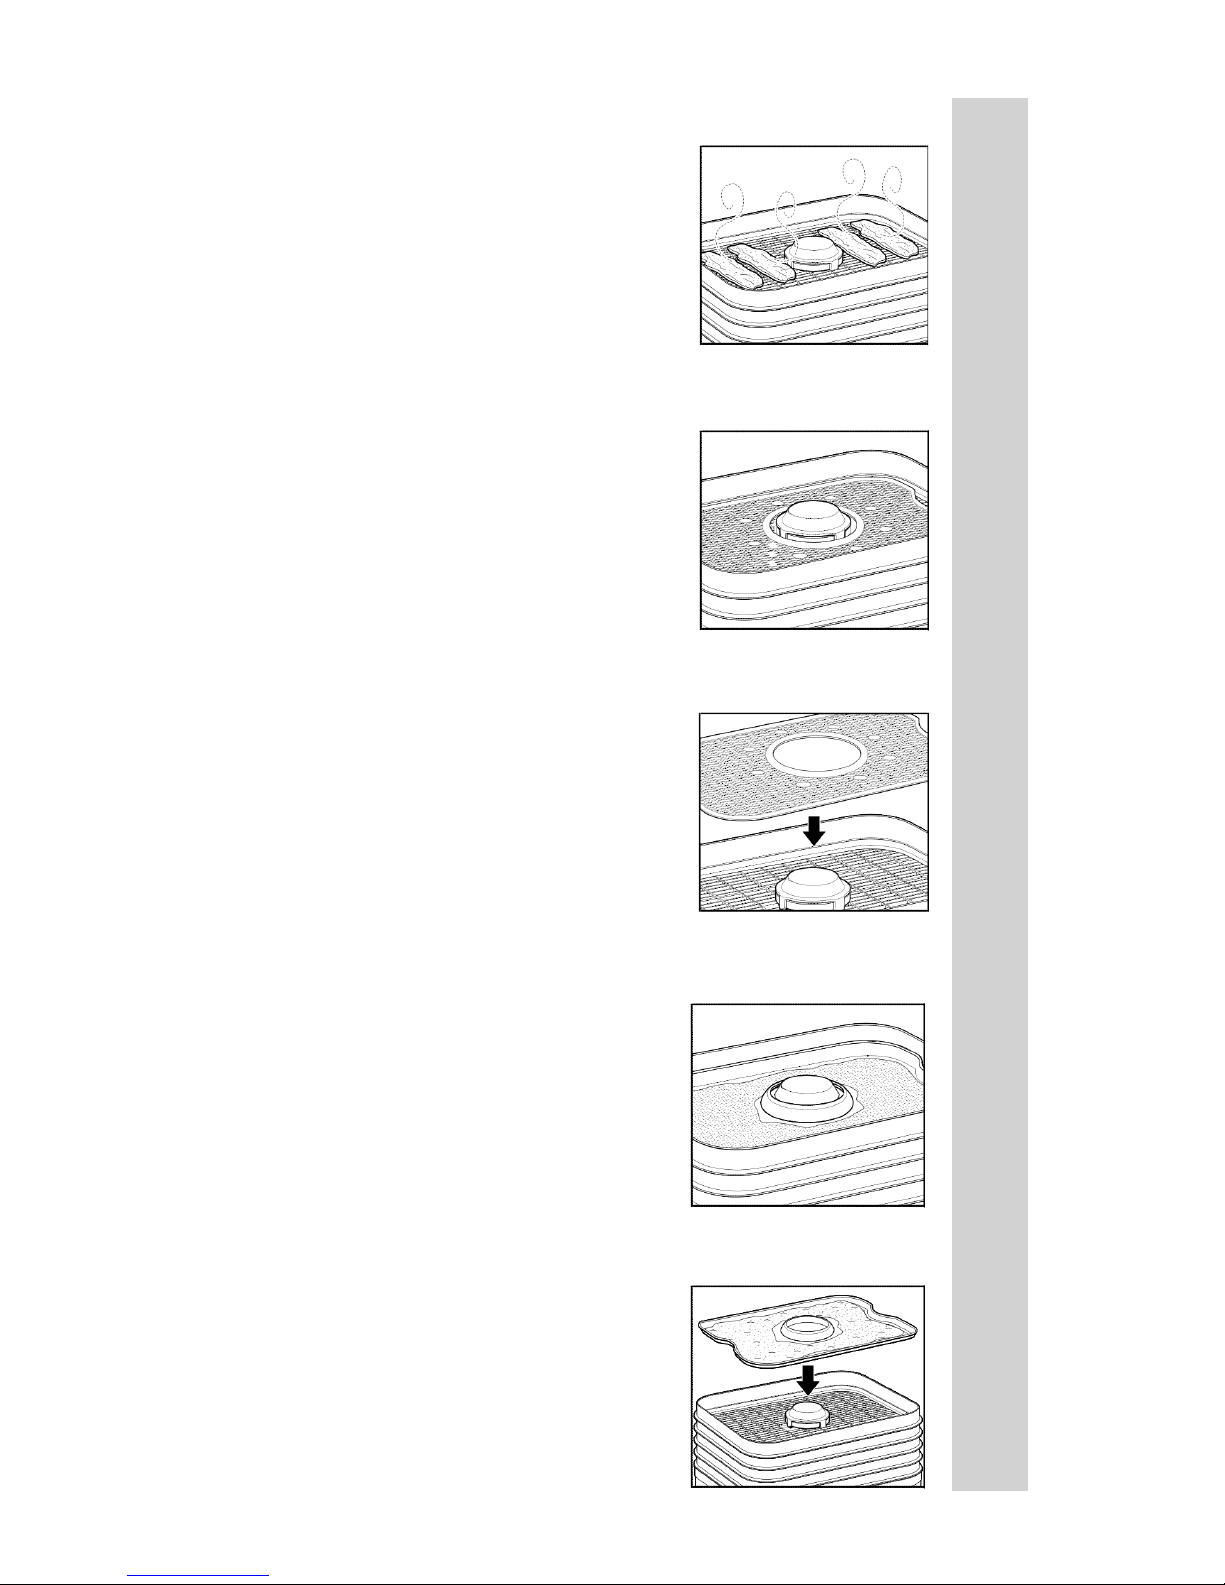
1. Plug in unit. Default time “00” will ash on
the display. FIGURE 7
2. Press the + arrow to set the drying time.
Maximum drying time is 48 hours, which can
be set in 1-hour increments. FIGURE 8
3. Press the TIME/TEMP button to set the
temperature. Default temperature “130” will
ash on the display. FIGURE 9
4. Press the + or – arrow to set the drying
temperature. Press the TIME/TEMP button to
adjust the temperature for Fahrenheit. Press
and hold the TIME/TEMP button for 2 seconds
while TEMP is displayed to change from ºF
to ºC. Temperature can be set from 100°F to
160°F in 5° increments. NOTE: Default
setting is Fahrenheit. If you reset this unit or
unplug it while it is set for Celsius, it will go
back to Fahrenheit. FIGURE 10
5. Press the START/PAUSE button to start
drying. The display will alternate from showing
TIME and TEMP over the drying period.
lid, for proper drying. FIGURE 11
FIGURE 10
FIGURE 11
Page 7
7
ENGLISH INSTRUCTIONS
6. To PAUSE to Check Food: Press the START/PAUSE
button and unit will pause. Display will ash “PA.” Press
the START/PAUSE button again to resume drying.
FIGURE 12
7. To RESET: Press and hold the START/ PAUSE
button for 2 seconds; “00” will ash in display. To
continue drying, press TIME/TEMP button to set a
new time and temperature. FIGURE 13
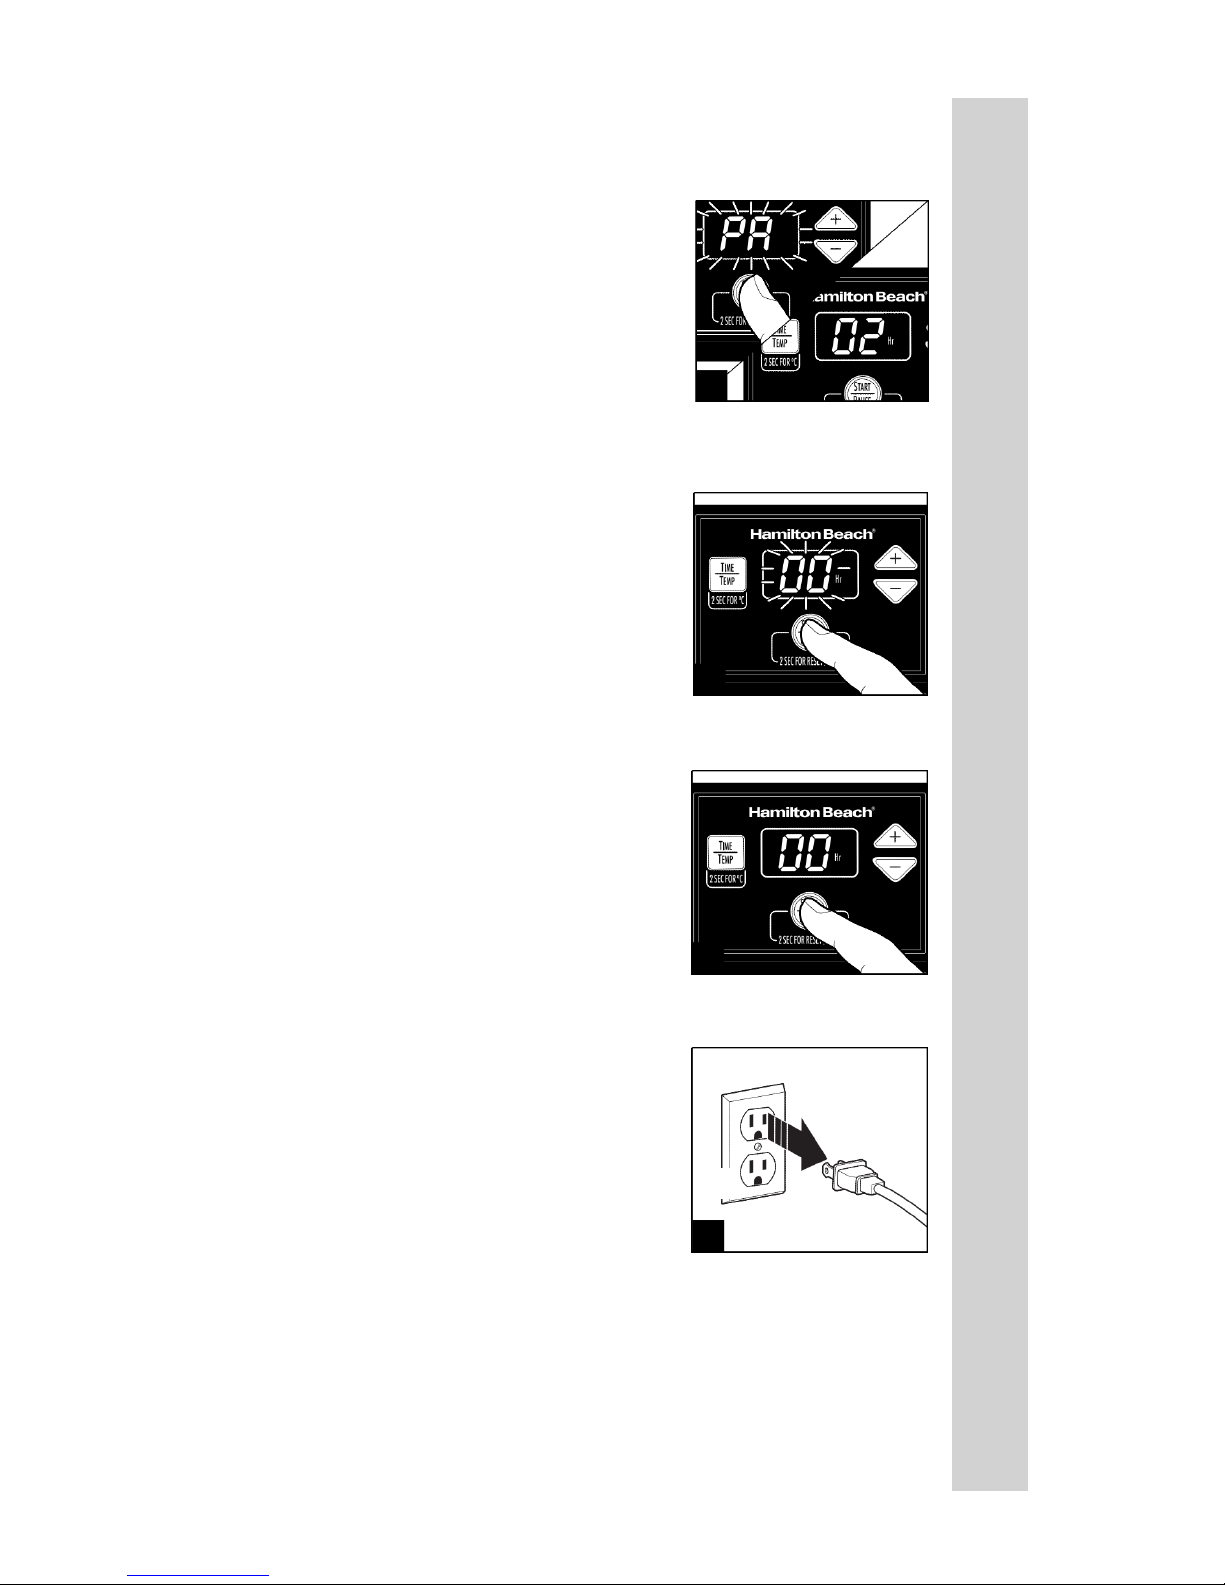
8. To STOP “00” ashing: Press and hold the
START/PAUSE button again for an additional 2
seconds. “00” will still appear in display and not
ash. If drying is complete, unplug the unit. FIGURE
14
9. If drying is complete before programmed time has
ended, PAUSE or STOP unit and then unplug. Let
food cool completely on trays or wire rack before
storing. FIGURE 15
FIGURE 12
FIGURE 13
HOW TO USE THE DEHYDRATOR
FIGURE 14
FIGURE 15
Page 8

ENGLISH INSTRUCTIONS
8
• For food safety, to help ensure any bacteria present are destroyed, choose
pretreatment or post treatment from below:
• Pretreatment of Meat Prior to Dehydrating – Heat oven to 350°F (177°C).
Drain and discard marinade from meat. Pat dry with paper towels and place
meat in a single layer, leaving a space around each piece on baking sheet.
Bake 5 to 10 minutes or until internal temperature reaches 160°F (72°C).
Poultry must reach 165°F (74°C). NOTE: This method may reduce drying time
and may result in a drier texture.
• Post Treatment of Meat After Dehydrating – Heat oven to 275°F (135°C).
Line a large baking sheet with foil. Place jerky in a single layer, leaving a small
space around each piece. Bake for 10 to 12 minutes. Cool completely on a
wire rack. Pat jerky dry with paper towels to remove any surface fats before
storing.
• Marinating meats helps with the avor and texture of jerky. Do not marinate
meat longer than recipe or package directions call for.
TIP: Post treatment of meat after dehydrating may result in a more desirable
jerky texture. Try each treatment to determine which jerky you like best.
• Visit www.usda.gov for any questions on meat and food safety.
• Never dehydrate meats with fruits and vegetables, due to crosscontamination of foods. Meats dry at a different temperature from fruits or
vegetables.
• All dehydrated foods must be cooled completely before storing.
• For food safety, complete the food drying process. Do not start and stop the
process for longer than 5 minutes. You may pause the process to check on
the food’s dryness or to remove dehydrated pieces.
• Label and date all containers of dried foods.
FOOD SAFETY TIPS
A. Food Preparation
• Always wash hands before starting food preparation.
• Wash all fruits and vegetables before preparation.
• Choose fruits and vegetables that are in season for the best avor.
• Discard any fruits and vegetables that have bruises or mold.
• Cut foods the same thickness, size, or shape before drying to ensure even
drying.
• Some foods, like garlic, onions, cauliower, and broccoli, have a strong smell
when drying.
B. Pre-treatment
• Some fruits and vegetables require pretreatment before drying. Blanch or
add color protectors to preserve natural color.
How to Blanch
Blanching is recommended for some vegetables to help prevent color and
avor loss during drying and storage. Blanching is used to break the skins on
some fruits to help shorten the drying process.
• Bring a large stockpot lled with cold water to a rolling boil.
• Place cleaned fruits or vegetables in a strainer with a handle.
• Dip strainer into the boiling water for the recommended time.
• Make sure that all the fruits or vegetables are covered with water for even
blanching.
DEHYDRATING FRUITS AND VEGETABLES
Page 9

ENGLISH INSTRUCTIONS
9
• After blanching is complete, plunge into a large bowl lled with ice water to
stop the blanching process.
• Drain and completely pat dry the fruits or vegetables before dehydrating.
How to Protect Color
Some fruits and potatoes may discolor during the drying process. To protect
the color, follow these steps.
• Prepare a solution of equal parts lemon juice and water.
• Dip pieces into the solution; drain.
• If using a commercial fruit preservative, follow package directions.
C. Determining Dryness
• Many things inuence drying time, including moisture content, type and
amount of food, shape and evenness of food slices, air temperature, humidity,
and your personal preference in texture of your food.
• Drying charts are a guideline. Drying times and temperatures vary for
different types of foods; start checking food at the minimum recommended
time referenced on the chart. If the food is not listed on the chart, pick a similar
food.
• Combine any remaining food to upper trays for ease of checking doneness.
• Check all trays for doneness at the minimum recommended time on the
chart.
• All fruits should be able to bend and be slightly soft but not be tacky, except
for apples and bananas which should be crisp.
• All vegetables should be crisp and easily broken.
D. Drying Fruit Rolls
• Fruit rolls can be made with peeled and pitted pureed fresh fruits; canned
fruit that has been well drained and pureed; defrosted frozen fruit, drained and
pureed; or with store-bought applesauce.
• Fruits that are higher in pectin (apples, apricots, blueberries, grapes,
peaches, pears, pineapples, and plums) will make a fruit roll with a nice
leatherlike texture.
• When using a low-pectin fruit (grapefruits, lemons, limes, oranges,
raspberries, and strawberries), combine with a higher-pectin fruit for an easy
peelable fruit roll.
• Lightly spray the fruit roll sheet with nonstick cooking spray or lightly grease
with vegetable oil before adding your pureed fruit.
• Evenly spread about 3/4 cup to 1 cup (177 ml to 237 ml) puree on the
prepared fruit roll sheet about 1/4 inch (0.6 cm) thick.
• Add the fruit roll sheet to one of the top two trays for drying.
• Fruit rolls should be checked for doneness starting at 4 hours.
• Fruit rolls will be slightly tacky when dried.
• Always remove the fruit roll from the sheet after cooling for 15 minutes.
• The fruit roll should be slightly warm to easily remove from the fruit roll sheet.
• Once rolled up, cool completely before storing in an airtight container.
Page 10

ENGLISH INSTRUCTIONS
10
• Dehydrated foods have to be cooled completely before packaging.
• Properly dried foods need to be stored in a clean, dry, airtight container,
such as resealable plastic bags, plastic containers, or glass canning jars with
a tight-tting lid, to keep foods from rehydrating.
• Store all packages in a cool, dry place.
• Dried fruits stored at 60°F (16°C) may keep up to 1 year, while vegetables
stored at 60°F (16°C) may keep up to 6 months.
• Fruit rolls stored at room temperature may keep up to 1 month, if stored
properly.
• If jerky has been properly dried, cooled, and packaged, it may be stored up
to 2 months in an airtight container at room temperature.
• Storing at higher temperature locations will shorten the storing time. Place
packaged foods in the freezer for a longer storing time.
• It is a good practice to check dehydrated foods daily. Dehydrate again if you
see fruits and vegetables getting soft or if they have condensation on them.
Check frequently during the additional drying, since this process will be much
shorter.
• Always check the condition of your food prior to consumption. When in
doubt, throw it out.
STORING DEHYDRATED FOOD
Page 11

ENGLISH INSTRUCTIONS
11
FRUIT HOW TO
PREPARE
PRETREATMENT/
TIME
DEHYDRATING
TIME**
HIGH
PECTIN
FRUIT
Apples Peeled, sliced
1/4 inch (0.6 cm)
thick
#C 8 to 12 hours Yes
Apricots Pitted, peeled,
sliced 1/4 inch
(0.6 cm) thick
#C 15 to 19 hours Yes
Bananas Sliced 1/4 inch
(0.6 cm) thick
#C 6 to 10 hours No
Blueberries Whole *B/1 minute 14 to 18 hours Yes
Cherries Pitted, halved – 22 to 26 hours No
Cranberries Whole *B/1 minute 17 to 21 hours Yes
Green or Red
Seedless
Grapes
Halved – 19 to 23 hours Yes
Kiwi Sliced 1/4 inch
(0.6 cm) thick
– 8 to 12 hours Yes
Lemons, Limes,
or Oranges
Sliced 1/4 inch
(0.6 cm) thick
– 17 to 21 hours No
Mangoes Peeled, pitted,
sliced 1/4 inch
(0.6 cm) thick
– 13 to 17 hours No
Nectarines Peeled, pitted,
sliced 1/4 inch
(0.6 cm) thick
#C 11 to 15 hours Yes
Peaches Peeled, sliced
1/4 inch (0.6 cm)
thick
#C 11 to 15 hours Yes
Pears Peeled, sliced
1/4 inch (0.6 cm)
thick
#C 10 to 14 hours Yes
Pineapples Peeled, cored,
sliced 1/4 inch
(0.6 cm) thick
– 12 to 16 hours Yes
Plums Pitted, sliced in
eighths
– 23 to 27 hours Yes
Strawberries Sliced 1/4 inch
(0.6 cm) thick
– 6 to 10 hours No
DEHYDRATING CHART FOR FRUITS AT 135°F (60°C)
*B = Blanching #C = Color Protector
(See “How to Blanch” and “How to Protect Color” on page 8)
**Times may vary depending on the ripeness of your fruits and amount per
tray. See “Dehydrating Fruits and Vegetables” on pages 8 and 9.
Page 12

ENGLISH INSTRUCTIONS
12
VEGETABLE HOW TO PREPARE PRE-
TREATMENT/
TIME
DEHYDRATING
TIME**
Bell Peppers Sliced 1/4 inch (0.6 cm)
thick
– 9 to 13 hours
Broccoli Small orets *B/2 minutes 9 to 13 hours
Carrots Sliced diagonally 1/4 inch
(0.6 cm) thick
*B/2 minutes 11 to 15 hours
Cauliower Small orets *B/2 minutes 8 to 12 hours
Celery Sliced diagonally 1/4 inch
(0.6 cm) thick
– 5 to 9 hours
Grape Tomatoes
Halved – 13 to 17 hours
Green Beans Sliced 1/4 inch (0.6 cm)
thick
*B/2 minutes 12 to 16 hours
Mushrooms Sliced 1/4 inch (0.6 cm)
thick
– 8 to 12 hours
Onions Sliced 1/4 inch (0.6 cm)
thick
– 14 to 18 hours
Squash, Yellow
or Zucchini
Sliced 1/4 inch (0.6 cm)
thick
– 7 to 11 hours
Tomatoes Sliced 1/4 inch (0.6 cm)
thick
– 10 to 13 hours
DEHYDRATING CHART FOR VEGETABLES AT 125°F (55°C)
*B = Blanching (See “How to Blanch” on page 8)
**Times may vary depending on the water content of your vegetables.
Page 13

DEHYDRATING FRESH HERBS
• Herb leaves that are larger such as basil, bay leaves, mint, sage, or sorrel
should be picked from the stems before drying.
• Herbs such as cilantro, dill, parsley, or rosemary should be kept on the stem
for drying. It is easier to remove the herbs after drying.
• Always rinse herbs with cold water and carefully remove any remaining
water with a salad spinner or paper towels. Herbs must be completely dried
before dehydrating begins.
• Small herbs should be placed on the mesh screen for the best drying.
• Herbs are fast-drying when compared to fruits, vegetables, and marinated
meats.
• Herbs crumble easily when dried.
• Herbs must be cooled completely before storing in an airtight container.
ENGLISH INSTRUCTIONS
13
FRESH HERB DEHYDRATING TIME**
Basil 4 to 6 hours
Chives
5 to 7 hours
Cilantro
4 to 6 hours
Mint
5 to 7 hours
Parsley
4 to 6 hours
Rosemary
5 to 7 hours
DEHYDRATING CHART FOR HERBS AT 100°F (40°C)
*B = Blanching (See “How to Blanch” on page 8)
DEHYDRATING JERKY
• Wash your hands with soap and warm water before preparation of jerky.
• Choose lean cuts of meat for jerky.
• Trim any fat from meat before marinating.
• Wrap meat in plastic wrap and freeze for a minimum of 1 hour for easy
slicing before marinating.
• Marinate in a heavy-duty resealable plastic zipper bag or a glass dish. Do
not use a metal pan for marinating, since it causes a avor change and a
possible reaction of the marinade to the metal of the pan.
• Always marinate meats for jerky in a refrigerator; drain and discard marinade
before drying.
• Dehydrate jerky according to the recipe or follow jerky preparation according
to package directions.
• Check jerky after 4 hours and every 30 minutes after.
• Jerky is dry when it cracks without breaking when bent.
• Pat jerky dry with a paper towel to remove any surface fats and cool
completely before storing in an airtight container.
• If jerky has been properly dried, cooled, and packaged, it may be stored up
to 2 months in an airtight container at room temperature.
• Always slice meats against the grain for a more tender jerky.
• Meat slices should be no more than 1/4 inch (0.6 cm) thick, 4 inches (10.2
cm) long and 2 inches (5.1 cm) wide.
• Never marinate meat at room temperature. Always refrigerate meat when
marinating.
• Always follow the recipe directions.
• Label and date all containers of jerky.
Page 14
CARE AND CLEANING
1. Unplug unit when through drying. Let cool.
FIGURE 16
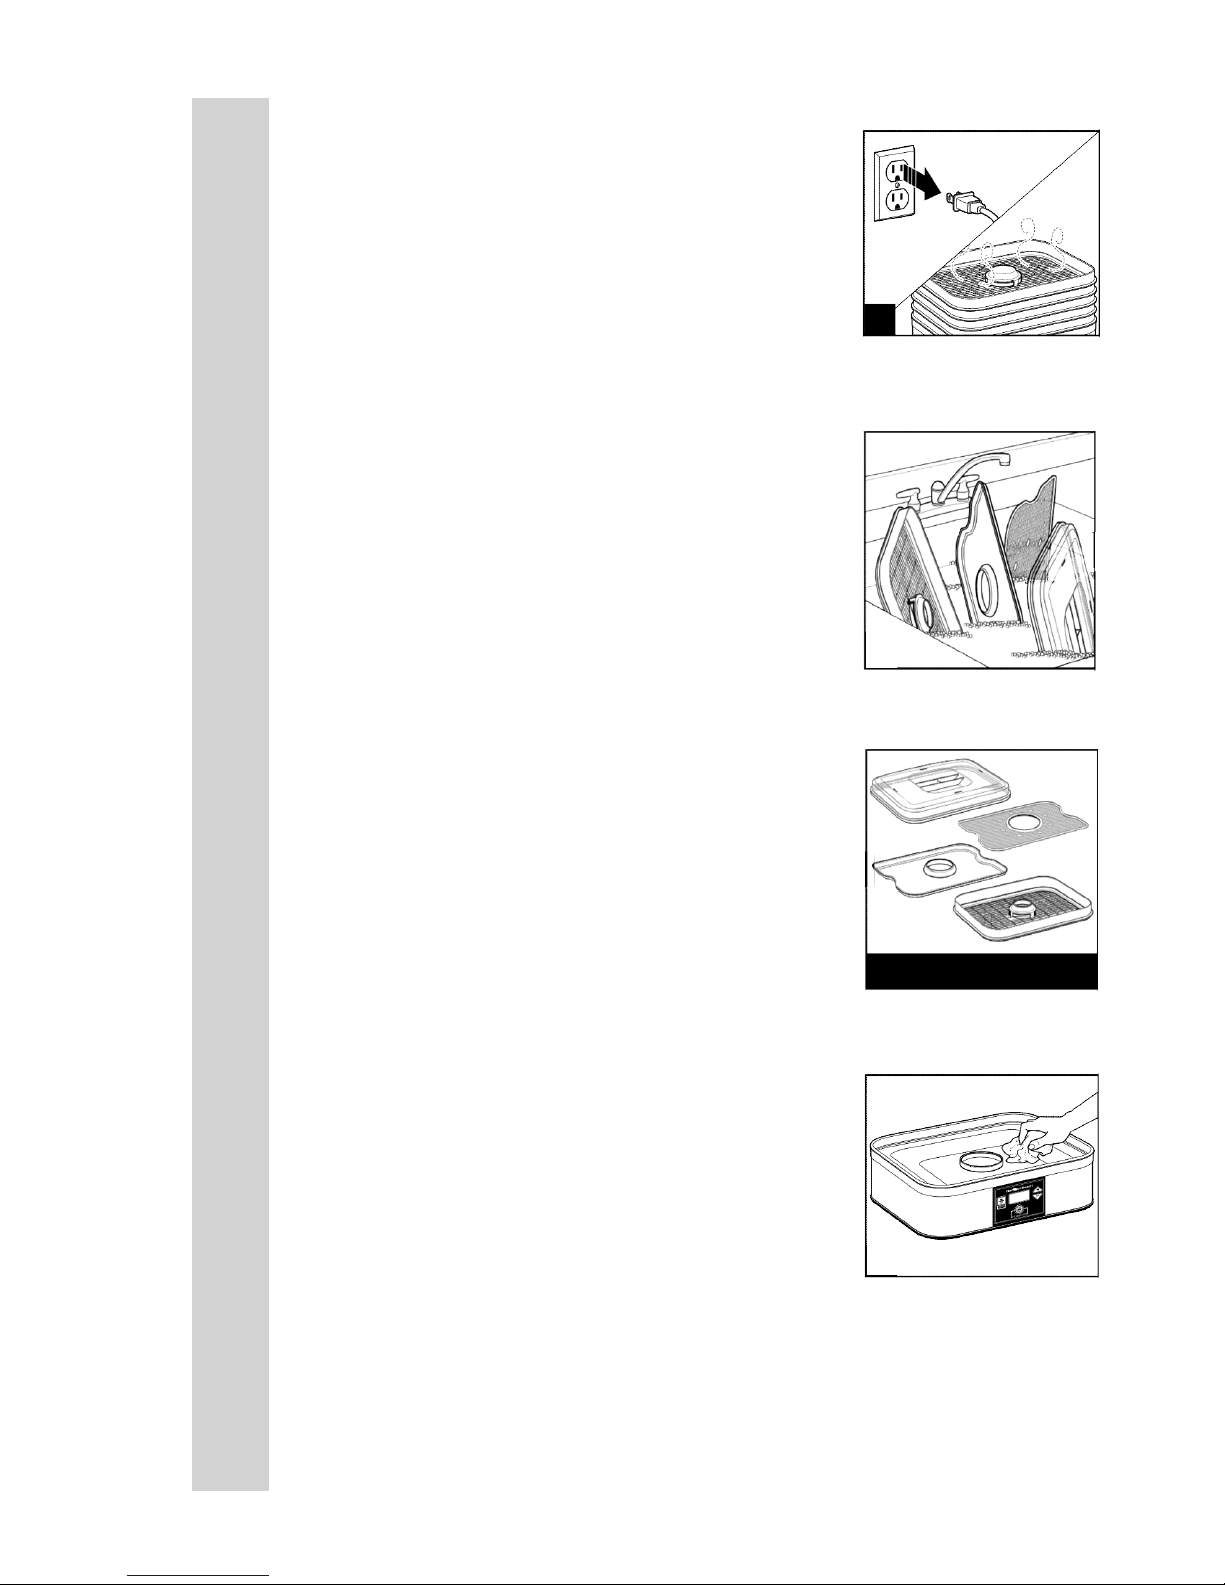
2. Wash in warm, soapy water. FIGURE 17
3. DO NOT use the “SANI” setting when washing
in the dishwasher. “SANI” cycle temperatures
could damage your product. FIGURE 18
4. Wipe the base with a damp, soapy cloth.
FIGURE 19
ENGLISH INSTRUCTIONS
14
FIGURE 16
FIGURE 16
FIGURE 18
DISHWASHER SAFE
FIGURE 19
Page 15

ENGLISH INSTRUCTIONS
15
PROBLEM PROBABLE CAUSE/SOLUTION
Food not drying. Food could be cut too thick or peel could have
been left on. Follow recommendations in charts
on pages 10, 11, or 12, or according to the
recipe.
Too much food on each tray. Remove some
foods and dehydrate for a longer time.
Food drying unevenly. Foods need to be cut uniformly.
Foods with uneven pieces can be rotated during
the drying process.
Fruits or vegetables
become soft during
storage.
Too much moisture was left in the food. Dry
further to remove excess moisture.
TROUBLESHOOTING
Page 16

Weston Brands LLC warrants to the ORIGINAL RETAIL PURCHASER of this product that if operated in accordance
with the printed instruction accompanying it, then for a period of 1 year from the date of purchase, the product shall be free
from defects in material and workmanship.
The Warranty Card, along with a copy of the original receipt, must be received by Weston Brands LLC within 30 days
from purchase date for the warranty to apply. Failure to send the completely lled out Warranty Card, along with a copy of
the original receipt, will void the warranty.
The product must be delivered to or shipped freight prepaid to Weston Brands LLC for warranty services, in either
its original packaging or similar packaging affording an equal degree of protection. Damage due to shipping is not the
responsibility of the company. Weston Brands LLC charges a $35.00 per hour bench charge. NOTE: No repairs will
be started without the authorization of the customer. The return shipping cost to the customer will be added to the repair
invoice.
Prior to returning the product for Warranty Repair, the product must be thoroughly cleaned and free from any food
particles or other debris. Failure of the purchaser to comply with this standard will result in the unit being returned without
repair. In some cases, a $50 cleaning surcharge may apply.
Weston Brands LLC will repair (or at its discretion, replace) the product free of charge, if in the judgment of the
company, it has been proven to be defective as to seller’s labor and material, within the warranty period.
New or rebuilt replacements for factory defective parts will be supplied for one (1) year from the date of purchase.
Replacement parts are warranted for the remainder of the original warranty period.
For non-warranty repairs, contact Weston Brands LLC’s Customer Service at 1-800-814-4895 M-F 8am-5pm ET
(outside of the United States 001-440-638-3131) to obtain a Return Merchandise Authorization Number (RMA Number).
Weston Brands LLC will refuse all returns that do not contain this number. DO NOT RETURN THE UNIT WITHOUT
PROPER AUTHORIZATION FROM WESTON BRANDS LLC.
LIMITATIONS: The warranty is void if the product is used for any purpose other than that for which it is designed.
The product must not have been previously altered, repaired, or serviced by anyone else other than Weston Brands
LLC. If applicable, the serial number must not have been altered or removed. The product must not have been subjected
to accident in transit or while in the customer’s possession, misused, abused, or operated contrary to the instructions
contained in the instruction manual. This includes failure caused by neglect of reasonable and necessary maintenance,
improper line voltage and acts of nature. This warranty is not transferable and applies only to U.S. and Canadian sales.
Except to the extent prohibited by applicable law, no other warranties whether expressed or implied, including
warranty merchantability and tness for a particular purpose, shall apply to this product. Under no circumstances shall
Weston Brands LLC be liable for consequential damages sustained in connection with said product and Weston Brands
LLC neither assumes nor authorizes any representative or other person to assume for it any obligation or liability other than
such as is expressly set forth herein. Any applicable implied warranties are also limited to the one (1) year period of the
limited warranty.
This warranty covers only the product and its specic parts, not the food or other products processed in it. Weston is
not responsible for missing or damaged parts on discounted/clearance, resale or nal sale items where the seller may not
be able to guarantee full functionality or completeness of the unit.
CUT ALONG THE DOTTED LINE AND SEND THE WARRANTY CARD ALONG WITH A COPY OF YOUR
ORIGINAL PURCHASE RECEIPT TO:
Weston Brands LLC / WARRANTY
20365 Progress Drive, Strongsville, OH 44149 USA
Customer Name:
Address:
City/State/Zip/Country:
Telephone Number:
E-Mail Address:
Original Date of Purchase:
Product Model #:
Serial # (if applicable):
I have read the warranty information. Initial here:
WESTON WARRANTY INFORMATION
SAVE THIS WARRANTY INFORMATION FOR YOUR RECORDS!
WESTON WARRANTY CARD
SEND THIS CARD ALONG WITH A COPY OF YOUR ORIGINAL PURCHASE RECEIPT TO:
WESTON BRANDS LLC / WARRANTY, 20365 PROGRESS DRIVE, STRONGSVILLE, OH 44149 USA
Copy of Receipt
Included
Page 17

DESHIDRATADOR DE
ALIMENTOS
75-0401-W 6 TRAY / 75-0501-W 5 TRAY
DEBIDO A CONSTANTES MEJORAS EN LA FÁBRICA, EL PRODUCTO QUE SE MUESTRA PUEDE
SER LIGERAMENTE DIFERENTE DEL PRODUCTO EN ESTA CAJA. 081015
Page 18

CLEANING INSTRUCTIONS
1. Lea todas las instrucciones.
2. Este aparato no se destina para
utilizarse por personas (incluyendo
niños) cuyas capacidades físicas,
sensoriales o mentales sean diferentes
o estén reducidas, o carezcan de
experiencia o conocimiento, a menos
que dichas personas reciban una
supervisión o capacitación para el
funcionamiento del aparato por una
persona responsable de su seguridad.
3. Se requiere de una estrecha
supervisión cuando el aparato se
use cerca de niños. Los niños deben
supervisarse para asegurar que ellos no
empleen los aparatos como juguete.
4. Verique que el voltaje de su
instalación corresponda con el del
producto.
5. No toque las supercies calientes.
Use las manijas o perillas.
6. Para protegerse contra un riesgo de
descarga eléctrica no sumerja el cable,
enchufe o base en agua u otro líquido.
7. Desconecte de la toma cuando no
esté en uso y antes de limpiar. Deje
enfriar antes de poner o quitar partes.
8. No opere ningún aparato que
tenga un cable o enchufe dañado o
después de un mal funcionamiento
del aparato, o si se ha caído o dañado
de cualquier manera. Llame a nuestro
número gratuito de servicio al cliente
para información sobre examinación,
reparación o ajuste.
9. El uso de aditamentos de accesorio
no recomendados por el fabricante del
aparato puede causar lesiones.
10. No use en exteriores.
11. No deje que el cable cuelgue del
borde de la mesa o cubierta, o que
toque supercies calientes, incluyendo
la estufa.
¡GUARDE ESTAS INSTRUCCIONES!
12. No coloque sobre o cerca de un
quemador caliente de gas o eléctrico, o
sobre un horno calentado.
13. Para desconectarlo, presione los
botones de pausa o recongurar/detener
del artefacto y luego quite el enchufe del
tomacorriente.
14. No use el aparato para otro uso que
no sea para el que fue hecho.
15. ADVERTENCIA Peligro de
Descarga Eléctrica: Este producto es
provisto con un enchufe polarizado (una
pata más ancha) para reducir el riesgo
de una descarga eléctrica. El enchufe
embona únicamente en una dirección
dentro de un tomacorriente polarizado.
No trate de obviar el propósito de
seguridad del enchufe modicándolo
de alguna manera o utilizando un
adaptador. Si el enchufe no entra
completamente en la toma, invierta el
enchufe. Si aún no entra, haga que un
electricista reemplace la toma.
16. El largo del cable que se usa en este
aparato fue seleccionado para reducir
el peligro de que alguien se enganche
o tropiece con un cable más largo. Si
es necesario usar un cable más largo,
se podrá usar un cable de extensión
aprobado. La clasicación eléctrica
nominal del cable de extensión debe
ser igual o mayor que la clasicación
nominal del aparato. Es importante
tener cuidado de colocar el cable de
extensión para que no se pliegue sobre
el mostrador o la mesera en donde niños
puedan tirar del mismo o tropezarse
accidentalmente. Para evitar una
sobrecarga eléctrica del circuito, no use
otro aparato de alto voltaje en el mismo
circuito con este aparato.
REGLAS IMPORTANTES DE SEGURIDAD
LEA Y ENTIENDA COMPLETAMENTE TODAS LAS INSTRUCCIONES Y
ADVERTENCIAS ANTES DE UTILIZAR ESTA UNIDAD. ¡SU SEGURIDAD
ES LO MÁS IMPORTANTE! NO SEGUIR LOS PROCEDIMIENTOS
Y PRECAUCIONES PUEDE PROVOCAR LESIONES GRAVES Y
DAÑOS MATERIALES. RECUERDE: ¡SU SEGURIDAD PERSONAL ES
RESPONSABILIDAD DE USTED!
18
INSTRUCCIONES EN ESPAÑOL
Page 19

LISTA DE COMPONENTES
NÚMERO DE DIAGRAMA DESCRIPCIÓN DE LA PIEZA NÚMERO DE PIEZA
1 COUVERCLE 75-0402
2 EL FILTRO DE MALLA 75-0403
3 BANDEJA PARA ROLLOS DE FRUTA 75-0404
4 BANDEJA SUPERIOR CON CUBIERTA
DE VENTILACIÓN
75-0405
5 BANDEJA WTH VENT AGUJERO 75-0406
Si cualquier componente de esta unidad está roto, si no funciona debidamente, o si necesita un
instructivo de repuesto, visítenos en la Web en
WestonProducts.com
O llame a Weston Brands LLC larga distancia sin costo 1-800-814-4895
De lunes a viernes, de 8:00 am a 5:00 pm tiempo del ET. Fuera de Estados Unidos llame
al 001-440-638-3131
4
1
2
5
3
19
INSTRUCCIONES EN ESPAÑOL
Page 20

CÓMO CARGAR LAS BANDEJAS Y LOS
FILTROS
FIGURA 1
FIGURA 2
FIGURA 3
FIGURA 4
Preparación del Deshidratador
• La bandeja superior siempre debe colocarse en
la posición superior para lograr una deshidratación
correcta.
• Las (5) o (6) bandejas deben usarse durante todos
los procesos de deshidratación, aún si algunas se
encuentran vacías.
• Es mejor deshidratar un tipo de alimento similar por
vez; por ejemplo, todas frutas o todos vegetales.
• Siempre deje las bandejas en su lugar hasta que
haya nalizado la deshidratación. Usted puede
quitar los alimentos de las bandejas cuanto estén
deshidratados de manera aceptable.
1. Siempre coloque los alimentos en una sola capa
en cada bandeja para lograr una deshidratación
pareja. FIGURA 1
2. Utilice el ltro de malla para secar hierbas y
pequeños trozos de frutas o vegetales. FIGURA 2
3. Si utiliza un ltro de malla, coloque el ltro en la
bandeja antes de colocar los alimentos. Para
mejores resultados, sólo utilice los ltros de malla
en las dos bandejas superiores. FIGURA 3
4. Utilice la bandeja para rollos de fruta para secar
purés de frutas o vegetales. FIGURA 4
5. Si va a usar la bandeja para rollos de fruta,
coloque la bandeja en la posición superior. Para
mejores resultados, no utilice más de dos bandejas
para rollos de fruta y colóquelas en las dos
posiciones superiores. Siempre apile la bandeja
superior por último, antes de la tapa, para lograr
una correcta deshidratación. FIGURA 5
FIGURA 5
20
INSTRUCCIONES EN ESPAÑOL
Page 21

CÓMO USAR EL DESHIDRATADOR
FIGURE 7
FIGURE 8
FIGURE 9
NOTAS:
• Los alimentos deben almacenarse en un
recipiente hermético una vez que se hayan enfriado
adecuadamente.
• Para iniciar (START), pausar (PAUSE), o
recongurar (RESET): Presione el botón START/
PAUSE (iniciar/pausa).
• Para Cambiar el Tiempo o la Temperatura Durante
el
Secado sin Accionar Pausa o Recongurar: Presione
el botón TIME/TEMP (tiempo/temperatura) una
vez para el tiempo y dos veces para la temperatura.
La última conguración comenzará a destellar.
Utilice las echas para ajustar. La unidad continuará
la deshidratación automáticamente en la nueva
conguración.
1.Enchufe la unidad. En la pantalla podrá verse el
tiempo predeterminado “00”.
FIGURA 7
2. Presione la echa + para congurar el tiempo
de secado. El tiempo de secado máximo es 48
horas, que puede congurarse en aumentos de
unidades de 1 hora.
FIGURA 8
3. Presione el botón TIME/TEMP (tiempo/
temperatura) para congurar la temperatura.
En la pantalla podrá verse la temperatura
predeterminada “130”. FIGURA 9
4. Presione la echa + o – para congurar la
temperatura de secado. Presione el botón TIME/
TEMP (tiempo/temperatura) para ajustar la
temperatura en grados Fahrenheit. Presione
y sostenga el botón TIME/TEMP (tiempo/
temperatura) por 2 segundos mientras se visualiza
la temperatura para cambiar de ºF a ºC. La
temperatura puede congurarse desde 100°F a
160°F en aumentos de temperatura
en unidades de 5°. NOTA: La conguración
predeterminada es en Fahrenheit. Si usted
recongura la unidad o la desenchufa mientras
está congurada en Celsius, ésta volverá a
Fahrenheit.
FIGURA 10
5. Presione el botón START/PAUSE (iniciar/
pausa) para iniciar el secado. La pantalla mostrará
el TIEMPO y la TEMPERATURA alternativamente
durante el período de deshidratación. FIGURA 11
FIGURE 10
FIGURE 11
21
INSTRUCCIONES EN ESPAÑOL
Page 22

6. Para Activar PAUSA para Controlar los Alimentos:
Presione el botón START/PAUSE (iniciar/pausa) y la
unidad hará una pausa. En la pantalla se verá “PA”.
FIGURA 12
7. Presione el botón START/PAUSE (iniciar/
pausa) de nuevo para reanudar el secado. Para
RECONFIGURAR: Presione y sostenga el botón
START/PAUSE (iniciar/pausa) por 2 segundos; “00”
titilará en la pantalla. FIGURA 13
8. Para DETENER el “00” que Titila: Presione y
sostenga el botón START/PAUSE (iniciar/pausa)
de nuevo por unos 2 segundos adicionales. “00”
aparecerá en la pantalla pero no destellará. Si la
deshidratación ha nalizado, desenchufe la unidad.
FIGURA 14
9. Si la deshidratación se ha completado antes
de que nalice el tiempo programado, PAUSE o
DETENGA la unidad y luego desenchúfela. Deje
que los alimentos se enfríen por completo en
bandejas o rejillas antes de almacenarlos. FIGURA
15
FIGURA 12
FIGURA 13
CÓMO USAR EL DESHIDRATADOR
FIGURA 14
FIGURA 15
22
INSTRUCCIONES EN ESPAÑOL
Page 23

• Para seguridad de los alimentos, y garantizar que se destruya cualquier clase de bacteria
presente, elija un tratamiento previo o tratamiento posterior de los incluidos a continuación:
• Tratamiento Previo de la Carne Antes de la Deshidratación – Caliente el horno a 350°F
(177°C). Escurra y descarte el adobo de la carne. Seque con toallas de papel dando
golpecitos y coloque la carne en una sola capa, dejando un espacio alrededor de cada trozo
sobre una bandeja para hornear. Hornee de 5 a 10 minutos o hasta que la temperatura
interna alcance los 160°F (72°C). La carne de ave debe alcanzar los 165°F (74°C). NOTA:
Este método puede reducir el tiempo de secado y puede obtenerse una textura más seca.
• Tratamiento Posterior de la Carne Después de la Deshidratación – Caliente el horno a 275°F
(135°C). Recubra una bandeja para hornear grande con papel de aluminio. Coloque la cecina
en una sola capa, dejando un espacio pequeño alrededor de cada pieza. Hornee de
10 a 12 minutos. Enfríe por completo sobre una rejilla. Seque con toallas de papel dando
golpecitos para quitar la grasa supercial antes de almacenar.
• Adobar las carnes ayuda con el sabor y la textura de la cecina. No adobe las carnes por un
período más prolongado del que señalan las instrucciones del paquete.
CONSEJO: El tratamiento posterior de la carne después de la deshidratación puede dar
como resultado una textura de la cecina más deseable. Realice ambos tratamientos para
determinar qué cecina la gusta más.
• Visite www.usda.gov si tiene alguna pregunta sobre la seguridad de la carne y de los
alimentos.
• Nunca deshidrate carnes con frutas o vegetales, debido a la posible contaminación cruzada
de los alimentos. Las carnes se secan a diferentes temperaturas que las frutas o vegetales.
• Todos los alimentos deshidratados deben enfriarse por completo antes de almacenarse.
• Para seguridad de los alimentos, complete el proceso de secado de los alimentos. No
comience y detenga el proceso por un período mayor de 5 minutos. Usted puede pausar
el proceso para vericar el nivel de deshidratación de los alimentos o para quitar las piezas
deshidratadas.
• Etiquete y ponga fecha a todos los recipientes con alimentos deshidratados.
CONSEJOS DE SEGURIDAD DE LOS ALIMENTOS
A. Preparación de los Alimentos
• Siempre lávese las manos antes de comenzar la preparación de los alimentos.
• Lave todas las frutas y vegetales antes de comenzar la preparación.
• Elija las frutas y vegetales que se encuentren en su temporada para obtener un mejor
sabor.
• Descarte las frutas y vegetales que tengan golpes u hongos.
• Corte los alimentos con el mismo grosor, tamaño o forma antes de secarlos para
garantizar una deshidratación pareja.
• Algunos alimentos, tales como el ajo, las cebollas, la colior y el brócoli, tienen un olor
fuerte cuando se secan.
B. Tratamiento Previo
• Algunas frutas y vegetales requieren un tratamiento previo antes del secado.
Blanquee o agregue protectores de color para preservar el color natural.
Cómo Blanquear
Se recomienda blanquear algunos vegetales para ayudar a prevenir la pérdida de color
y sabor durante el secado y el almacenamiento. El blanqueado se utiliza para romper la
cáscara de algunas frutas y así acortar el proceso de deshidratación.
• Lleve al hervor constante una olla grande llena con agua.
• Coloque frutas o vegetales lavados en un colador con manija.
• Introduzca el colador dentro del agua hirviendo por el tiempo recomendado.
• Asegúrese de que todas las frutas o vegetales estén cubiertos con agua para un
blanqueado parejo.
• Después de nalizado el blanqueado, colóquelas en un tazón grande lleno de agua
helada para detener el proceso de blanqueado.
• Escurra y seque las frutas o vegetales dando golpecitos antes de deshidratarlos.
blanching process.
CÓMO DESHIDRATAR FRUTAS Y VEGETALES
23
INSTRUCCIONES EN ESPAÑOL
Page 24

Cómo Proteger el Color
Algunas frutas y las papas puede decolorarse durante el proceso de secado. Para
proteger el color, siga estos pasos.
• Prepare una solución de partes iguales de jugo de limón y agua.
• Coloque los trozos dentro de la solución; escurra.
• Si utiliza un conservante comercial para frutas, siga las instrucciones del paquete.
C. Cómo Determinar el Nivel de Deshidratación
• Muchos factores inuyen en el tiempo de secado, como el contenido de humedad, el
tipo y cantidad de alimento, la forma y la uniformidad de las rodajas de los alimentos,
la temperatura del aire, la humedad y su preferencia personal en cuanto a la textura de
sus alimentos.
• Las tablas de secado son una guía. Los tiempos de secado y las temperaturas son
diferentes para distintos tipos de alimentos; comience vericando los alimentos con el
tiempo mínimo recomendado indicado en la tabla. Si el alimento no está listado en la
tabla, elija uno similar.
• Coloque los alimentos restantes en las bandejas superiores para que sea más fácil
vericar el nivel de deshidratación.
• Verique el nivel de cocción de todas las bandejas cuando haya alcanzado el tiempo
mínimo recomendado en la tabla.
• Todas las frutas deben poder doblarse y estar ligeramente blandas sin estar
pegajosas, con excepción de las manzanas y las bananas que deben estar crujientes.
• Todos los vegetales deben estar crujientes y deben quebrarse con facilidad.
D. Cómo Secar Rollos de Fruta
• Los rollos de fruta pueden prepararse con frutas frescas peladas y sin carozo hechas
puré, fruta enlatada bien escurrida y hecha puré, fruta descongelada escurrida y hecha
puré, o con salsa de manzana comprada.
• Las frutas que tienen un nivel más elevado de pectina (manzanas, damascos,
arándanos, uvas, duraznos, peras, piñas y ciruelas) permiten preparar rollos de fruta de
una textura similar al cuero.
• Cuando utilice frutas bajas en pectina (pomelo, limones, limas, naranjas, frambuesas
y fresas), mézclelas con una fruta de pectina más elevada para obtener un rollo de fruta
más fácil de pelar.
• Rocíe ligeramente la bandeja para rollos de fruta con aerosol para cocción
antiadherente o pase un poco de aceite vegetal antes de agregar el puré de frutas.
• Esparza uniformemente 3/4 a 1 taza (177 ml a 237 ml) de puré sobre la bandeja
preparada para rollos de fruta para formar un grosor de 1/4 de pulgada (0.6 cm).
• Coloque la bandeja para rollos de fruta en una de las dos bandejas superiores para
comenzar la deshidratación.
• Se debe controlar el nivel de cocción de los rollos de fruta a partir de las 4 horas.
• Los rollos de fruta estarán ligeramente pegajosos cuando se sequen.
• Siempre retire el rollo de fruta de la bandeja después de que se enfríen por 15
minutos.
• El rollo de fruta debe estar ligeramente tibio para poder quitarse fácilmente de la
bandeja para rollos de fruta.
• Una vez que se ha enrollado, enfríe por completo entes de almacenarlo en un
recipiente hermético.
24
INSTRUCCIONES EN ESPAÑOL
Page 25

• Los alimentos deshidratados deben enfriarse por completo antes de
almacenarse.
• Los alimentos secados adecuadamente deben almacenarse en un recipiente
limpio, seco y hermético, como bolsas plásticas
resellables, recipientes plásticos o frascos de vidrio para conservas con una
tapa hermética, a n de evitar que los alimentos se rehidraten.
• Guarde todos los recipientes en un lugar fresco y seco.
• Las frutas secas almacenadas a 60°F (16°C) se conservan hasta por
1 año, mientras que los vegetales almacenados a 60°F (16°C) pueden
conservarse hasta 6 meses.
• Los rollos de fruta almacenados a temperatura ambiente pueden
conservarse hasta 1 mes, si se almacenan correctamente.
• Si la cecina se ha secado, enfriado y guardado correctamente, puede
almacenarse hasta 2 meses en un recipiente hermético a temperatura
ambiente.
• Almacenar alimentos en lugares con temperaturas mayores acortará el
tiempo de almacenamiento. Coloque los recipientes con alimentos en el
congelador por un tiempo de almacenamiento más prolongado.
• Resulta una buena costumbre controlar los alimentos deshidratados en
forma diaria. Vuelva a deshidratarlos si ve que las frutas o vegetales se
ablandan o si tienen condensación. Controle los alimentos con frecuencia
durante el secado adicional, ya que este proceso será mucho más corto.
• Siempre controle el estado de sus alimentos antes del consumo. Si tiene
alguna duda, deséchelo.
CÓMO ALMACENAR ALIMENTOS DESHIDRATADOS
25
INSTRUCCIONES EN ESPAÑOL
Page 26

FRUTA CÓMO
PREPARAR
TRATAMIENTO
PREVIO /
TIEMPO
TIEMPO DE
DESHIDRATACIÓN**
FRUTA DE
PECTINA
ELEVADA
Manzanas Peladas, en rebanadas
de un grosor de
1/4 pulgada
(0.6 cm)
#C 8 a 12 horas Sí
Damasco Sin carozo, pelados y
en rebanadas de un
grosor de 1/4 pulgada
(0.6 cm)
Pitted, peeled, sliced
1/4 inch (0.6 cm) thick
#C 15 a 19 horas Sí
Bananas En rebanadas de un
grosor de 1/4 pulgada
(0.6 cm)
#C 6 a 10 horas No
Arándanos Enteros *B/1 minuto 14 a 18 horas Sí
Cerezas Sin carozo, en mitades – 22 a 26 horas No
Arándanos
rojos
Enteros *B/1 minuto 17 a 21 horas Sí
Uvas sin
semillas
verdes o
rojas
En mitades – 19 a 23 horas Sí
Kiwi En rebanadas de un
grosor de 1/4 pulgada
(0.6 cm)
– 8 a 12 horas Sí
Limones,
limas o
naranjas
En rebanadas de un
grosor de 1/4 pulgada
(0.6 cm)
– 17 a 21 horas No
Mangos Pelados, sin carozo y
en rebanadas de un
grosor de 1/4 pulgada
(0.6 cm)
– 13 a 17 horas No
Pelones Pelados, sin carozo y
en rebanadas de un
grosor de 1/4 pulgada
(0.6 cm)
#C 11 a 15 horas Sí
Duraznos Peladas, en rebanadas
de un grosor de 1/4
pulgada (0.6 cm)
#C 11 a 15 horas Sí
Peras Peladas, en rebanadas
de un grosor de 1/4
pulgada (0.6 cm)
#C 10 a 14 horas Sí
Piñas Peladas, sin semillas
y en rebanadas de un
grosor de 1/4 pulgada
(0.6 cm)
– 12 a 16 horas Sí
Ciruelas Sin carozo, rebanadas
en octavos
– 23 a 27 horas Sí
Fresas En rebanadas de un
grosor de 1/4 pulgada
(0.6 cm)
– 6 a 10 horas No
TABLA DE DESHIDRATACIÓN PARA FRUTAS A 135°F (60°C)
*B = Blanqueado #C = Protector de Color
(ver “Cómo Blanquear” y “Cómo Proteger el Color” en la página 44)
26
INSTRUCCIONES EN ESPAÑOL
Page 27

VEGETAL CÓMO PREPARAR TRATAMIENTO
PREVIO/
TIEMPO
TIEMPO DE
DESHIDRATACIÓN**
Pimientos En rebanadas de un
grosor de1/4 pulgada
(0.6 cm)
– 9 a 13 horas
Brócoli Flores pequeñas *B/2 minutos 9 a 13 horas
Zanahorias Rebanadas en diagonal
de un grosor de
1/4 pulgada (0.6 cm)
*B/2 minutos
11 a 15 horas
Colior Flores pequeñas *B/2 minutos 8 a 12 horas
Apio Rebanadas en diagonal
de un grosor de
1/4 pulgada (0.6 cm)
– 5 a 9 horas
Tomates Uva En mitades – 13 a 17 horas
Habichuelas En rebanadas de un
grosor de
1/4 pulgada (0.6 cm)
*B/2 minutos 12 a 16 horas
Hongos En rebanadas de un
grosor de
1/4 pulgada (0.6 cm)
– 8 a 12 horas
Cebollas En rebanadas de un
grosor de
1/4 pulgada (0.6 cm)
– 14 a 18 horas
Zapollo Amarillo
o Zucchini
En rebanadas de un
grosor de
1/4 pulgada (0.6 cm)
– 7 a 11 horas
Tomates En rebanadas de un
grosor de
1/4 pulgada (0.6 cm)
– 10 a 13 horas
TABLA DE DESHIDRATACIÓN PARA VEGETALES A 125°F (55°C)
*B = Blanqueado (Ver “Cómo Blanquear” en la página 44)
**Los tiempos pueden variar dependiendo del contenido de agua de los
vegetales.
27
INSTRUCCIONES EN ESPAÑOL
Page 28

CÓMO DESHIDRATAR HIERBAS FRESCAS
• Las hojas de hierbas más grandes, tales como la albahaca, hojas de laurel, menta,
salvia o acedera deben quitarse de los tallos antes del secado.
• Las hierbras tales como el cilantro, eneldo, perejil o romero deben mantenerse en
el tallo para la deshidratación. Es más fácil quitar las hierbas después del secado.
• Siempre enjuague las hierbas con agua fría y quite con cuidado el agua restante
con un centrifugador de ensalada o toallas de papel. Las hierbas deben estar
completamente secas antes de comenzar la deshidratación.
• Las hierbas pequeñas deben colocarse en el ltro de malla para lograr un mejor
secado.
• Las hierbas se secan más rápidamente en comparación con las frutas, vegetales y
carnes adobadas.
• Las hierbas se desmenuzan fácilmente cuando están secas.
• Las hierbas deben enfriarse por completo antes de almacenarlas en un recipiente
hermético.
HIERBA FRESCA TIEMPO DE DESHIDRATACIÓN** DEHYDRATING TIME**
Albahaca 4 a 6 horas
Cebolleta
5 a 7 horas
Cilantro
4 a 6 horas
Menta
5 a 7 horas
Perejil
4 a 6 horas
Romero
5 a 7 horas
TABLA DE DESHIDRATACIÓN PARA HIERBAS A 100°F (40°C)
Los tiempos pueden variar dependiendo del contenido de agua de las hierbas.
CÓMO DESHIDRATAR CECINA
• Lávese las manos con agua tibia y jabón antes de preparar la cecina.
• Elija cortes de carne magros para la cecina.
• Recorte toda la grasa de la carne antes de adobarla.
• Envuelva la carne en un envoltorio plástico y congele por un mínimo de 1 hora para
poder rebanarla más fácilemente antes del adobo.
• Adobe la carne en una bolsa plástica resellable con cierre muy resistente o en
un plato de vidrio. No utilice un recipiente metálico para adobar, ya que genera
un cambio en el sabor y una posible reacción del adobo respecto del metal del
recipiente.
• Siempre adobe las carnes para la cecina en un refrigerador; escurra y elimine el
adobo antes de deshidratar.
• Deshidrate la cecina de acuerdo con la receta o siga la preparación de la cecina de
acuerdo con las instrucciones del paquete.
• Controle la cecina después de 4 horas y cada 30 minutos después de eso.
• La cecina está seca cuando se quiebra sin romperse cuando se dobla.
• Seque la cecina con una toalla de papel dando golpecitos para eliminar la grasa
supercial y deje enfriar por completo antes de almacenarla en un recipiente
hermético.
• Si la cecina se ha secado, enfriado y guardado correctamente, puede almacenarse
hasta 2 meses en un recipiente hermético a temperatura ambiente.
• Siempre rebane las carnes contra la veta para lograr una cecina más tierna.
• Las rebanadas de carne no deben tener un grosor mayor a 1/4 pulgada (0.6 cm), 4
pulgadas (10.2 cm) de largo y 2 pulgadas (5.1 cm) de ancho.
• Nunca adobe la carne a temperatura ambiente. Siempre refrigere la carne cuando la
esté adobando.
• Siempre siga las instrucciones de la receta.
• Etiquete y ponga fecha a todos los recipientes con cecina.
28
INSTRUCCIONES EN ESPAÑOL
Page 29

CUIDADO Y LIMPIEZA
1. Desenchufe la unidad cuando haya terminado
de secar. Déjela enfriar. FIGURA 16
2. Lave en agua tibia jabonosa. FIGURA 17
3. No utilice la conguración “SANI” cuando la
lave en el lavavajillas. Las temperaturas del ciclo
“SANI” pueden dañar su producto. FIGURA 18
4. Limpie la base con un paño jabonoso húmedo.
FIGURA 19
FIGURA 16
FIGURA 17
FIGURA 18
RESISTENTE AL
LAVAVAJILLAS
FIGURA 19
29
INSTRUCCIONES EN ESPAÑOL
Page 30

PROBLEMA CAUSA PROBABLE/SOLUCIÓN
Los alimentos no se
deshidratan.
• Los alimentos pueden ser muy gruesos o
quizás se dejó la cáscara o la piel de los alimentos. Siga las recomendaciones de las tablas de
las páginas 46, 47 o 48, o siga la receta.
• Demasiados alimentos en cada bandeja. Quite
algunos alimentos y deshidrátelos por un período
más prolongado.
Los alimentos se secan
en forma despareja.
• Los alimentos deben cortarse uniformemente.
• Los alimentos con piezas desparejas pueden
girarse durante el proceso de secado.
Las frutas o los
vegetales se
ablandan durante el
almacenamiento.
• Se dejó demasiada humedad en los alimentos.
Seque por más tiempo para quitar la humedad
excesiva.
RESOLVIENDO PROBLEMAS
30
INSTRUCCIONES EN ESPAÑOL
Page 31

Page 32

Weston Brands LLC garantiza al COMPRADOR AL DETALLE ORIGINAL de este producto que si funciona en cumplimiento
con las instrucciones impresas adjuntas, entonces por un período de 1 año desde la fecha de compra, el producto se
considerará libre de defectos respecto del material y mano de obra.
La Tarjeta de Garantía, junto con una copia del recibo original debe ser recibida por Weston Brands LLC dentro de 30 días
desde la fecha de compra para hacer efectiva la garantía. Si no se envía la Tarjeta de Garantía completamente llena, junto
con una copia del recibo original, anulará la garantía.
El producto debe ser enviado o despachado mediante ete prepagado a Weston Brands LLC para efectuar los servicios
establecidos en la garantía, en su envase original o en un envase similar que garantice igual grado de protección. El daño
producto del despacho no es responsabilidad de la compañía. Weston Brands LLC cobra $35.00 por concepto de mesón por
hora. NOTA: Las reparaciones no se iniciarán sin la autorización del cliente. El costo por despacho de devolución al cliente se
agregará a la factura por reparación.
Antes de devolver el producto para la Reparación según la Garantía, el producto debe estar completamente limpio y libre de
partículas de alimentos u otros fragmentos. El incumplimiento del comprador respecto de esta norma resultará en el envío de
la unidad sin reparación. En algunos casos, podría aplicar un sobrecargo de $50 por concepto de limpieza.
Weston Brands LLC reparará (o a su decisión, cambiará) el producto sin cobro, si a juicio de la compañía, se ha demostrado
que está defectuoso respecto de la mano de obra y material del vendedor, dentro del período de garantía.
Los cambios de productos nuevos o reacondicionados por partes defectuosas de fábrica serán suministrados por un (1) año
desde la fecha de compra. Las partes cambiadas están garantizadas por el resto del período original de garantía.
Para las reparaciones que no estén cubiertas en la garantía, comuníquese con Servicio al Cliente de Weston Brands LLC al
1-800-814-4895 de lunes a viernes, desde las 8 a.m. hasta las 5pm ET (Desde fuera de los Estados Unidos comuníquese
al 001-440-638-3131) para solicitar un Número de Autorización de Devolución de la Mercadería (Número RMA). Weston
Brands LLC rechazará todo envío que no contenga este número. NO DEVUELVA LA UNIDAD SIN LA AUTORIZACIÓN DE
WESTON BRANDS LLC.
LIMITACIONES: La garantía queda invalidada si el producto se utiliza para algún objetivo que no sea aquél para el cual
está diseñado. El producto no debe haber sido previamente alterado, reparado, ni tampoco se le debe haber hecho servicio
técnico por cualquier otra persona que no sea de Weston Brands LLC. Si corresponde, no se debe alterar o eliminar el
número de serie. El producto no debe estar sujeto a accidentes durante el transporte o estando en posesión del cliente, no
debe ser mal usado, mal tratado, u operado en forma contraria a las instrucciones de este manual. Esto incluye toda falla
causada por negligencia de mantención razonable o necesaria, voltaje de línea inadecuado o actos de la naturaleza. Esta
garantía es intransferible y sólo se aplica a ventas realizadas en Estados Unidos y Canadá.
Salvo en la medida en que lo prohíba la ley correspondiente, ninguna otra garantía expresa o implícita, incluyendo
comerciabilidad o aptitud de la garantía para un objetivo en particular, aplicará a este producto. Bajo ninguna circunstancia
Weston Brands LLC será responsable de daños emergentes sostenidos en conexión con dicho producto y Weston Brands
LLC no asume ni autoriza a ningún representante u otra persona a asumir por él ninguna obligación o responsabilidad que no
sea aquella expresamente establecida en esta tarjeta de garantía. Toda garantía correspondiente implícita también se limita a
un período de un (1) año de la garantía limitada.
Esta garantía cubre sólo el producto y sus partes especícas, no cubre los alimentos u otros productos procesados en
él. Weston no se hace responsable por partes faltantes o dañadas en productos con descuento/en oferta, reventa, o en
promoción nal, sobre los cuales el vendedor puede no ser capaz de garantizar una funcionalidad completa, o la integridad de
la unidad.
CORTE POR LA LÍNEA PUNTEADA Y ENVÍE LA TARJETA DE GARANTÍA JUNTO CON UNA COPIA DE SU RECIBO DE
COMPRA ORIGINAL A
Weston Brands LLC / WARRANTY
20365 Progress Drive, Strongsville, OH 44149 USA
Nombre del Cliente:
Dirección:
Ciudad/Estado/Código Zip/País:
Número Telefónico:
Dirección de Correo Electrónico:
Fecha de Compra Original:
Modelo del Producto #:
# de Serie (Si corresponde):
INFORMACIÓN DE GARANTÍA WESTON
¡GUARDE ESTA INFORMACIÓN DE GARANTÍA PARA SUS REGISTROS!
TARJETA DE GARANTÍA WESTON
ENVÍE ESTA TARJETA JUNTO CON UNA COPIA DE SU RECIBO DE COMPRA ORIGINAL A:
WESTON BRANDS LLC/WARRANTY, 20365 PROGRESS DRIVE. STRONGSVILLE, OH 44149 USA
Copia del recibo
incluido
Page 33

DÉSHYDRATEUR D’ALIMENTS
75-0401-W 6 TRAY / 75-0501-W 5 TRAY
PARCE QUE NOS PRODUITS BÉNÈFICIENT DE PERFECTIONNEMENTS CONSTANTS
APPORTÉS EN USINE, LES ILLUSTRATIONS PRÉSENTES PEUVENT ÊTRE LÉGÈREMENT
DIFFÉRENTES DU PRODUIT REÇU. 081015
Page 34

1. Lire toutes les instructions.
2. Ne pas toucher aux surfaces chaudes.
Utiliser les poignées ou les boutons.
3. Pour se protéger contre le risque de
choc électrique, ne pas immerger
le cordon, la che ou le corps de la
friteuse dans l’eau ou autre liquide.
4. Une bonne surveillance est nécessaire
lorsqu’un appareil ménager est utilisé
par des enfants ou près d’eux.
5. Assurer que le manche soit bien
assemblé au panier et xé en place.
Consulter les instructions détaillées
de montage.
6. Débrancher la friteuse de la prise de
courant lorsqu’elle n’est pas utilisée et
avant le nettoyage. La laisser refroidir
avant d’y ajouter ou d’y enlever des
pièces ou de la nettoyer.
7. Ne pas faire fonctionner un appareil
ménager avec une che ou un cordon
endommagé(e) ou lorsque l’appareil
ne fonctionne pas bien ou a été
endommagé d’une manière quelconque.
Appeler notre numéro sans frais de
service à la clientèle pour des
renseignements concernant l’examen,
la réparation ou l’ajustement.
8. L’utilisation d’accessoires non
recommandés ou non vendus par le
fabricant d’appareil pour ce modèle
peut causer des blessures.
9. Ne pas utiliser à l’extérieur.
10. Ne pas laisser le cordon pendre du bord
d’une table ou d’un comptoir, ni toucher
des surfaces chaudes.
11. Ne pas placer l’appareil
12. Ne déplacer jamais la friteuse contenant
de l’huile chaude.
13. Toujours brancher le cordon sur
l’appareil d’abord, puis sur une prise
de courant murale. Pour débrancher,
mettre tous les contacts en position
OFF (arrêt) et retirer la che de la prise
murale.
14. Ne pas utiliser la friteuse à une n autre
que celle pour laquelle elle a été
conçue.
15. Pour réduire le risque de blessure, NE
PAS remplir d’huile au-dessus du repère
de niveau maximal.
16. Toujours assurer que le pot à huile soit
rempli au moins au niveau minimum.
17. Ne jamais laisser la friteuse sans
IMPORTANTES RÈGLES DE SÉCURITÉ
LIRE ET COMPRENDRE COMPLÈTEMENT TOUTES LES DIRECTIVES
ET AVERTISSEMENTS AVANT D’UTILISER CE PRODUIT. LE PLUS
IMPORTANT EST VOTRE SÉCURITÉ! LE DÉFAUT D’OBSERVER LES
PROCÉDURES ET MISES EN GARDE PEUT ENTRAINER DES BLESSURES
GRAVES OU DES DOMMAGES MATÉRIELS. N’OUBLIEZ PAS : VOTRE
SÉCURITÉ PERSONNELLE EST VOTRE RESPONSABILITÉ!
CONSERVER CES DIRECTIVES!
surveillance durant son utilisation.
18. Toujours sécher les aliments et enlever la
glace avant de faire frire.
19. Toujours sécher complètement les
éléments de la friteuse après les avoir
lavés et avant de faire frire.
20. Toujours frire avec le couvercle en
place.
21. Ne jamais utiliser d’huile réfrigérée.
22. Ne jamais bloquer l’évent sur le
couvercle. Ayez conscience de la
vapeur qui sort de l’évent.
23. Des émissions de vapeur peuvent
entraîner des brûlures aux mains ou aux
doigts. Faites bien attention quand vous
ouvrez le couvercle.
24. Toujours soulever le panier, le reposer
sur le support d’égouttage et permetter
aux aliments d’égoutter.
25. Cet appareil est conçu uniquement pour
l’usage domestique. Cet appareil est conçu
uniquement pour la préparation, la cuisson
et servir des aliments. Cet appareil n’est
pas conçu pour l’utilisation de matériaux ou
produits non alimentaires.
26. AVERTISSEMENT ! Risque
d’électrocution : Cet appareil électroménager
possède une che polarisée (une broche
large) qui réduit le risque d’électrocution.
Cette che n’entre que dans un seul sens
dans une prise polarisée. Ne contrecarrez
pas l’objectif sécuritaire de cette che en la
modiant de quelque manière que ce soit ou
en utilisant un adaptateur. Si vous ne pouvez
pas insérer complètement la che dans la
prise, inversez la che. Si elle refuse toujours
de s’insérer, faire remplacer la prise
par un électricien.
27. AVERTISSEMENT ! Danger de brûlure.
• De l’huile chaude renversée d’une bassine
à friture tirée par mégarde du comptoir
peut causer des brûlures sévères. Ne
jamais laisser le cordon d’alimentation
pendre par l’extrémité d’un comptoir. Il
peut être saisi par un enfant et il peut se
mêler pendant l’usage. Ne jamais utiliser
avec une rallonge.
• Vous serez éclaboussé par du liquide
chaud si vous manquez le support
d’égouttage et laissez tomber
accidentellement le baquet à frire dans
le liquide chaud. Ne vous penchez
INSTRUCTIONS EN FRANÇAIS
34
Page 35

DESCRIPTION DE LA PIÈCE
NUMÉRO DE SCHÉMA DESCRIPTION DE LA PIÉCE NUMÉRO DE LA PIÉCE
1 COUVERCLE 75-0402
2 TAMIS À MAILLES 75-0403
3 TAPIS POUR ROULEAU DE FRUITS 75-0404
4 HAUT PLATEAU AVEC COUVRE-ÉVENT 75-0405
5 PLATEAU AVEC TROU 75-0406
N’hésitez pas à visiter notre site Web WestonProduct.com/support si un composant est cassé, l’outil
fonctionne mal, ou pour commander un nouveau mode d’emploi.
WestonProducts.com
Veuillez appeler Weston Brands, LLC au numéro sans frais : 1-800-814-4895
Du lundi au vendredi: de 8h00 à 17h00 ET. En dehors des États-Unis, veuillez
appeler le 001-440-638-3131
4
1
2
5
3
INSTRUCTIONS EN FRANÇAIS
35
Page 36

COMMENT RÉPARTIR LES ALIMENTS
SUR LES PLATEAUX ET LES TAMIS
Préparation du déshydrateur d’aliments
• Le plateau supérieur doit toujours être placé à la
position supérieur pour obtenir un bon séchage.
• Les cinq (5) ou (6) plateaux doivent être utilisés
pendant chaque séchage même s’ils sont vides.
• Il est préférable de sécher des aliments
semblables à la fois; par exemple, sécher
uniquement des fruits ou uniquement des
légumes.
• Toujours laisser les plateaux en place tant
que le séchage n’est pas terminé. Les aliments
peuvent être retirés des plateaux dès qu’ils sont
convenablement séchés.
1. Toujours déposer les aliments en une
seule couche sur chaque plateau pour obtenir
un séchage uniforme. Ne pas chevaucher
les fruits, les légumes ou les viandes ou
surcharger les plateaux. FIGURE 1
2. Utiliser le tamis à mailles pour sécher les
herbes ou les petits morceaux de fruits ou de
légumes. FIGURE 2
3. Si l’on utilise le tamis à mailles, placer le
tamis dans le plateau avant d’y ajouter les
aliments. Pour obtenir de meilleurs résultats,
utiliser seulement les tamis à mailles dans les
deux plateaux supérieurs. FIGURE 3
4. Utiliser le tapis pour rouleau de fruits pour
sécher les purées de fruits ou de légumes.
FIGURE 4
5. Si l’on utilise le tapis pour rouleau de fruits,
placer le tapis dans le plateau supérieur.
Pour obtenir de meilleurs résultats, ne pas
utiliser plus de deux (2) tapis pour rouleau de
fruits par-dessus les deux plateaux. Toujours
déposer le plateau supérieur en dernier, avant
le couvercle, pour obtenir un bon séchage.
FIGURE 5
FIGURE 1
FIGURE 2
FIGURE 3
FIGURE 4
FIGURE 5
INSTRUCTIONS EN FRANÇAIS
36
Page 37

INSTRUCTIONS EN FRANÇAIS
37
UTILISATION DU DÉSHYDRATEUR
D’ALIMENTS
FIGURE 7
FIGURE 8
FIGURE 9
REMARQUES :
• Les aliments doivent être stockés dans un
contenant hermétique après le refroidissement
complet.
• Pour METTRE EN MARCHE, FAIRE UNE PAUSE
ou RÉINITIALISER : Appuyer sur le bouton START/
PAUSE.
• Pour modier la durée ou la température pendant le
séchage sans faire une pause
ou réinitialiser : Appuyer sur le bouton TIME/TEMP
(durée/ température) une fois pour modier la durée
ou deux fois
pour modier la température. Le dernier réglage
clignotera. Utiliser les èches pour régler. L’appareil
poursuivra automatiquement
le séchage selon le nouveau réglage.
1. Brancher l’appareil. La durée par défaut « 00 »
clignotera à l’afcheur. FIGURE 7
2. Appuyer sur la èche + pour régler la durée
de séchage. La durée de séchage maximum est
de 48 heures et se règle par incrément d’une (1)
heure. FIGURE 8
3. Appuyer sur le bouton TIME/TEMP (durée/
température) pour régler la température. La
température par défaut « 130 » clignotera à
l’afcheur. FIGURE 9
4. Appuyer sur la èche + ou – pour régler la
température de séchage. Appuyer sur le bouton
TIME/TEMP (durée/température) pour régler la
température en Fahrenheit. Appuyer et maintenir
le bouton TIME/ TEMP (durée/température)
pendant 2 secondes pendant que la température
est afché pour passer des degrés Fahrenheit en
Celsius. La température peut être réglée de 100
°F à 160 °F par incrément de 5°. REMARQUE :
Le réglage par défaut est en degrés Fahrenheit.
L’appareil afchera les degrés Fahrenheit si ce
dernier est réinitialisé ou débranché lorsque le
réglage a été modié en degrés Celsius. FIGURE
10
5. Appuyer sur le bouton START/PAUSE (mise
en marche/pause) pour commencer le séchage.
L’afcheur indiquera alternativement DURÉE et
TEMPÉRATURE pendant la période de séchage.
FIGURE 11
FIGURE 10
FIGURE 11
Page 38

6. Pour effectuer une PAUSE an de vérier les
aliments : Appuyer sur le bouton START/PAUSE
(mise en marche/pause) pour interrompre le séchage.
L’afcheur indiquera « PA » (pause). Appuyer à
nouveau sur START/PAUSE (mise en marche/pause)
pour poursuivre le séchage. FIGURE 12
7. Pour RÉINITIALISER : Appuyer et maintenir
le bouton START/PAUSE (mise en marche/
pause) enfoncé pendant 2 secondes. Les chiffres
« 00 » clignoteront à l’afcheur. Pour poursuivre
le séchage, appuyer sur le bouton TIME/TEMP
(durée/température) pour modier la durée et la
température. FIGURE 13
8. Pour ARRÊTER le clignotement des chiffres
« 00 » : Appuyer et maintenir le bouton START/
PAUSE (mise en marche/pause) enfoncé à
nouveau pendant 2 secondes de plus. Les chiffres
« 00 » seront afchés, mais ne clignoteront plus.
Débrancher l’appareil dès que le séchage est
terminé. FIGURE 14
9. Si le séchage est terminé avant la durée
programmée, mettre l’appareil en PAUSE ou
l’ÉTEINDRE puis débrancher l’appareil. Laisser
refroidir complètement les aliments sur les plateaux
ou les grilles avant de les stocker. FIGURE 15
FIGURE 12
FIGURE 13
UTILISATION DU DÉSHYDRATEUR
D’ALIMENTS
FIGURE 14
FIGURE 15
INSTRUCTIONS EN FRANÇAIS
38
Page 39

INSTRUCTIONS EN FRANÇAIS
39
• Pour préserver l’innocuité des aliments et assurer la destruction de toutes bactéries,
choisir le prétraitement ou le post-traitement ci-dessous :
• Prétraitement des viandes avant la déshydratation – Chauffer le four à 177 °C (350
°F). Vider et jeter la marinade utilisée pour la viande. Éponger avec des serviettes de
papier et disposer la viande en une seule couche sur une plaque à biscuits en laissant
un espace autour de chaque morceau. Cuire 5 à 10 minutes ou jusqu’à ce que la
température interne atteigne 74 °C (165 °F). La température de la volaille doit atteindre
74 °C (165 °F).
REMARQUE : Cette méthode peut réduire la durée de séchage et produire une texture
plus sèche.
• Post-traitement des viandes après la déshydratation – Chauffer le four à 135 °C (275
°F). Chemiser une grande plaque à biscuits avec du papier aluminium. Déposer les
morceaux de bœuf séché en une seule couche et en laissant un petit espace autour de
chaque morceau. Cuire pendant 10 à 12 minutes. Laisser refroidir complètement sur
une grille. Éponger le bœuf séché avec des serviettes en papier pour éliminer tout le
gras en surface avant de le stocker.
• Les viandes marinées rehaussent la saveur et la texture du bœuf séché. Ne pas
faire mariner la viande plus longtemps que la durée suggérée par la recette ou sur
l’emballage.
CONSEIL : Le post-traitement des viandes après la déshydratation aide à obtenir une
meilleure texture du bœuf séché. Essayer chaque traitement an de déterminer la
texture de bœuf séché préférée.
• Visiter le site www.usda.gov pour toutes questions au sujet des viandes et de
l’innocuité des aliments.
• Ne jamais déshydrater des viandes avec des fruits et des légumes pour éviter la
contamination croisée des aliments. La température de séchage des viandes est
différente de celle des fruits ou des légumes.
• Tous les aliments déshydratés doivent refroidir complètement avant de les stocker.
• Pour assurer l’innocuité, exécuter la procédure complète de déshydratation des
aliments. Ne pas interrompre et arrêter le cycle pendant plus de 5 minutes. Faire une
pause pendant le cycle pour vérier l’état de sécheresse des aliments ou pour retirer les
morceaux déshydratés.
• Étiqueter et dater tous les contenants d’aliments séchés.
CONSEILS POUR L’INNOCUITÉ DES ALIMENTS
A. PRÉPARATION DES ALIMENTS
• Toujours se laver les mains avant de commencer la préparation des aliments.
• Laver tous les fruits et les légumes avant la préparation.
• Choisir les fruits et les légumes saisonniers pour obtenir une saveur plus riche.
• Ne pas prendre aucun fruit ou légume abimé ou moisi.
• Couper les aliments à la même épaisseur, dimension ou forme avant le séchage pour
assurer un séchage uniforme.
• Certains aliments comme l’ail, les oignons, le chou-eur et le brocoli dégagent une
forte odeur pendant le séchage.
B. PRÉTRAITEMENT
• Certains fruits et légumes nécessitent un prétraitement avant le séchage. Blanchir ou
ajouter des agents de préservation de couleur an de préserver la couleur naturelle.
COMMENT BLANCHIR
Il est recommandé de blanchir certains légumes an d’en préserver la couleur et la
saveur pendant le séchage et le stockage. Blanchir les fruits ou légumes permet de
briser les pelures de certains fruits et de réduire la durée de séchage.
• Porter un grand chaudron rempli d’eau froide à ébullition.
• Mettre les fruits ou les légumes lavés dans un tamis équipé d’une poignée.
• Plonger le tamis dans l’eau bouillante selon la durée recommandée.
• S’assurer que tous les fruits ou légumes sont recouverts d’eau an de blanchir
uniformément.
• Dès que les fruits ou légumes sont blanchis, les plonger dans un grand bol rempli
d’eau glacée pour arrêter l’échaudage.
• Égoutter et éponger complètement les fruits ou les légumes avant de les déshydrater.
DÉSHYDRATATION DES FRUITS ET DES LÉGUMES
Page 40

COMMENT CONSERVER LA COULEUR
Certains fruits et pommes de terre peuvent se décolorer pendant le cycle de
séchage. Suivre ces étapes an de conserver la couleur :
• Préparer une solution de quantité égale de jus de citron et d’eau.
• Plonger les morceaux dans la solution puis égoutter.
• Avec l’utilisation d’un agent de conservation pour fruits commercial,
respecter les instructions sur l’emballage.
C. DÉTERMINATION DE L’ÉTAT DE SÉCHAGE
• Plusieurs facteurs peuvent inuencer la durée de séchage, y compris de
taux d’humidité, le type et la quantité d’aliments, la forme et l’uniformité des
tranches d’aliments, la température ambiante, l’humidité et les préférences
personnelles de texture des aliments.
• Les tableaux de séchage sont un guide. Les durées de séchage et les
températures varient selon les types d’aliments. Commencer à vérier les
aliments à la durée minimum recommandée au tableau. Choisir un aliment
semblable si l’aliment à sécher n’est pas indiqué au tableau.
• Combiner tous les aliments résiduels dans les plateaux supérieurs an de
vérier plus facilement l’état de séchage.
• Vérier l’état de séchage de tous les plateaux à la durée minimum
recommandée au tableau.
• Tous les fruits doivent pouvoir se plier et être légèrement mous, mais
sans être gluants, sauf pour les pommes et les bananes qui doivent être
croustillantes.
• Tous les légumes doivent être croustillants et se briser facilement.
D. SÉCHAGE DES ROULEAUX DE FRUITS
• Les rouleaux de fruits peuvent être faits avec des fruits frais pelés,
dénoyautés et en purée, des fruits en conserve biens égouttés et réduit en
purée, des fruits congelés décongelés, égouttés et en réduit en purée ou avec
des compotes de pommes commerciales.
• Les fruits ayant un taux élevé de pectine (pommes, abricots, bleuets, raisins,
pêches, poires, ananas et prunes) auront une texture semblable au cuir.
• Les fruits ayant peu de pectine (raisins, citrons, limettes, oranges,
framboises et fraises) combinés à un fruit ayant un taux de pectine plus élevé
facilitera le démoulage du rouleau de fruits.
• Vaporiser légèrement le tapis pour rouleau de fruits avec un enduit à cuisson
antiadhésif ou d’une mince couche d’huile végétale avant d’y ajouter les fruits
en purée.
• Étendre uniformément environ 3/4 à 1 tasse (177 à 237 ml) de purée sur le
tapis pour rouleau de fruits préparé à une épaisseur d’environ 1/4 po (0,6 cm).
• Mettre le tapis pour rouleau de fruits sur l’un des deux plateaux supérieurs
pour faire sécher.
• Vérier l’état de séchage des rouleaux de fruits 4 heures après la mise en
marche.
• Les rouleaux de fruits séchés doivent être légèrement collants.
• Toujours laisser refroidir les rouleaux de fruits pendant 15 minutes avant des
les démouler.
• Le rouleau de fruits doit être légèrement chaud an de faciliter le démoulage
du tapis
• Une fois roulé, laisser complètement refroidir avant de stocker dans un
contenant hermétique.
INSTRUCTIONS EN FRANÇAIS
40
Page 41

INSTRUCTIONS EN FRANÇAIS
41
• Les aliments déshydratés doivent être complètement refroidis avant de les
emballer.
• Les aliments séchés adéquatement doivent être stockés dans un contenant
propre, sec et hermétique comme des sacs en plastique réutilisables, des
contenants de plastique, des pots en verre avec couvercle étanche an
d’éviter la réhydratation des aliments.
• Stocker tous les emballages dans un endroit frais et sec.
• Les fruits séchés stockés à une température de 16 °C (60 °F) peuvent se
conserver jusqu’à 1 an et les légumes stockés à une température de 16 °C
(60 °F) peuvent se conserver jusqu’à 6 mois.
• Les rouleaux aux fruits stockés adéquatement à la température ambiante
peuvent se conserver jusqu’à un 1 mois.
• Le bœuf séché a été séché, refroidi et emballé correctement se conserve
jusqu’à 2 mois dans un contenant hermétique et stocké à la température
ambiante.
• Le stockage dans des endroits plus chauds peut diminuer la durée de
conservation. Stocker les aliments emballés au congélateur pour prolonger la
durée de conservation.
• Une bonne pratique consiste à vérier quotidiennement les aliments
déshydratés. Faire sécher à nouveau les fruits et les légumes ramollis ou
s’ils présentent des traces de condensation. Vérier fréquemment pendant le
nouveau séchage, car le cycle peut être plus court.
• Toujours vérier l’état des aliments avant de les consommer. Jeter en cas de
doute.
STOCKAGE DES ALIMENTS DÉSHYDRATÉS
Page 42

FRUIT HOW TO
PREPARE
PRETREATMENT/
TIME
DEHYDRATING
TIME**
HIGH
PECTIN
FRUIT
Pommes Peler, trancher à 1/4
po (0,6 cm) d’épaisseur
#C 8 à 12 heures Oui
Abricots Dénoyauter, peler et
trancher à 1/4 po (0,6
cm) d’épaisseur
#C 15 à 19 heures Oui
Bananes Trancher à 1/4 po (0,6
cm) d’épaisseur
#C 6 à 10 heures Non
Bleuets Entier *B pendant 1
minute
14 à 18 heures Oui
Cerises Dénoyauter, couper
en 2
– 22 à 26 heures Non
Canneberg-esEntier *B pendant 1
minute
17 à 21 heures Oui
Raisins,
verts ou
rouges sans
pepin
Couper en 2 – 19 to 23 hours Oui
Kiwi Trancher à 1/4 po (0,6
cm) d’épaisseur
– 8 à 12 heures Oui
Citrons,
limettes ou
oranges
Trancher à 1/4 po (0,6
cm) d’épaisseur
– 17 à 21 heures Non
Mangues Peler, dénoyauter et
trancher à 1/4 po (0,6
cm) d’épaisseur
– 13 à 17 heures Non
Nectarines Peler, dénoyauter et
trancher à 1/4 po (0,6
cm) d’épaisseur
#C 11 à 15 heures Oui
Pêches Peler, trancher à 1/4
po (0,6 cm) d’épaisseur
#C 11 à 15 heures Oui
Poires Peler, trancher à 1/4
po (0,6 cm) d’épaisseur
#C 10 à 14 heures Oui
Ananas Peler, dénoyauter et
trancher à 1/4 po (0,6
cm) d’épaisseur
– 12 à 16 heures Oui
Prunes Dénoyauter, couper
en 8
– 23 à 27 heures Oui
Fraises Trancher à 1/4 po (0,6
cm) d’épaisseur
– 6 à 10 heures Non
TABLEAU DE DÉSHYDRATATION POUR LES FRUITS À 60 °C (135 °F)
*B = Blanchir #C = Conservation de la couleur (Consulter « Comment
blanchir » et « Comment conserver la couleur » à la page 26)
**Les durées peuvent varier selon la maturité des fruits et la quantité sur le
plateau. Consulter « Déshydratation des fruits et des légumes » aux pages 39
et 40.
INSTRUCTIONS EN FRANÇAIS
42
Page 43

LÉGUMES PRÉPARATION PRÉTRAITEMENT/
DURÉE
DURÉE DE
DÉSHYDRATATION**
Poivrons Trancher à 1/4 po (0,6
cm) d’épaisseur
– 9 à 13 heures
Brocoli Petites eurettes *B pendant 2
minutes
9 à 13 heures
Carrottes Trancher en diagonale à
1/4 po (0,6 cm) d’épaisseur
*B pendant 2
minutes
11 à 15 heures
Choueur Petites eurettes *B pendant 2
minutes
8 à 12 heures
Céleri Trancher en diagonale à
1/4 po (0,6 cm) d’épaisseur
– 5 à 9 heures
Tomates raisins Couper en 2 – 13 à 17 heures
Haricots verts Trancher à 1/4 po (0,6
cm) d’épaisseur
*B pendant 2
minutes
12 à 16 heures
Champignons Trancher à 1/4 po (0,6
cm) d’épaisseur
– 8 à 12 heures
Oignons Trancher à 1/4 po (0,6
cm) d’épaisseur
– 14 à 18 heures
Courge jaune ou
courgettes
Trancher à 1/4 po (0,6
cm) d’épaisseur
– 7 à 11 heures
Tomates Trancher à 1/4 po (0,6
cm) d’épaisseur
– 10 à 13 heures
TABLEAU DE DÉSHYDRATATION DES LÉGUMES À 55 °C (125 °F)
*B = Blanchir (Consulter « Comment blanchir » à la page 26)
**Les durées peuvent varier selon la teneur en eau des légumes.
INSTRUCTIONS EN FRANÇAIS
43
Page 44

DÉSHYDRATATION DES HERBES FRAÎCHES
Les grandes feuilles de certaines herbes, comme le basilic, la menthe, la sauge et
l’oseille, doivent être détachées de la tige avant le séchage.
• Les herbes, comme la coriandre, l’aneth, le persil et le romarin, doivent être séchées
avec les tiges pour faciliter le retrait après le séchage.
• Toujours rincer les herbes à l’eau froide et d’éliminer délicatement l’eau résiduelle
avec une essoreuse à salade ou des serviettes de papier. Les herbes doivent être
complètement sèches avant de commencer la déshydratation.
• Les petites herbes doivent être placées sur le tamis à mailles pour obtenir un séchage
optimal.
• Les herbes sèchent plus rapidement que les fruits, les légumes et les viandes marinées.
• Les herbes s’émiettent facilement une fois séchées.
• Les herbes doivent complètement refroidir avant de les stocker dans un contenant
hermétique.
FRESH HERB DEHYDRATING TIME**
Basilic 4 à 6 heures
Ciboulette
5 à 7 heures
Coriandre
4 à 6 heures
Menthe
5 à 7 heures
Persil
4 à 6 heures
Romarin
5 à 7 heures
TABLEAU DE DÉSHYDRATATION DES HERBES À 40 °C (100 °F)
**Les durées peuvent varier selon la teneur en eau des herbes.
DÉSHYDRATATION DU BŒUF
Se laver les mains à l’eau chaude savonneuse avant de préparer les tranches de bœuf.
• Choisir des coupes de viande maigre pour préparer le bœuf séché.
• Enlever tout le gras de la viande avant de la mariner.
• Envelopper la viande dans une pellicule plastique et congeler pendant au moins une
heure pour la trancher plus facilement avant de la mariner.
• Mariner dans un sac en plastique épais réutilisable ou un plat en verre. Ne pas utiliser
de plat métallique pour mariner pour éviter de modier la saveur et une réaction possible
de la marinade avec le plat métallique.
• Toujours mariner la viande pour bœuf séché au réfrigérateur. Égoutter et jeter la
marinade avant de commencer le séchage.
• Faire sécher la viande selon la recette ou suivre la préparation pour bœuf séché selon
les instructions d’emballage.
• Vérier l’état du bœuf séché après 4 heures et chaque 30 minutes suivante.
• Le bœuf séché sera sec lorsqu’il pourra être plié sans se casser.
• Éponger le bœuf séché avec une serviette de papier pour éliminer tout le gras de
surface et laisser complètement refroidir avant de stocker dans un contenant hermétique.
• Le bœuf séché, refroidi et stocké correctement peut se conserver jusqu’à 2 mois dans
un contenant hermétique et à la température ambiante.
• Toujours trancher la viande en sens contraire du grain pour obtenir des morceaux plus
tendres.
• Les tranches de viande ne doivent pas être plus épaisses que 1/4 po (0,6 cm), 4 po
(10,2 cm) de longueur et 2 po (5,1 cm) de largeur.
• Ne jamais mariner la viande à la température ambiante. Toujours mettre la viande à
mariner au réfrigérateur.
• Toujours suivre les instructions de la recette.
• Étiqueter et dater tous les contenants de bœuf séché.
INSTRUCTIONS EN FRANÇAIS
44
Page 45

ENTRETIEN ET NETTOYAGE
1. Débrancher l’appareil dès la n du séchage.
Laisser refroidir. FIGURE 16
2. Laver dans l’eau tiède savonneuse. FIGURE 17
3. NE PAS utiliser le réglage “SANI” du lave-vaisselle. Les températures du cycle “SANI”
peuvent endommager le produit. FIGURE 18
4. Essuyer la base avec un linge humide et
savonneux..
FIGURE 19
FIGURE 16
FIGURE 16
FIGURE 18
LAVABLE AU LAVE-VAISSELLE
FIGURE 19
INSTRUCTIONS EN FRANÇAIS
45
Page 46

PROBLÈME CAUSE POSSIBLE/SOLUTION
Les aliments ne
sèchent pas.
• La coupe des aliments est trop épaisse ou
présence de pelures. Suivre les recommandations des tableaux aux pages 28, 29 ou 30 ou
respecter la recette.
• Trop d’aliments sur chaque plateau. Retirer
quelques aliments et augmenter la durée de
séchage.
Séchage inégal des
aliments.
• Les aliments doivent être coupés uniformément.
• Les morceaux d’aliments inégaux peuvent
rouler pendant le cycle de séchage.
Les fruits ou les
légumes ramollissent
pendant le stockage.
• Les aliments n’ont pas été sufsamment
épongés. Faire sécher plus longtemps pour
éliminer l’excès d’humidité.
DÉPANNAGE
INSTRUCTIONS EN FRANÇAIS
46
Page 47

Weston Brands LLC garantit à l’ACHETEUR AU DÉTAIL D’ORIGINE de ce produit contre tout défaut en matériau
et en main-d’œuvre pendant un (1) an a partir de la date d’achat à condition qu’il soit utilisé conformément aux
directives imprimées qui y sont jointes.
La Carte de Garantie, avec une copie du reçu original, doivent être reçus par Weston Brands LLC dans les trente
(30) jours à partir de la date d’achat pour que la garantie puisse s’appliquer. Le manque d’envoyer la Carte de
Garantie complètement remplie avec une copie du reçu original annulera la garantie.
Le produit doit être livré à ou expédié franco de port à Weston Brands LLC pour les services de garantie, soit dans
son emballage d’origine ou un emballage similaire offrant un degré de protection équivalent. Les dommages causés
par l’expédition ne sont pas la responsabilité de la société. Weston Brands LLC charge 35,00 $ par heure pour frais
de service. REMARQUE : Aucune réparation ne sera commencée sans l’autorisation du client. Les frais d’expédition
de retour seront ajoutés à la facture de réparation.
Avant de renvoyer le produit pour une réparation sous garantie, bien nettoyer le produit pour qu’il soit exempt de
toute particule alimentaire ou autres débris. Si l’acheteur ne respecte pas cette consigne, le produit lui sera renvoyé
sans avoir été réparé. Dans certains, la somme de 50 dollars sera facturée pour le nettoyage.
Weston Brands LLC réparera (ou à sa discrétion, remplacera) le produit sans frais, si à l’opinion de la société, il a
été prouvé être défectueux en matériau et en main d’œuvre dans la période de garantie.
Des remplacements neufs ou remis en état pour les pièces d’usine défectueuses seront fournis pendant un (1)
an à partir de la date d’achat. Les pièces de remplacement sont garanties pour le reste de la période de garantie
originale.
Pour les réparations non garanties, veuillez contacter le Service à la clientèle de Weston Brands LLC au numéro
sans frais 1-800-814-4895, du lundi au vendredi, de 8h00 à 17h00 ET (en dehors des États-Unis : 001-440-638-
3131) pour obtenir une Autorisation de retour d’article (Numéro RMA). Weston Brands LLC refusera tous les retours
qui ne contiennent pas ce numéro. NE PAS RENVOYER CET APPAREIL SANS L’AUTORISATION CORRECTE
DE Weston Brands LLC.
LIMITATIONS : La garantie est annulée si le produit est utilisé pour toute raison autre que pour laquelle il est
conçu. Le produit ne doit pas avoir été antérieurement modié, réparé, ou entretenu par quelqu’un autre que
Weston Brands LLC. Le cas échéant, le numéro de série ne doit pas être modié ou enlevé. Le produit ne doit pas
avoir été soumis à un accident en transit ou pendant qu’il est en la possession du client, mal utilisé, mal traité, ou
utilisé contrairement aux directives contenues dans le manuel d’utilisation. Ceci comprend la défaillance causée
par la négligence d’un entretien raisonnable et nécessaire, une tension de secteur incorrecte et des catastrophes
naturelles. Cette garantie n’est pas transférable et s’applique seulement aux ventes américaines et canadiennes.
À l’exception des cas où la loi en vigueur l’interdit, aucune autre garantie, expresse ou implicite, y compris les
garanties relatives au caractère adéquat pour la commercialisation ou un usage particulier, ne s’appliquera à ce
produit. Weston Brands LLC ne sera en aucun cas responsable des dommages indirects liés au dit produit et
Weston Brands LLC n’a aucune obligation ni responsabilité autre que celles expressément établies dans la présente,
et n’autorise aucun représentant ou autre personne à les assumer pour lui. Toutes garanties implicites applicables
sont aussi limitées à la période d’un (1) an de la garantie limitée.
Cette garantie couvre seulement le produit et ses pièces spéciques, pas les aliments ou autres produits traités
dans celui-ci. Weston n’est pas responsable des pièces manquantes ou endommagées pour les articles réduits/
en solde ou les articles naux de vente où le vendeur peut ne pas être en mesure de garantir l’ensemble de la
fonctionnalité ou l’intégralité de l’unité.
DÉCOUPEZ LE LONG DE LA LIGNE POINTILLÉE ET ENVOYEZ CETTE CARTE DE GARANTIE AVEC UNE
COPIE DE VOTRE REÇU D’ACHAT ORIGINAL À :
Weston Brands LLC / WARRANTY
20365 Progress Drive, Strongsville, OH 44149 USA
INFORMATION SUR LA GARANTIE
CONSERVEZ CETTE INFORMATION SUR LA GARANTIE POUR VOS DOSSIERS!
Nom du Client:
Adresse:
Province/Code postal/Région:
Numéro de téléphone:
Adresse de courrier électronique:
Date d’achat d’origine:
No de modèle du produit:
No de série (s’il y a lieu):
J’ai lu les informations relatives à la garantie. Initiales ici:
CARTE DE GARANTIE
ENVOYEZ CETTE CARTE DE GARANTIE AVEC UNE COPIE DE VOTRE REÇU D’ACHAT ORIGINAL À:
WESTON BRANDS LLC / WARRANTY, 20365 PROGRESS DRIVE, STRONGSVILLE, OH 44149 USA
Copie du reçu incluse
Page 48

ATTENTION!
PLEASE INSPECT THIS PACKAGE THOROUGHLY FOR MISSING PARTS OR ANY PRODUCT DAMAGE.
IF YOUR PRODUCT CONTAINS SHIPPING DAMAGE, PLEASE CONTACT RETAILER FOR ASSISTANCE.
For all other questions regarding product usage, missing parts, product damage, difculty or warranty activation,
please contact the Weston Brands Customer Service Team:
8:00 am to 5:00 pm ET, Monday thru Friday
CustomerService@WestonProducts.com
U.S. Residents Customer Service Line: 1-800-814-4895 (Outside U.S. Call: 001-440-638-3131)
Weston Brands LLC, Cleveland, Ohio 44149
WestonProducts.com
Please DO NOT return this item to the retailer before contacting
Weston Brands Customer Service.
SAVE THESE INSTRUCTIONS!
Refer to them often and use them to instruct others.
ATTENTION!
VEUILLEZ INSPECTER CET EMBALLAGE AVEC SOIN POUR Y DÉTECTER
TOUTE PIÈCE MANQUANTE OU ENDOMMAGÉE.
SI DES PIÈCES ONT ÉTÉ ENDOMMAGÉES PENDANT LE TRANSPORT, VEUILLEZ
COMMUNIQUER AVEC LE DÉTAILLANT POUR OBTENIR DE L’AIDE.
Pour toutes les autres questions concernant l’utilisation du produit, les pièces manquantes, les problèmes ou
l’activation de la garantie, veuillez communiquer avec l’équipe du service clientèle des produits Weston:
de 8:00 à 17:00 HNE, du lundi au vendredi.
CustomerService@WestonProducts.com
Numéro de téléphone du service clientèle pour les résidents des É.-U. : 1-440-638-3131
Numéro de téléphone à l’extérieur des É.-U. : 001-440-638-3131 Weston Brands LLC,
Weston Brands LLC, Cleveland, Ohio 44149
WestonProducts.com
Veuillez communiquer avec le service clientèle des produits Weston AVANT de retourner cet appareil au détaillant.
CONSERVER CES DIRECTIVES!
Veuillez les consulter fréquemment et les utiliser pour la formation.
¡ATENCIÓN!
Revise completamente el envase y compruebe que no falten partes o que algún producto esté dañado.
si el producto está dañado por el transporte, solicite asistencia al distribuidor.
Para todas aquellas preguntas referentes al uso del producto, partes faltantes, daño del producto, dicultad
o activación de la garantía, comuníquese con el equipo de servicio al cliente de weston Brands:
desde las 8:00 am hasta las 5:00 pm ET, de lunes a viernes
CustomerService@WestonProducts.com
Línea de Servicio al Cliente para Residentes de EE.UU.: 1.800.814.4895 (Fuera de EE.UU., llame al: 001-
1-440-638-3131) Weston Brands LLC, Cleveland, Ohio 44149
WestonProducts.com
NO devuelva este artículo al vendedor minorista antes de comunicarse con Servicio al Cliente de
Weston Brands.
¡GUARDE ESTAS INSTRUCCIONES!
Consulte estas instrucciones y úselas para enseñar sobre el uso de este producto a otras personas.
 Loading...