

Page 1
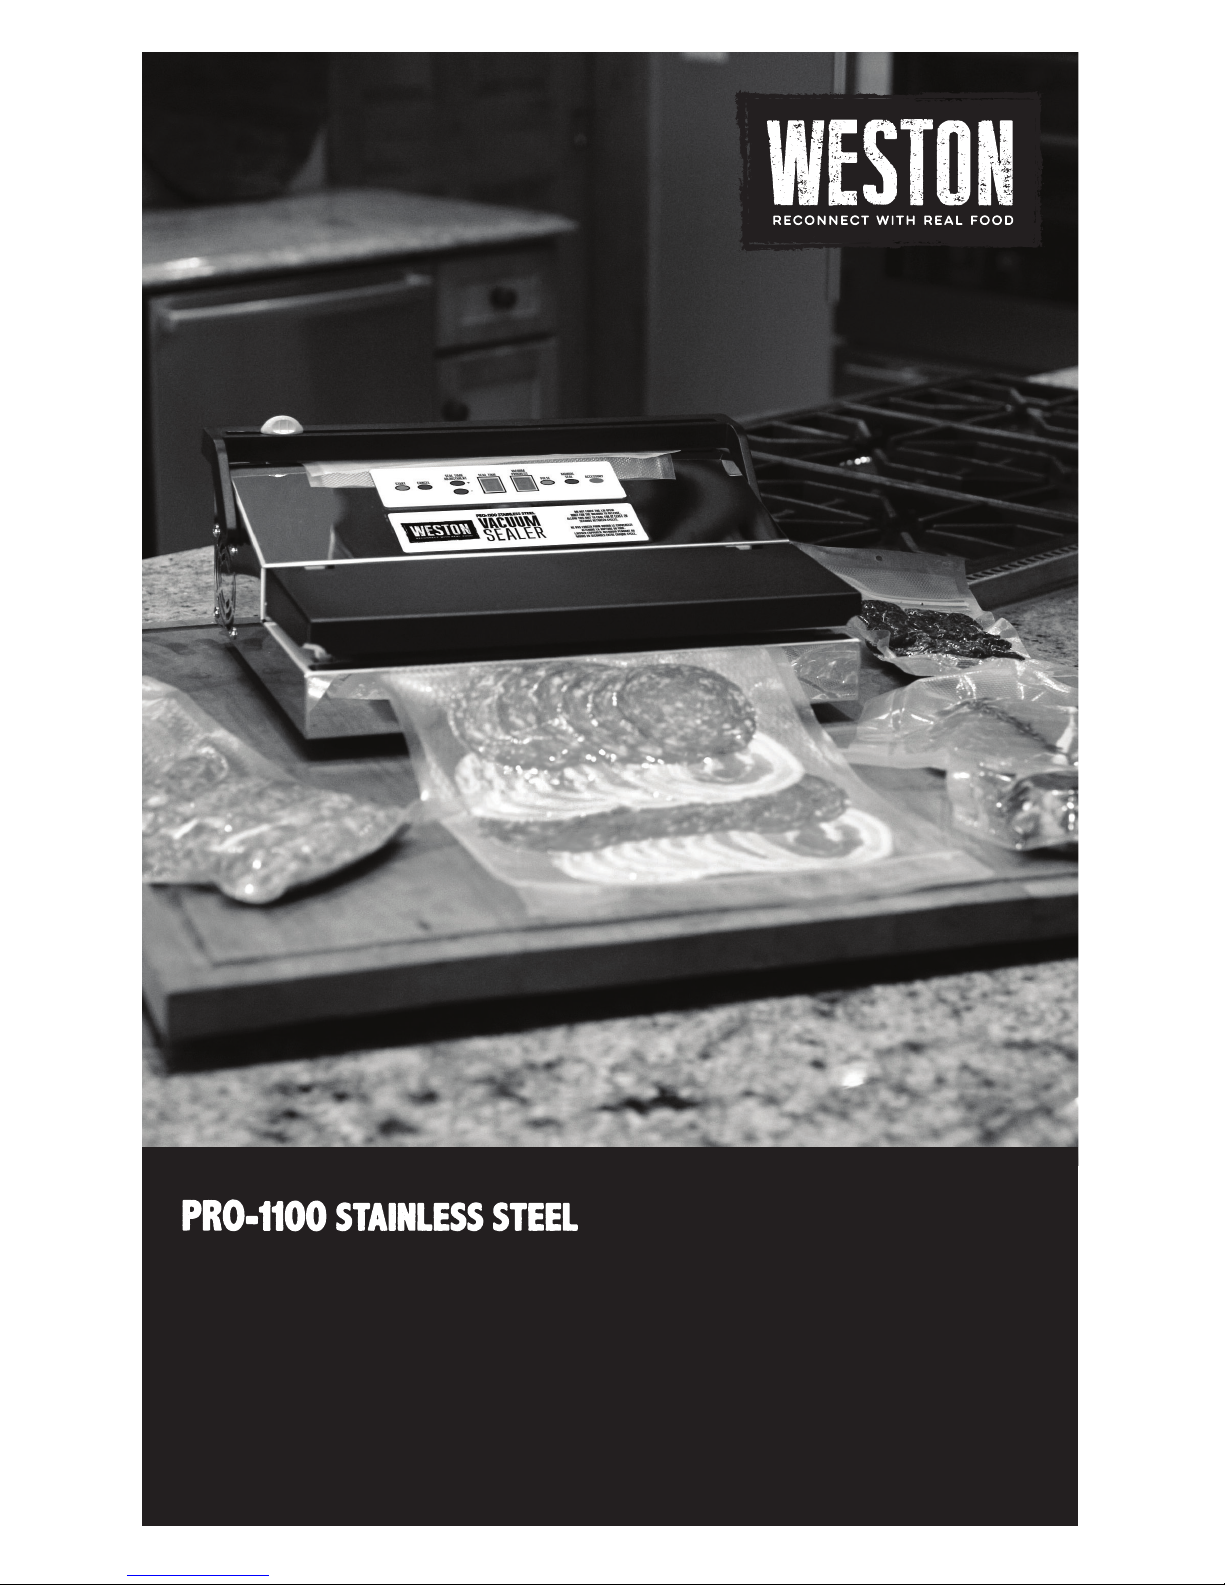
VACUUM SEALER
65-0601-W
DUE TO CONSTANT FACTORY IMPROVEMENTS, THE PRODUCT PICTURED MIGHT DIFFER
SLIGHTLY FROM THE PRODUCT IN THIS BOX. 020915
Page 2

TABLE OF CONTENTS / ÍNDICE / TABLE DES MATIÈRES
2
3
4-5
6
6
7
7
7
7
8
8
9
10
11
12
13
14
15-16
17
18
19
20
22
24
26-27
28
28
29
29
29
29
30
30
31
32
33
34
35
36
37-38
39
40
41
42
44
46
48-49
50
50
51
51
51
51
52
52
53
54
55
56
57
58
59-60
61
62
63
64
66
GENERAL SAFETY RULES
COMPONENT LIST
PROTECTIVE TAPE
COOLING FAN
VACUUM CHAMBER SEALS
LIMIT SWITCH
THERMAL OVERLOAD PROTECTOR
ASSEMBLY
GROUNDING
CLEANING
CONTROL PANEL
USING THE ROLL HOLDER & CUTTER
INITIAL TESTING OF THE BAG SEAL
AUTOMATIC MODE OPERATION
MANUAL MODE OPERATION
MAINTENANCE KIT INSTRUCTIONS
TROUBLESHOOTING
REPLACING THE FUSE
STORAGE LIFESPAN GUIDELINES
VACUUM PACKAGING GUIDELINES
FOOD SAFETY
WARRANTY INFORMATION
NORMAS GENERALES DE SEGURIDAD
LISTA DE COMPONENTES
CINTA PROTECTORA
VENTILADOR DE REFRIGERACIÓN
SELLOS DE LA CÁMARA DE VACÍO
INTERRUPTOR DE LÍMITE
PROTECTOR DE SOBRECARGA TÉERMICA
ENSAMBLADO
INSTRUCCIONES PARA HACER TIERRA
INSTRUCCIONES DE CUIDAD Y LIMPIEZA
PANEL DE CONTROL
UTILIZACIÓN DEL PORTAROLLOS Y EL CORTADOR
PRUEBA INICIAL DE SELLADO DE BOLSAS
OPERACIÓN EN MODO AUTOMÁTICO
FUNCIONAMIENTO EN MODO MANUAL
INSTRUCIONES DEL KIT DE MANTENIMIENTO
SOLUCIÓN DE PROBLEMAS
SUSTITUCIÓN DEL FUSIBLE
PAUTAS SOBRE LA VIDA EN ALMACENAMIENTO
LINEAMIENTOS PARA EMPACAR AL VACÍO
SEGURIDAD DE LOS ALIMENTOS
INFORMACIÓN DE GARANTÍA
IMPORTANTED RÈGLES DE SÉCURITÉ
DESCRIPTION DE LA PIÈCE
RUBAN PROTECTEUR
VENTILATEUR
JOINTS DE LA CHAMBRE SOUS VIDE
INTERRUPTEUR DE FIN DE COURSE
PROTECTION CONTRE LES SURCHARGES THERMIQUES
ASSEMBLY
INSTRUCTIONS DE MISE A LA TERRE
INSTRUCTIONS D’ENTRETIEN ET DE NETTOYAGE
PANNEAU DE COMMANDE
UTILISATION DU PORTE-ROULEAU ET DU COUPE-SAC
TEST INTIAL DU SCELLEMENT D’UN SAC
FONCTIONNEMENT EN MODE AUTOMATIQUE
FONCTIONNEMENT EN MODE MANUEL
DIRECTIVES POUR LA TROUSSE D’ENTRETIEN
DÉPANNAGE
REMPLACEMENT SU FUSIBLE
GUIDE DE CONSERVATION DES ALIMENTS EMBALLÉS
GUIDE D’EMBALLAGE SOUS VIDE
SÉCURITÉ ALIMENTAIRE
INFORMATION SUR LA GARANTIE
Page 3

1. ALWAYS DISCONNECT Vacuum
Sealer from power source before
servicing, changing accessories or
cleaning the unit.
2. Plug the Vacuum Sealer into a
standard 120 Volt, 60 Hz wall outlet.
Avoid using extension cords.
3. DO NOT USE the Vacuum Sealer
if the Power Cord, Plug or any other
parts are damaged. If the Power
Cord or the Vacuum Sealer is
damaged, call Customer Service.
DO NOT ATTEMPT TO REPLACE
THE CORD. Be sure to not allow
the Power Cord to drape into your
work area. Check that all parts are
operating properly, and perform the
intended functions. Check for any
other conditions that may affect the
operation.
4. NEVER use any accessories
or parts from other manufacturers.
Doing so will VOID YOUR
WARRANTY and may cause re,
electrical shock or injury.
5. Reduce risk of unintentional
starting. Make sure the Power
Switch is in the “OFF” position before
attaching to the power source.
6. KEEP FINGERS CLEAR of the
Heat Sealing Bar and Seal Bar Tape
AT ALL TIMES, these areas become
HOT. Doing so may cause serious
injury.
7. DO NOT take this appliance
apart; doing so will VOID YOUR
WARRANTY and may result in
personal injury.
GENERAL SAFETY RULES
READ AND FULLY UNDERSTAND ALL INSTRUCTIONS AND WARNINGS
PRIOR TO USING THIS UNIT. YOUR SAFETY IS MOST IMPORTANT!
FAILURE TO COMPLY WITH PROCEDURES AND SAFE GUARDS MAY
RESULT IN SERIOUS INJURY OR PROPERTY DAMAGE. REMEMBER:
YOUR PERSONAL SAFETY IS YOUR RESPONSIBILITY!
8 TO PROTECT AGAINST RISK
OF ELECTRICAL SHOCK: DO NOT
SUBMERGE THE VACUUM SEALER
INTO WATER OR LIQUID. BE
SURE THE VACUUM SEALER IS
DISCONNECTED FROM THE POWER
SOURCE BEFORE CLEANING. Follow
the “Cleaning Instructions” in this booklet.
NEVER rinse appliance Vacuum Sealer
under tap.
9. NEVER LEAVE THE VACUUM
SEALER UNATTENDED. Be safe,
DISCONNECT the Vacuum Sealer from
power source before leaving the work
area. Close supervision is necessary
when any appliance is used near children.
This appliance is NOT to be used by
children.
10. DO NOT let the Power Cord hang
over edge of work surface.
11. Be sure the Vacuum Sealer is on
a stable work surface. Be sure all the
Vacuum Sealer Feet are stable.
12. DO NOT use the Vacuum Sealer
outdoors.
13. DO NOT use the Vacuum Sealer
while under the inuence of drugs,
medications or alcohol.
14. The Vacuum Sealer is ONLY
intended to be used with VACUUM
BAGS. For best results, only use the
recommended vacuum bags. DO NOT
USE HOUSEHOLD BAGS! Any other
uses of the Vacuum Sealer, other than
the uses described in this booklet, could
potentially damage the appliance and
void the warranty!
SAVE THESE INSTRUCTIONS
3
ENGLISH INSTRUCTIONS
Page 4
1
2
3
4
5
6
7
8
9
10
11
12
Vacuum Lid
16
Power
Panel
Upper
Housing
Lower Housing
Vacuum
Chamber
I
O
13
14
ENGLISH INSTRUCTIONS
4
Page 5

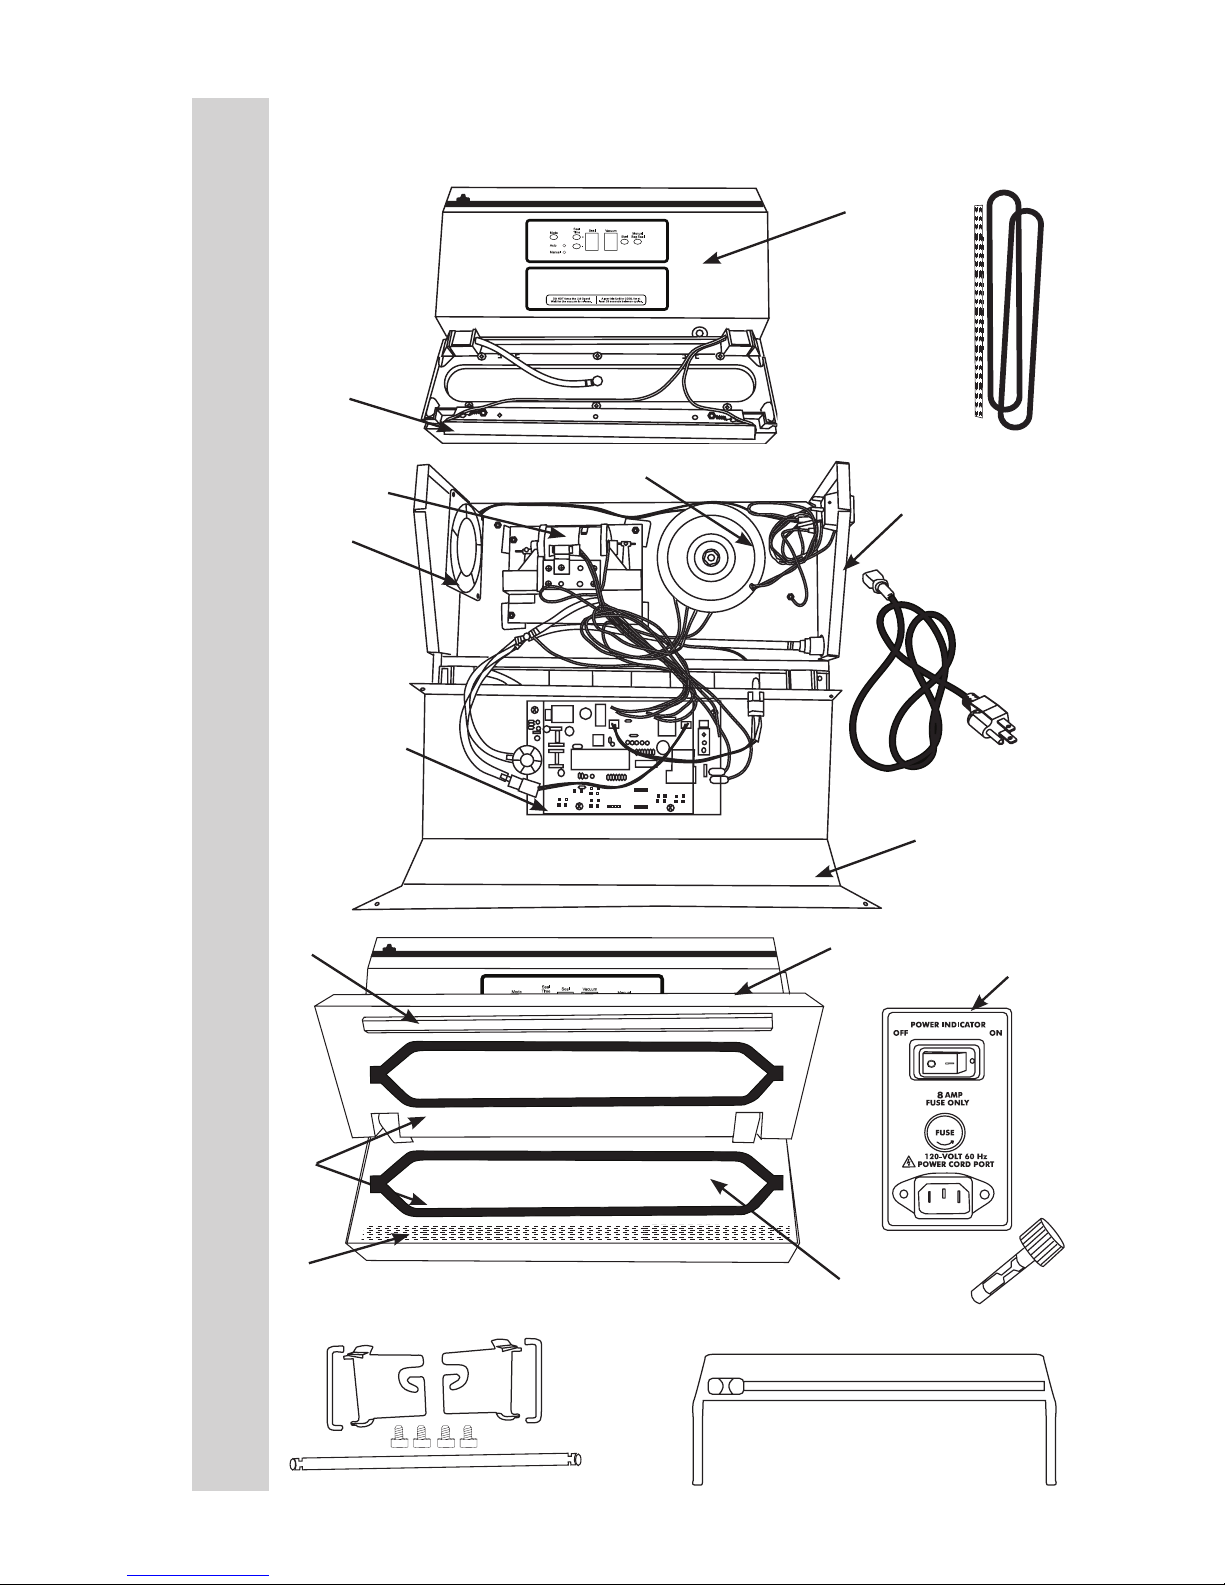
COMPONENT LIST
If any components of this unit are broken, the unit does not operate properly or you
need a replacement instruction manual, visit us on the web at
WestonProducts.com
Or call Weston Products LLC Toll Free at 1-800-814-4895
Monday thru Friday 8:00am-5:00pm ET. Outside the U.S. call 001-440-638-3131
DIAGRAM NUMBER PART DESCRIPTION PART NUMBER
1 SEAL WIRE 08-0627
2 SEAL BAR INSULATOR 08-0625
3 POWER CORD 08-0402
4 FUSE HOLDER 08-0604
5 8-AMP FUSE 08-0605
6 VACUUM PUMP 08-0639
7 TRANSFORMER 08-0641
8 FAN 08-0643
9 CIRCUIT BOARD 65-0638
VACUUM SENSOR 65-0643
10 SEAL BAR TAPE (BLACK) SEE MAINTENANCE
KIT
11 CHAMBER SEAL (2) SEE MAINTENANCE
KIT
12 VACUUM SEALER MAINTENANCE KIT: SEAL
BAR TAPE (BLACK) CHAMBER SEALS(2)
65-0701
13 ROLL HOLDER KIT INCLUDES: ROLL HOLDER
ROD ROD HOLDING ARMS (2) BRACKETS WITH
SCREWS (2 BRACKETS, 4 SCREWS)
65-0639
14 BAG CUTTER KIT INCLUDES: BLADE BLADE
HOLDER
65-0640
15 BLADE 65-0641
16 CONTROL PANEL 65-0642
ENGLISH INSTRUCTIONS
5
Page 6
The Vacuum Sealer has an Internal Cooling Fan that runs whenever
the unit is plugged in and turned on. To save energy, turn the unit
“OFF” and unplug the Power Cord when not in use.
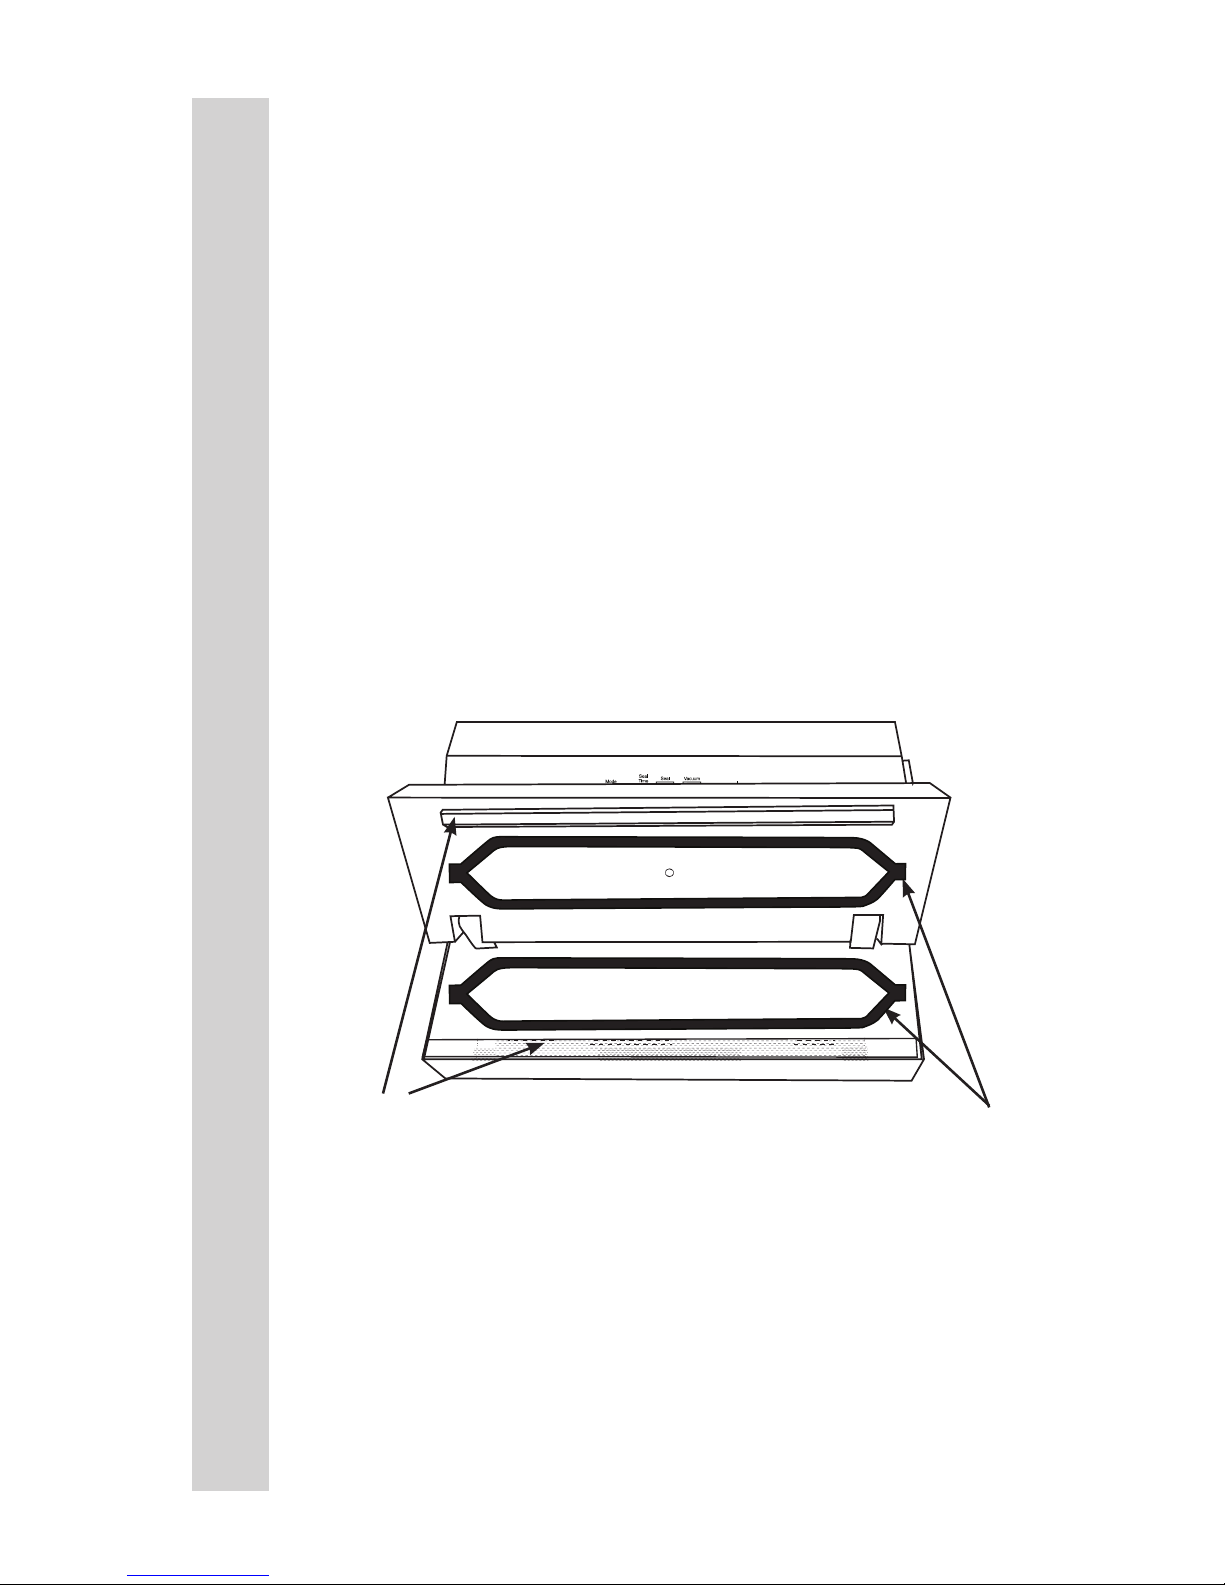
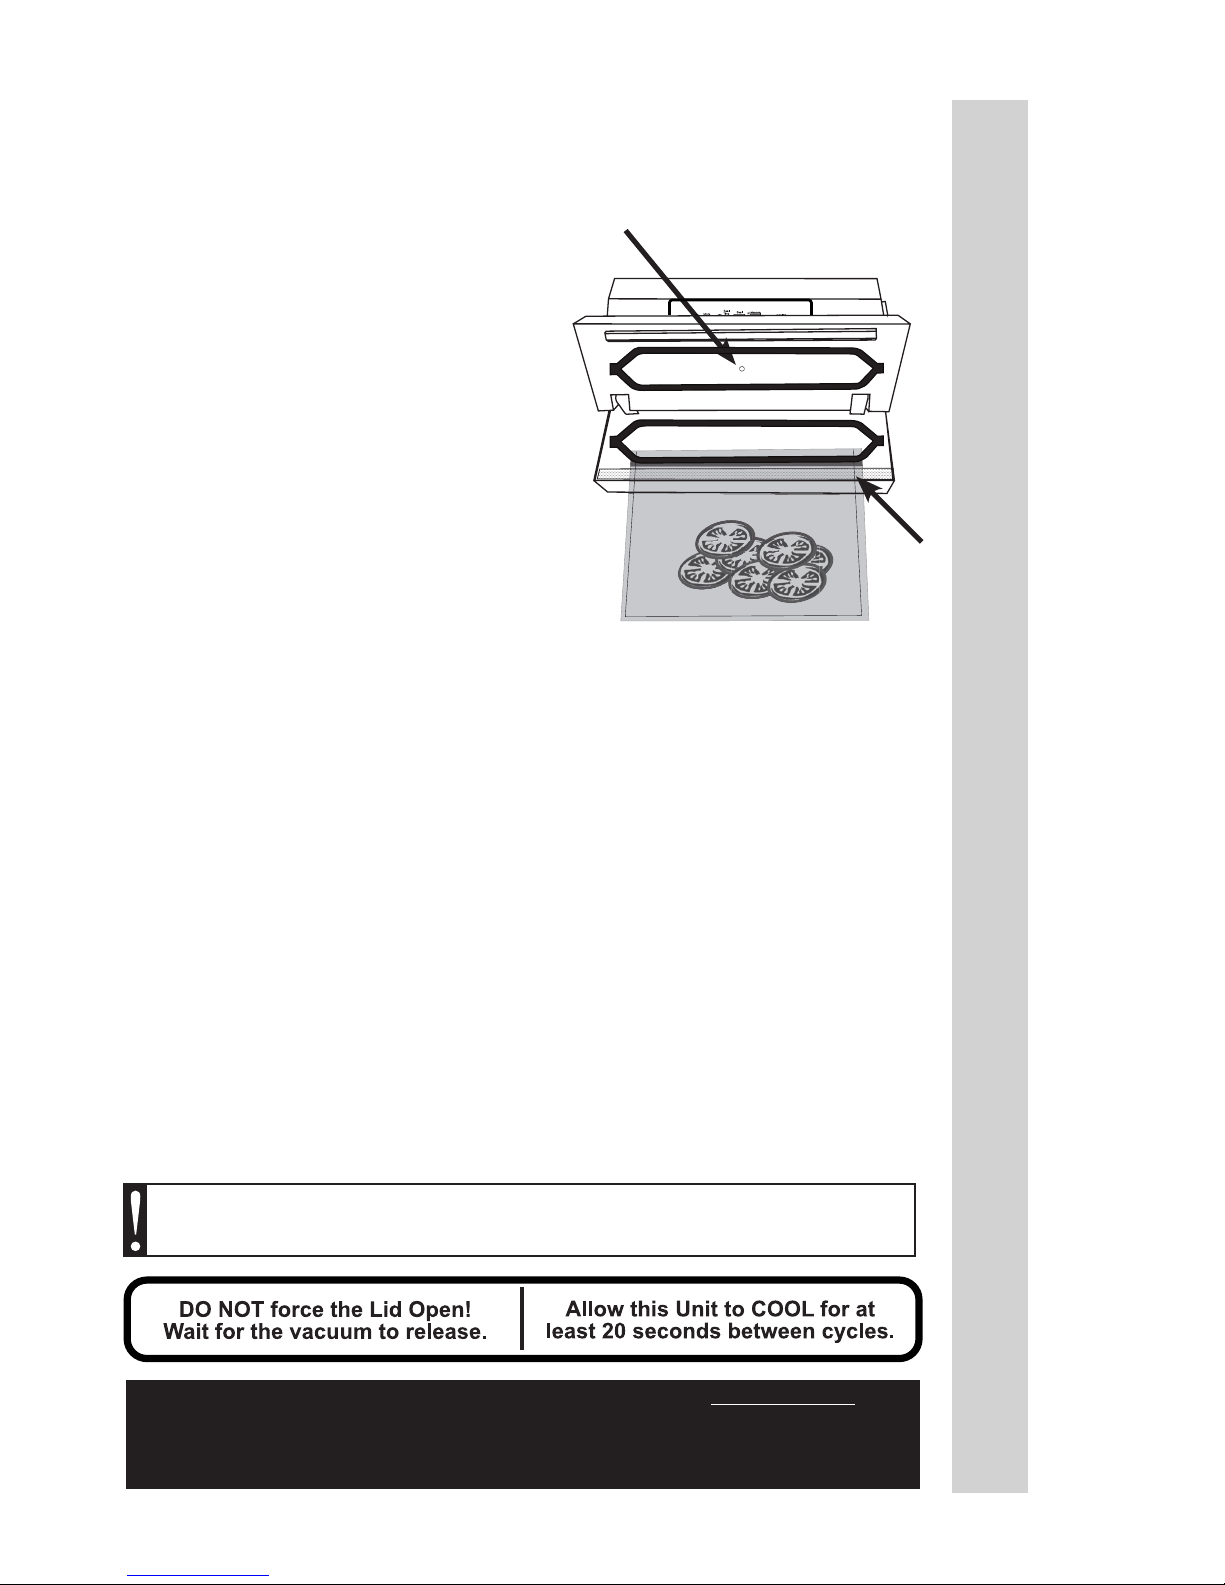
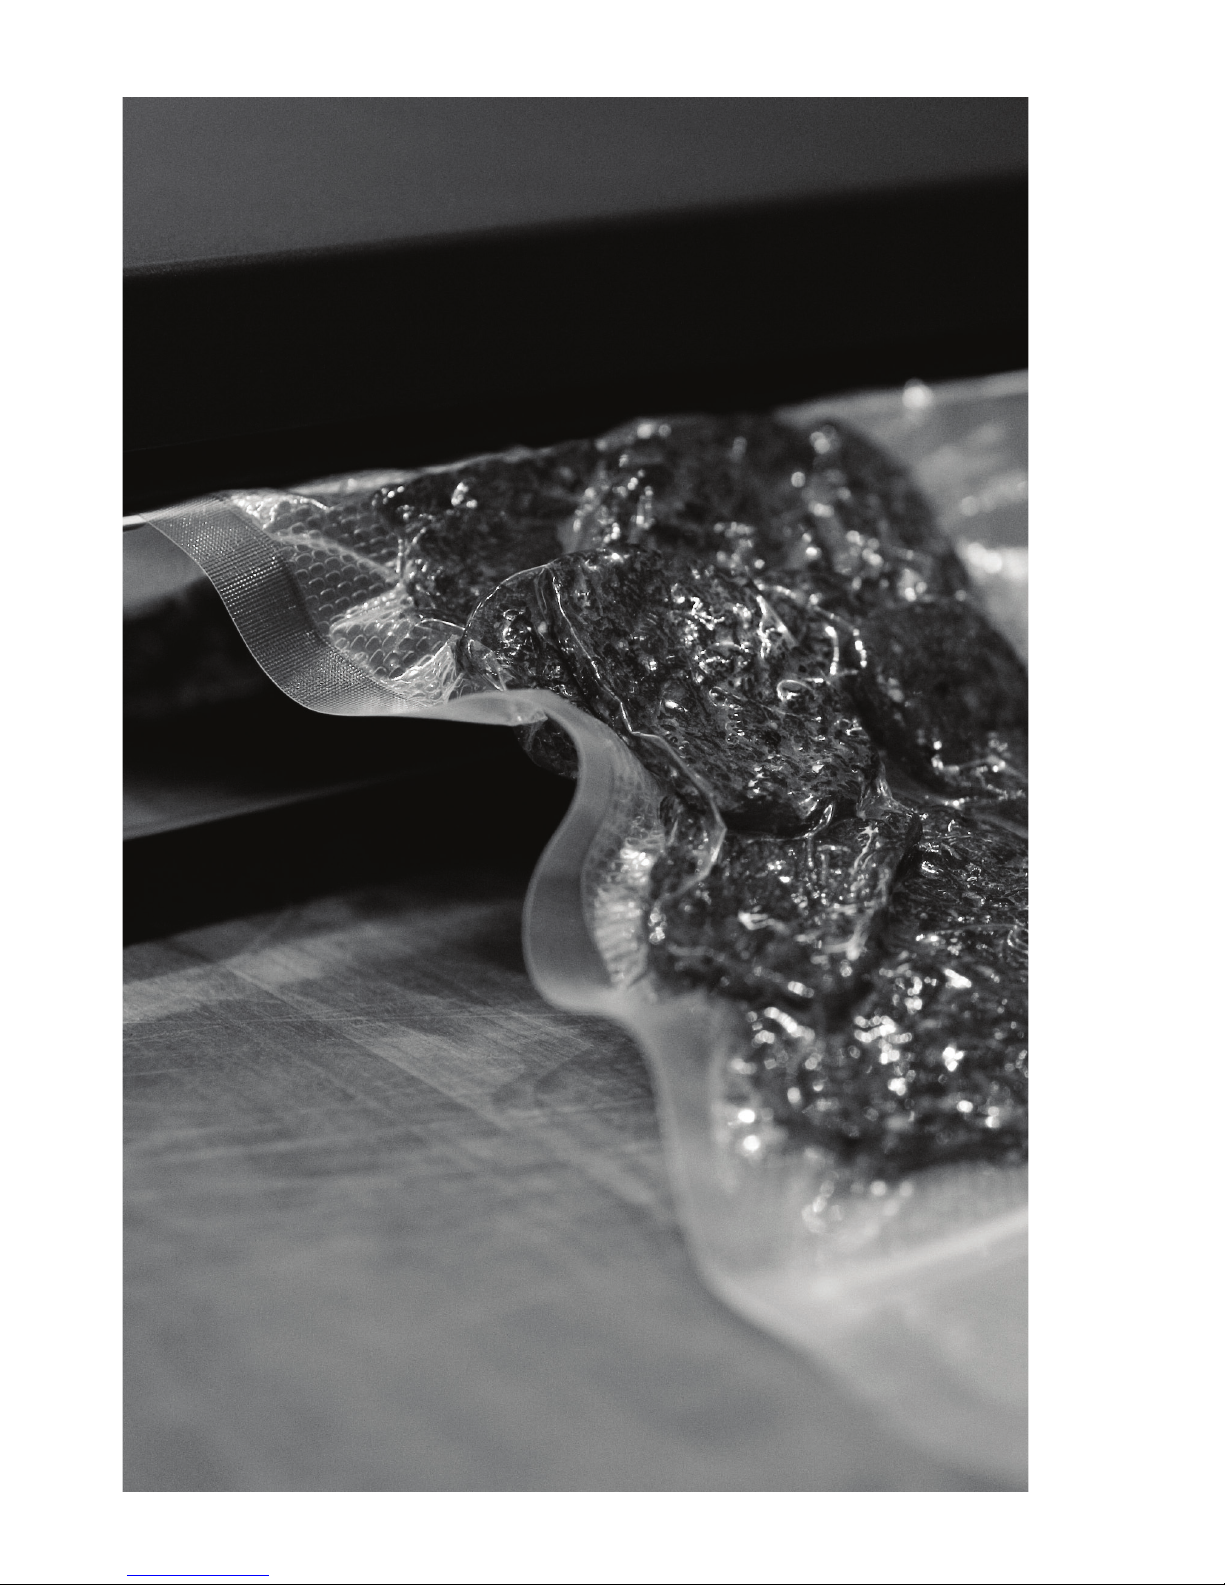
SEAL BAR TAPE
DO NOT
REMOVE!
The Seal Bar Heating Element is covered with Seal Bar Tape to
protect vacuum bags during sealing (Figure 1). DO NOT remove the
Seal Bar Tape. See the “Maintenance Kit” section of this manual for
information on replacing the Seal Bar Tape, if necessary.
OVAL VACUUM CHAMBER SEALS
DO NOT REMOVE!
BEFORE YOU START BAG SEALING
Before using the Vacuum Sealer, familiarize yourself with the bag sealing
functions. A vacuum bag is sealed when the Seal Bar Heating Element is
activated and heats the bag to its melting point, which then permanently
welds the bag layers together, sealing the bag shut. This appliance comes
pre-set from the factory to engage the Seal Bar Heating Element for 3
seconds. This is the correct amount of time required to fully seal Vacuum
Bags. Different brands of vacuum bags may require slightly more or slightly
less sealing time.
Test seal a couple of bags to be sure that the Seal Time is set properly. The
Seal Time may need to be increased (+) or decreased (-) to optimally seal a
bag.
ENGLISH INSTRUCTIONS
6
PROTECTIVE TAPE
There is one factory installed
strip of Seal Bar Tape on the Vacuum Sealer.
DO NOT REMOVE THE TAPE!
FIGURE 1
COOLING FAN
Page 7
There are two factory-installed Oval Vacuum Chamber Seals on the Vacuum
Sealer. When the Vacuum Lid is closed and downward force applied, they
form an airtight seal so the Vacuum Chamber can be evacuated.
The Oval Vacuum Chamber Seals may wear over time and require
replacement. See the “Maintenance Kit” section of this manual for
information on replacing the Oval Vacuum Chamber Seals, if necessary.
THERMAL OVERLOAD PROTECTOR
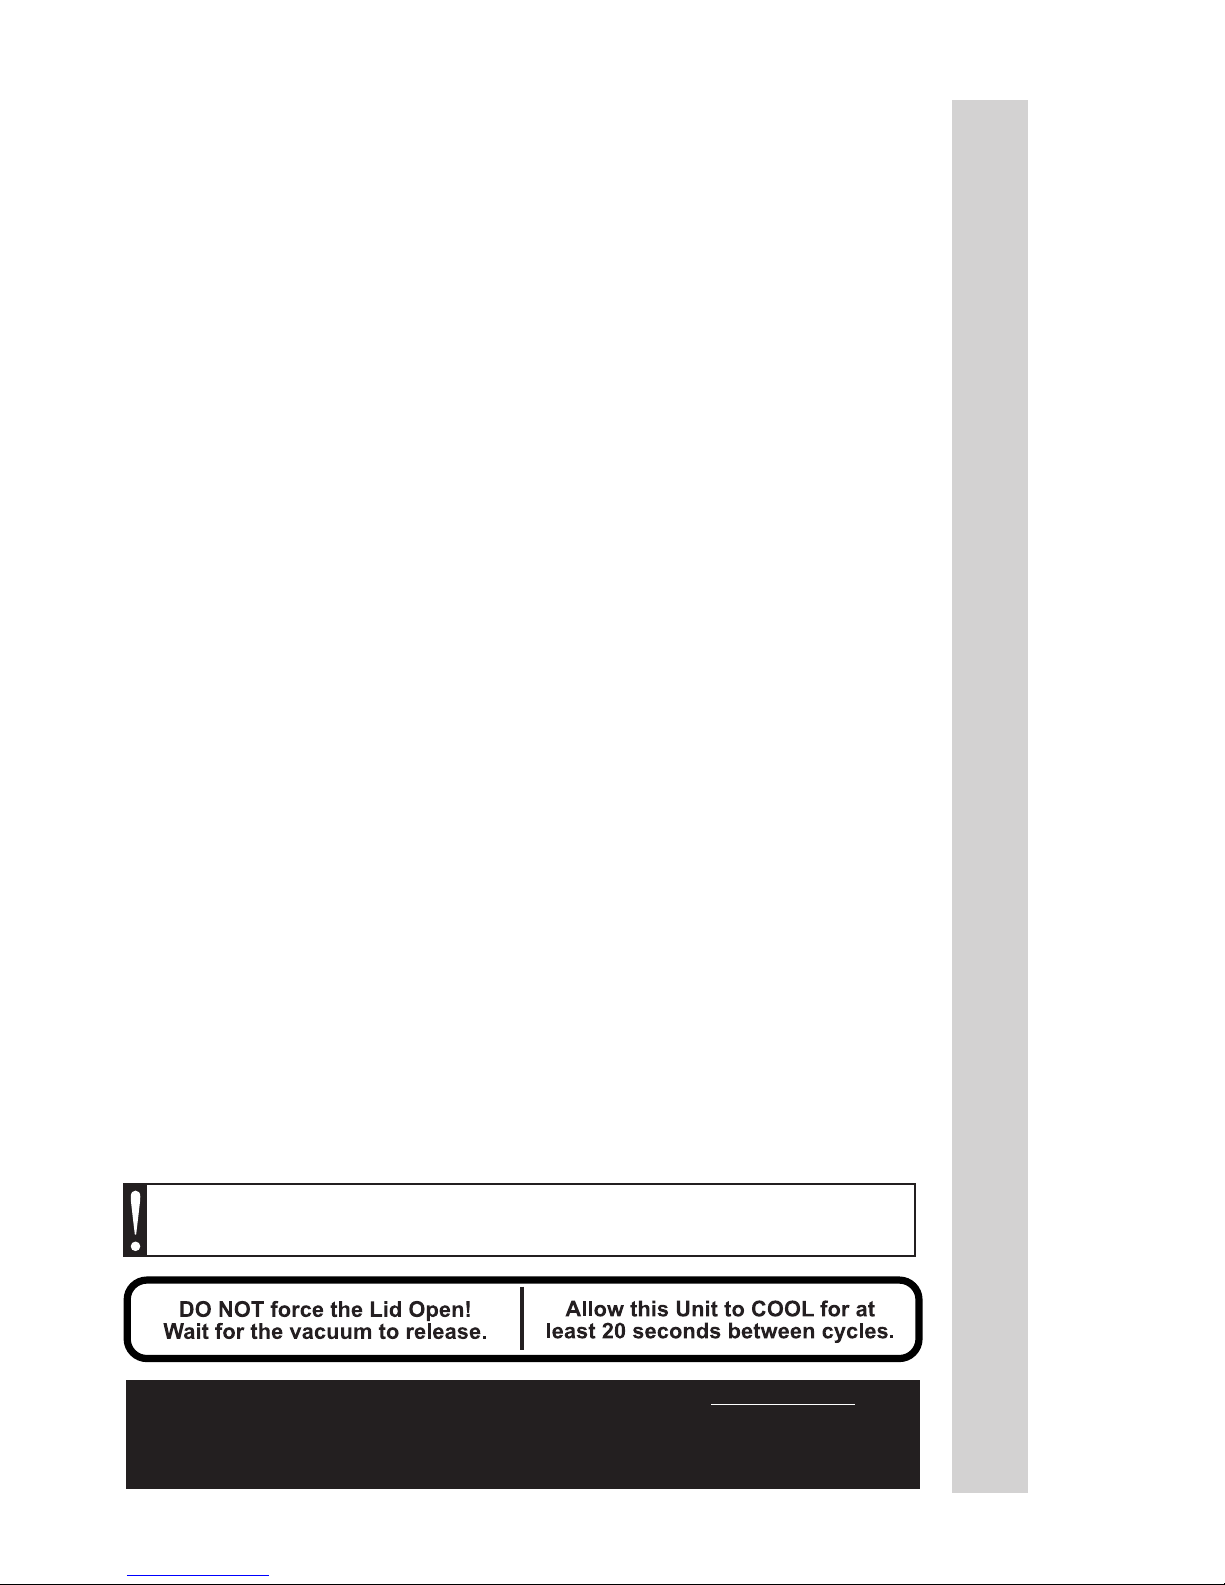
The Vacuum Sealer will automatically shut down if it overheats. If this occurs,
turn the unit off and open the Vacuum Lid. Resume normal operation after
the unit cools or about 20 minutes.
To help prevent overheating, wait at least 20 seconds between cycles with the
Vacuum Lid open. Avoid touching the Seal Bar Tape. The Seal Bar Tape
will remain hot for a brief period of time after each sealing cycle.
LIMIT SWITCH
The Vacuum Sealer is equipped with a switch to prevent actuation of the Seal
Bar Heating Element in manual mode when the Vacuum Lid is open. When
the Vacuum Lid is closed, heat made by the Seal Bar Heating Element is
absorbed by the vacuum bag and Vacuum Lid Seal.
When the Vacuum Lid is open, there is no means to dissipate the heat and
unit damage may occur.
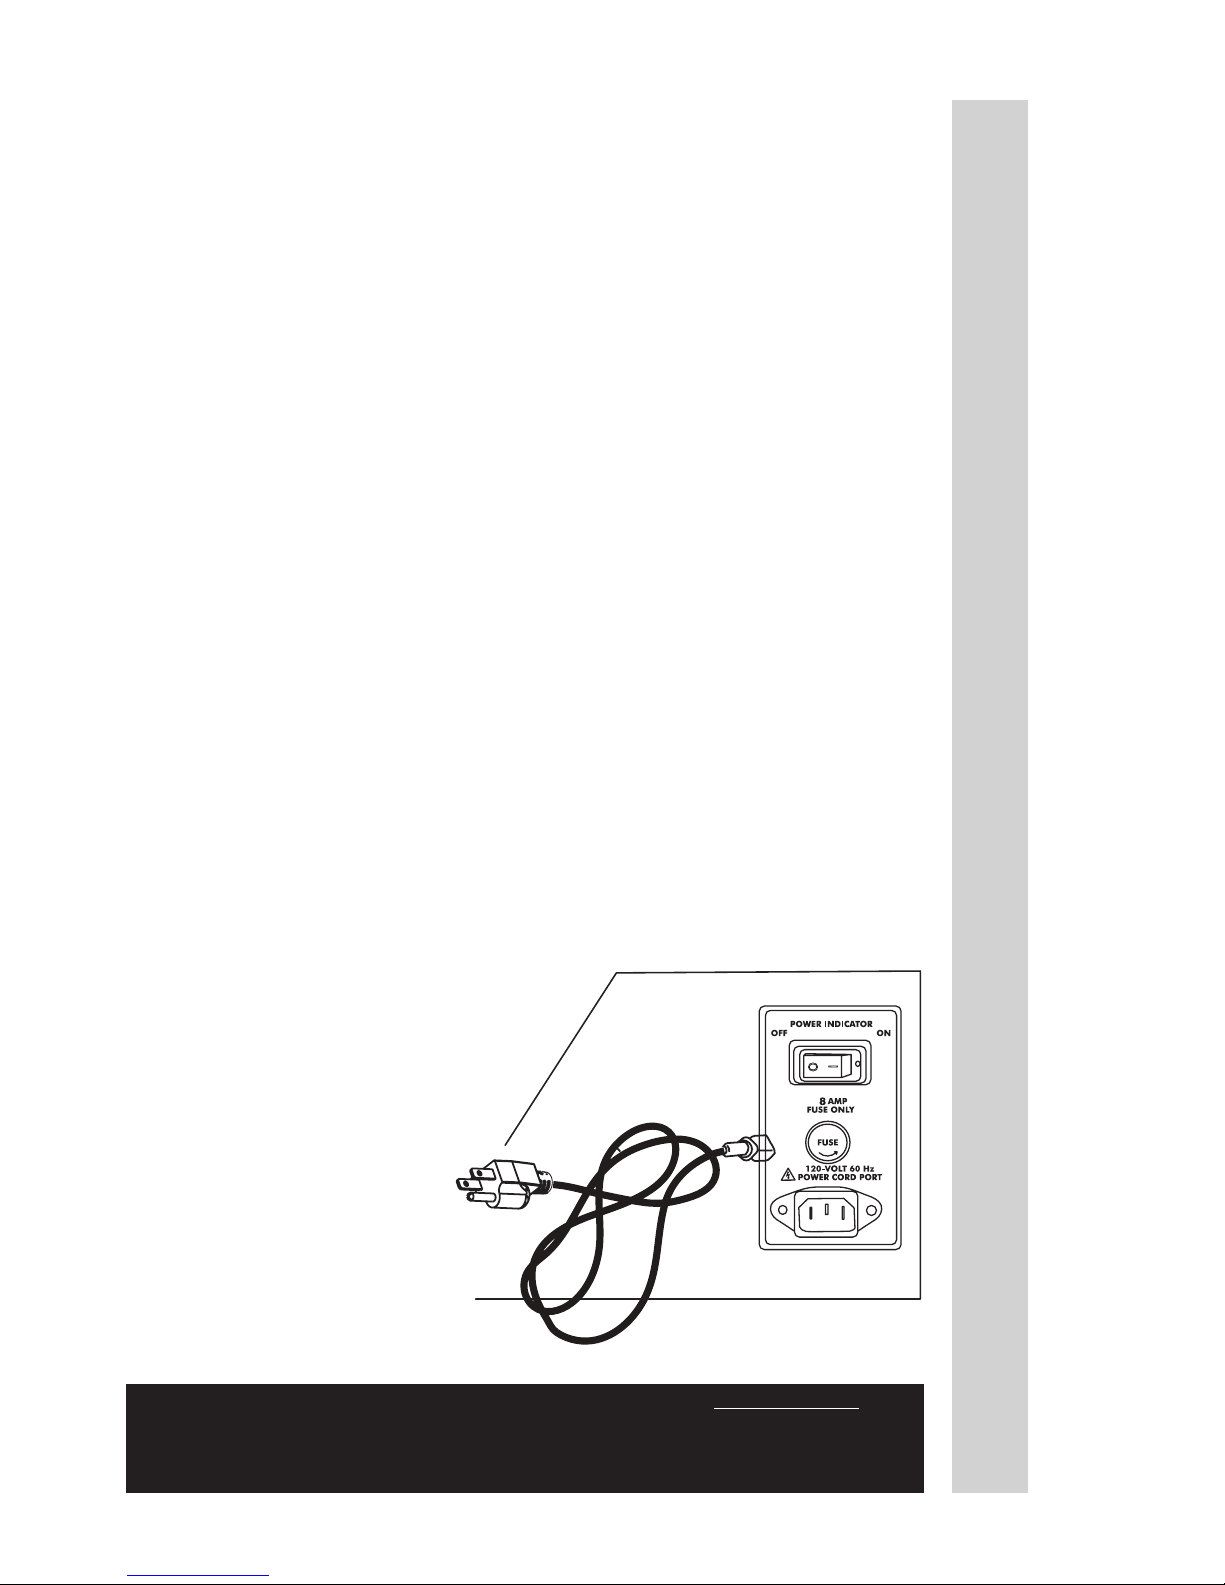
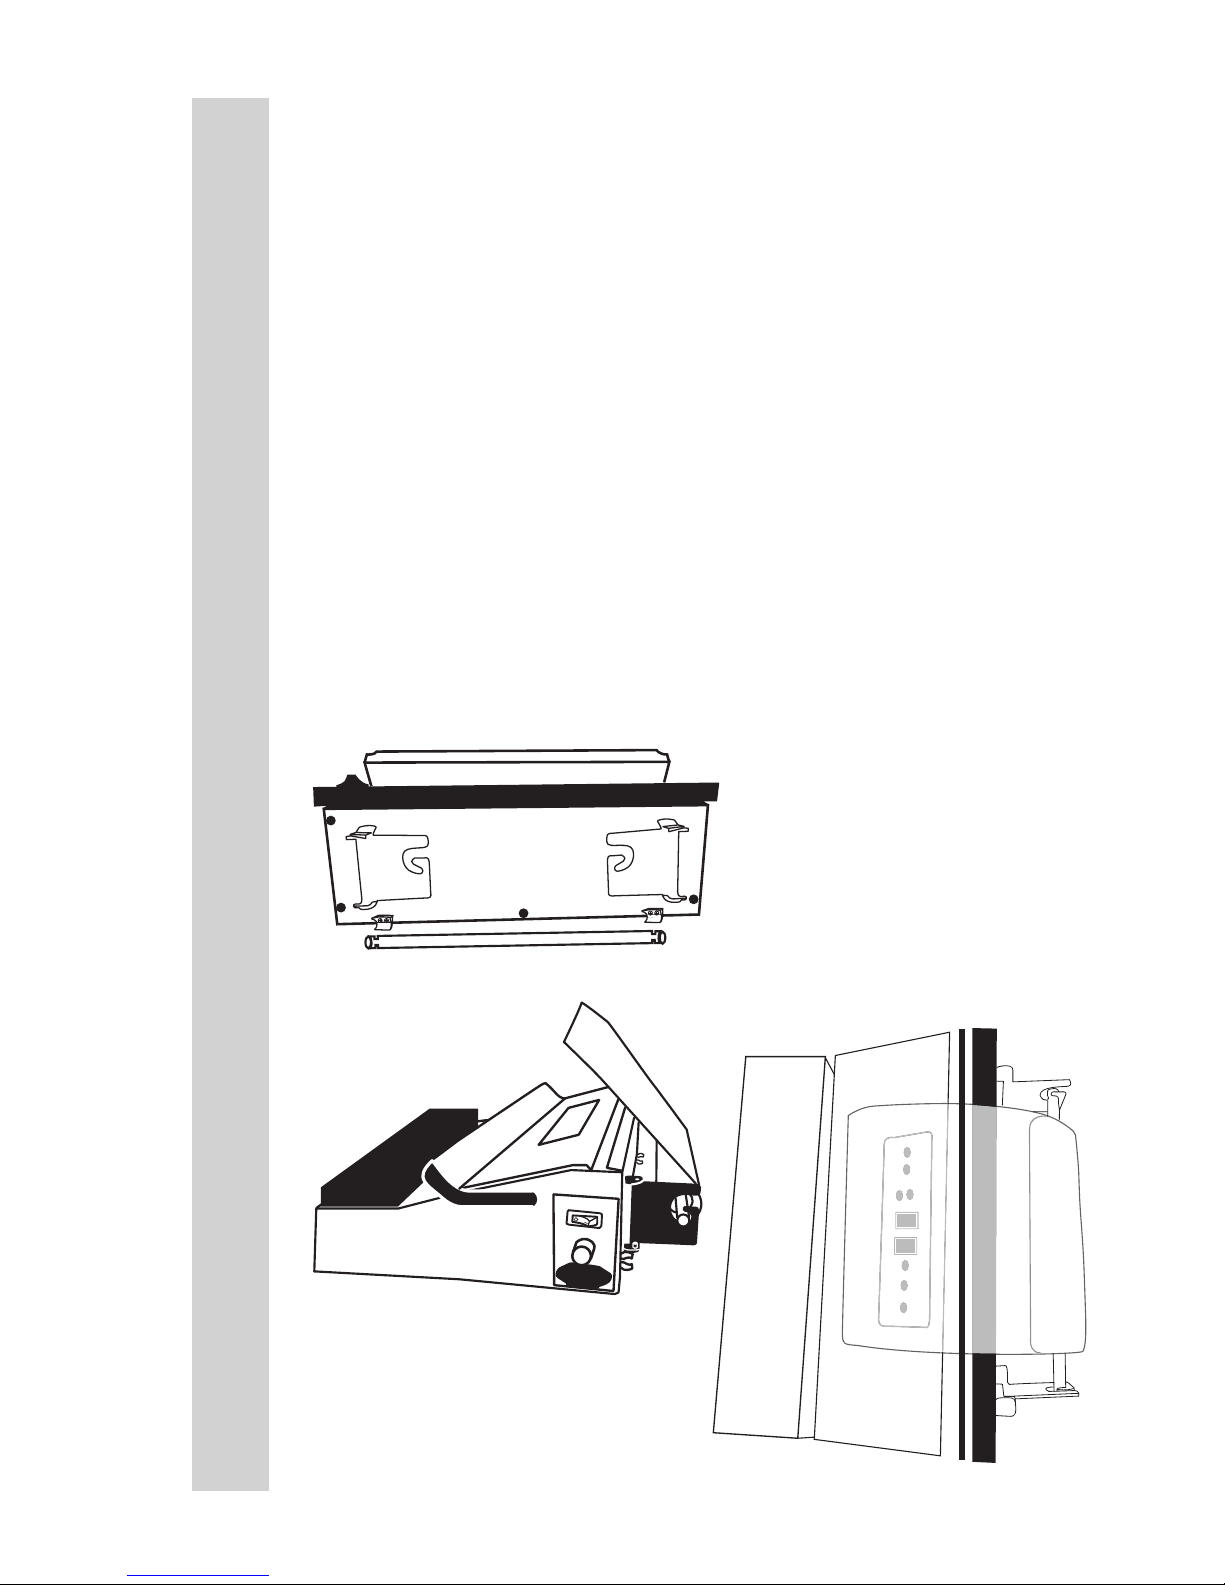
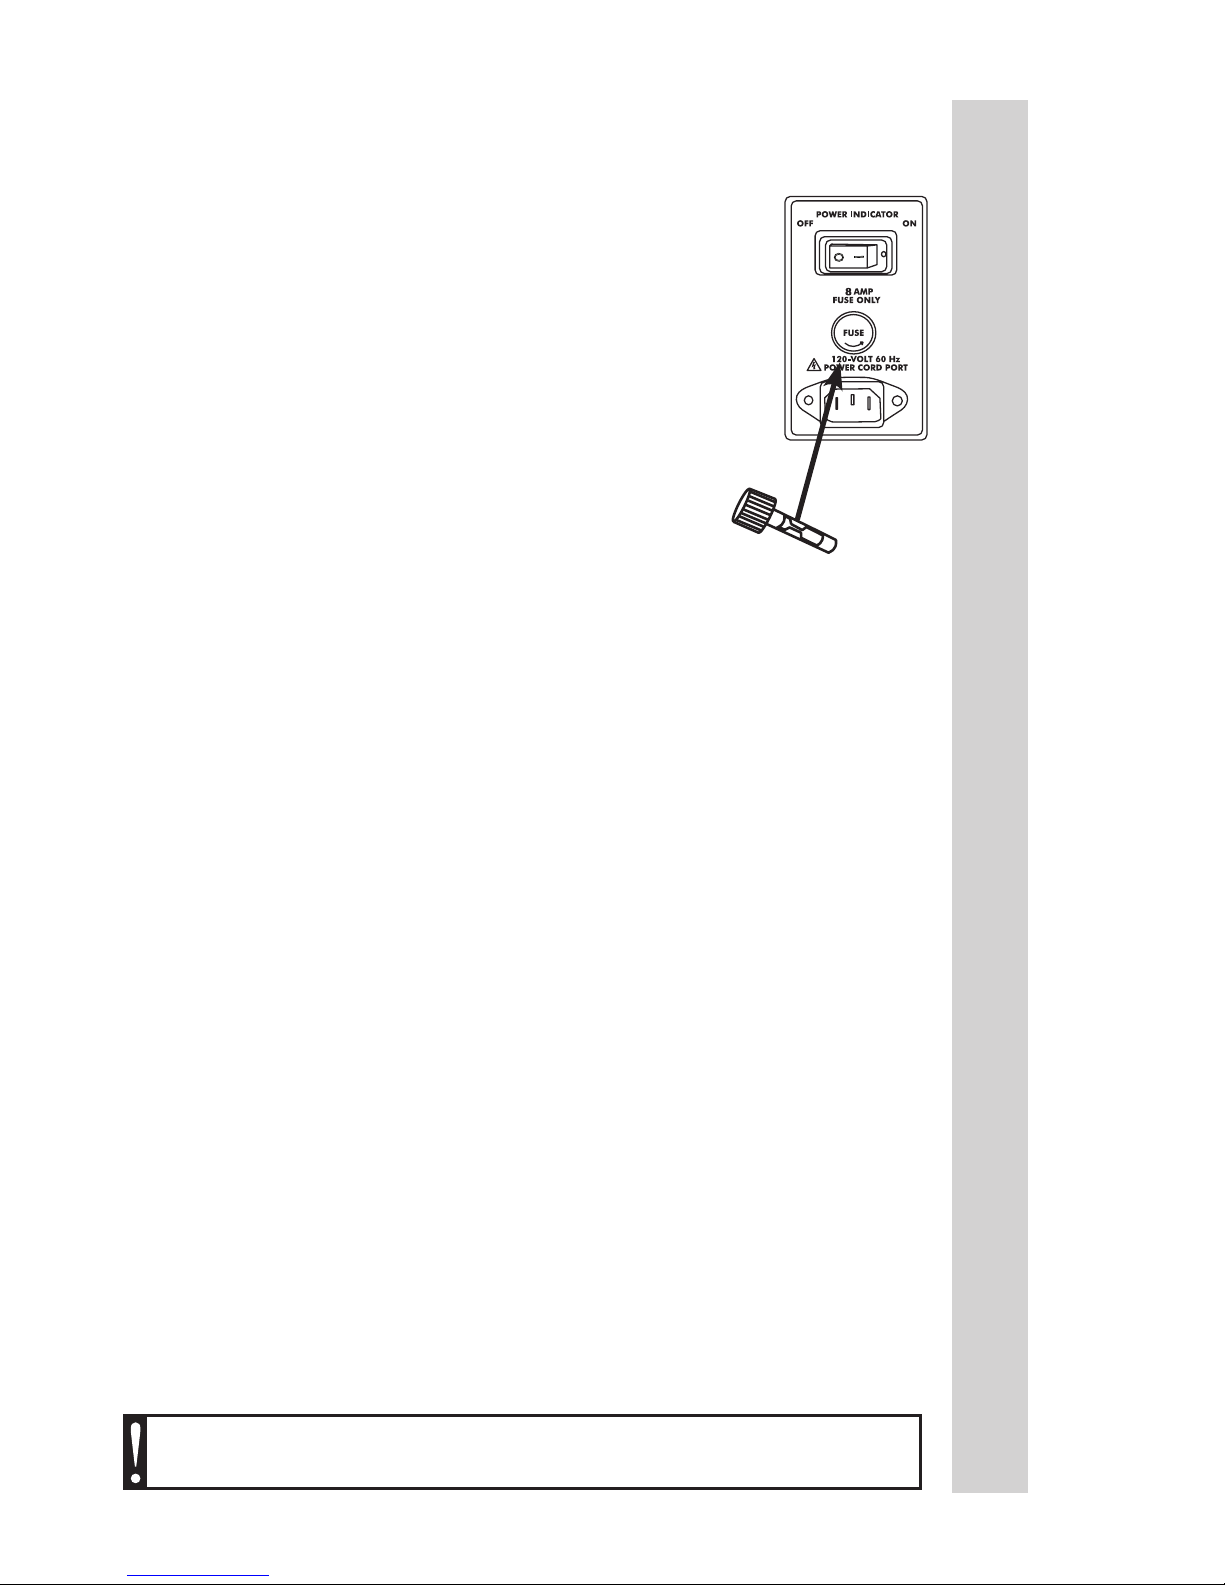
ASSEMBLY
• Place the Vacuum Sealer on
a at, dry surface.
• Plug the female end of the
Power Cord into the Power
Supply Port on the right side of
the appliance (Figure 2).
• Plug the male end of the
Power Cord into a standard,
grounded 120-volt household
electrical outlet. DO NOT
attempt to modify the plug to t
into an unsuitable outlet.
FIGURE 2
I
O
NOTE: The Vacuum Sealer is ONLY intended to be used with VACUUM BAGS. For
best results, only use the recommended vacuum bags with an embossed or mesh lining.
DO NOT USE HOUSEHOLD BAGS! Any other uses of the Vacuum Sealer, other than
the uses described in this booklet, could potentially damage the appliance and void the
warranty!
ENGLISH INSTRUCTIONS
7
VACUUM CHAMBER SEALS
Page 8

· NEVER IMMERSE the Vacuum Sealer in water or other liquid.
· Make sure the Vacuum Sealer has completely cooled before cleaning it.
· Wipe clean all outside surfaces including the Plastic Vacuum Chamber and
Vacuum Lid with a damp cloth or paper towel. Most household spray cleaners
are safe to use. Avoid spraying directly into the vent on the left side of the
unit. DO NOT use abrasive cleansers!
· Be careful while cleaning not to peel or damage the strip of Seal Bar Tape
covering the Seal Bar Heating Element.
· Dry all surfaces and close the Vacuum Lid before storing the Vacuum
Sealer.
GROUNDING
This appliance must be grounded while in use
to protect the operator from electrical shock.
The appliance is equipped with a 3-conductor
cord and a 3-prong grounding type plug to t
the proper grounding-type receptacle. The
appliance has a plug that looks like Figure
3. An adapter, Figure 4, should be used
for connecting Figure 3 plugs to two-prong
receptacles. The grounding tab which extends
from the adapter must be connected to a
permanent ground such as a properly grounded
outlet box as shown in Figure 5 using a metal
screw.
EXTENSION CORDS
Use only 3-wire extension cords which have
3-prong grounding-type plugs and a 3-pole
cord connector that accepts the plug from the
appliance. Use only extension cords having
an electrical rating not less than the rating of
the appliance. Do not use damaged extension
cords. Examine extension cord before using and
replace if damaged. Do not abuse extension
cord and do not yank on any cord to disconnect.
Keep cord away from heat and sharp edges.
FIGURE 3
FIGURE 4
FIGURE 5
Circuit
Grounding
Conductor
Grounding
Prong
Metal
Grounding
Screw
Cover of
Grounded
Outlet Box
Grounding
Means
AA2220
GROUNDING INSTRUCTIONS
WARNING! Before cleaning, assembling or disassembling the
appliance, make sure the appliance is OFF and the PLUG IS REMOVED
FROM THE OUTLET/POWER SOURCE!
CLEANING INSTRUCTIONS
ENGLISH INSTRUCTIONS
8
Page 9
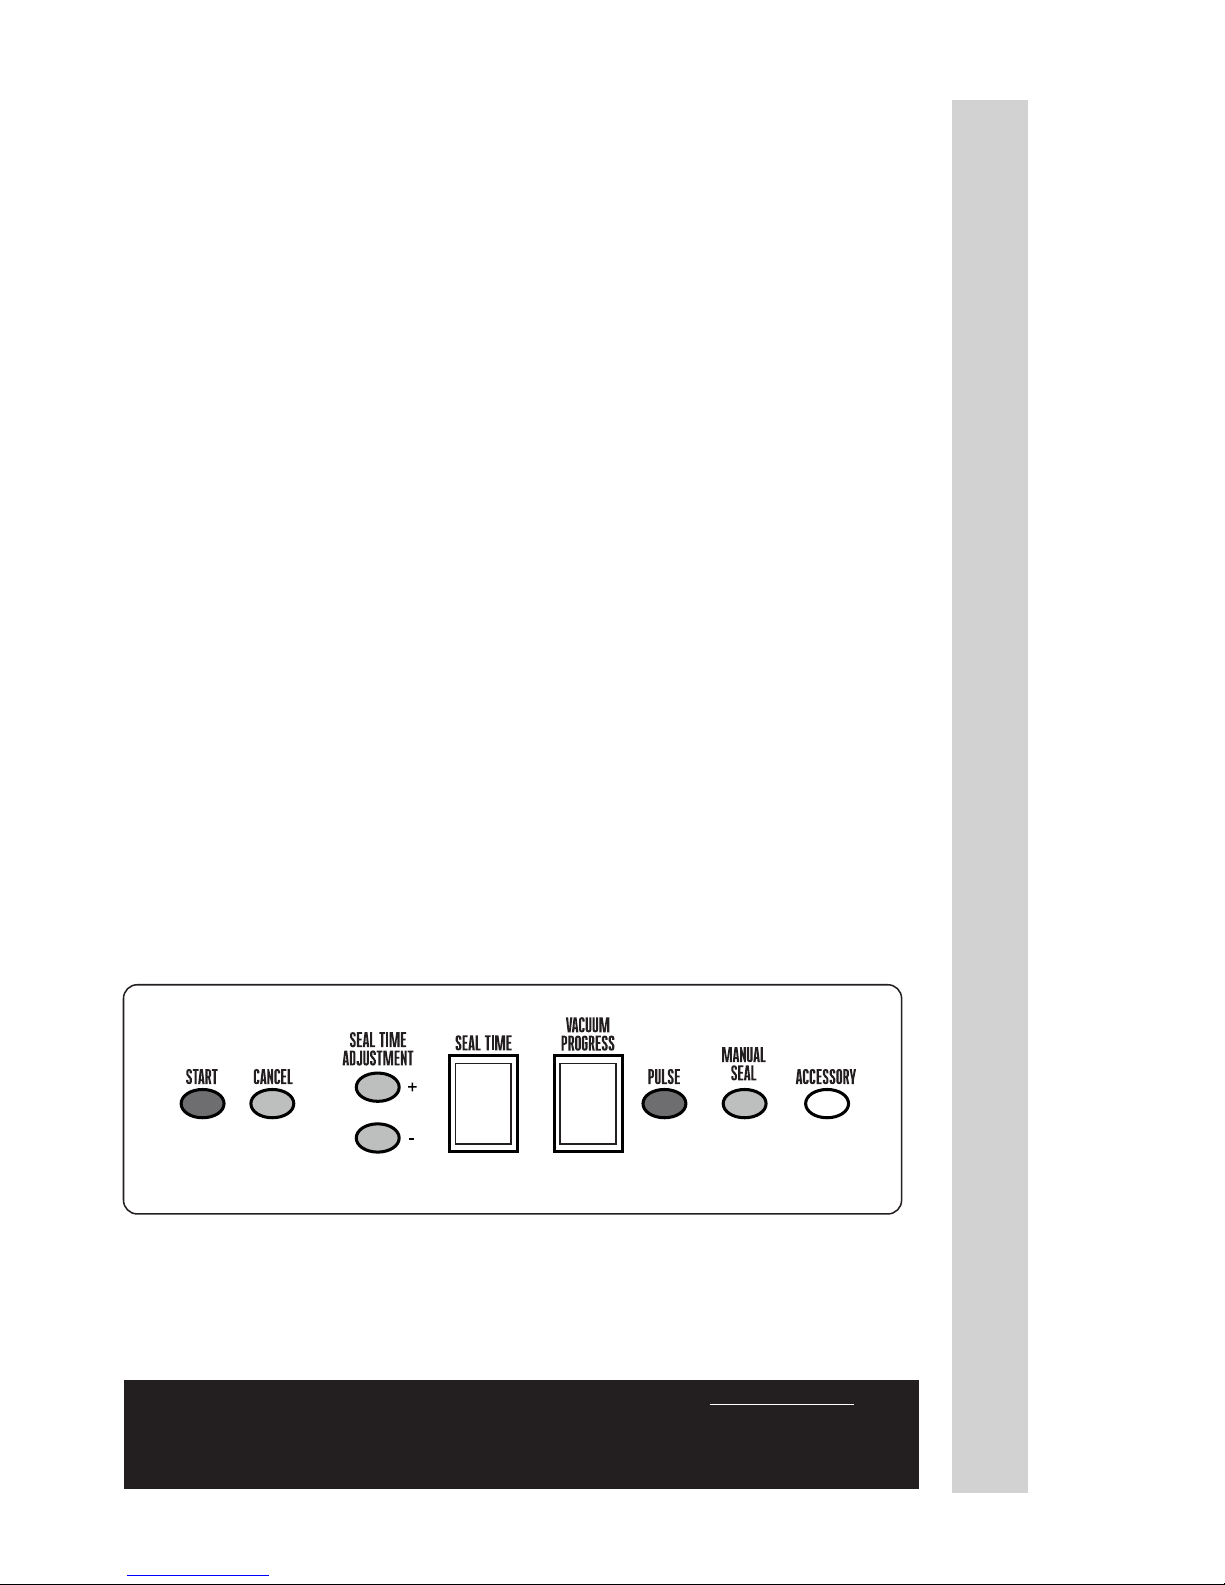
· Start Button: The Start Button starts the 2-Piston Vacuum Pump, which
engages the air evacuation process.
· Cancel Button: This button is used to stop the vacuum cycle at any time.
· Seal Time + and - Buttons: The Seal Time Button adjusts the number of
seconds that the Sealing Bar will apply heat to create the bag’s seal. The
optimal time for different brands of bags can be adjusted using the Plus (+) or
Minus (-) Buttons. See the “Bag Sealing” section in this booklet for further
information on sealing vacuum bags.
· Seal Window: The numeric LED Seal Window indicates the number of
seconds that the Sealing Bar will be activated to apply heat to the bag that
creates the seal. Once the Seal Bar is activated, the display will countdown
to “0”. See the “Bag Sealing” section in this booklet for further information on
sealing vacuum bags.
· Vacuum Window: The numeric LED Vacuum Window indicates the level of
vacuum that the Vacuum Sealer has attained. The display will count up from
“0” to “9”.
·
Pulse Button: The pulse button is for sealing liquids or delicate items, lettnig
you control the vacuum process. When the bag is prepared, press the pulse
button as many times as necessary until you have eliminated the desired
amount of air. Press the manual seal button to seal the bag.
· Manual Bag Seal Button: This button will start the Seal Bar at any time in
Manual Mode. More information about the Manual Mode can be found in the
“Manual Mode” section of his booklet.
· Accessory Button: Press the Accessory Button when using vacuum
canisters (sold separately) to vacuum and seal items stored in a canister.
CONTROL PANEL
NOTE: The Vacuum Sealer is ONLY intended to be used with VACUUM BAGS. For
best results, only use the recommended vacuum bags with an embossed or mesh lining.
DO NOT USE HOUSEHOLD BAGS! Any other uses of the Vacuum Sealer, other than
the uses described in this booklet, could potentially damage the appliance and void the
warranty!
ENGLISH INSTRUCTIONS
9
Page 10
1. To create bags using the roll holder, remove the roll holder rod from the
cilps at the back of the vacuum sealer (FIGURE 6).
2. Slide the rod through the center opening of the roll (will hold bags up to
11” wide).
3. Fold the roll holder arms out and rest the rod in the slots on the roll holder
arms, carefully lining up the notches in the rod with the slots in the arms.
4. It is easier to cut bags from the roll when the bags are rolled over the roll
(as opposed to under the roll) (FIGURE 7).
5. Move the bag cutter towards the lid and pull the vacuum bag over the
cutter slot until you have reached the desired length.
6. Move the bag cutter back over the top of the bag roll, making sure the
blade is to one side.
7. Slide the blade across the bag roll to cut your roll into your custom bag
size (FIGURE 8).
USING THE ROLL HOLDER & CUTTER
FIGURE 6
P
O
W
E
R
I
N
D
I
C
ATO
R
O
N
O
F
F
8 A
M
P
F
U
S
E
O
N
LY
FIGURE 7
FIGURE 8
ENGLISH INSTRUCTIONS
10
Page 11
1. ALWAYS allow the sealing bar to cool for approximately 20 seconds
between bags. Leave the Vacuum Lid OPEN between uses, this allows the
Heating Element to cool more quickly between bags.
2. Place one end of the bag onto the Sealing Bar, leaving about 2” (5 cm) of the
empty part of the bag beyond the inside edge of the Sealing Bar.
3. Be sure not to cover the Vacuum Port with the bag. Covering the Vacuum
Port prevents the proper vacuuming of air from the bag.
4. Close the Vacuum Lid while holding the bag in place. Press down on both
sides of the lid to lock the lid in place. You will hear each side “click” when it is
secured. NOTE: If both sides are NOT securely locked, the lid will NOT release
automatically. To resolve this issue, press down on both sides of the lid twice to
release the locks.
5. Press the Start Button engaging the Vacuum Pump (the Vacuum Pump must be
on for the Seal Bar to heat up).
6. Press the Manual Seal Button immediately after the Vacuum Pump starts.
(Press down on the Vacuum Lid to contact the Sealing Bar.)
7. After the Seal Window counts down to zero (0) the unit will automatically
release the vacuum and enable the Vacuum Lid to open.
8. Remove the bag and inspect the seal. The seal should appear smooth and
consistent all the way across the bag. The seal SHOULD NOT melt through
the bag at any point. Be sure there are no creases or wrinkles that may allow
air to leak into the bag. A properly sealed bag will not pull apart, the bag must
be cut open.
9. Do not form side seals on the bags, the sides are already sealed.
10. If the seal is good, proceed with vacuum packaging. Otherwise:
.
If the seal is melted through the bag trim off the bad seal with scissors and
adjust the Seal Time Down (-) in one second increments and try the test
process again.
.
If the seal has not fully welded the bag closed, trim off the bad seal with
scissors and adjust the Seal Time Up (+) in one second increments and try
the test process again.
INITIAL TESTING OF THE BAG SEAL
NOTE: The Vacuum Sealer is ONLY intended to be used with VACUUM BAGS. For
best results, only use the recommended vacuum bags with an embossed or mesh lining.
DO NOT USE HOUSEHOLD BAGS! Any other uses of the Vacuum Sealer, other than
the uses described in this booklet, could potentially damage the appliance and void the
warranty!
WARNING! Before cleaning, assembling or disassembling the
appliance, make sure the appliance is OFF and the PLUG IS REMOVED
FROM THE OUTLET/POWER SOURCE!
ENGLISH INSTRUCTIONS
11
Page 12
BEFORE ATTEMPTING VACUUM
PACKAGING BE SURE THAT THE
VACUUM SEALER IS SET UP IN
ACCORDANCE WITH ALL OF THE
SAFETY PRECAUTIONS LISTED IN
THIS BOOKLET.
1. Place the items to be vacuum
sealed into a vacuum bag. Allow at
least 2” (5 cm) at the open end of
the bag in order to create enough
seal space. Be sure not to cover the
Vacuum Port (FIGURE 9).
2. Close the Vacuum Lid while holding
the bag in place. Press down on both
sides of the lid to lock the lid in place.
You will hear each side “click” when it is
secured. NOTE: If both sides are NOT
securely locked, the lid will NOT release
automatically. To resolve this issue, press down on both sides of the lid twice to
release the locks.
3. Press and release the Start Button. The 2-Piston Vacuum Pump will begin
removing air from the bag while the LED Vacuum Window begins to count up.
You may need to apply light pressure to the Vacuum Lid during the countup process. The LED Vacuum Window will count up starting at the number
“1” and going thru to the number “9”, before automatically engaging the bag
sealing process. These numbers represent stages, not seconds.
4. Once the LED Vacuum Window displays the number “9”, the sealing
process will begin by counting down from your chosen setting to “0” on the
LED Seal Window.
5. Once the LED Seal Window has reached “0”, the Vacuum Sealer will
automatically stop the 2-Piston Vacuum Pump and release the vacuum
pressure moments later. DO NOT ATTEMPT TO PULL THE VACUUM LID
OPEN BEFORE THE VACUUM HAS BEEN RELEASED, SEVERE DAMAGE
TO THE SEALING BAR WILL RESULT.
AUTOMATIC MODE OPERATION
FIGURE 9
Leave 2”
Seal
Space
Vacuum Port
ENGLISH INSTRUCTIONS
12
Page 13
BEFORE ATTEMPTING VACUUM
PACKAGING, BE SURE THAT THE
VACUUM SEALER IS SET UP IN
ACCORDANCE WITH ALL OF THE
SAFETY PRECAUTIONS LISTED IN THIS
BOOKLET.
1. Place the items to be vacuum sealed into
a vacuum bag. Allow at least 2” (5 cm) at
the open end of the bag in order to create
enough seal space. Be sure not to cover
the Vacuum Ports (Figure 10).
2. Close the Vacuum Lid while holding the bag
in place. Press down on both sides of the lid
to lock the lid in place. You will hear each side
“click” when it is secured. NOTE: If both sides
are NOT securely locked, the lid will NOT
release automatically. To resolve this issue,
press down on both sides of the lid twice to
release the locks.
3. While monitoring the vacuum bag, press and release START Button.
The 2-Piston Vacuum Pump will begin removing air from the bag. When
the desired level of air has been evacuated from the bag, press and
release the Manual Bag Seal Button. It will start the sealing bag process.
Note: You may need to apply light pressure to the Vacuum Lid during this
process.
Note: It requires some vacuum pressure in the bag to get good seal for the
bag.
4.Once the LED Seal Window has reached “0”, the Vacuum Sealer will
automatically stop the Vacuum Pump and release the vacuum pressure
moments later. DO NOT ATTEMPT TO PULL THE VACUUM LID OPEN
BEFORE THE VACUUM HAS BEEN RELEASED, SEVERE DAMAGE TO
THE SEALING BAR WILL RESULT.
FIGURE 10
Leave 2”
Seal
Space
Vacuum Port
NOTE: The Vacuum Sealer is ONLY intended to be used with VACUUM BAGS. For
best results, only use the recommended vacuum bags with an embossed or mesh lining.
DO NOT USE HOUSEHOLD BAGS! Any other uses of the Vacuum Sealer, other than
the uses described in this booklet, could potentially damage the appliance and void the
warranty!
WARNING! Before cleaning, assembling or disassembling the
appliance, make sure the appliance is OFF and the PLUG IS REMOVED
FROM THE OUTLET/POWER SOURCE!
ENGLISH INSTRUCTIONS
13
MANUAL MODE OPERATION
Page 14

Some parts of the Vacuum Sealer may need replacing after repeated use. The
Vacuum Sealer Maintenance Kit will be necessary for the Vacuum Sealer to
properly function.
REPLACING THE OVAL VACUUM CHAMBER SEALS:
1. Turn “OFF” the Vacuum Sealer and remove the Power Cord from the electrical
outlet.
2. Make sure the unit is completely cool.
3. Open the Vacuum Lid.
4. Remove the Oval Vacuum Chamber Seal from the groove on the underside of
the Vacuum Lid.
5. Remove the Oval Vacuum Chamber Seal from the groove in the Plastic
Vacuum Chamber.
6. Set a new Oval Vacuum Chamber Seal on the groove in the Plastic Vacuum
Chamber. Work the seal into the groove with your ngers until done.
7. Position a new Oval Vacuum Chamber Seal into the groove in the Vacuum
Lid. Work the seal into the groove with your ngers until done.
REPLACING THE SEAL BAR TAPE:
1. Turn “OFF” the Vacuum Sealer and remove the Power Cord from the electrical
outlet.
2. Make sure the unit is completely cool.
3. Open the Vacuum Lid.
4. Pick at either end of the Seal Bar Tape covering the Seal Bar Heating Element
with a ngernail until it lifts slightly. Grasp the loose end and slowly pull
the Seal Bar Tape back over itself until fully removed.
5. Remove the backing from a new strip of Seal Bar Tape. Be careful not to
allow the Seal Bar Tape to contact anything including itself while the adhesive
side is exposed.
6. Hold one end of the Seal Bar Tape in each hand. Stick the left end of the Seal
Bar Tape to the at area on the Plastic Vacuum Chamber just left of the Seal
Bar Heating Element. Apply the Seal Bar Tape from left to right over the Seal
Bar Heating Element until done. Make sure there are no wrinkles or folds in the
Seal Bar Tape once applied. The Seal Bar Tape should fully cover the Seal Bar
Heating Element.
MAINTENANCE KIT INSTRUCTIONS
ENGLISH INSTRUCTIONS
14
Page 15

TROUBLESHOOTING
Q: NOTHING HAPPENS WHEN THE POWER BUTTON IS PRESSED!
1. Make sure that the Power Cord is not
damaged in any way.
2. Be sure that the female end of the Power
Cord is plugged completely into the Power
Supply Port of the Vacuum Sealer, and that
the male end of the Power Cord is firmly
plugged into the wall outlet (Figure 11).
3. If the Vacuum Sealer is properly plugged
in, and the Power Button still does not work,
check the Fuse, located above the Power
Supply Port, on the right side of the Vacuum
Sealer. Twist the Fuse Holder off, then look
at the clear tube to see
if the Fuse is darkened. If the Fuse is
darkened, it will need to be replaced with a
standard 8-Amp Fuse.
4. If the Fuse does not need to be replaced, you will need to be sure the
electrical wall outlet is properly working. Plug in another appliance to see if
that appliance works from the wall outlet. USE ONLY TIME-DELAY FUSES.
Q: MY VACUUM SEALER SHUT OFF AND WILL NOT START AGAIN.
1. The Thermal Overload Protector may have been activated. In this
case, allow the Vacuum Sealer to cool by opening the Vacuum Lid for
approximately 20 minutes. Be sure to leave the Vacuum Lid open between
bag sealing.
2. Be sure that the female end of the Power Cord is plugged completely into
the Power Supply Port of the Vacuum Sealer, and that the male end of the
Power Cord is firmly plugged into the wall outlet.
3. If the Vacuum Sealer is properly plugged in, and the Power Button still
does not work, check the Fuse, located above the Power Supply Port, on
the right side of the Vacuum Sealer. Twist the Fuse Cap off, then look at the
clear tube to see if the Fuse is darkened. If the Fuse is darkened, it will need
to be replaced with a standard 8-Amp Fuse (Figure F).
4. If the Fuse does not need to be replaced, you will need to be sure the
electrical wall outlet is properly working. Plug in another appliance to see if
that appliance works from the wall outlet.
FIGURE 11
Check to see if the
Fuse is darkened.
I
O
ENGLISH INSTRUCTIONS
15
Page 16

Q: THE BAG SEAL PULLS APART.
1. If the seal has not fully welded the bag closed, trim off the bad seal with
scissors and adjust the Seal Time Up (+) in one second increments and try the
test process again.
2. The Vacuum Sealer is only intended to be used with vacuum sealing
bags. For best results, Weston Vacuum Bags should be used. DO NOT USE
HOUSEHOLD BAGS with the Vacuum Sealer.
3. The seal of the bag may be incomplete. If the seal has a crease in it, or if
a liquid or powder has been trapped between the layers of the bag, the layers
may not have been welded together properly. Cut the seal off and wipe the
inside of the bag clean. Then, try to vacuum seal the package again. When
sealing a moist or powdery food, insert a paper towel into the bag above the
food before vacuum packaging. The paper towel will prevent the food from
interfering with the seal. See the “Vacuum Packaging Guidelines” in this
booklet for helpful tips.
FIGURE 12
Q: THE VACUUM PUMP STARTS, BUT NO AIR IS BEING
REMOVE FROM THE VACUUM BAG.
1. For the best results, always use
Weston brand vacuum bags.
2. Be sure that the bag is inserted
properly. Be sure not to cover the
Vacuum Port opening (Figure 12).
3. The bag may have a leak. If there
is a leak in the bag, air will be pulled
into the bag from the outside. Check
for tears or punctures. If you are
using a bag that was made from a roll
of material, double check that the seal
on the end of the bag is welded closed.
Q: THE SEALING BAR MELTS THROUGH THE BAG.
1. The Vacuum Sealer is only intended to be used with vacuum sealing
bags. For best results, Weston Vacuum Bags should be used. DO NOT USE
HOUSEHOLD BAGS with the Vacuum Sealer.
2. Check the condition of the Seal Bar Tape strips. Replace if needed.
3. Open the Vacuum Lid and allow the sealing bar to cool for 5-10 minutes.
Always leave the Vacuum Lid open between bags, and allow at least 20 seconds
between cycles.
4. The Sealing Bar time may need to be lowered. Adjust the Seal Time Down
(-) in one second increments and try the test process again. Refer to the “Initial
Testing of the Bag Seal” instructions in this booklet for more information.
Leave 2”
Seal
Space
ENGLISH INSTRUCTIONS
16
Page 17
REPLACING THE FUSE
If the Vacuum Sealer does not operate when it is plugged
in and turned on, try any or all of the following:
1. Make sure the Fuse is not blown. The Fuse is located
on the right side of the unit directly above the Power
Cord Port. Turn “OFF” and unplug the Vacuum Sealer.
Twist off and remove the Fuse Holder. Remove and
check the Fuse. The thin metal band in the center of the
Fuse should be clean and unbroken. If it is burned and/or
broken, replace it with a new Fuse (8 Amp). Replace the
Fuse Holder.
2. Make sure the Connector at the end of the Power Cord
is plugged completely into the Power Cord Port.
3. Make sure the Power Cord is not damaged. DO
NOT use a damaged Power Cord. Call the Customer
Service line for information on part replacement.
4. Try connecting the Power Cord Plug to another
electrical outlet.
WARNING! Before cleaning, assembling or disassembling the Vacuum Sealer,
make sure the Vacuum Sealer is OFF and the PLUG IS REMOVED FROM THE
OUTLET/POWER SOURCE!
I
O
FIGURE 13
ENGLISH INSTRUCTIONS
17
Page 18

. IMPORTANT NOTE: Vacuum packaging is NOT a substitute for refrigeration.
Vacuum packed perishable foods still require refrigeration.
. NEVER thaw frozen foods at room temperature. Thaw frozen foods in a
refrigerator or microwave oven.
. In general, the colder the temperature at which foods are stored, the longer the
shelf life.
. Handle vacuum sealer bags with care. Avoid damaging them. A damaged bag
will not hold a seal.
. Only use information in the following chart as a guideline! Refer to the “Vacuum
Packaging Guidelines” and “Food Safety” sections of this manual. Actual storage
life spans may vary. Check all food for spoilage before use.
STORAGE LIFESPAN GUIDELINES
FOOD STORAGE NORMAL VACUUM
TYPE LOCATION LIFE PACKED
LIFE
LARGE CUTS OF MEAT Freezer 6 months 2-3 years
GROUND MEAT Freezer 4 months 1 year
FISH Freezer 6 months 2 years
For best results, freeze meats & sh for 1-2 hours before vacuum packing to help prevent moisture
and juices from interfering with the seal of the vacuum bag.
COFFEE BEANS Room temperature 4 weeks 16 months
COFFEE BEANS Freezer 6-9 months 2-3 years
FLOUR, RICE, SUGAR Room Temperature 6 months 1-2 years
For best results, powder or grainy substances should be kept in their original container or bag, then placed in a
vacuum bag for sealing to prevent interfering with the seal of the vacuum bag.
BERRIES strawberries, raspberries, blackberries Refrigerator 1-3 days 1 week
BERRIES cranberries, huckleberries, blueberries Refrigerator 3-6 days 2 weeks
To prevent berries from being crushed by the vacuum sealer, it is best to freeze item before packing. Spread the berries out on a
cookie sheet to allow them to freeze individually. Berries frozen in a large block will be difcult to vacuum seal due to the
many small air pockets that would form between the berries.
CHEESE Refrigerator 1-2 weeks 4-8 months
If vacuum packed cheese is used often, make sure the vacuum bag is long enough to allow for repeated sealing. For shredded
cheese, place a paper towel inside the vacuum bag, on top of the cheese to prevent the cheese from being
sucked into the Vacuum Sealer or interfering with the sealing of the bag.
COOKIES, CRACKERS, BREADS with periodical opening Room Temperature 1-2 weeks 3-6 weeks
Freeze soft airy foods for 1-2 hours prior vacuum packing, to retain shape & texture.
PASTA, GRAINS, DRIED BEANS Room Temperature 6 months 1-1/2 years
NUTS Room Temperature 6 months 2 years
Dried foods with sharp edges should be wrapped in a paper towel or other matter to prevent the sharp edges from puncturing the vacuum bag.
LETTUCE Refrigerator 3-6 days 2 weeks
Wash & thoroughly dry leafy vegetables before vacuum packaging.
VEGETABLES Freezer 8 months 2 1/2 years
To maximize the taste of vegetables, blanch them before vacuum packaging. Blanching cooks the vegetables very briey, sealing
in the avor, color and texture, leaving the vegetables cooked but still crisp. Vegetables can be blanched in boiling water in the microwave,
most vegetables only require 2-3 minutes (corn on the cob requires 6-11 minutes). Then immerse the vegetables in cold water to
stop the cooking process. Dry the vegetables, then vacuum pack.
Table adapted from Dr. G.K.York, Dept. of Food Science & Tech, U of California, Davis.
ENGLISH INSTRUCTIONS
18
Page 19

Powdery Items: When vacuum sealing powdery items, like our, it is best to keep
them in their original packaging before putting them into the vacuum bags.
Sharp or Pointed Items: When vacuum sealing sharp or pointy items, it is best
to cushion the edges so they do not puncture the bag during the vacuum process.
YEAST & BACTERIA
For best results in extending the life of foods, it is important to vacuum package
foods that are fresh. Once food has begun to deteriorate, vacuum packaging may
only slow the deterioration process. Vacuum sealing cannot completely prevent
the growth of mold. Other disease causing microorganisms can still grow in low
oxygen environments and may require further measures to be eliminated.
Yeast: The development of yeast can be slowed by refrigeration and completely
stopped by freezing food at 0oF (-18oC). Yeast causes fermentation, which will give
food an identiable smell.
Bacteria: Freezing cannot eliminate bacteria, but their growth can be stopped.
The growth of bacteria can be easily identied by an offensive odor and sometimes
a slimy texture. Some bacteria, like the one that causes botulism, can grow in low
oxygen environments and cannot be detected by smell, taste or color. Botulism is
very rare, but dangerous. Be sure that all foods are stored and cooked properly
before eating.
COOKING & HEATING
.
Before microwaving vacuum-packed foods, puncture or open the bag to allow
hot airto escape while heating.
.
Vacuum-packed foods can be thawed or cooked in boiling water.
.
Vacuum-packed perishable foods like meats, vegetables and cheeses must
be refrigerated (at or below 34oF (1.1oC)) or frozen, especially acid-free or
low-acid foods.
This is important because although vacuum packaging removes most air from
the bag, bacteria like Clostridium Botulinum, which produces a toxin that causes
the illness botulism, is anaerobic and grows in the absence of oxygen. Refrigeration
and freezing slow the growth of bacteria. It is also important to maintain a clean
working area to reduce the likelihood of packaging harmful bacteria with the food.
VACUUM PACKAGING GUIDELINES
ENGLISH INSTRUCTIONS
19
Page 20

There are basic rules to follow when handling food.
They are COOK, SEPARATE, CLEAN, and CHILL.
COOK
It’s crucial to cook food to a safe internal temperature to destroy bacteria that is present.
The safety of hamburgers and other foods made with ground meat has been receiving a lot
of attention lately, and with good reason. When meat is ground, the bacteria present on the
surface is mixed throughout the ground mixture. If this ground meat is not cooked to at least
160oF to 165oF (71oC to 74oC), bacteria will not be destroyed and there’s a good chance you
will get sick.
Solid pieces of meat like steaks and chops don’t have dangerous bacteria like E. coli on the
inside, so they can be served more rare. Still, any beef cut should be cooked to an internal
temperature of at least 145oF (63oC) (medium rare). The safe temperature for poultry is 165oF
(75oC) and solid cuts of pork should be cooked to 145oF (63oC).
SEPARATE
Foods that will be eaten uncooked and foods that will be cooked before eating MUST
ALWAYS be separated. Cross-contamination occurs when raw meats or eggs come in
contact with foods that will be eaten uncooked. This is a major source of food poisoning.
Always double-wrap raw meats and place them on the lowest shelf in the refrigerator so
there is no way juices can drip onto fresh produce. Then use the raw meats within 1-2 days
of purchase, or freeze for longer storage. Defrost frozen meats in the refrigerator, not on the
counter.
When grilling or cooking raw meats or sh, make sure to place the cooked meat on a clean
platter. Don’t use the same platter you used to carry the food out to the grill. Wash the utensils
used in grilling after the food is turned for the last time on the grill, as well as spatulas and
spoons used for stir-frying or turning meat as it cooks.
Make sure to wash your hands after handling raw meats or raw eggs. Washing hands with
soap and water, or using a pre-moistened antibacterial towelette is absolutely necessary after
you have touched raw meat or raw eggs. Not washing hands and surfaces while cooking is a
major cause of cross-contamination.
CLEAN
Wash your hands and work surfaces frequently when you are cooking. Washing with soap
and warm water for at least 15 seconds, then dry with a paper towel.
CHILL
Chilling food is very important. The danger zone where bacteria multiply is between 40oF and
140oF (4oC and 6oC). Your refrigerator should be set to 40oF (4oC) or below; your freezer should
be 0oF (-17oC) or below. Simple rule: serve hot foods hot, cold foods cold. Use chang dishes
or hot plates to keep food hot while serving. Use ice water baths to keep cold foods cold. Never
let any food sit at room temperature for more than 2 hours - 1 hour if the ambient temperature
is 90oF (32oC) or above. When packing for a picnic, make sure the foods are already chilled
when they go into the insulated hamper. The hamper won’t chill food - it just keeps food cold
when properly packed with ice. Hot cooked foods should be placed in shallow containers and
immediately refrigerated so they cool rapidly. Make sure to cover foods after they are cool.
NOTE: Special considerations must be made when using venison or other wild game, since it
can become heavily contaminated during eld dressing. Venison is often held at temperatures
that could potentially allow bacteria to grow, such as when it is being transported. Refer to
the USDA Meat and Poultry Department for further questions or information on meat and
food safety.
FOOD SAFETY
20
ENGLISH INSTRUCTIONS
Page 21
Page 22

Weston Brands LLC warrants to the ORIGINAL RETAIL PURCHASER of this product that if operated in accordance
with the printed instruction accompanying it, then for a period of 2 year from the date of purchase, the product shall be free
from defects in material and workmanship.
The Warranty Card, along with a copy of the original receipt, must be received by Weston Brands LLC within 30 days
from purchase date for the warranty to apply. Failure to send the completely lled out Warranty Card, along with a copy of
the original receipt, will void the warranty.
The product must be delivered to or shipped freight prepaid to Weston Brands LLC for warranty services, in either
its original packaging or similar packaging affording an equal degree of protection. Damage due to shipping is not the
responsibility of the company. Weston Brands LLC charges a $35.00 per hour bench charge. NOTE: No repairs will
be started without the authorization of the customer. The return shipping cost to the customer will be added to the repair
invoice.
Prior to returning the product for Warranty Repair, the product must be thoroughly cleaned and free from any food
particles or other debris. Failure of the purchaser to comply with this standard will result in the unit being returned without
repair. In some cases, a $50 cleaning surcharge may apply.
Weston Brands LLC will repair (or at its discretion, replace) the product free of charge, if in the judgment of the
company, it has been proven to be defective as to seller’s labor and material, within the warranty period.
New or rebuilt replacements for factory defective parts will be supplied for two (2) year from the date of purchase.
Replacement parts are warranted for the remainder of the original warranty period.
For non-warranty repairs, contact Weston Brands LLC’s Customer Service at 1-800-814-4895 M-F 8am-5pm ET
(outside of the United States 001-440-638-3131) to obtain a Return Merchandise Authorization Number (RMA Number).
Weston Brands LLC will refuse all returns that do not contain this number. DO NOT RETURN THE UNIT WITHOUT
PROPER AUTHORIZATION FROM WESTON BRANDS LLC.
LIMITATIONS: The warranty is void if the product is used for any purpose other than that for which it is designed.
The product must not have been previously altered, repaired, or serviced by anyone else other than Weston Brands
LLC. If applicable, the serial number must not have been altered or removed. The product must not have been subjected
to accident in transit or while in the customer’s possession, misused, abused, or operated contrary to the instructions
contained in the instruction manual. This includes failure caused by neglect of reasonable and necessary maintenance,
improper line voltage and acts of nature. This warranty is not transferable and applies only to U.S. and Canadian sales.
Except to the extent prohibited by applicable law, no other warranties whether expressed or implied, including
warranty merchantability and tness for a particular purpose, shall apply to this product. Under no circumstances shall
Weston Brands LLC be liable for consequential damages sustained in connection with said product and Weston Brands
LLC neither assumes nor authorizes any representative or other person to assume for it any obligation or liability other than
such as is expressly set forth herein. Any applicable implied warranties are also limited to the two (2) year period of the
limited warranty.
This warranty covers only the product and its specic parts, not the food or other products processed in it. Weston is
not responsible for missing or damaged parts on discounted/clearance, resale or nal sale items where the seller may not
be able to guarantee full functionality or completeness of the unit.
CUT ALONG THE DOTTED LINE AND SEND THE WARRANTY CARD ALONG WITH A COPY OF YOUR
ORIGINAL PURCHASE RECEIPT TO:
Weston Brands LLC / WARRANTY
20365 Progress Drive, Strongsville, OH 44149 USA
Customer Name:
Address:
City/State/Zip/Country:
Telephone Number:
E-Mail Address:
Original Date of Purchase:
Product Model #:
Serial # (if applicable):
I have read the warranty information. Initial here:
WESTON WARRANTY INFORMATION
SAVE THIS WARRANTY INFORMATION FOR YOUR RECORDS!
WESTON WARRANTY CARD
SEND THIS CARD ALONG WITH A COPY OF YOUR ORIGINAL PURCHASE RECEIPT TO:
WESTON BRANDS LLC / WARRANTY, 20365 PROGRESS DRIVE, STRONGSVILLE, OH 44149 USA
Copy of Receipt
Included
Page 23

SELLADOR A VACÍO
65-0601-W
DEBIDO A CONSTANTES MEJORAS EN LA FÁBRICA, EL PRODUCTO QUE SE MUESTRA PUEDE
SER LIGERAMENTE DIFERENTE DEL PRODUCTO EN ESTA CAJA. 020915
Page 24

24
1. SIEMPRE DESCONECTE la
selladora al vacío de la fuente de
corriente antes de darle mantenimiento,
cambiarle accesorios o limpiarla.
2. Conecte la selladora al vacío en un
tomacorriente estándar de 120 volts y 60
Hz. Evite usar cables de extensión.
3. NO USE la selladora al vacío si el
cable de corriente, la clavija o cualquier
otra parte estuvieran dañadas. Si
está dañado el cable de corriente o la
selladora al vacío, llame a servicio al
cliente. NO TRATE DE REEMPLAZAR
EL CABLE.
4. NUNCA use accesorios o partes de
otros fabricantes. Hacerlo INVALIDA LA
GARANTÍA y puede causar incendios,
choques eléctricos y lesiones.
5. Reduzca el riesgo de arranques
involuntarios. Asegúrese de que el
interruptor Power (Encendido) esté en
la posición “OFF” (Apagado) antes de
conectar la fuente de alimentación.
6. MANTENGA LOS DEDOS
ALEJADOS de la barra térmica
selladora y la cinta de la barra de sellado
EN TODO MOMENTO. Estas áreas se
CALIENTAN. Podrían causarle lesiones
graves.
7. NO DESARME este aparato; hacerlo
ANULA LA GARANTÍA y puede
provocar lesiones.
8 PARA PROTEGERSE DE
CHOQUES ELÉCTRICOS: NO
SUMERJA EN AGUA U OTRO
LÍQUIDO LA SELLADORA AL VACÍO.
REVISE QUE LA SELLADORA AL
¡GUARDE ESTAS INSTRUCCIONES!
NORMAS GENERALES DE SEGURIDAD
LEA Y COMPRENDA TODAS LAS INSTRUCCIONES Y ADVERTENCIAS
ANTES DE USAR ESTA UNIDAD. ¡SU SEGURIDAD ES PRIMORDIAL! NO
CUMPLIR CON LOS PROCEDIMIENTOS Y MEDIDAS DE SEGURIDAD PUEDE
OCASIONAR LESIONES GRAVES O DAÑOS MATERIALES. RECUERDE:
¡USTED TIENE LA RESPONSABILIDAD SOBRE SU SEGURIDAD PERSONAL!
VACÍO ESTÉ DESCONECTADA
DE LA FUENTE DE CORRIENTE
ANTES DE LIMPIARLA. Siga las
“Instrucciones de limpieza” de este
folleto. NUNCA enjuague la selladora
al vacío bajo el grifo de agua.
9. NUNCA DEJE SIN
SUPERVISIÓN LA SELLADORA
AL VACÍO. Sea prudente:
DESCONECTE LA SELLADORA AL
VACÍO de la fuente de corriente al
salir del área de trabajo. Es necesaria
la supervisión cercana cuando se
use cualquier aparato cerca de niños.
Este aparato NO DEBE ser usado por
niños.
10. NO DEJE que el cable de
corriente cuelgue por el borde de la
supercie de trabajo.
11. Revise que la selladora al vacío
esté en una supercie de trabajo
estable. Revise que estén estables
las patas de la selladora al vacío.
12. NO USE la selladora al vacío en
exteriores.
13. NO USE la selladora al vacío bajo
los efectos de drogas, medicamentos
o alcohol.
14. La selladora al vacío
está diseñada para usarse
EXCLUSIVAMENTE con BOLSAS
AL VACÍO. Para obtener mejores
resultados use exclusivamente las
bolsas recomendadas. ¡NO USE
BOLSAS CASERAS! Cualquier uso
de la selladora al vacío que no sea
de los descritos en este folleto puede
dañar el aparato y anular la garantía.
INSTRUCCIONES EN ESPAÑOL
Page 25

Page 26

1
2
3
4
5
6
7
8
9
10
11
12
Tapa
de vacío
16
Panel de
alimentación
Cubierta
superior
Cubierta inferior
Cámara de
vacío
I
O
13
14
26
INSTRUCCIONES EN ESPAÑOL
Page 27

27
INSTRUCCIONES EN ESPAÑOL
NÚMERO DE DIAGRAMA DESCRIPCIÓN DE LA PIEZA NÚMERO DE PIEZA
1 CABLE DE SELLADO 08-0627
2 AISLANTE DE LA BARRA SELLADORA 08-0625
3 CABLE DE CORRIENTE 08-0402
4 SUJETADOR DEL FUSIBLE 08-0604
5 FUSIBLE DE 8 AMP 08-0605
6 BOMBA DE VACÍO 08-0639
7 TRANSFORMADOR 08-0641
8 VENTILADOR 08-0643
9 TABLERO DE CIRCUITO 65-0638
SENSOR DE VACÍO 65-0643
10 CINTA DE LA BARRA SELLADORA (NEGRA) CONSULTE EL JUEGO
DE MANTENIMIENTO
11 CÁMARA DE SELLADO (2) CONSULTE EL JUEGO
DE MANTENIMIENTO
12 JUEGO DE MANTENIMIENTO DE LA SELLADORA
AL VACÍO CINTA DE LA BARRA SELLADORA
(NEGRA) , SELLOS DE LA CÁMARA (2)
65-0701
13 KIT PORTARROLLOS INCLUYE: VARA
PORTARROLLOS, BRAZOS DE SUJECIÓN DE LA
VARA (2), SOPORTES CON TORNILLOS
(2 SOPORTES, 4 TORNILLOS)
65-0639
14 KIT CORTADOR DE BOLSAS INCLUYE: HOJA
SUJETADOR DE LA HOJA
65-0640
15 HOJA 65-0641
16 PANEL DE CONTROL 65-0642
LISTA DE COMPONENTES
Si cualquier componente de esta unidad está roto, si no funciona debidamente,
o si necesita un instructivo de repuesto, visítenos en la Web en
WestonProducts.com
O llame a Weston Brands LLC larga distancia sin costo 1-800-814-4895
De lunes a viernes, de 8:00 am a 5:00 pm tiempo del ET. Fuera de Estados Unidos
llame al 001-440-638-3131
Page 28

La selladora al vacío cuenta con un ventilador de refrigeración interno
que funciona siempre que la unidad está conectada y encendida.
Para ahorrar energía, coloque la unidad en posición “OFF” (Apagado)
y desconecte el cable de alimentación cuando no esté en uso.
CINTA DE LA BARRA
SELLADORA
¡NO LA QUITE!
El elemento térmico de la barra selladora está cubierto con una cinta
para proteger las bolsas de vacío durante el sellado (FIGURA 1). ¡NO
RETIRE la cinta de la barra selladora! Si necesita reemplazar la cinta
de la barra selladora, consulte la sección “Juego de mantenimiento”
de este manual, si le hace falta.
¡NO QUITE LOS SELLOS OVALADOS DE LA
CÁMARA DE VACÍO!
ANTES DE COMENZAR A SELLAR LA BOLSA
Ante de utilizar la Selladora al vacío, familiarícese con las funciones de
sellado de bolsa. Una bolsa de vacío se sella cuando el Calentador de la
barra de sellado se activa y calienta la bolsa hasta su punto de fusión, que
une permanentemente las capas de la bolsa, y sella la bolsa para cerrarla.
Este electrodoméstico ya viene preestablecido de fábrica para activar el
Calentador de la barra de sellado durante 3 segundos. Esta es la cantidad de
tiempo correcta y necesaria para sellar completamente las bolsas de vacío.
Diferentes marcas de bolsas de vacío pueden requerir un poco más o menos
de tiempo de sellado.
Pruebe sellar un par de bolsas para asegurarse de que el Tiempo de sellado
se establece correctamente. El Tiempo de sellado se puede aumentar (+) o
disminuir (-) para sellar una bolsa de forma óptima.
CINTA PROTECTORA
En la selladora al vacío hay una tira de cinta
para barra selladora instalada de fábrica.
¡NO RETIRE ESA CINTA!
FIGURA 1
VENTILADOR DE REFRIGERACIÓN
28
INSTRUCCIONES EN ESPAÑOL
Page 29

29
INSTRUCCIONES EN ESPAÑOL
La selladora al vacío tiene dos sellos ovalados en la cámara instalados de
fábrica. Cuando se cierra la tapa de vacío, ésta forma un cierro hermético
para que pueda evacuarse la cámara.
Los sellos ovalados de la cámara pueden desgastarse con el tiempo y
necesitan ser reemplazados. Si necesita reemplazar los sellos ovalados de
la cámara de vacío, consulte la sección “Juego de mantenimiento” de este
manual, si le hace falta.
PROTECTOR DE SOBRECARGA TÉRMICA
La selladora al vacío se apaga automáticamente si se sobrecalienta.
Si ocurre esto, apague el aparato y abra la tapa de vacío. Reanude las
operaciones normales cuando se haya enfriado el aparato o unos 20 minutos
después.
Para evitar el sobrecalentamiento espere por lo menos 20 segundos entre
un ciclo y otro con la tapa de vacío abierta. Evite tocar la cinta de la barra
selladora. La cinta de la barra selladora se mantiene caliente por un periodo
breve después de cada ciclo de sellado.
INTERRUPTOR DE LÍMITE
La selladora al vacío está equipada con un interruptor para evitar el
accionamiento del calentador de la barra de sellado en modo manual cuando
la tapa de vacío está abierta. Cuando la tapa de vacío está cerrada, el calor
producido por el calentador de la barra de sellado se absorbe por la bolsa de
vacío y el sello de la tapa de vacío.
Cuando la tapa de vacío está abierta, no hay forma de disipar el calor y la
unidad podría dañarse.
ENSAMBLADO
• Coloque la selladora al
vacío en una superficie lisa y
seca.
• Conecte el extremo hembra
del cable de alimentación
en el puerto de la fuente de
alimentación a la derecha del
electrodoméstico (FIGURA 2).
• Conecte el extremo macho
del cable de alimentación a
un tomacorriente estándar
doméstico de 120 voltios
conectado a tierra. NO intente
modificar el enchufe para que
encaje en un tomacorriente
inadecuado.
FIGURA 2
I
O
SELLOS DE LA CÁMARA DE VACÍO
NOTA: La selladora al vacío está diseñada para usarse EXCLUSIVAMENTE con BOLSAS
AL VACÍO. Obtenga mejores resultados usando solamente las bolsas recomendadas con
forro de malla o estampado.
¡NO USE BOLSAS CASERAS! Cualquier uso de la selladora al vacío que no sea de los
descritos en este folleto puede dañar el aparato y anular la garantía.
Page 30

. NUNCA SUMERJA LA SELLADORA AL VACÍO EN AGUA U OTRO
LÍQUIDO.
. Cerciórese de que la selladora al vacío se haya enfriado por completo antes
de limpiarla
. Frote todas las supercies exteriores, en especial la cámara de vacío de
plástico y la tapa de vacío con un paño o toalla de papel húmedos. Puede
usar la mayoría de los limpiadores caseros en aerosol. Evite rociar en la
ventila del lado izquierdo del aparato. ¡NO USE limpiadores abrasivos!
. Al limpiarla, tenga cuidado de no pelar o dañar la tira de cinta de la barra
selladora que cubre el elemento térmico.
. Seque todas las supercies y cierre la tapa de vacío antes de guardar la
selladora al vacío.
INSTRUCCIONES DE CUIDADO Y LIMPIEZA
30
INSTRUCCIONES EN ESPAÑOL
ATERRIZADO
Este aparato debe estar aterrizado para proteger
al operario de choques eléctricos. El aparato
está equipado con un cable de 3 conductores
y una clavija de tierra de tres patas que entra
en un tomacorriente aterrizado apropiado. El
aparato tiene una clavija que se ve como la
gura 3. Debe usarse un adaptador, gura
4, para conectar la clavija de la gura 3 en
tomacorrientes de dos patas. La pestaña de
tierra que sale del adaptador debe conectarse
a una tierra permanente, por ejemplo, una caja
de conexiones debidamente aterrizada, como la
que se muestra en la gura 5, usando un tornillo
de metal. NO modique la clavija de ninguna
manera.
CABLES DE EXTENSIÓN
Use solamente cables de extensión de 3
alambres que tengan clavijas de tierra de 3
patas y un conector de 3 polos que acepte
la clavija del aparato. Use solamente cables
de extensión que tengan una calibración
eléctrica no menor que la calibración del
aparato. NO USE cables de extensión dañados.
Examine el cable de extensión antes de
usarlo y reemplácelo si está dañado. NO
maltrate el cable de extensión y no lo jale para
desconectarlo. Mantenga el cable alejado del
calor y de bordes losos. NO permita que el
cable cuelgue por el borde del área de trabajo.
FIGURA 3
FIGURA 4
FIGURA 5
Conductor
del circuito
de tierra
Pata de
tierra
Tornillo
metálico de
tierra
Cubierta de
la caja de
conexiones
de tierra
Medios de
aterrizaje
AA2220
INSTRUCCIONES PARA HACER TIERRA
ADVERTENCIA! Antes de limpiar, ensamblar o desarmar la selladora
al vacío, cerciórese de que esté APAGADA y de que LA CLAVIJA ESTÉ
RETIRADA DEL TOMACORRIENTE O FUENTE DE ENERGÍA.
Page 31

31
INSTRUCCIONES EN ESPAÑOL
. Botón Start (Arranque): El botón Start (Arranque) enciende la bomba de vacío
de 2 pistones que activa el proceso de evacuación de aire.
. Botón Cancel (Cancelar): Este botón se utiliza para detener el ciclo de vacío
en cualquier momento.
. Botones + y - de tiempo de sellado: El botón Seal Time (Tiempo de sellado)
ajusta la cantidad de segundos durante la cual la barra de sellado aplicará calor
para crear el sello de la bolsa. El tiempo adecuado para las distintas marcas de
bolsas puede ajustarse con los botones Más (+) o Menos (-). Consulte la sección
“Sellado de bolsas” en este folleto para obtener más información sobre el sellado
de bolsas al vacío.
. Ventana de sellado: La ventana LED numérica de sellado indica la cantidad
de segundos durante la cual la barra de sellado permanecerá activada para
aplicar calor a la bolsa que crea el sello. Una vez que la barra de sellado esté
activada, la pantalla descontará hasta “0”. Consulte la sección “Sellado de
bolsas” en este folleto para obtener más información sobre el sellado de bolsas
al vacío.
. Ventana de vacío: La ventana LED numérica de vacío indica el nivel de vacío
que alcanzó la selladora al vacío. La pantalla comenzará a contar de “0” a “9”.
• Botón de pulso: El botón de pulso se usa al sellar artículos o líquidos
delicados, permitiendo controlar el proceso de vacío. Cuando la bolsa esté
preparada para sellarla al vacío, oprima el botón de pulso una vez para
bloquearla. Después oprima el botón de pulso tantas veces como lo necesite
hasta haber eliminado la cantidad de aire deseada. Oprima el botón de sellado
para sellar la bolsa.
. Botón Manual Bag Seal (Sellado manual de la bolsa): Este botón iniciará
la barra de sellado en cualquier momento en Modo manual. Encontrará más
información sobre el Modo manual en la sección “Modo manual” de este folleto.
. Botón de accesorios: Presione el botón de accesorios al utilizar recipientes
de vacío (se venden por separado) para aspirar y elementos de sellado
almacenados en el recipiente.
PANEL DE CONTROL
NOTA: La selladora al vacío está diseñada para usarse EXCLUSIVAMENTE con BOLSAS
AL VACÍO. Obtenga mejores resultados usando solamente las bolsas recomendadas con
forro de malla o estampado.
¡NO USE BOLSAS CASERAS! Cualquier uso de la selladora al vacío que no sea de los
descritos en este folleto puede dañar el aparato y anular la garantía.
Page 32

1. Para crear bolsas con el portarrollos, extraiga la vara del portarrollos de
los sujetadores en la parte trasera de la selladora al vacío (FIGURA 6).
2. Deslice la vara por la abertura central del rollo (sostiene bolsas de 11” de
ancho).
3. Pliegue los brazos del portarrollos hacia fuera y coloque la vara en las
ranuras de los brazos del portarrollos, alineando con cuidado las muescas en
la vara con las ranuras de los brazos.
4. Es más sencillo cortar las bolsas desde el rollo cuando estas están
enroscadas (y no debajo del rollo) (FIGURA 7).
5. Mueva el cortador de bolsas hacia la tapa y tire de la bolsa de vacío sobre
la ranura del cortador hasta que haya alcanzado la extensión deseada.
6. Mueva el cortador de bolsas hacia atrás sobre la parte superior del rollo de
bolsas y asegúrese de que la hoja esté en uno de los laterales.
7. Deslice la hoja a través del rollo de bolsas para cortar el tamaño de bolsa
que desee (FIGURA 8).
UTILIZACIÓN DEL PORTAROLLOS Y EL CORTADOR
FIGURA 6
P
O
W
E
R
I
N
D
I
C
ATO
R
O
N
O
F
F
8 A
M
P
F
U
S
E
O
N
LY
FIGURA 7
FIGURA 8
32
INSTRUCCIONES EN ESPAÑOL
Page 33

33
INSTRUCCIONES EN ESPAÑOL
1. SIEMPRE permita que se enfríe la barra selladora unos 20 segundos
entre una bolsa y otra. Deje ABIERTA la tapa de vacío entre cada uso; este
permite que el elemento térmico se enfríe más rápidamente entre una bolsa
y otra.
2. Coloque un extremo de la bolsa en la barra selladora, dejando unos 5 cm
(2”) de la parte vacía más allá del borde interno de la barra selladora.
3. Revise que la bolsa no cubra el puerto de vacío. Cubrir el puerto de vacío
impide la salida adecuada del aire de la bolsa.
4. Cierre la tapa de vacío mientras sostiene la bolsa en su lugar. Presione
hacia abajo en ambos lados de la tapa para bloquear la tapa en su lugar.
Usted escuchará cada lado “clic” cuando está asegurada. NOTA: Si ambas
partes no están bien sujetas bloqueadas, la tapa no liberará automáticamente. Para resolver este problema, presione hacia abajo en ambos lados
de la tapa dos veces para liberar los bloqueos.
5. Oprima el botón de arranque para encender la bomba de vacío (la bomba
de vacío debe estar encendida para que se caliente la barra selladora).
6. Presione el botón Manual Seal (Sello manual) inmediatamente luego de
que la bomba de vacío arranque. (Presione la tapa de vacío para que tome
contacto con la barra de sellado.)
7. Cuando la ventana de sellado llegue a 0, el aparato libera automáticamente el vacío y permite que se abra la tapa de vacío.
8. Retire la bolsa e inspeccione el sello. El sello debe verse liso y uniforme
a lo largo de la bolsa. El sello NO DEBE derretirse hacia la bolsa en ningún
punto. Revise que no haya suras o arrugas que permitan la entrada de aire
en la bolsa. Una bolsa sellada debidamente no puede separarse; debe de
cortarse para abrirse.
9. No forme sellos en el costado de las bolsas, éstos ya vienen sellados.
10. Si el sello está bien, continúe con el empaque al vacío. Si no está bien:
• Si el sello está derretido a través de la bolsa, córtelo con unas tijeras y ajuste
el tiempo de sellado hacia abajo (-) en incrementos de un segundo, para probar
nuevamente el proceso.
• Si el sello no soldó por completo la bolsa, córtelo con unas tijeras y ajuste el
tiempo de sellado hacia arriba (+) en incrementos de un segundo, para probar
nuevamente el proceso.
PRUEBA INICIAL DE SELLADO DE BOLSAS
¡NO ABRA a la fuerza la tapa de
vacío! Espere a que el vacío la libere.
Permita que el aparato se ENFRÍE
por lo menos durante 20 segundos
entre un ciclo y otro.
NOTA: La selladora al vacío está diseñada para usarse EXCLUSIVAMENTE
con BOLSAS AL VACÍO. Obtenga mejores resultados usando solamente las
bolsas recomendadas con forro de malla o estampado.
¡NO USE BOLSAS CASERAS! Cualquier uso de la selladora al vacío que no
sea de los descritos en este folleto puede dañar el aparato y anular la garantía.
ADVERTENCIA! Antes de limpiar, ensamblar o desarmar la selladora
al vacío, cerciórese de que esté APAGADA y de que LA CLAVIJA ESTÉ
RETIRADA DEL TOMACORRIENTE O FUENTE DE ENERGÍA.
Page 34

ANTES DE PROBAR EL ENVASADO
AL VACÍO, ASEGÚRESE DE QUE LA
SELLADORA AL VACÍO CUMPLA
CON TODAS LAS PRECAUCIONES
DE SEGURIDAD QUE SE
ENUMERAN
EN ESTE FOLLETO.
1. Coloque los elementos que se
sellarán al vacío dentro de la bolsa
de vacío. Deje al menos 2” (5 cm) en
el extremo abierto de la bolsa para
crear suciente espacio de sellado.
Asegúrese de no cubrir el puerto de
vacío (FIGURA 9).
2. Cierre la tapa de vacío y compruebe
que la abertura de la bolsa esté en
el centro de la cámara de vacío.
Presione hacia abajo en ambos
lados de la tapa para bloquear la tapa en su lugar. Usted escuchará cada
lado “clic” cuando está asegurada. NOTA: Si ambas partes no están bien
sujetas bloqueadas, la tapa no liberará automáticamente. Para resolver este
problema, presione hacia abajo en ambos lados de la tapa dos veces para
liberar los bloqueos.
3. Presione y suelte el botón Start (Arranque). La bomba de vacío de
2 pistones comenzará a extraer el aire de la bolsa mientras la ventana
LED de vacío comienza a contar en forma ascendente. Es probable de
deba presionar levemente la tapa de vacío durante el proceso de cuenta
ascendente. La ventana LED de vacío contará en forma ascendente desde
el número “1” hasta el número “9”, antes de comenzar automáticamente con
el proceso de sellado de la bolsa. Estos números representan etapas, no
segundos.
4. Una vez que la ventana LED de vacío muestra el número “9”, el proceso
de sellado comenzará a descontar desde la conguración establecida hasta
llegar a “0” en la ventana LED de vacío.
5. Una vez que la ventana LED de sellado llegue a “0”, la selladora al vacío
detendrá automáticamente la bomba de vacío de 2 pistones y liberará la
presión al vacío momentos más tarde. NO INTENTE ABRIR LA TAPA DE
VACÍO ANTES DE QUE SE LIBERE EL VACÍO, ESTO PODRÍA CAUSAR
DAÑOS SEVEROS EN LA BARRA DE SELLADO.
OPERACIÓN EN MODO AUTOMÁTICO
FIGURA 9
Deje 5 cm
(2”) de
espacio
para sellar.
Puerto de
vacío
34
INSTRUCCIONES EN ESPAÑOL
¡NO ABRA a la fuerza la tapa de
vacío! Espere a que el vacío la libere.
Permita que el aparato se ENFRÍE
por lo menos durante 20 segundos
entre un ciclo y otro.
NOTA: La selladora al vacío está diseñada para usarse EXCLUSIVAMENTE
con BOLSAS AL VACÍO. Obtenga mejores resultados usando solamente las
bolsas recomendadas con forro de malla o estampado.
¡NO USE BOLSAS CASERAS! Cualquier uso de la selladora al vacío que no
sea de los descritos en este folleto puede dañar el aparato y anular la garantía.
Page 35

35
INSTRUCCIONES EN ESPAÑOL
ANTES DE PROBAR EL ENVASADO
AL VACÍO, ASEGÚRESE DE QUE LA
SELLADORA AL VACÍO CUMPLA
CON TODAS LAS PRECAUCIONES DE
SEGURIDAD QUE SE ENUMERAN EN
ESTE FOLLETO.
1. Coloque los elementos que se sellarán
al vacío dentro de la bolsa de vacío. Deje
al menos 2” (5 cm) en el extremo abierto
de la bolsa para crear suficiente espacio de
sellado. Asegúrese de no cubrir los puertos
de vacío (FIGURA 10).
2. Cierre la tapa de vacío y compruebe que
la abertura de la bolsa esté en el centro de
la cámara de vacío. Presione hacia abajo en
ambos lados de la tapa para bloquear la tapa
en su lugar. Usted escuchará cada lado “clic”
cuando está asegurada. NOTA: Si ambas
partes no están bien sujetas bloqueadas,
la tapa no liberará automáticamente. Para
resolver este problema, presione hacia abajo en ambos lados de la tapa dos
veces para liberar los bloqueos.
3. Mientras supervisa la bolsa de vacío, presione y suelte el botón START
(Arranque). La bomba de vacío de 2 pistones comenzará a extraer el aire de
la bolsa. Cuando se haya extraído la cantidad de aire necesario de la bolsa,
presione y suelte el botón Manual Bag Seal (Sellado manual de la bolsa).
Comenzará con el proceso de sellado de la bolsa.
Nota: Es probable de deba presionar levemente la tapa de vacío durante este
proceso.
Nota: Se requiere algo de presión de vacío dentro de la bolsa para conseguir
un buen sellado.
4. Una vez que la ventana LED de sellado llegue a “0”, la selladora al vacío
detendrá automáticamente la bomba de vacío y liberará la presión de vacío
momentos más tarde. NO INTENTE ABRIR LA TAPA DE VACÍO ANTES DE
QUE SE LIBERE EL VACÍO, ESTO PODRÍA CAUSAR DAÑOS SEVEROS EN
LA BARRA DE SELLADO.
FIGURA 10
Deje
5 cm
(2”) de
espacio
para
sellar.
Puerto de
vacío
FUNCIONAMIENTO EN MODO MANUAL
¡NO ABRA a la fuerza la tapa de
vacío! Espere a que el vacío la libere.
Permita que el aparato se ENFRÍE
por lo menos durante 20 segundos
entre un ciclo y otro.
NOTA: La selladora al vacío está diseñada para usarse EXCLUSIVAMENTE
con BOLSAS AL VACÍO. Obtenga mejores resultados usando solamente las
bolsas recomendadas con forro de malla o estampado.
¡NO USE BOLSAS CASERAS! Cualquier uso de la selladora al vacío que no
sea de los descritos en este folleto puede dañar el aparato y anular la garantía.
ADVERTENCIA! Antes de limpiar, ensamblar o desarmar la selladora
al vacío, cerciórese de que esté APAGADA y de que LA CLAVIJA ESTÉ
RETIRADA DEL TOMACORRIENTE O FUENTE DE ENERGÍA.
Page 36

Algunas piezas de la selladora al vacío quizás deban sustituirse luego de ser
utilizadas repetidamente. El kit de mantenimiento de la selladora al vacío será
necesario para que la selladora al vacío funcione correctamente.
1. Coloque la selladora al vacío en posición “OFF” (Apagado) y extraiga el cable
de alimentación del tomacorriente.
2. Asegúrese de que la unidad esté completamente fría.
3. Abra la tapa de vacío.
4. Extraiga el sello ovalado de la cámara de vacío de la ranura en la parte inferior
de la tapa de vacío.
5. Extraiga el sello ovalado de la cámara de vacío de la ranura de la cámara de
vacío de plástico.
6. Coloque un nuevo sello ovalado de la cámara de vacío en la ranura de la
cámara de vacío de plástico. Coloque el sello en la ranura con los dedos hasta
que esté listo.
7. Coloque un nuevo sello ovalado de la cámara de vacío dentro de la ranura en
la tapa de vacío. Coloque el sello en la ranura con los dedos hasta que esté listo.
SUSTITUCIÓN DE LA CINTA DE LA BARRA DE SELLADO:
1. Coloque la selladora al vacío en posición “OFF” (Apagado) y extraiga el cable
de alimentación del tomacorriente.
2. Asegúrese de que la unidad esté completamente fría.
3. Abra la tapa de vacío.
4. Tome con la uña cualquiera de los extremos de la cinta de la barra de
sellado que cubren el calentador de la barra de sellado hasta que se levante
suavemente. Tome el extremo ojo y tire suavemente
la cinta de la barra de sellado hacia atrás hasta que haya salido completamente.
5. Extraiga la parte trasera de la nueva correa de la cinta de la barra de sellado.
Tenga cuidado de que la cinta de la barra de sellado no tome contacto con nada,
ni consigo misma, cuando el lado del adhesivo quede expuesto.
6. Sostenga un extremo de la cinta de la barra de sellado en cada mano. Pegue
el extremo izquierdo de la cinta de la barra de sellado en el área lisa de la
cámara de vacío de plástico justo a la izquierda del calentador de la barra de
sellado. Coloque la cinta de la barra de sellado de izquierda a derecha sobre
el calentador de la barra de sellado hasta que esté lista. Asegúrese de que no
queden arrugas o dobleces en la cinta de la barra de sellado. La cinta de la barra
de sellado debe cubrir por completo el calentador de la barra de sellado.
INSTRUCIONES DEL KIT DE MANTENIMIENTO
36
INSTRUCCIONES EN ESPAÑOL
Page 37

37
INSTRUCCIONES EN ESPAÑOL
SOLUCIÓN DE PROBLEMAS
PREGUNTA: NO PASA NADA CUANDO PRESIONO EL BOTÓN POWER
(ENCENDIDO).
1. Asegúrese de que el cable de alimentación
no esté para nada dañado.
2. Asegúrese de que el extremo hembra
del cable de alimentación esté conectado
completamente en el puerto de la fuente de
alimentación de la selladora al vacío, y que el
extremo macho del cable de alimentación esté
conectado firmemente al tomacorriente de la
pared (FIGURA 11).
3. Si la selladora al vacío está conectada
correctamente, y el botón Power (Encendido)
aún no funciona, compruebe el estado del
fusible, que se encuentra sobre el puerto de
la fuente de alimentación, a la derecha de la
selladora al vacío. Extraiga el sujetador del fusible y luego observe el tubo
transparente para revisar
si el fusible está oscuro. Si el fusible está oscuro, deberá sustituirse con un
fusible estándar de 8 Amp.
4. Si no es necesario sustituir el fusible, deberá asegurarse de que el
tomacorriente de la pared funcione correctamente. Conecte otro electrodoméstico
al tomacorriente para comprobar si funciona. UTILICE SOLO FUSIBLES CON
RETARDO DE TIEMPO.
PREGUNTA: MI SELLADORA AL VACÍO SE APAGÓ Y NO ARRANCA
NUEVAMENTE.
1. El protector de sobrecarga térmica puede haberse activado. En este caso,
permita que la selladora al vacío se enfríe al abrir la tapa de vacío durante
aproximadamente 20 minutos. Asegúrese de dejar la tapa de vacío abierta
entre la bolsa y el sellado.
2. Asegúrese de que el extremo hembra del cable de alimentación esté
conectado completamente en el puerto de la fuente de alimentación de la
selladora al vacío, y que el extremo macho del cable de alimentación esté
conectado firmemente al tomacorriente de la pared.
3. Si la selladora al vacío está conectada correctamente, y el botón Power
(Encendido) aún no funciona, compruebe el estado del fusible, que se
encuentra sobre el puerto de la fuente de alimentación, a la derecha de la
selladora al vacío. Extraiga la tapa del fusible y observe el tubo transparente
para ver si el fusible está oscuro. Si el fusible está oscuro, deberá sustituirse
con un fusible estándar de 8 Amp.
4. Si no es necesario sustituir el fusible, deberá asegurarse de que
el tomacorriente de la pared funcione correctamente. Conecte otro
electrodoméstico al tomacorriente para comprobar si funciona.
FIGURA 11
Compruebe si el
fusible se oscurece
I
O
Page 38

PREGUNTA: EL SELLO DE LA BOLSA SE SEPARA.
1. Si el sello no soldó por completo la bolsa, córtelo con unas tijeras y ajuste
el tiempo de sellado hacia arriba (+) en incrementos de un segundo, para probar
nuevamente el proceso.
2. La selladora al vacío está diseñada para usarse con bolsas para envasado al
vacío. Para obtener mejores resultados use bolsas al vacío de Weston®. NO USE
BOLSAS CASERAS con la selladora al vacío.
3. El sello de la bolsa puede estar incompleto. Si el sello tiene una fisura o si entre
las capas de la bolsa quedaron atrapados líquidos o polvos, las capas podrían no
haber quedado debidamente soldadas. Corte el sello y limpie el interior de la bolsa.
Después haga la prueba de volver a sellar al vacío el paquete. Cuando envase
un alimento húmedo o en polvo, inserte una toalla de papel en la bolsa antes del
envasado al vacío. La toalla de papel evita que el alimento interfiera con el sellado.
Vea algunos consejos útiles en la sección “Lineamientos de envasado al vacío” de
este folleto.
4. Si ninguna de las medidas anteriores resuelve el problema, comuníquese con
Servicio al cliente.
FIGURA 12
PREGUNTA: LA BOMBA DE VACÍO ARRANCA PERO NO ELIMINA EL AIRE
DE LA BOLSA.
Para obtener mejores resultados use
siempre
bolsas de la marca de Weston®.
1. Revise que la bolsa esté insertada
debidamente. El extremo abierto de
la bolsa debe estar centrado dentro.
Revise que la bolsa no cubra la apertura
del puerto de vacío (FIGURA 12).
2. La bolsa podría tener una fuga. Si
hay una fuga en la bolsa, el aire entra
en la bolsa del exterior. Revise si tiene
desgarraduras o pinchazos. Si está
usando una bolsa hecha a partir de
un rollo de material, revise bien que el
sello del extremo de la bolsa esté bien
cerrado.
THE PREGUNTA: LA BARRA SELLADORA DERRITE LA BOLSA
La selladora al vacío está diseñada para usarse con bolsas para envasado al
vacío. Para obtener mejores resultados use bolsas al vacío de Weston®. NO
USE BOLSAS CASERAS con la selladora al vacío.
3. Revise la condición de las tiras de cinta de la barra selladora.
Reemplácelas si es necesario.
4. Abra la tapa de vacío y deje que la barra selladora se enfríe de 5 a 10
minutos. Siempre deje abierta la tapa de vacío después de cada bolsa y deje
pasar por lo menos 20 segundos entra una y otra.
5. Podría necesitar reducir el tiempo de la barra de sellado. Ajuste el tiempo
de sellado hacia abajo (-) en incrementos de un segundo y vuelva a hacer
una prueba. Consulte las instrucciones “Prueba inicial de sellado de bolsas”
de esta folleto para ver más información.
Deje
5 cm
(2”) de
espacio
para
sellar.
38
INSTRUCCIONES EN ESPAÑOL
Page 39

39
INSTRUCCIONES EN ESPAÑOL
SUSTITUCIÓN DEL FUSIBLE
Si la selladora al vacío no funciona cuando se la enchufa
y enciende, intente con alguna de las siguientes opciones
o con todas:
1. Asegúrese de que el fusible no esté quemado. El
fusible se encuentra en el lateral derecho de la unidad,
justo por encima del puerto del cable de alimentación.
Apague y desenchufe la selladora al vacío. Desenrosque
y extraiga el sujetador del fusible. Extraiga y revise el
fusible. La delgada banda de metal en el centro del
fusible debe estar limpia y sana. Si está quemada y/o
rota, sustitúyala con un nuevo fusible (8 Amp). Sustituya
el sujetador del fusible.
2. Asegúrese de que el conector en el extremo del cable
de alimentación esté conectado completamente en el
puerto del cable de alimentación.
3. Asegúrese de que el cable de alimentación no esté
dañado. NO utilice un cable de alimentación que esté
dañado. Llame a la línea de Servicio de Atención al
Cliente para obtener más información sobre la sustitución
de piezas.
4. Intente conectar el enchufe del cable de alimentación a
otro tomacorriente.
WARNING! Before cleaning, assembling or disassembling the Vacuum Sealer,
make sure the Vacuum Sealer is OFF and the PLUG IS REMOVED FROM THE
OUTLET/POWER SOURCE!
I
O
FIGURA 13
Page 40

40
Congele alimentos suaves y porosos durante 1 a 2 horas antes de empacarlas al vacío para retener su forma y textura.
TIPO DE UBICACIÓN DEL VIDA VIDA CON
ALIMENTO ALMACENAMIENTO NORMAL ENVASADO
AL VACÍO
CORTES GRANDES DE CARNE Congelador 6 meses De 2 a 3 años
CARNE MOLIDA Congelador 4 meses 1 año
PESCADO Congelador 6 meses 2 años
Para obtener mejores resultados, congele la carne y los pescados 1 o 2 horas antes de envasarlos al vacío para evitar que la
humedad y los jugos intereran con el sellado de la bolsa al vacío.
GRANOS DE CAFÉ Temperatura ambiente 4 semanas 16 meses
GRANOS DE CAFÉ Congelador 6-9 meses De 2 a 3 años
HARINA, ARROZ, AZÚCAR Temperatura ambiente 6 meses De 1 a 2 años
Para obtener mejores resultados, las sustancias en polvo o en granos deben mantenerse en el envase o en la bolsa originales,
luego colocarse en la bolsa de vacío para sellarlos y así evitar que el sellado interera con el sellado de la bolsa al vacío.
BAYAS, fresas, frambuesas, zarzamoras Refrigerador De 1 a 3 días 1 semana
BAYAS, arándanos rojos, moras negras, arándanos Refrigerador De 3 a 6 días 2 semanas
Para evitar que las bayas sean aplastadas por la selladora al vacío, es mejor congelar cada elemento antes de envasarlo. Esparza las
bayas en una placa para horno para permitir que se congelen de manera individual. Las bayas congeladas en un bloque grande
serían difíciles de sellar al vacío, debido a las pequeñas burbujas de aire que se formarían entre las bayas.
QUESO Refrigerador De 1 a 2 semanas De 4 a 8 meses
Si el queso envasado al vacío se utiliza de manera frecuente, asegúrese de que la bolsa de vacío sea lo sucientemente larga para permitir
varios sellados. Para el queso rallado, coloque un paño de papel dentro de la bolsa de vacío, arriba del queso, para evitar que se succione
en la selladora al vacío o que interera con el sellado de la bolsa.
GALLETAS, GALLETAS SALADAS,
PAN que se abren de manera periódica Temperatura ambiente De 1 a 2 semanas De 3 a 6 semanas
PASTA, GRANOS, FRUTOS SECOS Temperatura ambiente 6 meses De 1 año a 1 año y medio
NUECES Temperatura ambiente 6 meses 2 años
Los alimentos secos con bordes losos deben envolverse en un paño de papel o algún otro elemento para evitar
que los bordes losos perforen la bolsa de vacío.
LECHUGA Refrigerador De 3 a 6 días 2 semanas
Lave y seque cuidadosamente los vegetales de hojas antes de envasarlos al vacío.
VEGETALES Congelador 8 meses 2 años y medio
Para maximizar el sabor de los vegetales, sumérjalos en agua hirviendo antes de envasarlos al vacío. Sumergirlos en agua
hirviendo cocina los vegetales durante un tiempo breve y sella el sabor, el color y la textura y conserva los vegetales cocidos, pero
aún crocantes. Los vegetales pueden cocinarse parcialmente en agua hirviente en el microondas; la mayoría de los vegetales
solo requieren de 2 a 3 minutos (la mazorca de maíz requiere de 6 a 11 minutos). Luego sumerja los vegetales en agua fría para
detener el proceso de cocción. Seque los vegetales, luego enváselos al vacío.
Cuadro adaptado de Dr. G.K.York, Dept. of Food Science & Tech (Dept. de ciencia y tecnología alimenticia), U of California, Davis..
.NOTA IMPORTANTE: El envasado al vacío NO sustituye la refrigeración. Los
alimentos perecederos envasados al vacío requieren refrigeración.
. NUNCA descongele los alimentos congelados a temperatura ambiente.
Descongele los alimentos congelados en el refrigerador o en el microondas.
. En general, en cuanto más fría sea la temperatura en que los alimentos se
almacenan, estos durarán más.
. Maneje con cuidado las bolsas al vacío. Evite dañarlas. Una bolsa dañada no
podrá sellarse.
. ¡Utilice la información en el cuadro siguiente solo como una guía! Consulte las
secciones “Pautas para el envasado al vacío” y “Seguridad alimentaria” de este
manual. La vida real en almacenamiento puede variar. Revise si los alimentos se
encuentran en descomposición antes de usarlos.
INSTRUCCIONES EN ESPAÑOL
PAUTAS SOBRE LA VIDA EN ALMACENAMIENTO
Page 41

41
Artículos con polvo: Cuando envase artículos con polvo al vacío, cómo
harina, es mejor conservarlos en su empaque original antes de ponerlos en
bolsas de vacío.
Artículos losos o puntiagudos: Cuando se sellen artículos losos o
puntiagudos, es mejor cubrir sus bordes para que no perforen la bolsa
durante el proceso de vacío.
LEVADURA Y BACTERIAS
Para obtener mejores resultados al prolongar la vida de los alimentos, es
mejor empacar al vacío los alimentos frescos. En cuanto el alimento se ha
empezado a deteriorar, empacarlos al vacío sólo hará más lento el proceso
de deterioro. El sellado al vacío no previene por completo el crecimiento
de hongos. Otros microorganismos que provocan enfermedades pueden
seguir creciendo en ambientes con poco oxígeno, lo cuál requiere medidas
adicionales para eliminarlos.
Levadura: El desarrollo de levadura se puede hacer más lento con
refrigeración, y detener completamente congelando el alimento a 0°F
(-18°C). La levadura provocar fermentación, la cuál da al alimento un olor
identicable.
Bacterias: El congelamiento no elimina las bacterias, pero puede detener su
crecimiento. El crecimiento de las bacterias se puede identicar fácilmente
con un olor desagradable, y en ocasiones con una textura babosa. Algunas
bacterias, como las que provocan el botulismo, pueden crecer en ambiente
con poco oxígeno y no pueden detectarse a través de olor, sabor o color. El
botulismo es muy raro, pero peligroso. Asegúrese que todos los alimentos
sean correctamente almacenados y cocinados antes de ser ingeridos.
CÓMO COCINAR Y CALENTAR
.
Antes de calentar alimentos empacados al vacío en un horno de
microondas, perfore o abra la bolsa para permitir que escape el aire caliente
que se generará.
.
Los alimentos empacados al vacío pueden ser descongelados o cocinados
en agua hirviendo.
.
Alimentos perecederos empacados al vacío cómo carnes, vegetales
y quesos debe refrigerarse (a 34°F [1.1°C] o a menor temperatura) o
congelarse, especialmente los alimentos libres o bajos en ácidos.
Esto es importante pues aunque el empaque al vacío retira la mayoría
del aire de la bolsa, bacterias cómo Clostridium botulinum, que produce
una toxina que provoca la enfermedad del botulismo, es anaerobia y crece
en ausencia del oxígeno. La refrigeración y el congelamiento reducen el ritmo
de crecimiento de las bacterias. También es importante mantener el área
de trabajo limpia para reducir la posibilidad de empacar bacterias nocivas con los
alimentos.
INSTRUCCIONES EN ESPAÑOL
LINEAMIENTOS PARA EMPACAR AL VACÍOPAUTAS SOBRE LA VIDA EN ALMACENAMIENTO
Page 42

42
Hay que seguir ciertas reglas básicas al manejar alimentos.
Las reglas son COCINAR, SEPARAR, LIMPIAR y ENFRIAR.
COCINAR
Es muy importante cocinar los alimentos a una temperatura interna que destruya cualquier
bacteria que esté presente. Últimamente se ha puesto mucha atención en la higiene de
las hamburguesas y otros alimentos elaborados con carne molida y con razón. Cuando se
muele la carne, las bacterias presentes en la supercie se revuelven en toda la mezcla de la
carne molida. Si la carne molida no se cuece a por lo menos 71°C a 74°C (160°F - 165°F),
no se destruyen las bacterias y hay una buena posibilidad de enfermarse.
Las piezas de carne sólida, como los letes y las chuletas, no tienen en su interior bacterias
peligrosas como le E. coli, por lo que pueden servirse menos cocidas. Aun así, cualquier
corte de vacuno debe cocinarse a una temperatura interna de por lo menos 63°C (145°F)
(medio cocido). La temperatura recomendable para las aves es de 75°C (165°F) y los cortes
sólidos de carne de puerco deben cocinarse a 71°C (160°F).
SEPARAR
SIEMPRE DEBE separar los alimentos que se comen crudos y los que se vayan a cocer
antes de comerse. La contaminación cruzada se presenta cuando la carne o los huevos
crudos entran en contacto con alimentos que se van a consumir sin cocimiento. Ésta es una
importante causa de intoxicaciones. Siempre use una doble envoltura para la carne cruda
y colóquela en la repisa más baja del refrigerador, para que no haya manera de que su
jugo gotee en las verduras frescas. Use la carne cruda 1 o 2 días después de comprarla, o
congélela para guardarla más tiempo. Descongele la carne congelada en el refrigerador, no
en el mesón de la cocina.
Cuando ase o cocine carne o pescado crudo, coloque la carne ya cocida en un platón
limpio. No use el mismo platón que usó para llevar la carne al asador. Lave los utensilios
usados en el asador después de haber volteado los alimentos por última vez, así como las
cucharas y espátulas usadas para freír o para voltear la carne al estarla cocinando.
No olvide lavarse las manos después de manejar carne o huevos crudos. Es absolutamente
necesario lavarse las manos con agua y jabón o usar una toallita húmeda antibacteriana
después de tocar carne o huevos crudos. No lavarse las manos o las supercies cuando se
cocina es una causa importante de contaminación cruzada.
LIMPIAR
Lávese las manos y las supercies de trabajo con frecuencia mientras esté cocinando.
Lávese con agua tibia y jabón durante por lo menos 15 segundos; después séquese con
una toalla de papel.
ENFRIAR
Es muy importante enfriar los alimentos. La zona de peligro para la multiplicación de
bacterias está entre los 4 °C y 60 °C (40 °F - 140 °F). El refrigerador debe estar a 4 °C
(40 °F) o menos; el congelador debe estar a -17 °C (0 °F) o menos. Regla básica: sirva
calientes los alimentos calientes y sirva fríos los alimentos fríos. Use platos calientes
para mantener caliente la comida a la hora de servirla. Use baños de agua con hielo para
mantener fría la comida fría. Nunca deje ningún alimento a temperatura ambiente por más
de 2 horas; o por más de 1 hora si la temperatura ambiente es de 32 °C (90 °F) o superior.
Cuando empaque para un picnic, asegúrese de que la comida ya esté fría cuando la
meta en la canasta aislada. La canasta no enfría la comida; sólo la mantiene fría si está
debidamente empacada con hielo. Los alimentos cocidos calientes deben colocarse en
recipientes bajos y refrigerarse de inmediato para que se enfríen rápidamente. No olvide
cubrir los alimentos una vez que se enfríen..
NOTA: Debe tener especial consideración al usar venado y otra carne de caza, ya que
puede contaminarse durante la preparación de campo. El venado suele mantenerse a
temperaturas que podrían permitir el crecimiento de bacterias, como cuando se transporta.
Consulte con el Departamento de Carnes y Aves de la USDA si tiene más preguntas o
quiere más información sobre higiene de carne y alimentos.
SEGURIDAD DE LOS ALIMENTOS
INSTRUCCIONES EN ESPAÑOL
Page 43

Page 44

Weston Brands, LLC garantiza al COMPRADOR AL DETALLE ORIGINAL de este producto que si funciona en cumplimiento
con las instrucciones impresas adjuntas, entonces por un período de 2 años desde la fecha de compra, el producto se
considerará libre de defectos respecto del material y mano de obra.
La Tarjeta de Garantía, junto con una copia del recibo original debe ser recibida por Weston Brands, LLC dentro de 30 días
desde la fecha de compra para hacer efectiva la garantía. Si no se envía la Tarjeta de Garantía completamente llena, junto
con una copia del recibo original, anulará la garantía.
El producto debe ser enviado o despachado mediante ete prepagado a Weston Brands LLC para efectuar los servicios
establecidos en la garantía, en su envase original o en un envase similar que garantice igual grado de protección. El daño
producto del despacho no es responsabilidad de la compañía. Weston Brands, LLC cobra $35.00 por concepto de mesón por
hora. NOTA: Las reparaciones no se iniciarán sin la autorización del cliente. El costo por despacho de devolución al cliente se
agregará a la factura por reparación.
Antes de devolver el producto para la Reparación según la Garantía, el producto debe estar completamente limpio y libre de
partículas de alimentos u otros fragmentos. El incumplimiento del comprador respecto de esta norma resultará en el envío de
la unidad sin reparación. En algunos casos, podría aplicar un sobrecargo de $50 por concepto de limpieza.
Weston Brands, LLC reparará (o a su decisión, cambiará) el producto sin cobro, si a juicio de la compañía, se ha demostrado
que está defectuoso respecto de la mano de obra y material del vendedor, dentro del período de garantía.
Los cambios de productos nuevos o reacondicionados por partes defectuosas de fábrica serán suministrados por dos (2) años
desde la fecha de compra. Las partes cambiadas están garantizadas por el resto del período original de garantía.
Para las reparaciones que no estén cubiertas en la garantía, comuníquese con Servicio al Cliente de Weston Brands, LLC al
1-800-814-4895 de lunes a viernes, desde las 8 a.m. hasta las 5pm ET (Desde fuera de los Estados Unidos comuníquese
al 001-440-638-3131) para solicitar un Número de Autorización de Devolución de la Mercadería (Número RMA). Weston
Brands, LLC rechazará todo envío que no contenga este número. NO DEVUELVA LA UNIDAD SIN LA AUTORIZACIÓN DE
WESTON BRANDS, LLC.
LIMITACIONES: La garantía queda invalidada si el producto se utiliza para algún objetivo que no sea aquél para el cual
está diseñado. El producto no debe haber sido previamente alterado, reparado, ni tampoco se le debe haber hecho servicio
técnico por cualquier otra persona que no sea de Weston Brands, LLC. Si corresponde, no se debe alterar o eliminar el
número de serie. El producto no debe estar sujeto a accidentes durante el transporte o estando en posesión del cliente, no
debe ser mal usado, mal tratado, u operado en forma contraria a las instrucciones de este manual. Esto incluye toda falla
causada por negligencia de mantención razonable o necesaria, voltaje de línea inadecuado o actos de la naturaleza. Esta
garantía es intransferible y sólo se aplica a ventas realizadas en Estados Unidos y Canadá.
Salvo en la medida en que lo prohíba la ley correspondiente, ninguna otra garantía expresa o implícita, incluyendo
comerciabilidad o aptitud de la garantía para un objetivo en particular, aplicará a este producto. Bajo ninguna circunstancia
Weston Brands, LLC será responsable de daños emergentes sostenidos en conexión con dicho producto y Weston Brands
LLC no asume ni autoriza a ningún representante u otra persona a asumir por él ninguna obligación o responsabilidad que no
sea aquella expresamente establecida en esta tarjeta de garantía. Toda garantía correspondiente implícita también se limita a
un período de dos (2) años de la garantía limitada.
Esta garantía cubre sólo el producto y sus partes especícas, no cubre los alimentos u otros productos procesados en
él. Weston no se hace responsable por partes faltantes o dañadas en productos con descuento/en oferta, reventa, o en
promoción nal, sobre los cuales el vendedor puede no ser capaz de garantizar una funcionalidad completa, o la integridad de
la unidad.
CORTE POR LA LÍNEA PUNTEADA Y ENVÍE LA TARJETA DE GARANTÍA JUNTO CON UNA COPIA DE SU RECIBO DE
COMPRA ORIGINAL A
Weston Brands, LLC / WARRANTY
20365 Progress Drive, Strongsville, OH 44149 USA
Nombre del Cliente:
Dirección:
Ciudad/Estado/Código Zip/País:
Número Telefónico:
Dirección de Correo Electrónico:
Fecha de Compra Original:
Modelo del Producto #:
# de Serie (Si corresponde):
INFORMACIÓN DE GARANTÍA WESTON
¡GUARDE ESTA INFORMACIÓN DE GARANTÍA PARA SUS REGISTROS!
TARJETA DE GARANTÍA WESTON
ENVÍE ESTA TARJETA JUNTO CON UNA COPIA DE SU RECIBO DE COMPRA ORIGINAL A: WESTON
BRANDS, LLC/WARRANTY, 20365 PROGRESS DRIVE. STRONGSVILLE, OH 44149 USA
Copia del recibo
incluido
Page 45

SOUS VIDE
65-0601-W
PARCE QUE NOS PRODUITS BÉNÈFICIENT DE PERFECTIONNEMENTS CONSTANTS APPORTÉS
EN USINE, LES ILLUSTRATIONS PRÉSENTES PEUVENT ÊTRE LÉGÈREMENT DIFFÉRENTES DU
PRODUIT REÇU. 020915
Page 46

INSTRUCTIONS EN FRANÇAIS
46
1. TOUJOURS DÉCONNECTER la scelleuse
sous vide de la source d’alimentation avant
de procéder à des opérations de réparation/
entretien, au changement d’accessoires ou
nettoyage de l’unité.
2. Branchez la scelleuse sous vide dans une
prise murale standard de 120 V, 60 Hz NE
PAS utiliser de rallonge.
3. NE PAS UTILISER la scelleuse sous vide
si le cordon d’alimentation, la che ou toute
autre pièce sont endommagés. Si le cordon
d’alimentation ou la scelleuse sous vide sont
endommagés, appelez le service clientèle. NE
PAS REMPLACER LE CORDON. Veiller ce
que le cordon d’alimentation ne se trouve pas
sur la surface de travail. Vérier que toutes les
pièces fonctionnent correctement et comme
prévu. Vérier tout autre facteur qui pourrait
avoir une incidence sur le fonctionnement.
4. NE JAMAIS utiliser des accessoires ou
des pièces d’autres fabricants. Si vous utilisez
des pièces d’autres fabricants, la GARANTIE
SERA ANNULÉE et il y a risque d’électrocution
ou de blessure.
5. Réduire le risque de démarrage accidentel.
S’assurer que le l’interrupteur d’alimentation
est en position « OFF » (arrêt) avant de
brancher l’appareil à la source d’alimentation.
6. TOUJOURS TENIR LES DOIGTS À
L’ÉCART de la barre scellante à chaud et
du ruban de la barre scellante. Ces zones
CHAUFFENT. Il y a risque de graves
blessures.
7. NE PAS démonter cet appareil sous risque
d’ANNULER LA GARANTIE et d’entraîner des
blessures.
8. POUR VOUS PROTÉGER CONTRE TOUT
RISQUE DE CHOCS ÉLECTRIQUES: NE
CONSERVER CES DIRECTIVES!
IMPORTANTES RÈGLES DE SÉCURITÉ
LIRE ET COMPRENDRE COMPLÈTEMENT TOUTES LES DIRECTIVES
ET AVERTISSEMENTS AVANT D’UTILISER CE PRODUIT. LE PLUS
IMPORTANT EST VOTRE SÉCURITÉ! LE DÉFAUT D’OBSERVER LES
PROCÉDURES ET MISES EN GARDE PEUT ENTRAINER DES BLESSURES
GRAVES OU DES DOMMAGES MATÉRIELS. N’OUBLIEZ PAS : VOTRE
SÉCURITÉ PERSONNELLE EST VOTRE RESPONSABILITÉ!
PAS IMMERGER LA SCELLEUSE SOUS
VIDE DANS DE L’EAU OU DU LIQUIDE.
S’ASSURER QUE LA SCELLEUSE SOUS
VIDE EST DÉBRANCHÉE DE LA SOURCE
D’ALIMENTATION AVANT DE PROCÉDER
AU NETTOYAGE. Procéder selon la
section Instructions de nettoyage dans cette
brochure. NE JAMAIS rincer la scelleuse
sous vide sous l’eau du robinet.
9. NE JAMAIS LAISSER LA SCELLEUSE
SOUS VIDE SANS SURVEILLANCE. Par
précaution, DÉBRANCHER la scelleuse
sous vide de la source d’alimentation
avant de quitter la zone de travail. Toujours
superviser les appareils en présence
d’enfants. Cet appareil NE DOIT PAS être
utilisé par des enfants.
10. NE PAS laisser le cordon d’alimentation
pendre du bord de la surface de travail.
11. S’assurer que la scelleuse sous vide
est posée sur une surface de travail stable.
S’assurer que les pieds de la scelleuse sous
vide sont stables..
12. NE PAS utiliser la scelleuse sous vide à
l’extérieur.
13. NE PAS utiliser la scelleuse sous vide
sous l’inuence de l’alcool ou d’une drogue
quelconque.
14. La scelleuse sous vide doit
UNIQUEMENT être utilisée avec les SACS
SOUS VIDE. Pour obtenir de meilleurs
résultats, utiliser uniquement les sacs sous
vide recommandés. NE PAS UTILISER DE
SAC DE MÉNAGE! Toute autre utilisation
de la scelleuse sous vide autre que celles
indiquées dans cette brochure pourrait
endommager l’appareil et annuler la
garantie!
Page 47

Page 48

48
INSTRUCTIONS EN FRANÇAIS
1
2
3
4
5
6
7
8
9
10
11
12
Couvercle à
vide
16
Panneau d’
alimentation
Boîtier
supérieur
Boîtier inférieur
Chambre
sous vide
I
O
13
14
Page 49

DESCRIPTION DE LA PIÈCE
N’hésitez pas à visiter notre site Web WestonProduct.com/support si un composant est cassé, l’outil
fonctionne mal, ou pour commander un nouveau mode d’emploi.
WestonProducts.com
Veuillez appeler Weston Brands, LLC au numéro sans frais : 1-800-814-4895
Du lundi au vendredi: de 8h00 à 17h00 ET. En dehors des États-Unis, veuillez
appeler le 001-440-638-3131
NUMÉRO DE SCHÉMA DESCRIPTION DE LA PIÉCE NUMÉRO DE LA PIÉCE
1 FONCTIONNEMENT EN MODE MANUEL 08-0627
2 ISOLATEUR LA BARRE SCELLANTE 08-0625
3 CORDON D’ALIMENTATION 08-0402
4 PORTE-FUSIBLE 08-0604
5 FUSIBLE 8 A 08-0605
6 POMPE À VIDE 08-0639
7 TRANSFORMATEUR 08-0641
8 VENTILATEUR 08-0643
9 CARTE DE CIRCUITS IMPRIMÉS 65-0638
CAPTEUR DE VIDE 65-0643
10 RUBAN DE LA BARRE SCELLANTE (NOIR) VOIR LE KIT DE
MAINTENANCE
11 JOINT DE LA CHAMBRE (2) VOIR LE KIT DE
MAINTENANCE
12 KIT DE MAINTENANCE DE LA SCELLEUSE SOUS
VIDE, RUBAN DE LA BARRE SCELLANTE (NOIR),
JOINTS DE LA CHAMBRE (2)
65-0701
13 ENSEMBLE PORTE-ROULEAU COMPREND:
UNE TIGE DE PORTE-ROULEAU, DES BRAS DE
PORTE-TIGE (2), DES SUPPORTS AVEC VIS (2
SUPPORTS, 4 VIS)
65-0639
14 UN ENSEMBLE COUPE-SAC COMPREND: UNE
LAME, UN PORTE-LAME
65-0640
15 LAME 65-0641
16 PANNEAU DE COMMANDE 65-0642
49
INSTRUCTIONS EN FRANÇAIS
Page 50

L’appareil d’emballage sous vide comporte un ventilateur interne
qui fonctionne lorsque l’appareil est branché et sous tension. Pour
économiser l’énergie, éteindre l’appareil, puis débrancher le cordon
d’alimentation lorsque l’appareil n’est pas utilisé.
RUBAN DE LA
BARRE SCELLANTE
NE PAS RETIRER!
L’élément chauffant de la barre scellante est recouvert d’un ruban
pour protéger les sacs sous vide pendant l’opération (Figure 1).
NE PAS retirer le ruban de la barre scellante. Voir la section Kit de
maintenance dans ce manuel pour de plus amples informations sur le
remplacement du ruban de la barre scellante.
NE PAS RETIRER LES JOINTS DE LA
CHAMBRE SOUS VIDE DE FORME
OVALE!
AVANT DE LANCER LE SCELLEMENT DES SACS
Avant d’utiliser la scelleuse sous vide, se familiariser avec les fonctions de
scellement de sacs. Un sac à vide est scellé lorsque l’élément chauffant de
la barre scellante est activé et chauffe le sac à son point de fusion qui colle
dénitivement les couches du sac ensemble permettant d’étanchéiser le sac.
Cet appareil est livré pré-réglé de l’usine pour engager l’élément chauffant
de la barre scellante pendant 3 secondes. Cette durée est appropriée au
scellement de sacs sous vide Weston®. Des sacs d’autres marques peuvent
nécessiter légèrement plus ou légèrement moins de temps.
Tester le scellement de plusieurs sacs pour garantir que la durée de
scellement est correcte. Il peut s’avérer nécessaire d’augmenter (+) ou de
diminuer (-) la durée de scellement pour obtenir un scellement optimal des
sacs.
RUBAN PROTECTEUR
Une bande du ruban de la barre scellante a été
installée à l’usine sur la scelleuse sous vide.
NE PAS RETIRER LE RUBAN!
FIGURE 1
VENTILATEUR
50
INSTRUCTIONS EN FRANÇAIS
Page 51

Deux joints de la chambre de forme ovale sont installés à l’usine sur la scelleuse
sous vide (Figure 2). Lorsque le couvercle à vide est fermé, une fermeture
hermétique est créée pour l’évacuation de l’air de la chambre sous vide.
Les joints de la chambre de forme ovale peuvent s’user au l du temps et exiger
le remplacement. Voir la section Kit de maintenance dans ce manuel pour de plus
amples informations sur le remplacement des joints de la chambre sous vide de
forme ovale.
PROTECTION CONTRE LES SURCHARGES THERMIQUES
La scelleuse sous vide s’arrête automatiquement en cas de surchauffe. Si cela
se produit, mettre l’unité hors tension et ouvrir le couvercle à vide. Reprendre
normalement l’opération une fois que l’unité a refroidi ou environ 20 minutes après.
Pour éviter toute surchauffe, attendre au moins 20 secondes entre les cycles avec
le couvercle à vide ouvert. Ne pas toucher le ruban de la barre scellante. Le ruban
de la barre scellante est toujours chaud pendant un moment après chaque cycle
scellant.
INTERRUPTEUR DE FIN DE COURSE
L’appareil d’emballage sous vide comporte un interrupteur pour empêcher
l’actionnement de l’élément de chauffage de la barre de scellage en mode
manuel lorsque le couvercle de l’appareil d’emballage sous vide est ouvert.
Lorsque le couvercle de l’appareil d’emballage sous vide est fermé, la chaleur
dégagée par l’élément de chauffage de la barre de scellage est absorbée par
le sac sous vide et le joint du couvercle de l’appareil d’emballage sous vide.
Lorsque le couvercle de l’appareil d’emballage sous vide est ouvert, il n’existe
aucun moyen de dissiper la chaleur et l’appareil risque de s’endommager.
ASSEMBLY
• Poser l’appareil d’emballage
sous vide sur une surface
sèche et plane.
• Brancher la fiche femelle du
cordon d’alimentation dans le
port d’alimentation du côté droit
de l’appareil (Figure 2).
• Brancher la fiche mâle du
cordon d’alimentation dans
une prise secteur standard
de 120 V mise à la terre. NE
PAS tenter de modifier la fiche
pour l’adapter à une prise
inappropriée.
FIGURE 2
I
O
JOINTS DE LA CHAMBRE SOUS VIDE
51
INSTRUCTIONS EN FRANÇAIS
REMARQUE: La scelleuse sous vide doit UNIQUEMENT être utilisée avec les SACS SOUS VIDE.
Pour obtenir de meilleurs résultats, utiliser uniquement les sacs sous vide recommandés avec une
doublure gaufrée ou en maille.
NE PAS UTILISER DE SAC DE MÉNAGE! Toute autre utilisation de la scelleuse sous vide
autre que celles indiquées dans cette brochure pourrait endommager l’appareil et annuler la garantie!
Page 52

• NE JAMAIS IMMERGER la scelleuse sous vide dans l’eau ni dans d’autres
liquides.
• S’assurer que la scelleuse sous vide a complètement refroidi avant de la
nettoyer.
• Essuyer toutes les surfaces extérieures, y compris la chambre sous vide
en plastique et le couvercle à vide avec un tissu humide ou une serviette en
papier. La majorité des produits de nettoyage ménagers peuvent être utilisés.
Ne pas pulvériser directement dans l’évent sur le côté gauche de l’unité. NE
PAS utiliser de produits abrasifs!
• Pendant le nettoyage, ne pas détacher ni endommager la bande du ruban
de la barre scellante recouvrant l’élément chauffant de la barre scellante.
• Sécher toutes les surfaces et fermer le couvercle à vide avant de placer la
scelleuse sous vide.
INSTRUCTIONS D’ENTRETIEN ET DE NETTOYAGE
52
INSTRUCTIONS EN FRANÇAIS
AVERTISSEMENT! Avant de procéder au nettoyage, au montage ou au
démontage de la scelleuse sous vide, s’assurer que la scelleuse sous vide est HORS
TENSION et que la FICHE A ÉTÉ RETIRÉE DE LA PRISE/SOURCE D’ALIMENTATION!
MISE À LA TERRE
Cet appareil doit être mis à la terre lorsqu’il est utilisé
an de protéger son utilisateur contre les décharges
électriques. Cet appareil est équipé d’un cordon
d’alimentation polarisé et d’une che à trois lames
permettant de le brancher à une prise de courant mise
à la terre. La che de cet appareil ressemble à celle
illustrée à la gure A. Un adaptateur, illustré à la gure
B, doit être utilisé pour brancher la che polarisée
dans une prise de courant à deux trous. La patte de
mise à la masse qui dépasse de l’adaptateur doit être
branchée à une masse permanente, comme une prise
de courant correctement mise à la terre, à l’aide d’une
vis en métal, comme il est illustré à la gure C.
RALLONGES
Utiliser uniquement des rallonges polarisées
qui comportent des ches à trois lames et des
connecteurs de rallonges à trois lames pouvant
accepter la che polarisée de cet appareil. Utiliser
uniquement des rallonges ayant une classication
électrique égale ou supérieure à celle de l’appareil.
NE PAS utiliser de rallonges endommagées.
Vérier l’état de la rallonge avant de l’utiliser et la
remplacer si elle est endommagée. NE PAS faire
une utilisation abusive de la rallonge et ne pas la
débrancher en tirant sur le cordon. Garder le cordon
d’alimentation à bonne distance de la chaleur et des
rebords tranchants.
FIGURE A
FIGURE B
FIGURE C
Conducteur
de mise à
la terre du
circuit
Broche de
mises à la
terre
Vis de mises
à la terre en
métal
Plaque de
la prise de
courant avec
mise à la
terre
Patte de
mise à la
terre
AA2220
INSTRUCTIONS DE MISE À LA TERRE
Page 53

• Bouton Start (démarrage) : le bouton Start (démarrage) démarre la pompe
d’aspiration à 2 pistons, qui commence le processus d’évacuation de l’air.
• Bouton Cancel (annuler) : ce bouton est utilisé pour interrompre le cycle de
vide à tout moment.
• Boutons Seal Time (temps de scellage) + et - : le bouton Seal Time (temps
de scellage) congure le nombre de secondes pendant lesquelles la barre de
scellage appliquera de la chaleur pour sceller le sac. Le temps optimal pour les
différentes marques de sac peut être conguré en utilisant les boutons Plus (+) ou
Moins (-). Voir la section « Scellage de sac » du présent livret pour de l’information
supplémentaire sur le scellage de sac sous vide.
• Fenêtre de scellage : la fenêtre de scellage à DEL numérique indique le
nombre de secondes pendant lesquelles la barre de scellage appliquera de la
chaleur pour sceller le sac. Une fois que la barre de scellage aura été activée,
l’afchage commencera le compte à rebours jusqu’à « 0 ». Voir la section «
Scellage de sac » du présent livret pour de l’information supplémentaire sur le
scellage de sac sous vide.
• Fenêtre du cycle de vide : la fenêtre du cycle de vide à DEL numérique
indique le degré de vide que l’appareil d’emballage sous vide a atteint. L’afchage
comptera de « 0 » à « 9 ».
• Bouton du mode pulsé (Pulse): Le bouton du mode pulsé (Pulse) sert à sceller
des liquides ou des articles délicats, en vous permettant de contrôler le processus
d’emballage sous vide. Lorsque le sac est prêt, appuyez sur le bouton du mode
pulsé (Pulse) autant de fois que nécessaire jusqu’à ce que vous ayez éliminé
la quantité d’air voulue. Appuyez sur le bouton de scellage de sac manuel pour
sceller le sac.
• .Bouton Manual Bag Seal (scellage de sac manuel) : ce bouton démarrera
la barre de scellage à tout moment au cours du mode Manual (manuel). Vous
trouverez de l’information supplémentaire sur le mode Manual (manuel) à la
section « Mode manuel » du présent livret.
• Accessory Button” Touche Accessory (ACCESSOIRE): Appuyer sur la touche
ACCESSORY lors de l’utilisation de boîtes sous vide pour aspirer l’air de ces
boîtes et les sceller.
PANNEAU DE COMMANDE
NOTE: The Vacuum Sealer is ONLY intended to be used with VACUUM BAGS. For
best results, only use the recommended vacuum bags with an embossed or mesh lining.
DO NOT USE HOUSEHOLD BAGS! Any other uses of the Vacuum Sealer, other than
the uses described in this booklet, could potentially damage the appliance and void the
warranty!
53
INSTRUCTIONS EN FRANÇAIS
REMARQUE: La scelleuse sous vide doit UNIQUEMENT être utilisée avec les SACS SOUS VIDE.
Pour obtenir de meilleurs résultats, utiliser uniquement les sacs sous vide recommandés avec une
doublure gaufrée ou en maille.
NE PAS UTILISER DE SAC DE MÉNAGE! Toute autre utilisation de la scelleuse sous vide
autre que celles indiquées dans cette brochure pourrait endommager l’appareil et annuler la garantie!
Page 54

1. Pour créer un sac à l’aide du porte-rouleau, enlever les agrafes qui
retiennent la tige du porte-rouleau à l’arrière de l’appareil d’emballage sous vide
(FIGURE 6).
2. Faire glisser la tige par l’ouverture centrale du rouleau (pour les sacs jusqu’à
11 po de largeur).
3. Déployer les bras du porte-rouleau, puis laisser la tige venir s’appuyer dans
les rainures des bras du porte-rouleau. Aligner soigneusement les encoches de
la tige avec les rainures des bras.
4. Le coupage des sacs à partir du rouleau s’avère plus facile lorsque les sacs
sont enroulés sur le rouleau (et non sous le rouleau) (FIGURE 7).
5. Déplacer le coupe-sac vers le couvercle, puis retirer le sac d’aspiration sur
la rainure du coupe-sac jusqu’à ce que la longueur désirée soit atteinte.
6. Ramener le coupe-sac sur le dessus du rouleau de sacs, en s’assurant que
la lame est sur l’un des côtés.
7. Faire glisser la lame sur le rouleau de sacs pour couper le rouleau en
fonction des dimensions de sac souhaitées (FIGURE 8).
UTILISATION DU PORTE-ROULEAU ET DU COUPE-SAC
FIGURE 6
P
O
W
E
R
I
N
D
I
C
ATO
R
O
N
O
F
F
8 A
M
P
F
U
S
E
O
N
LY
FIGURE 7
FIGURE 8
54
INSTRUCTIONS EN FRANÇAIS
Page 55

REMARQUE: La scelleuse sous vide doit UNIQUEMENT être utilisée avec les SACS SOUS VIDE.
Pour obtenir de meilleurs résultats, utiliser uniquement les sacs sous vide recommandés avec une
doublure gaufrée ou en maille.
NE PAS UTILISER DE SAC DE MÉNAGE! Toute autre utilisation de la scelleuse sous vide
autre que celles indiquées dans cette brochure pourrait endommager l’appareil et annuler la garantie!
NE PAS forcer l’ouverture du
couvercle! Attendre que le vide
soit relâché.
Laisser refroidir l’unité pendant
20 secondes au moins entre les
cycles.
55
INSTRUCTIONS EN FRANÇAIS
1. TOUJOURS laisser la barre scellante refroidir pendant environ 20 secondes
entre les sacs. Laisser le couvercle à vide OUVERT entre les emplois pour
permettre à l’élément chauffant de se refroidir plus rapidement entre les sacs.
2. Placer une extrémité du sac sur la barre scellante en laissant environ 5 cm
de la partie vide du sac dépasser le bord interne de la barre scellante.
3. Placer une extrémité du sac sur la barre scellante en laissant environ 5 cm
de la partie vide du sac dépasser le bord interne de la barre scellante.
4. Fermer le couvercle de l’appareil d’emballage sous vide tout en maintenant
le sac en place. Appuyez sur les deux côtés du couvercle pour verrouiller le
couvercle en place. Vous entendrez chaque côté “clic” quand il est fixé. NOTE:
Si les deux côtés sont pas correctement verrouillés, le couvercle ne libérera pas
automatiquement. Pour résoudre ce problème, appuyez sur les deux côtés du
couvercle deux fois pour libérer les verrous.
5. Appuyer sur le bouton de démarrage ce qui enclenche la pompe à vide (la
pompe à vide doit être en marche pour que la barre scellante puisse chauffer).
6. Appuyer immédiatement sur le bouton Manual Bag Seal (scellage de
sac manuel) après le démarrage de la pompe d’aspiration. (Appuyer sur le
couvercle de l’appareil d’emballage sous vide pour qu’il y ait contact avec la
barre de scellage.)
7. Après le comptage à rebours de la fenêtre de scellement jusqu’à zéro (0),
l’unité dégage automatiquement le vide ce qui permet au couvercle à vide de
s’ouvrir.
8. Retirer le sac et inspecter le scellement. Le scellement doit être uniforme sur
toute la longueur du sac. Le scellement NE DOIT JAMAIS faire fondre le sac.
S’assurer qu’il n’y a pas de déchirures ni de plis qui pourrait permettre à l’air
de pénétrer le sac. Un sac correctement scellé ne se détachera pas, il faut le
couper pour l’ouvrir.
9. Ne pas former de scellements latéraux sur le sac, les côtés sont déjà scellés.
10. Si le scellement est approprié, procéder à l’emballage sous vide. Dans le
cas contraire:
• Si le scellement est fondu sur la bordure du sac, couper le mauvais
scellement avec des ciseaux et réduire la durée de scellement (-) par
incrément d’une seconde. Retester.
• Si le scellement n’a totalement scellé le sac au point de le fermer
hermétiquement, couper le mauvais scellement avec des ciseaux et
augmenter la durée de scellement (+) par incrément d’une seconde.
Retester.
TEST INITIAL DU SCELLEMENT D’UN SAC
AVERTISSEMENT! Avant de procéder au nettoyage, au montage ou au
démontage de la scelleuse sous vide, s’assurer que la scelleuse sous vide est HORS
TENSION et que la FICHE A ÉTÉ RETIRÉE DE LA PRISE/SOURCE D’ALIMENTATION!
Page 56

56
INSTRUCTIONS EN FRANÇAIS
AVANT D’EFFECTUER UN
EMBALLAGE SOUS VIDE,
S’ASSURER QUE L’APPAREIL
D’EMBALLAGE SOUS VIDE EST
INSTALLÉ CONFORMÉMENT À
TOUTES LES PRÉCAUTIONS DE
SÉCURITÉ FIGURANT DANS LE
PRÉSENT LIVRET.
1. Poser les articles à sceller sous
vide dans un sac d’emballage sous
vide. Laissez au moins 2 po (5 cm) à
l’extrémité ouverte du sac an de créer
sufsamment d’espace pour le joint.
S’assurer de ne pas couvrir l’orice
d’aspiration (FIGURE 9).
2. Fermer le couvercle de l’appareil
d’emballage sous vide, puis vérier
que l’ouverture du sac est au centre
de la chambre d’aspiration. Appuyez sur les deux côtés du couvercle pour
verrouiller le couvercle en place. Vous entendrez chaque côté “clic” quand il est
xé. NOTE: Si les deux côtés sont pas correctement verrouillés, le couvercle
ne libérera pas automatiquement. Pour résoudre ce problème, appuyez sur les
deux côtés du couvercle deux fois pour libérer les verrous.
3. Appuyer, puis relâcher le bouton Start (démarrage). La pompe d’aspiration
à 2 pistons commencera à retirer l’air du sac pendant que la fenêtre du cycle
de vide à DEL commence le décompte. Une légère pression devra peut-être
être exercée sur le couvercle de l’appareil d’emballage sous vide pendant le
décompte. La fenêtre du cycle de vide à DEL commencera le décompte à «
1 » et ira jusqu’à « 9 », avant d’engager automatiquement le processus de
scellage du sac. Ces chiffres représentent des étapes et non des secondes.
4. Une fois que la fenêtre du cycle de vide à DEL afchera le chiffre « 9 »,
le processus de scellage commencera le compte à rebours en fonction du
paramètre choisi jusqu’à « 0 » à la fenêtre de scellage à DEL.
5. Une fois que la fenêtre de scellage à DEL aura atteint « 0 », l’appareil
d’emballage sous vide interrompra automatiquement la pompe d’aspiration
à 2 pistons, puis relâchera la pression d’aspiration quelques instants
plus tard. NE PAS ESSAYER D’OUVRIR LE COUVERCLE AVANT LE
RELÂCHEMENT DE LA PRESSION SOUS VIDE. UN GRAVE DOMMAGE À
LA BARRE DE SCELLAGE EN RÉSULTERA.
FONCTIONNEMENT EN MODE AUTOMATIQUE
FIGURE 9
Laisser
5 cm
d’espace
pour le
scellement
Port de l’orice
du vide
Page 57

57
INSTRUCTIONS EN FRANÇAIS
AVANT D’EFFECTUER UN EMBALLAGE
SOUS VIDE, S’ASSURER QUE L’APPAREIL
D’EMBALLAGE SOUS VIDE EST INSTALLÉ
CONFORMÉMENT À TOUTES LES
PRÉCAUTIONS DE SÉCURITÉ FIGURANT
DANS LE PRÉSENT LIVRET.
1. Poser les articles à sceller sous vide dans
un sac d’emballage sous vide. Laissez au
moins 2 po (5 cm) à l’extrémité ouverte du sac
an de créer sufsamment d’espace pour le
joint. S’assurer de ne pas couvrir les orices
d’aspiration (FIGURE 10).
2. Fermer le couvercle de l’appareil
d’emballage sous vide, puis vérier que
l’ouverture du sac est au centre de la chambre
d’aspiration. Appuyez sur les deux côtés
du couvercle pour verrouiller le couvercle
en place. Vous entendrez chaque côté “clic”
quand il est xé. NOTE: Si les deux côtés sont
pas correctement verrouillés, le couvercle ne
libérera pas automatiquement. Pour résoudre ce problème, appuyez sur les deux
côtés du couvercle deux fois pour libérer les verrous.
3. Tout en vériant le sac d’aspiration, appuyer, puis relâcher le bouton START
(démarrage). La pompe d’aspiration à 2 pistons commencera à retirer l’air du sac.
Lorsque la quantité d’air désirée aura été retirée du sac, appuyer sur le bouton
Manual Bag Seal (scellage de sac manuel), puis le relâcher. Il commencera le
processus de scellage du sac.
4. Remarque: une légère pression sur le couvercle de l’appareil d’emballage sous
vide sera peut-être nécessaire pendant ce processus.
5. Remarque: il faut une certaine pression sous vide dans le sac pour obtenir un
bon scellage.
6. Une fois que la fenêtre de scellage à DEL aura atteint « 0 », l’appareil
d’emballage sous vide interrompra automatiquement la pompe d’aspiration, puis
relâchera la pression d’aspiration quelques instants plus tard. NE PAS ESSAYER
D’OUVRIR LE COUVERCLE AVANT LE RELÂCHEMENT DE LA PRESSION
SOUS VIDE. UN GRAVE DOMMAGE À LA BARRE DE SCELLAGE EN
RÉSULTERA.
FIGURE 10
FONCTIONNEMENT EN MODE MANUEL
Port de l’orice
du vide
Laisser
5 cm
d’espace
pour le
scellement
REMARQUE: La scelleuse sous vide doit UNIQUEMENT être utilisée avec les SACS SOUS VIDE.
Pour obtenir de meilleurs résultats, utiliser uniquement les sacs sous vide recommandés avec une
doublure gaufrée ou en maille.
NE PAS UTILISER DE SAC DE MÉNAGE! Toute autre utilisation de la scelleuse sous vide
autre que celles indiquées dans cette brochure pourrait endommager l’appareil et annuler la garantie!
NE PAS forcer l’ouverture du
couvercle! Attendre que le vide
soit relâché.
Laisser refroidir l’unité pendant
20 secondes au moins entre les
cycles.
AVERTISSEMENT! Avant de procéder au nettoyage, au montage ou au
démontage de la scelleuse sous vide, s’assurer que la scelleuse sous vide est HORS
TENSION et que la FICHE A ÉTÉ RETIRÉE DE LA PRISE/SOURCE D’ALIMENTATION!
Page 58

Certaines pièces de l’appareil d’emballage sous vide doivent être remplacées
après un usage répété. La trousse d’entretien de l’appareil d’emballage sous vide
sera nécessaire pour le bon fonctionnement de l’appareil d’emballage sous vide.
1. Éteindre l’appareil d’emballage sous vide, puis retirer le cordon d’alimentation
de la prise secteur.
2. S’assurer que l’appareil est complètement refroidi.
3. Ouvrir le couvercle de l’appareil d’emballage sous vide.
4. Retirer le joint de la chambre d’aspiration de forme ovale de la rainure de la
face inférieure du couvercle de l’appareil d’emballage sous vide.
5. Retirer le joint de la chambre d’aspiration de forme ovale de la rainure de la
chambre d’aspiration en plastique.
6. Poser un nouveau joint de la chambre d’aspiration de forme ovale sur la
rainure de la chambre d’aspiration en plastique. Insérer le joint dans la rainure
avec les doigts jusqu’à ce qu’il soit en place.
7. Poser un nouveau joint de la chambre d’aspiration de forme ovale sur la
rainure du couvercle de l’appareil d’emballage sous vide. Insérer le joint dans la
rainure avec les doigts jusqu’à ce qu’il soit en place.
REMPLACEMENT DU RUBAN DE LA BARRE DE SCELLAGE :
1. Éteindre l’appareil d’emballage sous vide, puis retirer le cordon d’alimentation
de la prise secteur.
2. S’assurer que l’appareil est complètement refroidi.
3. Ouvrir le couvercle de l’appareil d’emballage sous vide.
4. Choisir l’une des extrémités du ruban de la barre de scellage recouvrant
l’élément de chauffage de la barre de scellage à l’aide d’un ongle jusqu’à ce qu’il
se soulève légèrement. Saisir l’extrémité libre, puis tirer lentement sur
le ruban de la barre de scellage sur elle-même jusqu’à ce qu’elle soit
complètement retirée.
5. Retirer l’endos d’une nouvelle bande du ruban de la barre de scellage. Veiller à
ne pas laisser le ruban de la barre de scellage entrer en contact avec quoi que ce
soit, y compris lui-même alors que le côté adhésif est exposé.
6. Tenir une extrémité du ruban de la barre de scellage dans chaque main.
Coller l’extrémité gauche du ruban de la barre de scellage à la surface plane de
la chambre d’aspiration en plastique, à gauche de l’élément de chauffage de la
barre de scellage. Appliquer le ruban de la barre de scellage de gauche à droite
sur l’élément de chauffage de la barre de scellage jusqu’à ce qu’il soit en place.
S’assurer qu’il n’y a aucune ride ni aucun pli dans le ruban de la barre de scellage
une fois appliqué. Le ruban de la barre de scellage doit recouvrir complètement
l’élément de chauffage de la barre de scellage.
DIRECTIVES POUR LA TROUSSE D’ENTRETIEN
58
INSTRUCTIONS EN FRANÇAIS
Page 59

59
INSTRUCTIONS EN FRANÇAIS
DÉPANNAGE
Q: Rien ne se produit lorsque le bouton Power (d’alimentation)
est enfoncé!
1 S’assurer que le cordon d’alimentation n’est
pas endommagé de quelque façon que ce soit.
2. S’assurer que l’extrémité femelle du
cordon d’alimentation est enfoncée dans le
port d’alimentation de l’appareil d’emballage
sous vide et que l’extrémité mâle du cordon
d’alimentation est fermement raccordée à la
prise secteur (FIGURE 11).
3 Si l’appareil d’emballage sous vide est
correctement branché, et que le bouton Power
(d’alimentation) ne fonctionne toujours pas,
vérifier le fusible, situé au-dessus du port
d’alimentation, sur le côté droit de l’appareil
d’emballage sous vide. Dévisser le portefusible, puis regarder le tube transparent pour voir si le fusible est noirci. Si le
fusible est noirci, le remplacer par un fusible de 8 A standard.
4. Si le fusible n’a pas besoin d’être remplacé, s’assurer que la prise secteur
fonctionne correctement. Brancher un autre appareil pour voir si ce dernier
fonctionne dans la prise secteur. UTILISER UNIQUEMENT DES FUSIBLES
TEMPORISÉS.
Q: Mon appareil d’emballage sous vide s’arrête et ne
redémarre pas.
1. Le protecteur de surcharge thermique peut avoir été activé. Le cas échéant,
laisser l’appareil d’emballage sous vide refroidir en laissant le couvercle de
l’appareil d’emballage sous vide ouvert pendant 20 minutes environ. S’assurer
de laisser le couvercle l’appareil d’emballage sous vide ouvert entre les
scellages de sac.
2. S’assurer que l’extrémité femelle du cordon d’alimentation est bien branchée
dans le port de l’alimentation de l’appareil d’emballage sous vide et que
l’extrémité mâle du cordon d’alimentation est fermement branchée à la prise
secteur.
3. Si l’appareil d’emballage sous vide est correctement branché, et que le
bouton Power (d’alimentation) ne fonctionne toujours pas, vérifier le fusible,
situé au-dessus du port de l’alimentation, sur le côté droit de l’appareil
d’emballage sous vide. Dévisser le capuchon du fusible, puis regarder par
le tube transparent pour voir si le fusible est noirci. Si le fusible est noirci, le
remplacer par un fusible de 8 A standard.
4. Si le fusible n’a pas besoin d’être remplacé, s’assurer que la prise secteur
fonctionne correctement. Brancher un autre appareil pour voir si ce dernier
fonctionne dans la prise secteur.
FIGURE 11
Check to see if the
Fuse is darkened.
I
O
Page 60

60
INSTRUCTIONS EN FRANÇAIS
Q: LE SCELLEMENT DU SAC SE DÉCOLLE.
1. Si l’opération n’a pas totalement scellé le sac, couper le mauvais
scellement avec des ciseaux et augmenter la durée de scellement (+) par
incrément d’une seconde. Retester.
2. La scelleuse sous vide doit uniquement être utilisée avec des sacs
de scellement sous vide. Pour les meilleurs résultats, les sacs sous vide
Weston® doivent être utilisés. NE PAS UTILISER DE SAC DE MÉNAGE
avec la scelleuse sous vide.
3. Le scellement du sac peut être incomplet. Si le scellement a une
crevasse dedans ou si un liquide ou une poudre a été piégée entre les
couches du sac, les couches peuvent ne pas être scellées correctement
ensemble. Couper le scellement et nettoyer l’intérieur du sac. Essayer
d’emballer sous vide à nouveau. Lors du scellement un aliment humide ou
poudreux, introduire une serviette en papier dans le sac au-dessus de la
nourriture avant de procéder à l’emballage sous vide. La serviette en papier
empêchera les nourritures de gêner le scellement. Voir la section Directives
d’emballage sous vide dans cette brochure pour les suggestions pratiques.
FIGURE 12
Q: LA POMPE À VIDE SE MET EN MARCHE, MAIS IL N’Y A PAS D’AIR
RETIRÉ DU SAC À VIDE.
1. Pour obtenir de meilleurs résultats,
utiliser toujours les sacs sous vide
recommandés de la marque Weston®.
2. S’assurer que le sac est bien
inséré. L’extrémité ouverte du sac doit
être centrée dans Joints hermétiques
de forme ovale. Prendre soin de ne pas
couvrir le port à vide (FIGURE 12).
3. Le sac peut avoir une fuite. S’il y
a une fuite dans le sac, l’air rentrera
dedans de l’extérieur. Vérifier qu’il n’y ait
pas de déchirures ou ponctions. Si vous
utilisez un sac formé à partir d’un rouleau
de matériaux, vérifier deux fois que le
scellement sur l’extrémité du sac soit bien
scellée.
Q: LA BARRE DE SCELLEMENT FOND LES COUCHES DU SAC.
4. La scelleuse sous vide doit uniquement être utilisée avec des sacs
de scellement sous vide. Pour les meilleurs résultats, les sacs sous vide
Weston® doivent être utilisés. NE PAS UTILISER DE SAC DE MÉNAGE avec
la scelleuse sous vide.
5. Vérifier l’état de la bande du ruban de la barre scellante. Remplacer, le
cas échéant.
6. Ouvrir le couvercle à vide et laisser la barre de scellement refroidir entre
5 et 10 minutes. Toujours laisser le couvercle à vide ouvert entre les cycles de
scellement des sacs et attendre environ 20 secondes entre les cycles.
7. Il peut s’avérer nécessaire de réduire la durée d’activation de la barre
scellante. Réduire la durée de scellement (-) par incrément d’une (1) seconde
et retester. Voir les instructions Essai initial du scellement du sac dans cette
brochure de plus amples informations.
Laisser
5 cm
d’espace
pour le
scellement
Page 61

61
INSTRUCTIONS EN FRANÇAIS
REMPLACEMENT DU FUSIBLE
Si l’appareil d’emballage sous vide ne fonctionne pas
lorsqu’il est branché et sous tension, essayer l’une ou
toutes les directives suivantes :
1. S’assurer que le fusible n’est pas grillé. Le fusible
est situé sur le côté droit de l’appareil, directement audessus du port du cordon d’alimentation. Éteindre, puis
débrancher l’appareil d’emballage sous vide. Dévisser,
puis retirer le porte-fusible. Retirer, puis vérier le fusible.
La bande de métal mince au centre du fusible doit
être propre et intacte. Si elle est grillée et/ou cassée,
remplacer par un fusible neuf (8 A). Remettre le portefusible.
2. S’assurer que le connecteur à l’extrémité du cordon
d’alimentation est fermement branché dans le port du
cordon d’alimentation.
3. S’assurer que le cordon d’alimentation n’est pas
endommagé. N’utiliser AUCUN cordon d’alimentation
endommagé. Communiquer avec le Service à la clientèle
pour obtenir de l’information sur le remplacement de
pièce.
4. Essayer de brancher le cordon d’alimentation à une
autre prise secteur.
I
O
FIGURE 13
AVERTISSEMENT! Avant de procéder au nettoyage, au montage ou au
démontage de la scelleuse sous vide, s’assurer que la scelleuse sous vide est HORS
TENSION et que la FICHE A ÉTÉ RETIRÉE DE LA PRISE/SOURCE D’ALIMENTATION!
Page 62

. REMARQUE IMPORTANTE : L’emballage sous vide ne remplace PAS la
réfrigération. Les denrées périssables emballées sous vide doivent quand même
être réfrigérées.
. NE JAMAIS décongeler des aliments à la température ambiante. Décongeler
les aliments au réfrigérateur ou au micro-ondes.
. En règle générale, plus froide est la température, et plus longue sera la durée
de conservation des aliments.
. Manipuler les sacs sous vide avec soin. Prendre garde de ne pas les
endommager, car un sac endommagé n’est plus hermétique.
. Se référer uniquement au tableau suivant en tant que guide ! Consulter les
sections Guide d’emballage sous vide et Sécurité alimentaire de ce livret. La
durée réelle de conservation pourra varier. Regarder si les aliments ne sont pas
gâtés avant de les consommer ou préparer.
GUIDE DE CONSERVATION DES ALIMENTS EMBALLÉS
TYPE LIEU DE DURÉE DURÉE DE
D’ALIMENT CONSERVATION NORMALE DE CONSERVATION
CONSERVATION EMBALLÉ
SOUS VIDE
TRANCHES ÉPAISSES DE VIANDE Congélateur 6 mois 2-3 ans
VIANDE HACHÉE Congélateur 4 mois 1 ans
POISSON Congélateur 6 mois 2 ans
Pour obtenir les meilleurs résultats, précongeler la viande ou le poisson pendant 1 à 2 heures avant de les emballer
sous vide, an d’empêcher l’humidité et les jus de nuire au scellement..
GRAINS DE CAFÉ Température ambiante 4 semaines 16 mois
FARINE, RIZ, SUCRE Congélateur 6-9 moiss 2-3 ans
Température ambiante 6 mois 1-2 ans
Pour obtenir les meilleurs résultats, laisser l’article dans son récipient ou sac d’origine, puis placer le tout
dans un sac sous vide. Cela empêche ces aliments d’être aspirés et aide à bien sceller le produit.
BAIES FRAISES, FRAMBOISES, MÛRES Réfrigérateur 1-3 jours 1 semaines
BAIES CANNEBERGES, MYRTILLES, BLEUETS Réfrigérateur 3-6 jours 2 semaines
Pour éviter que la scelleuse écrase les baies, il est préférable de les congeler avant de les emballer. Étendre les baies
sur une tôle à biscuits pour favoriser la congélation de chaque baie. Un gros bloc de baies congelées sera plus
difcile à emballer sous vide, à cause des nombreuses petites poches d’air formées entre les baies.
FROMAGE Réfrigérateur 1-2 semaines 4-8 mois
Si le fromage emballé sous vide est utilisé fréquemment, s’assurer que le sac est sufsamment long pour
permettre plusieurs scellements. Fromage râpé : Bloquer le fromage dans le sac avec un essuie-tout
replié sur le fromage pour empêcher celui-ci d’être aspiré ou de nuire au scellement.
BISCUITS, CRAQUELINS, PAINS Température ambiante 1-2 semaines 3-6 semaines
Avec ouverture périodique
Précongeler les aliments mous et peu denses pendant 1 à 2 heures pour préserver leur forme et leur texture.
PÂTES , CÉRÉALES, NOIX Température ambiante 6 mois 1-1/2 ans
HARICOTS SECS Température ambiante 6 mois 2 ans
Les aliments secs avec bords aigus doivent être enveloppés dans un essuie-tout
ou un autre article pour empêcher les bords de percer le sac sous vide.
LAITUE Réfrigérateur 3-6 jours 2 semaines
Laver, puis sécher à fond les légumes à feuilles avant de les emballer sous vide.
LÉGUMES Congélateur 8 mois 2 1/2 ans
Pour conserver la saveur optimale des légumes, les blanchir avant de les emballer sous vide. Le blanchiment cuit très peu les légumes
et préserve la saveur, la couleur et la texture : les légumes sont cuits croquants. Pour les blanchir, plonger les légumes dans
l’eau bouillante au micro-ondes 2 à 3 minutes dans la plupart des cas (6 à 11 minutes pour les épis de maïs). Plonger ensuite les légumes
dans l’eau froide pour arrêter leur cuisson. Sécher les légumes, puis les emballer sous vide.
Ce tableau est une adaptation de Dr. G.K. York, Dept. of Food Science & Tech, U of California, Davis.
62
INSTRUCTIONS EN FRANÇAIS
Page 63

Article en poudre: Pour emballer les articles en poudre, tels la farine, il est
préférable de les laisser dans leur emballage d’origine avant de les mettre dans
le sac sous vide. La poudre ne risque en effet d’être aspirée dans la pompe à
vide à 2 pistons, causant sufsamment de dégâts pour raccourcir la durée de
vie utile de la scelleuse sous vide. Les articles en poudre risquent également de
nuire au scellement du sac.
Articles pointus ou eflés: Lorsque l’on emballe sous vide des articles pointus
ou eflés, il est préférable de les enrober pour éviter qu’ils ne percent le sac
pendant le scellement.
LEVURES ET BACTÉRIES
Pour une conservation optimale des aliments, il importe de les emballer
sous vide lorsqu’ils sont frais. Lorsque l’altération des aliments a commencé,
l’emballage sous vide ne fera que la ralentir. L’emballage sous vide ne peut
empêcher complètement la prolifération de la moisissure. D’autres microbes
pathogènes peuvent aussi continuer à proliférer dans un milieu pauvre en
oxygène et ils exigent de prendre d’autres mesures pour les éliminer.
Les levures: La réfrigération ralentit la croissance des levures, tandis la
congélation l’arrête complètement (-18 °C ou 0 °F). Les levures entraînent la
fermentation, que l’on identie généralement à l’odeur.
Les bactéries: La congélation ne tue pas les micro-organismes, mais elle arrête
leur croissance. La prolifération de bactéries est facilement identiée par une
mauvaise odeur et, parfois, par une texture gluante. Certaines bactéries, telles
celles qui causent le botulisme, peuvent croître sans air dans des conditions
propices ; elles sont impossibles à détecter par l’odeur, le goût ou la couleur.
Bien qu’extrêmement rare, le botulisme est très dangereux. Veiller à conserver et
à cuire proprement tous les aliments avant de les consommer.
CUISSON ET RÉCHAUFFAGE
. Avant de mettre au micro-ondes les aliments emballés sous vide, percer ou
ouvrir le sac pour laisser l’air chaud s’échapper pendant le réchauffage.
. Les aliments emballés sous vide peuvent être décongelés ou cuits dans l’eau
bouillante.
. Les denrées périssables emballées sous vide, telles les viandes, légumes et
fromages, doivent être réfrigérées (à 1,1 °C (34 °F) ou plus froid), surtout les
aliments peu ou non acides.
Cela est important, car l’emballage sous vide élimine presque tout l’air du sac,
mais une bactérie comme celle de la toxine botulique (Clostridium Botulinum)
est anaérobie (elle) se développe normalement dans un milieu dépourvu d’air
ou d’oxygène). La réfrigération et la congélation ralentissent la prolifération
microbienne. Il importe également de maintenir propre un lieu de travail pour
minimiser le risque d’emballer sous vide des bactéries avec les aliments.
GUIDE D’EMBALLAGE SOUS VIDE
63
INSTRUCTIONS EN FRANÇAIS
Page 64

64
INSTRUCTIONS EN FRANÇAIS
Il y a des règles fondamentales à suivre lors de la manipulation d’aliments.
Elles sont CUIRE, SÉPARER, NETTOYER, et REFROIDIR RAPIDEMENT.
CUIRE
Il est crucial de cuire les aliments à une température interne sûre pour détruire les bactéries qui sont
présentes. La sécurité des hamburgers et autres aliments faits avec de la viande hachée a reçu
dernièrement beaucoup d’attention, et pour une bonne raison. Quand la viande est hachée, les bactéries
présentes sur la surface sont mélangées dans l’ensemble du mélange haché. Si cette viande hachée n’est
pas cuite jusqu’à au moins 71oC à 74oC (160oF à 165oF), les bactéries ne seront pas détruites et il y a
une forte chance que cela vous rendra malade.
Des morceaux solides de viande comme des steaks et côtelettes n’ont pas de bactéries dangereuses
comme E. coli à l’intérieur, donc ils peuvent être servis plus saignants. Quand même, tout morceau de
bœuf doit être cuit à une température interne d’au moins 63oC (145oF) (mi-saignant).La température
sûre pour la volaille est 75oC (165oF) et les morceaux de viande entier de porc doivent être cuits à 71oC
(160oF).
SÉPARER
Les aliments qui seront mangés crus et les aliments qui seront cuits avant d’être mangés DOIVENT
TOUJOURS être séparés. La contamination croisée se produit quand des viandes crues ou des œufs
viennent en contact avec des aliments qui seront mangés crus. Ceci est une source principale d’intoxication
alimentaire. Enveloppez toujours deux fois les viandes crues et placez-les sur l’étagère la plus basse dans
le réfrigérateur de manière qu’aucun jus ne puisse goutter sur les fruits et légumes crus. Puis utilisez
les viandes crues entre 1 et 2 jours après l’achat, ou congelez-les pour les conserver plus longtemps.
Décongelez les viandes congelées dans le réfrigérateur, pas sur le comptoir.
Quand vous grillez ou cuisez des viandes ou des poissons crus, assurez-vous de mettre la viande cuite
sur un plat propre. N’utilisez pas le même plat que vous avez utilisé pour transporter les aliments avant de
les mettre sur le grill. Lavez les ustensiles utilisés pour griller après que les aliments sont tournés pour la
dernière fois sur le grill, aussi bien que les spatules et cuillers utilisées pour faire sauter à feu vif en remuant
ou pour tourner la viande au fur et à mesure qu’elle cuit.
Assurez-vous de bien laver vos mains après avoir manipulé des viandes crues ou des œufs crus. Se laver
les mains avec du savon et de l’eau, ou utiliser une lingette antibactérienne pré-humidiée est absolument
nécessaire après avoir touché de la viande crue ou des œufs crus. Ne pas se laver les mains et les
surfaces pendant la cuisine est une cause majeure de contamination croisée.
NETTOYER
Lavez fréquemment vos mains et les surfaces de travail lorsque vous cuisinez. Lavez avec du savon et de
l’eau chaude pendant au moins 15 seconds, puis séchez avec une serviette en papier.
REFROIDIR RAPIDEMENT
La réfrigération rapide des aliments est très importante. La zone de danger où les bactéries se multiplient
est entre 4oC et 60oC (40oF et 140oF). Votre réfrigérateur doit être réglé à 4oC (40oF) ou en-dessous;
votre congélateur doit être à -17oC (0oF) ou en-dessous. Une règle simple : servir chaud les aliments
chauds, servir froid les aliments froids. Utilisez des réchauds ou plaques chauffantes pour garder les
aliments chauds pendant le service. Utilisez des bains d’eau glacée pour garder au froid les aliments
froids. Ne jamais laisser des aliments à la température ambiante pendant plus de deux (2) heures - 1 heure
si la température ambiante est 32oC (90oF) ou au-dessus. Lorsque vous emballez les aliments pour un
pique-nique, assurez-vous que les aliments sont déjà refroidis rapidement lorsqu’ils sont mis dans le panier
à pique-nique isotherme. Le panier à pique-nique ne refroidira pas les aliments – il garde simplement les
aliments froids lorsqu’il est emballé correctement avec de la glace. Les aliments cuits chauds doivent
être placés dans des conteneurs peu profonds et immédiatement réfrigérés pour qu’ils se refroidissent
rapidement. Assurez-vous de bien couvrir les aliments après qu’ils sont froids.
REMARQUE : Des considérations particulières doivent prises lors de l’utilisation de venaison ou d’autre
gibier sauvage, puisqu’ils peuvent devenir très contaminés durant l’opération de dépouille. La venaison est
souvent gardée à des températures qui pourraient potentiellement permettre la croissance de bactéries,
tel que lorsque celle-ci est transportée. Se référer au Département de la viande et de la volaille de l’USDA
(USDA Meat and Poultry Department) pour d’autres questions ou informations sur la sécurité de la viande
et des aliments.
SÉCURITÉ ALIMENTAIRE
Page 65

Page 66

Page 67

Weston Brands LLC garantit à l’ACHETEUR AU DÉTAIL D’ORIGINE de ce produit contre tout défaut en matériau
et en main-d’œuvre pendant un (2) ans a partir de la date d’achat à condition qu’il soit utilisé conformément aux
directives imprimées qui y sont jointes.
La Carte de Garantie, avec une copie du reçu original, doivent être reçus par Weston Brands LLC dans les trente
(30) jours à partir de la date d’achat pour que la garantie puisse s’appliquer. Le manque d’envoyer la Carte de
Garantie complètement remplie avec une copie du reçu original annulera la garantie.
Le produit doit être livré à ou expédié franco de port à Weston Brands LLC pour les services de garantie, soit dans
son emballage d’origine ou un emballage similaire offrant un degré de protection équivalent. Les dommages causés
par l’expédition ne sont pas la responsabilité de la société. Weston Brands LLC charge 35,00 $ par heure pour frais
de service. REMARQUE : Aucune réparation ne sera commencée sans l’autorisation du client. Les frais d’expédition
de retour seront ajoutés à la facture de réparation.
Avant de renvoyer le produit pour une réparation sous garantie, bien nettoyer le produit pour qu’il soit exempt de
toute particule alimentaire ou autres débris. Si l’acheteur ne respecte pas cette consigne, le produit lui sera renvoyé
sans avoir été réparé. Dans certains, la somme de 50 dollars sera facturée pour le nettoyage.
Weston Brands LLC réparera (ou à sa discrétion, remplacera) le produit sans frais, si à l’opinion de la société, il a
été prouvé être défectueux en matériau et en main d’œuvre dans la période de garantie.
Des remplacements neufs ou remis en état pour les pièces d’usine défectueuses seront fournis pendant de (2)
ans à partir de la date d’achat. Les pièces de remplacement sont garanties pour le reste de la période de garantie
originale.
Pour les réparations non garanties, veuillez contacter le Service à la clientèle de Weston Brands LLC au numéro
sans frais 1-800-814-4895, du lundi au vendredi, de 8h00 à 17h00 ET (en dehors des États-Unis : 001-440-638-
3131) pour obtenir une Autorisation de retour d’article (Numéro RMA). Weston Brands LLC refusera tous les retours
qui ne contiennent pas ce numéro. NE PAS RENVOYER CET APPAREIL SANS L’AUTORISATION CORRECTE
DE Weston Brands LLC.
LIMITATIONS : La garantie est annulée si le produit est utilisé pour toute raison autre que pour laquelle il est
conçu. Le produit ne doit pas avoir été antérieurement modié, réparé, ou entretenu par quelqu’un autre que
Weston Brands LLC. Le cas échéant, le numéro de série ne doit pas être modié ou enlevé. Le produit ne doit pas
avoir été soumis à un accident en transit ou pendant qu’il est en la possession du client, mal utilisé, mal traité, ou
utilisé contrairement aux directives contenues dans le manuel d’utilisation. Ceci comprend la défaillance causée
par la négligence d’un entretien raisonnable et nécessaire, une tension de secteur incorrecte et des catastrophes
naturelles. Cette garantie n’est pas transférable et s’applique seulement aux ventes américaines et canadiennes.
À l’exception des cas où la loi en vigueur l’interdit, aucune autre garantie, expresse ou implicite, y compris les
garanties relatives au caractère adéquat pour la commercialisation ou un usage particulier, ne s’appliquera à ce
produit. Weston Brands LLC ne sera en aucun cas responsable des dommages indirects liés au dit produit et
Weston Brands LLC n’a aucune obligation ni responsabilité autre que celles expressément établies dans la présente,
et n’autorise aucun représentant ou autre personne à les assumer pour lui. Toutes garanties implicites applicables
sont aussi limitées à la période de (2) ans de la garantie limitée.
Cette garantie couvre seulement le produit et ses pièces spéciques, pas les aliments ou autres produits traités
dans celui-ci. Weston n’est pas responsable des pièces manquantes ou endommagées pour les articles réduits/
en solde ou les articles naux de vente où le vendeur peut ne pas être en mesure de garantir l’ensemble de la
fonctionnalité ou l’intégralité de l’unité.
DÉCOUPEZ LE LONG DE LA LIGNE POINTILLÉE ET ENVOYEZ CETTE CARTE DE GARANTIE AVEC UNE
COPIE DE VOTRE REÇU D’ACHAT ORIGINAL À :
Weston Brands LLC / WARRANTY
20365 Progress Drive, Strongsville, OH 44149 USA
INFORMATION SUR LA GARANTIE
CONSERVEZ CETTE INFORMATION SUR LA GARANTIE POUR VOS DOSSIERS!
Nom du Client:
Adresse:
Province/Code postal/Région:
Numéro de téléphone:
Adresse de courrier électronique:
Date d’achat d’origine:
No de modèle du produit:
No de série (s’il y a lieu):
J’ai lu les informations relatives à la garantie. Initiales ici:
CARTE DE GARANTIE
ENVOYEZ CETTE CARTE DE GARANTIE AVEC UNE COPIE DE VOTRE REÇU D’ACHAT ORIGINAL À:
WESTON BRANDS LLC / WARRANTY, 20365 PROGRESS DRIVE, STRONGSVILLE, OH 44149 USA
Copie du reçu incluse
Page 68

ATTENTION!
VEUILLEZ INSPECTER CET EMBALLAGE AVEC SOIN POUR Y DÉTECTER
TOUTE PIÈCE MANQUANTE OU ENDOMMAGÉE.
SI DES PIÈCES ONT ÉTÉ ENDOMMAGÉES PENDANT LE TRANSPORT, VEUILLEZ
COMMUNIQUER AVEC LE DÉTAILLANT POUR OBTENIR DE L’AIDE.
Pour toutes les autres questions concernant l’utilisation du produit, les pièces manquantes, les problèmes ou
l’activation de la garantie, veuillez communiquer avec l’équipe du service clientèle des produits Weston:
de 8:00 à 17:00 HNE, du lundi au vendredi.
CustomerService@WestonProducts.com
Numéro de téléphone du service clientèle pour les résidents des É.-U. : 1-440-638-3131
Numéro de téléphone à l’extérieur des É.-U. : 001-440-638-3131 Weston Brands LLC,
20365 Progress Drive, Strongsville, Ohio 44149
WestonProducts.com
Veuillez communiquer avec le service clientèle des produits Weston AVANT de retourner cet appareil au détaillant.
CONSERVER CES DIRECTIVES!
Veuillez les consulter fréquemment et les utiliser pour la formation.
¡ATENCIÓN!
REVISE COMPLETAMENTE EL ENVASE Y COMPRUEBE QUE
NO FALTEN PARTES O QUE ALGÚN PRODUCTO ESTÉ DAÑADO.
SI EL PRODUCTO ESTÁ DAÑADO POR EL TRANSPORTE, SOLICITE ASISTENCIA AL DISTRIBUIDOR.
Para todas aquellas preguntas referentes al uso del producto, partes faltantes, daño del producto, dicultad
o activación de la garantía, comuníquese con el equipo de servicio al cliente de weston Brands:
desde las 8:00 am hasta las 5:00 pm ET, de lunes a viernes
CustomerService@WestonProducts.com
Línea de Servicio al Cliente para Residentes de EE.UU.: 1.800.814.4895 (Fuera de EE.UU., llame al:
001-1-440-638-3131) Weston Brands LLC, 20365 Progress Drive, Strongsville, Ohio 44149
WestonProducts.com
NO devuelva este artículo al vendedor minorista antes de comunicarse con Servicio al Cliente de
Weston Brands.
¡GUARDE ESTAS INSTRUCCIONES!
Consulte estas instrucciones y úselas para enseñar sobre el uso de este producto a otras personas.
ATTENTION!
PLEASE INSPECT THIS PACKAGE THOROUGHLY FOR MISSING PARTS OR ANY PRODUCT DAMAGE.
IF YOUR PRODUCT CONTAINS SHIPPING DAMAGE, PLEASE CONTACT RETAILER FOR ASSISTANCE.
For all other questions regarding product usage, missing parts, product damage, difculty or warranty activation,
please contact the Weston Brands Customer Service Team:
8:00 am to 5:00 pm ET, Monday thru Friday
CustomerService@WestonProducts.com
U.S. Residents Customer Service Line: 1-800-814-4895 (Outside U.S. Call: 001-440-638-3131)
Weston Brands LLC, 20365 Progress Drive, Strongsville, Ohio 44149
WestonProducts.com
Please DO NOT return this item to the retailer before contacting
Weston Brands Customer Service.
SAVE THESE INSTRUCTIONS!
Refer to them often and use them to instruct others.
 Loading...