

Page 1

USER MANUAL
REFRIGERATION
Bar Fridges with Ice Box,
All Refrigerators and Upright Freezers
WIM1000WC, WIM1200WD, WIM1200AD, WRM1400WD,
WRM2400WE, WFM0900WD, WFM1700WE
Page 2

WARNING
WARNING
CONGRATULATIONS
WARNING
WARNING
TIPS & INFORMATION
ENVIRONMENTAL TIPS
WARNING
WARNING
TIPS & INFORMATION
ENVIRONMENTAL TIPS
Dear customer,
Congratulations and thank you for choosing our
refrigerator/freezer. We are sure you will find your new
appliance a pleasure to use. Before you use the appliance
we recommend that you read through the relevant
sections of this manual, which provides a description of
your refrigerator/freezer and its functions.
To avoid the risks that are always present when you use
an electric appliance, it is important that the appliance
is installed correctly and that you read the safety
instructions carefully to avoid misuse and hazards.
We recommend that you keep this instruction booklet
for future reference and pass it on to any future owners.
After unpacking the refrigerator/freezer, please check it
is not damaged. If in doubt, do not use the refrigerator
but contact your local customer care centre.
Conditions of Use
This appliance is designed and intended to be used in
normal domestic applications only:
• Staff kitchen areas in shops, offices and other
working environments
• Farm Houses
• By clients in hotels, motels, and other residential
type environments
• Bed and Breakfast type environments
Record model and serial number here:
Model number: ..................................................................................
Serial number: ...................................................................................
Please read the user manual carefully and store in a
handy place for later reference. The symbols you will see
in this booklet have these meanings:
WARNING
This symbol indicates information concerning your
personal safety
CAUTION
This symbol indicates information on how to avoid
damaging the appliance
TIPS AND INFORMATION
This symbol indicates tips and information about use of
the appliance
ENVIRONMENT
This symbol indicates tips and information about
economical and ecological use of the appliance
CONTENTS
Important safety instructions ....................................................3
Bar refrigerator with ice box features ...................................4
Bar refrigerator without ice box features ............................5
Single door all refrigerator features ......................................6
Bar freezer features ..................................................................... 7
Single door all freezer features ...............................................8
Installing your new appliance ....................................................9
Initial start-up - Fridge
Controlling the temperature ............................................. 10
Using your appliance –
Ice Box models (WIM1000 & WIM1200)
Making ice ................................................................................ 11
De-icing the ice box .............................................................. 11
Initial startup freezer (WFM0900) ........................................ 12
Initial startup freezer (WFM1700) ......................................... 13
Reversing the ice box door opening
direction (WIM1200) ..................................................................14
Reversing the door opening direction
WRM2400 & WFM1700 ............................................................. 15
Reversing the door opening direction
WIM1000 ......................................................................................... 17
Reversing the door opening direction
WFM0900, WIM1200, WRM1400 .......................................... 18
Care and maintenance
Lamp replacement (Models with lamp) .......................19
General information
Cleaning the appliance ......................................................20
Troubleshooting ............................................................................ 21
Warranty ......................................................................................... 23
TIPS AND INFORMATION
Important – CHECK FOR ANY DAMAGE OR MARKS
If you find the appliance is damaged or marked, you must
report it within 7 days if you wish to claim for damage/
marks under the manufacturer’s warranty. This does not
affect your statutory rights.
ENVIRONMENT
Information on disposal for users
• Most of the packing materials are recyclable.
Please dispose of those materials through your local
recycling depot or by placing them in appropriate
collection containers.
• If you wish to discard this product, please contact
your local authorities and ask for the correct method
of disposal.
IMPORTANT INFORMATION THAT MAY IMPACT
YOUR MANUFACTURER’S WARRANTY
Adherence to the directions for use in this manual
is extremely important for health and safety. Failure
to strictly adhere to the requirements in this manual
may result in personal injury, property damage
and affect your ability to make a claim under the
Westinghouse manufacturer’s warranty provided
with your product. Products must be used, installed
and operated in accordance with this manual. You
may not be able to claim on the Westinghouse
manufacturer’s warranty in the event that your
product fault is due to failure to adhere this manual.
IMPORTANT SAFETY
INSTRUCTIONS
It is hazardous for anyone other than an Authorised
WARNING
• The refrigerator must be plugged into its own
dedicated 220-240V, 50Hz AC electrical outlet.
• The plug must be accessible when the refrigerator is
in position.
• It is essential the power point is properly earthed to
ground. Consult a qualified electrician if you are unsure.
• Don’t use extension cords or adapter plugs with this
refrigerator.
• If the power cord is damaged, have it replaced by a
qualified service technician.
• Unplug the refrigerator before cleaning it, or changing
the light bulb to avoid electric shock.
• Never unplug the refrigerator by pulling the electrical
cord as this may damage it. Grip the plug firmly and
pull straight out.
• Choose a location for your refrigerator that isn’t too
cold. The ambient room temperature should be above
10°C.
• Stand your refrigerator in a dry place – avoid areas of
high moisture or humidity.
• Don’t put the refrigerator in frosty or unprotected
areas like a garage or on the verandah.
• Keep the refrigerator out of direct sunlight.
• Don’t locate the refrigerator near stoves, fires or
heaters.
• When installed correctly, your refrigerator should:
– Have adequate space at the back and sides for air
circulation (refer to page 9).
– Be aligned to the surrounding cupboards.
– Have doors that will self-close from a partially open
position.
WARNING
R600a refrigerant warning
This appliance contains R600a refrigerant. Avoid safety
hazards by carefully installing, handling, servicing and
disposing of this appliance.
• Ensure that the tubing of the refrigerant circuit is not
damaged during transportation and installation.
• The room for installing appliance must be at least
3
1m
per 8g of refrigerant. The amount of refrigerant
charged in the appliance can be found on the rating
plate on the appliance.
• Keep ventilation openings in the appliance enclosure
or in the built-in structure, clear of obstruction.
• Do not use mechanical devices or other means to
accelerate the defrosting process, other than those
recommended by the manufacturer.
Service Person to service this appliance. In Queensland
the Authorised Service Person MUST hold a Gas Work
Authorisation for hydrocarbon refrigerants to carry out
servicing or repairs which involve the removal of covers.
Switching off your refrigerator
If you switch 'off' your refrigerator for an extended period,
follow these steps to reduce the chances of mould:
1. Remove all food.
2. Remove the power plug from the power point.
3. Thoroughly clean and dry the interior.
4. Ensure that all the doors are wedged open slightly
for air circulation.
Safety
This appliance is not intended for use by persons
(including children) with reduced physical, sensory or
mental capabilities, or lack of experience and knowledge,
unless they have been given supervision or instruction
concerning use of the appliance by a person responsible
for their safety. Children should be supervised to ensure
that they do not play with the appliance.
WARNING
• Always check the power point is properly earthed –
if you are not sure get an electrician to check it.
• Always switch off and unplug the refrigerator at the
power point before you clean or move it.
• If the power supply cord is damaged, always have
it replaced by the manufacturer, service agent or
similarly qualified person.
• Never let children play with the refrigerator.
• Do not store explosive substances such as aerosol
cans with a flammable propellant in this appliance.
• Never store fizzy drinks in the freezer compartment.
• Never lick icy foods when they first come out of the
freezer. This can burn your your lips and mouth.
• Never try to repair the refrigerator yourself.
• Never use electric heaters or dryers to defrost the
freezer because you can receive an electric shock
• Never use electrical appliances inside the food storage
areas.
• This appliance contains insulation formed with
flammable blowing gases. For safety reasons, take
care when you dispose of it.
• Do not damage the refrigerant circuit.
WARNING
When you dispose of your old refrigerator or freezer,
remove any doors to prevent children from being trapped
inside.
2 3CONTENTS SAFETY
Page 3

BAR REFRIGERATORS WITH ICE BOX FEATURES
1
BAR REFRIGERATORS WITHOUT ICE BOX FEATURES
4
2
11
5
3
6
7
8
15
WIM1000WC illustrated
12
9
13
10
3
3
2
1
10
5
6
11
4
9
8
7
WRM1400WD illustrated
13
4
11
3
2
1
6
14
7
12
10
1
Control knob
2
Light
3
Light Switch
4
Glass shelf
5
Glass Crisper Cover
6
Crisper
7
Door bin
8
Egg tray
9
Door seal
10
Drain hole
11
Adjustable levelling leg
Features may vary depending on model. Not all models will have features listed.
WIM1200AD has grey outer cabinet. Refrigerator door is silver metal look. WIM1200WD has white cabinet and door.
4 5FEATURES
8
15
1
Control knob
2
Light
3
Light Switch
4
Ice Box
5
Drip Tray
6
Glass shelf
7
Glass Crisper Cover
8
Crisper
WIM1200WD; WIM1200AD illustrated
9
Door rail
10
Door bin
11
Ice Cube Tray
12
Egg tray
13
Door seal
14
Drain hole
15
Adjustable levelling leg
Features may vary depending on model. Not all models will have features listed.
FEATURES
Page 4

SINGLE DOOR ALL REFRIGERATOR FEATURES BAR FREEZER FEATURES
1
2
4
5
3
1
3
7
2
4
8
1
Temperature control
2
9
Freezer bin
3
Door seal
4
Adjustable levelling leg
WFM0900WD illustrated
6
Features may vary depending on model. Not all models will have features listed.
WRM2400SC has grey outer cabinet. Refrigerator door is silver metal look. WRM2400WC has white cabinet and door.
6 7FEATURESFEATURES
WRM2400WE illustrated
1
Controller box and LED light
2
Refrigerator shelf
3
Egg tray
4
Vegetable drawer cover
5
Vegetable drawer
6
Adjustable bottom feet
7
Upper door shelf
8
Lower door shelf
9
Refrigerator door
Page 5
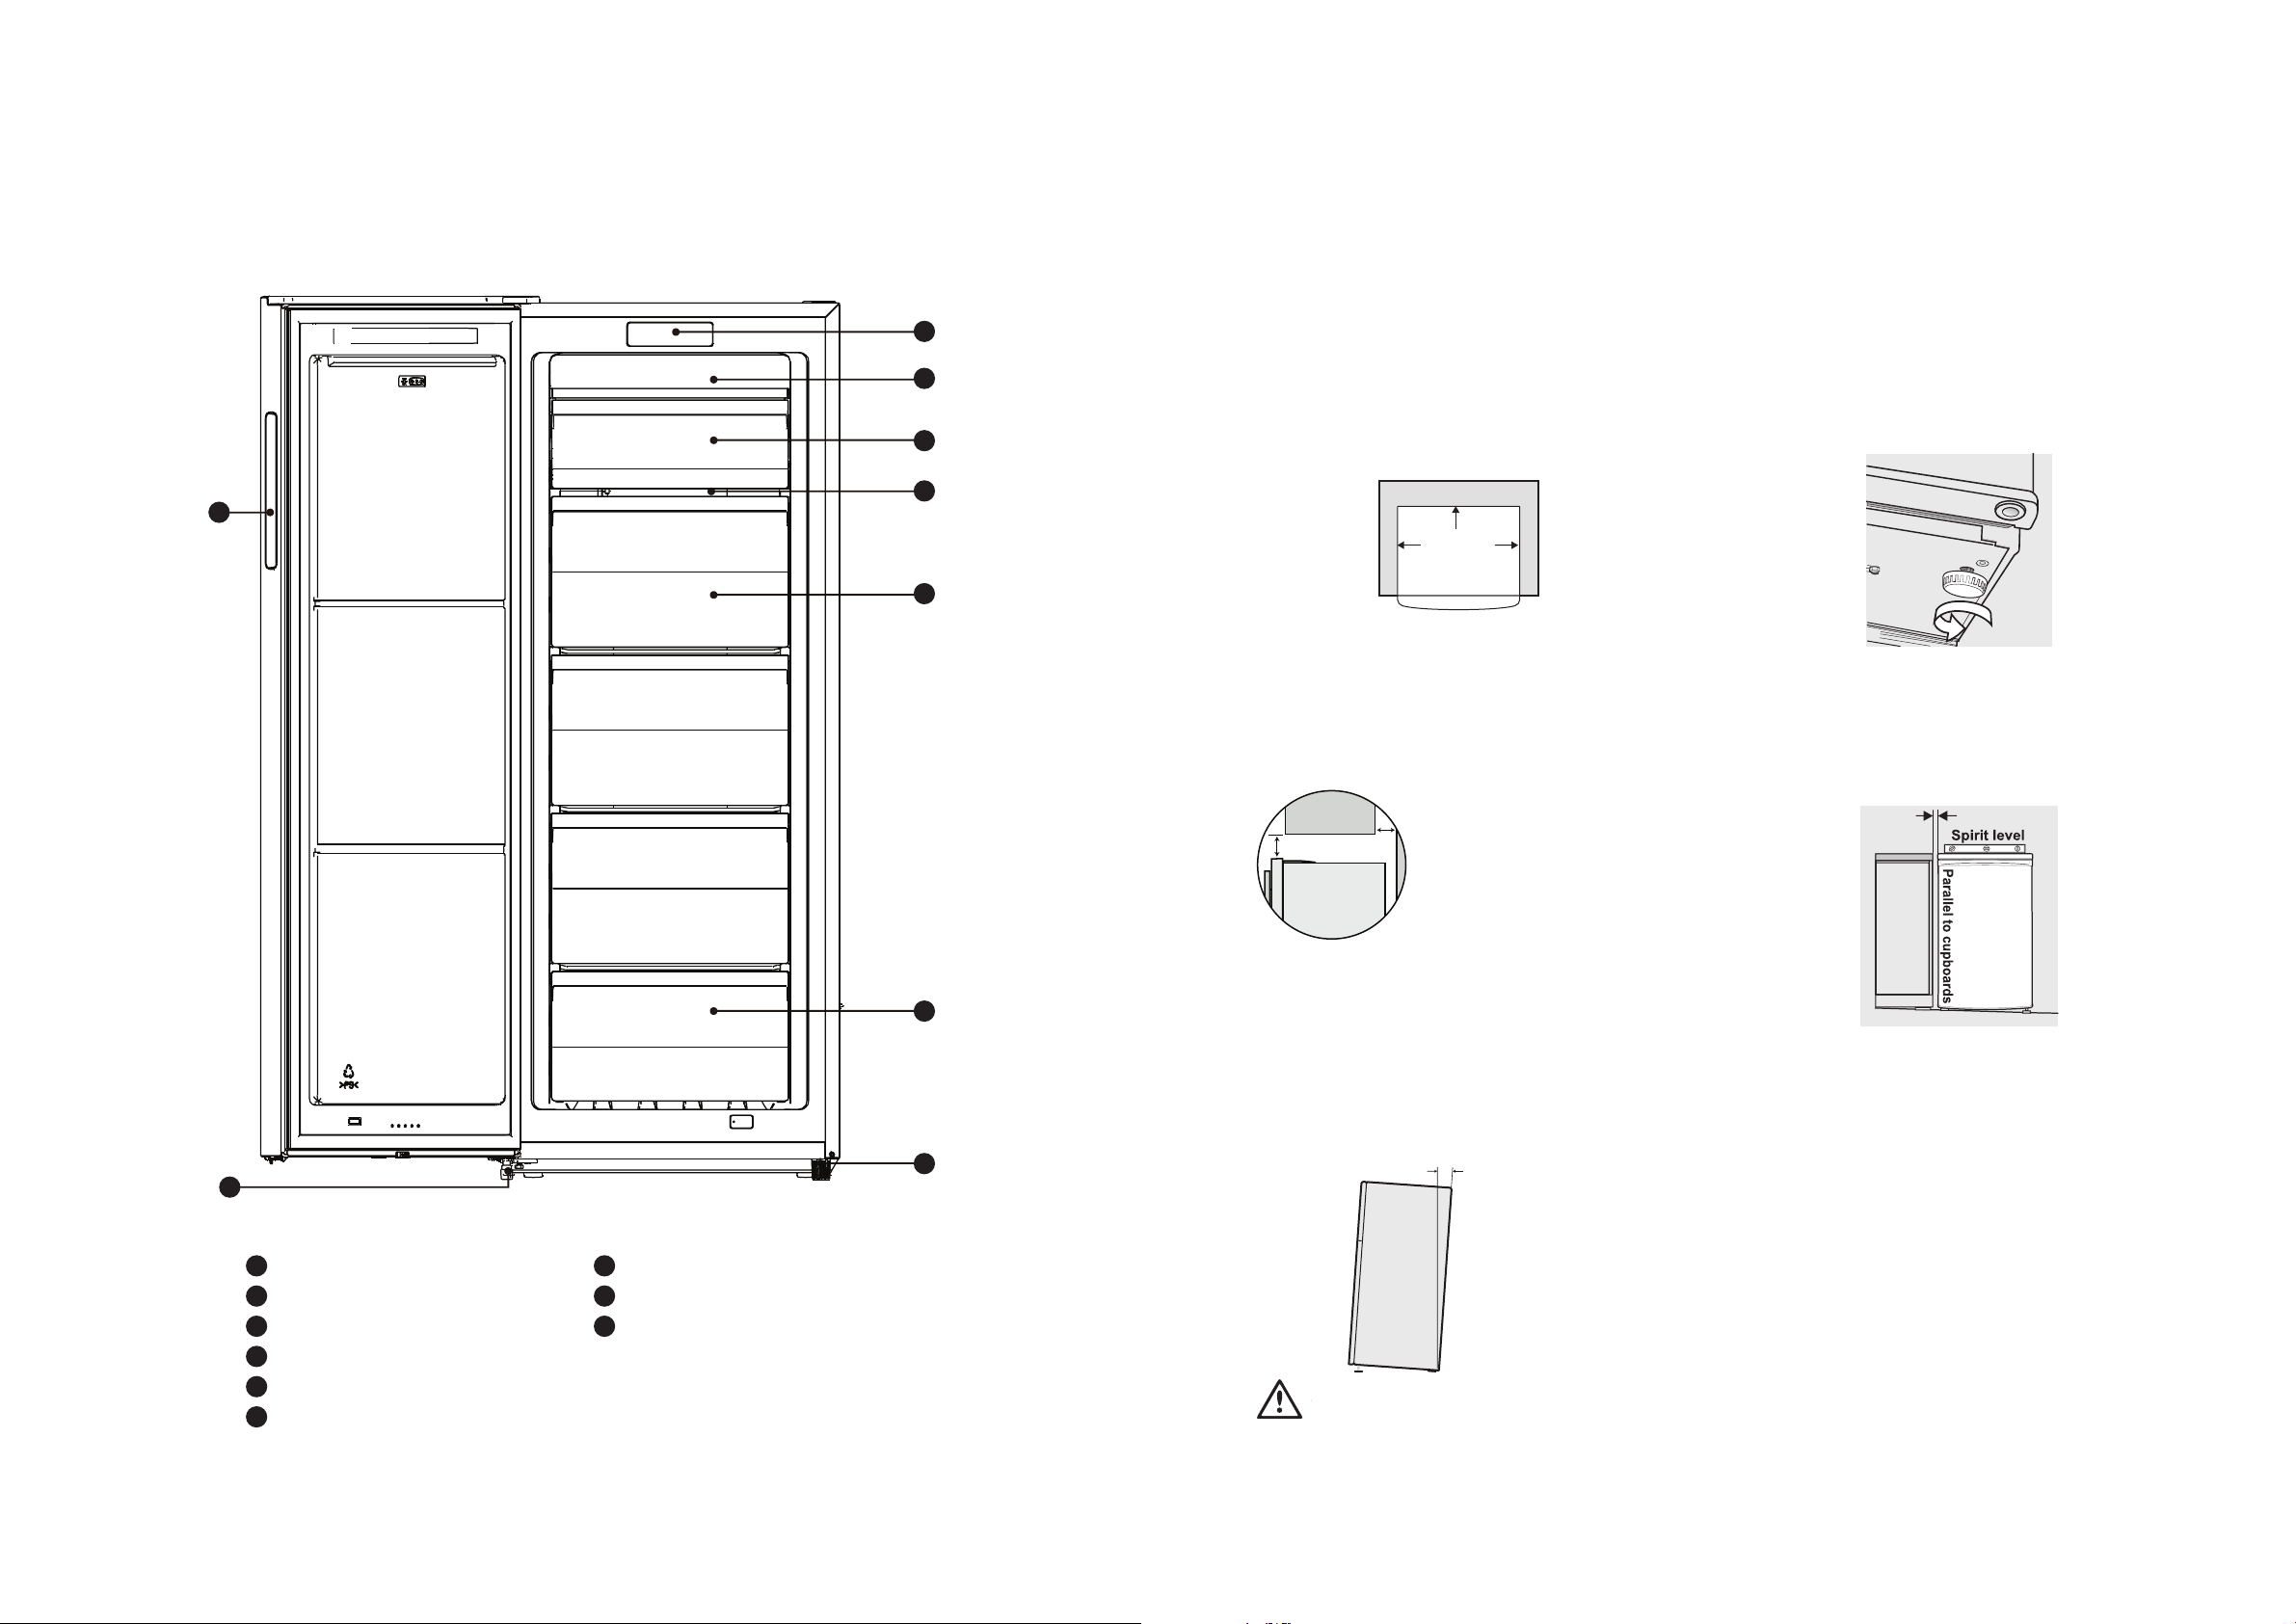
SINGLE DOOR ALL FREEZER FEATURES
10 –15mm
Height adjustable
front rollers
WARNING
DOOR
INSTALLING YOUR NEW APPLIANCE
Adequate ventilation around your refrigerator.
Before you move your appliance into the place where it
will operate, check that it will have adequate clearance.
Clearance is required for air circulation and too little
clearance may affect the performance of your appliance.
1
2
We recommend minimum clearances of:
• 30mm on each side.
• 30mm above the refrigerator.
3
4
9
5
• 50mm minimum/75mm maximum behind the
refrigerator.
50mm (75mm max)
30mm
30mm
Recommended
airspace
CABINET
1. Move the appliance into its final position.
2. If the appliance is not tilting back as described
earlier, minor adjustments can be made to the
two front levelling legs by turning the feet in an
anticlockwise direction (below). This will increase the
height of the feet. If you have difficulty turning the
foot, have someone tilt the appliance back to gain
better access. If it is not tilted back enough and the
levelling legs are fully extended, additional packing
might be required (see note 4 for appropriate
materials).
NOTE: Doors are designed to sit proud of cabinetry (not
flush). The clearances shown above are the recommended
minimum clearances. The clearance at the rear must not
exceed 75mm.
Recommended minimum clearances for WRM2400/
WFM1700
3. Compare the alignment of the appliance to the
surrounding cupboard. The top of the appliance
should be level from side to side (see diagram
below). If you need to adjust the level, use the
levelling feet as detailed in step 2.
If you have a cupboard above the
refrigerator with a rear gap of less
X
Y
than 100mm (Y), recommended
minimum clearance at the top of
the refrigerator increases from
30mm to 70mm (X).
8
WFM1700WE illustrated
1
Control panel
2
Wind channel
3
Flap
4
Glass shelf
5
Features may vary depending on model. Not all models will have features listed.
Middle drawers
6
Lower drawer
7
Right adjustable bottom foot
8
Lower hinge part
9
Side pocket handle
Installing your refrigerator or freezer
6
The appliance should arrive with the front levelling feet
wound up. The appliance may need to be tilted backward
at the top by about 10-15mm from vertical (see diagram
below). This will allow the door to gravitate to the
closed position. The complete closure of the door seal is
reliant on manually pushing the door closed to provide a
consistent door seal.
7
4. If the appliance now rocks from one corner to the
opposite rear corner, this means that the floor is
uneven. You may need to put some packing under
the fridge to the rear of the appliance. You could use
thin pieces of solid material such as thin board, vinyl
floor tiles or laminate.
5. You may now need to fine tune the installation by
repeating steps 2, 3 and 4.
6. Wipe off any dust that has accumulated during
shipping and clean following the directions on page 17.
7. Plug the appliance into the power point. Don’t use a
double adaptor or extension cord.
8. It is recommended that you let the appliance run for
an hour or two (three hours for a freezer) before you
put any food in it. This will confirm that it is operating
correctly and make the conditions appropriate for
CAUTION
The rollers are designed for forward or backward
movement only. They are not castors. Moving the
refrigerator sideways may damage your floor and
food storage.
Congratulations! You have successfully installed your
refrigerator/freezer.
the rollers.
8 9INSTALLATIONFEATURES
Page 6
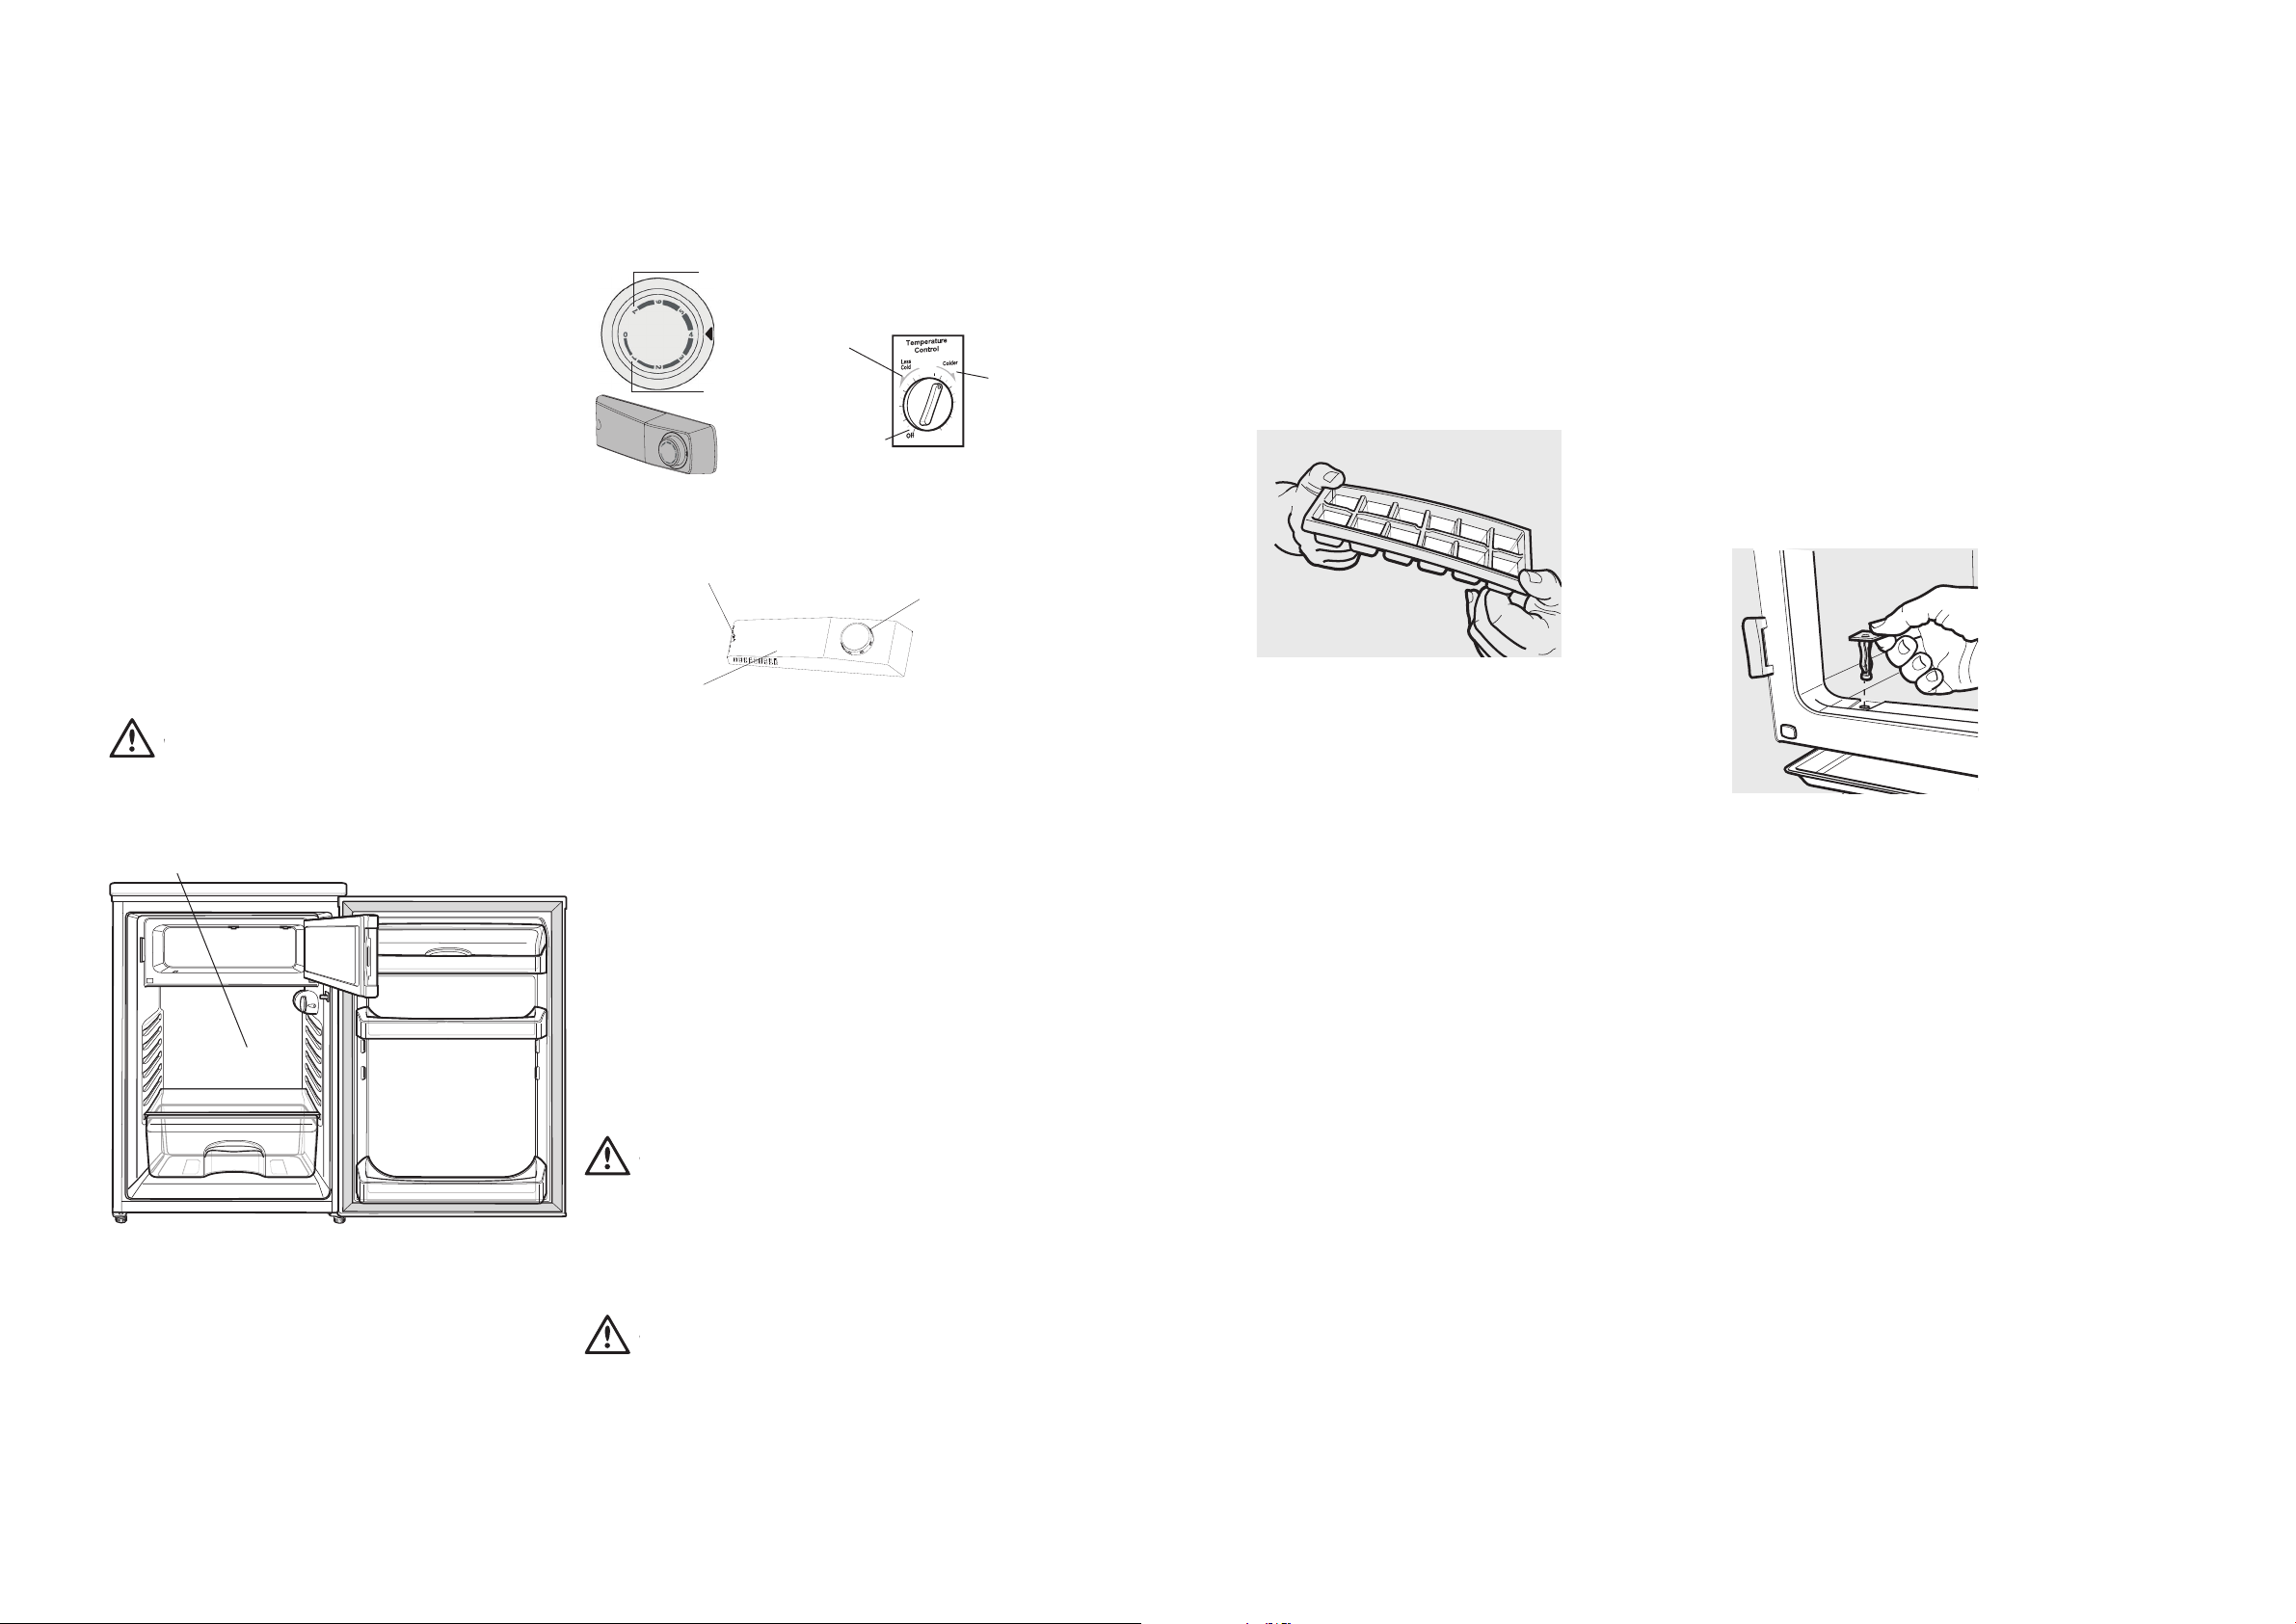
WARNING
WARNING
INITIAL START-UP – FRIDGES
WARNING
ICE BOX MODELS (WIM1000 & WIM1200)
Refrigerator models WRM1400 & WRM2400 have been
fitted with a 'wet wall' evaporator which is positioned
behind the rear liner. The rear liner will, at times be wet
or appear frosted. This is normal and demonstrates that
the refrigerator is functioning correctly. This product is
designed to operate on a power supply of 220/240 volts
50Hz. Connect to a separate power point with a correctly
earthed three pin socket. Do not use double adaptors.
Controlling the temperature in your refrigerator
Refrigerators work by transferring heat from the food
inside to the outside air. This operation makes the back
and sides of the refrigerator (particularly at start-up)
feel warm – which is normal. Make sure you fully close
the refrigerator door after loading or removing food. If
the door is left partially open, a heavy frost will coat the
inside of the ice box. Ensure shelves are pushed back
completely to prevent them holding the door open.
If the unit is unplugged, power lost or turned off, you
must wait 3 to 5 minutes before restarting the unit. If
you attempt to restart the unit before this time delay, the
refrigerator will not start.
When the thermostat is turned to it’s lowest setting
and past the point of resistance, the appliance will not
operate.
WARNING
Power is still supplied to the appliance.
Condensation caused
by the cooling plate
When the ambient room temperature is 25°C, a setting
of half way between ‘Off’ and ‘Colder’ recommended.
Coldest
Less Cold
Cold
Off
WIM1000
WRM2400
When you change temperature settings, make small
adjustments and wait 24 hours before assessing whether
you need to make further changes.
Bulb (inside)
Lampshade
WIM1200 and WIM1400
Thermostat knob
Colder
Starting up and temperature regulation (WRM2400)
• Insert the plug of the connection lead into the plug
socket with protective earth contact. When the
refrigerator compartment door is opened, the internal
lighting is switched on. After the fridge has been
placed in position, wait for 5 minutes before electricity
is supplied. Don't store anything until the temperature
inside the fridge becomes low enough.
• The temperature selector knob is located on the right of
the refrigerator compartment.
NOTE: The ice box compartment of the WIM1000 is
recommended for only making ice, it is not for the
storage of frozen food.
Making ice
To make ice cubes, fill the ice tray with water and place
it in the ice box. To remove ice cubes easily, run water
on the tray before gently twisting and inverting the tray.
De-icing
The de-icing system for the fridge compartment is
automatic in models WIM1200, and vertical fridges
WRM1400 and WRM2400. The rear inside of the
fridge is covered with frost when the compressor
operates and de-ices when it stops. When the ice
melts, the water evaporates automatically.
WIM1000 achieves its cooling from the ice box.
De-icing the ice box
The ice box compartment must always be de-iced when
the layer of frost reaches a thickness of about 4mm. This
compartment should be de-iced at least once a year
regardless of the thickness of the frost. Model WIM1000
has the added feature of a drip tray to collect the water.
When de-icing, a scraper or plastic utensil may be used.
Never use metal instruments or electrical appliances to
de-ice the ice box.
1. Switch off and disconnect the appliance from the
electricity supply.
2. Remove the plug from the drain (Model WIM1000
diagram below)
3. Place a container underneath the drain hole to
collect the water.
4. To speed up the process, you can place a bowl of hot
water inside the compartment and close the door.
5. When de-icing is complete, clean the appliance
before restoring the power.
Turn the control knob clockwise to turn the appliance on.
Rotating clockwise will make the appliance colder.
For all models, ‘Less Cold’ corresponds to the warmest
temperature while ‘Colder’ the coldest.
Adjusting the control knobs of WIM1000 amd WIM1200
will adjust the temperature in both the fridge and freezer
compartments.
When the ambient room temperature is 16°C, a setting
of half way between ‘Less Cold’ and ‘Off’ recommended.
Setting O means: Off.
Clockwise rotate the knob to turn on the appliance.
Setting 1 means:
Highest temperature, warmest setting.
Setting 7 (end-stop) means:
Lowest temperature, coldest setting.
IMPORTANT
Normally we advise you select setting of 2 or 3 Or 4, if
you want the temperature higher or colder please turn
the knob to warmer or colder setting accordingly. When
you turn the knob to colder which can lead to the more
energy efficiency-Otherwise, it would result in more
energy-consuming.
IMPORTANT
High ambient temperatures (e.g. on hot summer days)
and a cold setting (position 6 to 7) may cause the
compressor to run continuously or even non-stop!
Reason: when the ambient temperature is high, the
compressor must run continuously to maintain the low
temperature in the appliance
10 11ICE BOX MODELS
INITIAL START-UP
Page 7
INITIAL START-UP – FREEZER (WFM0900)
WARNING
WARNING
WARNING
WARNING
WARNING
INITIAL START-UP – FREEZER (WFM1700)
Your freezer was cleaned and polished before it left the
factory. Before use, dust and wipe over inside and out
using a clean dry cloth.
This product is designed to operate on a power supply
of 220/240 volts 50Hz. Connect to a separate power
point with a correctly earthed three pin socket. Do not
use double adaptors.
General Information
The freezer transfers heat from food placed inside to the
outside air. This process makes the rear and sides of the
outer cabinet feel warm to touch, particularly at initial
start up. This is normal.
Make sure you fully close the freezer door after loading
or removing food. If the door is left partly open, a heavy
frost will coat the inside of the freezer. Ensure that
baskets or bins are pushed all the way in to prevent the
door being held open.
If the unit is unplugged, power lost, or turned off you must
wait 5 minutes before restarting the unit. If you attempt to
restart before this time delay, the freezer will not start.
Features and general hints
• Try not to leave the door open for too long,
especially in warm and humid climates.
• It is recommended that you wrap all food in
freezer bags.
• Corned or pickled products (containing salts) must
NOT be stored in the freezer unless thoroughly
sealed. Salts cause metal oxidisation.
• In some circumstances (particularly after recent
opening and closing of the door) you may
experience a heavier than normal resistance when
opening the door. Should this occur wait a minute
or two between openings to stabilise the air
pressure within the cabinet.
• If going away for an extended period, turn your
freezer off, remove all foods and dry interior
thoroughly. Unplug the freezer from the electrical
outlet and leave the door open.
• If there is a power failure, do not open the door.
Frozen foods will stay frozen for up to 24 hours
depending on temperature and load conditions if
the door is kept closed.
• It is recommended that to ensure safe food storage,
the freezer operates for 3 hours with the door
closed before being stocked with food. It is also
recommended that you wait until the following day
before you purchase additional food, either frozen
or unfrozen, to stock your freezer.
WARNING
Do not touch freezer shelf surfaces, particularly when
hands are damp or wet. Extremely low temperatures
may cause your hands to stick.
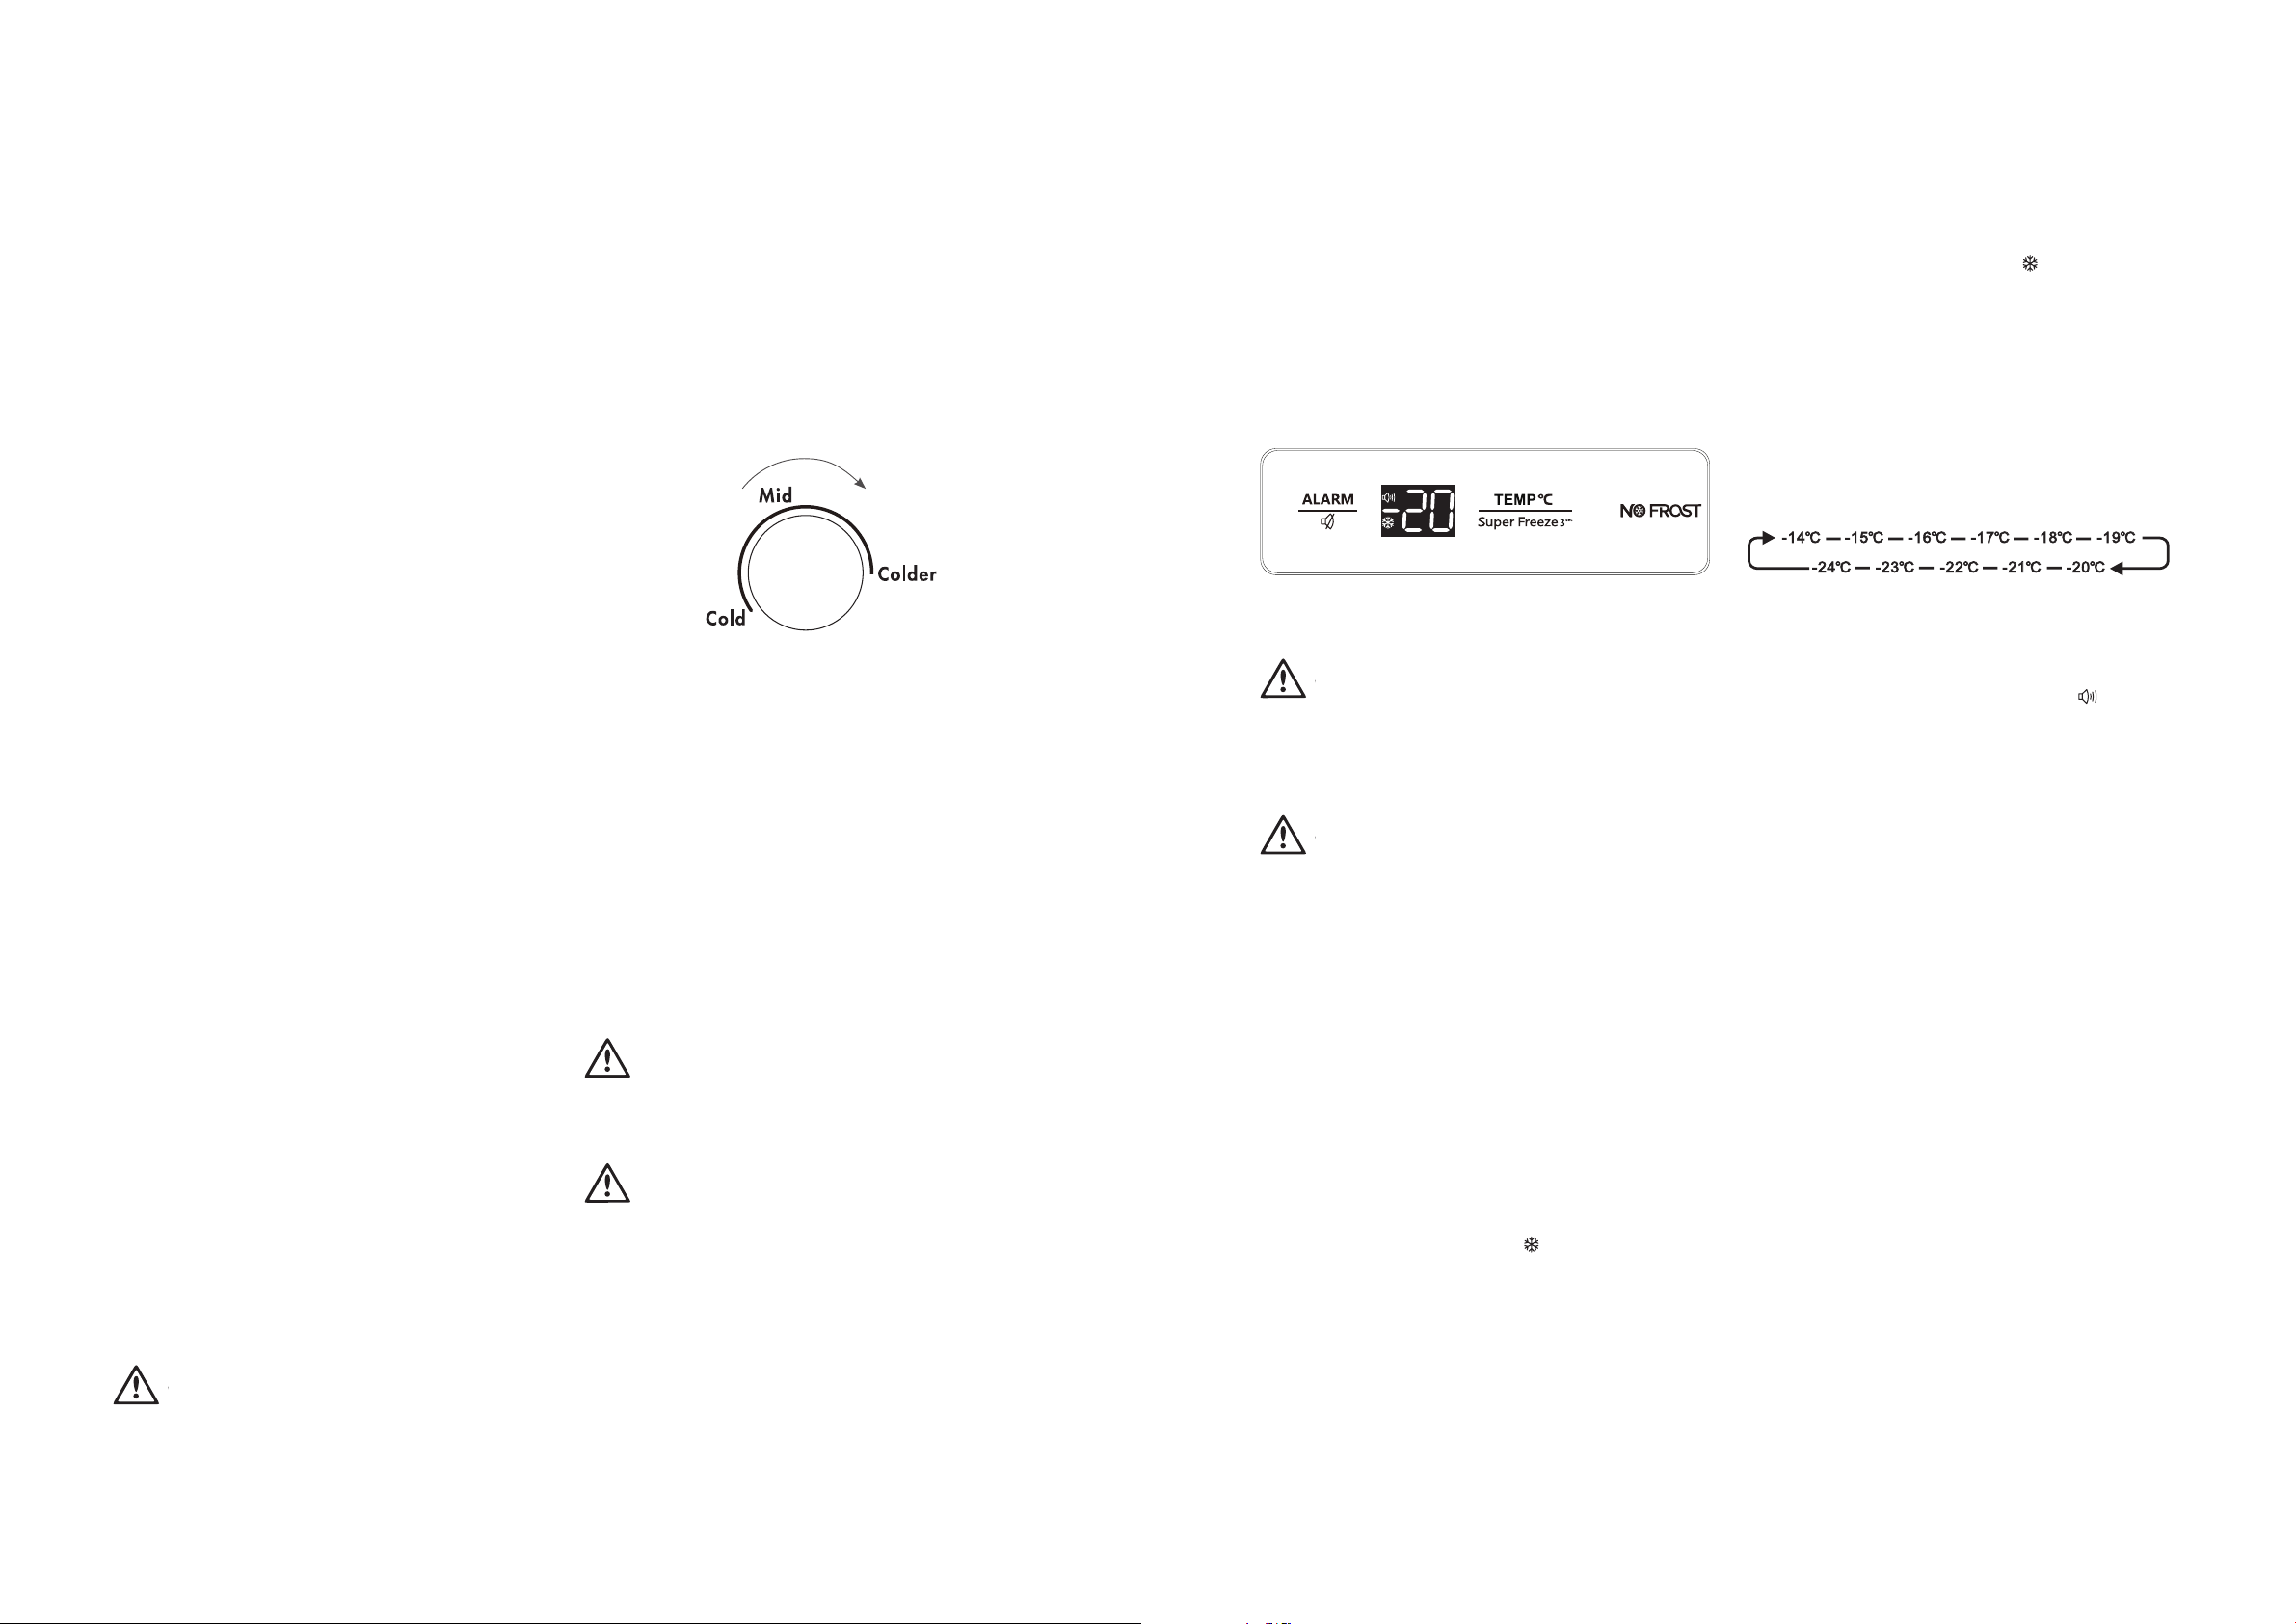
Controls
The temperature control is located on top of the front
right hand side of the cabinet on Model WFM0900.
Leave the control knob in the ‘Mid’ position for a trial
period. The control setting can be adjusted if required
by rotating the knob. Turn in a clockwise direction for a
colder temperature. When the thermostat is turned to
its lowest setting and past the point of resistance, the
appliance will not operate.
Colder
Defrosting
Your freezer should be defrosted when frost is
approximately 6mm thick otherwise it will interfere
with efficient operation and storage capacity. To ensure
optimal hygiene and efficiency complete defrosting is
recommended at least twice a year, preferably when
food supply is low.
• Switch off power to freezer at power outlet and
remove power supply plug from electrical outlet.
• Remove frozen food, wrap in newspaper and place in
a cardboard box or esky.
• Leave door open and wait for the frost to soften.
Pans of hot water may be placed inside the freezer to
speed up the defrosting process.
• Place towels and a container to catch the water in
the bottom of the freezer.
WARNING
On no account should an electric heater or hair dryer be
used for defrosting the freezer.
CAUTION
Do not use a knife, metal scraper or sharp pointed tool or
instrument to remove ice as they may cause damage to
the lining of your freezer.
• Scrape the softened frost off the walls of your freezer
using a plastic scraper.
• After defrosting is complete and all of the water has
drained, wipe the freezer thoroughly with a damp
cloth before drying thoroughly.
• Reconnect the power cord to the electrical outlet
and switch on.
• Replace frozen food.
The control panel that controls the temperature inside
the freezer compartment is located inside the freezer.
Use your appliance according to the following control
regulations, your appliance has the corresponding
functions and modes as the control panel showed in the
picture below. When the appliance is powered on for
the first time, the backlighting of the icons on display
panel starts working. The doors are closed, the back
lighting will turn off.
Controlling the temperature
IMPORTANT
Normally we recommend you set the temperature
for the freezer to -18 . If you want to change the
temperature, follow the instructions below.
CAUTION!
When you set a temperature, you set an average
temperature for the whole refrigerator cabinet.
Temperatures inside compartment may vary from the
temperatures displayed on the panel, depending on
how much food you store and where you place it. High
or low room temperature may also affect the actual
temperature inside the appliance.
Mode
SUPER FREEZE
Super Freeze will quickly lower the temperature within
the freezer so food will freeze faster. This can lock in the
vitamins and nutrients of fresh food and keep food fresh
longer.
O
• Press “TEMP
seconds to select the Super Freeze function. The
screen display “-24 ” and the indicator will be on.
• For the maximum amount of food to be frozen,
several hours before placing fresh food in the
freezer compartment, switch on super freezing to
prevent an unwanted temperature rise.
• If the freezing capacity according to the rating plate
is to be used, switch on super freezing 24 hours
before the fresh products are placed in the freezer
compartment, Super freeze automatically quit after
52h
C /Super freeze 3
sec
button after 3
• To switch off the “super freezing”, press the “TEMP
/Super freeze 3
switched off, the super indicator
simultaneity, and the appliance automatically
switches to the temperature set prior to super
freezing mode.
sec
” button. If super freezing is
will shut off
TEMP OC
• You can press the “TEMPOC /Super freeze 3
button to activate the mode to control the
freezer temperature. When you press the button
continuously, the temperature will be set as the
following sequence.
sec
”
Door Alarm
• If the door of freezer is open for over 1 minutes, the
door alarm will sound and the indicator begin
to flash. The buzzer will stop alarming by press
"ALARM" button and the indicator will be on but will
stop flashing.
• To save energy, please avoid keeping the door open
for a long time when using the appliance. The door
alarm can be cleared by closing the door.
O
C
12 INITIAL START-UP 13INITIAL START-UP
Page 8
WARNING
WARNING
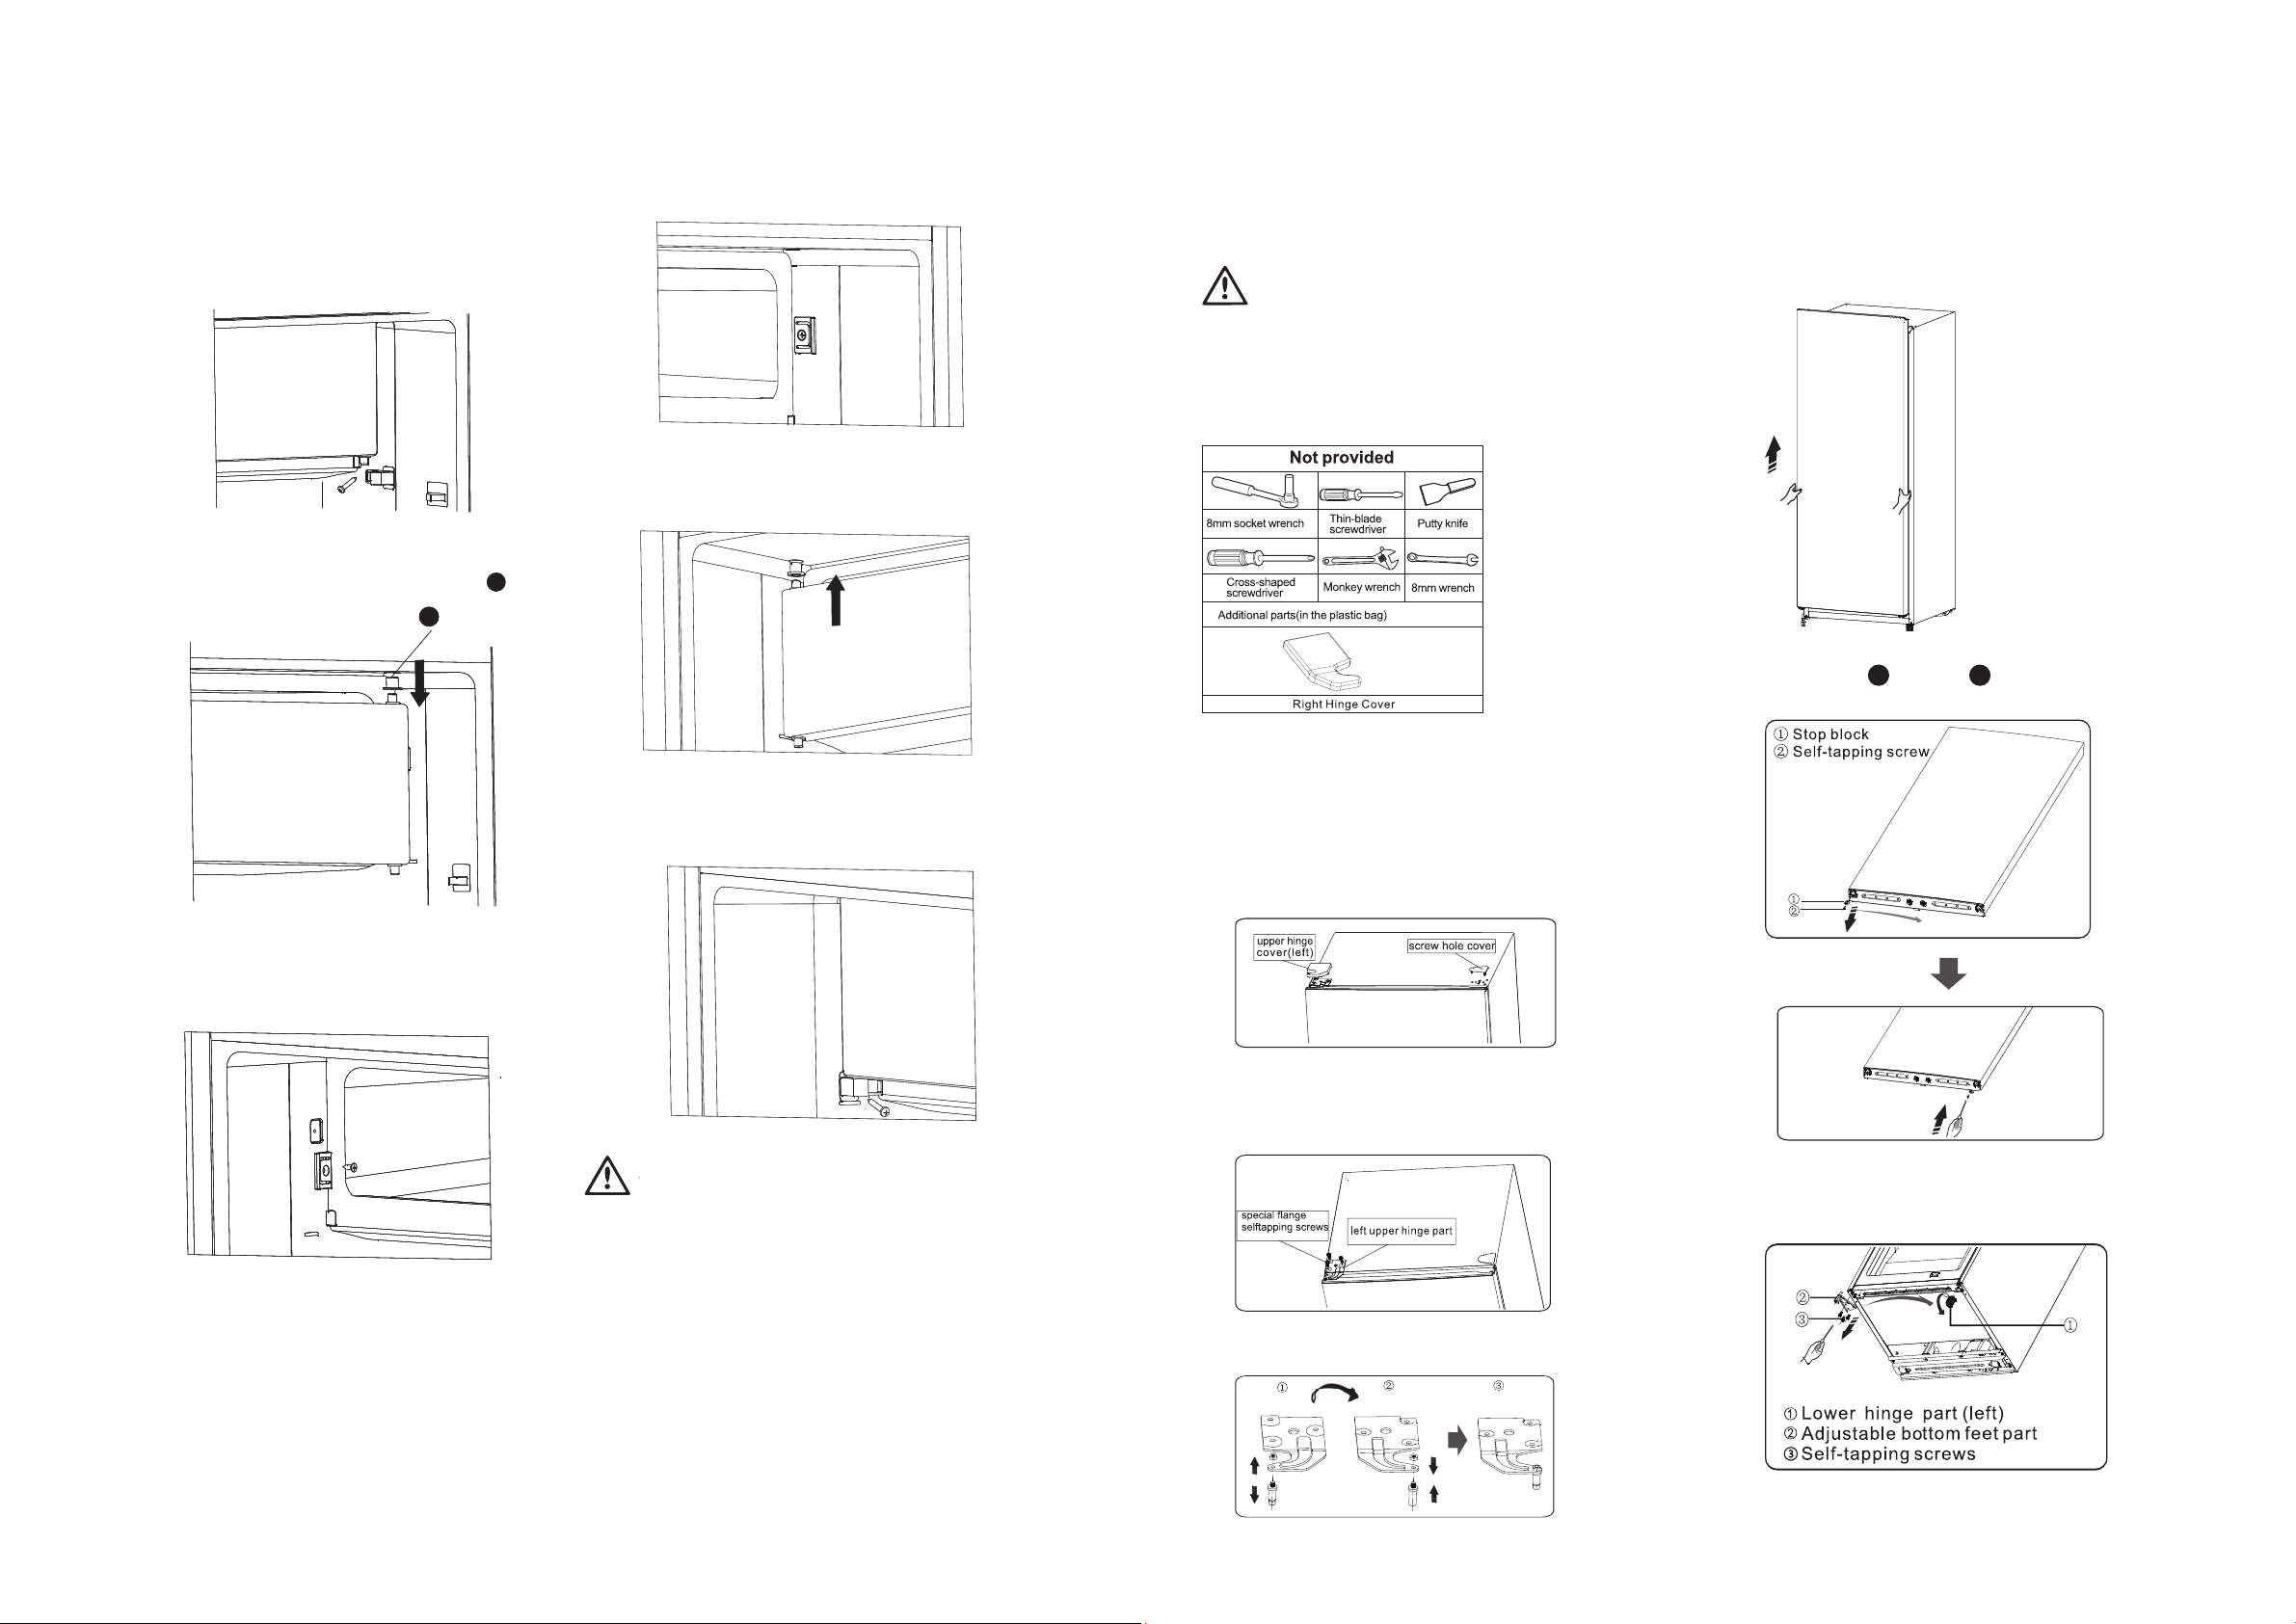
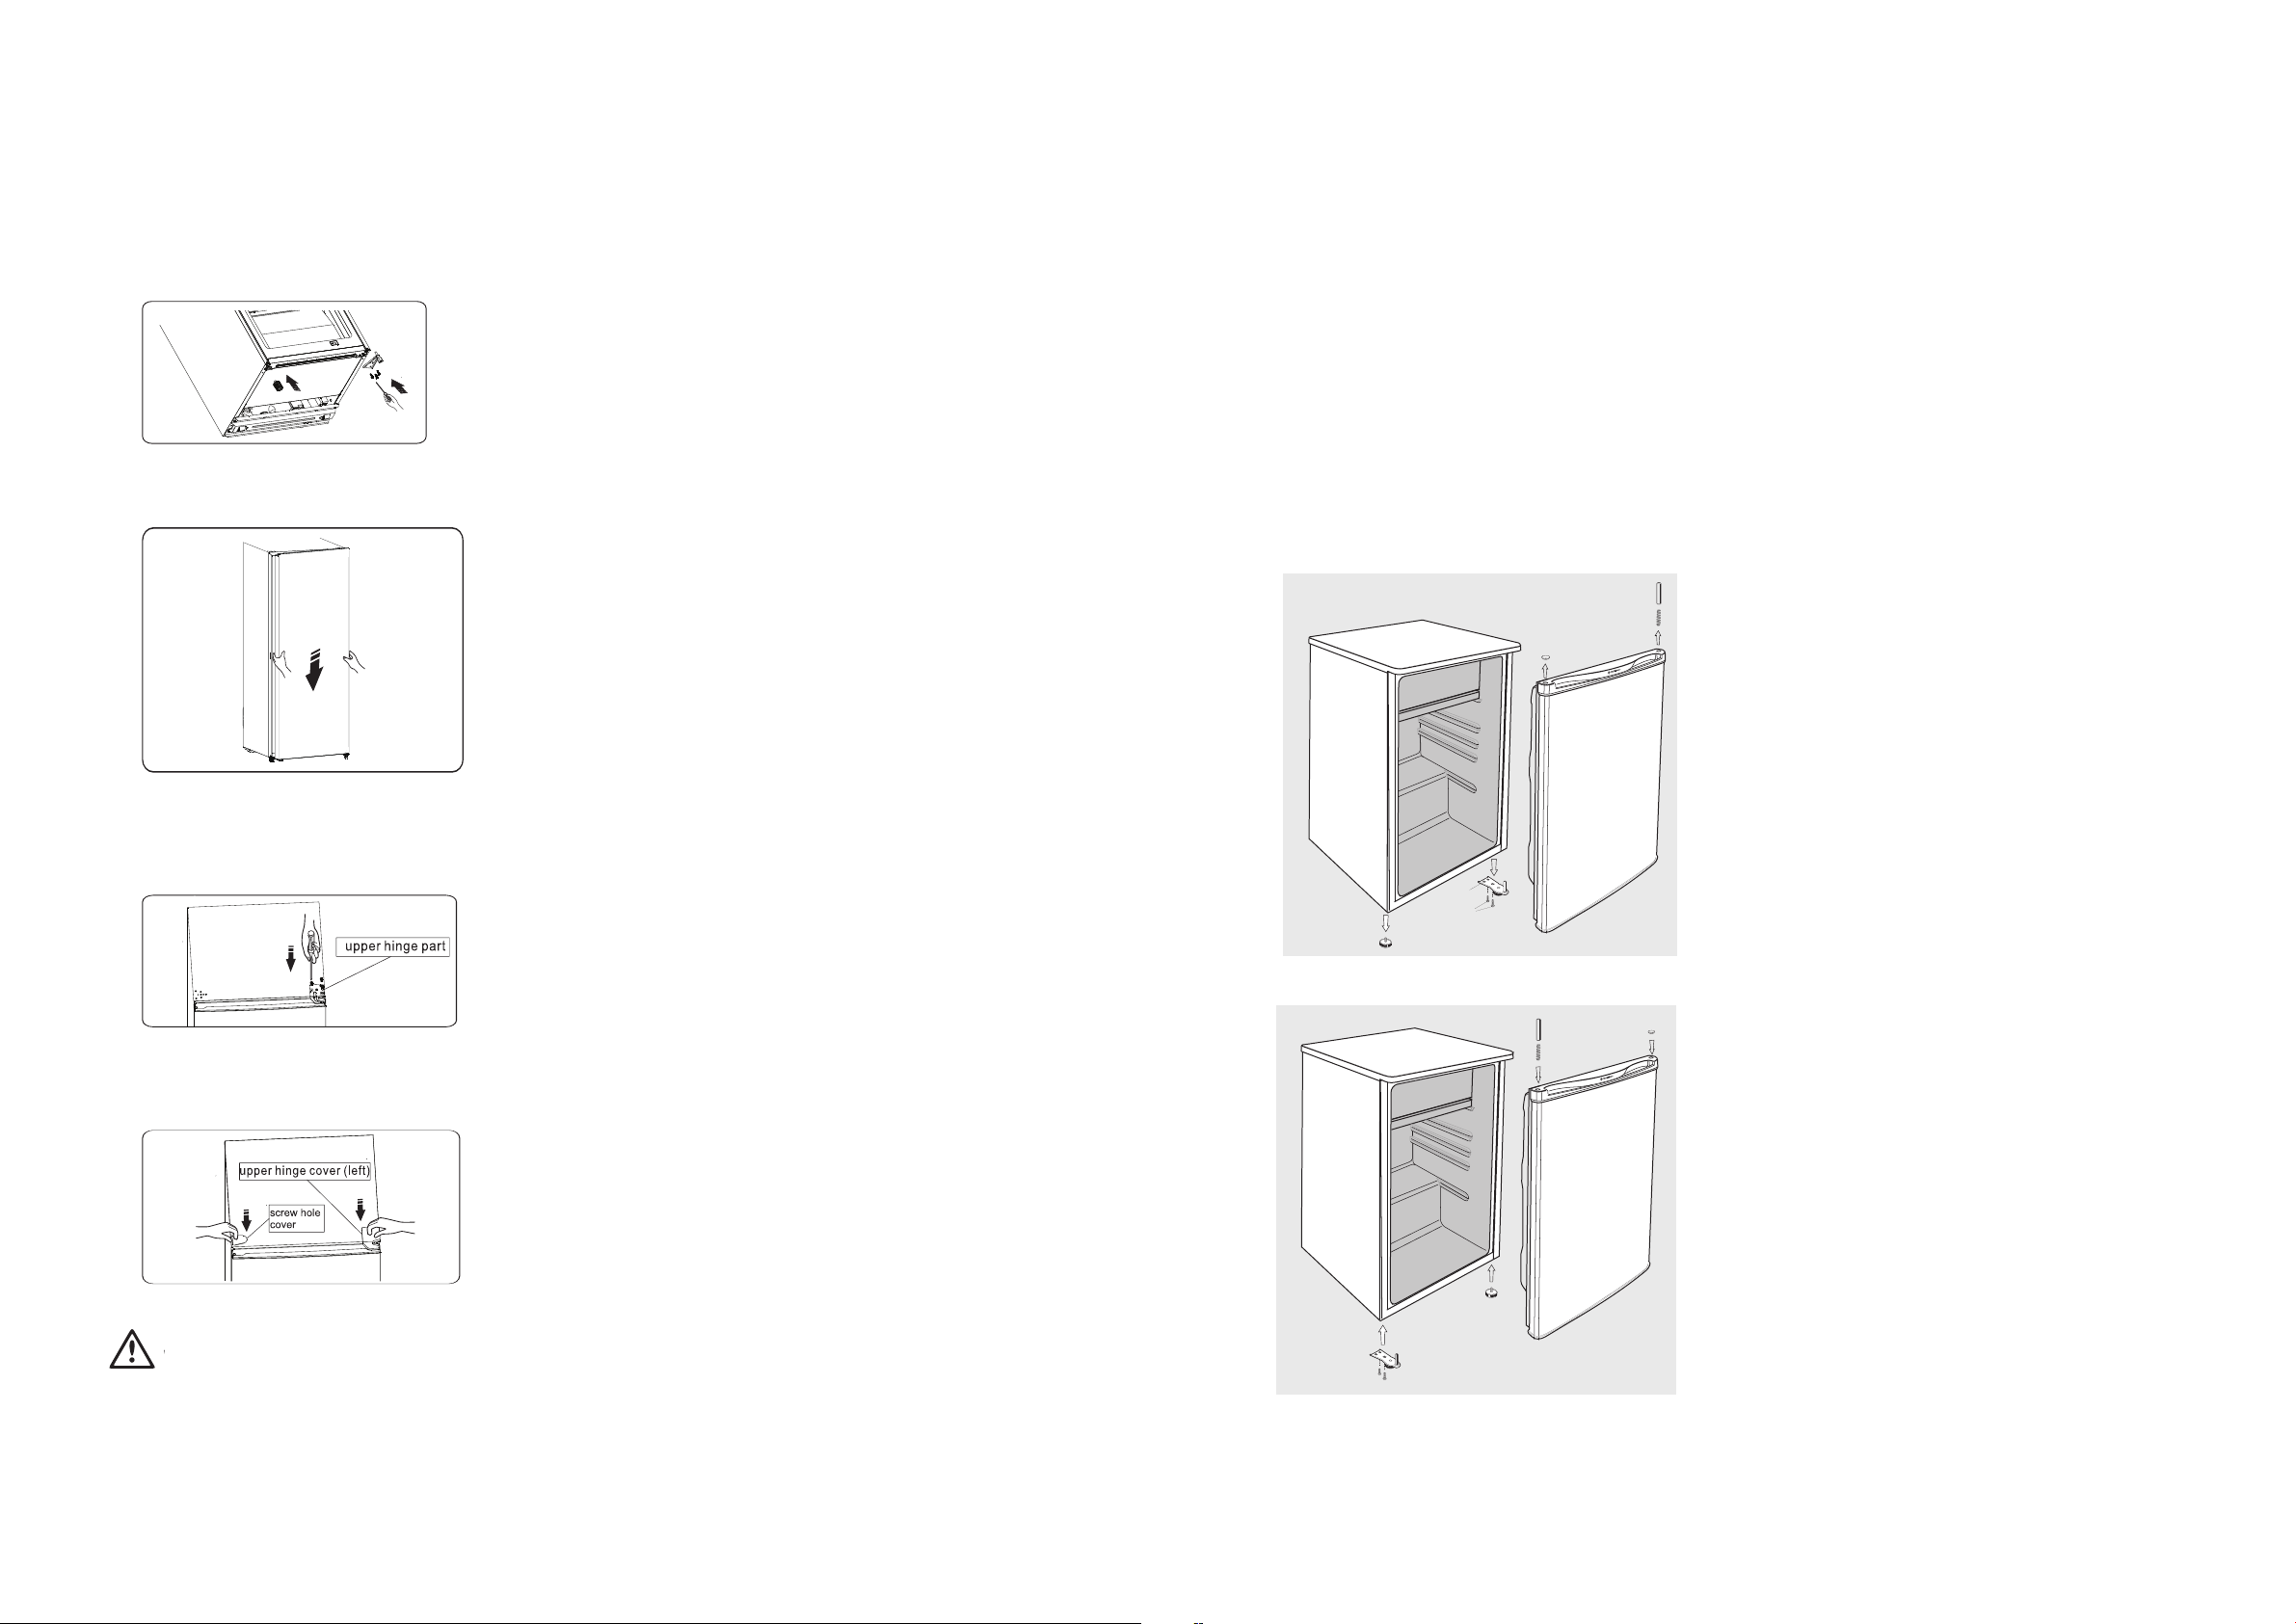
CHANGING OVER THE ICE BOX DOOR (WIM1200 ONLY)
1. Keep the freezer compartment door closed.
1. Keep the freezer compartment door closed.
Using a screwdriver, remove the mount screw for
Using a screwdriver, remove the mount screw for
the installation button, and take the installation
the installation button, and take the installation
button down.
button down.
4. Turn the freezer compartment door through 180°,
cover the cap on the up door bearing, then fit the
door into the up door axle hole.
2. Open the freezer compartment door a little way.
2. Open the freezer compartment door a little way.
Pull down the freezer compartment door and the
Pull down the freezer compartment door and the
cap which covering on the up door bearing 1.
cap which covering on the up door bearing 1.
REVERSING THE DOOR OPENING DIRECTION
The side at which the door opens can be changed, from the right
side (as supplied) to the left side, if the installation site requires.
WARNING
When reversing the door, the appliance must not be
connected to the mains. Ensure that the plug is removed from
the mains socket.
4. Remove the door from the lower hinge. NOTE: When
(WRM2400 & WFM1700)
removing the door, watch for washer(S) between the
lower hinge and the bottom of the lower door that may
stick to the door. Do not lose.
Tools you will need
1
3. Using a screwdriver, take down the installation
3. Using a screwdriver, take down the installation
buckle, and then fix it in the opposite side.
buckle, and then fix it in the opposite side.
.
5. Keep the freezer compartment door closed. Fix the
installation button to the lower door bearing, Press
the installation button to make it have no gap with
the cavity, then fix the screw.
WARNING
1. When changing the side at which the door opens,
the appliance must not be connected to the mains.
Remove plug from the mains beforehand.
2. Please use the screw hole covers to decorate the
screw holes in the original installation position. The
screw hole covers can be find in the plastic packet.
Note: If required you may lay the refrigerator on its back
in order to gain access to the base, you should rest it on
soft foam packaging or similar material to avoid damaging
the backboard of the refrigerator. To reverse the door, the
following steps are generally recommended.
1. Use a putty knife or thin-blade screwdriver to prize
the screw cover which is at the top left corner of the
refrigerator, and the upper hinge cover which cover cover
which is at the top left of corner of the refrigerator.
2. Unscrew the special flange self tapping screws which are
used for fixing the left upper hinge part by a 8mm socket
driver or a spanner (please support the upper door with
your hand whe doing it).
3. Remove the upper hinge axis, transfer it to reversed side
and tighten securely, then put it in a safe place.
5. Place it on a smooth surface with its panel upwards.
Loose screw
side and tighten securely.
6. Lay the refrigerator on soft foam packaging or similar
material. Remove both adjustable bottom feet parts, and
the lower hinge part by unscrewing the special flange
selftapping screws.
1
and pard 2, then install them to the left
14
CHANGING OVER THE ICE BOX DOOR
15REVERSING DOOR14
Page 9
WARNING
REVERSING THE DOOR OPENING DIRECTION
(WRM2400 & WFM1800)
REVERSING THE DOOR OPENING DIRECTION
(WIM1000)
7. Replace the lower hinge part to the right side and
fixing it which the special flange self-tapping screws.
Replace the adjustable bottom feet part to another
side and fixing it.
8. Transfer the door to the properly position, adjust the
lower hinge part, make the hinge axis into the lower
hole of the door.
9. Transfer the upper hinge part and make the upper
hinge axis into the upper hole of the door, and adjust
the position of the door(please support the door
with your hand when doing it), fixing the upper hinge
part with the special flange self-tapping screws.
In these examples the operation is changed from right
side hinging to left side hinging.
Precautions
• Turn off the appliance.
• Unplug the power cable.
• Remove all food from the appliance.
• Remove shelves and baskets.
• Do not lay the appliance down flat on its back as this
will impair its operation.
• When tilting the appliance to access the underside,
support it so that it will not fall to the floor.
Right sided hinging assembly
6
7
2
1
3
5
• Support the door from below and remove the two
screws (1) that secure the hinge (2) to the bottom
right side of the appliance. Stand the door to one
side carefully.
• Unscrew the left front leg (3) and transfer it to the
right side.
• Remove the metal hinging pin (6) and the spring (5)
beneath it from the hole in the top right hand corner
of the door.
• Insert the spring (5) first and then the pin (6) –
previously removed from the right hand side – into
the top left hole.
• Position the door on the cabinet with the pin (6)
protruding from the top left corner entering the
corresponding hole (arrowed in left hinging assembly
illustration) under the top frame of the cabinet.
• While holding the door in the closed position, secure
the hinge (2) – previously removed from the other
side – onto the bottom left corner, tightening the 2
screws (1) firmly.
10. Install the screw hole on the top left corner of the
refrigerator. Install the upper hinge (which is in the
plastic bag) on the right corner. Put the other upper
hinge cover into the plastic bag.
WARNING
When changing the side at which the door opens, the
appliance must not be connected to the mains. Remove
plug from the mains beforehand.
Left sided hinging assembly
6 7
5
3
2
1
Note: All parts removed must be retained to reinstall
door.
17REVERSING DOOR16 REVERSING DOOR
Page 10
.
.
.
①
②
.
①
②
.
①
②
REVERSING THE DOOR OPENING DIRECTION
.
.
①
②
.
①
②
WARNING
TIPS & INFORMATION
(WFM0900, WIM1200 & WRM1400)
LAMP REPLACEMENT (WIM1000)
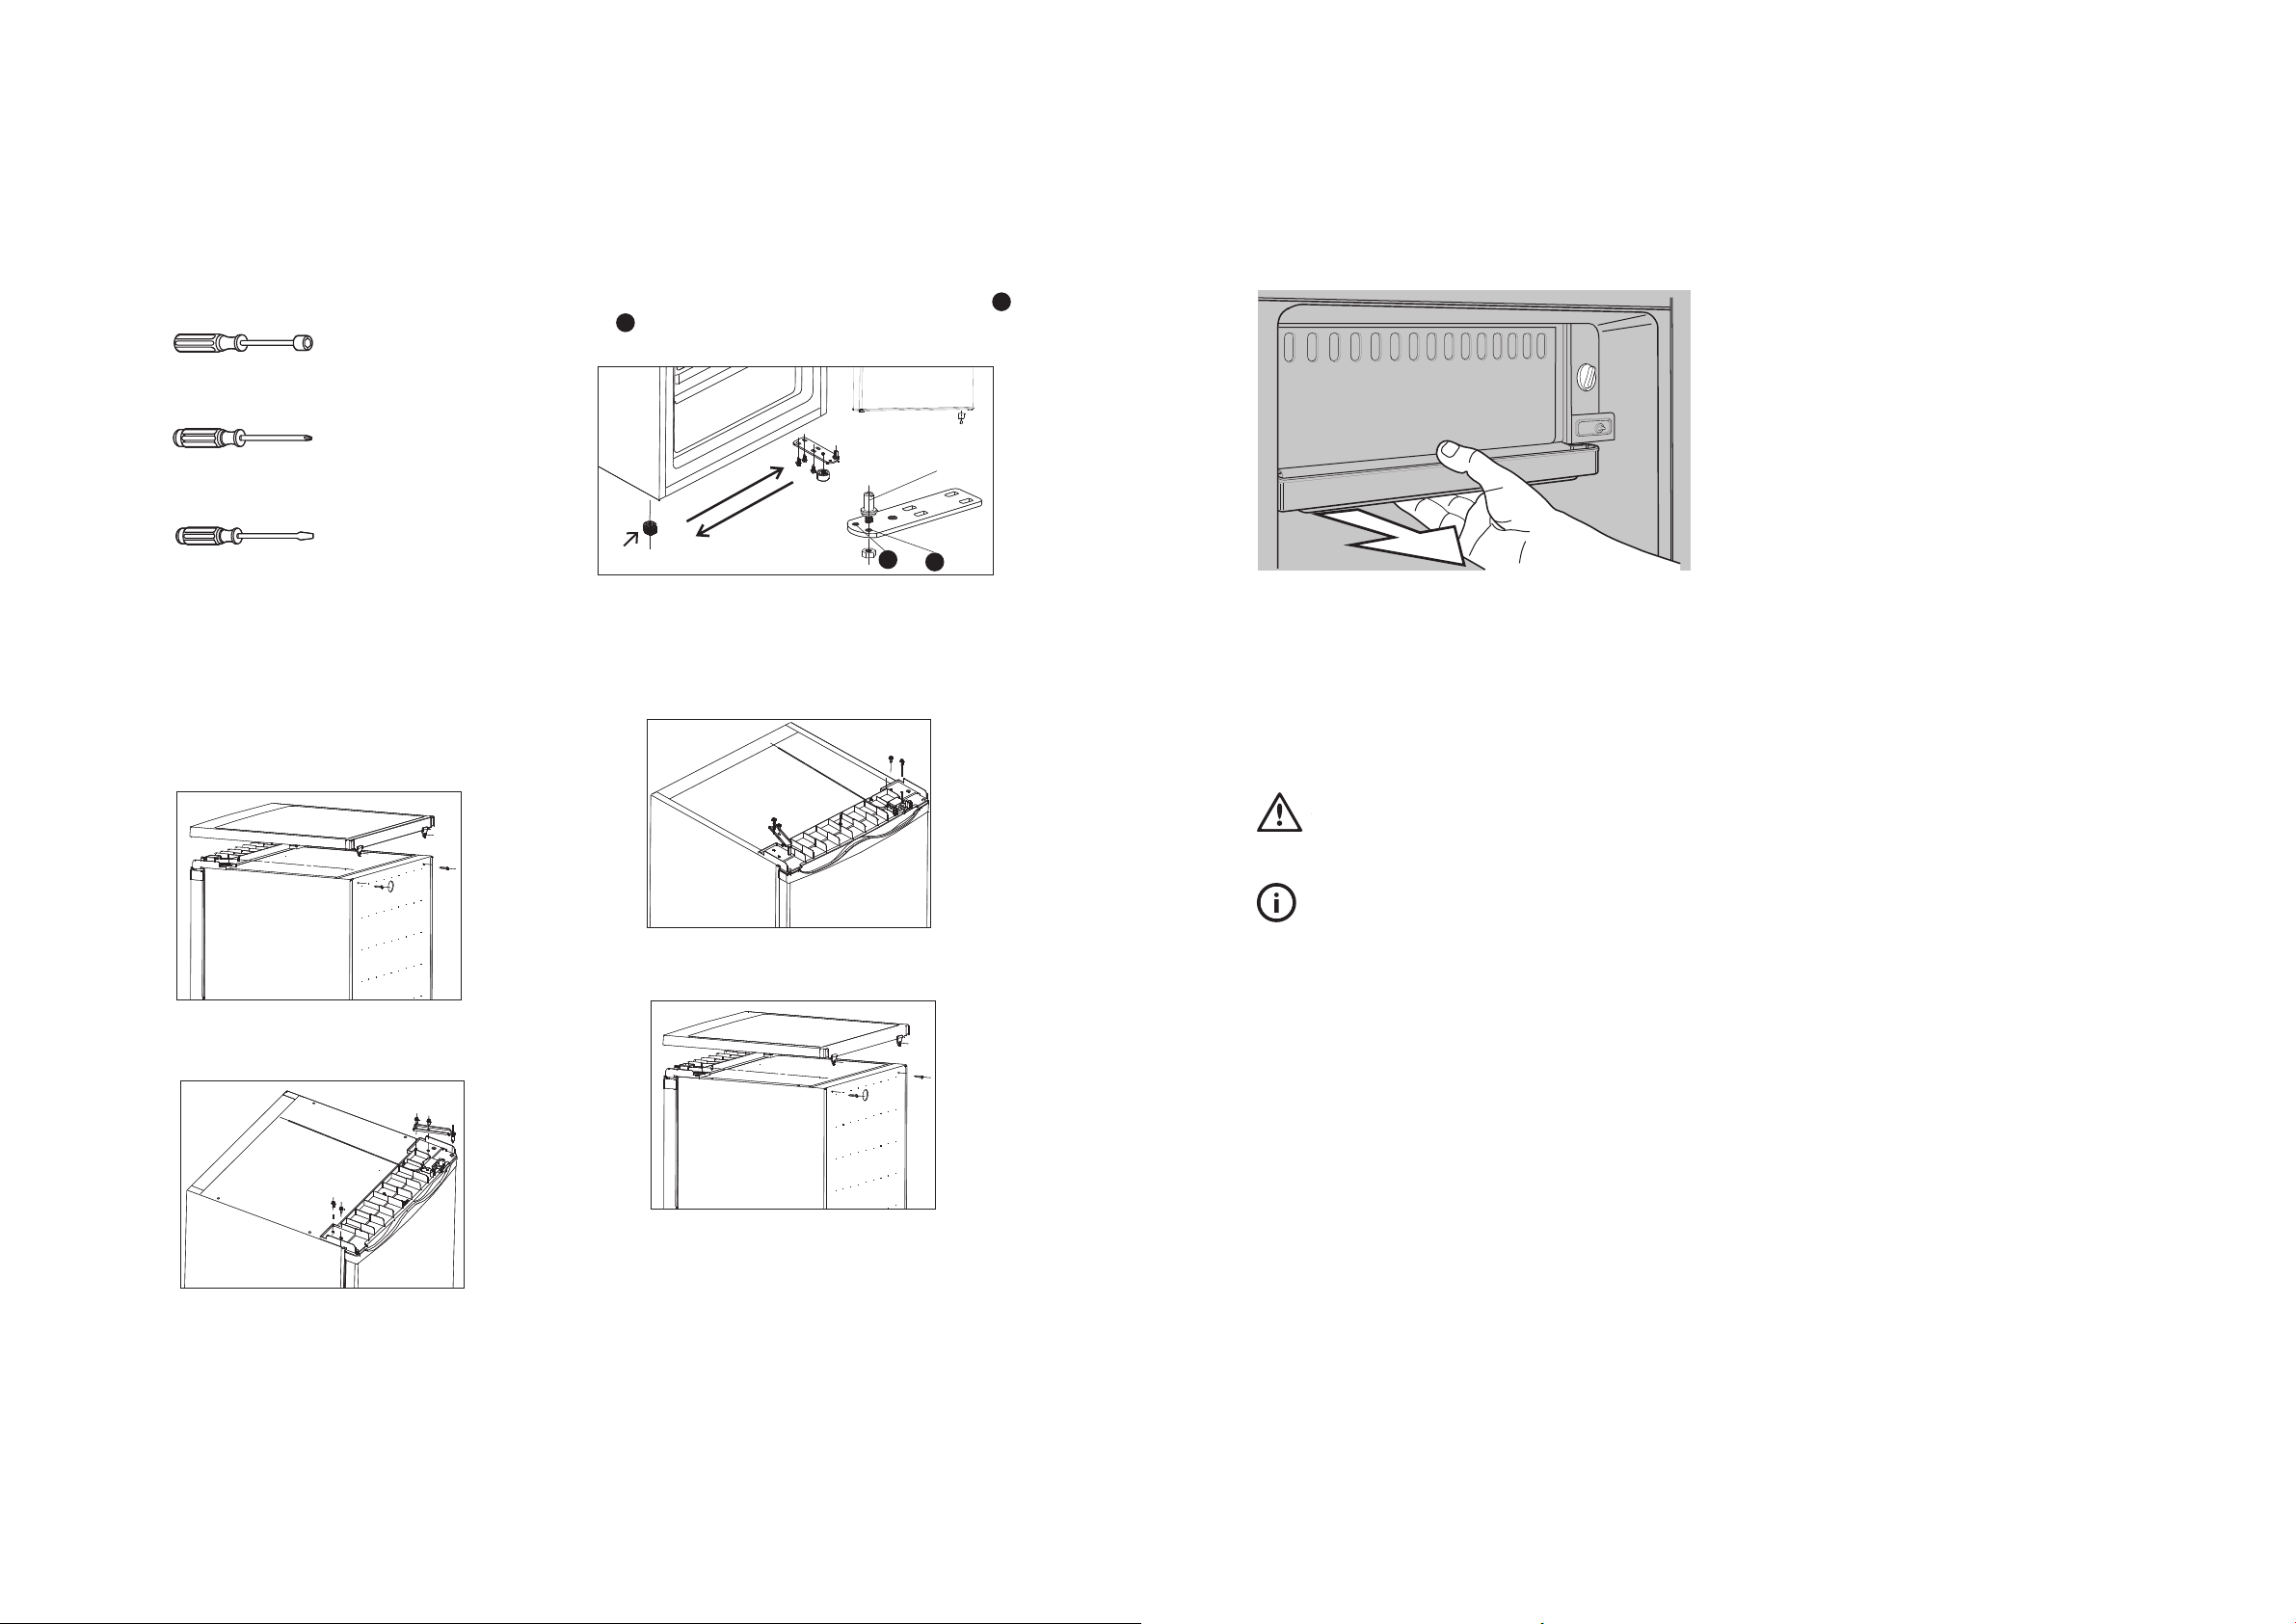
The side in which the door opens can be changed
from the right side (as supplied) to the left side, if the
installation site allows for it. Tools you will need:
1. 8mm socket driver
2. Phillips head screwdriver
3. Thin-blade screwdriver
Before you begin, place the fridge on it’s back in order to
gain access to the base, you should rest it on soft foam
packaging or similar material to avoid damaging the
cooling pipes at the rear of the fridge.
Reverse the door
1. Stand the fridge, remove the two screws on the back
of the top cover, then lift the top cover and place it
on a padded surface to prevent scratching.
3. Lift the door and place it on a padded surface to
prevent scratching. Remove both adjustable feet and
remove the bottom hinge bracket by unscrewing the
bolts. Then transfer them to the other side.
Note: 1. You need to move the hinge pin from hole 1
2
before transfer. 2. You need to install the foot
to
on the side which does not have a hinge.
hinge pin
foot
4. Set the door into its new place making sure the
pin enters the bushing at the lower frame section.
Replace the lid by fitting the upper hinge into the
upper door's hole, securing it with the two screws.
Replace another two screws to another side.
②
2
①
1
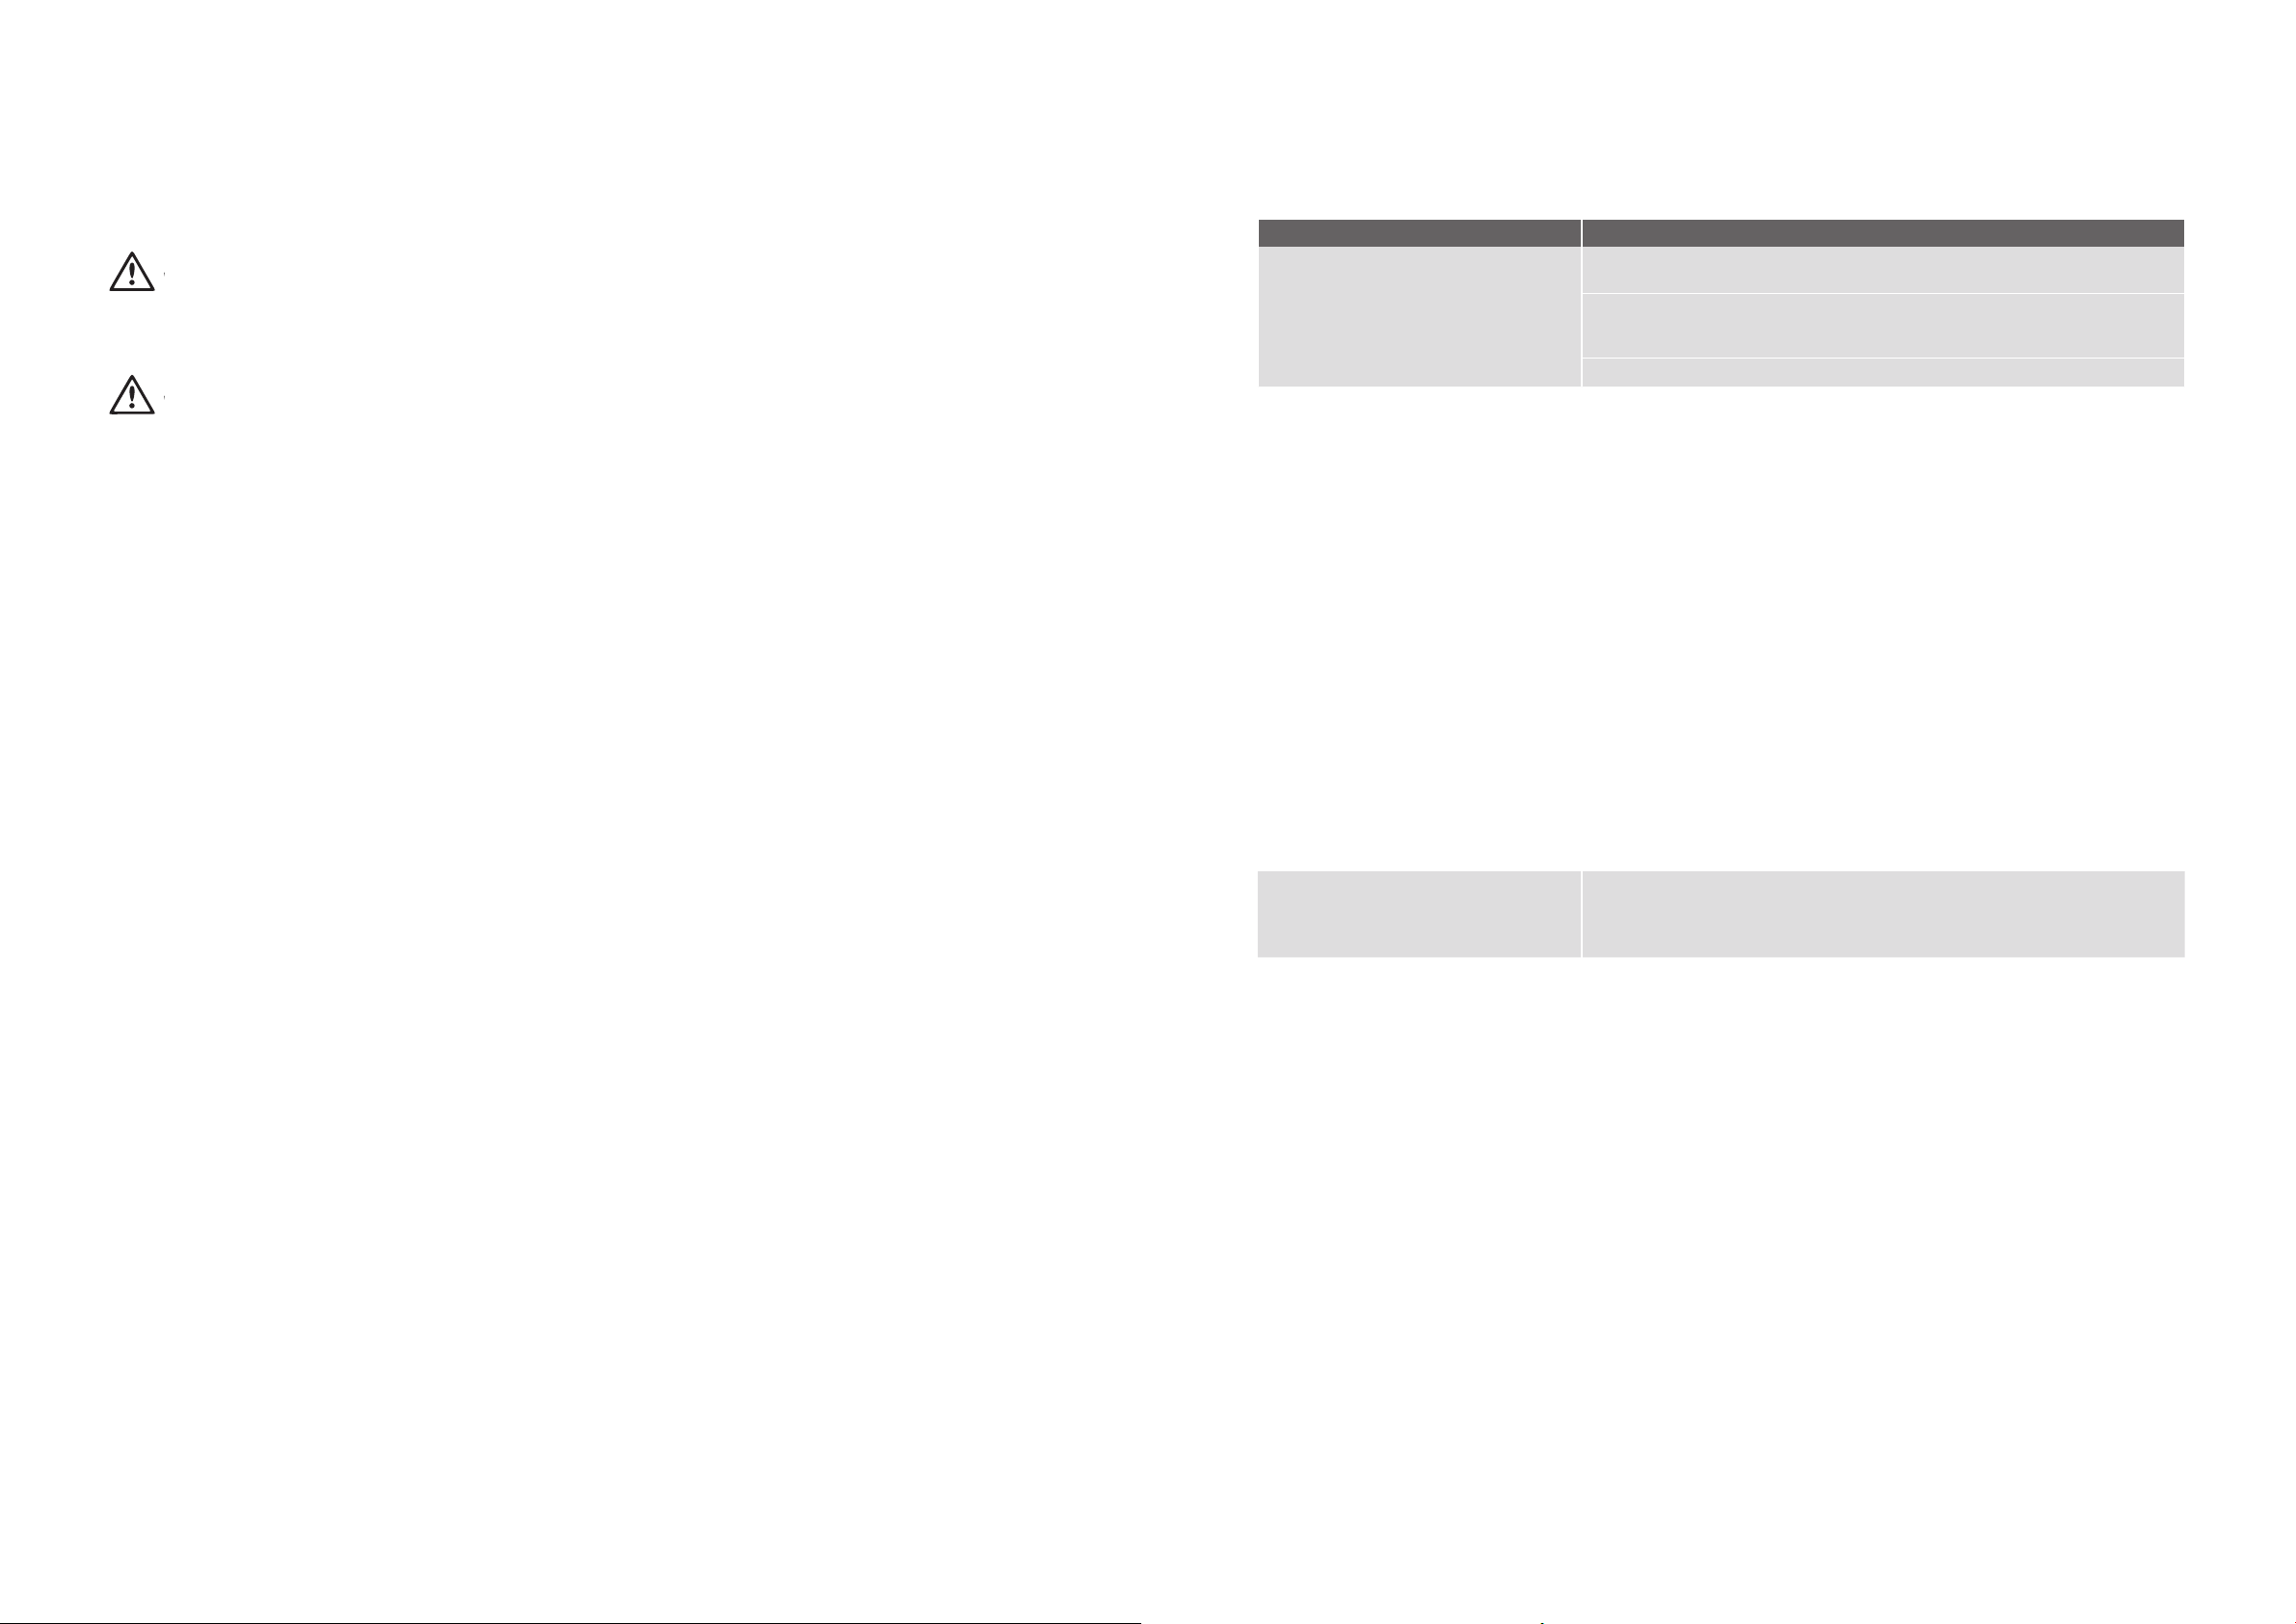
1. Switch off the power at the power point and remove
the cord by pulling the plug.
2. Slide out the drip tray from beneath the ice box.
3. Unscrew the light bulb in an anti-clockwise direction.
4. Screw the replacement bulb into the socket in a
clockwise direction.
6. Replace the drip tray.
7. Wait 5 minutes to ensure pressures in the
refrigeration system are equalised, before turning the
refrigerator on at the power point.
2. Remove the four screws as shown in the diagram.
Remove the top hinge and keep for reassembly.
5. Replace the top cover. Tighten the two screws on
the back of top cover.
replace note copy to read: "Note: 1. You
need to move the hinge pin from hole 1
to 2 before transfer. 2. You need to install
the foot on the side which does not have
a hinge."
WARNING
Never insert your finger into the light bulb socket.
TIPS AND INFORMATION
Not all 15 watt screw-in lamps will fit the lamp housing.
Appropriate replacement lamps can be purchased from
Electrolux or by calling 13 13 50.
LAMP REPLACEMENT
(WIM1200, WRM1400 & WRM2400)
Models WIM1200, WIM1400 are fitted with LED lights.
These are not user serviceable and should be replaced
by an authorised service centre. Normal service call and
labour charges apply.
18 REVERSING DOOR
19LAMP REPLACEMENT
Page 11
WARNING
WARNING
GENERAL INFORMATIONGENERAL INFORMATION
WHAT TO DO BEFORE CALLING FOR SERVICE
Cleaning the refrigerator
WARNING
BEFORE CLEANING: Turn the refrigerator off at the
power point and unplug the cord to prevent any chance
of electrocuting yourself.
CAUTION
• Doors and exterior (white & silver)
You should only clean the doors with lukewarm
soapy water and a soft cloth.
• Silver finish
Your silver refrigerator is manufactured from markresistant silver metal look steel. This silver metal look
steel has a special advanced protective coating that
eases the removal of marks such as fingerprints and
water spots. To keep its appearance, clean it regularly
with lukewarm soapy water and a soft cloth.
Never use stainless steel cleaners, abrasive pads or other
cleaners that will scratch the surface. Damage to the
appliance after delivery is not covered by your warranty.
Never use hot water, solvents, commercial kitchen
cleaners, aerosol cleaners, metal polishes, caustic or
abrasive cleaners, or scourers to clean your refrigerator.
Many commercially available cleaning products and
detergents contain solvents that will damage your
refrigerator. Use only a soft cloth with an unscented mild
soap and lukewarm water.
If your refrigerator has telescopic extension slides, simply
wipe them with a damp cloth to clean them and never
immerse them in water.
PROBLEM SOLUTION
Refrigerator is not operating
When there is refrigerator/freezer
noise
If heavy frosting occurs in the freezer Make sure you fully close the freezer and fridge doors. If the doors are left
Check that the power cord is plugged into the power outlet properly and that
the outlet is switched ‘ON’.
Try running another appliance from the power outlet. If no power is coming
from the outlet you may have blown a fuse or tripped a circuit of your
household power supply.
Try adjusting the temperature control to a slightly “colder” position.
Modern refrigerators/freezers with increased storage capacity use high
speed compressors. These can provide a seemingly high level of sound
which is quite normal. Normal operational sounds include:
• Occasional gurgling, similar to water boiling.
• Air flow noise (air circulates because of a small fan).
• A popping noise heard during automatic defrost.
• A clicking noise heard just before the compressor starts (this is just
the automatic switching action of the temperature control, turning the
compressor on or off).
Other strange sounds may mean that you need to check and take action.
For example, noises may mean that:
• The cabinet is not level.
• The floor is uneven or weak.
• Bottles are badly placed and rattling.
• There are vibrations from an object on top of or behind or beside the
refrigerator.
• The back of the refrigerator cabinet is touching the wall.
Remember it is quite normal for noise to seem louder just after the
refrigerator starts operating.
open, a heavy frost will coat the inside of the freezer. If a frost develops,
remove it and take care to properly close the doors.
If there are odours inside the
refrigerator
• The interior may need cleaning.
• Some foods produce odours.
• Some containers and wrapping can cause odours.
• Ask yourself if the odour started about the same time you started
storing something unusual.
20 GENERAL INFORMATION
21TROUBLESHOOTING21 CONTENTS
Page 12
TROUBLESHOOTING
PROBLEM SOLUTION
When the motor seems to run more
than expected
If the temperature in the refrigerator is
too warm
If the temperature in the refrigerator is
too cold
If water drips on the floor The defrost water tray, (located at the back or underneath of the cabinet)
Ice build up on freezer shelves A freezer will normally build up ice in several places and will not affect the
Moisture on inside rear surface of
refrigerator
If you still require service
If you have a problem, and the problem persists after
you have made the checks mentioned above, contact
your nearest approved Service Centre or the dealer you
bought the refrigerator from. Be ready to quote the
model number, 9-digit PNC and 8-digit serial number,
which is stated on the label inside the refrigerator
compartment.
It is normal to frequently hear the sound of the motor. However, to keep
operation to a minimum check the following:
• Are doors kept open too long or too often?
• Are controls set too cold? See ‘Controls’ on page 12.
• Have large amounts of warm food just recently been stored? Summer,
festive seasons and holidays usually mean a lot more work for your
refrigerator.
• If the day is hot or the room is very warm, the refrigerator will need to
run more than normal.
• The refrigerator will run more that normal just after you install it or when
it has been turned off for a long time.
• Check that the appliance has enough clearance at the sides, back and
top. Refer to the installation instructions on page 8.
• Refer to ‘Controls’ on page 12.
• You may have kept the door open too long or too frequently.
• Food containers or packaging may be holding a door open.
• Refer to ‘Controls’ on page 12.
• Increase the temperature to avoid high energy consumption.
may not be properly positioned, or the drain tube may not be properly
positioned to direct water into this tray. You may need to pull the
refrigerator away from the wall to check the tray and tube.
correct operation of the freezer. Over time when this build up becomes
inconvenient, it is necessary to manually defrost product by switching the
product off, removing any food and cleaning the product as described
under “DEFROSTING” on page 12.
The rear of the inside liner may, at times, appear frosty and wet. This is
normal for refrigerators of this type and demonstrates that the product is
functioning correctly, please refer to information on page 10.
Warranty
FOR SALES IN AUSTRALIA AND NEW ZEALAND
APPLIANCE: WESTINGHOUSE REFRIGERATORS AND FREEZERS
This document sets out the terms and conditions of the product
warranties for Westinghouse Appliances. It is an important
document. Please keep it with your proof of purchase documents
in a safe place for future reference should there be a manufacturing
defect in your Appliance. This warranty is in addition to other rights
you may have under the Australian Consumer Law.
1. In this warranty:
(a) ‘ACL’ or ‘Australian Consumer Law’ means Schedule 2 to the
Competition and Consumer Act 2010;
(b) ‘Appliance’ means any Electrolux product purchased by you and
accompanied by this document;
(c) ‘ASC’ means Electrolux’s authorised serviced centres;
(d) ‘Westinghouse’ is the brand controlled by Electrolux Home Products
Pty Ltd of 163 O’Riordan Street, Mascot NSW 2020, ABN 51 004
762 341 in respect of Appliances purchased in Australia and Electrolux
(NZ) Limited (collectively “Electrolux”) of 3-5 Niall Burgess Road, Mount
Wellington, in respect of Appliances purchased in New Zealand;
(e) ‘WarrantyPeriod’meanstheperiodspeciedinclause3ofthis
warranty;
(f) ‘you’ means the purchaser of the Appliance not having purchased
the Appliance for re-sale, and ‘your’ has a corresponding meaning.
2. Application: This warranty only applies to new Appliances, purchased
and used in Australia or New Zealand and is in addition to (and does not
exclude, restrict, or modify in any way) other rights and remedies under
a law to which the Appliances or services relate, including any nonexcludable statutory guarantees in Australia and New Zealand.
3. Warranty Period: Subject to these terms and conditions, this warranty
continues for in Australia for a period of 24 months and in New Zealand
for a period of 24 months, following the date of original purchase of the
Appliance.Speciccomponentsarewarrantedagainstmanufacturing
defects in Australia and New Zealand for the periods listed below;
• Compressor – Further 3 years
• External Condenser – Further 3 years
• Evaporator – Further 3 years
• Drier – Further 3 years
4. Repair or replace warranty: During the Warranty Period, Electrolux
or its ASC will, at no extra charge if your Appliance is readily accessible
for service, without special equipment and subject to these terms and
conditions, repair or replace any parts which it considers to be defective.
Electrolux may, in its absolute discretion, choose whether the remedy
oeredforavalidwarrantyclaimisrepairorreplacement.Electroluxorits
ASC may use refurbished parts to repair your Appliance. You agree that
any replaced Appliances or parts become the property of Electrolux.
5. Travel and transportation costs: Subject to clause 7, Electrolux will
bear the reasonable cost of transportation, travel and delivery of the
Appliance to and from Electrolux or its ASC. Travel and transportation will
be arranged by Electrolux as part of any valid warranty claim.
6. Proof of purchase is required before you can make a claim under this
warranty.
7. Exclusions: You may not make a claim under this warranty unless the
defect claimed is due to faulty or defective parts or workmanship. This
warranty does not cover:
(a) lightglobes,batteries,ltersorsimilarperishableparts;
(b) parts and Appliances not supplied by Electrolux;
(c) cosmeticdamagewhichdoesnotaecttheoperationofthe
Appliance;
(d) damage to the Appliance caused by:
(i) negligence or accident;
(ii) misuse or abuse, including failure to properly maintain or service;
(iii) improper, negligent or faulty servicing or repair works done by
anyone other than an Electrolux authorised repairer or ASC;
(iv) normal wear and tear;
(v) power surges, electrical storm damage or incorrect power supply;
(vi) incomplete or improper installation;
(vii) incorrect, improper or inappropriate operation;
(viii) insect or vermin infestation;
(ix) failure to comply with any additional instructions supplied with
the Appliance;
In addition, Electrolux is not liable under this warranty if:
(a) the Appliance has been, or Electrolux reasonably believes that the
Appliance has been, used for purposes other than those for which
the Appliance was intended, including where the Appliance has
been used for any non-domestic purpose;
(b) theApplianceismodiedwithoutauthorityfromElectroluxinwriting;
(c) the Appliance’s serial number or warranty seal has been removed
or defaced.
8. How to claim under this warranty: To enquire about claiming under
this warranty, please follow these steps:
(a) carefully check the operating instructions, user manual and the
terms of this warranty;
(b) have the model and serial number of the Appliance available;
(c) have the proof of purchase (e.g. an invoice) available;
(d) telephone the numbers shown below.
9. Australia: For Appliances and services provided by Electrolux in
Australia: Electrolux goods come with guarantees that cannot be
excluded under the Australian Consumer Law. You are entitled to a
replacement or refund for a major failure and for compensation for any
other reasonably foreseeable loss or damage. You are also entitled to
have the Appliance repaired or replaced if the Appliance fails to be of
acceptable quality and the failure does not amount to a major failure.
‘Acceptable quality’ and ‘major failure’ have the same meaning as
referred to in the ACL.
10. New Zealand: For Appliances and services provided by Electrolux
in New Zealand, the Appliances come with a guarantee by Electrolux
pursuant to the provisions of the Consumer Guarantees Act, the Sale
of Goods Act and the Fair Trading Act. Where the Appliance was
purchased in New Zealand for commercial purposes the Consumer
Guarantee Act does not apply.
11.Condentiality: You accept that if you make a warranty claim, Electrolux
and its agents including ASC may exchange information in relation to you
to enable Electrolux to meet its obligations under this warranty.
22 TROUBLESHOOTING22
Before calling for service, please ensure that the steps listed in clause 8 above have been followed.
AUSTRALIA
NEW ZEALAND
WFridgeFreezer_Warr_Jul19
Important Notice
FOR SERVICE
ortondtheaddressofyournearest
authorised service centre in Australia
PLEASE CALL 13 13 49
For the cost of a local call
FOR SERVICE
ortondtheaddressofyournearest
authorised service centre in New Zealand
PLEASE CALL 0800 10 66 10
FOR SPARE PARTS
ortondtheaddressofyournearest
spare parts centre in Australia
PLEASE CALL 13 13 50
For the cost of a local call
FOR SPARE PARTS
ortondtheaddressofyournearest
spare parts centre in New Zealand
PLEASE CALL 0800 10 66 20
23WARRANTY
Page 13
For more information on all Westinghouse
appliances, or for dimension and installation
information, call into your retailer, phone or email
our customer care team or visit our website:
AUSTRALIA
phone: 13 13 49
email: [email protected]
web: westinghouse.com.au
NEW ZEALAND
phone: 0800 436 245
email: [email protected]
web: westinghouse.co.nz
and WESTINGHOUSE are trademarks of Westinghouse Electric Corporation.
Used under license by Electrolux Home Products Pty Ltd. All Rights Reserved.
ANC No.
© 2021 Electrolux Home Products Pty Ltd.
ABN 51 004 762 341
WMAN_WFRISDUM_Jul21
 Loading...