

Page 1

USER’S MANUAL
MANUEL DE L’UTILISATEUR
MANUAL DEL USUARIO
DPF-0702
Widescreen Digital Photo Frame
Cadre Photo Numérique
Marco de Fotos Digitales
Page 2

TABLE OF CONTENTS
INSTALLATION / QUICK START…………………..…………...…..……………2
DIAGRAM OF THE DIGITAL PHOTO FRAME...………………………………3
KEYPAD BUTTON FUNCTIONS...……..…………………………………………4
OSD MENU FUNCTIONS…………………………………….…………………….5
MOSAICVIEWTM AND ADDITIONAL FEATURES…………………………..…6
DIGITAL PHOTO FRAME NAVIGATION…..……………....…………………...7
USING THE MINI-USB FOR FILE TRANSFER…..…………………….………8
SAVING AND DELETING FILE FROM INTERNAL MEMORY..…….……….9
TECHINICAL SPECIFICATIONS…..…………………………………………...10
FREQUENTLY ASKED QUESTIONS….………………………………………..11
IMPORTANT SAFETY INSTRUCTIONS……………………………………….12
CLEANING THE DIGITAL PHOTO FRAME…………………………………..14
WARRANTY INFORMATION……………………………………………………15
1
Page 3

Congratulations on your purchase of a Westinghouse 7.0” LCD Digital Photo
Frame. We are excited to bring you a new experience in viewing your digital
memories. Contents include an AC/DC Power Supply Adapter and User’s
Manual. Please read carefully and follow all warnings and instructions in this
User's Manual and those marked on the product before you use the Digital
Photo Frame. Failing to follow warnings can result in personal injury or
damage to the Digital Photo Frame. Please keep this User’s Manual in a
convenient location for future reference.
Important: Save the original box and all packing material for future shipping
needs.
Quick Start
1. Plug the AC adapter into the Digital Photo Frame and plug it into a
power outlet.
2. Insert a memory card into one of the four slots:
Slot 1 - Secure DigitalTM or MultiMedia CardTM
Slot 2 - Compact FlashTM or Micro Drive
Slot 3 - xD-Picture CardTM
Slot 4 - Memory StickTM, Memory Stick PROTM, Memory Stick
DuoTM, or Memory Stick PRO DuoTM
Or insert a USB Thumbnail Drive into the USB port.
Note: To view a sample of how the Photo Frame displays digital photos, simply
turn on the frame without inserting a memory card.
3. Turn on the Power Switch on the back of the Digital Photo Frame.
4. Once the Digital Photo Frame has turned on, it will enter into
MosaicView
TM
Slide Show automatically.
5. To view photos individually, press the Menu button to enter
Thumbnail View. Using the Arrow Buttons (<<) and (>>), highlight a
photo and press the Play (4) button to view the image. To enter into
MosaicView
TM
Slide Show again, press the Play (4) button.
Note: To delete photos from the internal memory or save photos to the internal
memory, please refer to page 8 or 9.
TM
2
Page 4
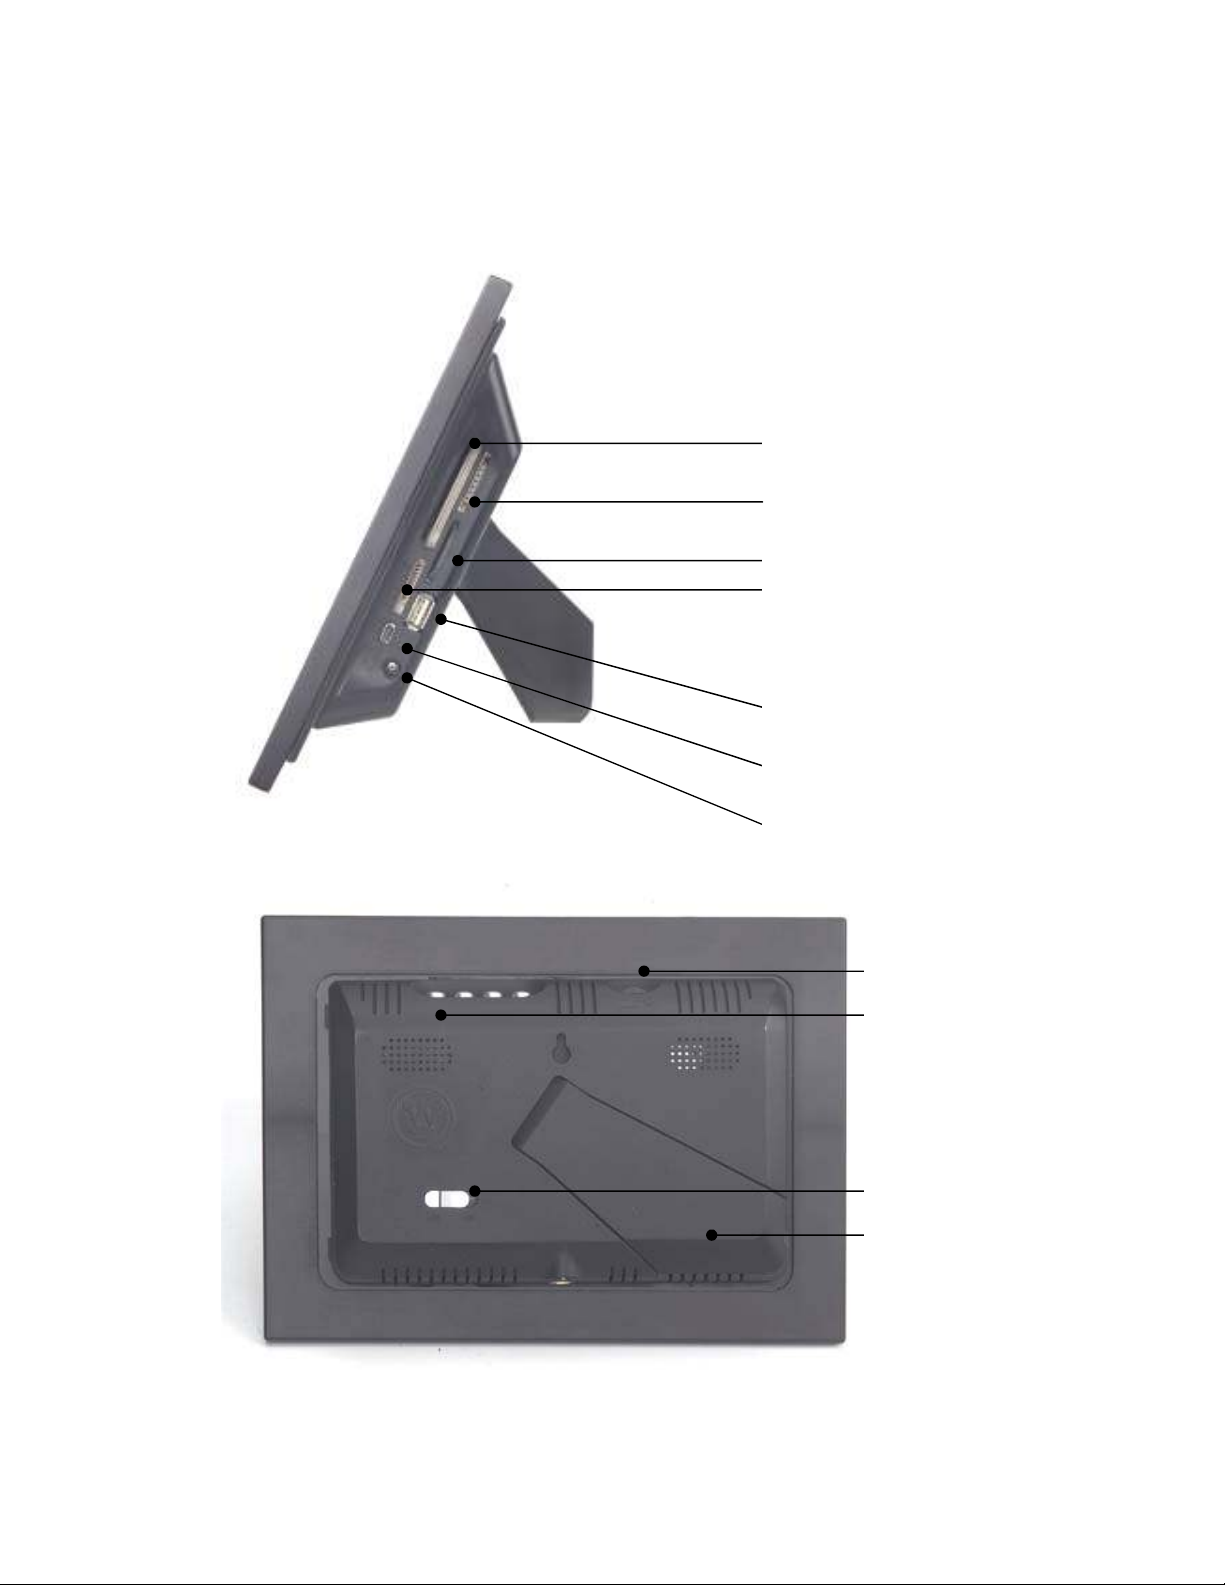
Power Switch
Diagram of the Digital Photo Frame
Compact FlashTM and
Micro DriveTM Slot
Secure DigitalTM and
Multi Media CardTM Slot
xD-Picture CardTM Slot
Memory StickTM, Memory Stick
PROTM, Memory Stick DuoTM, and
Memory Stick PRO DuoTM Slot
USB Port for USB Flash Drives
Mini USB Port for File Transfer
AC Power Input
Brightness Control
Keypad
Adjustable Stand
3
Page 5

Keypad Button Functions
On Screen Display Functions
Note: To enter the On Screen Display (OSD), press the Menu button for 2
seconds (except when in Slide Show). To exit the OSD, simply press the Menu
button again.
Button
<<
Play
>>
Menu
Viewing Images Individually
Button Command
<< Go to Previous Image
Play Start Slide Show
>> Go to Next Image
Menu
Thumbnail View/ Select Mode Page / Card Select Page
Button Command
<< Left
Play Select
>> Right
Menu Back one page
Viewing Video Files
Button Command
<< Go to Previous Video File
Play Play / Pause Video File
>> Go to Next Video File
Menu Exit to Video Selection Page
Command
Up
Select
Down
Back/Exit
Press once to exit to Thumbnail View or hold down for 2
seconds to enter OSD Menu
4
Page 6

OSD Menu Functions
All function settings for the Digital Photo Frame can be controlled via the buttons located
on top of the Frame. You can access the On Screen Display (OSD) at any time, expect
when in Slide Show Mode or playing a video, by simply holding down the “Menu” button
for 2 seconds.
OSD Menu Sub-Menus Description and Function of Operation
MosaicViewTM
Image Size Optimal Optimizes the picture to fill the whole space
Slide Show Effect
Slide Show Speed
Video Repeat
Start Slide Show - Unit will go into Slide Show
Copy File -
Delete File -
Set Favorite -
Reset Settings - Reset all settings back to default.
Language -
Note: If a selection is red, you will not be able to perform that function. For example, when you are
viewing pictures from a memory card, the Delete File option will be highlighted red and will not be
available.
On
Off
Original Displays images in their original aspect ratio
Off
Fade
Shutter
Cross Comb
Mask
Brick
Dissolve
Random
3 Seconds
5 Seconds
10 Seconds
30 Seconds
60 Seconds
On Slide Show Shuffle
Off
One Selected video file will repeat continuously
All All video files will repeat continuously
Off Selected video file will not repeat automatically
Turning off MosaicViewTM will allow you to view
pictures one at a time during Slide Show.
Select Style of Image Transition
Select Speed of Slide Show
This function allows images to be displayed in random
order.
This allows a file to be copied from a memory card
into the internal flash memory.
This allows a file to be deleted from the internal flash
memory.
This function allows you to select images to appear
more often.
Changes the OSD menu language: English, Italian,
German, French, Spanish, Portuguese or Dutch
5
Page 7

MosaicViewTM
What is MosaicViewTM?
MosaicViewTM is an exciting new technology developed by Westinghouse
which allows you to view multiple photos at the same time. MosaicViewTM
automatically detects different picture orientations and displays them randomly
through Slide Show.
How MosaicViewTM works:
With MosaicView™, up to 4 images can be displayed at the same time. Portrait
and landscape images are displayed in a random configuration such as a
portrait and two landscape photos or two portrait images displayed at the same
time.
The Slide Show is set to MosaicViewTM as the default setting. In addition, to
maximize the area of display, images are set to “Optimal” under “Image Size”.
Please note that some cropping of the images will occur in this mode. If you
wish to view the images in their original aspect ratio, select “Original” under
“Image Size” in the OSD. The images will maintain their native aspect ratio.
Starting a Slide Show
There are two ways of starting a Slide Show; one is pressing the play button
when viewing images individually, or by entering the OSD and selecting “Start
Slide Show”. (Note: If a memory card is inserted into the Digital Photo Frame,
selecting “Start Slide Show” will run a Slide Show of images contained in the
memory card.)
Additional Features
Setting Favorite Picture
Marking an image as a Favorite allows you to see the image more often during
Slide Show. To do so, in Thumbnail View highlight a picture and enter the OSD
menu by holding down the Menu button. Select “Set Favorite” and a small “F”
will appear next to the image. When MosaicViewTM is on, the selected favorite
picture will appear individually during slide show.
Slide Show Shuffle
Images are displayed in random order during Slide Show. You may turn this
feature “on” or “off” in the OSD under “Slide Show Shuffle”.
6
Page 8

Digital Photo Frame Navigation
Using the Play and Menu button, you will be able to advance or go back a
Menu Page within the Digital Photo Frame.
The top Menu Page is the “Select Card” Page. To enter this selection, press
the Menu button twice from Thumbnail View.
Select Card Page
SD / MMC
MS / MS Duo
CF / MD
XD
Built-in Memory
Selecting an option that is highlighted will take you to the next page.
Select Mode Page
Photo – Selecting Photo will allow you to preview your photos through
Thumbnail View.
Video – Selecting “Video” will list all video files available for viewing.
Select a file and press the “Play” button to view. (No audio will be available.)
File – Selecting “File” will allow you to see information of a file.
7
Page 9

Using the Mini-USB for File Transfer
The Digital Photo Frame comes with 128MB of built-in Flash Memory. Make
sure that the Frame is first turned off before connecting a USB cable (not
included) from a computer to the Digital Photo Frame and ensure that the
power supply is plugged into the Digital Photo Frame.
Turn on the Photo Frame. Once the computer has detected the Photo Frame,
you will be able to download compatible image or video files stored in your
computer or delete them from the internal memory of the Digital Photo Frame.
Disconnecting the Frame from a PC Computer:
1. Click the “Safely Remove Device” icon on the Task Bar located on the
bottom right corner of the computer Desktop.
2. A dialogue box (“Safely Remove Hardware”) will appear.
3. Select USB Mass Storage Device and click “Stop”.
4. On the next dialogue box, click “OK”.
5. On the final dialogue box, click “Close”. Now you can safely remove the
Digital Photo Frame.
The saved images will appear once you have turned off the Frame and turned
it back on.
Note: Attempting to disconnect the Digital Photo Frame without using
the “Safely Remove Device” procedure may cause the files in the internal
memory to be unreadable.
8
Page 10

Saving to and Deleting an Image from
the Internal Flash Memory
How to save an image into the internal memory from a Memory Card:
Note: The Copy File function only allows compatible image files from the memory card to
be copied onto the internal memory.
1) Make sure that the Digital Photo Frame is turned off.
2) Insert a memory card into the Digital Photo Frame.
3) After turning on the frame, exit the Slide Show and highlight the picture you
would like to save into the internal memory.
4) Hold down the “Menu” button to enter the OSD. Select “Copy File” to save
the image into the internal memory.
How to delete files from the internal memory:
Note: The Delete File function only allows files in the internal memory to be deleted.
1) When viewing images from the internal memory, go to Thumbnail View and
highlight the picture you would like to delete.
2) Hold down the “Menu” button to enter the OSD.
3) Select “Delete File” to delete the image from the internal memory.
9
Page 11

10
Technical Specifications
Model No.: DPF-0702
Product: 7.0” LCD Digital Photo Frame
Frame Style: Ebony Wood Frame
Input Formats: Secure DigitalTM, Multi Media CardTM, Compact FlashTM,
Micro DriveTM, xD-Picture CardTM, Memory StickTM,
Memory Stick PROTM, Memory Stick DuoTM, Memory Stick
PRO DuoTM and USB Flash Drives
File Format: JPEG, AVI Motion JPEG, MPEG1, MPEG4
Features: MosaicView
TM
Slide Show
Individual Picture View and Slide Show
Range of Transitional Styles for Slide Show
Variable Speed for Slide Show
Random Picture Shuffle
Set Favorite Pictures
AVI Motion JPEG Player
MPEG 1 and 4 Video Player
Extendable Stand for Angle Adjustment
Internal Memory: 128MB FLASH
USB Ports: Mini-USB (for file transfer)
USB (for USB Flash Drives)
Power: Input: 100V-240V AC, 50~60HZ
Output: 9V DC, 2A
Weight: 1.5 lbs
Dimensions: 9” x 6.25” x 1.25”
Page 12

Frequently Asked Questions
Q: What other media formats can the Digital Photo Frame support? Why will it
not play all images or movie files?
A: The Digital Photo Frame will support JPEGs and AVI Motion JPEGs taken
from a digital camera. The Digital Photo Frame may not read all images or
video files downloaded from the Internet. Many of the video formats
downloaded from the Internet are not supported as well.
Q: I have a memory card in the Digital Photo Frame, but it’s not reading the
card. What should I do?
A: First, make sure that you are using a memory card that is supported by the
Digital Photo Frame. Second, ensure that the memory card is inserted all
the way into the correct slot. Third, press the Menu button until you reach
the Card Select page. If the memory card is properly inserted into the slot,
that memory card icon will be highlighted.
Note: Some digital cameras save images into non-standard formats. Please
refer to your camera’s operating manual for specifics.
Q: Why do some pictures load faster than others?
A: Higher resolution pictures load slower. Using a lower resolution when taking
pictures will speed up loading time.
Q: If I have a card inserted into the frame, but I want to run the Slide Show with
pictures in the internal memory, what should I do?
A: Go to the Card Select page and select “Built-in Memory”. Go to Photos and
select an image. Press the Play Button and the unit will go into Slide Show.
Q: How do I rotate portrait photos to display correctly on the frame?
A: Rotate the images by using a computer. Portrait pictures must stand upright
to allow the Photo Frame to detect it as a portrait picture.
Q: How many images can 128MB of Flash Memory hold?
A; To maximize the use of the internal flash memory, simply reduce the image
size of your image to 640 x 480 for landscape images, and 480 x 640 for
portrait images. Each file will be approximately 60KB, allowing you to fit
over 2000 photos into the internal memory.
For further questions or support, please call (866) 287-5555.
11
Page 13

12
IMPORTANT PRODUCT SAFETY
INSTRUCTIONS
Proper Handling of the Digital Photo Frame
Always handle the Digital Photo Frame with care. Avoid touching the LCD
screen. Skin oils are difficult to remove.
Always position the Digital Photo Frame on a stable and level surface. Unstable
surfaces can cause the Digital Photo Frame to topple and fall, resulting in
possible damage or injury.
Avoid exposing the Digital Photo Frame to direct sunlight or high temperatures,
which can damage or shorten its useful life. Do not place it near heat sources
such as radiators, heat registers, or other appliances that generate heat. Orient
the Digital Photo Frames away from direct sunlight to reduce glare.
Avoid exposing the Digital Photo Frame to rain, water, moisture or high
humidity. Do not place it near basins or sinks where it may come in contact with
water.
Never place heavy or sharp objects on the LCD panel, frame, or power cord.
Overloading Outlets
Do not overload electrical power sources when using the Digital Photo Frame.
Overloading wall outlets, circuits, or extension cords can result in overheating,
fire, or electric shock. Use only grounded or polarized outlets.
Power Cord Protection
Minimize wear on the power supply cord. The power supply cord should be
routed away from foot traffic and contact with other objects. Do not route the
power cord under rugs or carpeting. The cord should never be severely bent,
pinched, or twisted. Periodically inspect the power cord and each end of the
cord for wear or damage. Unplug and replace the cord if it is damaged.
Page 14

13
Ventilation
Slots and openings on the Digital Photo Frame are provided for ventilation
purposes. To ensure reliable operation of the product and to protect it from
overheating, these openings must not be blocked or covered. Keep the Digital
Photo Frame a minimum of four (4) inches away from any wall to assure
sufficient airflow and ventilation. Increased temperatures may cause fire or
device failure.
To assure proper ventilation, do not block the openings by placing the Digital
Photo Frame on a bed, sofa, rug or other similar surface. Do not place it in a
built-in installation, such as a bookcase or enclosed rack, unless proper
ventilation is provided.
Other Notices and Precautions
Caution: Never remove the plastic casing. There are no user serviceable
parts inside. The Digital Photo Frame contains high voltage parts. You may be
seriously injured if you touch them.
Do not attempt repairs yourself. The warranty does not cover repairs or
attempted repairs by anyone not authorized by Westinghouse Digital. Refer all
servicing and repairs to qualified service personnel.
If the Frame begins to emit smoke, an abnormal noise, or a strange odor,
immediately turn it off and unplug the power cord. Contact the Westinghouse
Service Center.
If the Digital Photo Frame will not be used for an extended period of time,
unplug the power cord.
Page 15

14
Cleaning the Digital Photo Frame
• MAKE SURE THE DIGITAL PHOTO FRAME IS TURNED OFF
• NEVER SPRAY OR POUR LIQUID DIRECTLY ONTO THE SCREEN
OR PLASTIC CASING
To Clean the Screen:
1. Wipe the screen with a clean, soft, lint-free cloth. This removes dust
and other particles.
2. If it still is not clean, apply a small amount of non-ammonia, non-alcohol
based glass cleaner on a clean, soft, lint-free cloth to clean the screen.
To Clean the Plastic Casing:
1. Use a soft, dry cloth.
2. If it still is not clean, apply a small amount of non-ammonia, non-alcohol
based, and mild non-abrasive detergent on a clean, soft, lint-free cloth
to clean the surface.
To Clean the Frame:
1. Use a soft, dry cloth.
Disclaimer
Westinghouse Digital does not recommend the use of any ammonia or
alcohol-based cleaners on the LCD screen or plastic casing. Some chemical
cleaners have been reported to damage the screen and/or display case.
Westinghouse Digital will not be liable for damage resulting from the use of
any ammonia or alcohol-based cleaners.
Page 16

15
Product Warranty
Westinghouse Digital Electronics
LCD Digital Photo Frame Six Month Limited Warranty
Westinghouse Digital Electronics warrants this LCD Digital Photo Frame against defects in material or workmanship for a period of six
(6) months from the original date of purchase, subject to the following terms and conditions:
LABOR AND PARTS — For a period of six (6) months from the original date of purchase, Westinghouse Digital Electronics will repair
any defect in material or workmanship in the Product, or at its option, replace a defective Product. During the six (6) months warranty
period, Westinghouse Digital Electronics will supply new or rebuilt replacement parts in exchange for defective parts. Replacement parts
will be warranted for either the remainder of the original warranty period or ninety (90) days from date of installation, whichever occurs last.
After the expiration of the warranty period, repairs to the Product are the responsibility of you, the purchaser.
OBTAINING WARRANTY SERVICE — To obtain warranty services, you must either personally deliver the Product to a Westinghouse
Digital Electronics service center, or ship the Product to said service center freight prepaid, in its original packaging or in packaging
providing an equal degree of protection. Westinghouse Digital Electronics is not responsible for damage to any Product that occurs
during shipping. Please call Westinghouse Digital Electronics at (866) 287-5555 for the locations of the nearest Westinghouse Digital
Electronics service center.
EXCLUSIONS TO WARRANTY — Damage to the Product resulting from acts of God, accident, misuse, abuse, negligence,
commercial use (not consumer or personal use), alteration, or unauthorized repair of the Product is not covered by this warranty. This
warranty does not cover damage due to: (i) improper installation, set-up adjustments, operation, or maintenance; (ii) power surges,
connection to incorrect voltage, or combination with incompatible components or accessories; or, (iii) repairs attempted by anyone
other than an authorized Westinghouse Digital Electronics service facility. This warranty is valid only for Products purchased and used
in the United States of America or Canada.
PROOF OF ORIGINAL PURCHASE — A sales receipt, invoice, or other proof of purchase specifying the original date of purchase,
must be presented within the six (6) months warranty period to obtain warranty service. This warranty extends to the original purchaser
and is not transferable. The factory-applied serial number must appear on the Product or this warranty shall not apply.
EITHER REPAIR OR REPLACEMENT IS YOUR EXCLUSIVE REMEDY UNDER THIS WARRANTY. EXCEPT TO THE EXTENT
PROHIBITED BY LAW, WESTINGHOUSE DIGITAL SHALL NOT BE LIABLE FOR ANY INCIDENTAL OR CONSEQUENTIAL
DAMAGES CLAIMED TO ARISE FROM BREACH OF ANY EXPRESS OR IMPLIED WARRANTY ON THIS PRODUCT. ANY IMPLIED
WARRANTY OF MERCHANTABILITY OR FITNESS FOR A PARTICULAR PURPOSE ON THIS PRODUCT IS LIMITED IN
DURATION AND SCOPE TO THE TERMS OF THIS WARRANTY.
Some States do not allow the exclusion or limitation of incidental or consequential damages, or allow limitations on how long an implied
warranty lasts, so the above limitations or exclusions may not apply to you. This warranty gives you specific legal rights, and you may also
have other rights, which vary from State to State.
For latest product information and tips please check www.wde.com
To register your Digital Photo Frame, please call (866) 287-5555 or visit our website to register online.
Page 17

16
TABLE DES MATIÈRES
INSTALLATION / MISE EN ROUTE RAPIDE…………………..…………...…............................17
SCHÉMA DU CADRE PHOTO NUMÉRIQUE...…………………………...................……..……18
BOUTONS DE COMMANDE...……..……………………………………….........………...........…29
AFFICHAGE DES FONCTIONS DU MENU.…………………...............................................…….20
MOSAICVIEWTM ET FONCTIONS SUPPLÉMENTAIRES………….....................………..……21
NAVIGATION DU MENU…..……………....………….............................…….......................……..22
UTILISATION DU MINI PORT USB POUR LE TRANSFERT DE FICHIERS..........................23
SAUVEGARDE ET SUPPRESSION DE FICHIERS DE LA MÉMOIRE INTERNE..…...……24
SPÉCIFICATIONS TECHNIQUES…..………………………………………….............................25
FOIRE AUX QUESTIONS…………………………………......................................................…....26
CONSIGNES DE SÉCURITÉ IMPORTANTES...………………..........................……………….27
NETTOYAGE DU CADRE PHOTO NUMÉRIQUE...…………………………............................29
INFORMATION SUR LA GARANTIE……………………………………................................…30
Page 18

17
Félicitations pour l'achat de votre cadre photo numérique ACL de 7 po de Westinghouse.
Nous sommes heureux de vous offrir une nouvelle façon de visionner vos souvenirs
numériques. Veuillez lire et suivre toutes les instructions et les mises en garde du manuel
d'utilisation et celles indiquées sur le produit avant d’utiliser le cadre photo numérique. Si
les instructions ne sont pas respectées, il peut s'ensuivre des blessures corporelles ou
des dommages au cadre photo numérique. Veuillez conserver ce manuel d’utilisation
pour consultation ultérieure.
Important : Conservez tout l'emballage original au cas ou vous auriez besoin de
l'expédier.
Contenu de l'emballage
• Cadre photo numérique de 7 pouces en bois d’ébène
• Adaptateur c.a.
• Manuel d’utilisation
Mise en route rapide
1. Branchez l’adaptateur c.a. dans le cadre photo numérique et ensuite dans une prise
d’alimentation murale.
2. Insérez une carte mémoire dans l’un des quatre logements :
Logement 1 - Secure DigitalTM ou MultiMedia CardTM
Logement 2 - Compact FlashTM ou Micro Drive
Logement 3 -xD-Picture CardTM
Logement 4 - Memory StickTM, Memory Stick PROTM, Memory Stick DuoTM, ou
Memory Stick PRO DuoTM
Ou insérez une unité de stockage USB dans le port USB.
Remarque : Pour voir comment le cadre photo affiche les photos numériques,
allumez-le sans y avoir inséré une carte mémoire.
3. Mettez l'interrupteur d'alimentation à l’arrière du cadre photo numérique sous tension.
4. Une fois allumé, il passe en mode diaporama MosaicViewTM.
5. Pour visionner chaque photo individuellement, appuyez sur le bouton menu pour
entrer en mode vignette. À l’aide des boutons (<<) et (>>), surlignez une photo et
appuyez sur le bouton de lecture (4) pour visionner l’image. Pour revenir en mode
diaporama MosaicViewTM, appuyez de nouveau sur le bouton de lecture (4).
TM
Page 19

18
Interrupteur
Schéma du cadre photo numérique
Logement Compact FlashTM et
Micro DriveTM
Logement Secure DigitalTM et Multi
Media CardTM
Logement xD-Picture CardTM
Logement Memory StickTM, Memory Stick PROTM,
Memory Stick DuoTM, et Memory Stick PRO
DuoTM
Port USB pour mémoire flash USB
Mini port USB pour le transfert de fichiers
Alimentation c.a.
Contrôle de la luminosité
Boutons de commande
Support extensible
Page 20

19
Boutons de commande
Fonctions d’affichage (OSD)
Remarque : Pour activer l’affichage du menu, appuyez sur le bouton menu pour 2
secondes (sauf en mode diaporama). Pour désactiver l’affichage du menu, appuyez de
nouveau sur le bouton menu.
Bouton
<<
Lecture
>>
Menu
Visionnement des images de manière individuelle
Bouton Commande
<< Allez à l’image précédente
Lecture Lancez le mode diaporama
>> Allez à l’image suivante
Menu
Mode vignette/Page du mode de sélection/Page de sélection de la carte
Bouton Commande
<< Gauche
Lecture Sélection
>> Droit
Menu Page précédente
Visionnement de fichiers vidéo
Bouton Commande
<< Allez au fichier vidéo précédent
Lecture Lecture/Pause fichier vidéo
>> Allez au fichier vidéo suivant
Menu Allez à la page de sélection vidéo
Commande
Précédent
Sélection
Suivant
Arrière/Quitter
Appuyez une fois pour quitter le mode vignette ou maintenez-le
enfoncé pendant 2 secondes pour afficher le menu.
Page 21

Affichage des fonctions du menu
Toutes les configurations des fonctions pour le cadre photo numérique peuvent être commandées par le biais des boutons situés à
l’arrière, sur le dessus du cadre photo. Il est possible d'accéder à l’affichage du menu en tout temps, sauf en mode diaporama ou lors
de la lecture d’une vidéo, en maintenant le bouton menu enfoncé pendant 2 secondes.
Menu Sous-menus Description et fonctionnement
Activer MosaicViewTM
Désactiver
Dimesion d’ image
Effets de projection de
diapositivites
Intervalle Diaporama
Répétition vidéo
Lancement de
diaporama - Cette fonction permet de lancer le mode diaporama.
Copier fichier Supprimer fichier - Cette fonction permet de supprimer un fichier de la mémoire flash interne.
S
électionarre favori
Résselectionarre - Cette fonction permet de restituer tous les réglages d’usine.
Langue -
Remarque : Une fonction n’est pas disponible lorsqu’elle est surlignée en rouge. Par exemple, lors du visionnement d'images sur une
carte mémoire, l'option « Supprimer fichier » est surlignée en rouge et n'est pas disponible.
Optimale
Original
Désactiver
Baisser d’ image
Obsturateur
Croix
Masque
Brique
Dissoudre
Aléatoire
3 secondes
5 secondes
10 secondes
30 secondes
60 secondes
Activer Diaporama aléatoire
Désactiver
Un Cette fonction permet le visionnement répété du fichier vidéo sélectionné.
Tous Cette fonction permet le visionnement répété de tous les fichiers vidéo.
Désactiver
- Cette fonction permet d’afficher les images préférées plus fréquemment.
Cette fonction permet de désactiver le mode MosaicView
visionner les images une à la fois durant le diaporama.
Cette fonction permet de redimensionner la taille de l’image afin
de remplir l’écran.
Cette fonction permet d’afficher l’image en respectant l’aspect ratio
original
Cette fonction permet de sélectionner le style de transition d’image.
Cette fonction permet de sélectionner la vitesse de défilement du
diaporama.
Cette fonction permet l’affichage aléatoire des images.
Lorsque cette fonction est activée, les fichiers vidéo sélectionnés ne
seront pas répétés.
Cette fonction permet de copier un fichier de la carte mémoire à
la mémoire flash interne.
Cette fonction permet de modifier la langue d’affichage du système
de menus : anglais, italien, allemand, français, espagnol, portugais
ou hollandais.
TM
afin de
Page 22

21
MosaicViewTM
Qu'est-ce que la fonction MosaicViewTM?
MosaicViewTM est une nouvelle technologie développée par Westinghouse qui permet
de visionner plusieurs images en même temps. MosaicViewTM détecte automatiquement
l’orientation des différentes images et les affiche de manière aléatoire durant le
diaporama.
Comment fonctionne le mode MosaicView
Avec MosaicView™, jusqu’à 4 images peuvent être affichées en même temps. Les
images de format portrait ou paysage sont affichées dans une configuration aléatoire,
telle qu'une image de format portrait et deux de format paysage.
MosaicViewTM est le réglage par défaut du mode diaporama. Afin de maximiser
l'affichage, le réglage de la taille des images par défaut est « Optimal » sous le menu
« Taille de l’image ». En ce mode, certaines images peuvent subir un recadrage. Afin de
visionner les images dans leur aspect ratio original, sélectionner « Original » sous
« Taille de l’image » dans le menu. Les images maintiendront leur aspect ratio original.
Lancement du diaporama
Il y a deux façons de lancer un diaporama; en appuyant sur le bouton de lecture durant
le visionnement d’images individuelles, ou en sélectionnant « Lancement du
diaporama » à partir du menu d'affichage. (Remarque : si la fonction « Lancement du
diaporama » est sélectionnée lorsqu’une carte mémoire est insérée dans le cadre photo
numérique, les images provenant de la carte mémoire seront lues en mode diaporama.
TM
:
Fonctions supplémentaires
Réglage d’une image favorite
Le réglage d’une image favorite permet de visionner l’image à plusieurs reprises durant
le diaporama. Pour ce faire, en mode vignette, il faut surligner une image et entrer dans
le menu d'affichage en maintenant enfoncé le bouton menu. Puis, sélectionner l'option
« Réglages des favoris », un petit « F » doit s’afficher près de l’image. Lorsque l’option
MosaicViewTM est activée, l’image favorite apparaît individuellement durant le
diaporama.
Diaporama aléatoire
Les images sont affichées de manière aléatoire durant le diaporama. Il est possible
d'activer ou de désactiver cette fonction dans le menu « Diaporama aléatoire ».
Page 23

22
Navigation du menu
À l’aide des boutons de lecture et de menu, il est possible de sauter à la page suivante
ou précédente du menu du cadre photo numérique.
La page supérieure du menu est la page de « Sélection de la carte ». Pour entrer cette
sélection, il faut appuyer sur le bouton menu deux fois à partir du mode vignette.
Page « Sélection de la carte »
SD/MMC
MS/MS Duo
CF/MD
XD
Mémoire intégrée
La sélection d’une option surlignée permet de passer à la page suivante.
Page « Sélection du mode »
Photo – Sélectionner le mode photo permet de visionner les images en mode vignette.
Vidéo – Sélectionner le mode vidéo permet de visionner la liste de tous les fichiers vidéo
disponibles.
Il suffit de sélectionner un fichier et d’appuyer sur le bouton de lecture. (L’audio ne sera
pas disponible.)
Fichier – Sélectionner « Fichier » permet de voir l’information concernant le fichier.
Page 24

23
Utilisation du mini port USB pour effectuer le
transfert de fichiers
Le cadre photo numérique est doté d’une mémoire flash intégrée de 16 Mo. S’assurer
que le cadre photo est hors tension avant de brancher un câble USB (non inclus) du
cadre à l’ordinateur et que le câble d’alimentation du cadre est branché à une prise
secteur.
Mettre le cadre sous tension. Une fois que l’ordinateur a reconnu le cadre photo, il est
possible de télécharger des images et des fichiers vidéo de formats compatibles
sauvegardés sur l’ordinateur à la mémoire interne du cadre photo numérique.
Débranchement du cadre de l’ordinateur :
1. Cliquez sur l’icône « Safely Remove Device (Retirer votre périphérique en toute
sécurité) » dans la barre des tâches dans le coin droit du bureau de l’ordinateur.
2. Une boîte de dialogue s’ouvre (« Safely Remove Hardware (Retirer votre matériel
en toute sécurité) »).
3. Sélectionnez le périphérique de stockage USB et cliquez sur « Arrêter ».
4. Sur la boîte de dialogue suivante, cliquez sur « OK ».
5. Sur la dernière boîte de dialogue, cliquer sur « Fermer ». Le cadre photo
numérique peut maintenant être débranché de façon sécuritaire de l’ordinateur.
Les images sauvegardées apparaîtront seulement une fois que le cadre sera remis sous
tension.
Remarque : Débrancher le cadre photo numérique sans suivre la procédure
« Retirer votre périphérique en toute sécurité » peut rendre les fichiers de la
mémoire interne illisibles.
Page 25

24
Sauvegarde et suppression d’images de la
mémoire flash interne
Comment sauvegarder une image depuis une carte mémoire à la mémoire interne :
Remarque : La fonction « Sauvegarde de fichier » permet de sauvegarder des fichiers images
compatibles provenant de la carte mémoire sur la mémoire interne.
1) Assurez-vous que le cadre photo numérique est hors tension.
2) Insérez une carte mémoire dans le cadre photo numérique.
3) Après avoir mis le cadre sous tension, quittez le mode diaporama et sélectionnez
l’image à sauvegarder dans la mémoire interne.
4) Maintenez le bouton menu enfoncé pour afficher le menu. Sélectionnez « Copier
fichier » pour sauvegarder l’image sur la mémoire interne.
Comment supprimer des fichiers de la mémoire interne :
Remarque : La fonction de supprimer fichier permet uniquement de supprimer des fichiers sur la
mémoire interne.
1) Lors du visionnement d’images provenant de la mémoire interne, passer en mode
vignette et sélectionner l’image à supprimer.
2) Maintenez le bouton menu enfoncé pour afficher le menu.
3) Sélectionnez « Supprimer fichier » afin de supprimer l’image de la mémoire interne.
Page 26

25
Spécifications techniques
No de modèle : DPF-0702
Produit : Cadre photo numérique de 7 pouces avec écran ACL
Style d'encadrement : Cadre en bois d’ébène
Support mémoire : Secure DigitalTM, Multi Media CardTM, Compact FlashTM, Micro
DriveTM, xD-Picture CardTM, Memory StickTM, Memory Stick PROTM,
Memory Stick DuoTM, Memory Stick PRO DuoTM et mémoire flash
USB.
Format de fichiers : JPEG, BMP, AVI Motion JPEG, MPEG1, MPEG4
Caractéristiques : Diaporama MosaicView
TM
Visionnement d’image individuelle et diaporama
Gamme de styles de transition
Choix de vitesse pour les diaporamas
Ordre de visionnement des images aléatoire
Réglages des images favorites
Lecteur AVI Motion JPEG
Lecteur vidéo MPEG 1 et 4
Support extensible pour les réglages d’angle
Mémoire interne : Flash de 16 Mo
Ports USB : Mini port USB pour le transfert de fichiers
USB (Disque USB flash)
Alimentation électrique :
Entrée : 100 V-240 V AC, 50~60 HZ
Sortie : 9 V DC, 2A
Poids : 1,5 lb
Dimensions : 9 po x 6,25 po x 1,25 po
Page 27

26
Foire aux questions
Q : Quels autres formats de fichiers média sont compatibles avec le cadre de photo
numérique? Pourquoi ne lit-il pas tous les fichiers images ou vidéo?
R : Le cadre photo numérique supporte les fichiers JPEG et AVI Motion JPEG pris avec
une caméra numérique. Il peut ne pas lire tous les fichiers image ou vidéo
téléchargés de l'Internet. Plusieurs formats de fichiers vidéo téléchargés de l’Internet
ne sont également pas supportés.
Q : Une carte mémoire est insérée dans le cadre photo numérique, mais il ne la lit pas.
Que dois-je faire?
R : Premièrement, assurez-vous que la carte mémoire est compatible avec le cadre
photo numérique. Deuxièmement, assurez-vous que la carte mémoire est bien
insérée jusqu’au fond du logement. Troisièmement, enfoncez le bouton menu jusqu’à
ce que la page « Sélection de la carte » s’affiche. Si la carte mémoire est
correctement insérée dans le logement, l’icône pour cette carte devrait être surlignée.
Remarque : Certaines caméras numériques sauvegardent les images en formats non
standards. Veuillez consulter le guide d’utilisation de votre caméra pour plus de détails.
Q : Pourquoi certaines images se chargent plus rapidement que d’autres?
R : Les images en haute définition sont plus longues à charger. L’utilisation d’une
définition plus basse raccourcira le temps de chargement des images.
Q : Que dois-je faire, si une carte mémoire est insérée dans le cadre, mais que je désire
visionner un diaporama d’images provenant de la mémoire interne?
R : Allez à la page « Sélection de la carte mémoire » et sélectionnez l’option « Mémoire
intégrée ». Allez au menu Images et sélectionnez une image. Appuyez sur le bouton
de lecture pour que l’appareil lance le mode diaporama.
Q : Comment faire pivoter les images pour qu’elles s’affichent correctement sur le
cadre?
R : Il est possible de faire pivoter les images à l’aide d’un ordinateur. Les images en
format portrait doivent être à la verticale pour que le cadre photo puisse détecter leur
format.
Q : Combien d’images une mémoire flash de 128 Mo peut-elle contenir?
R : Pour optimiser la capacité de la mémoire flash interne, réduire la taille de l’image à
640 x 480 pour les images en format paysage, et à 480 x 640 pour celles en format
portrait. Chaque fichier sera d'environ 60 ko, permettant de stocker au-delà de 2000
photos dans la mémoire interne.
Pour toutes questions, vous pouvez communiquer avec nous au (866) 287-5555.
Page 28

27
CONSIGNES DE SÉCURITÉ IMPORTANTES
Manipulation du cadre photo numérique
Manipuler toujours le cadre photo numérique avec précaution. Éviter de toucher à l’écran
ACL. Les huiles de la peau sont difficiles à éliminer.
Installer le cadre photo numérique sur une surface stable et au niveau. Sur une surface
instable, le cadre photo pourrait tomber, causant des dommages ou des blessures.
Éviter l'exposition directe du cadre photo aux rayons du soleil ou à une autre source de
chaleur qui pourrait l’endommager et réduire sa durée de vie. Ne pas installer près des
sources de chaleur telles que radiateurs, registres de chaleur, ou autres appareils qui
génèrent de la chaleur. Diriger le cadre photo numérique de façon à éviter les rayons de
soleil afin de réduire les reflets.
Éviter d'exposer le cadre photo à la pluie, à l'eau, et à l'humidité. Ne pas le placer où il
pourrait entrer en contact avec de l’eau.
Ne pas placer d’objets lourds ou pointus sur le panneau ACL, le cadre ou sur le câble
d’alimentation.
Surcharge
Ne pas surcharger les prises murales lors de l’utilisation du cadre photo. Surcharger les
prises murales, les circuits ou les rallonges électriques peut provoquer une surchauffe,
un incendie ou des chocs électriques. N’utiliser que des prises avec mise à la terre ou
polarisées.
Protection du câble d'alimentation
Minimiser l’usure du câble d’alimentation. Le câble d’alimentation doit être positionné de
façon à ce qu’il ne soit pas piétiné, ou qu’il entre en contact avec d’autres objets. Ne pas
placer le câble d’alimentation sous les carpettes ou les moquettes. Le câble ne doit pas
être plié, pincé ou tordu. Inspecter régulièrement le câble ainsi que chacune de ses
extrémités pour déceler les détériorations. Débrancher et remplacer le câble s’il est
endommagé.
Page 29

28
Ventilation
Les logements et orifices sur le cadre photo numérique ont pour but de permettre la
ventilation. Pour un fonctionnement fiable du produit et pour le protéger des surchauffes,
les orifices ne doivent être ni obstrués ni couverts. Garder le cadre photo numérique à au
moins quatre (4) pouces du mur afin d’assurer une ventilation suffisante. L’utilisation de
l’appareil à des températures élevées pourrait causer un incendie ou l’endommager.
Ne pas obstruer les orifices en installant le cadre photo numérique sur un lit, un canapé,
un tapis ou autres surfaces similaires. Ne pas installer le cadre dans un meuble fermé tel
qu’une bibliothèque ou une étagère à moins qu’il ait sa propre ventilation.
Autres avertissements et précautions
Mise en garde : Ne jamais retirer le panneau arrière. Aucun des éléments internes ne
doit être réparé par l’utilisateur. Le cadre photo numérique contient des composantes à
haute tension. Vous pouvez vous blesser sérieusement si vous les touchez.
Ne pas tenter de le réparer vous-même. La garantie ne couvre pas les réparations ou
tentatives de réparations réalisées par des personnes non autorisées par Westinghouse
Digital. Confier la réparation à du personnel technique qualifié.
Si le cadre dégage de la fumée, une odeur étrange ou s’il émet un bruit anormal,
éteignez-le immédiatement et débranchez le câble d’alimentation. Contactez le centre
de service de Westinghouse.
Si vous n’envisagez pas d’utiliser le cadre photo numérique pendant un certain temps,
débranchez le câble d'alimentation.
Page 30

29
Nettoyage du cadre photo numérique
• ASSUREZ-VOUS QUE LE CADRE PHOTO NUMÉRIQUE EST HORS TENSION.
• NE PAS VAPORISER OU VERSER DE LIQUIDE DIRECTEMENT SUR
L’ÉCRAN OU LE COFFRET.
Pour nettoyer l’écran :
1. Essuyer l’écran avec un chiffon propre, doux et non pelucheux. Celui-ci retire la
poussière et autres particules.
2. S’il n’est toujours pas propre, appliquer une petite quantité de nettoyant pour vitre
sans ammoniaque et sans alcool sur un chiffon propre, doux et non pelucheux et
essuyer l’écran.
Pour nettoyer le coffret :
1. Utiliser un chiffon propre et doux.
2. S’il n’est toujours pas propre, appliquer une petite quantité de nettoyant non
abrasif, sans ammoniaque et sans alcool sur un chiffon propre, doux et non
pelucheux et essuyer le coffret.
Pour nettoyer le cadre :
1. Utiliser un chiffon propre et doux.
Avis de dégagement de responsabilité
Westinghouse Digital ne recommande l’utilisation d’aucun nettoyant à base
d’ammoniaque ou d’alcool sur l’écran ACL ou le coffret de plastique. Certains nettoyants
chimiques sont reconnus pour endommager l’écran ou le coffret. Westinghouse Digital
n’est pas responsable des dommages dus à l’utilisation de nettoyants à base
d’ammoniaque ou d’alcool.
Page 31

30
Garantie
Westinghouse Digital Electronics
Garantie limitée de six mois pour le
cadre photo numérique à écran ACL
Westinghouse Digital Electronics garantit que ce cadre photo numérique à écran ACL n’a aucun défaut matériel ou de main-d’oeuvre, et ceci, pendant
une période de six (6) mois à partir de la date d’achat d’origine, assujettie aux conditions générales suivantes :
MAIN-D’OEUVRE ET PIÈCES DE RECHANGE —Pendant une période de (6) mois à partir de la date d’achat originale, Westinghouse Digital
Electronics réparera quelconque défaut matériel ou de main-d’oeuvre du produit, ou à sa discrétion, remplacera le produit défectueux. Durant la
période de garantie de (6) mois, Westinghouse Digital Electronics fournira des pièces de rechange neuves ou réusinées pour échanger les pièces
défectueuses. Les pièces de rechange seront sous garantie soit pour le reste de la période de garantie originale, soit quatre-vingt-dix (90) jours à partir de la
date d’installation, selon la durée la plus longue. Après l’échéance de la période de garantie, les réparations du produit seront à la charge de l’acheteur.
L’OBTENTION DE SERVICE DE GARANTIE —Afin d'obtenir les services prévus par la garantie, vous devez soit remettre personnellement le produit à
un centre de service de garantie Westinghouse Digital Electronics, soit l'expédier au dit centre de service, frais d'expédition prépayés, dans son
emballage original ou bien dans un emballage fournissant un niveau égal de protection. Westinghouse Digital Electronics n'est pas responsable d'un
dommage qui serait survenu au cours du transport. Veuillez contacter Westinghouse Digital Electronics au (866) 287-5555 afin de connaître
l'emplacement du centre de service Westinghouse Digital Electronics le plus proche ou bien afin d'obtenir un service à domicile prévu par la garantie.
EXCEPTIONS DE LA GARANTIE —Les dommages ayant étés causés par un désastre naturel, une mauvaise utilisation, des abus, de la négligence,
une utilisation commerciale (non pour l’utilisation personnelle du consommateur), altérations, ou une réparation non autorisée du produit ne sont pas
couverts par cette garantie. La présente garantie limitée ne couvre pas les dommages causés par :
e n t r e t i e n i n a d é q u a t ; ( i i ) s u r t e n s i o n s , t e n s i o n i n a d é q u a t e , o u l ’ u t i l i s a t i o n a v e c d e s c o m p o s a n t s o u d e s a c c e s s o i r e s i n c o m p a t i b l e s ; o u ,
( i i i ) r é p a r a t i o n s t e n t é e s p a r q u e l c o n q u e a u t r e p e r s o n n e q u e c e l l e a u t o r i s é e p a r l ’ é t a b l i s s e m e n t d u s e r v i c e a p r è s - v e n t e d e
W e s t i n g h o u s e D i g i t a l E l e c t r o n i c s
Cette garantie s’applique uniquement pour les produits achetés et utilisés aux États-Unis et au Canada.
PREUVE D’ACHAT —Un reçu, une facture ou quelconque autre preuve d’achat qui spécifie la date de l’achat d’origine doit être présentée dans un
délai de (6) mois pour se prévaloir de la garantie.
e t t e g a r a n t i e s ’ é t e n d à l ’ a c h e t e u r d ’ o r i g i n e e t n e p e u t p a s ê t r e t r a n s f é r é e .
C
série d’usine doit apparaître sur le Produit, faute de quoi cette garantie ne sera pas applicable.
LA RÉPARATION ET LE REMPLACEMENT SONT VOS UNIQUES RECOURS SOUS CETTE GARANTIE. À L’EXCEPTION DES LIMITES ÉTABLIES
PAR LA LOI, WESTINGHOUSE DIGITAL ELECTRONICS NE SERA PAS TENUE RESPONSABLE POUR QUELCONQUES DOMMAGES DIRECTS
OU INDIRECTS DÉCLARÉS COMME AYANT ÉTÉ CAUSÉS PAR QUELCONQUE VIOLATION EXPRESSE OU IMPLICITE DE GARANTIE SUR CE
PRODUIT. QUELCONQUE GARANTIE IMPLICITE DE QUALITÉ MARCHANDE OU DE BONNE CONDITION POUR UNE UTILISATION
PARTICULIÈRE DE CE PRODUIT EST LIMITÉE EN DURÉE ET EN CHAMPS D’APPLICATION AUX CONDITIONS DE CETTE GARANTIE.
Certaines juridictions ne permettent pas de limitations ou d’exceptions de dommages directs ou indirects, ou ne permettent pas de date limite pour la durée
de garanties, donc les limitations ou les exceptions peuvent ne pas s’appliquer à vous. La présente garantie vous confère des droits spécifiques, il se
pourrait que vous ayez d'autres droits, lesquels peuvent varier d'une juridiction à l'autre.
o u r d e s r e n s e i g n e m e n t s e t d e s c o n s e i l s , v e u i l l e z c o n s u l t e r
P
www.wde.com.
Pour enregistrer votre cadre photo numérique, veuillez appeler au (866) 287-5555 ou visiter notre site internet .
( i ) i n s t a l l a t i o n , a j u s t e m e n t , u t i l i s a t i o n e t
Le numéro de
Page 32

31
INDICE
INSTALACIÓN/INICIO RÁPIDO……………………………………………….32
DIAGRAMA DEL MARCO DE FOTOS DIGITALES…….……………………33
FUNCIONES DE LOS BOTONES DEL TECLADO…………………………….34
FUNCIONES DEL MENÚ OSD……………………..…………………………….35
VISIÓN MOSAICO Y CARACATERÍSTICAS ADICIONALES……………….36
NAVEGACIÓN EN EL MARCO DE FOTOS DIGITALES……….…..…….…..37
USO DEL MINI-USB PARA TRANSFERENCIA DE ARCHIVOS………..……38
SALVANDO Y BORRANDO ARCHIVOS DE LA MEMORIA INTERNA…….39
ESPECIFICACIONES TÉCNICAS……………………………………………….40
PREGUNTAS FRECUENTES……………………………………………………..41
INSTRUCCIONES DE SEGURIDAD IMPORTANTES………………………...42
LIMPIEZA DEL MARCO DE FOTOS DIGITALES...…………………………..44
INFORMACIÓN DE GARANTÍA………………………………………………...45
Page 33

32
Felicitaciones por la compra de un Marco de Fotos Digitales LCD Westinghouse 7,0”
Estamos felices de presentarle una nueva experiencia para ver sus recuerdos digitales.
Lea cuidadosamente y siga todas las instrucciones y advertencias en este Manual del
Usuario y las que están marcadas en el producto antes de usar el Marco de Fotos
Digitales. El no seguir las advertencias puede resultar en lesiones personales o daño al
Marco de Fotos Digitales. Por favor, guarde este Manual del Usuario en un lugar
conveniente para futura referencia.
Importante: Guarde la caja original y todo el material de empaque para necesidades
futuras de envío.
Contenido del Paquete
• Marco de Fotos Digitales 7.0” con Marco de Madera de Ébano
• Fuente de Poder AC/DC
• Manual del Usuario
Inicio Rápido
1. Enchúfe el adaptador de corriente AC en el Marco de Fotos Digitales a la
toma de corriente.
2. Inserte la tarjeta de memoria en una de las cuatro ranuras:
Ranura 1 – Secure DigitalTM o MultiMedia CardTM
Ranura 2 - Compact FlashTM o Micro Drive
Ranura 3 - xD-Picture CardTM
Ranura 4 - Memory StickTM, Memory Stick PROTM, Memory Stick DuoTM,
o Memory Stick PRO DuoTM
O inserte un Drive Thumbnail (Imágenes a Escala) USB en el puerto USB.
Nota: Para ver un ejemplo de cómo el Marco de Fotos muestra las fotos digitales,
simplemente encienda el marco sin insertar una tarjeta de memoria.
3. Mueva el Interruptor a la posición Encendido (ON) en la parte posterior del
Marco de Fotos Digitales.
4. Una vez que se ha encendido el Marco de Fotos Digitales, la unidad se
iniciará automáticamente en el Modo de Demostración de Diapositiva.
5. Para ver fotos individualmente, apriete el botón Menú para entrar en Visión
de Imágenes a Escala (Thumbnail View)
(>>), destaque la foto y apriete el botón Play (4) para ver la imagen. Para entrar en
Demostración de Diapositivas
MosaicView
TM
TM
Usando los Botones de Flechas (<<) y
nuevamente, presione el botón Play.
Page 34

33
Interruptor de Encendido
Diagrama del Marco de Photo Digitales
Ranura Compact FlashTM
y Micro DriveTM
Ranura Secure DigitalTM y
Multi Media CardTM
Ranura xD-Picture CardTM
Ranura Memory StickTM, Memory Stick
PROTM, Memory Stick DuoTM, y Memory
Stick PRO DuoTM
Puerto USB para Drives USB Flash
Puerto Mini USB para Transferencia de Archivos
Toma de Corriente AC
Control de Brillo
Teclado
Soporte Ajustable
Page 35

34
Funciones de los Botones del Teclado
Funciones del Menú en Pantallas
Nota: Para entrar al Menú en Pantalla (OSD), oprima el botón Menú durante 2
segundos (excepto si está en Demostración de Diapositiva) Para salir del OSD,
simplemente oprima el botón Menú otra vez.
Botón
<<
Play
>>
Menú
Viendo Imágenes Individualmente
Botón Comando
<< Ir a imagen anterior
Play Comience la demostración de Diapositiva
>> Ir a la siguiente imagen
Menu
Apriete una vez para salir a Visión de Imágenes a Escala
Modo de Imágenes a Escala (Thumbnail)/Página de Selección de Modo/Página de
Selección de Tarjeta
Botón Comando
<< Izquierda
Play Seleccionar
>> Derecha
Menú Atrás una página
Viendo Archivos de Video
Botón Comando
<< Ir a Archivo de Video Anterior
Play Play / Pausa Archivo de Video
>> Ir a Siguiente Archivo de Video
Menú Salir a Página de Selección de Video
Comando
Arriba
Seleccionar
Abajo
Atrás/Salir
apretado por 2 segundos para entrar al Menú OSD
o mantenga
Page 36

Funciones del Menú OSD (Menú de Pantalla)
Todos los ajustes de función del Marco de Fotos Digitales pueden controlarse mediante los botones en la parte
superior del Marco. Usted puede entrar al Menú de Pantalla (OSD) en cualquier momento, excepto en el Modo de
Demostración de Diapositivas o viendo un video, manteniendo apretado el botón “Menú” durante 2 segundos.
Menu OSD Sub-Menus Descripción y Función de Operación
MosaicViewTM
Tamaño de Imagen
Efecto de la
Demostración de
Diapositiva
Velocidad de la
Demostración de
Diapositiva
de Diapositiva
Repeticion Video
Comience la
Demostración de
Diapositiva - La unidad entrará en Demstración de Diapositiva
Copia Archivo -
Borrar Archivo -
File a favorita -
Reajuste los Ajustes - Reajusta todos los Ajustes de vuelta a los originales.
Idioma -
Nota: Si una selección está en rojo, usted no podrá realizar ésta función. Por ejemplo, cuando usted está viendo fotos
desde la tarjeta de memoria, la función Borrar Archivo estará destacada en rojo y no estará disponible.
Función
Apagar
Optimo Optimiza la foto para llenar todo el espacio
Original Muestra las imágenes en su tamaño original
Apagar
Dismuniuir
Cierrer
Barrido Cruzado
Masacara
Ladrillo
Disuelver
Al Azar
3 Segundos
5 Segundos
10 Segundos
30 Segundos
60 Segundos
Función Barajar la Demostración
Apagar
Uno Archivo de video seleccionado se repetirá continuamente.
Todos Todos los archivos de video se repetirán continuamente.
Apagar
Apagar MosaicViewTM le permitirá ver las fotos de a una a la
vez durante la Demostración de Diapositivas.
Seleccione Estilo de Transición de Imagen
Selecciona Velocidad de la Demostración de Diapositiva
Esta función permite que las imágenes se vean al azar
Archivo de video seleccionado no se repetirá
automáticamente.
Esto permite que un archivo sea copiado desde la tarjeta de
memoria a la memoria flash interna.
Esto permite que un archivo sea borrado de la memoria flash
interna.
Esta función le permite seleccionar imágenes para que
aparezcan más a menudo.
Cambia el idioma del menú OSD: Inglés, Italiano, Alemán,
Francés, Español, Portugués o Holandés
Page 37

36
MosaicViewTM
¿Qué es MosaicView
TM
?
MosaicView™ es una exitante nueva tecnología desarrollada por Westinghouse que le permite
ver multiples fotos al mismo tiempo. MosaicView™ detecta automáticamente diferentes
orientaciones de fotos y las muestra al azar mediante una demostración de Diapositivas.
Cómo funciona MosaicViewTM:
Con MosaicView™, puede verse hasta 4 imágenes al mismo tiempo. Las imágenes tipo
retrato o apaisadas se muestran en una configuración al azar tal como un retrato y dos fotos
apaisadas o dos imágenes retrato mostradas al mismo tiempo
La Demostración de Diapositivas está configurada como MosaicView™ por defecto. Además,
para maximizar el área de visión, las imágenes están configuradas a “Optimo” bajo “Tamaño de
Imagen”. Por favor considere que ocurrirán cortes de las imágenes en este modo. Si usted
desea ver las imágenes en su tamaño original, seleccione “Original” bajo “Tamaño de Imagen”
en el OSD. Las imágenes mantendran su tamaño original.
Comenzando un Deomstracion de Diapositiva
Hay dos formas de iniciar la Deomstración de Diapositivas, uno es apretando el botón play
cuando está viendo imágenes individualmente o entrando al Menú OSD y seleccionando
“Comience la Deomstración de Diapositivas”. Nota: Si hay una tarjeta de memoria introducida
en el Marco de Fotos Digitales, al seleccionar “Comience la demostración de Diapositivas” se
iniciará una Demostración de Diapositivas de imágenes contenidas en la tarjeta de memoria.
Características Adicionales
Ajustes de Fotos Favoritas
Marcar una imagen como Favorita le permite ver la imagen más a menudo durante la
Demostración de Diapositivas. Para hacerlo, en Visión de Imágenes a Escala (Thumbnail View)
destaque una foto y entre al menú OSD manteniéndo apretado el botón Menú. Seleccione
“Configurar Favorita” y una pequeña “F” aparecerá al lado de la imagen. Cuando la
MosaicViewTM está activada, la foto seleccionada como favorita aparecerá individualmente
durante la demostración de diapositivas.
Barajadura de la Demostración de Diapositivas
Las imágenes se muestran al azar durante la Demostración de Diapositivas. Usted puede
“encender” o “apagar” esta característica en el menú OSD bajo “Barajadura de la Demostración
de Diapositivas”.
Page 38

37
Navegación en el Marco de Fotos Digitales
Usando el botón Play y Menú, usted podrá avanzar o retroceder una Página de Menú
dentro del Marco de Fotos Digitales.
La Página de menú superior es la Página “Select Card”. Para entrar esta selección,
apriete el botón Menú dos veces desde Visión de Imágenes a Escala
Página Select Card
SD / MMC
MS / MS Duo
CF / MD
XD
Memoria Interna
Seleccionando una opción que está destacada le llevará a la página siguiente.
Página Modo Seleccionado
Photo – Seleccionando Photo le permitirá una vista previa de sus photos a través de
Visión de Imagénes a Escala.
Video – Seleccionando “Video” listará todos los archivos de video disponibles para ver.
Seleccione un archivo y apriete el botón “Play” para ver. (No habrá audio disponible)
Archivo – Seleccionando “Archivo” le permitirá ver la información de un archivo.
Page 39

38
Usando el Mini-USB para Transferencia de
Archivos
El Marco de Fotos Digitales viene con una Memoria Flash incorporada de 128 MB.
Asegúrese de apagar el Marco primero antes de conectar un cable USB (no incluído)
desde una computadora al Marco de Fotos Digitales y que la fuente de poder está
enchufada al Marco de Fotos Digitales.
Encienda el Marco de Fotos. Una vez que la computadora ha detectado el Marco de
Fotos, usted podrá descargar las imágenes o archivos de video compatibles
almacenadas en su computadora a la memoria interna del Marco de Fotos Digitales.
Como desconectar el Marco de una Computadora:
1. Haga clic en el ícono “Remover Dispositivo de manera Segura” en la Barra de
Tareas ubicada en la esquina inferior derecha del Escritorio de la computadora.
2. Aparecerá una ventana de diálogo “Puede Remover Hardware en forma
Segura”.
3. Seleccione Dispositivo de Almacenaje USB y haga clic en”Stop”
4. En la siguiente ventana de diálogo, haga clic en “OK”.
5. En la ventana de diálogo final, haga clic en “Cerrar”. Ahora usted puede
remover en forma segura el Marco de Fotos Digitales.
Las imágenes guardadas aparecerán después que usted haya apagado el Marco y lo
haya encendido otra vez.
Nota: Intentar desconectar el Marco de Fotos Digitales sin usar el procedimiento
de "Remover Dispositivo en forma Segura" puede provocar que los archivos en la
memoria interna no se puedan leer.
Page 40

39
Salvando y Borrando una imagen de la
Memoria Flash Interna
Como salvar una imagen en la memoria interna desde una Tarjeta de Memoria:
Nota: La función de Copia Archivo permite que sólo archivos de imágenes compatibles en la tarjeta
de memoria sean copiadas a la memoria interna.
1) Asegúrese de que el Marco de Fotos Digitales está apagado.
2) Inserte la tarjeta de memoria en el Marco de Fotos Digitales.
3) Después de encender el marco, salga de la Demostración de Diapositiva y
destaque las fotos que usted desea salvar en la memoria interna.
4) Mantenga apretado el botón “Menú” para entrar al OSD (Menú de Pantalla)
Seleccione “Copia Archivo” para salvar la imagen en la memoria interna
Como borrar archivos de la memoria interna:
Nota: La Función Borrar Archivo permite borrar sólo archivos en la memoria interna.
1) Mientras está viendo imágenes desde la memoria interna, vaya a Visión de
Imágenes a Escala (Thumbnail View) y destaque la foto que usted quisiera
borrar.
2) Mantenga apretado el botón “Menú” para entrar al OSD (Menú de Pantalla)
3) Seleccione “Borrar Archivo” para borrar la imagen de la memoria interna.
Page 41

40
Especificaciones Técnicas
Modelo No.: DPF-0702
Producto: Marco de Fotos Digitales (Pantalla LCD) 7.0”
Estílo de Marco: Marco de Madera de Ébano
Formatos de Entrada: Secure DigitalTM, Multi Media CardTM, Compact FlashTM, Micro
DriveTM, xD-Picture CardTM, Memory StickTM, Memory Stick
PROTM, Memory Stick DuoTM, Memory Stick PRO DuoTM y
Drives USB Flash
Formato de Archivo: JPEG, Película AVI JPEG, MPEG1, MPEG4
Características: Demostración de Diapositiva MosaicViewTM
Visión Previa Individual y Demostracion de Diapositiva
Rango de Estílos de Transición para Demostracion de
Diapositiva
Velocidad Variable para Demostración de Diapositiva
Barajar de Fotos al Azar
Ajuste de Fotos Favoritas
Reproductor de Película AVI JPEG
Reproductor de Video MPEG 1 y 4
Soporte extendible para Ajuste de Ángulo
Memoria Interna FLASH 128MB
Puertos USB: Mini-USB (para transferencia de archivos)
USB (para Drives USB Flash)
Alimentación: Entrada: 100Volts-240Volts AC, 50-60HZ
Salida: 9Volts DC,2Amp.
Peso: 1.5 lbs (660 grms)
Dimensiones: 9” x 6.25” x 1.25” (228mm x 158mm x 38mm)
Page 42

41
Preguntas Frecuentes
P: ¿Qué otros tipos de formato acepta el Marco de Fotos Digitales? ¿Porqué no
muestra todos los archivos de imágenes o película?
R: El Marco de Fotos Digitales acepta JPEGs y películas AVI JPEG tomadas con una
cámara digital. Es posible que el Marco de Fotos Digitales no lea todas las
imágenes o archivos de video bajadas del Internet. Muchos de los formatos de video
bajados del Internet tampoco son aceptados.
P: Tengo una tarjeta de memoria en el Marco de Fotos Digitales, pero no lee la tarjeta.
¿Qué debería hacer?
R: Primero, asegúrese de que está usando una tarjeta de memoria que es aceptada por el
Marco de Fotos Digitales. Segundo, asegúrese de que la tarjeta de memoria está
introducida totalmente en la ranura correcta. Tercero, oprima el botón Menú hasta
que llegue a la página de Select Card. Si la tarjeta de memoria está introducida
adecuadamente, el ícono de ésa tarjeta de memoria aparecerá destacado.
Nota: Algunas cámaras digitales guardan las imágenes en formatos no-estándar. Por
favor consulte el manual del operador de su cámara para ver las especificaciones.
P: ¿Porqué algunas fotos se cargan más rápido que otras?
R: Las fotos de alta resolución se cargan más lentamente. Usando una resolución más
baja cuando toma fotos, acelerará el tiempo de carga.
P: Si tengo una tarjeta de memoria insertada en el marco, pero quiero ver una
Demostración de Diapositiva de la memoria interna, ¿Qué debo hacer?.
R: Vaya a la página de Select Card y seleccione “Memoria Incorporada”. Vaya a Photos
y seleccione una imagen. Oprima el Botón Play y la unidad entrará en el Modo de
Demostración de Diapositiva.
P: ¿Cómo puedo rotar fotos tipo retrato para que se vean correctamente en el marco?
R: Rote las imágenes usando una computadora. Las fotos tipo retrato deben estar
verticales para permitir que el Marco de Foto las detecte como una foto tipo retrato
P: ¿Cuántas imágenes puede guardar una Memoria Flash de 128MB?
R; Para maximizar el uso de la memoria flash interna, simplemente reduzca el tamaño
de imagen de su imagen a 640 x 480 para imágenes apaisadas y 480 x 640 para
imágenes tipo retrato. Cada archivo será de aproximadamente 60KB, permitiendo
que usted guarde más de 2000 fotos en la memoria interna.
Para más consultas o asistencia, por favor llame al (866) 287-5555
Page 43

42
IMPORTANTES INSTRUCCIONES DE
SEGURIDAD DEL PRODUCTO
Manejo Apropiado del Marco de Fotos Digitales
Siempre maneje con cuidado el Marco de Fotos Digitales. Evite tocar la
Pantalla de Cristal Líquido (LCD) Los aceites de la piel son difíciles de
remover.
Siempre ponga el Marco de Fotos Digitales sobre una superficie estable y
nivelada. Las superficies inestables pueden hacer que el Marco de Fotos
Digitales se vuelque y se caiga, provocando posibles daños o lesiones.
Evite exponer el Marco de Fotos Digitales a la luz directa del sol o a altas
temperaturas, ya que pueden dañar o acortar su vida útil. No lo ponga cerca de
fuentes de calor tales como radiadores, salidas de calefacción u otros
dispositivos que generen calor. Oriente el Marco de Fotos Digitales fuera de la
luz directa del sol para reducir el reflejo.
Evite exponer el Marco de Fotos Digitales a la lluvia, agua, humedad o alta
humedad. No lo ponga cerca de lava manos o lava platos donde puede quedar
en contacto con el agua.
Nunca ponga objetos con filo o pesados sobre la pantalla LCD, marco o cable
de toma de corriente.
Tomas de Corriente Sobrecargadas
No sobrecargue las tomas de corriente cuando esté usando el Marco de Fotos
Digitales. Sobrecargar las tomas de corriente de pares, circuitos o cables de
extensión puede provocar exceso de temperatura, incendio o golpes de
electricidad. Use sólo tomas de corriente polarizadas con toma de tierra.
Protección del Cable de Corriente
Minimice el gasto del cable de toma de corriente. El cable de toma de corriente
debería instalarse lejos de donde se camine o en contacto con otros objetos.
No pase el cable de corriente bajo alfombras o cubre pisos. Nunca se debe
torcer, pinchar y doblar demasiado el cable. Inspeccione periódicamente el
cable de corriente y los extremos para ver desgaste o daño. Desenchufe y
reemplace el cable si está dañado.
Page 44

43
Ventilación
Las ranuras y aperturas del Marco de Fotos Digitales son para propósitos de
ventilación. Para asegurar una operación confiable del producto y para
protegerlo de sobre-calentamiento, estas aperturas no deben bloquearse o
taparse. Mantenga el Marco de Fotos Digitales a una distancia mínima de
cuatro (4) pulgadas (10 cms.) de cualquier pared para asegurar suficiente
circulación de aire y ventilación. Las temperaturas elevadas pueden producir
un incendio o una falla del dispositivo.
Para asegurar una ventilación adecuada, no obstruya las aberturas colocando
el Marco de Fotos Digitales en una cama, sofá, alfombra u otras superficies
similares. No lo ponga en una instalación armada, tal como un estante para
libros o estante encerrado, a menos que tenga ventilación apropiada.
Otras Advertencias y Precauciones
Cuidado: Nunca remueva la cubierta de plástico. No hay partes que pueda
reemplazar el usuario. El Marco de Fotos Digitales contiene partes de alto
voltaje. Usted podría sufrir serias lesiones si las toca.
No intente hacer reparaciones usted mismo. La garantía no cubre
reparaciones o intentos de reparaciones por cualquier persona no autorizada
por Westinghouse Digital. Refiera todos los servicios y reparaciones a
personal de servicio calificado.
Si el Marco comienza a echar humo, emitir un ruido anormal o algún olor
extraño, apáguelo inmediatamente y desenchufe el cable de alimentación de
corriente Contacte el Centro de Servicio Westinghouse.
Si el Marco de Fotos Digitales no se usará durante un tiempo prolongado,
desenchufe el cable de alimentación de corriente.
Page 45

44
Limpieza del Marco de Photo Digitales
• ASEGÚRESE DE QUE EL MARCO DE FOTOS DIGITALES ESTÁ
APAGADO
• NUNCA ROCÍE O ECHE LÍQUIDO DIRECTAMENTE SOBRE LA
PANTALLA
Para Limpiar la Pantalla:
1. Limpie la pantalla con un paño limpio, suave y sin pelusas. Esto remueve el
polvo y otras partículas.
2. Si aún no está limpia, aplique una pequeña cantidad de limpia vidrios que no
contenga amoníaco ni alcohol, en un paño limpio, suave y sin pelusas para
limpiar la pantalla.
Para Limpiar la Caja de Plástico
1. Use un paño suave y seco.
2. Si aún no está limpia, aplique una pequeña cantidad de detergente suave
no-abrasivo que no contenga amoníaco ni alcohol, en un paño limpio, suave y
sin pelusas para limpiar la superficie.
Para Limpiar el Marco:
1. Use un paño suave y seco.
Declinación
Westinghouse Digital no recomienda el uso de limpiadores con base de amoníaco o
alcohol sobre la pantalla LCD o sobre la caja de plástico. Se ha informado que algunos
limpiadores químicos han dañado la pantalla y/o la caja de la unidad. Westinghouse
Digital no será responsable por los daños que resulten del uso de cualquier limpiador a
base de amoníaco o alcohol.
Page 46

45
Garantía del Producto
Westinghouse Digital Electronics
Garantía Limitada de Seis Meses
del Marco de Fotos Digitales LCD
Westinghouse Digital Electronics garantiza este Marco de Fotos Digitales LCD contra defectos de materiales y mano de
obra por un periodo de seis (6) meses desde la fecha original de compra, sujeto a los siguientes términos y condiciones
MANO DE OBRA Y REPUESTOS – Por un período de seis (6) meses desde la fecha original de compra, Westinghouse
Digital Electronics reparará cualquier defecto de material u obra de mano en el Producto, o a su elección, reemplazará un
Producto defectuoso. Durante el período de garantía de seis (6) meses, Westinghouse Digital Electronics proporcionará
repuestos nuevos o remanufacturados para reemplazo de partes defectuosas. Las partes de reemplazo estarán garantizadas ya
sea por el remanente del período de garantía original o por noventa (90) días a partir de la fecha de instalación, cualquiera que
ocurra último. Después de la expiración del período de garantía, las reparaciones del Producto serán de responsabilidad suya, el
comprador.
PARA OBTENER SERVICIO DE GARANTÍA – Para obtener servicios de garantía, usted debe ya sea llevar el Producto
personalmente a un centro de servicios Westinghouse Digital Electronics o enviar el Producto a dichos centros de servicio
con flete pre-pagado, en su empaque original o en un empaque que proporcione igual grado de protección. Westinghouse
Digital Electronics no es responsible por daños a cualquier Producto que ocurra durante el envío. Por favor llame a
Westinghouse Digital Electronics al (866) 287-5555 para información de la ubicación del centro de servicio Westinghouse
Digital Electronics más cercano a usted.
EXCLUSIÓN A LA GARANTÍA – Daños al Producto que resulten de un acto de Dios, accidente, mal uso, abuso,
negligencia, uso comercial (no uso de consumidor o personal), alteración o reparación no autorizada del producto, no están
cubiertas por esta garantía. Esta garantía no cubre daños debido a: (i) instalación inapropiada, ajustes de configuración,
operación o manutención; (ii) variación de corriente, conexión a voltaje incorrecto o combinación con accesorios o
componentes incompatibles; (iii) intentos de reparación por cualquier otro que no sea facilidades de servicios autorizada
Westinghouse Digital Electronics. Esta garantía es válida sólo para productos comprados y usados en Estados Unidos y
Canadá.
PRUEBA DE COMPRA ORIGINAL – Se debe presentar un recibo de venta, factura u otra prueba de compra especificando
la fecha original de compra, dentro de los seis (6) meses del período de garantía, para obtener servicio de garantía. Esta
garantía se extiende al comprador original y no es transferible. El número de serie estampado por la fábrica, debe aparecer
en el Producto o esta garantía no será aplicable.
YA SEA REPARACIÓN O REEMPLAZO ES SU ÚNICO REMEDIO BAJO ESTA GARANTÍA. EXCEPTO HASTA
DONDE LO PROHÍBA LA LEY, WESTINGHOUSE DIGITAL NO SERÁ RESPONSABLE POR CUALQUIER
RECLAMO POR DAÑOS INCIDENTALES O CONSECUENTES QUE SURJAN DE LA NO OBSERVACIÓN DE
CUALQUIER GARANTÍA EXPRESA O IMPLICADA SOBRE ESTE PRODUCTO. CUALQUIER GARANTÍA DE
COMERCIABILIDAD O APTITUD PARA ALGÚN PROPÓSITO EN PARTICULAR SOBRE ESTE PRODUCTO
Page 47

46
ESTÁ LIMITADO EN DURACIÓN Y ALCANCE A LOS TÉRMINOS DE ÉSTA GARANTÍA.
Algunos Estados no permiten la exclusión o limitación de daños incidentales o consecuentes o permiten limitaciones sobre
cuánto dura una garantía implicada, de manera que es posible que las limitaciones o exclusiones de más arriba, no sean
aplicables a usted. Ésta garantía le otorga derechos legales específicos y es posible que usted tenga otros derechos, que varían
de Estado a Estado.
Para la más reciente información y consejos del producto, por favor visite www.wde.com
Para registrar su Marco de Fotos Digitales, por favor llame al (866) 287-5555 o visite nuestro sitio en internet para hacer el
registro en línea.
Page 48

www.wde.com
Westinghouse Digital Electronics, LLC
Santa Fe Springs, CA
SE-UM-0702-0701
 Loading...