

Page 1
UW39T7HW
Page 2

English
1
1
2
2
3
4
5
6
6
6
7
8
8
8
9
9
9
10
11
12
13
14
14
14
15
15
16
17
17
17
18
i
i
TABLE OF CONTENTS
TABLE OF
DIGITAL TELEVISION TRANSITION NOTICE
ENERGY STAR
IMPORTANT
CONTENTS .................................................................
DISCLAIMER .....................................................
INFORMATION.......................................................
TABLE OF
............................
CONT ENTS
Warnings ..................................................................................
NOTICES
FCC COMPLIANCE STATEMENT
IMPORTANT SAFETY
Circuit
Power Cord
.................................................................................
..........................................
INSTRUCTIONS .................................
Overload........................................................................
Protection .............................................................
Ventilation.................................................................................
WARNINGS AND
ANTENNA INSTALLATION
PRECAUTIONS ..........................................
SAFETY.......................................
Lightning...................................................................................
Power
CLEANING THE LED
Dolby-Digital
Licensing and Patent
PACKAGE
CONTROL
TERMINALS
REMOTE
REMOTE CONTROL
INSTALLING THE REMOTE CONTROL
REMOTE CONTROL TRANSMISSION
LED TV
INSTALLING THE LED TV
REMOVING THE LED TV BASE
ANTENNA
OUTDOOR ANTENNA
CABLE TV (CTV/DTV)
EXTERNAL DEVICE
lines...............................................................................
TV .........................................................
Notice..................................................................
Information.............................................
CONTENTS ..............................................................
PANEL......................................................................
...............................................................................
CONTROL ..................................................................
OPERATION ............................................
BATTERIES ..........
RANGE ...................
BASE .............................................................................
BASE ..........................................
...........................................
CONNECTION..........................................................
CONNECTION..................................
CONNECTION ..................................
CONNECTIONS .......................................
Page 3

English
TABLE OF CONTENTS
POWER
CONNECTION .............................................................
CONNECTING AC
INITIAL
ANTENNA OR COAXIAL CABLE CONNECTION
CABLE OR SATELLITE BOX CONNECTION SETUP
OTHER INPUT SOURCE CONNECTION SETUP
POWER...................................................
SETUP ......................................................................
SETUP ....
..........
................
20
20
20
21
24
26
WESTINGHOUSE HDTV SETUP - NOT THROUGH CABLE/
SATELLITE
BASIC
OPERATIONS.................................................................
TURNING THE POWER ON AND
ADJUSTING THE
CHANGING CHANNELS
SELECTING THE INPUT
ADJUSTING THE DISPLAY FORMAT
SETUP
MENUS ..........................................................................
SETUP MENU
PICTURE................................................................................
SOUND
CHANNEL ..............................................................................
PARENTAL
SETUP
CHANNEL
WALL MOUNT
WALL MOUNT INSTALLATION
TROUBLESHOOTING ................................................................
SPECIFICATIONS ......................................................................
BOX....................................................................
OFF .................................
VOLUME...................................................
.......................................................
SOURCE.......................................
..................................
OPERATION..................................................
..................................................................................
CONTROL..........................................................
...................................................................................
..............................................................................
OPTION .............................................................
REMINDERS ......................
28
30
30
30
31
31
32
33
33
34
41
45
48
53
53
57
57
58
61
ii
Page 4

English
DIGITAL TELEVISION TRANSITION NOTICE
DIGITAL TELEVISION TRANSITION NOTICE
This device contains a digital television tuner, so it should receive digital over the air
TV programming, with a suitable antenna, after the end of full-power analog TV
broadcasting in the United States on June 12, 2009. The nationwide switch to digital
television broadcasting will be complete on June 12, 2009, but your local television
stations may switch sooner. After the switch, analog-only television sets that receive
TV programming through an antenna will need a converter box to continue to receive
over-the-air TV. Watch your local stations to find out when they will turn off their
analog signal and switch to digital-only broadcasting.
For more information, call the FCC at 1-888-CALL-FCC (1-888-225-5322) or see
www.DTV.gov. For information on the TV Converter program, and on government
coupons that may be used toward the purchase of one, see www.dtv2009.gov, or call
the NTIA at 1-888-DTV-2009.
ENERGY STAR DISCLAIMER
This Westinghouse product has earned the ENERGY STAR® for meeting U.S.
Federal energy efficiency guidelines as set by the Department of Energy and
Environmental Protection agency. The ENERGY STAR® program exists to provide
energy saving guidelines and help promote energy efficient products and practices.
Changes to certain features, settings and functions of this TV can change and/or
increase its power consumption. Depending on how settings are changed, power
consumption may exceed the limits required for ENERGY STAR® qualification. This
Westinghouse TV will operate at optimal energy efficiency in “Home” mode.
1
Page 5
English English
IMPORTANT INFORMATION
IMPORTANT INFORMATION
Warnings
To reduce the risk of fire or electric shock:
• Do not expose this product to rain or moisture.
• Do not remove the rear cover. There are no user-serviceable parts inside.
Refer all servicing requirements to qualified service personnel.
• The plug should be connected to a mains socket outlet with a protective
earthing connection.
The lightning flash with arrowhead inside an equilateral
triangle symbol is i nt en ded to ale rt t he user to the presenc e
of uninsulated dangerous voltage within t he p roduct's
enclosure that may be of sufficient magnitu de to constitute a
risk of electric shock.
The exclamation inside an equilateral triangle symbol is intended to
alert the user to related operating and maintenance instructions in
the user documentation accompanying the product.
WARNING!
This device must be operated with the original power supply.
WARNING!
To prevent injury, this apparatus must be securely attached to the floor/wall in
accordance with the installation instructions.
CAUTION:
The power supply outlet should be located near the LED TV and should be easily
accessible.
Always use the appropriate AC cord that is certified for your specific country.
Some examples are listed below:
• USA – UL
• Canada – CSA
• Japan – Electric Appliance Control Act
2
Page 6
English
IMPORTANT INFORMATION
NOTICES
Important Notices Concerning Power Cord Selection
The specific power cord for this LED TV is enclosed and has been selected
according to the country of destination. Use the enclosed power cord to prevent
electric shock. Observe the following guidelines if it is necessary to replace the
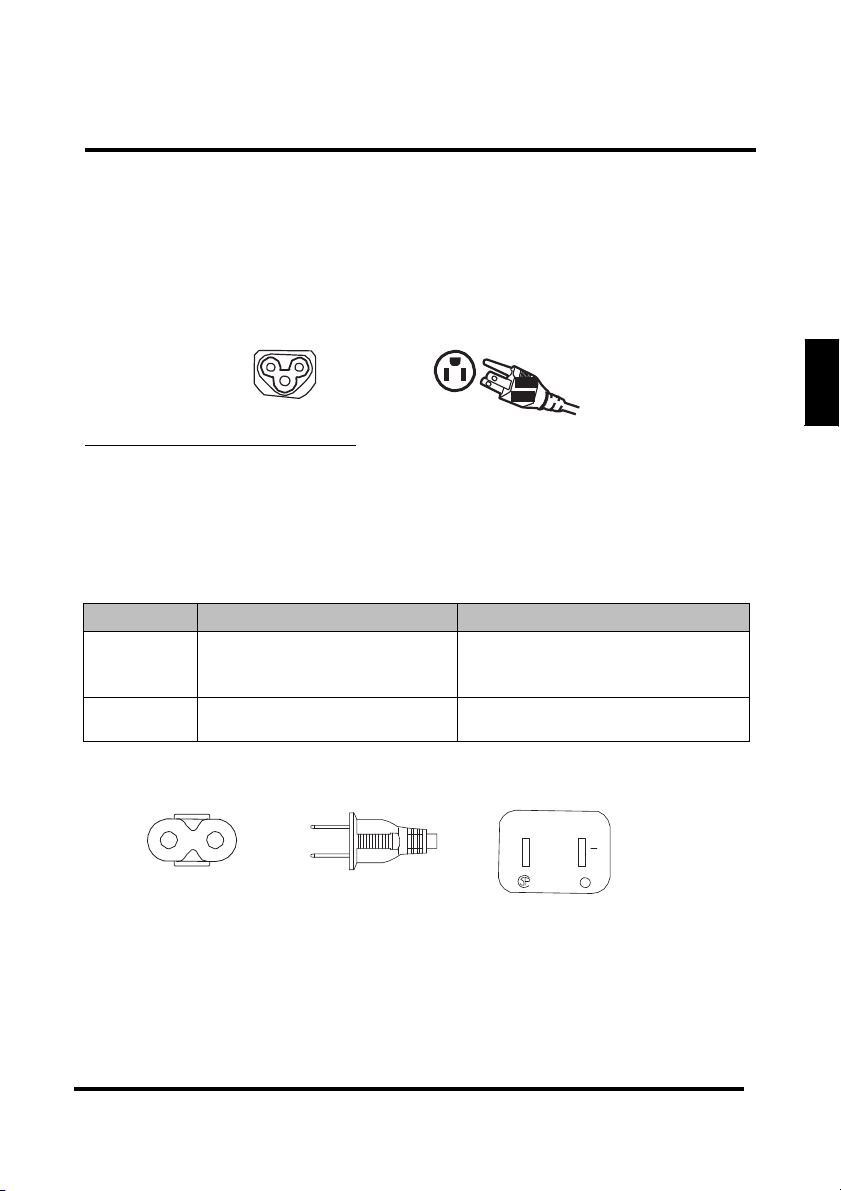
original cord set, or if there is no cord set enclosed. The female receptacle of the
cord set must meet IEC-60320 requirements and should look like Figure A1 below:
Figure A1
Figure A2
For the United States and Canada
In the United States and Canada the male plug is a NEMA5-15 style (Figure A2),
UL-listed, and CSA-labeled. For LED TVs that are to be placed on a desk or table,
type SVT or SJT cord sets may be used. For LED TVs that are to be placed directly
on the floor, only SJT type cord sets may be used. The cord set must be selected
according to the current rating for the LED TV. Consult the table below for the
selection criteria of power cords used in the United States and Canada.
Cord Type Size of Co nd uctor in C ord Maximum Unit Current Rating
SJT
18 AWG
16 AWG
14 AWG
SVT
18 AWG
17 AWG
10 Amps
12 Amps
12 Amps
10 Amps
12 Amps
Figure a1
Figure a2
I-SHENG
SP-12N X
E55943
K
7A
125V
Figure a2-1
Detachable, Max. 4.5 m long, Min. 1.5 m long, Type SVT, SJT or SPT-2, No. 18
AWG/2C. One end terminates in NEMA 1-15P with min. 125 V ac, 2.0 A
min., or
NEMA 2-15P with min. 250 V ac, 2.0 A min., the other end with an
appliance coupler.
3
Page 7

English
IMPORTANT INFORMATION
FCC COMPLIANCE STATEMENT
This equipment has been tested and complies with the limits for a Class B digital
device, pursuant to part 15 of the FCC Rules. These limits are designed to provide
reasonable protection against harmful interference in a residential installation. This
equipment generates, uses, and can radiate radio frequency energy, and may cause
harmful interference to radio communications if not installed and used in accordance
with the instructions. However, there is no guarantee that interference will not occur
in a particular installation. If this equipment does cause harmful interference to radio
or television reception, which can be determined by turning the equipment off and
on, the user is encouraged to try to correct the interference by one or more of the
following measures:
• Reorient or relocate the receiving antenna.
• Increase the distance between the LED TV and the receiver.
• Connect the LED TV to an outlet on a circuit separate from to which the
receiver is connected.
• If the interference persists even after performing the above measures,
consult the Westinghouse Service Center or an experienced radio/TV
technician for assistance.
FCC Warning
To assure continued FCC compliance, use a grounded power supply cord and the
provided shielded video interface cable with bonded ferrite cores. If a BNC cable is
used, use only a shielded BNC (5) cable. Also, any unauthorized changes or
modifications not expressly approved by the manufacturer will void the user's
authority to operate this device.
4
Page 8

English
IMPORTANT INFORMATION
IMPORTANT SAFETY INSTRUCTIONS
Make sure to note and follow all warnings and instructions marked on the LED TV.
Observe the following safety instructions.
• Read these instructions.
• Keep these instructions.
• Read all warnings.
• Follow all instructions.
• Do not use this apparatus near water.
• Clean only with dry cloth.
• Do not block any ventilation openings. Install in accordance with the
manufacturer’s instructions.
• Do not install near any heat sources such as radiators, heat registers,
stoves, or other apparatus (including amplifiers) that produce heat.
• Do not defeat the safety purpose of the polarized or grounding-type plug. A
polarized plug has two blades with one wider than the other. A grounding
type plug has two blades and a third grounding prong. The wide blade or the
third prong are provided for your safety. If the provided plug does not fit into
your outlet, consult an electrician for replacement of the obsolete outlet.
• Protect the power cord from being walked on or pinched particularly at plugs,
convenience receptacles, and the point where they exit from the apparatus.
• Only use attachments/accessories specified by the manufacturer.
• Use only with the cart, stand, tripod, bracket, or table specified by the
manufacturer, or sold with the apparatus. When a cart is used, use caution
when moving the cart/apparatus combination to avoid injury from tip-over.
• Unplug this apparatus during lightning storms or when unused for long
periods of time.
• Refer all servicing to qualified service personnel. Servicing is required when
the apparatus has been damaged in any way, such as power-supply cord or
plug is damaged, liquid has been spilled or objects have fallen into the
apparatus, the apparatus has been exposed to rain or moisture, does not
operate normally, or has been dropped.
5
Page 9
English
IMPORTANT INFORMATION
Circuit Overload
Do not overload wall outlets, extension cords, or power strips. This can result in a fire
or electronic shock.
Power Cord Pr otection
Power supply cords should be routed so that they are not likely to be walked on or
pinched by items placed upon or against them. Periodically inspect the cords for
damage. Install the LED TV near a wall socket outlet where the power cord can be
readily accessed.
Ventilation
The slots and openings on the cabinet are provided for necessary ventilation. To
ensure reliable operation of the LED TV and to protect it from overheating, these
slots and openings must never be blocked or covered.
6
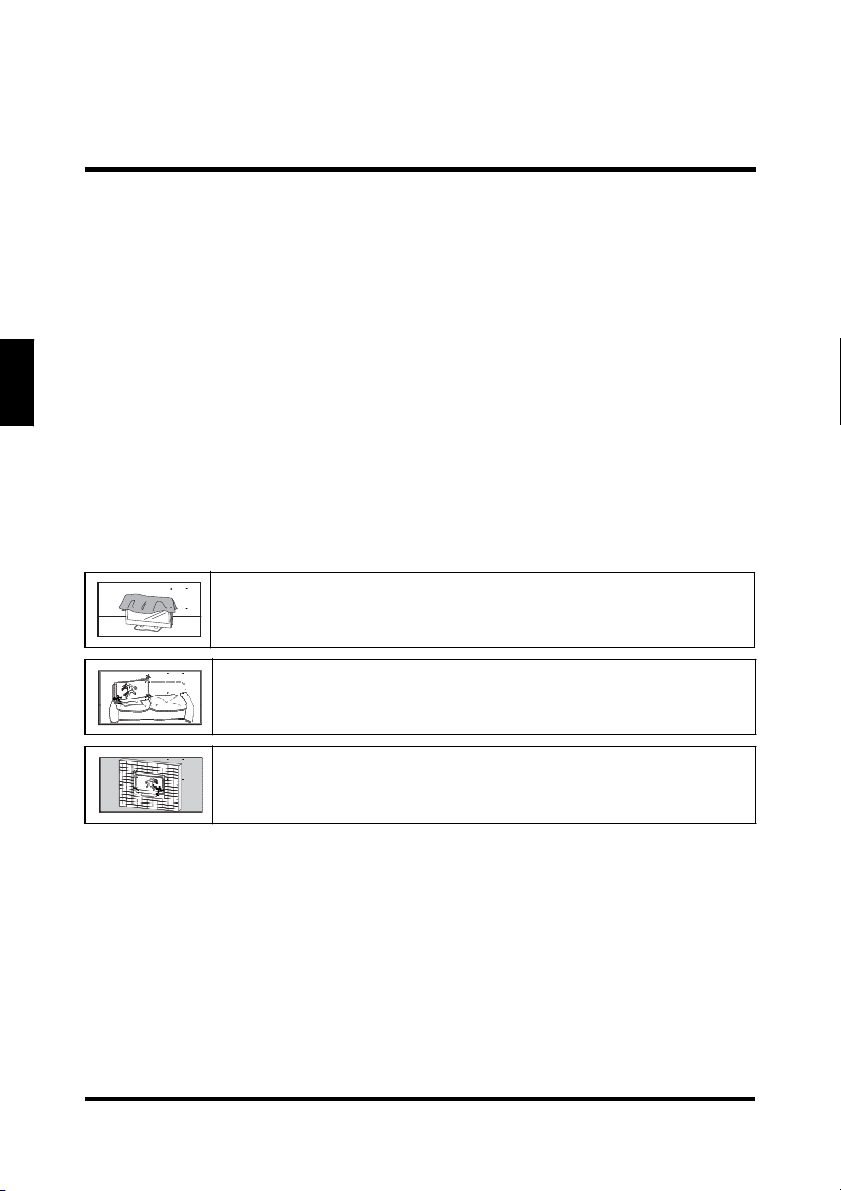
Never cover the slots and openings with a cloth or other materials.
Do not block the openings by placing the LED TV on a bed, sofa,
rug or other similar surface.
Do not place the LED TV in a built-in installation such as a
bookcase or a rack unless proper ventilation is provided or the
manufacturer’s instructions have been adhered to.
Page 10

English
IMPORTANT INFORMATION
WARNINGS AND PRECAUTIONS
• Do not orient the LED TV towards direct sunlight to reduce glare.
• If the LED TV will not be used for a long period of time, unplug the unit and
remove the batteries from the remote control.
• Avoid touching the display screen by hand or any object.
• Never remove the rear cover. The LED TV interior contains high-voltage
parts. You may be seriously injured if you touch them.
• Always handle the LED TV with caution when moving it.
• Do not install the LED TV in airtight compartments, or in areas where it can
be exposed to water or high temperature.
• Ensure that the area around the LED TV is clean and free of moisture.
• Do not place anything on the LED TV that can hinder heat dissipation.
• Do not place naked flame sources, such as lighted candles, on or near the
LED TV.
• Do not place anything on the LED TV that can cause liquid to splash on it
(e.g. flower vase).
• Do not place heavy objects on the LED TV, audio/video cables, or power
cord.
• If the LED TV emits smoke, abnormal noise, or a strange odor, immediately
turn it off and contact the Westinghouse Service Center by:
– Logging on to www.wde.com.
– Contacting the Westinghouse Customer Service at (800) 701-0680.
– E-mailing us at service@wde.com.
7
Page 11
English
IMPORTANT INFORMATION
ANTENNA INSTALLATION SAFETY
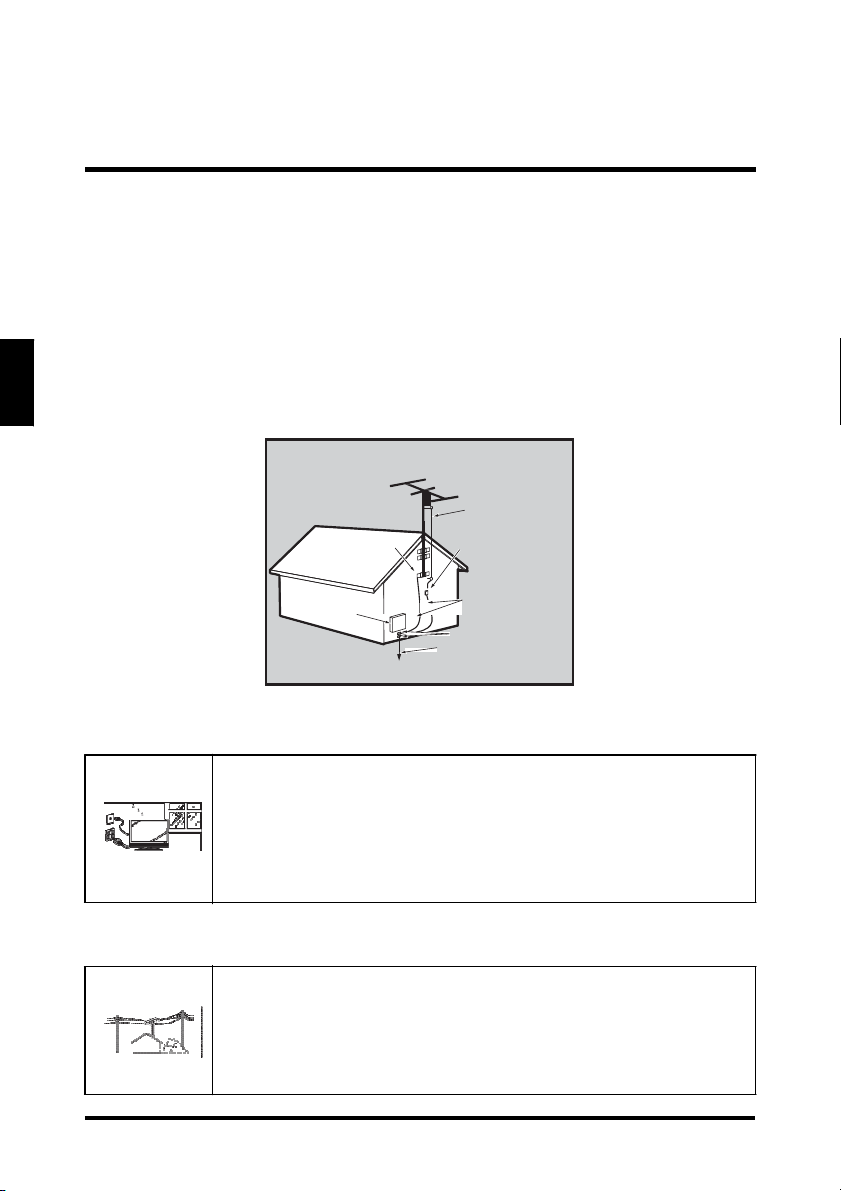
Outdoor Antenna Grounding
If an outside antenna or cable system is connected to the LED TV, be sure the
antenna or cable system is grounded to prevent voltage surges and built-up static
charges. Article 810 of the National Electrical Code, ANS/NFPA 70, provides
information on proper grounding of the mast and supporting structure, grounding of
the lead-in wire to an antenna discharge unit, connection to grounding electrodes,
and requirements for the grounding electrode.
Antenna Grounding According to the National
Electrical Code, ANSI/NFPA 70
Ground ing
cla mps
Electr ic servic e
equip ment
NEC: Na tional E lectrical Code
Antenn a lead in wire
Antenn a dischar ge unit
(NEC S ection 81 0-20)
Ground ing Conduc tors
(NEC S ection 81 0-21)
Ground ing clamps
Power s ervice gr ounding
elect rode system (NE C Art
250 par t H)
Lightning
For added protection for the LED TV during a lightning storm, or
when it is left unattended and unused for long periods of time,
unplug it from the wall outlet and disconnect the antenna or cable
system. DO NOT disconnect the antenna or the power cord during
a heavy storm—lightning may strike while you are holding the
cable cord, causing serious injury. Turn off the LED TV and wait for
the weather to improve.
Power lines
8
An outside antenna system should not be located in the vicinity of
overhead power lines or other electric light or power circuits, or
where it can fall into such power lines or circuits. When installing an
outside antenna system, extreme care should be taken to keep
from touching such power lines or circuits as contact with them
might be fatal.
Page 12
English
IMPORTANT INFORMATION
CLEANING THE LED TV
To clean the screen:
1 Wipe the screen with a clean, soft, lint-free cloth. This removes dust and other
particles.
2 If it is still not clean, apply a small amount of non-ammonia, non-alcohol
based glass cleaner onto a clean, soft, lint-free cloth, and wipe the screen.
To clean the case:
1 Wipe the case with a soft, dry cloth.
2 If it is still not clean, apply a small amount of non-ammonia, non-alcohol
based, mild non-abrasive detergent onto a clean, soft, lint-free cloth, then
wipe the surface.
Dolby License Notice
• Make sure the LED TV is turned off and the power cord is
disconnected from the power outlet.
• Never spray or pour any liquid directly onto the screen or the
case.
Manufactured under license from Dolby Laboratories. Dolby and the double-D
symbol are registered trademarks of Dolby Laboratories.
is a trademark of SRS Labs, Inc. TruSurround HD technology is
incorporated under license from SRS Labs, Inc.
SRS TruSurround HD™ creates an immersive, feature-rich surround sound
experience from two speakers, complete with rich bass, high frequency detail and
clear dialog.
Licensing and Patent Information
This WESTINGHOUSE product may be covered by one or more U.S. and foreign
patents and patent applications. See http://westinghousedigital.com/compliance/ for
details.
9
Page 13
English
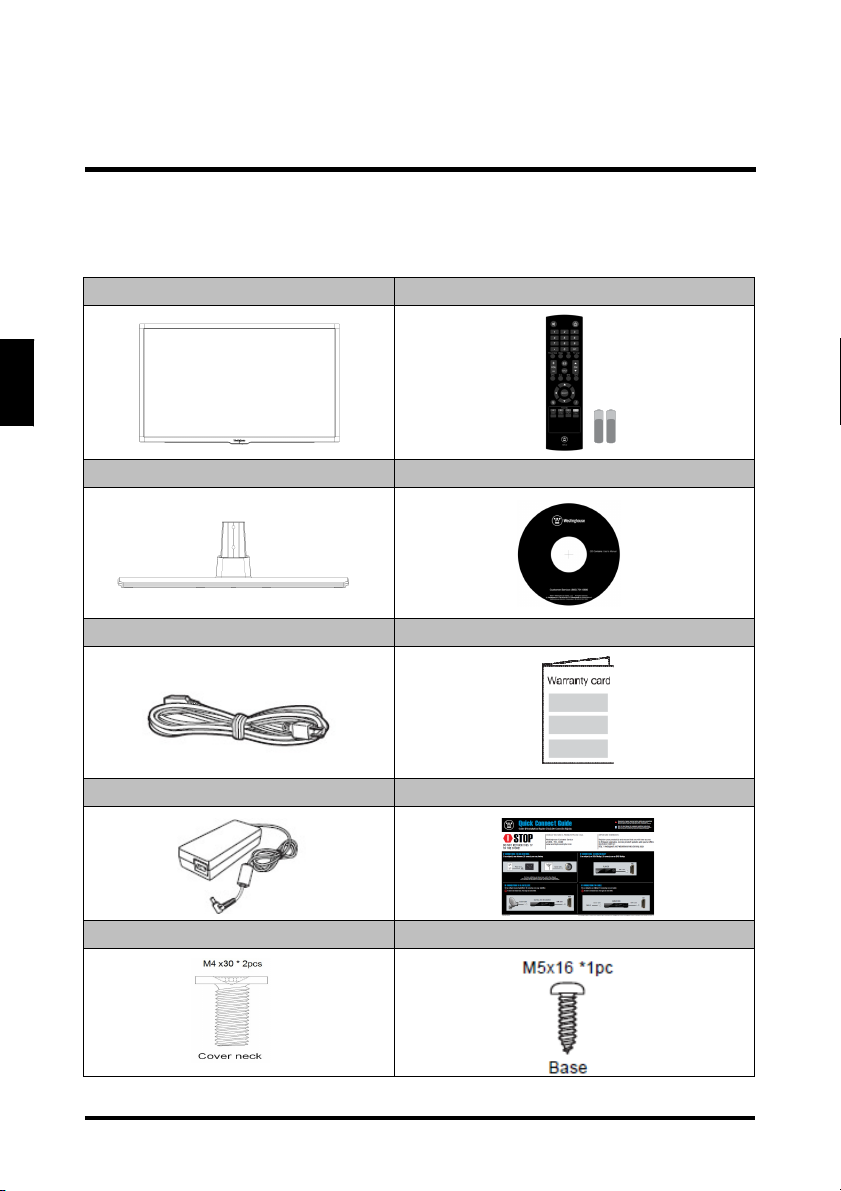
PACKAGE CONTENTS
PACKAGE CONTENTS
37” LED TV Unit
LED TV Base
Remote Control (with 2x AAA batteries)
User Ma
nual
Power Cord
AC Adapter
Warranty Card
Quick Connect Guide
Screws for Base
Screw for Base
10
Page 14
English
CONTROL
PANEL
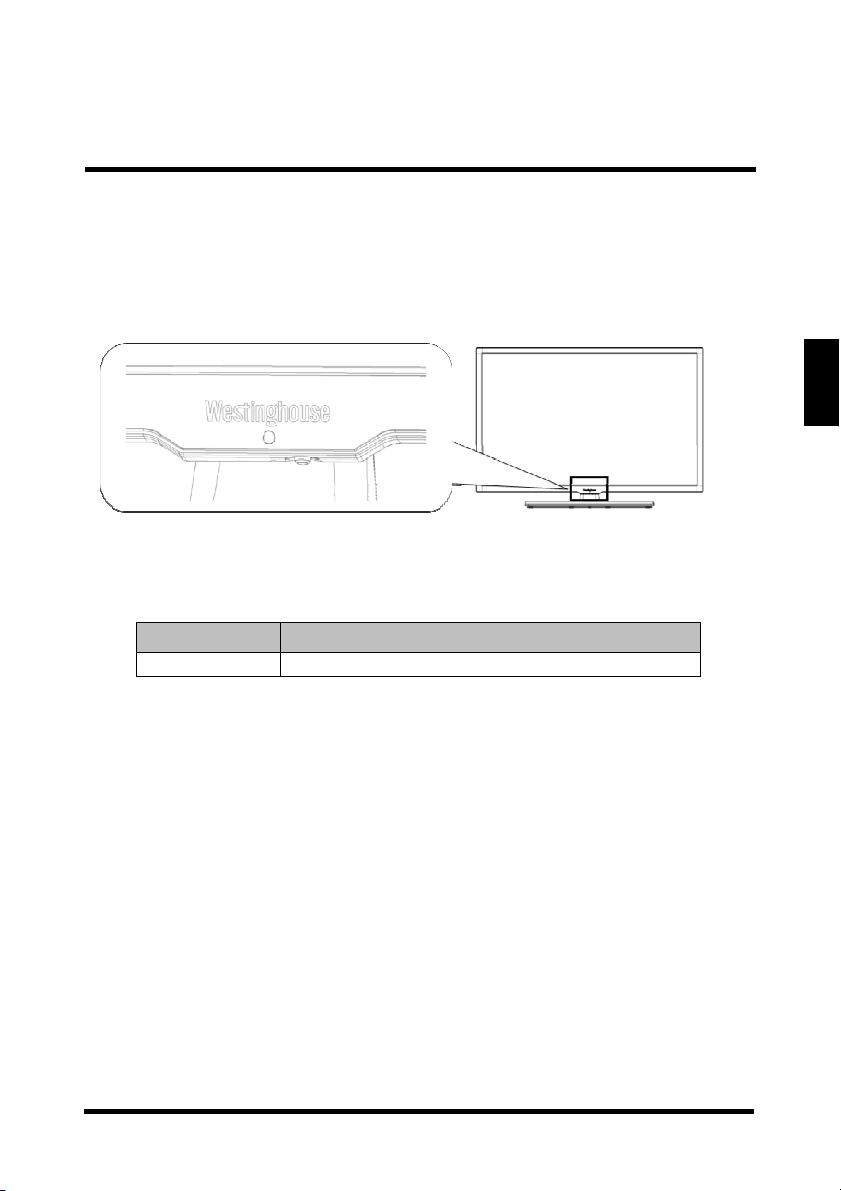
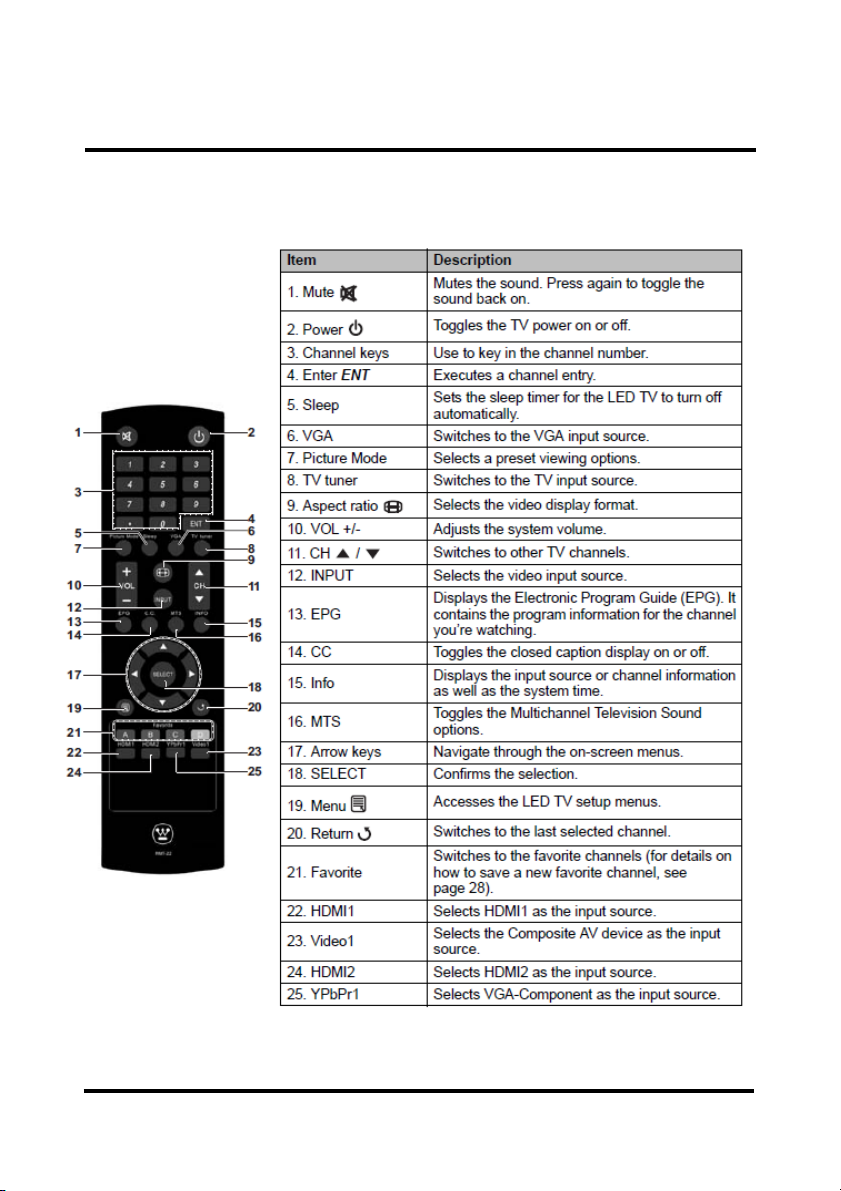
CONTROL PANEL
Item
1. Power
Description
Toggles the power on and off.
11
Page 15
English
AUDIO
TERMINALS
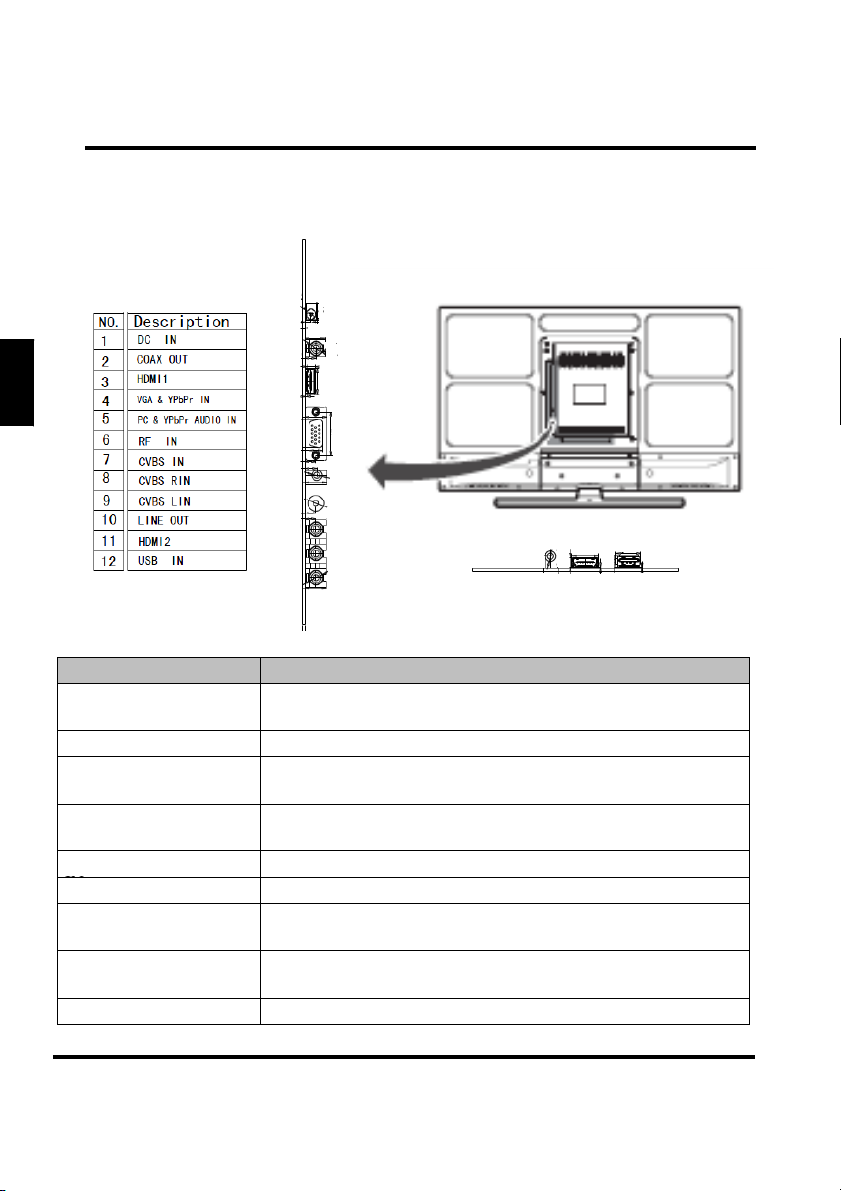
TERMINALS
Item
1. DC IN
2. COAX OUT
3. HDMI1/2
4. VGA & Ypbpr IN
5. PC & Ypbpr
6. TV Tuner
A A UD IO IN VI DEO L IN R L OUT R
1
2
3
4
5
6
7
8
9
10 11 12
Function
Connects the AC to DC adapter from this outlet to a power
source
Connects to an external analog audio receiver
Connects to an external AV device such as a VCR, DVD player,
set-top box, or game system.
Connects to a computer or other device with a VGA or
Ypbpr output using a 15-pin VGA cable.
Connects to the audio out port of a computer or other device.
Connects the LED TV to an antenna or cable service.
7. USB
8. AV
9. LINE OUT
12
For service only.
Connect to an external AV device such as a VCR, DVD player,
set-top box, or game system.
Connect to an analog audio output device.
Page 16
REMOTE CONTROL
REMOTE
CONT ROL
13
Page 17
REMOTE CONTROL OPERATION
REMOTE CONTROL OPERATION
INSTALLING THE REMOTE CONTROL BATTERIES
CAUTIONS:
• Only use AAA batteries.
• Do not mix new and old batteries. This may result in cracking or leakage, which
may pose a fire risk or lead to personal injury.
• Insert batteries according to the (+) and (-) markings. Inserting the batteries
incorrectly may result in cracking or leakage, which may pose a risk of fire or
lead to physical injury.
• Dispose of used batteries in accordance with local laws and regulations.
• Keep batteries away from children and pets.
• When the remote control will not to be used for an extended period, remove the
batteries.
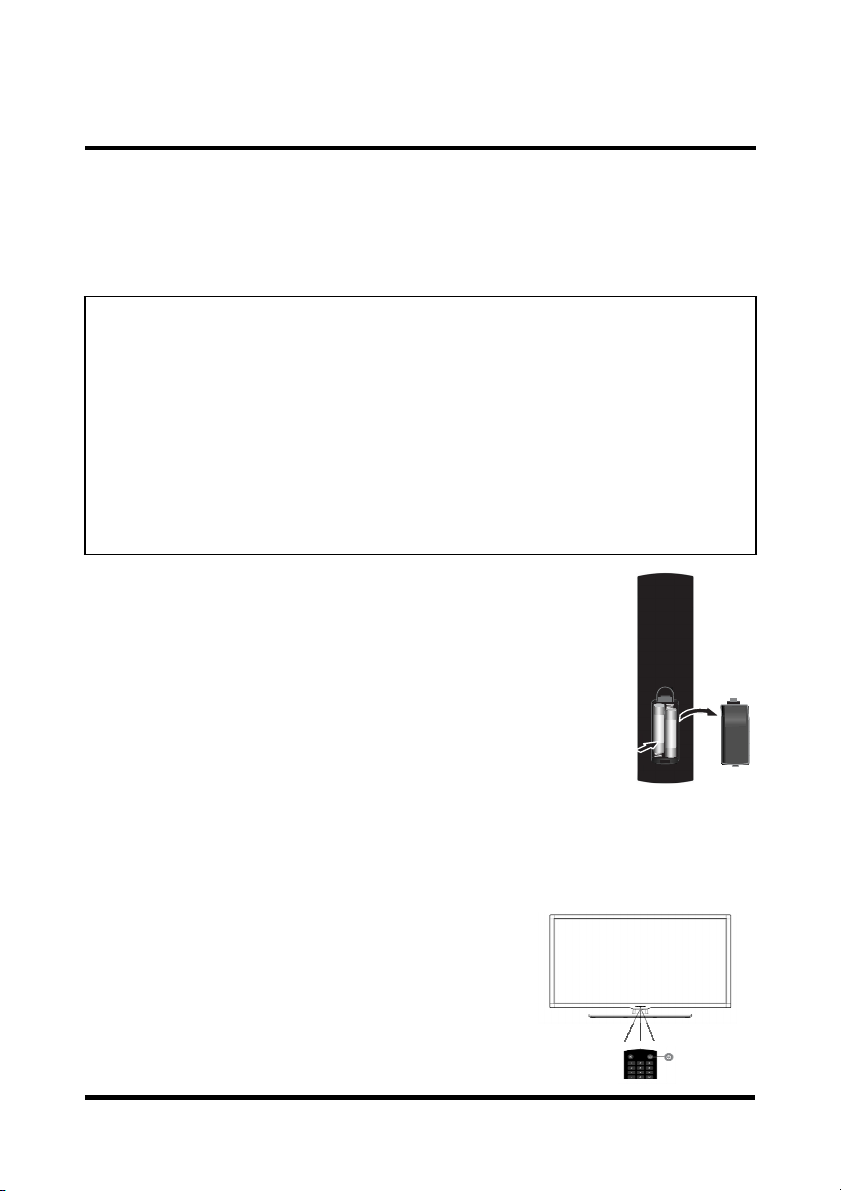
1 Remove the battery cover.
2 Insert the batteries. Make sure the (+) and (–) marks on the
batteries match those inside the compartment.
3 Re-attach the battery cover.
REMOTE CONTROL TRANSMISSION RANGE
Transmission range depends upon the reception angle.
The range of coverage is 20° horizontal/vertical at a
distance of 10 feet from the LED TV.
14
Page 18

English
LED TV
BASE
LED TV BASE
CAUTION:
The LED TV unit ma y be too heavy for one person to lift. If this is the case ,
make sure to ask for assistance in handling the LED TV to p revent
physical injury and/or d amag e to t he unit.
INSTALLING THE LED TV BASE
1 Open the LED TV carton box.
2 Remove the LED TV base.
3 Remove the plastic bag.
4 Remove the two top carton stabilizers from the LED TV.
5 Remove the protective plastic covering the LED TV.
6 Grasp the two sides of the LED TV and then pull it out of the carton box.
7 Remove the two bottom carton stabilizers from the LED TV.
8 Lay the LED TV on a clear, flat, and stable surface.
9 Align the base to the bottom side of the LED TV and use two M4*30 screws to
secure it.
10 Carefully orient the LED TV in an upright position.
11 Use one M5 x 16 screw to fix the stand base and LED TV on the desk.
Be sure to place the TV at a location (at least 75cm high)
15
Page 19
English
LED TV BASE
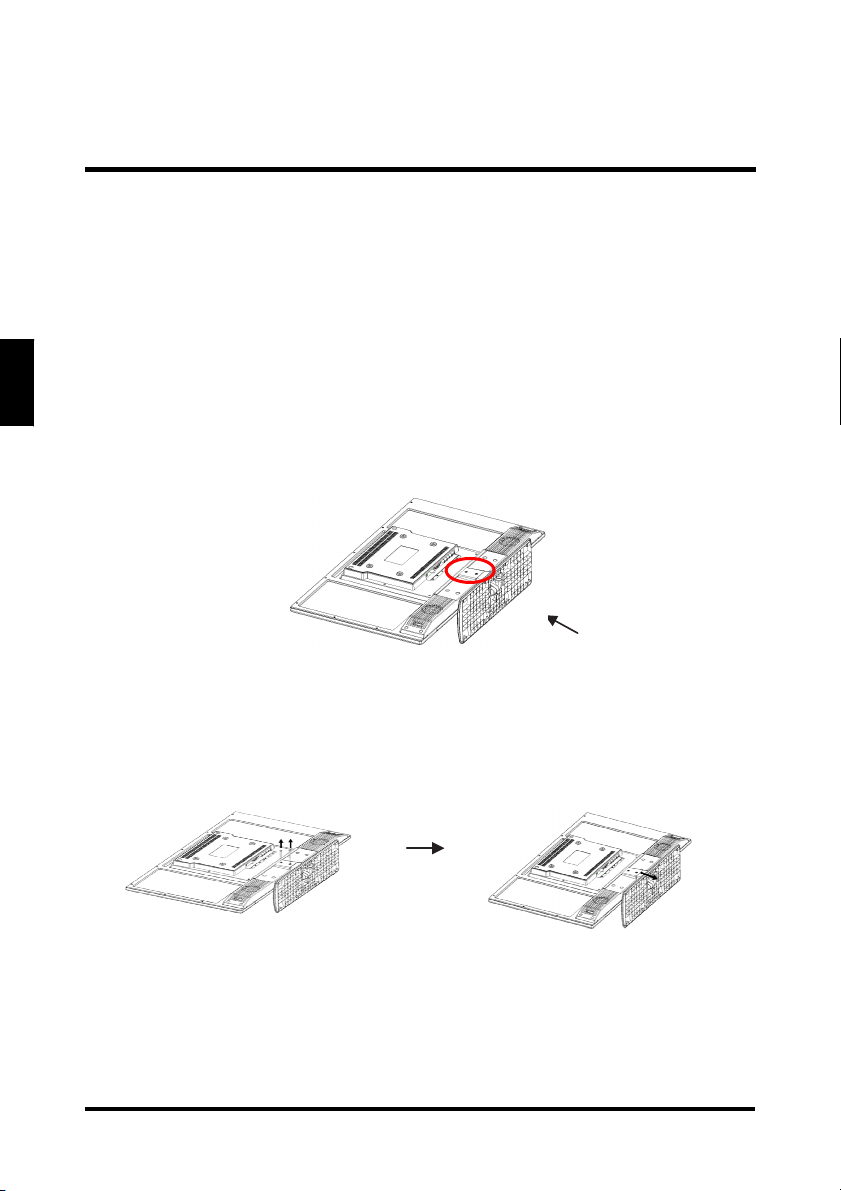
REMOVING THE LED TV BASE
If you intend to repack the LED TV unit (for shipping or storage) or you want to
change the installation to a wall mount option, you must first remove the LED TV
base.
1 Turn off the LED TV and all connected devices.
2 Disconnect the power cord from the LED TV.
3 Disconnect all signal cables from the I/O port terminals.
4 Remove the M5 x 16 screw securing the base to the desk.
5 Lay the LED TV on a clear, flat, and stable surface.
M4 x 30 x 2
M5 x 16
6 Remove the two M4*30 screws securing the base to the LED TV.
7 Detach the base from LED TV.
8 Pack the screws you removed in step 5 together with the LED TV base for
future reassembly.
16
Page 20
English
ANTENNA CONNECTION
ANTENNA CONNECTION
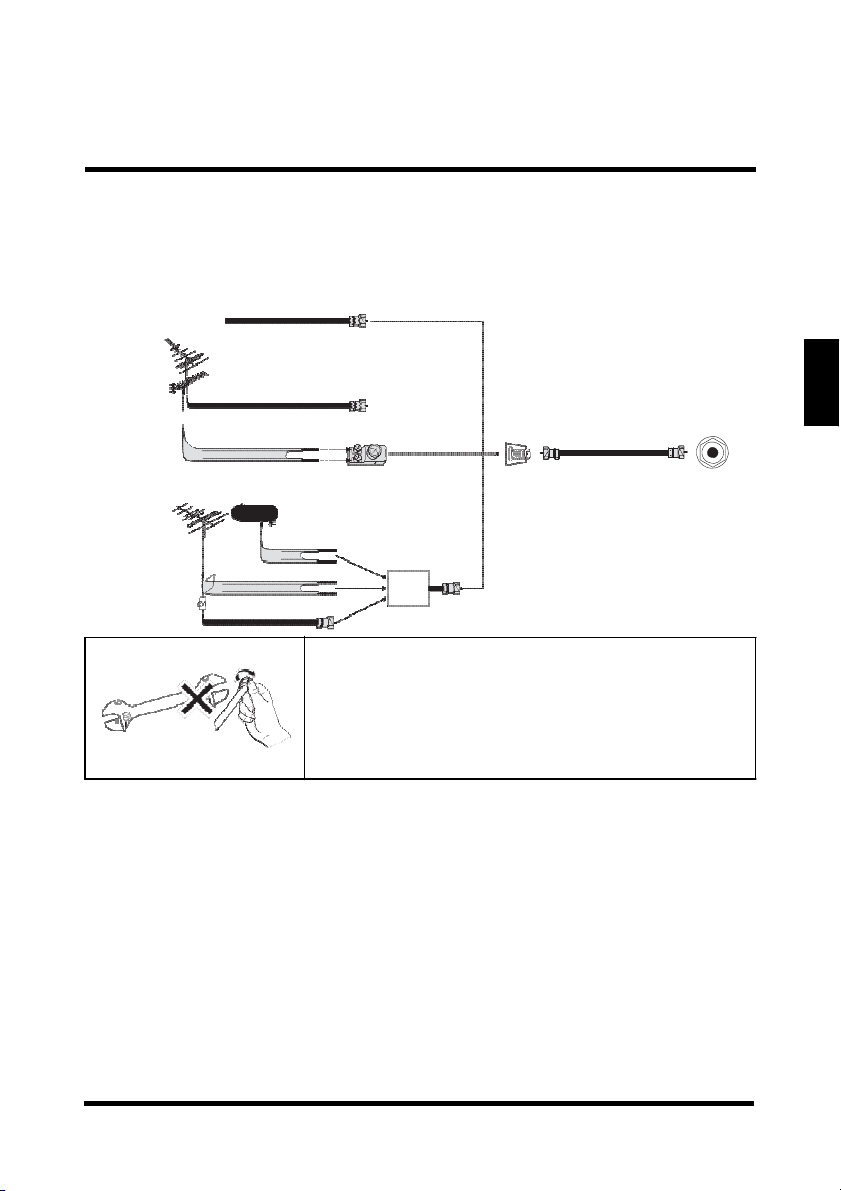
OUTDOOR ANTENNA CONNECTION
Cable TV lead in
VHF, UHF or VHF/UHF
combination antenna
75 ohm coaxial cable (round)
300 ohm twin-lead (flat)
300-75 ohm ADAPTER
(Not supplied)
Separate VHF/UHF Antenna
VHF Antenna UHF Antenna
300 ohm
300 ohm twin-lead
75 ohm coaxial cable
twin-l
ead COMBINER
(Not supplied)
IN OUT
NOTE:
The F-type connector should be finger-tightened only.
When connecting the RF cable to the LED TV, do not
tighten F-type connector with any tool. If tools are used,
it may cause damage to the LED TV (e.g. breaking of
internal circuit).
CABLE TV (CTV/DTV) CONNECTION
The unit has a TV tuner (75 ohm coaxial cable connector) located on the rear I/O
panel for easy cable hookup. When connecting the 75 ohm coaxial cable to the unit,
screw the 75 ohm cable to the TV tuner. Some cable TV companies offer premium
pay channels. Since the signals of these channels are scrambled, a cable TV
converter/descrambler is usually provided to the subscriber by the cable TV
company. This converter/descrambler is necessary for normal viewing of the
scrambled channels. (Set your TV to channel 3 or 4. Typically one of these channels
is used. If a channel is unknown, consult your cable TV company.) For more specific
instructions on installing cable TV, consult your cable TV company. One possible
method of utilizing the converter/descrambler provided by your cable TV company is
explained below.
Home Antenna
terminal (75 ohm)
RF IN
17
Page 21

EXTERNAL DEVICE CONNECTIONS
• A position on the RF switch (not supplied) – You can view all unscrambled
channels by using the TV's channel keys.
• B position on the RF switch (not supplied) – You can view the scrambled
channels via the converter/descrambler by using the converter's channel keys.
EXTERNAL DEVICE CONNECTIONS
IMPORTANT:
• Turn off the LED TV first before connecting an external device to prevent any
possible damage or physical injury.
• For more information about external device connections, see the operation
manual of the external device you wish to connect to the LED TV.
• Make sure that the correct cables are connected to each terminal. Improper
cable connections may cause damage to the LED TV.
You can enjoy picture and sound by connecting various audio-video devices to the
terminals located on the rear and side I/O panels of the LED TV.
• TV cable input – You can use a commercially available audio/video cable.
• Component (YPbPr) input – Picture can be displayed only when a 480i, 480P,
720P, 1080i, or 1080P signal is received.
• HDMI input – Picture can be displayed only when a 480i, 480P, 720P, 1080i, or
1080P signal is received. When you connect to the HDMI terminal with a DVIHDMI conversion cable, there is a possibility that the picture may not display
correctly.
• Audio output – You can output audio signals from the LED TV set through the
analog audio out and SPDIF terminals.
18
Page 22

Power outlet
Antenna
Audio cable
Audio out
VGA
Audio
RGB
cabl
e
Power outlet
3.5 mm
stereo
mini jack cable
Ante
nna c
able /
Composite A
V
DVI-HDMI
DVI-HDMI
DVD pl
ayer with
an
DVD player
with a
Audio out
Audio cable
D
igital TV tuner
DVD playe
r
VCR
Camcorder
Home video
EXTERNAL DEVICE CONNECTIONS
The following diagram shows the external device connections.
AC to DC adapter
amplifier
Cable TV line
cable / Cable
TV line
cable
cable
DVI terminal
HDMI termina l
game syst em
cable
19
Page 23

POWER CONNECTION
POWER CONNECTION
CONNECTING AC POWER
IMPORTANT:
The LED TV is designed to be powered via an AC adapter. Use ONLY the
AC adapter included in the package. Tur n off all connected devices before
plugging the AC adapter into the power outlet.
Connect the power cord of the AC adapter to the LED TV then to a proper AC outlet.
INITIAL SETUP
Press on the control panel or on the remote control to turn on the LED TV. Select
the desired language and select Yes to use the SetupWizard. The SetupWizard will
guide you on how to set up the LED TV’s operational settings.
20
Page 24

English
POWER
ANTENNA OR COAXIAL CABLE CONNECTION SETUP
Select Language
Use remote control to select the language
to be used for menus and messages. Press
SELECT to continue.
Time Zone
Use remote control to select your local time
zone. Select “Next” and then press SELECT
to continue. Press Go Back to return to the
previous screen.
CONNECTION
Power On Mode
Use remote control to select the power on
mode. Select “Home” and then press
SELECT to continue. Press Go Back to return
to the previous screen.
Let’s Get Connected
Select “Antenna or coaxial cable input” and
press SELECT on your remote control to start
scanning channels. Press Go Back to return to
the previous screen.
21
Page 25

English
POWER CONNECTION
Select Channel Scan Type
Use remote control to select the channel
scan type. Press SELECT to continue.
Press Go Back to return to the previous
screen.
NOTE: Antenna users selecting to scan Overthe-Air ATSC channels need a Channel
Access Code in order to perform a channel
scan and receive broadcast signals.
For Antenna [ATSC] only: Antenna [ATSC]
Channel Access
Select “Next” and then press SELECT to
continue. Press Go Back to return to the
previous screen.
Antenna Channel Access Information
Take note of the channel access information.
Select “Next” and then press SELECT to
continue. Press Go Back to return to the
previous screen.
Enter Channel Access Code
Use the number keys on the remote control to
enter the channel access code. Press
SELECT to continue. Press Go Back to return
to the previous screen.
22
Page 26

English
POWER
CONNECTION
Channel Scan in progress
The channel scan may take a while to complete.
When the scan is complete, you will be able to
watch your local TV programming.
23
Page 27

English
POWER CONNECTION
CABLE OR SATELLITE BOX CONNECTION SETUP
Select Language
Use remote control to select the language to be
used for menus and messages. Press SELECT
to continue.
Time Zone
Use remote control to select your local time
zone. Press SELECT to continue. Press Go
Back to return to the previous screen.
Power On Mode
Use remote control to select the power on
mode. Press SELECT to continue. Press Go
Back to return to the previous screen.
Channel Scan - Cable/Satellite Box
Select “Click here to connect a Cable Box or
Satellite Box.” and press SELECT on your
remote control to start scanning channels.
Press SELECT to continue. Press Go Back to
return to the previous screen.
24
Page 28

English
POWER
Cable/Satellite Box Input
Use remote control to select the input
connected to the set top box. Press SELECT
to continue. Press Go Back to return to the
previous screen.
RF Warning
Use the up and down arrows on your HDTV
control panel or remote control to select. Select
“Proceed” and then press SELECT to search
the program. Press Go Back to return to the
previous screen.
CONNECTION
25
Page 29

English
time
POWER CONNECTION
OTHER INPUT SOURCE CONNECTION SETUP
Select Language
Use remote control to select the language
to be used for menus and messages.
Press SELECT to continue.
Time Zone
Use remote control to select your local
zone. Press SELECT to continue. Press
Go Back to return to the previous screen.
26
Power On Mode
Use remote control to select the power on
mode. Press SELECT to continue. Press
Go Back to return to the previous screen.
Let’s Get Connected
Select “Click here to connect a Game,
Blu-Ray, DVD, or other player.” and press
SELECT on your remote control. Press
SELECT to continue. Press Go Back to
return to the previous screen.
Page 30

English
POWER
CONNECTION
Select Input Source
Use remote control to select the input
source. Press SELECT to continue. Press
Go Back to return to the previous screen.
27
Page 31

English
time
POWER CONNECTION
WESTINGHOUSE HDTV SETUP - NOT THROUGH CABLE/
SATELLITE BOX
Select Language
Use remote control to select the language
to be used for menus and messages.
Press SELECT to continue.
Time Zone
Use remote control to select your local
zone. Press SELECT to continue. Press
Go Back to return to the previous screen.
28
Power On Mode
Use remote control to select the power on
mode. Press SELECT to continue. Press
Go Back to return to the previous screen.
Page 32

English
POWER
CONNECTION
Let’s Get Connected
Select “Click here to connect a Game,
Blu-Ray, DVD, or other player.” and press
SELECT on your remote control. Press
SELECT to continue. Press Go Back to
return to the previous screen.
Select Input Source
Use the keys on your remote control
to select the input source. Press SELECT
to continue.
29
Page 33

Engl
ish
BASIC OPERATIONS
BASIC OPERATIONS
URNING THE POWER ON AND OFF
power
LED indicator
Turns from none to red. Turn the power on.
Turns from red to none. Turn the power off.
Turning on the power
Press on the control panel or on the remote control to turn on the LED TV.
Turning off
Press on the control panel or on the remote control to turn off the LED TV. The
LED behavior will depend on the enabled Power settings.
the
NOTES:
• If you are not going to use the TV for a long time, be sure to disconnect the
power cord from the wall outlet and remove the batteries from the remote
control.
• In standby mode, a small amount of electricity is still consumed even when the
power is turned off.
ADJUSTING THE VOLUME
Vo lu
Mute
Volume
Press Vol+ to increase the volume; press Vol- to
decrease the volume.
Mute
Press to turn off the sound. The mute icon appears
on the screen. Press again to turn on the sound.
me
Operation
30
Page 34

English
BASIC
OPER ATIONS
CHANGING CHANNELS
Follow the instructions below to change channels.
Using the Ch
/
Browse channels
To browse through the available channels, press Ch on
the remote control or on the control panel.
Buttons
Using the Channel Keys
Selecting channel
To change to a certain channel, key in the channel number using
the channel keys and press ENT.
Selecting digital channel
To select a digital channel, key in the digital channel number using
the channel keys and the • key, then press ENT.
Using the Favorite Keys
Select
ing
favorite
To select a favorite channel, press the Favorite button (A, B, C, or
D) corresponding to the preferred channel.
Saving a channel as a favorite
1 Switch to the channel you want to add as a favorite.
2 Press and hold the Favorite button which you want to add
the current channel to for 3 seconds.
3 The Channel Saved message appears to confirm the new
favorite channel item.
channels
SELECTING THE INPUT SOURCE
There are two ways to select the video input source.
Using the Individual Input Keys
TV, VGA, Video, YPbPr, HDMI Keys
Press any of the following remote control keys to change the input
source: TV, VGA, Video1, YPbPr1, HDMI1, or HDMI2.
31
Page 35

English
BASIC OPERATIONS
Using the Input Key
Select source using Input Key
ADJUSTING THE DISPLAY FORMAT
The input source can sometimes affect the way images are displayed on-screen.
You can adjust the display format to view the image properly.
32
1 Press Input.
2 A list of supported video sources is displayed.
3 Press / to select the preferred source.
4 Press to switch to the selected input source.
Format Options
Press repeatedly to toggle the display format. As you toggle
each option on, the actual display will change accordingly. The
available options are:
• Standard: Picture is displayed in its original size.
• Fill: Picture is displayed to cover the entire screen.
• Overscan: Picture is scaled up to fit the display area.
Page 36

English
H D MI 2
SPD I F
U S B
SETUP
MENUS
SETUP MENUS
SETUP MENU OPERATION
Use the setup menus to configure the various operational settings of the LED TV.
Displaying the setup menu screen
Press on the remote control or MENU on the control panel to display the setup
menu screen.
Navigating the setup menu screen
Use the buttons on the remote control or on the control panel to navigate through
the menu screens.
H D MI 1
33
Page 37

SETUP MENUS
PICTURE
Use the Picture sub-menus to configure the display quality.
Press on the remote control to display the setup menu screen then select
Picture to display the Picture sub-menu. The following options are available:
Picture Mode, Sound, Time, Setup, Lock, Channel.
Picture Settings
Adjust the picture quality including brightness, contrast, color, tint, sharpness.
34
Page 38

SETUP
MENUS
Picture mode
Use this sub-menu to select one of four preset view options optimized for different
viewing conditions.
The following options are available:
• Energy Star: Select for power saving picture.
• Retail: Select for enhanced picture contrast and sharpness
• Movie: Select for a finely detailed picture.
• User: Select for standard picture.
Brightness
Use Brightness to adjust the luminance level.
Adjusting Brightness
1 Use the keys to select Brightness and press .
2 Press the keys on the remote control to adjust the brightness level.
3 Press to save and exit the screen.
Contrast
Use Contrast to adjust the brightness to darkness ratio.
Adjusting Contrast
1 Use the keys to select Contrast and press .
2 Press the keys on the remote control to adjust the contrast level.
3 Press to save and exit the screen.
35
Page 39

English
SETUP MENUS
Color
Use Color to adjust the color intensity.
Adjusting Color
1 Use the keys to select Color and press .
2 Press the keys on the remote control to adjust the Color level.
3 Press to save and exit the screen.
Tint
Use Hue to adjust the balance of the red, green, and blue colors in the display.
Adjusting Tint
The following options are available:
1 Use the keys to select Tint and press .
2 Press the Keys on the remote control to adjust the Tint level.
3 Press to save and exit the screen.
Sharpness
Use Sharpness to adjust the sharpness or softness of the display.
Adjusting Sharpness
1 Use the eys to select Sharpness and press .
2 Press the keys on the remote control to adjust the sharpness
level.
3 Press to save and exit the screen.
36
Page 40

English
SETUP
MENUS
Advanced Settings
Press / to selet the display aspect ratio till the picture is fit onto the screen.
The options are different according to different input source.
• Use the keys to select Noise Reduction, Press to select Low
Medium and High
• Use the keys to select Dynamic Contrast, Press to select on or
off
• Use the keys to select HDMI Mode, Press to select Video or
Graphic
• Use the keys to select Color Space, Press SELECT to enter Color Mode,
Color, Hue, Saturation, Brightness, Reset , adjust the TV setting.
• Use the keys to select White Balance, Press SELECT to enter Red Gain,
Green Gain, Blue Gain, Red Gain, Green Offset, Blue Offset, or Reset, adjust the
TV setting.
• Press
to save and exit the screen.
37
Page 41

English
SETUP MENUS
SOUND
Use the Sound sub-menus to configure the sound quality.
Press on the remote control to display the setup menu screen then select
Sound to display the Sound sub-menu. The following options are available:
Equalizer, MTS, Audio Language, Digital Audio Output, AVL, SRS TruSurround
HD.
Equalizer
Use this sub-menu to select one of four preset audio options optimized for
different sounding conditions.
The following options are available:
• Standard: Select for standard sound.
• Music: Select for POP sound.
• Movie: Select for harmonious sound.
• Sports: Select for rhythm sound.
• User: Select for customized sound.
38
Page 42

English
SETUP
MENUS
MTS
The following options are available:
• Mono: Allows mono output (useful when stereo is noisy or inconsistent).
• Stereo: Allows stereo sound for superior TV viewing experience.
• SAP: Allows second audio program from the speakers while watching a scene
in the original program.
Adjusting MTS
1 Use the / Keys to select MTS and press
2 Press the keys on the remote control to select the desired option.
3 Press to save and exit the screen.
Digital Audio Output (PCM/Raw/Off)
Set the audio output type of coax or optical terminal. Raw means output the original
format of audio stream. PCM can be matched with most AV amplifiers.
AVL (On/Off)
Automatic volume control
SRS TruSurround HD (On/Off)
39
Page 43

SETUP MENUS
Time
Use the Time sub-menus to configure the Time setting.
Sleep Timer
The following options are available:
• Sleep timer: Off/ 5 min / 10 min / 15 min / 30 min / 60 min / 90 min / 120 min /
180 min/ 240 min/ .
Adjusting Time
1 Use the / Keys to select Time and press
2 Press the keys on the remote control to select the desired option.
3 Press to save and exit the screen.
Time Zone
The following options are available:
• Time Zone: Pacific/ Alaska / Hawaii/ Samoa / Newfoundland / Atlantic /
Eastern / Central / Mountain
Adjusting Time
1 Use the / Keys to select Time Zone and press
2 Press the keys on the remote control to select the desired option.
3 Press to save and exit the screen.
40
Page 44

SETUP MENUS
Daylight Saving Time
1 Use the / Keys to select Daylight Saving Time and press
2 Press repeatedly to check(enable) or uncheck(disable) Adjust for
Daylight Saving Time.
3 Press to save and exit the screen.
Time Format (12-hour/ 24-hour)
Auto Clock (On/Off)
If set it to On , the TV will sync the local clock according to the DTV
broadcasting time automatically. Otherwise you can set the time manually.
If set Auto Clock to Off, then you can set the time manually .
Clock (Clock/AM/PM)
41
Page 45

SETUP MENUS
Sutup
Use the Settings sub-menus to configure the LED TV operational setup and view
the current firmware version.
Press on the remote control to display the setup menu screen then select
Setup to display the Settings sub-menu. The following options are available:
Menu Language, OSD Timeout, Closed Caption, Other Settings, Restore Default.
Menu Language
Use Menu Language to select the language to display on the screen:
English, French, or Spanish.
Adjusting Menu Language
1 Use the keys to select Menu Language and press .
2 Press the keys on the remote control to select English, French or
Spanish.
3 Press to save and exit the screen.
OSD Timout
Use OSD Timeout to adjust the OSD duration on the screen: 5 sec, 15 sec, 30
sec, or 45 sec, 60 sec .
42
Page 46

Adjusting OSD Timeout
1 Use the keys to select OSD Timeout and press.
2 Press the keys on the remote control to select 5 sec, 15 sec,
30 sec, or 45 sec, 60 sec.
3 Press to save and exit the screen.
Closed Captions
Use Closed Captions to configure the settings for closed captioning in TV programs.
SETUP MENUS
• CC Mode
Display or hide the CC.
• Analog CC
Select from below closed-caption modes for analog programs.
CC1,2,3,4: Displays corresponding caption channel of a analog program.
(Usually be set to CC1 for most programs).
Text1,2,3,4: Displays corresponding text service channel of a analog program.
43
Page 47

SETUP MENUS
• Digital CC
Applies only to digital channels with closed caption.
Service1,2,3,4,5,6: These are different service data
channels.
• Option
The following options are available:
– Mode: Can be set to Default or Custom.
– Font Style: Can be set to as Default, Font 1, Font 2, Font 3, Font 4, Font
5, Font 6, or Font 7, Font 0.
– Font Size: Can be set to As Default, Small, Medium, or Large.
– Font Edgy Style: Left Shadow, Right Shadow, Default, None, Raised,
Depressed, Uniform.
– Font Edgy Color: Red, Black, White, Green, Blue, Yellow, Magenta,
cyan, Default
– FG Color: Default, White, Red, Green, Blue, Yellow, Magenta, cyan
– BG Color: Default, Black, White, Red, Blue, Yellow, Magenta, cyan,
Transparent
– FG Opacity: Default, Solid, flashing, Transparent
– BG Opacity: Can be set to as Default, Solid, Translucent,
Transparent, or Flashing.
44
Page 48

SETUP MENUS
Adjusting Closed Captions Settings
1 Use the keys to select Closed Captions and press .
2 Use the keys to select the desired Closed Captions option.
3 Use the keys to adjust the value.
4 Press to save and exit the screen.
VGA Settings
Use VGA Settings to configure the settings for closed captioning in TV programs.
Auto
Automatically adjust Clock, Phase, H-Position and V-Position settings.
In order to get a good result, you should open a “filling the screen” picture before
executing Auto Adjust.
H. Position
Shift the screen horizontal slightly to left or right.
V. Position
Shift the screen vertical slightly up or down.
Clock
Adjust the DB15 picture signal sampling clock rate.
45
Page 49

SETUP MENUS
Other Settings
Use Other Settings to configure the settings for audio On/Off in TV programs.
1 Use the keys to select Other Settings and press .
2 Press the keys on the remote control to adjust the Audio on/off.
3 For Au d i o O n l y On/ O ff
Restore Default
1 Use the keys to select Restore Default and press
46
Page 50

SETUP MENUS
Lock
Press to select the source you want to lock, then press SELECT to set it to
lock. If anyone want to use this source, the password is needed.
Change Password
Change Password allows you to change your current password.
The following options are available:
• Enter Old Password.
• Enter New Password.
• Confirm Password
47
Page 51

English
SETUP MENUS
Changing Password
1 Use the / keys to select Change Password and press .
2 Use the Channel keys to enter the current password and press .
3 Use the Channel keys to enter the new password and press .
4 Use the Channel keys to enter the new password again for confirmation
and press .
5 Press to save and exit the screen.
System Lock (On/Off)
Input Block
Press to select the source you want to lock, then press SELECT to set it to
lock. If anyone want to use this source, the password is needed.
• TV
(Unblock/Block)
• AV
(Unblock/Block)
• Component
• HDMI
• VGA
(Unblock/Block)
48
(Unblock/Block)
(Unblock/Block)
.
.
.
.
.
Page 52

Changing Input Block
1 Use the / keys to select Input Source and press.
2 Use the / keys to select Unblock/Block and press
3 Press to save and exit the screen.
US Rating
Rating system used at USA.
– TV Rating: Use this sub-menu to customize US TV Rating programs.
SETUP MENUS
Rating Description
TV-Y
Suitable for young children.
TV-Y7
May not be suitable for children under 7.
TV-G
Suitable for all audiences.
TV-PG
Parental guidance suggested.
TV-14
Parental guidance suggested for children under 14.
TV-MA
FV
D
L
S
V
Suitable for mature audiences only; may be unsuitable for children
under 17.
Fantasy violence, combative situations.
Suggestive dialogue.
L Coarse language.
Sexual situations.
Violence.
49
Page 53

English
May c
ontain e
xplicit
sex scenes, a
n accumulation of
.
SETUP
MENUS
– MPAA: Use this sub-menu to select the ratings of allowable movies.
Rating Description
Off
Contains nothing most parents will consider offensive
G
PG
PG-13
R
NC-17
X
for even their youngest children to see or hear;
suitable for young children.
May contain some material parents might not like to
expose to their young children-material that will
clearly need to be examined or inquired about before
children are allowed to view the film.
May contain some scenes of drug use; use of one of
the harsher sexually-derived words may be heard.
May be inappropriate for preteens.
May contain some adult material. Parents are urged
to learn more about the film before letting their
children view it.
sexually-oriented language, and/or scenes of
excessive violence. Suitable for adult audiences only
Rating does not signify that the film is obscene or
Contains extreme violence or explicit sex; suitable for
adult audiences only.
50
Page 54

English
SETUP MENUS
• Canada Rating
Rating system used at Canada.
– Canada English: Use this sub-menu to select the classification categories
(based on Canadian ratings) of allowable TV programs and movies.
51
Page 55

SETUP
MENUS
Rating Description
Off
C
C8+
G
PG
14+
18+
– Canada French: Use this sub-menu to select the ratings of allowable
TV programs and movies. These ratings are based on the
classification categories determined by La Régie du cinéma du
Québec.
Suitable for viewing by children of all ages.
Not suitable for children under 8 years of age.
Suitable for general audiences.
Parental guidance advised.
Suitable for people 14 years of age or older.
Suitable for people 18 years of age or older.
52
Rating Description
Off
G
8 ans + Not suitable for children under 8 years of age.
13 ans+ Not suitable for persons under 13 years of age.
16 ans+ Not suitable for persons under 16 years of age.
18 ans+ Not suitable for persons under 18 years of age.
For general audiences.
Page 56

SETUP
MENUS
CHANNEL
Use the Channel sub-menus to configure the channel.
Press on the remote control to display the setup menu screen then select
Channel to display the Channel sub-menu. The following options are available:
Signal Type, Auto Scan, Favorite, Channel List, Show/Hide, Channel Number,
Channel Label.
NOTE: The menu is available only at TV source.
Signal Type
Set to Air or Cable according to your antenna source. When set to Air, TV can
Catch 8VSB broadcasting signal. When set to Cable, TV can catch analog and
clear 64QAM/256QAM broadcasting signal.
53
Page 57

SETUP
MENUS
Auto Scan
Select Auto Scan and press ENT. Two options are available:
• Are you sure to auto Scan?
• No.
Auto Search automatically creates a list of receivable channels for the
selected source.
Favorite List
The following options are available: Channel, Channel Label, Favorite, Prev, Next.
All of your favorite channels are listed in this menu, and you can choose them
quickly.
54
Page 58

SETUP
MENUS
Channel List
The following options are available: Press change Channel, Channel Label,
Prev, Next.
You can view all the channels and choose one quickly.
"CH-1": Label of the Channel
Show/Hide
The following options are available: Channel, Channel Label, Hide, Prev, Next.
55
Page 59

SETUP
MENUS
Channel Number
The TV screen shows current TV channel.
Channel Label
Rename label of the channel.
56
.
Page 60

WALL MOUNT OPTION
WALL MOUNT OPTION
The LED TV has been fitted with VESA FPMPMI compliant mounting holes. These
200 x 100 mm mounting holes allow the unit to be mounted on a wall. Use the four
M6 x L12 mm screws to wall mount the LED TV.
WALL MOUNT INSTALLATION REMINDERS
• Remove the LED TV base first before mounting the unit on a wall.
• It is the user's responsibility to use a UL listed wall mount unit rated to support the
weight of this LED TV.
• Please consult qualified contractors for wall mount installation.
CAUTION:
The incomplete or improper mounting of this unit to a wall may cause it to fall down
resulting to property damage and/or potentially serious injury.
57
Page 61

English
TROU BLESHOOTING
TROUBLESHOOTING
Problem
No power
Power is suddenly turned
off.
Remote control does not
work.
Remote control code
cannot be detected by a
universal remote.
No picture
No picture or the No Signal
message appears when a
VGA cable is connected.
Corrective Action
• Make sure the power indicator is illuminated
blue.
• Make sure the power cord is securely connected
to the AC-in jack and is plugged into a functional
AC outlet. You may want to plug in another
electrical device to the power outlet to verify that
it is supplying the proper voltage.
Make sure the sleep timer is turned off.
• Press only one button at a time.
• Make sure the batteries are properly inserted.
• The batteries may already be drained out.
Replace batteries with new ones.
• Purchase a separate learning remote control.
• Go to www.wde.com for a list of remote codes.
• Make sure the video input cable is properly
connected to the correct terminal, and that the
correct input mode is enabled. To illustrate, when
a VGA cable is connected to display a computer
screen, the VGA input mode must be enabled.
• Verify that the antenna is properly connected
and that the preferred channel is enabled in the
channel list. Press and select Channels/Channel
List.
• Adjust the display settings.
• Make sure the VGA cable is properly connected
to the LED TV’s VGA port.
• Decrease the video resolution setting on the
computer and try again.
• Adjust the display settings.
58
Page 62

English
TROUBLESHOOTING
Problem
Picture is cut off or appear
in a sidebar screen.
Poor image quality in TV
mode (cutoff picture, snowy
images).
Wrong, abnormal or
missing colors
No sound
Corrective Action
Press to adjust the Aspect ratio.
• Check your antenna connection. If necessary,
rotate the antenna and wait up to ten seconds for
a signal.
• Reduce signal splitters and excessively long
cables.
• Replace poor antenna cables and/or connectors
to improve signal quality.
• Press to adjust the Aspect ratio.
• Adjust the Noise Reduction setting in Picture
menu.
• In HDMI mode, make sure the external device is
compatible with the LED TV.
• If any colors (red, green or blue) are missing,
check the video cable to make sure it is securely
connected. Loose or broken pins in the cable
connector could cause an improper connection.
• Adjust the Hue, Saturation and Color
Temperature settings in Picture menu.
• Connect the TV to another computer and check
if the problem is with the computer screen.
• Make sure the audio input cable is properly
connected to the correct terminal, and that the
correct input mode is enabled.
• The volume may be muted, press or Vol+ key to
turn on the volume.
• Adjust the Bass, Treble, and Balance settings in
Audio menu.
• If you are using the TV speakers, make sure the
TV Speakers option is set to On in Audio menu.
• If you are using an external audio device, press
and select Audio to make sure the TV Speakers
option is set to Off in Audio menu.
59
Page 63

English
TROU BLESHOOTING
Problem Corrective Action
NOTES:
If the problem condition persists even after performing the recommended
corrective actions, contact us by:
• Logging on to www.wde.com
• Contacting the Westinghouse Customer Service at (800) 701-0680 or e-mail
us at service@wde.com
60
Page 64

English
SPECIFICATIONS
Item
Model Name
Panel
Audio/Video
Input/Output
Terminals
Speaker Out
AV Timing
VGA Timing
Specification
UW39T7HW
Active Area
(Diagonal, mm)
Resolution
Contrast Ratio (min) 3000 (typ.)
Response Time
(min)
Aspect Ratio
Display color
• HDMI x2
• AV with R/L Audio x1
• VGA with 3.5 mm mini jack x1
• USB for service x1
• Tuner x1
• R/L Audio Line Out X1
• SPDIF Out X1 (coaxial)
2X3W (2 channels)
480i/p, 720p, 1080i/p
SPECIFICATIONS
853.92 (H) x 480.33 (V)
1,920x1,080
6.5ms (typ.)
1.77 (16:9)
8 bit
640 x 480 @ 60Hz /75Hz,
800 x 600 @ 60Hz /75Hz,
1024 x 768 @ 60Hz /75Hz,
1280 x 1024 @ 60Hz,
1920 x 1080 @ 60Hz
Power Consumption
(Watts)
Power Consumption
(Standby, Watts)
≤ 65W (@ 19V DC)
<1W
61
Page 65

English
SPECIFICATIONS
Item
Physical
Specifications
Specification
Dimensions
(WxHxD)
With stand:
895.88*570.9*154.0mm
Without stand:
895.88*530.27*53.96mm
Weight (Net)
Weight (Gross)
NOTES:
• These product specifications are subject to change without user notification.
• Do not set your computer graphics card to exceed the unit’s refresh rates; doing
so may cause damage to the LED TV.
8.4 Kgs
10.6 Kgs
62
Page 66

 Loading...