

Page 1
USER MANUAL
CORDLESS BLOWER
Thank you for choosing Westinghouse!
PLEASE READ BEFORE RETURNING
THIS PRODUCT FOR ANY REASON.
If you have a question or experience a problem with your Westinghouse
purchase, call us at 855-944-3571 to speak with an agent.
SAVE THIS MANUAL FOR FUTURE REFERENCE.
HOW TO REGISTER YOUR WESTINGHOUSE PRODUCT
To register your new product, call 855-944-3571 or visit
www.westinghouseoutdoorpower.com/register
MAKE SURE TO HAVE SERIAL NUMBER ON HAND
Page 2
SAFETY GUIDELINES - DEFINITIONS
It is important to read and understand this manual. The
information it contains relates to protecting YOUR SAFETY
and PREVENTING PROBLEMS. The symbols below are used
to help you recognize this information.
DANGER: Indicates an imminently hazardous situation
which, if not avoided will result in death or serious injury.
WARNING: Indicates a potentially hazardous situation
which, if not avoided, could result in death or serious injury.
CAUTION: Indicates a potentially hazardous situation
which, if not avoided, may result in minor or moderate injury.
NOTICE: Used without the safety alert symbol indicates
potentially hazardous situation which, if not avoided, may result
in property damage.
DISCLAIMERS:
Some dust created by this product
contains chemicals known to the
State of California to cause cancer,
birth defects or other reproductive
harm. Some examples of these
chemicals are:
• compounds in fertilizers
• compounds in insecticides,
• arsenic and chromium from
To reduce your exposure to these
chemicals, wear approved safety
equipment such as dust masks that
are specially designed to lter out
microscopic particles.
WARNING
herbicides and pesticides
chemically treated lumber
All information, illustrations and specications in this manual
are based on the latest information available at the time of
publishing. The illustrations used in this manual are intended as representative reference views only.
Moreover, because of our continuous product improvement policy, we may modify information,
illustrations and/or specications to explain and/or exemplify a product, service or maintenance
improvement. We reserve the right to make any change at any time without notice. Some images
may vary depending upon which model is shown.
ALL RIGHTS RESERVED:
No part of this publication may be reproduced or used in any form by any means – graphic,
electronic or mechanical, including photocopying, recording, taping or information storage and
retrieval systems – without the written permission of Westinghouse Outdoor Power Equipment.
DANGER: This manual contains important instructions for operating this product. For your safety
and the safety of others, be sure to read this manual thoroughly before operating the battery/charger.
Failure to properly follow all instructions and precautions can cause you and others to be seriously
hurt or killed.
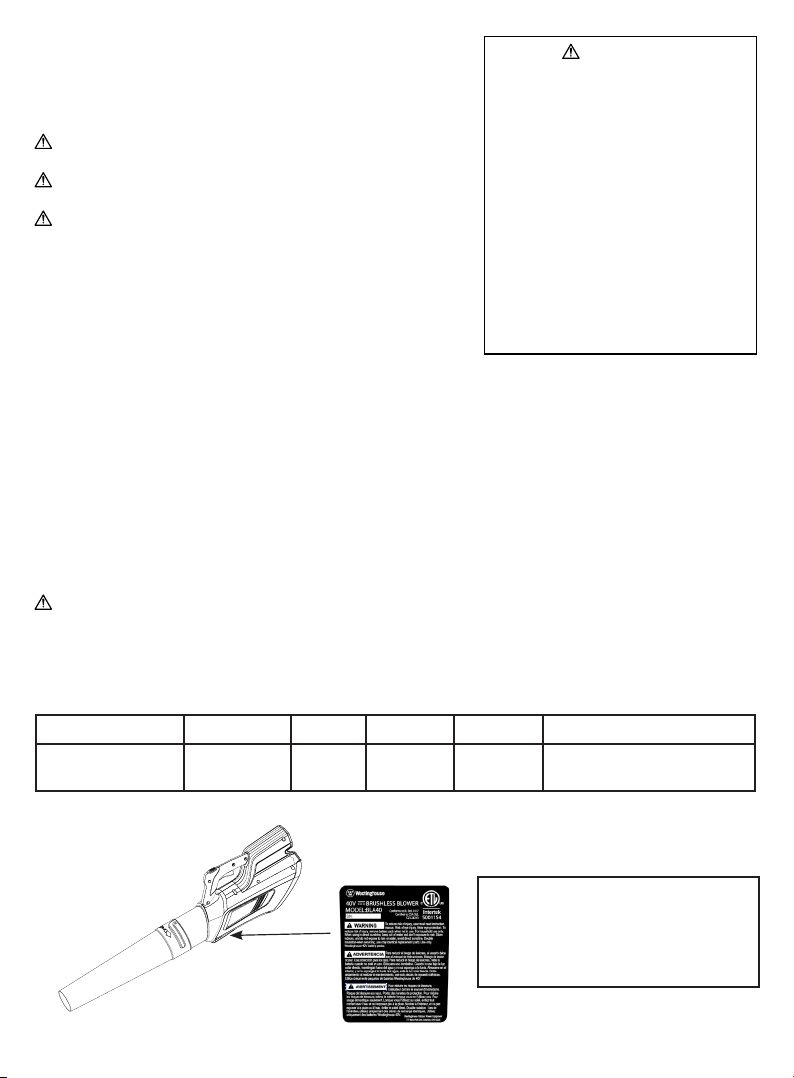
BLOWER SPECIFICATIONS
Model Part Number Motor Air Speed Air Volume Works with Battery
Westinghouse 40V
Cordless Blower
BLA40 40V DC 90 MPH 400 CFM LBA40120, LBA40125,
LBA40240
WHERE IS MY SERIAL NUMBER? Serial number on this product is located beneath the blower
body.
WHAT COMES WITH TOOL
• Blower body
• Blower tube
• Warranty
• Manual
2
Page 3

SAFETY SYMBOLS
Some of the following symbols may be used on this product. Please study them and learn their
meaning. Proper interpretation of these symbols will allow you to operate the product better and safer.
Symbols Name Designation/Explanation
V Volts Voltage
A Amperes Current
Hz Hertz Frequency (cycles per second)
W Watts Power
min Minutes Time
Alternating Current Type of current
Direct Current Type or a characteristic of current
/min Per Minute Revolutions, strokes, surface speed, orbits etc., per minute
Wet Conditions Alert Do not expose to rain or use in damp locations
Read the Operator’s
Manual
Eye Protection Always wear eye protection with side shields marked to
Safety Alert Precautions that involve your safety.
Long Hair Failure to keep long hair away from the air inlet could result
Loose Clothing Failure to keep loose clothing from being drawn into air
Keep Bystanders
Away
Blower Tubes Do not operate without tubes in place.
Impeller Blades Rotating impeller blades can cause severe injury.
To reduce the risk of injury user must read and understand
operator’s manual before using this product.
comply with ANSI Z87.1 when operating this equipment.
in personal injury.
intake could result in personal injury.
Keep all bystanders at least 50 ft. away.
3
Page 4

SAFETY INFORMATION
IMPORTANT SAFETY WARNINGS & INSTRUCTIONS
WARNING: TO REDUCE RISK OF INJURY:
• Before any use, be sure everyone using this unit reads and understands all safety instructions and
other information contained in this manual.
• Save these instructions and review frequently prior to use and in instructing others.
• Do not point unit discharge at self or bystanders.
• Keep long hair and loose clothing away from openings and moving parts.
WARNING: When using an electric tool, basic safety precautions should always be followed to
reduce risk of re, electric shock, and personal injury, including the following.
WARNING: When using blower be aware of your surroundings. Dust generated by your
surrounding has the potential of containing harmful chemicals such as: compounds in fertilizers,
compounds in insecticides, herbicides and pesticides, arsenic and chromium from chemically
treated lumber. To reduce your exposure to these chemicals, wear approved safety equipment such
as dust masks that are specially designed to lter out microscopic particles.
GENERAL SAFETY WARNINGS FOR BLOWER
BEFORE USING
• Use extra care when cleaning on stairs.
• DO NOT use on wet surfaces.
• DO NOT allow to be used as a toy. Close attention is necessary when used by or near children.
• Use only as described in this manual. Use only manufacturer’s recommended attachments. Do
not use with a damaged plug. If the tool is not working as it should, or if it has been dropped,
damaged, left outdoors, or dropped into water, return it to an authorized service center.
• When using in direct sunshine, keep out of water.
• DO NOT expose to rain when operating the machine.
• Store indoors. Do not expose to rain or water. Avoid direct sunshine.
WHEN USING
• Never allow children to operate the equipment. Never allow adults to operate the equipment
without proper instruction.
• Do not operate power tools in an explosive atmosphere, such as in the presence of ammable
liquids, gases, or dust. Power tools create sparks that may ignite the dust of fumes.
• For household use only.
• Wear eye protection that is marked to comply with ANSI Z87.1 when operating this product.
• Use only 40V Westinghouse batteries.
• Use only Westinghouse charger.
• DO NOT operate this unit when you are tired, ill, or under the inuence of alcohol, drugs, or
medication.
• Do not operate in poor lighting.
• Keep all parts of your body away from any moving parts and all hot surfaces of the unit.
• Do not put any object into openings. Do not use with any opening blocked. Keep openings free of
dust, lint, hair, and anything that may reduce air ow.
• Check the work area before each use. Remove all objects that can be thrown or become
entangled in the machine, such as rocks, broken glass, nails, wire, or string.
4
Page 5

SAFETY INFORMATION
• Use only identical manufacturer’s replacement parts and accessories. Use of any other parts may
create a hazard or cause product damage.
• Keep all bystanders, children, and pets at least 50 ft. (15 m) away.
• Do not operate the equipment while barefoot or when wearing sandals or similar lightweight
footwear.
• Wear protective footwear that will protect your feet and improve your footing on slippery surfaces.
• Secure long hair so it is above shoulder level to prevent entanglement in any moving parts.
• Keep rm footing and balance. Do not overreach. Overreaching can result in loss of balance.
GENERAL SAFETY WARNINGS AND INSTRUCTIONS FOR ALL TOOLS
• A BATTERY OPERATED UNIT with integral batteries or a separate battery pack must be re-
charged only with the specied charger for the battery. A charger that may be suitable for one type
of battery may create a risk of re when used with another battery.
• AVOID accidental starting. Be sure switch is in the o position before inserting battery pack. Car-
rying units with your nger on the switch or inserting the battery pack into a unit with the switch on
invites accidents.
• DO NOT use unit if switch does not turn it on or o. A unit that cannot be controlled with the
switch is dangerous and must be repaired.
• DISCONNECT battery pack from unit or place the switch in the locked or o position before mak-
ing any adjustments, changing accessories, or storing the unit. Such preventative safety measures
reduce the risk of starting the unit accidentally.
• ALWAYS WEAR EYE PROTECTION – Wear safety glasses or goggles at all times when this unit
is in use. Also use face or dust mask.
• DO NOT place outlet of sweeper near eyes or ears when operating.
• STORE IDLE UNITS. When not in use, the unit should be stored in a dry, high or locked-up place
- out of reach of children.
• DON’T OVERREACH. Keep proper footing and balance at all times.
• MAINTAIN UNIT WITH CARE. Keep unit clean for best and safest performance. Follow instruc-
tions for proper maintenance.
• DO NOT attempt to repair the sweeper. To assure product safety and reliability, repairs, main-
tenance, and adjustments should be performed by Westinghouse service centers or authorized
service centers, always using Westinghouse replacement parts.
• DO NOT operate sweeper in a gaseous or explosive atmosphere. Motors in these units normally
spark, and the sparks might ignite fumes.
• AVOID DANGEROUS ENVIRONMENTAL CONDITIONS – Do not use electric units in damp or
wet locations. Don’t use the unit in the rain.
• STAY ALERT - Watch what you are doing. Use common sense. Do not operate unit when you are
tired.
• USE THE RIGHT UNIT – Do not use this unit for any job except that for which it is intended.
• USE EXTRA CARE when cleaning on stairs.
• DO NOT allow to be used as a toy. Close attention is necessary when used by or near children.
Not recommended for use by children.
5
Page 6

SAFETY INFORMATION
• DO NOT attempt to clear clogs from unit without rst removing battery.
• USE ONLY as described in this manual. Use only manufacturer’s recommended attachments.
• DO NOT put any objects into openings. Do not use with any opening blocked; keep free of dust,
lint, hair and everything that may reduce air ow.
• KEEP hair, loose clothing, ngers, and all parts of body away from openings and moving parts.
• DO NOT immerse any part of the unit in liquid.
• DO NOT handle charger, including charger plug, and charger terminals with wet hands.
• KEEP CHILDREN, BYSTANDERS AND ANIMALS AWAY from the work area a minimum of 30
feet (10 meters) when starting or operating the unit.
• INSPECT THE AREA before using the unit. Remove all debris and hard objects such as rocks,
glass, wire, etc. that can ricochet, be thrown, or otherwise cause injury or damage during operation.
• USE ONLY charger supplied by the manufacturer to recharge.
• EXERCISE CARE in handling batteries in order not to short the battery with conducting materials
such as rings, bracelets and keys. The battery or conductor may overheat and cause burns.
• DO NOT OPEN OR MUTILATE the batteries. Released electrolyte is corrosive and may cause
damage to the eyes or skin. It may be toxic if swallowed.
• DO NOT CHARGE the unit outdoors.
WARNING: To reduce the risk of electrical shock; do not expose to rain, do not use on wet sur-
faces. Store indoors.
IMPORTANT SAFETY INSTRUCTIONS FOR BATTERY CHARGERS
WARNING: Shock hazard. Do not allow any liquid to get inside charger.
CAUTION: Burn hazard. To reduce the risk of injury, charge only designated Westinghouse batter-
ies. Other types of batteries may burst causing personal injury and damage.
CAUTION: Under certain conditions, with the charger plugged in to the power supply, the charger
can be shorted by foreign material. Foreign materials of a conductive nature such as, but not limited
to, steel wool, aluminum foil, or any buildup of metallic particles should be kept away from charger
cavities. Always unplug the charger from the power supply when there is no battery pack in the cavity. Unplug charger before attempting to clean.
• DO NOT attempt to charge the battery pack with any chargers other than the ones in this manual.
The charger and battery pack are specically designed to work together.
• These chargers are not intended for any uses other than charging designated Westinghouse re-
chargeable batteries. Any other uses may result in risk of re, electric shock or electrocution.
• DO NOT expose charger to rain or snow.
• Pull by plug rather than cord when disconnecting charger. This will reduce risk of damage to electric plug and cord.
• Make sure that cord is located so that it will not be stepped on, tripped over, or otherwise subjected to damage or stress.
• DO NOT use an extension cord unless it is absolutely necessary. Use of improper extension cord
could result in risk of re, electric shock, or electrocution.
• DO NOT operate charger with damaged cord or plug — have them replaced immediately.
• DO NOT operate charger if it has received a sharp blow, been dropped, or otherwise damaged in
any way. Take it to an authorized service center.
6
Page 7

SAFETY INFORMATION
• DO NOT disassemble charger; take it to an authorized service center when service or repair is
required. Incorrect reassembly may result in a risk of electric shock, electrocution or re.
• Disconnect the charger from the outlet before attempting any cleaning. This will reduce the risk of
electric shock. Removing the battery pack will not reduce this risk.
• NEVER attempt to connect 2 chargers together.
• The charger is designed to operate on standard household electrical power (120 Volts). Do not
attempt to use it on any other voltage.
• An extension cord should not be used unless absolutely necessary. Use of improper extension
cord could result in a risk of re and electric shock. If extension cord must be used, make sure:
a. That pins on plug of extension cord are the same number, size and shape as those of plug on
charger.
b. That extension cord is properly wired and in good electrical condition; and
c. That wire size is large enough for AC ampere rating of charger as specied below:
Cord Length (Feet) 25’ 50’ 100’
Cord Size (AWG) 16 16 16
IMPORTANT SAFETY INSTRUCTION FOR BATTERY PACKS
WARNING: For safe operation, read this manual and manuals originally supplied with tool before
using the charger. The battery pack is not fully charged out of the carton. Before using the battery
pack and charger, read the safety instructions below. Then follow charging procedures outlined.
READ ALL INSTRUCTIONS
• DO NOT incinerate the battery pack even if it is severely damaged or is completely worn out. The
battery pack can explode in a re. Toxic fumes and materials are created when battery packs are
burned.
• DO NOT charge or use battery in explosive atmospheres, such as in the presence of ammable
liquids, gases or dust. Inserting or removing the battery from the charger may ignite the dust or
fumes.
• If battery contents come into contact with the skin, immediately wash area with mild soap and
water. If battery liquid gets into the eye, rinse water over the open eye for 15 minutes or until
irritation ceases. If medical attention is needed, the battery electrolyte for Lithium-Ion batteries is
composed of a mixture of liquid organic carbonates and lithium salts.
• Contents of opened battery cells may cause respiratory irritation. Provide fresh air. If symptoms
persist, seek medical attention.
WARNING: Burn hazard. Battery liquid may be ammable if exposed to spark or ame.
• Charge the battery packs only in Westinghouse chargers.
• DO NOT splash or immerse in water or other liquids. This may cause premature cell failure.
• Do not store or use the tool and battery pack in locations where the temperature may reach or
exceed 105°F (40˚C) (such as outside sheds or metal buildings in summer).
WARNING: Never attempt to open the battery pack for any reason. If battery pack case is
cracked or damaged, do not insert into charger. Do not crush, drop or damage battery pack. Do not
use a battery pack or charger that has received a sharp blow, been dropped, run over or damaged in
any way (i.e., pierced with a nail, hit with a hammer, stepped on). Damaged battery packs should be
returned to service center for recycling.
7
Page 8

SAFETY INFORMATION
WARNING: Fire hazard. Do not store or carry battery so that metal objects can contact exposed
battery terminals. For example, do not place battery in aprons, pockets, tool boxes, product kit
boxes, drawers, etc., with loose nails, screws, keys, etc. Transporting batteries can possibly cause
res if the battery terminals inadvertently come in contact with conductive materials such as keys,
coins, hand tools and the like. The US Department of Transportation Hazardous Material Regulations
(HMR) actually prohibit transporting batteries in commerce or on airplanes (i.e., packed in suitcases
and carry on luggage) UNLESS they are properly protected from short circuits. So when transporting
individual batteries, make sure that the battery terminals are protected and well insulated from
materials that could contact them and cause a short circuit. NOTE: Lithium-Ion batteries should not
be put in checked baggage.
STORAGE RECOMMENDATIONS
1. The best storage place is one that is cool and dry away from direct sunlight and excess heat or
cold.
2. Long storage will not harm the battery pack or charger.
CHARGING PROCEDURE:
Battery packs are shipped in a low charge condition to prevent possible problems. Therefore, you
should charge them before rst use. If the charger does not charge your battery pack under normal
circumstances, return both the battery pack and charger to your nearest repair center for electrical
check. Charge time varies and is dependent upon the amp hour capacity of battery pack.
NOTICE: Do not place the charger in an area of extreme heat or cold. It will work best at normal
room temperature. The battery pack will become slightly warm to the touch while charging. This is
normal and does not indicate a problem.
1. Plug charger into household outlet, make sure the power supply is normal household voltage, 120
Volts, AC only, 60 Hz.
2. Attach the battery pack to the charger by aligning the raised ribs on the
battery pack with the grooves in the charger, then slide the battery pack onto
the charger.
3. Press down on the battery pack to be sure contacts on the battery pack
engage properly with contacts in the charger. The green LED will ash as the
battery charges.
4. After charging is complete, the green LED will remain on.
To remove the battery pack from the charger, slide back the battery pack.
IMPORTANT CHARGING NOTES
1. Longest life and best performance can be obtained if the battery pack is charged when the air
temperature is between 65°F and 75°F (18°- 24°C). DO NOT charge the battery pack in an air
temperature below +40°F (+4.5°C), or above +105°F (+40.5°C). This is important and will prevent
serious damage to the battery pack.
2. The charger and battery pack may become warm to touch while charging. This is a normal
condition, and does not indicate a problem. To facilitate the cooling of the battery pack after use,
avoid placing the charger or battery pack in a warm environment such as in a metal shed, or an
uninsulated trailer.
8
Page 9
SAFETY INFORMATION
2
7
3. If the battery pack does not charge properly:
a. Check current at receptacle by plugging in a lamp or other appliance
b. Check to see if receptacle is connected to a light switch which turns power o when you turn
out the lights.
c. Move charger and battery pack to a location where the surrounding air temperature is
approximately 65°F - 75°F (18°- 24°C).
d. If charging problems persist, take the tool, battery pack and charger to your local service center.
4. The battery pack should be recharged when it fails to produce sucient power on jobs which were
easily done previously. DO NOT CONTINUE to use under these conditions. Follow the charging
procedure. You may also charge a partially used pack whenever you desire with no adverse aect
on the battery pack.
5. Foreign materials of a conductive nature such as, but not limited to, steel wool, aluminum foil, or
any buildup of metallic particles should be kept away from charger cavities. Always unplug the
charger from the power supply when there is no battery pack in the cavity. Unplug charger before
attempting to clean.
6. Do not freeze or immerse the charger in water or any other liquid.
WARNING: Do not allow any liquid to get inside charger. Never attempt to open the battery pack
for any reason. If the plastic housing of the battery pack breaks or cracks, return to a service center
for recycling.
FEATURES
3
8
1
6
5
4
This product can accept any of the batteries and chargers
listed in the chart below:
Westinghouse 40V Lithium-Ion Packs and Chargers
Description Part number
40V Batteries: LI-ION LBA40120, LBA40125,
Chargers CGA402
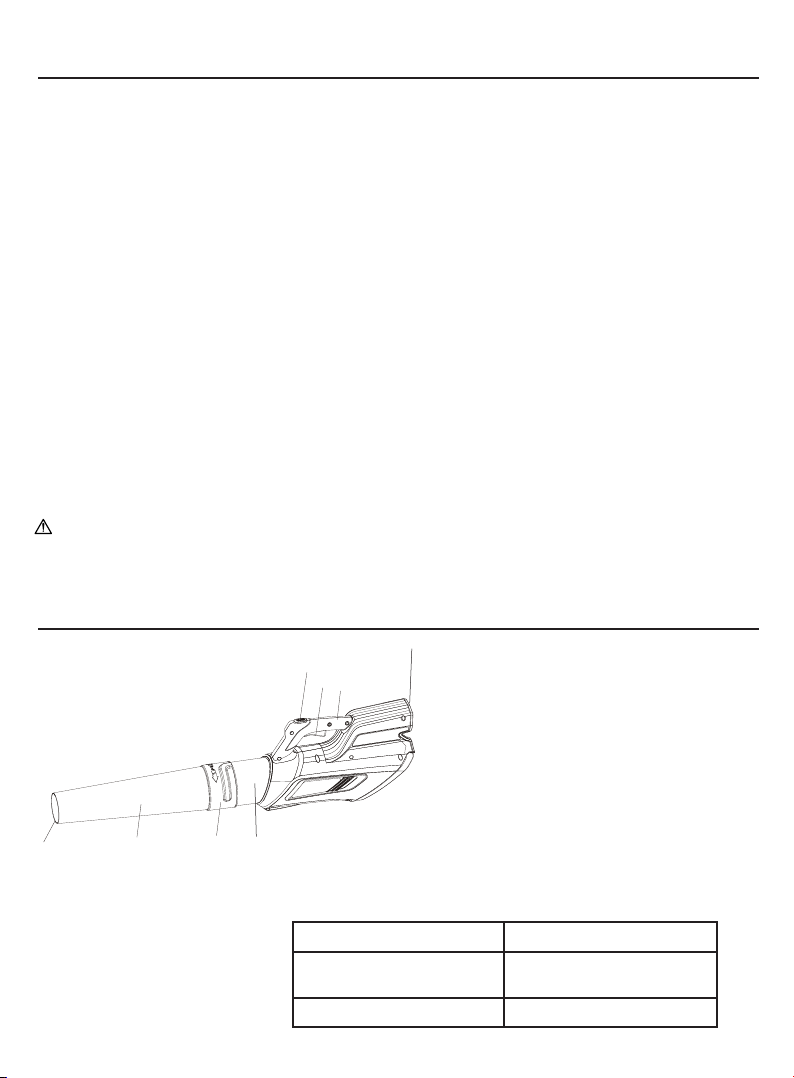
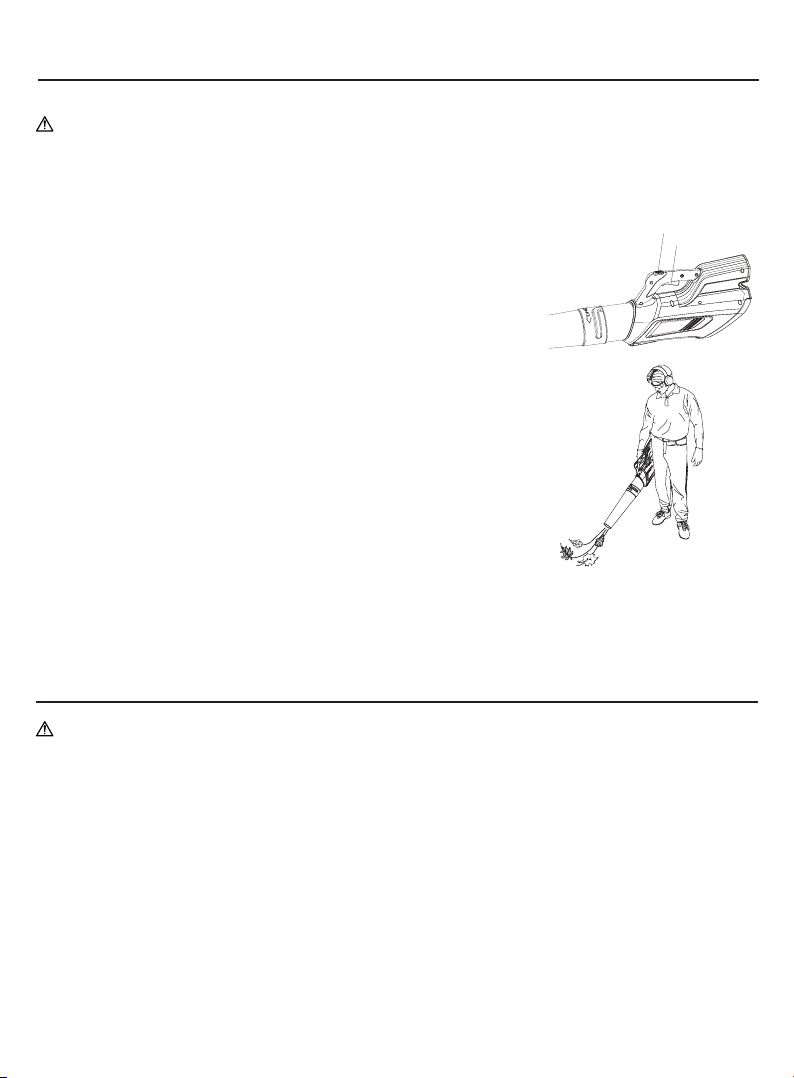
Description of the parts
1. Handle
2. TurboBoost Button
3. Battery Pack Interlock
4. Jetfan
5. Tube Latch
6. Blower Tube
7. Blower Tube outlet
8. ON/OFF Trigger
LBA40240
9
Page 10
ASSEMBLY
4
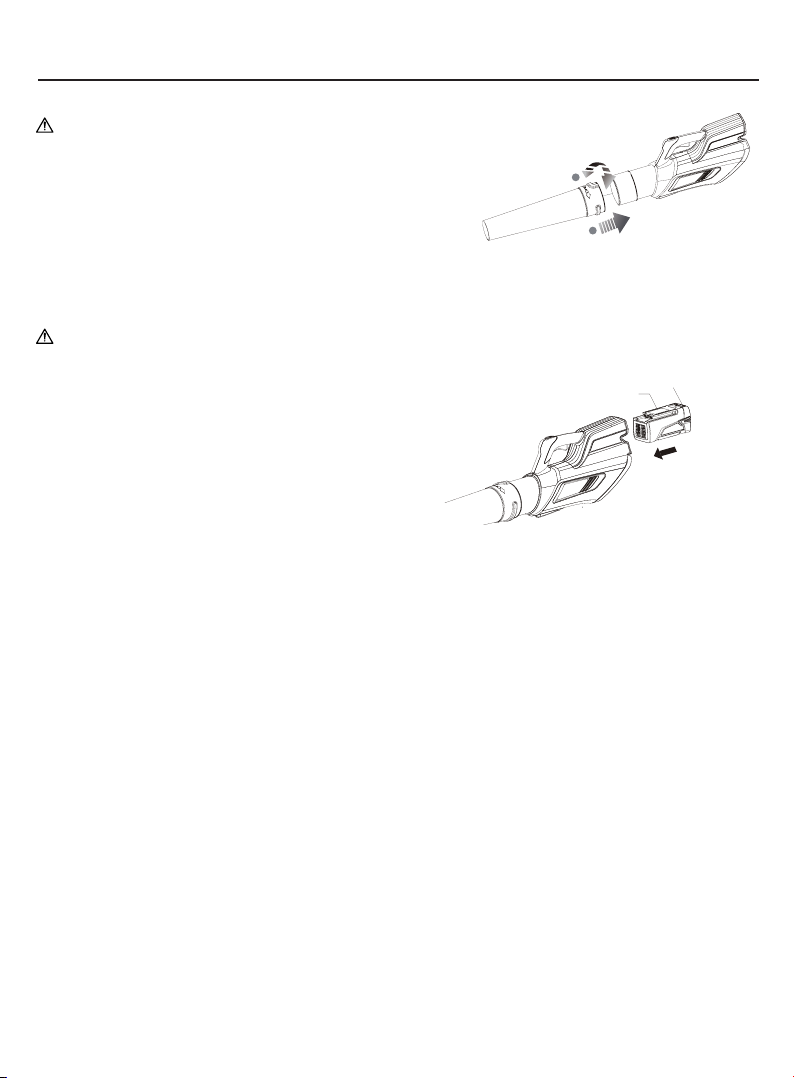
INSTALLING BLOWER TUBE
WARNING: Do not use the device until the blow tube has
been properly mounted on the blower body.
Slide the blower tube over the jet fan and rotate until the
tube latch clicks into place. Make sure tube is secure before
using.
INSTALLING AND REMOVING THE RECHARGEABLE BATTERY
WARNING: Always switch the tool o before you insert or remove the rechargeable battery.
If you want to remove the rechargeable battery (3) from the tool, press the battery release button (4)
on the end of the battery and pull it from the tool. To
insert the rechargeable battery in the tool, rst line up
the base of the rechargeable battery with the guide in
the blower battery housing. Then push the rechargeable
battery rmly into the tool until hear the locking click
into place. If the rechargeable battery is not locked into
place, you or other persons may be injured.
CHARGING PROCEDURE:
Battery packs are shipped in a low charge condition to prevent possible problems. Therefore, you
should charge them before rst use. If the charger does not charge your battery pack under normal
circumstances, return both the battery pack and charger to your nearest repair center for electrical
check. Charge time varies and is dependent upon the amp hour capacity of battery pack.
NOTICE: Do not place the charger in an area of extreme heat or cold. It will work best at normal
room temperature. The battery pack will become slightly warm to the touch while charging. This is
normal and does not indicate a problem.
2
1
3
1. Plug charger into household outlet, make sure the power supply is normal household voltage, 120
Volts, AC only, 60 Hz.
2. Attach the battery pack to the charger by aligning the raised ribs on the battery pack with the
grooves in the charger, then slide the battery pack onto the charger.
3. Press down on the battery pack to be sure contacts on the battery pack engage properly with
contacts in the charger. The green LED will ash as the battery charges.
4. After charging is complete, the green LED will remain on.
5. To remove the battery pack from the charger, slide back the battery pack.
6. Charging takes approx. 1-3 hours depending on battery size. The battery heats up during the
charging process. This is normal and does not signal a fault. Do not let battery remain on charger
for more than 5 hours.
Note: Occasionally, the permissible temperature range may be exceeded during the charging cycle.
In this case, the electronic charging control interrupts the charging cycle to avoid any damage to the
battery. The red control light will then glow continuously. If you should witness this, pull the battery
from the charging station and let it cool down for about 30 minutes. Then, restart the charging cycle
by sliding the battery back onto the charging station.
10
Page 11
OPERATION
2
8
BEFORE OPERATING
CAUTION: Always wear safety glasses. Wear a lter mask if the operation is dusty. Use of gloves,
long pants and substantial footwear is recommended. Keep long hair and loose clothing away from
openings and moving parts. THIS SWEEPER IS FOR HOUSEHOLD USE ONLY.
• Before setting the device into operation, always check that all parts are connected properly.
• Examine the work area before starting work. Use a rake or broom to remove all objects or wastes
which could be hurled away by the leaf blower.
• If needed, lightly moisten dusty ground.
BLOWING FUNCTION
1. With battery installed, pull the On/O Trigger (8) to turn the blower
on. You can vary the blower speed by amount of pressure you put
on trigger.
2. Hold the blower with one hand as shown and sweep from side to
side with the blower tube several inches above the ground. Slowly
advance keeping the accumulated pile of debris in front of you.
3. If you need more power to move debris, use your thumb to hold
the TurboBoost button on top of the handle (2).
4. Blow waste material into a heap.
• Do not direct the air jet into the middle of the waste heap.
• Adjust the blowing power to the requirements.
• Make sure the air jet is not directed at children, pet animals,
open windows or automobiles.
• Always keep the ventilation slots free during operation to
prevent overheating.
• Do not use the device on wet ground.
5. Clean the tool after working.
2
8
CARE AND MAINTENANCE
WARNING: Always remove the rechargeable battery from the device before all work.
• Replace all damaged or worn parts to ensure the leaf blower is always ready for safe operation.
• Clean ventilation slots and openings with a brush.
• DO NOT use any solvents or cleaning agents containing chemicals which could damage the plastic
• Always store the blower in a dry, frost-free location beyond the reach of children.
• Store and charge your rechargeable batteries at a cool location. Temperatures above or below
• Do not store rechargeable batteries when discharged. Wait until the rechargeable battery has
• Rechargeable batteries gradually lose their charge. The higher the temperature, the quicker they
parts. Wipe the housing clean with a cloth.
normal room temperature shorten the lifespan of the rechargeable batteries.
cooled down and charge it completely.
lose their charge. For longer storage periods, recharge the rechargeable battery every one or two
months. This will extend the lifespan of the rechargeable battery.
11
Page 12
TROUBLESHOOTING
PROBLEM POSSIBLE CAUSE POSSIBLE SOLUTION
Battery not installed properly Check battery installation
Unit will not start.
Battery not charged
Battery not inserted into
charger
Charger not plugged in
Battery will not charge
Surrounding air temperature
too hot or too cold
Check battery charging
requirements
Insert battery into charger
until red LED appears
Plug charger into a working outlet.
Check current at receptacle by plugging in a lamp
or other appliance.
Check to see if receptacle
is connected to a light
switch which turns power
o when you turn out the
lights.
Move charger and tool to
a surrounding air temperature of above 40 degree
F (4.5°C) or below 105
degree F (+40.5°C).
BATTERY PACK REMOVAL AND PREPARATION FOR RECYCLING
To preserve natural resources, please recycle or dispose of batteries properly. This product contains
lithium-ion batteries. Local, state or federal laws may prohibit disposal of lithium-ion batteries in
ordinary trash. Consult your local waste authority for information regarding available recycling and/or
disposal options.
WARNING: Upon removal, cover the battery pack’s terminals with heavy-duty adhesive tape.
Do not attempt to destroy or disassemble battery pack or remove any of its components. Lithiumion batteries must be recycled or disposed of properly. Also, never touch both terminals with metal
objects and/or body parts as short circuit may result. Keep away from children. Failure to comply
with these warnings could result in re and/or serious injury.
12
Page 13

MANUAL DE USUARIO
SOPORTE INALÁMBRICO
¡Gracias por elegir Westinghouse!
POR FAVOR LEA ANTES DE DEVOLVER
ESTE PRODUCTO POR CUALQUIER MOTIVO.
Si tiene una pregunta o tiene algún problema con su compra de Westing-
house, llámenos al 855-944-3571 para hablar con un agente.
GUARDE ESTE MANUAL PARA FUTURAS REFERENCIAS.
COMO REGISTRAR SU PRODUCTO DE WESTINGHOUSE
Para registrar su nuevo producto, llame al 855-944-3571 o visite
www.westinghouseoutdoorpower.com/register
ASEGÚRESE DE TENER UN NÚMERO DE SERIE A MANO
13
Page 14

DIRECTRICES DE SEGURIDAD - DEFINICIONES
Es importante leer y entender este manual. La información que
contiene se reere a proteger SU SEGURIDAD y PREVENIR
PROBLEMAS. Los siguientes símbolos se utilizan para ayudarlo a
reconocer esta información.
PELIGRO: Indica una situación de peligro inminente que, si no
se evita, causará la muerte o lesiones graves.
ADVERTENCIA: Indica una situación potencialmente peligrosa
que, de no evitarse, podría causar la muerte o lesiones graves.
PRECAUCIÓN: Indica una situación potencialmente peligrosa
que, si no se evita, puede provocar lesiones leves o moderadas.
DARSE CUENTA: El uso del símbolo de alerta de seguridad indica
una situación potencialmente peligrosa que, si no se evita, puede
provocar daños a la propiedad.
RENUNCIAS:
ADVERTENCIA
Parte del polvo creado por este
producto contiene sustancias
químicas que, según el estado de
California, causan cáncer, defectos
de nacimiento u otros daños
reproductivos. Algunos ejemplos de
estos químicos son:
• compuestos en fertilizantes
• Compuestos en insecticidas,
herbicidas y pesticidas.
• Arsénico y cromo de la madera
tratada químicamente.
Para reducir su exposición a estos
productos químicos, use equipo
de seguridad aprobado, como
máscaras contra el polvo que estén
especialmente diseñadas para ltrar
partículas microscópicas.
Toda la información, las ilustraciones y las especicaciones de
este manual se basan en la información más reciente disponible en el momento de la publicación.
Las ilustraciones utilizadas en este manual están pensadas únicamente como vistas de referencia
representativas. Además, debido a nuestra política de mejora continua del producto, podemos
modicar información, ilustraciones y / o especicaciones para explicar y / o ejemplicar una mejora
de producto, servicio o mantenimiento. Nos reservamos el derecho de realizar cualquier cambio
en cualquier momento sin previo aviso. Algunas imágenes pueden variar según el modelo que se
muestra.
TODOS LOS DERECHOS RESERVADOS:
Ninguna parte de esta publicación puede reproducirse ni utilizarse de ninguna forma por ningún
medio (gráco, electrónico o mecánico, incluidos los sistemas de fotocopiado, grabación, grabación
o almacenamiento y recuperación de información) sin el permiso por escrito de Westinghouse
Outdoor Power Equipment.
PELIGRO: Este manual contiene instrucciones importantes para operar este producto. Para su
seguridad y la seguridad de los demás, asegúrese de leer detenidamente este manual antes de
operar la batería / cargador. Si no sigue correctamente todas las instrucciones y precauciones, usted
y otras personas pueden sufrir lesiones graves o incluso morir.
ESPECIFICACIONES DEL SOPLADOR
Modelo
Westinghouse
40V Soplador
inalámbrico
Número de
pieza Motor
BLA40 40V DC 90MPH 400CFM LBA40120, LBA40125,
Velocidad
del aire
Volumen
de aire Funciona con batería
LBA40240
¿DONDE ESTA MI NUMERO DE SERIE? El número de serie de este producto se encuentra debajo
del cuerpo del soplador.
LO QUE VIENE CON LA
HERRAMIENTA
• Cuerpo del soplador
• Tubo soplador
• Garantía
14
• Manual
Page 15

SÍMBOLOS DE SEGURIDAD
Algunos de los siguientes símbolos pueden usarse en este producto. Por favor estudialas y aprende su
signicado. La interpretación correcta de estos símbolos le permitirá operar el producto mejor y más seguro.
Simbolos Nombre Designación / Explicación
V Voltios voltaje
A Amperios Corriente
Hz Hertz Frecuencia (ciclos por segundo)
W Vatios Poder
min Minutos Hora
Corriente alterna Tipo de corriente
Corriente continua Tipo o característica de la corriente
/min Por minuto Revoluciones, golpes, velocidad de supercie, órbitas, etc.,
Alerta de condiciones
húmedas
por minuto
No exponer a la lluvia o usar en lugares húmedos.
Lea el manual del
operador
Protección para los
ojos
Alerta de seguridad Precauciones que involucran su seguridad.
Pelo largo Si no se mantiene el cabello largo lejos de la entrada de
Ropa poco ajustada Si no evita que la ropa suelta se introduzca en la entrada de
Mantener a los
espectadores Lejos
Tubos de soplado No operar sin tubos en su lugar.
Palas del impulsor Las palas giratorias del impulsor pueden causar lesiones
Para reducir el riesgo de lesiones, el usuario debe leer y
comprender el manual del operador antes de usar este
producto.
Siempre use protección para los ojos con protectores laterales marcados para cumplir con ANSI Z87.1 cuando opere
este equipo.
aire, podrían producirse lesiones personales.
aire, podrían producirse lesiones personales.
Mantenga a todos los espectadores al menos a 50 pies de
distancia.
graves.
15
Page 16

INFORMACIÓN DE SEGURIDAD
ADVERTENCIAS E INSTRUCCIONES IMPORTANTES DE SEGURIDAD
ADVERTENCIA: PARA REDUCIR EL RIESGO DE LESIÓN:
• Antes de cualquier uso, asegúrese de que todos los que usen esta unidad lean y comprendan
todas las instrucciones de seguridad y otra información contenida en este manual.
• Guarde estas instrucciones y revíselas con frecuencia antes de usarlas e informar a otros.
• No apunte la descarga de la unidad a sí mismo ni a otras personas.
• Mantenga el cabello largo y la ropa suelta alejados de las aberturas y piezas móviles.
ADVERTENCIA: Al usar una herramienta eléctrica, siempre se deben seguir las precauciones
básicas de seguridad para reducir el riesgo de incendio, descarga eléctrica y lesiones personales,
incluidas las siguientes.
ADVERTENCIA: Cuando utilice un soplador, tenga en cuenta su entorno. El polvo generado por su
entorno tiene el potencial de contener químicos dañinos como: compuestos en fertilizantes, compuestos
en insecticidas, herbicidas y pesticidas, arsénico y cromo de madera tratada químicamente. Para reducir
su exposición a estos productos químicos, use equipo de seguridad aprobado, como máscaras contra el
polvo que estén especialmente diseñadas para ltrar partículas microscópicas.
ADVERTENCIAS GENERALES DE SEGURIDAD PARA SOPLADOR
ANTES DE USAR
• Tenga especial cuidado al limpiar escaleras.
• NO lo use en supercies mojadas.
• NO permita que se use como un juguete. Es necesario prestar mucha atención cuando es usado
por o cerca de niños.
• Use solo como se describe en este manual. Use solo los accesorios recomendados por el
fabricante. No usar con un enchufe dañado. Si la herramienta no funciona como debería, o si
se ha caído, dañado, se ha dejado al aire libre o se ha caído al agua, devuélvala a un centro de
servicio autorizado.
• Cuando se utiliza en la luz solar directa, mantener fuera del agua.
• NO lo exponga a la lluvia al operar la máquina.
• Almacenar en el interior. No exponer a la lluvia ni al agua. Evite el sol directo.
CUANDO USAS
• Nunca permita que los niños operen el equipo. Nunca permita que los adultos operen el equipo
sin la instrucción adecuada.
• No opere herramientas eléctricas en una atmósfera explosiva, como en la presencia de líquidos
inamables, gases o polvo. Las herramientas eléctricas generan chispas que pueden encender el
polvo de los humos.
• Sólo para uso doméstico.
• Use protección para los ojos que esté marcada para cumplir con ANSI Z87.1 al operar este producto.
• Utilice solo baterías de 40V Westinghouse.
• Utilice únicamente el cargador Westinghouse.
• NO opere esta unidad cuando esté cansado, enfermo o bajo la inuencia del alcohol, las drogas o
los medicamentos.
• No operar en condiciones de poca iluminación.
• Mantenga todas las partes de su cuerpo alejadas de cualquier parte móvil y de todas las
supercies calientes de la unidad.
• No ponga ningún objeto en las aberturas. No usar con ninguna abertura bloqueada. Mantenga las
aberturas libres de polvo, pelusas, pelos y cualquier cosa que pueda reducir el ujo de aire.
• Revise el área de trabajo antes de cada uso. Retire todos los objetos que puedan lanzarse o
enredarse en la máquina, como piedras, vidrios rotos, clavos, cables o cuerdas.
16
Page 17

INFORMACIÓN DE SEGURIDAD
• Use solo repuestos y accesorios idénticos del fabricante. El uso de cualquier otra parte puede
crear un peligro o causar daños al producto.
• Mantenga a todos los transeúntes, niños y mascotas a una distancia de al menos 50 pies (15 m).
• No opere el equipo con los pies descalzos o cuando use sandalias o calzado ligero similar.
• Use calzado de protección que proteja sus pies y mejore su equilibrio en supercies resbaladizas.
• Asegure el cabello largo de modo que quede por encima del nivel del hombro para evitar que se
enrede en las partes móviles.
• Mantenga una posición rme y el equilibrio. No se extienda demasiado. El exceso de alcance
puede resultar en la pérdida de equilibrio.
ADVERTENCIAS E INSTRUCCIONES GENERALES DE SEGURIDAD PARA TODAS LAS
HERRAMIENTAS
• Una UNIDAD OPERADA POR BATERÍA con baterías integradas o un paquete de baterías
separado debe recargarse solo con el cargador especicado para la batería. Un cargador que
puede ser adecuado para un tipo de batería puede crear un riesgo de incendio cuando se usa con
otra batería.
• UTILICE LA UNIDAD OPERADA POR BATERÍA SOLAMENTE con el paquete de baterías
Westinghouse 40V. El uso de cualquier otra batería puede crear un riesgo de incendio.
• EVITAR arranque accidental. Asegúrese de que el interruptor esté en la posición de apagado
antes de insertar la batería. Llevar unidades con el dedo en el interruptor o insertar la batería en
una unidad con el interruptor encendido invita a accidentes.
• NO use la unidad si el interruptor no la enciende o apaga. Una unidad que no se puede controlar
con el interruptor es peligrosa y debe repararse.
• DESCONECTE la batería de la unidad o coloque el interruptor en la posición de bloqueo o
apagado antes de realizar cualquier ajuste, cambiar accesorios o guardar la unidad. Tales medidas
de seguridad preventivas reducen el riesgo de que la unidad se arranque accidentalmente.
• SIEMPRE USE PROTECCIÓN PARA LOS OJOS: use gafas de seguridad o gafas de protección
en todo momento cuando esta unidad esté en uso. También use máscara facial o antipolvo.
• NO coloque la salida de la barredora cerca de los ojos u oídos durante la operación.
• GUARDAR UNIDADES IDLEAS. Cuando no esté en uso, la unidad debe almacenarse en un lugar
seco, alto o cerrado, fuera del alcance de los niños.
• NO SE EXTRAIGA Mantenga la postura y el equilibrio en todo momento.
• MANTENGA LA UNIDAD CON CUIDADO. Mantenga la unidad limpia para un mejor y más
seguro desempeño. Siga las instrucciones para el mantenimiento adecuado.
• NO intente reparar la barredora. Para garantizar la seguridad y conabilidad del producto, las
reparaciones, el mantenimiento y los ajustes deben ser realizados por los centros de servicio de
Westinghouse o los centros de servicio autorizados, utilizando siempre piezas de repuesto de
Westinghouse.
• NO opere la barredora en una atmósfera gaseosa o explosiva. Los motores en estas unidades
normalmente producen chispas, y las chispas pueden encender los humos.
• EVITE LAS CONDICIONES AMBIENTALES PELIGROSAS: no utilice unidades eléctricas en
lugares húmedos o mojados. No uses la unidad bajo la lluvia.
• MANTENTE ALERTA - Mira lo que estás haciendo. Usa el sentido común. No opere la unidad
cuando esté cansado.
• UTILICE LA UNIDAD ADECUADA: no use esta unidad para ningún trabajo, excepto para el que
está destinada.
• UTILICE CUIDADO EXTRA al limpiar en escaleras.
• NO permita que se use como un juguete. Es necesario prestar mucha atención cuando es usado
por o cerca de niños. No recomendado para uso en niños.
17
Page 18

INFORMACIÓN DE SEGURIDAD
• NO intente eliminar las obstrucciones de la unidad sin retirar primero la batería.
• USE SOLAMENTE como se describe en este manual. Use solo los accesorios recomendados por
el fabricante.
• NO coloque ningún objeto en las aberturas. No usar con ninguna abertura bloqueada; Manténgalo
libre de polvo, pelusas, pelos y todo lo que pueda reducir el ujo de aire.
• MANTENGA el cabello, la ropa suelta, los dedos y todas las partes del cuerpo lejos de las
aberturas y las partes móviles.
• NO sumerja ninguna parte de la unidad en líquido.
• NO manipule el cargador, incluido el enchufe del cargador, y los terminales del cargador con las
manos mojadas.
• MANTENGA A LOS NIÑOS, PADRES Y ANIMALES ALEJADOS del área de trabajo un mínimo
de 30 pies (10 metros) cuando inicie u opere la unidad.
• INSPECCIONE EL ÁREA antes de usar la unidad. Retire todos los escombros y objetos duros
como piedras, vidrios, alambres, etc. que puedan rebotar, ser arrojados o causar lesiones o daños
durante la operación.
• UTILICE ÚNICAMENTE el cargador suministrado por el fabricante para recargar.
• CUIDADO DEL EJERCICIO en el manejo de las baterías para no cortocircuitar la batería
con materiales conductores como anillos, pulseras y llaves. La batería o el conductor pueden
sobrecalentarse y provocar quemaduras.
• NO ABRIR NI MUTILAR las baterías. El electrolito liberado es corrosivo y puede causar daños a
los ojos o la piel. Puede ser tóxico si se ingiere.
• NO CARGUE la unidad al aire libre.
ADVERTENCIA: Para reducir el riesgo de descarga eléctrica; No exponer a la lluvia, no usar
sobre supercies mojadas. Almacenar en el interior.
INSTRUCCIONES IMPORTANTES DE SEGURIDAD PARA LOS CARGADORES DE BATERÍAS
ADVERTENCIA: Peligro de choque. No permita que ningún líquido entre en el cargador.
PRECAUCIÓN: Peligro de quemaduras. Para reducir el riesgo de lesiones, cargue solo las
baterías designadas de Westinghouse. Otros tipos de baterías pueden explotar y causar lesiones
personales y daños.
PRECAUCIÓN: Bajo ciertas condiciones, con el cargador enchufado a la fuente de alimentación,
el cargador puede ser cortocircuitado por material extraño. Los materiales extraños de naturaleza
conductiva, como la lana de acero, el papel de aluminio o cualquier acumulación de partículas
metálicas, deben mantenerse alejados de las cavidades del cargador. Siempre desenchufe el
cargador de la fuente de alimentación cuando no haya un paquete de baterías en la cavidad.
Desenchufe el cargador antes de intentar limpiar.
• NO intente cargar la batería con otros cargadores que no sean los de este manual. El cargador y
la batería están diseñados especícamente para funcionar juntos.
• Estos cargadores no están diseñados para ningún otro uso que no sea la carga de las baterías
recargables designadas de Westinghouse. Cualquier otro uso puede resultar en riesgo de
incendio, descarga eléctrica o electrocución.
• NO exponga el cargador a la lluvia o nieve.
• Tire del enchufe en lugar del cable al desconectar el cargador. Esto reducirá el riesgo de daños al
enchufe y cable eléctrico.
• Asegúrese de que el cable esté ubicado de manera que no se pise, tropiece ni se someta a daños
o tensiones.
• NO use un cable de extensión a menos que sea absolutamente necesario. El uso de un cable de
extensión inadecuado puede provocar un incendio, descarga eléctrica o electrocución.
• NO opere el cargador con el cable o el enchufe dañado, hágalos reemplazar de inmediato.
• NO opere el cargador si ha recibido un golpe fuerte, se ha caído o se ha dañado de alguna otra
manera. Llévelo a un centro de servicio autorizado.
18
Page 19

INFORMACIÓN DE SEGURIDAD
• NO desarme el cargador; llévelo a un centro de servicio autorizado cuando se requiera servicio o
reparación. Un reensamblaje incorrecto puede provocar un riesgo de descarga eléctrica, electrocución
o incendio.
• Desconecte el cargador del tomacorriente antes de limpiarlo. Esto reducirá el riesgo de descarga
eléctrica. La extracción de la batería no reducirá este riesgo.
• NUNCA intente conectar 2 cargadores juntos.
• El cargador está diseñado para funcionar con energía eléctrica doméstica estándar (120Voltios). No
intente utilizarlo en ningún otro voltaje.
• No debe usarse un cable de extensión a menos que sea absolutamente necesario. El uso de un cable
de extensión inadecuado podría provocar un incendio y una descarga eléctrica. Si se debe usar un
cable de extensión, asegúrese de:
a. Los pines en el enchufe del cable de extensión son del mismo número, tamaño y forma que los del
enchufe en el cargador.
b. El cable de extensión está correctamente cableado y en buenas condiciones eléctricas; y
c. El tamaño del cable es lo sucientemente grande para la clasicación de amperios de CA del
cargador, como se especica a continuación:
Longitud del cable (pies) 25’ 50’ 100’
Tamaño del cable (AWG) 16 16 16
INSTRUCCIONES IMPORTANTES DE SEGURIDAD PARA LOS PAQUETES DE BATERÍA
ADVERTENCIA: Para una operación segura, lea este manual y los manuales suministrados
originalmente con la herramienta antes de usar el cargador. La batería no está completamente cargada
de la caja. Antes de usar la batería y el cargador, lea las instrucciones de seguridad a continuación.
Luego siga los procedimientos de carga descritos.
LEE TODAS LAS INSTRUCCIONES
• NO incinere el paquete de batería incluso si está gravemente dañado o si está completamente
desgastado. La batería puede explotar en un incendio. Los vapores y materiales tóxicos se crean
cuando se queman los paquetes de baterías.
• NO cargue ni use la batería en atmósferas explosivas, como en la presencia de líquidos inamables,
gases o polvo. La inserción o extracción de la batería del cargador puede encender el polvo o los
vapores.
• Si el contenido de la batería entra en contacto con la piel, lave inmediatamente el área con agua y
jabón suave. Si el líquido de la batería entra en el ojo, enjuague el agua sobre el ojo abierto durante 15
minutos o hasta que cese la irritación. Si se necesita atención médica, el electrolito de la batería para
baterías de ión litio está compuesto por una mezcla de carbonatos orgánicos líquidos y sales de litio.
• El contenido de las celdas abiertas de la batería puede causar irritación respiratoria. Proporcionar aire
fresco. Si los síntomas persisten, busque atención médica.
ADVERTENCIA: Peligro de quemaduras. El líquido de la batería puede ser inamable si se expone a
chispas o llamas.
• Cargue los paquetes de baterías solo en los cargadores Westinghouse.
• NO salpique ni sumerja en agua u otros líquidos. Esto puede causar una falla celular prematura.
• No almacene ni use la herramienta y el paquete de baterías en lugares donde la temperatura pueda
alcanzar o exceder los 105 ° F (40 ° C) (como cobertizos exteriores o edicios metálicos en verano).
ADVERTENCIA: Nunca intente abrir la batería por ningún motivo. Si la caja de la batería está
agrietada o dañada, no la inserte en el cargador. No aplaste, deje caer o dañe la batería. No use un
paquete de baterías o cargador que haya recibido un golpe fuerte, se haya caído, haya atropellado o
dañado de alguna manera (es decir, se haya perforado con un clavo, se haya golpeado con un martillo,
se haya pisado). Los paquetes de baterías dañados deben devolverse al centro de servicio para su
reciclaje.
19
Page 20

INFORMACIÓN DE SEGURIDAD
ADVERTENCIA: Riesgo de incendio. No almacene ni transporte la batería, ya que los objetos
metálicos pueden entrar en contacto con los terminales expuestos de la batería. Por ejemplo,
no coloque la batería en delantales, bolsillos, cajas de herramientas, cajas de kits de productos,
cajones, etc., con clavos sueltos, tornillos, llaves, etc. El transporte de las baterías puede ocasionar
incendios si los terminales de la batería entran en contacto accidentalmente con conductores
materiales tales como llaves, monedas, herramientas de mano y similares. El Reglamento de
Materiales Peligrosos (HMR, por sus siglas en inglés) del Departamento de Transporte de los EE. UU.
Prohíbe el transporte de baterías en comercios o aviones (es decir, empacado en maletas y equipaje
de mano) A MENOS QUE estén protegidos adecuadamente contra cortocircuitos. Por lo tanto, al
transportar baterías individuales, asegúrese de que los terminales de la batería estén protegidos y
bien aislados de los materiales que podrían entrar en contacto con ellos y provocar un cortocircuito.
NOTA: Las baterías de iones de litio no deben colocarse en el equipaje facturado.
RECOMENDACIONES DE ALMACENAMIENTO
1. El mejor lugar de almacenamiento es uno fresco y seco, alejado de la luz solar directa y del
exceso de calor o frío.
2. Un almacenamiento prolongado no dañará la batería ni el cargador.
PROCEDIMIENTO DE CARGA:
Los paquetes de baterías se envían en una condición de carga baja para evitar posibles
problemas. Por lo tanto, debe cargarlos antes del primer uso. Si el cargador no carga su batería en
circunstancias normales, devuelva la batería y el cargador a su centro de reparaciones más cercano
para su revisión eléctrica. El tiempo de carga varía y depende de la capacidad en amperios / hora de
la batería.
AVISO: No coloque el cargador en un área de calor o frío extremos. Funcionará mejor a temperatura
ambiente normal. La batería se calentará ligeramente al tacto mientras se carga. Esto es normal y no
indica un problema.
• Enchufe el cargador en una toma de corriente doméstica, asegúrese de que la fuente de
alimentación sea la tensión normal de la casa, 120 voltios, solo CA, 60 Hz.
• Conecte la batería al cargador alineando las costillas levantadas en la batería
con las ranuras en el cargador, luego deslice la batería en el cargador.
• Presione hacia abajo la batería para asegurarse de que los contactos de la
batería se acoplan correctamente con los contactos del cargador. El LED verde
parpadeará mientras se carga la batería.
• Una vez nalizada la carga, el LED verde permanecerá encendido.
Para extraer la batería del cargador, deslice la batería hacia atrás.
NOTAS IMPORTANTES DE CARGA
1. Se puede obtener una vida útil más prolongada y el mejor rendimiento si
la batería se carga cuando la temperatura del aire está entre 65 ° F y 75 ° F (18 ° - 24 ° C). NO
cargue la batería en una temperatura del aire inferior a + 40 ° F (+ 4.5 ° C) o superior a + 105 ° F (+
40.5 ° C). Esto es importante y evitará daños graves a la batería.
2. El cargador y el paquete de batería pueden calentarse al tacto mientras se carga. Esta es una
condición normal y no indica un problema. Para facilitar el enfriamiento del paquete de baterías
después de su uso, evite colocar el cargador o el paquete de baterías en un ambiente cálido,
como un cobertizo de metal o un remolque sin aislamiento.
20
Page 21

INFORMACIÓN DE SEGURIDAD
2
7
3. Si la batería no se carga correctamente:
a. Compruebe la corriente en el receptáculo enchufando una lámpara u otro aparato.
b. Verique si el receptáculo está conectado a un interruptor de luz que apaga la alimentación
cuando apaga las luces.
c. Mueva el cargador y el paquete de baterías a un lugar donde la temperatura del aire circundante
sea de aproximadamente 65 ° F - 75 ° F (18 ° - 24 ° C).
d. Si los problemas de carga persisten, lleve la herramienta, el paquete de baterías y el cargador a
su centro de servicio local.
4. El paquete de baterías se debe recargar cuando no produce suciente energía en trabajos que se
realizaron fácilmente. NO CONTINÚE con el uso en estas condiciones. Siga el procedimiento de
carga. También puede cargar un paquete parcialmente usado siempre que lo desee sin afectar
negativamente al paquete de baterías.
5. Los materiales extraños de naturaleza conductiva, como la lana de acero, el papel de aluminio
o cualquier acumulación de partículas metálicas, deben mantenerse alejados de las cavidades
del cargador. Siempre desenchufe el cargador de la fuente de alimentación cuando no haya un
paquete de baterías en la cavidad. Desenchufe el cargador antes de intentar limpiar.
6. No congele ni sumerja el cargador en agua ni en ningún otro líquido.
ADVERTENCIA: No permita que ningún líquido entre en el cargador. Nunca intente abrir la
batería por ningún motivo. Si la carcasa de plástico del paquete de baterías se rompe o se agrieta,
devuélvala a un centro de servicio para su reciclaje.
CARACTERISTICAS
3
8
1
6
5
4
Este producto puede aceptar cualquiera de las baterías y cargadores enumerados en la tabla a continuación:
Paquetes de iones de litio y cargadores Westinghouse de 40 V
Descripción Número de parte
40V Baterias: LI-ION LBA40120, LBA40125,
Cargadores CGA402
Descripción de las partes.
1. Encargarse de
2. Botón TurboBoost
3. Interbloqueo de la batería
4. Jetfan
5. Cierre de tubo
6. Tubo del soplador
7. Salida del tubo del soplador
8. Gatillo de encendido / apagado
LBA40240
21
Page 22

MONTAJE
4
INSTALANDO TUBO DE SOPLADOR
ADVERTENCIA: No utilice el dispositivo hasta que el tubo
de soplado se haya montado correctamente en el cuerpo del
soplador.
Deslice el tubo del soplador sobre el ventilador y gírelo hasta
que el seguro del tubo encaje en su lugar. Asegúrese de que
el tubo esté seguro antes de usar.
INSTALACIÓN Y EXTRACCIÓN DE LA BATERÍA RECARGABLE
ADVERTENCIA: Siempre apague la herramienta antes de insertar o quitar la batería recargable.
Si desea extraer la batería recargable (3) de la herramienta, presione el botón de liberación de la
batería (4) en el extremo de la batería y sáquelo de la herramienta. Para insertar la batería recargable
en la herramienta, primero alinee la base de la batería
recargable con la guía en el alojamiento de la batería del
soplador. Luego empuje la batería recargable rmemente
en la herramienta hasta que escuche el clic de bloqueo
en su lugar. Si la batería recargable no está bloqueada
en su lugar, usted u otras personas podrían lesionarse.
PROCEDIMIENTO DE CARGA:
Los paquetes de baterías se envían en una condición
de carga baja para evitar posibles problemas. Por lo tanto, debe cargarlos antes del primer uso. Si
el cargador no carga su batería en circunstancias normales, devuelva la batería y el cargador a su
centro de reparaciones más cercano para su revisión eléctrica. El tiempo de carga varía y depende
de la capacidad en amperios / hora de la batería. AVISO: No coloque el cargador en un área de
calor o frío extremos. Funcionará mejor a temperatura ambiente normal. La batería se calentará
ligeramente al tacto mientras se carga. Esto es normal y no indica un problema.
2
1
3
1. Enchufe el cargador en una toma de corriente doméstica, asegúrese de que la fuente de
alimentación sea la tensión normal de la casa, 120 voltios, solo CA, 60 Hz.
2. Conecte la batería al cargador alineando las costillas levantadas en la batería con las ranuras en el
cargador, luego deslice la batería en el cargador.
3. Presione hacia abajo la batería para asegurarse de que los contactos de la batería se acoplan
correctamente con los contactos del cargador. El LED verde parpadeará mientras se carga la
batería.
4. Una vez nalizada la carga, el LED verde permanecerá encendido.
5. Para extraer la batería del cargador, deslice la batería hacia atrás.
6. La carga lleva aprox. 1-3 horas dependiendo del tamaño de la batería. La batería se calienta
durante el proceso de carga. Esto es normal y no señala una falla. No deje que la batería
permanezca en el cargador durante más de 5 horas.
Nota: Ocasionalmente, el rango de temperatura permisible se puede exceder durante el ciclo de
carga. En este caso, el control de carga electrónico interrumpe el ciclo de carga para evitar cualquier
daño a la batería. La luz roja de control se iluminará continuamente. Si observa esto, saque la batería
de la estación de carga y deje que se enfríe durante unos 30 minutos. Luego, reinicie el ciclo de
carga deslizando la batería nuevamente en la estación de carga.
22
Page 23

OPERACIÓN
2
8
ANTES DE OPERAR
PRECAUCIÓN: Siempre use gafas de seguridad. Use una máscara de ltro si la operación es polvorienta. Se
recomienda el uso de guantes, pantalones largos y calzado resistente. Mantenga el cabello largo y la ropa suelta
alejados de las aberturas y piezas móviles. ESTE SWEEPER ES PARA USO DOMÉSTICO SOLAMENTE.
• Antes de poner el dispositivo en funcionamiento, siempre verique que todas las partes estén conectadas
correctamente.
• Examine el área de trabajo antes de comenzar a trabajar. Use un
rastrillo o una escoba para eliminar todos los objetos o desechos que el
soplador de hojas pueda arrojar.
• Si es necesario, humedezca ligeramente el suelo polvoriento.
FUNCIÓN DE SOPLADO
1. Con la batería instalada, tire del Disparador de Encendido / Apagado (8)
para encender el soplador. Puedes variar la velocidad del soplador según la
cantidad de presión que pones en el gatillo.
2. Sostenga el soplador con una mano como se muestra y deslice de lado
a lado con el tubo del soplador a varias pulgadas del suelo. Avance
lentamente manteniendo la pila de escombros acumulada frente a usted.
3. Si necesita más potencia para mover escombros, use su pulgar para
mantener el botón TurboBoost en la parte superior del mango (2).
4. Blow material de desecho en un montón.
• No dirija el chorro de aire hacia el centro del montón de desechos.
• Ajuste la potencia de soplado a los requisitos.
• Asegúrese de que el chorro de aire no esté dirigido a niños, mascotas,
ventanas abiertas o automóviles.
• Mantenga siempre libres las ranuras de ventilación durante la operación para evitar el sobrecalentamiento.
• No utilice el dispositivo en suelo húmedo.
5. Limpie la herramienta después de trabajar.
2
8
CUIDADO Y MANTENIMIENTO
ADVERTENCIA: Siempre retire la batería recargable del dispositivo antes de todo trabajo.
• Reemplace todas las piezas dañadas o desgastadas para asegurarse de que el soplador de hojas esté siempre
listo para una operación segura.
• Limpie las ranuras de ventilación y las aberturas con un cepillo.
• NO utilice disolventes ni productos de limpieza que contengan productos químicos que puedan dañar las piezas
de plástico. Limpie la carcasa con un paño.
• Siempre almacene el soplador en un lugar seco y libre de heladas fuera del alcance de los niños.
• Almacene y cargue sus baterías recargables en un lugar fresco. Las temperaturas superiores o inferiores a la
temperatura ambiente normal acortan la vida útil de las baterías recargables.
• No almacene pilas recargables cuando se descarguen. Espere hasta que la batería recargable se haya enfriado y
cárguela completamente.
• Las baterías recargables pierden gradualmente su carga. Cuanto más alta es la temperatura, más rápido pierden
su carga. Para periodos de almacenamiento más prolongados, recargue la batería recargable cada uno o dos
meses. Esto prolongará la vida útil de la batería recargable.
23
Page 24

SOLUCIÓN DE PROBLEMAS
PROBLEMA CAUSA POSIBLE SOLUCIÓN POSIBLE
Batería no instalada
correctamente
La unidad no se iniciará.
Batería no cargada
Batería no insertada en el
cargador
Cargador no enchufado
La batería no se carga
Compruebe la instalación de la
batería
Verique los requisitos de carga
de la batería.
Inserte la batería en el cargador
hasta que aparezca el LED rojo
Enchufe el cargador en un
tomacorriente que funcione.
Verique la corriente en el
receptáculo enchufando una
lámpara u otro aparato.
Verique si el receptáculo está
conectado a un interruptor de
luz que apaga la alimentación
cuando apaga las luces.
Temperatura del aire
circundante demasiado
caliente o demasiado fría
herramienta a una temperatura
del aire circundante superior a
40 grados F (4.5 ° C) o inferior a
105 grados F (+ 40.5 ° C).
REMOCIÓN Y PREPARACIÓN DEL PAQUETE DE BATERÍA PARA RECICLAR
Para preservar los recursos naturales, recicle o deseche las baterías adecuadamente. Este producto
contiene baterías de iones de litio. Las leyes locales, estatales o federales pueden prohibir la
eliminación de baterías de iones de litio en la basura ordinaria. Consulte a su autoridad local de
residuos para obtener información sobre el reciclaje disponible y / o las opciones de eliminación.
ADVERTENCIA: Al retirarlo, cubra los terminales del paquete de baterías con cinta adhesiva
resistente. No intente destruir o desarmar la batería ni quitar ninguno de sus componentes. Las
baterías de iones de litio deben reciclarse o eliminarse de manera adecuada. Además, nunca
toque ambos terminales con objetos metálicos y / o partes del cuerpo, ya que podría producirse
un cortocircuito. Aléjate de los niños. El incumplimiento de estas advertencias podría provocar un
incendio y / o lesiones graves.
24
Mueva el cargador y la
Page 25

MANUEL UTILISATEUR
SOUFFLEUR SANS FIL
Merci d’avoir choisi Westinghouse!
VEUILLEZ LIRE AVANT DE RETOURNER
CE PRODUIT POUR TOUTE RAISON.
Si vous avez une question ou rencontrez un problème avec votre achat
Westinghouse, appelez-nous au 855-944-3571 pour parler à un agent.
CONSERVEZ CE MANUEL POUR FUTURE RÉFÉRENCE.
COMMENT ENREGISTRER VOTRE PRODUIT WESTINGHOUSE
Pour enregistrer votre nouveau produit, appelez le 855-944-3571 ou visitez le site
www.westinghouseoutdoorpower.com/register
S’ASSURER D’AVOIR UN NUMÉRO DE SÉRIE À LA MAIN
25
Page 26

DIRECTIVES DE SÉCURITÉ - DÉFINITIONS
Il est important de lire et de comprendre ce manuel. Les informations
qu’il contient concernent la protection de votre sécurité et la
prévention des problèmes. Les symboles ci-dessous sont utilisés pour
vous aider à reconnaître cette information.
DANGER: Indique une situation extrêmement dangereuse qui, si
elle n’est pas évitée, entraînera la mort ou des blessures graves.
ATTENTION: Indique une situation potentiellement dangereuse
qui, si elle n’est pas évitée, pourrait entraîner la mort ou des blessures
graves.
MISE EN GARDE: Indique une situation potentiellement
dangereuse qui, si elle n’est pas évitée, peut entraîner des blessures
mineures ou modérées.
AVIS: utilisé sans le symbole d’alerte de sécurité, il indique une
situation potentiellement dangereuse qui, si elle n’est pas évitée, peut
entraîner des dommages matériels.
LIMITATIONS DE RESPONSABILITÉ:
Toutes les informations, illustrations et spécications de ce
manuel sont basées sur les dernières informations disponibles au
ATTENTION
Certaines poussières générées
par ce produit contiennent des
produits chimiques reconnus
par l’État de Californie comme
pouvant causer le cancer,
des anomalies congénitales
ou d’autres troubles de la
reproduction. Voici quelques
exemples de ces produits
chimiques:
• composés dans les engrais
• composés dans les insecti-
cides, les herbicides et les
pesticides
• arsenic et chrome provenant
de bois traité chimiquement
Pour réduire votre exposition à
ces produits chimiques, portez
des équipements de sécurité
approuvés, tels que des masques
antipoussières spécialement
conçus pour ltrer les particules
microscopiques.
moment de la publication. Les illustrations utilisées dans ce manuel
servent uniquement de vues de référence représentatives. De plus, en raison de notre politique
d’amélioration continue des produits, nous pouvons modier les informations, illustrations et / ou
spécications pour expliquer et / ou illustrer une amélioration de produit, service ou maintenance.
Nous nous réservons le droit d’apporter des modications à tout moment et sans préavis. Certaines
images peuvent varier en fonction du modèle présenté.
TOUS LES DROITS SONT RÉSERVÉS:
Aucune partie de cette publication ne peut être reproduite ou utilisée sous quelque forme que ce soit
- graphique, électronique ou mécanique, y compris les systèmes de photocopie, d’enregistrement,
d’enregistrement ou de stockage et de récupération des informations - sans l’autorisation écrite de
Westinghouse Outdoor Power Equipment.
DANGER: Ce manuel contient des instructions importantes pour l’utilisation de ce produit. Pour
votre sécurité et celle des autres, veillez à lire attentivement ce manuel avant d’utiliser la batterie / le
chargeur. Si vous ne suivez pas correctement toutes les instructions et les précautions, vous et les
autres pouvez être gravement blessé ou tué.
SOUFFLEUR SPÉCIFICATIONS
Modèle
Soueur sans l
Westinghouse 40V
Numéro
d’article Moteur
BLA40 40V DC 90MPH 400CFM LBA40120 / 40125 / 40240
Vitesse de
l’air
Volume
d’air Fonctionne avec batterie
O EST MON NUMÉRO DE SÉRIE? Le numéro de série de ce produit est situé sous le corps du
ventilateur.
CE QUI VIENT AVEC OUTIL
• Corps de souante
• Tube de souante
• Garantie
• Manuel
26
Page 27

SYMBOLES DE SÉCURITÉ
Certains des symboles suivants peuvent être utilisés sur ce produit. Veuillez les étudier et apprendre
leur signication. Une interprétation correcte de ces symboles vous permettra d’utiliser le produit plus
ecacement et en toute sécurité.
Symboles Prénom Désignation / Explication
V Volts Tension
A Les ampères Actuel
Hz Hertz Fréquence (cycles par seconde)
W Watts Puissance
min Minutes Temps
Courant alternatif Type de courant
Courant continu Type ou caractéristique du courant
/min Par minute Tours, coups, vitesse de surface, orbites, etc., par minute
Alerte de conditions
humides
Ne pas exposer à la pluie ou utiliser dans des endroits
humides
Lire le manuel de
l’opérateur
Protection des yeux Portez toujours des lunettes de protection avec des écrans
Alerte de sécurité Précautions qui impliquent votre sécurité.
Cheveux longs Si vous ne gardez pas les cheveux longs à l’entrée d’air,
Vêtements amples Ne pas attirer les vêtements amples dans l’admission d’air
Gardez les
spectateurs une façon
Tubes Souantes Ne pas utiliser sans tubes en place.
Pales de roue Les pales en rotation peuvent causer des blessures graves.
Pour réduire le risque de blessure, l’utilisateur doit lire et
comprendre le manuel de l’utilisateur avant d’utiliser ce
produit.
latéraux marqués conformes à la norme ANSI Z87.1 lorsque
vous utilisez cet équipement.
vous pourriez vous blesser.
peut entraîner des blessures.
Gardez tous les passants à au moins 50 pieds.
27
Page 28

INFORMATION SUR LA SÉCURITÉ
AVERTISSEMENTS ET INSTRUCTIONS DE SÉCURITÉ IMPORTANTS
AVERTISSEMENT: POUR RÉDUIRE LES RISQUES DE BLESSURES:
• Avant toute utilisation, assurez-vous que tous les utilisateurs de cet appareil lisent et comprennent
toutes les instructions de sécurité et les autres informations contenues dans ce manuel.
• Conservez ces instructions et consultez-les fréquemment avant de les utiliser et d’instruire les autres.
• Ne dirigez pas la décharge de l’appareil vers vous-même ou des personnes à proximité.
• Gardez les cheveux longs et les vêtements amples à l’écart des ouvertures et des pièces mobiles.
AVERTISSEMENT: lorsque vous utilisez un outil électrique, vous devez toujours respecter les règles
de sécurité élémentaires pour réduire les risques d’incendie, de choc électrique et de blessures, notamment les suivantes.
AVERTISSEMENT: Lorsque vous utilisez le ventilateur, tenez compte de votre environnement. La
poussière générée par votre environnement peut contenir des produits chimiques nocifs tels que:
composés dans les engrais, composés dans les insecticides, les herbicides et les pesticides, arsenic et
chrome provenant du bois traité chimiquement. Pour réduire votre exposition à ces produits chimiques,
portez des équipements de sécurité approuvés, tels que des masques antipoussières spécialement
conçus pour ltrer les particules microscopiques.
AVERTISSEMENTS DE SÉCURITÉ GÉNÉRAUX POUR LE SOUFFLEUR AVANT L’UTILISATION
• Faites très attention lorsque vous nettoyez les escaliers.
• NE PAS utiliser sur des surfaces mouillées.
• NE PAS permettre d’être utilisé comme un jouet. Une attention particulière est nécessaire lorsque
utilisé par ou près des enfants.
• Utilisez uniquement comme décrit dans ce manuel. Utilisez uniquement les accessoires recommandés
par le fabricant. Ne pas utiliser avec une che endommagée. Si l’outil ne fonctionne pas correctement,
ou s’il est tombé, endommagé, laissé à l’extérieur ou tombé dans l’eau, retournez-le à un centre de
service autorisé.
• Gardez hors de l’eau lorsque vous l’utilisez au soleil.
• NE PAS exposer à la pluie lors de l’utilisation de la machine.
• Magasin à l’intérieur. Ne pas exposer à la pluie ou à l’eau. Évitez le soleil direct.
QUAND UTILISER
• Ne laissez jamais les enfants utiliser l’appareil. Ne permettez jamais aux adultes d’utiliser du matériel
sans instructions appropriées.
• N’utilisez pas d’outils électriques dans une atmosphère explosive, par exemple en présence de liq-
uides, de gaz ou de poussières inammables. Les outils électriques créent des étincelles qui peuvent
enammer la poussière de vapeurs.
• Pour usage domestique seulement.
• Portez des lunettes de protection conformes à la norme ANSI Z87.1 lorsque vous utilisez ce produit.
• Utilisez uniquement des piles Westinghouse 40V.
• Utilisez uniquement le chargeur Westinghouse.
• N’UTILISEZ PAS cet appareil si vous êtes fatigué, malade ou sous l’inuence de l’alcool, de drogues
ou de médicaments.
• Ne pas utiliser sous un éclairage insusant.
• Gardez toutes les parties de votre corps à l’écart des pièces en mouvement et des surfaces chaudes
de l’appareil.
• Ne mettez aucun objet dans les ouvertures. Ne pas utiliser avec une ouverture bloquée. Gardez les
ouvertures exemptes de poussière, de peluches, de cheveux et de tout ce qui pourrait réduire le débit
d’air.
• Vériez la zone de travail avant chaque utilisation. Retirez tous les objets pouvant être projetés ou se
prendre dans la machine, tels que des pierres, du verre brisé, des clous, des ls de fer ou des cordes.
28
Page 29

INFORMATION SUR LA SÉCURITÉ
• Utilisez uniquement des pièces de rechange et des accessoires du fabricant identiques.
L’utilisation de toute autre pièce peut créer un danger ou endommager le produit.
• Gardez tous les passants, les enfants et les animaux domestiques à au moins 15 m (15 m).
• Ne pas utiliser l’équipement pieds nus ou avec des sandales ou des chaussures légères similaires.
• Portez des chaussures de protection qui protégeront vos pieds et amélioreront votre position sur
des surfaces glissantes.
• Sécurisez les cheveux longs an qu’ils se trouvent au-dessus du niveau des épaules pour éviter
tout enchevêtrement dans les pièces mobiles
• Gardez le pied ferme et l’équilibre. Ne pas trop atteindre. Un dépassement peut entraîner une
perte d’équilibre..
AVERTISSEMENTS DE SECURITE GENERAUX ET INSTRUCTIONS POUR TOUS LES OUTILS
• UN APPAREIL À BATTERIE avec batteries intégrées ou un bloc batterie séparé doit être rechargé
uniquement avec le chargeur spécié pour la batterie. Un chargeur pouvant convenir à un type de
batterie peut créer un risque d’incendie s’il est utilisé avec une autre batterie.
• UTILISEZ UNIQUEMENT L’APPAREIL SUR BATTERIE avec le bloc de batterie Westinghouse
40V. L’utilisation de toute autre batterie peut créer un risque d’incendie.
• ÉVITER tout démarrage accidentel. Assurez-vous que l’interrupteur est en position d’arrêt avant
d’insérer le bloc-batterie. Porter les appareils avec le doigt sur l’interrupteur ou insérer le blocbatterie dans un appareil avec l’interrupteur en marche peut provoquer des accidents.
• NE PAS utiliser l’appareil si l’interrupteur ne l’allume pas ou ne s’éteint pas. Une unité qui ne peut
pas être contrôlée avec le commutateur est dangereuse et doit être réparée.
• DÉBRANCHEZ le bloc-batterie de l’appareil ou placez l’interrupteur en position verrouillée ou
éteinte avant d’eectuer tout réglage, de changer d’accessoire ou de ranger l’appareil. Ces
mesures de sécurité préventives réduisent le risque de démarrage accidentel de l’unité.
• TOUJOURS PORTER UNE PROTECTION DES YEUX - Portez toujours des lunettes de sécurité
ou des lunettes étanches lorsque vous utilisez cet appareil. Utilisez également un masque facial
ou antipoussière.
• NE PLACEZ PAS la sortie de la balayeuse près des yeux ou des oreilles lors de son utilisation.
• STOCK UNITES. Lorsqu’il n’est pas utilisé, l’appareil doit être rangé dans un endroit sec, au sec
ou en hauteur, hors de portée des enfants.
• Ne pas trop aller. Gardez une bonne assise et un bon équilibre à tout moment.
• MAINTENIR L’UNITÉ AVEC SOIN. Gardez l’unité propre pour des performances optimales et
sûres. Suivez les instructions pour un entretien correct.
• NE PAS essayer de réparer la balayeuse. Pour assurer la sécurité et la abilité des produits,
les réparations, l’entretien et les réglages doivent être eectués par des centres de service
Westinghouse ou des centres de service agréés, utilisant toujours des pièces de rechange
Westinghouse.
• NE PAS utiliser la balayeuse dans une atmosphère gazeuse ou explosive. Les moteurs de ces
unités produisent normalement des étincelles qui pourraient enammer les vapeurs.
• ÉVITEZ LES CONDITIONS ENVIRONNEMENTALES DANGEREUSES - N’utilisez pas d’appareils
électriques dans des endroits humides ou mouillés. Ne pas utiliser l’appareil sous la pluie.
• RESTEZ ALERTE - Regardez ce que vous faites. Utiliser le bon sens. N’utilisez pas l’appareil
lorsque vous êtes fatigué.
• UTILISEZ L’APPAREIL DROIT - N’utilisez pas cet appareil pour un travail autre que celui auquel il
est destiné.
• Faites très attention lors du nettoyage des escaliers.
• NE PAS permettre d’être utilisé comme un jouet. Une attention particulière est nécessaire lorsque
utilisé par ou près des enfants. Non recommandé pour une utilisation par les enfants.
29
Page 30

INFORMATION SUR LA SÉCURITÉ
• NE PAS essayer de nettoyer les sabots de l’appareil sans avoir au préalable retiré la batterie.
• UTILISER UNIQUEMENT comme décrit dans ce manuel. Utilisez uniquement les accessoires
recommandés par le fabricant.
• NE PAS mettre d’objets dans les ouvertures. Ne pas utiliser avec une ouverture bloquée; évitez la
poussière, les peluches, les cheveux et tout ce qui peut réduire le débit d’air.
• GARDER les cheveux, les vêtements amples, les doigts et toutes les parties du corps à l’écart des
ouvertures et des pièces en mouvement.
• N’immergez aucune partie de l’appareil dans un liquide.
• NE manipulez PAS le chargeur, y compris la che du chargeur, ni les bornes du chargeur avec les
mains mouillées.
• GARDER LES ENFANTS, LES INTERVENANTS ET LES ANIMAUX LOIN de la zone de travail à au
moins 10 mètres lors du démarrage ou de l’utilisation de l’appareil.
• INSPECTEZ LA ZONE avant d’utiliser l’appareil. Enlevez tous les débris et objets durs tels que les
cailloux, le verre, les ls métalliques, etc.
• UTILISEZ UNIQUEMENT le chargeur fourni par le fabricant pour recharger.
• Prenez soin de manipuler les piles an de ne pas la mettre en court-circuit avec des matériaux
conducteurs tels que bagues, bracelets et clés. La batterie ou le conducteur peut surchauer et
causer des brûlures.
• NE PAS OUVRIR OU MUTILER les piles. L’électrolyte libéré est corrosif et peut endommager les
yeux ou la peau. Il peut être toxique en cas d’ingestion.
• NE PAS CHARGER l’appareil à l’extérieur.
AVERTISSEMENT: pour réduire le risque de choc électrique; ne pas exposer à la pluie, ne pas
utiliser sur des surfaces mouillées. Magasin à l’intérieur.
INSTRUCTIONS DE SECURITE IMPORTANTES POUR LES CHARGEURS DE BATTERIES
AVERTISSEMENT: Risque d’électrocution. Ne laissez aucun liquide pénétrer dans le chargeur.
ATTENTION: Risque de brûlure. Pour réduire les risques de blessures, ne chargez que les batteries
Westinghouse désignées. D’autres types de piles peuvent exploser, provoquant des blessures et des
dégâts matériels.
ATTENTION: Dans certaines conditions, avec le chargeur branché sur le secteur, le chargeur peut
être court-circuité par des corps étrangers. Les matières étrangères de nature conductrice, telles que
la laine d’acier, le papier d’aluminium ou toute accumulation de particules métalliques, doivent être
tenues à l’écart des cavités du chargeur. Débranchez toujours le chargeur de la source d’alimentation
lorsqu’il n’y a pas de batterie dans la cavité. Débranchez le chargeur avant de tenter de le nettoyer.
• NE PAS essayer de charger la batterie avec des chargeurs autres que ceux décrits dans ce manuel.
Le chargeur et la batterie sont spéciquement conçus pour fonctionner ensemble.
• Ces chargeurs ne sont pas destinés à des utilisations autres que la charge des piles rechargeables
Westinghouse désignées. Toute autre utilisation peut entraîner un risque d’incendie, de choc
électrique ou d’électrocution.
• NE PAS exposer le chargeur à la pluie ou à la neige.
• Tirez sur la che plutôt que sur le cordon lorsque vous débranchez le chargeur. Cela réduira les
risques d’endommagement de la che et du cordon électriques.
• Assurez-vous que le cordon est placé de manière à ne pas être piétiné, trébuché ou soumis à des
dommages ou à des contraintes.
• NE PAS utiliser de rallonge sauf si cela est absolument nécessaire. L’utilisation d’une rallonge
inappropriée peut entraîner un risque d’incendie, de choc électrique ou d’électrocution.
• NE PAS utiliser le chargeur avec un cordon ou une che endommagé - faites-le remplacer
immédiatement.
• N’UTILISEZ PAS le chargeur s’il a reçu un coup violent, s’il est tombé ou s’il a été endommagé de
quelque manière que ce soit. Rapportez-le à un centre de service autorisé.
30
Page 31

INFORMATION SUR LA SÉCURITÉ
• NE PAS démonter le chargeur; apportez-le à un centre de service autorisé lorsqu’un service ou
une réparation est nécessaire. Un remontage incorrect peut entraîner un risque de choc électrique,
d’électrocution ou d’incendie.
• Débranchez le chargeur de la prise avant toute tentative de nettoyage. Cela réduira le risque de choc
électrique. Le retrait de la batterie ne réduira pas ce risque.
• N’essayez JAMAIS de connecter deux chargeurs ensemble.
• Le chargeur est conçu pour fonctionner avec une alimentation électrique domestique standard
(120Volts). N’essayez pas de l’utiliser sur une autre tension.
• Une rallonge ne doit pas être utilisée sauf en cas d’absolue nécessité. L’utilisation d’une rallonge
inappropriée peut entraîner un risque d’incendie et de choc électrique. Si une rallonge doit être
utilisée, assurez-vous que:
a. Les broches de la che de la rallonge ont le même nombre, la même taille et la même forme que
celles de la che du chargeur.
b. Cette rallonge est correctement câblée et en bon état électrique; et
c. Cette taille de l est susamment grande pour que le chargeur dispose de la capacité nominale
en ampères CA, comme indiqué ci-dessous:
Longueur du cordon (pieds) 25’ 50’ 100’
Taille du cordon (AWG) 16 16 16
INSTRUCTIONS DE SECURITE IMPORTANTES POUR LES BLOCS DE BATTERIES
AVERTISSEMENT: pour une utilisation en toute sécurité, lisez ce manuel et les manuels fournis à
l’origine avec l’outil avant d’utiliser le chargeur. La batterie n’est pas complètement chargée en dehors
du carton. Avant d’utiliser la batterie et le chargeur, lisez les consignes de sécurité ci-dessous. Suivez
ensuite les procédures de charge décrites.
LISEZ TOUTES LES INSTRUCTIONS
• NE PAS incinérer le bloc-batterie même s’il est gravement endommagé ou complètement usé. La
batterie peut exploser dans un incendie. Des vapeurs et des matériaux toxiques sont créés lors de la
combustion des batteries.
• NE PAS charger ou utiliser la batterie dans des atmosphères explosives, telles que la présence
de liquides inammables, de gaz ou de poussières. Insérer ou retirer la batterie du chargeur peut
enammer la poussière ou les émanations.
• Si le contenu de la batterie entre en contact avec la peau, nettoyez immédiatement la zone avec du
savon doux et de l’eau. Si le liquide de la batterie pénètre dans les yeux, rincez-les à grande eau
pendant 15 minutes ou jusqu’à ce que l’irritation cesse. Si des soins médicaux sont nécessaires,
l’électrolyte de la batterie lithium-ion est composé d’un mélange de carbonates organiques liquides
et de sels de lithium.
• Le contenu des cellules de batterie ouvertes peut irriter les voies respiratoires. Fournir de l’air frais.
Si les symptômes persistent, consultez un médecin.
AVERTISSEMENT: Risque de brûlure. Le liquide de la batterie peut être inammable s’il est exposé
à une étincelle ou à une amme.
• Chargez les batteries uniquement dans les chargeurs Westinghouse.
• NE PAS éclabousser ou plonger dans l’eau ou d’autres liquides. Cela peut provoquer une
défaillance prématurée de la cellule.
• Ne rangez pas et n’utilisez pas l’outil et le bloc-batterie dans des endroits où la température peut
atteindre ou dépasser 40 ° C (tels que des hangars extérieurs ou des bâtiments métalliques en été).
AVERTISSEMENT: N’essayez jamais d’ouvrir la batterie pour quelque raison que ce soit. Si le
boîtier de la batterie est ssuré ou endommagé, ne l’insérez pas dans le chargeur. Ne pas écraser,
laisser tomber ou endommager la batterie. N’utilisez pas de batterie ou de chargeur ayant subi un choc
violent, ayant été échappé, écrasé ou endommagé de quelque manière que ce soit (c’est-à-dire percé
d’un clou, frappé avec un marteau ou piétiné). Les batteries endommagées doivent être renvoyées au
centre de service pour recyclage.
31
Page 32

INFORMATION SUR LA SÉCURITÉ
AVERTISSEMENT: Risque d’incendie. Ne stockez pas et ne transportez pas la batterie de
manière à ce que des objets métalliques ne puissent pas toucher les bornes de la batterie exposées.
Par exemple, ne placez pas la batterie dans les tabliers, les poches, les cores à outils, les cores à
produits, les tiroirs, etc., avec des clous, des vis, des clés, etc. des matériaux tels que des clés, des
pièces de monnaie, des outils à main et similaires. Les réglementations sur les matières dangereuses
du ministère des Transports des États-Unis interdisent le transport de batteries dans le commerce
ou dans des avions (c’est-à-dire qu’elles sont emballées dans des valises et portent des bagages),
SAUF si elles sont correctement protégées des courts-circuits. Par conséquent, lors du transport
de batteries individuelles, assurez-vous que les bornes de la batterie sont protégées et bien isolées
des matériaux qui pourraient les contacter et causer un court-circuit. REMARQUE: les batteries au
lithium-ion ne doivent pas être placées dans les bagages enregistrés.
RECOMMANDATIONS DE STOCKAGE
1. Le meilleur lieu de stockage est un endroit frais et sec, à l’abri de la lumière directe du soleil et des
chaleurs excessives.
2. Un long stockage n’endommagera pas la batterie ou le chargeur.
PROCÉDURE DE CHARGE:
Les batteries sont expédiées dans des conditions de charge faible pour éviter tout problème
éventuel. Par conséquent, vous devriez les charger avant la première utilisation. Si le chargeur ne
charge pas votre batterie dans des circonstances normales, renvoyez-le à la fois au chargeur et
au centre de réparation le plus proche pour vérication. Le temps de charge varie et dépend de la
capacité en ampères-heures de la batterie.
AVIS: Ne placez pas le chargeur dans une zone de chaleur ou de froid extrême. Cela fonctionnera
mieux à température ambiante normale. La batterie devient légèrement chaude au toucher pendant
le chargement. Ceci est normal et n’indique pas un problème.
• Branchez le chargeur dans la prise secteur, assurez-vous que la tension
secteur est normale, 120 volts, alternatif, 60 Hz.
• Fixez la batterie au chargeur en alignant les nervures surélevées de la batterie
avec les rainures du chargeur, puis faites glisser la batterie sur le chargeur.
• Appuyez sur la batterie pour vous assurer que ses contacts s’engagent
correctement avec ceux du chargeur. Le voyant vert clignote pendant le
chargement de la batterie.
• Une fois le chargement terminé, le voyant vert reste allumé.
Pour retirer la batterie du chargeur, faites-la glisser vers l’arrière.
REMARQUES IMPORTANTES SUR LA CHARGE
1. La durée de vie la plus longue et les meilleures performances peuvent être obtenues si le blocbatterie est chargé lorsque la température de l’air est comprise entre 18 et 24 ° C. NE chargez
PAS la batterie à une température ambiante inférieure à + 4,5 ° C (+ 40 ° F) ou supérieure à + 40,5
° C (+ 105 ° F). Ceci est important et évitera des dommages graves à la batterie.
2. Le chargeur et le bloc-piles peuvent devenir chauds au toucher pendant le chargement. Ceci est
une condition normale et n’indique pas un problème. Pour faciliter le refroidissement de la batterie
après utilisation, évitez de placer le chargeur ou la batterie dans un environnement chaud, comme
un hangar en métal ou une remorque non isolée.
32
Page 33

INFORMATION SUR LA SÉCURITÉ
2
7
3. Si la batterie ne se charge pas correctement:
a. Vériez le courant à la prise en branchant une lampe ou un autre appareil
b. Vériez si le réceptacle est connecté à un interrupteur de lumière qui éteint lorsque vous
éteignez les lumières.
c. Déplacez le chargeur et le bloc-piles dans un endroit où la température de l’air ambiant est
d’environ 18 ° C à 24 ° C (75 ° F).
d. Si les problèmes de charge persistent, apportez l’outil, le bloc-batterie et le chargeur à votre
centre de service local.
4. La batterie doit être rechargée si elle ne produit pas susamment de puissance pour des tâches
faciles à eectuer auparavant. NE PAS CONTINUER à utiliser dans ces conditions. Suivez la
procédure de charge. Vous pouvez également charger un pack partiellement utilisé quand vous le
souhaitez sans que cela aecte la batterie.
5. Les matières étrangères de nature conductrice, telles que la laine d’acier, le papier d’aluminium
ou toute accumulation de particules métalliques, doivent être tenues à l’écart des cavités du
chargeur. Débranchez toujours le chargeur de la source d’alimentation lorsqu’il n’y a pas de
batterie dans la cavité. Débranchez le chargeur avant de tenter de le nettoyer.
6. Ne pas congeler ni immerger le chargeur dans de l’eau ou dans tout autre liquide.
AVERTISSEMENT: Ne laissez aucun liquide pénétrer à l’intérieur du chargeur. N’essayez jamais
d’ouvrir la batterie pour quelque raison que ce soit. Si le boîtier en plastique du bloc-batterie se
casse ou se ssure, renvoyez-le à un centre de service pour le recyclage.
FONCTIONNALITÉS
3
8
1
6
5
4
Ce produit peut accepter toutes les batteries et chargeurs
énumérés dans le tableau ci-dessous:
Westinghouse Packs et chargeurs Lithium-Ion 40V
La description Numéro d’article
40V Piles: LI-ION LBA40120, LBA40125,
Chargeurs CGA402
Description des pièces
1. Manipuler
2. Bouton TurboBoost
3. Blocage de la batterie
4. Jetfan
5. Verrou de tube
6. Tube de ventilateur
7. Sortie du tube de souante
8. Déclencheur ON / OFF
LBA40240
33
Page 34

ASSEMBLÉE
4
INSTALLATION DU TUBE DU SOUFFLEUR
ATTENTION: N’utilisez pas l’appareil tant que le tube de
souage n’a pas été correctement monté sur le corps du
ventilateur.
Faites glisser le tube du ventilateur sur le ventilateur et
tournez jusqu’à ce que le loquet du tube s’enclenche.
Assurez-vous que le tube est sécurisé avant de l’utiliser.
INSTALLATION ET RETRAIT DE LA BATTERIE RECHARGEABLE
AVERTISSEMENT: mettez toujours l’outil hors tension avant d’insérer ou de retirer la batterie
rechargeable.
Si vous souhaitez retirer la batterie rechargeable (3) de l’outil, appuyez sur le bouton de libération de
la batterie (4) à l’extrémité de la batterie et retirez-la de l’outil. Pour insérer la batterie rechargeable
dans l’outil, commencez par aligner la base de la batterie
rechargeable avec le guide situé dans le logement de
la batterie du ventilateur. Ensuite, enfoncez fermement
la batterie rechargeable dans l’outil jusqu’à ce que
vous entendiez un déclic de verrouillage. Si la batterie
rechargeable n’est pas verrouillée, vous ou une autre
personne peut être blessé.
PROCÉDURE DE CHARGE:
Les batteries sont expédiées dans des conditions de charge faible pour éviter tout problème
éventuel. Par conséquent, vous devriez les charger avant la première utilisation. Si le chargeur ne
charge pas votre batterie dans des circonstances normales, renvoyez-le à la fois au chargeur et
au centre de réparation le plus proche pour vérication. Le temps de charge varie et dépend de la
capacité en ampères-heures de la batterie.
AVIS: Ne placez pas le chargeur dans une zone de chaleur ou de froid extrême. Cela fonctionnera
mieux à température ambiante normale. La batterie devient légèrement chaude au toucher pendant
le chargement. Ceci est normal et n’indique pas un problème.
2
1
3
1. Branchez le chargeur dans la prise secteur, assurez-vous que la tension secteur est normale, 120
volts, alternatif, 60 Hz.
2. Fixez la batterie au chargeur en alignant les nervures surélevées de la batterie avec les rainures du
chargeur, puis faites glisser la batterie sur le chargeur.
3. Appuyez sur la batterie pour vous assurer que ses contacts s’engagent correctement avec ceux
du chargeur. Le voyant vert clignote pendant le chargement de la batterie.
4. Une fois le chargement terminé, le voyant vert reste allumé.
5. Pour retirer la batterie du chargeur, faites-la glisser vers l’arrière.
6. Le chargement prend environ. 1-3 heures selon la taille de la batterie. La batterie chaue pendant
le processus de charge. Ceci est normal et ne signale pas un défaut. Ne laissez pas la batterie sur
le chargeur pendant plus de 5 heures.
Remarque: La plage de température admissible peut parfois être dépassée pendant le cycle de
charge. Dans ce cas, la commande de charge électronique interrompt le cycle de charge pour éviter
tout dommage à la batterie. Le voyant de contrôle rouge reste alors allumé. Si vous en êtes témoin,
retirez la batterie de la station de charge et laissez-la refroidir pendant environ 30 minutes. Ensuite,
redémarrez le cycle de chargement en replaçant la batterie sur la station de chargement.
34
Page 35

OPÉRATION
2
8
AVANT UTILISATION
ATTENTION: Portez toujours des lunettes de sécurité. Portez un masque ltrant si l’opération est poussiéreuse.
L’utilisation de gants, de pantalons longs et de chaussures solides est recommandée. Gardez les cheveux longs et
les vêtements amples à l’écart des ouvertures et des pièces mobiles. CETTE BALAYEUSE EST UNIQUEMENT À
USAGE DOMESTIQUE.
• Avant de mettre l’appareil en service, vériez toujours que toutes les pièces sont correctement connectées.
• Examinez la zone de travail avant de commencer les travaux. Utilisez un râteau
ou un balai pour enlever tous les objets ou déchets qui pourraient être jetés
par le soueur de feuilles.
• Si nécessaire, humidiez légèrement le sol poussiéreux.
FONCTION DE SOUFFLAGE
1. Avec la batterie installée, appuyez sur la gâchette marche / arrêt (8) pour
allumer le ventilateur. Vous pouvez modier la vitesse du ventilateur en
fonction de la pression exercée sur la gâchette.
2. Tenez le ventilateur avec une main comme indiqué et balayez
d’un côté à l’autre le tube du ventilateur à plusieurs pouces du
sol. Avancez lentement en gardant le tas de débris accumulé devant vous.
3. Si vous avez besoin de plus de puissance pour déplacer les débris, utilisez
votre pouce pour maintenir le bouton TurboBoost au-dessus de la poignée
(2).
4. Souez les déchets en un tas.
• Ne dirigez pas le jet d’air au milieu du tas de déchets.
• Ajustez la puissance de souage aux exigences.
• Assurez-vous que le jet d’air ne soit pas dirigé sur les enfants, les
animaux domestiques, les fenêtres ouvertes ou les automobiles.
• Gardez toujours les orices de ventilation libres pendant le fonctionnement pour éviter toute surchaue.
• Ne pas utiliser l’appareil sur un sol humide.
5. Nettoyer l’outil après le travail.
2
8
SOIN ET ENTRETIEN
AVERTISSEMENT: retirez toujours la batterie rechargeable de l’appareil avant tout travail.
• Remplacez toutes les pièces endommagées ou usées pour que le soueur de feuilles soit toujours prêt à
fonctionner en toute sécurité.
• Nettoyez les fentes de ventilation et les ouvertures avec une brosse.
• NE PAS utiliser de solvants ou d’agents de nettoyage contenant des produits chimiques qui pourraient
endommager les pièces en plastique. Essuyez le boîtier avec un chion.
• Rangez toujours la soueuse à feuilles dans un endroit sec, à l’abri du gel, hors de portée des enfants.
• Rangez et rechargez vos piles rechargeables dans un endroit frais. Les températures supérieures ou inférieures à
la température ambiante réduisent la durée de vie des piles rechargeables.
• Ne conservez pas de piles rechargeables déchargées. Attendez que la batterie rechargeable se soit refroidie et
chargez-la complètement.
• Les piles rechargeables se déchargent progressivement. Plus la température est élevée, plus vite ils perdent leur
charge. Pour des périodes de stockage plus longues, rechargez la batterie rechargeable tous les un ou deux mois.
Cela prolongera la durée de vie de la batterie rechargeable.
35
Page 36

DÉPANNAGE
PROBLÈME CAUSE POSSIBLE SOLUTION POSSIBLE
L’unité ne démarrera
pas.
La batterie ne se charge
pas
La batterie n’est pas installée
correctement
Batterie non chargée
Batterie non insérée dans le
chargeur
Chargeur non branché
La température de l’air ambiant
est trop chaude ou trop froide
Vériez l’installation de la
batterie.
Vérier les exigences de
charge de la batterie.
Insérez la batterie dans le
chargeur jusqu’à ce que le
voyant rouge apparaisse.
Branchez le chargeur dans
une prise de travail.
Vériez le courant à
la prise en branchant
une lampe ou un autre
appareil. Vériez si le
réceptacle est connecté à
un interrupteur de lumière
qui éteint lorsque vous
éteignez les lumières.
Déplacez le chargeur et
l’outil à une température
ambiante supérieure à 4,5 °
C ou inférieure à + 40,5 ° C.
ENLÈVEMENT DE LA BATTERIE ET PRÉPARATION POUR LE RECYCLAGE
Pour préserver les ressources naturelles, veuillez recycler ou jeter les piles correctement. Ce produit
contient des batteries lithium-ion. Les lois locales, nationales ou fédérales peuvent interdire la mise au
rebut des batteries lithium-ion dans les ordures ménagères. Consultez votre autorité de traitement des
déchets locale pour obtenir des informations sur les options de recyclage et / ou d’élimination disponibles.
AVERTISSEMENT: lors du retrait, couvrez les bornes du bloc-batterie avec du ruban adhésif
résistant. N’essayez pas de détruire ou de démonter le bloc-batterie ni de retirer l’un de ses
composants. Les batteries au lithium-ion doivent être recyclées ou éliminées correctement. De
même, ne touchez jamais les deux bornes avec des objets métalliques et / ou des parties du
corps, car cela pourrait provoquer un court-circuit. Garder loin des enfants. Le non respect de ces
avertissements peut provoquer un incendie et / ou des blessures graves.
36
Page 37

This page was intentionally left blank
37
Page 38

This page was intentionally left blank
38
Page 39

This page was intentionally left blank
39
Page 40

WestinghouseOutdoorPower.com
Service Hotline: (855) 944-3571
777 Manor Park Drive Columbus, OH 43228
, WESTINGHOUSE, and INNOVATION YOU CAN BE SURE OF
are trademarks of Westinghouse Electric Corporation. Used under
license by Westinghouse Outdoor Power Equipment.
All Rights Reserved.
Version 02.27.19KD
 Loading...