

Page 1
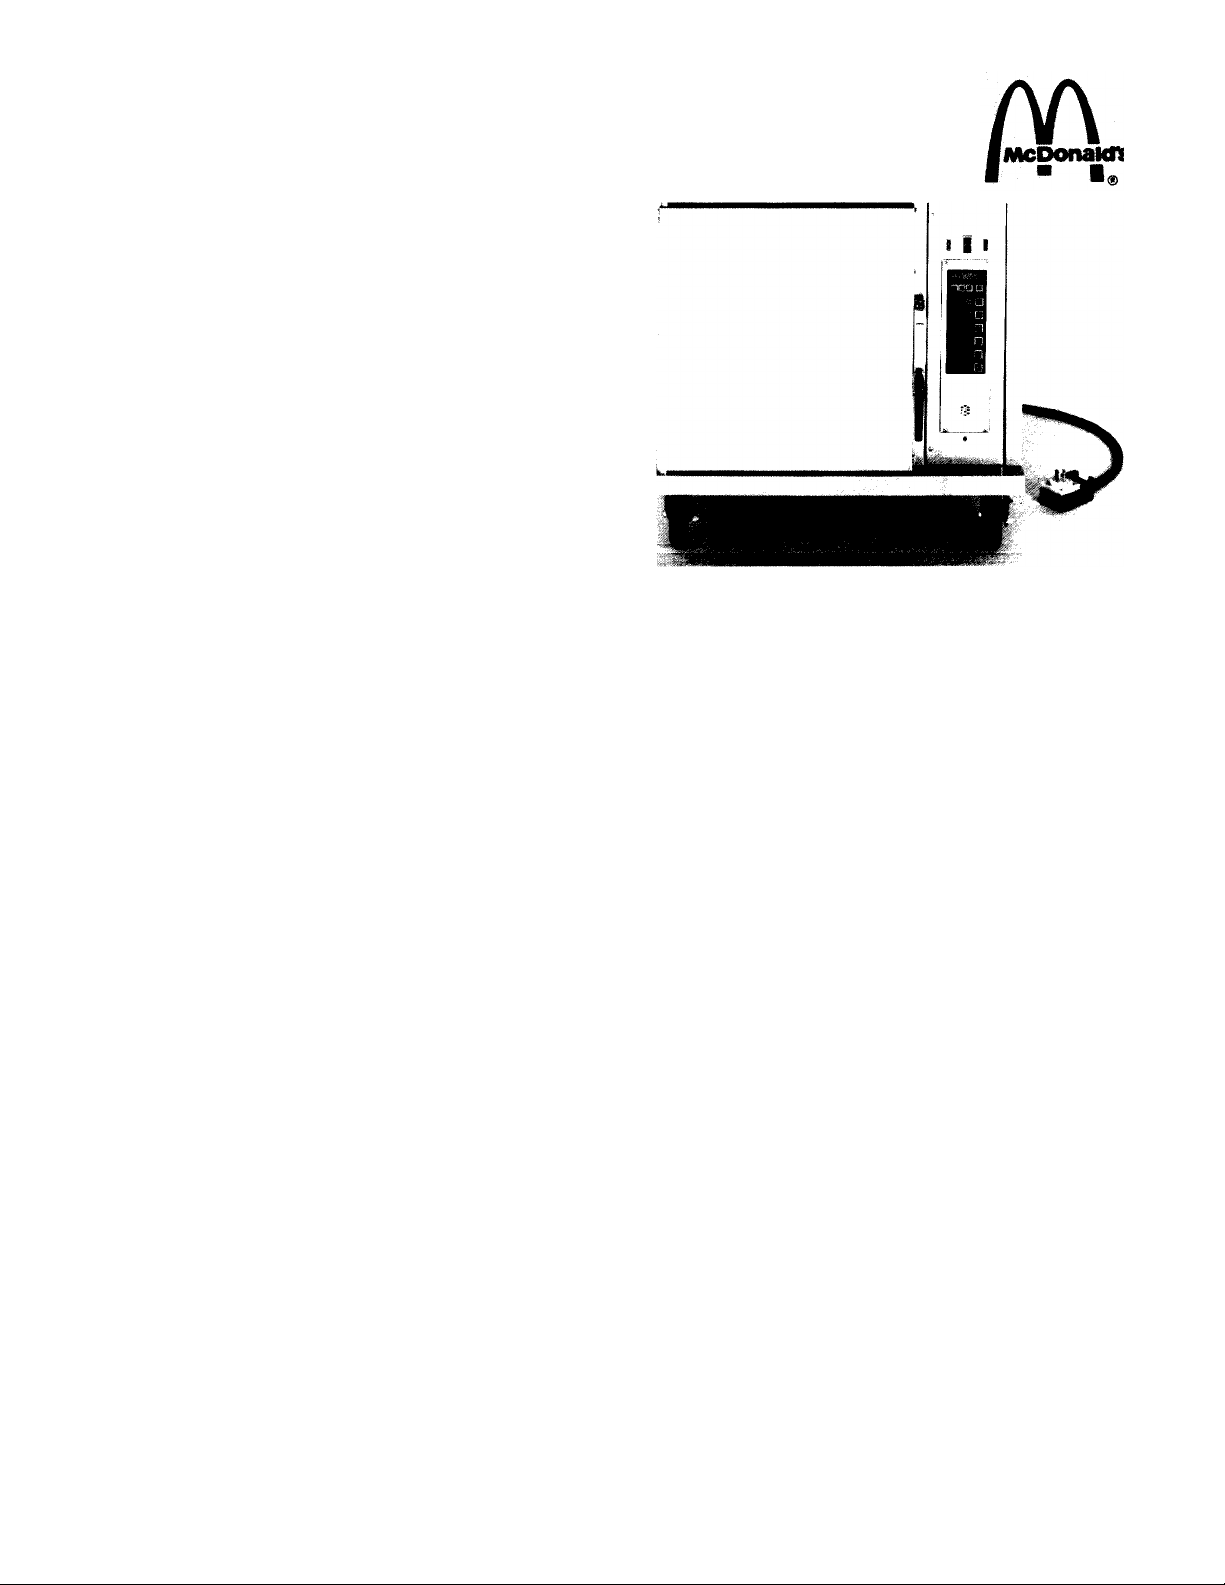
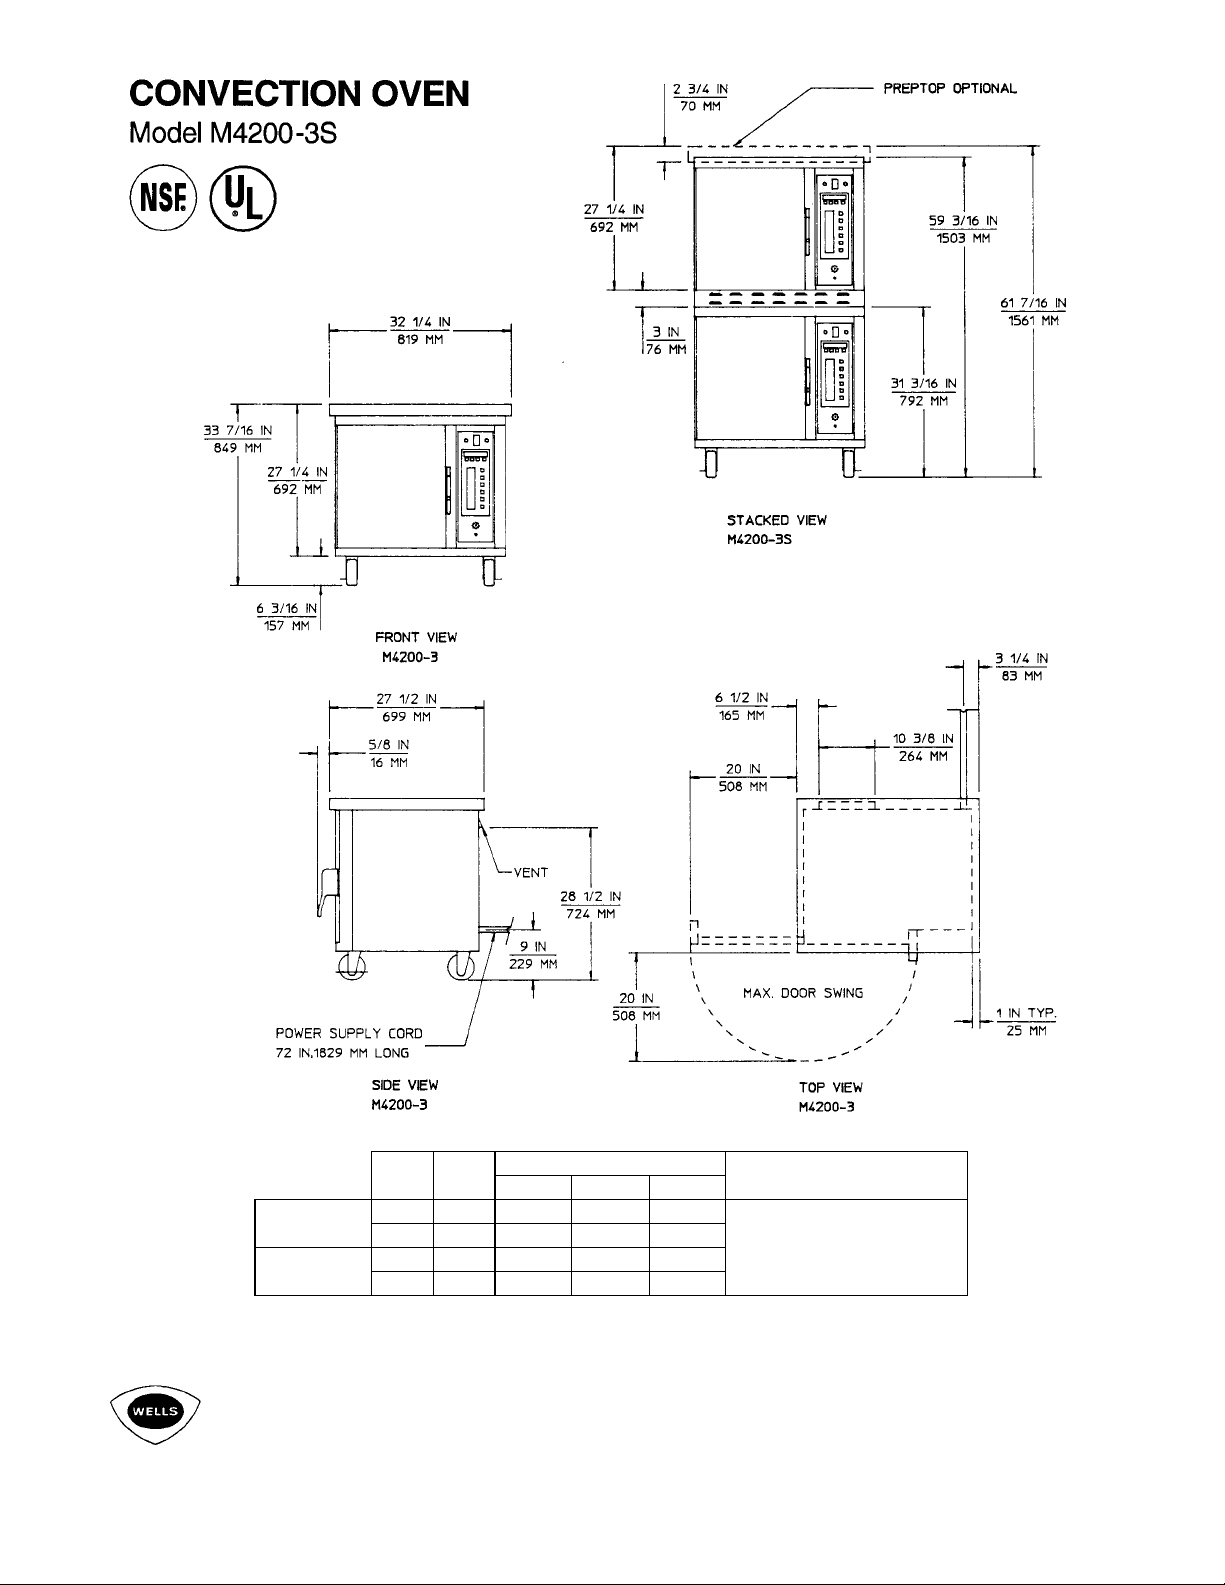
CONVECTION OVEN
WELLS MODELS WITH TOUCHPAD TEMPERATURE CONTROLLER/TIMERS
M4200-3, M4200-3S
This equipment chapter is to be inserted in the Oven section of the Equipment Manual.
MANUFACTURED EXCLUSIVELY FOR
McDONALD'S BY
WELLS MANUFACTURING COMPANY
2 ERIK CIRCLE VERDI, NEVADA 89439
PHONE: (702) 345-0444 TOLL FREE: (800) 777-0450
FAX: (702) 345-0569
FAX: (800) 356-5142 (FOR ORDERS ONLY)
TABLE OF CONTENTS ............................................................................................................Page 1
WARRANTY.............................................................................................................................Page 2
INTRODUCTION SAFETY........................................................................................................ Page 2
PARTS IDENTIFICATION/FUNCTION/PHOTOS........................................................................ Page 3
HARDWARE IDENTIFICATION .............................................................................................. Page 15
EQUIPMENT SET UP AND CLOSE PROCEDURES................................................................ Page 16
TROUBLESHOOTING............................................................................................................ Page 19
ORDERING/SERVICE INFORMATION.................................................................................... Page 20
NON-SCHEDULED MAINTENANCE....................................................................................... Page 20
WIRING PICTORIAL/WIRING DIAGRAM ................................................................................ Page 31
WARRANTY STATEMENT..................................................................................................... Page 32
The M4200-3 and M4200-3S Convection Ovens manufactured by Wells Manufacturing are warranted to be free
from defects in materials and workmanship for a period of one year from the date of original installation and is for
the benefit of the original purchaser only, BUT NOT AGAINST DAMAGE CAUSED BY ABUSE, FAULTY
INSTALLATION, INCLUDING IMPROPER ELECTRICAL CURRENT. THIS WARRANTY IS THE COMPLETE
AND ONLY WARRANTY, THERE BEING NO OTHER WARRANTY, EXPRESSED OR IMPLIED IN LAW OR IN
FACT, INCLUDING BUT NOT LIMITED TO, WARRANTIES OF MERCHANTABILITY OR FITNESS FOR ANY
PARTICULAR PURPOSE, AND/OR FOR DIRECT, INDIRECT, OR CONSEQUENTIAL DAMAGES IN
CONNECTION WITH WELLS PRODUCTS.
Wells' obligation under this warranty is limited to the repair of defects or replacement without charge by a WELLS
factory authorized service agency or one of its sub-service agencies. This service will be provided on customer's
request. Please contact the Service Department: Wells Manufacturing Company, P.O. Box 280, Verdi, Nevada,
89439; to arrange service or additional information and other details concerning the product and/or this warranty.
This manual is for the exclusive use of licensees and employees of McDonald's Systems, Inc.
Printed in July EM 05
© 1990 McDonald's Corporation All Rights Reserved
Printed In The United States of America
Page 2
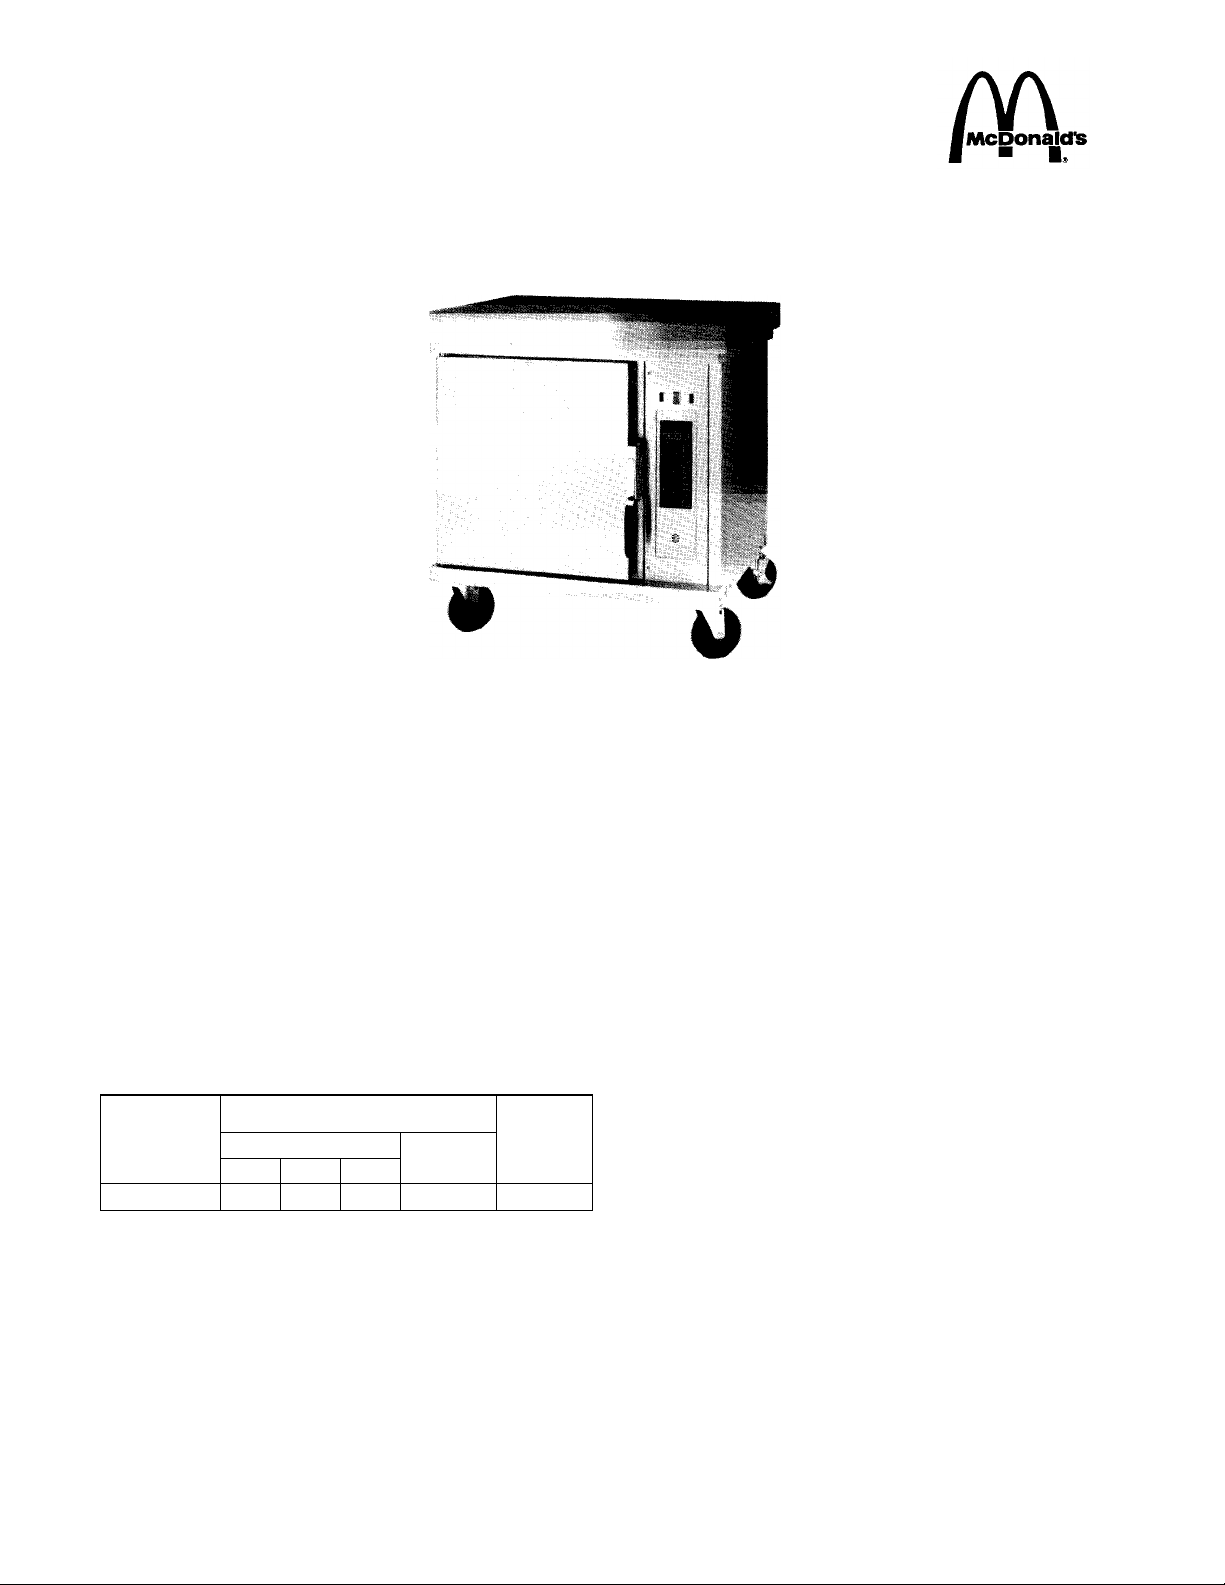
CONVECTION OVEN
Model M4200-3S
PRODUCT FEATURES
• Six-channel built-in timer.
• Solid-state temperature controller with on-demand
digital temperature display maintains accurate
temperature.
• Stainless steel interior and exterior for durability and
easy cleaning.
• Refrigerator-type door handle.
• Three fully adjustable shelves.
• Reversible door.
ACCESSORIES
21342 Oven stacking kit
21330 Caster kit
21445 Oven prep top
DIMENSIONS
MODEL INSTALLED
DIMENSIONS WEIGHT
W D H
M4200-3S 30" 25 1/2" 25" 204 Ibs. 232 Ibs.
SHIPPING
WEIGHT
ELECTRICAL INFORMATION Voltage: 208V OR
240V, three phase. Power: 208V: 7.5 KW, 21.8
amps per line maximum. 204V: 8.4 KW, 21.2
amps per line maximum.
Oven is provided with a low profile pin-and-sleeve plug
(L43-30P9).
PRODUCT FINISH
Stainless steel top, front, sides and back.
PRODUCT WARRANTY
The M4200-3S Convection Oven manufactured by Wells is
warranted to be free from defects in materials and
workmanship for a period of one year from the date of
original installation and is for the benefit of the original
purchaser only. This warranty does not apply to damage
resulting from fire, water, burglary, accident, abuse,
misuse, acts of God, faulty installation including improper
electrical supply.
THIS WARRANTY IS THE COMPLETE AND ONLY WARRANTY,
THERE BEING NO OTHER WARRANTIES, EXPRESSED OR
IMPLIED IN LAW OR IN FACT, INCLUDING BUT NOT LIMITED
TO, WARRANTIES OF MERCHANT-ABILITY OR FITNESS FOR
ANY PARTICULAR PURPOSE, AND/OR FOR DIRECT,
INDIRECT, OR INCONSEQUENTIAL DAMAGES IN
CONNECTION WITH WELLS' PRODUCTS.
Wells' obligation under this warranty is limited to the repair
of defects or replacement without charge by a WELLS
factory authorized service agency or one of its sub-service
agencies. This service will be provided on customer's
premises.
1
Page 3
ELECTRICAL SPECIFICATIONS:
VOLTS KW AMPS PER LINE THREE PHASE NEMA PLUG CONFIGURATION
L1 L2 L3
208 7.5 20.8 21.8 21.8 L430P9
M-4200-3 240 8.4 20.2 21.2 21.2
M4200-3S 208 7.5 20.8 21.8 21.8
240 8.4 20.2 21.2 21.2
Wells Manufacturing Company
2 Erik Circle, P.O. Box 280 • Verdi, NV 89439
(702) 345-0444 FAX: 702-345-0569
1994 Wells Manufacturing Company Printed in U.S.A. Item No. 43957 F
TOLL-FREE FAX: 800-356-5142, for orders only
1a
Page 4

INTRODUCTION
These commercial Convection Oven Models M42003 and M4200-3S are designed to bake food products
uniformly and economically. They incorporate stateof-the-art, solid-state electronic controls for
controlling the cooking temperature and time. The
M4200-3 and M4200-3S are 7.5 KW ovens. The
M4200-3S is the stackable model of the oven.
SAFETY
Knowledge of proper installation, operation and
maintenance procedures is essential to ensure safe
operation of any equipment. The instructions
contained herein are meant as guidelines:
• Always have dry hands prior to turning the
ON/OFF/FAN switch ON or OFF or FAN.
• Turn OFF the ON/OFF/FAN switch anytime the
oven is not in use.
• If an electrical shock is felt when touching the
oven, disconnect the power immediately and call
Wells Service Department for assistance and
service.
• Have the electrical power receptacle installed by
a licensed electrician. Make sure that the
equipment is properly grounded.
• If you find that the power cord is frayed, do not
plug it into the power receptacle. If it is already
plugged in, disconnect the plug after shutting
OFF the circuit breaker.
• DISCONNECT THE POWER CORD BEFORE
ATTEMPTING ANY REPAIRS AND/OR
CLEANING THE OVEN.
• Allow the unit to cool before cleaning.
• DO NOT SPLASH WATER ON OR INTO THE
OVEN. WET ELECTRICAL COMPONENTS AND
WIRING PRESENT A HIGH SHOCK HAZARD.
• Do not operate the unit unless all 4 casters are
installed or the oven has been properly stacked
on top of another oven.
Hazard Communication Standard (HCS) —
Procedure(s) in this equipment manual include
the use of chemical products. These chemical
products will be highlighted with bold face letters
followed by the abbreviation (HCS) in the text of
the manual. See the Hazard Communication
Standard (HCS) Manual for the appropriate
Material Safety Data Sheet(s) (MSDS).
2
Page 5
ITEM
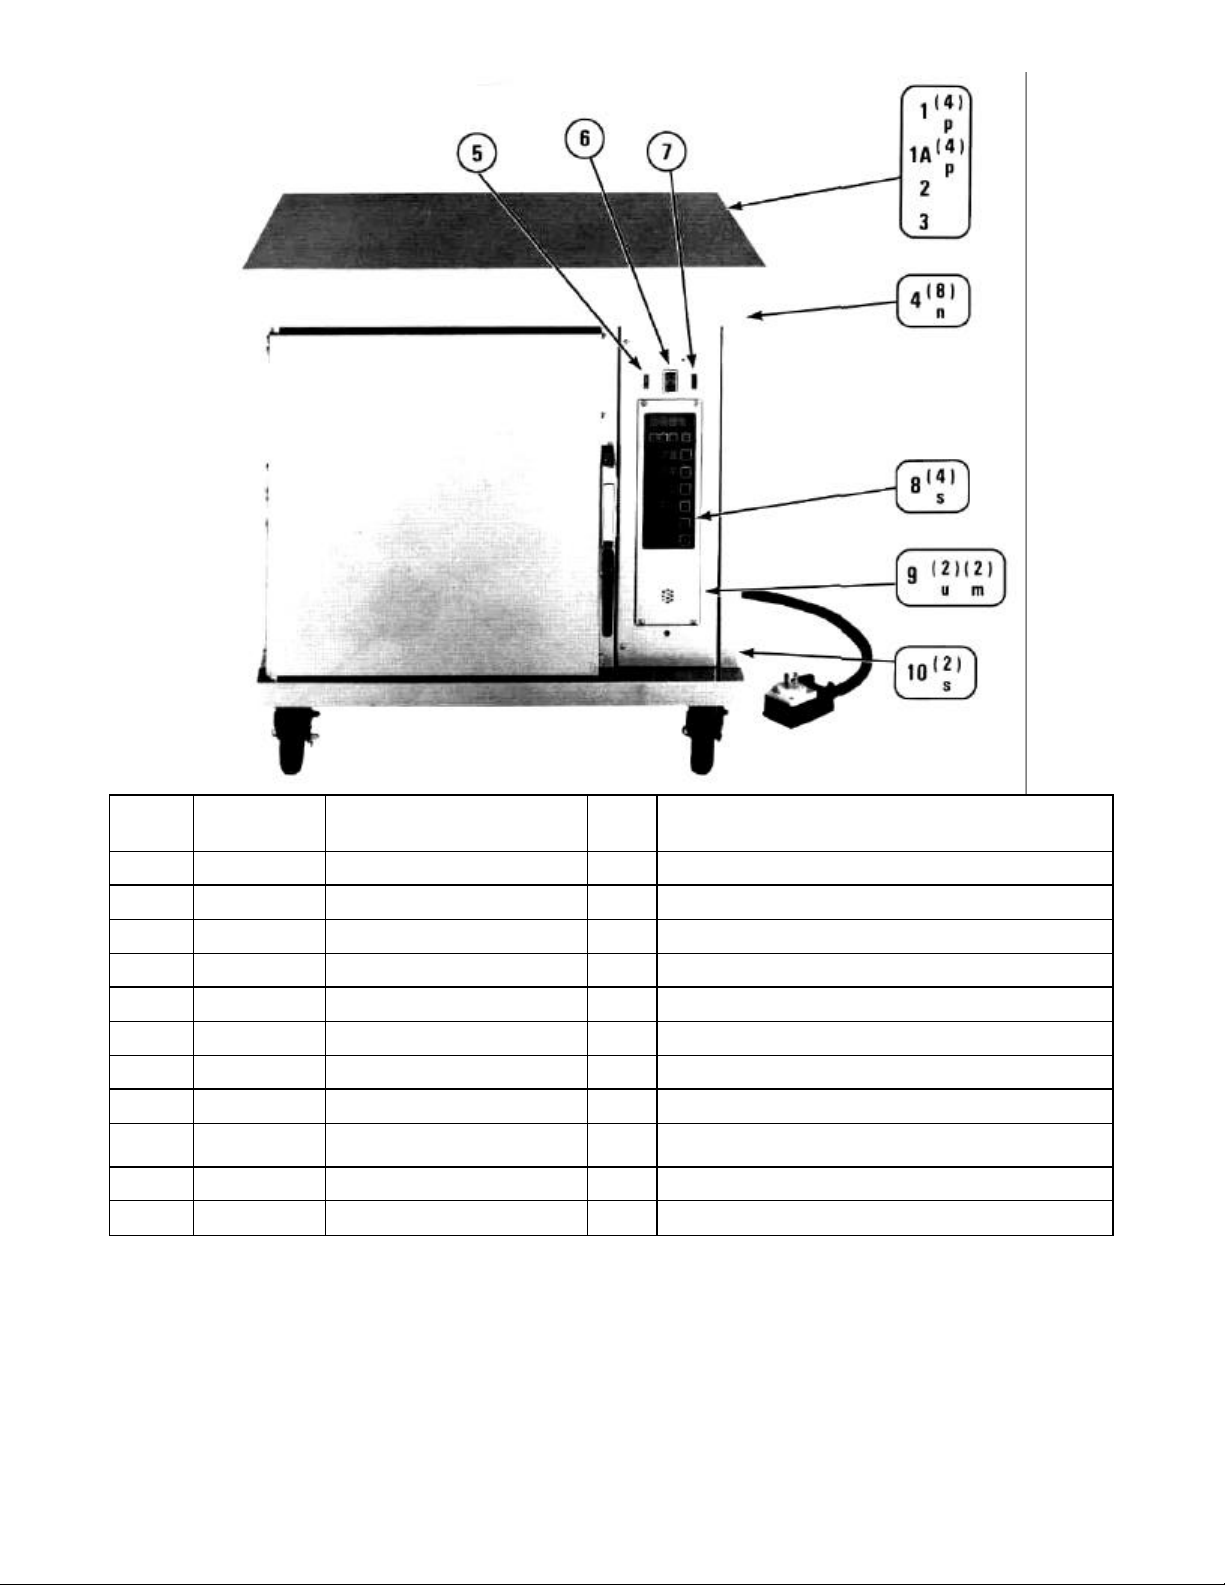
1 21445 Prep-top Assembly 1 Pre-assembled parts no. 1A, 2, 3.
1A 63952 Prep-top (TOP) 1 Provides working surface.
*2 63953 Prep-top insulation 2 Thermal Barrier for the prep-top.
*3 63950 Prep-top (Bottom) Cover 1 Protects prep-top insulation.
4 63788 Oven top 1 Covers and protects top insulation.
5 65145 Heat ON Light (amber) 1 Indicates oven is heating.
6 63918 ON/OFF/FAN Switch 1 Turns the electrical power ON, OFF, or FAN only.
7 65146 Power ON Light (red) 1 Indicates power is ON.
8 64964 Oven controller 1
9 65138 Control Panel 1 Used to mount electrical components.
10 63801 Right Front Corner Trim 1 Covers oven frame.
PART
NO.
DESCRIPTION QTY. FUNCTION
Controls oven. Sets, adjusts and programs oven
cooking time and temperature.
*Not Shown
3
Page 6
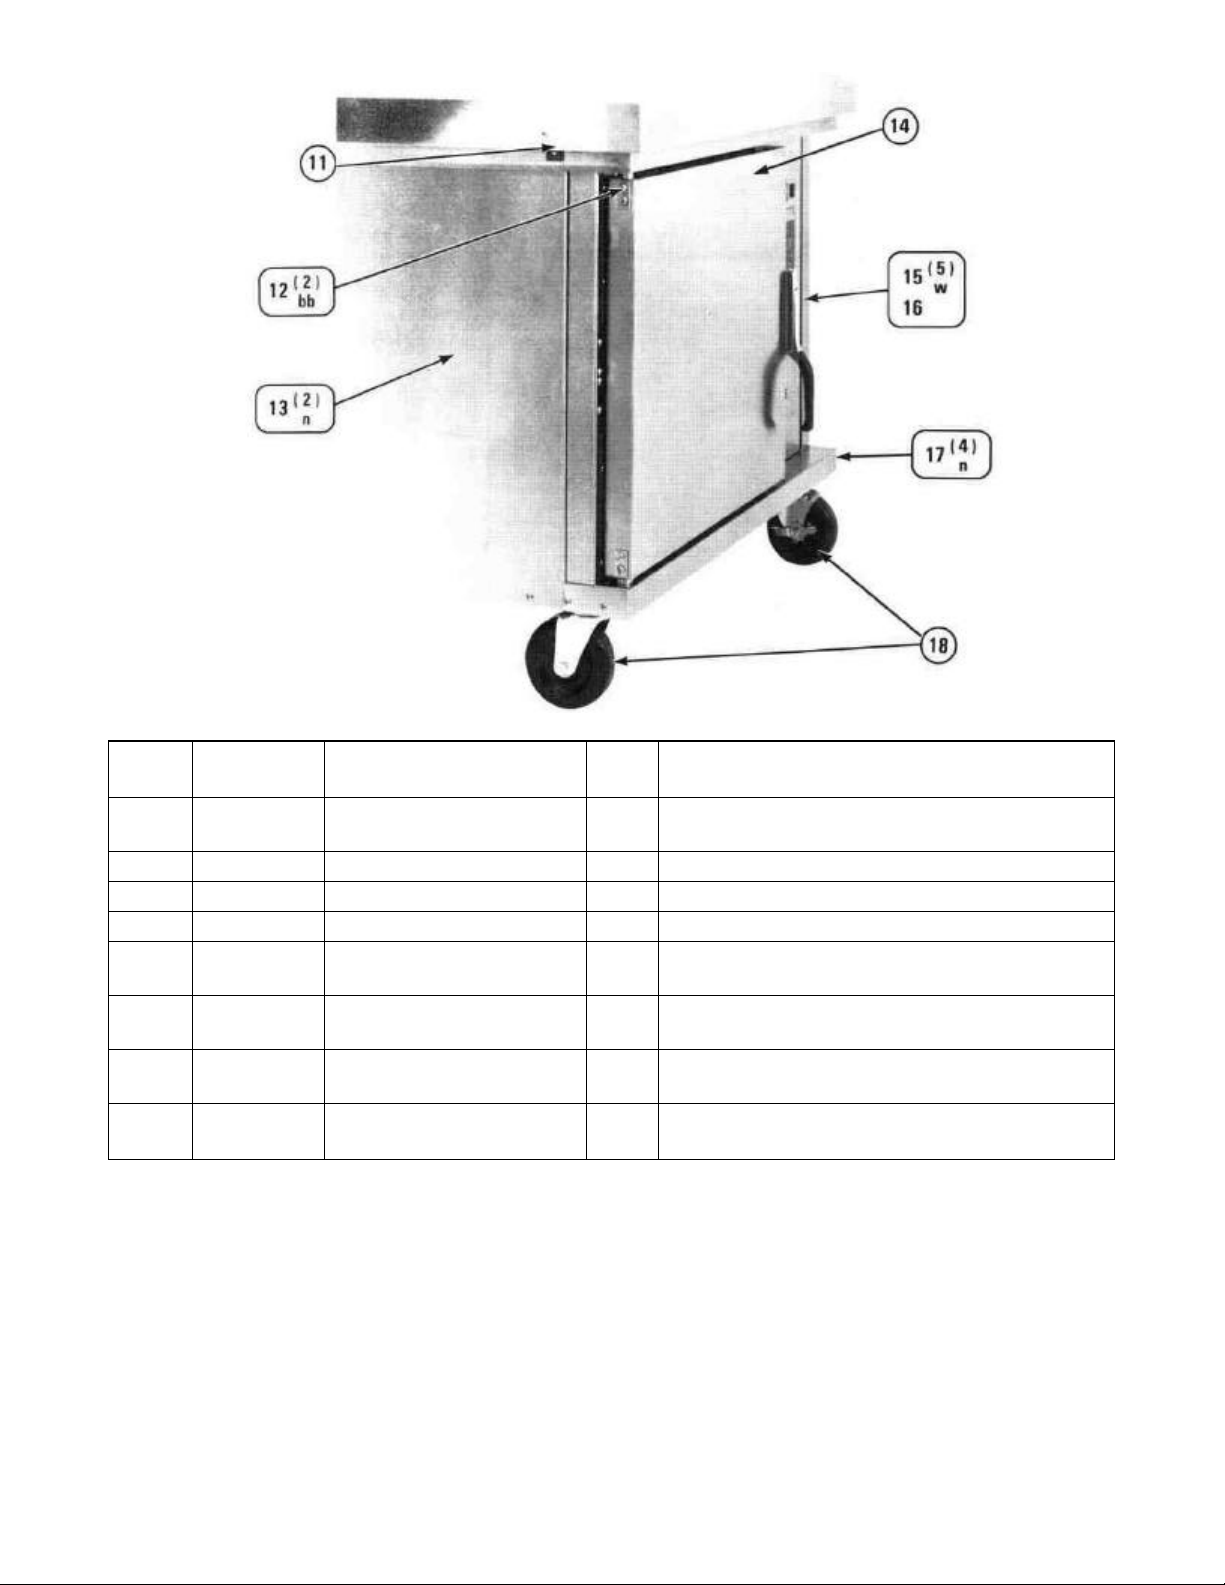
ITEM
PART
NO.
DESCRIPTION QTY. FUNCTION
11 63828
12 63913 Door Pin Cover 2 Allows access to the door hinge pin.
13 63790 Side panel (left & right) 2 Covers and protects oven sides.
14 65156 Door Assembly 1 Covers and provides access to oven cavity.
15 63946
*16 63945 Door Striker Spacer 1
17 63804 Lower Front Trim 1
18 21372
Prep-top mounting bracket
(not on M4200-3S)
Door Handle and Latch
Assembly
Front Casters with Brake (not
on M4200-3S)
4 Brackets securing prep-top to the oven.
Provides access to the oven cavity and secures the
1
door closed.
Provides correct positioning for the door handle
assembly.
Provides access to the bottom door adjustment and the
door ajar sensor.
Allows oven to be moved about and secures it in place
2
when stationary.
*Not Shown
4
Page 7
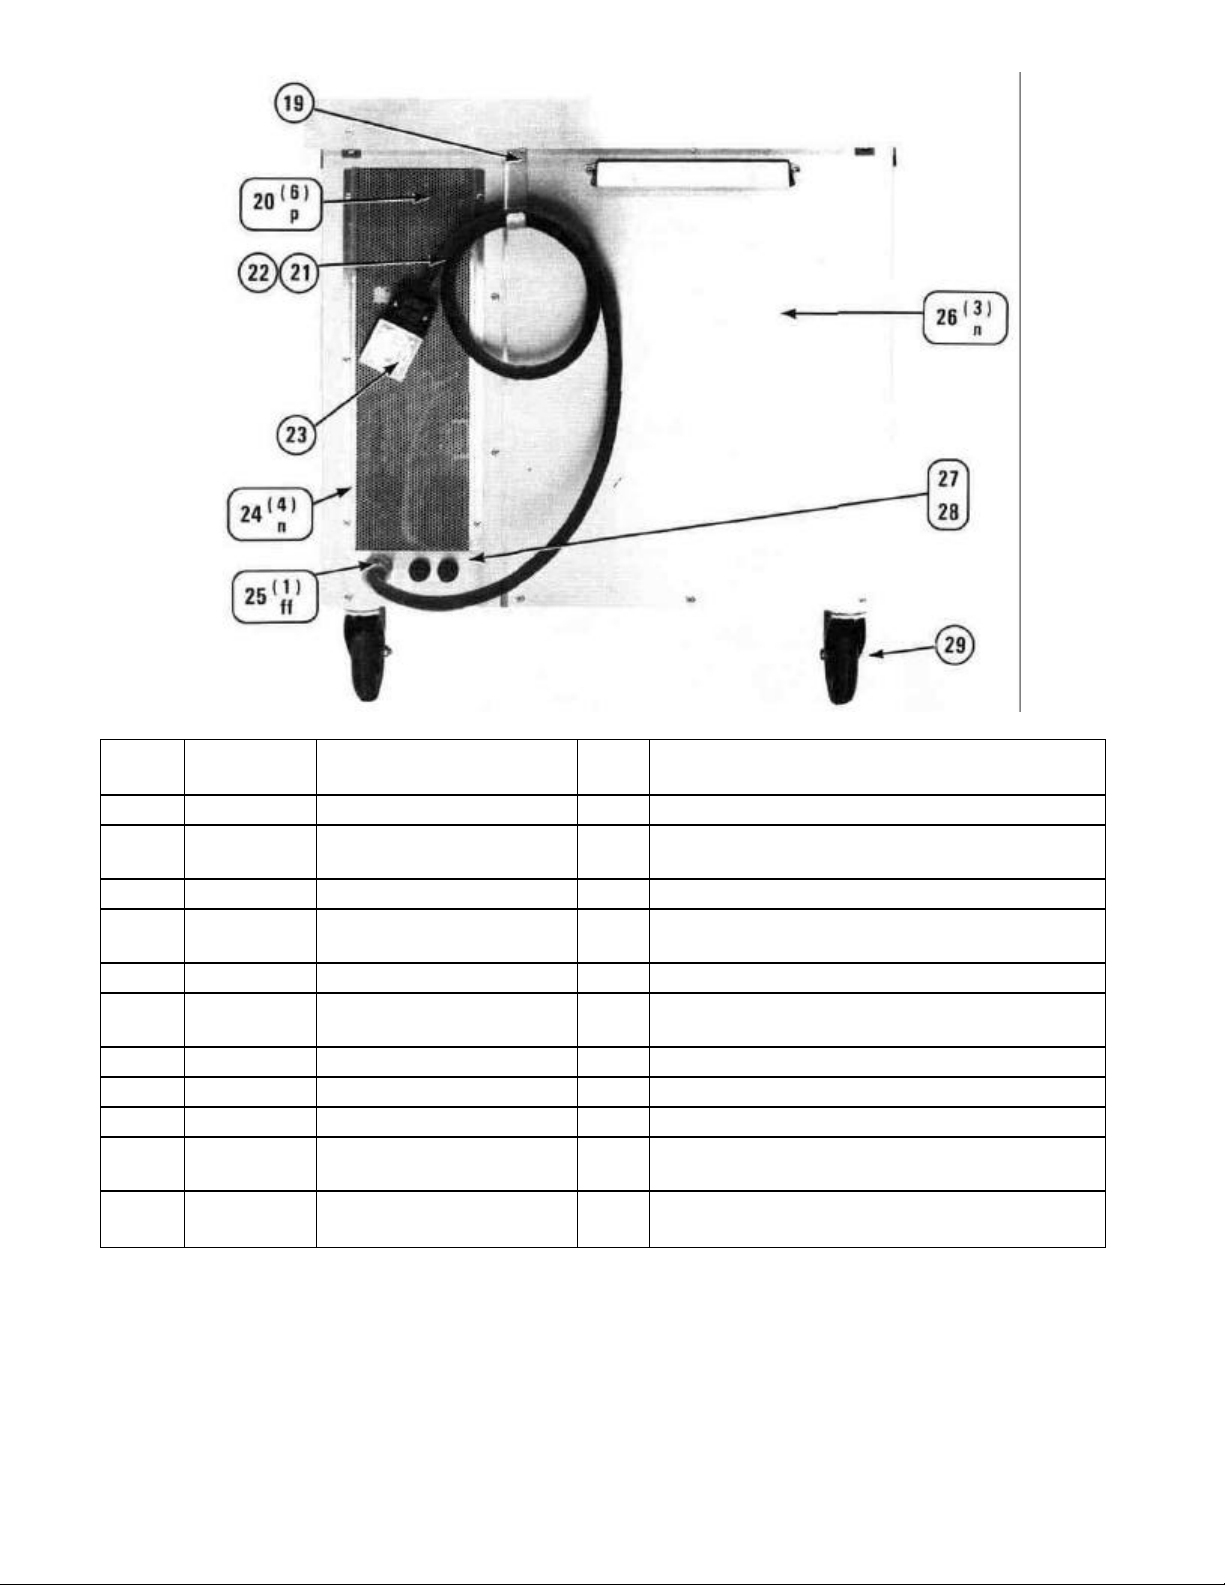
ITEM
19 63827 Cord Hanger 1 Bracket for Power Cord storage.
20 63766 Rear Access Cover 1
21 21486 Power Cord Assembly 1 Pre-assembled parts no. 22, 23, 25.
22 56324 Power Cord 10/4, Type 50 1 Transfers electric power to the unit.
23 65501 Plug LP-430P9 1 Connects oven to the electrical power supply.
24 65583 Right Rear Panel 1 Covers high voltage components from the rear.
25 65502 Cord Strain Relief 1 Secures the power supply cord to the oven.
26 65173 Rear Left Panel 1 Covers wrap insulation and frame.
27 54769 Fuse holders 2 Secures fuse 10A x 300V.
*28 54768 Fuse 10A x 300V 2
29 21373
*Not Shown
PART
NO.
DESCRIPTION QTY. FUNCTION
Rear casters (no brake) (not on
M4200-3S)
Allows access to main power supply connection and
high voltage components.
Over-current protection; device for the solid state
controls and the motor.
2 Allows the oven to be moved about.
5
Page 8
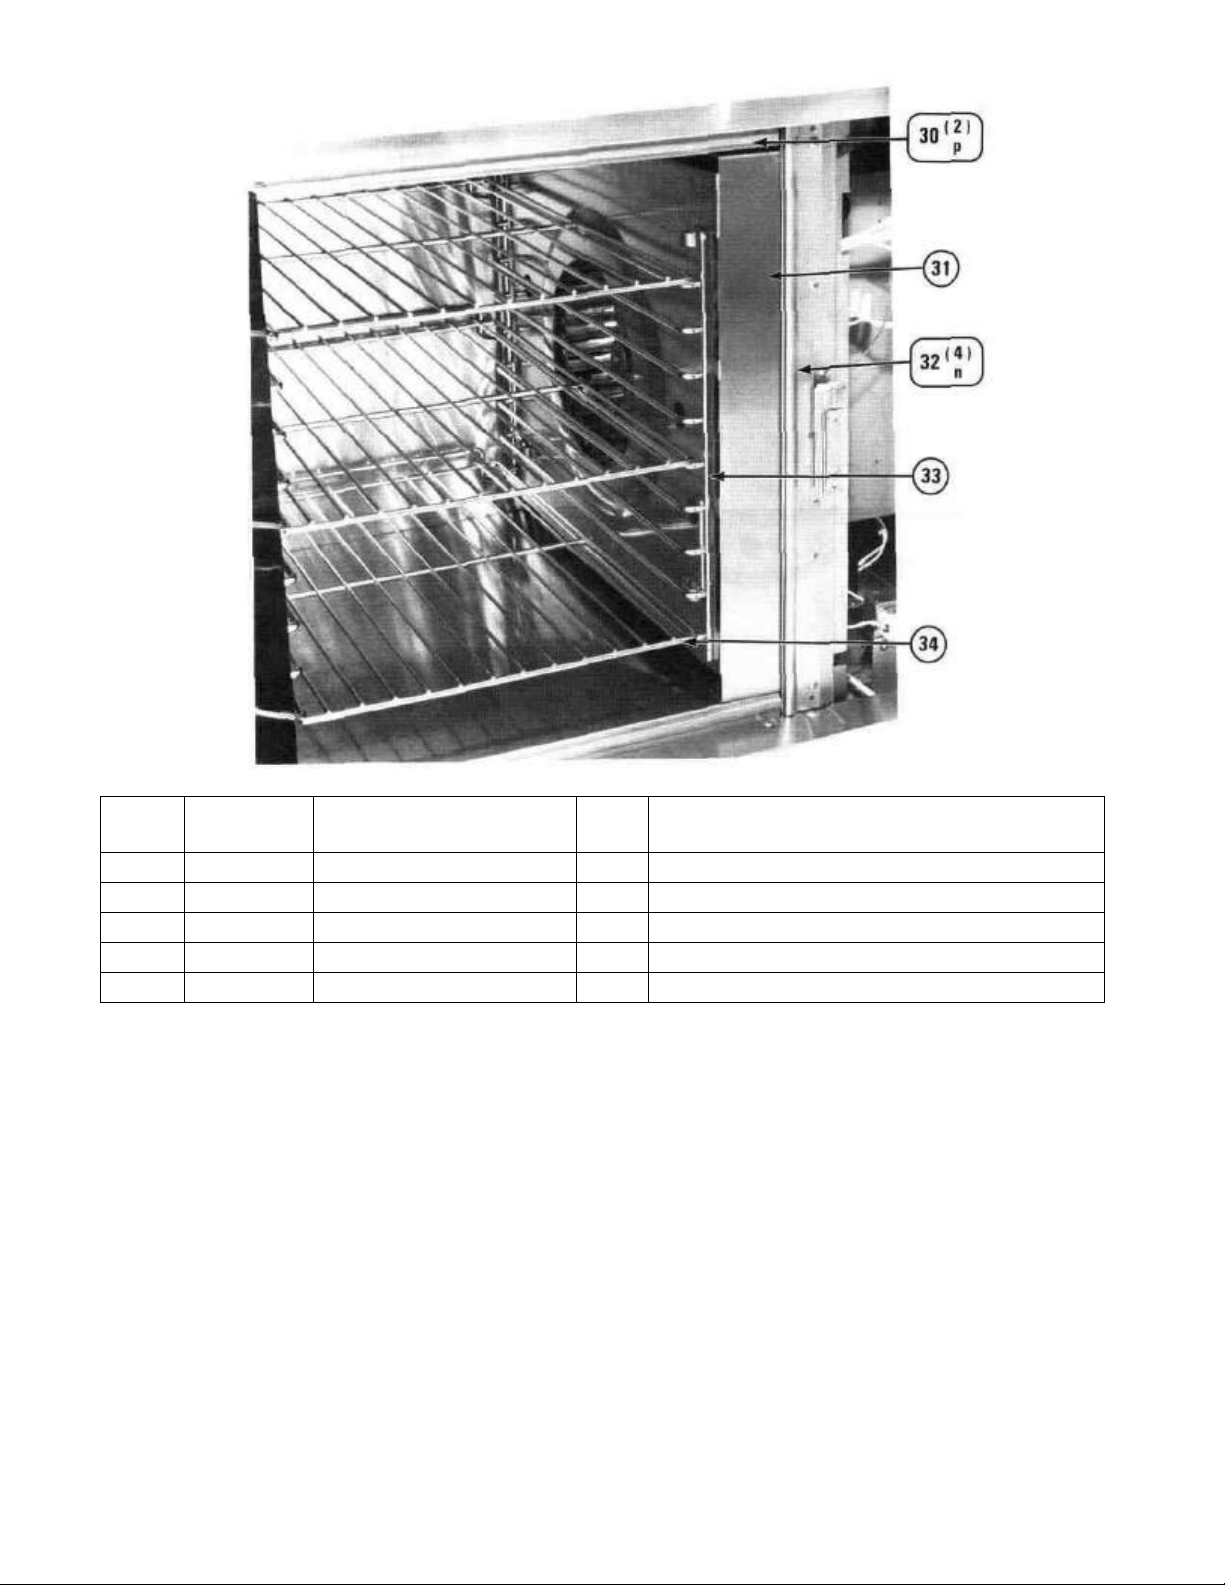
ITEM
30 63817 Top and Bottom Door Gasket 2 Seal to retain the interior oven environment.
31 64504 Interior Air Baffle 1 Uniformly dispenses heated air throughout the oven.
32 63820 Side Door Gasket 2 Seal to retain the interior oven environment.
33 21375 Oven Rack Supports 2 Supports oven racks.
34 21376 Oven Rack 3 Supports product pans.
PART
NO.
DESCRIPTION QTY. FUNCTION
6
Page 9
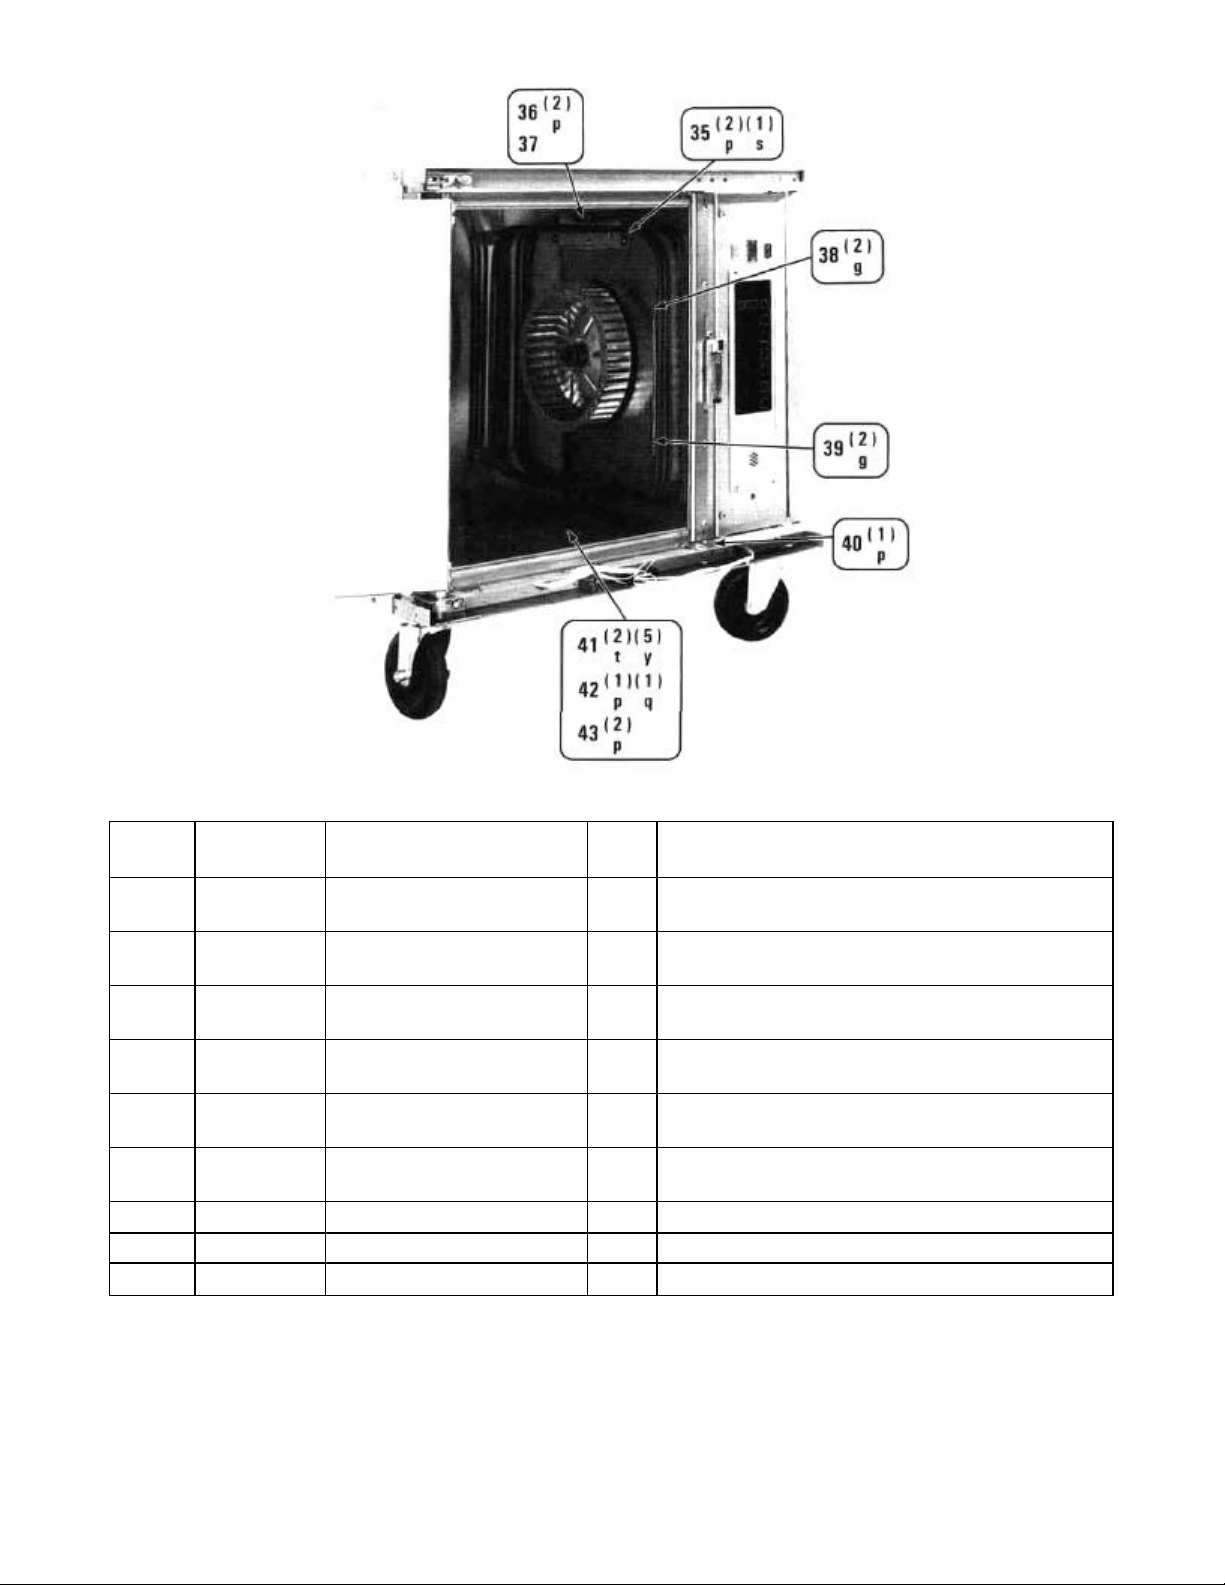
ITEM
35 63829 Heating Element Bracket 6 Holds the heating elements to the inner cavity.
36 63836 Inner Heat Gasket Cover 1 Protects and secures the heating element gasket.
PART
NO.
DESCRIPTION QTY. FUNCTION
*37 63834 Heating Element Gasket 2
38 63881 High-Limit Top Clip 1 Secures the high-limit thermostat bulb in place.
39 63883 High-Limit Bottom Clip 1 Secures the high-limit thermostat bulb in place.
40 63903 Blank Hinge Cover 1
41 63759 Cavity Assembly 1 Provides the interior surface of the oven.
*42 65015 Rear Cavity Support 2 Supports cavity.
*43 63889 Rack Support Clip 4 Supports the oven rack support.
Element thermal seal to retain the inner cavity
environment.
Covers the unused hinge hole for left to right door
option.
*Not Shown
7
Page 10
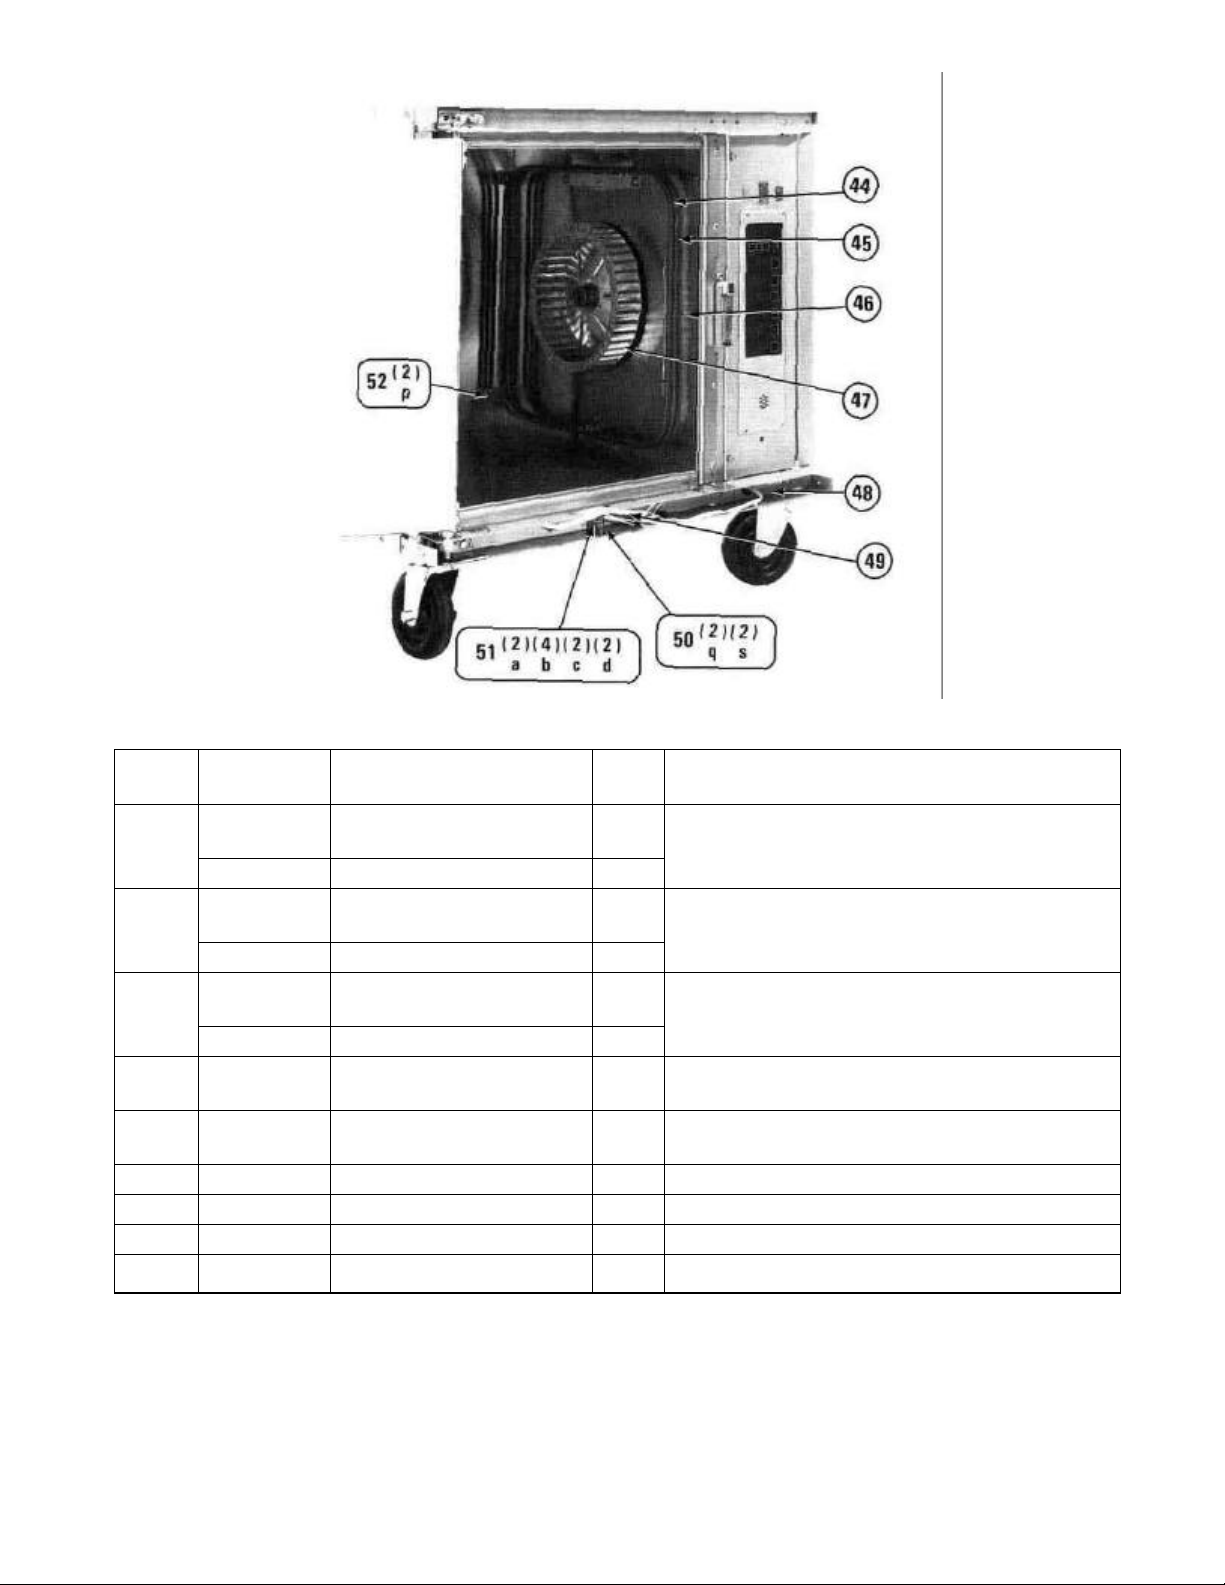
ITEM
PART
NO.
DESCRIPTION QTY. FUNCTION
44 63873
63949 (240 Volt Oven) 1
45 63866
63800 (240 Volt Oven) 1
46 63872
63783 (240 Volt Oven) 1
47 63797 Blower Wheel 1 Circulates heated air throughout the oven cavity.
48 51040 Bushing 1 Protects electrical wiring to the door ajar switch.
49 65647 Ajar Switch Shield 1 Protects the switch from interior oven heat.
50 63787 Reed Switch Bracket 1 Supports the door ajar sensor.
51 65239 Door Ajar Switch 1 Sensor for door ajar.
52 63876 Baffle Support Assembly (Rear) 2 Supports the interior baffle.
Outer Heating Element (208
Volt Oven)
Center Heating Element (208
Volt Oven)
Inner Heating Element (208
Volt Oven)
1 Heats the oven cavity interior and air.
1 Heats the oven cavity interior and air.
1 Heats the oven cavity interior and air.
8
Page 11
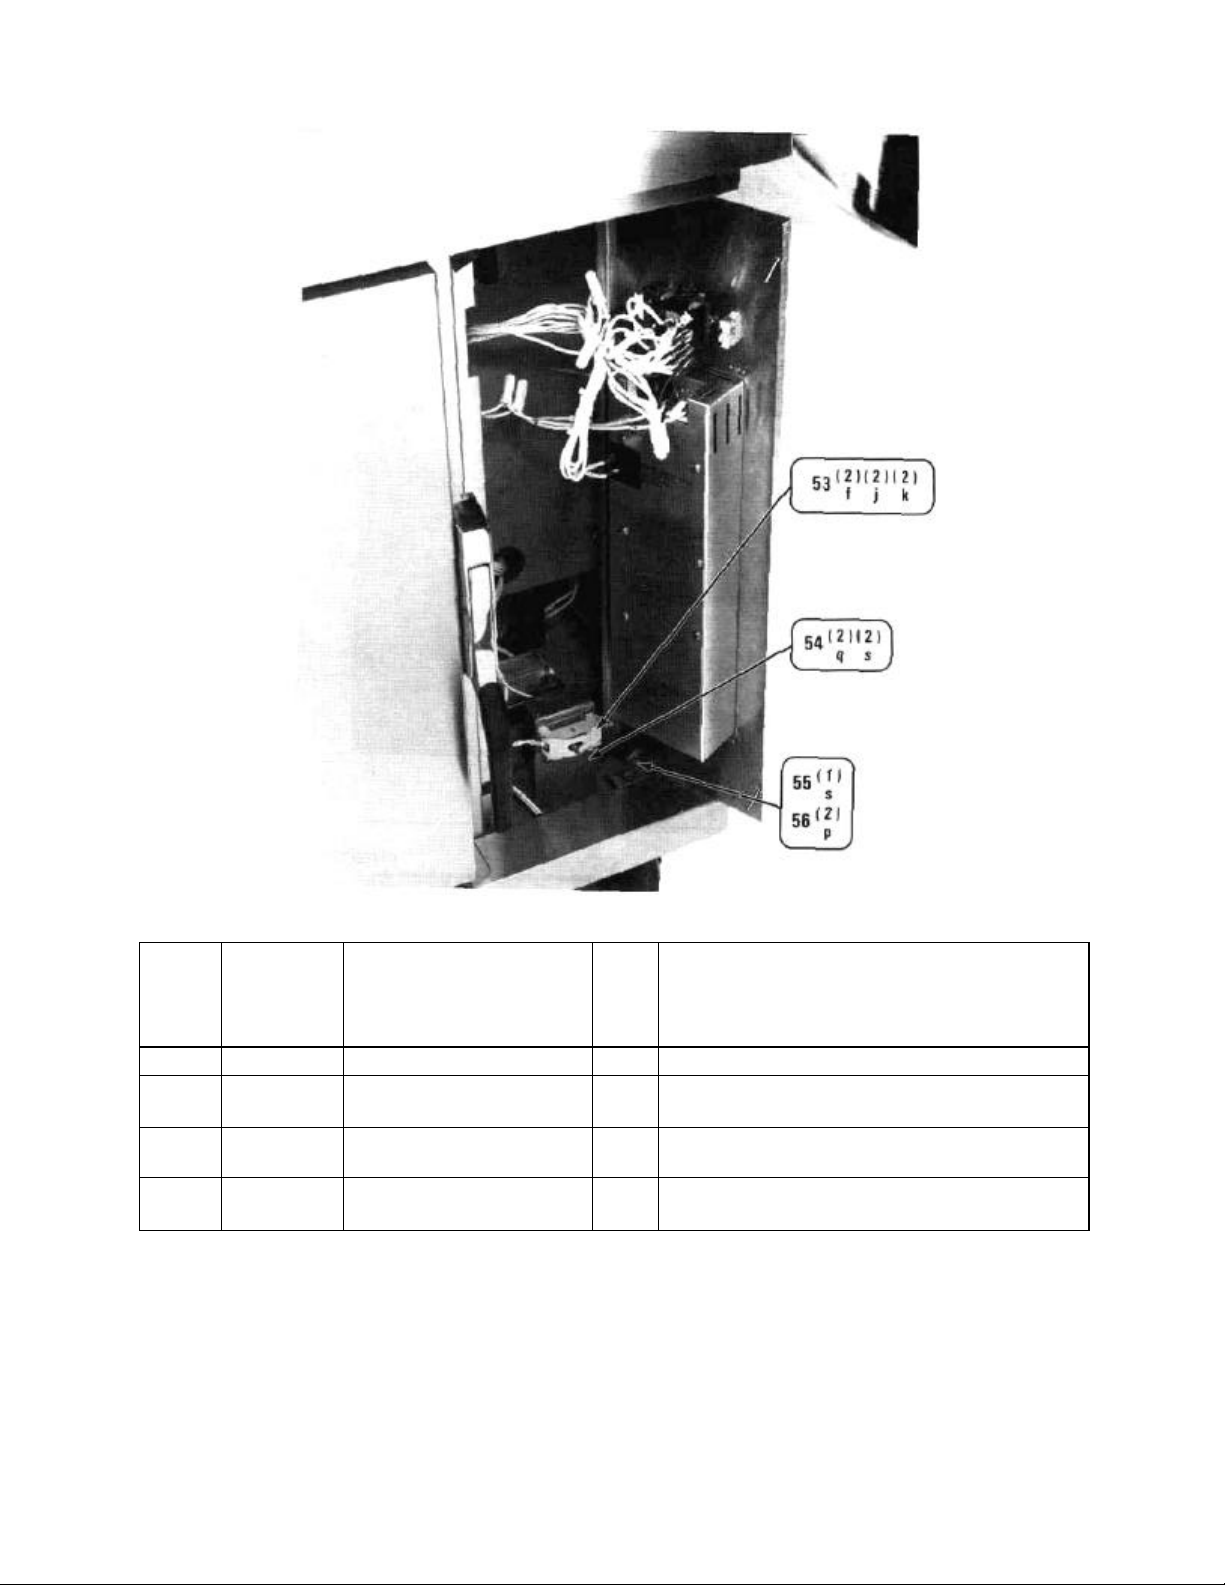
ITEM PART
NO.
53 65211 High-Limit Thermostat 1 Safety device which prevents excessive oven
54 63840 High-Limit Bracket 1 Supports the high-limit thermostat.
55 63898 Control Panel Hinge
Bracket Assembly
56 63897 Angle Frame Pin Hinge 2 Secures the control panel to the oven and allows it to
*57 63907 Wire Harness
Stand-Off
*Not Shown
DESCRIPTION QTY. FUNCTION
temperatures.
2 Provides pivot shaft to the control panel.
pivot open.
1 Secures wire harness at the front of the unit.
9
Page 12

ITEM
58 63880 Relay 1 Turns the fan and heat OFF when the door is ajar.
59 63929 Transformer 1 Provides low voltage power to the electronic controls.
60 63849 Insulation Cavity Wrap 1 Thermal barrier for interior cavity.
61 63755 Frame Assembly 1 Substructure of oven.
62 57465 Power Terminal Block 1 Connection block for the main power supply to the unit.
PART
NO.
DESCRIPTION QTY. FUNCTION
63 61439 Ground Connection Lug 1
64 63920 Mercury Power Relay 1 Transfers electrical power to the heating element.
65 63843
Bottom and Top Cavity
Insulation (Bottom Not Shown)
Connection for the external unit ground from the main
power supply.
2 Thermal barrier for interior top and bottom cavity.
10
Page 13

ITEM
PART
NO.
DESCRIPTION QTY. FUNCTION
66 63837 Outer Heater Gasket Cover 1
67 64957
68 51040 Bushing 1 Protects wiring to the motor,
69 63932
70 63811 Motor Mount 1 Used to hold motor in position.
71 65166 Main Wire Harness 1 Provides electrical connection to control components.
72 64687 Cooling Fan 1 Used to cool down electrical components.
7.5 KW Heater Harness
(M4200-3 and -3S)
Fan Motor 208/240V 1/4 H.P.,
1800 RPM
Protects and secures the heating element gasket in
place.
1 Transfers electrical power to the heating elements.
1 Rotates air movement fan.
11
Page 14
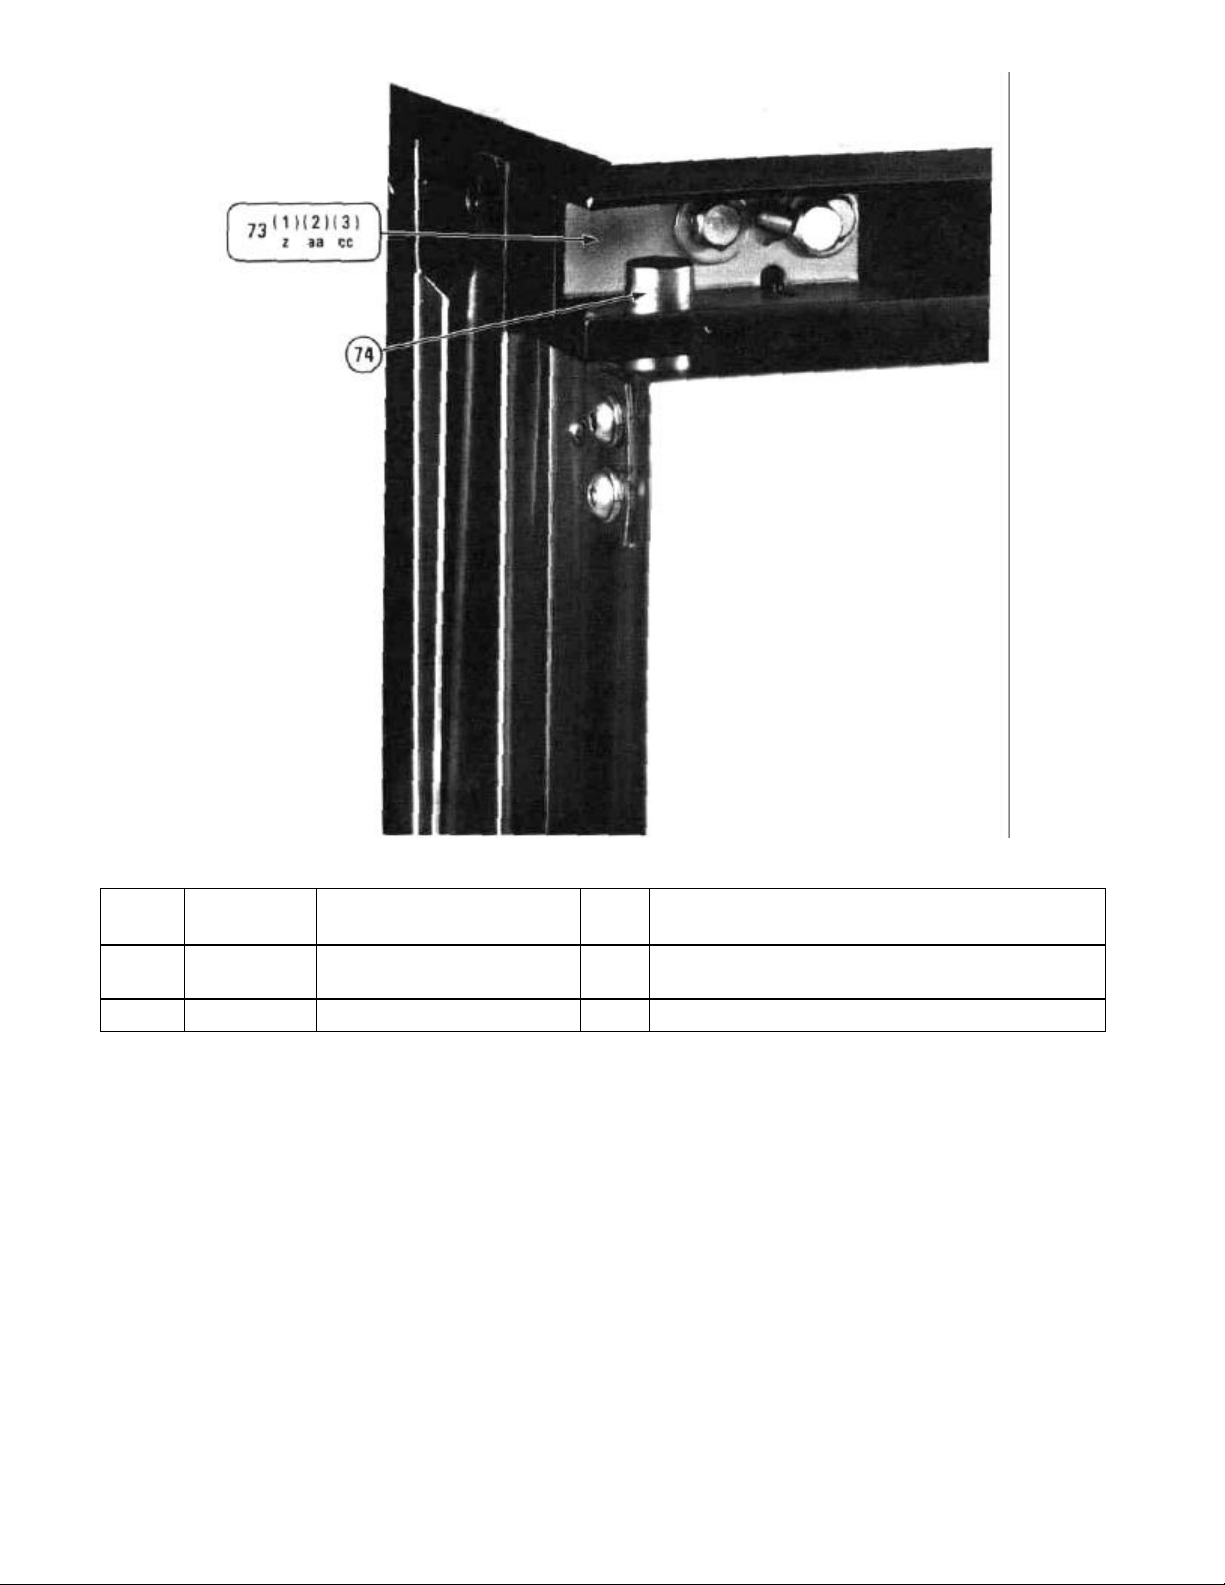
ITEM
PART
NO.
DESCRIPTION QTY. FUNCTION
73 63860 Door Top Hinge Bracket 1
74 63887 Door Top Hinge Pin 1 Holds the door to the upper hinge bracket.
Attaches the door to the oven and is used for door
adjustment.
12
Page 15

ITEM
*75 63912 Bottom Door Hinge Pin 1 Holds the door to the bottom hinge bracket assembly.
76 63900 Bottom Hinge Sleeve 1 Door alignment adjustment sleeve.
77 63899 Hinge Pivot Cover 1 Covers the frame around the bottom door hinge.
PART
NO.
DESCRIPTION QTY. FUNCTION
78 63896
*Not Shown
Door Bottom Hinge Bracket
Assembly
1 Attaches the door to the oven and allows it to open.
13
Page 16
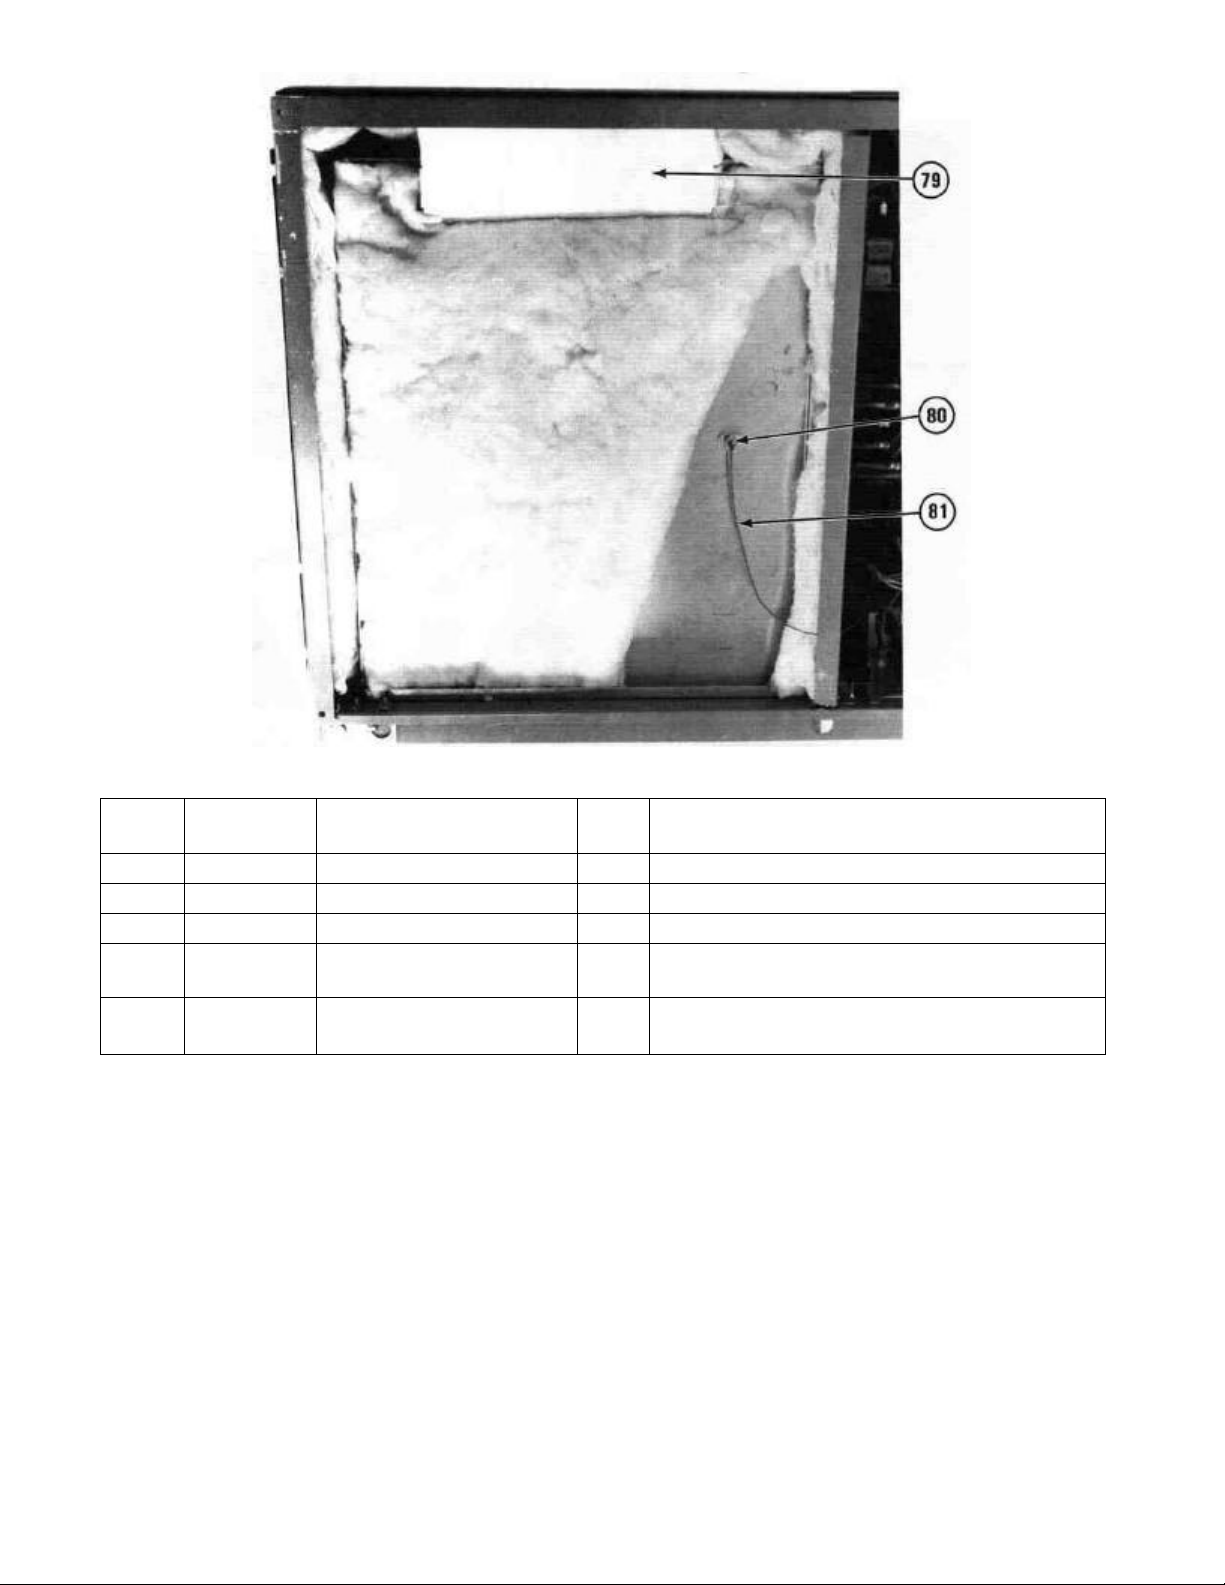
ITEM PART
NO.
79 65238 Air Duct Assembly 1 Thermal barrier to the rear exhaust vent.
80 63927 Thermocouple 1 Sensor for interior oven temperature.
81 65127 24" (61 cm) Sleeving 1 Protects thermocouple wire.
*82 21342 Oven Stacking Kit (M4200-3S
only)
*83 21330 Caster Kit (For M4200-3S
ovens only)
*Not Shown
DESCRIPTION QTY. FUNCTION
1 Used to secure the oven on top of another oven.
1 Kit of parts to provide mobility to the M4200-3S oven.
14
Page 17

HARDWARE IDENTIFICATION
ITEM PART NO. DESCRIPTION TOTAL QUANTITY
a 55618 4-40 Screw x 3/8" (10 mm) long 2
b 55496 4-Flat Washer 4
c 55474 4-Split Lock Washer 2
d 55276 4-40 Hex Nut 2
e 60329 6-32 Screw x 7/8" (22 mm) long 2
f 51245 6-32 Screw x 1/2" (13 mm) long 2
9 60732 6-32 Screw x 1/4" (6 mm) long 4
h 53923 6-32 Screw x 3/16" (5 mm) long 9
j 55495 6-Flat Washer 2
k 53961 6-32 Kep Hex Nut 2
l 65201 8-32 Screw x 2" (5,0 cm) long 2
m 54911 8-32 Screw x 7/8" (22 mm) long 2
n 65000 8-Self-Tapping Screw x 1/2" (13 mm) 31
p 61620 8-32 Screw x 1/2" (13 mm) Tri Head 29
q 54285 8-32 Screw x 1/2" (13 mm) Flat Head 6
r 55204 8-Flat Washer 8
s 51053 8-32 Kep Hex Nut 28
t 57943 8-Tinnerman Clip 2
u 51039 8-Speed Nut, Type J 2
v 63909 8-Spacer 4
w 60821 10-32 Screw x 1-1/2" (3,8 cm) long 5
y 65001 10-Self-Tapping Screw x 1/2" (13 mm) 5
z 61180 1/4-20 Bolt x 1-1/4" (3,1 cm) long 2
aa 61048 1/4-20 Bolt x 3/4" (19 mm) long 8
bb 57761 1/4-20 Screw x 5/8" (16 mm) long 4
cc 61791 1/4 Flat Washer 8
dd 55486 1/4 Split Lock Washer 4
ee 55485 1/4-20 Hex Nut 4
ff 65504 1" (25 mm) NPT Locknut 1
99 64363 3/4-10 UNC Nut 1
15
Page 18

EQUIPMENT SET-UP AND
CLOSE PROCEDURES
Set-up
1. Make sure the power cord is plugged into the
appropriate receptacle.
2. Place the 3 product racks in the 2, 5, and 8 rack
support positions.
3. Place the ON/OFF/FAN switch in the ON
position. The red power ON light will come ON.
4. Check oven set temperature. Press and hold
the temp button for 5 seconds or until the
screen flashes the current set temperature in
degrees. If this is not right refer to and follow
the step by step procedure for "Setting the
Oven Temperature."
5. If the oven set temperature is correct, press the
temp button again to clear the display.
6. Ensure that the door is closed. The amber heat
ON light will come on indicating that the heaters
are ON.
7. Allow the oven to preheat for 30 minutes.
NOTE: The product timer can be used for timing this
pre-heat time.
8. When the amber heat ON light goes out the
oven is ready to use. From then on the amber
heat ON light will cycle ON and OFF with the
heaters (the lights and heaters will be ON at the
same time).
9. Check to see that the timers are set for the
correct times. If not, see "Setting the Timers".
Close
1. Place the ON/OFF/FAN switch in the FAN
position, open the door and leave it ajar while
the oven cools down for 20 minutes.
NOTE: The product timer can be used for this 20
minute cooling cycle.
CAUTION: The oven is still hot at this point, it
can burn you. Hand protection is required.
2. Remove the 3 product racks and the rack
supports. Clean them with a hot solution of McD
All Purpose Concentrate (APC) (HCS) from
the sink proportioner.
16
3. Spray a diluted solution of McD High Temp
Grill Cleaner (HCS) on all of the exposed oven
interior cavity surfaces.
NOTE: Mix 1 part McD High Temp Grill Cleaner
(HCS) to 5 parts hot water for the cleaning solution.
4. Close the oven door, place the ON/OFF/ FAN
switch in the OFF position and let stand for 10
minutes.
5. Wipe or scrub the interior surfaces with a clean
damp cloth or a nylon pad. Rinse/ wipe with a
wet towel to remove all solution residue.
6. Wipe down the exterior of the oven.
7. Replace the rack supports and the product
racks. Leave the oven door open overnight.
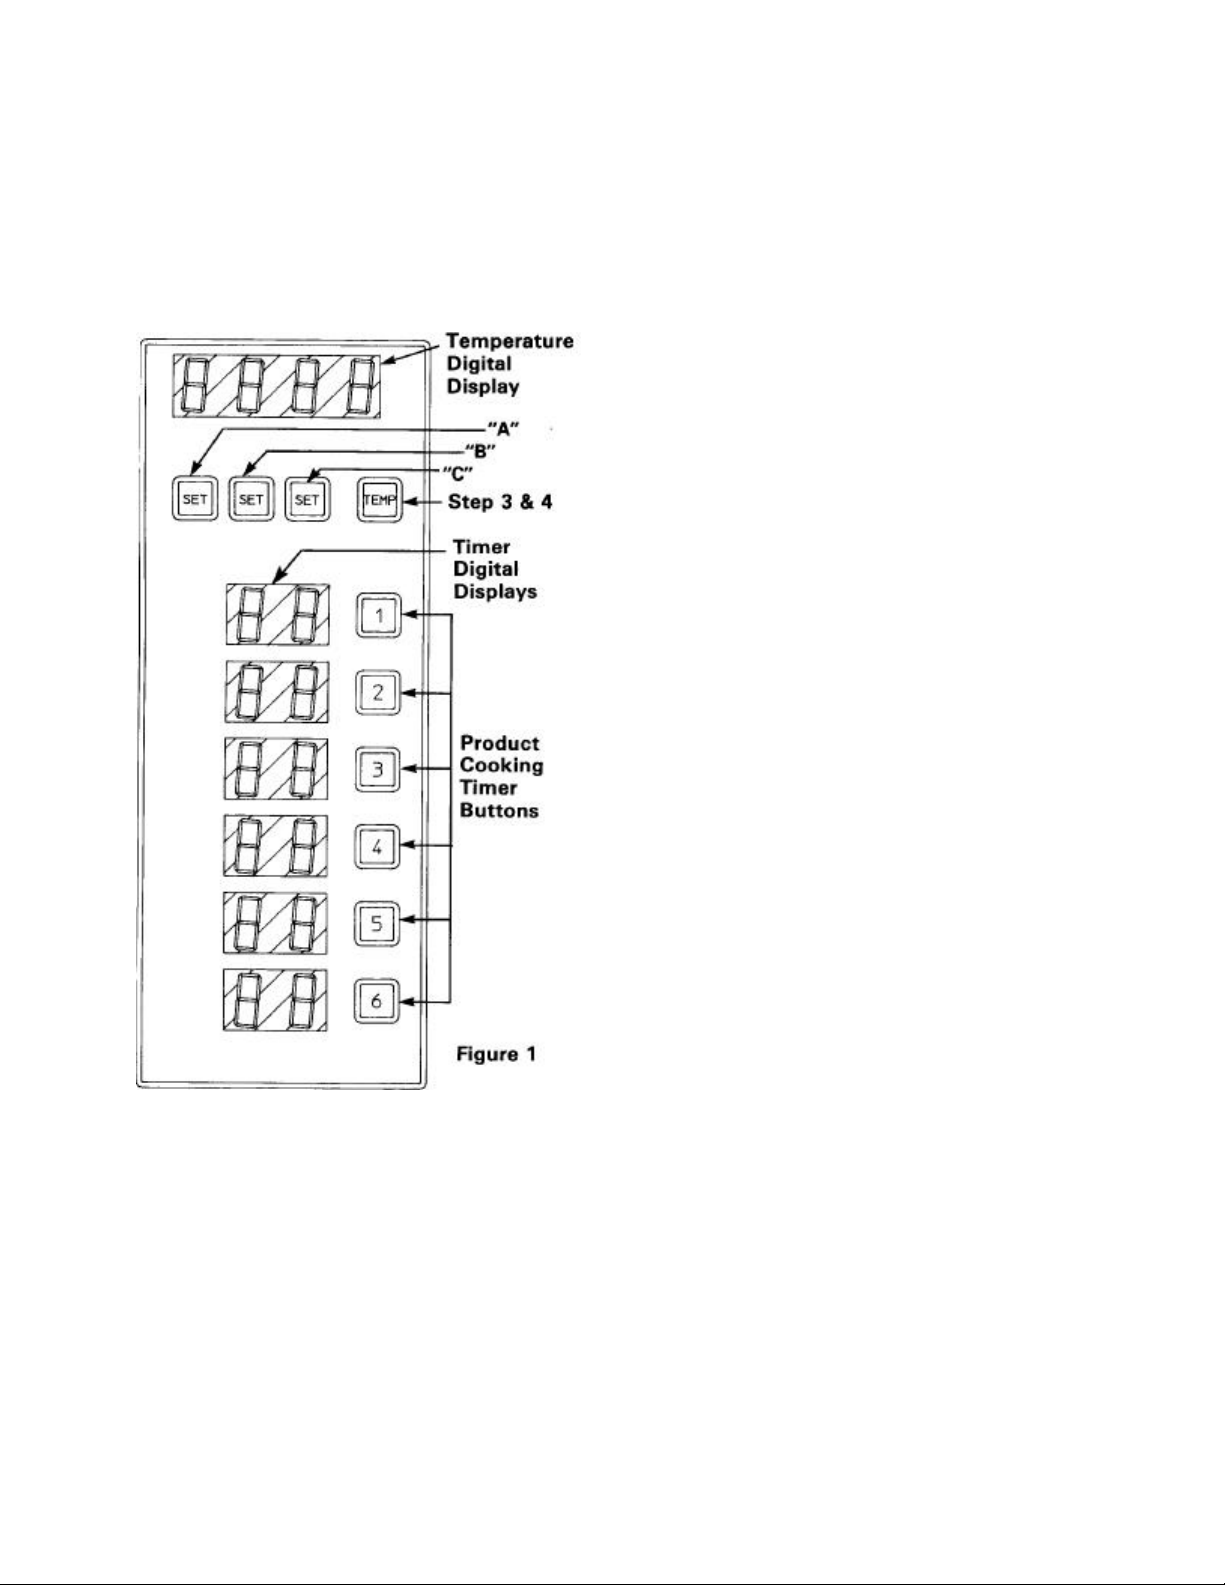
SETTING THE OVEN TEMPERATURE (See
Figure 1)
1. Make sure that the power cord is plugged into
the appropriate power supply receptacle.
2. Place the ON/OFF/FAN switch in the ON
position.
NOTE: No display will be present until the Temp
button is pressed.
3. Press the temp button momentarily to display
the current oven temperature. The display will
hold for 5 seconds.
4. Press the temp button and hold it for 3
seconds. This will cause the current set
temperature to flash. The controller is now in
the programming mode.
5. Use the 3 set buttons (A,B, and C) to set oven
temperature. Press Set button "A" to set
hundreds, press button "B" to set tens, and
press button "C" to set ones for oven
temperature. The corresponding digit on the
screen above the buttons will increase from "0"
to "9". Lift finger from button when desired digit
is displayed on the screen.
6. Press the temp button to exit the programming
mode. The new set temperature will
automatically be stored in memory.
NOTE: Failure to press the temp button within 30
seconds of programming the new oven set
temperature will cause the controller to assume' the
original oven set temperature and delete the new
oven set temperature just entered
Page 19
TIMER SETTING AND OPERATION
17
7. The maximum temperature the controller can be
programmed for is 500° F (260 °C), although
the actual oven temperature displayed may
read as high as 600° F (316 °C). If an attempt is
made to program the controller for temperatures
higher than 500° F (260 °C), the controller will
automatically adjust the oven set temperature to
500 °F (260°C).
2. Place the ON/OFF/FAN switch in the ON or
FAN position.
3. Verify that the time being displayed on the
appropriate product cooking timer is correct; if
not, proceed as follows.
4. With the timer display at low intensity: (Idle not counting down)
ONES — Depress set button "C" with your lefthand finger and press the corresponding timer
button (1-6) with your right-hand finger. The
right-most digit of the timer display will brighten
and start to rotate through the digits "0" to "9".
To stop the display at the desired digit, release
both buttons. The display will then stop and
retain the setting and return to the idle mode.
TENS — Depress set button "B" with your left
hand finger and press the corresponding timer
channel button (1-6) with your right hand
finger. The left most digit of the timer display
will brighten and start to rotate through the
digits "0" to "9". To stop the display at the
desired digit, release both buttons. The display
will then stop and retain the setting and return
to the idle mode.
Wells convection ovens have a product cooking
timer as part of the oven control panel. The timer
consists of 6 independent product cooking timers
that can be activated and deactivated independently
of each other by pressing the corresponding timer
operation button on the control panel.
SETTING THE TIMERS (See
Figure 1)
1. Make sure that the power cord is plugged into
the appropriate power supply receptacle.
OPERATION:
1. Make sure that the power cord is plugged into
the appropriate power supply receptacle.
2. Place the ON/OFF/FAN switch in the ON
position.
3. Verify that the time displayed is correct for the
product cooking timer needed; if not, see
"Setting the Timers."
4. To start a product cooking timer, press the
corresponding timer operation button once.
The digital display will become brighter and a
timing indicator dot will appear and start
blinking in the lower right-hand corner of the
digital display.
The timer will then automatically begin to
countdown. The display will indicate the total
time remaining in cooking cycle.
5. When each timer reaches "00", a three-tone
audible signal will
BE
heard, and the digital
display will blink.
6. To stop a product cooking timer or to cancel
the 3-tone audible signal, press the
corresponding timer operation button once.
Page 20

CALIBRATION
Tools: Digital Thermometer with Oven Probe; Oven
Mitt.
1. Be sure the oven is plugged into the appropriate
power supply receptacle.
2. Open the oven door and clamp the oven probe in
the center of the middle rack.
A. Pass the oven probe wire between the door
and the door gasket. Close the door.
B. Plug the oven probe wire into the digital
thermometer.
3. Place the ON/OFF/FAN switch in the ON
position.
4. Allow the oven to warm up for 30 minutes.
NOTE: All product cooking timers must be in the idle
mode (low intensity display) before calibration can
begin.
5. Press and hold the temp button for 10 seconds.
The display should be flashing the word "CAL b".
(See Figure 2)
6. Press the product timer buttons sequentially (1-
6). The temperature display will read "- -" and will
remain that way until Step 8.
7. Note the reading on the digital thermometer when
the heat ON (amber) light goes from ON to OFF.
8. When the heat ON light goes OFF there will be
an audible beep and the temperature display will
record the temperature of the oven at that time.
9. The temperature displayed on the oven should
be within 3°F (1 °C) of the temperature displayed
on the digital thermometer. If the temperatures
are within 3°F (1 °C) calibration check is
complete. If the difference between the
temperatures is greater than 3°F (1 °C) proceed
with Step 10.
10. Use the SET buttons located below the
temperature display (Figure 2) to set the
displayed temperature so that it is the same as
the temperature reading on the digital
thermometer.
11. Use the right-most SET button to increase the
temperature and the left-most SET button to
decrease the temperature (see figure 2). A
maximum of 50° F (33° C) correction can be
made to the original temperature reading.
12. Press the temp button to record the new setting
and to exit the calibration mode.
13. Place the ON/OFF/FAN switch to the OFF
position.
Figure 2
WARNING: Use an oven mitt when unclamping
and removing the oven probe. The oven interior
and probe are HOT.
14. Open the oven door and remove the oven probe.
The digital display will change to the idle mode
(low intensity), the timing indicator dot will turn
OFF and the 3-tone audible signal will be
cancelled.
18
Page 21

9
TROUBLESHOOTING
operating)
operate)
problem.
operational)
Faulty blower motor.
Call service agency.
Defective temperature controller.
Call service agency.
constantly ON.
PROBLEM PROBABLE CAUSE CORRECTIVE ACTION
ON/OFF/FAN switch is in
the ON or FAN position
No power to the unit. Verify power connection, check circuit
breaker.
and oven fails to operate.
(No Red Power ON Light
Faulty ON/OFF/FAN switch. Call service agency.
Oven temperature too high, high-limit
thermostat has tripped.
Check setting and calibration or the
temperature controller, allow oven to cool
Faulty high-limit thermostat. Call service agency.
ON/OFF/FAN switch is in
Blown oven fuse. Check and replace fuse.
the ON or FAN position
and oven fails to operate.
(Red Power ON Light is
all that works)
ON/OFF/FAN switch is in
Door not closed. Check door and close.
the ON position and oven
fails to operate. (Blower
and Heat ON Light do not
Door ajar switch out of adjustment, or
Adjust or replace the door ajar switch.
defective.
Faulty door relay. Replace door relay.
ON/OFF/FAN switch is in
Faulty ON/OFF/FAN switch. Replace ON/OFF/FAN switch.
the FAN position and the
blower fails to operate.
Faulty door relay. Replace door relay.
Blower is not operating. See troubleshooting guide for blower
Blower does not operate
(all other functions are
Actual oven temperature
Blower motor has overheated. Allow the oven/motor to cool, retry
operation.
Controller out of calibration. Check temperature controller calibration.
is below the Set
Temperature and the
Heat ON Light does not
signal Power to the
Heaters.
Defective temperature controller. Call service agency.
Actual oven temperature
Temperature controller out of calibration. Check temperature controller calibration.
is above the Set
Temperature and the
Heat ON Light does
signal Power to the
Heaters
Actual oven temperature
Faulty mercury relay. Call service agency.
is below the set
Temperature and the
Heat ON Light is
Faulty heating elements. Call service agency.
1
Page 22

PROBLEM PROBABLE CAUSE CORRECTIVE ACTION
changed.
operate button is pushed.
time cycle.
Product is burning. Temperature set too high. Check temperature setting.
Temperature controller out of calibration. Check temperature controller calibration.
Timer set to the wrong time for the
Check timer setting.
product.
Product is not cooked. Temperature set too low. Check temperature setting.
Temperature controller out of calibration. Check temperature controller calibration.
Oven not operating. See troubleshooting guide for power
problems.
Timer set to the wrong time for the
Check timer setting.
product.
Faulty mercury relay. Call service agency.
Faulty heating element(s). Check and replace if necessary.
Blower not operational. Check and replace if necessary.
Time display readout
Loose connection. Check wire connections.
does not work.
Time program cannot be
Faulty oven controller. Call service agency.
Loose connection. Check wire connection.
Timer does not start when
Faulty oven controller. Call service agency.
Loose connection. Check wire connection.
No three-tone signal is
Faulty oven controller. Call service agency.
heard at the end of the
Loose connection. Check wire connection.
PARTS ORDERING/ SERVICE INFORMATION
If service parts or technical information is required, please contact the Factory Service Department. To help speed
up your inquiry, the following information is required: (fill in for your records)
1. Model Number:______________________
2. Serial Number: _______________________
3. Voltage: ____________________________
4. Item Part Number: ___________________
5. Quantity required:____________________
6. Nature of service problem and the symptoms of the unit.
NON-SCHEDULED MAINTENANCE
Under normal conditions, with proper use and cleaning, very little non-scheduled maintenance (NSM) will be
required for this unit. However, this section provides procedures for checking and replacement of various parts and
components in the event that it becomes necessary. Before replacement of any parts, refer to the Troubleshooting
Guide for assistance in determining the cause of any malfunction and remember, if in doubt, call the Service
Department: Wells Manufacturing Company, P.O. Box 280, Verdi, Nevada 89439, (702) 345-0444.
WARNING: SOME OF THE PROCEDURES CONTAINED ON THIS SECTION INVOLVE ACCESSING BARE
ELECTRICAL TERMINALS AND EXPOSURE TO VOLTAGES CAPABLE OF PRODUCING A FATAL SHOCK;
THEREFORE, THEY MUST BE USED BY PROPERLY TRAINED PERSONNEL AND STANDARD SAFETY
RULES FOR ELECTRICAL EQUIPMENT MUST BE ADHERED TO.
20
Page 23

NOTE: The wiring diagram is located on the inside
of the right side panel of the oven. In order to use it,
the right side panel must be removed, but only after
the unit has been unplugged from the power supply
receptacle.
NOTE: Loctite #242 should be applied to all
threaded hardware parts before reassembly (except
electrical wire connection terminals).
NOTE: Extra care is required when reinstalling selftapping screws to avoid stripping of the threads.
REVERSING THE OVEN DOOR
Tools: 1/4" (6 mm) Blade Screwdriver, 7/16" (11
mm) Socket/Ratchet, Phillips Head
Screwdriver, Open End Wrench.
Parts: None.
1. Unplug the power cord from the power supply
receptacle.
WARNING: Failure to do so will result in
electrical shock.
2. Remove the tower front trim from the oven.
NOTE: Step 3 is for M4200-3 oven only.
3. Remove the prep-top assembly.
4. Remove the oven top.
5. Open the oven door and remove the door handle
from the door.
6. Rotate the door handle 180 degrees and reinstall
on the door.
7. Using a 1/4" (6 mm) blade screwdriver, remove
the lower screw from the top hinge only and
loosen the top screw only. The top hinge pin
will now slide into the door and reset on the
upper screw that was loosened.
8. Remove the door by pulling it slightly forward and
lifting it up and out of the bottom hinge.
9. Using a 7/16" (11 mm) socket/ratchet, remove
the top and bottom hinge bracket assemblies
and reinstall them into the opposite end of the
oven frame in the holes provided.
10. Remove the door latch assembly and the
corresponding screws from the door jam.
Reinstall the door latch assembly on the
opposite side and replace the screws into the
open screw holes on the opposite door jam.
21
11. Using a 1/4" (6 mm) blade screwdriver remove
top and bottom hinge pins and reinstall them in
the reverse position. Leave the upper screw in
the top hinge pin loose.
12. Reinstall the door and tighten the top hinge
screws.
13. Reverse the procedure to reinstall the remaining
parts.
14. Adjust the door per Non-Scheduled
Maintenance Procedure found on page 29.
STACKING TWO OVENS
Tools: #2 Phillips Head Screwdriver, 10" (25,4
cm) Adjustable Wrench.
Parts: Oven Stacking Kit.
NOTE: This oven stacking kit has been designed
such that any combination of Wells and Hobart
ovens can be stacked.
1. Unplug the power cord.
WARNING: Failure to do so will result in
electrical shock.
2. Remove the prep-top assembly (if installed)
from the oven that has been designated as the
bottom unit.
3. Carefully lay the top oven on its back. Remove
the casters and install the left and right
stacking brackets on the bottom of the oven.
4. Punch out the 2 access knockouts located on
the right side of the oven top.
5. Lift the top oven onto the top of the bottom oven
and bolt it into place through the 2 holes in the
bottom oven top.
6. Install the front and rear trim parts into the left
and right stacking brackets.
REPLACEMENT OF THE ON/OFF/FAN SWITCH
(Should be done by a qualified service person)
Tools: Phillips Head Screwdriver, Needle Nose
Pliers, 1/16" (2 mm) Flatblade Screwdriver.
Parts: ON/OFF/FAN Switch.
1. Unplug the power cord.
WARNING: Failure to do so will result in
electrical shock.
Page 24

2. Using the phillips screwdriver, turn the 2 captive
screws at the upper and lower left-hand side of
the control panel until the panel is released.
Then swing the panel open.
NOTE: The screws will remain with the panel.
3. Disconnect the wire leads from the rear of the
ON/OFF/FAN switch.
4. From the rear of the switch, use the 1/16" (2
mm) flatblade screwdriver and pry the top
flange of the switch upward to release the
switch from the metal bracket. Remove the
metal bracket through the front of the control
panel and the switch from the rear.
by lifting it at the bottom and pulling it up and
out.
3. Remove the top high-limit thermostat clip by
removing the 2 screws holding it in place. (See
Figure 4)
TOP HIGH-LIMIT THERMOSTAT CLIP
5. Reverse the procedure and use the wiring
diagram to install the new ON/OFF/FAN switch.
Figure 4
4. Using the phillips screwdriver, turn the 2 captive
screws at the upper and lower left-hand side of
the control panel until the panel is released.
(See Figure 5) Then swing the panel open.
NOTE: The screws will remain with the panel.
5. Disconnect the electrical wires from the
thermostat body and remove the thermostat
body from the supporting bracket. (See Figure
5)
ELECTRICAL WIRES
REPLACEMENT OF THE HIGH-LIMIT
THERMOSTAT (Should be done by a qualified
service person)
Tools: Phillips Head Screwdriver, Flatblade
Screwdriver, 5/16" (8 mm) Nutdriver.
Parts: High-Limit Thermostat.
1. Unplug the power cord.
WARNING: Failure to do so will result in
electrical shock.
Remove the racks and the rack supports from
the oven interior. Remove the interior air baffle
Page 25

6. Remove the thermostat capillary and bulb from
the inside of the oven and remove the high-limit
thermostat from the oven. (See Figure 5)
NOTE: Adjust the thermostat body on the support
bracket so that the red trip-plunger is centered and
extends 1/8" (3 mm) through the hole in the front
control panel.
7. Reverse the procedure and use the wiring
diagram to install the new high-limit thermostat.
REPLACEMENT OF THE FUSE
Tools: Phillips Head Screwdriver.
Parts: Fuse.
NOTE: A spare fuse is supplied with the oven.
1. Unplug the power cord.
WARNING: Failure to do so will result in
electrical shock.
2. Press and twist off the fuse holder cap located in
the lower left-hand corner of the back panel.
Remove the fuse from the fuse holder cap. (See
Figure 6)
ADJUSTMENT/REPLACEMENT OF THE DOOR
AJAR SWITCH (Should be done by a qualified
service person)
Tools: Phillips Head Screwdriver, 1/16^ (2 mm)
Flatblade Screwdriver.
Parts: Door Ajar Switch.
1. Unplug the power cord.
WARNING: Failure to do so will result in
electrical shock.
2. Remove the lower front trim by removing the 4
screws located on the sides of the trim piece.
(See Figure 7)
FUSE HOLDER
CAPS
Figure 6
3. Reverse the procedure to install the new fuse.
Figure 7
3. FOR ADJUSTMENT ONLY.
CAUTION: The following steps are performed
with the power connected to the cabinet. Use
appropriate safety.
To Increase the Switch Sensitivity:
A. Use the 1/16" (2 mm) flatblade screwdriver to
loosen the 2 screws holding the switch to the
23
support bracket and adjust the switch
upward approximately 1/16" (2 mm).
B. Plug the power cord back into the power
receptacle, press the ON/OFF/FAN switch to
the ON position, and open and close the
door to verify the adjustment.
Page 26

C. Repeat until the door ajar switch functions
properly.
NOTE: It is possible to adjust the door ajar switch
such that it will interfere with the reinstallation of the
lower front trim piece.
WARNING: Make sure that the door ajar switch
shield is in place prior to reinstalling the lower
front trim piece. Failure to do so may cause the
switch to malfunction.
To Decrease the Switch Sensitivity:
(See Figure 8)
B. Disconnect the switch leads from the wire
harness and remove the switch from the
oven.
C. Reverse the procedure to install the new door
ajar switch.
WARNING: Make sure that the door ajar switch
shield is in place prior to reinstalling the lower
front trim piece. Failure to do so may cause the
switch to malfunction.
REPLACEMENT OF THE DOOR AJAR RELAY
(Should be done by a qualified service person)
Tools: Phillips Head Screwdriver, Needle Nose
Pliers.
Parts: Door Ajar Relay.
1. Unplug the power cord.
WARNING: Failure to do so will result in electrical shock.
Figure 9
WARNING: Make sure that the door ajar switch
shield is in place prior to reinstalling the lower
front trim piece. Failure to do so may cause the
switch to malfunction.
4. FOR REPLACEMENT ONLY:
A. Use the flatblade screwdriver to loosen the 2
screws holding the switch to the support bracket.
Figure 8
3. Locate the door ajar relay on the rear com-ponent
panel and disconnect the wires from the relay with
the needle nose pliers.
4. Using the phillips screwdriver, remove the relay
from the rear component panel.
Figure 10
2. Using the phillips screwdriver, remove the rear
access cover. (See Figure 9)
A. Use the 1/16" (2 mm) flatblade screwdriver to
loosen the 2 screws holding the switch to the
support bracket and ad-just the switch
downward approximately 1/16" (2 mm). (See
Figure 8)
B. Plug the power cord back into the power
receptacle, press the ON/OFF/FAN switch to
the ON position, and open and close the door
to verify the adjustment.
C. Repeat until the door ajar switch functions
properly.
5. Reverse the procedure and use the wiring diagram
to install the new door ajar relay.
24
Page 27

REPLACEMENT OF THE FAN MOTOR (Should be
done by a qualified service person)
Tools: Phillips Head Screwdriver, 5/32" (3 mm)
Hex-Key Wrench, 8" (20,3 cm) Adjustable
Wrench, Short Handle Flatblade
Screwdriver.
Parts: Fan Motor.
1. Unplug the power cord.
WARNING: Failure to do so will result in electrical
shock.
2. Remove the racks, rack supports, and interior
air baffle from the oven interior.
3. Loosen the 2 hex-key set screws on the blower
wheel and remove the wheel from the motor
shaft. (See Figure 11)
Figure 11
4. Remove the right side panel.
5. Remove the top of the motor electrical junction box
located on the top of the motor and disconnect the
wiring to the motor. (See Figure 12)
7. Remove motor ground wire.
8. Reverse the procedure and use the wiring
diagram to install the new Fan Motor.
25
Figure 12
REPLACEMENT OF THE OVEN CONTROLLER
(Should be done by a qualified service person)
Tools: Phillips Head Screwdriver, 11/32" (8 mm) Nut
Driver, Long nose pliers, Flatblade
screwdriver.
Parts: Oven Controller
1. Unplug the power cord.
WARNING: Failure to do so will result in electrical
shock.
Page 28

2, Using the phillips screwdriver, turn the 2 captive
screws at the upper and lower left-hand side of
the control panel until the panel is released.
Swing the panel open.
NOTE: The screws will remain with the panel.
3. Using the long nose pliers, disconnect the
electrical wire connections, and unscrew the
thermocouple wires. (See Figure 13)
4. Using the nut driver, remove 4 hex-nuts and
remove the oven controller. (See Figure 13)
5. Reverse the procedure to install the new oven
controller.
2. Remove the rear access cover by removing 6
screws.
Figure 14
3. Disconnect the leads from the mercury power
relay. (See Figure 15)
4. Remove the 2 screws from the bottom left and
top right of bracket. (See Figure 15)
5. Loosen the 2 screws from the top left and
bottom right of bracket, and remove the
mercury relay by sliding it toward the top right.
(See Figure 15)
6. Reverse the procedure and use the wiring
diagram for installing the new mercury power
relay.
Figure 13
REPLACEMENT OF THE MERCURY POWER
RELAY (Should be done by a qualified service
person)
Tools: Phillips Head Screwdriver, 1/4" (6 mm)
Flatblade Screwdriver.
Parts: Mercury Power Relay.
1. Unplug the power cord.
WARNING: Failure to do so will result in
electrical shock.
26
Page 29

REPLACEMENT OF THE HEATING ELEMENT(S)
connections are for the
inner heating element.
(Should be done by a qualified service person)
Tools: Phillips Head Screwdriver, 3/8" (10mm) Open
End Wrench, 11/32" (8 mm) Nut-driver.
Parts: Heating Element (outer). Heating Element
(center). Heating Element (inner).
1. Unplug the power cord.
WARNING: Failure to do so will result in electrical
shock.
2. Remove the racks and rack supports. (See Figure
16)
3. Remove the interior air baffle by lifting at the
bottom and pulling forward. (See Figure 16)
5. Disconnect the wires from the element(s) that
are to be removed. (See Figure 17)
NOTE: The inner 2 connections are for the outer
heating element, the center 2 connections are for
the center heating element and the outer 2
Figure 16
4. Remove right side panel by removing 2 screws at
the bottom and loosening 2 screws at the top. Pull
side panel out from oven frame bottom about 1/2"
(13 mm) then pull down to remove.
NOTE:
A. Remove the outer element only when it has to
be replaced.
B. Remove the outer and center elements when
the center is to be replaced.
C. Remove all 3 elements when the inner element
is to be replaced.
Figure 17
6. Remove the 6 heating element screws holding
the heating elements to the element brackets.
(See Figure 18)
7. Remove the 3 screws holding the inner portion
of the element bracket to the cavity side and
remove the 3 inner element brackets. (See
Figure 18)
27
Page 30

8. Remove the heating element(s) by pulling it
straight out from the side of the cavity.
9. Reverse the procedure and use the wiring
diagram to install the new heating elements).
REPLACEMENT OF THE LOW VOLTAGE POWER
TRANSFORMER (Should be done by a qualified
service person)
Tools: Phillips Head Screwdriver, Needle Nose
Pliers.
REPLACEMENT OF THE POWER AND HEAT
ON LIGHTS
Tools: Phillips Head Screwdriver, Needle Nose
Pliers.
Parts: Power ON Light (red). Heat ON Light
(amber).
1. Unplug the power cord.
WARNING: Failure to do so will result in electrical
shock.
2. Using the phillips screwdriver, turn the 2 captive
screws at the upper and lower left-hand side of
the control panel until the panel is released.
Swing the panel open.
NOTE: The screws will remain with the panel.
3. Disconnect the wires from the rear of the light(s).
(See Figure 19)
4. Using the needle nose pliers, squeeze the 2 ears
on the plastic body of the light and push it out of
the control panel. (See Figure 19)
5. Reverse the procedure to install the new light(s).
Parts: Transformer.
1. Unplug the power cord.
WARNING: Failure to do so will result in electrical
shock.
2. Using the phillips screwdriver, remove the rear
access cover. (See Figure 20)
Figure 20
3. Locate the low voltage power transformer on the
rear component panel and disconnect the wires
from the transformer. (See Figure 21)
4. Using the phillips screwdriver, remove the
transformer from the rear component panel.
(See Figure 21)
5. Reverse the procedure and use the wiring
diagram to install the new low voltage power
transformer.
Figure 19 28
Figure 21
Page 31

ADJUSTMENT OF THE DOOR (TOP TO
BOTTOM)
Tools: Phillips Head Screwdriver, 10" (25 cm) .
adjustable wrench.
Parts: None.
1. Unplug the power cord.
WARNING: Failure to do so will result in
electrical shock.
2. Remove the lower front trim by removing the 4
screws located on the sides of the trim piece.
3. TO RAISE THE DOOR -
A. Using the 10" (25 cm) adjustable wrench, loosen
the retaining nut located at the bottom of the brass
hinge sleeve. (See Figure 22)
B. Using the 10" (25 cm) adjustable wrench, turn the
brass hinge sleeve COUNTERCLOCKWISE to raise
the door. (See Figure 22)
C. After the proper adjustment has been made,
tighten the retaining nut up to the bottom of the
brass hinge sleeve.
4. TO LOWER THE DOOR -
A. Using the 10" (25 cm) adjustable wrench, loosen
the retaining nut located at the bottom of the brass
hinge sleeve. (See Figure 22)
B. Using the 10"" (25 cm) adjustable wrench, turn
the brass hinge sleeve CLOCKWISE to tower the
door. (See Figure 22)
C. After the proper adjustment has been made,
tighten the retaining nut up to the bottom of the
brass hinge sleeve.
5. Once the proper adjustment has been made
replace the lower front trim.
ADJUSTMENT OF THE DOOR TO THE DOOR
GASKET
Tools: Phillips Head Screwdriver, 7/16" (11 mm)
Ratchet/Socket Assembly (with minimum 2
1/2" (6,4 cm) extension)
Parts: None.
1. Unplug the power cord.
WARNING: Failure to do so will result in
electrical shock.
2. Remove the lower front trim by removing the 4
screws located on the side of the trim piece.
3. Remove the top from the oven by removing the
8 screws located around its perimeter (note:
the prep-top must be removed if it has been
installed).
4. For each of the hinge brackets, top and bottom,
adjust as follows:
DOOR CLOSER TO THE GASKET -
Turn the center bolt CLOCKWISE to the gasket,
then tighten the 2 outer bolts to secure it in place.
(See Figures 23 & 24)
29
Page 32

30
DOOR TOO CLOSE TO THE GASKET -
Loosen the 2 outer bolts and turn the center bolt
COUNTERCLOCKWISE to bring the door away
from the door gasket. Secure it in place by
tightening the 2 outer bolts. (See Figures 23 & 24)
5. Once the proper adjustment has been made,
replace the lower front trim and the oven top.
Page 33

Page 34

Page 35

INSTALLATION INSTRUCTIONS
For Converting an M4200 From 1 to 3 Phase
1. Warning: Be sure that all electrical power to the convection oven has been
disconnected before proceeding.
2. Remove the right side panel as illustrated. This procedure may require the removal of
either two 8-32 x 5/8" screws or four 8-32 x 5/8" screws depending on the model.
To remove the side panel that has two screws requires the operator to lift it up
and pull it out. The four screw panel requires the operator to pull the panel
out towards him/her and then down.
3. With step 2 completed, refer to the supplied wiring diagram (P/N 43923) for guided
assistance. Listed below are two sets of procedures. Follow the procedure for the model
unit you have.
For units using wiring diagram 43906:
A. Disconnect jumper wire 39 from the top side
of the mercury relay and discard.
B. Take wires 23 and 26 from the wire set supplied (P/N 45074)
and connect them to the mercury relay and the vacant heating
element as illustrated in the wiring diagram.
For units using wiring diagram 45600:
A. Disconnect wire 24 from the right leg (R) of the mercury relay and
then install it to the left leg (L) of the same relay.
B. Take wires 23 and 26 from the wire set supplied (P/N 45074) and
connect them to the mercury relay and the vacant heating element as
illustrated in the wiring diagram.
EPCI 1/29/882001-II45075
P/N 45075 Rev. A
33
Page 36

Installation Instructions For Converting an M4200 From I to 3 Phase
4. With step 3 completed, remove the existing plug and strip the black cord jacket back to
expose the red wire approximately 2". Slide the 90° adaptor (P/N 44256) over the cord.
Be sure that all four wires are of the same length and strip the wire insulation back
1/2". Now connect the plug (P/N 43924) to the four wires. Be sure to place the green
wire into the green lug of the plug. The remaining wires have no designated location.
Now mate the 90° adaptor with the plug.
5. With step 4 completed, take the new nameplate (P/N 44642 for 208V and P/N
44643 for 240V) and adhere it in place to the right of the cord over the
existing nameplate.
Note: Be sure to clean the surface before mounting. Failure to clean away
any grease or film will cause the nameplate to fall off or not stick
at all.
6. A receptacle (P/N 43874) has been provided for your convenience. This should be
mounted by an authorized electrician only.
7. With all steps completed, the side panel can now be put back in place. This may
be done by reversing step 2 as it applies.
If additional help is required, please call Wells Manufacturing Company Customer Service at
(702) 345-0444.
34 P/N 45075 Rev. A
 Loading...