

Page 1

Micropaq
®
Monitor
Service Manual
Model 402 and Model 404
Software version 1.5X
Page 2

ii Welch Allyn Micropaq Monitor
Copyright 2006, Welch Allyn. All rights are reserved. No one is permitted to reproduce or duplicate, in any
form, this manual or any part thereof without permission from Welch Allyn.
Welch Allyn assumes no responsibility for injury or for any illegal or improper use of the product that may
result from failure to use this product in accordance with the instructions, cautions, warnings, or
indications for use published in this manual.
Welch Allyn
®
, Acuity®, Micropaq®, FlexNet® and Flexible Monitoring® are registered trademarks of Welch
Allyn, Inc.
Nellcor
®
is a registered trademark of Nellcor Puritan Bennett. Masimo® and SET® are registered trademarks
of Masimo Corporation.
Software in this product is Copyright 2006, Welch Allyn or its vendors. All rights are reserved. The
software is protected by United States of America copyright laws and international treaty provisions
applicable worldwide. Under such laws, the licensee is entitled to use the copy of the software
incorporated within this instrument as intended in the operation of the product in which it is embedded.
The software may not be copied, decompiled, reverse-engineered, disassembled or otherwise reduced to
human-perceivable form. This is not a sale of the software or any copy of the software; all right, title and
ownership of the software remain with Welch Allyn or its vendors.
For information about any Welch Allyn product, please call Welch Allyn Technical Support:
USA 800 535 6663
315 685 4560
Canada 800 561 8797 China 86 21 6327 9631
European Call Center 353 46 9067790 France 33 1 55 69 58 49
Germany 49 7477 9271 86 Japan 81 3 3219 0071
Latin America 305 669 9003 Netherlands 31 157 505 000
Singapore 65 6419 8100 South Africa 27 11 777 7555
United Kingdom 44 1332 363812
Australia 61 2 9638 3000
800 074 793
Reorder Part Number 810-2313-XX (CD)
Reorder Part Number 810-2317-XX (printed)
Manual Part Number 810-2279-00 Rev A, 02/2006
Welch Allyn
8500 SW Creekside Place
Beaverton, Oregon 97008-7101
USA
www.monitoring.welchallyn.com
Printed in USA
0123
Page 3

Contents
1 - Safety Summary . . . . . . . . . . . . . . . . . . . . . . . . . . . . . . . . . . . . . . . . . 1
2 - Overview . . . . . . . . . . . . . . . . . . . . . . . . . . . . . . . . . . . . . . . . . . . . . . . 5
iii
General Safety Considerations . . . . . . . . . . . . . . . . . . . . . . . . . . . . . . . . . . . . . . . 1
Definitions. . . . . . . . . . . . . . . . . . . . . . . . . . . . . . . . . . . . . . . . . . . . . . . . . . . . . . . 1
Warnings and Cautions. . . . . . . . . . . . . . . . . . . . . . . . . . . . . . . . . . . . . . . . . . . . . 1
Symbols . . . . . . . . . . . . . . . . . . . . . . . . . . . . . . . . . . . . . . . . . . . . . . . . . . . . . . . . 2
Electrostatic Discharge (ESD) . . . . . . . . . . . . . . . . . . . . . . . . . . . . . . . . . . . . . . . . 3
Purpose and Scope. . . . . . . . . . . . . . . . . . . . . . . . . . . . . . . . . . . . . . . . . . . . . . . . 5
Related Documents . . . . . . . . . . . . . . . . . . . . . . . . . . . . . . . . . . . . . . . . . . . . . . . 5
Technical Support and Repair Services . . . . . . . . . . . . . . . . . . . . . . . . . . . . . . . . . 6
Returning Products . . . . . . . . . . . . . . . . . . . . . . . . . . . . . . . . . . . . . . . . . . . . . . . . 6
Product Configurations . . . . . . . . . . . . . . . . . . . . . . . . . . . . . . . . . . . . . . . . . . . . . 7
Service Options . . . . . . . . . . . . . . . . . . . . . . . . . . . . . . . . . . . . . . . . . . . . . . . . . . 7
Warranty Service . . . . . . . . . . . . . . . . . . . . . . . . . . . . . . . . . . . . . . . . . . . . . . 7
Non-Warranty Service . . . . . . . . . . . . . . . . . . . . . . . . . . . . . . . . . . . . . . . . . . 7
Connectors, Indicators and Controls. . . . . . . . . . . . . . . . . . . . . . . . . . . . . . . . . . . 8
Indicators . . . . . . . . . . . . . . . . . . . . . . . . . . . . . . . . . . . . . . . . . . . . . . . . . . . . 9
Controls . . . . . . . . . . . . . . . . . . . . . . . . . . . . . . . . . . . . . . . . . . . . . . . . . . . . . 9
Battery . . . . . . . . . . . . . . . . . . . . . . . . . . . . . . . . . . . . . . . . . . . . . . . . . . . . . 10
Service Menu . . . . . . . . . . . . . . . . . . . . . . . . . . . . . . . . . . . . . . . . . . . . . . . . . . . 10
Maintenance . . . . . . . . . . . . . . . . . . . . . . . . . . . . . . . . . . . . . . . . . . . . . . . . . . . . 10
3 - Functional Verification . . . . . . . . . . . . . . . . . . . . . . . . . . . . . . . . . . . 11
Visual Check . . . . . . . . . . . . . . . . . . . . . . . . . . . . . . . . . . . . . . . . . . . . . . . . . . . . 11
Power-Up Test. . . . . . . . . . . . . . . . . . . . . . . . . . . . . . . . . . . . . . . . . . . . . . . . . . . 12
System Test . . . . . . . . . . . . . . . . . . . . . . . . . . . . . . . . . . . . . . . . . . . . . . . . . . . . 12
ECG Test . . . . . . . . . . . . . . . . . . . . . . . . . . . . . . . . . . . . . . . . . . . . . . . . . . . . . . . 14
SpO
Test (Model 404 Only) . . . . . . . . . . . . . . . . . . . . . . . . . . . . . . . . . . . . . . . . 14
2
Network Test . . . . . . . . . . . . . . . . . . . . . . . . . . . . . . . . . . . . . . . . . . . . . . . . . . . 15
Wireless to Acuity Central Communication . . . . . . . . . . . . . . . . . . . . . . . . . . . . 15
Battery Charger Functional Verification . . . . . . . . . . . . . . . . . . . . . . . . . . . . . . . . 16
Replace Fuses in the Battery Charger. . . . . . . . . . . . . . . . . . . . . . . . . . . . . . . . . 16
System Information Menu . . . . . . . . . . . . . . . . . . . . . . . . . . . . . . . . . . . . . . . . . 18
SpO2 Information . . . . . . . . . . . . . . . . . . . . . . . . . . . . . . . . . . . . . . . . . . . . . 18
Network Monitor . . . . . . . . . . . . . . . . . . . . . . . . . . . . . . . . . . . . . . . . . . . . . 19
Network Status . . . . . . . . . . . . . . . . . . . . . . . . . . . . . . . . . . . . . . . . . . . . . . 20
Change the Network Name . . . . . . . . . . . . . . . . . . . . . . . . . . . . . . . . . . . . . . . . 21
Changing a Factory-Defined Network Name . . . . . . . . . . . . . . . . . . . . . . . . 21
Changing a Custom Network Name . . . . . . . . . . . . . . . . . . . . . . . . . . . . . . 22
Page 4

iv Contents Welch Allyn Micropaq Monitor
4 - Troubleshooting . . . . . . . . . . . . . . . . . . . . . . . . . . . . . . . . . . . . . . . . 23
Troubleshooting Chart. . . . . . . . . . . . . . . . . . . . . . . . . . . . . . . . . . . . . . . . . . . . . 23
Alert Messages and Display Information . . . . . . . . . . . . . . . . . . . . . . . . . . . . . . 25
5 - Repair Procedures . . . . . . . . . . . . . . . . . . . . . . . . . . . . . . . . . . . . . . . 27
Introduction. . . . . . . . . . . . . . . . . . . . . . . . . . . . . . . . . . . . . . . . . . . . . . . . . . . . . 27
Required Tools and Equipment . . . . . . . . . . . . . . . . . . . . . . . . . . . . . . . . . . . . . . 27
Zero Insertion Force (ZIF) Connectors . . . . . . . . . . . . . . . . . . . . . . . . . . . . . 28
Procedures . . . . . . . . . . . . . . . . . . . . . . . . . . . . . . . . . . . . . . . . . . . . . . . . . . . . . 30
Disassembly - Model 404 . . . . . . . . . . . . . . . . . . . . . . . . . . . . . . . . . . . . . . . . . . 30
Opening the Case . . . . . . . . . . . . . . . . . . . . . . . . . . . . . . . . . . . . . . . . . . . . 30
Removing the SpO
Disconnecting the SpO
Disconnecting the SpO
Removing the Main Board, Subframe and Radio Card (all models) . . . . . . . 34
Removing the Display from the Front Case . . . . . . . . . . . . . . . . . . . . . . . . . 35
Reassembly - Model 404 . . . . . . . . . . . . . . . . . . . . . . . . . . . . . . . . . . . . . . . . . . 37
Installing the Display . . . . . . . . . . . . . . . . . . . . . . . . . . . . . . . . . . . . . . . . . . 37
Installing the Main Board, Subframe and Radio Card. . . . . . . . . . . . . . . . . . 39
Installing the SpO
Installing the SpO
Installing the SpO
Closing the Case . . . . . . . . . . . . . . . . . . . . . . . . . . . . . . . . . . . . . . . . . . . . . 46
Attaching Labels . . . . . . . . . . . . . . . . . . . . . . . . . . . . . . . . . . . . . . . . . . . . . . 48
Disassembly - Model 402 . . . . . . . . . . . . . . . . . . . . . . . . . . . . . . . . . . . . . . . . . . 49
Opening the Case . . . . . . . . . . . . . . . . . . . . . . . . . . . . . . . . . . . . . . . . . . . . 49
Removing the Main Board, Subframe and Radio Card . . . . . . . . . . . . . . . . . 50
Removing the Display from the Front Case . . . . . . . . . . . . . . . . . . . . . . . . . 51
Reassembly - Model 402 . . . . . . . . . . . . . . . . . . . . . . . . . . . . . . . . . . . . . . . . . . 53
Installing the Display . . . . . . . . . . . . . . . . . . . . . . . . . . . . . . . . . . . . . . . . . . 53
Installing the Main Board, Subframe and Radio Card. . . . . . . . . . . . . . . . . . 55
Closing the Case . . . . . . . . . . . . . . . . . . . . . . . . . . . . . . . . . . . . . . . . . . . . . 57
Attaching Labels . . . . . . . . . . . . . . . . . . . . . . . . . . . . . . . . . . . . . . . . . . . . . . 60
Board . . . . . . . . . . . . . . . . . . . . . . . . . . . . . . . . . . . . . . 31
2
Board (Masimo models) . . . . . . . . . . . . . . . . . . . . 32
2
Board (Nellcor models) . . . . . . . . . . . . . . . . . . . . . 33
2
Board (Masimo models) . . . . . . . . . . . . . . . . . . . . . . . . 43
2
Board (Nellcor models) . . . . . . . . . . . . . . . . . . . . . . . . . 44
2
Shield (all models) . . . . . . . . . . . . . . . . . . . . . . . . . . . . . 45
2
6 - Technical Overview . . . . . . . . . . . . . . . . . . . . . . . . . . . . . . . . . . . . . . 61
Feature Summary . . . . . . . . . . . . . . . . . . . . . . . . . . . . . . . . . . . . . . . . . . . . . . . . 61
Micropaq 402 . . . . . . . . . . . . . . . . . . . . . . . . . . . . . . . . . . . . . . . . . . . . . . . . 62
Micropaq 404 . . . . . . . . . . . . . . . . . . . . . . . . . . . . . . . . . . . . . . . . . . . . . . . . 62
Understanding Micropaq and the FlexNet Network . . . . . . . . . . . . . . . . . . . . . . 62
7 - Field Replaceable Units . . . . . . . . . . . . . . . . . . . . . . . . . . . . . . . . . . 63
Page 5
1
1
Safety Summary
All users of the monitor must read this safety summary and all warning and caution
statements in the manual.
General Safety Considerations
• If the monitor detects a problem that prevents it from operating properly, it
displays an error message and error number. Report such errors to Welch Allyn.
• Do not service a monitor under warranty. Servicing a monitor under warranty
voids the warranty. All service on monitors under warranty must be performed by
Welch Allyn.Contact Welch Allyn for information about post-warranty period
service.
• Frequently check all cables, both electrically and visually.
Definitions
WARNING The Warning symbol indicates a condition that could lead to illness,
injury or death.
Caution The Caution symbol indicates a condition that could damage
equipment or other property.
Warnings and Cautions
Familiarize yourself with all warnings and cautions before using the monitor.
WARNING The monitor may not meet its performance specifications if stored or
used outside the specified temperature and humidity ranges.
WARNING Make frequent electrical and visual checks on cables, sensors, and
electrode wires. All cables, sensors, and electrode wires must be inspected and
properly maintained and in proper working order to allow the equipment to
function properly and protect patient safety.
WARNING If the monitor has been dropped or severely abused, remove it from
service until it has passed the functional verification.
Caution Do not autoclave the monitor. Autoclave accessories only if the
manufacturer's instructions clearly approve it. Many accessories can be severely
damaged by autoclaving.
Page 6
2 Safety Summary Welch Allyn Micropaq Monitor
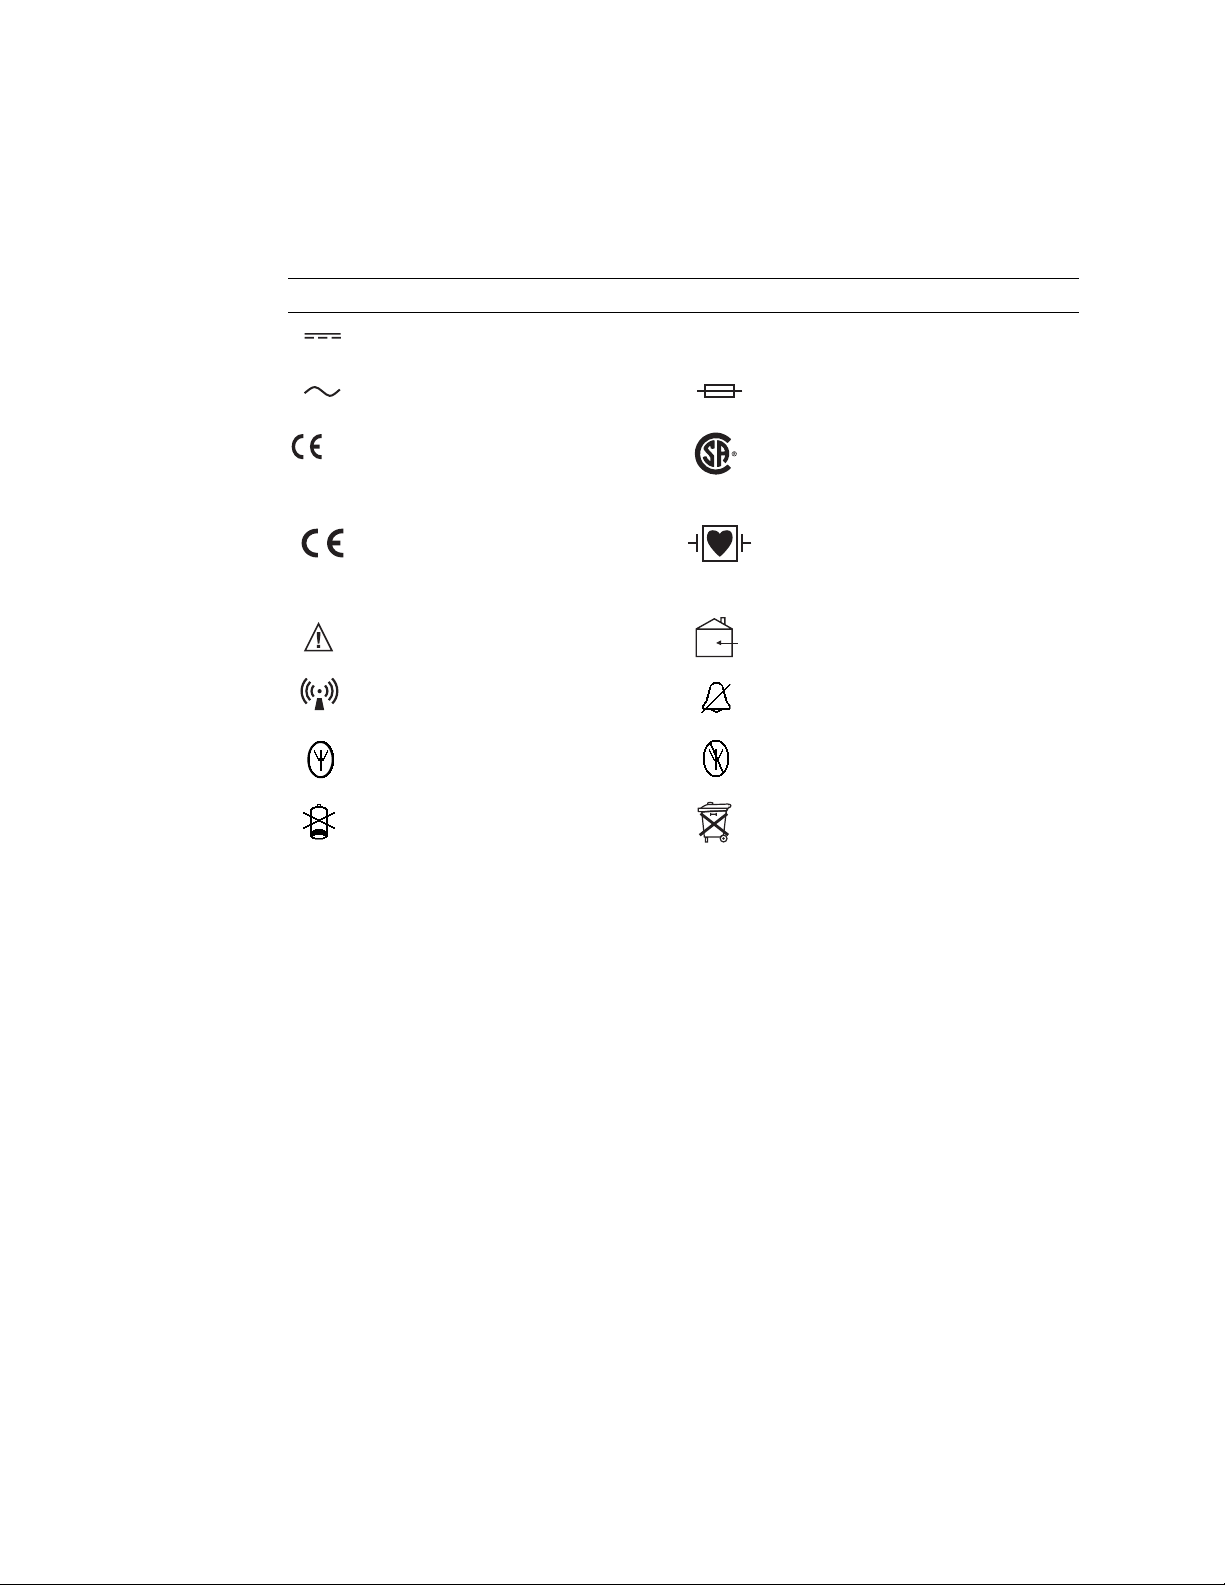
Symbols
The following symbols appear on the monitor, battery charger or accessories.
Symbol Definition Symbol Definition
Direct current (battery charger) Enclosure Protection Drip proof: Classification
Alternating current (battery charger) Fuse (battery charger)
IPX1
IPX1 per EN60529: 1991
The CE Mark and Notified Body Registration
Number signify the device has met all essential
0123
requirements of European Medical Device
Directive 93/42/EEC
Signifies the device has met all essential
requirements of European Medical Device
Directive 93/42/EEC for a Class 1 product
C
kj
This device has been tested and certified by
the Canadian Standards Association
International to comply with applicable U.S.
US
and Canadian medical safety standards.
Patient connections are Type CF, isolated for
direct cardiac application, and protected
against defibrillation
(battery charger)
Caution: Refer to Directions For Use and
For indoor use only (battery charger)
accompanying documentation
Non-ionizing electromagnetic radiation Alarm(s) Off
Connected to the Acuity network Not connected to the Acuity network
Low battery Do not dispose of this product as ‘unsorted
municipal waste’. Prepare it for reuse or
separate collection as specified by Directive
2002/96/EC of the European Parliament and
the Council of the European Union on Waste
Electronic and Electrical Equipment (WEEE).
(See www.welchallyn.com/weee.)
If the monitor, the cradle or the battery is
contaminated, this directive does not apply.
Page 7
Service Manual Safety Summary 3
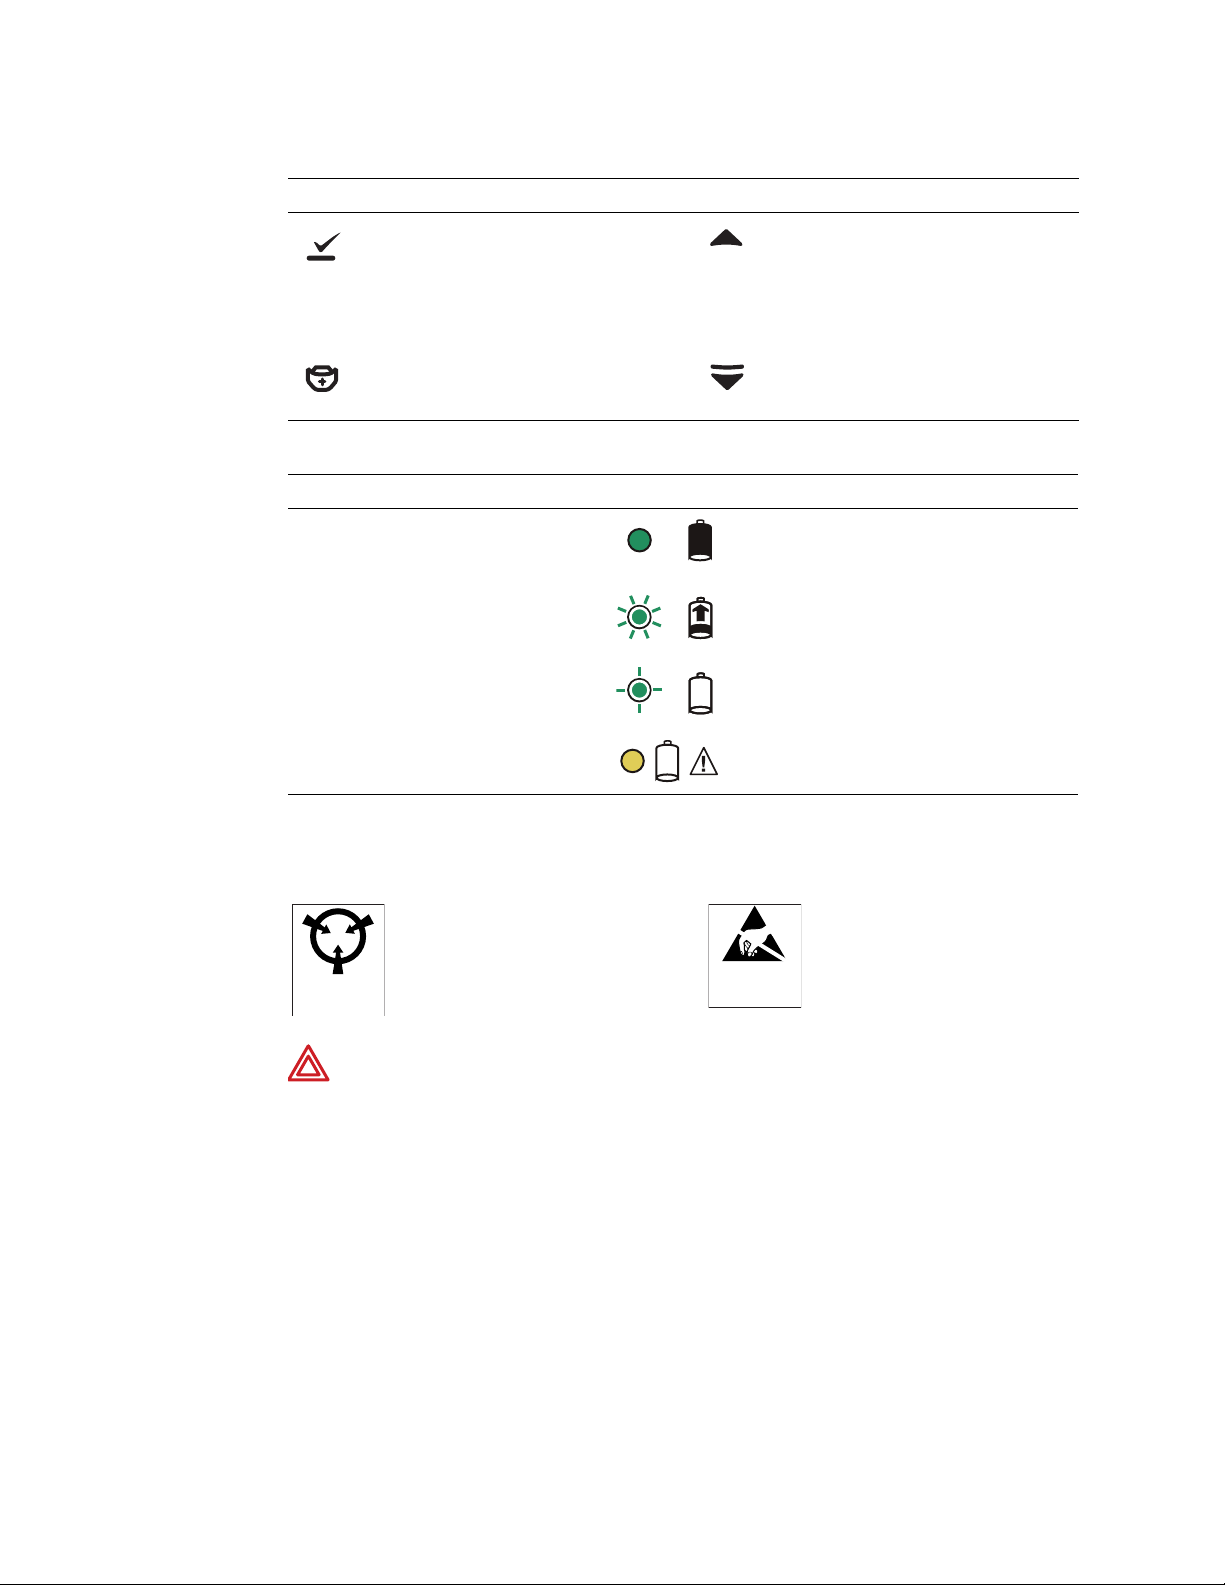
Monitor Front Panel Keys
Select Key and Silence Patient Alarm/Equipment
Alert Key- Selects the choice highlighted on the
menu. During patient alarms, silences the tone at
the monitor and Acuity (if connected) for 90
Scroll Up Key and Reset Alarm Tone KeyScrolls up menus on the display. During
patient alarms, resets the tone at the monitor
and Acuity (if connected).
seconds. During equipment alerts, silences or
acknowledges (dismisses) the alert.
Nurse Call Key - When connected to Acuity,
pressing this key sends Acuity a Nurse Call
message.
Scroll Down Key and Main Menu Key- Scrolls
down menus on the display, or causes the
Main Menu to appear if no menu is displayed.
Battery Charger Label and LEDs
Green LED on continuously Battery is fully charged.
Green LED flashing
kj
Battery is charging.
Green LED flashing very slowly Battery detected and waiting to be charged.
Yellow LED on continuously Something is wrong with the battery or the
charger.
Electrostatic Discharge (ESD)
CAUTION
SENSITIVE ELECTRONIC DEVICES
DO NOT SHIP OR STORE NEAR STRONG
ELECTROSTATIC, ELECTROMAGNETIC,
WARNING Electrostatic discharge (ESD) can damage or destroy electronic
components. Handle static-sensitive components only at static-safe workstation.
WARNING Assume that all electrical and electronic components of the monitor
are static-sensitive.
Electrostatic discharge is a sudden current flowing from a charged object to another
object or to ground. Electrostatic charges can accumulate on common items such as
foam drinking cups, cellophane tape, synthetic clothing, untreated foam packaging
material, and untreated plastic bags and work folders, to name only a few.
Electronic components and assemblies, if not properly protected against ESD, can be
permanently damaged or destroyed when near or in contact with electrostatically charged
objects. When you handle components or assemblies that are not in protective bags and
you are not sure whether they are static-sensitive, assume that they are static-sensitive
and handle them accordingly.
ATTENTION
OBSERVE PRECAUTIONS
FOR HANDLING
ELECTROSTATIC
SENSITIVE DEVICES
Page 8

4 Safety Summary Welch Allyn Micropaq Monitor
• Perform all service procedures in a static-protected environment. Always use
techniques and equipment designed to protect personnel and equipment from
electrostatic discharge.
• Remove static-sensitive components and assemblies from their static-shielding
bags only at static-safe workstations—a properly grounded table and grounded
floor mat—and only when you are wearing a grounded wrist strap (with a resistor
of at least 1 megohm in series) or other grounding device.
• Use only grounded tools when inserting, adjusting, or removing static-sensitive
components and assemblies.
• Remove or insert static-sensitive components and assemblies only with monitor
power turned off.
• Insert and seal static-sensitive components and assemblies into their original
static-shielding bags before removing them from static-protected areas.
• Always test your ground strap, bench mat, conductive work surface, and ground
cord before removing components and assemblies from their protective bags and
before beginning any disassembly or assembly procedures.
Page 9

5
2
Overview
Purpose and Scope
This document provides instructions for disassembly and assembly, troubleshooting,
functional testing and performance verification for the Micropaq monitor.
This document covers the following monitors:
• Micropaq Model 404 monitor, Masimo version
• Micropaq Model 404 monitor, Nellcor version
• Micropaq Model 402 monitor
For service information about any other monitor, refer to the service manual for that
monitor.
Any service work not described in this manual must be performed by qualified service
personnel at the factory or at an authorized Welch Allyn service center. (For contact
information, see page ii.)
This manual is intended for use only by technically qualified service personnel.
Corrective service is supported to the level of field-replaceable units. Field-replaceable
units include certain subassemblies, service kits, and other parts. All field-replaceable
parts are listed in “Field Replaceable Units” on page 63.
The following activities are not supported:
• Repair and replacement of the main board, radio board, and SpO
• Component-level repair of circuit boards and subassemblies,
• Performance of any service procedure or instruction in any manner other than
exactly described in this manual.
WARNING Failure to observe and adhere to these restrictions could lead to
serious personal injury.
Caution Failure to observe and adhere to these restrictions could damage the
monitor and will invalidate the monitor warranty.
Related Documents
When using this manual, it may be helpful to refer to the following documents:
• Micropaq Directions for Use, 810-1177-XX
• Welch Allyn Products and Accessories, 810-0409-XX
board,
2
Page 10

6 Overview Welch Allyn Micropaq Monitor
Technical Support and Repair Services
Service Activity Monitor Battery Charger
Parts Replacement Replace the display, front case (with
Calibration None required None required
Periodic Service
a. More frequent service may be needed in extreme environments (heat, cold, dust, etc.).
a
Contact Welch Allyn Technical Support at one of the numbers listed on page ii.
Returning Products
To return a product for service, contact Welch Allyn Technical Support (page ii) and
request a Return Material Authorization (RMA) number.
Note
Welch Allyn does not accept returned products without an RMA.
connectors and keyboard), rear case.
Contact Welch Allyn Technical Support for
service and monitor exchange policy.
Every 6 months to 2 years (per hospital
protocols):
• Complete functional verification as
described in this manual
• Inspect the monitor for mechanical and
functional damage
• Inspect safety labels for legibility
Replace only fuses (see procedure in this
manual). Contact Welch Allyn Technical Support
for service and monitor exchange policy
Every 6 months to 2 years:
• Complete functional verification as
described in this manual
• Inspect the battery charger for mechanical
and functional damage
• Inspect safety labels for legibility
• Inspect the rear panel fuses for compliance
to specified rating
When requesting an RMA, please have the following information available:
• Product name, model number, and serial number.
• A complete return shipping address.
• A contact name and phone number.
• Any special shipping instructions.
• A purchase-order number or credit-card number if the product is not covered by
warranty.
• A full description of the problem or service request.
Note
To ensure safe receipt of your monitor by the service center and to expedite
processing and return of the monitor to you, thoroughly clean all residues from
the monitor before you ship it to Welch Allyn.
United States federal regulations prohibit the processing of any device
contaminated with blood-borne pathogens. Welch Allyn thoroughly cleans all
returned monitors on receipt, but any monitor that cannot be adequately cleaned
cannot be repaired.
Before shipping the monitor, please observe these packing guidelines:
• Remove from the package all hoses, connectors, cables, sensors, power cords,
and other ancillary products and equipment, except those items that might be
associated with the problem.
Page 11

Service Manual Overview 7
• Put the monitor, enclosed in a plastic bag with a packing list, into the original
shipping carton with the original packing materials or into another appropriate
shipping carton.
• Write the Welch Allyn RMA number with the Welch Allyn address on the outside
of the shipping carton.
Product Configurations
Configurations for the available model numbers are as follows:
Model Monitoring
Parameters
404 ECG, SpO
402 ECG Yes
Service Options
Warranty Service
All repairs on products under warranty must be performed or approved by Welch Allyn.
Refer all warranty service to Welch Allyn Factory Service or another authorized Welch
Allyn Service Center. Obtain an RMA number for all returns to Welch Allyn Factory
Service. (See “Returning Products” on page 6.)
Caution Unauthorized repairs will void the product warranty.
Non-Warranty Service
Welch Allyn Beaverton factory service and authorized service centers support nonwarranty repairs. Contact any Welch Allyn regional service center for pricing and service
options.
FlexNet/Acuity
Communication
Enabled
2
Yes
Welch Allyn offers modular repair parts for sale to support non-warranty service. This
service must be performed only by qualified end-user biomedical/clinical engineers using
this service manual.
Micropaq monitor service training is available from Welch Allyn for biomedical/clinical
engineers. Contact Welch Allyn Technical Support Services for information.
Page 12

8 Overview Welch Allyn Micropaq Monitor
Connectors, Indicators and Controls
SpO
Connector
2
ECG Connector
Visual Alarm Indicator
Liquid Crystal Display
Select Key and
Silence Patient Alarm/
Equipment Alert Key
Scroll Up Key and Reset Patient Alarm Tone Key
Scroll Down Key and Main Menu Key
Nurse Call
Key
Battery pack latch
Battery
Back
Page 13

Service Manual Overview 9
Indicators
Visual Alarm Indicator
Green Flashes slowly during normal operation.
Red Flashes during patient alarm. Remains on continuously when alarms are
silenced or suspended.
Yellow Flashes during an equipment alert and while the monitor is not connected to
the network.
Remains on continuously if the operator suspends an alert at Acuity for 90
seconds or acknowledges (dismisses) a low battery alert from the monitor or
Acuity.
Note
Flashing green indicates that the monitor is connected to the network but not
necessarily connected to a patient. If the monitor is actively monitoring a
patient, continuous green indicates that no alarms or alerts are detected.
Audible Alarm Indicator
Beeps to indicate a patient alarm, and beeps faster for life-threatening arrhythmia alarms.
Beeps when the equipment needs attention. This beep tone is slower than the patient
alarm tones.
Volume can be configured at Acuity as high, low, or off.
Volume can be configured at Acuity for network connection or for when communications
with the FlexNet network are interrupted.
Controls
Nurse Call
• Sends a Nurse Call message to Acuity when the monitor is connected to Acuity.
Depending on how Acuity is configured, the Nurse Call message may cause the
Acuity Central Station to generate a Nurse Call Alert and/or print a snapshot of the
patient waveform at the Acuity Central Station.
Scroll Up and Reset Patient Alarm Tone
• Scrolls up menus on the display.
• Resets a silenced patient alarm tone.
Scroll Down and Main Menu
• Scrolls down menus on the display.
• Displays the Main Menu.
Select and Silence Patient Alarm/Equipment Alert
• Selects the choice highlighted on the menu.
Page 14

10 Overview Welch Allyn Micropaq Monitor
• During patient alarms, silences the tone at the monitor and Acuity (if connected) for
90 seconds. During equipment alerts, silences or acknowledges (dismisses) the alert
at the monitor and at Acuity.
Battery
Insert the battery to turn on power. Remove the battery to turn off power. (While the
battery is removed, no monitoring occurs.)
Recharge the battery while it is removed from the monitor.
To order a new battery, contact Customer Service (see page ii).
Service Menu
Refer to “Functional Verification” on page 11 for service menus and test screens.
Maintenance
For monitor maintenance information, refer to “Operator Maintenance” in Micropaq
Directions for Use. Covered topics include the following:
• Inspecting and cleaning the monitor and accessories
• Charging or replacing the battery
Page 15

11
3
Functional Verification
This procedure helps to confirm the proper operation of the Micropaq monitor. No monitor
disassembly is required.
The following equipment is required:
Model Required Equipment
402 and 404 • DNI Nevada Inc. Patient Simulator 217A or 214B (or equivalent ECG patient simulator)
404 with Masimo • Micropaq Masimo SpO2 cable (008-0961-XX)
404 with Nellcor • Micropaq Nellcor SpO2 cable (008-0754-XX)
Visual Check
Perform this check if the monitor is being serviced in the field by a biomedical/clinical
engineer.
• Micropaq ECG Cable (008-0522-XX)
• Fully charged battery
• Access to a properly functioning FlexNet network with an access point within range
• Masimo adult SpO2 sensor for finger
• BIO-TEK Index 2 Series SpO2 Simulator with optical finger for sensor connection (or equivalent)
• Nellcor adult SpO2 sensor for finger
• BIO-TEK Index 2 Series SpO2 Simulator with optical finger for sensor connection (or equivalent)
1. Verify that the rubber gasket is not protruding from the case.
2. Verify that the rubber feet have been installed.
3. Verify that screw covers are in place over all four screws in the battery compartment
and the small recessed connector next to the battery connector.
4. Verify that the correct labels have been applied to the case. (See “Attaching Labels”
on page 48 for Model 404 monitors or “Attaching Labels” on page 60 for Model 402
monitors.)
a. Verify that the correct rear case label and battery label are attached.
b. Verify that the serial number label is attached and that the correct information has
been recorded for the model number, part number and serial number.
c. Verify that the clear label cover has been applied over the serial number label.
Page 16
12 Functional Verification Welch Allyn Micropaq Monitor
Power-Up Test
1. Disconnect any patient cables connected to the monitor and remove the battery (if
installed).
2. Insert a fully charged battery into the monitor.
During power-up, the monitor performs a comprehensive self test of software. If
software testing is successful, the monitor then tests internal hardware. If all tests
are successful, the monitor completes power-up and displays the initial monitoring
screen.
3. Confirm the following:
• The screen is initially blank for a few seconds, that the LED displays each of the
three colors (red, yellow and then green), and that the monitor emits two short
beeps while booting—a quiet beep followed by a second, louder beep.
• A power-up screen with the model number appears for a few seconds, followed
by an initial monitoring screen with no error messages.
If the monitor does not power up properly, contact Welch Allyn Technical Support (page ii)
for assistance.
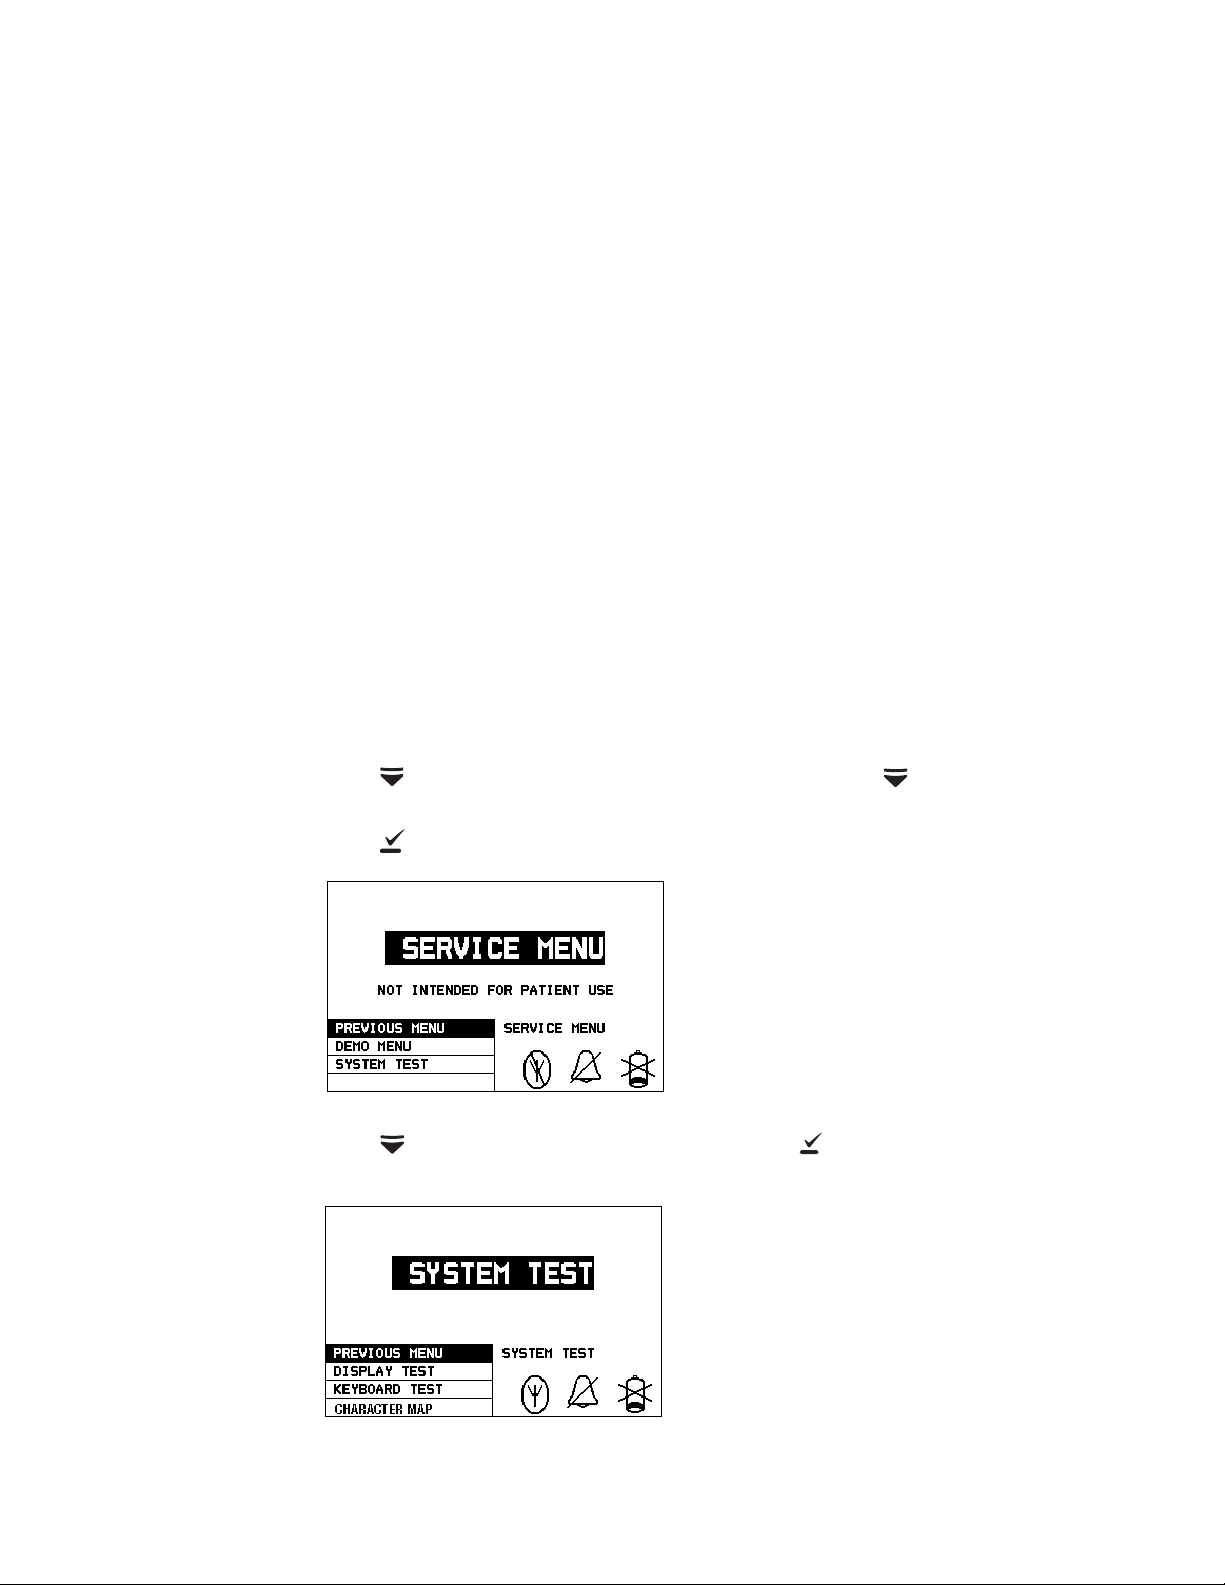
System Test
1. Press to access the Main Menu, and then repeatedly press until SERVICE
2. Press to display the Service Menu screen.
3. Press to highlight SYSTEM TEST, and then press to display the System Test
MENU is highlighted.
Service Menu Screen
screen.
System Test Screen
Page 17
Service Manual Functional Verification 13
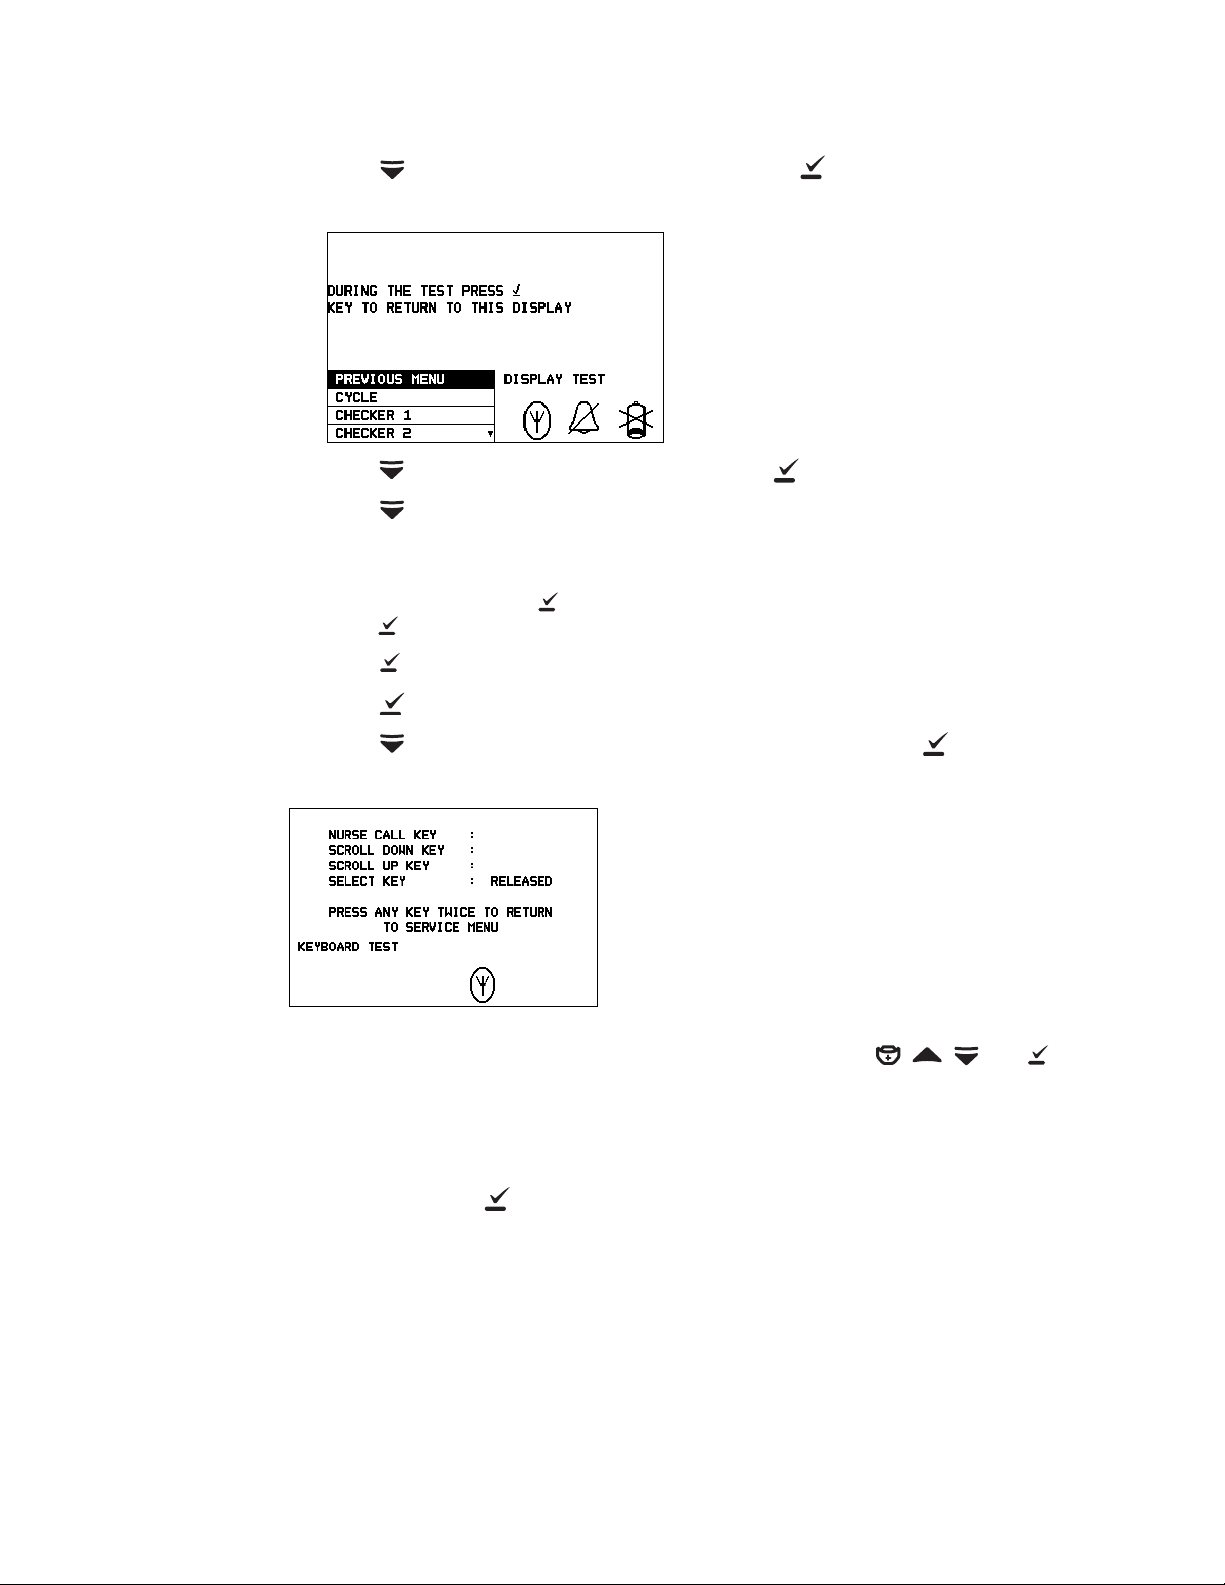
4. Press to highlight DISPLAY TEST, and then press to display the Display Test
screen.
Display Test Screen
5. Press once to highlight CYCLE, and then press .
Press to cycle through all display tests while observing the screen. Watch for any
defects such as pixel deficiencies, stuck pixels, or nonuniform illumination.
Optionally, you can run any of the other display tests (CHECKER 1 through CHECKER
4, and BORDER). Press to exit the display test, and then scroll to another test and
press again to run the highlighted display test.
6. Press to exit the display test and return to the Display Test screen.
7. Press again to exit the Display Test screen and return to the System Test screen.
8. Press as needed to highlight KEYBOARD TEST, and then press to display the
Keyboard Test screen.
Keyboard Test Screen
9. Observe the screen. For each of the front panel monitor keys ( , , , and ),
press and then release the key.
Confirm that the screen displays PRESSED and then RELEASED for each key.
10. Exit the Keyboard Test screen by quickly pressing one of the keys twice.
11. Repeatedly press as needed to exit the service screens and return to the normal
monitoring screen.
Page 18

14 Functional Verification Welch Allyn Micropaq Monitor
ECG Test
1. Turn on power to the ECG simulator.
2. Connect the ECG cable to the monitor and to the ECG simulator.
3. Set the ECG simulator for a normal sinus rhythm.
Confirm that the monitor displays a normal sinus rhythm ECG waveform with a heart
rate that is the same (± 4 bpm) as the input of the ECG simulator.
4. Conduct an ECG Lead Fail test:
a. Remove the far left (LA) lead from the simulator. A skeletal torso appears in the
monitor display, with five dots arrayed on it.
b. In the monitor display, verify that the dot corresponding to the LA electrode is
blinking. Reconnect the LA lead to the simulator.
c. Remove each simulator lead in turn. The corresponding dot blinks with each
removed simulator lead, and stops blinking when the switch is released.
5. Disconnect the ECG cable from the simulator and monitor, and then turn off power to
the simulator.
Model 402: Testing is complete. Remove the monitor battery.
Model 404: Go on to the next section to test SpO
SpO2 Test (Model 404 Only)
1. Turn on power to the SpO2 simulator.
2. Connect the SpO
3. Apply the SpO
4. Set the SpO
Nellcor.
5. Set the simulator output to SpO
minute (with no motion artifact selected).
Confirm the following:
• The monitor displays SpO
• The displayed saturation = 94 percent ± 4 counts.
• The displayed pulse rate = 60 ± 4 bpm.
6. Disconnect the sensor from the simulator and the cable, disconnect the SpO
and remove the monitor battery.
cable to the monitor and the SpO2 sensor.
2
sensor to the SpO2 simulator optical finger.
2
simulator manufacturer type (“MAKE”) as appropriate: Masimo or
2
.
2
saturation 94 percent and pulse rate 60 beats per
2
data and the pulse amplitude indicator is moving.
2
cable,
2
Page 19
Service Manual Functional Verification 15
Network Test
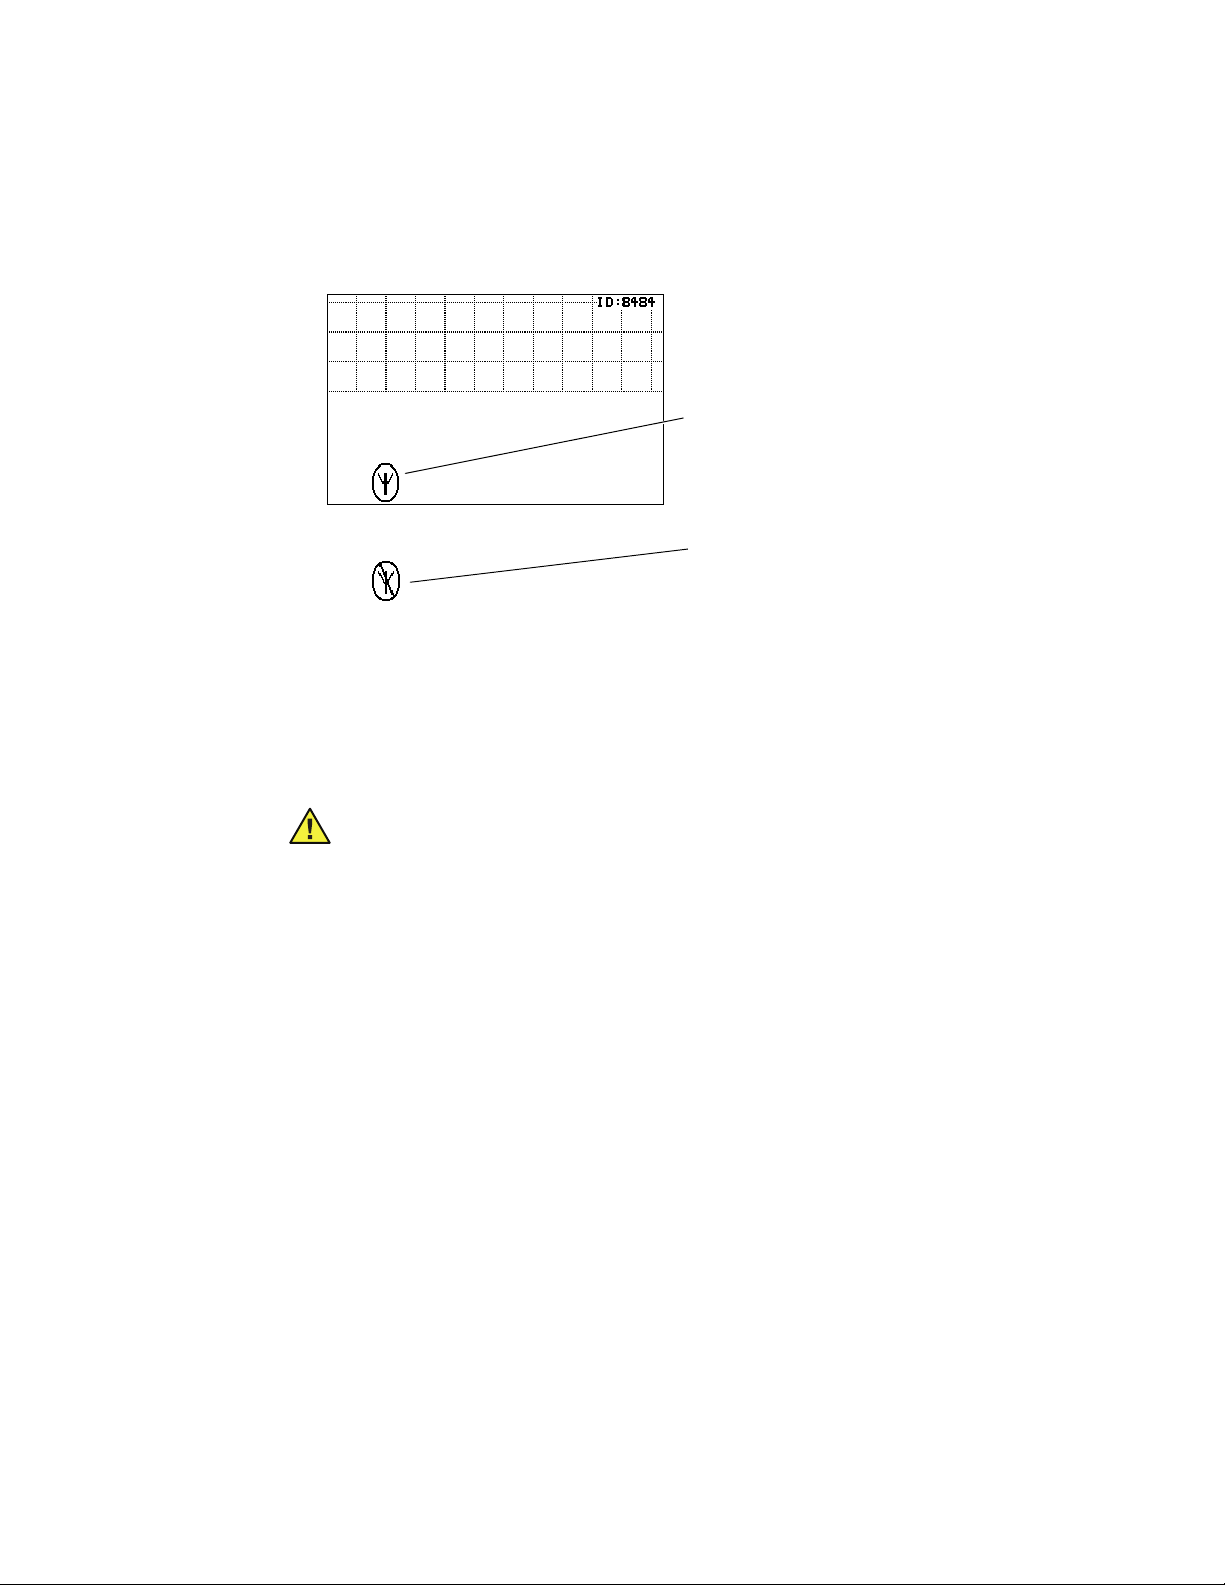
Observe the screen and confirm that the network connection symbol appears (indicating
that the monitor is communicating with the network).
Connection Symbol:
Network connection is established.
Example of Initial Monitor Screen
No Connection Symbol:
The monitor is searching for a
network connection.
If the network connection is not yet established, wait a short time (60 seconds or less)
and confirm that the connection symbol appears.
Wireless to Acuity Central Communication
Caution Before beginning the following procedure, advise Acuity monitoring
personnel that you will be testing the monitor.
To confirm proper communication between the monitor and the Acuity system:
In an area of RF coverage, perform the following test on each monitor.
1. Insert a newly charged battery into the battery compartment of the monitor. A powerup screen appears and is soon replaced by a blank monitoring screen.
2. If the network is configured to allow multiple Acuity systems to view the monitor,
select the system from the unit list that will be the primary link in the test.
If this is a single system, or if the monitor is configured to communicate only with a
specific Acuity system, select a patient from the patient list.
3. On Acuity, verify that the Monitor Connecting icon (a blue hourglass) appears in the
Wireless area on the Acuity Central Monitor Map (in the Map View). Wait for the
Monitor Connecting icon to change to an Unconfirmed Patient ID icon.
4. Verify that the proper last four digits of the monitor serial number appear as the Room
Number in the Waveform window and ID screen.
Page 20

16 Functional Verification Welch Allyn Micropaq Monitor
5. Verify that the LED above the screen in the upper right corner of the monitor is
blinking green. This indicates communication between the monitor and the Acuity
system. Refer to the communication status symbols below, as they appear in the
lower left corner of the monitor display.
Monitor with access point association and Acuity communication.
(Flashing) Monitor with access point association, but no Acuity communication.
Monitor with no access point association.
Battery Charger Functional Verification
This procedure helps to confirm the proper operation of the monitor battery charger.
• No battery charger disassembly is required.
• A monitor battery is required.
To verify charger function:
1. Remove any batteries installed in the charger battery wells.
2. Unplug the ac power cord from the rear of the charger.
3. Plug the ac power cord into the rear of the charger and observe the charger top panel.
Confirm the following:
• Each green LED blinks in sequence, and then each yellow LED blinks in
sequence. This confirms proper operation of the LEDs and the charger software.
• The green LED by the ac power symbol (at the far right side of the charger’s top
panel) is on, and that no other LED is on.
4. Insert the battery into a battery well and confirm that the corresponding green LED
begins to flash. (The green LED flashes while charging, and remains on continuously
when the battery is fully charged.) Remove the battery.
5. Repeat Step 4 for each of the other seven battery wells.
Replace Fuses in the Battery Charger
If the battery charger ac power cord is connected but the green ac power LED is not on,
the battery charger fuses may need replacement.
To replace the fuses:
1. Disconnect the ac power cord from the rear panel of the battery charger. The fuse
module is located directly beneath the ac power receptacle.
2. Use a small flat-blade screwdriver to pry open the black fuse module.
3. Slide out the fuse module, and then unlatch and slide out the fuse holder.
4. Use the screwdriver to dislodge the two fuses.
Page 21

Service Manual Functional Verification 17
5. Insert two fuses of the appropriate rating into the fuse holder:
Fuses: T1.25 A/250 V, Time-Delay, 5x20 mm (503-0111-XX)
WARNING Fire Hazard. To protect against fire hazard, always replace fuses
with the specified type, size, current rating, and voltage rating.
6. Slide the fuse holder back into the black fuse module until it latches securely, and then
slide the fuse module back into the charger. Press it firmly and verify that it latches
securely.
7. Connect the ac power cord to the rear panel of the battery charger and to an ac power
source appropriate for the power rating of the battery charger.
8. Confirm that the green ac power LED is on.
Note
If the fuses blow soon after reconnecting ac power, the battery charger may
need replacement.
Page 22

18 Functional Verification Welch Allyn Micropaq Monitor
System Information Menu
The System Information Menu provides additional information that may be required during
service activity.
To access the System Information Menu:
1. From the monitoring screen, press to access the Main Menu.
2. Press again to highlight SYSTEM INFORMATION, and then press to display
the System Information Menu.
System Information Menu
3. To access one of the menu items, press or to highlight the menu item, and
press .
Note
SpO2 Information
Although the System Information Menu functions are not intended to be used
while the monitor is connected to a patient, they can be used to troubleshoot
network activity while the monitor is communicating (or attempting to
communicate) with the network.
SpO2 Information Screen Examples
Page 23

Service Manual Functional Verification 19
Network Monitor
Use the Network Monitor screen as a diagnostic aid for troubleshooting wireless
connections between the monitor and a network access point.
LOAD LEVELING If nonzero, indicates the number of times the monitor has roamed
to another access point because the previous access point was too
busy. Any nonzero value might indicate a problem with the WLAN
or the access points.
AP DROPPED MUs If nonzero, indicates the number of times the monitor was forced
off of the access point it was associated with. Any nonzero value
might indicate a problem with the WLAN or the access points.
LOW RSSI If nonzero, indicates the number of times the monitor has roamed
to another access point because the Received Signal Strength
Indicator was too low. Any nonzero value might indicate either
inadequate WLAN coverage or that monitor was on the edge of
coverage for an extended period and was having difficulty passing
data to the associated access point.
Page 24

20 Functional Verification Welch Allyn Micropaq Monitor
Network Status
The Network Status screen displays the current status of the monitor and its
communication channel.
Network Status Screen Examples
FIRMWARE VER Firmware version of the radio card.
S24 COUNTRY Controlled by the access point with which the monitor is
associated.
RSSI (Received Signal Strength Indicator) indicates the strength (in
dB) of the radio signal as seen by the associated access point.
The smaller the number, the stronger the signal.
A value greater than 70 indicates either:
• a fault in the monitor or in the radio card, or
• an area of poor or no radio coverage
ACUITY CONNECTED During startup, this briefly displays other messages. After
startup, any other message here indicates a communication
problem.
Page 25
Service Manual Functional Verification 21
Change the Network Name
Use this procedure to change the network name assigned to the monitor.
Note
This procedure applies only if the current net name is one of the names available
in the Network Name Menu. For other network names, see “Changing a
Custom Network Name” on page 22.
Caution Changing the monitor network name will cause the monitor to restart
and seek to connect with the FlexNet network corresponding to the new name.
Do not attempt to change the network name unless you are a qualified
biomedical service engineer or technician.
Changing a Factory-Defined Network Name
To change the network name:
1. P r e s s to access the Main Menu, and then repeatedly press until SERVICE
MENU is highlighted.
2. Press to display the Service Menu screen.
3. Press and hold , , and . The Network Name Menu appears.
If the current monitor network name is one of the following factory-defined names:
com.protocol demo.protocol
com1.protocol com2.protocol
com3.protocol com4.protocol
com5.protocol com6.protocol
com7.protocol com8.protocol
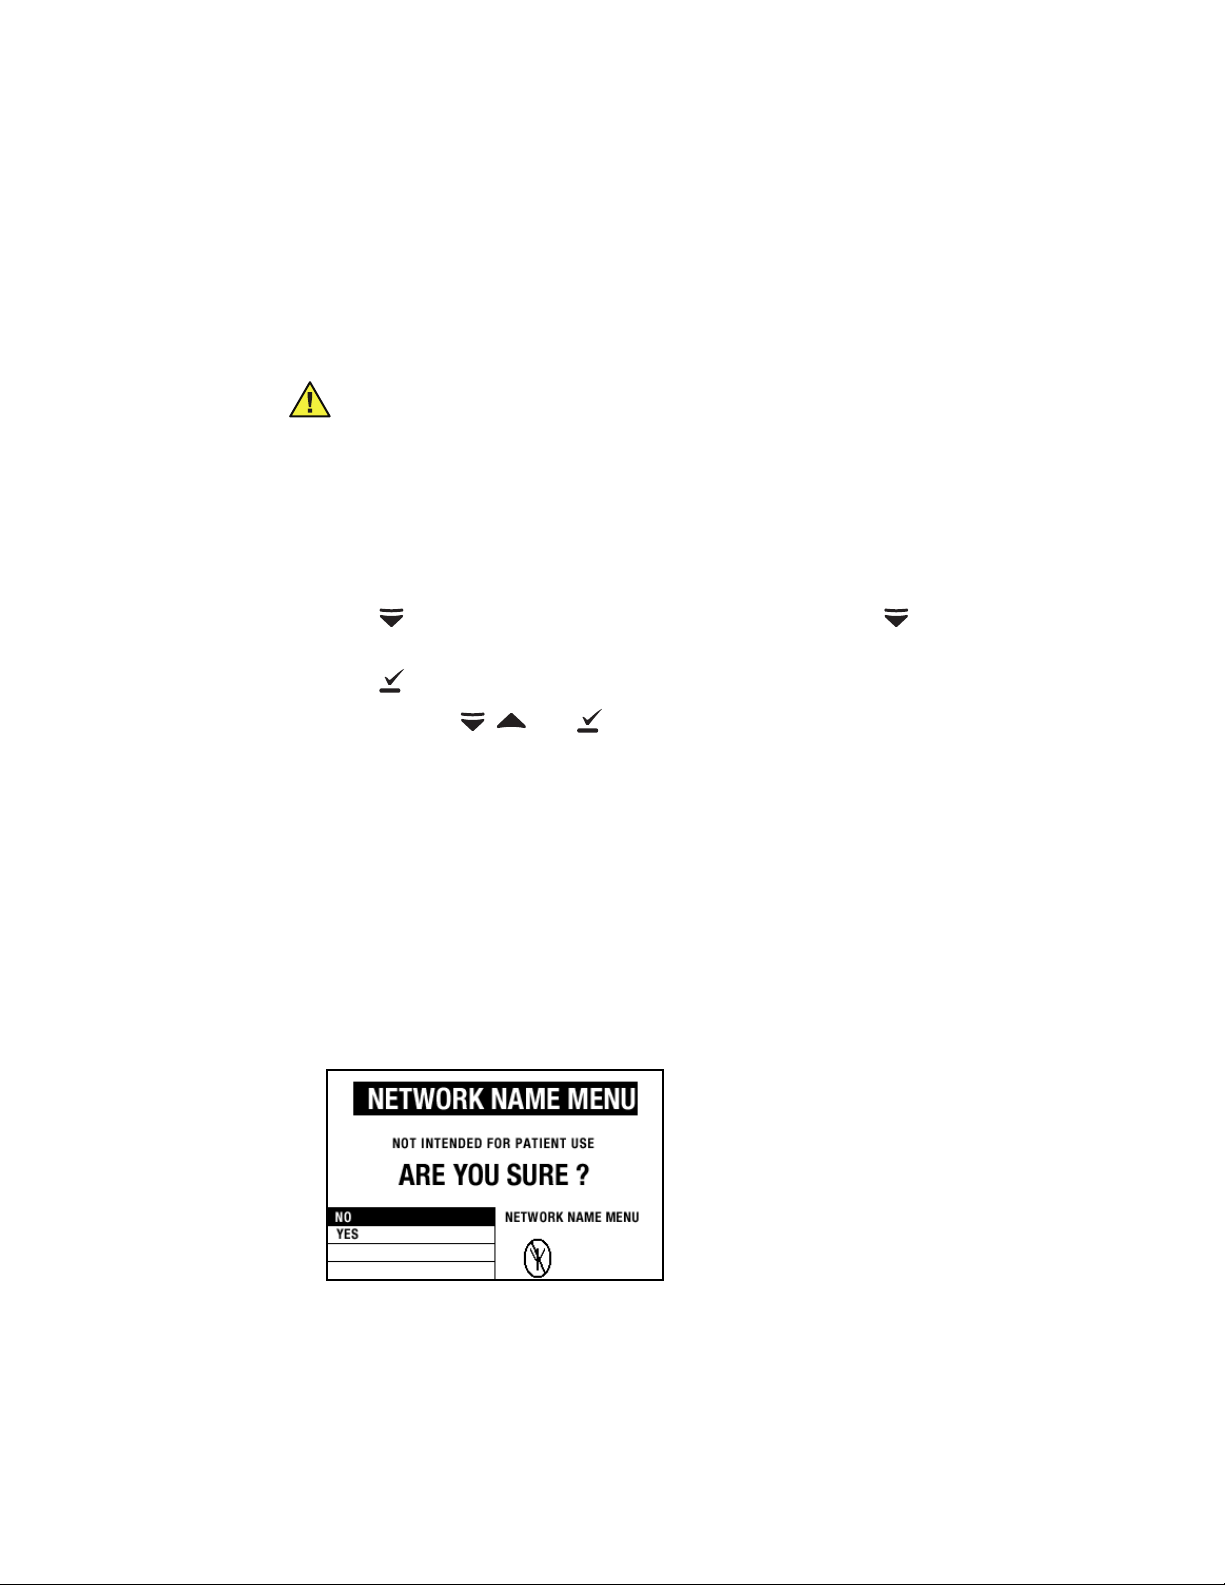
then the monitor displays the following screen
Page 26

22 Functional Verification Welch Allyn Micropaq Monitor
4. Verify that YES is highlighted, and press to display the following screen:
5. Press or to highlight the desired network name, and then press .
The monitor turns itself off, and then turns on and seeks to connect to a FlexNet
network with the new network name.
Changing a Custom Network Name
If the current monitor network name is a custom name, the monitor displays the following
screen:
You cannot change the network name using the Network Name Menu. Press to return
to the Service Menu. Contact Welch Allyn Technical Support (page ii) for assistance.
Page 27

23
4
Troubleshooting
Troubleshooting Chart
This troubleshooting chart includes system faults and equipment alerts related to possible
internal failures. If other error codes appear, refer to the directions for use for information
on the cause and suggested remedy for those errors.
Caution Replace parts, components, or accessories only with parts supplied or
approved by Welch Allyn. The use of any other parts can lead to inferior monitor
performance and will void the product warranty.
Symptom Possible Cause Possible Corrective Action
Keyboard buttons
stuck or locked up.
Display intermittent. Battery not secured against the monitor. Reinsert the battery. If this does not correct the
Monitor menu lock function is engaged. Refer to Micropaq Monitor Directions for Use.
Bad keyboard connection to the main
board at connector J3.
Keyboard flex cable is shorting out to the
metalized subframe (older versions of the
monitor only) near connector J3.
Keyboard flex cable is damaged. Check
for sharp bends in the keyboard flex
cable.
Defective keyboard. Replace the front case assembly.
Bad display connection to the main board
at connector J4.
Check the keyboard flex cable connection at J3:
unlock the ZIF connector, reseat the flex cable, and
then relock the connector.
Add Kapton tape between the flex cable and the
metalized subframe close to connector J3.
Replace the front case assembly.
problem, check the back case for damage to the
plastic or to the battery connector.
Check the display flex cable connection at J4: unlock
the ZIF connector, reseat the flex cable, and then
relock the connector.
Display flex cable is damaged. Check for
sharp bends in the display flex cable.
Check for damage at the connection
between the flex cable and the display.
Defective or damaged display. Replace the display assembly.
Lines in the display. Check for display circuit damage caused
by improper display installation. Solder
connections on the ECG or SpO
connectors may damage the display
circuit.
2
Replace the display assembly.
Replace the display assembly.
Page 28

24 Troubleshooting Welch Allyn Micropaq Monitor
Symptom Possible Cause Possible Corrective Action
SpO
is not working. Bad connection to the SpO2 board.
2
Possible error code OXB87 on the display.
Bad SpO2 flex cable connection to the
main board at connector J8.
Check connections at the SpO2 board assembly.
Check the SpO2 flex cable connection at J8: unlock
the ZIF connector, reseat the flex cable, and then
relock the connector.
SpO
sensor has no LED. Check the ground connection to the main board at
2
Broken SpO2 flex cable solder
connection.
connector J11.
Check for fractured solder joints on the SpO2
connector (often caused by dropping the monitor).
Repair the solder joints and retest the monitor.
ECG “LEADS OFF”
message when ECG
leads are connected.
Broken SpO
SpO
Bad SpO
Broken ECG flex cable solder connection. Check for fractured solder joints on the ECG
flex cable. Replace the front case assembly.
2
external connector is damaged. Replace the front case assembly.
2
assembly. Send to Welch Allyn factory service for repair.
2
connector (often caused by dropping the monitor).
Repair solder joints and retest the monitor.
ECG is not working. Bad ECG connection. Check the ECG connection to the main board at
connector J1: unlock the ZIF connector, reseat the
flex cable, and then relock the connector.
Broken ECG flex cable solder connection. Check for fractured solder joints on the ECG
connector (often caused by dropping the monitor).
Repair solder joints and retest the monitor.
Broken ECG flex cable. Replace the appropriate front case assembly.
ECG external connector is damaged. Replace the appropriate front case assembly.
Bad main board. Send the monitor to Welch Allyn factory service for
repair.
The monitor is not
making a connection
to Acuity.
Outside of access point coverage area. Move into range of the access point.
Bad antenna connection. Send the monitor to Welch Allyn factory service for
repair.
Bad radio card. Send the monitor to Welch Allyn factory service for
repair.
No power or power
intermittent.
The monitor causes
rf/emi interference.
Broken battery connector. Send the monitor to Welch Allyn factory service for
repair.
Nylon washers and metal washers are
incorrectly installed on the SpO
shield.
board/
2
Install nylon washers in the correct locations
according to the instructions in "Installing the SpO2
Shield (all models)" on page 45.
SpO2 shield is not correctly installed. Check that the SpO2 shield is installed according to
the instructions in "Installing the SpO2 Shield (all
models)" on page 45.
The flap on the antenna is not covering
the ECG connector.
Check that the flap on the antenna is installed
according to the instructions in "Installing the Main
Board, Subframe and Radio Card" on page 39 or
"Installing the Main Board, Subframe and Radio
Card" on page 55.
Page 29

Service Manual Troubleshooting 25
Alert Messages and Display Information
Message and Display
Possible Cause(s) and Suggested Response
Information
LOW BATTERY The monitor will shut down in less than 30 minutes due to a low battery.
• Replace the battery as soon as possible.
VERY LOW BATTERY The monitor will shut down in less than 5 minutes due to a low battery.
• Replace the battery as soon as possible.
BATTERY TOO LOW
SHUT DOWN IN PROGRESS
The battery is so low the monitor has to shut down operation.
• Replace the battery immediately.
ACUITY CONNECTION LOST The monitor is not connected to the network.
• Press to acknowledge and silence the tone and cancel the message. While
disconnected from the network, the off-network icon and the yellow LED
continue to flash.
NOTE: The monitor will continue to attempt to reconnect until it is successful.
EXCESSIVE ECG OFFSET
REPLACE ELECTRODES
a
Chest icon is displayed with
flashing ECG electrode(s).
The monitor detects poor ECG electrode contact.
• Check and replace ECG electrodes as needed.
The monitor detects that at least one ECG electrodes is disconnected.
a
• Check and replace or reconnect electrodes as needed.
NO ECG CABLE DETECTED • If the ECG cable has been intentionally disconnected from the monitor, press
to cancel the alert tone.
• If the ECG cable has been unintentionally disconnected, reconnect it. Check the
patient and monitor to verify that ECG monitoring resumes properly.
NO SpO2 SENSOR DETECTED The SpO2 sensor has been disconnected for more than 5 seconds.
• If disconnection is intentional, press to acknowledge and silence the tone.
• If disconnection is not intentional, reconnect the sensor or replace the sensor and
reconnect.
DEFECTIVE SpO2 SENSOR
or
UNRECOGNIZED SpO
<key name> KEY STUCK
a
SENSOR
2
a
The SpO2 sensor is either defective or not recognized.
• Replace the SpO
a
sensor with a new, compatible SpO2 sensor.
2
During the power-up self test, the monitor detected that a key is stuck ( , , ,
or ). This can happen if you accidentally press a key down before the Main Menu
is displayed during power-up.
• Remove and then reinsert the battery to power up again and see if the key is still
stuck. If it is, contact your biomedical engineering department.
System Error
Thread: <nnn>
The equipment problem is so serious the monitor cannot be used.
• Contact your biomedical engineering department.
Error ID: <nnn>
a. This alert message can be acknowledged from Acuity, but not from the monitor.
Page 30

26 Troubleshooting Welch Allyn Micropaq Monitor
Page 31

27
5
Repair Procedures
Introduction
This section provides instructions for disassembly and reassembly of the monitor.
Caution Perform all repair procedures at a static-protected station.
Caution When the monitor case is opened, all parts must be regarded as
extremely fragile. All procedure steps must be executed with care and precision.
Required Tools and Equipment
• 3 in. lb. torque driver
• 5 in. lb. torque driver
• #1 Phillips screwdriver bit
• Tweezers
• Needlenose pliers
• Kapton tape
• Soft lens wipes
• Scissors or other cutting device
• Canned air
• Ultrafine-point permanent marker
• Small paper clip
Page 32

28 Repair Procedures Welch Allyn Micropaq Monitor
Zero Insertion Force (ZIF) Connectors
The monitor uses flex cables and zero insertion force (ZIF) flex cable connectors. The flex
cables are all marked with a designator number which corresponds to a PCB board
designator. Flex cables and ZIF connectors require special care when handling them.
ZIF connectors use a sliding outer piece that latches and unlatches to secure and release
the flex cable. ZIF cables cannot be successfully connected or disconnected without
properly unlatching and latching the sliding outer piece.
Disconnecting a ZIF Cable
1. Using a suitable tool (for example, a paper clip, small flat-head screwdriver, or needlenose pliers), slide the latching piece of the connector away from the connector body.
Latching piece
2. Remove the cable.
Caution Do not attempt to remove a flex cable until the ZIF latch has been
opened.
Connecting a ZIF Cable
1. Slide the latching piece of the connector away from the connector body.
2. Insert the flex cable into the connector. This may require using a suitable tool to keep
the latching piece elevated.
Connector body
Page 33

Service Manual Repair Procedures 29
3. Push the latching piece toward the connector body until it locks into place.
Connector Locations
Connector
(Main Board)
J1 (ZIF connector) ECG (flex cable) External ECG connector (flex cable) page 34
J3 (ZIF connector) Keyboard (flex cable) Keyboard (flex cable) page 35
J4 (ZIF connector) Display (flex) cable Display (flex cable) page 35
J11 SpO
Description Connects with Referred to on...
(flex cable) Main board ground (flex cable) page 34
2
Page 34

30 Repair Procedures Welch Allyn Micropaq Monitor
Procedures
Disassembly - Model 404 . . . . . . . . . . . . . . . . . . . . . . . . . . . . . . . . . . . . . . . . . .30
Reassembly - Model 404. . . . . . . . . . . . . . . . . . . . . . . . . . . . . . . . . . . . . . . . . . .37
Disassembly - Model 402 . . . . . . . . . . . . . . . . . . . . . . . . . . . . . . . . . . . . . . . . . .49
Reassembly - Model 402. . . . . . . . . . . . . . . . . . . . . . . . . . . . . . . . . . . . . . . . . . .53
Disassembly - Model 404
This procedure covers the Masimo and Nellcor versions of the Model 404 monitor with
SpO
.
2
Opening the Case
1. Remove the battery pack.
2. Remove the rubber feet from the rear panel.
3. Remove the six case screws.
Case screws
Page 35

Service Manual Repair Procedures 31
4. Separate the case.
Note
If you are replacing only the rear case, proceed to the gasket replacement step on
“Closing the Case” on page 46.
Removing the SpO2 Board
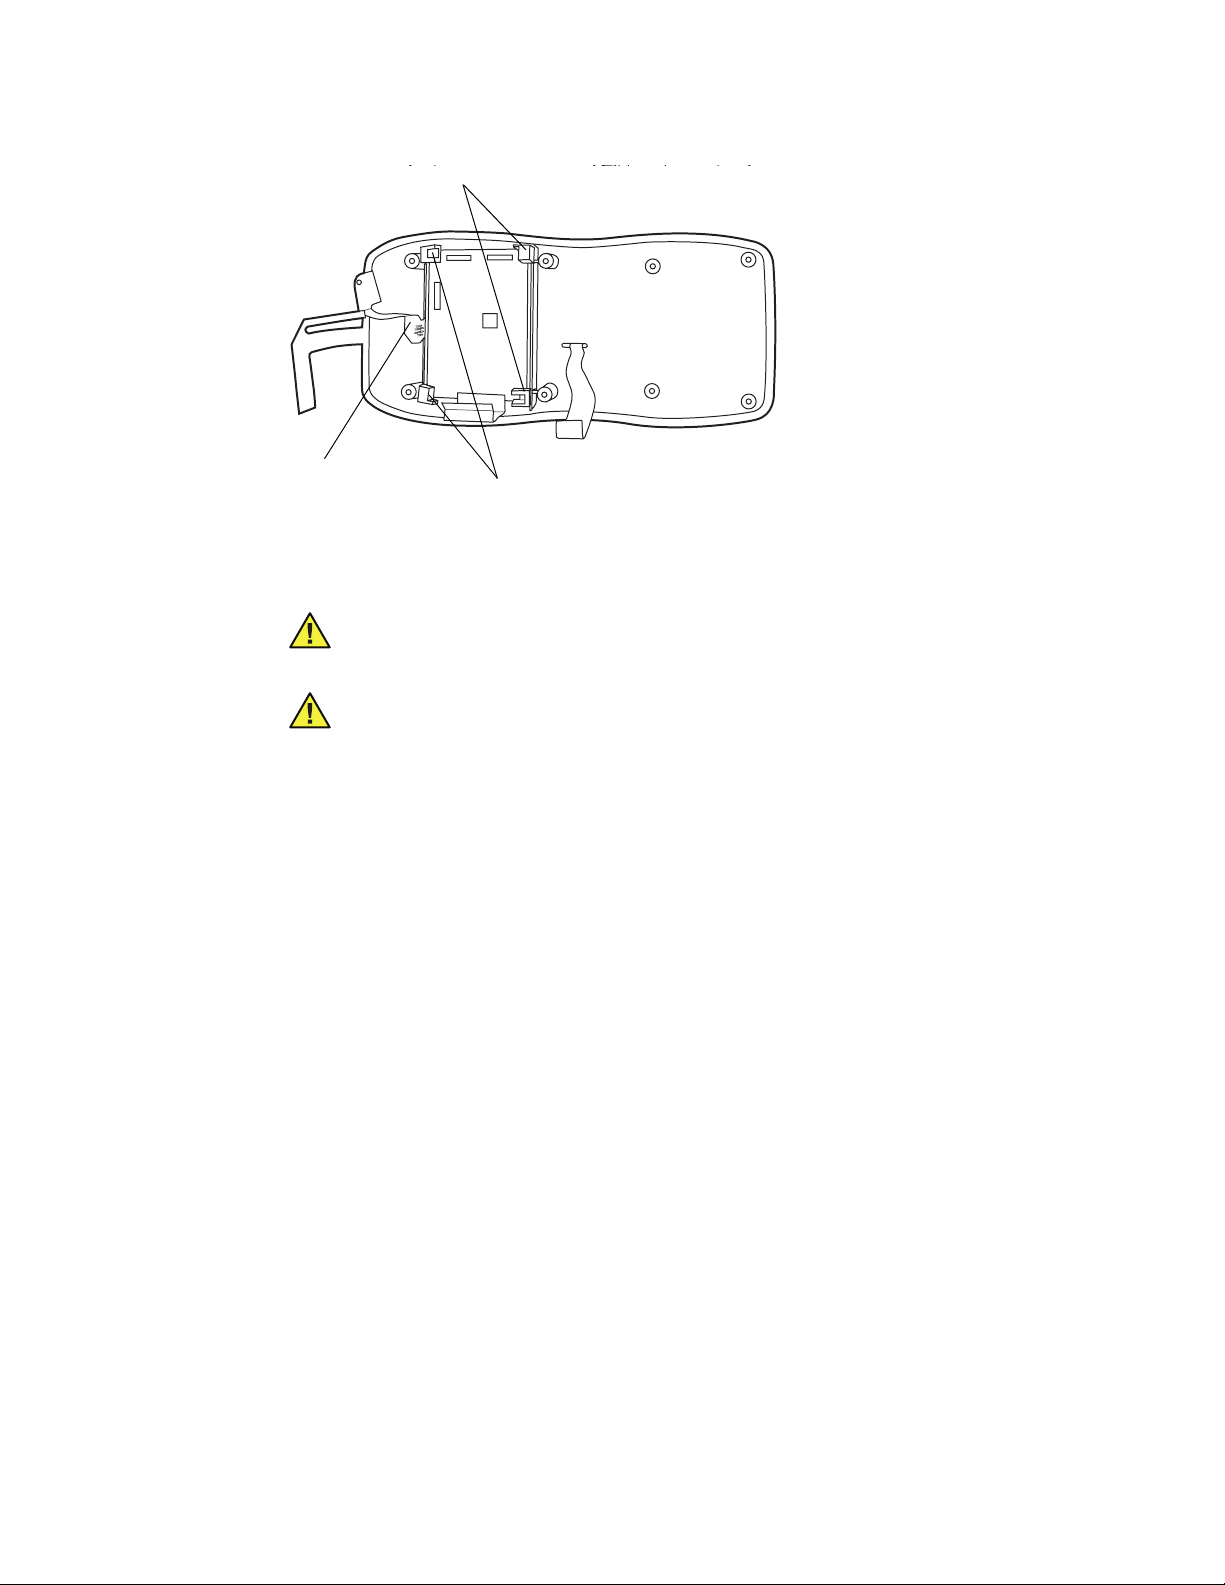
1. Remove the screws and metal washers at the locations shown below.
2. Remove the screws and nylon shoulder washers at the locations shown below.
Note
Note
Do not damage the SpO
The Masimo version has two screws with nylon shoulder washers. The Nellcor
version has only one screw with a nylon shoulder washer, as shown below.
Screws with metal washers
foil shield when removing the nylon shoulder washers.
2
Screw with nylon shoulder washer (Masimo only)
Screw with nylon shoulder washer (Masimo and Nellcor)
3. Unfold the SpO
shield.
2
4. For Masimo models, continue with the next section. For Nellcor models, continue
with “Disconnecting the SpO2 Board (Nellcor models)” on page 33.
Page 36

32 Repair Procedures Welch Allyn Micropaq Monitor
Disconnecting the SpO2 Board (Masimo models)
1. Slide the SpO2 board out from under the two bracket hooks.
Bracket hook
Bracket hook
2. Lift the SpO
board, and disconnect the flex cables from connectors J1 and J3.
2
J1
J3
3. Continue with “Removing the Main Board, Subframe and Radio Card (all models)” on
page 34.
Page 37

Service Manual Repair Procedures 33
Disconnecting the SpO2 Board (Nellcor models)
1. Unplug the flex cables from connectors J1 and J2.
J1
2. Slide the SpO
board out from under the two bracket hooks (shown at left in the
2
illustration below).
Bracket hook
Bracket hook
3. Remove the SpO
J2
board.
2
Page 38

34 Repair Procedures Welch Allyn Micropaq Monitor
Removing the Main Board, Subframe and Radio Card (all models)
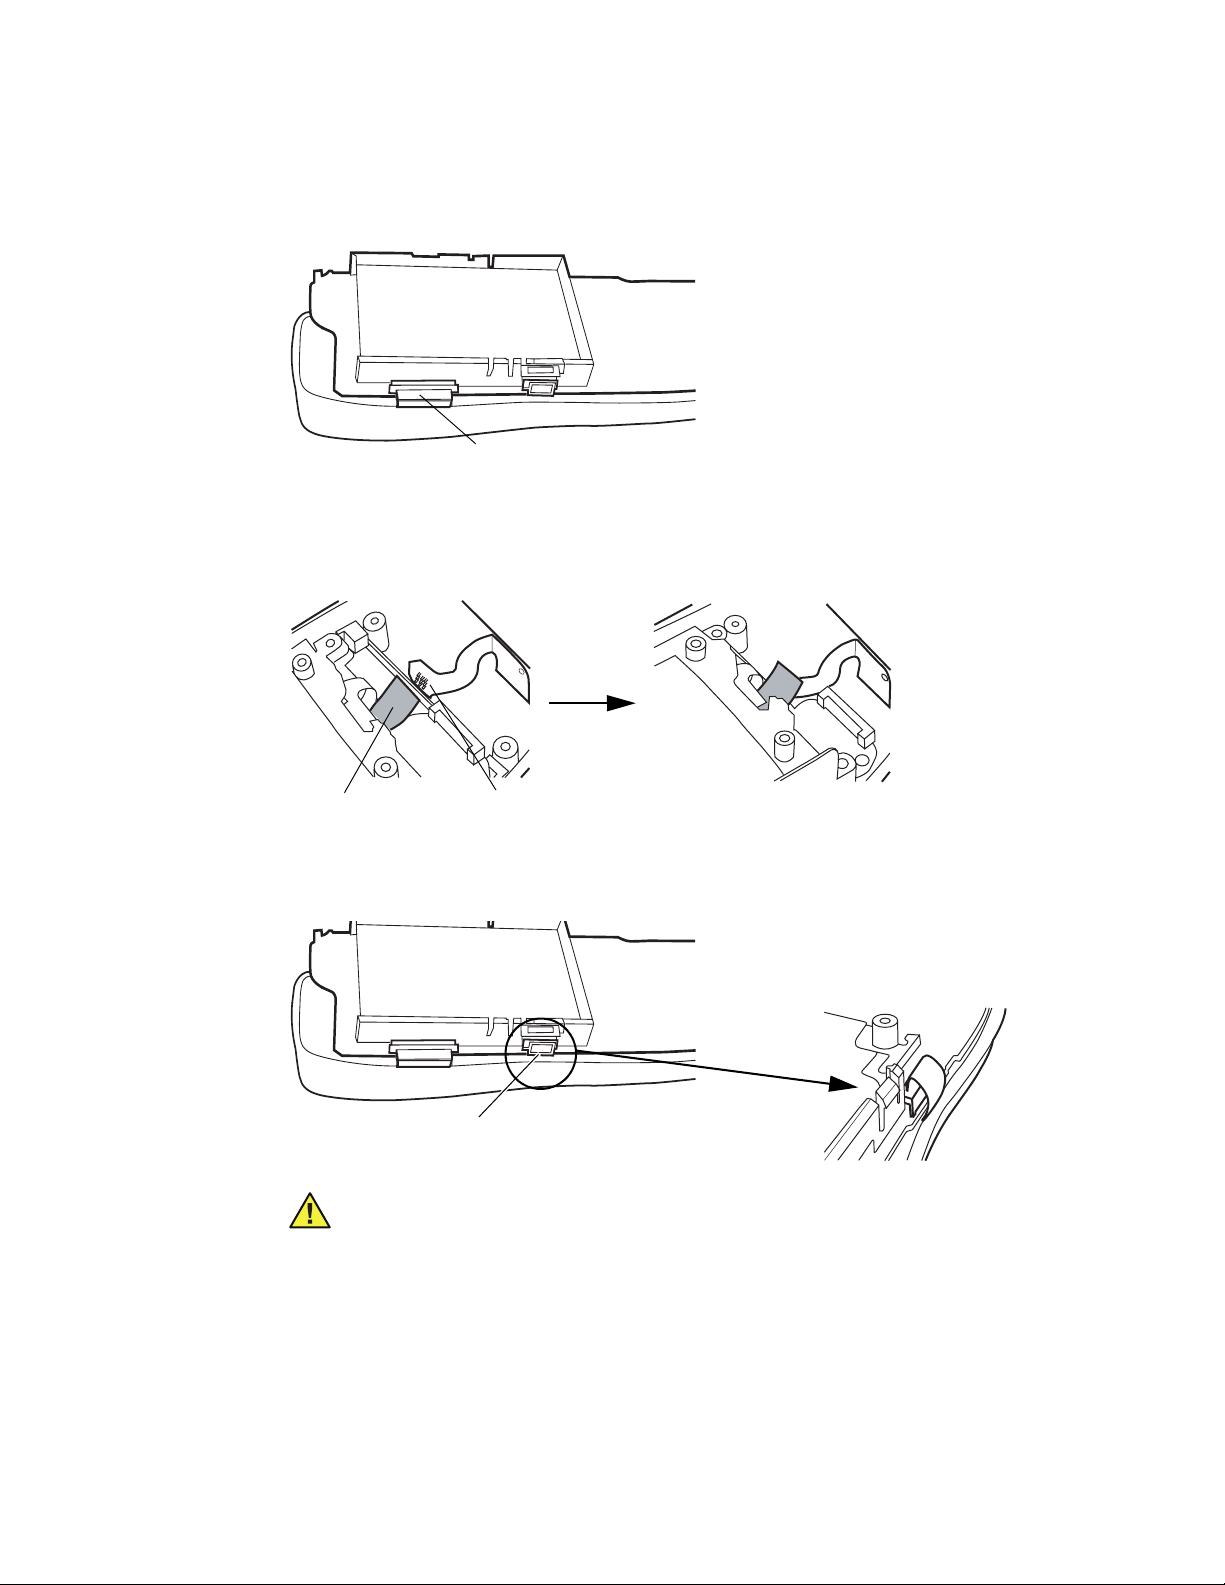
1. Unplug the SpO2 flex cable at connector J11.
SpO2 flex cable at J11
2. Unplug the ECG sensor cable at connector J1.
ECG sensor cable at J1
3. Remove the screws and rectangular washers from the SpO
shield.
2
Screws and rectangular washers
Page 39

Service Manual Repair Procedures 35
4. Unplug the display cable from connector J4 and keyboard cable from connector J3.
shield not shown here for clarity.)
(SpO
2
J4
J3
5. Remove main board, subframe, and radio card (as one assembly) from the front case.
(SpO2 shield not shown here for clarity.)
Caution Do not separate the main board, the subframe, and the radio card.
They are not serviceable. Separation will damage the single-use antenna
connector, which can be replaced only at the factory.
Removing the Display from the Front Case
1. Remove the display from the front case using the procedure below.
Caution Failure to follow the sequence below may result in damage to the
display—the soldered connections next to the display may scratch the delicate
flex cable circuitry.
a. Slightly raise the side of the display farthest from the connectors by using a
suitable tool to pry up the rubber cushions.
b. Carefully slide the display out from under the soldered connections.
c. Pry up the rubber cushions closest to the connectors and remove the display.
Page 40
36 Repair Procedures Welch Allyn Micropaq Monitor
Step a
Step b
Step c
2. If you are installing a new display, remove and save the rubber cushions.
3. Set the display down on a clean surface with the circuit board side facing up.
Caution Do not bend or stress the display flex cable, especially at its
connection to the circuit board.
Caution Do not touch the display screen. Fingerprints are difficult to remove
without damaging the display.
Page 41

Service Manual Repair Procedures 37
Reassembly - Model 404
Installing the Display
Note
The first two steps apply only if you are installing a new display. If you are reusing
a display, skip to step 3 on page 38.
Caution The display flex cable is fragile. Damage may result if the flex cable is
bent too sharply or if its connection with the circuit board is stressed.
Refer to the illustration.
s
Display
Circuit board side
Display side
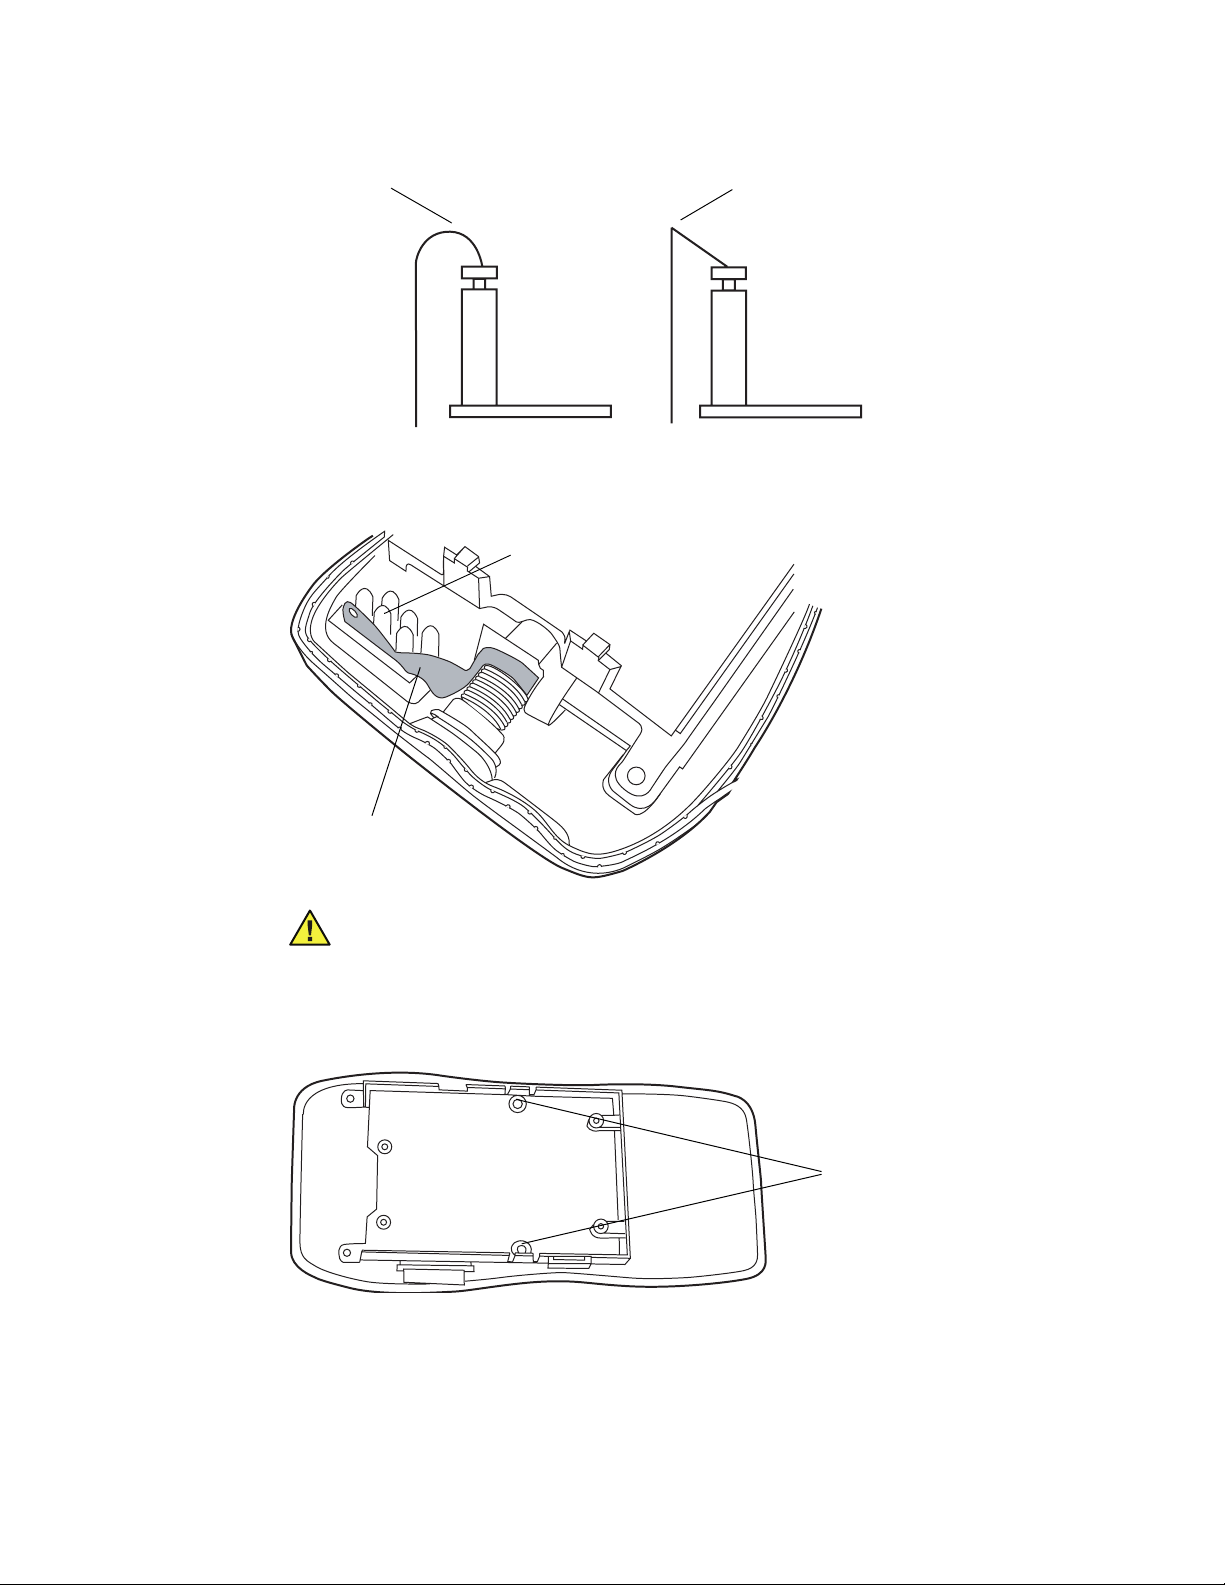
1. Form a 45-degree bend in the end of the display cable.
Bend line
Exposed flex circuit trace
Flex cable
Bend line
Exposed flex circuit trace
a. With needle nose pliers, clamp the flex cable just behind the exposed flex circuit
trace. You will form the bend along the edge of the pliers.
b. Press the end of the flex cable against a hard surface to bend it 45 degrees,
toward the display side, at the edge (bend line) of the exposed flex trace.
Caution The direction of the bend is away from the exposed flex circuit trace.
Do not bend the cable in the opposite direction.
2. Peel the protective plastic liner from the front of the display.
Note
Remove the protective liner before installing the display in the case.
Page 42

38 Repair Procedures Welch Allyn Micropaq Monitor
3. Press the rubber cushions onto the display, with the raised cushion corners up as
shown.
4. Install the display in the front case using the procedure below.
Caution Failure to follow the sequence below may result in damage to the
display—the soldered connections next to the display may scratch the delicate
flex cable circuitry.
a. Lower the rubber cushions closest to the connectors into the front case.
b. Carefully slide the display under the soldered connections.
c. Press the rubber cushions farthest from the connectors into place.
Step a
Step b
Step c
5. Carefully bend the display flex cable so that it curves back toward the circuit board, as
shown in the diagram below. The curve will follow the curve of the front case.
Page 43

Service Manual Repair Procedures 39
Exposed flex circuit trace
Circuit board side
Display
Display side
Caution The display flex cable is fragile. Damage may result if the flex cable is
bent too sharply, or if its connection with the circuit board is stressed.
Installing the Main Board, Subframe and Radio Card
1. Install the main board, subframe and radio card as one assembly onto the front case.
(
SpO
2. Connect the display cable to the J4 connector and lock the latching piece (refer to
“Zero Insertion Force (ZIF) Connectors” on page 28 for complete ZIF connector
installation instructions.)
shield not shown here for clarity.)
2
Page 44
40 Repair Procedures Welch Allyn Micropaq Monitor
Note
Tilt the assembly slightly toward the connectors, as shown, to allow insertion of
the display flex cable into the J4 connector.
(SpO2 shield not shown here for clarity.)
J4
3. Insert the display flex cable into the J4 connector and lock the collar.
4. When placing the assembly into the case, verify that the flap on the antenna covers
the ECG connector. Failure to cover will cause radio interference problems.
Antenna flap ECG connector Antenna flap covering connector
5. Place the main board into the front case.
6. Insert the keyboard cable into the J3 connector and lock the latching piece.
(SpO2 shield not shown here for clarity.)
J3
Caution When attaching the J3 connector, bend the flex cable toward the
connector in a smooth radius curve (as shown below) to avoid cable damage.
Page 45

Service Manual Repair Procedures 41
Smooth curve in flex cable
Correct Incorrect
Sharp bend in flex cable
7. Insert the ECG sensor cable into the J1 connector and lock the latching piece.
ECG sensor cable at J1
Page 46
42 Repair Procedures Welch Allyn Micropaq Monitor
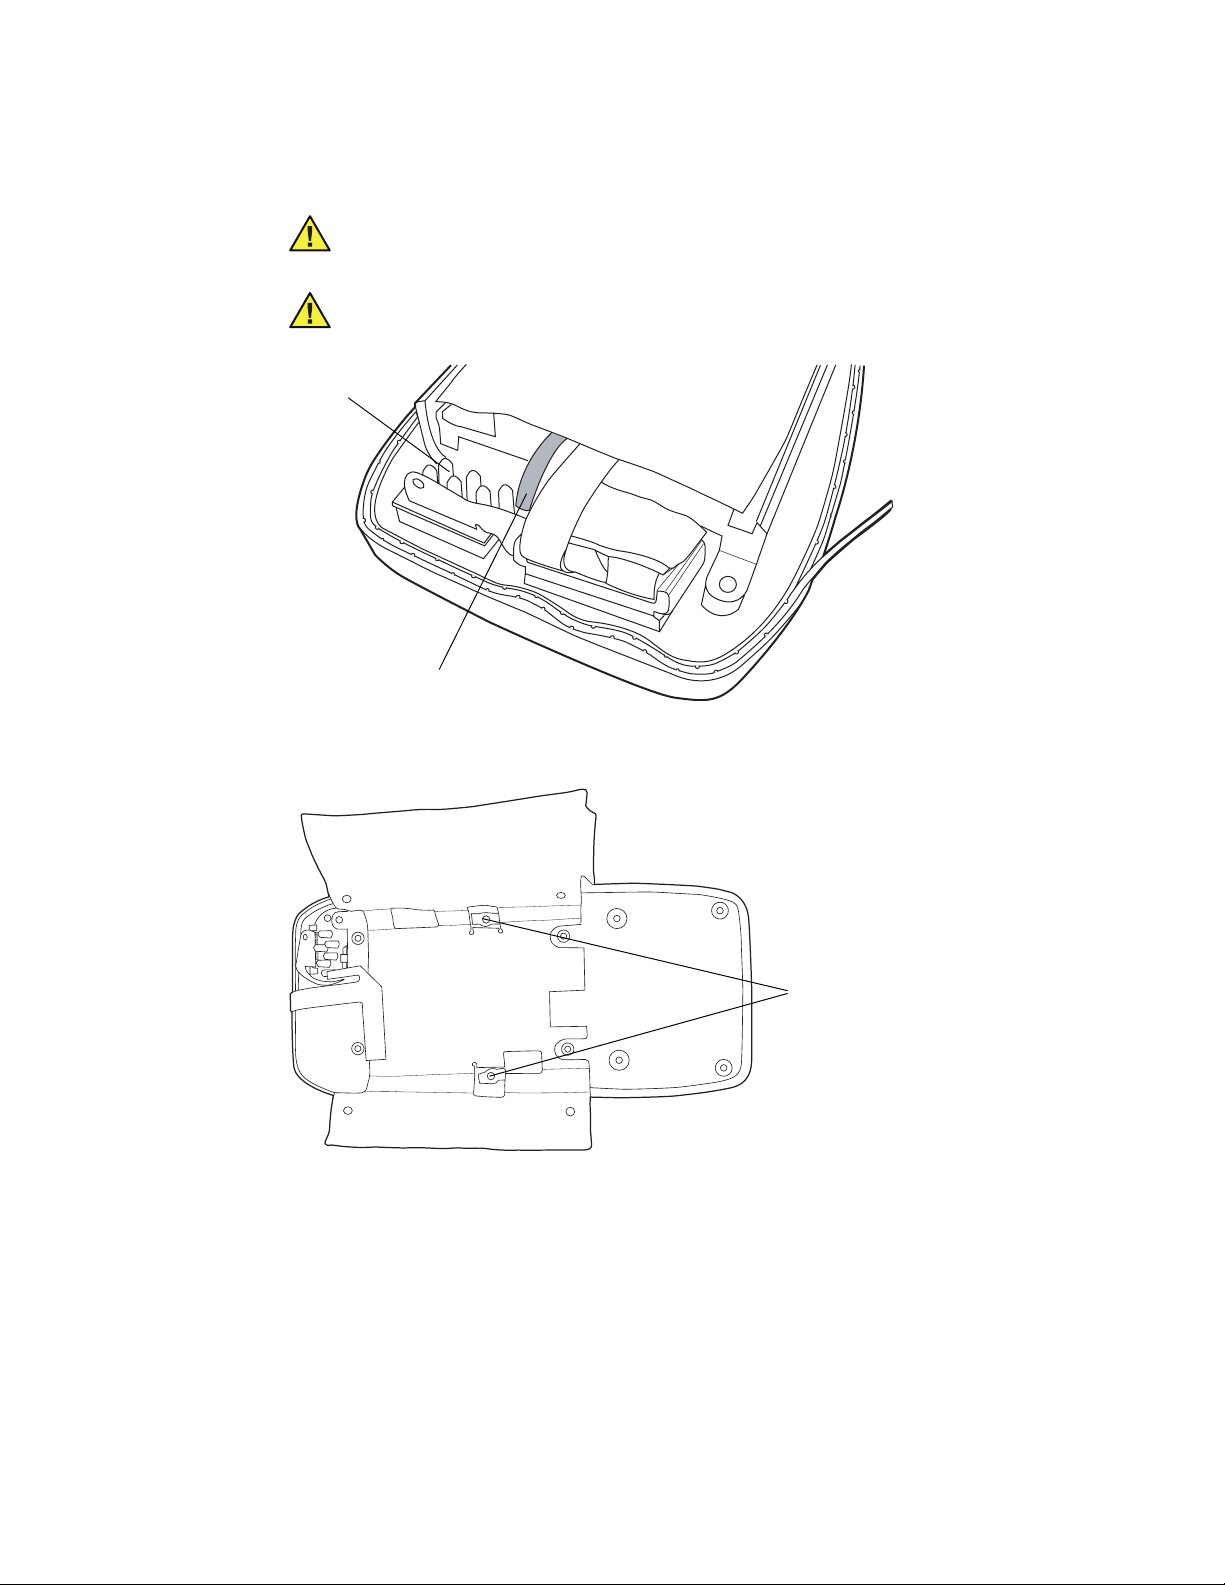
8. Insert the SpO2 flex cable pin into the J11 connector.
Caution The pin on the SpO2 flex cable can bend and break easily.
Caution Do not to bend or tilt any of the neon bulbs. They must remain vertical.
Neon bulbs
SpO2 flex cable at J11
9. Install the SpO
shield, screws and rectangular washers to secure the main board to
2
the front case. Torque the screws to 3 in. lbs.
Screws and rectangular washers
10. For Masimo models, continue with the next section. For Nellcor models, continue
with “Installing the SpO2 Board (Nellcor models)” on page 44.
Page 47

Service Manual Repair Procedures 43
Installing the SpO2 Board (Masimo models)
This section covers installation of the SpO2 board on Masimo models. For Nellcor models,
go to “Installing the SpO2 Board (Nellcor models)” on page 44.
1. Attach the SpO
J1
2. Seat the SpO
Bracket hook
2
sensor cables to connectors J1 and J3.
2
J3
board in place on the subframe, under the bracket hooks as shown.
Bracket hook
Page 48

44 Repair Procedures Welch Allyn Micropaq Monitor
Installing the SpO2 Board (Nellcor models)
1. Carefully slide the SpO2 board under the two bracket hooks as shown.
Bracket hook
Bracket hook
2. Plug the SpO
cables into connectors J1 and J2.
2
J1
J2
Page 49

Service Manual Repair Procedures 45
Installing the SpO2 Shield (all models)
1. F o l d t h e S p O2 shield closed, with the short side overlapping the long side.
2. Insert the nylon shoulder washer(s) at the location(s) shown above and fully seat in
the SpO
shield.
2
Caution Take care to place the nylon washer(s) in the correct location(s) or the
system will not operate properly and may cause radio interference problems.
Note
3. Add screws after the nylon shoulder washers are seated and torque to 3 in. lbs.
4. Place metal washers and screws in the locations shown below and torque to 3 in. lbs.
The Masimo version has two screws with nylon shoulder washers. The Nellcor
version has only one screw with a nylon shoulder washer, as shown below.
Screw with nylon shoulder washer (Masimo only)
Screw with nylon shoulder washer (Masimo and Nellcor)
Screws with metal washers
Page 50

46 Repair Procedures Welch Allyn Micropaq Monitor
Closing the Case
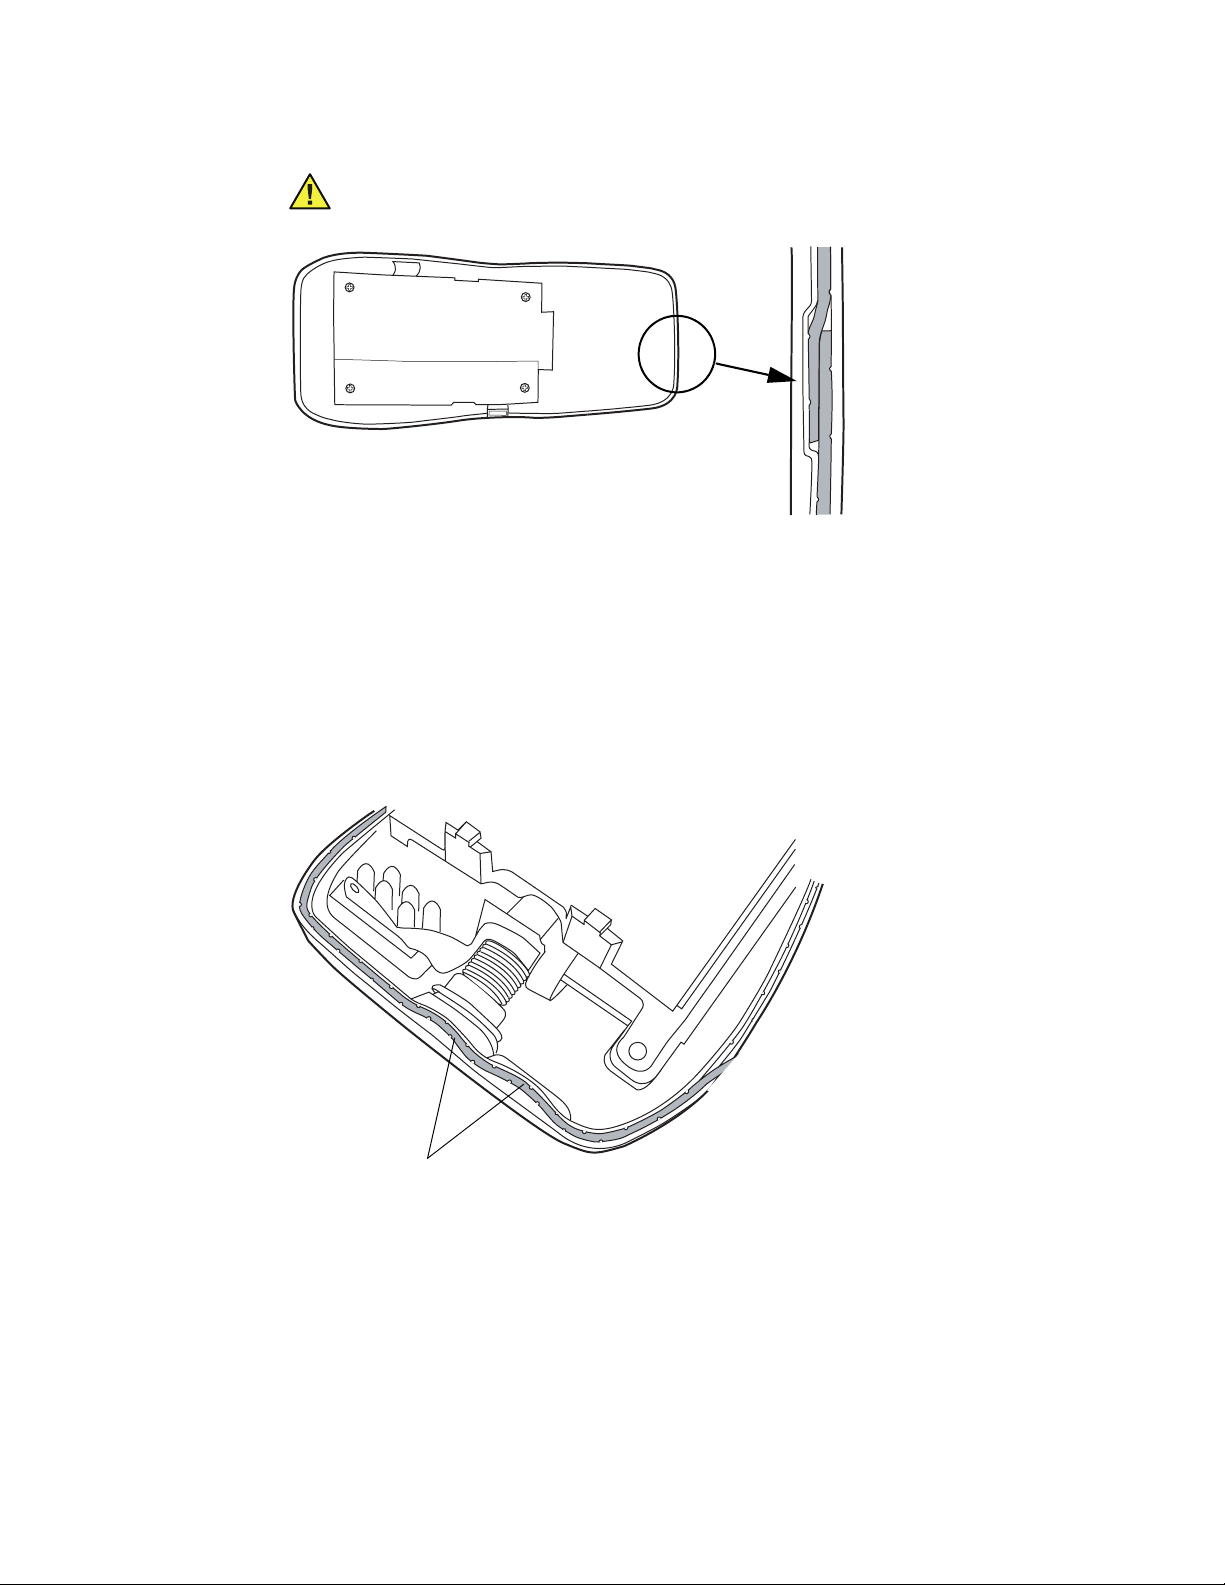
1. Insert the rubber gasket (part of the fastener kit) into the groove in the front case.
Begin inserting the gasket in the end locking section, located on the lower edge of the
case (as shown below).
Caution Do not stretch the gasket. Stretching the gasket will make reassembly
more difficult, and may result in a poor seal between the front and rear case.
Note
Note
Note
Both ends of the gasket should extend as far as possible into the end locking
section (refer to the drawing).
Do not trim the gasket until it has been fully inserted in the groove, with the
overlap as shown above.
Take special care when inserting the gasket into the curved section of the groove
near the connectors. If the gasket is stretched, it may pull out of the groove at this
point.
Curved section of gasket groove
2. After fully inserting the gasket into the groove, trim it to the specified length, as
shown in the illustration of the end locking section on page 46.
3. Attach the battery and verify that:
Page 51

Service Manual Repair Procedures 47
• the LEDs light red, yellow and green,
• no error messages are received,
• the keyboard works.
4. Remove the battery.
5. Adjust the ferrite bead to lay flat and square so that it does not interfere with the
placement of the back case.
Neon bulbs
Ferrite bead
6. Verify that the neon bulbs are vertical, so that they are not crushed between the front
and rear cases during reassembly.
7. Screw the rear case to the front case, making sure the rubber gasket stays in its
groove. Torque the screws as shown in the illustration below.
Note
Use all new screws, label covers and rubber feet (supplied in the service fastener
kit) when reassembling the case.
Four pan-head screws, 4-40 x 3/8.
Torque to 5 in. lbs.
Two pan-head screws, 2-56 x 3/16.
Torque to 3 in. lbs.
8. Push the rubber feet into the rear case. For ease of installation, apply a small amount
of alcohol to the rubber feet.
Page 52

48 Repair Procedures Welch Allyn Micropaq Monitor
Attaching Labels
Most of the labels shown below are part of the service fastener kit. The clear serial
number cover (not shown below) and the blank serial number label are included in the rear
case service kit.
The rear case and battery well labels must be ordered separately.
Rear case label
Screw covers (gray)
Serial number label (blank)
Battery well label
Notched label (clear)
Screw covers (clear)
1. Apply the gray screw covers over the upper screw holes in the battery area.
2. Apply the clear screw covers over the lower screws in the battery well.
3. Apply the notched label over the small recessed connector next to the battery
connector.
4. Apply the rear case and battery well labels.
5. Apply the blank serial number label to the rear case label at the location shown above.
6. Mark the blank serial number label with the model number, part number and serial
number as shown below. Use an ultrafine point permanent marker. Write small to fit
in all the required information.
7. Apply the clear cover over the marked serial number label.
8. Attach the battery and verify that:
• the LED lights red, yellow and green,
• no error messages are received,
• the keyboard works.
Page 53

Service Manual Repair Procedures 49
Disassembly - Model 402
This procedure covers the Model 402 monitor with ECG only.
Opening the Case
1. Remove the battery pack.
2. Remove the rubber feet from the rear panel.
3. Remove the six case screws.
Case screws
4. Separate the case.
Note
If you are replacing only the rear case, proceed to “Closing the Case” on page 57.
Page 54

50 Repair Procedures Welch Allyn Micropaq Monitor
Removing the Main Board, Subframe and Radio Card
1. Unplug the ECG sensor cable at connector J1.
ECG sensor flex cable at J1
2. Remove the screws and rectangular washers from the subframe.
Screws and rectangular washers
3. Unplug the display cable from connector J4 and keyboard cable from connector J3.
J4 J3
Page 55

Service Manual Repair Procedures 51
4. Remove main board, subframe, and radio card (as one assembly) from the front case.
Caution Do not separate the main board, the subframe, and the radio card.
They are not serviceable. Separation will damage the single-use antenna
connector, which can be replaced only at the factory.
Removing the Display from the Front Case
1. Remove the display from the front case using the procedure below.
Caution Failure to follow the sequence below may result in damage to the
display—the soldered connections next to the display may scratch the delicate
flex cable circuitry.
a. Slightly raise the side of the display farthest from the connectors by using a
suitable tool to pry up the rubber cushions.
b. Carefully slide the display out from under the soldered connections.
c. Pry up the rubber cushions closest to the connectors and remove the display.
Step a
Step b
2. If you are installing a new display, remove and save the rubber cushions.
3. Set the display down on a clean surface with the circuit board side facing up.
Step c
Page 56

52 Repair Procedures Welch Allyn Micropaq Monitor
Caution Do not bend or stress the display flex cable, especially at its
connection to the circuit board.
Caution Do not touch the display screen. Fingerprints are difficult to remove
without damaging the display.
Page 57

Service Manual Repair Procedures 53
Reassembly - Model 402
Installing the Display
Note
The first two steps of this section apply only if you are installing a new display. If
you are reusing a display, skip to step 3 on page 54.
Caution The display flex cable is fragile. Damage may result if the flex cable is
bent too sharply or if its connection with the circuit board is stressed.
Refer to the illustration.
s
Display
Circuit board side
Display side
1. Form a 45-degree bend in the end of the display cable.
Bend line
Exposed flex circuit trace
Flex cable
Bend line
Exposed flex circuit trace
a. With needle nose pliers, clamp the flex cable just behind the exposed flex circuit
trace. You will form the bend along the edge of the pliers.
b. Press the end of the flex cable against a hard surface to bend it 45 degrees,
toward the display side, at the edge (bend line) of the exposed flex trace.
Caution The direction of the bend is towards the exposed flex circuit trace. Do
not bend the cable in the opposite direction.
2. Peel the protective plastic liner from the front of the display.
Note
Remove the protective liner before installing the display in the case.
Page 58

54 Repair Procedures Welch Allyn Micropaq Monitor
3. Press the rubber cushions onto the display, with the raised cushion corners up as
shown.
4. Install the display in the front case using the procedure below.
Caution Failure to follow the sequence below may result in damage to the
display—the soldered connections next to the display may scratch the delicate
flex cable circuitry.
a. Lower the rubber cushions closest to the connectors into the front case.
b. Carefully slide the display underneath the soldered connections.
c. Press the rubber cushions farthest from the connectors into place.
Step a
Step b
Step c
5. Carefully bend the display flex cable so that it curves back toward the circuit board, as
shown in the diagram below. The curve will follow the curve of the front case.
Page 59

Service Manual Repair Procedures 55
Exposed flex circuit trace
Circuit board side
Display
Display side
Caution The display flex cable is fragile. Damage may result if the flex cable is
bent too sharply, or if its connection with the circuit board is stressed.
Installing the Main Board, Subframe and Radio Card
1. Install the main board, subframe and radio card as one assembly onto the front case.
2. Connect the display cable to the J4 connector and lock the latching piece (refer to
“Zero Insertion Force (ZIF) Connectors” on page 28 for complete ZIF connector
installation instructions.)
Page 60

56 Repair Procedures Welch Allyn Micropaq Monitor
Note
Tilt the assembly slightly toward the connectors, as shown, to allow insertion of
the display flex cable into the J4 connector.
J4
3. Insert the display flex cable into the J4 connector.
4. When placing the assembly into the case, verify that the flap on the antenna covers
the ECG connector. Failure to cover will cause radio interference problems.
Antenna flap ECG connector Antenna flap covering the ECG connector
5. Place the main board into the front case.
6. Insert the keyboard cable into the J3 connector and lock the latching piece.
J3
Caution When attaching the J3 connector, bend the flex cable toward the
connector in a smooth curve (shown below at left) to avoid cable damage.
Page 61
Service Manual Repair Procedures 57
Smooth curve in flex cable
Correct Incorrect
Sharp bend in flex cable
7. Insert the ECG sensor cable into the J1 connector and lock the latching piece.
Neon bulbs
ECG sensor flex cable at J1
8. Install the screws and rectangular washers to secure the main board to the front
case. Torque the screws to 3 in. lbs.
Closing the Case
1. Insert the rubber gasket (part of the fastener kit) into the groove in the front case.
Begin inserting the gasket in the end locking section, located on the lower edge of the
case (as shown below).
Caution Do not to bend or tilt any of the neon bulbs. They must remain vertical.
Screws and rectangular washers
Page 62
58 Repair Procedures Welch Allyn Micropaq Monitor
Caution Do not stretch the gasket. Stretching the gasket will make reassembly
more difficult, and may result in a poor seal between the front and rear case.
Note
Note
Note
Both ends of the gasket should extend as far as possible into the end locking
section (refer to the drawing).
Do not trim the gasket until it has been fully inserted in the groove, with the
overlap as shown above.
Take special care when inserting the gasket into the curved section of the groove
near the connectors. If the gasket is stretched, it may pull out of the groove at this
point. (See the illustration below.)
Curved section of gasket groove
2. After fully inserting the gasket into the groove, trim it to the specified length, as
shown in the illustration of the end locking section on page 57.
3. Attach the battery and verify that:
• the LEDs light red, yellow and green
• no error messages are received
• the keyboard works
Page 63

Service Manual Repair Procedures 59
4. Remove the battery.
5. Verify that the neon bulbs are vertical, so that they are not crushed between the front
and rear cases during reassembly.
6. Screw the rear case to the front case, making sure the rubber gasket stays in its
groove. Torque the screws as shown in the illustration below.
Note
Use all new screws, label covers and rubber feet (supplied in the service fastener
kit) when reassembling the case.
Four pan-head screws, 4-40 x 3/8.
Torque to 5 in. lbs.
Two pan-head screws, 2-56 x 3/16.
Torque to 3 in. lbs.
7. Push the rubber feet into the rear case. For ease of installation, apply a small amount
of alcohol to the rubber feet.
Page 64

60 Repair Procedures Welch Allyn Micropaq Monitor
Attaching Labels
Most of the labels shown below are part of the service fastener kit. The clear serial
number cover (not shown below) and the blank serial number label are included in the rear
case service kit.
The rear case and battery well labels must be ordered separately.
Rear case label
Screw covers (gray)
Serial number label (blank)
Battery well label
Notched label (clear)
Screw covers (clear)
1. Apply the gray screw covers over the upper screw holes in the battery area.
2. Apply the clear screw covers over the lower screws in the battery well.
3. Apply the notched label over the small recessed connector next to the battery
connector.
4. Apply the rear case and battery well labels.
5. Apply the blank serial number label to the rear case label at the location shown above.
6. Mark the blank serial number label with the model number, part number and serial
number as shown below. Use an ultrafine point permanent marker. Write small to fit
in all the required information.
7. Apply the clear cover over the marked serial number label.
8. Attach the battery and verify that:
• the LED lights red, yellow and green,
• no error messages are received,
• the keyboard works.
Page 65

61
6
Technical Overview
Feature Summary
The monitor is a patient-worn vital signs monitor for use by adult or pediatric ambulatory
patients.
• One or two ECG channels displayed
• Up to 2 ECG leads displayed at the monitor:
I, II, III, V, aV
• Up to 7 ECG leads displayed at Acuity:
I, II, III, V, aV
• Pulse oximetry (SpO
advanced technology for accuracy under
motion and low perfusion conditions
(Micropaq 404 only)
• Two-way wireless communication within
Welch Allyn’s FlexNet network
• LCD for display of ECG waveforms, SpO
and heart rate/pulse rate data, and
messages from Acuity
• Standalone operation with patient alarms
when out of range of the network
• Patient alarm limits that can be set at the
monitor or Acuity Central Station
• Configurable formats for single- or dualwaveform ECG display
• Internal antenna
• Nurse call key
• Lightweight (slightly more than 1 pound with battery)
• Rugged and tolerant of brief water exposure
• Rechargeable battery
• Sleep mode to extend battery life
, aVL, or aVF with 5-lead cable
R
, aVL, or aVF with 5-lead cable
R
) monitoring with
2
2
Page 66

62 Technical Overview Welch Allyn Micropaq Monitor
Micropaq 402
ECG monitoring
Micropaq 404
ECG monitoring and either of two pulse oximetry (SpO2) monitoring options:
•SpO
•SpO
with Masimo SET technology
2
with Nellcor OxiMax technology
2
Understanding Micropaq and the FlexNet Network
The monitor is intended to operate with an Acuity Central Station as part of Welch Allyn’s
FlexNet network. FlexNet allows multiple devices to communicate through hardwired
Ethernet networks and Wireless Local Area Networks (WLANs). The Acuity Central
Station provides the primary display and entry of patient data for a patient connected to
the monitor.
To other Acuity
Central Stations
H
R
S
p
O
2
8
0
97
Access points
H
R
S
p
O
2
8
0
97
H
R
S
p
O
2
80
97
To other
access
points
H
R
S
p
O
2
80
97
Acuity Central Station
Micropaq monitors
FlexNet Network
Each patient-worn monitor supports two-way communication with an Acuity Central
Station through an access point in the FlexNet network. The access point is a digital radio
transceiver that connects to the FlexNet network. During monitoring, the monitor sends
the patient data to Acuity. Acuity and the monitor continuously analyze the data. Acuity
provides appropriate alarm or alert messages at the Central Station and other network
devices such as a hallway message panel and the monitor itself. Acuity also stores the
patient data for viewing or report printing.
If the monitor is moved out of range or loses communication with the FlexNet network
and Acuity, it continues to monitor the patient and display patient data. While not
communicating with Acuity, the monitor continues to generate local patient alarms or
alert messages. Patient data is not stored and Acuity does not perform waveform analysis
or generate arrhythmia messages while the monitor is not communicating with Acuity.
When the monitor is returned to within range of the FlexNet network, it automatically
reconnects to Acuity.
Page 67

63
7
Field Replaceable Units
This list includes field-replaceable service parts only. Product accessories are listed
separately in Welch Allyn Products and Accessories (810-0409-XX), which is available from
Welch Allyn Customer Service.
The following table lists parts available for the Micropaq monitor.
Table 1. Service Parts List
Order Number Item Description Model
640-0513-04 Label, Rear/Batt Well, Sheet, Masimo, Micropaq 404 with Masimo
640-0540-02 Label, Rear/Batt Well, Sheet, Nellcor, Micropaq 404 with Nellcor
640-0600-XX Label, Rear/Battery Well, Sheet, ECG Only, Micropaq 402 ECG only
500-0040-00 Display, LCD, 320X200 All
020-0607-XX Service Kit, Front Case Subassembly, 404, MS5 404 with Masimo
020-0614-XX Service Kit, Front Case Subassembly, 404, MP-506 404 with Nellcor
020-0606-XX Service Kit, Front Case Subassembly, 402 402 ECG only
020-0645-XX Service Kit, Fasteners, Micropaq All
020-0646-XX Service Kit, Rear Case, Micropaq All
Page 68

64 Field Replaceable Units Welch Allyn Micropaq Monitor
 Loading...