

Page 1
R
ProCheck™
Taking Your
Own Blood Pressure
Page 2

2
Page 3
Taking Your own Blood Pressure
Taking your own blood pressure can be an important part of your general health care.
Frequent and reliable measurements of blood pressure are the best means of detecting
the onset of high blood pressure and for determining the effectiveness of any treatment
program.
Your physician has probably given you some instruction in the use of this device, but
sometimes it is hard to remember everything the doctor has told you.
To help you use the unit most effectively, we have prepared this booklet which will
familiarize you with the equipment and prepare you to take your blood pressure easily,
reliably, and safely.
Read this booklet carefully before you attempt to use this device. Consult your physician
for additional instructions, if necessary.
Let’s Look At This Device
This device is called a sphygmomanometer (sfig-mo-man-om-eter) or simply, sphyg for
short.
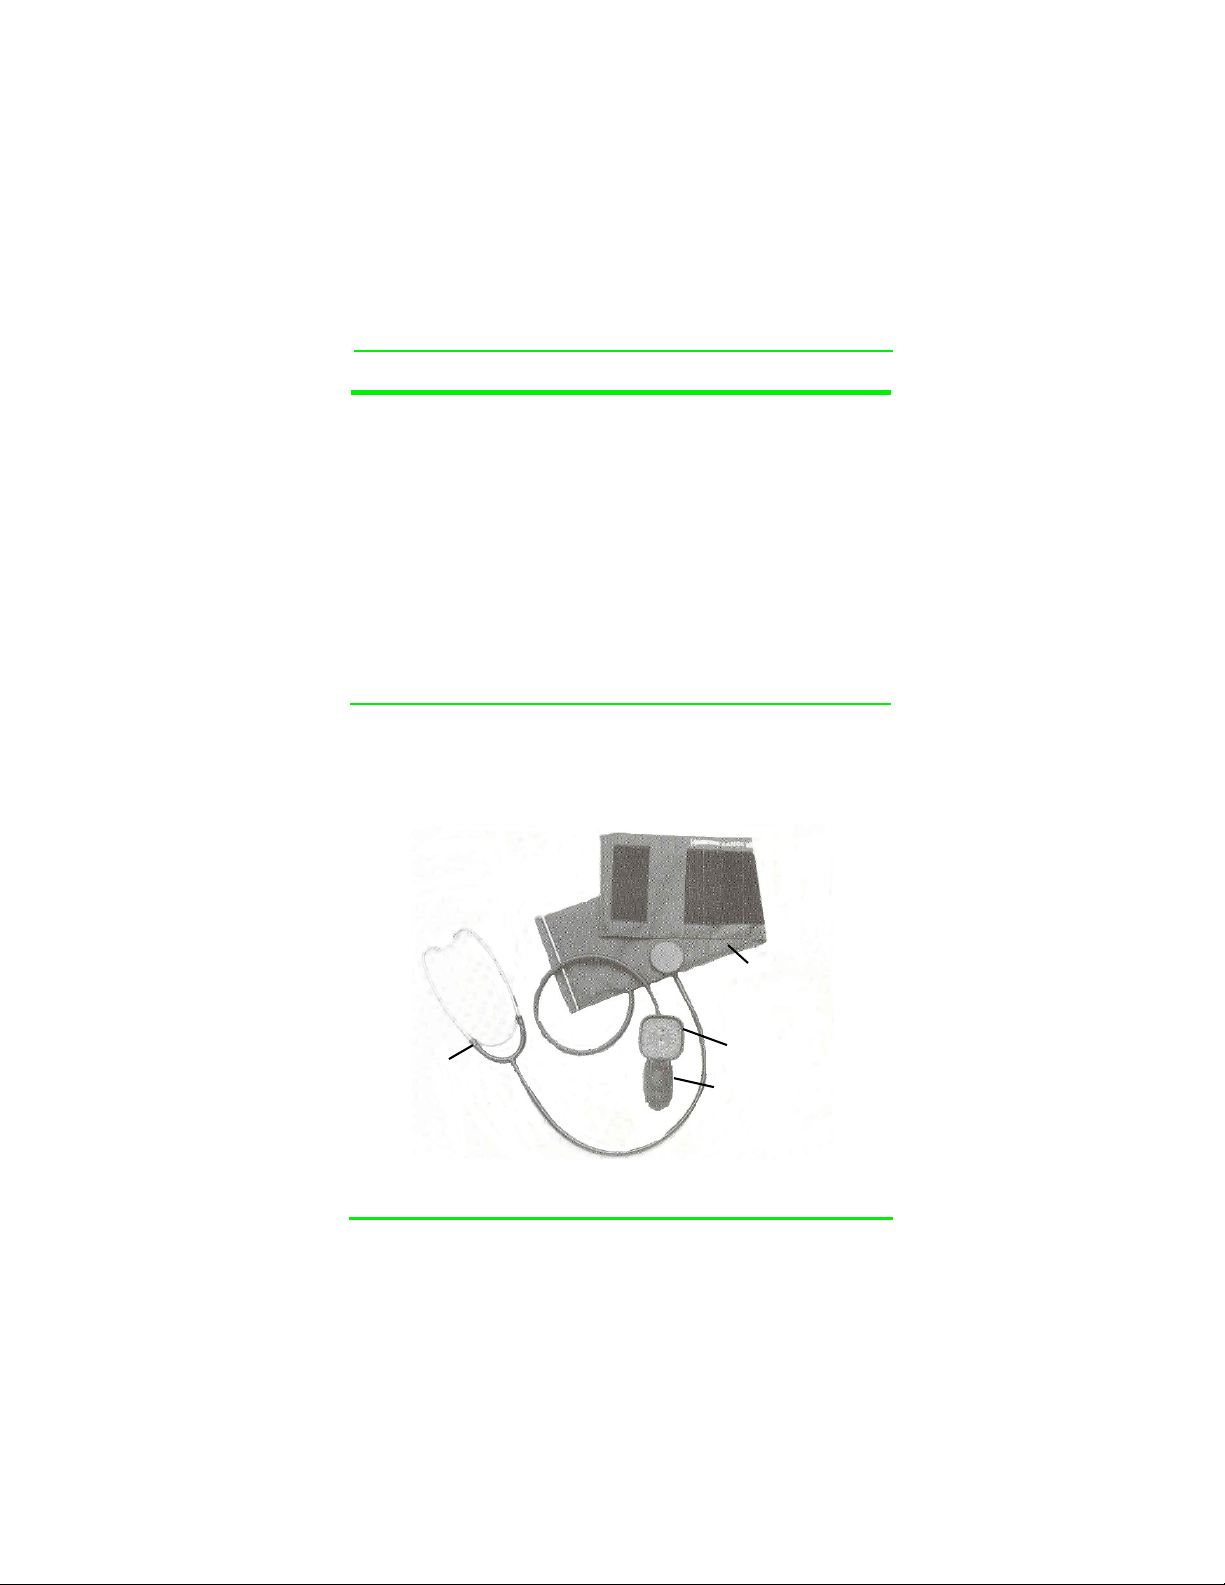
This sphyg has three basic parts:
an inflatable cuff, a pressure gauge combined with an inflation bulb and valve, and a
stethoscope.
Stethoscope
Inflatable Cuff
Pressure Gauge
Inflation Bulb
3
Page 4
The Cuff
The cuff is a fabric band that wraps around your arm. It has a metal D-ring on one end
and hook and loop fasteners to allow easy one hand size adjustment. Inside the cuff is
an air tight rubber bladder. This bladder receives the air that creates the constricting
force on the arm necessary for blood pressure measurement. The tube of the bladder
connects directly to the pressure gauge. The stethoscope chest piece is attached
directly to the cuff to help insure that blood pressure sound will be heard clearly and
accurately.
The Gauge And Inflation Bulb
The gauge you have purchased is an aneroid device
which utilizes a mechanical system to measure
pressure. It features a circular dial face which measures
from 0 to 300 millimeters of mercury (mmHg). mmHg is
the standard unit of measurement for blood pressure.
The gauge is a durable product, but should be handled
carefully and not dropped.
The inflation bulb is used to pressurize the cuff. This is
done by squeezing the bulb quickly and repeatedly until
the desired level of pressure is desired.
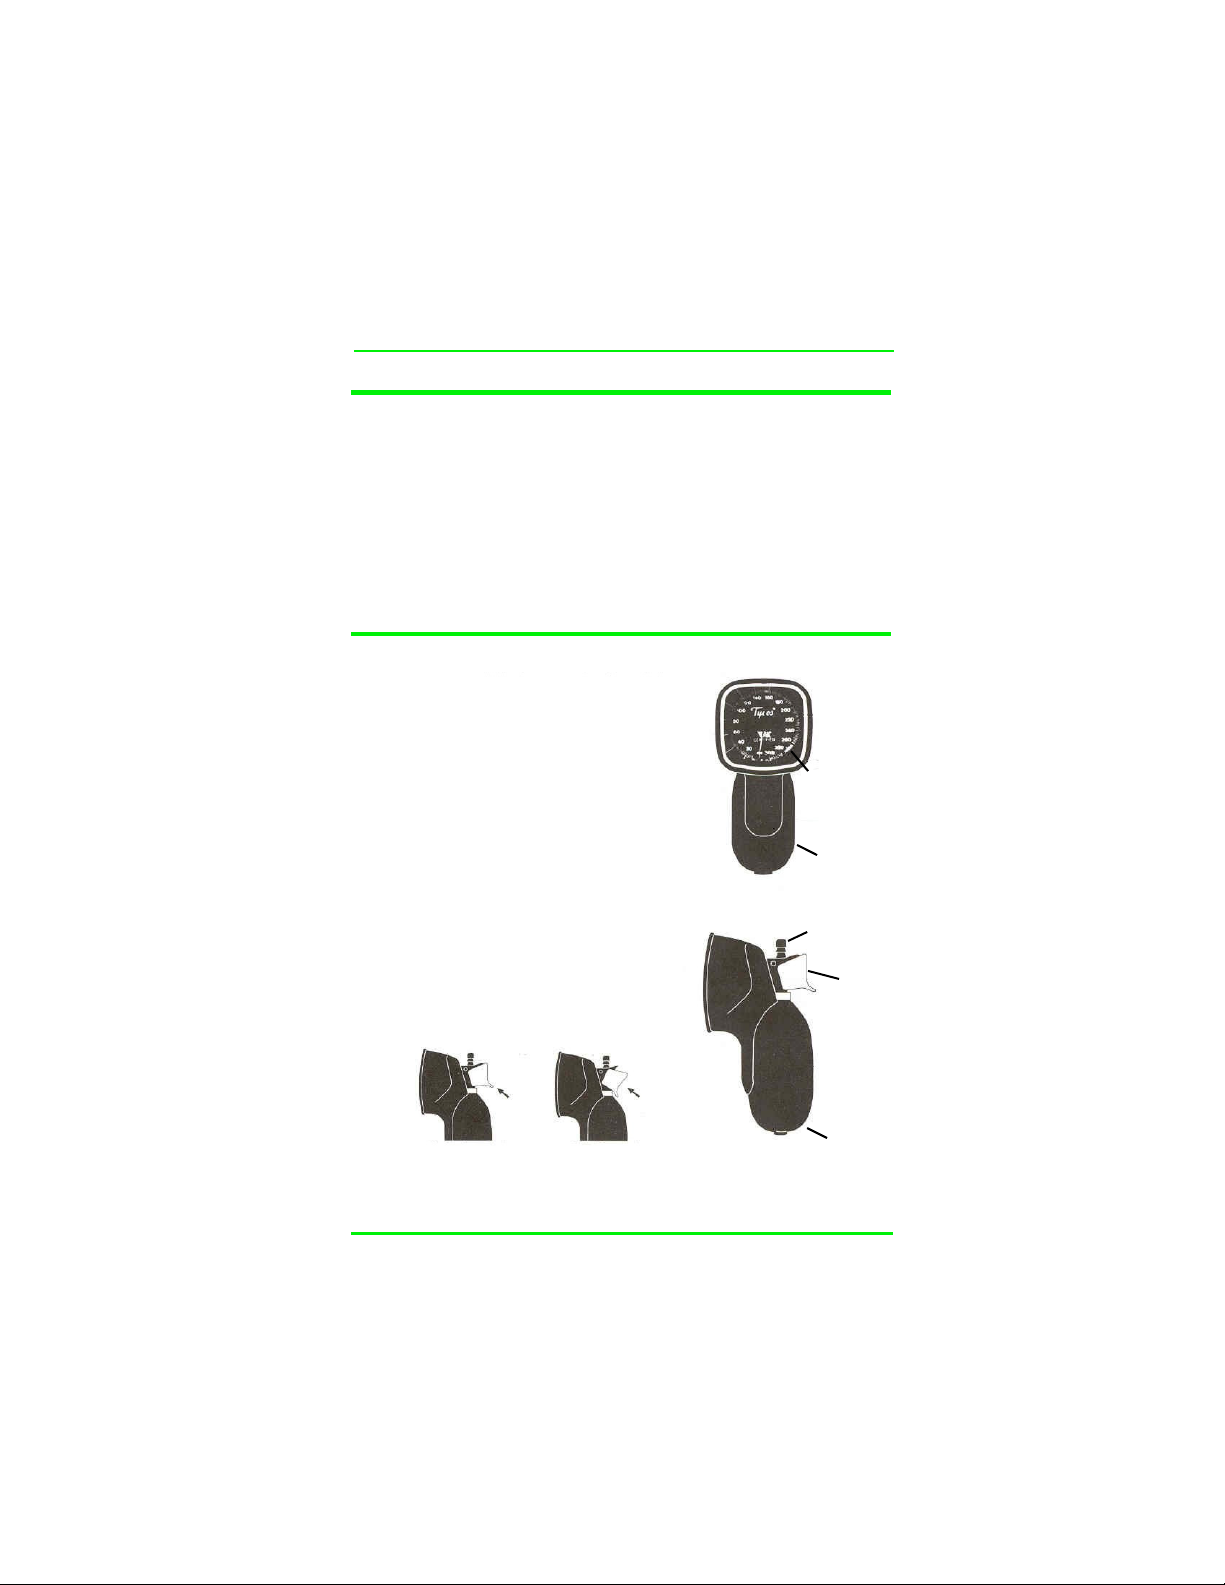
Above the inflation bulb is a trigger release valve which
allows you to deflate air from the cuff at a slow and
even rate. The trigger is utilized in the “out” or “pump”
position when inflating the cuff. When the measurement
is complete, the trigger can be locked down into the
“dump” position for complete deflation of the cuff.
Side View
Manometer
Section
Zero Range
Bulb
Cuff Hose
Connector
Air
Release
Valve
Out (pump)
4
In (dump)
Bulb
Page 5

Operating The Gauge, Bulb & Valve
To become comfortable with the operation of the unit, follow this practice procedure:
1. Wrap and secure the cuff around a solid circular object. We suggest using an item such as a coffee can or large canned food item.
2. With the trigger in the “out” or “pump” position, hold the gauge comfortably in your hand and pump the inflation bulb several times until the pointer reaches 180 mmHg.
3. Watch the dial face of the
gauge and deflate the cuff
by pressing lightly on the
trigger until tension is felt.
The deflation rate will
increase dramatically as
trigger is depressed beyond
the “tension point”. Concentrate on keeping the deflation rate at 2 to 4 mmHg per
second.
4. When the pointer reaches
40 mmHg, depress the trigger to the “dump” position.
This allows complete deflation of cuff.
5. Push your index finger upward to return trigger to the “out” or “pump” position. You are now ready for your next measurement.
Repeat this procedure until you are comfortable using the bulb and trigger.
5
Page 6

The Stethoscope
The last component necessary for taking your blood pressure is the stethoscope. The
stethoscope is shipped in three parts: the chest piece is connected to the cuff; the metal
ear tubes and Y tubing are folded separately in the package. When you first use your
unit, you will have to connect these three components.
Assemble The Stethoscope
First, press the bottom of the Y tubing onto the barbed stem of the chest piece which
passes through the cuff (Figure 1). Next, insert the two metal ear tubes into the Y
section of the rubber tubing (Figure 2).
You will notice that the ear tubes can be turned. When using the stethoscope, it is best
to turn the ear tubes so that the ear tips are facing slightly forward. This will assure a
more comfortable fit, better hearing, and less outside noise.
Figure 1
Figure 2
6
Page 7

A Few Things To Remember
About Blood Pressure
Blood pressure is the force of blood against the walls of the arteries-- the blood vessels
that carry blood from the heart to all parts of the body. Each time the heart beats, the
pressure in the arteries increases. Each time the heart relaxes between beats, the
pressure goes down.
Therefore, there are two measures of blood pressure: the highest blood pressure when
the heart beats, called the “systolic” pressure; and the lowest pressure when the heart
relaxes called the “diastolic” pressure.
When we read a blood pressure, we say for example. “120 over 80,” giving the systolic
number first and the diastolic number next. This means that when the heart beats, the
pressure is 120 mmHg, and when the heart relaxes, the pressure is 80 mmHg.
What Is Normal? What Is Not?
No two people have exactly the same pressure, nor is a person’s blood pressure
necessarily the same from one moment to the next. That is why we speak of blood
pressure being in “a normal range.” Any healthy individual can have times when his or
her blood pressure is above the normal range, but if it remains above this range, we call
it high blood pressure (also called hypertension). There are no symptoms of high blood
pressure; in other words, you don’t feel any different when you have high blood
pressure. The only way to detect high blood pressure is by measuring it with a sphyg like
the one you have purchased. If high blood pressure is not treated, it can lead to the
damage of many parts of the body, resulting in a stroke, kidney disease, or a heart
attack.
What Do The Numbers Mean?
For people under the age of 60, it is generally accepted that blood pressure below 140/
90 are normal, up to 160/95 are borderline, and above 160/95 are considered high blood
pressure. In general, if your blood pressure readings are higher than 160/100, a serious
condition may exist. See your personal physician immediately. It is important to
remember that home blood pressure measurements may be significantly lower than
those made in the doctor’s office. If you are using this device to monitor the effects of a
treatment program, make sure that you keep careful records of your home readings. A
pad of record sheets is provided for your convenience (reorder No. 5095-48). Bring these
records with you to your regular checkups and review them with your physician. DO
NOT change your medication because of any readings you take. Only your doctor can
correctly interpret your blood pressure measurement.
7
Page 8
Now You Are Ready To Measure
Your Own Blood Pressure
Throughout this booklet, we talk about taking your
own blood pressure. However, to take someone
else’s blood pressure, you should follow the same
procedures. Don’t rush. Take your time.
You may take your blood pressure on either arm,
although most people choose the left. The arm
should be bare. If you roll up a sleeve, be certain
that it is not so tight that it cuts off circulation to
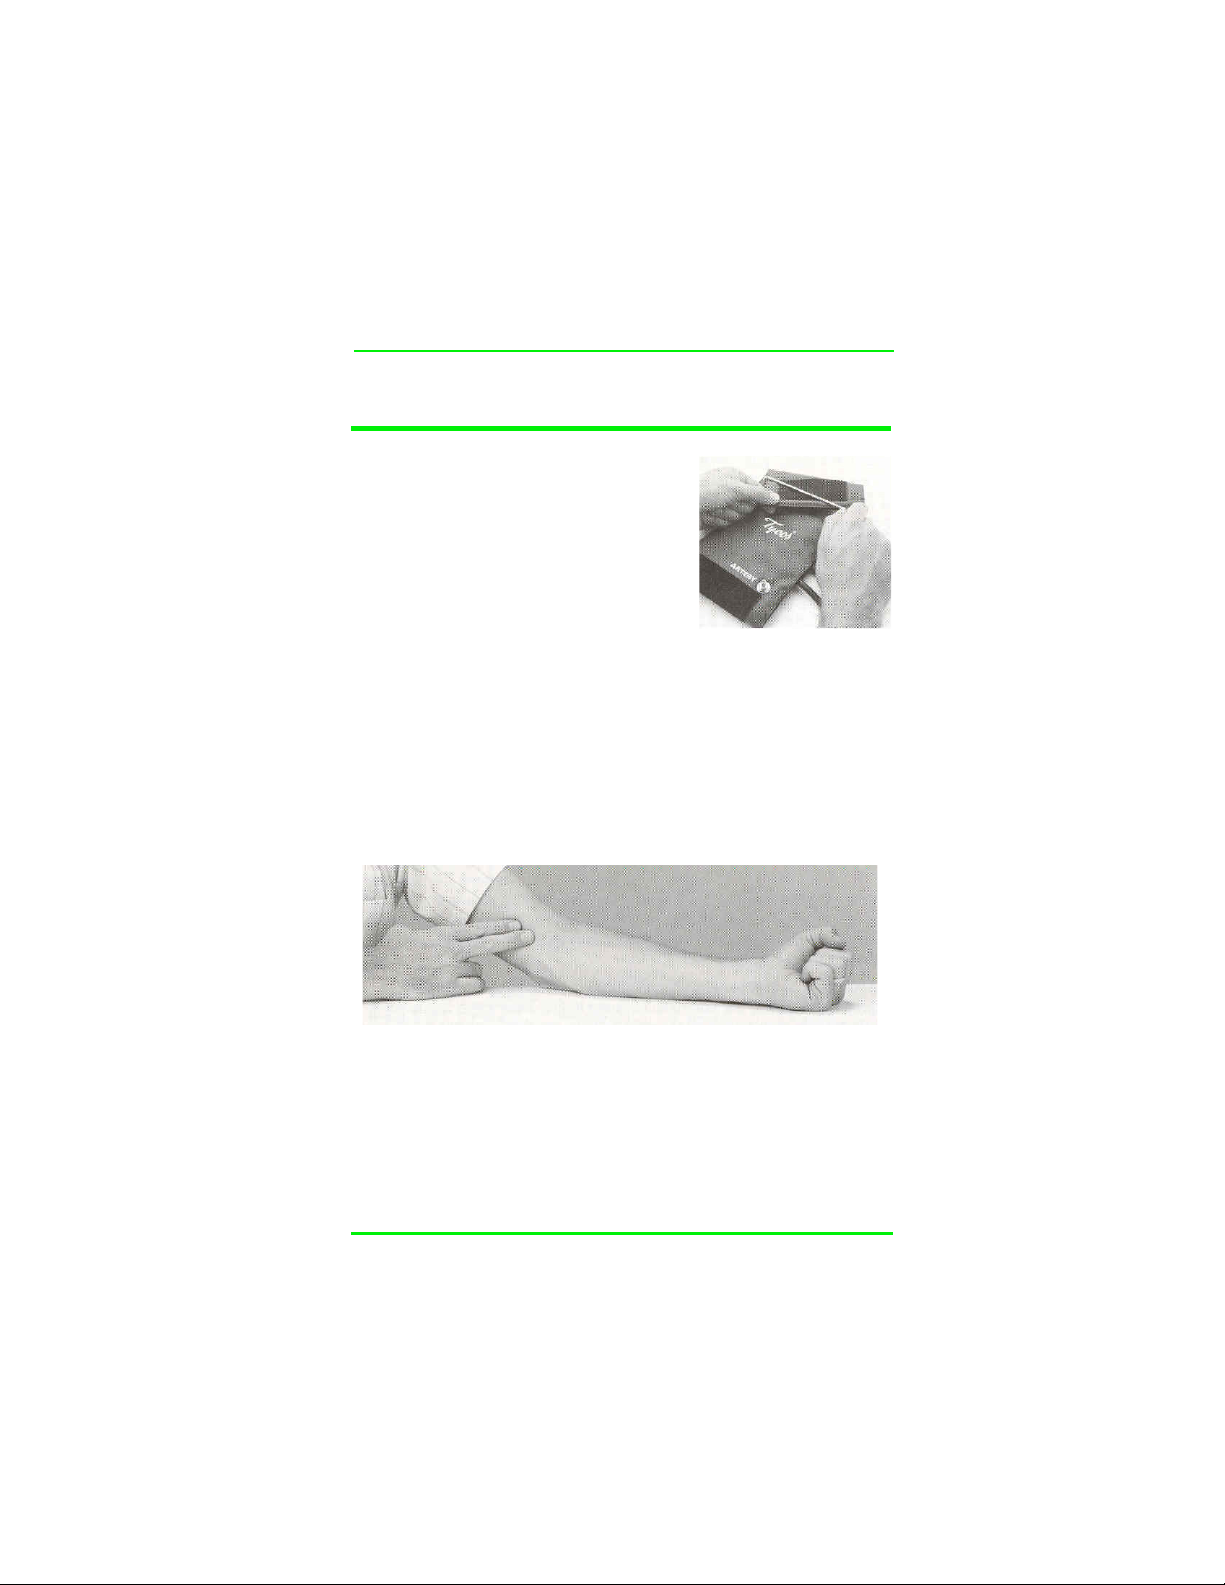
the arm. First, slide the end of the cuff through the
metal D-ring (Figure 3). The fastener material
should be facing outward, away from the arm.
Then slide the cuff onto your arm to a position just above the elbow.
Now rotate the cuff so that the chest piece of the stethoscope is about one inch above
the elbow and under the biceps muscle as shown in Figure 4. This is where the brachial
artery runs. By putting your finger along this spot, you may be able to feel the pulse.
Make sure the stethoscope chest piece is over the pulse spot. Tighten the cuff by pulling
the tail of the cuff through the D-ring and wrapping it back over the fastener. Make sure
the chest piece is placed correctly or you won’t be able to measure your blood pressure
accurately.
Figure 3
Figure 4
Sit at a table with your forearm resting comfortably at about heart level. The room
should be quiet.
Place the ear tips of the stethoscope in your ears, remembering to turn ear tubes slightly
forward for a better fit.
Hold the pressure gauge in the hand of the arm without the cuff.
8
Page 9

With the trigger in the “out” or “pump” position, rapidly squeeze the bulb until the
pointer in the gauge is about 30 mmHg above your systolic (top number) pressure. Your
physician should provide you with this number. If you do not know your systolic pressure,
try 180. The cuff should feel tight and your arm may feel cramped. Note: The trigger
must be in the “out” position or the cuff will not inflate.
Once the cuff is inflated, stop
pumping and position your index
finger over the trigger air release
valve. Watch the gauge dial face
and slowly deflate the cuff by
depressing lightly on the trigger
until tension is felt. During the
measurement phase attempt to
keep the deflation rate slow and
steady, at 2 to 4 mmHg per
second. This requires only light
pressure on the trigger. (Note:
Inflate the cuff rapidly, and
quickly begin pressure deflation
to avoid hazards that may occur
due to prolonged overinflation of
the cuff).
As you start to deflate the cuff
you should hear nothing. If you
hear sound immediately you will have to pump higher before you begin. As the cuff
pressure decreases and the pointer falls, the first sound you will hear is a thumping -the first of several similar beats. The point at which these sounds begin is your systolic
pressure. Note the position of the pointer.
Continue listening for the thumping sounds. When the sounds stop, you have reached
your diastolic pressure. Note the position of the pointer. Once you have measured your
systolic and diastolic pressures, depress the trigger to the “dump” position and release
the remaining air out of the cuff.
Immediately record your systolic and diastolic pressure.
If you are not certain about either the systolic or diastolic pressures, do not immediately
reinflate the cuff. Wait a few minutes for normal circulation to return to your arm and
begin again. Be certain to record all measurements on the blood pressure record sheets
provided with your kit.
9
Page 10

If you have not been able to hear the sounds clearly:
1. You may not have the cuff positioned correctly. Check Figure 4 on page 7. Make sure the stethoscope is over the brachial artery.
2. You may be in a noisy place and not able to hear clearly. Relax and take your pressure in a quiet place.
3. You may not have the cuff tight enough when you begin to pump it. In general, two fingers should fit snugly under the uninflated cuff.
4. The sounds are louder if the cuff is inflated as rapidly as possible. Make sure you’re pumping quickly.
5. The ear tips should fit comfortably in your ears, forming an “air seal” to block outside noise. This may take several adjustments of the stethoscope ear tubes.
6. People whose arms are extremely large may require a larger than standard sized cuff for accurate measurement. Check with your doctor if your upper arm is larger than 16 in. around.
7. For a variety of medical reasons, your blood pressure may be particularly hard to measure. Check your technique with someone experienced in blood pressure measurements if you continue to have difficulty.
Cleaning And Maintenance
Gauge
Clean the manometer by wiping with slightly dampened cloth or alcohol wipe.
Cuff
Safely clean Tycos cuffs with a damp cloth or washed in water with soap or detergent.
Note the following steps.
1. Prior to laundering in soap and water, remove the stethoscope chest piece. To
detach the chest piece, first remove the tubing from the barbed fitting. Next, use a
small wrench to loosen and remove the nut and washer. Now pull the stethoscope
chest piece through the other side. The bladder is then easily removed by pulling it
through the slit in the cuffs where the tube ends.
2. Press the hook and loop fasteners together for protection when washing. After washing allow the cuff to air dry.
3. DO NOT PRESS WITH A HOT IRON. Nylon hooks and loops are destroyed at
temperatures above 250°F. Iron only on the reverse side with medium heat.
10
Page 11

Bladder
May be cleaned by wiping with a slightly dampened cloth.
Stethoscope
Clean the tubing and stethoscope cleaned by wiping with a slightly dampened cloth. Do
not kink the stethoscope tubing when storing the unit. If the tubing does develop a kink,
disassemble the stethoscope and submerge the tubing in hot water until the kink is
removed. Dry and reassemble.
Accessories
The following accessories can be ordered through a local Tycos/Welch Allyn distributor.
Number Description Number Description
5095-48 Blood Pressure
Record Forms
5082-67 Adult Cuff and
Bag Assembly
5082-68 Large Adult Cuff and
Bag Assembly
5079-129 Stethoscope Assembly
5086-05 Inflation Bulb
5098-79 Crystal
Warranty
Manometer
Your Tycos manometer is covered by a 5 year warranty against original defects in
material or workmanship. If the manometer is found to be defective or at variance from
the manufacturer’s specifications, Tycos will repair or replace the instrument or
component(s) at no cost to the purchaser.
Calibration
Should the manometer deviate from the ±3 mmHg accuracy specifications, tycos will
recalibrate the manometer at no charge for a period of 5 years from the date of
purchase.
Accessories
The cuff, inflation bag, and stethoscope are covered by a two year warranty against
original defects in material or workmanship.
11
Page 12

This warranty does not cover breakage or failure due to tampering, misuse, neglect,
accidents, modification or shipping, and is void if the instrument is not used in
accordance with manufacturer’s recommendations or if repaired or serviced by other
than Tycos or a Tycos authorized representative.
All repairs should be sent prepaid, to:
Welch Allyn Technical Service Department
4341 State Street Road
Skaneateles Falls, NY 13153 USA
Telephone: (315) 685-4560 or (800) 535-6663
Fax: (315) 685-3361
The CE mark on this product indicates it has been
tested to and conforms with the provisions noted
within the 93/42/EEC Medical Device Directive.
European Regulatory Manager
Medical Division
Welch Allyn Ltd.
Navan, Co. Meath, Republic of Ireland
Tel: 353-46-67700
FAX: 353-46-27128
R
Welch Allyn, Inc.
4341 State Street Road, Skaneateles Falls, NY 13153 USA
Tycos -- A tradition of excellence
Printed in U.S.A. 1200120 Rev C
 Loading...