

Page 1

Diagnostic Menu
Page 2

TM
Contents
Episcope
Skin Surface Microscope
Operating Instructions
Thank you for purchasing the Welch
operating and maintenance instructions found in this manual should be followed
to ensure many years of accurate and reliable service. Please read these instructions
thoroughly before using your new EpiScope Skin Surface Microscope.
Introduction to Skin Surface Microscopy..
Operating Instructions
Tables of Common Pigmented Lesions
Photographs of Common
Terminology
Care
Power Sources
Warranty
Technical Specifications
..................................................................................................
and Maintenance
A. Cleaning and Sterilization
B. Lamp Replacement Instructions
.................................................................................................................
...............................................................................................
Pigmented Lesions
.......................................................................................
and Accessories
..........................................................................................
Allyn EpiScope
...............................................................
.................................................................3-6
...........................................................................
Skin Surface Microscope. The
....................................................
.
1
2
7-8
19-20
21-22
22-23
.23
23
End Notes
Acknowledgments
......................................
...........................................................................
....................................................................................................
24
24
Page 3

The use of in vivo skin surface microscopy as a means of more accurately
Introduction to
Skin Surface Microscopy
1,
2,3
assessing pigmented skin lesions has been advocated for over four
decades.
Recent studies have demonstrated the effectiveness of this method and new terms
have been developed to describe the unique images of the skin which are accen-
4,
tuated by skin surface
microscopy
5
.
One of these new terms is Epiluminescence
Microscopy (ELM) - the application of oil on the lesion while performing skin
surface microscopy.
It has been reported that “in vivo epiluminescence microscopy provides for a
more detailed inspection of the surface of pigmented skin lesions, and, by using
the oil immersion technique, which renders the epidermis translucent, opens a
new dimension of skin morphology by including the dermoepidermal junction
into the macroscopic evaluation of a
lesion."
6
Improvement in diagnostic accuracy when performing in vivo epiluminescence
318
microscopy in a study of
small pigmented skin lesions (that were diagnostically
equivocal when examined with the naked eye) was as follows: “for small nodular
melanomas from 50% to 70%; for superficial spreading melanoma in situ, from
to 80%; for invasive superficial spreading melanoma, from
early lentigo
maligna
and lentigo
maligna
melanoma, from
the diagnosis of pigmented Spitz nevi improved from
basal cell carcinomas from
60% to
90%.
7
"
64% to 90%; and for
67% to 88%. Conversely,
46% to 93% and of pigmented
46%
Included in this manual are tables of criteria for pattern analysis of pigmented lesions using epiluminescence microscopy, established by members of the
Department of Dermatology at the University of Vienna. This department, under
the chairmanship of Klaus Wolff, MD, has studied well over 7,000 pigmented
lesions. A selection of their photographs, magnified 10 times, (the same magnification as the Welch
Allyn EpiScope Skin
Surface Microscope) are included in this
manual, accompanied by descriptive legends. Where noted, some of the photographs
16x
were taken at
to accentuate the benefits of ELM. All the photographs were
taken with a WILD M650 (Wild Heerbrugg AG, Heerbrugg, Switzerland) binocular,
stereo microscope, equipped with an automatic Nikon F801 camera, mounted on
a side arm of the microscope and employing macro flash light illumination. All of
the photographs included in this manual are less than
6mm
in diameter, except
where noted in the legends. The diagnosis of the lesions included in this manual
were confirmed histologically.
1, 2, 3, *, 5, 6,
7
Refer to page 24 for End Notes
Page 4

1.
Operating Instructions
2
The EpiScopeTM Skin Surface Microscope can be powered
by any Welch Allyn 3.5v battery powered source. A list
of these power sources is found on page 22 of this
manual. Place the skin surface microscope on the top of
the handle, push down and twist it clockwise until
it locks in place.
2.
Locate the lesion and examine for its surface structure.
To reduce the glare from the stratum corneum, moisten
the lesion with oil (mineral oil, petroleum jelly, etc.).
3..
Turn the skin surface microscope on by adjusting the
rest
it,
solely
on the ap-
instru-
3-6
gently
of
rheostat found on the power source, and
contact plate first, over the lesion so that
it is in the center of the contact plate.
4.
With your index finger on the knurled
focusing ring, adjust for optimal focus
while your eye is resting on the eye guard.
When wearing eye glasses, fold the rubber
eye guard over the focusing sleeve to
minimize focal distance.
Please note:
within operational focal range, no
greater
5.
Observe the illuminated and magnified
lesion, making note of its General Appearance, Surface, Pigment Pattern, Border and
Depigmentation. (See tables, pages
this manual, for specific lesion criteria.)
6.
Remove the contact plate for examination
of raised moles or lesions. Clean contact
plate after each use according to Cleaning
and Sterilization Instructions, page 21 of
this manual.
Important:
background of each patient. A diagnosis should not be made
pearance of the skin lesion while magnified by the skin surface microscope, but
instead must be based on a critical evaluation of all available criteria. This
ment is designed to provide the physician with a more accurate view of the lesion.
2
Focusing sleeve to work
than
1/4"
from the skin surface.
The physician should always take care to understand the clinical
Page 5

A. Cleaning and Sterilization
Care and Maintenance
Contact Plate
The contact plate can withstand cleaning or disinfection by any of the following:
Cidex, Cidex 7, Cidex Plus
Isopropyl alcohol (70% by volume)
Ammonia (10% by volume)
Bleach solution (10% by volume)
Betadine
(10% by volume)
Wescodyne (10% by volume)
The contact plate can withstand sterilization by any of the following:
Steam Autoclave
Cidex, Cidex 7, Cidex Plus
Betadine
(10% by volume)
Wescodyne (10% by volume)
*Clean contact plate with any recommended cleaning solution prior to using
steam autoclave. Wrap contact plate in a sterilization wrap and wipe clean
immediately upon removal from autoclave.
Note: Always follow manufacturers’ instructions for proper
exposure time.
Lens
Moisten cotton-tipped applicator with 70% ethyl alcohol or a solution of water
and mild detergent. Clean debris from lens.
Note: DO NOT
and permanently damage optics system.
use abrasive materials to clean lens, Doing so can scratch
(270°F,
28 PSI, 6 min. cycle)*
EpiScope Housing
External housing may be cleaned with a mild detergent and soft cloth
Warning: DO NOT
Storage
Store skin surface microscope in dry, clean area. No. 05232 Carrying Case
accessory available, which holds
immerse skin surface microscope housing as lens may fog.
3.5v
rechargeable handle and extra contact plate.
21
Page 6
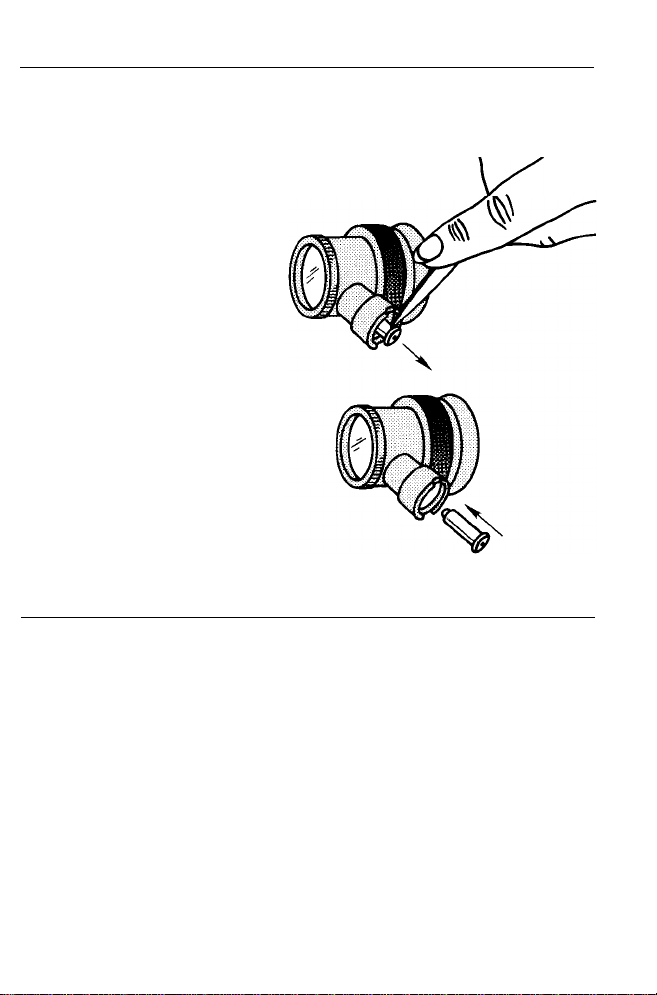
B. Lamp Replacement
1.
Remove skin surface microscope from power source.
CAUTION: Lamps may be hot. Lamp should be allowed to cool
before removal.
efficiency and illumination. Mistreatment
may cause shattering. Protect lamp surface
against abrasions and scratches.
protective eyeglasses when handling.
Dispose of lamp with care.
2.
Lift out lamp with a nail file
or similar tool inserted under
base flange.
3.
Taking care not to touch the glass
surface, insert new Welch Allyn
No. 03000 lamp and push firmly
into place. If lamp surface is
smudged, wipe clean with a soft
cloth. Lamp base contact pin
should be slightly below metal
base. Replace skin surface
microscope on power source.
Halogen lamps are pressurized to provide maximum
Use
Power Sources and Accessories
Power Sources
The EpiScope Skin Surface Microscope is compatible with any of these Welch Allyn
3.5v
power sources:
71000
71055
71670
22
Rechargeable battery handle. This
3.5v
Welch Allyn
charger keeps portable instruments ready when needed. Simply unscrew
top cap and plug bottom section into any conventional
Fast charging in only
Rechargeable
and voltage). Conforms to IEC
Well recharging battery handle
l
Fits most manufactures’ charging wells.
*Accepts all Welch Allyn 3.5v diagnostic instrument heads.
diagnostic instrument heads. A convenient, built-in
14
to
3.5v
handle and transformer,
3.5v
rechargeable handle accepts all
16
hours. Cannot overcharge.
export
(specify country
601-1,220-250v, 50/60Hz
110v
wall outlet.
Page 7

71610
23
Desk Charger - This unit offers both the convenience of automatic
recharging and portability.
Complete unit, includes charger No.
handles No.
71670, 1
10-130v, 50/60
71110
and 2 each
3.5v
rechargeable
HZ, UL listed, CSA certified.
*Constant automatic charging - cannot overcharge
l
71605
For convenient use with all Welch Allyn
*Compact charger base measures only
l
Optional wall bracket
Same as No. 71610, but
to IEC
601-1,220-250v, 50/60Hz
export
(specify country and voltage). Conforms
3.5v
instrument heads
3-3/8" (86mm)
x
7-1/4"
(184mm)
Accessories
47310
Reticle Contact Plate
47320 Plano Contact Plate
05232 Carrying Case
Warranty
The
EpiScope
Skin Surface Microscope is guaranteed by Welch Allyn against all
manufacturing defects. Welch Allyn will repair or replace, free of charge, any parts
of its own manufacture proven to be defective through causes other than misuse,
neglect, damage in shipment, or normal wear. Skin surface microscope contact
plates are guaranteed for one year from date of purchase.
Magnification:
10x
Focal Range (correction):
Focal Length: 25mm
f
5D
23
Page 8

 Loading...