

Page 1
E315 • CSE315 • CSS315
LP Owner’s Manual
Download the Weber Grills App!
Onboard with the free Weber Grills App. The Weber app is your answer to everything
grilling and will lead you through everything from gas tank installation to your first grill
out. Customize the app to your exact model, and taste, by registering your grill with a
few simple questions.
• Grill setup and gas tank installation
• Grilling techniques and guides
• Timers and tools
Keep this Owner’s Manual for future reference, thoroughly read through it, and
if you have any questions please contact us today.
• Recipes for any taste
• Seasonal menus/recipes
54145
062218
enUS esMX frCA
Page 2
Important
SafetyInformation
DANGER, WARNING, and CAUTION
statements are used throughout this
Owner's Manual to emphasize critical and
important information. Read and follow
these statements to help ensure safety and
prevent property damage. Thestatements
are defined below.
m DANGER: Indicates a hazardous
situation which, if not avoided,
will result in death or seriousinjury.
Welcome to Weber
m WARNING: Indicates a hazardous
situation which, if not avoided,
could result in death or seriousinjury.
m CAUTION: Indicates a hazardous
situation which, if not avoided,
could result in minor or moderateinjury.
m DANGER
If you smell gas:
• Shut o gas to the appliance
(grill).
• Extinguish any open flame.
• Open lid.
• If odor continues, keep away
from the appliance (grill)
and immediately call your
gas supplier or your fire
department.
m WARNING
• Do not store or use gasoline
or other flammable liquids
or vapors in the vicinity
of this (grill) or any other
appliance.
• An LP cylinder (tank) not
connected for use shall
not be stored in the vicinity
of this (grill) or any other
appliance.
USE OUTDOORS ONLY.
READ THE INSTRUCTIONS BEFORE USING
THE APPLIANCE (GRILL).
NOTICE TO INSTALLER: These instructions
must be left with the consumer.
NOTICE TO CONSUMER: Retain these
instructions for future reference.
2
Installation and Assembly
m DANGER: This grill is not intended to be installed in
or on recreational vehicles or boats.
m WARNING: Do not use this grill unless all parts
are in place and the grill was properly assembled
according to the assembly instructions.
m WARNING: Do not build this model of grill in any
built-in or slide-in construction.
m WARNING: Do not modify the appliance (grill). Liquid
propane gas is not natural gas. The conversion or
attempted use of natural gas in a liquid propane gas
unit or liquid propane gas in a natural gas unit is
unsafe and will void your warranty.
• In the United States, installation must conform with
local codes or, in the absence of local codes, with
either the National Fuel Gas Code, ANSI Z223.1/
NFPA 54, Natural Gas and Propane Installation Code,
CSA B149.1; or Propane Storage and Handling Code,
B149.2; or the Standard for Recreational Vehicles,
ANSI A119.2/NFPA 1192, and CSA Z240 RV Series,
Recreational Vehicle Code, as applicable.
• InCanada, the installation of this grill must comply
with local codes and/or the latest edition of Standard
CAN/CSA-B149.2 (Propane Storage and Handling
Code). These instructions, while generally acceptable,
do not necessarily comply with the Canadian
installation codes, particularly with piping above and
below ground.
• In Mexico, if there are local codes that apply to
portable gas appliances, you must comply with the
latest edition of Ocial Mexican Standard (NOM).
• If an external electrical source is utilized (such as
a rotisserie) it must be electrically grounded in
accordance with local codes or, in the absence of local
codes, with the National Electrical Code, ANSI/NFPA
70, or the Canadian Electrical Code, Part 1, CSA C22.1.
Operation
m DANGER: Only use the grill outdoors in a well-
ventilated area. Do not use in a garage, building,
breezeway, tent, any other enclosed area, or
beneath overhead combustibleconstruction.
m DANGER: Do not use the grill in any vehicle or in any
storage or cargo area of any vehicle. This includes,
but is not limited to, cars, trucks, station wagons,
mini-vans, sport utility vehicles, recreational
vehicles, andboats.
m DANGER: Do not use the grill within 24 inches (61
cm) of combustible materials. This includes the top,
bottom, back and sides of the grill.
m DANGER: Keep the cooking area clear of flammable
vapors and liquids such as gasoline, alcohol, etc.,
and combustible materials.
m DANGER: This appliance (grill) must be kept away
from flammable materials during use.
m DANGER: Do not put a grill cover or anything
flammable on, or in the storage area under the grill
while it is in operation or is hot.
m DANGER: Should a grease fire occur, turn o all
burners and leave lid closed until fire is out.
m WARNING: Accessible parts may be very hot.
Keepyoung children away.
m WARNING: The use of alcohol, prescription drugs,
non-prescription drugs, or illegal drugs may impair
the consumer’s ability to properly and safely
assemble, move, store, or operate thegrill.
m WARNING: Never leave the grill unattended during
pre-heating or use. Exercise caution when using
this grill. The entire cookbox gets hot when in use.
m WARNING: Do not move the appliance (grill)
duringuse.
m WARNING: Keep any electrical supply cord and the
fuel supply hose away from any heated surfaces.
m CAUTION: This product has been safety-tested and
is only certified for use in a specific country. Refer
to country designation located on outside of box.
• Do not use charcoal or lava rock in the grill.
Storage and/or Nonuse
m WARNING: Turn o the gas supply at the gas
cylinder (tank) after use.
m WARNING: LP tanks must be stored outdoors out of
the reach of children and must not be stored in a
building, garage, or any other enclosed space.
m WARNING: After a period of storage and/or nonuse,
the grill should be checked for gas leaks and burner
obstructions before use.
m Storage of the grill indoors is permissible only if the
LP tank is disconnected and removed from the grill.
California Proposition 65
m WARNING: Combustion byproducts produced when
using this product contain chemicals known to the
state of California to cause cancer, birth defects, or
other reproductive harm.
m PROPOSITION 65 WARNING: Handling the brass
material on this product exposes you to lead, a
chemical known to the state of California to cause
cancer, birth defects, or other reproductive harm.
Wash hands after handling this product.
Page 3

Hello and welcome to
Welcome to Weber
TABLE OF CONTENTS
2 Welcome to Weber
the Weber Family!
Please be sure to read this Owner’s Manual and download the
free Weber Grills app so that you’re up and grilling as quickly
as possible. The Weber Grills app is your answer to everything
grilling. From gas tank installation to recipes and customizable
features, this app is where you’ll start your grilling journey and
never look back.
Thank you for choosing Weber!
Important SafetyInformation
4 The Weber Promise
Warranty
5 Product Features
GENESIS II Features
The GS4 GrillingSystem
6 Tips and Hints
The Flame - Direct or Indirect
Grilling Do's and Don'ts
8 Getting Started
Important Information about LPGas
& Gas Connections
LP Tank Installation & LeakChecking
Refilling or Replacing an LPTank
12 Operation
The Very First Time You Grill
Every Time You Grill
Igniting the Grill
14 Product Care
Cleaning and Maintenance
16 Troubleshooting
18 Grilling Guide
55 Replacement Parts
esMX
19
frCA
37
The grills illustrated in this Owner’s Manual may vary
slightly from the model purchased.
3
Page 4

The WEBER Promise
At WEBER, we pride ourselves on two things: making grills that last and
providing a lifetime of excellent customer service.
Warranty
Thank you for purchasing a WEBER product. WeberStephen Products LLC, 1415 S. Roselle Road, Palatine,
Illinois 60067 and its Americas Business units
(“WEBER”) pride ourselves on delivering a safe, durable,
and reliable product.
This is WEBER’s Voluntary Warranty provided to you
at no extra charge. It contains the information you will
need to have your WEBER product repaired or replaced
The Weber Promise
in the unlikely event of a failure or defect.
Pursuant to applicable laws, the Owner has several
rights in case the product is defective. Those rights
include supplementary performance or replacement,
abatement of the purchasing price, and compensation.
These and other statutory rights remain unaected by
this Warranty provision. In fact, this Warranty grants
additional rights to the Owner that are independent
from statutory Warranty provisions.
WEBER’s Voluntary Warranty
WEBER warrants, to the purchaser of the WEBER
product (or in the case of a gift or promotional situation,
the person for whom it was purchased as a gift or
promotional item) (“Owner”), that the WEBER product is
free from defects in material and workmanship for ten
(10) years from the date of purchase when assembled
and operated in accordance with the accompanying
Owner’s Manual, normal wear and tear excluded. (Note:
If you lose or misplace your WEBER Owner’s Manual,
a replacement is available online at www.weber.com.)
WEBER agrees within the framework of this warranty
to repair or replace the part that is defective in
material or workmanship subject to the limitations, and
exclusions listed below. TO THE EXTENT ALLOWABLE
BY APPLICABLE LAW, THIS WARRANTY IS EXTENDED
ONLY TO THE ORIGINAL PURCHASER AND IS NOT
TRANSFERABLE TO SUBSEQUENT OWNERS, EXCEPT
IN THE CASE OF GIFTS AND PROMOTIONAL ITEMS AS
NOTED ABOVE.
WEBER stands by its products and is happy to provide
you with the Warranty described for material defects in
the grill or its relevant components, normal wear and
tear excepted.
• ‘Normal wear and tear’ includes cosmetic and
other immaterial deterioration that may come with
ownership of your grill over time, such as surface rust,
dents / scratches, etc.
However, WEBER will honor this Warranty for the grill or
its relevant components where damage or dysfunction
results from a material defect.
• ‘Material defect’ includes rust through or burn through
of certain parts, or other damage or failure inhibiting
your ability to safely / properly use your grill.
Owner’s Responsibilities Under this
Warranty / Exclusion of Warranty
To ensure trouble-free Warranty coverage, it is
important (but not required) that you register your
WEBER product online at www.weber.com. Please
also retain your original sales receipt and/or invoice.
Registering your WEBER product confirms your
warranty coverage, will expedite any Warranty claims
you may need to make, and provides a direct link
between you and WEBER in case we need to contact
you. If you have not had time to register your grill before
calling for Warranty service, please have the following
information available when you do call:
Name – Address – Phone Number – Email – Serial
Number – Purchase Date – Purchase Dealer – Model –
Color – Primary Issue
The above warranty only applies if the Owner takes
reasonable care of the WEBER product by following
all assembly instructions, usage instructions,
and preventative maintenance as outlined in the
accompanying Owner’s Manual, unless the Owner can
prove that the defect or failure is independent of noncompliance with the above mentioned obligations. If
you live in a coastal area, or have your product located
near a pool, maintenance includes regular washing
and rinsing of the exterior surfaces as outlined in the
accompanying Owner’s Manual.
This WARRANTY lapses if there are damages,
deteriorations, discolorations, and/or rust for which
WEBER is not responsible caused by:
• Abuse, misuse, alteration, modification, misapplication,
vandalism, neglect, improper assembly or installation,
and failure to properly perform normal and routine
maintenance;
• Insects (such as spiders) and rodents (such as
squirrels), including but not limited to damage to
burners and/or gas hoses;
• Exposure to salt air and/or chlorine sources such as
swimming pools and hot tubs/spas;
• Severe weather conditions such as hail, hurricanes,
earthquakes, tsunamis or surges, tornadoes or severe
storms.
• Acid rain and other environmental factors
The use and/or installation of parts on your WEBER
product that are not genuine WEBER parts will void this
Warranty, and any damages that result hereby are not
covered by this Warranty. Any conversion of a gas grill
not authorized by WEBER and performed by a WEBER
authorized service technician will void this Warranty.
Warranty Processing
If you believe that you have a part which is covered by
this Warranty, please contact WEBER Customer Service
using the contact information on our website (www.
weber.com). WEBER will, upon investigation, repair or
replace (at its option) a defective part that is covered by
this Warranty. In the event that repair or replacement
are not possible, WEBER may choose (at its option) to
replace the grill in question with a new grill of equal or
greater value. WEBER may ask you to return parts for
inspection, shipping charges to be pre-paid by Owner.
When you contact Customer Service, please have the
following information available:
Name – Address – Phone Number – Email – Serial
Number – Purchase Date – Purchase Dealer – Model –
Color – Primary Issue
Disclaimers
APART FROM THE WARRANTY AND DISCLAIMERS
AS DESCRIBED IN THIS WARRANTY STATEMENT,
THERE ARE EXPLICITLY NO FURTHER WARRANTY
OR VOLUNTARY DECLARATIONS OF LIABILITY GIVEN
HERE WHICH GO BEYOND THE STATUTORY LIABILITY
APPLYING TO WEBER. THE PRESENT WARRANTY
STATEMENT ALSO DOES NOT LIMIT OR EXCLUDE
SITUATIONS OR CLAIMS WHERE WEBER HAS
MANDATORY LIABILITY AS PRESCRIBED BY STATUTE.
NO WARRANTIES SHALL APPLY AFTER THE TEN
(10) YEAR PERIOD OF THIS WARRANTY. NO OTHER
WARRANTIES GIVEN BY ANY PERSON, INCLUDING
A DEALER OR RETAILER, WITH RESPECT TO ANY
PRODUCT (SUCH AS ANY “EXTENDED WARRANTIES”),
SHALL BIND WEBER. THE EXCLUSIVE REMEDY OF THIS
WARRANTY IS REPAIR OR REPLACEMENT OF THE PART
OR PRODUCT.
IN NO EVENT UNDER THIS VOLUNTARY WARRANTY
SHALL RECOVERY OF ANY KIND BE GREATER THAN
THE AMOUNT OF THE PURCHASE PRICE OF THE
WEBER PRODUCT SOLD.
YOU ASSUME THE RISK AND LIABILITY FOR LOSS,
DAMAGE, OR INJURY TO YOU AND YOUR PROPERTY
AND/OR TO OTHERS AND THEIR PROPERTY ARISING
OUT OF THE MISUSE OR ABUSE OF THE PRODUCT OR
FAILURE TO FOLLOW INSTRUCTIONS PROVIDED BY
WEBER IN THE ACCOMPANYING OWNER’S MANUAL.
PARTS AND ACCESSORIES REPLACED UNDER THIS
WARRANTY ARE WARRANTED ONLY FOR THE BALANCE
OF THE ABOVE MENTIONED ORIGINAL TEN (10) YEAR
WARRANTY PERIOD.
THIS WARRANTY APPLIES TO PRIVATE SINGLE FAMILY
HOME OR APARTMENT USE ONLY AND DOES NOT
APPLY TO WEBER GRILLS USED IN COMMERCIAL,
COMMUNAL OR MULTI-UNIT SETTINGS SUCH AS
RESTAURANTS, HOTELS, RESORTS, OR RENTAL
PROPERTIES.
WEBER MAY FROM TIME TO TIME CHANGE THE DESIGN
OF ITS PRODUCTS. NOTHING CONTAINED IN THIS
WARRANTY SHALL BE CONSTRUED AS OBLIGATING
WEBER TO INCORPORATE SUCH DESIGN CHANGES
INTO PREVIOUSLY MANUFACTURED PRODUCTS,
NOR SHALL SUCH CHANGES BE CONSTRUED AS
AN ADMISSION THAT PREVIOUS DESIGNS WERE
DEFECTIVE.
Weber-Stephen Products LLC
Customer Service Center
1415 S. Roselle Road
Palatine, IL 60067
U.S.A.
For replacement parts, call:
1-800-446-1071
PROTECT
YOUR
INVESTMENT
Shield your grill from the
elements with a heavy-duty
premiumgrillcover.
4
Page 5
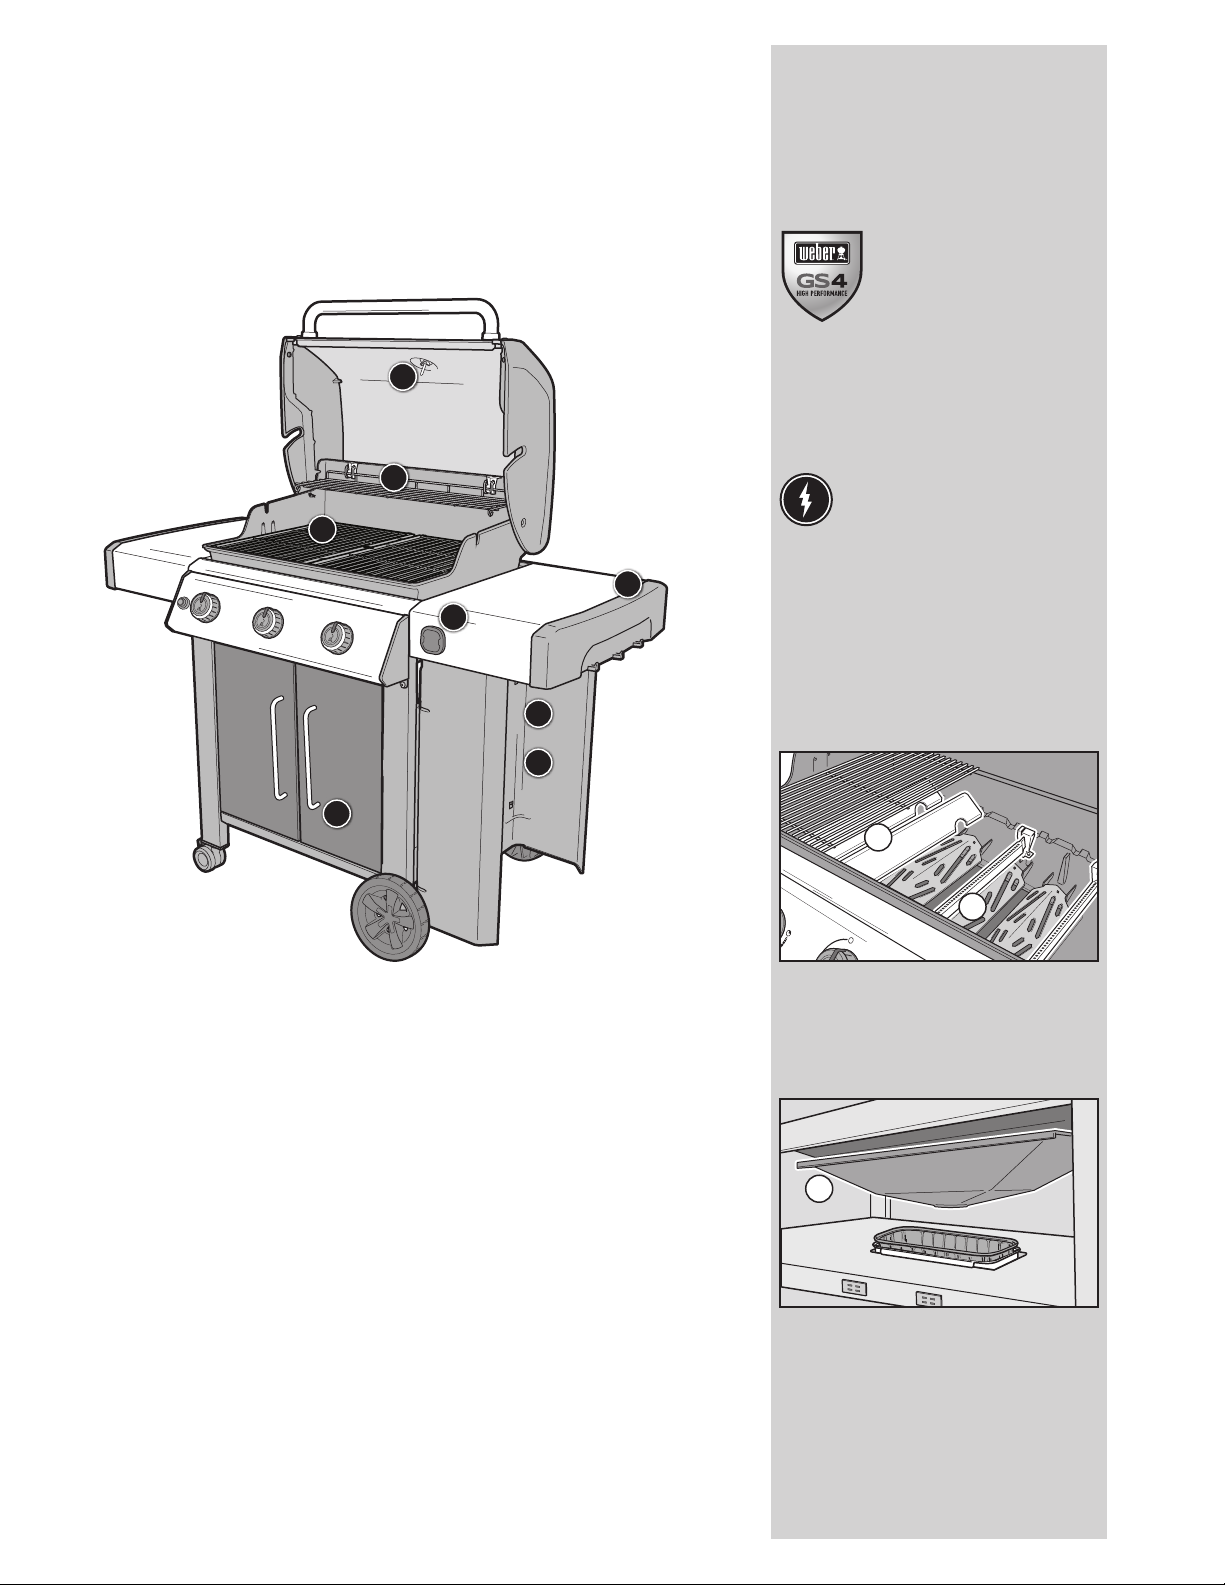
Product Features
GENESIS II
FEATURES
A
B
C
GS4 HIGH
PERFORMANCE
GRILLING SYSTEM
The GS4 high performance grilling
system sets the standard in the
world of gas grilling, and lands
Weber in a class of its own. This
powerful grilling system is based on
culinary expertise, and most importantly, the wants
and needs of the people who matter most – our
grilling community. Each component of GS4 was
uniquely designed for ease-of-use and to provide
an unequaled satisfaction to your backyard grilling
experience.
1 INFINITY Ignition
2 Burners
D
E
The unique, tapered shape delivers a consistent gas
flow from front to back. This provides ultimate heat
distribution, ensuring that food grills evenly and
consistently anywhere on the cooking grates.
3 FLAVORIZER BARS
Stainless Steel FLAVORIZER BARS are angled just
F
G
right to catch drippings that smoke and sizzle,
adding that irresistible smoky flavor that we all
know and love to your food.
over 65 years of grilling experience,
The Infinity Ignition is guaranteed to
ignite. Rest assured that you’ll be up-andgrilling the first time, ever y time.
H
A Built-In Thermometer
Being aware of the temperature inside of your grill
allows you to adjust the heat when needed.
B TUCKAWAY Warming Rack
Keeps food warm, or toasts buns, while the main
course finishes grilling on the grate. Fold it down when
not in use for easy storage.
C Porcelain-Enameled,
Cast Iron Cooking Grates
Porcelain-enameled, cast-iron cooking grates provide
even heat distribution across the entire grilling surface
and superior heat retention.
(CSE-315, CSS-315 equipped with stainless steel
grates.)
D Side Tables with Integrated Tool Hooks
Use the side tables to keep platters, seasonings, and
tools within arm’s reach. Hang your essential grilling
tools on the hooks for easy access and organization of
your backyard workspace.
E iGRILL3 Compatible
The iGrill 3 app-connected thermometer monitors
food from beginning to end, displaying the real-time
temperature on your mobile device. (Accessory sold
separately.)
F Fuel Gauge
The easy-to-read fuel gauge located next to the gas
tank lets you see how much fuel is left in the tank.
G Side Mounted Gas Tank
Mounting the gas tank to the outside of the grill makes
it easier to access and remove.
H Grill Cabinet
The grill cabinet adds enclosed storage space for all of
your essential grilling tools and accessories.
3
2
4 Grease Management System
Drippings that are not vaporized by the FLAVORIZER
BARS are funneled away from the burners into the
disposable drip tray, located within the removable
catch pan under the cookbox. Simply remove the
catch pan and replace the drip tray as needed.
4
5
Page 6
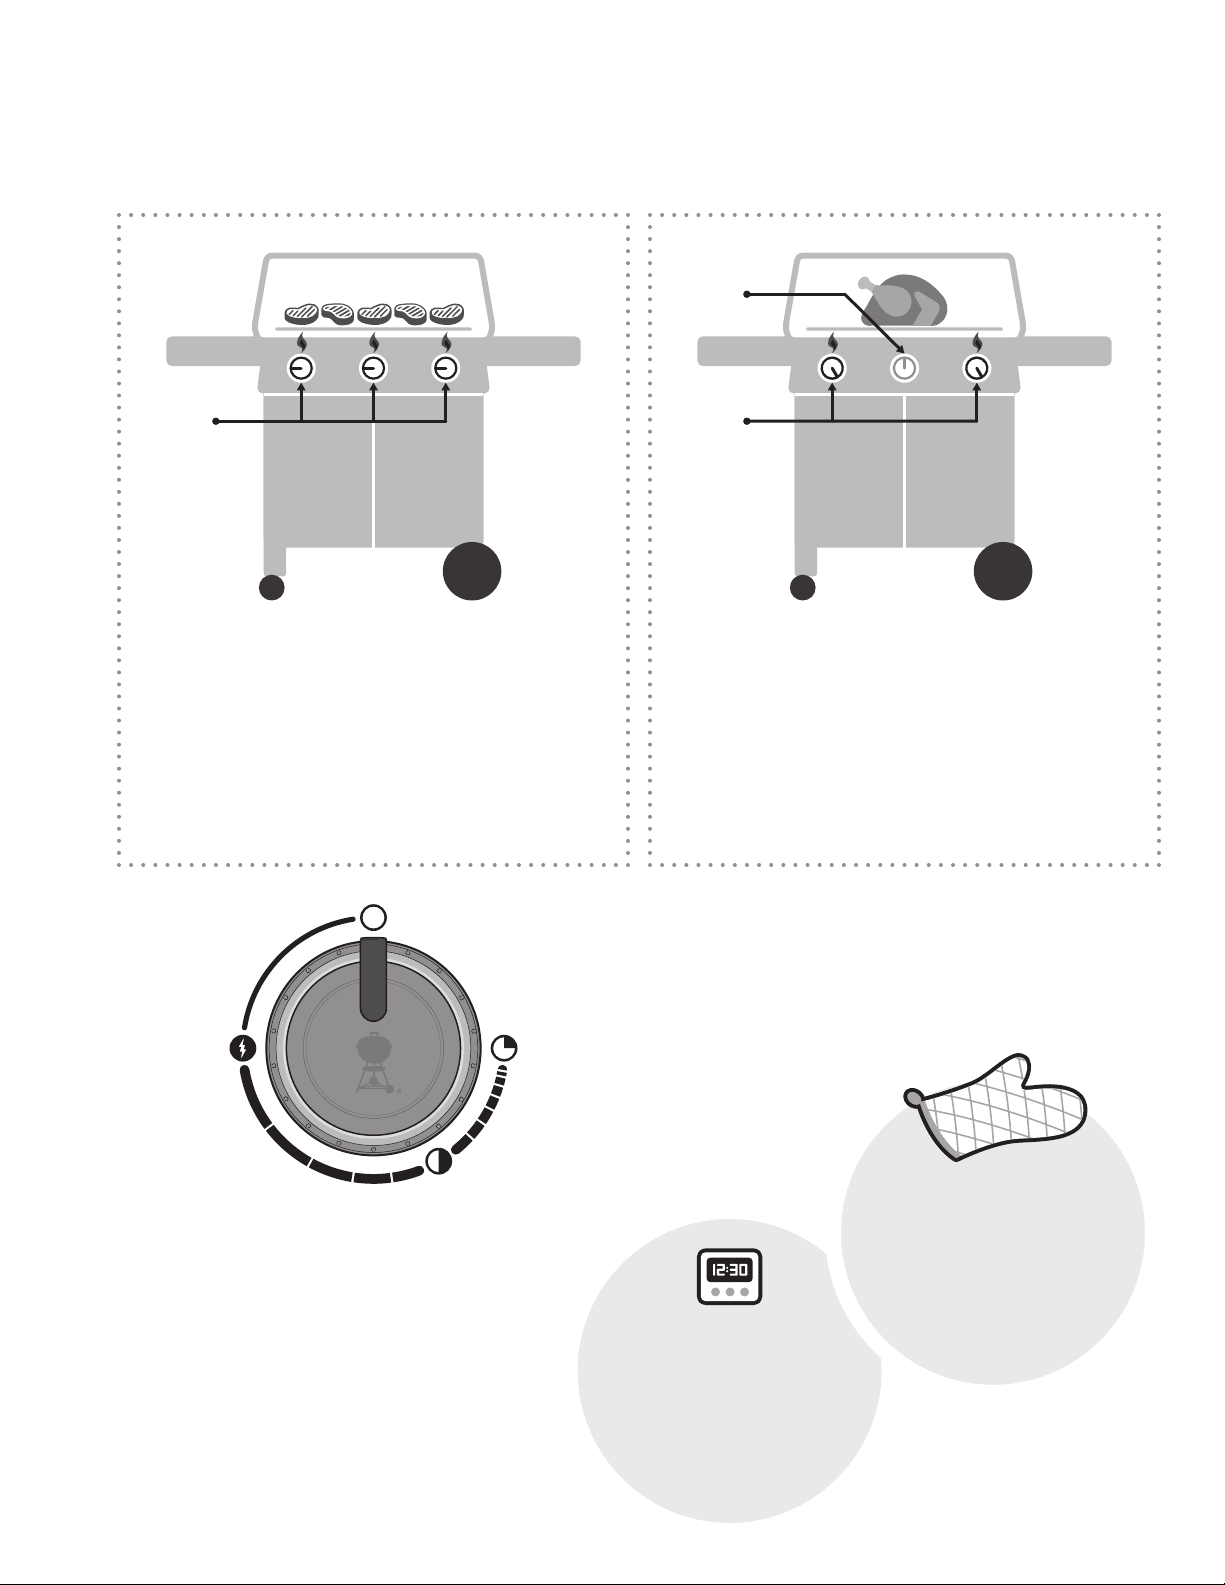
The Flame -
Direct or Indirect
Tips and Hints
HIGH
DIRECT HEAT
SETUP
Use the direct method for small, tender pieces of food that take less than
20 minutes to cook, suchas: hamburgers, steaks, chops, kabobs, boneless
chicken pieces, fish fillets, shellfish, and slicedvegetables.
With direct heat, the fire is right below the food. It sears the surfaces of the
food, developing flavors, texture, and delicious caramelization while cooking
the food all the way to thecenter.
OFF
MEDIUM
INDIRECT HEAT
SETUP
Use the indirect method for larger cuts of meat that require 20 minutes or
more of grilling time, or for foods so delicate that direct exposure to the heat
would dry them out or scorch them, such as: roasts, bone-in poultry pieces,
whole fish, delicate fish fillets, whole chickens, turkeys, and ribs. Indirect heat
can also be used for finishing thicker foods or bone-in cuts that have been
seared or browned first over direct heat.
With indirect heat, the heat is on both sides of the grill, or o to one side of
the grill. The food sits over the unlit part on the cooking grate.
OFF
START/HIGH
MEDIUM
6
LOW
O
O
L
T
S
G
•
N
I
L
L
I
R
G
E
V
A
H
-
T
S
U
M
•
S
L
O
O
T
G
N
I
L
L
I
R
Avoid the disappointment of torching
G
E
V
your dinner by simply setting a timer.
A
H
T
Nothing fancy needed—just one
S
U
M
•
TIMER
that is reliable and easy
S
L
O
O
T
to use.
G
N
I
L
L
I
R
M
U
S
T
-
S
•
M
U
S
T
-
G
H
E
A
V
O
O
L
T
G
N
I
L
L
I
R
G
E
V
A
H
-
T
S
U
M
•
S
L
O
O
T
G
N
I
L
H
A
L
V
I
E
R
G
G
E
V
G
T
O
O
L
BARBECUE
R
I
L
L
I
A
N
When in doubt, wear them. The good
G
H
-
T
T
O
S
U
M
•
E
G
R
I
L
L
I
N
MITTS
ones are insulated and protect
O
L
S
both hand and forearm.
S
•
L
O
M
O
T
U
G
N
I
S
L
L
I
R
G
E
A
T
-
H
A
V
V
S
•
M
U
S
T
-
H
A
V
E
G
R
I
L
L
I
N
G
T
O
O
L
S
•
M
U
S
T
-
H
A
V
E
G
R
I
L
L
I
N
G
T
O
O
L
S
•
M
U
S
T
-
H
Page 7
Tips and Hints
GrillingDo’s
andDon’ts
Preheat each and every time.
If the cooking grates aren’t hot enough, food will stick,
and you will likely never have a chance of searing
properly or developing those handsome grill marks.
Even if a recipe calls for medium or low heat, always
preheat the grill on the highest setting first. Open the
lid, turn up the heat, close the lid, and then let the
cooking grate heat up for about ten minutes or until the
lid thermometer reads 500° F (260° C).
Don't grill on dirty grates.
Tossing food onto the cooking grates before they have
been cleaned is never a good idea. Leftover “stu” on
the grates acts like glue, binding it to the grates and
your new food. To avoid tasting last night’s dinner on
today’s lunch, make sure you are grilling on a clean
cooking grate. Once the grates are preheated, use
a stainless steel bristle grill brush to make a clean,
smooth surface.
Be present in the process.
Before firing up your grill, make sure that everything
you need is within arm’s reach. Don’t forget your
essential grilling tools, already oiled and seasoned
food, glazes or sauces, and clean cooking platters for
cooked food. Having to run back to your kitchen not only
means missing out on the fun, but could also result in
burning your food. French chefs call this “mise en place”
(meaning, “put in place”). We call it “being present”.
Create a little elbow room.
Packing too much food onto the cooking grates restricts
your flexibility. Leave at least one-quarter of the cooking
grates clear, with plenty of space between each food
item, in order to get your tongs in there and easily
move the food around. Sometimes grilling involves
split-second decisions and the ability to jockey food
from one area to another. Sogive yourself enough room
to operate.
Try not to peek.
The lid on your grill is for more than just keeping the
rain out. Most importantly, it’s for preventing too much
air from getting in, and too much heat and smoke from
getting out. When the lid is closed, the cooking grates
are hotter, the grilling times are faster, the smoky tastes
are stronger, and the flare-ups are fewer. So put a lid
on it!
Only flip once.
What’s better than a juicy steak with a deep sear and
plenty of beautifully caramelized bits? The key to
accomplishing these results is to keep your food in
place. Sometimes we have the tendency to flip our food
before it reaches the desirable level of color and flavor.
In nearly all cases, you should turn food just once. If
fiddling with it more than that, you are probably also
opening the lid too much, which causes its own set of
problems. So step back and trust the grill.
Know when to tame the flame.
When grilling, sometimes the most important thing to
know is when to stop. The most reliable way to test
doneness of your food is to invest in an instant-read
thermometer. This slim little gem will help you pinpoint
that critical moment when your food is at its best.
Don’t be afraid to experiment.
Back in the 1950s, grilling meant one thing: meat (and
only meat) charred over open flames. The modern
day backyard chef doesn’t need a kitchen in order to
prepare a full course meal. Use your grill to make chargrilled appetizers, sides, and even desserts. Register
your grill to receive special content that will inspire
you along the way. We’d love to join you on your grilling
adventures.
Optimize
Grill Space
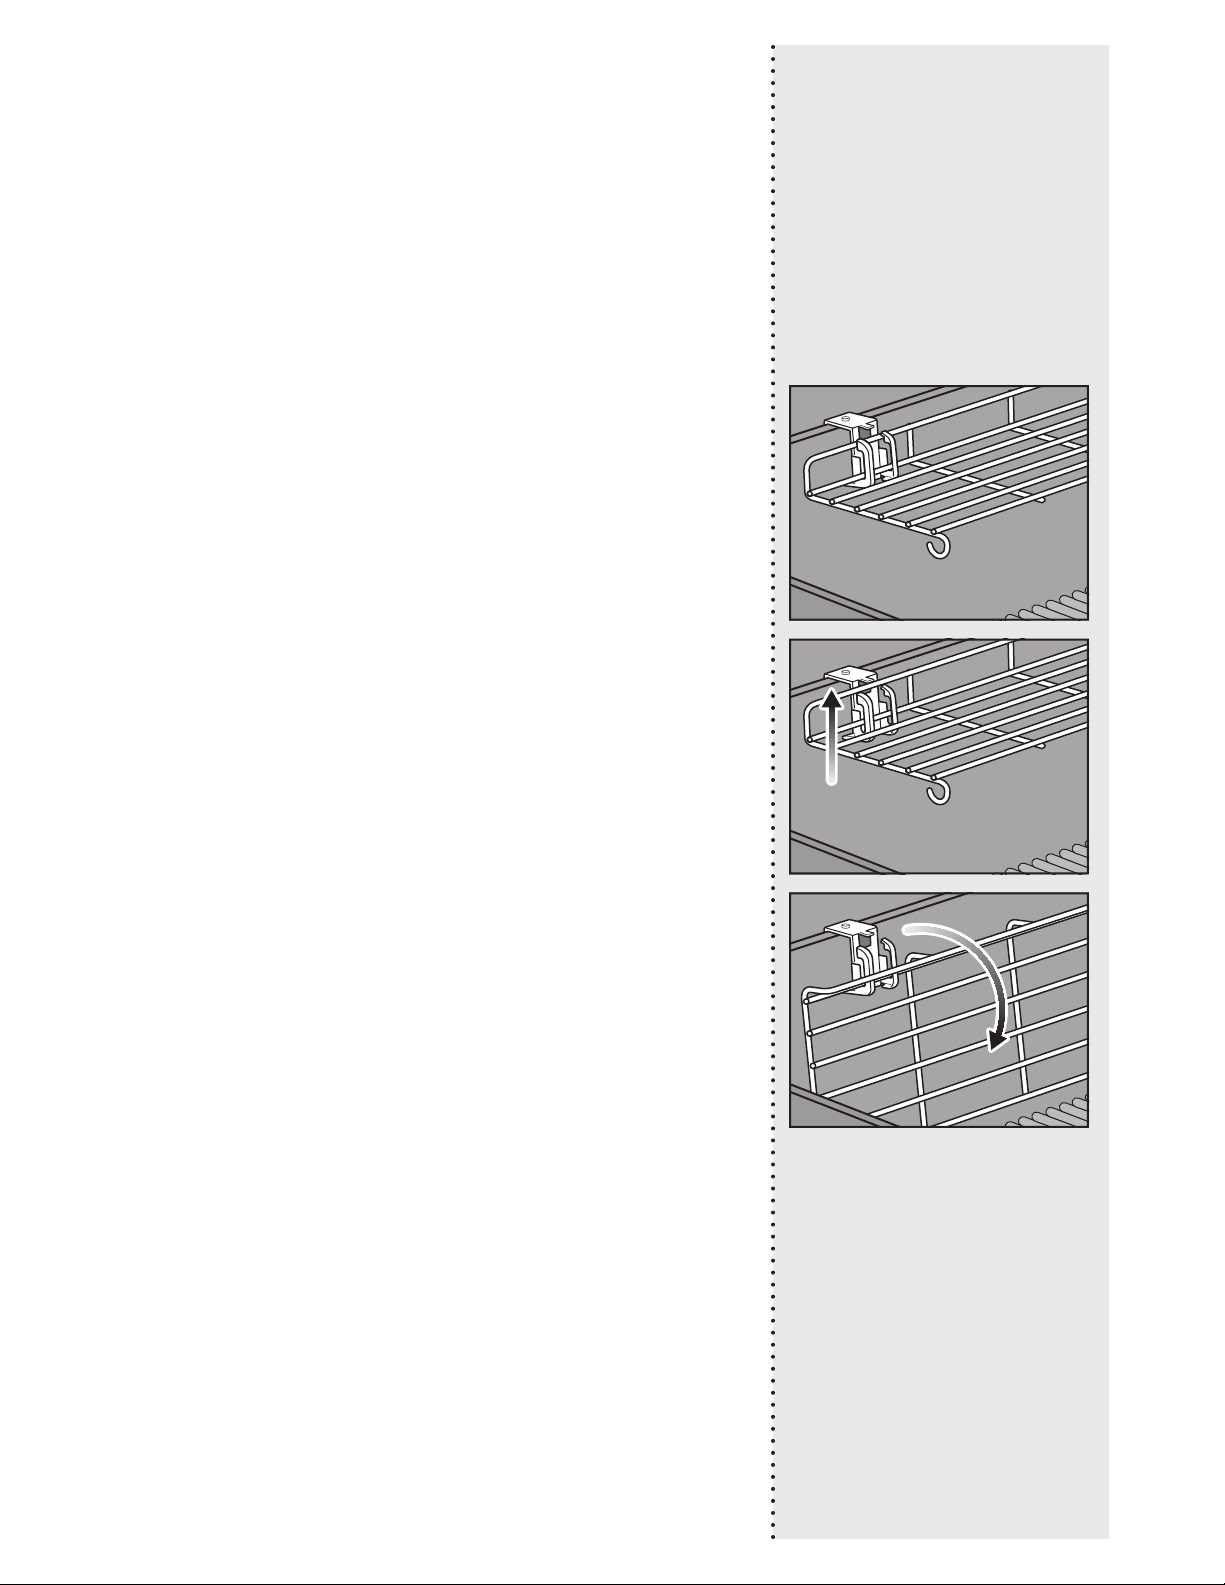
Using the TUCKAWAY
Warming Rack
Use the warming rack up to keep food warm
or fold it down when not in use. To fold the
warming rack down, lift rack slightly and rotate
downward. Use heat-resistant mitts or gloves
when adjusting rack.
7
Page 8

Important Information about
LPGas & Gas Connections
What Is LP Gas?
Liquefied petroleum gas, also called LP, LP gas, liquid
propane, or simply propane or butane, is the flammable,
petroleum-based product used to fuel your grill. It is
a gas at moderate temperatures and pressure when
it is not contained. But at moderate pressure inside a
container, such as a tank, LP is a liquid. As pressure is
released from the tank, the liquid readily vaporizes and
becomes gas.
Safe Handling Tips For LP Tanks
Getting Started
• A dented or rusty liquid propane tank may be
hazardous and should be checked by your liquid
propane supplier. Donot use a liquid propane tank
with a damaged valve.
• Although your liquid propane tank may appear to be
empty, gas may still be present, and the tank should be
transported and stored accordingly.
• The LP tank must be installed, transported, and stored
in an upright, secure position. LP tanks should not be
dropped or handled roughly.
• Never store or transport the LP tank where
temperatures can reach 125° F (51.7° C) (the tank will
become too hot to hold by hand).
• Place dust cap on tank valve outlet whenever the tank
is not in use. Only install the type of dust cap on the
tank valve outlet that is provided with the tank valve.
Other types of caps or plugs may result in leakage of
propane.
A
B
LP Tank Requirements
• The tank must be approximately 18¼inches (46.35
cm) high and 12¼ inches (31.1 cm) in diameter with a
marked 20 pound (9.07 kg) LPG capacity or 47.6 pound
(21.6 kg) water capacity as stated by the manufacturer.
Other tanks may be acceptable provided they are
compatible with the grill retention means (tank scale).
• The tank used must be constructed and marked
in accordance with the Specifications for LP gas
Cylinders of the U.S. Department of Transportation
(D.O.T.); or the Canadian Standard for Cylinders,
Spheres and Tubes for Transportation of Dangerous
Goods and Commission, CAN/CSA-B339, as applicable.
• Tanks must be provided with a listed OPD (Overfilling
Prevention Device) and a Type 1 (CGA 810) tank
connection. The tank connection must be compatible
with the grill connection.
• The tank must include a collar to protect the tank
valve.
• Tanks must have a D.O.T. certification (A), and a testing
date (B) that is within five years of current use.
What is a Regulator?
Your gas grill is equipped with a pressure regulator,
which is a device to control and maintain uniform gas
pressure as gas is released from the LP tank.
Regulator Requirements
• The regulator and hose assembly supplied with this
grill must be used. This regulator has a flow limiting
device built into the unit that will restrict the flow of
gas in the event that a leak is detected.
• Replacement regulator and hose assemblies must be
as specified by Weber-Stephen Products LLC (UL-listed
Type 1 (CGA 810) tank connection device as described
in the latest edition of ANSI Z21.81).
8
Page 9

LP Tank Installation &
LeakChecking
Installation Location
The tank is hung onto the tank scale which is located
outside the cabinet base under the right side table.
The shape of the collar assembly (the metal protective
ring around the tank valve) determines one of two
directions in which the tank will correctly hang on the
tank scale (A).
Inspect the Tank
1) Confirm that the tank valve is fully closed. Close by
turning valve clockwise.
2) Confirm that the tank valve is the proper mating
type for the regulator (B).
3) Inspect the tank valve, including the internal rubber
seal for damage or debris (C). If damaged, return
tank to local retailer.
Install The Tank
1) Check that all burner control knobs are in the
o position. Check by pushing in and turning
knobs clockwise.
2) Loosen hand nut and rotate tank lock up(D).
3) Lift tank into position on the tank scale (E).
4) Rotate the tank lock down. Tighten the hand nut.
5) Screw the regulator coupling onto the tank valve,
turning clockwise (F). Hand-tighten only. Using a
wrench could damage the regulator coupling and
could cause a leak. Proceed to “CHECKING FOR
GASLEAKS.”
Getting Started
D
A
E
B
C
F
9
Page 10
What is a Leak Check?
Once the LP tank is properly installed, it is necessary
to perform a leak check. A leak check is a reliable way
to verify that gas is not escaping after you connect the
tank. The fuel system in your grill features factorymade connections that have been thoroughly checked
for gas leaks and the burners have been flame-tested.
WEBER recommends performing a thorough leak
check after assembly, as well as annually. The
following fittings should be tested:
• Where the regulator connects to the tank.
• Where the gas hose connects to the bulkhead.
• Where the bulkhead connects to the corrugated gas
line.
Getting Started
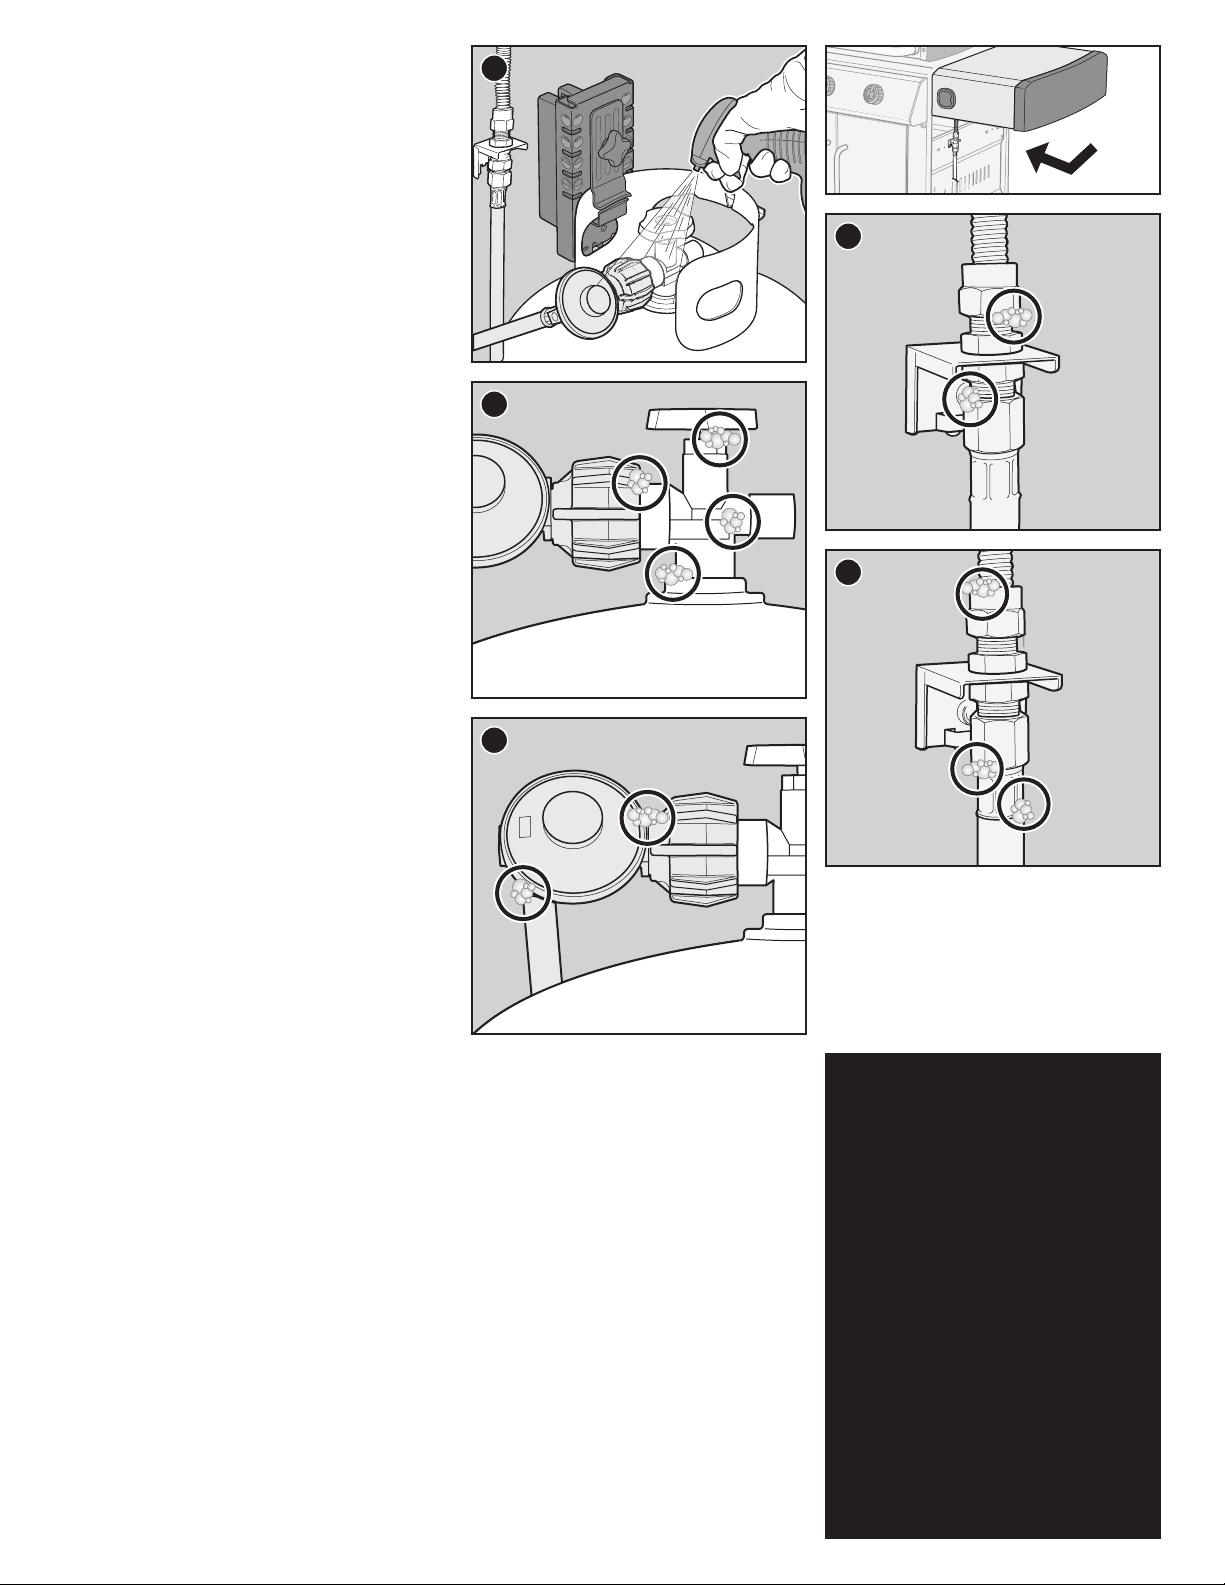
Checking for Gas Leaks
1) Wet fittings (G) with a soap and water solution,
using a spray bottle, brush, or rag. You can make
your own soap and water solution by mixing 20%
liquid soap with 80% water; or, you can purchase
leak check solution in the plumbing section of any
hardware store.
2) Slowly open gas supply by turning tank valve
counterclockwise while checking for bubbles.
3) If bubbles appear there is a leak:
a) If the leak is at the cylinder (H), turn o the gas.
DONOT OPERATE THE GRILL. Disconnect the
tank and return the tank to your local retailer.
b) If the leak is at the regulator (I), turn o the
gas. DONOT OPERATE THE GRILL. Contact the
Customer Service Representative in your area
using the contact information on our website.
c) If the leak is at any fittings indicated in
illustration (J), re-tighten fitting with a wrench
and recheck for leaks with soap and water
solution. If leak persists, turn o the gas. DO NOT
OPERATE THE GRILL.
d) If the leak is at any fittings indicated in
illustration (K), turn o the gas. DO NOT
OPERATE THE GRILL.
If a leak is present, contact the Customer Service
Representative in your area using the contact
information on our website.
4) If bubbles do not appear, leak checking is complete:
a) Turn gas supply o at the tank and rinse
connections with water.
NOTE: Since some leak test solutions, including soap and
water, may be slightly corrosive, all connections should
be rinsed with water after checking for leaks.
G
J
H
K
I
10
m DANGER: Do not use a flame to check for gas
leaks. Besure there are no sparks or open
flames in the area while you check for leaks.
m DANGER: Leaking gas may cause a fire or
explosion.
m DANGER: Do not operate the grill if there is a
gas leak present.
m DANGER: If you see, smell, or hear the hiss of
gas escaping from the liquid propane tank:
1) Move away from liquid propane tank.
2) Do not attempt to correct the problem
yourself.
3) Call your fire department.
m DANGER: Always close the tank valve before
disconnecting the regulator. Do not attempt
to disconnect the gas regulator and hose
assembly or any gas fitting while this grill is
in operation.
m DANGER: Do not store a spare LP tank under
or near this grill. Never fill the tank beyond
80% full. Failure to follow these statements
exactly may result in a fire causing death or
serious injury.
Page 11
Refilling or Replacing an
LPTank
Getting Started
Getting Started
L
O
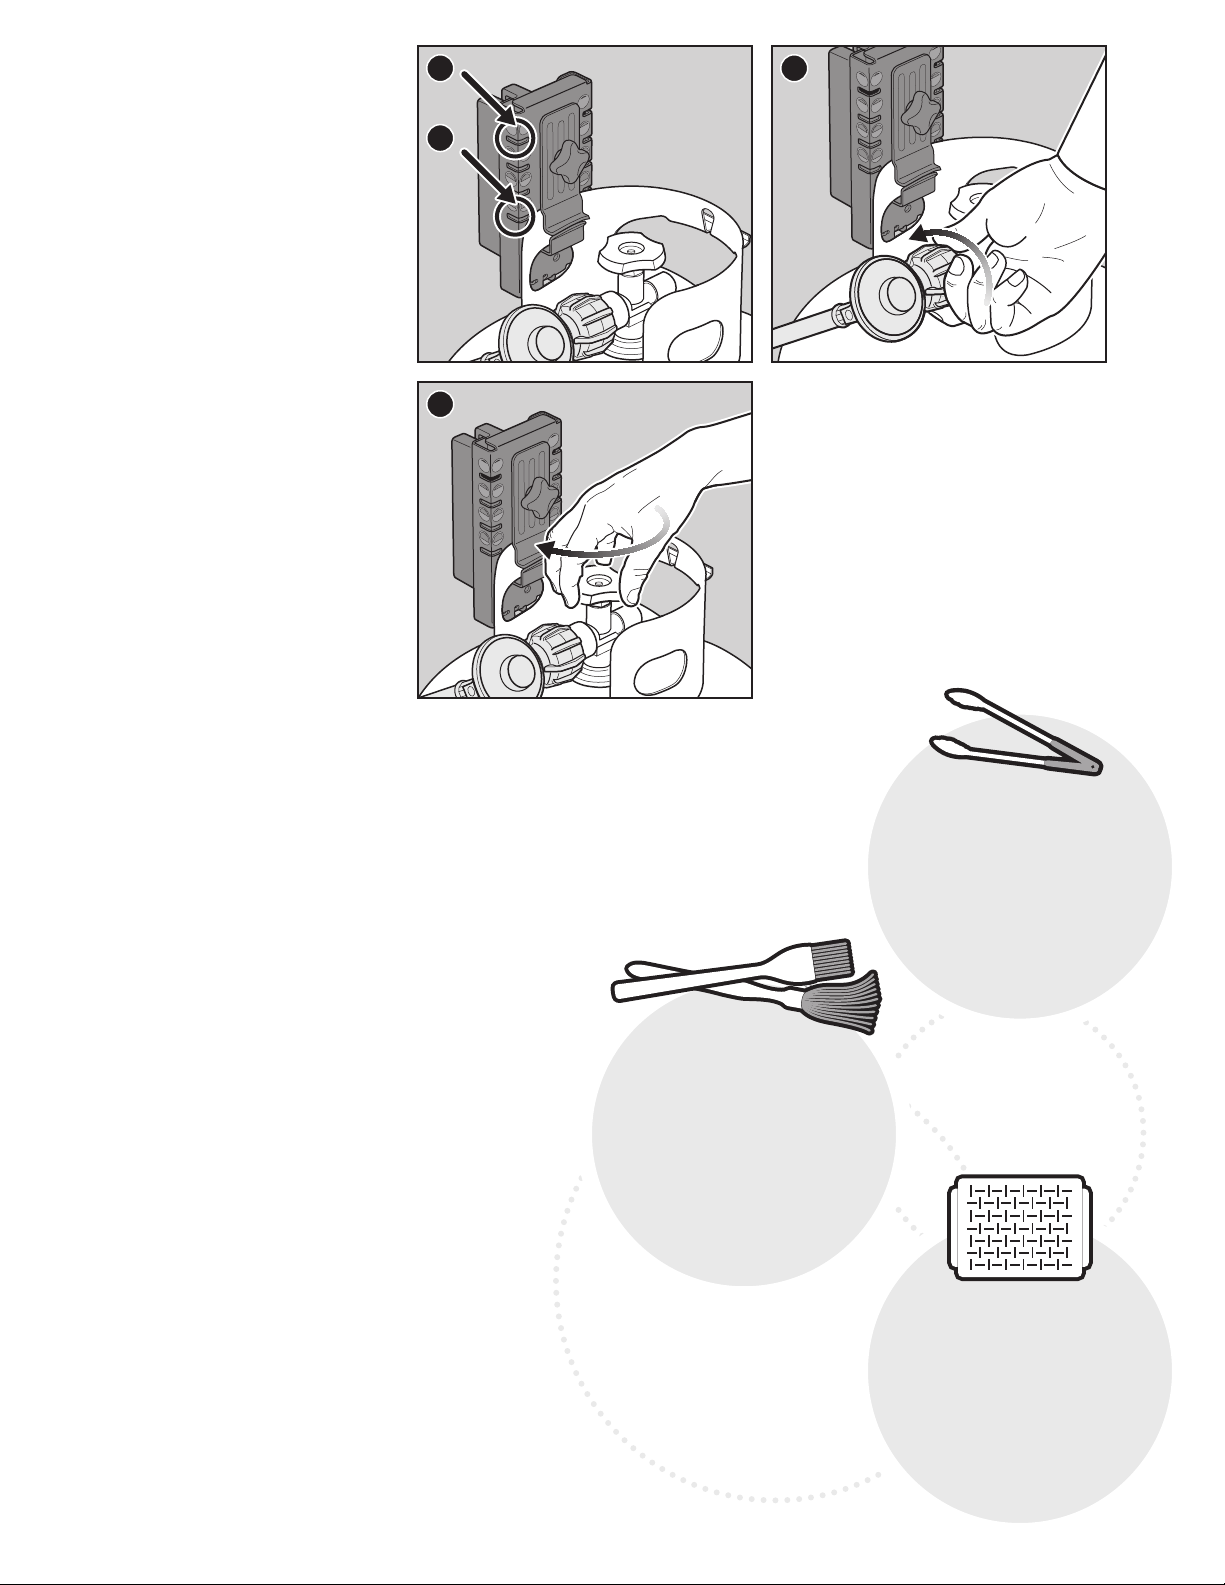
How Much Fuel is in the Tank?
The tank scale indicates the amount of fuel in a
standard 20 pound (9.07 kg) tank once the tank is hung
from the scale. The fuel level is checked by viewing
the red level indicator line, located on scale. When the
indicator line is at the top, the tank is full (L). When it
is at the bottom, the tank is empty(M) and needs to be
removed to replace or refill.
Removal of the LP Tank
1) Confirm that the tank valve is fully closed. Close by
turning valve clockwise (N).
2) Unscrew regulator coupling by turning
counterclockwise by hand (O).
3) Loosen tank hand nut and turn tank lock up out of
the way.
4) Lift tank o tank scale.
Additional Leak Check Precautions
The following fittings should be tested for gas leaks
each time a tank is refilled and reinstalled:
• Where the regulator connects to the tank (H) and at
the regulator (I).
Follow the instructions for "Checking for Gas Leaks".
M
N
O
O
L
T
S
G
•
M
U
S
T
-
H
A
V
E
G
R
I
L
L
I
N
G
T
O
O
L
S
•
M
U
S
T
-
H
A
V
E
G
R
I
L
L
I
N
G
T
O
O
L
S
•
M
U
S
T
-
G
H
E
A
V
O
O
L
T
S
•
M
U
S
T
-
H
A
V
E
G
R
I
L
L
I
N
G
T
O
O
L
S
•
M
U
S
T
-
H
A
V
E
G
R
I
L
L
I
N
G
T
O
O
L
S
•
M
U
S
T
-
G
H
E
A
V
11
O
O
L
T
S
G
•
N
I
L
L
I
R
G
E
V
A
H
-
T
S
U
M
•
S
L
O
O
T
G
N
I
L
Look for a basting brush with heat-
L
I
R
G
resistant silicone bristles and a long
E
V
A
handle, and a mop with long, cotton
H
T
S
U
M
BRUSH
AND MOP
threads that sop up the thinner,
•
S
vinegar-based sauces.
L
O
O
T
G
N
I
L
L
I
R
M
U
S
•
M
U
S
T
-
G
H
E
A
V
N
I
L
L
I
R
G
E
V
A
H
-
T
S
U
M
•
S
L
O
O
T
G
N
Consider these to be an extension
I
L
L
I
R
G
E
should have an eortless tension
V
A
H
T
S
U
M
T
-
H
A
V
E
G
R
I
L
L
I
N
G
T
O
O
L
S
•
M
U
S
T
-
H
A
V
E
G
R
I
L
L
I
N
G
T
O
O
L
S
S
U
M
•
S
L
O
O
T
G
Designed for food that is either too
N
I
L
L
I
small or too delicate for the cooking
R
G
E
V
A
H
T
S
U
M
TONGS
of your hand. The best tongs
mechanism, comfortable hand
grips, and a lock to keep
•
S
L
O
O
themcompact.
T
G
N
I
L
L
I
R
G
N
I
L
L
I
R
G
E
V
A
H
-
T
GRILLINGPAN
grates, a perforated grilling pan
keeps food right where it ought
tobe—on the grill,
•
S
L
O
not in it.
O
T
G
N
I
L
L
I
R
Page 12
The Very First Time You Grill
Perform an Initial Burn-Off
Heat the grill on the highest setting, with the lid closed,
for at least 20 minutes prior to grilling for the firsttime.
Every Time You Grill
Operation
Meal-to-Meal Maintenance
The Meal-To-Meal Maintenance plan includes the
following simple, yet important, steps that should
always be performed prior to grilling.
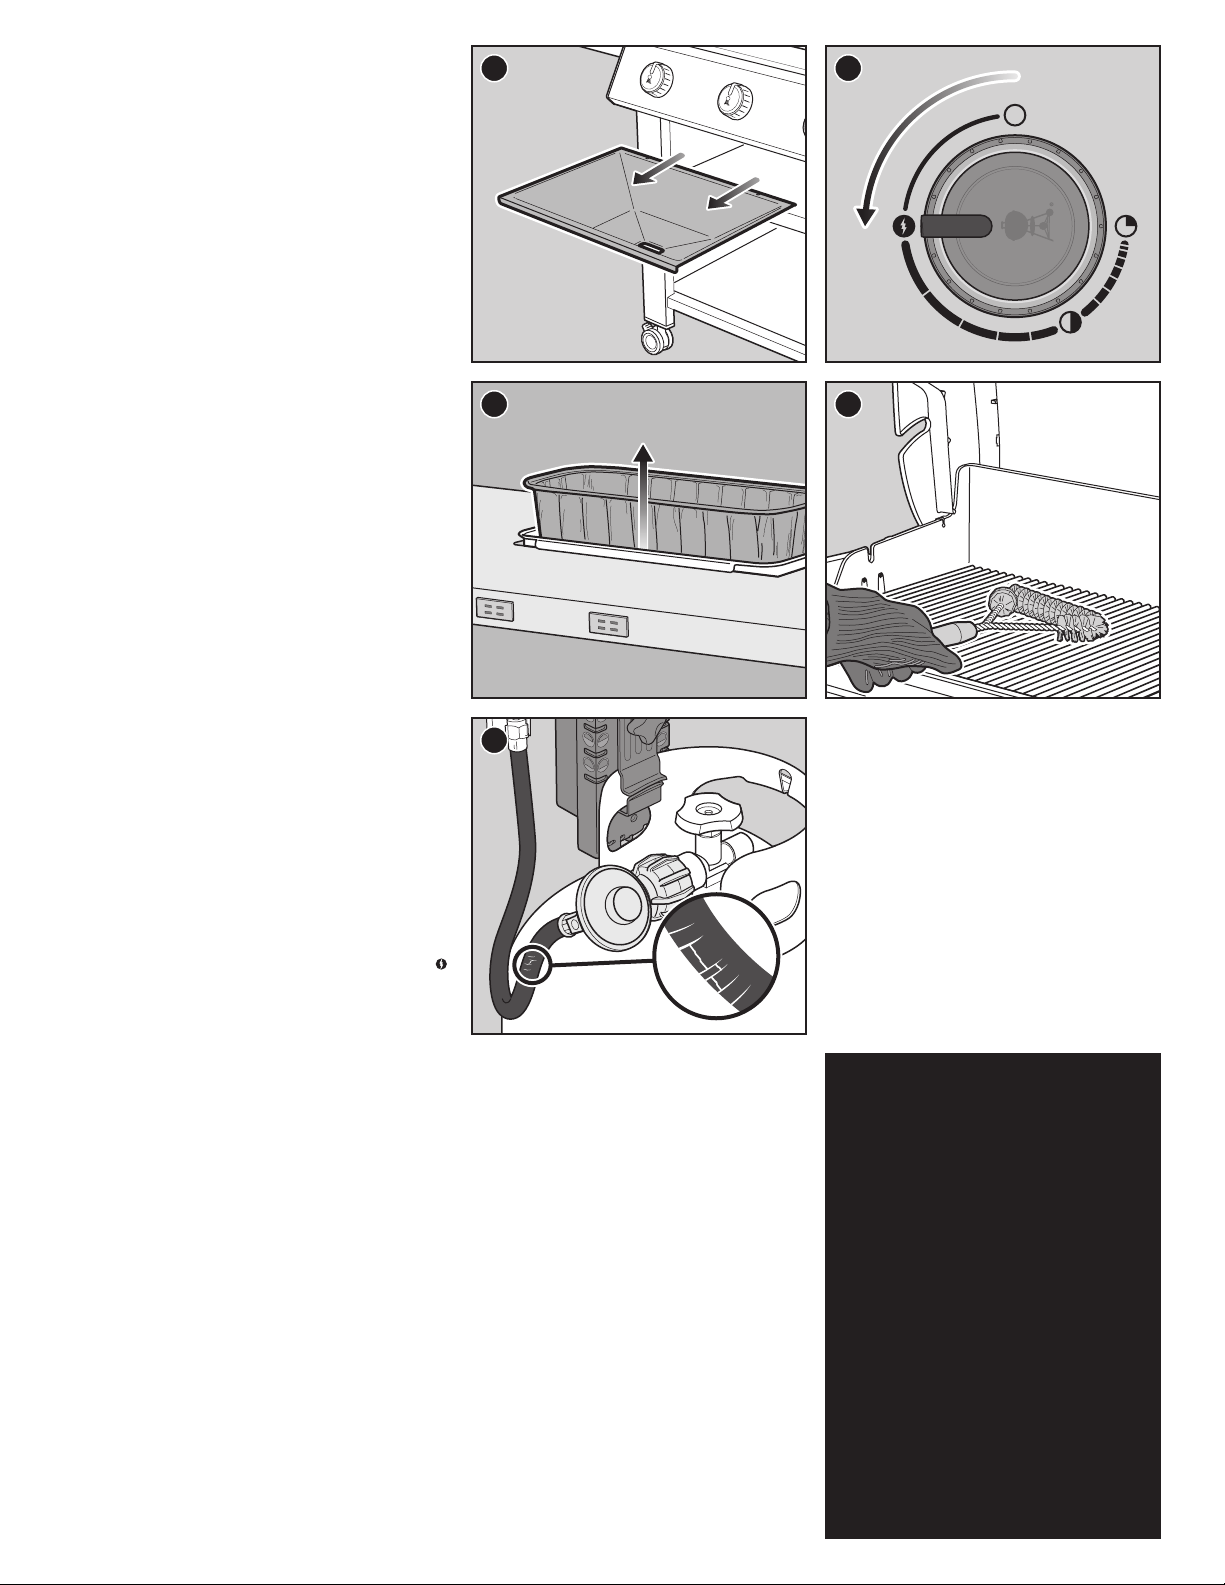
Check for Grease
Your grill was built with a grease management
system that funnels grease away from food and into a
disposable container. As you cook, grease is channeled
down the slide-out grease tray and into a disposable
drip tray that lines the catch pan. This system should be
cleaned each and every time you grill to preventfires.
1. Confirm that the grill is o and cool.
2. Remove the slide-out grease tray by pulling the tray
out of the cabinet (A). Remove excess grease with a
plastic scraper.
3. Remove the catch pan (B). Check for excessive
amounts of grease in the disposable drip pan that
lines the catch pan. Discard disposable drip pan
when necessary and replace with a new one.
4. Reinstall all components.
A
D
EB
Inspect the Hose
Routine inspection of the hose is necessary.
1. Confirm that the grill is o and cool.
2. Check hose for any signs of cracking, abrasions, or
cuts(C). If the hose is found to be damaged in any
way, do not use the grill.
Preheat the Grill
Preheating the grill is critical to successful grilling.
Preheating helps to prevent food from sticking to the
grate and gets the grate hot enough to sear properly.
Italso burns o residue of a previously cooked meal.
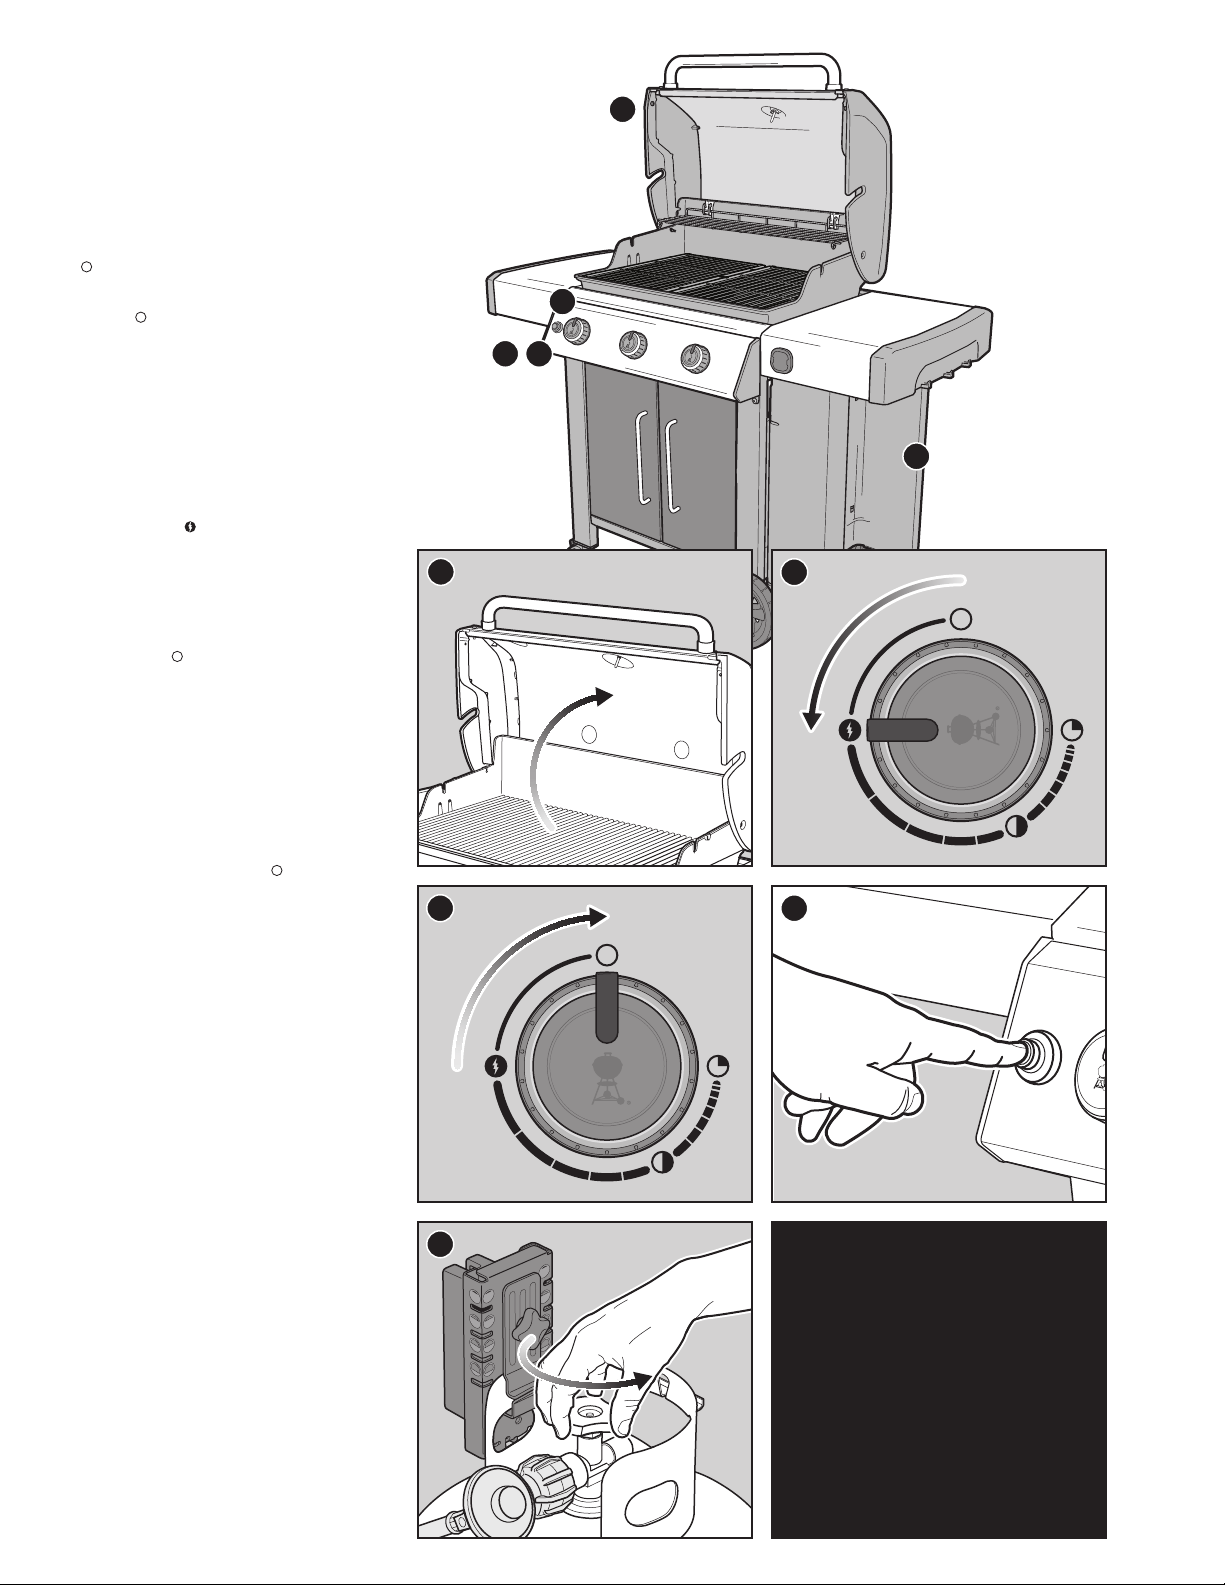
1. Open the grill lid.
2. Ignite your grill according to the ignition instructions
in this Owner's Manual.
3. Close lid.
4. Preheat the grill with all burners on the start/high
position for 10 to 15 minutes or until thermometer
registers 500° F (260° C)(D).
Clean the Cooking Grate
After preheating, any bits of food or debris left over from
previous use will be easier to remove. Cleaned grates
will also prevent your next meal from sticking.
1. Brush the grates with a stainless steel bristle grill
brush immediately after preheating (E).
C
m DANGER: Do not line the slide-out grease tray
or cookbox with aluminum foil.
m DANGER: Check the slide-out grease tray and
catch pan for grease build-up before each use.
Remove excess grease to avoid a grease fire.
m WARNING: Use heat-resistant barbecue mitts
or gloves when operating grill.
m WARNING: Grill brushes should be checked for
loose bristles and excessive wear on a regular
basis. Replace brush if any loose bristles are
found on cooking grates or brush. WEBER
recommends purchasing a new stainless steel
bristle grill brush at the beginning of every
spring.
m WARNING: If the hose is found to be damaged
in any way, do not use the grill. Replace using
only WEBER authorized replacement hose.
m WARNING: Keep ventilation openings around
tank clear and free of debris.
12
Page 13
Igniting the Grill
Operation
Using the Electronic Ignition System to
Ignite the Grill
Each control knob operates an individual burner, and
each burner ignites independently. Ignite the burners
starting from left to right. All burners should be lit for
preheating, however, all burners do not have to be lit
while grilling.
1) Open the grill lid (A).
2) Check that all burner control knobs are in the o
position. Check by pushing in and turning knobs
clockwise (B).
Note: It is important that all burner control knobs are
in the o position before turning on the LP tank.
If they are not, the flow limiting device built into the
regulator will activate, limiting the flow of gas from
the LP tank.
3) Turn the LP tank on by slowly turning the tank valve
counterclockwise; wait 60 seconds (C).
Note: It is important that the LP tank is turned on
slowly. Ifit is opened too quickly, the flow limiting
device built into the regulator will activate, limiting the
flow of gas from the LP tank.
4) Begin with the burner furthest to the left. Push the
burner control knob in and turn it counterclockwise
to the start/high
5) Push and hold the electronic ignition button (E).
Youwill hear it ticking.
6) Check that the burner is lit by looking through the
cooking grates and through the half-circle cutout in
the FLAVORIZER bar.
7) If the burner does not ignite, turn burner control
knob to the o
allow the gas to clear before attempting to light the
burner again.
8) If the burner ignites, repeat steps 4 through 6 to
light the remaining burners.
Should the burners fail to ignite using the electronic
ignition, refer to the TROUBLESHOOTING section.
Thereyou will find instructions on igniting the grill
with a match to help determine the exact problem.
position (D).
position and wait five minutes to
To Extinguish Burners
1) Push each burner control knob in and then turn
clockwise all the way to the o position.
2) Turn gas supply o at the LP tank.
A
E
BCD
A
B
D
E
C
m WARNING: Open lid during ignition.
m WARNING: Do not lean over open grill while
igniting or cooking.
m WARNING: Each burner must be ignited
individually by pushing the electronic ignition
button.
m WARNING: If ignition does not occur within
four seconds of attempting to light the first
burner, turn the burner control knob to
the o position. Wait five minutes to allow
accumulated gas to dissipate, and then repeat
the lighting procedure.
13
Page 14

Cleaning and Maintenance
Cleaning the Inside of the Grill
Over time, the per formance of your grill can
diminish if it has not been maintained properly.
Low temperatures, uneven heat, and food sticking
to cooking grates are all signs that cleaning and
maintenance are overdue. When your grill is o and
cool, start by cleaning the inside, from the top down.
A thorough cleaning is recommended at least twice a
year. Consistent use may require quarterly cleanings.
Product Care
Cleaning the Lid
From time to time you may notice “paint-like” flakes
on the inside of the lid. During use, grease and smoke
vapors slowly change into carbon and deposit on the
inside of your lid. These deposits will eventually peel,
and looks very similar to paint. These deposits are
non-toxic, but the flakes could fall onto your food if you
do not clean the lid regularly.
1) Brush the carbonized grease from the inside of the
lid with a stainless steel bristle grill brush (A). To
minimize further build-up, the inside of the lid can
be wiped with a paper towel after grilling while the
grill is still warm (nothot).
Cleaning the Cooking Grates
If you have been cleaning your cooking grates as
recommended, the debris on your grates should be
minimal.
1) With grates installed, brush the debris o your
cooking grate with a stainless steel bristle grill
brush(B).
2) Take the grates out and set aside.
Cleaning the FLAVORIZERBARS
FLAVORIZER BARS catch drippings that smoke and
sizzle, adding flavor to your food. Any drippings that
are not vaporized by the FLAVORIZER BARS are
funneled away from the burners. This helps prevent
flare-ups inside of your grill, and protects the burners
from getting clogged.
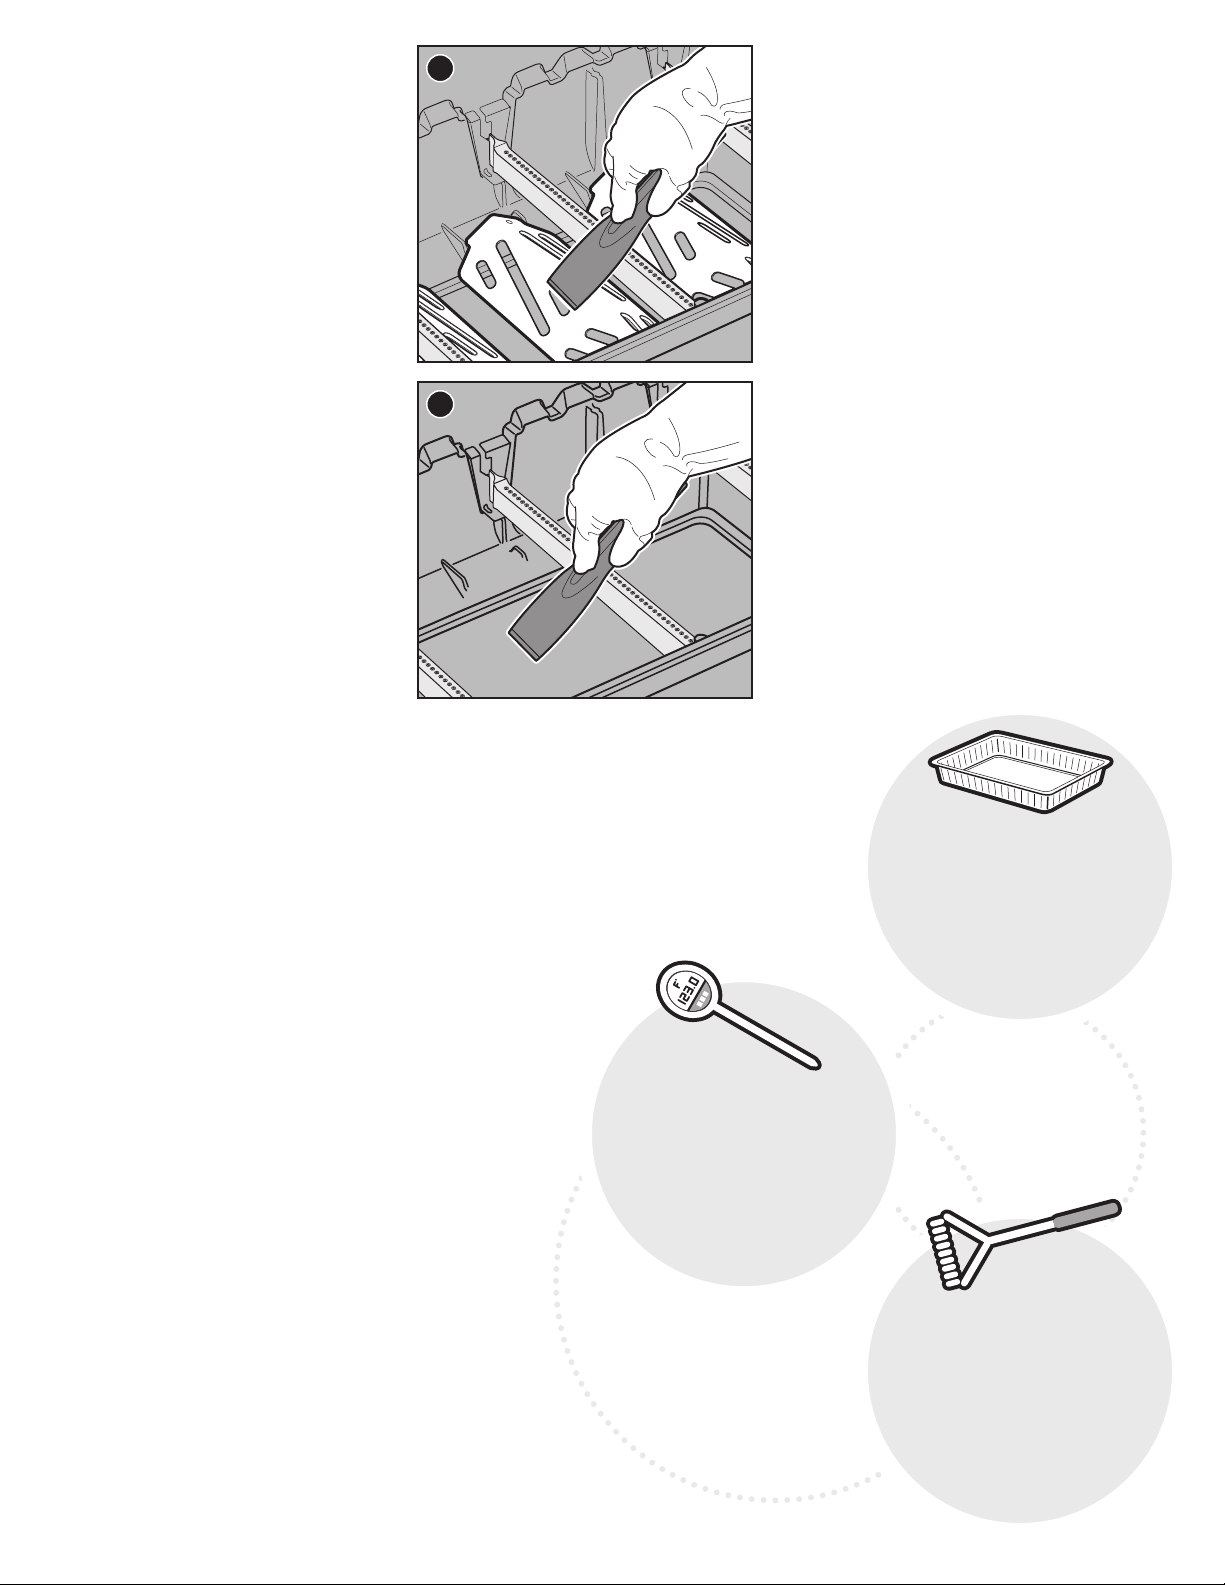
1) Scrape the FLAVORIZER BARS with a plastic
scraper(C).
2) If necessary, brush the FL AVORIZER BARS with a
stainless steel bristle grill brush.
3) Remove FLAVORIZER BARS and set aside.
Cleaning the Burners
Two areas on the burners that are key to optimum
performance are the ports (small raised openings
running along the length of the burners) and the
spider/insect screens on the ends of the burner.
Keeping these areas clean is essential for safe
operation.
Cleaning the Burner Ports
1) Use a clean stainless steel bristle grill brush to
clean the outside of the burners by brushing across
the top of the burner ports (D).
2) When cleaning the burners, avoid damaging the
ignition electrode by carefully brushing around
it(E).
Cleaning the Spider Screens
1) Locate the ends of the burners on the underside of
the control panel where they meet the valves.
2) Clean the spider/insect screens on each of the
burners using a sof t bristle brush (F).
A
B
C
REPLACEMENT
PARTS
To obtain replacement parts,
contact the local retailer
in your area or log onto
weber.com.
D
E
F
m WARNING: Turn your grill o and wait for it to
cool before thoroughly cleaning.
m WARNING: Over time, the development of
rough surfaces can form on the FLAVORIZER
BARS. Wearing gloves is recommended when
handling. Do not clean FLAVORIZER BARS or
cooking grates in a sink, dishwasher, or selfcleaning oven.
m WARNING: When cleaning the burners, never
use a brush that has already been used to
clean the cooking grates. Never put sharp
objects into the burner port holes.
m CAUTION: Do not place any grill components
onto the side tables as they may scratch the
paint or stainless steel surfaces.
m CAUTION: Do not use any of the following
to clean your grill: abrasive stainless steel
polishes or paints, cleaners that contain
acid, mineral spirits or xylene, oven cleaner,
abrasive cleansers (kitchen cleansers), or
abrasive cleaning pads.
14
Page 15
Cleaning the Heat Deflectors
Located under the burners, the heat deflectors
distribute heat evenly throughout the cookbox while
cooking. Keeping heat deflectors clean will enhance
the cooking performance of your grill.
1) Scrape the heat deflectors with a plastic
scraper(G).
2) If necessary, brush the heat deflectors with a
stainless steel bristle grill brush.
3) Remove heat deflectors and set aside.
Cleaning the Cookbox
Look inside the cookbox for any grease accumulation
or leftover food particles. Excessive accumulation can
cause a fire.
1) Use a plastic scraper to scrape debris o the sides
and bottom of the grill into the opening in bottom of
the cookbox(H). This opening leads debris into the
slide-out grease tray.
Cleaning the Grease ManagementSystem
The grease management system consists of an
angled slide-out grease tray and a catch pan. These
components were designed to be easily removed,
cleaned, and replaced; an essential step every time
you prepare to grill. Instructions on inspecting the
grease management system can be found in MEAL-TOMEAL MAINTENANCE.
Cleaning the Outside of theGrill
The outside of your grill may include stainless steel,
porcelain-enameled, and plastic surfaces. WEBER
recommends the following methods based on the
surfacetype.
Cleaning Stainless Steel Surfaces
Clean stainless steel using a non-toxic, non-abrasive
stainless steel cleaner or polish designed for use on
outdoor products and grills. Use a microfiber cloth to
clean in the direction of the grain of the stainless steel.
Donot use paper towels.
Note: Do not risk scratching your stainless steel with
abrasive pastes. Pastes do not clean or polish. They
will change the color of the metal by removing the top
chromium oxide film coating.
Cleaning Painted, Porcelain-Enameled
Surfaces and PlasticComponents
Clean painted, porcelain-enameled and plastic
components with warm soapy water, and paper towels
or cloth. After wiping down the surfaces, rinse and dry
thoroughly.
Cleaning the Outside of Grills that are in
Unique Environments
If your grill is subject to a particularly harsh
environment, you will want to clean the outside more
often. Acid rain, pool chemicals, and salt water can
cause surface rusting to appear. Wipe down the
outside of your grill with warm soapy water. Follow
up with a rinse and thorough drying. Additionally, you
may want to apply a stainless steel cleaner weekly to
prevent surface rust.
Product Care
G
H
O
O
L
T
S
G
•
M
U
S
T
-
H
A
V
E
G
R
I
L
L
I
N
G
T
O
O
L
S
•
M
U
S
T
-
H
A
V
E
G
R
I
L
L
I
N
G
T
O
O
L
S
•
M
U
S
T
-
G
H
E
A
V
O
O
L
T
S
•
M
U
S
T
-
H
A
V
E
G
R
I
L
L
I
N
G
T
O
O
L
S
•
M
U
S
T
-
H
A
V
E
G
R
I
L
L
I
N
G
T
O
O
L
S
•
M
U
S
T
-
G
H
E
A
V
15
O
O
L
T
S
G
•
N
I
L
L
I
R
G
E
V
A
H
-
T
S
U
M
•
S
L
O
O
T
G
N
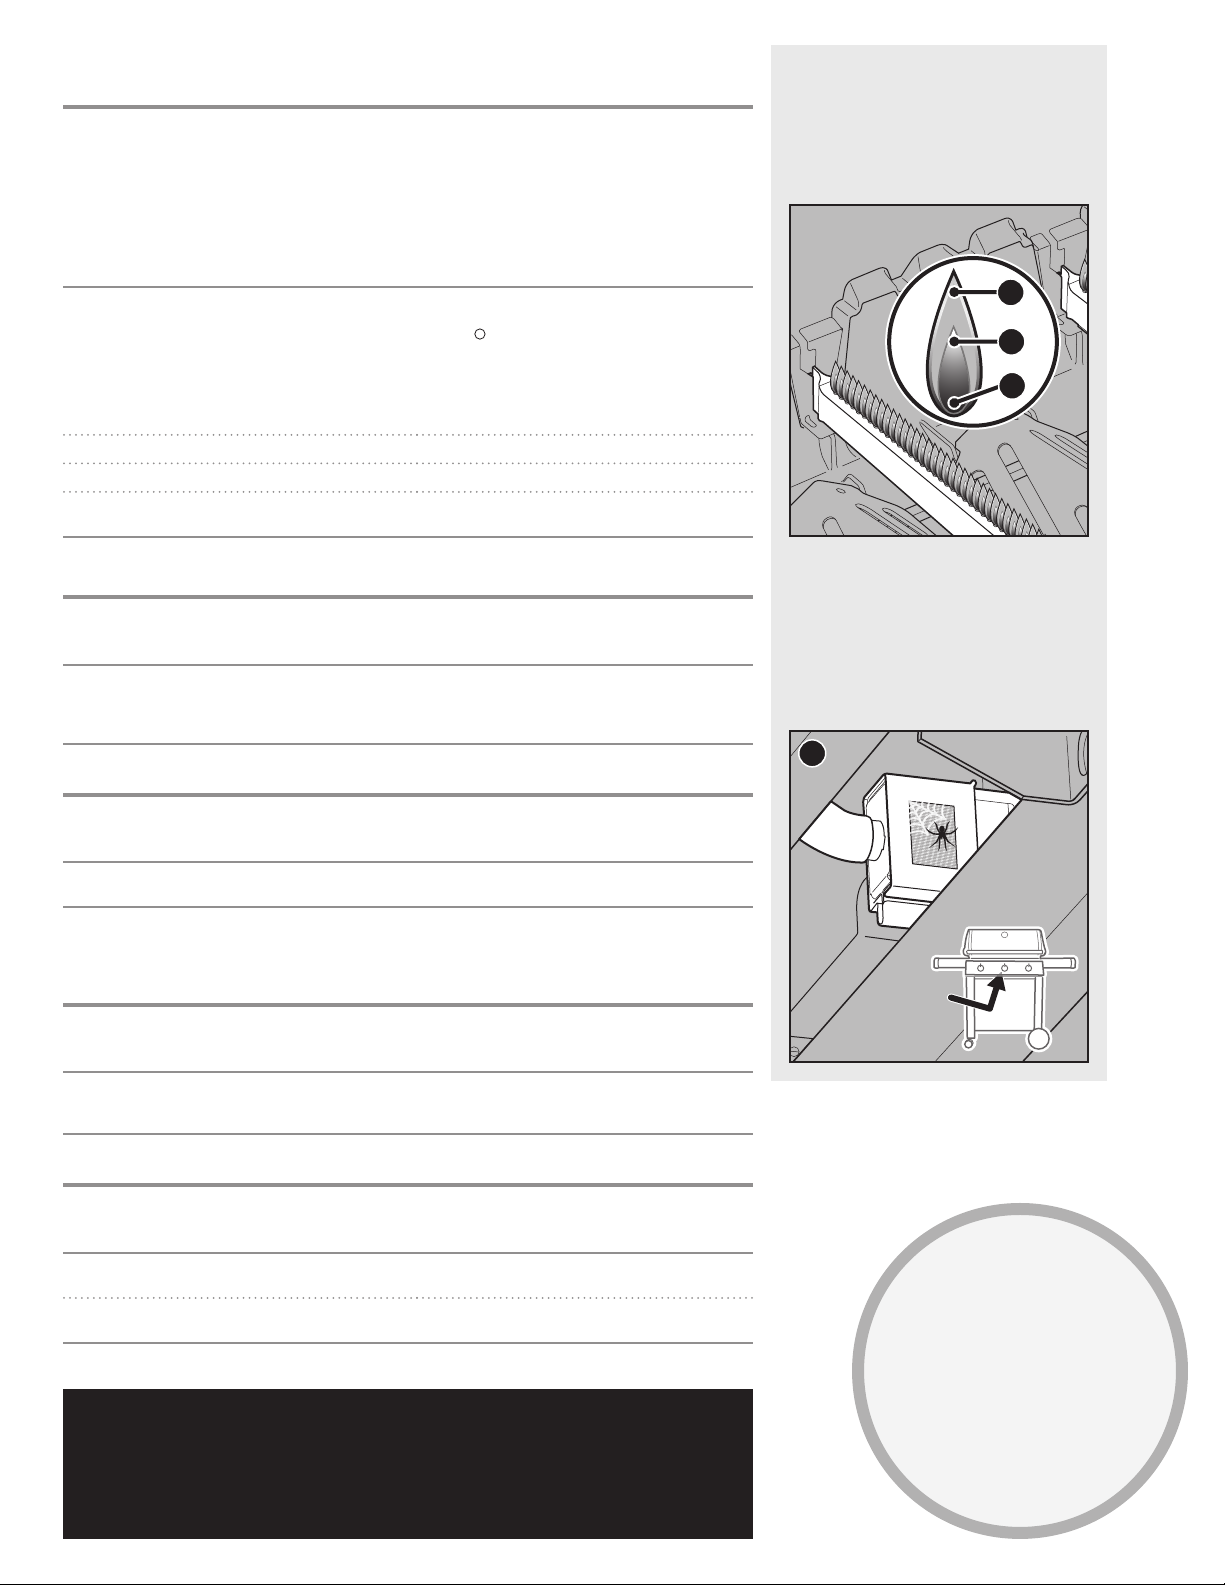
THERMOMETER
I
L
L
I
Small and relatively inexpensive,
R
G
E
V
this gadget is essential for quickly
A
H
T
gauging the internal temperature
S
U
M
of the meat when grilling.
•
S
L
O
O
T
G
N
I
L
L
I
R
M
U
U
S
T
-
G
H
E
A
V
N
I
L
L
I
R
G
E
V
A
H
-
T
S
U
M
•
S
L
O
O
T
G
N
I
L
L
I
R
G
E
V
A
S
T
-
H
A
V
E
G
R
I
L
L
L
I
N
G
T
O
O
L
S
•
M
L
O
O
T
G
N
I
L
L
I
R
G
E
V
A
FOILPANS
Perfect for lining the
catchpan to make cleanup
H
T
S
convenient and easy.
U
M
•
S
L
O
O
T
G
N
I
L
L
I
R
I
N
G
T
O
O
L
S
•
M
U
S
T
-
H
A
V
E
G
R
I
L
V
A
H
-
T
S
U
M
•
S
G
N
I
L
L
I
R
G
E
GRILLBRUSH
A must-use before you even dream
of grilling. A quick once-over on hot
grates prevents the charred remains
H
T
S
of meals past from sticking to
U
M
•
your meals present.
S
L
O
O
T
G
N
I
L
L
I
R
Page 16

GRILL WILL NOT IGNITE
SYMPTOM
• Burner does not ignite when following the electronic ignition instructions in the “Operation” section of this Owner's Manual.
CAUSE SOLUTION
There is a problem with gas flow. If the grill will not ignite, the first step is to determine if there is gas flowing to the burners. Tocheck this,
There is a problem with the electronic ignition system. If the grill will not ignite, the first step is to determine if there is gas flowing to the burners. Tocheck this,
follow the instructions below for “Using a Match to Determine if there is Gas Flow to the Burners.”
If match lighting IS NOT successful, follow the gas flow troubleshooting suggestions on the next page.
followthe instructions below for “Using a Match to Determine if there is Gas Flow to the Burners.”
If match lighting IS successful, follow the instructions below for “Checking the Components of the Electronic
IgnitionSystem.”
Troubleshooting
Using a Match to Determine if there is
Gas Flow to the Burners
1) Open the grill lid.
2) Check that all burner control knobs are in the
position. Check by pushing in and turning
o
knobs clockwise.
Note: It is important that all burner control knobs be
in the o position before you turn on the LP tank.
If they are not, the flow limiting device built into the
regulator will activate, limiting the flow of gas from
the LP tank.
3) Turn the LP tank on by slowly turning the tank valve
counterclockwise; wait 60 seconds.
Note: It is important that the LP tank is turned on
slowly. Ifit is opened too quickly, the flow limiting
device built into the regulator will activate, limiting the
flow of gas from the LP tank.
4) Begin with the burner furthest to the left. Put
match in the matchstick holder and strike match.
(Matchstick holder is located under right side
table.) Insert lit match down through the cooking
grates, past the FLAVORIZER BARS and next to the
burner(A).
5) Push the burner control knob in and turn it
counterclockwise to the start/high
6) Check that the burner is lit by looking through the
cooking grates and through the half-circle cutout in
the FLAVORIZER BAR.
7) If the burner does not ignite within 4 seconds,
turn burner control knob to the o
wait five minutes to allow the gas to clear before
attempting to light the burner again. If repeated
attempts fail, follow the gas flow troubleshooting
instructions on the next page.
8) If the burner ignites, the problem lies in the ignition
system. Follow the instructions for “Checking the
Components of the Electronic Ignition System.”
9) Replace the matchstick holder by hanging
underneath right side table (B).
position.
position and
Checking the Components of the
Electronic Ignition System
When pressing the ignition button you should hear a
ticking sound. If you cannot hear the ticking sound,
check the batter y, then check the wires.
Checking the Battery
There are three potential issues with the battery that
supplies the power to your ignition module that need
to be checked:
1) Some batteries have a plastic protective wrap
around them. (Do not confuse this plastic with
the battery label.) Check that this plastic wrap is
removed.
2) Confirm that the battery is installed correctly (C).
3) If the battery is old, replace it with a new battery.
Checking the Wires
There are two potential trouble spots that need to be
checked:
1) Check that the ignition wires are connected
securely to the terminals on the ignition button
under the control panel.
2) Make sure the ignition wires are properly attached
to the ignition module. The wire terminals are color
coded to correspond with the terminals on the
ignition module. The number of wires will vary per
model.
A
B
C
16
315 Igniter Module Wire Chart
1 342
3
1 4
Checking the Ground Wire
Models 310, 315 and 435 have a ground wire
connected to the manifold bracket. This is visible from
beneath the control panel (D):
2
1) Check that the ground wire is properly secured with
a screw.
D
Page 17
GAS FLOW
SYMPTOM
• Grill does not reach desired temperature or heatsunevenly.
• One or more of the burners fail to ignite.
• Flame is low when burner is on high position.
• Flames do not run the whole length of the burner.
• Burner flame pattern is erratic.
CAUSE SOLUTION
The “flow limiting device” has been activated.
Thissafety feature built into the regulator restricts
the gas flow in the event of a gas leak. You can
inadvertently activate this safety feature without
having a gas leak. This typically occurs when you
turn on the gas at the LP tank and one or more of the
control knobs are not in the o position. It may also
occur if you turn on the LP tank too quickly.
The LP tank is low or empty. Refill LP tank.
Fuel hose is bent or kinked. Straighten fuel hose.
Burner ports are dirty. Clean burner ports. Refer to “Cleaning the
Reset the “flow limiting device” by closing the LP
tank valve and turning all the burner control knobs
to the o position. Wait five minutes to allow
accumulated gas to dissipate, then ignite the grill
again following the instructions in the “Operation”
section.
BurnerPorts.”
Troubleshooting
Proper Burner Flame Pattern
The burners in your grill were factor y set for the
correct air and gas mixture. When the burners
are performing correctly, you will see a specific
flame pattern. The tips may occasionally flicker
yellow (A), with a descending light blue (B) to
dark blue flame (C).
A
B
C
SYMPTOM
• Gas is smelled in conjunction with burner flames that appear yellow andlazy.
CAUSE SOLUTION
Spider screens on the burners are obstructed. Clean spider screens. Refer to “Cleaning the Spider
Screens” in the Product Care section. Also refer to
the illustrations and information in this section about
proper flame pattern and spiderscreens.
SYMPTOM
• The smell of gas and/or a light hissing sound.
CAUSE SOLUTION
The internal rubber seal in the LP tank valve could be
damaged.
Inspect the rubber seal for damage. If damaged,
return tank to local retailer.
GREASY GRILL (Peeling Paint & Flare-Ups)
SYMPTOM
• Inside of lid appears to have the appearance of peelingpaint.
CAUSE SOLUTION
The flakes you see are accumulated cooking vapors
that have turned into carbon.
This happens over time after repeated use of your
grill. This is not a defect. Clean the lid. Refer to the
“Product Care” section.
Spider Screens
The combustion air openings of the burners(D)
are fitted with stainless steel screens to
prevent spiders and other insects from spinning
webs and building nests inside the burners.
Additionally, dust and debris can accumulate
on the outside of the spider/insect screen and
obstruct the oxygen flow to the burners.
D
SYMPTOM
• Experiencing flare-ups when grilling or preheating.
CAUSE SOLUTION
There is leftover food from the previous meal. Always preheat the grill on the highest setting for 10
to 15 minutes.
The inside of the grill needs to be cleaned thoroughly. Follow the steps in the "Cleaning and Maintenance"
section to clean the grill inside from the top down.
m WARNING: Do not attempt to make any repair to gas carrying, gas burning, ignition components or
structural components without contacting Weber-Stephen Products LLC, Customer Service Department.
m WARNING: Failure to use genuine Weber-Stephen parts for any repair or replacement will void all
warranty protection.
m CAUTION: The burner tube openings must be positioned properly over the valve orifices.
CALL
CUSTOMER
SERVICE
If you are still experiencing any
problems, contact the CustomerService
Representative in your area using
the contact information on
weber.com.
17
Page 18

Grilling Guide
Grilling Guide
Type Thickness/Weight Approximate Total Grill Time
RED MEAT
¾ inch (19 mm) thick 4 to 6 minutes direct high heat
Steak: New York strip, porterhouse,
rib-eye, T-bone, and filet mignon
(tenderloin)
Flank Steak 1½ to 2 pounds (0,68 - 0,91 kg), ¾ inch (19 mm) thick 8 to 10 minutes direct medium heat
Ground Beef Patty ¾ inch (19 mm) thick 8 to 10 minutes direct medium heat
Tenderloin 3 to 4 pounds (1,36 -1,81 kg)
PORK
Bratwurst: fresh 3 ounce (85 g) link 20 to 25 minutes direct low heat
Chop: boneless or bone in
Ribs: baby back, spareribs 3 to 4 pounds (1,36 -1,81 kg) 1½ to 2 hours indirect medium heat
Ribs: country-style, bone in 3 to 4 pounds (1,36 -1,81 kg) 1½ to 2 hours indirect medium heat
Tenderloin 1 pound (0,45 kg)
POULTRY
Chicken Breast: boneless, skinless 6 to 8 ounces (170-226 g) 8 to 12 minutes direct medium heat
Chicken Thigh: boneless, skinless 4 ounces (113g) 8 to 10 minutes direct medium heat
Chicken Pieces: bone in, assorted 3 to 6 ounces (85-170 g)
Chicken: whole 4 to 5 pounds (1,81-2,27 kg) 1 to 1¼ hours indirect medium heat
Cornish Game Hen 1½ to 2 pounds (0,68-0,91 kg) 60 to 70 minutes indirect medium heat
Turkey: whole, unstued 10 to 12 pounds (4,54-5,44 kg) 2 to 2½ hours indirect medium heat
SEAFOOD
Fish, Fillet, or Steak: halibut,
red snapper, salmon, sea bass,
swordfish, and tuna
Fish: whole
Shrimp 1½ ounces (42,5 g) 2 to 4 minutes direct high heat
VEGETABLES
Asparagus ½ inch (12,7 mm) diameter 6 to 8 minutes direct medium heat
Corn
Mushroom
Onion
Potato
1 inch (25 mm) thick 6 to 8 minutes direct high heat
2 inches (5 cm) thick
¾ inch (19 mm) thick 6 to 8 minutes direct high heat
1¼ to 1½ inches (3,18 - 3,81 cm) thick
¼ to ½ inch (6,35-12,7 mm) thick 3 to 5 minutes direct medium heat
1 to 1¼ inches (25-31 mm) thick 10 to 12 minutes direct medium heat
1 pound (0,45 kg) 15 to 20 minutes indirect medium heat
3 pounds (1,36 kg) 30 to 45 minutes indirect medium heat
in husk 25 to 30 minutes direct medium heat
husked 10 to 15 minutes direct medium heat
shiitake or button 8 to 10 minutes direct medium heat
portobello 10 to 15 minutes direct medium heat
halved 35 to 40 minutes indirect medium heat
½ inch (12,7 mm) slices 8 to 12 minutes direct medium heat
whole 45 to 60 minutes indirect medium heat
½ inch (12,7 mm) slices
14 to 18 minutes sear 6 to 8 minutes direct high heat,
then 8 to 10 minutes indirect high heat
45 to 60 minutes 15 minutes direct medium heat, then
30 to 45 minutes indirect medium heat
10 to 12 minutes sear 6 minutes direct high heat, then
4 to 6 minutes indirect high heat
30 minutes sear 5 minutes direct high heat, then 25
minutes indirect medium heat
36 to 40 minutes 6 to 10 minutes direct low heat, then
30 minutes indirect medium heat
9 to 11 minutes parboil 3 minutes, then 6 to 8 minutes
direct medium heat
18
The cuts, thicknesses, weights, and grilling times above are meant to be guidelines. Factors such as altitude, wind, and outside temperature can aect cooking times.
Two rules of thumb: Grill steaks, fish fillets, boneless chicken pieces, and vegetables using the direct method for the time given on the chart (or to the desired doneness),
turning food once halfway through grilling time. Grill roasts, whole poultry, bone-in poultry pieces, whole fish, and thicker cuts using the indirect method for the time
given on the chart (or until an instant-read thermometer registers the desired internal temperature). Cooking times for beef and lamb use the USDA’s definition of
medium doneness unless otherwise noted. Before carving, let roasts, larger cuts of meat, and thick chops and steaks rest for 5 to 10 minutes after cooking. The internal
temperature of the meat will rise by 5 to 10 degrees during this time.
The Bluetooth® word mark and logos are register ed
trademarks owned by Bluetooth SIG, Inc. and any use
© 2018 Designed and engineered Weber-Stephen Products L LC,
1415 S. Roselle Road, Pal atine, Illinois 60067 (EE. UU.).
of such marks by Weber-Stephen Products LLC is under
license. Other trademarks and trade names are those of
DON'T FORGET TO REGISTER
their respective owners.
Page 19

E315 • CSE315 • CSS315
MANUAL DEL PROPIETARIO LP
¡Descarga la app Weber Grills!
Sube a bordo con la app gratuita Weber Grills. La app Weber Grills es la respuesta
a tus dudas acerca de la cocina a la parrilla y contiene información acerca de todo:
desde la instalación del tanque de gas hasta tu primera sesión de asado al aire libre.
Personalízala según tu modelo exacto y tus gustos registrando tu asador. Para ello,
sólotienes que contestar unas cuantas preguntas sencillas.
• Ayuda para configurar tu asador
einstalar el tanque de gas
• Técnicas y guías de cocina a la parrilla
Guarda este manual del propietario para poder consultarlo en el futuro, léelo íntegramente y,
si tienes alguna duda, contacta hoy con nosotros.
• Temporizadores y herramientas
• Recetas para todos los gustos
• Menús/recetas de temporada
esMX - Spanish
19
Page 20

20
¡Te damos la
bienvenida
a la familia
Weber!
Asegúrate de leer este
Bienvenido a Weber
manual del propietario y
descargar gratis la app
Weber Grills, y estarás
listo para cocinar de todo
en tu asador antes de
lo que imaginas. La app
WeberGrills es la respuesta
a todas tus dudas acerca
de la cocina a la parrilla.
Desde la instalación del
tanque de gas hasta las
mejores recetas, pasando
por la configuración de las
funciones personalizables,
úsala para emprender tu
viaje al calor de las llamas y
no mires atrás.
¡Gracias por elegir Weber!
Información importante
sobre seguridad
Los avisos encabezados por las palabras
PELIGRO, ADVERTENCIA y PRECAUCIÓN
se emplean a lo largo de este manual
del propietario para poner de manifiesto
información crítica e importante. Lea y
respete tales avisos para garantizar la
seguridad durante el uso y evitar posibles
daños materiales. Dichos avisos se
describen acontinuación.
m PELIGRO: Indica una situación peligrosa
que, de no evitarse, provocará muertes o
lesiones graves.
m ADVERTENCIA: Indica una situación
peligrosa que, de no evitarse, puede
provocar muertes o lesiones graves.
m PRECAUCIÓN: Indica una situación
peligrosa que, de no evitarse, puede
provocar lesiones leves o moderadas.
m PELIGRO
Si percibe olor a gas:
• Interrumpa el suministro
degas al aparato (asador).
•
Extinga las llamas prendidas.
• Abra la tapa.
•
Si el olor no se disipa,
manténgase alejado del
aparato (asador) y avise
inmediatamente a su
proveedor de gas o el
departamento de bomberos.
m ADVERTENCIA
• No guarde ni use gasolina
u otros líquidos o vapores
inflamables cerca de
este aparato (asador)
ocualquierotro.
• Evite guardar botellas
(tanques) de LP no
conectadas para su uso
cerca de este aparato
(asador) o cualquier otro.
SÓLO APTO PARA EL USO AL AIRE LIBRE.
LEA LAS INSTRUCCIONES ANTES DE USAR
ELAPARATO (ASADOR).
AVISO PARA EL INSTALADOR: Entregue
estas instrucciones al consumidor.
AVISO PARA EL CONSUMIDOR: Guarde estas
instrucciones para poder consultarlas en
elfuturo.
Instalación y montaje
m PELIGRO: Este asador no ha sido diseñado para
suinstalación en el interior o encima de vehículos
oembarcaciones recreativas.
m ADVERTENCIA: Se prohíbe el uso de este asador
a menos que estén instaladas todas las piezas
y el asador se haya montado de acuerdo con las
instrucciones de montaje.
m ADVERTENCIA: No instale este modelo de asador
enuna estructura empotrada o móvil.
m ADVERTENCIA: No modifique el aparato (asador).
El gas propano líquido no es un gas natural. La
conversión o el intento de uso de gas natural en
un equipo de gas propano líquido, o gas propano
líquido en un equipo de gas natural, no es seguro y
constituye un motivo de invalidación de la garantía.
• En Estados Unidos, la instalación debe tener lugar de
acuerdo con los códigos locales en vigor o, en ausencia
de códigos locales, de conformidad con las siguientes
normas, según corresponda: “National Fuel Gas Code,
ANSI Z223.1/NFPA 54, Natural Gas and Propane
Installation Code, CSA B149.1”; “Propane Storage and
Handling Code, B149.2”; o “Standard for Recreational
Vehicles, ANSI A119.2/NFPA 1192, CSA Z240 RV Series,
Recreational Vehicle Code”.
• En Canadá, la instalación de este asador debe cumplir
los requisitos establecidos por los códigos locales y/o
la edición más reciente de la norma “CAN/CSA-B149.2
(Propane Storage and Handling Code)”. En los casos en
los que se considera generalmente aceptable, estas
instrucciones no cumplen necesariamente los códigos
de instalación canadienses, en particular en relación
con la instalación de tuberías en tierra y bajo tierra.
• En México, si existen códigos locales en materia de
aparatos portátiles de gas, deberán cumplirse los
requisitos establecidos por la edición más reciente
dela Norma Oficial Mexicana (NOM).
• Si se emplea una fuente eléctrica externa (por ejemplo,
para alimentar un asador giratorio), esta deberá
conectarse eléctricamente a tierra de acuerdo con los
códigos locales o, en ausencia de códigos locales, de
conformidad con los códigos “National Electrical Code,
ANSI/NFPA 70” o “Canadian Electrical Code, Part 1,
CSA C22.1”.
Operación
m PELIGRO: El uso de este asador sólo debe tener
lugar al aire libre, en áreas bien ventiladas.
Se prohíbe el uso en garajes, edificios, pasajes
cubiertos, tiendas de campaña y otras áreas
cerradas, así como bajo tejados combustibles.
m PELIGRO: Se prohíbe el uso del asador en vehículos,
así como en las áreas de almacenamiento o carga
de los mismos. Lo anterior hace referencia a
automóviles, camiones, camionetas, minivans,
utilitarios deportivos, vehículos y embarcaciones
recreativos, etc.
m PELIGRO: Se prohíbe el uso del asador (incluidos sus
extremos superior, inferior, posterior y laterales) a
menos de 24 in (61 cm) de materiales combustibles.
m
PELIGRO: Mantenga el área destinada a la preparación
de alimentos libre de vapores y líquidos inflamables,
como gasolina, alcohol, etc., así como de materiales
combustibles.
m PELIGRO: Este aparato (asador) debe mantenerse
alejado de materiales inflamables de todo tipo
durante el uso.
m PELIGRO: No coloque la funda del asador ni ningún
otro objeto inflamable dentro o encima del espacio
de almacenamiento situado bajo el mismo durante
el uso del asador o mientras este se encuentre
caliente.
m PELIGRO: Si la grasa liberada por los alimentos
provocase un incendio, apague todos los
quemadores y mantenga la tapa cerrada hasta
quelas llamas se extingan.
m ADVERTENCIA: Las piezas al alcance del usuario
pueden estar muy calientes. Los niños deben
permanecer alejados del aparato.
m ADVERTENCIA: El consumo de alcohol,
medicamentos (bajo supervisión médica o no)
ydrogas ilegales puede afectar a la capacidad
delusuario para montar, desplazar, guardar y usar
el asador correctamente y con seguridad.
m ADVERTENCIA: Debe prestarse atención al asador
tanto durante el precalentamiento como durante
eluso. El uso de este asador exige precaución.
El compartimento de asado alcanza temperaturas
muy elevadas durante el uso.
m ADVERTENCIA: No desplace el aparato (asador)
durante el uso.
m ADVERTENCIA: Mantenga los cables de alimentación
eléctrica y las mangueras de suministro de
combustible alejados de las superficies calientes.
• Se prohíbe el uso de carbón o rocas de lava en
esteasador.
Almacenamiento y/o desuso
m ADVERTENCIA: Interrumpa el suministro de gas
cerrando la llave de la botella (tanque) de gas tras
eluso.
m ADVERTENCIA: Los tanques de LP deben
almacenarse al aire libre, lejos del alcance de los
niños, y no en edificios, garajes u otros espacios
cerrados.
m ADVERTENCIA: Tras un período de almacenamiento
y/o desuso, debe comprobarse el asador para
determinar si sufre fugas de gas u obstrucciones
en los quemadores antes del uso.
• El almacenamiento del asador en interiores sólo se
permite si el tanque de LP se desconecta del asador
yse extrae del mismo.
Propuesta 65 del estado de California
m ADVERTENCIA: Los productos derivados de la
combustión que tiene lugar durante el uso de este
producto contienen sustancias químicas que, según
el estado de California, provocan cáncer, defectos de
nacimiento y otras lesiones reproductivas.
m PROPUESTA 65 ADVERTENCIA: La manipulación de
las piezas de bronce que contiene este producto expone
al usuario al contacto con plomo, un elemento químico
que, según el estado de California, provoca cáncer,
defectos de nacimiento y otras lesiones reproductivas.
Lávese las manos tras manipular este producto.
Page 21

Bienvenido a Weber
Aplica solo a los clientes en México:
Debe leer esta guía del propietario antes de poner a
funcionar el asadorde gas.
m
PELIGRO:
Si huele a gas:
1. Cierre el suministro de
gas al artefacto.
2. Apague todas las flamas
cerrando la válvula
general de paso.
3. Abra la tapa.
4. No accione interruptores
eléctricos.
5. Llame inmediatamente a
la central de fugas o a su
proveedor de gas.
m
ADVERTENCIA:
• No almacene gasolina u
otros fluidos flamables en
la cercanía de su aparato.
• Ningún cilindro de gas
que no esté conectado
para su uso deberá
almacenarse cerca de
éste o cualquier otro
artefacto doméstico.
• No obstruir la salida de
los gases de combustión
del asador.
ÍNDICE
20 Bienvenido a Weber
Información importante sobre seguridad
22 La promesa de Weber
Garantía
23 Características
delproducto
GENESIS II: Características
Sistema de asado
24 Consejos y sugerencias
La llama: directa o indirecta
Qué hacer y qué no hacer al cocinar
a la parrilla
26 Primeros pasos
Información importante acerca del gas
LP y las conexiones de gas
Instalación de un tanque de LP yprueba
defugas
Rellenar o sustituir un tanque de LP
de alto desempeño
GS4
6. Una fuga de gas puede
provocar un incendio
o explosión que puede
resultar en lesiones
corporales serias o la
muerte, o daños a la
propiedad.
m
ADVERTENCIA:
• No debe utilizarse como
calefactor de ambiente.
• Mantener los alrededores
del aparato libres de
materiales combustibles,
gasolina y otros vapores o
líquidos flamables.
Este aparato no debe ser utilizado como calentador de
ambiente, sólo se debe utilizar para cocinar alimentos.
m
ADVERTENCIA:
Estos productos trabajan a una presión de 2,75 kPa.
3 Quemadores Principales de: 13 716 kJ/h
30 Operación
La primera vez que uses el asador
Cada vez que cocines a la parrilla
Encendido del asador
32 Mantenimiento
delproducto
Limpieza y mantenimiento
34 Resolución de problemas
36 Guía de cocina
alaparrilla
55 Piezas de repuesto
4 Quemadores Principales de: 12 661 kJ/h
Puede que las parrillas que aparecen en las ilustraciones de este manual del propietario difieran ligeramente de
las incluidas con el modelo adquirido.
21
Page 22

22
La promesa de WEBER
En WEBER estamos orgullosos de dos cosas: fabricar asadores que duran
yofrecer toda una vida de excelente atención al cliente.
Garantía
Gracias por adquirir un producto WEBER. WeberStephen Products LLC, 1415 S. Roselle Road, Palatine,
Illinois 60067, y sus delegaciones comerciales
de Norteamérica y Sudamérica (en adelante y en
conjunto, “WEBER”) se enorgullecen de fabricar
productos seguros, duraderos y confiables.
WEBER ofrece esta Garantía Voluntaria sin costo
adicional. Aquí encontrarás la información necesaria
si tu producto WEBER necesita reparación o
reemplazo, en el caso poco probable de que sufra una
La promesa de Weber
falla o defecto.
Según la legislación vigente, el Propietario posee
diversos derechos en caso de que el producto resulte
defectuoso. Tales derechos incluyen desempeño
complementario o reemplazo, rebaja del precio
de compra y compensación. Las cláusulas de esta
Garantía no afectan a tales derechos legales ni a
ningún otro. De hecho, esta Garantía proporciona al
Propietario derechos que van más allá de los que le
otorga la Garantía legal.
Garantía Voluntaria de WEBER
WEBER garantiza al comprador del producto WEBER
(o, en caso de que sea un regalo o promoción, la
persona para quien haya sido adquirido como regalo
o artículo promocional) (en adelante, el “Propietario”)
que este se encontrará libre de defectos de materiales
y mano de obra durante diez (10) años a partir de la
fecha de compra, siempre que el armado y uso del
mismo tengan lugar de acuerdo con el manual del
propietario que lo acompaña, quedando excluidos
el desgaste y deterioro normales del producto.
(Nota: En caso de pérdida o extravío del manual del
propietario del producto WEBER, es posible descargar
un reemplazo en www.weber.com). WEBER acepta,
en el marco de esta Garantía, reparar o sustituir las
piezas defectuosas en cuanto a materiales o mano
de obra, con las limitaciones y exclusiones descritas
a continuación. EN LA MEDIDA EN QUE LO PERMITA
LA LEGISLACIÓN APLICABLE, ESTA GARANTÍA SÓLO
SERÁ VÁLIDA PARA EL COMPRADOR ORIGINAL
Y NO PODRÁ TRANSFERIRSE A POSTERIORES
PROPIE TARIOS, EXCEPTO EN CASO DE REGALO O
ENTREGA COMO ARTÍCULO PROMOCIONAL, SEGÚN LO
DESCRITO ANTERIORMENTE.
WEBER respalda sus productos y ofrece con gusto la
Garantía descrita frente a defectos de materiales en
el asador o sus componentes, quedando excluidos el
desgaste y deterioro normales del producto.
• Se entienden por “desgaste y deterioro normales” los
deterioros estéticos e inmateriales que se deriven de
la propiedad prolongada del asador, como la oxidación
de superficies, las abolladuras/rayones, etc.
WEBER, no obstante, cumplirá sus obligaciones
según esta Garantía en relación con el asador y sus
componentes en caso de daño o disfunción como
consecuencia de defectos de materiales.
• Se entienden por “defectos de materiales” el
agrietamiento por corrosión o quemadura de ciertas
piezas, así como otros daños o fallas que impidan usar
el asador con seguridad/de un modo apropiado.
Responsabilidades del Propietario bajo
esta Garantía/situaciones no cubiertas
A fin de asegurar la debida cobertura de la Garantía,
es impor tante (aunque no obligatorio) registrar
el producto WEBER en www.weber.com. Deben
conser varse el recibo y/o la factura de compra
originales. Al registrar el producto WEBER, se
confirma la cobertura de la Garantía, se acelera el
procesamiento de las posibles reclamaciones en
Garantía y se establece un vínculo directo con WEBER
que el fabricante puede usar si necesita contactar
con el Propietario. Si no tuviste tiempo de registrar
tu asador antes de solicitar asistencia en Garantía,
recopila los siguientes datos antes de llamar:
nombre, domicilio, número de teléfono, correo
electrónico, número de serie, fecha de compra,
distribuidor, modelo, color y principal problema.
La Garantía anterior sólo será válida si el Propietario
cuida razonablemente del producto WEBER de acuerdo
con las instrucciones de armado, las instrucciones
de uso y las indicaciones de mantenimiento
preventivo descritas en el manual del propietario
que lo acompaña, a menos que el Propietario pueda
demostrar que la falla o el defecto no tiene relación
con el incumplimiento de tales obligaciones. Si el
producto se instala en una zona costera o cerca de
una alberca, el lavado y enjuague periódicos de las
superficies exteriores se considerarán parte del
mantenimiento, según lo descrito en el manual del
propietario.
Esta GARANTÍA no cubre piezas dañadas,
deterioradas, decoloradas y/u oxidadas por motivos
de los que WEBER no sea responsable y tengan su
origenen:
• Abuso, mal uso, alteración, modificación, uso indebido,
vandalismo, negligencia, armado o instalación
incorrectos, u omisión al llevar a cabo las labores
normales y rutinarias de mantenimiento.
• Insectos (como arañas) y roedores (como ardillas),
incluidos, entre otros, los daños en quemadores y/o
mangueras de gas.
• Exposición a atmósferas salinas y/o fuentes de cloro,
como albercas o tinas calientes/spas.
• Condiciones meteorológicas severas, como granizo,
huracanes, terremotos, tsunamis o temporales,
tornados o grandes tormentas.
• Lluvia ácida y otros factores ambientales.
El uso y/o la instalación de piezas no fabricadas
por WEBER en el producto WEBER es motivo de
invalidación de esta Garantía, que no cubrirá los daños
que resulten de tales acciones. Toda conversión de un
asador de gas no autorizada por WEBER y llevada a
cabo por un técnico autorizado por WEBER ocasionará
la invalidación de esta Garantía.
Procesamiento de la Garantía
Si crees que tienes una pieza cubierta por esta
Garantía, contacta con el servicio de atención al
cliente de WEBER usando la información de contacto
disponible en nuestro sitio web (www.weber.
com). Luego de llevar a cabo las investigaciones
que correspondan, WEBER reparará o sustituirá (a
decisión propia) la pieza defectuosa cubierta por esta
Garantía. En caso de que la reparación o sustitución
no sea posible, WEBER podrá (a decisión propia)
reemplazar el asador en cuestión por otro nuevo de
igual o mayor valor. Puede ser que WEBER te pida que
devuelvas las piezas afectadas para su inspección
(deberás cubrir los gastos de envío).
Antes de contactar con el ser vicio de atención al
cliente, recopila la siguiente información:
nombre, domicilio, número de teléfono, correo
electrónico, número de serie, fecha de compra,
distribuidor, modelo, color y principal problema.
Exenciones de responsabilidad
APARTE DE LAS GARANTÍAS Y EXENCIONES
DESCRITAS COMO PARTE DE ESTA DECL ARACIÓN
DE GARANTÍA, NO EXISTEN OTRAS GARANTÍAS
O DECLARACIONES VOLUNTARIAS DE
RESPONSABILIDAD EXPLÍCITAS, MÁS ALLÁ DE
LA RESPONSABILIDAD LEGAL APLICABLE A
WEBER. ASIMISMO, LA PRESENTE DECLARACIÓN
DE GARANTÍA NO LIMITA NI EXCLUYE AQUELLAS
SITUACIONES O RECLAMACIONES DE LAS QUE
WEBER DEBA HACERSE RESPONSABLE SEGÚN LO
PREVISTO EN LA LEY.
NO SE CONSIDERARÁ VÁLIDA NINGUNA OTRA
GARANTÍA UNA VEZ VENCIDA ESTA GARANTÍA DE
DIEZ (10) AÑOS. WEBER NO ASUMIRÁ NINGUNA
OTRA GARANTÍA (INCLUIDAS LAS “GAR ANTÍAS
AMPLIADAS”) OFRECIDA POR NINGUNA PERSONA,
DISTRIBUIDOR O AGENTE COMERCIAL, EN RELACIÓN
CON NINGÚN PRODUCTO. EL ÚNICO OBJETO DE ESTA
GARANTÍA ES LA REPARACIÓN O SUSTITUCIÓN DE
LA PIEZA O EL PRODUCTO EN CUESTIÓN.
ESTA GARANTÍA VOLUNTARIA NO CUBRIRÁ EN
NINGÚN CASO IMPORTES ECONÓMICOS SUPERIORES
AL PRECIO DE COMPRA DEL PRODUCTO WEBER
ADQUIRIDO.
EL USUARIO ASUME EL RIESGO Y LA
RESPONSABILIDAD DERIVADOS DE AQUELLAS
PÉRDIDAS, DAÑOS O LESIONES SUFRIDOS POR
AQUEL Y SU PROPIEDAD Y/U OTRAS PERSONAS Y
SUS PROPIEDADES, QUE SE DERIVEN DEL MAL USO
O ABUSO DEL PRODUCTO, O DE NO RESPETAR LAS
INSTRUCCIONES INCLUIDAS EN EL MANUAL DEL
PROPIETARIO QUE LO ACOMPAÑA.
LAS PIEZAS Y ACCESORIOS SUSTITUIDOS EN
EL MARCO DE ESTA GARANTÍA GOZ ARÁN DE UN
PERÍODO DE GARANTÍA EQUIVALENTE AL TIEMPO
RESTANTE DEL PERÍODO DE GARANTÍA ORIGINAL,
DE DIEZ (10) AÑOS.
ESTA GARANTÍA SÓLO ES VÁLIDA PARA EL USO EN
VIVIENDAS O DEPARTAMENTOS UNIFAMILIARES
PRIVADOS, NO ASÍ PARA ASADORES WEBER
DESTINADOS AL USO EN INSTALACIONES
COMERCIALES, COMUNITARIAS O DE UNIDADES
MÚLTIPLES, COMO RESTAURANTES, HOTELES,
COMPLEJOS TURÍSTICOS O PROPIEDADES DE RENTA.
PUEDE SER QUE WEBER MODIFIQUE EL DISEÑO DE
SUS PRODUCTOS CADA CIERTO TIEMPO. NINGUNA
DE LAS ESTIPULACIONES QUE CONTIENE ESTA
GARANTÍA DEBE CONSIDERARSE CONSTITUYENTE
DE UNA OBLIGACIÓN POR PARTE DE WEBER
DE INCORPORAR TALES CAMBIOS DE DISEÑO A
PRODUCTOS FABRICADOS ANTERIORMENTE; DEL
MISMO MODO, LA APLICACIÓN DE TALES CAMBIOS
NO CONSTITUIRÁ UNA ADMISIÓN DEL CARÁCTER
DEFECTUOSO DE LOS DISEÑOS ANTERIORES.
Weber-Stephen Products LLC
Centro de atención al cliente
1415 S. Roselle Road
Palatine, IL 60067
EE. UU.
Para adquirir piezas de repuesto, llama al teléfono:
1-800-446-1071
Para compras hechas en México / Para garantía
acudir / Importado por:
Weber-Stephen Products S.A. de C.V.
Anat ole France 139 -139A
Colonia. Polanco III Seccion
Del. Miguel Hidalgo
Ciudad de México
C.P. 11540
RFC: WPR030919-ND4
Para partes de repuesto llame a:
01800-00-WEBER (93237)
Para hacer efectiva esta garantía es necesario llame
por teléfono a los números indicados en este apartado
o presentarse en los establecimientos autorizados por
WEBER. Para hacer efectiva esta garantía no pueden
exigirse otros requisitos más que la presentación del
producto, la garantía vigente y comprobante de venta.
Puede que las parrillas que aparecen en las
ilustraciones de este manual del propietario difieran
ligeramente de las incluidas con el modelo adquirido.
Page 23
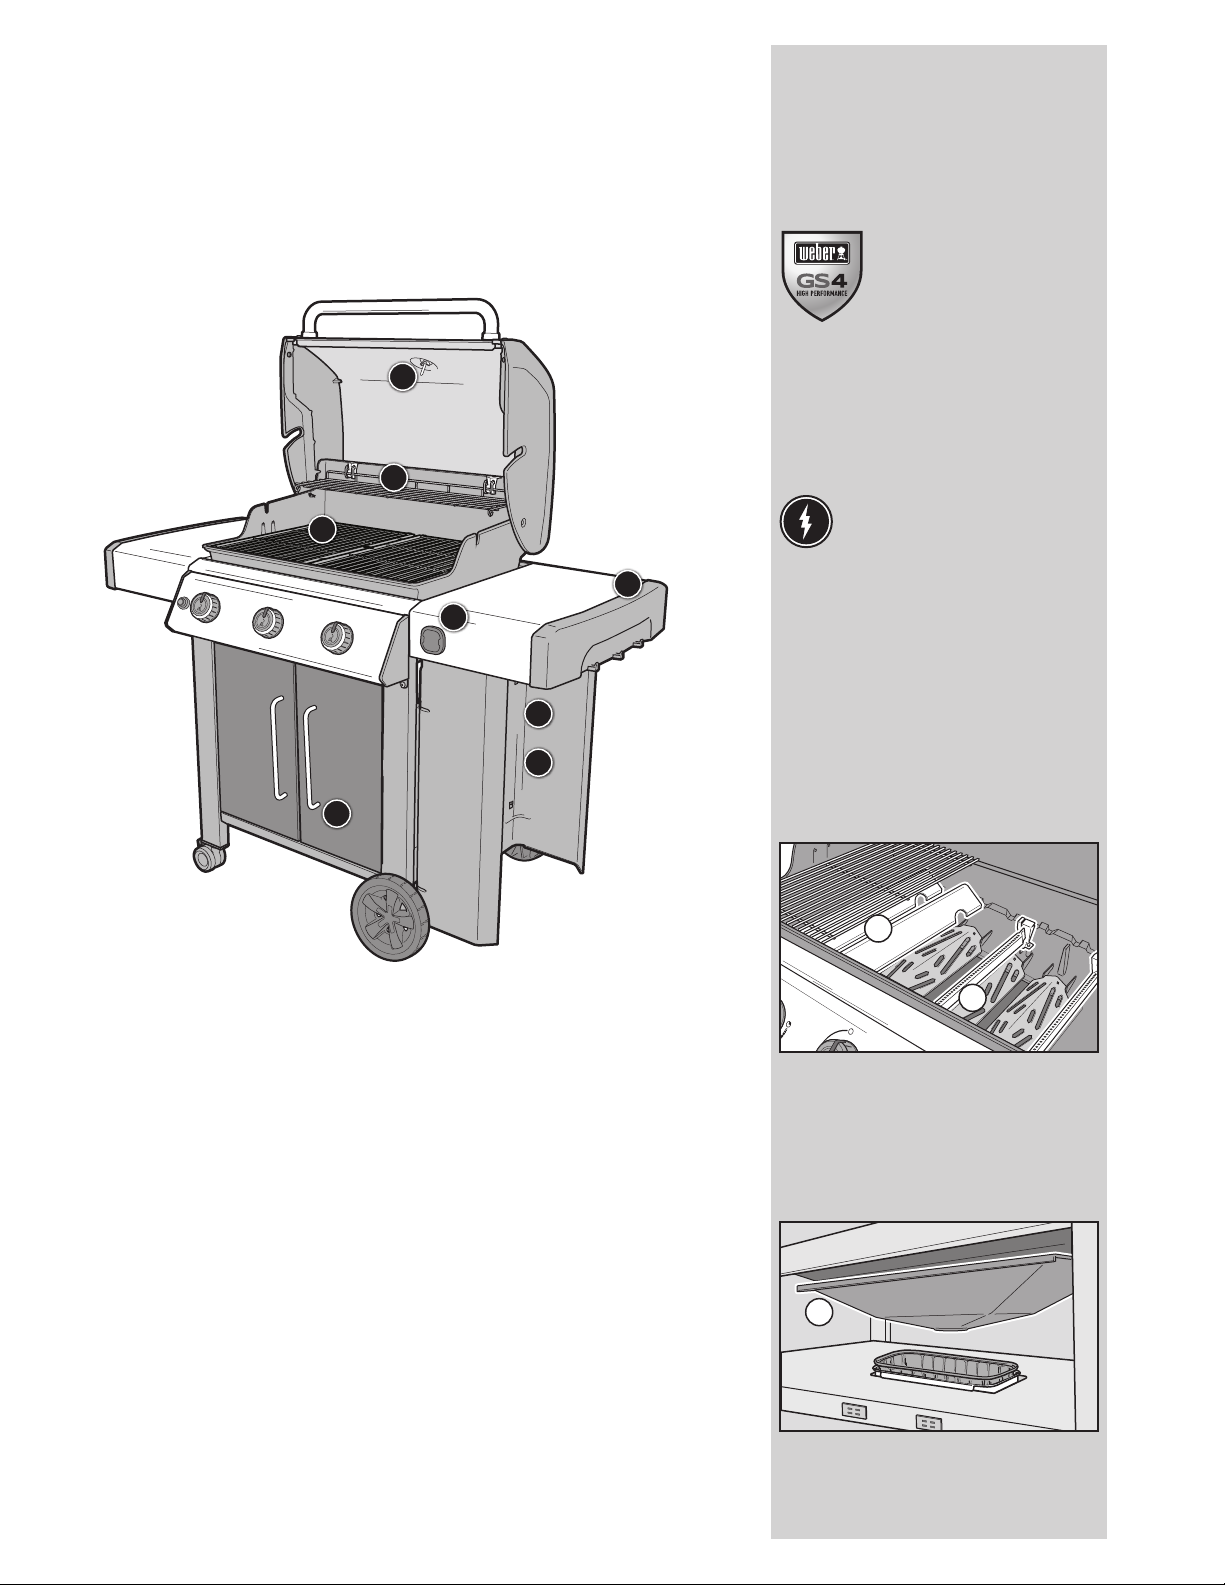
Características del producto
GENESIS II:
CARACTERÍSTICAS
A
B
C
E
F
G
H
SISTEMA DE
ASADO DE ALTO
DESEMPEÑO GS4
El sistema de asado de alto
desempeño GS4 es una referencia en
el mundo de los asadores de gas y
diferencia los equipos Weber de todos
los demás. Este potente sistema
experiencia en el campo de los asadores, avanzadas
técnicas de cocina y, aún más importante, los deseos
y necesidades de nuestra comunidad de parrilleros.
Todos los componentes del sistema de asado GS4
están cuidadosamente diseñados para facilitar su uso
y ofrecer un inigualable nivel de satisfacción en cuanto
a la experiencia de asado al aire libre.
1 Sistema de encendido INFINITY
D
2 Quemadores
Su exclusiva forma afilada proporciona un caudal
de gas constante desde delante hacia atrás. Esto
garantiza una distribución óptima del calor y
asegura que los alimentos se asen uniforme y
consistentemente, independientemente del lugar
delas parrillas de cocción en el que se pongan.
3 FLAVORIZER BARS
Las FLAVORIZER BARS de acero inoxidable forman
el ángulo perfecto para capturar los jugos, que
humean y crepitan al contacto con ellas para
aportar a los alimentos ese irresistible sabor
ahumado que todos conocemos y adoramos.
se basa en más de 65 años de
El sistema de encendido INFINITY
garantiza el encendido del asador.
Teloaseguramos: comenzarás a cocinar
siempre a la primera. Sin excepción.
A Termómetro integrado
Conocer la temperatura en el interior del asador te
permite ajustar el fuego cuando es necesario.
B Soporte para calentar TUCKAWAY
Mantiene los alimentos calientes y permite tostar
bollos mientras el plato principal termina de hacerse
en las parrillas de cocción. Pliégalo cuando no lo
necesites y ni siquiera notarás su presencia.
C Parrillas de cocción de hierro
fundidovitrificado
Las parrillas de cocción de hierro fundido vitrificado
distribuyen uniformemente el calor por toda la
superficie de cocción y se caracterizan por sus
excepcionales propiedades de retención térmica.
(Los modelos CSE-315 y CSS-315 cuentan conparrillas
de acero inoxidable).
D Mesas laterales con ganchos
portautensilios integrados
Usa las mesas laterales para tener las bandejas,
condimentos y herramientas siempre al alcance de tu
mano. Cuelga en los ganchos los utensilios que más
uses para acceder fácilmente a ellos y organizar tu
espacio de trabajo al aire libre.
E Compatible con iGRILL3
Junto con la app que lo acompaña, el termómetro
iGRILL 3 controla los alimentos de principio a fin,
mostrando al instante su temperatura en tu dispositivo
móvil. (Se vende por separado).
F Indicador de combustible
El indicador de combustible, de fácil lectura, se
encuentra junto al tanque de gas y te permite saber
cuánto combustible queda.
G Tanque de gas instalado a un lado
Al encontrarse fuera del asador, el acceso al tanque de
gas y su sustitución resultan más sencillos.
H Gabinete debajo del asador
El gabinete ubicado debajo del asador proporciona
espacio para guardar y proteger todas tus herramientas
y accesorios de asado indispensables.
3
2
4 Sistema de gestión de grasa
Los jugos que no se evaporan en las FLAVORIZERBARS
se recogen lejos de los quemadores, en la bandeja de
goteo desechable que protege el colector extraíble,
debajo del compartimento de asado. Sólo tienes
que sacar el colector y sustituir la bandeja de goteo
cuando sea necesario.
4
23
Page 24
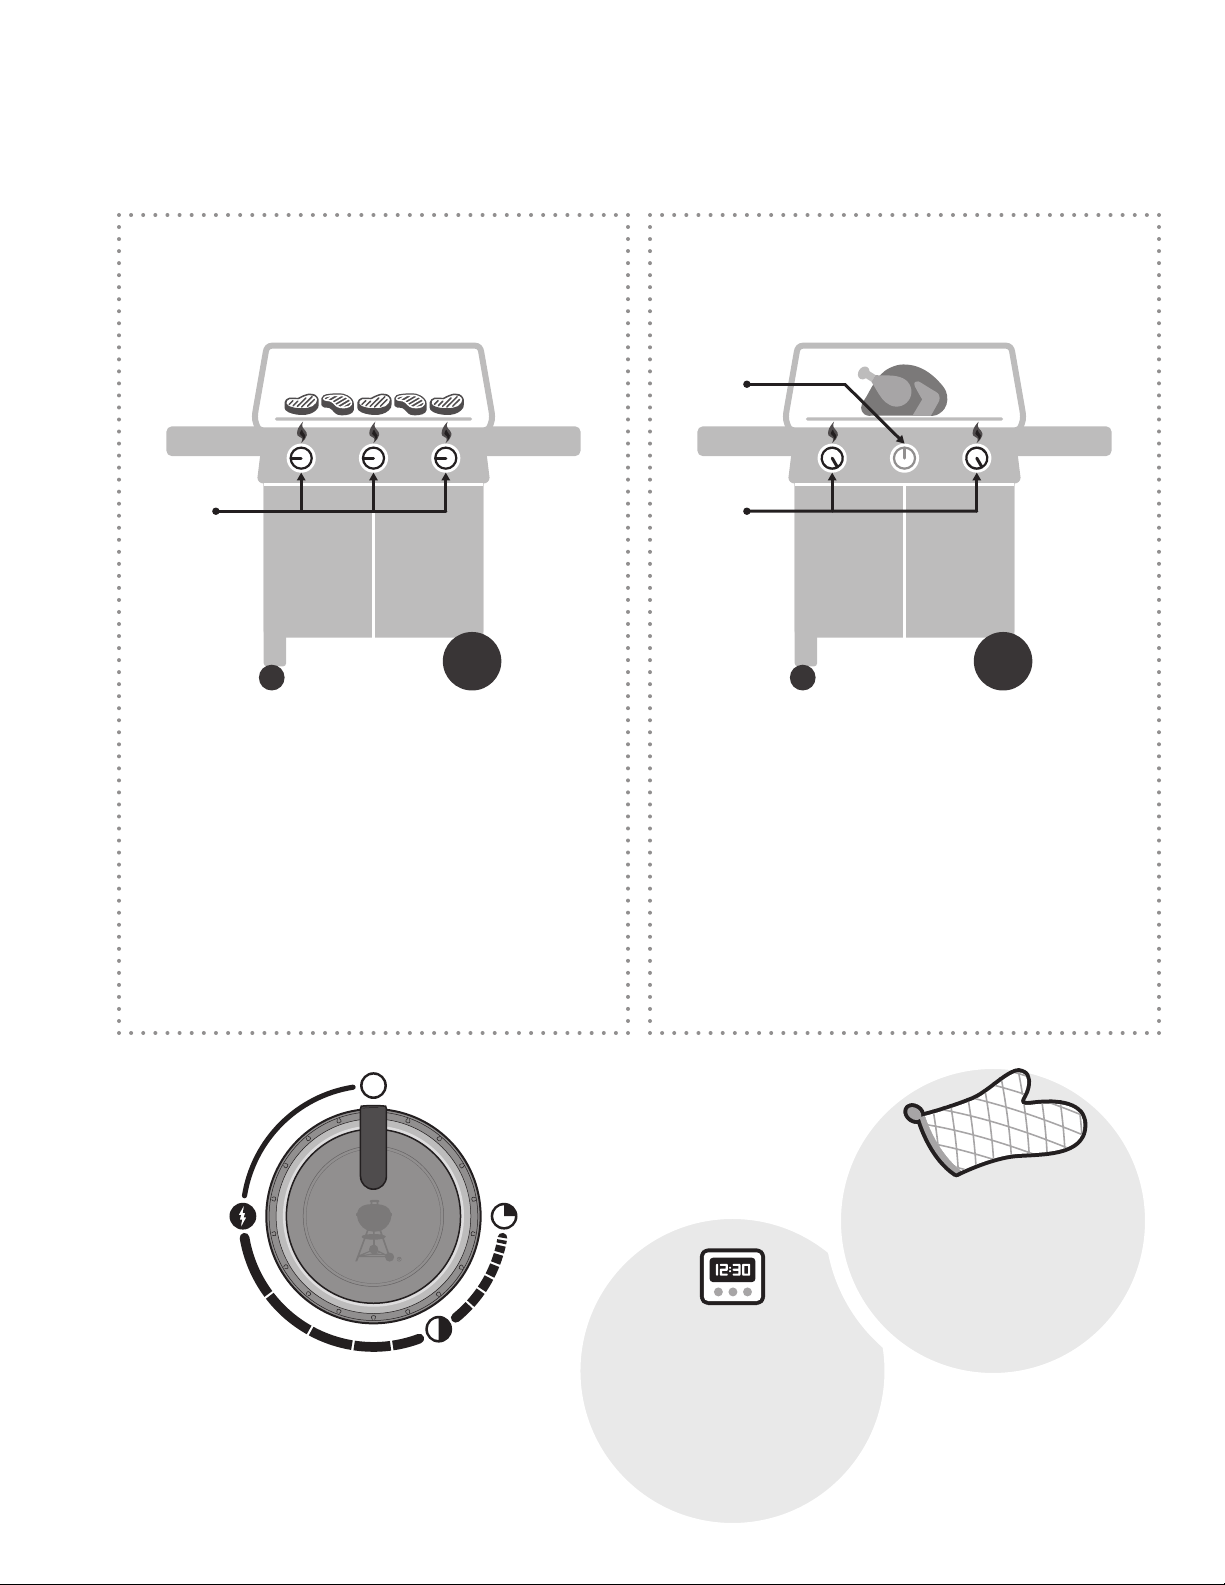
La llama:
directa o indirecta
Consejos y sugerencias
CONFIGURACIÓN PARA
CALOR DIRECTO
ALT O
Usa el método directo para cocinar alimentos tiernos de pequeño
tamaño que requieran menos de 20 minutos de cocción, como
hamburguesas, filetes, chuletas, kebabs, piezas de pollo sin
hueso, pescado en filetes, marisco y verduras en rodajas.
Con calor directo, el fuego se sitúa justo bajo el alimento.
La superficie se dora, se desarrollan los sabores y texturas,
ytiene lugar una deliciosa caramelización, mientras que el
alimento se cocina hasta el centro.
CONFIGURACIÓN PARA
CALOR INDIRECTO
APAGADO
MEDIO
Usa el método indirecto para cortes de carne más gruesos que
requieran un tiempo de cocción superior a 20 minutos o alimentos
tan delicados que la exposición directa al calor pudiera secarlos
o quemarlos, como asados, piezas de pollo con hueso, pescados
enteros, filetes de pescado delicados, pollos enteros, pavos o
costillas. El calor indirecto se puede usar también para acabar
alimentos muy gruesos o cortes con hueso previamente dorados
o tostados con calor directo.
El método indirecto permite repartir el calor por ambos lados de
la parrilla o concentrarlo sólo en uno de ellos. Coloca el alimento
en la parte de la parrilla de cocción que no esté encendida.
24
ENCENDIDO/ALTO
APAGADO
MEDIO
BAJO
A
D
S
A
L
•
L
I
R
R
A
P
S
U
T
A
R
A
P
S
E
L
B
I
D
TEMPORIZADOR
N
I
C
S
Evita la decepción de una cena
E
R
quemada usando un sencillo
P
temporizador. No necesitas nada
M
I
S
sofisticado, sólouno que sea
A
T
N
confiable yfácil de usar.
E
I
M
A
R
R
E
H
•
L
L
A
S
D
A
A
D
S
A
L
•
L
I
R
R
A
P
S
U
T
A
R
A
P
S
E
L
B
I
D
H
E
R
R
A
P
A
R
R
I
MANOPLAS DE
N
I
C
M
S
I
E
E
N
R
P
T
U
S
BARBACOA
T
A
S
En caso de duda, úsalas. Las mejores
M
I
I
M
S
están aisladas y protegen la
A
P
T
R
N
mano y el antebrazo.
E
E
I
S
M
A
C
R
R
I
E
N
D
I
B
L
E
S
P
A
R
A
H
•
H
E
R
R
A
M
I
E
N
T
A
S
I
M
P
R
E
S
C
I
N
D
I
B
L
E
S
P
A
R
A
T
U
S
P
A
R
R
I
L
L
A
S
D
A
Page 25
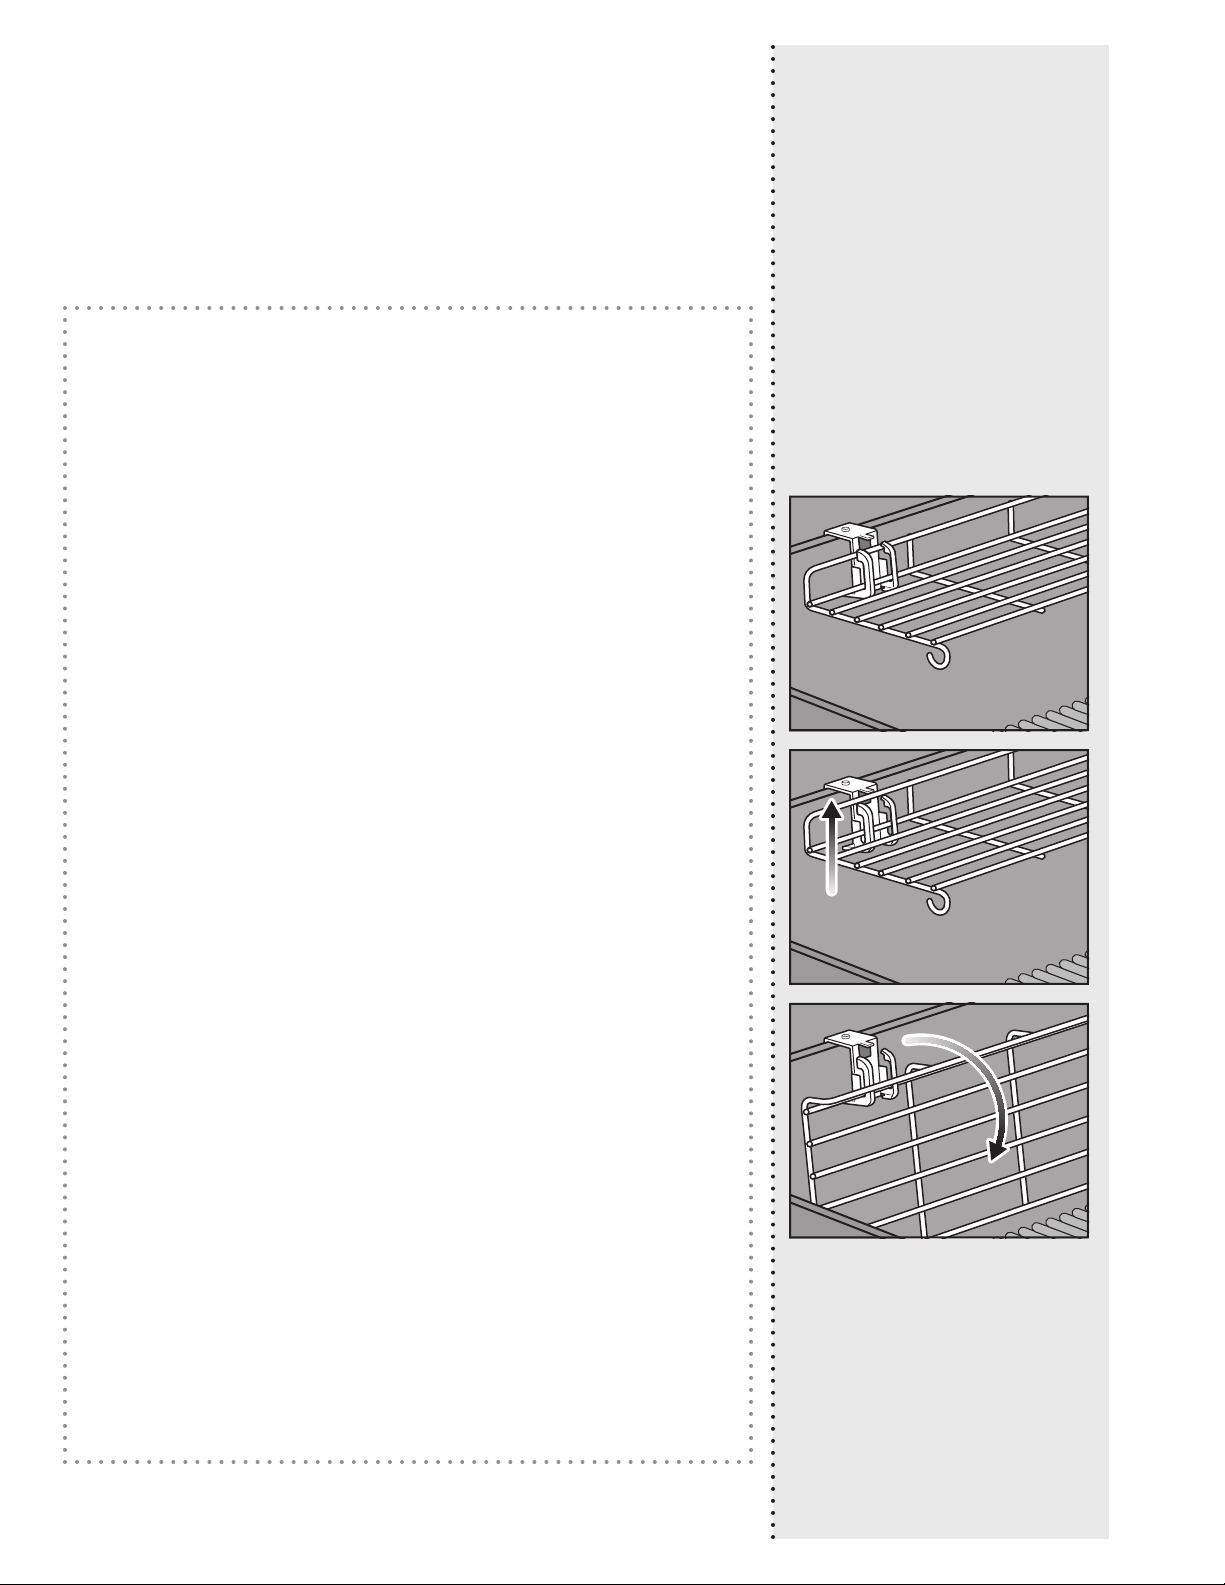
Consejos y sugerencias
Qué hacer y qué no
hacer al cocinar a
la parrilla
Precalienta siempre el asador
antes decocinar.
Si las parrillas de cocción no están lo
suficientemente calientes, los alimentos se
pegarán y no podrás dorar tus piezas de
carne ni disfrutar de esas atractivas marcas
de parrilla. Incluso aunque la receta indique
que debes cocinar a fuego medio o bajo,
precalienta antes el asador a fuego máximo.
Abre la tapa, sube el fuego, cierra la tapa y
deja que la parrilla de cocción se caliente
durante unos diez minutos o hasta que el
termómetro de la tapa indique 260 °C (500
°F).
No cocines en parrillas sucias.
Cocinar alimentos en una parrilla de cocción
sucia nunca es una buena idea. Los restos de
alimentos adheridos a las parrillas son como
pegamento y acaban adhiriéndose también
a los alimentos nuevos. Si no quieres
saborear la cena de ayer en el almuerzo de
hoy, asegúrate de borrar la pizarra antes
de empezar. Cuando las parrillas estén
calientes, usa un cepillo con cerdas de
acero inoxidable para limpiar y suavizar la
superficie.
Mantente presente.
Antes de encender el asador, asegúrate
de tener todo lo que necesites al alcance
del brazo. No olvides tus principales
herramientas de parrillada, los alimentos
ya engrasados y sazonados, los glaseados o
salsas que quieras usar, así como bandejas
limpias para la comida cocinada. Tener que
volver a la cocina no sólo significa perderse
parte de la diversión, sino que puede ser el
principio de una comida quemada. Los chefs
franceses llaman a esto mise en place (algo
así como “puesta en escena”). Nosotros lo
llamamos estar presente.
No cocines demasiados
alimentos ala vez.
Poner demasiada comida en las parrillas
de cocción limita tu flexibilidad. Mantén
despejada, al menos, una cuarta parte de las
parrillas de cocción, con espacio suficiente
entre los alimentos para introducir las pinzas
y moverlos con libertad. A veces, cocinar a la
parrilla requiere tomar decisiones en pocos
segundos, y para eso es fundamental poder
mover los alimentos de una zona a otra.
Ofrécete espacio suficiente para trabajar.
Mantén a raya tu curiosidad.
La tapa del asador no sólo sirve para
protegerlo de la lluvia.
También, y más importante, impide que entre
demasiado aire y que salga demasiado calor
y humo. Cuando la tapa está cerrada, las
parrillas de cocción están más calientes,
los alimentos se asan en menos tiempo, los
sabores ahumados son más intensos y se
producen menos llamaradas. ¡Así que pon
la tapa!
Voltea una sola vez.
¿Hay algo mejor que una jugosa pieza de
carne con marcas profundas y preciosos
bordes caramelizados? La clave para
conseguir esos resultados es no tocar el
alimento. A veces sentimos la tentación de
voltear los alimentos antes de que alcancen
el nivel deseado de color y sabor. En casi
todos los casos, no hace falta voltear los
alimentos más de una vez. Si lo haces
más veces, probablemente también estés
abriendo la tapa con demasiada frecuencia,
dando lugar a otros problemas. Da un paso
atrás y confía en tuasador.
Controla tu fuego interior.
A veces, lo más importante al cocinar a la
parrilla es saber cuándo parar. La forma
más confiable de comprobar si un alimento
está hecho es consultar el termómetro. Esta
pequeña joya te permitirá determinar el
momento justo para servir.
No tengas miedo de
experimentar.
En la década de 1950, cocinar a la parrilla
significaba una única cosa: carne (y sólo
carne) carbonizada sobre una llama abierta.
Los chefs modernos no necesitan una cocina
para preparar una comida completa. Usa tu
asador para cocinar aperitivos, guarniciones
e incluso postres. Registra tu asador y recibe
contenidos especiales e ideas que seguro
disfrutarás poniendo en práctica.
Nos encantará acompañarte en tus
aventuras alaparrilla.
Optimiza
el espacio
alrededor de
tu asador
Uso del soporte para calentar
TUCKAWAY
Usa el soporte para calentar para mantener los
alimentos calientes y pliégalo cuando termines
de usarlo. Para plegar el soporte para calentar,
levántalo un poco y gíralo hacia abajo. Usa
manoplas o guantes resistentes al calor al ajustar
el soporte.
25
Page 26
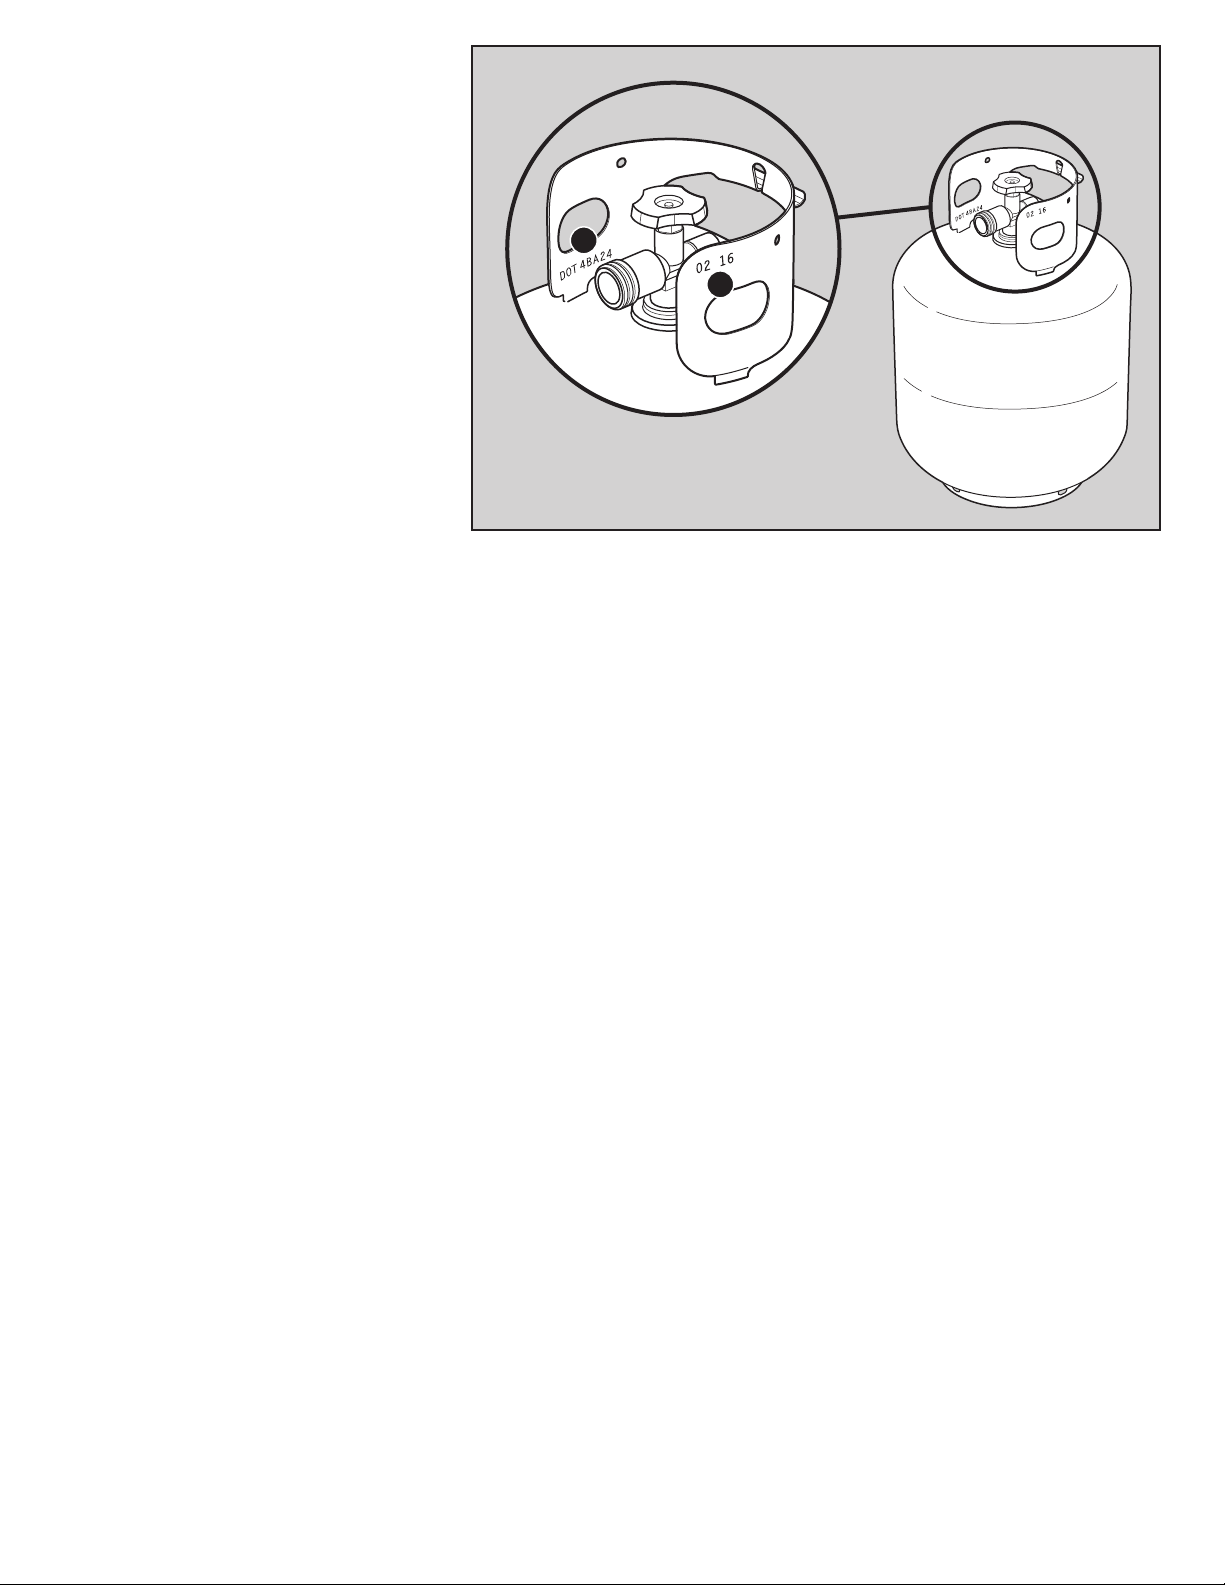
Información importante
acercadel gas LP y las
conexiones de gas
¿Qué es el gas LP?
El gas licuado de petróleo, también conocido como
LP, gas LP, propano líquido o, simplemente, propano
o butano, es un producto inflamable con base de
petróleo que debes usar como combustible para
tu asador. A temperaturas y presiones moderadas,
fuera de un contenedor, es un gas. Sin embargo, a
presiones moderadas dentro de un contenedor (como
un tanque), el LP es un líquido. Conforme se libera la
presión del tanque, el líquido se evapora rápidamente,
Primeros pasos
convirtiéndose en gas LP.
Consejos de seguridad para la
manipulación de tanques de LP
• Los tanques de propano líquido abollados u oxidados
pueden representar un riesgo y deben ser comprobados
por tu proveedor de propano líquido. No uses tanques
de propano líquido cuya válvula esté dañada.
• Aunque un tanque de propano líquido parezca estar
vacío, puede que aún contenga gas, por lo que
debe transportarse y almacenarse tomando las
precauciones adecuadas.
• Los tanques de LP deben instalarse, transportarse
y almacenarse en posición vertical y fija. Evita que
puedan caerse y no los manipules con brusquedad.
• No almacenes ni transportes un tanque de LP en
lugares en los que la temperatura pudiera alcanzar
los125 °F (51.7 °C) (el tanque se calentaría demasiado
como para sujetarlo con la mano).
• Coloque una tapa antipolvo a la salida de la válvula
del tanque cuando este no se encuentre en uso. En la
salida de la válvula del tanque, solamente instale el
tipo de tapa antipolvo que viene provisto con la válvula
del tanque. Otros tipos de tapas o tapones podrían
resultar en fugas de propano.
Requisitos que debe cumplir
un tanque de LP
• El tanque debe medir, aproximadamente,
18¼pulgadas (46,35 cm) de altura y 12¼ pulgadas
(31,1 cm) de diámetro. Asimismo, debe poseer una
capacidad de 20 libra (9,07 kg) de gas LP o 47.6 libra
(21,6 kg) de agua, según lo indicado por el fabricante.
Puede que sea aceptable también el uso de otros
tanques, siempre que sean compatibles con los
medios de retención delasador (báscula del tanque).
• El tanque debe haber sido fabricado y estar marcado
de acuerdo con las especificaciones establecidas
por las siguientes normas, según corresponda:
“Specifications for LP gas Cylinders of the U.S.
Department of Transportation (D.O.T.)”; o “Canadian
Standard for Cylinders, Spheres and Tubes for
Transportation of Dangerous Goods and Commission,
CAN/CSA-B339”.
• Los tanques deben equiparse con un dispositivo
homologado de protección de sobrellenado (OPD) y una
conexión de tanque de Tipo 1 (CGA 810). La conexión de
tanque debe ser compatible con la conexión del asador.
• El tanque debe incluir un collarín que proteja la válvula.
• Los tanques deben poseer certificación D.O.T. (A) y su
fecha de ensayo (B) no debe ser anterior a cinco años
desde la fecha de uso.
¿Qué es un regulador?
Tu asador está equipado con un regulador de presión,
que es un dispositivo destinado a controlar y mantener
uniforme la presión de gas mientras lo libera el tanque
de LP.
A
B
Requisitos que debe cumplir el regulador
• Usa el conjunto formado por el regulador y la manguera
suministrados con el asador. Este regulador posee un
dispositivo limitador de caudal integrado en la unidad
que restringe el caudal de gas en caso de detección de
una fuga de gas.
• La sustitución del conjunto formado por el regulador
yla manguera debe realizarse según lo especificado
por Weber-Stephen Products LLC (dispositivo de
conexión a tanque de Tipo 1 con homologación UL
(CGA 810), según lo descrito en la última edición de
lanorma ANSIZ21.81).
26
Page 27

Instalación de un tanque
de LP y prueba de fugas
Lugar de instalación
Cuelga el tanque de la báscula situada fuera de la base
del gabinete, bajo la mesa lateral derecha. La forma
del collarín (la placa circular que protege la válvula)
determina las dos direcciones en las que se puede
colgar el tanque de la báscula (A).
Inspección del tanque
1) Comprueba que la válvula del tanque se encuentre
completamente cerrada. Ciérrala girándola en el
sentido de las agujas del reloj.
2) Comprueba que la válvula del tanque sea compatible
con el regulador (B).
3) Inspecciona la válvula del tanque, incluido el sello
de caucho interno, en busca de daños o residuos (C).
Si detectas algún daño en el tanque, devuélvelo a tu
distribuidor local.
Instalación del tanque
1) Comprueba que los mandos de los quemadores
estén todos en la posición de cierre . Asegúrate
presionando los mandos y girándolos en el sentido
de las agujas del reloj.
2) Afloja la tuerca manual y gira el seguro del tanque (D).
3) Cuelga el tanque de la báscula (E).
4) Gira de nuevo el seguro del tanque. Aprieta la tuerca
manual.
5) Enrosca el acoplamiento del regulador en la válvula
del tanque girándolo en el sentido de las agujas
del reloj (F). Hazlo sólo con la mano. Si usas una
llave, podrías dañar el acoplamiento del regulador
y provocar una fuga. Pasa a la sección PRUEBA DE
FUGAS DE GAS.
Primeros pasos
D
A
E
B
C
F
27
Page 28

28
¿Qué es una prueba de fugas?
Una vez instalado correctamente el tanque de LP, es
necesario realizar una prueba de fugas. Una prueba
de fugas es una manera confiable de comprobar
que no existen escapes de gas después de conectar
el tanque. El sistema de combustible de tu asador
cuenta con conexiones que se realizan en la fábrica
ysuperan estrictas pruebas de detección de fugas de
gas; los quemadores, además, se someten a diferentes
pruebas de encendido de llamas. WEBER recomienda
llevar a cabo una prueba de fugas a profundidad
después de armar el asador, así como una vez al año.
Deben revisarse las siguientes uniones:
• Conexión entre el regulador y el tanque.
• Conexión entre la manguera de gas y el conector pasante.
Primeros pasos
• Conexión entre el conector pasante y el tubo corrugado
de gas.
Prueba de fugas de gas
1) Humedece las uniones (G) con una solución de agua
y jabón empleando un pulverizador, una brocha o
un trapo. Puedes hacer tu propia solución de agua
y jabón mezclando un 20 % de jabón y un 80%
de agua; también puedes adquirir una solución
de prueba de fugas en la sección de plomería de
cualquier tienda de bricolaje.
2) Lentamente, gira la válvula del tanque en sentido
contrario a las agujas del reloj para iniciar el
suministro de gas, comprobando al mismo tiempo
siaparecen burbujas.
3) Si aparecen burbujas, existirá una fuga:
a) Si la fuga está en el tanque (H), cierra la válvula
de gas. NO USES EL ASADOR. Desconecta el
tanque y devuélvelo a tu distribuidor local.
b) Si la fuga está en el regulador (I), cierra la válvula
de gas. NO USES EL ASADOR. Contacta con el
representante de atención al cliente de tu zona
usando la información de contacto disponible en
nuestro sitio web.
c) Si la fuga se encuentra en cualquiera de las
uniones indicadas en la ilustración (J), vuelve a
apretar la unión correspondiente con una llave y
realiza una nueva prueba de fugas con la solución
de agua y jabón. Si la fuga no desaparece, cierra
el suministro de gas. NO USES EL ASADOR.
d) Si la fuga se encuentra en cualquiera de las
uniones indicadas en la ilustración (K), cierra el
suministro de gas. NO USES EL ASADOR.
En caso de fuga, ponte en contacto con el
representante de atención al cliente de tu zona
usando la información de contacto disponible en
nuestro sitio web.
4) Si no aparecen burbujas, la prueba de fugas habrá
concluido.
a) Interrumpe el suministro de gas y enjuaga las
conexiones con agua.
NOTA: Ciertas soluciones de prueba de fugas, incluidas las
compuestas de agua y jabón, pueden resultar ligeramente
corrosivas, por lo que es importante enjuagar bien todas
las conexiones con agua después dela prueba.
G
J
H
K
I
m
PELIGRO: No use llamas para comprobar la
existencia de fugas. Asegúrese de que no se
generen chispas ni llamaradas en la zona
durante la prueba de fugas.
m
PELIGRO: Las fugas de gas pueden causar un
incendio o explosión.
m
PELIGRO: No use el asador si presenta alguna
fuga de gas.
m
PELIGRO: Si observa, huele o escucha un
escape de gas procedente del tanque de
propano líquido:
1. Aléjese del tanque de propano líquido.
2. No intente corregir el problema
personalmente.
3. Avise al departamento de bomberos.
m
PELIGRO: Cierre siempre la válvula del
tanque antes de desconectar el regulador. No
intente desconectar el conjunto formado por
el regulador de gas y la manguera ni otras
conexiones de gas con el asador enoperación.
m
PELIGRO: No guarde un tanque de LP de
repuesto bajo este asador o cerca del mismo.
No llene el tanque más del 80 %. El no acatar
estas advertencias al pie de la letra pudiera
resultar en un fuego letal o causar lesiones
serias.
Page 29

Rellenar o sustituir
untanquede LP
Primeros pasos
L
O
¿Cuánto combustible hay en el tanque?
La báscula indica la cantidad de combustible que
contiene un tanque estándar de 20 libra (9,07 kg) una
vez colgado de la misma. El nivel de combustible
se comprueba consultando la línea indicadora de
nivel roja de la báscula. Cuando la línea indicadora
se encuentra en el extremo superior, el tanque está
lleno (L). Cuando está en el extremo inferior, el tanque
está vacío (M) y es preciso retirarlo para sustituirlo
orellenarlo.
Retirada del tanque de LP
1) Comprueba que la válvula del tanque se encuentre
completamente cerrada. Ciérrala girándola en el
sentido de las agujas del reloj (N).
2) Desenrosca el acoplamiento del regulador
girándolo con la mano en sentido contrario a las
agujas delreloj (O).
3) Afloja la tuerca manual del seguro del tanque y aparta
el seguro del tanque.
4) Retira el tanque de la báscula.
Otras pruebas de fugas
Debe comprobarse la existencia de fugas de gas en las
siguientes uniones cada vez que se rellene y reinstale
un tanque:
• Conexión entre el regulador y el tanque (H), y uniones
del regulador (I) en sí.
Sigue las instrucciones descritas en la sección “Prueba
de fugas de gas”.
M
N
A
D
S
A
L
•
L
I
R
R
A
P
S
U
T
A
R
A
P
S
E
L
B
I
D
N
I
C
siliconaresistentes al calor y mango largo,
S
E
yuna brocha con cerdas largas de algodón
R
P
M
I
S
A
T
PINCEL
YBROCHA
Consigue un pincel con cerdas de
que absorban bien las salsas menos
densas con base de vinagre.
N
E
I
M
A
R
R
E
H
•
H
E
R
I
L
L
A
S
D
A
A
D
S
A
L
•
L
I
R
R
A
P
S
U
T
A
R
A
P
S
E
L
B
I
D
N
I
C
manos. Las mejores pinzas deben contar
S
E
R
P
M
I
S
A
R
R
A
M
I
S
P
A
R
T
E
N
T
A
S
I
M
P
R
E
S
C
I
N
D
I
B
L
E
S
P
A
R
A
T
U
A
R
A
P
S
E
L
B
I
D
N
I
Diseñadas para alimentos demasiado pequeños
C
S
E
o delicados para las parrillas de cocción,
R
P
M
I
S
A
T
PINZAS
Considéralas una prolongación de tus
conun mecanismo de tensión que no
cueste accionar, empuñaduras
confortables yun seguro que
N
permita guardarlas cerradas.
E
I
M
A
R
R
E
H
•
L
L
I
R
R
A
P
S
U
T
BANDEJA
PARA ASAR
lasbandejas para asar están perforadas
ymantienen los alimentos justo donde
deben estar: sobre la parrilla,
N
E
I
M
no dentro de ella.
A
R
R
E
H
•
H
E
R
R
A
M
I
E
N
T
A
S
I
M
P
R
E
S
C
I
N
D
I
B
L
E
S
P
A
R
A
T
U
S
P
A
R
R
I
L
L
A
S
D
A
A
D
S
A
•
H
E
R
R
A
M
I
E
N
T
A
S
I
M
P
R
E
S
C
I
N
D
I
B
L
E
S
P
A
R
A
T
U
S
P
A
R
R
I
L
L
A
S
D
A
29
Page 30

La primera vez
que uses el asador
Realiza una carbonización inicial
Calienta el asador a fuego máximo, con la tapa
cerrada, durante un mínimo de 20 minutos antes de
cocinar por primera vez.
Operación
Cada vez que cocines
a la parrilla
Mantenimiento entre comidas
El plan de mantenimiento entre comidas, sencillo
aunque importante, se compone de los pasos
descritos a continuación. Realízalos siempre antes
decocinar a la parrilla.
Grasa acumulada
Tu asador está equipado con un sistema de gestión de
grasa que la aleja de los alimentos y la deposita en un
contenedor desechable. Al cocinar, la grasa cae en la
bandeja de grasa extraíble hasta depositarse en una
bandeja de goteo desechable que encaja en el colector.
Este sistema debe limpiarse sin excepción antes de
usar el asador para evitar incendios.
1) Comprueba que el asador esté apagado y frío.
2) Retira la bandeja de grasa extraíble sacándola del
gabinete (A). Elimina el exceso de grasa con un
raspador de plástico.
3) Retira el colector (B). Comprueba si la bandeja
de goteo desechable que encaja en el colector
contiene una cantidad excesiva de grasa. Si es
necesario, desecha la bandeja de goteo desechable
ysustitúyela por una nueva.
4) Instala de nuevo todos los componentes.
Inspección de la manguera
Es necesario inspeccionar la manguera periódicamente.
1) Comprueba que el asador esté apagado y frío.
2) Comprueba si la manguera presenta signos de
agrietamiento o abrasión, o cortes (C). No uses el
asador si la manguera sufre algún tipo de daño.
A
D
EB
C
30
Precalentamiento del asador
Precalentar el asador es fundamental para el éxito
de cualquier comida. El precalentamiento contribuye
a evitar que los alimentos se peguen a la parrilla y la
calienta lo suficiente como para dorar correctamente
las piezas. También ayuda a carbonizar los residuos
de comidas anteriores.
1) Abre la tapa del asador.
2) Enciende el asador siguiendo las instrucciones de
encendido descritas en este manual del propietario.
3) Cierra la tapa.
4) Precalienta el asador manteniendo los mandos
de control de los quemadores en la posición de
encendido/fuego alto
hasta que el termómetro indique 500 °F (260 °C)(D).
durante 10-15 minutos o
Limpieza de las parrillas de cocción
Después de precalentar, será más fácil limpiar los
restos de alimentos y demás residuos generados por
el último uso del asador. Limpiar las parrillas evitará
también que la próxima comida se pegue.
1) Cepilla las parrillas empleando un cepillo con
cerdas de acero inoxidable inmediatamente
después de precalentar (E).
m PELIGRO: No forre de papel aluminio
la bandeja de grasa extraíble ni el
compartimento de asado.
m PELIGRO: Antes de cada uso, compruebe si se
ha acumulado demasiada grasa en la bandeja
de grasa extraíble o el colector. Elimine el
exceso de grasa para evitar que se incendie.
m ADVERTENCIA: Use manoplas o guantes de
barbacoa resistentes al calor durante el uso
del asador.
m ADVERTENCIA: Compruebe periódicamente
si sus cepillos metálicos presentan cerdas
sueltas o desgaste excesivo. Sustituya los
cepillos si encuentra cerdas desprendidas en
las parrillas de cocción o los propios cepillos.
Weber recomienda adquirir nuevos cepillos
con cerdas de acero inoxidable al principio
decada primavera.
m ADVERTENCIA: No use el asador si la
manguera sufre algún tipo de daño.
Sustitúyala sólo por una manguera de
repuesto autorizada por Weber.
m ADVERTENCIA: Mantenga las aberturas de
ventilación alrededor del tanque despejadas y
libres de residuos.
Page 31

Encendido del asador
Operación
Uso del sistema de encendido
electrónico para encender el asador
Cada mando de control acciona un quemador diferente
y cada quemador se enciende por separado. Enciende
los quemadores de izquierda a derecha. Todos los
quemadores deben permanecer encendidos durante
el precalentamiento, pero no es necesario que lo estén
al cocinar.
1) Abre la tapa del asador (A).
2) Comprueba que los mandos de los quemadores
estén todos en la posición de cierre
presionando los mandos y girándolos en el sentido
de las agujas del reloj (B).
Nota: Es importante que los mandos de control de
los quemadores se encuentren todos en la posición
de cierre antes de iniciar el suministro desde el
tanque de LP. Si no lo están, se activará el dispositivo
limitador de caudal integrado en el regulador, que
limitará el caudal de gas procedente del tanque de LP.
3) Abre el tanque de LP girando lentamente la válvula
del tanque en sentido contrario a las agujas del reloj
y espera 60 segundos (C).
Nota: Es importante abrir lentamente el tanque de LP.
Si se abre demasiado rápido, se activará el dispositivo
limitador de caudal integrado en el regulador, que
limitará el caudal de gas procedente del tanque de LP.
4) Comienza por el quemador situado más a la
izquierda. Presiona el mando de control del
quemador hacia dentro y gíralo en sentido
contrario a las agujas del reloj hasta la posición de
encendido/fuego alto
5) Mantén presionado el botón de encendido
electrónico (E). Oirás varios chasquidos.
6) Comprueba que el quemador esté encendido
mirando a través de las parrillas de cocción y la
abertura semicircular de las barras FLAVORIZER.
7) Si el quemador no se enciende, gira el mando de
control del quemador hasta la posición de cierre
y espera cinco minutos para que el gas se disipe
antes de intentar encender de nuevo el quemador.
8) Si el quemador se enciende, repite los pasos 4 a 6
para encender los demás quemadores.
Si los quemadores no se encienden mediante el
sistema de encendido electrónico, consulta la sección
RESOLUCIÓN DE PROBLEMAS. En ella encontrarás
instrucciones para encender el asador con un cerillo
ydeterminar así el origen exacto del problema.
(D).
. Asegúrate
Cómo apagar los quemadores
1) Presiona el mando de control de cada quemador
hacia dentro y gíralo en el sentido de las agujas del
reloj hasta la posición de cierre .
2) Interrumpe el suministro de gas desde el tanque
deLP.
A
E
BCD
A
B
D
E
C
m ADVERTENCIA: Mantenga abierta la tapa
durante el encendido.
m ADVERTENCIA: No se incline sobre el asador
durante el encendido o la preparación de
alimentos si la tapa está abierta.
m ADVERTENCIA: Cada quemador debe
encenderse por separado presionando el
botón de encendido electrónico.
m ADVERTENCIA: Si el encendido no tiene lugar
antes de cuatro segundos desde el intento
de encendido del primer quemador, coloque
el mando de control del quemador en la
posición de cierre. Espere cinco minutos para
que el gas acumulado se disipe y repita el
procedimiento de encendido.
31
Page 32

32
Limpieza y mantenimiento
Limpieza interior del asador
Con el tiempo, el desempeño del asador puede verse
afectado si no recibe los cuidados adecuados. Las
bajas temperaturas, el calor irregular y la adherencia
de los alimentos a las parrillas de cocción son señales
de que el asador requiere limpieza y mantenimiento.
Con el asador apagado y frío, comienza limpiando
el interior desde arriba hacia abajo. Se recomienda
realizar una limpieza completa, al menos, dos veces
al año. Si el asador recibe uso constante, puede que la
limpieza deba tener lugar cada tres meses.
Limpieza de la tapa
De vez en cuando, quizá descubras lo que parecen ser
“copos de pintura” dentro de la tapa. Durante el uso,
la grasa y los vapores se convierten poco a poco en
carbón y se acumulan en el interior del asador. Tales
depósitos acaban desprendiéndose y adquieren un
aspecto muy similar al de la pintura. Aunque no son
tóxicos, los copos pueden caer sobre los alimentos si
no limpias la tapa periódicamente.
1) Limpia la grasa carbonizada del interior de la
tapa empleando un cepillo con cerdas de acero
inoxidable (A). Para evitar la acumulación de
residuos, puedes limpiar el interior de la tapa con
toallas de papel después de cocinar, con el asador
Mantenimiento del producto
todavía templado (no caliente).
Limpieza de las parrillas de cocción
Si limpias las parrillas de cocción según lo
recomendado, apenas se acumularán residuos
enellas.
1) Con las parrillas instaladas, limpia los residuos
adheridos a las mismas con un cepillo con cerdas
de acero inoxidable (B).
2) Saca las parrillas y colócalas a un lado.
Limpieza de las barras FLAVORIZER
Las barras FLAVORIZER atrapan los jugos, que se
evaporan y crepitan al contacto con las mismas
para agregar sabor a los alimentos. Los jugos que
no se evaporan al entrar en contacto con las barras
FLAVORIZER se acumulan lejos de los quemadores.
Ello contribuye a evitar las llamaradas dentro del
asador e impide que los quemadores se obstruyan.
1) Raspa las barras FL AVORIZER con un raspador
deplástico(C).
2) Si es necesario, cepilla las barras FLAVORIZER
conun cepillo con cerdas de acero inoxidable.
3) Desmonta las barras FLAVORIZER y colócalas
aunlado.
Limpieza de los quemadores
Existen dos partes de los quemadores que son
fundamentales para su óptimo desempeño: los
puertos (pequeñas aber turas que sobresalen a lo
largo de los quemadores) y los filtros de arañas/
insectos, situados en los extremos. Mantener limpias
tales áreas es esencial para una operación segura.
Limpieza de los puertos de los quemadores
1) Usa un cepillo con cerdas de acero inoxidable para
limpiar los quemadores por fuera. Cepilla cada
quemador por encima, perpendicularmente a los
puertos de los quemadores (D).
2) Al limpiar los quemadores, evita dañar el electrodo
de encendido cepillando con cuidado a su
alrededor(E).
Limpieza de los filtros de arañas
1) Localiza los extremos de los quemadores bajo el
panel de control, donde se unen a las válvulas.
2) Limpia los filtros de arañas/insectos de cada
quemador empleando un cepillo con cerdas
blandas (F).
A
B
C
PIEZAS DE
REPUESTO
Para adquirir piezas de repuesto, ponte
en contacto con tu distribuidor
local o visita weber.com.
D
E
F
m
ADVERTENCIA: Apague el asador y espere
que se enfríe antes de realizar una limpieza
integral.
m
ADVERTENCIA: Con el tiempo, puede formarse
una película rugosa sobre las barras
FLAVORIZER. Se recomienda usar guantes para
manipularlas. No limpie las barras FLAVORIZER
ni las parrillas de cocción en un fregadero,
lavavajillas u horno con función de autolimpieza.
m
ADVERTENCIA: Al limpiar los quemadores,
nouse un cepillo que haya usado previamente
para limpiar las parrillas de cocción. No
introduzca objetos afilados en los orificios
delos puertos de los quemadores.
m
PRECAUCIÓN: No coloque los componentes
del asador en las mesas laterales; podrían
arañar la pintura o las superficies de acero
inoxidable.
m
PRECAUCIÓN: No use nada de lo siguiente para
limpiar el asador: abrillantadores de acero
inoxidable abrasivos, pinturas, productos
de limpieza que contengan ácido, alcoholes
minerales, xileno, productos de limpieza de
hornos, limpiadores abrasivos (limpiadores
decocina) o esponjas de limpieza abrasivas.
Page 33

Limpieza de los deflectores de calor
Situados bajo los quemadores, los deflectores de
calor distribuyen el calor uniformemente por el
compartimento de asado durante la cocción.
Mantener limpios los deflectores de calor mejora
eldesempeño del asador al cocinar.
1) Raspa los deflectores de calor con un raspador
deplástico (G).
2) Si es necesario, cepilla los deflectores de calor
conun cepillo con cerdas de acero inoxidable.
3) Desmonta los deflectores de calor y colócalos
a un lado.
Limpieza del compartimento de asado
Revisa el interior del compartimento de asado en
busca de grasa acumulada o restos de alimentos. La
acumulación excesiva de este tipo de residuos puede
causar un incendio.
1) Usa un raspador de plástico para raspar los
residuos de los laterales y la parte inferior del
asador, arrastrándolos hacia la abertura inferior
del compartimento de asado (H). Esta abertura
conduce los residuos hacia la bandeja de grasa
extraíble.
Limpieza del sistema de gestión de grasa
El sistema de gestión de grasa se compone de una
bandeja de grasa extraíble y un colector. Tales
componentes están diseñados para facilitar su
extracción, limpieza y sustitución, todos ellos pasos
fundamentales antes de prepararse para una
parrillada. Las instrucciones para inspeccionar el
sistema de gestión de grasa se recogen en la sección
MANTENIMIENTO ENTRE COMIDAS.
Limpieza exterior del asador
Por fuera, tu asador puede incluir superficies de
acero inoxidable, vitrificadas y de plástico. WEBER
recomienda los siguientes métodos en función del tipo
de superficie.
Limpieza de las superficies
de acero inoxidable
Limpia el acero inoxidable empleando un producto
de limpieza o un abrillantador de acero inoxidable no
tóxico ni abrasivo, diseñado para productos de uso al
aire libre y asadores. Usa una franela de microfibra y
limpia en la dirección de las vetas del acero inoxidable.
No uses toallas de papel.
Nota: No te arriesgues a arañar el acero inoxidable
empleando pastas abrasivas. Las pastas no limpian
ni pulen. Por el contrario, cambian el color del metal
eliminando el revestimiento de óxido de cromo.
Limpieza de los componentes pintados,
vitrificados y de plástico
Limpia los componentes pintados, vitrificados y de
plástico con agua tibia mezclada con jabón y toallas
de papel o una franela. Tras repasar las superficies,
enjuágalas y sécalas bien.
Limpieza exterior de asadores instalados
en entornos poco frecuentes
Si el asador se encuentra instalado en un entorno
particularmente severo, es probable que quieras
limpiarlo por fuera más a menudo. La lluvia ácida, los
químicos para piscinas y el agua salada pueden causar
corrosión super ficial. Limpia el exterior del asador
con agua tibia mezclada con jabón. Para concluir la
limpieza, enjuaga el asador y sécalo bien. Asimismo,
puedes aplicar semanalmente algún producto de
limpieza de acero inoxidable para evitar la corrosión
superficial.
Mantenimiento del producto
G
H
A
D
S
A
L
•
H
E
R
R
A
M
I
E
N
T
A
S
I
M
P
R
E
S
C
I
N
D
I
B
L
E
S
P
A
R
A
T
U
S
P
A
R
R
I
L
L
A
S
D
A
A
D
S
A
•
H
E
R
R
A
M
I
E
N
T
A
S
I
M
P
R
E
S
C
I
N
D
I
B
L
E
S
P
A
R
A
T
U
S
P
A
R
R
I
L
L
A
S
D
A
33
A
D
A
L
L
I
R
R
A
P
S
U
T
A
R
A
P
S
E
L
B
I
D
TERMÓMETRO
N
I
C
Pequeño y relativamente barato,
S
E
este componente es fundamental
R
P
para conocer rápidamente la
M
I
S
temperatura interna de la carne
A
T
N
al cocinarla a la parrilla.
E
I
M
A
R
R
E
H
•
S
A
L
I
R
R
A
P
S
U
T
A
R
A
P
S
E
L
B
I
D
N
I
C
S
E
R
P
S
•
H
E
R
R
A
M
I
E
N
T
A
R
A
T
U
S
P
A
R
R
I
L
L
A
D
S
E
L
B
I
D
N
I
C
S
E
R
P
BANDEJAS
DESECHABLES
M
Perfectas para cubrir el colector y hacer
I
S
más cómoda y sencilla la limpieza.
A
T
N
E
I
M
A
R
R
E
H
•
S
I
M
P
R
E
S
C
I
N
D
I
B
L
E
S
P
A
S
U
T
A
R
A
P
L
L
I
R
R
A
P
CEPILLO
METÁLICO
Imprescindible incluso antes de soñar con
una parrillada. Un cepillado rápido de las
parrillas calientes evitará que los restos
M
I
S
carbonizados de comidas pasadas
A
T
N
se adhieran a las comidas
E
I
M
A
presentes.
R
R
E
H
•
Page 34

EL ASADOR NO SE ENCIENDE
SÍNTOMA
• Un quemador no se enciende al seguir las instrucciones del sistema de encendido electrónico, descritas en la sección
“Operación” de este manual del propietario.
CAUSA SOLUCIÓN
Existe un problema relacionado con el caudal de gas.
Existe un problema relacionado con el sistema de
encendido electrónico.
Si el asador no se enciende, el primer paso es determinar si fluye gas hacia los quemadores. Para comprobarlo,
sigue las instrucciones descritas en la sección “Uso de un cerillo para determinar si fluye gas hacia los quemadores”.
Si el encendido con cerillo NO DA RESULTADO, sigue los consejos de resolución de problemas relacionados
con el caudal de gas, descritos en la página siguiente.
Si el asador no se enciende, el primer paso es determinar si fluye gas hacia los quemadores. Para comprobarlo, sigue
las instrucciones descritas en la sección “Uso de un cerillo para determinar si fluye gas hacia los quemadores”.
Si el encendido con cerillo DA RESULTADO, sigue las instrucciones descritas en la sección “Comprobación de
los componentes del sistema de encendido electrónico”.
Uso de un cerillo para determinar
si fluye gas hacia los quemadores
1) Abre la tapa del asador.
2) Comprueba que los mandos de los quemadores
Resolución de problemas
estén todos en la posición de cierre
presionando los mandos y girándolos en el sentido
de las agujas del reloj.
Nota: Es importante que los mandos de control de
los quemadores se encuentren todos en la posición
de cierre antes de iniciar el suministro desde el
tanque de LP. Si no lo están, se activará el dispositivo
limitador de caudal integrado en el regulador, que
limitará el caudal de gas procedente del tanque de LP.
3) Abre el tanque de LP girando lentamente la válvula
del tanque en sentido contrario a las agujas del
reloj y espera 60 segundos.
Nota: Es importante abrir lentamente el tanque de LP.
Si se abre demasiado rápido, se activará el dispositivo
limitador de caudal integrado en el regulador, que
limitará el caudal de gas procedente del tanque de LP.
4) Comienza por el quemador situado más a la
izquierda. Coloca un cerillo en el soporte para
cerillos y préndelo. (El soporte para cerillos se
encuentra situado bajo la mesa lateral derecha).
Inserta el cerillo encendido a través de las parrillas
de cocción y las barras FLAVORIZER, y colócalo
junto al quemador (A).
5) Presiona el mando de control del quemador
correspondiente y gíralo en sentido contrario
a las agujas del reloj hasta la posición de
encendido/fuego alto
6) Comprueba que el quemador esté encendido
mirando a través de las parrillas de cocción y la
abertura semicircular de las barras FLAVORIZER.
7) Si el quemador no se enciende antes de 4 segundos,
gira el mando de control del quemador hasta la
posición de cierre y espera cinco minutos para que
el gas se disipe antes de intentar encender de nuevo
el quemador. Si el nuevo intento no da resultado,
sigue las instrucciones de resolución de problemas
relacionados con el caudal de gas, descritas en la
página siguiente.
.
. Asegúrate
8) Si el quemador se enciende, el problema se
encuentra en el sistema de encendido. Sigue
las instrucciones descritas en la sección
“Comprobación de los componentes del
sistemadeencendido electrónico”.
9) Vuelve a colgar el soporte para cerillos bajo
lamesa lateral derecha (B).
Comprobación de los componentes
del sistema de encendido electrónico
Al presionar el botón de encendido, debes oír
varios chasquidos. Si no puedes oír los chasquidos,
comprueba la batería y, a continuación, los cables.
Comprobación de la batería
La batería que alimenta el módulo de encendido
puede presentar tres problemas que es necesario
comprobar:
1) Ciertas baterías poseen un envoltorio protector de
plástico a su alrededor (no debe confundirse con la
etiqueta de la batería). Asegúrate de haber retirado
el envoltorio de plástico.
2) Comprueba que la batería se encuentre correctamente
instalada (C).
3) Si la batería es antigua, sustitúyela por una
bateríanueva.
Comprobación de los cables
Los cables pueden presentar dos problemas que es
necesario comprobar:
1) Comprueba que los cables del módulo de encendido
estén bien conectados a los terminales del botón de
encendido, situados bajo el panel de control.
2) Asegúrate de que los cables del módulo de
encendido estén bien conectados al módulo de
encendido. Los terminales de los cables están
codificados por colores según los terminales del
módulo de encendido. El número de cables puede
variar en función del modelo.
A
B
C
34
Esquema de conexiones del módulo de encendido 315
3
1 4
1 342
Comprobación del cable de tierra
Los modelos 310, 315 y 435 cuentan con un cable de
tierra conectado al soporte del distribuidor. Dicho cable
se puede ver desde abajo del panel de control (D):
2
1) Revise que el cable de tierra se encuentre bien
sujeto con un tornillo.
D
Page 35

CAUDAL DE GAS
SÍNTOMA
• El asador no alcanza la temperatura deseada o se calienta de manera irregular.
• Uno o más de los quemadores no se encienden.
• Al colocar el mando de control del quemador en la posición de fuego alto, la llama
es muy débil.
• Las llamas no cubren toda la longitud del quemador.
• Las llamas del quemador forman un patrón errático.
CAUSA SOLUCIÓN
El “dispositivo limitador de caudal” se ha activado.
Esta función de seguridad integrada en el regulador
restringe el caudal de gas en caso de fuga de gas. La
activación puede producirse inadvertidamente, incluso
aunque no exista una fuga de gas. Normalmente, esto
sucede al iniciar el suministro de gas en el tanque de
LP y cuando uno o más de los mandos de control no
se encuentran en la posición de cierre. También puede
ocurrir si el tanque de LP se abre demasiado rápido.
El tanque de LP contiene poco gas o está vacío. Rellena el tanque de LP.
La manguera de combustible está doblada o torcida. Endereza la manguera de combustible.
Los puer tos del quemador están sucios. Limpia los puertos del quemador. Consulta la sección
SÍNTOMA
Restablece el “dispositivo limitador de caudal”
cerrando la válvula del tanque de LP y colocando
todos los mandos de control de los quemadores
en la posición de cierre . Espera cinco minutos
mientras el gas acumulado se disipa y enciende
de nuevo el asador siguiendo las instrucciones
descritas en la sección “Operación”.
“Limpieza de los puertos de los quemadores”.
Resolución de problemas
Aspecto de las llamas que
deben generar los quemadores
Los quemadores del asador se ajustan en
fábrica para que proporcionen la mezcla
correcta de aire y gas. Cuando los quemadores
operan correctamente, las llamas presentan un
aspecto específico. Como muestra la siguiente
ilustración, puede que se produzcan destellos
amarillentos en las puntas (A) de las llamas,
cuyo cuerpo debe ser de color azul claro por
arriba (B) y azul oscuro por abajo (C).
A
B
C
• Huele a gas y los quemadores producen llamas de aspecto débil y amarillento.
CAUSA SOLUCIÓN
Los filtros de arañas de los quemadores están
obstruidos.
Limpia los filtros de arañas. Consulta la sección
“Limpieza de los filtros de arañas” en el apartado
“Mantenimiento del producto”. Consulta también
las ilustraciones y la información descrita en esta
sección en relación con el aspecto que deben
presentar las llamas y los filtros de arañas.
SÍNTOMA
• Huele a gas y/o se escucha un ligero siseo.
CAUSA SOLUCIÓN
El sello de caucho interno del tanque de LP podría
estar dañado.
Comprueba si el sello de caucho presenta daños.
Si detectas algún daño en el tanque, devuélvelo a tu
distribuidor local.
ASADOR GRASIENTO (peladuras de pintura y llamaradas)
SÍNTOMA
• El interior de la tapa presenta lo que parecen ser peladuras de pintura.
CAUSA SOLUCIÓN
Los copos que puedes ver son en realidad vapores
acumulados que se han convertido en carbón.
SÍNTOMA
Esto sucede con el tiempo, tras el uso repetido del
asador, y no constituye un defecto. Limpia la tapa.
Consulta la sección “Mantenimiento del producto”.
Filtros de arañas
Las aberturas de aire para combustión de los
quemadores (D) cuentan con filtros de acero
inoxidable que impiden que las arañas y otros
insectos tejan telarañas y construyan nidos en
su interior. Los filtros de arañas/insectos pueden
impedir el flujo de oxígeno a los quemadores si
acumulan polvo y residuos por fuera.
D
• Se producen llamaradas al cocinar o precalentar el asador.
CAUSA SOLUCIÓN
Existen restos de alimentos cocinados anteriormente.
Es necesario realizar una limpieza completa del
interior del asador.
m
ADVERTENCIA: No intente reparar componentes destinados al transporte o la combustión de gas, el
encendido o el soporte estructural del asador sin contactar antes con el departamento de atención al
cliente de Weber-Stephen Products LLC.
m
ADVERTENCIA: La ejecución de reparaciones o sustituciones sin emplear piezas Weber-Stephen originales
dará lugar a la invalidación de la protección proporcionada por esta garantía.
m
PRECAUCIÓN: Las aberturas de los tubos de los quemadores deberán posicionarse correctamente sobre
los orificios de las válvulas .
Precalienta siempre el asador con todos los quemadores en
la posición de encendido/fuego alto durante 10-15 minutos.
Sigue los pasos descritos en la sección “Limpieza y
mantenimiento” para limpiar el asador de arriba abajo.
LLAMA
AL SERVICIO
DE ATENCIÓN AL
CLIENTE
Si sigues experimentando problemas,
ponte en contacto con el representante de
atención al cliente de tu zona usando
la información de contacto
disponible en weber.com.
35
Page 36

Guía de cocina a la barbacoa
Tipo de alimento Grosor/peso Tiempo de cocción total aproximado
CARNE ROJA
Filete: entrecot, Porterhouse,
costilla de ternera, T-bone y filet
mignon (solomillo)
Falda 1½ - 2 libras (0,68-0,90 kg), ¾ pulgada (19 mm) de grosor 8-10minutos fuego medio directo
Hamburguesa de ternera picada ¾ pulgada (19 mm) de grosor 8-10minutos fuego medio directo
Solomillo 3 - 4 libras (1,3-1,8 kg)
CERDO
Bratwurst: salchichas frescas Tira de 3 onza (85 g) 20-25minutos fuego bajo directo
Chuletas: sin hueso o con hueso
Costillas: costillar completo,
Guía de cocina a la parrilla
costillas sueltas
Costillas: estilo campestre, con
hueso
Solomillo 1 libra (0,454 kg)
POLLO
Pechuga de pollo: sin hueso, sin piel 6 to 8 onzas (170-226 g) 8-12minutos fuego medio directo
Muslo de pollo: sin hueso, sin piel 4 onzas (113 g) 8-10minutos fuego medio directo
Piezas de pollo: con hueso, surtidas 3 to 6 onzas (85-170 g)
Pollo: entero 4 to 5 libras (1,8-2,2 kg) 1-1¼horas fuego medio indirecto
Gallina de Cornualles 1½ to 2 libras (0,68-0,90 kg) 60-70minutos fuego medio indirecto
Pavo: entero, sin relleno 10 to 12 libras (4,5-5,4 kg) 2-2½horas fuego medio indirecto
MARISCO
Pescado, lomo o filete:
fletán, pargo rojo, salmón,
lubina, pez espada y atún
Pescado: entero
Gambas 1½ onzas (42,5 g) 2-4minutos fuego alto directo
VERDURA
Espárragos ½ inch (12,7 mm) de diámetro 6-8minutos fuego medio directo
Maíz
Setas
Cebolla
Patata
¾ pulgada (19 mm) de grosor 4-6minutos fuego alto directo
1 pulgada (25 mm) de grosor 6-8minutos fuego alto directo
2 pulgadas (50 mm) de grosor
¾ pulgada (19 mm) de grosor 6-8minutos fuego alto directo
1¼ - 1½ pulgadas (31-38 mm) de grosor
3 - 4 libras (1,3-1,8 kg) 1½-2horas fuego medio indirecto
3 - 4 libras (1,3-1,8 kg) 1½-2horas fuego medio indirecto
¼ to ½ pulgada (6,3-12,7 mm) de grosor 3-5minutos fuego medio directo
1 to 1¼ pulgadas (25,4-31,75 mm) de grosor 10-12minutos fuego medio directo
1 libra (0,454 kg) 15-20minutos fuego medio indirecto
3 libras (1,36 kg) 30-45minutos fuego medio indirecto
Con hojas 25-30minutos fuego medio directo
Sin hojas 10-15minutos fuego medio directo
Shiitake o champiñón 8-10minutos fuego medio directo
Portobello 10-15minutos fuego medio directo
En mitades 35-40minutos fuego medio indirecto
Rodajas de ½ inch (12,7 mm) 8-12minutos fuego medio directo
Entera 45-60minutos fuego medio indirecto
Rodajas de ½ inch (12,7 mm)
14-18minutos marcar 6-8minutos a fuego alto directo y,
después, mantener 8-10minutos afuego alto indirecto
45-60minutos 15 minutos a fuego medio directo y, después,
mantener 30-45minutos afuego medio indirecto
10-12minutos marcar 6minutos a fuego alto directo y,
después, mantener 4-6minutos afuego alto indirecto
30minutos marcar 5minutos a fuego alto directo y, después,
mantener 25minutos a fuego medio indirecto
36-40minutos marcar 6-10minutos a fuego bajo directo y,
después, mantener 30minutos afuego medio indirecto
9-11minutos escaldar 3minutos y, después, mantener
6-8minutos a fuego medio directo
36
Los cortes, grosores, pesos y tiempos de cocción anteriores son sólo directrices orientativas. Factores como la altitud, el viento y la temperatura exterior pueden afectar
a los tiempos de cocción. Dos reglas generales: cocine la carne, los lomos de pescado, las piezas de pollo sin hueso y las verduras empleando el método directo durante
el tiempo indicado en la tabla (o hasta conseguir el punto de cocción deseado), dando la vuelta al alimento a la mitad del tiempo de cocción; cocine los asados, los pollos
enteros, las piezas de pollo con hueso, los pescados enteros y los cortes más gruesos empleando el método indirecto durante el tiempo indicado en la tabla (o hasta que
el termómetro indique la temperatura interna deseada). Los tiempos de cocción indicados para la carne de ternera y cordero se corresponden con la definición de cocción
“al punto”, a menos que se indique lo contrario. Antes de trinchar, deje que sus asados, cortes grandes de carne, chuletas o filetes gruesos reposen durante 5-10minutos
después de cocinarlos. La temperatura interna de la carne aumentará unos 5-10grados en ese tiempo.
La marc a denominativa Bluetooth® y los logotipos asociados a la misma son
marcas comerciales registradas en propiedad de Bluetooth SIG, Inc.; el uso
© 2018 Diseñado y creado por Weber-Stephen Products LLC,
1415 S. Roselle Road, Pal atine, Illinois 60067 (EE. UU.).
de tales marcas por parte de Weber-Stephen P roducts LLC tiene lugar con
autorización. El resto de marcas y nombres comerciales pertenecen a sus
NO OLVIDES REGISTRARTE
respectivos propietarios.
Page 37

E315 • CSE315 • CSS315
MANUEL DU PROPRIÉTAIRE LP
Téléchargez l’application WeberGrills!
Pour commencer, profitez de l’application gratuite WeberGrills. L’application Weber
répondra à toutes vos questions en matière de cuisson sur le grill, et vous guidera
à chaque étape, de l’installation du réservoir à gaz à votre premier barbecue.
Personnalisez-la selon votre modèle (et vos goûts) en répondant à quelques
questionssimples afin d’enregistrer votre appareil.
• Réglage du barbecue et installation
duréservoir à gaz
• Guides et méthodes de cuisson
• Minuteries et outils
• Recettes pour tous les goûts
• Menus et recettes de saison
frCA - French CanadianLisez attentivement le présent manuel du propriétaire et conservez-le à titre de référence.
37
Page 38

38
Consignes de sécurité
importantes
Les mentions DANGER, AVERTISSEMENT
et PRUDENCE sont utilisées dans le
présent manuel afin de souligner des
éléments d’information particulièrement
importants. Lisez et respectez ces
consignes afin d’assurerla sécurité et de
prévenir les dommages matériels. Voici la
définition de chacune des mentions.
m DANGER: Indique une situation
dangereuse qui, si elle n’est pas évitée,
entraînera la mort ou des blessures
graves.
m AVERTISSEMENT: Indique une situation
dangereuse qui, si elle n’est pas évitée,
peut entraîner la mort ou des blessures
graves.
m PRUDENCE: Indique une situation
dangereuse qui, si elle n’est pas évitée,
peut entraîner des blessures mineures
oumodérées.
m DANGER
Bienvenue dans la famille Weber
S’il y a une odeur de gaz :
• Coupez l’admission de gaz
de l’appariel.
• Éteindre toute flamme nue.
• Ouvrir le couvercle.
• Si l’odeur persiste, éloignezvous de l’appareil et
appelez immédiatement le
fournisseur de gaz ou le
service d'incendie.
m AVERTISSEMENT
• Ne pas entreposer ni
utiliser de l’essence ni
d'autres vapeurs ou liquides
inflammables dans le
voisinage de l’appareil,
ni de tout autre appareil.
• Une bouteille de propane
qui n’est pas raccordée en
vue de son utilisation, ne
doit pas être entreposée
dans le voisinage de cet
appareil ou de tout autre
appareil.
UTILISATION À L’EXTÉRIEUR SEULEMENT.
LISEZ LES INSTRUCTIONS AVANT
D’UTILISER LEBARBECUE.
REMARQUE À L’INSTALLATEUR: Laissez
les présentes instructions au propriétaire.
REMARQUE AU PROPRIÉTAIRE: Conservez
ces instructions à titre de référence.
Installation et assemblage
m DANGER: Ce barbecue n’a pas été conçu pour
êtreinstallé sur un véhicule de plaisance ni sur
unbateau.
m AVERTISSEMENT: Utilisez ce barbecue uniquement
une fois que l’assemblage des pièces est terminé
conformément aux instructions d’assemblage.
m AVERTISSEMENT: N’installez pas ce barbecue dans
un espace encastré ni dans un aménagement sur
glissières.
m AVERTISSEMENT: Ne modifiez pas le barbecue.
Le propane liquide n’est pas du gaz naturel. Toute
tentative de conversion ou d’utilisation du gaz
naturel dans un appareil au propane liquide ou vice
versa est non sécuritaire et entraîne l’annulation de
la garantie.
• Aux États-Unis, l’installation doit être conforme aux
codes locaux en vigueur. En l’absence de codes locaux,
les codes applicables selon le type d’appareil sont
les suivants: le National Fuel Gas Code (ANSI Z223.1/
NFPA 54), le Natural Gas and Propane Installation Code
(CSA B149.1) ou le Propane Storage and Handling
Code (B149.2). Pour les véhicules de plaisance, les
codes sont: le Standard on Recreational Vehicles
(ANSIA119.2/NFPA 1192) et le Recreational Vehicle
Code (CSA Z240 RV Series).
• Au Canada, l’installation de ce barbecue doit être
conforme aux codes locaux en vigueur et à la version la
plus récente du Code de stockage et de manutention du
propane (CAN/CSA-B149.2). Les présentes instructions,
bien que généralement acceptables, ne respectent
pas nécessairement toutes les dispositions des codes
canadiens en matière d’installation, notamment quant
aux conduites hors terre et souterraines.
• Au Mexique, en l’absence de code local, vous devez
vous conformer à la plus récente version de la norme
ocielle mexicaine (NOM).
• Si une source électrique externe est utilisée (par
exemple, une rôtissoire), celle-ci doit être mise à la
terre conformément aux codes locaux en vigueur ou,
en l’absence de tels codes, au National Electrical Code
(ANSI/NFPA 70) ou au Code canadien de l’électricité, 1
partie, CSA C22.1.
Fonctionnement
m DANGER: Utilisez le barbecue à l’extérieur
seulement, dans un endroit bien aéré. Ne l’utilisez
pas dans un garage, un immeuble, un passage
recouvert, une tente ni tout autre endroit couvert
ou toute installation couverte de matériaux
combustibles.
m DANGER: N’utilisez pas le barbecue dans un véhicule
ni dans l’espace de rangement ou de stockage d’un
véhicule, quel qu’il soit. Cela comprend, sans toutefois
s’y limiter, les voitures, les camions, les voitures
familiales, les fourgonnettes, les utilitaires sport,
les véhicules de plaisance et les bateaux.
m DANGER: N’utilisez pas le barbecue à moins de
61cm (24po) de matériaux combustibles. Cette
distance doit être respectée au-dessus, en dessous,
à l’arrière et aux côtés de l’appareil.
m DANGER: Assurez-vous de l’absence de vapeurs
et de liquides inflammables (essence, alcool, etc.)
ainsi que de matériaux combustibles à proximité
de la zone de cuisson.
m DANGER: Lorsqu’il est en fonction, ce barbecue
doit être maintenu à distance de tout matériau
inflammable.
m DANGER: Ne placez pas de housse ni d’objets
inflammables sur le barbecue ou dans l’espace
de rangement sous le barbecue lorsque ce dernier
fonctionne ou est chaud.
m DANGER: En cas de feu de friture, fermez tous les
brûleurs et laissez le couvercle fermé jusqu’à ce que
le feu soit éteint.
m AVERTISSEMENT: Certaines parties accessibles
peuvent devenir très chaudes. Gardez les enfants
àdistance.
m AVERTISSEMENT: L’usage d’alcool, de médicaments
d’ordonnance ou sans ordonnance ainsi que de
drogues illégales peut altérer les capacités de
l’utilisateur et l’empêcher d’assembler, de déplacer,
de ranger ou d’utiliser le barbecue d’une manière
adéquate et sécuritaire.
m AVERTISSEMENT: Ne laissez jamais le barbecue
sans surveillance lorsqu’il est en préchauage ou
en fonction. Faites preuve de prudence lorsque vous
utilisez ce barbecue. L’ensemble du compartiment à
cuisson devient chaud durant la cuisson.
m AVERTISSEMENT: Ne déplacez pas le barbecue
lorsqu’il est en fonction.
m AVERTISSEMENT: Gardez tout cordon d’alimentation
électrique et tuyau d’alimentation en combustible à
l’écart des surfaces chauées.
• N’utilisez ni charbon de bois ni pierre de lave dans le
barbecue.
Entreposage et non-utilisation
m AVERTISSEMENT: Coupez l’alimentation en gaz
en fermant la bouteille de gaz (le réservoir) après
l’utilisation.
m AVERTISSEMENT: Les réservoirs de propane
liquide doivent être entreposés à l’extérieur, dans
un endroit hors de portée des enfants. Ils ne doivent
pas être entreposés dans un immeuble, un garage,
ni tout autre espace clos.
m AVERTISSEMENT: Avant d’utiliser le barbecue après
une certaine période d’entreposage ou de nonutilisation, assurez-vous qu’il n’y a aucune fuite de
gaz ni aucune obstruction des brûleurs.
• Vous pouvez entreposer le barbecue à l’intérieur
seulement si le réservoir de propane liquide est
déconnecté et retiré de l’appareil.
Proposition 65, Californie
m AVERTISSEMENT : Les sous-produits de la
combustion libérés lors de l’utilisation de cet
appareil contiennent des produits chimiques
re
reconnus par l’État de la Californie comme des
causes de cancer, d’anomalies congénitales ou
d’autres dangers pour le système de reproduction.
m PROPOSITION 65 AVERTISSEMENT : La manipulation
des composantes en laiton de cet appareil est
susceptible de vous exposer à du plomb, un produit
chimique reconnu par l’État de la Californie comme
une cause de cancer, d’anomalies congénitales ou
d’autres dangers pour le système de reproduction.
Lavezvous les mains après avoir manipulé cet appareil.
Page 39

Bonjour et bienvenue au
sein de la famille Weber!
Bienvenue dans la famille WeberBienvenue dans la famille Weber
TABLE DES MATIÈRES
38 Bienvenue dans la
famille Weber
Consignes de sécurité importantes
Veuillez vous assurer de lire le présent Guide d’utilisation
et de télécharger l’application gratuite WeberGrills afin
de commencer à cuisiner le plus rapidement possible.
L’application WeberGrills est la solution pour maîtriser l’art du
barbecue. Qu’il s’agisse de l’installation du réservoir à gaz, de
recettes ou de fonctionnalités personnalisables, l’application
est l’endroit où vous entamerez votre exploration du monde
desgrillades – et ne voudrez plus en ressortir.
Nous vous remercions d’avoir choisi Weber.
40 La promesse Weber
Garantie
41 Caractéristiques
del’appareil
GENESISII Caractéristiques
Système de
performance
42 Trucs et astuces
La cuisson directe ou indirecte
Les pratiques du barbecue
44 Pour commencer
Renseignements importants sur les
branchements de propane liquide et
de gaz
Installation du réservoir de propane
liquide et vérification des fuites
Remplissage ou remplacement
d’un réservoir de propane liquide
grillades haute
GS4
48 Fonctionnement
Première utilisation de votre
barbecue
À chaque utilisation de votre barbecue
Allumage du barbecue
50 Entretien de l’appareil
Nettoyage et entretien
52 Dépannage
54 Guide de cuisson
55
Pièces de remplacement
Le modèle de barbecue que vous avez acheté peut
diérer légèrement des illustrations dans le présent
manuel du propriétaire.
39
Page 40

La promesse WEBER
Tout le monde à WEBER est fier de fabriquer des barbecues durables et d’orir
un excellent service à la clientèle.
Garantie
Merci d'avoir acheté un produit WEBER. WeberStephen Products LLC, 1415 S. Roselle Road, Palatine,
Illinois 60067 et ses unités commerciales en Amérique
(«WEBER») sont fiers de vous orir un produit fiable,
durable et sécuritaire.
Cette garantie volontaire de la part de WEBER vous
est oerte sans frais supplémentaires. Elle contient
les renseignements dont vous aurez besoin pour faire
réparer ou remplacer votre produit WEBER dans le cas
La promesse Weber
improbable d'une défaillance ou d'un défaut.
En vertu des lois applicables, le propriétaire dispose
de plusieurs droits en cas de défectuosité du produit.
Parmi ces droits, notons le droit à un rendement
supérieur ou au remplacement, une remise sur le
prix d'achat et une compensation. Ces droits et les
autres droits légaux ne sont pas aectés par cette
disposition de garantie. En fait, la présente garantie
accorde des droits supplémentaires au propriétaire,
indépendamment des dispositions réglementaires de
la garantie.
Garantie de WEBER
WEBER garantit à l'acheteur d’un produit WEBER
(ou, s'il s'agit d'un cadeau ou d’une promotion, à la
personne pour laquelle il a été acheté comme cadeau
ou article promotionnel) (le « propriétaire »), que le
produit est exempt de défauts de matériel et de maind'œuvre pour dix (10) ans à compter de la date d'achat
lorsqu'il est assemblé et utilisé conformément au
manuel du propriétaire fourni, à l’exception de l’usure
normale. (Remarque : Si vous perdez votre mode
d’emploi WEBER, vous pouvez vous en procurer une
copie en ligne sur www.weber.com.) En vertu de cette
garantie, WEBER accepte de réparer ou remplacer la
pièce défectueuse en raison d’un vice de matériaux ou
de fabrication, soumis aux restrictions et exclusions
applicables énumérées ci-dessous. DANS LA
MESURE AUTORISÉE PAR LA LOI APPLICABLE, CET TE
GARANTIE N'EST ACCORDÉE QU'À L'ACHETEUR INITIAL
ET N'EST PAS TRANSFÉRABLE AUX PROPRIÉTAIRES
SUBSÉQUENTS, SAUF S’IL S’AGIT D’UN CADEAU OU
ARTICLE PROMOTIONNEL, TEL QU’EXPLIQUÉ CIDESSUS.
WEBER est fier de ses produits et vous ore la
garantie décrite pour les vices de matériaux sur la
grille ou toutes ses composantes, à l’exception de
l'usure normale.
• « L'usure normale » inclut la détérioration cosmétique
ou toute autre détérioration découlant de l’utilisation
de votre barbecue, tels que la rouille, les entailles et
rayures, etc.
Cependant, WEBER honorera cette garantie pour le
barbecue ou ses pièces lorsque le dommage ou le
dysfonctionnement résulte d'un défaut matériel.
• Les « vices de matériaux » incluent la rouille ou la
brûlure de certaines pièces, ou encore tout autre
dommage ou toute autre défaillance pouvant aecter
votre capacité à utiliser votre barbecue correctement
ou en toute sécurité.
Responsabilités du propriétaire en
vertu de la garantie et exclusions de la
garantie
Pour éviter tout problème lié à la garantie, il est
important (mais non obligatoire) d'enregistrer
votre produit WEBER en ligne au www.weber.com.
Veuillez également conserver votre facture d’achat.
L'enregistrement de votre produit WEBER confirme
la protection accordée par la garantie, permet
d'accélérer toute réclamation en vertu de la garantie,
et établit un lien direct entre vous et WEBER au cas
où nous aurions à vous joindre. Si vous n'avez pas
eu le temps d’enregistrer votre barbecue avant de
communiquer avec le service de garantie, veuillez
avoir sous la main les informations suivantes pendant
votre appel : Nom – Adresse – Numéro de téléphone –
Courriel – Numéro de série – Date d’achat – Vendeur
autorisé – Modèle – Couleur – Principal Problème
La garantie ci-dessus s'applique uniquement si le
propriétaire prend raisonnablement soin du produit
WEBER en suivant les consignes d'assemblage,
d'utilisation et d'entretien préventif dont il est fait
mention dans le manuel du propriétaire, sauf si le
propriétaire peut prouver que la défaillance ou le
défaut est survenu indépendamment du non-respect
des obligations mentionnées ci-dessus. Si vous vivez
dans une zone côtière ou que votre produit est installé
près d'une piscine, l'entretien inclut le nettoyage
et le rinçage régulier des surfaces extérieures, tel
qu’expliqué dans le mode d'emploi ci-joint.
Cette GARANTIE est annulée si les dommages,
la détérioration, la décoloration et la rouille sont
causéspar :
• L’utilisation abusive, la modification, le mauvais
usage, le vandalisme, la négligence, un assemblage
ou une installation inadéquat (e) ou toute négligence
concernant l’entretien régulier;
• Des insectes (comme des araignées) et rongeurs
(comme des écureuils), comprenant, sans s'y limiter,
tout dommage aux brûleurs ou conduites de gaz;
• L'exposition à l'air salin ou à des sources de chlore
comme des piscines, jacuzzi et spas;
• Des conditions météorologiques extrêmes comme la
grêle, un ouragan, un séisme, un tsunami, un raz-demarée, une tornade ou un orage violent;
• Les pluies acides et d'autres facteurs
environnementaux
En cas d'utilisation ou d’installation de pièces qui
ne sont pas authentiques sur votre produit WEBER,
cette garantie sera annulée par WEBER et aucun
dommage résultant ne sera couvert par celle-ci. Toute
conversion non autorisée d'un barbecue au gaz par
WEBER et eectuée par un technicien autorisé par
WEBER annulera cette garantie.
Traitement de la garantie
Si vous croyez qu'une pièce est couverte par cette
garantie, veuillez contacter le service à la clientèle
de WEBER dont les coordonnées sont achées sur
notre site web (www.weber.com). Après enquête,
WEBER réparera ou remplacera (à sa discrétion) toute
pièce défectueuse couverte par cette garantie. Si la
réparation ou le remplacement est impossible, WEBER
peut choisir (à sa discrétion) de remplacer le barbecue
en question par un nouveau, de valeur égale ou
supérieure. WEBER peut vous demander de retourner
les pièces pour inspection. Les frais d'expédition
doivent être prépayés par le propriétaire.
Veuillez avoir à portée de main les renseignements
suivants lorsque vous contactez le service à la
clientèle : Nom – Adresse – Numéro de téléphone –
Courriel – Numéro de série – Date d’achat – Vendeur
autorisé – Modèle – Couleur – Principal Problème
Avis de non-responsabilité
OUTRE LA GARANTIE ET LES CLAUSES DE
NON-RESPONSABILITÉ DÉCRITES DANS CETTE
DÉCLARATION DE GARANTIE, IL N'EXISTE
EXPLICITEMENT AUCUNE AUTRE GARANTIE OU
DÉCLARATION VOLONTAIRE DE RESPONSABILITÉ
FIGURANT ICI ALLANT AU-DELÀ DE LA
RESPONSABILITÉ LÉGALE APPLICABLE À WEBER.
LA PRÉSENTE DÉCLARATION DE GARANTIE NE
LIMITE NI N'EXCLUT LES SITUATIONS OU REQUÊTES
POUR LESQUELLES WEBER A UNE RESPONSABILITÉ
OBLIGATOIRE EN VERTU DE L A LÉGISLATION.
AUCUNE GARANTIE NE S'APPLIQUERA APRÈS LA
PÉRIODE DE DIX (10) ANS COUVERTE PAR CETTE
GARANTIE. AUCUNE AUTRE GARANTIE ACCORDÉE
PAR UN TIERS, Y COMPRIS UN DÉTAILL ANT OU
REVENDEUR, AU SUJET DE QUELQUE PRODUIT QUE
CE SOIT (COMME UNE « EXTENSION DE GARANTIE »),
N'ENGAGE WEBER. L'UNIQUE RECOURS EN VERTU
DE CET TE GARANTIE EST L A RÉPARATION OU LE
REMPLACEMENT DE LA PIÈCE OU DU PRODUIT.
LE RECOUVREMENT EN VERTU DE CETTE GARANTIE
VOLONTAIRE NE SERA EN AUCUN CAS SUPÉRIEUR
AU PRIX D'ACHAT DU PRODUIT WEBER VENDU.
VOUS DEVREZ ASSUMER LES RISQUES ET LA
RESPONSABILITÉ EN CAS DE PERTE, DE DOMMAGE,
OU DE BLESSURE OCCASIONNÉ(E) À VOUS ET VOS
BIENS ET/OU À D’AUTRES ET LEURS BIENS EN
RAISON D’UNE MAUVAISE UTILISATION OU D’UNE
UTILISATION ABUSIVE DU PRODUIT OU LE NONRESPECT DES INSTRUCTIONS FOURNIES PAR WEBER
DANS LE MANUEL DU PROPRIÉTAIRE FOURNI À
L’A CH AT.
LES PIÈCES ET ACCESSOIRES REMPLACÉS DANS LE
CADRE DE LA PRÉSENTE GARANTIE SONT GARANTIS
UNIQUEMENT POUR LE RESTE DES DIX (10) ANNÉES
D’ORIGINE DE LA PÉRIODE DE GARANTIE.
LA PRÉSENTE GARANTIE S'APPLIQUE UNIQUEMENT
À UNE UTILISATION DANS UN SEUL DOMICILE PRIVÉ,
UNE SEULE MAISON OU UN SEUL APPARTEMENT.
ELLE NE S'APPLIQUE PAS AUX BARBECUES WEBER
UTILISÉS DANS UN CONTEXTE COMMERCIAL,
COMMUNAL OU À PLUSIEURS UNITÉS, COMME
DES RESTAURANTS, HÔTELS, COMPLEXES OU
ÉTABLISSEMENTS LOCATIFS.
WEBER PEUT PARFOIS MODIFIER LA CONCEPTION
DE SES PRODUITS. AUCUN ÉLÉMENT DE CETTE
GARANTIE NE SAURAIT ÊTRE INTERPRÉTÉ COMME
UNE OBLIGATION POUR WEBER D'INCORPORER
CES MODIFICATIONS DE CONCEPTION DANS
DES PRODUITS FABRIQUÉS AUPARAVANT; CES
MODIFICATIONS NE POURRONT PAS NON PLUS
ÊTRE INTERPRÉTÉES COMME UN AVEU QUE
LES CONCEPTIONS PRÉCÉDENTES ÉTAIENT
DÉFECTUEUSES.
Weber-Stephen Products LLC
Centre de service à la clientèle
1415, S. Roselle Road
Palatine, IL 60067
ÉTAT S-UNIS .
Pour obtenir des pièces de remplacement,
composezle :
1-800-446-1071
PROTÉGEZ VOTRE
INVESTISSEMENT
Protégez votre barbecue des
éléments grâce àune housse
robuste de qualité supérieure.
40
Page 41

Caractéristiques de l’appareil
GENESISII
CARACTÉRISTIQUES
A
B
C
D
E
SYSTÈME DE
GRILLADES HAUTE
PERFORMANCE GS4
Le système de grillades haute
performance GS4 établit la norme
dans le monde de la cuisson au gaz,
et classe Weber dans une catégorie
à part. Ce système novateur se fonde
sur plus de 65ans d’expérience
de cuisson au barbecue, d’expertise culinaire, et
plus important encore, sur les besoins et volontés
des gens qui comptent le plus: notre communauté
d’amateurs de barbecue. Chaque composant du
système GS4 a été spécialement conçu pour être
facile à utiliser et orir une expérience de cuisine en
plein air sans pareille.
1 Module d’allumage Infinity
Le module Infinity vous garantit un
allumage réussi. Vous avez donc
l’assurance que votre barbecue
s’allumera chaque fois du premier coup.
2 Brûleurs
La forme unique en fuseau ore un flux de gaz
constant, de l’avant vers l’arrière. Il en résulte une
distribution de chaleur optimale assurant la cuisson
uniforme des aliments sur toute la surface des grilles.
H
A Thermomètre intégré
Connaître la température à l’intérieur de votre barbecue
vous permet d’ajuster la chaleur au besoin.
B Grille de réchauffage Tuck-Away
La grille de réchauage garde les aliments au chaud
ou permet de griller les pains pendant que l’on termine
la cuisson du repas principal. Lorsque la grille ne sert
pas, la rabattre permet un rangement facile.
C Grilles de cuisson en fonte émaillée
Les grilles de cuisson en fonte émaillée orent une
distribution uniforme de la chaleur sur toute la surface
de cuisson et une rétention thermique supérieure.
Les modèles CSE-315 et CSS-315 sont équipés de
grilles en acier inoxydable.
D Tablettes latérales avec
porte-accessoires intégré
Utiliser la tablette latérale pour garder plateaux,
assaisonnements et ustensiles à portée de main.
Accrocher les ustensiles indispensables sur les
crochets pour y avoir accès facilement et bien
organiser votre espace de travail en plein air.
F
G
E Modèle compatible avec l’iGRILL3
Le thermomètre iGrill3 connecté à son application
surveille la cuisson des aliments du début à la fin et
vous permet de voir la température en temps réel sur
votre appareil mobile. Accessoire vendu séparément.
F Jauge à gaz
Située près du réservoir, la jauge facile à lire permet
de savoir la quantité de combustible que contient le
réservoir.
G Réservoir à gaz latéral
Installer le réservoir à l’extérieur du barbecue en
facilite l’accès et l’enlèvement.
H Chariot à rangement fermé
Le chariot à rangement fermé du barbecue ajoute
un espace pour mettre à l’abri tous les outils et les
accessoires essentiels à vos grillades.
3 Flavorizer Bars (Barre Flavorizer)
Les Flavorizer Bars (Barre Flavorizer) en acier
inoxydable sont conçues selon un angle parfait
pour recueillir les coulures qui grésillent et fument,
de façon à ajouter cette irrésistible saveur fumée
dont nous raolons tous.
3
2
4 Système de gestion des graisses
Les coulures non vaporisées par les Flavorizer Bars
(Barre Flavorizer) sont canalisées loin des brûleurs
jusqu’à la barquette jetable située dans le bac de
récupération amovible sous la cuve de cuisson.
Onretire simplement le bac de récupération et
remplace la barquette au besoin.
4
41
Page 42

La cuisson directe
ou indirecte
Trucs et astuces
MÉTHODE
DE CUISSON DIRECTE
HIGH (élevé)
Utilisez la méthode de cuisson directe pour les morceaux petits et
tendres nécessitant moins de 20 minutes de cuisson, comme les
hamburgers, les biftecks, les côtelettes, les chiches-kébabs, les
morceaux de poulet désossés, les filets de poisson, les fruits de
mer et les légumes coupés.
Une cuisson directe signifie que la flamme se trouve juste en
dessous des aliments. Elle saisit la surface de la nourriture, la
caramélise et en accentue les saveurs ainsi que la texture tout
enla cuisant jusqu’au centre.
MÉTHODE
DE CUISSON INDIRECTE
OFF (éteint)
MEDIUM (moyen)
Appliquez la méthode de cuisson indirecte pour les grandes
pièces de viande nécessitant plus de 20minutes de cuisson ou
pour les aliments délicats qu’une exposition directe aux flammes
assécherait ou brûlerait, comme les rôtis, les morceaux de
volaille non désossés, les poissons entiers, les filets de poisson
fragiles, les poulets entiers, les dindes et les côtes levées. La
chaleur indirecte peut également servir à terminer la cuisson
d’aliments plus épais ou de morceaux non désossés ayant été
saisis ou dorés par une chaleur directe.
La chaleur indirecte provient des deux côtés du barbecue ou
uniquement d’un côté. Les aliments sont placés sur la grille de
cuisson, au-dessus de la partie éteinte de l’appareil.
42
START/HIGH
(démarrage/élevé)
OFF (éteint)
LOW (faible)
MEDIUM (moyen)
L
S
E
I
T
•
N
E
S
S
E
E
U
C
E
B
R
A
B
E
D
S
E
R
I
O
S
S
E
C
C
A
•
S
L
MINUTERIE
Évitez la déception de brûler votre repas
en vous servant tout simplement d’une
minuterie. Trouvez-en une qui est
E
fiableet, surtout, simple
I
T
N
E
S
S
à utiliser.
E
E
U
C
E
B
A
E
S
R
A
D
B
E
L
S
E
I
T
•
N
E
S
S
E
E
U
C
E
B
R
A
B
E
D
S
E
R
I
O
S
C
C
E
S
S
O
C
E
S
S
O
I
R
MITAINES POUR
S
E
C
I
C
R
A
E
S
•
D
S
L
E
•
A
C
BARBECUE
En cas de doute, portez-les. Les bonnes
E
B
A
mitaines sont isolées et protègent
I
R
T
B
N
à la fois les mains et les
E
E
S
C
S
E
U
avant-bras.
E
E
U
C
E
E
S
S
E
N
T
I
E
L
S
B
R
A
C
C
E
S
S
O
I
R
E
S
D
E
B
A
R
B
E
C
U
E
E
S
S
E
N
T
I
E
L
S
•
A
C
C
E
S
S
O
I
R
E
S
A
D
B
E
Page 43

Trucs et astuces
Les pratiques
dubarbecue
Préchauffez toujours votre
barbecue.
Si les grilles de cuisson ne sont pas assez
chaudes, les aliments colleront, et vous
n’aurez probablement pas la chance de bien
les saisir ni de créer ces superbes marques
de grillade. Même si une recette indique
une chaleur moyenne ou faible, préchauez
toujours le barbecue au réglage le plus élevé.
Ouvrez le couvercle, allumez le barbecue,
fermez le couvercle, puis laissez la grille
de cuisson se réchauer pendant environ
10minutes ou jusqu’à ce que le thermomètre
du couvercle atteigne 260 °C (500 °F).
Ne cuisinez pas sur des grilles
sales.
Il faut toujours nettoyer les grilles de cuisson
avant d’y déposer des aliments. Les résidus
agissent comme de la colle sur les grilles
et compliquent la cuisson des nouveaux
aliments. Pour éviter de goûter le repas
de la veille, assurez-vous de travailler sur
des grilles propres. Une fois les grilles
préchauées, utilisez une brosse à poils
en acier inoxydable pour bien nettoyer la
surface et la rendre lisse.
Demeurez près du barbecue
pendant sonutilisation.
Avant d’allumer votre appareil, assurezvous que tout est à portée de main: vos
accessoires essentiels, les aliments déjà
graissés et assaisonnés, les glaces ou les
sauces ainsi que des plateaux propres
pour la nourriture cuite. Si vous retournez
constamment dans votre cuisine, vous
raterez tout le plaisir, et vos aliments
risquent de brûler. Les chefs français
appellent cette façon de faire la «mise
en place». Nous l’appelons «être prêt et
présent».
Laissez-vous un peu d’espace.
Placer trop de nourriture sur les grilles de
cuisson limite votre souplesse. Laissez au
moins un quart de la surface des grilles libre,
avec assez d’espace entre chaque aliment,
afin d’être en mesure d’utiliser les pinces et
de déplacer facilement la nourriture. Il faut
parfois prendre rapidement des décisions et,
pour cela, il faut être en mesure de déplacer
les aliments d’un endroit à un autre. Laissezvous donc assez d’espace pour travailler.
Essayez de ne pas ouvrir le
couvercle.
Le couvercle de votre barbecue ne sert pas
uniquement à protéger votre repas de la
pluie. Il empêche surtout l’entrée d’une trop
grande quantité d’air, et il réduit la chaleur
et la fumée qui s’échappent. Lorsque le
couvercle est fermé, les grilles de cuisson
sont plus chaudes, le temps de cuisson est
réduit, le goût de fumée est plus prononcé
et les embrasements sont plus rares.
Enrésumé, fermez le couvercle!
Tournez les aliments une
seule fois.
Quoi de mieux qu’un bifteck juteux bien saisi
et joliment caramélisé? Le secret pour y
arriver est de laisser vos aliments en place.
Nous avons parfois tendance à les tourner
avant qu’ils atteignent le degré désiré de
coloration et de saveur. Vous devriez presque
toujours tourner vos aliments une seule fois.
Si vous les tournez souvent, vous ouvrez
probablement le couvercle trop souvent, ce
qui cause d’autres problèmes. Détendezvous et ayez confiance en votre barbecue.
Sachez quand réduire
l’intensité desflammes.
Parfois, la chose la plus importante est de
savoir quand s’arrêter. Rien de plus fiable
qu’un thermomètre à lecture instantanée
pour évaluer si vos aliments sont prêts.
Ce petit bijou vous aidera à déterminer le
moment exact où vos aliments sont les plus
savoureux.
N’ayez pas peur de faire des
essais.
Dans les années1950, la cuisson sur
barbecue signifiait une seule chose : de
la viande (et seulement de la viande)
carbonisée par des flammes nues. Le chef
moderne n’a pas besoin d’une cuisine pour
préparer un repas complet. Utilisez votre
barbecue pour créer des hors-d’œuvre,
des plats d’accompagnement et même des
desserts grillés. Enregistrez votre barbecue
pour recevoir du contenu spécial qui vous
inspirera. Nous aimerions vous accompagner
dans votre exploration.
Optimisation
de la surface
de cuisson
Utilisation de la grilleréchaud TUCKAWAY
La grille-réchaud permet de garder les aliments
au chaud. Rabattez-la lorsqu’elle ne sert pas. Pour
ce faire, soulevez légèrement la grille et faites-la
pivoter vers le bas. Portez des mitaines ou des
gants résistant à la chaleur lorsque vous ajustez
la grille.
43
Page 44

44
Renseignements importants sur
les branchements de propane
liquide et de gaz
Qu’est-ce que le gaz propane liquide?
Les gaz de pétrole liquéfiés, également appelés
«propane liquide» (PL), «gaz propane liquide» ou
simplement «propane» ou «butane», sont le produit
à base de pétrole inflammable utilisé pour alimenter
votre barbecue. Ils sont dans un état gazeux à une
pression et à des températures modérées lorsqu’ils
ne sont pas emprisonnés. Toutefois, placé dans
un contenant à une pression modérée comme un
réser voir, le propane liquide passe à l’état liquide.
Lorsque la pression est relâchée, le liquide s’évapore
Pour commencer
rapidement et devient du gaz propane liquide.
Consignes pour une manipulation
sécuritaire des réservoirs de
propaneliquide
• Un réservoir de propane liquide bosselé ou rouillé peut
être dangereux et devrait être vérifié par votre fournisseur
de propane liquide. N’utilisez pas un réservoir de propane
liquide si le robinet est endommagé.
• Même si votre réservoir de propane liquide semble vide,
il est possible qu’il contienne encore du gaz. Le réservoir
devrait donc être transporté et rangé en conséquence.
• Le réservoir de propane liquide doit être installé,
transporté et rangé dans une position verticale et
sécuritaire. Il ne doit pas être déposé ni manipulé
brutalement.
• Ne rangez ni ne transportez jamais le réservoir de
propane liquide dans des endroits où les températures
peuvent atteindre 51,7°C (125°F) (le réservoir deviendra
trop chaud pour être manipulé avec les mains).
• Installez un capuchon anti-poussières sur l’extrémité
du robinet du réservoir lorsque vous n’utilisez pas
le réservoir. Utilisez uniquement un capuchon antipoussières de même type que celui fourni avec le
robinet du réservoir. Les autres types de capuchons ou
de bouchons peuvent entraîner une fuite de propane.
Exigences relatives au réservoir
depropane liquide
• Le réservoir doit avoir environ 46cm de hauteur et 31cm
de diamètre. Il doit également comprendre une inscription
indiquant une capacité de 9,07kg de propane liquide ou
de 21,59kg d’eau, comme le précise le fabricant. D’autres
réservoirs peuvent être utilisés s’ils sont compatibles avec
le dispositif d’installation du réservoir (balance-réservoir).
• Le réservoir utilisé doit être fabriqué et désigné
conformément aux spécifications concernant les
bouteilles à gaz propane liquide cylindriques du
département des Transports (DOT) des États-Unis ou
àla norme canadienne Bouteilles à gaz cylindriques et
sphériques et tubes pour le transport des marchandises
dangereuses (CAN/CSA-B339), s’il y a lieu.
• Le réservoir doit être muni d’un robinet de type1
(CGA810) avec dispositif antidébordement. Le robinet
du réservoir doit être compatible avec le raccord du
barbecue.
• Le réservoir doit comprendre un collet qui protège le
robinet.
• Le réservoir doit être certifié DOT (A) et la date d’essai
(B) inscrite ne doit pas remonter à plus de cinq ans.
Qu’est-ce qu’un détendeur?
Votre barbecue au gaz est muni d’un détendeur de
pression qui contrôle et maintient une pression de
gazuniforme lorsque le gaz s’échappe du réservoir.
Exigences relatives au détendeur
• Il est obligatoire d’utiliser le détendeur et le flexible de
raccordement fournis avec ce barbecue. Le détendeur
comprend un limiteur de débit intégré qui restreint le
débit de gaz si une fuite est détectée.
• Les ensembles détendeur et flexible de rechange
doivent être ceux précisés par Weber-Stephen
Products LLC (robinet de réservoir de type 1 [CGA 810]
homologué UL comme il est décrit dans la dernière
version de la normeANSIZ21.81).
A
B
Page 45

Installation du réservoir de
propane liquide et vérification
desfuites
Lieu d’installation
Le réservoir est suspendu à la balance-réservoir qui est
située à l’extérieur du châssis, sous la tablette latérale
droite. Il est possible de suspendre le réservoir à la
balance-réservoir de deux façons diérentes, selon la
forme de l’anneau de protection en métal qui entoure le
robinet du réservoir (A).
Inspection du réservoir
1) Vérifiez que le robinet du réservoir est complètement
fermé. Fermez le robinet en le tournant dans le sens
des aiguilles d’une montre.
2) Vérifiez que le robinet du réser voir est compatible
avec le détendeur (B).
3) Examinez le robinet du réservoir, y compris le joint en
caoutchouc interne, afin de repérer tout dommage ou
débris. S’il est endommagé, retournez le réservoir à
votre détaillant régional.
Installation du réservoir
1) Assurez-vous que tous les boutons de commande
des brûleurs sont fermés (position O [éteint] ).
Pour ce faire, poussez sur chaque bouton de
commande, puis tournez-le dans le sens des
aiguilles d’une montre.
2) Desserrez l’écrou à serrage à main, puis faites
pivoter le verrou du réservoir vers le haut (D).
3) Installez le réservoir sur la balance-réservoir (E).
4) Faites pivoter le verrou du réser voir vers le bas.
Serrez l’écrou à serrage à main.
5) Fixez le raccord du détendeur au robinet du
réser voir en le tournant dans le sens des aiguilles
d’une montre(F). Serrez à la main seulement.
L’utilisation d’une clé pourrait endommager le raccord
du détendeur et causer une fuite de gaz. Passez à la
section «VÉRIFICATION DES FUITES DE GAZ».
Pour commencer
D
A
B
E
C
F
45
Page 46

46
En quoi consiste la vérification des fuites ?
Après avoir installé correctement le réservoir de propane
liquide, il est nécessaire d’eectuer une vérification des
fuites. Il s'agit d'un moyen fiable de s'assurer que le gaz
ne s'échappe pas du réservoir après l’avoir raccordé.
Le système d'alimentation de votre barbecue comprend
des raccordements eectués en usine, qui ont fait l'objet
d'une vérification minutieuse des fuites, et les brûleurs
ont été testés pour les flammes. WEBER recommande
d’eectuer une vérification approfondie supplémentaire
des fuites après l’assemblage ainsi qu’une fois par an.
Les raccords suivants doivent être testés :
• Là où le détendeur se branche au réservoir.
• Là où le tuyau de gaz se connecte à la cloison.
• Là où la cloison se connecte à la ligne de gaz ondulée.
Vérification des fuites de gaz
Pour commencer
1) Mouillez les raccords (G) d’eau savonneuse à l’aide
d’un flacon pulvérisateur, d’une brosse ou d’un
chion. Vous pouvez préparer votre propre solution
d’eau savonneuse en mélangeant une part de
savon liquide à quatre parts d’eau. Autrement, vous
pouvez vous procurer une solution de vérification
des fuites dans le rayon de plomberie de n’importe
quelle quincaillerie.
2) Ouvrez lentement l’alimentation en gaz en tournant
le robinet du réser voir dans le sens contraire des
aiguilles d’une montre, puis vérifiez si des bulles se
forment.
3) Si des bulles se forment, il y a une fuite:
a) Si des bulles apparaissent sur le réservoir(H),
fermez l’alimentation en gaz. N’UTILISEZ PAS
LE BARBECUE. Débranchez le réservoir et
retournez-le à votre détaillant local.
b) Si des bulles apparaissent sur le détendeur (I),
fermez l’alimentation en gaz. N’UTILISEZ PAS LE
BARBECUE. Communiquez avec le représentant
du service à la clientèle de votre région à l’aide des
coordonnées qui se trouvent sur notre site Web.
c) S’il y a présence d’une fuite à l’un des raccords
indiqués dans l’illustration (J), resserrer ce
raccord avec une clé, puis vérifier de nouveau s’il
y a fuite avec une solution d’eau savonneuse. Si
la fuite persiste, couper le gaz. NE PAS UTILISER
LE BARBECUE.
d) S’il y a présence d’une fuite à l’un des raccords
indiqués dans l’illustration (K), couper le gaz.
NE PAS UTILISER LE BARBECUE.
S’il y a présence d’une fuite, contacter le représentant
du service à la clientèle de votre région au moyen des
coordonnées indiquées sur notre site Internet.
4) Si aucune bulle ne se forme, la vérification des
fuites est terminée:
a) Fermez l’alimentation en gaz et rincez les
raccords avec de l’eau.
REMARQUE: Étant donné que certaines solutions de
vérification des fuites, y compris l’eau savonneuse,
peuvent être légèrement corrosives, il faut rincer tous les
raccords avec de l’eau après la vérification des fuites.
G
J
H
K
I
m DANGER: N’utilisez pas de flamme pour vérifier
les fuites de gaz. Assurez-vous qu’il n’y a aucune
étincelle ni flamme nue à proximité du barbecue
lorsque vous vérifiez la présence de fuites.
m
DANGER: Une fuite de gaz peut causer un
incendie ou une explosion.
m
DANGER: N’utilisez pas le barbecue si vous
avez détecté une fuite de gaz.
m
DANGER: Si vous voyez du gaz s’échapper du
réservoir de propane liquide, sentez une odeur
de gaz ou encore entendez un siement:
1. Éloignez-vous du réservoir de propane liquide.
2. Ne tentez pas de corriger le problème vous même.
3. Communiquez avec votre service d’incendie.
m
DANGER: Fermez toujours le robinet du réservoir
avant de débrancher le détendeur. Ne tentez
pas de débrancher le détendeur, le flexible
d’alimentation en gaz ni aucun autre raccord de
gaz pendant que le barbecue est en fonction.
m
DANGER: N’entreposez pas de réservoir de
propane liquide de remplacement sous le barbecue
ou à proximité de ce dernier. Ne remplissez jamais
le réservoir à plus de 80% de sa capacité.
Le non respect “exact” de ces consignes
risque d’entraîner un incendie susceptible de
provoquer un décès ou des blessures graves.
Page 47

Remplissage ou remplacement
d’un réservoir de propane liquide
Pour commencer
L
O
Quelle quantité de propane le réservoir
contient-il?
La balance-réservoir indique la quantité de propane
dans un réservoir standard de 9,07 kg. Pourconnaître
la quantité de propane qu’il reste dans votre réser voir,
suspendez-le à la balance-réservoir, puis vérifiez
l’indicateur de niveau rouge situé sur la balance. Si
l’indicateur de niveau est dans le haut, le réservoir est
plein (L). S’il est dans le bas, le réservoir est vide(M) ;
vous devez donc le remplacer ou leremplir.
Retrait du réservoir de propane liquide
1) Vérifiez que le robinet du réservoir est complètement
fermé. Fermez le robinet en le tournant dans le sens
des aiguilles d’une montre (N).
2) Dévissez le raccord du détendeur en le tournant à
la main dans le sens contraire des aiguilles d’une
montre (O).
3) Desserrez l’écrou à serrage à main du réservoir et
faites pivoter le verrou vers le haut.
4) Retirez le réservoir de la balance-réservoir.
Précautions supplémentaires de
vérification d'étanchéité
Les raccords suivants doivent être testés pour les
fuites de gaz chaque fois que le réservoir est rempli
etréinstallé:
• Là où le détendeur se branche au réservoir (H) et sur
le détendeur (I).
Suivre les instructions de la section « Vérification des
fuites de gaz ».
M
N
L
S
E
I
T
•
N
E
S
S
E
E
U
C
E
B
R
A
B
E
D
S
E
R
I
O
S
S
E
C
C
A
•
S
PINCEAU ET
LAVETTE
Procurez-vous un pinceau doté d’un long
manche et de poils en silicone résistant à la
chaleur. Accompagnez-le d’une lavette dont
les longs fils de coton sont idéaux pour
L
E
badigeonner vos viandes de sauces
I
T
N
E
liquides à base de vinaigre.
S
S
E
E
U
C
E
B
R
A
C
C
E
S
S
O
I
R
E
S
A
D
B
E
L
S
E
I
T
•
N
E
S
S
E
E
U
C
E
B
R
A
B
E
D
S
E
R
I
O
S
Considérez cet ustensile comme un
S
E
prolongement de votre main. La pince
C
C
A
idéale sera dotée d’un mécanisme de
•
tension sans eort, d’une poignée
S
L
E
I
T
N
E
S
O
I
R
E
S
•
A
C
C
E
S
S
D
E
B
A
R
B
E
C
U
E
E
S
S
E
N
T
I
E
L
S
E
B
R
A
B
E
D
S
E
R
I
O
S
S
E
Grâce à une poêle à fond cannelé perforé,
C
C
A
ne craignez plus de perdre dans le fond
•
de votre barbecue les aliments qui
S
L
E
I
T
N
E
S
PINCE
confortable et d’un verrou qui
la maintient fermée.
S
E
E
U
C
E
B
R
N
E
S
S
E
E
U
C
POÊLE À FOND
CANNELÉ
sont trop petits ou délicats pour
les grilles decuisson.
S
E
E
U
C
E
B
R
A
C
C
E
S
S
O
I
R
E
S
D
E
B
A
R
B
E
C
U
E
E
S
S
E
N
T
I
E
L
S
•
A
C
C
E
S
S
O
I
R
E
S
A
D
B
E
L
S
E
I
T
•
A
C
C
E
S
S
O
I
R
E
S
D
E
B
A
R
B
E
C
U
E
E
S
S
E
N
T
I
E
L
S
•
A
C
C
E
S
S
O
I
R
E
S
A
D
B
E
47
Page 48

48
Première utilisation
de votre barbecue
Rodage initial
Allumez les brûleurs à la position Star t/High
(démarrage/élevé), fermez le couvercle, puis chauez
le barbecue pendant au moins 20minutes avant de
l’utiliser pour la première fois.
À chaque utilisation
de votre barbecue
Entretien d’un repas à l’autre
Le plan d’entretien d’un repas à l’autre comporte des
Fonctionnement
étapes simples mais importantes que vous devez
toujours réaliser avant d’utiliser votre barbecue.
Vérification de la présence de graisse
Votre barbecue est équipé d’un système de traitement
de la graisse qui éloigne la graisse des aliments et
l’achemine directement dans un contenant jetable.
Pendant que vos aliments cuisent, la graisse s’écoule
vers le plateau à graisse amovible, puis dans le bac
récepteur jetable qui tapisse l’égouttoir. Vous devez
nettoyer ces pièces chaque fois que vous utilisez votre
barbecue afin de prévenir les incendies.
1) Assurez-vous que le barbecue est éteint et froid.
2) Retirez le plateau à graisse amovible en le tirant
hors du châssis (A). Enlevez toute accumulation de
graisse à l’aide d’un grattoir en plastique.
3) Retirez l’égouttoir (B). Vérifiez si le bac récepteur
jetable contient une quantité excessive de graisse.
Jetez le bac récepteur au besoin et remplacez-le
par un nouveau.
4) Réinstallez toutes les pièces.
Inspection du flexible
Il est nécessaire d’eectuer une inspection de routine
du flexible.
1) Assurez-vous que le barbecue est éteint et froid.
2) Examinez le flexible afin de repérer tout signe
de fissuration, d’abrasion ou de cassure(C). Si le
flexible est endommagé de quelque façon que ce
soit, n’utilisez pas le barbecue.
Préchauffage du barbecue
Il est essentiel de préchauer votre barbecue pour
profiter d’une expérience de cuisson optimale.
Le préchauage permet de chauer la grille
susamment pour saisir les aliments sans qu’ils
collent à la grille. Il permet également de brûler les
résidus d’un repas précédent.
1) Ouvrez le couvercle du barbecue.
2) Allumez votre barbecue conformément aux
instructions d’allumage du présent manuel du
propriétaire.
3) Fermez le couvercle.
4) Préchauez le barbecue en ouvrant tous les
brûleurs à la position Start/High (démarrage/
pendant 10à 15 minutes ou jusqu’à ce
élevé)
que la température du barbecue s’élève à 260°C
(500°F)(D).
Nettoyage de la grille de cuisson
Après avoir préchaué le barbecue, il vous sera plus
facile d’enlever tout résidu de nourriture ou débris d’un
repas précédent. Si vos grilles de cuisson sont propres,
il y a moins de risque que les aliments y collent.
1) Brossez les grilles à l’aide d’une brosse à poils
en acier inoxydable immédiatement après le
préchauage (E).
A
D
EB
C
m DANGER: Ne tapissez pas le plateau à graisse
amovible ni le compartiment à cuisson de
papier d’aluminium.
m DANGER: Avant chaque utilisation, vérifiez
qu’il n’y a pas d’accumulation de graisse dans
le plateau à graisse amovible ou l’égouttoir.
Retirez toute accumulation de graisse afin de
prévenir les risques de feu de friture.
m AVERTISSEMENT: Utilisez des mitaines ou
des gants résistant à la chaleur lorsque vous
utilisez votre barbecue.
m AVERTISSEMENT: Inspectez périodiquement
votre brosse à barbecue afin de repérer des
poils lâches et des signes d’usure excessive.
Remplacez la brosse si vous détectez des poils
lâches sur les grilles de cuisson ou la brosse.
Weber recommande d’acheter une nouvelle
brosse à barbecue à poils en acier inoxydable
chaque année, au début du printemps.
m AVERTISSEMENT: Si le flexible est
endommagé de quelque façon que ce soit,
n’utilisez pas le barbecue. Remplacez-le par
un flexible autorisé par Weber.
m AVERTISSEMENT : Les ouvertures de
ventilation autour du réservoir doivent être
dégagées et exemptes de débris.
Page 49

Allumage du barbecue
Fonctionnement
Utilisation du système d’allumage
électronique
Chaque bouton de commande actionne un brûleur
individuel, et chaque brûleur s’allume de façon
indépendante. Allumez les brûleurs de la gauche
vers la droite. Vous devez allumer tous les brûleurs
pour préchauer votre barbecue, mais il n’est
pas nécessaire de tous les garder ouverts durant
lacuisson.
1) Ouvrez le couvercle du barbecue (A).
2) Assurez-vous que tous les boutons de
commande des brûleurs sont fermés (position
O [éteint]
bouton de commande, puis tournez-le dans le sens
des aiguilles d’une montre (B).
REMARQUE: Il est important que tous les boutons
de commande des brûleurs soient fermés avant
d’ouvrir le réservoir de propane liquide. Si ce n’est
pas le cas, le limiteur de débit intégré au détendeur
s’activera, limitant le débit de gaz émanant du
réservoir.
3) Ouvrez l’alimentation en gaz en tournant lentement
le robinet du réser voir dans le sens contraire des
aiguilles d’une montre; attendez 60secondes (C).
REMARQUE: Il est important d’ouvrir lentement le
robinet du réservoir. Autrement, le limiteur de débit
intégré au détendeur s’activera, limitant le débit de gaz
émanant du réservoir.
4) Allumez le brûleur qui se trouve à l’extrémité
gauche du barbecue. Poussez sur le bouton de
commande, puis tournez-le dans le sens contraire
des aiguilles d’une montre jusqu’à la position Start/
High (démarrage/élevé)
5) Appuyez sur le bouton d’allumage électronique
et maintenez-le enfoncé (E). Vous entendrez un
cliquetis.
6) Vérifiez que le brûleur est allumé en regardant au
travers des grilles de cuisson et de l’ouverture en
demi-cercle dans la barre FLAVORIZER.
7) Si le brûleur ne s’allume pas, tournez le bouton de
commande du brûleur à la position O (éteint)
attendez cinq minutes afin de permettre au gaz de
se dissiper avant de tenter de rallumer le brûleur.
8) Si le brûleur s’allume, répétez les étapes 4 à 6 pour
tous les autres brûleurs.
Si les brûleurs ne s’allument pas à l’aide du système
d’allumage électronique, consultez la section
«DÉPANNAGE». Vous y trouverez des instructions sur
la façon d’allumer le barbecue à l’aide d’une allumette
afin de déterminer la cause du problème.
). Pour ce faire, poussez sur chaque
(D).
et
Extinction des brûleurs
1) Poussez sur le bouton de commande de chaque
brûleur et tournez-le dans le sens des aiguilles
d’une montre jusqu’à la position O (éteint) .
2) Coupez l’alimentation en gaz en fermant le robinet
du réservoir de propane liquide.
A
E
BCD
A
B
D
E
C
m AVERTISSEMENT: Allumez le barbecue avec le
couvercle ouvert.
m AVERTISSEMENT: Ne vous penchez pas au-
dessus du barbecue ouvert pendant que vous
l’allumez ou y faites cuire des aliments.
m AVERTISSEMENT: Chaque brûleur doit être
allumé individuellement à l’aide du bouton
d’allumage électronique.
m AVERTISSEMENT : Si le brûleur ne s’allume
pas dans un délai de quatre secondes, tournez
le bouton de commande du brûleur à la
position O (éteint). Attendez cinq minutes
afin de permettre au gaz de se dissiper, puis
répétez la procédure d’allumage.
49
Page 50

50
Nettoyage et entretien
Nettoyage de l’intérieur du barbecue
Au fil du temps, il est possible que la performance
de votre barbecue diminue s’il n’a pas fait l’objet d’un
entretien approprié. De basses températures, un
chauage inégal, des aliments collés aux grilles de
cuisson sont tous des signes qu’il est plus que temps
de nettoyer votre barbecue. Lorsque votre barbecue
est éteint et froid, commencez par nettoyer l’intérieur,
de haut en bas. Il est recommandé de procéder à un
nettoyage approfondi au moins deux fois par année.
Si vous utilisez fréquemment votre barbecue, vous
devriez le nettoyer tous les trois mois.
Nettoyage du couvercle
À l’occasion, vous pourriez remarquer des écaillures
« semblables à de la peinture » à l’intérieur du
couvercle. Lorsque le barbecue est en fonction, les
vapeurs de graisse et de fumée se transforment
lentement en carbone et se déposent à l’intérieur
du couvercle. Ces dépôts finiront par se décoller de
Entretien de l’appareil
la paroi, d’une façon semblable à de la peinture qui
s’écaille. Ces dépôts ne sont pas toxiques, mais les
écaillures pourraient tomber sur vos aliments si vous
ne nettoyez pas le couvercle régulièrement.
1) Enlevez la graisse carbonisée à l’intérieur du
couvercle à l’aide d’une brosse à barbecue à poils
en acier inoxydable (A). Afin d’éviter que la graisse
ne s’accumule, vous pouvez essuyer l’intérieur du
couvercle à l’aide d’une serviette en papier pendant
que le barbecue est encore tiède (pas chaud).
Nettoyage des grilles de cuisson
Si vous avez nettoyé vos grilles de cuisson comme il
est recommandé, il ne devrait pas y avoir beaucoup
de résidus.
1) Laissez les grilles installées dans le barbecue, puis
enlevez les résidus à l’aide d’une brosse à poils en
acier inoxydable(B).
2) Retirez les grilles du barbecue et mettez-les de côté.
Nettoyage des barres FLAVORIZER
Les barres FLAVORIZER recueillent les dégoulinades
qui grésillent et créent la fumée, ajoutant ainsi de
la saveur à vos aliments. Les dégoulinades qui ne
sont pas recueillies par les barres FLAVORIZER sont
acheminées loin des brûleurs. Cela permet de prévenir
les risques d’embrasement à l’intérieur de votre
barbecue et d’éviter que les brûleurs ne s’obstruent.
1) Grattez les barres FLAVORIZER à l’aide d’un grattoir
en plastique(C).
2) Au besoin, brossez les barres FLAVORIZER à l’aide
d’une brosse à poils en acier inoxydable.
3) Retirez les barres FLAVORIZER et mettez-les de
côté.
Nettoyage des brûleurs
Afin que vos brûleurs orent une performance
optimale, ils sont dotés d’orifices (petites ouvertures
surélevées situées sur toute la longueur des brûleurs)
et de grilles anti-araignées à leur extrémité. Il est
essentiel de garder ces éléments propres pour
assurer le fonctionnement sécuritaire du barbecue.
Nettoyage des orifices des brûleurs
1) À l’aide d’une brosse à poils en acier inoxydable,
nettoyez l’extérieur des brûleurs en passant la
brosse sur leurs orifices (D).
2) Lorsque vous nettoyez les brûleurs, évitez
d’endommager l’électrode d’allumage en passant
soigneusement la brosse tout autour(E).
Nettoyage des grilles anti-araignées
1) Repérez les extrémités des brûleurs, sur la face
inférieure du panneau de commande, là où elles
sont raccordées aux valves.
2) Nettoyez la grille anti-araignée de chaque brûleur
àl’aide d’une brosse à poils doux (F).
A
B
C
PIÈCES DE
REMPLACEMENT
Pour obtenir des pièces de
remplacement, communiquez avec
le détaillant de votre région ou
connectez-vous au site
weber.com.
D
E
F
m AVERTISSEMENT:
attendez qu’il refroidisse avant de le nettoyer.
m AVERTISSEMENT: Au fil du temps, vous pourriez
voir apparaître des surfaces rugueuses sur
les barres FLAVORIZER. Il est recommandé de
porter des gants pour manipuler les barres.
Ne nettoyez pas les barres FLAVORIZER ni
les grilles de cuisson dans un évier, un lavevaisselle ou un four autonettoyant.
m
AVERTISSEMENT: Pour nettoyer les brûleurs,
n’utilisez jamais une brosse qui a déjà servi à
nettoyer les grilles de cuisson. N’insérez jamais
d’objets pointus dans les orifices des brûleurs.
m
PRUDENCE: Ne déposez aucune pièce du
barbecue sur les tablettes latérales, car elle
pourrait en égratigner les surfaces peintes ou
en acier inoxydable.
m
PRUDENCE: N’utilisez aucun des éléments
suivants pour nettoyer votre barbecue: des
encaustiques ou des peintures abrasives pour
acier inoxydable; des solutions nettoyantes qui
contiennent de l’acide, de l’essence minérale ou
du xylène; des produits nettoyants pour le four;
des produits nettoyants abrasifs (nettoyants pour
la cuisine) ou des tampons nettoyeurs abrasifs.
Éteignez votre barbecue et
Page 51

Nettoyage des réflecteurs de chaleur
Situés sous les brûleurs, les réflecteurs de chaleur
distribuent la chaleur uniformément dans le
compartiment de cuisson. Gardez les réflecteurs de
chaleur propres afin d’améliorer la performance de
cuisson de votre barbecue.
1) Grattez les réflecteurs de chaleur à l’aide d’un
grattoir en plastique(G).
2) Au besoin, brossez les réflecteurs de chaleur à
l’aide d’une brosse à poils en acier inoxydable.
3) Retirez les réflecteurs de chaleur et mettez-les
decôté.
Nettoyage du compartiment de cuisson
Inspectez l’intérieur du compartiment de cuisson afin
de repérer tout résidu de nourriture ou accumulation
de graisse. Une accumulation excessive peut causer
un incendie.
1) À l’aide d’un grattoir en plastique, grattez les
résidus qui se sont déposés sur les parois internes
du barbecue et poussez-les dans l’ouverture située
au fond du compartiment de cuisson(H). Cette
ouverture permet d’acheminer les résidus vers le
plateau à graisse amovible.
Nettoyage du système de traitement de
la graisse
Le système de traitement de la graisse est constitué
d’un plateau à graisse incliné amovible et d’un
égouttoir. Ces composants sont conçus pour qu’il
soit facile de les retirer, de les nettoyer et de les
réinstaller: une procédure essentielle à suivre chaque
fois que vous utilisez votre barbecue. Vous trouverez
les instructions relatives à l’inspection du système
de traitement de la graisse à la section «ENTRE TIEN
D’UN REPAS À L’AUTRE».
Nettoyage de l’extérieur du barbecue
L’extérieur de votre barbecue se compose de
surfaces en acier inoxydable, en porcelaine émaillée
et en plastique. WEBER recommande d’adopter les
méthodes suivantes en fonction du type de sur face.
Nettoyage des surfaces en acier
inoxydable
Nettoyez les surfaces en acier inoxydable à l’aide
d’une solution de nettoyage ou de polissage non
toxique et non abrasive pour acier inoxydable conçue
pour un usage sur des barbecues et d’autres produits
pour l’extérieur. À l’aide d’un linge en microfibre,
nettoyez les surfaces dans le sens du grain de l’acier
inoxydable. N’utilisez pas de serviette en papier.
Remarque: Ne prenez pas le risque d’égratigner les
surfaces en acier inoxydable en utilisant de la pâte
abrasive. La pâte abrasive ne sert pas à nettoyer ni à
polir. Elle modifiera plutôt la couleur du métal en enlevant
le revêtement supérieur composé d’oxyde de chrome.
Nettoyage des surfaces peintes, en
porcelaine émaillée et en plastique
Nettoyez les surfaces peintes, en porcelaine émaillée
et en plastique à l’aide d’eau savonneuse tiède et de
serviettes en papier ou d’un linge. Après avoir essuyé
les surfaces, rincez-les et séchez-les soigneusement.
Nettoyage de l’extérieur d’un barbecue
situé dans un environnement
exceptionnel
Si votre barbecue est soumis à des conditions
particulièrement diciles, il est recommandé d’en
laver l’extérieur plus souvent. Les pluies acides, les
produits chimiques pour piscine et l’eau salée peuvent
entraîner la formation de rouille. Lavez l’extérieur
de votre barbecue avec de l’eau savonneuse tiède.
Ensuite, rincez-le et séchez-le soigneusement. De
plus, vous pouvez appliquer une solution nettoyante
pour acier inoxydable chaque semaine afin de prévenir
la formation de rouille.
Entretien de l’appareil
G
H
L
S
E
I
T
•
A
C
C
E
S
S
O
I
R
E
S
D
E
B
A
R
B
E
C
U
E
E
S
S
E
N
T
I
E
L
S
•
A
C
C
E
S
S
O
I
R
E
S
A
D
B
E
L
S
E
I
T
•
A
C
C
E
S
S
O
I
R
E
S
D
E
B
A
R
B
E
C
U
E
E
S
S
E
N
T
I
E
L
S
•
A
C
C
E
S
S
O
I
R
E
S
A
D
B
E
51
L
S
E
I
T
•
N
E
S
S
E
E
U
C
E
B
R
A
B
E
D
S
E
R
I
O
THERMOMÈTRE
S
S
E
Petit et relativement peu coûteux,
C
C
ce gadget essentiel mesure rapidement
A
•
la température interne de la viande
S
L
E
I
T
N
E
S
S
E
E
U
pendant la cuisson.
C
E
B
R
E
S
A
D
B
E
N
E
S
S
E
E
U
C
E
B
R
A
B
E
D
S
E
R
I
O
S
S
E
C
C
A
•
S
L
E
I
A
C
C
E
S
S
O
I
R
E
S
D
E
B
A
R
T
I
E
L
S
•
A
C
C
E
S
S
O
I
R
A
B
E
D
S
E
R
I
O
S
S
E
C
C
A
•
S
L
E
I
PLATSEN
ALUMINIUM
Tapissez-en l’égouttoir et profitez
d’unnettoyage pratique et facile.
T
N
E
S
S
E
E
U
C
E
B
R
B
E
C
U
E
E
S
S
E
N
N
E
S
S
E
E
U
C
E
B
R
BROSSE À
BARBECUE
Un incontournable avant même de
penser à faire du barbecue. Un rapide
coup de brosse sur les grilles chaudes
empêche les restes calcinés d’un
T
repas précédent de coller
N
E
S
à votre repas actuel.
S
E
E
U
C
E
B
R
Page 52

LE BARBECUE NE S’ALLUME PAS
SYMPTÔME
• Le brûleur ne s’allume pas, même si vous avez respecté toutes les instructions d’allumage électronique énoncées à la section
«Fonctionnement» du présent manuel du propriétaire.
CAUSE SOLUTION
Il y a un problème avec
l’alimentation en gaz.
Dépannage
Il y a un problème avec
le système d’allumage
électronique.
Si le barbecue ne s’allume pas, la première étape consiste à déterminer si le gaz se rend jusqu’aux brûleurs. Pour ce faire, suivez les
instructions de la section « Utilisation d’une allumette pour déterminer si le gaz se rend aux brûleurs ».
Si le barbecue NE S’ALLUME TOUJOURS PAS, suivez les suggestions de dépannage relatives au débit de gaz à la page suivante.
Si le barbecue ne s’allume pas, la première étape consiste à déterminer si le gaz se rend jusqu’aux brûleurs. Pour ce faire, suivez les
instructions de la section « Utilisation d’une allumette pour déterminer si le gaz se rend aux brûleurs ».
Si le barbecue S’ALLUME, suivez les instructions de la section « Vérification des composants du système d’allumage électronique » ci-dessous.
Utilisation d’une allumette pour
déterminer si le gaz se rend aux brûleurs
1) Ouvrez le couvercle du barbecue.
2) Assurez-vous que tous les boutons de commande
des brûleurs sont fermés (position O [éteint]
Pour ce faire, poussez sur chaque bouton de
commande, puis tournez-le dans le sens des
aiguilles d’une montre.
Remarque: Il est important que tous les boutons de
commande des brûleurs soient fermés avant d’ouvrir
le réservoir de propane liquide. Si ce n’est pas le cas,
le limiteur de débit intégré au détendeur s’activera,
limitant le débit de gaz émanant du réservoir.
3) Ouvrez l’alimentation en gaz en tournant lentement
le robinet du réser voir dans le sens contraire des
aiguilles d’une montre; attendez 60secondes.
Remarque: Il est important d’ouvrir lentement le
robinet du réservoir. Autrement, le limiteur de débit
intégré au détendeur s’activera, limitant le débit de gaz
émanant du réservoir.
4) Allumez le brûleur qui se trouve à l’extrémité
gauche du barbecue. Insérez une allumette dans
le porte-allumettes, puis allumez-la. (Le porteallumettes se trouve sous la tablette latérale
droite.) Glissez l’allumette enflammée à côté du
brûleur, directement au travers des grilles de
cuisson et des barres FLAVORIZER (A).
5) Poussez sur le bouton de commande, puis tournez-
le dans le sens contraire des aiguilles d’une montre
jusqu’à la position Start/High (démarrage/élevé)
6) Vérifiez que le brûleur est allumé en regardant au
travers des grilles de cuisson et de l’ouverture en
demi-cercle dans la barre FLAVORIZER.
7) Si le brûleur ne s’allume pas dans un délai de
quatre secondes, tournez le bouton de commande
du brûleur à la position O (éteint)
cinq minutes afin de permettre au gaz de se
dissiper avant de tenter de rallumer le brûleur. Si
après plusieurs tentatives le barbecue ne s’allume
pas, suivez les instructions de dépannage relatives
au débit de gaz à la page suivante.
et attendez
).
8) Si le brûleur s’allume, le problème se situe au niveau
du système d’allumage. Suivez les instructions de la
section « Vérification des composants du système
d’allumage électronique ».
9) Rangez le porte-allumettes en le suspendant sous
la tablette latérale droite (B).
Vérification des composants du système
d’allumage électronique
Quand vous appuyez sur le bouton d’allumage, vous
devriez entendre un cliquetis. Si ce n’est pas le cas,
vérifiez la pile, puis les fils.
Vérification de la pile
Trois causes possibles peuvent expliquer pourquoi la
pile qui alimente le module d’allumage fait défaut :
1) Certaines piles sont enveloppées d’une pellicule
protectrice en plastique. (Ne confondez pas ce
plastique avec l’étiquette de la pile.) Vérifiez si la
pellicule de plastique a été retirée.
2) Vérifiez que la pile a été installée correctement (C).
3) Si la pile est vieille, remplacez-la par une neuve.
Vérification des fils
Deux endroits doivent faire l’objet d’une vérification:
1) Vérifiez que les fils d’allumage sont correctement
branchés sur les bornes du bouton d’allumage,
sous le panneau de commande.
2) Assurez-vous que les fils d’allumage sont
correctement fixés au module d’allumage. Les
.
cosses sont codées par couleur afin de correspondre
aux bornes du module d’allumage. Le nombre de
fils variera selon le modèle.
A
B
C
52
Schéma des câbles du module d’allumage 315
1 342
3
1 4
Vérification du conducteur de mise à la terre
Les modèles 310, 315 et 435 sont munis d’un
conducteur de mise à la terre raccordé au support du
collecteur, visible sous le panneau de commande (D):
2
1) Vérifier que le conducteur de mise à la terre est
solidement vissé en place.
D
Page 53

DÉBIT DE GAZ
SYMPTÔME
• Le barbecue n’atteint pas la température souhaitée ou chauffe inégalement.
• Un ou plusieurs des brûleurs ne s’allument pas.
• La flamme est basse même si le brûleur est à la position Start/High (démarrage/élevé).
• Les flammes ne courent pas sur toute la longueur du brûleur.
• Le brûleur produit des flammes irrégulières.
CAUSE SOLUTION
Le limiteur de débit a été activé. Ce dispositif de sécurité
intégré au détendeur limite le débit de gaz en cas de
fuite. Vous pouvez avoir activé ce dispositif par mégarde
sans qu’il y ait une fuite de gaz. Cette situation se produit
généralement si vous ouvrez le robinet du réser voir de
propane liquide et que l’un ou plusieurs des boutons de
commande des brûleurs ne sont pas à la position O
(éteint). Il se pourrait également que vous ayez ouvert le
robinet du réservoir de propane liquide trop vite.
La quantité de propane dans le réservoir est basse, ou
le réservoir est vide.
Le flexible d’alimentation en carburant est plié ou tordu. Redressez le flexible d’alimentation en carburant.
Les orifices des brûleurs sont sales. Nettoyez les orifices des brûleurs. Consultez la section
SYMPTÔME
Réinitialisez le limiteur de débit en fermant le
robinet du réservoir de propane liquide et en
tournant tous les boutons de commande des
brûleurs à la position O (éteint) . Attendez
cinq minutes pour permettre au gaz de se
dissiper, puis tentez une nouvelle fois d’allumer le
barbecue en suivant les instructions à la section
«Fonctionnement» du présent manuel.
Remplissez le réservoir de propane liquide.
«Nettoyage des orifices des brûleurs».
Dépannage
Type de flammes appropriées
Les brûleurs de votre barbecue ont été réglés en
usine afin qu’ils soient alimentés par un mélange
d’air et de gaz approprié. Lorsque les brûleurs
fonctionnent correctement, vous verrez un type
de flammes particulier. Vacillant à l’occasion, les
pointes jaunes (A) se superposent à une flamme
bleu pâle (B) et se terminent par une flamme
bleu foncé (C).
A
B
C
• Une odeur de gaz émane du barbecue et les flammes des brûleurs sont jaunes et faibles.
CAUSE SOLUTION
Les grilles anti-araignées des brûleurs sont obstruées. Nettoyez les grilles anti-araignées. Consultez la
section «Nettoyage des grilles anti-araignées».
Reportez-vous également aux illustrations et aux
renseignements de cette section relativement au
type de flammes et aux grilles anti-araignées.
SYMPTÔME
• Une odeur de gaz émane du barbecue et un sifflement se fait entendre.
CAUSE SOLUTION
Le joint en caoutchouc interne du robinet du réser voir
de propane liquide est peut-être endommagé.
Inspectez le joint en caoutchouc. S’il est
endommagé, retournez le réservoir à votre
détaillant régional.
BARBECUE GRAISSEUX (écaillures de peinture)
SYMPTÔME
• L’intérieur du couvercle semble avoir l’apparence de peinture écaillée.
CAUSE SOLUTION
Les écaillures que vous voyez représentent en fait
des vapeurs de cuisson accumulées qui se sont
transformées en carbone.
SYMPTÔME
Cette situation se produit au fil du temps, après un
usage répété de votre barbecue. Il ne s’agit pas
d’une défectuosité. Nettoyez le couvercle. Consultez
la section «Entretien de l’appareil».
Grilles anti-araignées
Les ouvertures d’air de combustion des brûleurs
(D) sont dotées de grilles en acier inoxydable
visant à empêcher les araignées et d’autres
insectes de tisser des toiles et de construire des
nids à l’intérieur des brûleurs. De la poussière et
des débris peuvent s’accumuler à l’extérieur des
grilles anti-araignées, entravant ainsi le débit
d’oxygène vers les brûleurs.
D
• Des écaillures se détachent du couvercle pendant la cuisson ou le préchauffage.
CAUSE SOLUTION
Il y a des résidus de nourriture d’un repas précédent. Préchauez toujours le barbecue en allumant tous les
L’intérieur du barbecue doit être nettoyé à fond.
m
AVERTISSEMENT: Ne tentez pas de réparer les composants d’alimentation en gaz, de combustion du gaz, d’allumage
ou de structure avant d’avoir communiqué avec le Centre de service à la clientèle de Weber-Stephen Products LLC.
m
AVERTISSEMENT: Toute garantie sera annulée si des réparations ou des remplacements ne sont pas réalisés avec
des pièces Weber-Stephen authentiques.
m
ATTENTION : Les ouvertures des tubes du brûleur doivent être correctement positionnées au-dessus des
orifices des valves.
brûleurs à la position Start/High (démarrage/élevé)
pendant 10 à 15 minutes.
Suivez les étapes de la section «Nettoyage et entretien»
pour nettoyer l’intérieur de votre barbecue de haut en bas.
APPELEZ
LE SERVICE À LA
CLIENTÈLE
Si vous éprouvez encore des problèmes,
communiquez avec le représentant du
service à la clientèle de votre région
à l’aide descoordonnées qui se
trouvent surle site
weber.com.
53
Page 54

Guide de cuisson
Type Épaisseur/poids Temps de cuisson approximatif
VIANDE ROUGE
Steak: coquille d’aloyau, aloyau, faux-filet,
bifteck d’aloyau et filet mignon (filet)
Bavette de flanchet 0,7 à 0,9kg , 2cm d’épaisseur De 8 à 10 minutes à chaleur moyenne directe
Fricadelles de bœuf 2 cm d’épaisseur De 8 à 10 minutes à chaleur moyenne directe
Filet De 1,4 à 1,8kg
Guide de cuisson
PORC
Saucisses Bratwurst: fraîches 85 g le chaînon De 20 à 25 minutes à chaleur faible directe
Côtelette : avec ou sans l’os
Côtes: petites côtes levées de dos, côtes levées
Côtes : longe avec l’os De 1,4 à 1,8kg De 1 heure et demie à 2 heures à chaleur moyenne indirecte
Filet 0,45kg
VOLAILLE
Poitrine de poulet: sans la peau ni les os De 170 à 227g De 8 à 12 minutes à chaleur moyenne directe
Cuisse de poulet: sans la peau ni les os 113g De 8 à 10 minutes à chaleur moyenne directe
Morceaux de poulet : avec l’os, assortis De 85 à 170g
Poulet: entier 1,8 à 2,3kg De 1 heure à 1 heure et quart à chaleur moyenne indirecte
Poulet de Cornouailles De 0,68 à 0,91kg De 60 à 70 minutes à chaleur moyenne indirecte
Dinde: entière, non farcie De 4,5 à 5,4kg De 2 heures à 2heures et demie à chaleur moyenne indirecte
FRUITS DE MER
Poisson, filet ou steak : flétan, vivaneau rouge,
saumon, bar commun, espadon et thon
Poisson: entier
Crevettes 43g De 2 à 4 minutes à chaleur élevée directe
LÉGUMES
Asperge Diamètre de 1,3cm De 6 à 8 minutes à chaleur moyenne directe
Maïs
Champignon
Oignon
Pomme de terre
2 cm d’épaisseur De 4 à 6 minutes à chaleur élevée directe
2,5cm d’épaisseur De 6 à 8 minutes à chaleur élevée directe
5cm d’épaisseur
2 cm d’épaisseur De 6 à 8 minutes à chaleur élevée directe
De 3 à 3,8cm d’épaisseur
De 1,4 à 1,8kg De 1 heure et demie à 2 heures à chaleur moyenne indirecte
De 0,6 à 1,3cm d’épaisseur De 3 à 5 minutes à chaleur moyenne directe
De 2,5 à 3cm d’épaisseur De 10 à 12 minutes à chaleur moyenne directe
0,45kg De 15 à 20 minutes à chaleur moyenne indirecte
1,4kg De 30 à 45 minutes à chaleur moyenne indirecte
Vêtu De 25 à 30 minutes à chaleur moyenne directe
Dépouillé De 10 à 15 minutes à chaleur moyenne directe
Shiitake ou champignon en bouton De 8 à 10 minutes à chaleur moyenne directe
Champignon de Paris De 10 à 15 minutes à chaleur moyenne directe
Coupé en deux De 35 à 40 minutes à chaleur moyenne indirecte
En tranches de 1.3cm De 8 à 12 minutes à chaleur moyenne directe
Entière De 45 à 60 minutes à chaleur moyenne indirecte
En tranches de 1,3cm
De 14 à 18 minutes saisir de 6 à 8 minutes à chaleur élevée directe,
puis de 8 à 10 minutes à chaleur élevée indirecte
De 45 à 60 minutes 15 minutes à chaleur moyenne directe,
puis de 30 à 45 minutes à chaleur moyenne indirecte
De 10 à 12 minutes saisir 6 minutes à chaleur élevée directe,
puis de 4 à 6 minutes à chaleur élevée indirecte
30 minutes saisir 5 minutes à chaleur élevée directe,
puis 25 minutes à chaleur moyenne indirecte
De 36 à 40 minutes de 6 à 10 minutes à chaleur faible directe,
puis 30 minutes à chaleur moyenne indirecte
De 9 à 11 minutes précuite 3 minutes,
puis de 6 à 8 minutes à chaleur moyenne directe
54
Les coupes, les épaisseurs, les poids et les temps de cuisson présentés ci-dessus sont fournis à titre indicatif seulement. Des facteurs comme l’altitude, le vent et la température
extérieure peuvent influer sur le temps de cuisson. Deux règles générales: Grillez les steaks, les filets de poisson, les morceaux de poulet sans os et les légumes à l’aide de la
méthode de cuisson directe en respectant le temps de cuisson fourni dans le tableau (ou jusqu’à la cuisson désirée). Tournez les aliments à la mi-cuisson. Grillez les rôtis, les
volailles entières, les morceaux de volaille avec os, les poissons entiers et les viandes dont la coupe est épaisse à l’aide de la méthode de cuisson indirecte en respectant le
temps de cuisson fourni dans le tableau (ou jusqu’à ce qu’un thermomètre à lecture instantanée ache la température interne souhaitée). Sauf indication contraire, les temps de
cuisson du bœuf et de l’agneau ont été établis selon la définition de « cuisson moyenne » établie par le Dépar tement de l’Agriculture des États-Unis (USDA). Avant de les couper,
laissez reposer les rôtis, les gros morceaux de viande ainsi que les côtelettes et les steaks épais pendant 5 à 10minutes après la cuisson. La température interne de la viande
augmentera de 5 à 10 degrés pendant ce temps.
La marque et les logos Bluetooth® sont des marques déposées appartenant à Bluet ooth SIG, Inc. et
l’util isation de ces marques par Weber-Stephen Product s LLC fait l'objet d'une licenc e. Les autres
marques et noms commerciaux appartiennent à leurs propriétaires respectifs.
© 2018. Conçu et fabriqué par Weber-Stephen Products L LC,
N’OUBLIEZ PAS D’ENREGISTRER VOTRE PRODUIT
1415 S. Roselle Road, Pal atine, Illinois 60067 É.-U.
Page 55

GENESIS II E315
1
2
3
4
5
6
7
8
9
10
11
12
13
14
15
Replacement Parts | Piezas de repuesto | Pièces de remplacement
Genesis II_E-315_LP_US_062018
37
16
17
18
19
20
21
22
23
24
25
26
27
28
29
30
31
32
33
38
39
40
41
42
43
44
45
46
47
48
49
50
51
34
35
36
52
53
54
55
56
57
weber.com
55
Page 56

GENESIS II CSE315 • CSS315
1
2
3
4
5
6
7
8
9
10
11
12
13
14
Genesis II_CSE/CSS-315_LP_US_031518
37
15
16
17
18
19
20
21
22
23
24
25
26
27
28
29
30
31
32
38
39
40
41
42
43
44
45
46
47
48
49
50
51
56
33
52
Replacement Parts | Piezas de repuesto | Pièces de remplacement
53
34
35
36
54
55
56
57
58
Page 57

Notes | Notas | Remarques
weber.com
Page 58

Notes | Notas | Remarques
58
Page 59

Notes | Notas | Remarques
weber.com
59
Page 60

weber.com
U.S.EE. UU.États-Unis :
1-800-446-1071
© 2018 Designed and engineered by Weber-Stephen Products LLC, 1415 S. Roselle Road, Palatine, Illinois 60067 USA.
Mexico/México/Mexique :
01 800 0093237
Canada/Canadá/Canada :
1-800-446-1071
Page 61

E315 • CSE315 • CSS315 • E325
LP
ASSEMBLY GUIDE
GUÍA DE MONTAJE | ENSEMBLE GUIDE
Descarga gratis la app BILT™ y sigue las instrucciones 3D paso a paso.
Téléchargez gratuitement l’application BILT™ pour obtenir les instructions étape par étape en3D.
54144
101818
enUS esMX frCA
Page 62

EN
ES
FR
DE
SV ETDACS FI NOHR PLHUIT ROLT
LV SKNL SLPT
ES
FR
DE
SV ETDACS FI NOHR PLHUIT ROLT
LV SKNL SLPT
FR
DE
SV ETDACS FI NOHR PLHUIT ROLT
LV SKNL SLPT
#2
#3
m Assemble grill on a flat, level, and soft surface.
m Remove protective film from stainless steel parts before installing.
m Do not use power tools for assembly.
m Two peoplerequired for assembly.
m There may be visual dierences between illustrations and model purchased.
m Always keep lid closed when assembling or moving your grill.
m Monte el asador sobre una superficie llana, nivelada y lisa.
m Retire la película protectora de las piezas de acero inoxidable antes de llevar
a cabo la instalación.
m No use herramientas eléctricas para montar el asador.
m Se requieren dos personas para montar el asador.
m Puede que existan diferencias visuales entre las ilustraciones y el
modeloadquirido.
m La tapa debe permanecer cerrada al montar o desplazar la barbacoa.
m Assemblez le barbecue sur une surface plate, de niveau et souple.
m Avant de procéder à l’assemblage, retirez le film protecteur qui recouvre les
pièces en acier inoxydable.
m N’utilisez pas d’outil électrique pour assembler le barbecue.
m Il faut deux personnes pour assembler le barbecue.
m Le modèle de barbecue que vous avez acheté peut diérer desillustrations.
m Toujours garder le couvercle fermé lors de l’assemblage ou au moment de
déplacer de votre barbecue.
TOOLS INCLUDED: TOOLS REQUIRED:
HERRAMIENTAS INCLUIDAS:
OUTILS INCLUS:
2
HERRAMIENTAS NECESARIAS:
OUTILS NÉCESSAIRES:
Page 63

A
-2 -8-4
-2
B
C
D
E
-14
-2 -2
-6
AA
F
-4 -4 -2
-2
-2
-1-1 -1-1
H
G
-4
-8-4
-1
WWW.WEBER.COM 3
Page 64

315
1 1
1 1
2 2
1 1
1 1
325
315
1 1
1 1
1 1
325
1 1
1 0
0 1
2 2
1 1
1 1
1 1
1 1
Page 65

315
325
315
325
1 1
1 1
1 1
1 1
1 1
1 1
2 2
2 2
2 2
1 1
1 1
5 5
3 3
1 1
1 1
3 3
0 1
1 1
1 1
Page 66

1
• Download the free BILT app for 3D step-by-step instructions.
• Descarga gratis la app BILT™ y sigue las instrucciones 3D paso a paso.
• Téléchargez gratuitement l’application BILT™ pour obtenir les instructions étape par étape en3D.
2
3
1-
A
6
Page 67

4
5
6
1-
A
WWW.WEBER.COM 7
Page 68

7
4-
A
8
8
4-
A
Page 69

5
8
9
3
2
_
0
4
1
9
1
6
9
2-
A
10
4-
A
WWW.WEBER.COM 9
Page 70

11
2-
B
12
10
2- 2-
B
Page 71

13
6-
B
14
4-
B
WWW.WEBER.COM 11
Page 72

15
m Save hardware.
m Conserve las partes.
m Sauvegarder le matériel.
12
Page 73

m IMPORTANT!
16
Wires and module must
be routed to the inside of
the grill frame.
Los cables y el módulo
deben introducirse en la
estructura de la barbacoa.
Les câbles et le module
doivent passer à
l’intérieur du châssis du
barbecue.
m ¡IMPORTANTE!
m IMPORTANT!
Gas line must be routed
on the OUTSIDE of the
grill frame.
El tubo de gas debe
pasar POR FUERA del
armazón del asador.
La conduite de gaz
doit être acheminée à
L’EXTÉRIEUR du châssis
du barbecue.
Route wires to
the outside of the
corrugated gas line.
Pase los cables por
el lado exterior de la
manguera corrugada
de gas.
Faire passer les câbles
vers l’extérieur du tube
ondulé de la conduite
de gaz.
WWW.WEBER.COM 13
Page 74

17
2- 2-
C
18
14
2-
C
Page 75

19
2-
D
20
2-
D
WWW.WEBER.COM 15
Page 76

21
Attach wires.
Conectar los cables.
Brancher les câbles.
22
16
2-
D
Page 77

23
24
m Do not tighten screws at this time.
No apretar los tornillos todavía.
m
m Ne pas encore serrer les vis.
WWW.WEBER.COM 17
Page 78

25
18
Page 79

26
1- 1-
E
27
1-
E
WWW.WEBER.COM 19
Page 80

28
1-
E
29
20
4- 4-
F
Page 81

30
31
2-
F
WWW.WEBER.COM 21
Page 82

32
8- 4-
G
Refer to the Troubleshooting section of
m
your Owner’s Guide for match lighting
instructions.
m
Consulte la sección “Resolución de problemas”
del manual del propietario si desea obtener
información acerca del encendido con cerillas.
m Consultez la section Dépannage de votre Mode d’emploi
pour obtenir les instructions d’allumage à l’allumette.
22
Page 83

33
4-
H
WWW.WEBER.COM 23
Page 84

34
UP
ARRIBA
HAUT
Use gloves or tool to
m
raise or lower warming
rack while grill is hot or
in use.
24
DOWN
ABAJO
BAS
m Use guantes o una
herramienta para subir
o bajar el soporte
calentador con el
asador caliente o en
uso.
m Utilisez des gants ou
un outil pour relever ou
abaisser la grille-réchaud
lorsque le barbecue est
chaud ou qu’il est en
fonction.
Page 85

35
2- 2-
1-
H
m WARNING: Always
keep lid closed when
assembling or moving
your grill.
m ADVERTENCIA: La tapa
debe permanecer cerrada
al montar o desplazar la
barbacoa.
m AVERTISSEMENT: Toujours
garder le couvercle fermé lors de
l’assemblage ou au moment de
déplacer de votre barbecue.
WWW.WEBER.COM 25
Page 86

36
37
26
1- 1-
Page 87

38
39
WWW.WEBER.COM 27
Page 88

Register Today.
Regístrate hoy.
Enregistrez-le aujourd’hui.
U.S.:
1-800-446-1071
EE. UU.:
1-800-446-1071
États-Unis:
1800446-1071
Apple and the Apple logo ar e trademarks of Apple Inc., re gistered in the U.S. and other
countries. A pp Store is a service mark of Apple Inc. Android and Google P lay are trademarks
of Google Inc.
Apple y el logotipo de Apple son marcas comerciales de Apple Inc., r egistradas en EE. UU.
y otros p aíses. App Store es una marca de servicio de Apple Inc. Android y Google Play son
marcas comerciales de Google Inc.
Apple et le logo d’Apple sont des marques de commerce d’AppleInc. déposées aux États-Unis
et dans d’autres pays. AppStore est une marque de ser vice d’AppleInc. Andr oid et GooglePlay
sont des marques de commerce de GoogleInc.
Mexico:
01 800 0093237
México:
01 800 0093237
Mexique:
01 800 0093237
Canada:
1-800-446-1071
Canadá:
1-800-446-1071
Canada:
1800446-1071
© 2018 Designed and engineered by Weber-Stephen Products LLC,
1415 S. Roselle Road, Palatine, Illinois 60067 USA.
www.weber.com
 Loading...