

Page 1

®
WindMate
100, 200, 300
Manual
EN English
DE Deutsch
FR Français
ES Español
ZH (中文)
JA (日本語)
815 W 1800 N (435) 750-1840
Logan, UT 84321 USA www.weatherhawk.com
Page 2
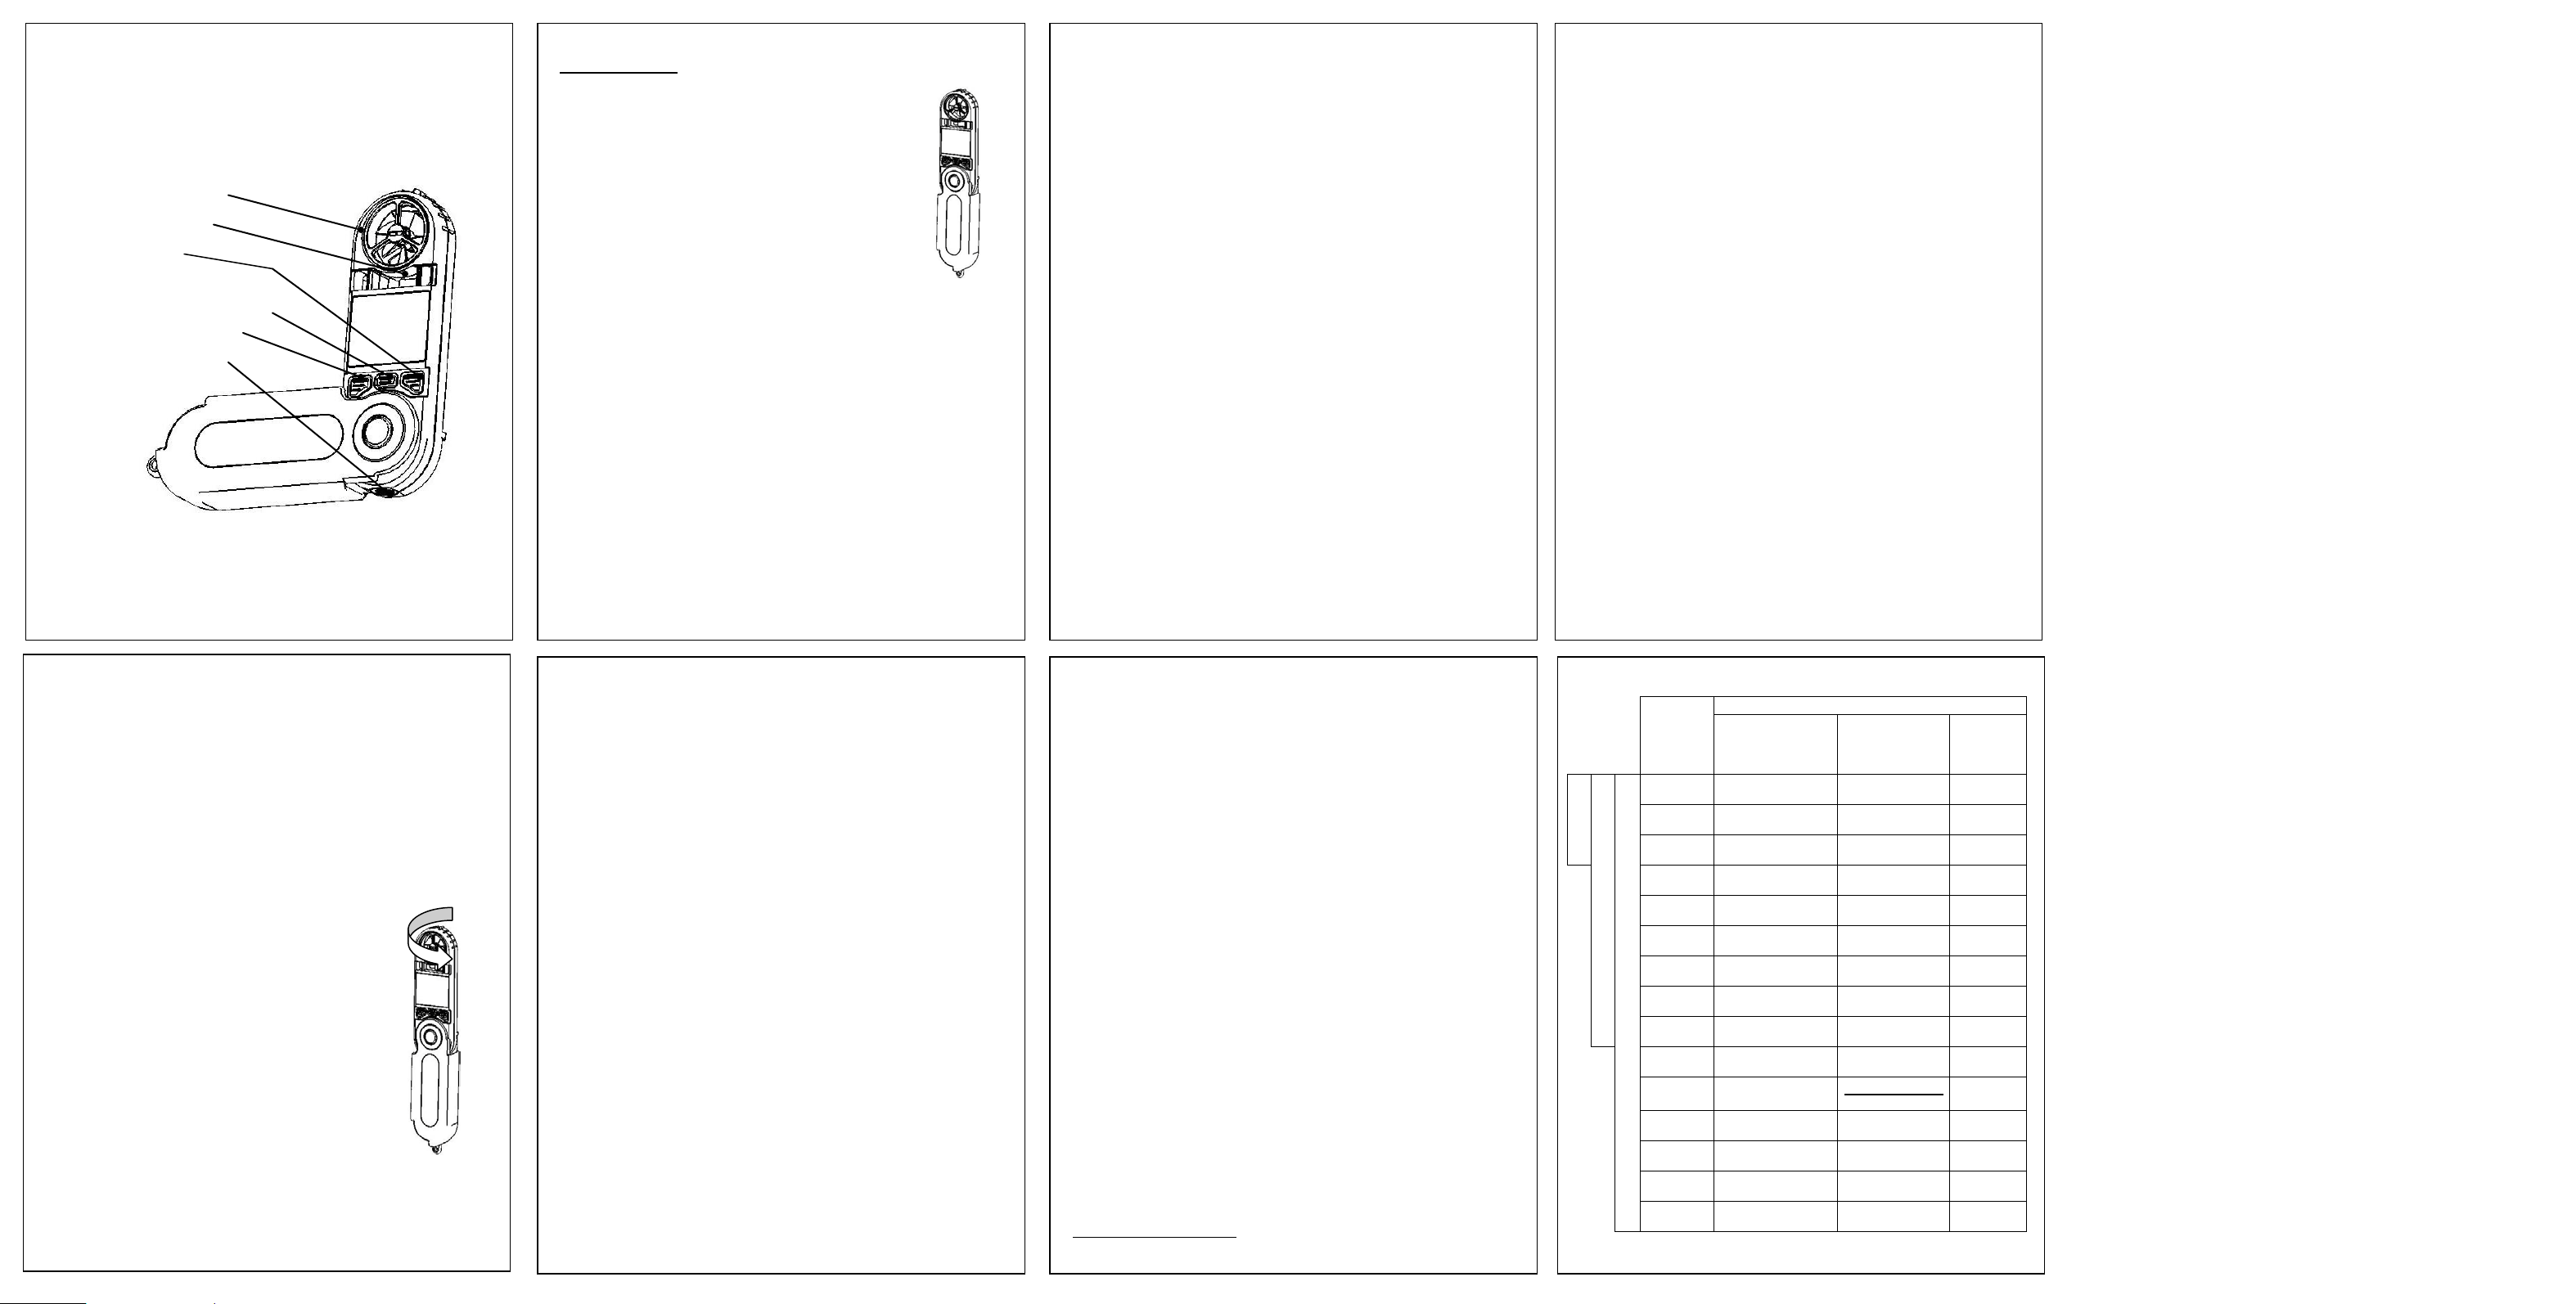
(Hold to turn power ON/ OFF)
Calibration
Calibration
Wind Impeller
Wind Vane
Units
ST/ EL (WM 100)
Mode/ On/ Off
Tripod Fitting
1 2 3 4 5 6 7 8
9
WindMate® 100, 200, 300
User Instruction Manual (Ver. 5/07)
SET/ EL (WM 200, 300)
Max. / Avg. / Wind Speed
MPH---->KMPH---->MPS---->FPM---->BF---->KNT
Temp. / Wind Chill/ Wet Bulb/ Dew Point/ Comfort Index/
Delta T
0
F---->0C
Compass Calibration (WM 200, 300)
If necessary, to correct for the presence of
ferrous metals, the compass can be calibrated.
Go to compass mode press and hold SET/EL
key till display shows “COMPAS S CAL”
(blinking). Turn the unit in a vertical position as
shown. Turn the unit around twice, 15 sec per
turn, as shown. After completing the 2 turns
press SET/EL key to confirm calibration. If the
display shows “END” the calibration is
successful. If the display shows “ERR” redo the
calibration process.
Getting Started
Open your WindMate
a tripod, open your WindMate
®
to 180o as shown. If using
®
to a 90o angle as
shown above to access the tripod fitting.
To turn the unit on or off, press and hold Mode
key for about 3 sec. You can turn off the unit at
any mode. If the unit is idle f or 5 minutes, it wil l
auto shut down to preserve battery life.
When taking wind measurements by hand, make sure to
®
keep the WindMate
at arm’s length from the body with the
display facing towards you so the wind will enter the wind
impeller through the rear. Use the wind vane to orient the
wind meter so you are on the wind’s axis. This will give you
the most accurate measurement.
®
CAUTION: The WindMate
is very accurate at low and
mid-range air speeds. Consistent use at very high speeds,
such as from a fast-moving car, will damage the impeller’s
bearing and reduce its accuracy. See below for impeller
replacement.
Digital Wind Direction (WM 200, 300)
®
Point the WindMate
directly into the wind and select
Compass mode. The edge of the wind vane will point
directly towards you. Wind direction is displayed digitally
and in compass points.
The compass feature can also compute the cross and
head/tail wind. Point the meter in the direction of travel or
target and get a steady compass reading. Press and hold
Units key until MARK stops blinking. Release Units key
and point the meter into the wind until you have a steady
compass reading. Press and hold Units key until MARK
stops blinking. The meter will display cross wind and to view
head wind press the Units Key. The computed cross and
head/tail wind may indicate a minus (–) sign. The minus (–)
sign will indicate the wind is coming from the back, while no
sign will indicate that the wind is coming from the front. To
exit, press Mode.
Using the Wind Meter Functions
When the unit is turned on for the first time, the default
mode is wind speed. Going to other modes or features is
simply done by pressing the Mode button.
Pressing Units Key at any mode, except Compass and
Humidity (WM 200, 300 only), changes the unit to your
preferred measurement unit. Units of measurement
sequence is shown below for each model.
Sequence for WM 100
• Wind speed – displays real time wind speed
• Max. wind speed – displays the max. wind speed
• Avg. wind speed – 5 sec
• Avg. wind speed – 10 sec
• Avg. wind speed – 13 sec
Max. / Avg. / Wind Speed
MPH---->KMPH---->MPS---->FPM---->BF---->KNT
Average Wind Speed (WM 100 only)
The WM 100 is equipped with 3 average wind speed options
5, 10 and 13 sec. Select the desired time duration in which
the unit will calculate the average wind speed. Press the
ST/EL key to start the count down. When the count down
reaches zero the average wind speed will be shown. To
take another average wind speed press ST/EL key.
Setting the Comfort Index™ (WM 300)
Accuweather.com® Comfort Index™ is the effect of temp,
relative humidity, wind speed & sun intensity on the human
body. You can adjust the formula based on sun intensity.
The solar factor has a range of 0 to 3.0 with a default setting
of 1.5 (medium sun intensity). Example: Full sun = 3.0;
Heavy clouds = 0. To change, press and hold SET/EL key.
Press Units key to adjust the current value of the solar
factor and press SET/EL to confirm and exit the setting
mode.
Replacing the Battery (All models)
The unit uses a CR2032 Lithium battery. Turn the unit to the back. Use a coin to turn battery cover as indicated by the arrow. Insert the battery with the printed side facing you and close the battery door.
Changing the Wind Impeller (All models)
WindMate
®
impellers can be replaced. Contact your dealer,
distributor or WeatherHawk for parts and instructions.
Your instrument has a 2-year warranty. Please save your
invoice for verification and contact WeatherHawk for
questions or service:
435-750-1840, M-F 8:00 to 5:00, USA Mountain Standard Time
www.weatherhawk.com
Sequence for WM 200
• Wind speed – displays real time wind speed
• Max. wind speed – displays max. wind speed
• Avg. wind speed – displays 10-sec average
• Compass
• Temperature
• WindChill
Max. / Avg. / Wind Speed
MPH---->KMPH---->MPS---->FPM---->BF---->KNT
Temp. / Wind Chill
0
F---->0C
Sequence for WM 300
• Wind speed – displays real time wind speed
• Max. wind speed – displays the max. wind speed
• Avg. wind speed – displays 10-sec average
• Compass
• Temperature
• WindChill
• Humidity (Sensor is self-calibrating)
• Wet Bulb
• Dewpoint
• Comfort Index
• Delta Temperature
Key Function Matrix
WM 100
WM 200
Mode
Wind speed
Max. Wind
speed
Avg. Wind
speed
Compass
Crosswind Exit to compass
Headwind Exit to compass
Compass
Temperature
WM 300
Wind Chill
Humidity
Wet Bulb
Dew Point
Comfort Index
Solar Factor
Setting
Delta T
(Hold to turn power ON/ OFF)
(Hold to turn power ON/ OFF)
(Hold to turn power ON/ OFF)
(Hold to turn power ON/ OFF)
(Hold to turn power ON/ OFF)
(Hold to turn power ON/ OFF)
(Hold to turn power ON/ OFF)
(Hold to turn power ON/ OFF)
(Hold to turn power ON/ OFF)
(Hold to turn power ON/ OFF)
Mode/ On/ Off
Change mode
Change mode
Change mode
Change mode
--------------- Exit to compass ---------------
Change mode
Change mode
Change mode
Change mode
Change mode
Change mode
--------------- Exit to Comfort Index Advance adjust
Change mode
Keys
ST / EL
(WM 100)
SET/ EL
(WM 200 & 300)
--------------- Change Units
--------------- Change Units
Start calculation (WM100) Change Units
Hold to enter Compass
Calibration
Hold to enter Compass
Hold to enter Compass
Calibration
--------------- Change Units
--------------- Change Units
--------------- ---------------
----
--------------- Change Units
Hold to enter Solar Factor
Setting
--------------- Change Units
Units
Hold to mark
direction
Headwind
Crosswind
Change Units
Change Units
Page 3

29
Transductor de Vi e nto
Veleta
es
Encendido/ EL
Modo/ Encendido/Apagado
Adaptador del Trípode
27
28
30
31
32
33
34
WindMate® 100, 200 y 300
Manual de Instrucciones (Versión 12/06)
Unidad
Secuencia para el WM 300
• muestra la velocidad del viento
• muestra la velocidad máxima del viento
• muestra la velocidad promedio tomada en 10 segundos
• Brújula
• Temperatura
• Sensación Térmica
• Humedad (El sensor se calibra automáticamente)
• Termómetro Húmedo
• Punto de Rocío
• Índice de Confort
• Temperatura Delta
Velocidad del Viento / Max. / Promedio
MPH---->KMPH---->MPS---->PPM---->BF---->Nudos
Temp. / Sensación T érmica / Term ómetro Húmedo / Punto
de Rocío / Índice de Confort / Temperatura Delta
0
F---->0C
Instrucciones básicas
Abra su
Si utiliza un trípode, abra su
se muestra en la figura de arriba a un ángulo de
90
Presione y mantenga presionado el botón Mode
(Modo) durante alrededor de 3 segundos para
encender o apagar la unidad. Podrá apagar la
unidad en cualquier modo. Luego de 5 minutos
de inactividad, la unidad se apagará
automáticamente para preservar la duración de
la batería.
Al tomar mediciones del viento en mano, asegúrese de
mantener al
cuerpo, con la pantalla mirando hacia usted, de manera que
el viento ingrese al transductor por detrás. Utilice la veleta
para orientar al anemómetro sobre el eje del viento. De esta
forma se obtendrán mediciones más exactas.
ADVERTENCIA: El
vientos de velocidades bajas o de rango medio. Su uso
constante en vientos de velocidades elevadas, tales como
las de un automóvil en movimiento, dañarán los
rodamientos del transductor y reducirán su precisión. Lea
más abajo a cerca del reemplazo del transductor.
Calibración de la Brújula (WM 200 y 300)
De ser necesario, para corregir la presencia de metales
ferrosos, la brújula puede ser calibrada. Pase al modo de
brújula y pre sione y mantenga presionado el botón Set/ EL
hasta que se muestre “COMPASS CAL” (titilando). Gire la
unidad dos veces, 15 segundos por vez, tal como se indica.
Luego de completar los dos giros, presione el botón Set/
EL. Si se muestra “END” en la pantalla, la calibración se
efectuó correctamente. Si se muestra “ERR” en la pantalla,
reanude el proceso de calibración.
Dirección Digital del Viento (WM 200 y 300)
Apunte el
viento y seleccione el modo Compass (Brújula).
El extremo de la veleta apuntará directamente
hacia usted. La dirección del viento será
mostrada digitalmente y en cuartas.
WindMate
o
para acceder al adaptador del trípode.
WindMate
WindMate
®
a 180o tal como se indica.
WindMate
®
a una distancia de un brazo de su
WindMate
®
directamente hacia el
®
tiene gran precisión en
®
como
Utilizando las Funciones del Anemómetro
Al encender la unidad por primera vez o luego de una
reinicialización completa, el modo predeterminado será el
de velocidad del viento. Se podrá pasar a otros m odos o
funciones simplemente presionando el botón Mode.
La unidad de medición puede ser modificada presionando
el botón Units (Unidades) en cualquier modo, con
excepción de los modos Compass (Brújula) y Humidity
(Humedad) (sólo en los modelos WM 200, 300). Más abajo
se detalla la secuencia de unidades de medición para cada
modelo.
Secuencia para el WM 100
• muestra la velocidad del viento en tiempo real.
• muestra la velocidad máxima del viento.
• Velocidad promedio del viento durante 5 segundos
• Velocidad promedio del viento durante 10 segundos
• Velocidad promedio del viento durante 13 segundos
Velocidad del Viento / Máx. / Promedio
MPH---->KMPH---->MPS---->PPM---->BF---->Nudos
La función de brújula también puede calcular el viento
cruzado y el viento de frente y de cola. Alinee la unidad con
la dirección de viaje o destino. Presione y mantenga
presionado el botón Units hasta que MARK deje de titilar.
Suelte el botón Units y apunte la unidad haci a el viento.
Nuevamente, presione y mantenga presionado el botón
Units hasta que MARK deje de titular. La unidad mostrará
el viento cruzado, y para ver el viento de frente, deberá
presionar el botón Units. El viento cr u zado y el viento de
frente y de cola computados pueden indicarse con un signo
“–“. El signo “–“ indicará que el viento viene desde atrás,
mientras que la ausencia del signo negativo, indicará que el
viento viene de frente. Para salir de esta función, presione
Mode.
Calcula ndo e l Í ndi ce d e C onf or t (C omfo rt Inde x™ ) ( WM
300)
El Índice de C on fort (Co mfort Inde x™ ) de Accuweather.com®
es el efecto de la temperatura, humedad relati va, velocida d
del viento e intensidad del sol so bre el cue rpo humano . Puede
ajustar la fórmula segú n la int ensidad del sol. El factor sola r
tiene un rango d e ent re 0 y 3. 0, con u n fa cto r pr ede ter mina do
de 1.5 (intensidad solar media). Por ejemplo: Cielo totalmente
despejado = 3. 0; Muy nu blad o = 0. Pa r a modificar, presio ne y
mantenga presionado el botón Set/ EL. Presione el botón
Units para ajustar el valor del factor solar actual y luego
presione Set/ EL para confirmar y salir del modo de ajuste.
Velocidad Promedio del Viento (sólo para el WM 100)
El WM 100 está equipado con 3 opciones de velocidad
promedio del viento: 5, 10 y 13 segundos. Selecc ione el
tiempo deseado dentro del cual la unidad calculará la
velocidad pr omedio del viento. Presione el botón Start/ EL
(Comienzo/EL) para comenzar la cuenta regresiva. Al
finalizar la cuenta regresiva se mostrará la velocidad
promedio. Para tomar otra velocidad promedio del viento,
presione el botón Start/EL.
Secuencia par el WM 200
• muestra la velocidad del viento en tiempo real
• muestra la velocidad máxima del viento
• muestra la velocidad promedio tomada en 10 segundos
• Brújula
• Temperatura
• Sensación Térmica
Velocidad del Viento / Máx. / Promedio
MPH---->KMPH---->MPS---->PPM---->BF---->Nudos
Temp. / Sensación Térmica
0
F---->0C
Reemplazo de la Batería (En todos los modos)
Cuando vea el ícono de la batería a la izquierda de la
pantalla, la batería se encontrará con un carga baja y
deberá ser reemplazada o de lo contrario afectará a la
precisión de la unidad. La unidad utiliza una batería de litio
CR2032. De vuelta la unidad. Use una moneda para girar la
cubierta de la batería en la dirección que indica la flecha.
Inserte la batería con la cara impresa mirando hacia usted y
luego cierre la cubierta de la batería.
Reemplazo del Transductor de Viento (En to d o s los modos)
Los transductores de
reemplazados. Póngase en contacto con su distribuidor en
caso de requerir piezas e instrucciones de ensamblaje.
WindMate
®
pueden ser
Page 4

21
22
Hélice
Girouette
Unités
Démarrage/ EL
Mode/ Marche/ Arrêt
Raccord de trépie d
19
20
23
24
25
26
18
WindMate® 100, 200, 300
Mode d’emploi (ver. 07/4)
Séquence pour le WM 200
• Vitesse du vent – affiche la vitesse du vent en temps réel
• Vitesse du vent max. – affiche la vitesse du vent max.
• Vitesse du vent moyenne – affiche la moyenne de 10
secondes
• Boussole
• Température
• Refroidissement
Vitesse du vent / Max. / Moyenne
MPH---->KMPH---->MPS---->FPM---->BF---->KNT
Temp. /Refroidissement
0
F---->0C
Pour commencer
Ouvrez votre WindMate® à un angle de 180o
comme illustré. Si vous uti lisez un trépied, ouvrez
le WindMate
ci-dessus afin d’accéder au raccord du trépied.
Pour mettre l’appareil sous tension ou hors tension,
appuyez sur la touche Mode et maintenez-la
enfoncée pendant environ 3 secondes. Vous
pouvez éteindre l’appareil quel que soit le mode. Si
l’appareil n’est pas util isé pendant 5 minutes, il se met hors
tension automatiquement afin de conserver la pile.
Lors des prises de mes ure manuelles du vent, veillez à ce
que le WindMate
votre corps, l’affichage vous faisant face afin que le vent
puisse entrer dans l’hélice par l’arrière. Utilisez la girouette
afin d’orienter l’a ppareil de mesure du vent, de f açon à ce
que vous vous trouviez dans l’axe du vent. Cela vous
permettra de prendre les mesures les plus précises.
Séquence pour le WM 300
®
à un angle de 90o comme illustré
®
se trouve à une distance d’un bras de
• Vitesse du vent – affiche la vitesse du vent en temps réel
• Vitesse du vent max. – affiche la vitesse du vent max.
• Vitesse du vent moyenne – affiche la moyenne de 10
secondes
• Boussole
• Température
• Refroidissement
• Humidité (capteur à autocalibrage)
• Bulbe humide
• Point de rosée
• Indice de confort
• Température Delta
Vitesse du vent / Max. / Moyenne
MPH---->KMPH---->MPS---->FPM---->BF---->KNT
Temp. / Refroidissement/ Bulbe humide/ Point de rosée/
Indice de confort/ Temp. Delta
0
F---->0C
ATTENTION : Le WindMate
pour les vitesses d’air de faible ou moyenne portée. Une
utilisation fréquente à des vitesses très élevées, comme à
partir d’une voiture se déplaçant rapidement, détériore la
surface d’appui de l’hélice et réduit la précision.
Reportez-vous ci-dessous pour le remplacement de l’hélice.
Utilisation des fonctions de l’appareil de mesure du vent
Lorsque l’appareil est m is sous tension la première fois ou
subit un redémarrage à froid, le mode par défaut est la
vitesse du vent. Vous pouv ez sim plem ent passer aux autres
modes ou fonctions en appuyant sur la touche Mode.
Lorsque vous appuyez sur la touche Units, quel que soit le
mode, hormis Boussole et Humidité (WM 200 et 300
seulement), vous paramétrez l’appareil sur les unités de
mesure choisies. La séquence des unités de mesure est
indiquée au-dessous de chaque modèle.
Calibrage de la boussole (WM 200 et 300)
Si besoin, en cas de présence de métaux
ferreux, vous pouvez calibrer la boussole.
Passez en mode boussole, appuyez sur la
touche Set/EL et maintenez-la enfoncée
jusqu’a ce que « CAL BOUSSOLE » s’affiche
(en clignotant). Faites tourner l’appareil deux
fois, 15 secondes par tour, comme indiqué.
Une fois les 2 tours terminés, appuyez sur la
touche Set/EL. Si « END » s’affiche, le
calibrage est réussi. Si « ERR » s’affiche, refaire la
procédure de calibrage.
Direction du vent numérique (WM 200 et 300)
Orientez le WindMate
sélectionnez le mode Boussole. Le bord de la girouette est
alors dirigé vers vous. La direction du vent est affichée
numériquement et en points de boussole.
®
®
est un appareil très précis
directement dans le vent et
Séquence pour le WM 100
• Vitesse du vent – affiche la vitesse du vent en temps réel
• Vitesse max. du vent – affiche la vitesse max. du vent
• Vitesse moyenne du vent – 5 secondes
• Vitesse moyenne du vent – 10 secondes
• Vitesse moyenne du vent – 13 secondes
Vitesse du vent / Max. / Moyenne
MPH---->KMPH---->MPS---->FPM---->BF---->KNT
Vitesse moyenne du vent (WM 100 uniquement)
Le WM 100 est équipé d e 3 options de vitesse m oyenne du
vent de 5, 10 et 13 s econd es. Sé lect ionnez l a durée dés irée
pendant laquelle l’ appareil calculera la vites se moyenne du
vent. Appuyez sur la touche Start/ EL pour commencer le
compte à rebours. Dès que le compte à rebours arrive à
zéro, la vitesse m oyenne du vent s’affic he. Pour pren dre un
autre relevé de vitesse moyenne du vent, appuyez sur la
touche Start/EL.
La fonction de la boussole peut calculer le vent arrière, le vent
debout et le vent d e travers . Dirige z l’appare il de mesur e dans
la direction du déplacement ou de la cible. Appuyez sur la
touche Units et mai ntenez -la enfoncée jusqu’à ce que « MARK
» s’arrête de clignoter. Relâchez la touche Units et dirigez
l’appareil de mesure dans le vent. Appuyez sur la touche Units
et maintenez-la enfoncée jusqu ’ à c e q ue « MA R K » s ’ ar r êt e d e
clignoter. L’app areil de mes ure a ffiche l e ven t de traver s et po ur
afficher le vent debout, appuyez sur la touche Units. Les vents
calculés de travers, debout et arrière peuvent présenter un
signe – . Le signe – indique que l e vent vient de l’arrière, tandis
que l’absence de signe indique que le vent vient de l’avant.
Pour quitter, appuyez sur Mode.
Réglage du C om for t In dex ™ ( WM 300 )
Accuweather.com® Comfort Index™ représente l’effet de la
températur e, de l’hum idité relati ve, de la vites se du vent et de
l’intensit é du solei l sur le corps humain. Vous pouv ez régler l a
formule selon l’intensité du soleil. Le facteu r solaire a une plag e
de 0 à 3,0 avec une valeur par défaut de 1,5 (intensité
moyenne du soleil). E xempl e : Plein soleil = 3 ; Très nuageux =
0. Pour modifie r, appuy ez sur la touche Set/ EL et maintenez -la
enfoncée. Appuyez sur la touc he Units pour régler la valeur
actuelle du facteur solaire et appuyez sur Set/ EL pour
confirmer et quitter le mode de réglage.
Remplacement de la pile (tous les modèles)
Lorsque vous voyez l’icône de la pile sur le côté gauche,
celle-ci est épuisée et il faut la remplacer afin de ne pas
affecter la précision. L’appareil utilise une pile au lithium
CR2032. Retournez l’appareil. Utilisez une pièce pour
tourner le couvercle de la pile comme indiqué. Introduisez la
pile, le côté imprimé face à vous et remettez le couvercle de
la pile.
Remplacement de l’hélice (tous les modèles)
Les hélices WindMate
votre revendeur ou distributeur pour les pièces de rechanges
et les instructions.
®
peuvent être remplacées. Contactez
Page 5

17
18
Windgebläserad
Winddrehschieber
Einheiten
Start / EL
Betriebsmodus / Ein / Aus
Tripod Anschluss
10
11
12
13
14
16 48
WindMate® 100, 200, 300
Anwenderhandbuch (Version 12/06)
Reihenfolge für WM 200
• Windgeschwindigkeit – zeigt Echtzeit- Windgeschwindigkeit
an
• Max. Windgeschwindigkeit – zeigt max.
Windgeschwindigkeit an
• Durchschnittl. Windgeschwindigkeit – zeigt 10 -Sek.
Durchschnitt an
• Kompass
• Temperatur
• Windauskühlungsfaktor
Max. / Durchschnittl. / Windgeschwindigkeit
MPH---->KMPH---->MPS---->FPM---->BF---->KNT
(Meilen pro Std. Kilom eter pr o Std. Mei len pro Sek unde
Fuss pro Minute Knoten)
Temp. / Windauskühlungsfaktor
0
F---->0C
Wie man anfängt
Den WindMate
öffnen. Wenn Sie einen Tripod benut zen, den
WindMate
®
auf 180o wie angezeigt
®
in einem 90 Grad Winkel wie oben
angezeigt öffnen um Zugang zum
Tripodanschluss zu haben.
Um das Gerät ein oder auszuschalten,
drücken und halten Sie bitte die Mode Taste
für circa 3 Sekunden. Sie können das Gerät in
jedem Modus ausschalten. Wenn das Gerät 5
Minuten lang nicht benutzt wird, wird es sich
automatisch ausschalten um Batterie zu
sparen.
Wenn Windmessungen manuell vorgenommen werden bitte
sicherstellen, dass der WindMate
®
eine Armlänge vom
Körper weg gehalten wird und die Anze ige in Ihre Richtung
zeigt, damit der Wind von hinten durch das Windgebläserad
geblasen wird. Benutzen Sie die Winddrehscheibe um den
Windmesser so einzustellen, dass Sie auf der Windachse
sind. Dadurc h werd en Sie die genau es ten Mes sung en
erhalten.
Sequence for WM 300
• Windgeschwindigkeit – gibt Echtzeit- Windgeschwindigkeit
an
• Max. Windgeschwindigkeit – zeigt die maximale
Windgeschwindigkeit an
• Durchschnittl. Windgeschwindigkeit – zeigt 10-Sek.
Durchschnitt an
• Kompass
• Temperatur
• Windauskühlungsfaktor
• Feuchtigkeit (Sensor stellt sich selbst ein)
• Feuchttemperatur (T. am Verdunstungsthermo.)
• Taupunkt
• Komfort-Index
• Delta Temperatur
Max. / Avg. / Wind Speed
MPH---->KMPH---->MPS---->FPM---->BF---->KNT
Temperatur / Windauskühlungsfaktor / Feuchttemperatur /
Taupunkt / Komfort Index / Delta Temperatur
0
F---->0C
15
VORSICHT: The WindMate
®
ist bei niedrigen und mittleren
Luftgeschwindigkeiten sehr genau. Ständiger Gebrauch bei
sehr hohen Geschwindigkeiten, wie zum Beispiel bei einem
schnell fahrenden Auto, wird das Lager des
Windgebläserades auf Dauer beschädigen und die
Genauigkeit verringern. Siehe unten für Informationen zum
Ersetzen des Windgebläserades.
Benutzen der Windmessfunktionen
Wenn das Gerät zum ersten mal eingeschaltet wird, oder ein
Reset gemacht wurde, ist Windgeschwindigkeit die
Standardeinstellung. Um zu anderen Einstellungen oder
Funktionen zu gelangen, drücken Sie einfach die Mode
Taste.
Durch Drücken der Units Taste in jedem ausser dem
Kompass- und Feuchtigkeitsmodus (nur bei WM 200, 300)
wird die Einheit auf Ihre gewünschte Messeinheit geändert.
Einheit en der Messreihenfolge werden für jedes Modell
unten angegeben.
Kompasskalibrierung (für WM 200, 300)
Wenn nötig, und um die Ablenkung des
Kompasses durch eisenhaltige Metalle zu
korrigieren, kann der Kompass kalibriert
werden. Gehen Sie in den Kompassmodus
und drücken und halten Sie die Set/
EL-Taste, bis die Anzeige “COMPASS
CAL” anzeigt (blinkt auf). Drehen Sie das
Gerät zweimal um, 15 Sek. pro Umdrehung,
wie angezeigt. Nachdem die zwei (2)
Umdrehungen beendet sind, die Set/ EL-Taste
drücken. Wenn die Anzeige „END” anzeigt, war die
Kalibrierung erfolgreich. Wenn die Anzeige „ERR”
anzeigt, wiederholen Sie bitte den Kalibrierungsprozess.
Reihenfolge für WM 100
• Windgeschwindigkeit –zeigt Echtzeit-Windgeschwindigkeit
an
• Max. Windgeschwindigkeit– zeigt die maximale
Windgeschwindigkeit an
• Durchschnittl. Windgeschwindigkeit – 5 Sek.
• Durchschnittl. Windgeschwindigkeit – 10 Sek.
• Durchschnittl. Windgeschwindigkeit – 13 Sek.
Max. / Durchschnittl. / Windgeschwindigkeit
MPH---->KMPH---->MPS---->FPM---->BF---->KNT
(Meilen pro Std. Kilom eter pr o Std. Mei len pro Sek unde
Fuss pro Minute Knoten)
Durchschnittliche Windgeschwindigkeit (nur für WM
100)
Der WM 100 ist mit drei Optionen zur durchschnittlichen
Windgeschwindigkeit, 5, 10 und 13 Sek. ausgestattet.
Wählen Sie die gewünschte Zeitdauer in welcher das Gerät
die durchschnittliche Windgeschwindigkeit messen soll.
Drücken Sie die Start/ El Taste um die Stoppuhr zu starten.
Wenn die Stoppuhr bei Null angelangt ist, wird die
durchschnittl. Windgeschwindigkeit angezeigt. Um eine
weitere durchschnittliche Windgeschwindigkeit zu messen,
drücken Sie die Start/EL Taste.
Digitale Windrichtung (WM 200, 300) Halten Sie den WindMate
®
direkt in den Wind und wählen
Sie den Kompass-Modus aus. Die Kante des
Windschiebehebels zeigt direkt in Ihre Richtung. Die
Windrichtung ist in Digitalformat und in Kompasspunkten
angegeben.
Die Kompassfunktion kann auc h den Se iten-, Gegen- und
Rückenwind berechnen. Halten Sie das Messgerät in die
Windrichtung oder in Richtung Ziel. Drücken und halten Sie
die Units Taste bis „MARK“ aufhört zu blinken. Lassen
Sie die Units Taste los und halten Sie das Messgerät in den
Wind. Drücken und halten Sie die Units Taste bis MARK
aufhört zu blinken. Das Messgerät wird dann Seitenwind
anzeigen und um den Gegenwind zu sehen, drücken Sie
bitte die Units Taste. Der kalkulierte Seiten- und
Gegen-/Rückenwind kann durch ein „– - Zeichen“ angegeben
werden. Das Minuszeichen gibt an, dass der Wind von
hinten kommt, während kein Vorzeichen angibt, dass der
Wind von vorne kommt. Um den Betriebsmodus zu beenden,
drücken Sie bitte Mode.
Einstellen des Komfort- Indexes™ (für WM 300)
Der Accuweather.com® Comfort Index™ ist der Effekt von
Temperatur, relativer Feuchtigkeit , Windgeschwindigkeit &
Sonnenintensität auf den menschlichen Körper. Sie können die
Formel je nach Sonnenintensitä t einstellen. Der So nnenfaktor
reicht von 0 bis 3.0 mit einer Standardeinstellung von 1. 5
(mittlere Sonnenintensität ). Zum Beis piel: Voll e Sonne = 3,0;
starke Bewölkung = 0. Um diese Einstellung zu verändern,
drücken und halten Sie die Set/ EL Taste. Drücken Sie die Units
Taste um den momentanen Wert des Sonnenfaktors
anzupassen und drücken Sie d ann Set/ EL um zu bestätigen
und den Einstellungsmodus zu ve rlassen .
Ersetzen der Batterie (für alle Modelle)
Wenn Sie das Symbol für die Batterie auf der linken Seite sehen,
ist die Batterie fast le er und mu ss ersetz t werden da sonst die
Messgenauigkeit beeinträchti gt wird. Für da s Gerät brau chen Sie
eine CR2032 Lithium Batterie. Drehen Sie da s Gerä t um.
Benutzen Sie eine Münz e um den Dec kel des Batterieber eiches
zu drehen wie au f dem P feil angezeigt w ird. Setz en Sie eine
Batterie ein, sodass die bed ruckte Sei te in I hre Richtung sieht,
und machen Sie den Batte riedeckel wiede r zu.
Auswechseln des the Windgebläserades (für alle Modelle ) Das WindMate
®
Gebläserad kann ersetzt werden.
Kontaktieren Sie Ihren Händler oder Lieferanten für Teile
oder Anleitungen.
Page 6

/ EL
/
43
44
45
46
49
50
51
52
47
WindMate® 100, 200, 300
ユーザー マニュアル (2006 年 12 月版)
羽根車
風向計
ユニット
開始
モード/ オン
三脚台継手
WM 300 の測定順序
• (風速)-リアルタイムの風速を表示。
• (最大風速)-最大風速を表示。
• (平均風速)-10 秒間の平均を表示。
• (コンパス)
• (気温)
• (風冷指数)
• (湿度)(センサーは自己校正します。)
• (湿球)
• (露点)
• (コンフォートインデックス)
• (デルタ温度)
(最大)/(平均)/(風速)
(マイル毎時)---->( キロメートル毎時)---->( メートル毎
秒)---->(フィート毎分)---->BF---->(ノット)
(気温) / (風冷指数)/ (湿球)/ (露点)/ (コンフォートイン
デックス)/ T(デルタ温度)
0
F---->
0
C
ご使用の前に
右の図のように、WindMate
さい。三脚台を使用する場合は、上の図のように
®
WindMate
を 90°の角度に開いて、三脚台継
手に接続してください。
本体をオンまたはオフにするためには、Mode(モー
ド)キーを約3秒間押し続けてください。どのモードで
も、本体をオフにすることができます。もし、本体が 5 分間活動し
ていない場合、バッテリーの寿命を長持ちさせるために自動的に
オフになります。
手で風速測定をするときは、風が本体の後ろから羽根車に入る
ように、ディスプレイ側を自分に向けて、WindMate
から腕の長さ分離して使用してください。風軸上になるように、
風向計を使用して風速計の方向を決めてください。この方法で
最も正確な測定ができます。
(コンパスの校正) (WM 200, 300)
必要に応じて、コンパスを校正して、鉄製の金属
の影響を補正してください。コンパスモードプレスへ
行き、ディスプレイが「COMPASS CAL(コンパス校
正)」(点滅)を表示するまで、
てください。図に示されるように、本体を 2 回、1回
転あたり 15 秒間で回転してください。2 回転した後、
セット/ EL キーを押してください。表示が「END (終
了)」になれば、校正は完了しています。表示が「ERR (エラー)」
ならば、校正をやり直してください。
®
を 180°開いてくだ
セット/ EL キーを押し
®
を必ず体
注意事項 WindMate
®
は弱~中程度の風速で非常に正確
です。高速で移動している車からなどの、高速での一貫した使用
は、羽根車(インペラー)のベアリングを破損して、精度を低下させ
る恐れがあります。羽根車の交換に関しては、以下をご覧くださ
い。
Windmeter(風速計)機能の使用法
本体を初めてオンにするとき、または計器をリセットするときは、デ
フォルトモードは風速に設定されています。他のモードまたは機能
にするためは、その
Mode(モード)キーを押してください。
Units Key( ユニットキー)を押すと、Compass( コンパス)と
Humidity(湿度)(WM200、300 のみ装備)を除いた、どのモードか
らも都合の良い測定モードに変えられます。各機種の測定順序
は、以下のようになります。
(デジタル風向)(WM 200, 300)
®
直接に風の中に WindMate
を向けて、Compass(コンパス)モ
ードを選択してください。wind vane(風向計)の端が直接ユーザ
ーの方を指します。デジタル式とコンパスの向きで、風向を表示し
ます。
コンパスには横風と向い風/追い風を計算する機能もあります。
移動または目標の向きに計器を向けてください。 MARK(マーク)
が点滅するのを止めるまで、
Units(ユニット)キーを放して、計器を風の中に向けてくださ
さい。
い。MARK(マーク)が点滅するのを止めるまで、
Units(ユニット)キーを押し続けてくだ
Units(ユニット)キ
ーを押し続けてください。計器は横風を表示をします。向い風を
見るためには、Units Key(ユニット)キーを押してください。 計算後
に、横風、向い風/追い風について、-というサインを表示するこ
とがあります。-サインは、風が背後から来ることを示し、サインが
ない場合は、風が正面からくることを示します。終了したい場合
Mode(モード)キーを押してください。
は、
WM 100 の測定順序
• (風速)-リアルタイムの風速を表示。
• (最大風速)-最大風速を表示。
• (5 秒間の平均風速)
• (10 秒間の平均風速)
• (13 秒間の平均風速)
(最大)/(平均)/(風速)
(マイル毎時)---->( キロメートル毎時)---->( メートル毎
秒)---->(フィート毎分)---->BF---->(ノット)
(平均風速) ( 100 のみ)
WM 100 は 5、10、および 13 秒間の、3 つの平均風速オプション
を備えています。必要な測定時間を選択してください。 本体が
平均風速を計算します。カウントダウンを始めるために開始
/ El
キーを押してください。カウントダウンがゼロに達すると、平均風速
が表示されます。別の平均風速を測定するには、開始
/EL キー
を押してください。
Comfort Index™ (コンフォートインデックス、WM 300)の設定
Accuweather.com® Comfort Index™ は人体への温度、相
対湿度、風速、および日射の強さの効果の指標です。 ユーザー
は日射の強さに基づいてそのフォーミュラを調整することができます。
日射の係数には、0~3.0 の範囲があります。 デフォルト設定は
1.5(中程度の日射の強さ)です。例、 晴天=3.0、完全な曇り=0。
変更するためには
下さい。 日射の係数を現在の値に調整するためには、
、セット/ EL キーを押し、しばらく押さえていて
Units(ユ
ニット)キーを押してください。そして、設定モードを確認し、そこから
出る場合、
セット/ EL キーを押してください。
バッテリーの交換(すべての機種で共通)
左側のバッテリーアイコンでバッテリーが少ない場合、精度に影響
するので、取り替えなければなりません。CR2032 リチウムバッテリ
ーを使用します。本体の背面を見てください。コインを使用して、
矢印によって示されているようにバッテリーカバーを回してください。
印刷側が表に来るようにしてバッテリーをはめ、バッテリーのカバー
を閉じてください。
WM 200 の測定順序
• (風速)-リアルタイムの風速を表示。
• (最大風速)-最大風速を表示。
• (平均風速)-10 秒間の平均を表示。
• (コンパス)
• (気温)
• (風冷指数)
(最大)/(平均)/(風速)
(マイル毎時)---->( キロメートル毎時)---->( メートル毎
秒)---->(フィート毎分)---->BF---->(ノット)
(気温) / (風冷指数)
0
F---->0C
(羽根車)の交換 (すべての機種に共通)
®
WindMate
の羽根車は交換できます。部品と取扱については、
ディーラーか販売業者にお問い合わせください。
Page 7

开始/EL
35
36
37
38
39
40
41
42
WindMate® 100、200、300
用户指导手册(版本 12/06)
风叶轮
风向标
单位
模式/开/关
三角架装置
WM 300 的顺序
• 风速 – 显示实时风速
• 最高风速 – 显示最高风速
• 平均风速 – 显示 10 秒平均风速
• 罗盘
• 温度
• 风力降温
• 湿度(传感器自校准)
• 湿球
• 露点
• 舒适度指数
• 温度变数
最高
/
平均
/
风速
MPH---->KMPH---->MPS---->FPM---->BF---->KNT
温度/风力降温/湿球/露点/舒适度指数/温度变数
0
F---->0C
入门
将您的 WindMate® 打开到 180
o
,如右图
所示。使用三角架,如上图所示将您的
WindMate® 打开到 90
o
角,以便使用三角
架装置。
要开关该装置,请按住模式键约 3 秒钟。您
可以在任何模式下关闭该装置。如果该装置
空闲 5 分钟,则它将关闭以延长电池寿命。
在手动执行风力测量时,请确保将 WindMate® 保
持在距身体一臂长度并且显示面朝向您,以便风能
够从后面进入风叶轮。使用风向标来确定风速仪的
方向,以便您处于风的轴上。这将为您提供最精确
的测量。
警告:WindMate® 对于低速和中速的风速非常精
确。经常在非常高速下使用(例如,在飞驰的汽车
上)将会损坏叶轮的轴承并降低其精确度。有关叶
轮更换,请参见下文。
罗盘校准(WM 200、300)
如果有必要由于存在铁金属而进行校正,则
可以校准罗盘。转到罗盘模式并按住设置
/EL 键,直到显示屏显示“COMPASS
CAL”(不断闪烁)。旋转该装置两次,每
次 15 秒,如图所示。在完成 2 次旋转后,
按下设置/EL 键。如果显示屏显示“END”,
则校准成功。如果显示屏显示“ERR”,则
重新执行校准过程。
数字风向(WM 200、300)
将 WindMate® 直接迎着风并选择“罗盘”模式。
风叶轮的边缘将直接指向您。风向将以数字形式、
按罗盘方位显示。
使用风速仪的各项功能
在首次打开该装置或执行硬复位时,默认模式为风
速。只需按下模式按钮,即可转到其他模式或功能。
如果在除了“罗盘”和“湿度”模式(仅限 WM 200、
300)外的任何模式下按下单位键,则可以将该单
位更改为您喜爱的测量单位。每个型号的测量单位
的顺序如下所示。
WM 100 的顺序
• 风速 – 显示实时风速
• 最高风速 – 显示最高风速
• 平均风速 – 5 秒
• 平均风速 - 10 秒
• 平均风速 - 13 秒
最高
/
平均
/
风速
MPH---->KMPH---->MPS---->FPM---->BF---->KNT
罗盘功能还可用于计算横向风和热风/顺风。沿旅行
或目标方向定位该仪器。按住单位键,直到 MARK
停止闪烁。松开单位键,并且将仪器指向风。按住
单位键,直到 MARK 停止闪烁。该仪器将显示横
向风,要查看热风,请按下单位键。计算出的横向
风和热风/顺风可能指示 – 符号。– 符号指示风是
从后面刮过来的,而没有符号则指示是从前面刮过
来的。要退出,请按下模式。
设置 Comfort Index™ (WM 300)
Accuweather.com® 的 Comfort Index™(舒适度
指数)指示温度、相对湿度、风速和阳光强度对人
体的影响。您可以基于阳光强度调整公式。太阳能
系数的范围是 0 到 3.0,默认设置为 1.5(中等阳
光强度)。示例:全光照 = 3.0;厚云 = 0。要进行
更改,请按住设置/EL 键。按下单位键可以调整太
阳能系数的当前值,按下设置/EL 键可以确认和退
出设置模式。
平均风速(仅限 WM 100)
WM 100 配备有 3 个平均风速选项,分别为 5
秒、10 秒和 13 秒。请选择该装置计算平均风
速的期望的时间段。按下开始/El 键可以开始倒计
时。在倒计时达到零时,将显示平均风速。要采
用其他平均风速,请按下开始/EL 键。
WM 200 的顺序
• 风速 – 显示实时风速
• 最高风速 – 显示最高风速
• 平均风速 – 显示 10 秒平均风速
• 罗盘
• 温度
•
风力降温
最高
/
平均
/
风速
MPH---->KMPH---->MPS---->FPM---->BF---->KNT
温度/风力降温
0
F---->0C
更换电池(所有模式)
当在左侧看到电池图标时,则表示电池电量低并且必
须更换,否则将影响精确性。该装置将使用 CR2032
锂电池。关闭该装置。使用硬币按箭头所示打开电池
盖。将打印面朝向您来插入电池,然后合上电池盖。
更改风叶轮(所有型号)
WindMate™ 叶轮可更换。有关部件和说明,请与
您的经销商或分销商联系。
 Loading...