

SM-28 SKYMASTER Manual V 4.05
English
Français
Español
Deutsch
Italiano
815 W 1800 N (435) 750-1840
Logan, UT 84321 USA www.weatherhawk.com
815 W 1800 N (435) 750-1840
Logan, UT 84321 USA www.weatherhawk.com
SM-28 SKYMASTER Manual V 4.05 - English
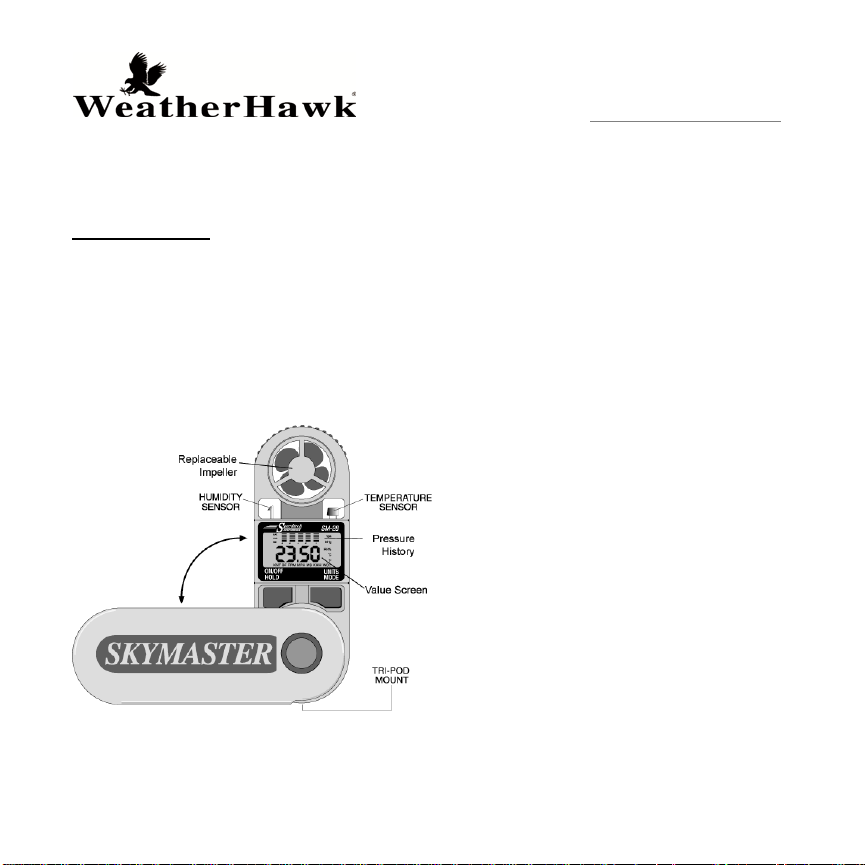
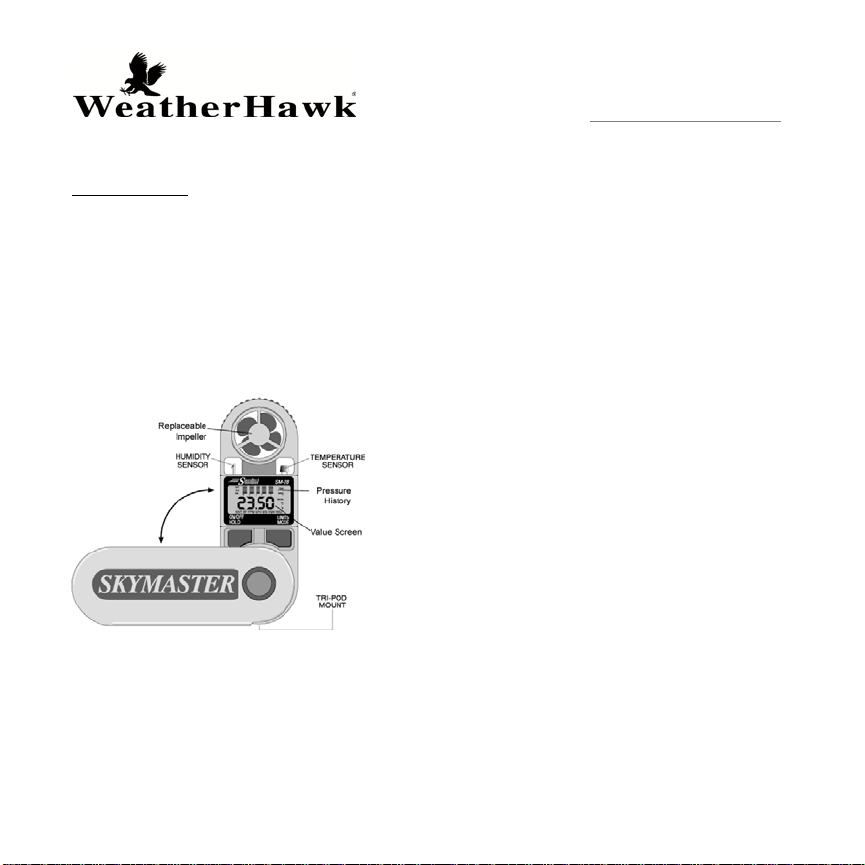
Getting Star ted
Your Skymaster package contains one 400-Hr Lithium CR2032 battery, a lanyard, and voltage
input numbers for humidi ty cali bration. It is very important that you keep the calibration
numbers for future calibration needs. Each instrument has unique voltage input numbers. To
install the lanyar d, feed one end through the hole at the bottom of the handle an d tie it to the
other end. Open case and click into fully opened position or, if using a tripod, click to the 90degree position. Your Skymaster’s sensors are extremely sensitive. Hold the Skymaster at
the bottom of the handle, away from your face and body, to avoid getting false readings. It is
also important that you do not touch the sensors.
Operating Modes:
Turn the unit on using the ON/OFF butto n on
the left. Use the MODE button o n the right
to scroll to the desired function. To turn off
the unit, press and hold the ON/OFF button
for 3 seconds, until the display is blank, then
release.
Changing the Units of Measure:
With the Skymaster on, change the units of
measure by selecting the mode you wish to
change (i.e. Wind speed). Next, press and
hold the ON/OFF button and, w hile ho ldi ng,
press the MODE button to change the units
of measure.
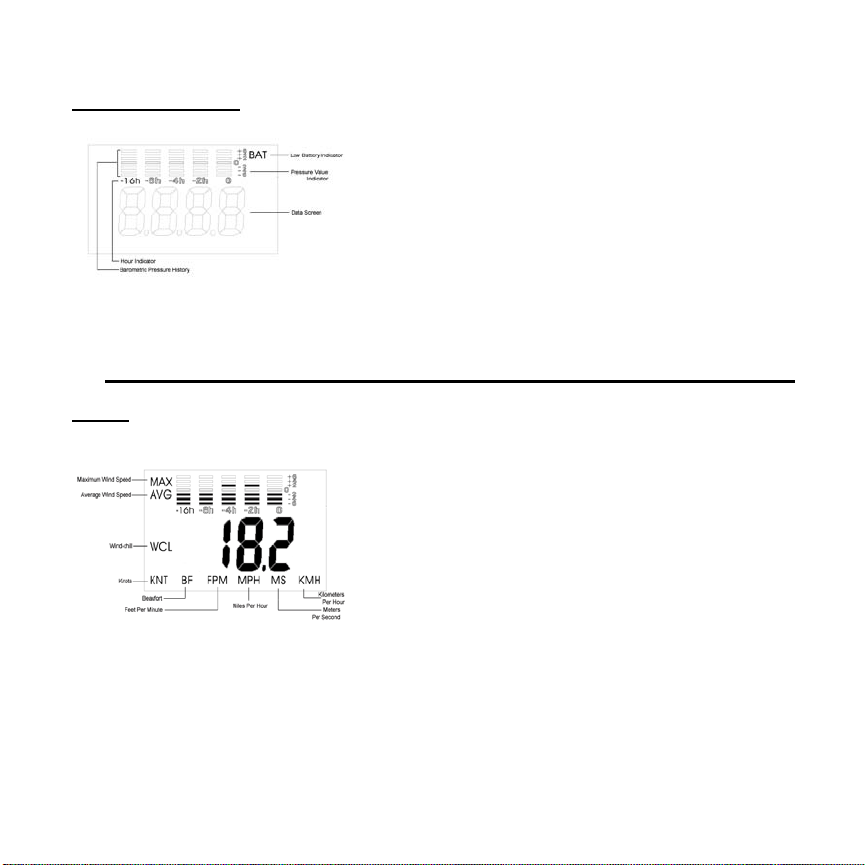
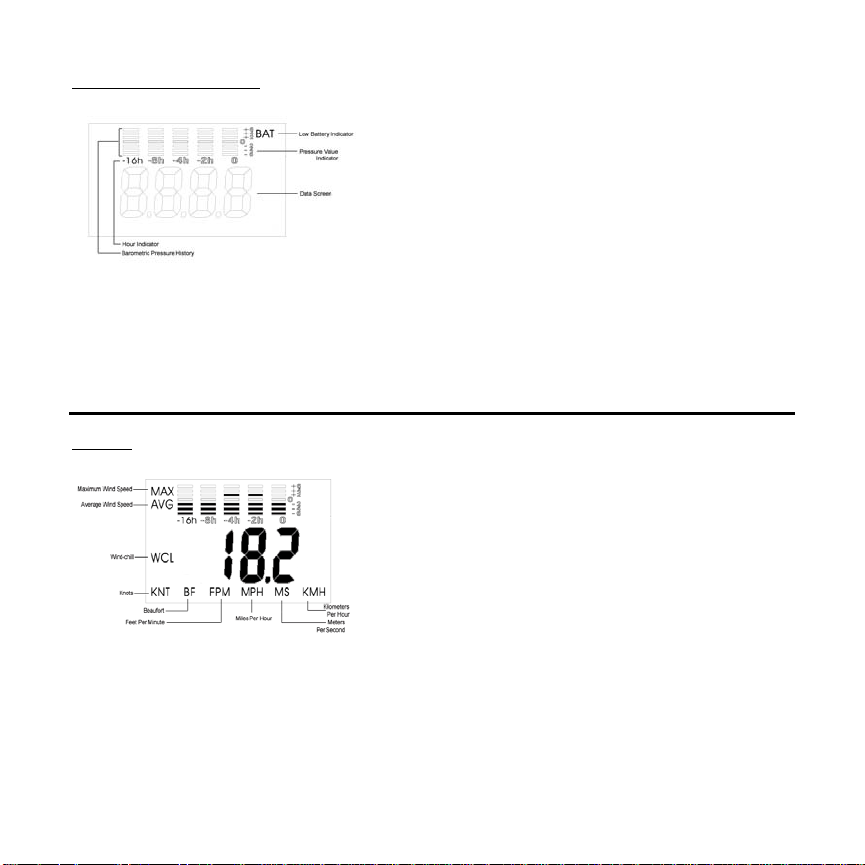
Bar Graph:
Units of Measure:
General Indicators
Modes
Wind Speed
Using the bar graph: The bar graph represents a 16hour history of the barometric pressure. The column
labeled “0” indicates the current pressure. Each
horizontal bar represents +/-2 mb/hpa as indicated by
the pressure value indicator. (Please note that the bar
graph will not be displayed unti l barometric history has
accumulated, as the Skymaster only records bar ometric
pressure while the unit is on.)
Low Battery Indic ator:
Indicates the battery is running dry.
Data Screen:
Indicates the value of data being collected by the
Skymaster.
The Skymaster measures wind speed in six different
units of measure: Knots, Beaufort, Feet Per Minute,
Miles Per Hour, Meters Per Second, and Kilometers Per
Hour. To switch between units of measure please see
the Units of Measure section for instructions.
Current Wind speed:
In current wind speed mode, only the unit of measure
will be shown.
Maximum Wind speed:
Displays maximum speed recor ded since the unit was
turned on.
Average Wind speed:
Displays a running average over ten seconds.
Wind-Chill:
Displays the effect that air tem perature comb ined with
wind speed has on human skin.
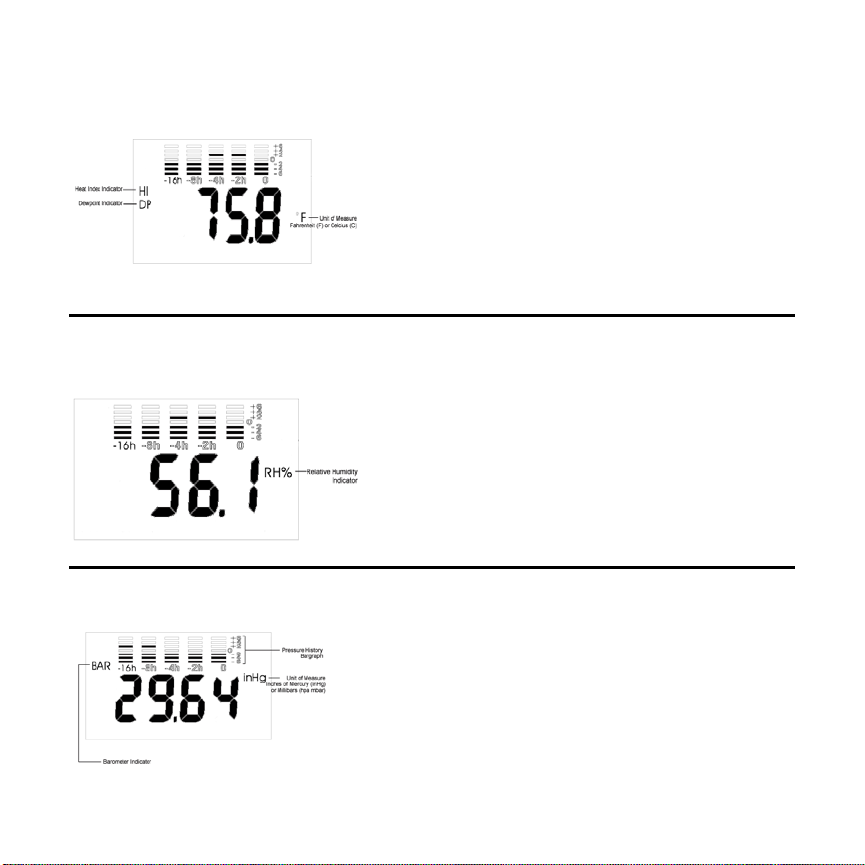
General Relative Humidity:
Unit of Measure:
Temperature
Relative Humidity
Barometric Pressure
General Temper ature:
Displays the t emperature in Fa hrenheit or Celsius.
Heat Index:
Displays the measur e of how hu mid ity ac ts alo ng w it h
high temperatures to reduce the body's ability to cool
itself. In most cases, the heat index will be lower than
the temperature.
Dew point:
Displays the t emperature at which air becomes
saturated with moisture (the temperature at which fog
will form).
Displays the cu r rent relative humidity. Relative
humidity is the amount of water vapor measured in
the air, divided by the potential amount of vapor
that the air can hold – at that temperature. The
relative humidity comes factory calibrated.
However, the Skymaster can be calibrated manually
for more demanding field requirements. To calibrate
the relative humidity, see the Humidity Calibration
section.
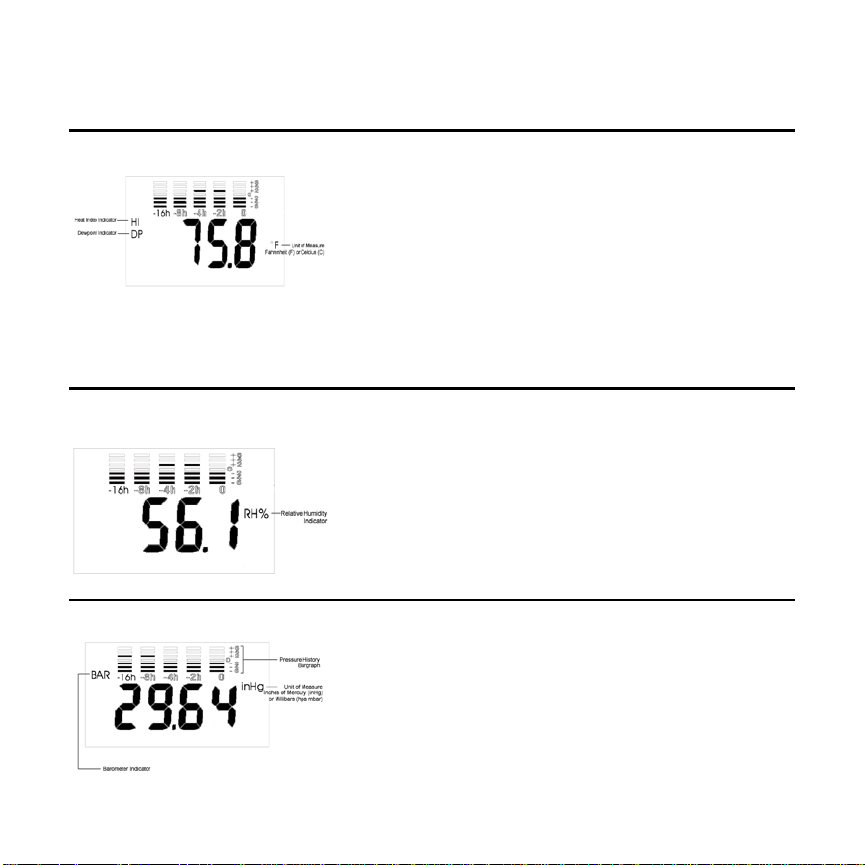
The Skymaster can display barometric pressure in
inches of mercury (inHg) or in millibars / hectopascals
(hpa mb).
Barometer Indicator:
BAR - Indicates the unit is barometer mode.
Pressure History Bar Graph:
Displays barometric pressure history for the p a st 16
hours. Note: The unit must be on for 16 hours before
the complete graph is displayed. For more
information, please see section titled Bar Graph.
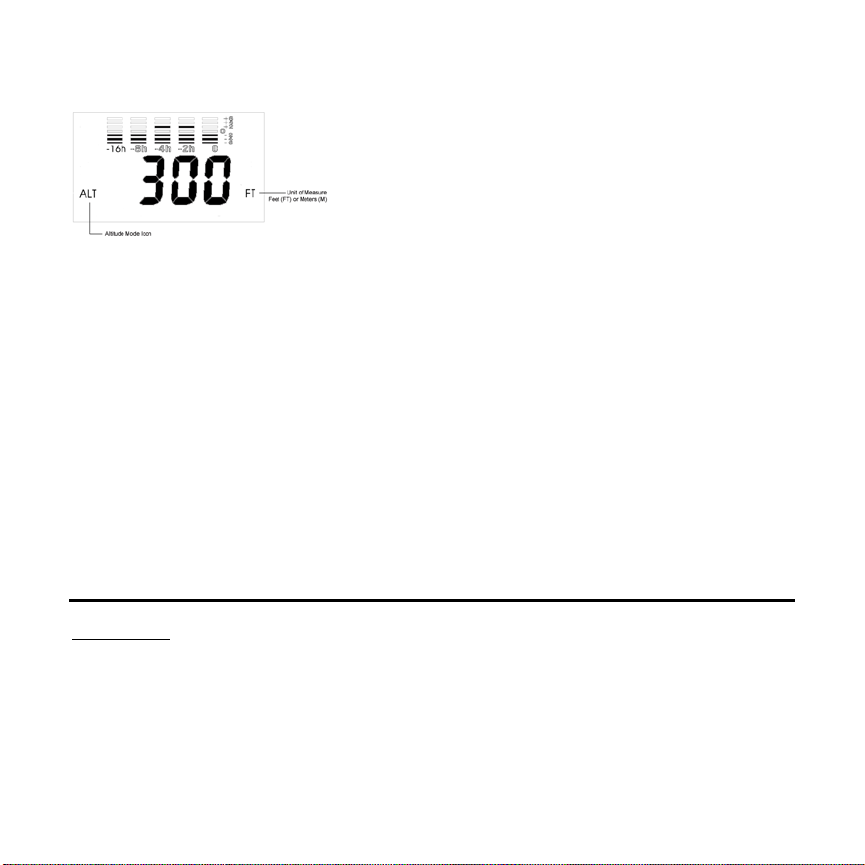
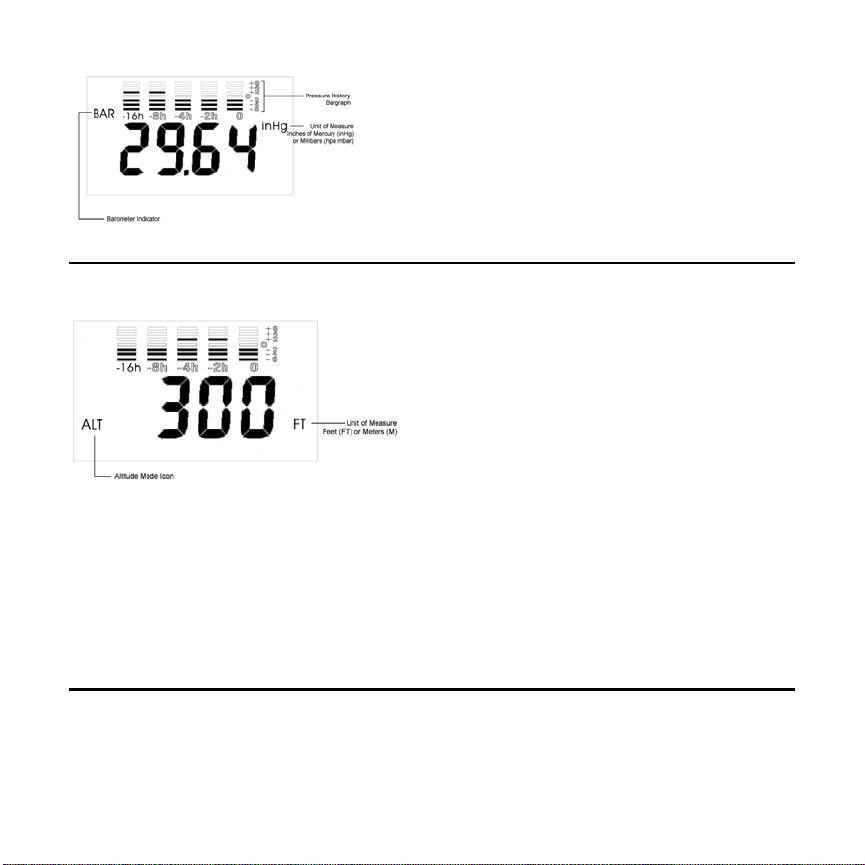
Altitude
Unit of Measure:
The Skymaster can display altitude in feet FT or meters M
General Altitud e Mode:
The Skymaster can register altitudes between -900 to
9000 feet.
Altitude Mode Icon:
ALT - Indicates the un it is in alti tud e mod e.
IMPORTANT INFORMATION: The SM-28 altimeter calculates alt itude based on changing air
pressure. Changes in the air pressure (caused by changes in altitude or weather patterns) will
cause the altitude reading to rise or fall. Your altitude should always be calibrated right before
use as an altimeter.
You should re-calibrate altitude if your ascent or descent takes more then a short period of
time. This will maintain instrument accuracy, since slight changes in pressure will cause the
altitude readings to cha ng e wh il e you rest at o ne location.
Remember that changing weather patterns will also affect your altitude readings. For example:
If the pressure changes .50 InHg, you will experience a change of altitud e o f +/- 470 feet, if
you are near sea level. Also note th at changes of altitude will change your barometric pressure
reading. For acc urate relative pressure readings while climbing or descending, you will need to
enter your altitude in calibration mode. Allow 15 minutes for the barometri c pressure readings
to respond to the newly calibrated alti tude.
Calibration
If you calibrate your altitude, you do not need to calibrate your barometer. It will calibrate
itself to the relative pressure after 15 minutes. However, you may wish to calibrate your unit
to a nearby reading obtained from a reliable weather source. Please remember that barom etric
pressure can change over a distance of just a few miles.
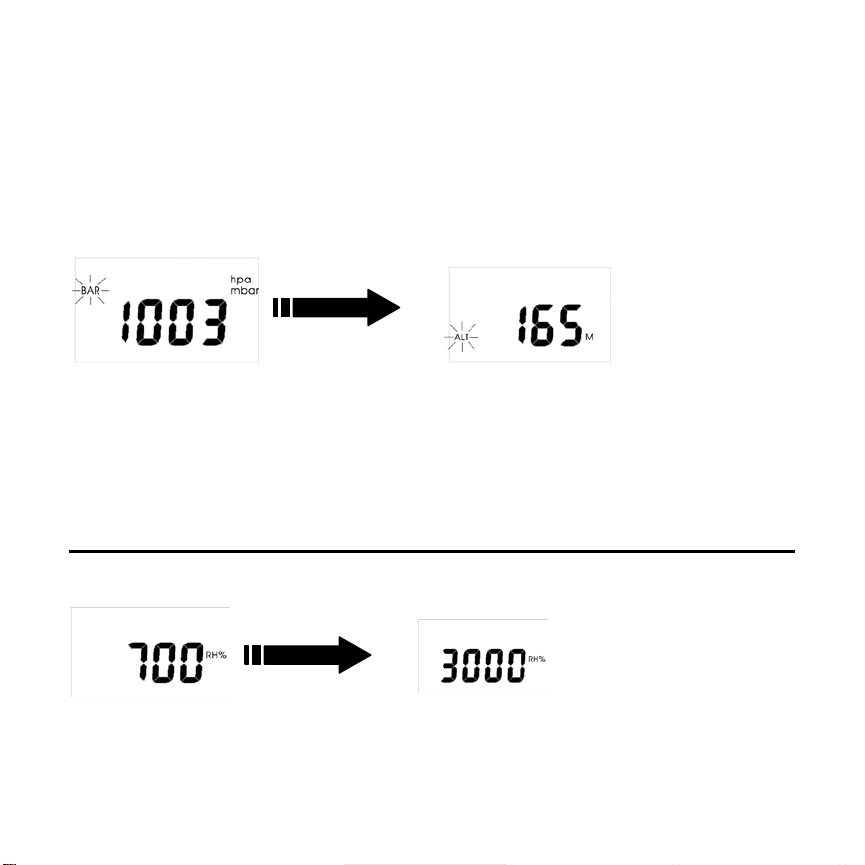
Barometric Pressure:
You may calibrate your unit in mb or inHg. Be sure to select your preferred mode prior to
calibration. While the unit is off, press and hold the on/off key for 2 seconds. The screen will
display current pressure with a flashing “BAR” indicator on the left side. When you see the
indicator flashing, release the on/off button. Press the on/off key to go up in units, press the
mode key to go down in units. After calibrating barometric pressure, wait 5 seconds and the
unit will automatically go into altitude calibra tion. If you do not wish to calibrate altitude,
simply leave the unit on and it will return to its norm al operating mode. The changes have
now been stored until you reca lib rate it.
Altitude: First obtain your local altitude.
Note: You may calibrate your altimeter in meters or feet. Be sure to select the mode prior to
calibration. With th e un it off, press and hold the on/off key for 2 seconds. You will see the
flashing “BAR” indicator on the left. After flashing for 5 seconds, it automatical ly moves to
Altitude calibration mode and you will see the current altitude and a flashing “ALT” indicator.
Press the on/off key to go up in units, press the mode key to go down in units. When you
have completed the calibration, the unit will automatically return to normal operation in a few
seconds. The changes have now been stored until you recalibrate it.
Humidity
NOTE: The relative humidity comes factory calibrated.
Figure A Figure B
First, locate the calibra t ion st ick er that was supplied with your Skymaster. It will have two
numbers displayed. You will ne ed to calibrate your unit to these numbers.

With the unit on, press and hold the o n/off button for 10 seconds. The display will turn off
and then back on, displaying the number 700 (Fig. A). Enter the first voltage input number
(in the above example, the number is 744) into this screen by pressing the mode button to
scroll up (omitting the decimal). Note: When in humidity calibration mode, the mode button
only scrolls up, not down, so it is important that you do not miss the number you are entering.
When finished, press the on/off button again, you will see the number 3000 (Fig. B). Enter
the second voltage input number (3056 in the example above), using the same procedure
as before. To store the changes, press the on/off button. The unit will then shut off with the
new values stored internally. NOTE: Each unit has unique voltage input numbers. It is crucial
that you do not lose your instrument’s numbers.
Impeller Replacement:
To replace the impelle r, use a sma ll scre wd riv e r to loos en the s et-s cr ew found on the back of
the weather monitor. Remove the impeller by twisting the impeller assembly clockwise (if you
are facing the back of the windmeter) to the “O” position marked on the rear of the meter.
Battery:
To replace the battery, turn the compartment cover in a count er-clockwise direction to remove
it. The battery will be visible in the battery comp artment. Insert a new CR2032 lithium
battery “+” side facing you. CR2032 batteries can be purchased anywhere b atteries are sold.
NOTE: Different modes have di fferent drains on the battery life. When left on in barometer
mode, the battery will last 400 hours. Wind speed &humidity will drain the battery quickest
Severe Weather Al a r m:
The severe weather alarm will sound if there is a dramatic change in pressure. The feature is
set to go off if the air pressure changes by 6 millibars (up or down) within a 3-hour pe riod.
(This is a good indication of sev er e weat her approaching.) The alarm will sound once for five
seconds. If the pressure continues to change by the same amount, the alarm will continue to
sound once every hour.
NOTE: the storm alarm feature is disabled when th e Skymaster is in Altitude mod e. This is to
prevent the alarm from sounding false alarms as your altitude changes (due to the altitude’s
effect on air density).
Modos de funcionamiento:
815 W 1800 N (435) 750-1840
Logan, UT 84321 USA www.weatherhawk.com
SM-28 SKYMASTER Manual
V 4.05 - Español
Para empezar
El paquete de Skymaster conti ene una pila de litio CR2032, números de calibración (sobre un
pequeño papel blanco incluido con el manual), y un cabo. Es muy importante que co n s erve
los números de calibración con su m anual. ¡No tire el papel de calibración! La unid ad es
fábrica calibrada y no necesita ser calibrada sobre recibo. Para instalar el cabo, pase un
extremo a través del agujero del fondo del asa y anúdelo al otro extremo. Abra la caja, que
tiene que hacer clic en la posición totalmente abierta; si utiliza un trípode, ésta tiene que
hacer clic en la posición a 90 gra dos. Su Skymaster tiene sondas sensibles. Mantenga el
Skymaster en la parte baj a de l asa , lejos d e su car a y cuerpo , par a ev itar l ectu ra s fa lsas.
Encienda la unidad utilizando el botón izquierdo.
Utilice el botón derecho para desplazar se hasta la
función deseada. Para apagar la unidad, pulse el
botón on/off (apagado/encendido) manteniéndolo
pulsado durante uno s tre s segu ndo s, ha sta qu e la
pantalla esté en blanco ; ento nc es, su é lte lo.
Unidades de medida:
Con el Skymaster encendido, cambie las unidades
de medida seleccionando el modo al que desee
cambiar (es decir, velocidad del viento). Después,
pulse y mantenga pulsada la tecla on/off y,
mientras realiza est a acc ió n, pul se la tec la de mod o
para cambiar las unidad es de medida.
Indicadores generales
Indicador de pilas bajas:
Velocidad del viento actual:
Indica que las pilas se están ag o tando .
Pantalla de datos:
Indica el valor de los datos que está recogiendo el
Skymaster.
Gráfico de barras:
Uso del gráfico de barras: El gráfico de barras representa un historial de 16 horas de la
presión barom étrica. La columna etiquetada co mo "0" indica la presión actual. Cada barra
horizontal representa +/-2 mb/hpa, según marca el indicador de valor de presión (tenga en
cuenta que el gráfico de barras no aparecerá hasta que se haya acumulado el historial
barométrico, dado que el Skymater sólo registra la presión barométrica mientr as está
encendido)
Modos:
Velocidad del viento
Viento-frío:
Muestra el efecto que la temperatura del aire, e n combinación con la velocidad del viento,
tiene sobr e la p iel humana.
Unidades de medida :
El Skymaster mide la velocidad del viento en seis unidades de medida diferentes. Nudos,
grados Beaufort, pies por minuto, millas por hora, metros por segundo y kilómetros por hora.
En el modo de velocidad del viento actual sólo se
mostrará la unidad de la medida.
Máxima velocidad d e l viento:
Muestra la máxima velo c idad d el vie nto re gi str ad a
desde que se encendió la unidad.
Velocidad media del viento:
Muestra una media de funcionamiento durante diez
segundos.
Para conmutar entre las unidades de medida, cons ult e las inst r ucc io nes en la s ecció n d e
Tempera t ura general:
de los casos, el índice de calor es menor que la
Humedad relativa general:
Indicador del barómetro:
barras.
unidades de medida.
Temperatura
Muestra la temperatura en grados Fahrenheit o
Celsius.
Índice de calor:
Muestra la medida de cóm o act úa la hum ed ad junt o
con altas temperaturas para reducir la capacidad del
cuerpo para r ef rigerarse a sí mismo. En la mayoría
Punto de rocío:
Muestra la temperatura a la que el aire se satura con humedad (la temperatura a la que se
formará niebla).
Humedad r e lativa
Muestra la humedad relativa actual. La humedad
relativa es la cantidad d e hum e dad m edi da en e l
aire. Su Skymaster tiene una calibración previa de
fábrica respecto a la humedad relativa. Sin
embargo, el Skymaster se puede calibrar
manualmente para unos requisitos de campo más
exigentes. Para calibr ar la hu m edad rel at iva, vea
la sección Calibración de humedad.
Presión barométrica
Indica que la unidad está en modo de presión
barométrica.
Gráfico de barras del historial de presión:
Muestra el historial de presión barométrica de las
últimas 16 horas. Nota: La unidad ha de estar
encendida 16 horas antes de que se muestre el
gráfico de barras completo. Para obtener más
información, consulte la sección titulada Gráfico de

Unidad de medida:
Modo de altitud general:
presión de aire; por ello, es práctico volver a calibrar.
El Skymaster puede mostrar la presión barométrica en pulgadas de mercurio (inHg) o en
milibares / hectopascales (hpa mbar).
Altitud
El Skymaster puede reg istr ar a lt itud es en tr e -600 y
7000 metros. Durante el uso como altímetro, la
alarma de torm enta está desactivada para evit ar
falsas alarmas como consecuencia de cambios en la
presión. Nota: La altitud se cambiará por sí so la
INFORMACIÓN IMPORTANTE:
El altímetro SM-28 calcula la altitud
basada en la presión de aire que
cambia. Los cambios en la presión de
aire harán la lectura de la altitud
levantarse o caer. Su altitud debe ser
calibrada siempre a la derecha antes de
que usted la utilice como altímetro.
Recalibración: (Su Skymaster tiene una calibración previa de fábrica.)
Presión barométrica:
Atención: Usted puede calibrar su Skymaster en el mb o el inHg. Seleccione el modo preferido
antes de la calibración. Mientr as la unidad está apagada , pulse y mantenga pulsa da la tecla
on/off durante dos segundos. La pantalla mostrará la presión actual con un indicador d e
"BAR" intermitente en el lado izq uierd o. C ua ndo vea qu e el indi cador e stá int erm ite nt e, sue lte
el botón on/off. Pulse la tecla on/off para subir en unidades; pulse la tecla modo para bajar
en unidades. Después de calibrar la presión barométrica, esp ere 5 segundos y la unidad
pasará de forma automática a la calibración de altitud. Si no desea calibrar la altitud,
simplemente deje la unidad encendida y ésta volverá a su modo de funcionamiento normal.
Ahora se han gu ardado los cambios hasta que vuelva a calibrar la unidad.
según los cambios de presión del aire. Nota: Se
producen cambios de altitud con los cambios de
Icono de modo altitud:
Indica que la unidad está en modo altitud.
Unidad de medida:
El Skymaster puede mostrar la altitud en pies (FT) o
metros (M).

Altitud:
Atención: Usted puede calibrar su Skymaster en M o el pie. Seleccione el modo preferido antes
de la calibración. Con la unidad apagada, pulse y mantenga pulsada la tecla on/off durante 2
segundos. Verá el indicador "BAR" intermitente a la izquierda. Después de parpadear
durante 5 segundos, pasará automáticamente al modo de calibración de altitud y verá la
altitud actual y el indicador "AL T" intermitente. Pulse la tecla on/off para subir en unidades;
pulse la tecla modo para bajar en unidades. Cuando haya completado la calibración, la
unidad volverá de forma automática al funcionamiento normal en unos pocos segundos.
Ahora se han guardado los cambios hasta que vuelva a calibrar la unidad.
Umedad
Figura A Figura B
Primero, localice la etiqueta engomada de la calibración que fue provista de su Skymaster.
Tendrá dos números visualizados. Usted necesitará calibrar su unidad a estos nú me ros. V ea
por favor las instrucciones abajo.
Con la unidad encendida, pulse y mantenga pulsado el botón on/off durante 10 segundos. La
pantalla se apagará y volverá a encenderse, mostrando el número 700 (Fig. A). Introduzca el
primer número de entrada de voltaje (en el ejemplo ant erior el número es 7 44) en esta
pantalla pulsando el botón de modo para desplazarse hacia arriba (omitiendo el decimal).
Nota: En el modo de calibración de la humedad, el botón de modo sólo se desplaza hacia
arriba, no hacia abajo; por ello, es importante que no se equivoque con el número que está
introduciendo. Cuando haya terminado, pulse de nuevo el botón on/off; verá el número 3000
(Fig. B). Introduzca el segundo núme r o d e e ntrada de voltaje (3056 en el ejemplo
anterior), utiliza ndo el procedimiento anterior. Para g uar dar los cambios, pulse el botón
on/off. La unidad se desconec tará con los nuevos valores almacenados internamente. (incluso

aunque muestre de nuevo los valores por defecto cuando vuelva al modo de calibración, la
unidad mantiene la calibración).
Cambio del propuls or:
Para cambiar el propulsor, utilice un pequeño destornillador (preferiblemente un destornillador
Phillips nº 2) para aflojar el tornillo de ajuste, que se encuentra en la parte posterior del
monitor meteorológico. Retire el propulsor girando el conjunto del propulsor hacia la derecha
(si está mirando la parte posterior del anemómetro) hasta la posición "O" marcada en la parte
posterior del dispositivo de medida.
Pila:
Para cambiar la pila, gire la cubierta del compartimento hacia la izquierda para re tirarla. La
pila quedará visible en su compartimento. Asegúrese de observar la posición de la pila y
cámbiela por una nueva CR2032 de litio en la misma posición. Las pi la s d e litio, incluyendo
las CR2032, se pueden obtener en cualquier comercio donde se vendan baterías.
Para conservar la duración de las pilas, deje la unidad en el modo de barómetro
cuando no esté en uso . L os diferentes mod os tienen diferentes consumos de energía. Si
se deja encendida en el modo de barómetro, la pila puede durar 4-6 meses. La velocidad del
viento consumirá la pila más rápidamente, seguida por la humedad relativa.
Alarma de condiciones atmosféricas severas:
La alarma de condiciones atmosféricas severas sonara si hay un cambio drástico de presión.
La prestación está preparada para apagarse, si la presión del a ire sufre un cambio de 6
milibares (hacia arriba o hacia abajo) en un periodo de 3 horas (esto es una buena indicación
de la aproximación de una clima tología severa). La alarma sonará una vez durante cinco
segundos. Si la presión cont in ú a camb iando, la alarma continu ará son and o un a ve z cada
hora. Nota: la prestación de alarma d e torm en ta s e desa ct iva cua ndo e l Skym ast er está en el
modo de altitud. Esto es para e vitar que la ala rma su e ne con f a lsas a lar mas cu and o cambie la
altitud (a causa del efecto de la alt itud e n la dens idad de l aire).

Modes de Fonctionnement:
815 W 1800 N (435) 750-1840
Logan, UT 84321 USA www.weatherhawk.com
SM-28 SKYMASTER Manual V 4.05 - Français
Pour commencer
Votre colis Skymast er con t ient u ne pi le CR20 3 2 au lith ium , les n um ér os de ca l ibrag e (in sc rit
sur un petit papi er blanc inséré dans le manuel), ainsi qu'un cordon. Il est très important
de conserver vos numéros de calibrage avec votre manuel. Ne pas jeter le papier sur
lequel figurent les numéros de calibrage! L'unité est usine calibrée et n'a pas besoin
d'être calibrée sur la réception. Pour fixer le cordon, passer l'une des extrémités da ns l'orifice
au bas de la poignée et la nouer à l'autre ex trémité. Ouvrir le boîtier et encl ench er la po s itio n
d'ouverture complète, ou si vous utilisez un trépied, enclencher la position 90 degrés. Votre
Skymaster possède des capteurs sensibles. Maintenir le Skymaster par le bas de la poignée,
éloigné de votre visage et de votre corps, afin de ne pas fausser les relevés.
Allumer l'unité en utilisant la touche de gauche.
Utiliser le bouton de droite pour faire défiler les
fonctions jusqu'à cel le choisi e. Pour éte ind r e l'unité,
rester appuyé sur la touche marche/arrêt pendant
environ 3 secondes. Relâcher la touche lorsque l'écran
n'affiche plus d'informations.
Unités de Mesure:
Lorsque Sk ym a s t er es t al lu mé , changer les un it és d e
mesure en choisissant le mod e que vous d ési rez
modifier (c'est-à-dire Windspeed). Tout en appuyant
ensuite sur la touche marche/arrêt, appuyer sur la
touche mode pour modifier les unités de mesure.

Témoins Indicateurs Généraux
Indicateur de Pile Faible:
Vitesse du vent actuelle:
Indique que la pile s'affaiblit.
Affichage des donné e s:
Affiche la valeur des données recueillies par le
Skymaster.
Diagramme en bâ tons:
Utilisation du diagramme en bâton: Le diagramme en bâtons représente un historique sur 16
heures de la p ression baromét rique. La colonne ma rquée "0" indique la pression en cour s.
Chaque bât on ho riz ontal re prés ente +/-2 mb/hpa comme indiqué par l'indicateur de pression.
(Veuillez remarquer que le diagramme en bâtons ne s'affichera que lorsque l'historique
barométrique aura été cumulé puisque le Skymaster n'enregistre la pression barométrique
qu'un fois mis en m arche.)
Modes:
Vitesse du vent
Unités de Mesure :
Le Skymaster mesure la vitesse du vent en utilisant six unités de mesure différentes. Nœuds,
Échelle de Beaufort, Pieds Par Minute, Miles Par Heure, Mètres Par Seconde et Kilomètres par
Heure. Pour convertir les unités de mesure, veuillez vous r éférer au paragra phe Unités de
Mesure.
En mode Vitesse du vent actuelle, seule l'unité de
mesure sera affichée.
Vitesse du vent Maximale:
Affiche la vitesse maximale enregistrée depuis la mise
en marche de l'unité.
Vitesse Moyenne d u vent:
Affiche une moyenne cumulée sur 10 secondes.
Refroidissement éolien:
Affiche l'effet sur la peau huma i ne de la temp éra tu re

Température
Point de Rosée:
Affiche la températu re à laqu e ll e l'air est satur é d' hum id ité (t e mpér at ur e à laqu e lle se form e l e
brouillard).
Humidité Relative
Pression Barométrique
Température Générale:
Affiche la température en Fah re nh eit ou Cels ius.
Indice Thermique:
Affiche une mesure indiqu ant co mm ent l' hum id ité
additionnée par des températures élevées agit sur le
corps en réduisant sa capacit é à se refroidir de luimême. Dans la plupart des cas, l'indice thermique
sera inférieur à la tempér ature.
Humidité Relat ive Générale:
Affich e l'humidit é r e la tive en cou rs. L'humidit é
relative correspond à la qua ntit é d'hum id ité me sur ée
dans l'air. Votre Skymaster sort de l'usine déjà préétalonné en ce qui concerne l'humidit é relative. Le
Skymaster peut cep e nd a nt ê t r e ét a lo nn é
manuellement pour répondre aux exigences du
milieu. Pour calibrer l'humidité relative, se référer
au paragraphe relatif au Ca libra ge de l'Hum id ité .
Indicateur du Baromètre:
BAR Indique que l'unité est en mode Pression
Barométrique.
Diagramme en bâtons correspondant à
l'Historique de la Pression:
Affiche l'historique des 16 dernières heures de la
pression barométrique. Remarque : L'unité doit avoir
été en march e p endant 16 heur es a vant que le
diagramme comp let ne so it aff iché. Pour plus
d'information, veuillez vous référer au paragraphe
intitulé Diagramm e en Bâto ns .

Unité de Mesure:
Mode Altitude G énérale:
Le Skymaster affiche la pression barométrique en pouces de mercure (inHg) ou en millibars /
hectopascals (hp a mb ar ).
Altitude
Le Skymaster est capab l e d'enr eg istr er d es alt itud es
comprises entre -600 et 7000 mètres. En mode
altitude, l'alarme tempête est désactivée afin d'éviter
son déclenchement faussé en raison des changements
de pression. Remarque : L'altitude se modifie de soimême en fonction des changements de pression de
l'air. Remarque : L'altitude se modifie par les
changements de pression de l'air, il est donc utile de
recalibrer l'unité.
Icône du Mode Altitude:
ALT Indique que l'unité est en m ode altitude.
Unité de Mesure:
Le Skymaster affich e l'al titud e e n pied s (FT) o u en
mètres (M).
L'INFORMATION IMPORTANTE :
L'altimètre SM-28 calcule l'altitude basée sur la pression atmosphérique changeante. Les
changements de la pression atmosphérique feront monter ou tomber la lecture d'altitude.
Votre altitude devrait toujours être calibrée bien avant que vous l'employiez comme altimètre.
Recalibrage: (Votre Skymaster sort de l'usine pré-étalonné.)
Pression Barométrique:
Attention : Vous pouvez calibrer votre Skymaster dans le mb ou l'inHg. Choisissez le mode
préféré avant le calibr ag e. L'unité étant éteinte, rester appuyer sur la touche mar ch e/ arr ê t
pendant 2 secondes. L'écran va afficher la pressio n actuelle, l'indi cateur témoin "BAR", sur la
gauche, clignote. Lorsque l'indicateur témoi n clignote, relâcher la touche marche/arrêt.
Appuyer sur la touche marche/arrêt pour augmenter les unités, appuyer sur la touche mode
pour diminuer les unités. Le calibrage du Sky master ne prend en compte que le s m il libars.
Après le calibrage de la pression barométrique, attendre 5 secondes pour perme ttre à l'unité
de passer automatiquement au calibrage de l' a ltitude. Si vous ne désirez pas effectuer le

calibrage de l'altitude, laisser simpl e ment l'unité allumée et elle retournera en mode de
fonctionnement normal. Les modifications sont conservées jusqu'à un autre calibrage.
Altitude:
Attention : Vous pouvez calibrer votre Skymaster en M ou FT. Choisissez le mode préféré
avant le calibrage. L'unité étant éteinte, restez appuyé sur la touche marche/arrêt pendant 2
secondes. L'indicateur témoin "BAR", sur la gauche de l'écran, clignote. Au bout de 5
secondes, l'unit é va auto matiquement passer en mode calibrage Altitude et vous pourrez voir
l'altitude actue lle et l'ind ic at eur témo i n "ALT" c lig not é. Appuy er sur la tou che m ar ch e/ar rê t
pour augmenter les unités, appuyer sur la touche mode pour diminuer les unités. Une fois
le calibrage effectué, après quelques secondes, l'unité va automatiquement retourner en
fonctionnement normal. Les modifications sont conservées jusqu'à un autre ca librage.
Humidité
Illustration A Illustration B
D'abord, localisez l'autocollant d'éta lonnage qui a été fourni avec votre Skymaster. Il aura
deux nombres affichés. Vous devrez calibrer votre unité à ces nombres. Veuillez voir les
instructions ci-dessous.
L'unité étant allumé e, re stez a p puy er su r la tou ch e marc he/arrêt pendant 10 secondes.
L'écran va d'abo r d s'éteindre puis se rallumer en affichant le nombre 700 (Illustration. A).
Entrez le premier nombre correspondant à la tension d'entrée (dans l'exemple
précédent, ce nomb re est 7 44) en app uy an t sur la touc h e mode pour faire déf iler les nombres
vers le haut (en omettant la déc im ale ). Remarque: En mode calibrage humidité, la touche
mode permet de f aire défiler les nombres uniquement vers le haut, non vers le bas : Il est
donc important d e ne pas rater le nombre que vous désirez entrer. Une fois le premier

nombre entré, appuy er à nouve au sur la touch e marc h e/ arrê t, v ous verr ez s'af fi cher l e
nombre 3000 (Illustration B). Entrer le deuxième nombre correspondant à la tension
d'entrée (3056 dans l'exemple précéd e nt), en ut ilisa nt la m êm e procéd ur e que
précédemment. Pour conserver les mo difications, appuyer sur la touche marche/arrêt. L'unité
va alors s'éteindre en conservant en mémoire le s nouvelles valeurs. (Même si, lorsque vous
retournez en mode calibrage, des valeurs par défaut sont affichées, l'unité conserve en
mémoire le c a lib ra g e.)
Remplacement du ventilateur:
Pour changer le ventilat eur, uti lisez un pet it to urn ev is (de préf ér ence un tou rn ev is cruc iforme
#2) pour dévisser les vis de serrage situées à l'arrière du moniteur d'informations
météorologiques. Retirer le ventilateur en tournant le dispositif comprenant le ventilateur
dans le sens des aiguilles d' un e montr e ( en étan t fac e au do s de l'aném om èt re ) jusq u' à
atteindre la position " O" marq u é e à l'arrière de l'instrument de mesure.
Pile:
Pour remplacer l a pile, ôter le couvercle du compartim ent à pile en le tournant dans le sens
inverse des aiguilles d'une montre. La pile est ainsi visible dans son compartiment. Observez
bien le sens da ns leq u e l est placée la pile e t la remplacer par une nouvelle pile au lithium
CR2032 en respectant son sens de placement. Les piles au lithium, y compris la pile
CR2032, sont disponibles dans tous les commerc es vendant habituellement des piles.
Pour préserver l'a utonomie de l'ins tr ument, laisser l'u nité en mode baro mètre
lorsqu'elle n'est pas utilisée. Chaque mode dispose de sa propre valeur de consommation
d'énergie. Lorsque l'unité est en mode baromètre, la pile devrait avoir une autonomie
comprise en t r e 4 et 6 mois. La mesure de la vitesse du vent consomme le plus d'énergie,
suivi par la mesure de l'humidité relative.
Alarme Intempérie:
L'alarme intempérie retentit en cas de changement de pression spectaculaire. Le dispositif est
réglé pour s'éteindre si les modifications de pression de l'air atteignent les 6 millibars (en plus
ou en moins) sur une période de 3 heures. (Il s'agit d'une bonne indication prévenant de
l'arrivée d'une intempérie) . L'alarme va retentir une fo is pendant 5 secondes. Si la pression
continue à se modifier, l'alarme va retentir une fois toutes les heures. Remarque : Le
dispositif alarme tempête est désactivé lorsqu e le Skymaster est en mode Altitude. Cela
permet d'éviter le déclenchement de l'alarme faussé par les modifications d'altitude (en raison
de l'effet de l'altitude sur l a den sité atmosphérique) .

Inbetriebnahme:
815 W 1800 N (435) 750-1840
Logan, UT 84321 USA www.weatherhawk.com
SM-28 SKYMASTER Manual
V 4.05 - Deutsch
Einführung
Im Lieferumfang Ihres Skymasters befindet sich eine 400 Stunde Lithium C R2032 Batterie,
Kalibrierungsnum m er (auf einem klein en weißen Zettel, der de m Handbuch beigeleg t ist), und
ein Trageriemen. Es ist sehr wichtig, dass Sie die Kalibrierungsnummer mit Ihrem Handbuch
aufbewahren. Werfen Sie den Zett el mit der Kalibrierungsnummer nicht weg! Die
Maßeinheit ist die kalibrierte Fabrik, und Kalibrierung ist nicht nach dem Empfang notwendig.
Um den Tragegurt anzubr inge n führ en S ie ein End e dur ch die Öffnung am unt e ren End e des
Griffs und befestigen ihn am anderen Ende. Bringen Sie die Abdeckung in di e vollständig
geöffnete Position, wenn Sie ein Stativ benutzen bringen Sie die Abdeckung in eine 90-Grad
Position. Ihr Skymaster hat empfindliche Sensoren. Halten Sie den Skymaster am unteren
Ende des Griffs, v on Körper und Gesicht entfern um eine falsche Anzeige zu vermeiden..
Schalten Sie das Gerät mit der linken Taste ein .
Benutzen Sie die rechte Taste um die gewünschte
Funktion auszuwählen. Um das Gerät
auszuschalten halten Sie die on/off Taste für 3
Sekunden gedrückt. bis keine Anzeige mehr auf
dem Display erscheint, dann lassen Sie die Taste
los.
Messfunktionen:
Bei eing eschaltetem Gerät können Sie die
Messfunktionen ändern indem Sie die
entsprechende Funktion auswählen, (z.B.
Windgeschwindigkeit). Als nächstes halten Sie die
on/off Taste gedrückt während Sie die Mode Taste
drücken um die Messfunktionen zu ändern.

Allgemeine In dikatoren
Low Battery Indic ator:
Current Windspeed:
hat.
Zeigt an wenn die Batter ie sch w ach wird .
Data Screen:
Zeigt den Wert der Daten an, die vom Skymaster
aufgeze ich n et w erden.
Bar Anzeige:
Ablesen der Bar Anzeige: Auf der Bar Anzeige können Sie die 16-stündige A ufzeichnung des
Luftdrucks ables en. Die Spalte mit der Bezeichnung “0” zeigt den aktuellen Luftdruck an..
Jeder waagrechte Strich zeigt +/-2 mb/hpa, wie auf der Luftdruckskala angezeigt. (Bitte
beachten Sie, dass die Luftdruckskala nicht erscheint, solange die aufgezeichneten
Luftdruckdaten nicht zuakkumuliert wurden, da der Skymaster Luftdruckdaten nur bei
eingesch al t et em Ge r ä t auf z eichnet..)
Funktionen:
Windgeschwindigkeit
In der Anzeige der aktuellen Wind-geschwindigkeit
wird nur die Maßeinheit angezeigt.
Maximum Windspeed:
Zeigt die maximale Windgeschwindigkeit, die seit
Einschalten des Gerä ts aufgezeichnet wurd e.
Average Windspeed:
Zeigt den Durchschnitt der letzten zehn Sekunden
an.
Wind-Chill:
Zeigt den Effekt den Lufttemperatur zusammen
mit Windgeschwindigkeit auf die menschliche Haut
Masseinheiten:
Der Skymaster misst die Windgeschwindigkeit in sechs verschiedenen Maßeinheiten. Knoten,
Beaufort, Fuß Pro Minute, Meilen Pro Stunde, Meter Pro Sekunden und Kilometer Pro Stunde.

Um zwischen den Maßeinheiten zu wechseln lesen Sie bitte die Anleitung unter dem Abschnitt
Maßeinheiten.
Temperatur
Dew point:
Zeigt die Temperatur an bei der die Luft mit Feuchtigkeit gesättigt ist (die Temperatur bei der
sich Nebel bildet).
Relative Luftfeuchtigkeit
Luftdruck
Maßeinheit:
Der Skymaster zeigt den Luftdruck in inches of mercury (in Hg) oder in Millibar / Hektopascal
(hpa mbar) an.
General Temper ature:
Zeigt die Temperatur in Fahr enh eit oder Ce lsi us
an.
Heat Index:
Zeigt an in welchem Maß der Körper s e ine
Fähigkeit zum Regulieren de r eigenen
Temperatur verliert wenn Feuchtigkeit zusammen
mit hohen Temperaturen auftritt. I n den meisten
Fällen liegt der Hi tzeindex unter der Temperatur.
General Rela tive Humid ity:
Zeigt die gegenwärtige relative Luftfeuchtigkeit
an. Relative Luftfeu cht igk e it ist der Gra d an
Luftfeuchtigkeit, der in der Luft gem es sen w ird.
Ihr Skymaster kommt vorkalibriert für relative
Luft-feuchtigkeit ab Werk. Sie können den
Skymaster jedoch ihren eigenen Bedürfnissen
entsprechend manuell kalibrieren. Zum
manuellen kalibrieren der relativen
Luftfeuchtigke it le sen S ie im Ka pite l
Feuchtigkeitskalibrierung.
Barometer Indicator:
falschen Alarm, durch Luftdruckänderung zu
änderungen statt, deshalb ist es ratsam zu
Metern (M) an.
Zeigt an, dass sich das Gerät s ich im Luftdruckmodus
befindet.
Pressure History Bar Graph:
Luftdruckanzeig e der letz ten 16 Stu nde n.. Beac ht en
Sie, dass das Gerät während der letzten 16 Stunden
eingeschaltet gewesen sein muss, damit die
komplett e Anzeige erscheint. Weit er e In fo r m ationen
Höhe
finden Sie unter dem Kapitel Bar Graph.
General Altitud e Mode:
Der Skymaster kann Höhen von -600 bis 7000
Metern registrieren. Während die Höhenfunktion
benutzt wird ist der Alarm ausgeschaltet um
vermeiden. Hinweis: Die Höhe ändert sich von
selbst, wenn sich der Luftdruck ändert. Hinweis:
Höhenänderungen finden mit Luftdruck-
rekalibrieren..
WICHTIGE INFORMATIONEN:
Der SM-28 Höhenmesser errechnet die
Höhe, die auf änderndem Luf tdr uck basiert.
Änderungen im Luftdruck veranlassen den
Höhe Messwert zu steigen od er zu fall en.
Altitude Mode Icon:
Zeigt an, dass sich das Gerät im Höhenmodus
befindet.
Unit of Measure:
Der Skymaster zeigt die Höhe in Fuß (FT oder
Ihre Höhe sollte immer nach rechts kalibriert
werden, bevor Sie sie als Höhenmesser
verwenden.
Rekalibrierung: (Ihr Skymaster wird im Werk vorkalibriert.)
Luftdruck:
Aufmerksamke it: Sie können Ihr Skymaster in mb oder im inHg kalibrie ren. Wählen Sie den
bevorzugten Modus vor Kalibrierung vor. Während das Gerät ausgeschaltet ist halten S ie d i e
on/off Taste für 2 Sekunden gedrückt. Das Display zeigt den aktuellen Luftdruck mit einer

aufleuchtenden “BAR” Anzeige auf d er linken Seite. Wenn Sie die Anzeige aufleuchten sehen
lassen Sie di e o n/o f f T a st e lo s. Dr üc k en Si e d ie on /o f f T a st e fü r aufsteigenden Wert,
drücken Sie die Mode Taste für absteigenden Wert. Nachdem Sie den Luftdruck kalibriert
haben warten Sie 5 Sekunden und das Gerät wird automatisch zur Höhenkalibrierung gehen.
Wenn Sie die Höhe nicht kalibrieren wollen lassen Sie d as Gerät einfach e ingeschaltet und es
wird automatisch in den norm a len Be tr iebsmo dus zurückkehren. Die Änderungen sind jetzt
gespeichert bis Sie es rekalibrieren.
Höhe:
Aufmerksamke it: Sie können Ihr Skymaster in M oder in FT kalibrieren. Wählen Sie den
bevorzugten Modus vor Kalibrierung vor. Während das Gerät ausgeschaltet ist halten S ie d i e
on/off Taste für 2 Sekunden gedrückt. Sie sehen links die aufblinkende “BAR” Anzeige.
Nachdem Sie 5 Sek unden aufgeleu chtet hat, wechse lt sie automatisch z ur Höhenkalibrierung
und Sie sehen die momentane Höhe und die “ALT” Anzeige aufleuchten. Drücken Sie die
on/off Taste für aufsteigenden Wert, drücken Sie die Mode Tas te für absteigenden Wert.
Wenn Sie die Kalibrierung beendet haben, kehrt das Gerät nach ein paar Sekunden
automatisch in den Betriebsmodus zurück. Die Änderung e n werden nu n gesp e iche rt bis Sie es
rekalibrieren.
Luftfeuchtigkeit
Figure A Figure B
Zuerst lokalisieren Sie den Kalibrierungsaufkleber, de r mit Ihrem Skymaster angegeben
wurde. Er hat zwei Zahlen angezeigt. Sie müssen Ihre Maßeinheit zu diesen Zahlen
kalibrieren. Sehen Sie bitte die Anweisungen unten.
Bei eingeschaltetem Gerät halten Sie die on/off Taste für 10 Sekunden gedrückt. Das Display
wird aus- und wieder eingesc haltet und zeigt die Zahl 700 (Fig. A) an. Geben Sie die first
voltage input numbe r ein (in o.g. Beispiel ist die Zahl 744) indem Sie die Mode Taste

drücken für aufsteigenden Wert (lassen Sie die Dezim alstellen weg). Hinweis: Da bei der
Kalibrierung der Luftfeuchtigkeit die Mode Taste nur aufst e igend e Wert e anz e igt ist es wicht ig,
dass Sie die Zahl die Sie eingeben wollen nicht überspringen. Wenn Sie die Eingabe beendet
haben drücken Sie die on/off Taste nochmals und Sie werden die Zahl 3000 sehen (Fig. B).
Geben Sie die second voltage input number ein (3056 in o. g. Beispiel), indem Sie nach
vorherigem Schema vorgehen. Um die Änderungen zu speichern drücken Sie die on/off T aste.
Das Gerät wird sich dann automatisch mit den neuen intern gespeicherten Daten abschalten..
(Selbst wenn die Werte nicht erscheinen wenn sie in den Kalibrierungsmodus zurückkehren,
hat das Gerät die Kalibrierung i n tern gespeicher t.)
Impeller Replacement:
Um den Impeller zu ersetzen, benutzen Sie einen kleinen Kreuzschlitzschraubenzieher
(vorzugsweise einen #2 Phillips Kreuzschlitzschraubenzieher) um den Satz Schrauben zu
lösen, die sich auf der Rückseite des Wetter monitors befinden Entferne n Sie den Impeller,
indem Si e den Impell er im Uhrzei gersinn ( mit Blick au f die Rückseite des Windmessers) auf
die mit 0 gekennzeichnete Position auf dem hinteren Teil des Zählers drehen.
Batterie:
Um die Ba t ter i e z u we ch se ln ne hm en Si e di e Ab de c kun g de s B at te ri e fa ch s a b, in de m Si e di es e
gegen den Uhr zeigersinn dre hen. Merken Sie sich die Position der Ba tterien im Batterie fach
und ersetzen Sie diese mit neuen CR2032 Lithium Batterien in der gleichen Position.
Lithium Batterien, einschließlich der CR2032, erhalten Sie überall dort wo Batterien verkauft
werden.
Um die Lebensdauer der Batterie zu verlängern lassen Sie das Gerät im
Barometermodus w enn es nicht benutzt wir d . Je nach Funktion wird die Batterie
unterschiedlich beansprucht. Im Barometermodus sollte die Batterie 4-6 Monte halten.
Schlechtwetteralarm:
Der Schl echtwetteralarm ertönt bei einer dramatischen Änderung des Luftd rucks. Die
Funktion wird aktiviert wenn sich der Luftdruck um mehr als 6 Millibar (steigend oder fallend)
innerhalb von 3 Stunden ändert. (Dies ist ein zuverlässiger Indikator dass es Schlechtwetter
geben wird). Der Alarm ertönt einmal für fünf Sekunden. Bei bweiterer Luftdruckänderung
ertönt der Alarm einmal pro Stunde. Hinweis: Die Sturmwarnungsfunktion ist ausgeschaltet
wenn sich der Skymaster im Höhenmodus befindet. Di es ist zur Vermeidung von falschem
Alarm wenn sich die Höhe ändert (da die Höhe die Luftdichte beeinflusst).

Modalità di funzionamento :
l’unità di misura
815 W 1800 N (435) 750-1840
Logan, UT 84321 USA www.weatherhawk.com
SM-28 SKYMASTER Manual V 4.05 - Italiano
Per cominciare
La confezione del vostro nuovo Skymaster contiene una batteria al litio CR2032, numeri di
taratura (su un foglietto bianco allegato al man uale) ed un cordino. È molto importante che
conserviate i numeri di taratu ra ins iem e con il man ua le. Non buttate via il foglietto con i
numeri di taratura! L'unità è calibrata alla fabbrica e non deve essere calibrata sulla
ricevuta. Fare passare un’estremità del cordino attraverso il foro che si trova in fondo al
manico e poi allacciarl a all’ altr a es tr em ità. Apri re la scat ol a completamente oppu re, se us at e
un cavalletto, posizionatela a 90°. Skymaster ha dei sensori m olto sensibili. Mantenere lo
strumento per il fondo del manico, lontano dal corpo o dal viso, in modo da evitare di falsare i
rilevamenti.
Lo strumento si accende prem endo il pulsante a
sinistra. Utilizzare il pulsante destro per
scorrere fino alla funzione desiderata. Per
spegnere lo strumento, premere il pulsante
on/off e tenerlo premuto per 3 secondi, fino a
quando lo schermo non sarà completamente
vuoto.
Unità di misura:
A strumento acceso, cambiare l’unità di misura
selezionando l a modalità che desiderate
cambiare (ad esempio, velocità del vento).
Successivamente, premere i l pulsante on/off e
mantenerlo premuto. Contemporaneamente,
premere anche il pulsante mode per cambiare

Indicatori generali
Indicatore batterie esaurite:
Velocità attuale del vento:
dell’aria in combinazione con la velocità del vento
Indica che le batterie si stanno esaurendo.
Display dati:
Indica i valori dei dati raccolti da Skymaster.
Diagramma a barre:
Utilizzo del diagramma a barre: questo diagramma illustra l’andamento della pressione
atmosferica nelle ultime 16 ore. La colonna indicata con “0” I r appresenta la pressione attuale.
Ogni barra orizzontale rapp re s enta + /-2 mb/hpa come mostra l’indicatore del valore della
pressione. (Attenzione: il diagramma non sarà visualizzato fina a quando non avrà raccolto
dati sufficienti a mostrare l’andamento della pressione, tenendo conto del fatto che lo
strumento è in grado di rilevarli soltanto quand o è acceso)
Modalità:
Velocità del vento
Unità di misura:
Skymaster misura la velocità del vento in sei unità di misura diverse: nodi, Beaufort, piedi
/minuto, miglia /ora, metri / secondo e chilometri/ora. Per commutare lo strumento da
un’unità di misura all’atra, si vedano le istruzioni riportate alla voce Unità di misura.
Nella modalità “Velocità attuale del vento”, viene
mostrata soltanto l’un ità di mi sur a.
Velocità mas s ima del vento:
Visualizza la massima v e loci tà de l vento reg i str at a
da quando lo strumento è st ato acc e so.
Velocità medi a del vento:
Visualizza la velocità med ia de l vento in diec i
secondi.
Vento-raffreddamento:
Visualizza gli effetti sulla pelle della temperatura

Temperatura
Tempera t ura generale:
Indicatore della pressione:
Visualizza la tempera tur a in gradi Fahrenheit o
Celsius.
Indice di calore:
Visualizza la misura di come l’umidità agisce sulle
alte temperature in mod o d a ridu rr e la capac it à del
corpo di autoraf freddarsi (teermoregolarsi). N ella
maggior parte dei casi, l’indice di calore sarà più
basso della tempera tur a.
Punto di condensa:
Visualizza la temperatura alla quale l’aria si satura d’umidità (temperatura a cui si forma la
condensa).
Umidità relativa
Umidit à relativa generale :
Visualizza l’umidi tà re lat iva at tu ale. L’um id ità
relativa corrisponde al livello di umidità rilevato
nell’aria. Il vostro Skymaster viene pretarato in
fabbrica, ma può essere ritarato manualmente per
risponder e m eg l io a ll e es igenze sul cam po . P e r
tarare l’umidità relativa, si v ed a alla voce Taratura
dell’umidità.
Pressione atmosferica
Indica che lo st r umento si trova in modalità
“pressione atmosf er ic a”.
Diagramma dell’a ndamento della pressione:
mostra l’andamento della pressione atmosfer ica nel
corso delle ultime 16 ore. Nota: lo strumento deve
restare acceso per 16 ore prima che venga
visualizzato un diagramma completo. Per maggiori
informazioni, si veda alla voce Diagramma a barre.

Unità di misura:
oppure in metri (M).
Skymaster indica la pre ss io ne atm osferica in pollici di mercurio (inHg) oppure in millibar /
hectopascals (hp a mb ar ).
Altitudine
LE INFORMAZIONI IMPORTANTI:
L'altimetro SM-28 calcola l'altezza
basata su pressione d'ar ia ca mbiante.
I cambiamenti nella pressione d'aria
indurranno la lettura di altezza ad
aumentare o cadere. La vostra al tezza
dovrebbe essere calibrata sempre a
destra prima che la usiate come
altimetro
Ritaratura: (Skymaster viene pretarato in fabbrica.)
Pressione atmosferica:
Attenzione: Potete calibrare il vostro Skymaster nel mb o nel inHg. Selezioni il modo preferito
prima della calibratura. A strumento spento, p reme re il p uls ante on/ of f e mant ene re pre mut o
per un paio di secondi. Il display mostrerà il valore della pressione attuale, accompagnato
dall’indicatore “BAR” che lampeggia in alto a sinistra. Lasciare il pulsante on/off quando appare
l’indicatore che lampeggia. Premere il pulsante on/off per scorrere verso l’alto oppure il
pulsante mode per scorrere verso il basso. Dopo la taratura della pressione atmosferica,
attendere 5 secondi e lo strumento passerà automaticamente alla fase di taratura
dell’altitudine. Se non desiderate tarare l’altitudine, lasciate semplicemente lo strumento
acceso e quest’ultimo si riporterà automaticamente nella modalità di funzionamento normale.
Modalità altitudine generale:
Skymaster è in grado di rilevare altitudini comprese
tra –600 e 7000 metri. Quando lo strumento è in
modalità altitudine, viene disattivato l’allarme
tempesta, per evitare falsi all armi derivanti da
variazioni di pressione. Nota: altitudine varia da sola
al variare dell a pressione atmosferica. Nota: l e
variazioni di altitudine si verificano al variare della
pressione atmosferica, quindi è opportuno effettuare
delle ritarature.
Icona della modali tà altitu di ne:
Indica che lo strumento si trova in modalità
altitudine.
Unità di misura:
Skymaster può mostrare l’altitudine in piedi (FT)

Le modifiche apportate verranno tenute in memoria fino ad una nuova operazione di
ritaratura.
Altitudine:
Attenzione: Potete calibrare il vostro Skymaster nella m. o nel FT. Selezioni il modo preferito
prima della calibratura. A strumento spento, premere il pulsante on/off e mantenere premuto
per un paio di secondi. Il display mostrerà l’indicatore “BAR” ch e lampeggia in alto a sinistra.
Dopo 5 secondi , lo strumento passa automaticamente nella moda lità per la taratura
dell’altitudine e verrà visualizzato il valore att u ale dell’altitudine, accompagnato dall’indicatore
“ALT” che lampeggia. Premere il pulsante on/off per scorrere verso l’alto oppure il pulsante
mode per scorrere verso il basso. Una volta conclusa l’operazione d i taratu ra, lo st rumento
tornerà alla modalità di funzionamento normale nel giro di pochi secondi. Le modifiche
apportate restano in memoria fino ad una nuova ritaratura.
Umidità
Figura A Figura B
In primo luogo, individui l'autoadesivo di calibratura che è stato fornito con il vostro
Skymaster. Visualizzerà due numeri. Dovrete calibrare la vostra unità a questi nu meri. Veda
prego le istruzioni qui sotto.
A strumento acceso, premere il pulsante on/off e tenere premuto per una decina di se condi. Il
display si s p eg nerà e poi si r iaccenderà, visua l izzando il nu mero 700 (F ig . A ). D igi t a r e i l
primo valore di ingresso della tensione (nel nostro esempio, sarà 744) sullo sch e rm o,
premendo il pulsante mode per scorrere ve rso l’ alto (om ett end o I decim ali ). Nota: una volta

in modalità di taratura dell’umidità, con il pulsante mode si scorre soltanto verso l’alto e non
verso il basso, quindi è importante che non ci si dimentichi di inserire i valori. Finita
l’operazione, premere nuovamente il pulsante on/off, e vedrete comparire il valore 3000 (Fig.
B). Digitare il secondo valore di ingress o d ella te nsione (nel nostro esempio, sarà 3056),
utilizzando la stessa pro c edur a so pra i llu str at a. Per me mo r izz ar e le modifiche, premere il
pulsante on/off. Lo strumento si spegnerà, avendo salvato i nuovi valori. (Anche se verranno
mostrati di nuovo i valori di default quando si torna in modalità di taratura, lo strumento ha
memori zz a t o le v ariazion i) .
Sostituzione del la ventola:
Per sostituire la vento la, ut iliz za te un pic co lo cac ciavite (preferibilm ent e un ca cciav it e a tag lio
a croce n° 2) per svitare le viti che si trovano sul retro del monitor. Rimuovere la ventola
esercitando una torsione in senso orario (guardando il retro dell’anemometro) fino a
raggiungere la posizione “O” segnata sul retro dello strumento.
Batteria:
Per sostituire la batteria, girare il coperchio del vano batterie in senso antiorario e rimuoverlo.
A questo punto potrete vedere la batteria. Assicurars i che le pol ar ità del la nuov a ba tter i a al
litio CR2032 vadano a posizionarsi correttamente ed inserir la nella stessa posizione della
recedente. Tutte le batterie al litio, comprese le CR2032, possono essere acquistate presso i
normali rivenditori di batterie.
Per preservare al durata delle batterie, quando non si usa lo strumento è bene
lasciarlo in modalità barometro. Le varie modalità dello strumento hanno consumi diversi.
Se lo strumento viene lasciato in modalità barometro, le batterie possono durare 4-6 mesi. La
modalità che ha il massimo consu mo di batterie è la velocità del vento, seguita dall’umidità
relativa.
Allarme tempo perturbato:
In caso di significative variazioni nei valori della pressione atmosferica, viene emesso l’allarme
per tempo perturbato. Ciò accade se la pressione atmosferica varia di 6 millibar (in più o in
meno) nel giro di 3 ore (è un dato significativo dell’avv icinarsi di una perturbazione). L’allarme
suona una sola volta per cinque secondi. Se la pressione continua a cambiare, allora l’allarme
suonerà una volta all’ora. Nota: l’allarme viene disattivato quando lo strumento si trov a n
modalit à altitud in e. Questo accorgimen to serve ad ev itare falsi a l la r mi dovuti a l le v ariazion i d i
altitudine (ed agli effetti dell’altitudine sulla densità dell’aria).

815 W 1800 N (435) 750-1840
Logan, UT 84321 USA www.weatherhawk.com
ACCURACY: +/- 3% Windspeed; +/- 2 F° Temp/Windchill; +/-3%
rH, Dew Point, & Heat Index; +/- .09 inHg Barometric Pressure
RANGES: Wind .4-89 MPH; Temp 32° to +122°F; Windchill -22° to
+158°F; Dew Point -31.2° to +155. 8°F ; H ea t Index +69.8 to
+155.8°F; rH 0-99%; Baromet er
9000 meters
OPTIONAL UNITS: Knots, MPH, KPH, M/Sec, Ft/Min, Beaufort Scale
- F or C; hpa/mb or inHg
RESPONSE TIMES: Current Windspeed; Ave. over 2 sec; Ave. Wind
5 sec; Max Wind 2 sec gust; Temp/w indchill/rH/dew point 1 min; 15
min sampling Bar ometer
POWER: CR2032 Lithium battery
11.8~32.5inHg; Altitude -900 to
 Loading...