

Wayne-Dalton Corp.
P.O. Box 67 Mt. Hope, OH 44660
(888) 827-3667
www.wayne-dalton.com
WINDLOAD POST
MODEL 8000/ 8100/8024/8124
INSTALLATION INSTRUCTIONS
See garage door owner’s manual for warranty information.
IMPORTANT NOTICE!
READ THE ENCLOSED INSTRUCTIONS CAREFULLY BEFORE INSTALLING THIS WIND LOAD POST. PAY
CLOSE ATTENTION TO ALL WARNING LABELS AND NOTES. THIS MANUAL SHOULD BE ATTACHED
TO THE WALL IN CLOSE PROXIMITY TO THE WIND LOAD POST.
Copyright 2007 Wayne-Dalton Corp. Rev 1 11/28/2007
312957
WIND LOAD POST
INSTALLATION INSTRUCTIONS
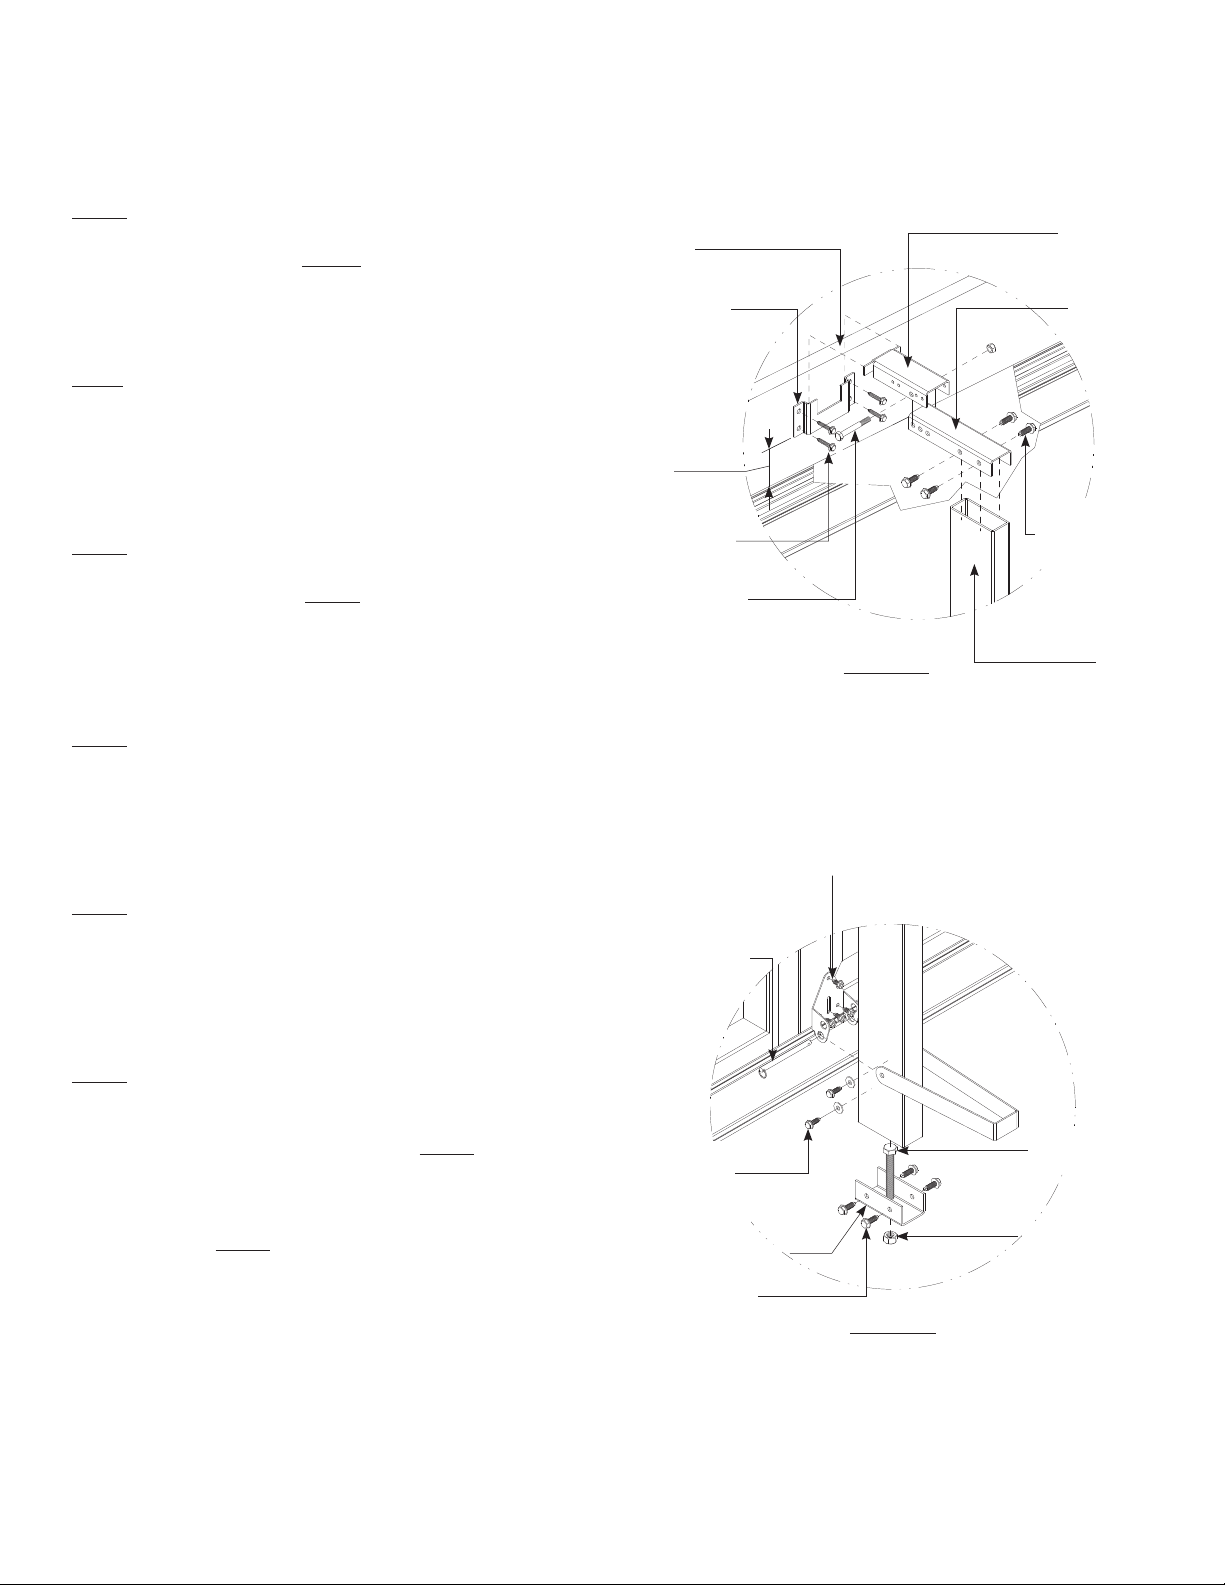
Step 1:
Attach the header lock bracket to the header using the (4) 5/16” x 1-5/8”
lag screws provided as shown in fi gure 1. The header lock bracket should
be in line with the intermediate hinges where the post is to be installed
and located such that the bottom of the bracket is approximately 2-1/2”
above the top of the door.
NOTE: Drywall or any other sacrifi cial material covering the header must
be removed prior to installing the header lock bracket and replaced with
the same thickness of wood. If this process is required, the length of
the lag screws must be increased accordingly to include the thickness of
the wood so that a minimum of 1-1/2” of lag screw penetration into the
header is maintained.
Step 2:
Align the large diameter hole in the top plate extension with the fi rst hole
in the top lock plate as shown in fi gure 1 and bolt together with (1) 5/1618 x 2-1/2” hex bolt and nut. Align the assembly over the top of the inner
post and secure with (4) 5/16-12 x 1” self drilling screws through the
holes provided in the top lock plate. Slide the opposite end of the inner
post into one end of the outer post.
Step 3:
Place the post assembly from step 2 into position by lowering the top
plate extension into the notch in the header lock bracket until the top plate
extension seats in the bottom of the notch. Allow the outer post to slide
down the inner post until the bottom of the outer post rests on the fl oor.
Plumb the post assembly.
HEADER
HEADER LOCK
BRACKET
2-1/2”
(4) 5/16 x 1-5/8”
LAG SCREWS
5/16-18 x 2-1/2”
HEX BOLT & NUT
14 GA NO. 2 HALF HINGE
ATTACHED TO DOOR WITH (4) 1/414 x 7/8” SELF DRILLING CRIMPTITE
SCREWS ALIGNED WITH THE TOP OF
THE LOWEST U-BAR
FIGURE 1
TOP PLATE
EXTENSION
TOP LOCK
PLATE
(4) 5/16-12 x
1” SELF DRILLING SCREWS
INNER
POST
Step 4:
Ensuring the post assembly is plumb, trace the outline of the bottom of
the outer post on the fl oor. Remove the post assembly and set aside until
step 5. Locate the center of the traced outline by connecting the corners
to form an ‘x’. at the intersection of the ‘x’, drill a 5/8” diameter hole a
minimum of 3-1/2” deep into the fl oor. Clean dust out of hole.
Step 5:
Place the half hinge at the bottom of the bottom section in line with the
intermediate hinges and just above the lowest u-bar and attach with (4)
1/4-20 x 11/16” self drilling screws as shown in fi gure 2. Assemble the
bottom lock plate by sliding (1) 1/2-13 x 3-1/2” bolt down through the top
the bracket and securing with the hex nut from below. Attach the bottom
lock plate to the bottom of the outer post with (4) 5/16-12 x 1” self drilling
screws as shown in fi gure 2.
5/16” HITCH PIN
(2) 5/16-12 x 1”
SELF DRILLING
SCREWS W/ 5/16
FLAT WASHERS
BOTTOM LOCK PLATE
(2) 5/16-12 x 1”
SELF DRILLING SCREWS
1/2-13 x 3-1/2”
HEX BOLT
1/2-13 HEX NUT
FIGURE 2
-2-

WIND LOAD POST
INSTALLATION INSTRUCTIONS
Step 6:
Place the post assembly into position by lowering the top plate
extension into the notch in the header lock bracket until the top plate
extension seats in the bottom of the notch. Allowing the outer post
to slide down the inner post, insert the 1/2-13 x 3-1/2” bolt at the
bottom of the outer post into the hole in the fl oor. Ensure the bolt is
fully inserted into the fl oor. the nut on the underside of the bottom
lock plate must rest on the fl oor.
Step 7:
Beginning at the top hinge, place the strap over the post as shown in
fi gure 3. Align the holes in the ends of the strap over the tube in the
hinge and insert a 5/16” hitch pin as shown. Raise the back of the
strap until the strap is perpendicular to the post. Connect the strap
to the post with (1) 5/16-12 x 1” self drilling screw and fl at washer
1/4” above the strap on the garage side of the post and 1/4” below
the strap on the door side of the post as shown. Do not tighten the
screws against the strap. Repeat for the remaining straps. The
bottom locking strap should be located at the half hinge location
installed in step 5.
NOTE: The strap is designed to slide freely between the screws
allowing movement of the door relative to the post. Do not place the
screws through the strap or tighten the screws too tight restricting
movement.
(4) 1/4-14 x 5/8”
SELF-TAPPING SCREWS
CENTER HINGE
(2) 5/16-12 x 1”
SELF DRILLING
SCREWS W/5/16
FLAT WASHER
5/16”
HITCH PIN
ALUMINUM POST
LOCKING
STRAP
FIGURE 3
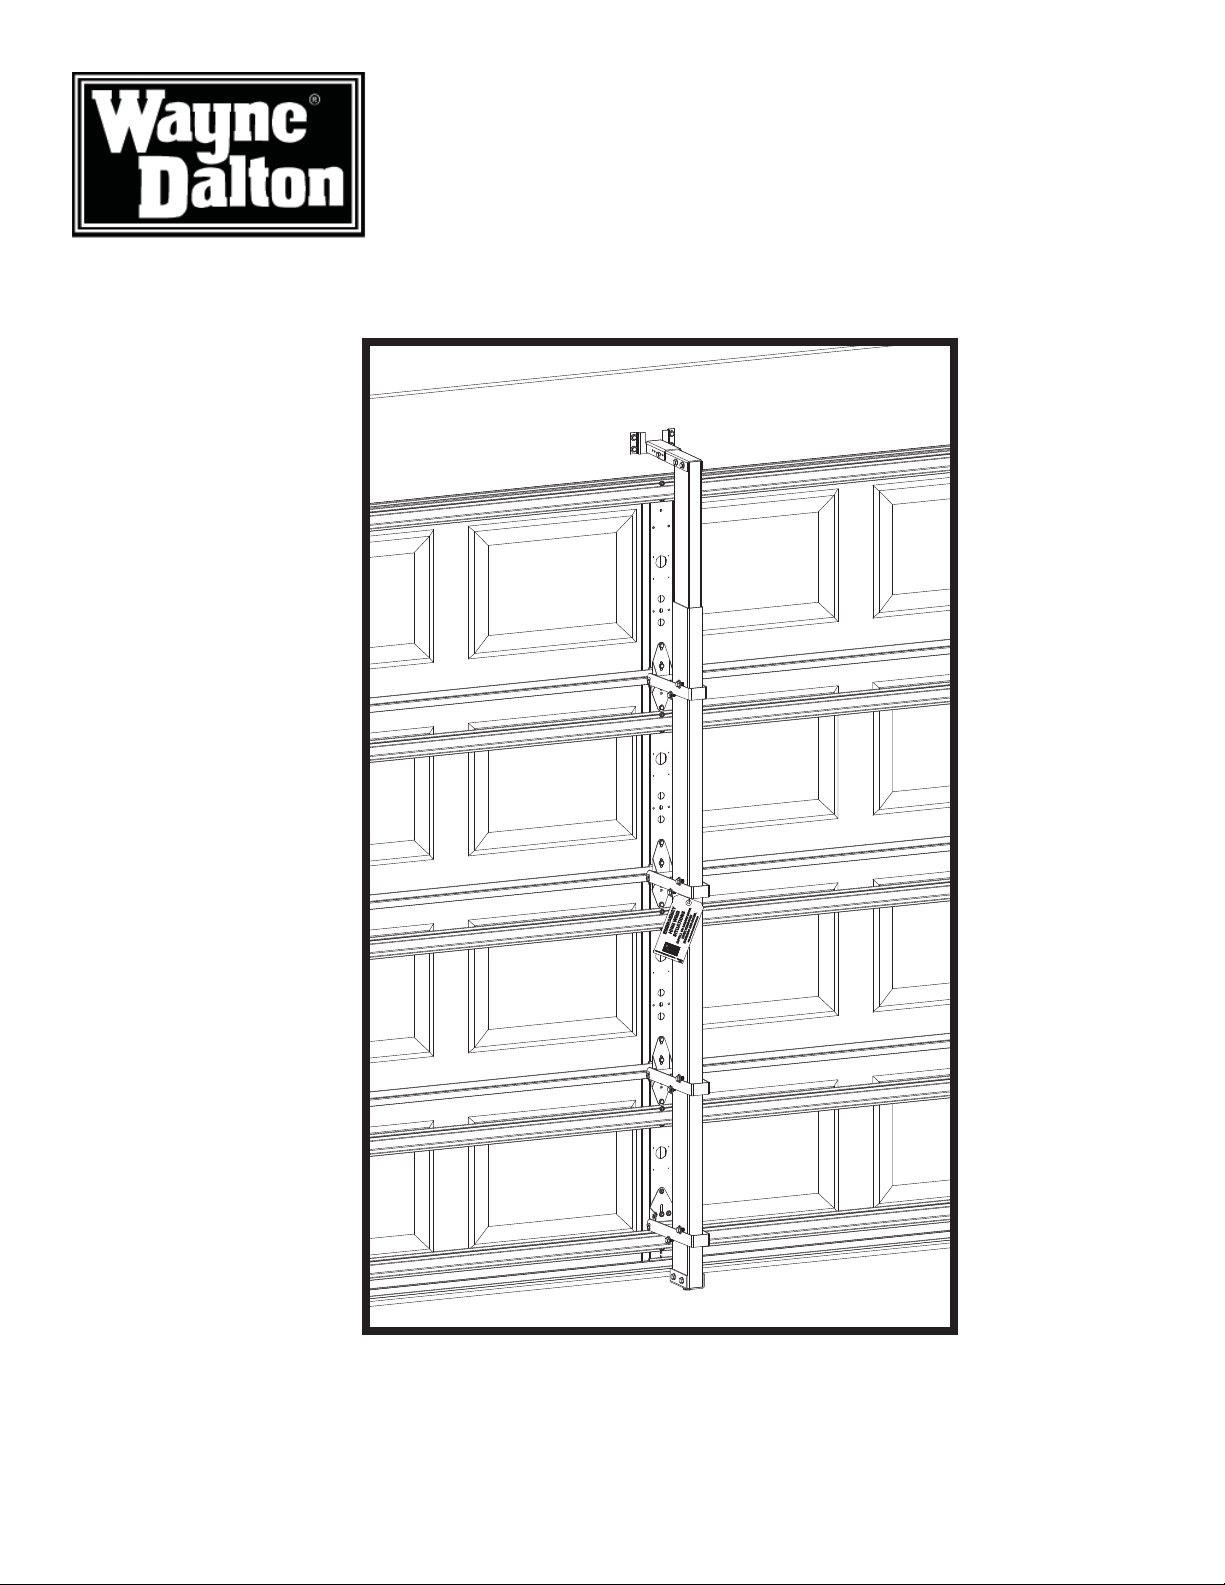
After all of the straps have been installed, check the post to make
sure it is secure by lifting up on the post. If the post raises out of
the header lock bracket, check the location of the screws above and
below the straps. The garage side screws must be located above the
strap as shown in the fi gure 4.
Storage instructions and decal installation continued on page 4.
COMPLETED INSTALLATION
ON (4) SECTION DOOR
-3-
FIGURE 4

WIND LOAD POST
INSTALLATION INSTRUCTIONS
SECURING POSTS FOR STORAGE
Step 1:
Locate a convenient location as close to the door as possible and
mount a header lock bracket to the wall such that the distance between the bottom of the header lock bracket and the fl oor is 4” greater
than the distance between the fl oor and the bottom of the header lock
bracket mounted over the door. The header lock bracket for storage
shall be mounted with a minimum of (2) 5/16” x 1-5/8” lag screws
(one each side) into solid wood. Masonry anchors may be substituted
for mounting directly to masonry or concrete. Provide wood blocking
adequately secured to structure as required for other substrates.
Step 2:
Mount a half hinge to the wall in line with the header lock bracket such
that the distance between the centerline of the tube in the half hinge
and the fl oor is 4” greater than the distance between the centerline
of the tube in the half hinge on the door and the fl oor when the door
is fully closed. The half hinge for storage shall be mounted with a
minimum of (2) 5/16” x 1-5/8” lag screws into solid wood. masonry
anchors may be substituted for mounting directly to masonry or
concrete. Provide wood blocking adequately secured to structure as
required for other substrates.
Step 3:
Place the post into the storage position by lowering the top plate
extension into the notch in the header lock bracket until the top plate
extension seats in the bottom of the notch. Secure the bottom locking
strap to the half hinge using the 5/16” hitch pin. Place all remaining
hitch pins into the remaining locking straps for storage. Insert the
plastic plug into the hole in the fl oor.
ATTACHING THE INSTALLATION DECALS
After installation is complete, locate an obviously visible location on the
inside of the garage door and the post and place the provided installation labels and tag onto the door and post for future reference - refer
to fi gure 5.
Important
Labels and tag must be attached to both door and post.
1. Applied by installer - one (1) wind load psf label per door.
2. Applied by installer - one (1) wind load post installation instructions
label to be applied to inside of door, near end of second section.
3. Applied by installer - one (1) emergency high wind situations tag
to be applied to post(s) when stored on wall for constant reminder to
consumer.
FIGURE 5
-4-
 Loading...