

Page 1

L3—Multimaximizer
Software audio processor
User's Guide
Waves L3 software guide page 1 of 26
Page 2

Table of Contents
1. Quick Start Guide
2. Introduction
3. Technology Overview
4. Using the L3
-The Peak Limiter Section
-Threshold and Priority
-Release Behavior Types: Manual, ARC, Smoothed, Scaled
-The IDR Section: Type1, Type2
-Noise Shaping Options: Moderate, Normal, Ultra
5. Controls and Displays
-The Peak Limiter Section: Threshold, Out Ceiling, Attenuation Meter
-Multimaximizer Master Release: Release behavior type, Master Release
-Ultramaximizer Release Control
-Profile
-Peak Limiter Multiband controls
-Crossover controls: Low, Low Mid, Hi Mid, Hi
-Separation
-Per Band Controls: Gain, Priority, Gain and Priority Link, Release
-The Gain/Frequency Graph
-The IDR Section: Quantize, Type, Shaping, IDR Active/Passive Indicator
6. Some secrets of digital audio
-Maximum Level
-Maximum Resolution
-Why use Dithering, and what is it?
-A bit more about IDR™
7. In-depth IDR™ Information
-About Dither and Noise Shaping
-Dither: Off, Type1, Type 2
-Noise Shaping: Off, Moderate, Normal, Ultra
8. 16-bit (and higher) mastering
9. Use the L3 last
10. Important notes on digital clipping
-Peak Normalized Signals
Waves L3 software guide page 2 of 26
Page 3

A Very Quick Start for Mastering with the L3
In a Hurry? For best results it is recommended that you read this manual
through or at least the chapters – Using L3 and L3 Controls and Displays.
However, just to get you started, here’s a bullet proof recipe for quick
mastering with the L3.
• Insert the L3 Ultramaximizer preferably after the master fader and in any
case do not insert any other plug-ins after it or make any consecutive gain
adjustments.
• Play the audio that you are mastering through the L3. Select a portion of
the more intense part of the program.
• Grab the Linked Threshold/Ceiling control located just between the Input
and Output meters. Start dragging downwards and watch the Attenuation
meter.
• Once the attenuation meter begins to register gain reduction, listen
carefully and continue to drag down until you start hearing degradation,
distortion or reduction in level.
• When you hear any of the above mentioned artifacts, stop and drag
upwards until you feel the program sounds transparent or at least not
degraded.
• Take the Ceiling control to -0.2dBfs.
• Set the IDR Quantize factor to match your designated medium, i.e. 16bit
for Audio CD mastering or 24bit for most other applications.
• Apply the process to the complete audio portion.
Following these instructions, you can hardly go wrong. With deeper
understanding of the controls and tools that the L3 offers you could potentially
do much better.
Read more of this users guide to get expert instructions of how to use the L3
to the maximum effect and optimal sound.
Waves L3 software guide page 3 of 26
Page 4

1. Introduction
The L3-Multimaximizer is an integrated Peak Limiter and Bit Depth ReQuantizer. It utilizes breakthrough patented technology that takes the Waves
Maximizers to the next level.
The Waves L1 and L2 Ultramaximizers staged a revolution in digital limiting
and re-quantizing for mastering and other applications. They used
“lookahead” technology to perform wideband dynamic gain adjustment for
brick wall limiting with no overshoots.
The L3 uses Multiband dynamics processing, limiting the full band or the total
of the multiple bands to a certain Threshold factor. This allows the L3 to reach
unprecedented loudness with even more musical sounding results. It offers a
wide variety of different sonic flavors from analog sounding to the smoothest,
most transparent digital limiting you could imagine. These many flavors are
easily accessed by selecting the related profiles and presets. The band split is
implemented using linear phase crossovers so that no phase distortion is
introduced by the crossovers. The only difference between input and output is
a certain amount of pure delay which is 24-bit transparent until limiting is
introduced.
The full L3 is comprised of two plug-ins that offer different interfaces to control
the same essential algorithm.
• The L3 Ultramaximizer maintains the general control surface of its
predecessors the L1 and L2. It also adds a Profile selector to select
different internal settings of the multiband engine. Setting the L3 up is
as easy as setting up an L2. Afterwards, you can toggle through the
profiles to find the best Tuning of the algorithm for the program that you
are processing.
• The L3 Multimaximizer allows full parametric control over very specific
settings of the per band Gain, Priority and release factors. This allows
the user to perform corrective EQ and provides fine tuning choices for
the most meticulous of engineers. In fact, the L3 offers much more than
just limiting. For the most part it can be used on its own as a full
mastering chain.
The IDR (Increased Digital Resolution) technology offers the same good ol’
Waves bit depth reduction system. This allows optimal results when going
from a 24-bit source to a 16-bit CD audio stream. The whole process is
double precision, so dithering to the 24th bit will already provide enhanced
resolution. The superb IDR 9th order Noise Shaping filter will assure that the
noise is as inaudible as possible.
Waves L3 software guide page 4 of 26
Page 5

2. Technology Overview
The L3 is a 5 band peak limiter that brings a new approach for multi band
peak limiting. The L3 does not consist of 5 independent peak limiters
operating separately on each of the bands. Instead, it has one central peak
limiter controlling all of the bands. The L3 is based on a new technology by
Waves called the Peak Limiting Mixer™ (patent pending).
The Peak Limiting Mixer™ examines the signals of all of its input bands. Then
it calculates an optimal attenuation for each of the bands (applies automatic
Gain to each of its input channels) so that the mixed result is peak limited.
In a wide band peak limiter, only one attenuation value needs to be computed
to bring the input to the Threshold. In a multiband peak limiter, there is more
freedom as to how the attenuation is distributed across the bands to achieve
the same output peak limiting.
In the L3, the decision of how to distribute the attenuation across the bands is
made through an optimization algorithm. It minimizes inter-modulation
between bands while maximizing the perceived overall level.
The L3 has far less inter-modulations between the frequency bands compared
with a wide band peak limiter.
The L3 GUI (Graphical User Interface) offers a global section that includes the
same controls as the Waves L1 and L2 wide band limiters. These are
Threshold, Ceiling, (Master) Release, and the IDR section.
The full L3 Multimaximizer offers per-band Gain, Priority and Release
controls. The global Separation control allows fine control over the spectral
balance of the processed output. The global Release Behavior and the per
band Release controls allow for optimizing the proper Release per band,
during which ARC (the Waves Adaptive Release Control technology) is
always engaged. The simple L3 Ultramaximizer offers Profiles of the per band
Priority, Release, Xover cutoffs and Separation.
Another important aspect of the L3 is that it is split into 5 bands using linear
phase filters. Thus, before applying any limiting, the audio path is 24 bit clean
and the only difference is a constant delay of 80 milliseconds.
Waves L3 software guide page 5 of 26
Page 6

3. Using the L3
The L3 user interface is divided into two main parts: the Peak Limiter section
and the IDR section.
The Peak Limiter section of the L3 Multimaximizer is divided into two main
parts:
-full band controls – Threshold, Ceiling, Master Release
-per band controls - Gain, Priority, Release
THE PEAK LIMITER SECTION
The single most important control is the Threshold control. Until the Threshold
is set, the L3 is idle. It introduces only pure delay, and is otherwise 24-bit
transparent.
Once the Threshold is set, any signal that goes over the Threshold will be
limited to the Threshold. The overall Gain is automatically made up by the
Threshold factor. Thus, a Threshold of 6dB will cause a 6dB boost of the
Gain.
The Ceiling control will scale the output so that the maximum energy will
reach the Ceiling value but won’t pass it.
The Ceiling and Threshold controls are placed side by side with the actual
controls placed between a set of Meters. The Threshold is between the input
meters to help adjust the Threshold by the action registered in the input. The
Ceiling is placed between the output meters in order to easily define the
maximum output value.
Between the Threshold and Ceiling controls is the linked control which will
allow you to move both the Threshold and Ceiling controls together. This is
useful in order to maintain consistency in the overall volume. It also allows
you to better perceive the effect of the limiting on the sound of the program
rather than on just the level.
It is recommended to use the linked control and take the Threshold and
Ceiling down together until sound begins to break, distort or lose loudness.
At this point its recommended to take the controls slightly up and then lift the
Ceiling by 0.2dB (or the value of your choice).
Once the Threshold and Ceiling are set, the choices are divided through the
simplified L3 Ultramaximizer vs. the complete L3 Multimaximizer.
In the L3 Ultramaximizer, the remaining Peak Limiter settings are the Master
Release and Profile. According to the selected profile, the Master Release
factor will be subject to different profile settings and will serve as a general
longer vs. shorter release time. The selected Profile will impose a certain
Waves L3 software guide page 6 of 26
Page 7
“flavor” for the limiter action. We recommend using the general purpose
default, or toggling through the profiles to select the one most suitable to your
program material and personal taste.
The user can select the Ultramaximizer profiles from the presets menu and
further tweak each and every per band of Gain, Priority and Release as well
as the Crossover frequencies, global Release behavior type and Separation
amount.
Threshold and Priority
The L3 applies attenuation in 5 discrete frequency bands, the sum of which
will be limited to the one Threshold. The Peak Limiting Mixer™ sets the single
Threshold across the multiple bands in equal Priority according to the width of
the band. If a certain band sounds too stressed compared to the rest, then the
user can increase its Priority at the expense of the other bands while
maintaining the summed energy to the same total peak. The result will be that
per the same input energy, less attenuation will be introduced to bands with
higher Priority and more to the bands with lower Priority, maintaining the
same sum.
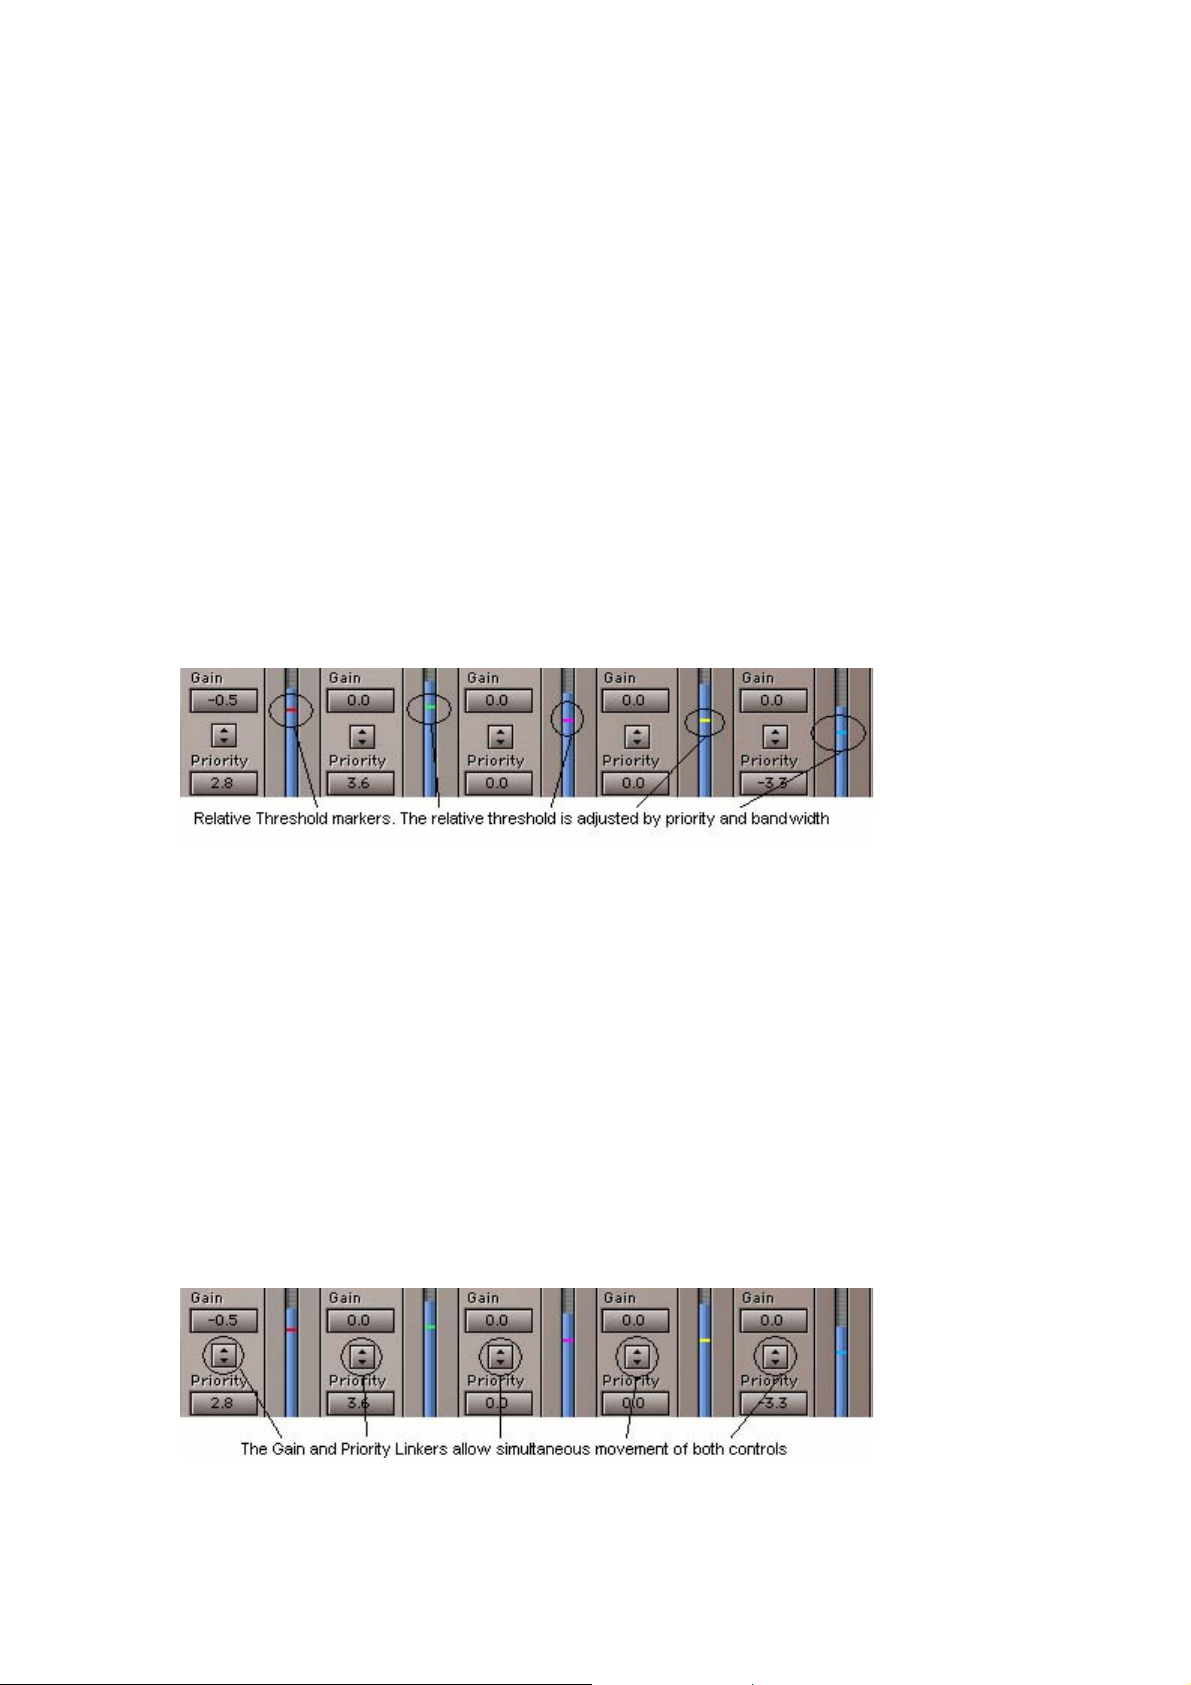
The little colored lines in the energy meter of each band show its relative
Threshold and will adjust with Priority settings. When moving a certain band’s
Priority you may notice that the relative Thresholds of the other bands go in
the opposite direction.
As you can see, the L3 Multimaximizer user can control the tone and spectral
balance of the program going through the L3 without defeating the peak
limiting process. However, the Gain factor is before the limiter (otherwise
limiting would break).
Thus, adding Gain to a certain band will increase its continuous level. But, the
peak level of that band will still be limited to the same relative Threshold. So, if
you are looking to boost the Gain of a certain band, including its peaks, it will
require a boost in both Gain and Priority. For this purpose we added the
linking control between the Gain and Priority controls of each band.
Waves L3 software guide page 7 of 26
Page 8

Selecting the Crossover frequencies can also affect the Multiband properties.
To make the most educated “tweaks”, we included solo buttons for each
band. This enables you to adjust the boundaries of each band as you hear the
audio running through each individual band.
The separation control is another unique tool that allows you to mix the sidechains of the per band energy detector. This smoothes out the differences
between bands until 0 separation actually sets all bands to attenuate at once.
However, the per band Gain, Priority and Release settings are still separate.
This Makes it like a wide band limiter with some EQ and multiband release
factors.
The per band Release controls allow you to specify a manual Release
reference value. This value will become a part of the equation that the Waves
ARC (Adaptive Release Control) technology will use to calculate the actual
Release value. The L3 has a Master Release section that allows choosing
one of five Release behavior types. The L3 also has a master control that
allows you to adjust all per band release controls simultaneously.
Release Behavior Types
Waves ARC – Adaptive Release Control technology optimizes the actual
release time in context with the program. In the L3 all Release behavior types
use a certain amount of ARC where some are more adaptive and others less,
or the amount of ARC is scaled across the bands in different ways.
ARC – This is the nominal and default release behavior type. It is set to be a
overall good setting for any kind of material.
Warm – Sets more adaptive release behavior to the Low frequency bands
and more Manual to the high frequencies.
Scaled – Sets more adaptive release behavior to the Hi frequency bands and
more Manual to the Low frequencies.
Aggressive – Probably the release behavior type capable of the most
extreme loudness, however this will work well on acoustic or electronic beat
music where the drum transients dominate the peaks.
Manual - sets minimal ARC. The release time of each band will be as set in
the per band Release control.
To get to know each of the Release behavior types, run some overly
aggressive limiting while toggling through each one. Listen to each type with
low vs. high release reference values, using the Master Release control to
adjust all values. This should allow you to hear the differences between the
types more obviously. Then you will be able to perceive them better when
applying more moderate settings.
Waves L3 software guide page 8 of 26
Page 9

THE IDR SECTION
In the L3, there are two types of Increased Digital Resolution dithers: Type1
and Type2. The differences between them will likely influence your choice for
your project.
• type1 gives no nonlinear distortion with optimal dither.
• type2 exhibits lower dither level with some low level distortion.
It is up to you to choose no distortion or lower dither level for your audio. More
information is in the section Basic control of IDR & Noise-shaping Options
(below).
Basic control of IDR
• Select Quantize level for desired output (24, 22, 20, 18, or 16-bit) by clicking
the button to toggle through the choices. Alternatively, use the integrated
popup menu for direct selection of the target bit-depth value.
• Select Dither (type1, type2, none) by clicking the Dither button.
• Select the type of noise-shaping (Moderate, Normal, Ultra, None) by clicking
the Shaping button. (There is extensive information on these 4 options below
under Noise Shaping options.)
For optimum results, level maximization (and at least normalization) should
also be done! This is why the L3 includes both advanced peak controlling and
IDR together: One step maximizes both.
YPE1
T
This is the ‘purist’ technology. It is designed for no nonlinear distortion or
modulation noise at low levels. Type1 combines optimal dither noise with
psychoacoustic Noise Shaping. If applied several times in succession, a
digital resolution enhancement technology optimized for one-stage CD
mastering can produce unwanted side-effects.
Waves Type1 technology is the first optimized for use at every processing
stage, allowing for the effects of cascading and subsequent signal processing.
Type1 is also optimized to cause minimal side effects when used with stereo
signals.
Type1 is the recommended choice for use with 20-bit and 16-bit file
processing and other high quality mastering applications. By combining level
maximization (peak controlling) and IDR processing, 16-bit files created from
20-bit or 24-bit masters can have an apparent 19-bit resolution — an 18dB
improvement.
Waves L3 software guide page 9 of 26
Page 10

TYPE2
Type2 also uses dither with a similar noise-shaping curve, but the dither is of
a unique kind designed to minimize the amount of noise added. This gives a
lower noise level than the IDR type1 process, but at the expense of some
low level distortion.
Type2 has some advantages for high quality mastering as well. It is your
choice whether the ultimate in low distortion of type1 is preferred, or the
additional reduction in dither level of type2. Type2 is "auto-blacking" with no
input signal. In other words, if the input signal is digital black (no signal at all)
there is no Type2 dither added to the output signal.
OISE-SHAPING OPTIONS
N
There is another way to decrease the perceived amount of noise and increase
perceived resolution. We ‘shape’ the frequency content of the noise so that it
matches the ear’s sensitivity curves. In basic terms, noise-shaping shifts the
energy of the noise to the frequency ranges where we hear it the least.
The three options of Noise-shaping provided in the L3’s IDR section push
more of the noise energy to higher frequencies above 15 kHz, where our ears
are least sensitive. This reduces the noise energy of lower frequencies. The
three
Noise-shaping options differ in the amount of this ‘shifting action’.
Moderate is the lightest noise-shaping curve.
Normal is the recommended option for use under most conditions and for all
bit-depths.
Ultra is a very high-quality setting, suitable only for use at the very last stage
of mastering high-resolution files (16-bit and higher) targeted for high-quality
digital media. It is theoretically possible that the relatively high amount of
high frequency energy could cause undesirable side effects if the signal is
going to be processed or digitally edited again. Therefore, it is best that Ultra
is used in the last stage of file preparation.
(However, with many thousands of L3- processed products, no such
situations have been reported. Since it is theoretically possible, we wish to
inform you of it. These theoretical side effects might cause clicks at later edit
points if ‘Ultra’ Noise Shaping was used, if played back on poorly designed
D/A converters.)
Of course, the effect of Noise-shaping is even greater when used with type1
or type2 dithering, since Noise-shaping reduces the audibility of the added
dither noise. Try the full effect of IDR technology by listening to the same
material, with both IDR types and different kinds of Noise Shaping. The most
obvious places to examine are notes or reverb during the ‘tail’ (end of the
sound). During this time, the quantization error is most audible, though it is
present on all low-level signals (such as elements that are soft in a mix, etc).
Waves L3 software guide page 10 of 26
Page 11

Since the entire issue of dithering is a very subtle one, we recommend you
listen to a rather long piece of audio (2-3 minutes). It should be of high-quality,
say 20-bits if possible, with a good dynamic range. Jazz and classical
recordings are ideal.
For a quick start, the option that will generally work well for CD-mastering is
type1 with Normal noise-shaping. For minimum noise with 16-bit and greater
files, type2 Ultra; for maximum resolution use type1 Ultra.
Waves L3 software guide page 11 of 26
Page 12
4. Controls and Displays
THE PEAK LIMITER SECTION
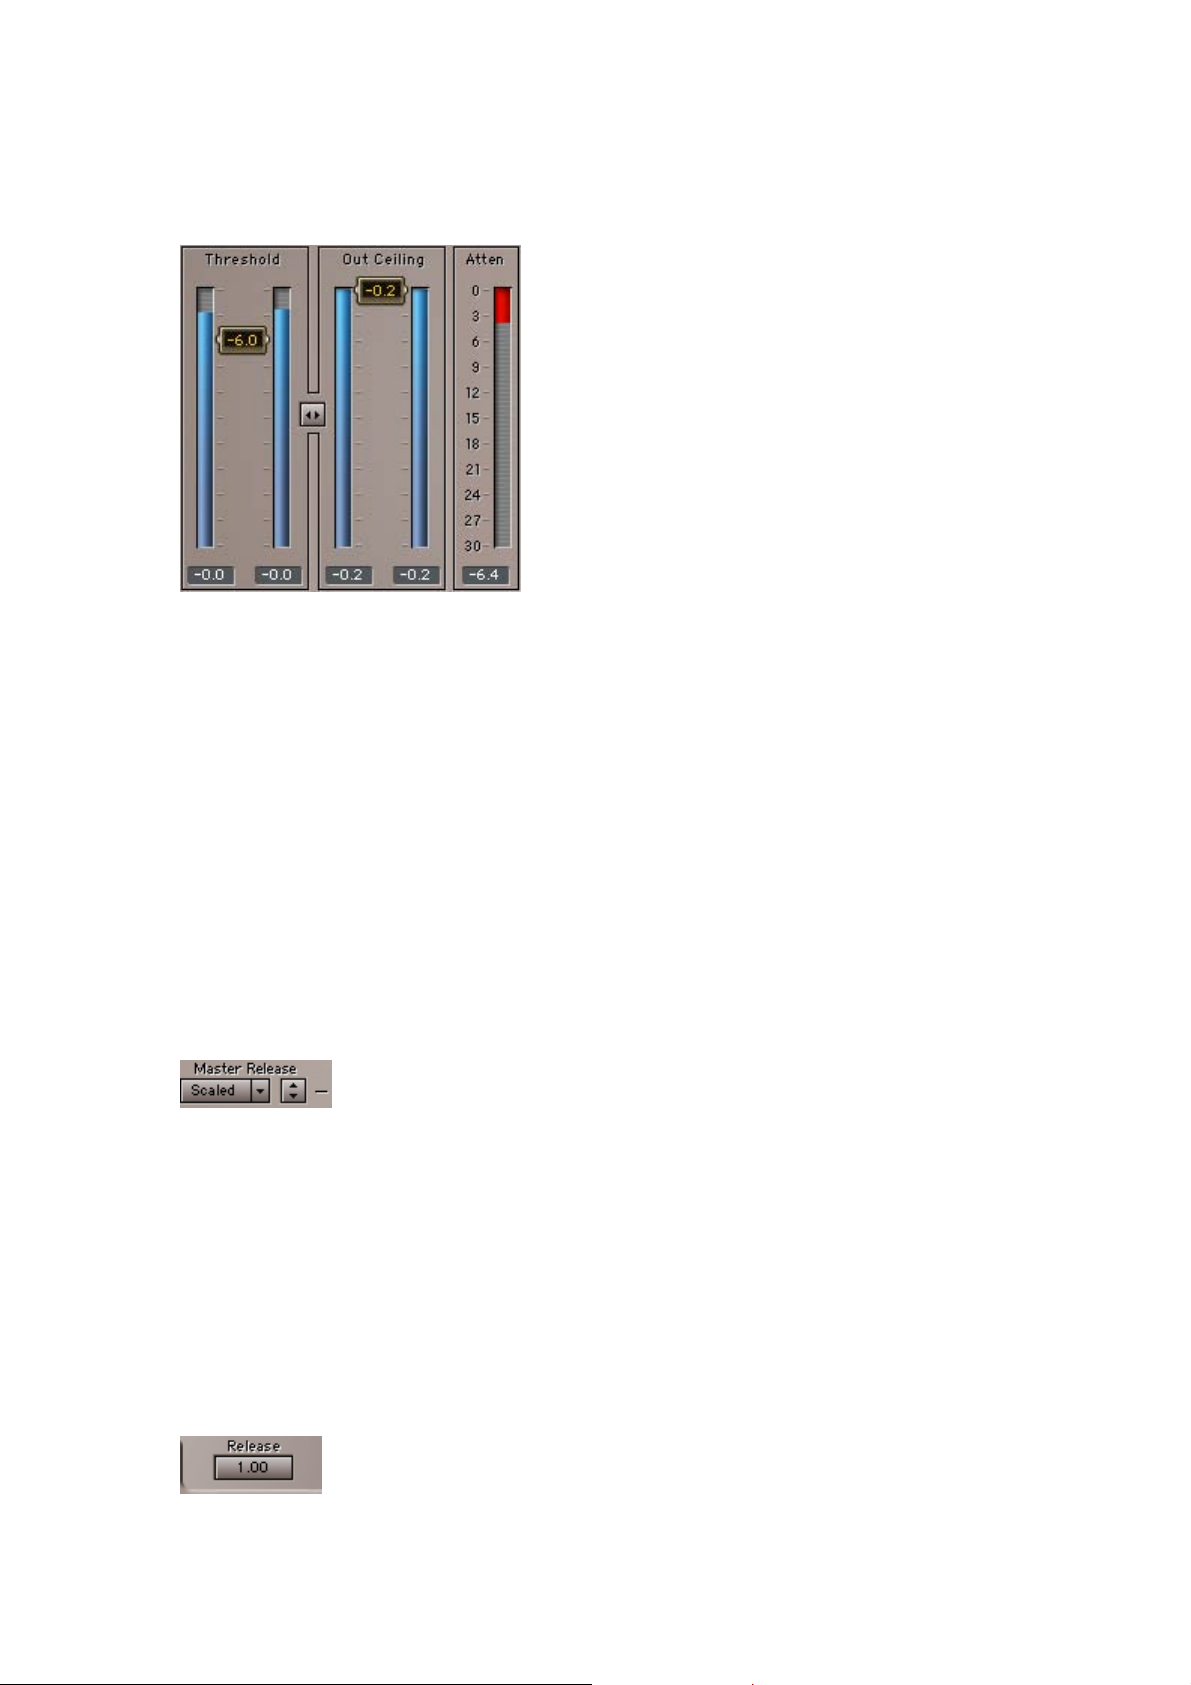
HRESHOLD: 0.0 to -30dBfs, Default 0.
T
The Threshold value sets the point that the audio energy should be limited to.
When the energy goes over the Threshold, Gain attenuation will be applied to
keep it just below the Threshold. The L3 will also add make up Gain in an
opposite value to the Threshold.
O
UT CEILING: 0.0 to -30dBfs, Default 0.
The Out Ceiling value scales the output of the peak limiter to a certain
maximum set by the user. By default this is 0.0 dB or the full digital scale.
ATTENUATION METER: 0 to -30dB
The Attenuation Meter shows the overall summed attenuation applied to the
program material. This attenuation is happening across the multiple bands
and can be seen in the L3 Multimaximizer.
Multimaximizer Master Release
The Master Release control of the L3 Multimaximizer is comprised of two
functions:
R
ELEASE BEHAVIOR TYPE is the left popup menu. It allows selecting 1 of 4
release behavior types that distribute different amounts of the Waves ARC
technology (Adaptive Release Control) across the 5 bands.
MASTER RELEASE is a control that scales the per band release values in a
linked operation.
Ultramaximizer Release Control
Waves L3 software guide page 12 of 26
Page 13

The Ultramaximizer has a single release control which controls all of the per
band release values as a master control. The indicated value is a multiplier for
the per band values of the currently selected Profile.
PROFILE: Default – Basic Profile. Ultramaximizer Only.
The Profile pop up menu includes combined settings for the L3 multiband
engine. Each profile applies different internal settings to the per band controls,
Release behavior type, Crossover frequencies and Separation.
PEAK LIMITER MULTIBAND CONTROLS – L3 MULTIMAXIMIZER ONLY
Crossover controls
Just below the graph are the Crossover frequency adjustment controls. There
are 4 Crossovers in the L3. Each sets the cutoff frequency for the High Pass
and Low Pass filters that cross each other.
The Xover controls will sound a click when the calculation intensive Linear
Phase filters are reset to a new position. You can use the mouse to adjust the
frequency or grab the markers at the bottom of the Graph. The new filter will
be set only when the mouse is released. This is to avoid zipper noise. Using
the arrow keys or control surface you can advance step by step to fine tune
your Xover position.
Each of the four Crossovers has a unique range of frequencies as follows:
L
OW: 40Hz to 350Hz. Default to 80Hz.
LOW MID: 150Hz to 2997Hz. Default to 320Hz.
HI MID: 1022Hz to 4757Hz. Default to 1278Hz.
HI: 4kHz to 16kHz. Default to 5113Hz.
EPARATION: 0 – 100. Default 100.
S
This control defines how the signal from each band will be fed into the side
chain of each band’s energy detector. At 100 Separation each band will be
fed only to its own energy detector. At 0 Separation all bands will be fed into
every band’s energy detector.
Per Band Controls GAIN: -12 to +12. Default 0.
The per band Gain is a straight forward Gain offset after the linear phase
crossover. It precedes the limiter and is good for EQ type operations. It is like
placing a Linear Phase equalizer before the L3.
PRIORITY: - 12 to +12. Default 0.
Waves L3 software guide page 13 of 26
Page 14

The per band Priority control affects the internal Peak Limiting Mixer™
optimization algorithm. When possible, the bands with higher Priority are
prioritized to receive less attenuation at the expense of other bands. This
allows for controlling the spectral balance of the processed output in a way
that is very different from a Gain control. When you feel limiting is causing one
band to be suppressed too much compared with the others, the Priority can
be used to change this.
GAIN AND PRIORITY LINK
Located between the per band Gain and Priority controls, this linker allows
both to move both simultaneously.
RELEASE: 0.1 to 5000.
The per band Release sets the reference Release time for each band. This
reference release time will be further adjusted by the Release Behavior Type.
THE GAIN/FREQUENCY GRAPH
The Gain/Frequency graph displays a Dynamic Gain line. This is a smoothed
ghost of the same dynamic Gain line and peak hold line showing the peak
attenuation that happened across the frequency range.
The Orange line is the Dynamic Gain line and shows the Gain changes as
they happen.
The Semi transparent blue shade is a smoothed trail of the dynamic Gain line.
The dynamic Gain line may move too fast for you to understand the overall
dynamic EQ that is happening, so we added this Ghost. The Ghost will
eventually join the Gain line when it settles for long enough.
The bottom darker blue line is a peak hold line of the dynamic Gain. It allows
you to view the maximal attenuation that was reached across the frequency
spectrum.
On the graph you will find 5 grab markers. They adjust the bands’ width when
moved left/right, or the linked Gain and Priority when moved up/down.
Waves L3 software guide page 14 of 26
Page 15

The graph also shows 4 markers for showing or adjusting the crossover
frequencies.
THE IDR SECTION
QUANTIZE – 24, 22, 20, 18, or 16. Default 24-bit.
The Quantize control sets the target bit depth of the L3 output. The perceptual
result will be increased by using Dither and Shaping. However, this control
sets the actual output bit depth of the L3. There is no way to turn this off, thus
the output of the L3 will be quantized to a maximum of 24-bits even if you are
in a floating point environment. The 24-bit maximum is very relevant even for
24-bit sources as the internal process is doubled in precision.
TYPE – 1, 2, None. Default – 1.
The Dither type selects the Dither type 1 or 2, or no dither at all. To better
understand the Dither types please read The IDR Sections in chapter 4, 6 and
7. The Noise Shaping is a separate process which will still work to move
Quantization noise to the less audible frequencies.
S
HAPING – Moderate, Normal, Ultra or None. Default – Normal.
Shaping relates to Noise Shaping. This control selects the amount of Noise
Shaping that will be applied to the dither and/or quantization noise. The
process of Noise Shaping lowers the energy in the main band and pushes it
upward in spectrum so that the energy is higher for the less audible
frequencies. Selecting None leaves the noise unfiltered.
IDR ACTIVE/BYPASS INDICATOR
Whenever Dither or Noise Shaping are engaged, the IDR status indicator will
be colored red to indicate activity in the IDR section. When both Type and
Shaping are set to None, the IDR logo will turn gray to indicate that no
increase in digital resolution is engaged. The actual bit depth reduction
system will not truncate the signal. Instead it rounds the signal. This is still
better than straightforward truncation of the lower bits.
Waves L3 software guide page 15 of 26
Page 16

5. Some secrets of digital audio
In order to make the best use of the L3-Ultramaximizer, it is important to
understand some of the less obvious implications of digital audio. Once these
have been explained, you will understand why Waves thought a product
such as the L3 was necessary. You will also be a in a better position to make
use of its powerful features. The operation of the L3 breaks down into two
main areas:
1 - Maximum level of the digital signal through proprietary peak control.
2 - Maximum resolution of the signal through dithering and Noise Shaping.
MAXIMUM LEVEL
The maximum level of a digital signal is governed by the highest peak in the
file. Simple normalization finds the highest peak, then raises the entire signal
so that this peak is at the maximum value. However, many of these peaks
may be of very short duration and can usually be reduced in level by several
dBs with minimal audible side effects. Those familiar with digital editing
systems may even have proved this by ‘redrawing’ some troublesome peaks
by hand. By transparently controlling these peaks, the entire level of the file
can be raised several more dB than by simple normalization. This results in a
higher average signal level.
The L3-Ultramaximizer avoids the possibility of overshoot by utilizing a
“lookahead” technique. This allows the system to anticipate and reshape
signal peaks in a way that produces the bare minimum of audible artifacts.
Because there is no possibility of overshoot, the L3 can be used with absolute
confidence when brickwall limiting is important.
MAXIMUM RESOLUTION
Any digital signal processing that alters the original digital data (mixing, Gain
changes, EQ, dynamic processing, etc.) generally increases the number of
bits required to represent the signal. Conventional truncation results in a loss
of signal-resolution each time the signal is processed. The human ear uses
this low level information to construct a mental image of the stereo
soundstage. Any compromise in this area manifests itself as a loss of
spaciousness and transparency.
Waves’ IDR prevents this loss of critical low-level detail. Even when
processing 16-bit signals, it is normal to process with at least 24-bit resolution.
Often even higher resolution is used, as in the L3, which is now doubleprecision.
As soon as the resolution is pulled back down to 16 bits by rounding or
truncation (removing the bottom 8 bits), the resulting rounding error produces
audible distortion at low signal levels. It also results in permanent loss of
digital resolution which can never be recovered.
Waves L3 software guide page 16 of 26
Page 17

If the audio signal is repeatedly processed and truncated back to 16 bits, the
losses accumulate. This causes a significant loss of fidelity. This fidelity loss is
most evident as a loss of the tonal subtleties of low-level sounds within a mix.
The solution is to properly dither and noise-shape a signal each time the
wordlength is increased and reduced. Nearly every digital signal process will
require this.
WHY USE DITHERING, AND WHAT IS IT?
Proper dithering is simply this: before the requantization (reduction of the
wordlength), a precisely controlled amount of noise (termed ‘dither’) is added
to the signal. Dithering can convert the low-level nonlinear distortion caused
by truncation into a simple steady hiss. This removes all traces of low-level
non-linearity at the expense of a very slightly increased background noise.
Obviously, increased noise levels are not ideal in high quality audio
applications. Fortunately the perceived level of this dither noise can be greatly
reduced. This is done by ‘shaping’ the noise in such a way that it falls into an
area of the audio spectrum where the human ear is least sensitive. The main
point of maximum resolution is simple: to ‘capture’ the best possible quality
into a shorter wordlength (smaller bit-depth) from a longer wordlength (higher
resolution).
A BIT ABOUT IDR™
IDR™ is a Waves proprietary Noise Shaping dither system developed by the
late Michael Gerzon and Waves. IDR signifies a major advance in preserving
and actually increasing the perceived resolution of the digital signal being
processed. In order to ensure that the final signal has the maximum resolution
possible, utilize IDR during each subsequent process (for 16-bit storage). Or,
use IDR just once at the end of a high-resolution chain (i.e. 24-bit).
IDR is of particular benefit when data is deliberately requantized from 48-bit to
24-bit, 24-bit to 20-bit and so on.
Dithered outputs of 24, 22, 20, 18, and 16-bit are available. The L3 features
double-precision resolution. For TDM (Time Division Multiplexing) systems, all
internal limiting and Gains are calculated with 48-bit fixed precision. Dithering
back to 24-bit output is now possible for the new DVD and other delivery
media, as well as for archives of masters.
By using the IDR implemented within the L3-Multimaximizer, optimum results
may be achieved during final file preparation, mastering, and quantization or
requantization. The greatest possible implementation of IDR available is in the
L2-hardware limiter and the software L2 and L3 plug-ins from Waves. Both
feature 9th-order Noise Shaping. (The original L1 software has 2nd-order
noise-shaping).
Waves L3 software guide page 17 of 26
Page 18

6. In-depth IDR Information
ABOUT DITHER AND NOISE SHAPING
Dithering and Noise Shaping are two independent, complementary
techniques. They are used to improve the perceived quality of sound after it
has been re-quantized. Each technique is responsible for the improvement of
a different subjective quality of the noise imposed by re-quantization. Each
can be used separately to improve that specific quality.
Dithering is done in order to change the character of the quantization noise to
more closely resemble analog hiss, rather than digital quantization noise. The
main effect of dithering is to reduce (or, in case of type1, virtually eliminate) all
correlation between the quantization noise and the original signal. This
reduces or eliminates non-linear distortion typical of digital quantization noise.
The dithering process 'exchanges' these distortions for a steadier analog-hiss
quality signal.
Noise Shaping is done in order to optimize the distribution of overall noise
energy across the spectrum. This optimization is according to the ear's
sensitivity. This means that a decrease in noise (whether distortion or hiss) in
the ear's sensitive areas (1 to 6kHz), is 'exchanged' for an increase of noise in
less sensitive areas (above 15kHz, toward Nyquist).
Hopefully this has helped you see that in both techniques, the issue is about
'exchanging' the character and frequency content of noise (hiss & distortion)
according to subjective criteria.
How do these processes help 'capture' 3 more bits of detail? The easiest
analogy is to point to dithering in graphics. This is exactly the same process,
and exactly the same type of psycho-perceptual model.
The brain is capable of perceiving detail that is lower than a noise floor (in this
case, dither). However, quantization noise is highly correlated to the signal. In
other words, it is related to and governed by the signal. Dithering makes this
noise become uncorrelated (as dither is a random signal), therefore allowing
the brain to perceive the detail. The noise-shaping then helps to shift the
energy of the noise to a less sensitive area of our hearing.
DITHER
No Dither <off>. This is not quite normal truncation, but rounding to the 24th
bit without adding any dither. It allows a high degree of nonlinear distortion at
low levels. The only reason to use this setting would be to provide a 24-bit
transparent (perfect clone) output from the input. However, it's easier just to
use the Bypass button! Even if you are using an external dithering system to
achieve your final desired wordlength, you should use the L3's IDR to dither to
a 24-bit output.
Waves L3 software guide page 18 of 26
Page 19

IDR type1 Dither. This dither is a wide-band dither. Type1 adds a certain
amount of noise, causing a 5dB increase in background noise compared to no
dither. It completely eliminates all low-level distortion and signal-dependent
modulation effects. The result is a very transparent and clean low-level sound
with a high resolution. It most resembles the steady low-level hiss of an
excellent quality analog system with no digital quantization noise.
This is the "purist" technology. Type1 is designed for no nonlinear distortion or
modulation noise at low levels. It combines optimal dither noise with
psychoacustic Noise Shaping. Type1 is also optimized to cause minimal side
effects when used with stereo signals. Type1 is the recommended choice for
use when processing high quality mastering applications. By combining level
maximization (peak controlling) and IDR processing, 16-bit audio created from
20 or 24-bit masters can have an apparent resolution of 19 bits. This is more
than an 18dB improvement!
Some signals will be subjected to more than one stage of processing and
quantization back to 16-bits. In these cases, the design of resolutionenhancement must satisfy more requirements than a technology designed
just for one-stage use. If applied several times in succession, a digital
resolution enhancement technology optimized for one-stage CD mastering
can produce unwanted side-effects. Waves type1 technology, however, is the
first optimized for use at every processing stage, allowing for the effects of
cascading and subsequent signal processing, when needed.
IDR type2 Dither. This dither is a narrow-band dither. It adds virtually no
audible noise so it is nearly 5dB quieter than type1. There is some low-level
distortion, but this distortion is generally much lower than with no dither at all.
Type2 is a unique kind of dither designed to minimize the amount of noise
added. This gives a lower noise level than the IDR type1 process, at the
expense of some low level distortion. Type2 does have some advantages for
high quality mastering as well. It is purely your choice whether the ultimate in
low distortion of type1 is preferred, or the additional reduction in noise of
type2.
NOISE SHAPING
Another way to decrease the perceived level of noise is to "shape" the
frequency content of the noise so that it matches the ear's sensitivity curves.
In basic terms, Noise Shaping shifts the noise to the frequency ranges where
we hear it the least. The three options of Noise Shaping provided on the L3
push more of the noise energy to higher frequencies above 15kHz and toward
Nyquist, where our ears are least sensitive. They do this while reducing the
noise energy at lower frequencies. The three Noise Shaping options
progressively differ in the amount of this "shifting action". The L3 features
ninth-order Noise Shaping for optimal wordlength reduction quality.
Off. No Noise Shaping, resulting in more audible noise (and distortion if dither
is not used). The result has equal noise (distortion) levels at all frequencies,
which is not optimal from a psychoacustic point of view.
Waves L3 software guide page 19 of 26
Page 20

Moderate. This typically reduces perceived hiss (or distortion if dither is not
used) by around 6dB. The HF noise Gain is about 9dB for 44.1kHz.
Normal. This typically reduces perceived hiss (or distortion if dither is not
used) by around 12dB. The HF noise Gain is about 15dB for 44.1kHz. Using
Normal with type1 dithering is very suitable for the creation of Production
Masters. It was also designed to be excellent for masters that would be
processed again for any reason, including consecutive re-dithering, with an
accumulation characteristic that is optimized to be minimal.
Ultra. This gives the greatest perceived hiss/distortion reduction, typically
18dB. The HF noise Gain is about 23dB for 44.1kHz. Ultra is a very highquality setting. It is suitable only for use at the very last stage of mastering
high-resolution audio (16-bit and longer word lengths) targeted for high-quality
digital media. It is best to use Ultra in the last stage of audio preparation (the
Production Master). Due to the HF Gain, it is theoretically possible that the
relatively high amount of high frequency energy could cause undesirable side
effects if the signal is going to be processed or digitally edited again.
However, with many thousands of IDR-processed masters no such situations
have been reported or observed.
You can hear the effect of Noise Shaping by itself by setting Dither type to Off
and selecting one of the Noise Shaping options while monitoring the output.
The effect of Noise Shaping is even greater when used with type1 or
Type-2 dithering. This is because Noise Shaping reduces the audibility of the
added dither noise.
Now try the full effect of IDR technology by listening to the same material, with
both IDR types and different kinds of Noise Shaping. The most obvious places
to examine are notes or reverb during the end of the sound, or "tail". It is
during this time that the quantization error is most audible, although it is
present on all low-level signals (such as elements that are soft in a mix, etc.)
The option that will generally work well for CD-mastering is type1 with Normal
Noise Shaping. For minimum noise with 16-bit and greater sources try type2
Ultra. For maximum resolution use type1 Ultra.
The noise reduction figures given here apply to sampling rates of 44.1 or
48kHz. They are even better for doubled sampling rates. If audibility of noise
were the only factor, the choice would almost always be to use Ultra noise
Shaping. But, in some situations, heavy Noise Shaping (Ultra) can
theoretically have some disadvantages. So, the milder settings such as
Normal or Moderate may be better.
For 16-bit applications, Ultra shaping should be avoided in the following
situations:
Subsequent Digital Editing When a signal is subjected to later editing,
extreme Noise Shaping might, in rare cases, cause low-level, yet audible
Waves L3 software guide page 20 of 26
Page 21

"clicks" at the edit points. This might occur when played on low quality CD
players.
Applications in which you should avoid use of Ultra shaping include CD's with
production music, sound effects libraries, or loop libraries. These would
certainly be subject to further digital editing.
Poor Error Correction When errors that are not properly corrected occur,
the Ultra setting (like all forms of heavy Noise Shaping and other resolution
enhancement technologies) tends to cause audible background crackles,
especially on very cheap CD players. While these effects generally don't
occur on the majority of mid- or hi-fi CD players, they can be noticeable on
very cheap products. The amount of such crackles on poor pressings is
greatly reduced by the Normal Noise Shaping. An example would be a signal
destined for a carrier medium with poor error correction, such as CDs pressed
in pressing plants with poor quality control.
Subsequent equalization before duplication, when heavy treble boost
equalization is subsequently employed. (We're referring to EQ by a pre-
mastering person before duplication, not when the end user boosts the treble
on their home system!) This can cause the strongly boosted higher
frequencies used by Ultra Noise Shaping to become so high in level that they
might feed excessive noise energy into loudspeakers. Therefore, Ultra
shaping is best avoided in situations where subsequent equalization may be
used in pre-mastering, such as in a compilation. Of course, if the mastering is
done correctly the first time, large treble boosts would be quite unnecessary.
Please note that much less HF Gain is used with the Normal and Moderate
noise shapers than with Ultra (all of which could be observed on a real-time
analyzer, such as Waves PAZ - Psychoacoustic Analyzer).
Waves L3 software guide page 21 of 26
Page 22

7. 16-bit (and higher) mastering
Here are the basic steps of using the L3 in a 16-bit, 44.1/48kHz application.
These steps also apply to 24, 22 and 20-bit mastering.
• All processing, sample rate conversion, dynamic changes, etc. MUST be
done before L3 processing. The L3-Multimaximizer should be the last
processing of the file. Ideally, dithering occurs only once.
• Using a 16 or higher bit input file, set the Threshold for desired peak
limiting. For suggestions on how much limiting to do for certain
applications, see chapter 4. In general, set Threshold for about 4-6 dB of
Gain Reduction in the Attenuation meter.
• Now take the Output Ceiling up to the maximum peak output you desire.
You can take this Output all the way to 0.0 dB without any clipping. For
CD’s, a recommended (Factory Preset) setting is -0.2dB; (For more
information please read about digital clipping in Chapter 9.)
• Leave the Release Behavior type set to ARC.
• Set Quantize output for 16-bit (for CD/DAT; or 22, 20, 18 for higher
archival or mastering medium if your hardware supports the transfer of 16+
bits).
• Set Dither type (type1 or type2). IDR type1 is recommended for most
high-resolution applications.
• Set Shaping (Moderate, Normal, Ultra, none). Ultra and Normal are
recommended for most high-resolution applications.
Our Recommendations:
Application Dither Noise Shaping
CD-mastering Type1 Normal
Minimum noise w/16-bit and greater files Type2 Ultra
Maximum resolution Type1 Ultra
Waves L3 software guide page 22 of 26
Page 23

8. Use the L3 last
It is recommended that L3 be used as the final process after all dynamic and
EQ adjustments have been made. Only when all these processes are
finalized should the question of peak level be addressed. Instinctively, it might
seem appropriate to Normalize the file once all other processing has taken
place. But, in practice, it may be better to set the peak levels to around 1dB
below clipping using the L3. For an explanation, see the notes on digital
clipping in chapter 9.
The choice of IDR setting depends on the final use to which the file will be put.
Type1 or 2, Normal, is recommended for most work. Type1 or 2, Ultra, is
considered best for final mass production of 16-bit and greater masters, and
for producing a complete disc master which will undergo no further edits. For
example, a production master CD (PMCD) run off from a hard disk editing
system in a single pass when no further editing is anticipated (all timing is
finalized). This PMCD would then be transferred unchanged to the glass
mastering process.
Certain CD Audio authoring programs string together separate regions of
sound files. When using such programs you must perform destructive
processing with the L3. Since these programs are a form of editing (playing
regions/songs with silence or splices between audio regions/songs), it is
recommended to use Normal noise-shaping with either Dither type1 or type2.
(However, thousands of IDR-processed masters have been produced with
type1 Ultra with no unusual problems whatsoever.)
If you must process or EQ any previously L3-processed file, you will need to
create headroom by lowering input on those later processes, then most likely
re-limit to restore the average level of the file.
Waves L3 software guide page 23 of 26
Page 24

9. Important notes on digital clipping
The digital words representing an audio signal at each moment have a
maximum possible positive value and a minimum possible negative value.
These are defined by the bit depth of the file format. Any attempt to force an
audio signal beyond these maximum permitted values (for example, by
applying excessive gain), will result in the audio signal being clipped. There
are other ways in which a signal can become clipped, and some of these are
far from obvious. We all know that clipping distortion sounds quite unpleasant
and is to be avoided.
PEAK-NORMALIZED SIGNALS
A 'Normalize’ process allows a file to be processed in such a way that the
maximum peak level within the file just reaches (but does not exceed) the
digital zero or clipping point. This is desirable because it means that the file is
as ‘loud’ as possible without clipping. This maintains the best signal-to-noise
ratio, especially at low bit word lengths.
the L3’s peak limiter is useful in situations where a higher average sound level
is required. It allows the typical level of signals to be even further increased by
gently pulling down the Gain of waveform peaks, with no audible nonlinear
distortion. The L3 can simultaneously re-scale the audio data so that the
limited peak signals approach or just reach digital zero.
However, by storing soundfiles at the maximum possible level, there is a risk
that any subsequent processing may take these peak levels too high. This will
result in clipping distortion. Peak limiting to 0dB, by whatever means, leaves
no margin for any subsequent increase in peak level.
Intuitively, you might think that simple Gain reduction could be applied without
incurring the risk of clipping, while any increase in Gain would surely cause
clipping. This is true. You might also think that applying an EQ boost at any
frequency might result in clipping, depending on the peak energy level within
the band being equalized. This is also true.
What is far less obvious is that applying an EQ cut also runs the risk of
causing clipping. To prove this would take a lot of math, but the following
description should help get the point across.
At any instant, the peak level of a signal may be the result of several
components at different frequencies and at different phases relative to each
other. Some components will add while others will subtract. But what happens
if you ‘EQ out’ a frequency that would otherwise be subtracting from the peak
level by virtue of its phase? The peak is now higher than it was. For most
audio material, this effect will be relatively small. Typically, peak levels will
increase by about 0.3 dB. However, it is possible that under unfavorable
Waves L3 software guide page 24 of 26
Page 25

circumstances or with non-typical signals, the peak level could increase
significantly more than this.
The L3 forces the signal to skim the peak level more often so the likelihood of
clipping in this way is further increased. In practice, filters attenuating mid or
high frequency components tend to cause the kind of increase in peak level
described. But, high pass filters that attenuate the bass can sometimes cause
much larger increases of peaks. This can be an increase of several dBs on
heavily limited signals. The phase response of certain high or low-pass filter
types can also increase peak levels by up to about 4 dB.
Bearing all this in mind, it might seem logical to keep the signal peaking a few
dB below digital zero until all processing has been carried out. After that, you
can safely normalize the signal–or can you?
A related problem with peak clipping can arise when a normalized soundfile or
signal is converted to a new sampling rate. This has to do with the samplerate conversion process itself. During sample rate reduction,
the signal is effectively being filtered. The available audio frequency range is
smaller at lower sampling rates. Such filtering can increase peak sound levels
in exactly the same way as attenuating equalizers can. But, even when
increasing sampling rate, an increase of peak level can occur. This is because
the continuous-time audio waveform is represented in the digital domain only
by its values at the sampling instants.
It is perfectly possible for the peak value of the continuous-time audio
waveform to occur at instants lying between two sampling instants, and thus
to be higher than the peak value at any of the sampling instants. When
changing the sampling rate, new sampling instants are chosen for the
continuous-time audio waveform. These new sampling instants may coincide
with an increased peak lying between the original sampling instants. This is
especially likely to occur with signals that have a lot of high frequencies. This
is because these signal waveforms change more rapidly between the
sampling instants. Artificially contrived signals can be created to really show
off this problem.
However, in real life, an attenuation of at least 0.3 dB or so prior to conversion
should provide adequate protection against clipping. You might expect sample
rate converter designers to account for the possibility by designing in a small
amount of attenuation. Unfortunately, the less expensive sample rate
converters generally do not account for this.
So, can you safely normalize a file that you know is at the final sample rate?
Unfortunately not! Many CD players (and some other digital consumer
equipment) use over-sampling digital-to-analog converters (DAC)’s to produce
the analog signal fed to the amplifier. Such over-sampling converters involve
a sampling rate conversion process which can (and will!) cause audible peak
clipping. Once again, some designers appear to have overlooked this
problem, although not as widely as they did in earlier DAC designs.
Waves L3 software guide page 25 of 26
Page 26

We hope that this has been a helpful guide for using your new L3. Enjoy the
new Waves L3 Ultramaximizer and Multimaximizer!!!
Waves L3 software guide page 26 of 26
 Loading...